1
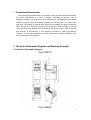
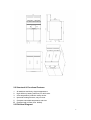
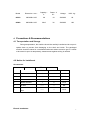
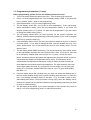
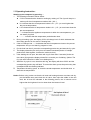
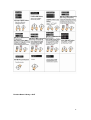
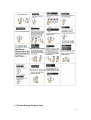
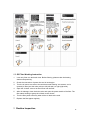
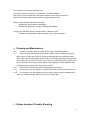
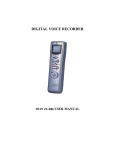
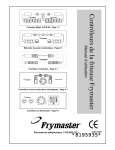
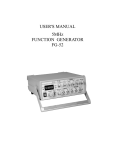
r
e
S
e
c
i
v
Mastro GmbH
Hüserstraße 53
+49 (0) 23 81/ 973 71– 0
59075 Hamm / Germany
+49 (0) 23 81/ 973 71– 88
w w w . m a s t r o s h o p . c o m
Floor-type Electric Fryer
Computer Version
8420A
8421A
PC board
User’s Manual
1
Dear Client & User,
Firstly, thanks for purchasing and using our product. All the information and
guidelines of this user’s manual comply with certain applicable regulations, which come
out from our long-term accumulated knowledge and experience as well as current project
development situations.
Limited to some special structures, additional specified items or new technology
changes, the actual usage situation might be some different from what stated in this
user’s manual. Should you have any question, please do not hesitate to contact the
manufacturer via the method shown in back cover page of this manual.
For safety purpose and efficient operation, please make this document available to
users for reference. Do have them to read this manual carefully before carrying out any
action on this device, especially when starting.
The manufacturer declines any responsibility in the event users do not follow
the instructions or guidelines stated here.
The user’s manual should be placed close to the device, in convenience of users’
reading before operation. We have the full autority to reserve the further technical
changes of the device, in the scope of further performance improvement characteristic
development.
Warning
Any self-modification, wrong installation, adjustment or maintenance can lead to
property loss or casualty. Please contact the manufacturer for any adjustment or
maintenance, and have the work done by a trained & qualified person.
For your safety sake, please keep the machine away from any liquid, gas or other
object, which is flammable or explosive.
This appliance should not be operated by those who have physiological, perceptual
or mental disabilities or those who have insufficient experience or knowledge
(including children). Only in conditions of being given sufficient supervise &
guarantee of personal safety, as well as proper instructions & guidance, those who
were mentioned above can make some particular operation of this device.
Keep children away from the device.
Preserve this manual safely. When passing on/selling the device to a third party, the
manuals must be handed over along with the device. All users must operate the
device complying with the user’s manual and related safety guidelines.
Keep the machine away from any liquid, gas or other object, which is flammable or
explosive.
If the appliance is placed near walls, partitions or kitchen furniture and the like, it is
advisable to make these facilities with non-combustible material, otherwise cover
them with non-combustible heat-resistant material, and pay attention to fire
prevention regulations.
2
Contents
1. Functional Introduction…………………………………………4
2. Structure Schematic Diagram & Working Principle…………4
3. Basic Features & Parameters…………………………………7
4. Precautions & Recommendations…………………………….7
5. 8421A Working Instructions…………………………………..9
6. 8420A Working Instructions……………………………….12
7. Routine Inspection……………………………………………..17
8. Cleaning & Maintenance………………………………………17
9. Failure Analysis & Trouble Shooting…………………………18
3
1.
Functional Introduction
This product is manufactured by our company, which is combined with advantages
from home and abroad. It is novel in design, reasonable in structure, easy in
operation, durable in use and convenient in maintenance. The powerful Power design
makes the cold oil reach the working condition and recovery fast. It is efficient and
high-yield. The deeper oil cooling zone makes the food debris not easy to carbonize
which can not only extend the oil service life but ensure the fried food in a colorful
color and luster. This appliance is controlled by computer, which is easy to operate
and superior in performance. It can program according to actual requirement.
Therefore, it is the ideal equipment for hotel, supermarket, western restaurant, fastfood restaurant and food industry.
2. Structure Schematic Diagram and Working Principle
2.1 Structure Schematic Diagram
Cod. 8421A
Cod. 8420A
4
2.2 Structural & Functional Features
1.
2.
All stainless steel body, elegant appearance.
High efficiency heating elements, oil relief valve.
3.
4.
Over temperature protection safety device.
Upturned heating element, easy to clean.
5.
Computer-controlled temperature and time.
6. Equipped with oil filter (Cod. 8420A).
2.3 Electrical Diagram:
5
3. Basic Features & Parameters
6
Model
Dimension mm
8421A
400×800×1100
8420A
800×800×1100
Capacity
L
Power k
W
Voltage
28
18
3N-380V
60
28×2
36
3N-380V
109
N/W kg
4. Precautions & Recommendations
4.1 Transportation and Storage
During transportation, the machine should be carefully handled and do not put it
upside down to prevent from damaging to the shell and inside. The packaged
machine should be stored in a ventilated warehouse without corrosive gas. If it needs
to be stored in open air temperately, measurement against raining is needed.
4.2 Notice for Installment
Accessories:
No.
Name
QTY
Unit
8421A
8420A
1
basket
2
4
PCS
2
oil-drain tube
1
2
PCS
3
lid
1
2
PCS
4
basket bracket
1
2
PCS
5
oil filter
——
1
Set
6
power line of oil
filter
——
1
PCS
Electric installation:
7
1. The power supply should be 380V/50HZ and a reliable grounding wire is needed.
2. The air switch that connecting to the power line should be above 40A.
3. Connect the phase line and zero line according to the power line standard.
4. Connect the oil outlet on the right side of the oil filter to oil tube, screw tightly and seal
it. The left side, use the power line to connect the receptacle.
Notice
1.
The supply voltage should correspond with the working voltage of the appliance.
2.
There is an earth stud at the back of the furnace body. A copper wire that no less
than 1.5 mm² should be connected to the earth wire complying with the safe
regulation reliably.
3.
Check the connection, voltage and safety grounding after installation.
4.
The appliance should be placed in a smooth place and kept a minimum clearance of
5.
6.
10cm away from the incombustible object on both sides and 20cm at the back(such
as walls, windows and so on).
The fixed arrangement of wire should be equipped with a all-poles shut-off switch
whose poles have a contact separation at a minimum clearance of 3mm. grounding
leakage protection switch is recommended. Do not put any sundries in front of the
switch for convenient operation sake.
The mounting position should keep away from the flammable and explosive objects.
The ambient temperature should be below 45 and the relative humidity should be
below 85%.
7. Installation should be operated by professional technician.
4.3 Special Notice
1. The appliance is not applicable for home use.
2. This appliance is a commercial machine, which needs to be operated by trained
cook.
3. All operators should follow close to the line of electric safety guidelines. Make sure
that the voltage corresponds to the service voltage on the nameplate and grounding
is safe.
4. All operation should be done in safe condition. If any failure occurs, please inform the
professional technician to check and repair.
5. The appliance should be installed correctly and debugged before using. Only when
the appliance was tested and made sure error free can the appliance be used.
6. Do not sway and tilt when using.
7. No self-modification! Self-modification may cause casualty.
8
8. Turn the power off when dismantling. Dismantlement should be operated after the
appliance cools down.
9. Do not open the casing of the machine.
10. The product contains high-voltage circuit inside, dismantlement may cause electric
shock.
11. Unplug and turn the power off before cleaning.
12. Do not spray water directly to the product when cleaning. It may cause electric shock.
13. Do not pat the product or put any object onto it.
14. Abnormal operation may cause damage and danger.
15. High temperature may cause scald.
16. Do not touch the appliance with hands directly due to high temperature during or after
the operation.
17. To prevent from damages, turn the electric switch off as soon as possible when near
the thunder zone.
18. Do not destroy the control panel with hard or sharp objects.
19. Turn the electric switch off when finish working.
20. Circuit maintenance and appliance installation should be operated by professional
and qualified personnel.
21. If the power cord is damaged, replace with an oil resistant sheath flexible cable
YZW 57 of GB/T 5013.1 IEC 60245 IDT
or the professional components that
bought from other manufacturer or maintenance department. Replacement should be
operated by professional person.
5. 8421A Working Instructions
5.1 Control Panel:
9
5.2 Programming Instruction: (1-tank)
Before programming, please do have the following instruction read:
1. Turn on the power switch and press one of the keys to start up the computer.
2.
Press √ to enter programming mode. The left display shows CODE. If you press this
key by mistake, press √ again to exit programming.
3.
Input the password 1,6,5,0 to enter programming mode.
4.
The left display shows SP-r (to set the oil tank temperature). If the right display
shows temperature setting, input the new temperature (Notice: If you need 170
degrees, please press 1-7-0), press √ to store the set temperature. If you don’t want
5.
to change the default value, press √.
The left display shows SELP (to select product). All the product indicators are
flashing, press the desired programming product key (Notice: If you need to program
the third key, press the third key.).
6.
7.
If the left display shows COOC (fry time), the right one shows the fry time. If the time
is correct, press √. If you want to change the time, input the desired time (e.g. 1min
30sec, please press 1-3-0 to set the third key time as 1min 30sec), press √ to lock
the time value.
The left display shows SENS (sensitivity). The pre-set sensitivity value will be shown
on the right display. Input the new value (Range from 1-9sec. If you input 0, there will
be no sensitivity. A better initial value may be 4 or 5.), press √ to lock the value.
Notice: Sensitivity refers to the feature that adjusting the computer version fry time to
compensate the dropping oil temperature during frying. This sensitivity device
compensates the temperature changes by cutting or adding fry time according to
food character, food quantity and initial temperature. The right sensitivity value can
ensure high-quality fried food. E.g. program for 4 ounce chips, you can get a good
quality as 2 1/2 pounds. A better initial value may be 4 or 5. To get a better quality,
test within 1-9.
8.
If the left display shows SH- (shaking time), the right one shows the shaking time. If
the food needs shaking during frying, input the shaking time and press √ to store the
time. If no shaking is needed, press “0” and then √. E.g. The total fry time is 3min,
start shaking after 45sec. Then input 45sec. During frying, when the shaking time is
reached, the buzzer will ring and the indicator of corresponding product key will flash
9.
for 3sec to remind shaking.
The left display shows SELP. If you want to program for more product key, return to
step 5. If no more programming, press √ to store the procedure.
10
5.3 Operating Instruction:
Starting up the computer by pressing :
1. The following information will be shown:
CYCL indicates that the heater is working by melting oil. The fryer will keep in a
melt way till the oil temperature reaches 180 (82 ).
H1 indicates that the oil temperature inside is 21 (15 ) or more higher than
the pre-set temperature.
LO indicates that the oil temperature inside is 21 (15 ) or more lower than the
pre-set temperature.
---- indicates that the appliance temperature is within the set temperature, you
can start frying food.
indicates that the temperature probe breaks down.
2.
3.
4.
5.
6.
7.
During oil melting cycle, the display CYCL will change into LO which indicates that
the melting process is over and it is heating fast.
If the LO changes into ----, it indicates that the oil temperature closes to the pre-set
temperature and you can start fry program in 2min.
Put the food into the oil, press the corresponding product key and start the fry cycle.
The display shows the pre-set fry time and starts countdown (Notice: If multiple
products are fried together, it shows the minimum time.).
If the shaking time is input, the alarm will ring for 3sec after X seconds (X=the set
time value) frying and the display shows SH- to remind you of shaking. (Notice: The
fry cycle won’t show SH- if there is no shaking time.)
When the fry cycle is over, the alarm will ring, the display will show COOC and the
corresponding product key will flash. To cancel the alarm, press the product key that
corresponds with the flashing indicator.
8. Temperature checking: press to check the actual temperature and double-click to
show the set temperature.
Notice: Before using, make sure that the oil tank and heating element are clean and dry;
put the basket away and check the oil valve; then inject the edible oil into the
tank, the oil level as indicated in the following picture, the oil should not be
higher than the highest oil level or lower than the lowest oil level.
11
6. 8420A Working Instructions
6.1 Manager/Chef Program Card
Notice: The following operations can be carried out by the authorization of
password 6647: system setting, product setting and product name library
compilation.
System Setting---6647
12
Product Name Library---6647
13
6.2 Product Setting Program Card
14
Notice: Password 1724 can carry out product setting operation.
Product Setting---1724
Product Setting:
15
6.3 Oil Filter Working Instruction
1.
It can only filter one tank each time. Before filtering, please make the heating
element stop working.
2.
3.
Check the connection of power line and oil outlet pipe.
Turn the oil return tee valve to the tank that needs filtering: two arrows, one is
upward (oil filter) and the other points to left (left tank) or right (right tank).
4.
Open the oil drain valve to let the oil flow into the filter.
5.
After oil drainage, close the drain valve and open the power switch of the filter. The
filter starts working to pump the oil back to the oil tank.
6.
Turn the filter power off timely when all the oil back to the tank.
7. Replace the filter paper regularly.
7. Routine Inspection
16
It is necessary to check the machine daily.
Check the machine regularly can avoid serious accident happens.
Stop using if user feels that there are some problems in the circuit or machine.
Check the situation of the machine before or after using every day.
Before using: Whether the machine is tilted?
Whether the control panel is damaged?
Whether the power line is aging, cracking or damaged?
During using: Whether there is strange smell or vibration noise?
Whether the temperature is out of control or any electric leakage?
8.
Cleaning and Maintenance
a.i.1.
In case of accident, please turn the power supply off before cleaning.
a.i.2.
Drain and filter the edible oil when finish working. Take the basket net and oildrain tube out, clean them with non-corrosive detergent and rinse with clear water.
Then clean the tank and heating element with non-corrosive detergent and rinse with
clear water, wipe up with a dry towel. Last, clean the surface and power outgoing line
with a wet towel. Do not spray water directly to the appliance. Water infiltration may
damage electric property and cause safety accident.
a.i.3.
Put all the accessories away after cleaning and cover the lid.
a.i.4.
If not going to use the appliance, please turn the PC board and power switch off.
a.i.5.
If not going to use the appliance for a long time, please clean it completely and
store it in a well-ventilated warehouse with no corrosive gas.
9. Failure Analysis &Trouble Shooting
17
Symptoms
Causes
Power on and the switch is
turned on, but the panel
has no reaction.
Power
on,
the
working
temperature keeps rising
and out of control during
heating.
1. The
Solutions
of
1. Tighten the connection
circuit board loosens or
damages.
or replace the circuit
board.
1. The
connection
thermocouple
is
defective.
thermocouple.
2. The temperature limiter 2. Replace
breaks down.
abnormal and
disconnected.
2. The fuse is fused.
the
the
temperature limiter.
1. The power supply is
It does not heat up and the
switch indicator is off.
1. Replace
it
is
1.
Check
the
power
supply and connection
to make it supply
normally.
2. Replace the fuse.
Aforementioned troubles are just for reference. If any failure
occurs, please stop using, and inform the professional technicians to
check and repair.
18