1
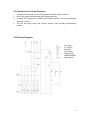
C9EBP801 Electric Tilting Braising Pan Luxury Electric Range Series User’s Manual Dear User & Client, Firstly, thanks for purchasing and using our product. All the information and guidelines of this user’s manual comply with certain applicable regulations, which come out from our long-term accumulated knowledge and experience as well as current project development situations. Limited to some special structures, additional specified items or new technology changes, the actual usage situation might be some different from what stated in this user’s manual. Should you have any question, please do not hesitate to contact the manufacturer via the method shown in back cover page of this manual. For safety purpose and efficient operation, please make this document available to users for reference. Do have them to read this manual carefully before carry out any action on this device, especially when starting. This manual is not applicable for those who have physical or mental disabilities, insufficient experience, and/or insufficient knowledge, including children. The manufacturer declines any responsibility in the event users do not follow the instructions or guidelines stated here. The user’s manual should be placed close to the device, in convenience of users’ reading before operation. We have the full authority to reserve the further technical changes of the device, in the scope of further performance improvement characteristic development. Warning Any self-modification, wrong installation, adjustment or maintenance can lead to property loss or casualty. Please contact the manufacturer for any adjustment or maintenance, and have the work done by a trained & qualified person. For your safety sake, please keep the machine away from any liquid, gas or other object, which is flammable or explosive. This appliance should not be operated by those who have physiological, perceptual or mental disabilities or those who have insufficient experience or knowledge (including children). Only in conditions of being given sufficient supervise & guarantee of personal safety, as well as proper instructions & guidance, those who were mentioned above can make some particular operation of this device. Keep children away from the device. Preserve this manual safely. When passing on/selling the device to a third party, the manuals must be handed over along with the device. All users must operate the device complying with the user’s manual and related safety guidelines. Do not store or use gas, liquid or object that is flammable or explosive in the vicinity of the mounting position of the appliance. If this appliance is placed near walls, partitions or kitchen furniture and the like, it is advisable to make these facilities with non-combustible material, otherwise cover them with non-combustible heat-resistant material, and pay attention to fire prevention regulations. Housing of the appliance must be grounded to ensure safety. Thanks for your cooperation! Contents 1. Functional Introduction………………………………............……1 2. Structure Schematic Diagram & Working Principle…............…1 3. Basic Features & Parameters………………………............……3 4. Precautions & Recommendations …………………............……3 5. Working Instructions & Operation Flow………………............…5 6. Routine Inspection ……………………………………............…..6 7. Cleaning & Maintenance………………………………............….6 8. F a i l u r e A n a l y s i s & T r o u b l e Shooting………………… .............….7 1. Functional Introduction This product remains the orthodox design of the series. Stainless steel made of housing, elegant in appearance and tilting in design, convenient for users to move the food in the pan maximally. The pan is made of stainless steel SS444. The heavy-duty heating elements provide a good heating efficiency. And the automatic thermostatic control setting, over-temperature protection function and pan-lifting disconnecting device, ensuring the safety of users during operation. Besides, the product achieves function diversified instead of monotony of the conventional products. For instance, it can not only fry, stir-fry, cook; but also braise, boil and stew. The versatility makes it handy with facility in cooking dry and wet food. Therefore, it is the perfect choice for you among multipurpose cooking equipments. 2. Structure Schematic Diagram & Working Principle 2.1 Structure Schematic Diagram: 1 2.2 Structural & Functional Features: 1. All stainless steel made, never rust. Equipped with water injection function. 2. 3. Heavy-duty heating elements with good heating efficiency. Provided with temperature controlled and constant function, and over-temperature 4. protection function. The pan has tilting, lifting and overturn function, and pan-lifting disconnecting function. 2.3 Electrical Diagram: 2 3. Basic Features & Parameters Model Dimension(mm) C9EBP801 800×900×(850+60) Capacity (L) 80 Working Capacity (L) 60 Power Supply 3N~380V~400V/50HZ Power(kW) Inlet Specification (mm) 13 1/2” tube 4. Precautions & Recommendations 1.1 Transportation and Storage During transportation, the machine should be carefully handled and do not put it upside down to prevent from damaging to the shell and inside. The packaged machine should be stored in a ventilated warehouse without corrosive gas. If it needs to be stored in open air temporarily, measurement against raining is needed. 1.2 Notice for Installment 1. The appliance should be installed in a well-ventilated area with a hood or extractor, ensuring the waste gas can be exhausted in time. 2. Appliance connection should comply with relative provisions of electric equipment safety requirements. 3. The appliance is not suitable for built-in installation. 4. If the appliance is near walls, keep a clearance of ≮100mm. 5. The cabinet is equipped with adjustable feet whose regulating range is ≥15mm. Making sure that the cabinet is level and stable. 6. The supply voltage should comply with the working voltage of the appliance. 7. The fixed arrangement of wire should be equipped with an all-poles disconnecting switch with a contact opening of 3mm on its poles. It is advisable to install a grounding leakage protection switch. Do not pile up sundries in front of the switch, for convenient operation sake. 3 8. After installation, check that whether the connection is loose, whether the voltage is normal and whether the safety grounding is reliable. 9. Before cleaning, cut off the power supply. Clean the appliance with a wet towel containing non-corrosive detergent. 10. Vicinity of the mounting position should not store flammable or explosive objects. The ambient temperature should be lower than 45℃ and the relative humidity should be below 85%. 11. Installation of the appliance should be done by professional technicians. 12. The appliance should be positioned at a stable area with a minimum clearance of 10cm away from non-combustible substances (e.g. walls, windows etc.) on both sides, and 20cm at back side. 13. Water connection: There is a water pipe connector in left front of the cabinet bottom, connect the tap water pipe to it with DN15 connector. 1.3 Special Notice 1. This product is a commercial machine that needs to be operated by trained cook, not applicable for household use. 2. Do not dismantle or self-modify the machine. Dismantlement and self-modification may cause casualty. 3. After working, turn off the switch. 4. Do not open the housing of the machine. This product contains high-voltage circuit, housing dismantlement may cause electric shock. 5. Before cleaning, unplug and cut off the power supply. 6. During cleaning, do not aim at the appliance with water jet. Water may conduct electricity, that may cause electric shock due to leakage. 7. Do not pat the product or put any heavy objects onto it. Abnormal operation may cause damage and danger. 8. High temperature may cause scald. Do not touch the pan surfaces with hands directly due to high temperature during or after operation. 9. To prevent damage, turn off the switch ASAP when near the thunder zone. 10. Do not destroy the control panel with hard or sharp objects. 11. Keep your hands dry during installation and operation. Plugs and switches etc. should remain dry contact. 12. Do not dry heat the pan. 13. Do not carry out maintenance operation if the appliance is energized. Turn off the power switch during maintenance. 14. Do not aim at the appliance with water, neither does soak the appliance in water. 15. Do not clean any part of metal with corrosive detergent. 16. Clean the pan and cabinet timely after use to keep sanitary. 17. Maintenance should be done by qualified technician, it is dangerous for others to have the work done. 4 18. To avoid hazard caused by false reset of the thermal breaker, do not supply the appliance with external switch device, e.g. timer, or connect the appliance to circuit connected or disconnected by general components at regular time. 19. If the power cord is damaged, replace it with an oil resistant sheath flexible cable YZW/YCW (No.57 of GB/T 5013.1(IEC 60245,IDT)) or dedicated components that bought from manufacturer or its maintenance department. Substitution should be done by professional personnel. 5. Working Instructions & Operation Flow 1. 2. Control panel: As shown in structure schematic diagram, No.1-6 stands for corresponding functional switches respectively. Lift the cover and rotate the inlet valve knob 1 on control panel to inject appropriate amount of water into the pan. 3. Switch on the power switch, at this time, the appliance is energized and the power 4. indicator illuminates. Turn the thermostat knob 4 to desired value. The appliance start working when the working indicator illuminates, and the heating elements start heating up. 5. Keep constant: When the heating elements work for a period of time and the temperature reaches the set point, the thermostat will cut off the power supply automatically, and the elements stop working. Once the temperature drops a bit, the thermostat will connect the power supply automatically and the elements continue to work. The procedure circulates to keep the temperature in the set range. 6. 7. After working, rotate the thermostat counterclockwise to limit position. Cut off the power supply to ensure safety. Pan lifting and overturn: Turn the tap 6 to position away from lifting area of the cover, then lift up the cover and rotate the hand wheel 5 clockwise to desired positon. In turn, recover the pan to original state. Note: Heating will be stopped automatically when the pan is lifted up. 5 6. Routine Inspection It is necessary to check the machine daily. Check the machine regularly can avoid serious accident happens. Stop using if user feels that there are some problems in the circuit or machine. Check the situation of the machine before or after using every day. Before using: Whether the machine is tilted? Whether the control panel is damaged? Whether the power cord is aging, cracking or damaged? During using: Whether there is strange odor or vibration noise? Whether the power is normal? 7. Cleaning and Maintenance 1. 2. The device shall be cleaned and maintained every day after working. Remove the grease and residues in drip pan regularly to keep the pan and the appliance surfaces clean. 3. 4. 5. During cleaning, do not scrub the appliance and pan surface with abrasive substance or corrosive detergent, that may damage the appliance performance and appearance. When cleaning the housing or cabinet, use woodenware and cotton cloth to clean the metal surfaces instead of hard metal substance. Do not aim at electrical elements with water, it would be better to use a wet towel instead. If the electrical elements are splashed, dry them timely to prevent damage. Do not aim at the appliance with water jet during cleaning. 6 8. Failure Analysis &Trouble Shooting Symptoms Causes Solutions 1. Whether the power switch is switched on. Power indicator (red) is 2. The heater works, but the not on. indicator is defective. 3. Control circuit of the 1. Check the power switch. 2. Replace the indicator. 3. Check the control circuit. indicator is damaged. 1. Power indicator (green) is not on. 2. The thermostat defective. is The heater works, but the 1. Replace the thermostat. 2. Replace the indicator. indicator is defective. The heater does not 1. The thermostat defective. work. 2. Heating damaged. elements is are 1. Replace the thermostat. 2. Replace the heating elements. If any failure occurs, contact the manufacturer to solve the problems timely. 7