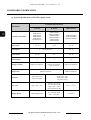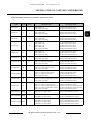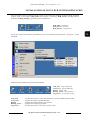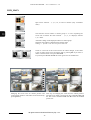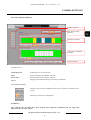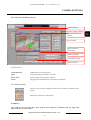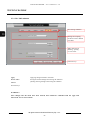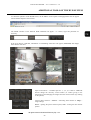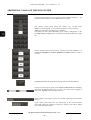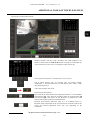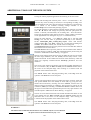
1
U s e r ’s m a n u a l
NOVUS DVR SYSTEM
Server Software for A, B and MPG
Series NOVUS capture cards
NOVUS DVR SYSTEM - User’s manual ver. 2.0
INFORMATION
EMC (89/336/EEC) and LVD (73/23/EEC) Directives
CE Marking
Our products are manufactured to comply with requirements of the following directives and national
regulations implementing the directives: :
• Electromagnetic compatibility EMC 89/336/EEC with further amendments
• Low-voltage LVD 73/23/EEC with further amendments. This directive applies to electrical
equipment designed for use with a voltage rating of between 50VAC and 1000VAC as well as 75VDC
and 1500VDC.
WEEE 2002/96/EC Directive
Information for users who want to get rid of electrical and electronic appliances
This product is marked according to the European Directive on Waste Electrical and Electronic
Equipment (2002/96/EC) and further amendments. By ensuring this product is disposed of correctly,
you will help to prevent potential negative consequences for the environment and human health, which
could otherwise be caused by inappropriate waste handling of this product.
The symbol on the product, or the documents accompanying the product, indicates that this appliance
may not be treated as household waste. It shall be handed over to the applicable collection point for the
waste electrical and electronic equipment for recycling purpose.
For more information about recycling of this product, please contact your local authorities, your
household waste disposal service or the shop where you purchased the product.
2002/95/EC RoHS Directive
Information concerning limitation of the use of dangerous substances in the electrical and
electronic appliances.
Out of concern for human health protection and friendly environment, we assure that our
products falling under RoHS Directive regulations, regarding the restriction of the use of
hazardous substances in electrical and electronic equipment, have been designed and
manufactured in compliance with the above mentioned regulation. Simultaneously, we claim
that our products have been tested and do not contain hazardous substances whose exceeding limits
could have negative impact on human health or natural environment.
Information
The device, as a part of professional CCTV system used for surveillance and control, is not designed
for self installation in households by individuals without technical knowledge.
The manufacturer is not responsible for any defects or damages resulting from improper, or
inconsistent with user’s manual, installation of the device in the system.
All rights reserved © NOVUS Security Sp. z o.o.
2
NOVUS DVR SYSTEM - User’s manual ver. 2.0
CRUCIAL INFORMATION
ATTENTION!
THE KNOWLEDGE OF THIS USER’S MANUAL IS AN INDESPENSIBLE
CONDITION OF A PROPER MULTIPLEXER OPERATING. YOU ARE KINDLY
REQUESTED TO FAMILIARIZE YOURSELF WITH THIS MANUAL BEFORE
STARTING THE DEVICE.
THE MANUAL SHOULD BE KEPT FOR FUTURE USE.
WARNING !
IN ORDER TO PROTECT YOURSELF AGAINST THE RISK OF FIRE OR ELECTRIC SHOCK
YOU NEED TO AVOID PLACING THE DEVICE IN HUMID AND DUSTY PLACES.
CAUTION!
THE COVER MUSTN’T BE TAKEN OFF. ANY SELF-REPAIRS MUSTN’T BE
EXECUTED.
ALL REPAIRS CAN BE EXECUTED ONLY BY QUALIFIED STAFF OF THE
AUTHORISED NOVUS SERVICE.
CAUTION!
THE MULTIPLEXER IS SENSITVE TO STATIC CHARGES, THAT IS WHY IT HAS TO BE
USED ACCORDING TO DEVICE OPERATION RULES BASED ON CMOS/MOSFET SYSTEMS.
INFORMATION
All the data included in this manual are up to date at the moment of printing this manual. Novus
Security Sp. z o.o. reserves the right to amend this manual. The producer reserves the right to modify
multiplexer’s parameters and change its design without notice.
All rights reserved © NOVUS Security Sp. z o.o.
3
NOVUS DVR SYSTEM - User’s manual ver. 2.0
SAFETY REQUIREMENTS
1. The installation of capture cards should be carried out by a qualified service person or a
professional safety system installer.
2. Due to the fact that the card emits substantial amount of heat good ventilation should be assured;
additional fan is advised. Computer with a capture card mustn’t be placed in places where
ventilating holes are partially or fully covered.
3. In case repair is needed you need to contact authorized service point. The device should be kep
clean and protected from mechanical strokes.
4. The capture card has to be protected against humidity and dust. In case it has contact with water
react immediately: switch off the power supply and contact the authorized Novus service. If the
device gets dirty it might get damaged or electrocute someone.
5. The computer should be equipped with a power supply unit with a capacity of at least 350 W
- recommended 400 W.
6. Signal cords should be laid in a way that eliminates the risk of mechanical damage; special
attention should be paid to the plug.
7. To avoid multiplexer’s damage vision and control signals should be equipped with systems
protecting against disturbances, over voltage and atmospheric discharge that are in compliance with
Polish regulations. It is also advised to use ground loop isolators.
8. The device mustn’t be used in conditions which do not fulfill operating requirements as far as
power supply, relative humidity or air temperature are concerned.
9. Computer in which capture card is installed should be configured exactly with the specification
given in this user’s manual.
10. Capture cards should be used only with original NOVUS drivers and software enclosed on a CD or
available at: www.novuscctv.com. If you do not comply with the above mentioned requirements it
may damage the card.
All rights reserved © NOVUS Security Sp. z o.o.
4
NOVUS DVR SYSTEM - User’s manual ver. 2.0
TABLE OF CONTENTS
1. FOREWORD INFORMATION ................................................................................... ..7
1.1. Foreword....................................................................................................................... 7
1.2. General specification of NOVUS capture cards........................................................... 8
1.3. Computer specification ................................................................................................ 9
1.4. Computer settings before installation of capture cards drivers and software............. 10
2. Installation of capture card drivers ............................................................................... 14
3. Installation of NOVUS DVR SYSTEM application..................................................... 20
4. DVR_Main ...................................................................................................................... 29
5. DVR_Settings - recording system settings configuration ........................................... 33
5.1. Disks settings.............................................................................................................. 35
5.2. System settings ........................................................................................................... 37
5.3. Camera settings ......................................................................................................... 42
5.3.1 The General submenu ......................................................................................... 42
5.3.2 The Schedule submenu........................................................................................ 45
5.3.3 The Color & Motion submenu ............................................................................ 47
5.4. Sensor settings ............................................................................................................ 52
5.5. Backup copy settings .................................................................................................. 54
5.6. User settings ............................................................................................................... 56
5.7. Text-in feature ............................................................................................................ 58
5.7.1 The Device submenu ........................................................................................... 59
5.7.2 The Data submenu ........................................................................................... 61
5.7.3 The Data base submenu ...................................................................................... 65
5.7.4 The Search submenu........................................................................................... 66
5.7.5 The XML submenu ............................................................................................. 68
5.7.6 The Connecting submenu ................................................................................... 70
6. DVR_Search..................................................................................................................... 73
7. Smart_Search................................................................................................................... 79
8. Additional tools of the NOVUS DVR SYSTEM .................................................................. 82
8.1. The Backup program + manual creation of a backup copy ............................................... 82
8.2. Backup_Viewer - backup copy viewing..................................................................... 84
8.3. Auth_Tool - exported JPG file verification ............................................................... 86
8.4. AVI_Viewer - MP4 file playback .............................................................................. 87
8.5. Log_Viewer - DVR SYSTEM log register viewing .................................................. 88
8.6. Start.exe - NOVUS DVR SYSTEM admin registration ............................................ 90
All rights reserved © NOVUS Security Sp. z o.o.
5
NOVUS DVR SYSTEM - User’s manual ver. 2.0
TABLE OF CONTENTS
8.7. DBTool.exe - DVR SYSTEM data base playback..................................................... 93
8.8. MCSetup.exe - alteration of sound card configuration............................................... 95
8.9. DirectWeb.exe - WWW server .................................................................................. 98
9. PTZ camera control ...................................................................................................... 104
9.1. NOVUS CAMA-I (NOVUS-C) ............................................................................... 104
9.2. NOVUS CAMA-I (PELCO-D i PELCO-P)............................................................ 106
9.3. PELCO SPECTRA (PELCO-D i PELCO-P) .......................................................... 108
9.4. NOVUS CAMA-mini (NOVUS-C1) ....................................................................... 109
9.5. NOVUS CAMA-mini (PELCO-D) ......................................................................... 111
9.6. NOVUS NVC-625/660 DN, NVC-HC520ZL,
NVC-HC370ZL-2 (NOVUS – C1) ....................................................................... 112
9.7. NOVUS NVC-HC520ZL, NVC-HC370ZL-2 (PELCO-D i PELCO-P)................. 112
9.8. NOVUS NVC-825/860 DN (NOVUS – C2)............................................................ 112
10. Selected configuration activities - „step by step” ..................................................... 113
10.1. Assigning disk space to video recording and creating volumes. ................................. 113
10.2. Video recording with audio ....................................................................................... 113
10.3. Video and audio playback .......................................................................................... 113
10.4. Motion detection recording ................................................................................... 113
10.5. Recording with variable speed (Normal + Event) .................................................. 114
10.6. E-mail notification configuration .......................................................................... 114
10.7. Back-up copy ......................................................................................................... 114
10.8. Control and configuration of PTZ cameras ............................................................ 114
10.9. Basic integration with ASCII / XML data generating devices............................... 115
10.10. Activation of network connections ........................................................................... 115
10.11. Remote alarm notification ................................................................................... 115
All rights reserved © NOVUS Security Sp. z o.o.
6
NOVUS DVR SYSTEM - User’s manual ver. 2.0
FOREWORD INFORMATION
1. Foreword information
1.1 Introduction
1. A, B and MPG capture cards
A, B and MPG Series Novus capture cards operation.
2. 1~32 video inputs
The software handles up to 32 video channels (32 video inputs 75 Ohm, 1 Vp-p) depending on the model of
the installed capture card.
3. 1~16 alarm inputs
Up to 16 alarm inputs (detectors). The software allows for combining any number of cameras with each
input (detector). Detector activation may induce a defined reaction or may trigger recording process from
the cameras combined with the detectors.
4. 1~8 alarm outputs
Up to 8 alarm outputs - can be used for connecting external devices such as sirens or alarm centers. Alarm
outputs can be activated manually as a result of motion detection or other defined alarm events.
5. 1~16 channel audio recording
Multi channel audio recording - audio synchronized with video. The software allows for live listening and
video playback with sound. Depending on the capture card model up to 16 audio channels can be recorded.
6. Up to 32 cameras on one screen
Split screen: 1, 4, 6, 9, 10, 16, 33 (some of the split screens active depending on the capture card model).
7. Advanced PTZ functions
The software allows for a full configuration and control of PTZ cameras, motor-zoom cameras and
NOVUS day/night cameras with RS-485 interface.
8. Watchdog function
Capture cards are equipped with hardware Watchdog function. In case of system error or when PC does
not react Windows is automatically restarted.
9. Advanced motion detection
The software allows for detailed specification of the motion detection area as well as sensitivity and
activation threshold for each camera.
10. Advanced recoding schedule
The software is equipped with a week-hour graphic recording schedule. The choice of recording mode
(continuous, motion detection, alarm, alarm + motion detection, continuous + event or only viewing) is
independent for each camera.
11. Backup copy
The software allows for manual (users select cameras and time range) or automatic (incremental backup)
creation of backup copies.
12. Network connection
Network connection through dedicated client software (configuration, monitoring and remote playback),
www browser (monitoring and playback) and PDA (live monitoring, playback).
13. Text-in feature
Combining text data from cash registers, cash machines, access control with video image. Apart from data
visualization the software allows users to search the date according to required criteria.
All rights reserved © NOVUS Security Sp. z o.o.
7
NOVUS DVR SYSTEM - User’s manual ver. 2.0
FOREWORD INFORMATION
1.2. General specification of NOVUS capture cards
Parameter
Available card models
Video inputs
Technical specification
A Series
B Series
MPG Series
NVB-025/4A
NVB-050/4A
NVB-050/8A
NVB-100/8A
NVB-050/16A
NVB-100/16B
NVB-100/16BLV
NVB-200/16B
NVB-200/16BLV
NVB-200/32B
NVB-400/32B
NVB-100/4MPG
NVB-200/8MPG
NVB-400/16MPG
4, 8, 16
16, 32
4, 8, 16
1 ~ 4 (2 sound cards)
Audio inputs
4, 8, 16
Alarm inputs
4, 8, 16
16
4, 8, 16
Alarm outputs
4
4
4, 8
Full screen sequence
Full screen sequence,
split, PC screen
Full screen sequence
Analogue outputs
Compression
Resolution
MPEG-4 software
MPEG-4 hardware
4CIF (704 x 576)
2CIF (704 x 288)
CIF (352 x 288)
4CIF (704 x 576)
CIF (352 x 288)
CPU Load
high - 90% ~ 97%
average - 40 ~ 60 %
(for 16-chanel cards)
high - 80% ~ 90%
(for 32-channel cards)
Display speed
Recording speed
B - recording speed
BLV - „real time”
All rights reserved © NOVUS Security Sp. z o.o.
8
low - 5 ~ 10 %
„real time””
NOVUS DVR SYSTEM - User’s manual ver. 2.0
FOREWORD INFORMATION
1.3. Computer specification
Parameters
4, 8, or 16-input cards
32-input cards
CPU
only INTEL - P4 2.4 GHz or newer
only INTEL - P4 3.0 GHz HT,
Core Duo or newer
RAM
512 MB
1024 MB
Only motherboards based on INTEL i845,
i865, i9xx chipsets manufactured by Intel,
Asus and Gigabyte
Only motherboards based on INTEL
i9xx chipsets manufactured by Intel, Asus
and Gigabyte
only ATI Radon 7500 or newer
only ATI Radon X300 or newer
IDE or S-ATA
only S-ATA
Motherboard
VGA card
HDD
CD / DVD
CD / DVD drives
Sound Blaster or C-Media
Sound card
Power supply unit
min. 350 W (400 W recommended)
Additional fan
Other
Microsoft Windows 2000, XP. VISTA (only 32-bit version)
Microsoft Vista requires the NOVUS DVR SYSTEM software version 7.0 or newer
OS
8.0 or newer
Direct X
Due to the fact that some computers are not compatible with NOVUS capture cards do not use :
- ready-to-use computer sets (HP, Compaq, Dell etc.), mini PCs (Small Form Factor)
- other CPUs than the ones made by INTEL (i.e.: AMD, Cyrix etc.)
- motherboards based on chipsets other than INTEL i845, i865, i9xx (i.e.: nVidia, ATI, SiS, VIA etc.)
Recommended motherboards manufacturers: Intel, Asus and Gigabyte.
- motherboards based on INTEL i845G (additional AGP VGA card is required)
- VGA cards other than Intel and ATI Radeon (i.e.: SiS, VIA etc).
- Microsoft Windows NT/95/98/Me/VISTA (64-bit version) and LINUX
Additionally, before installing a capture card you are advised to:
- update Windows
- Update motherboard, VGA card and sound card drivers to the latest versions available on manufacturers
websites.
- switch off all the energy saving options and screen saver
- in case of reinstallation of OS the capture card should be removed from the PCI socket.
In case of problems with the selection of appropriate hardware please contact your local NOVUS distributor.
All rights reserved © NOVUS Security Sp. z o.o.
9
NOVUS DVR SYSTEM - User’s manual ver. 2.0
FOREWORD INFORMATION
1.4. Computer settings before installation of capture cards drivers and software
Before installation make sure all power saving functions, both in the BIOS and Windows settings, have been
switched off.
WARNING !
The description below applies to Windows XP. Configuration of power supply settings and screen saver
in Windows 2000 and Vista is very similar.
Windows power supply settings.
Start -> Settings -> Control Panel ->
Power options
Windows screen saver settings.
Start -> Settings -> Control Panel ->
Display -> Screen Saver
All rights reserved © NOVUS Security Sp. z o.o.
10
NOVUS DVR SYSTEM - User’s manual ver. 2.0
FOREWORD INFORMATION
WARNING !
NOVUS DVR SYSTEM software requires 1024 x 768 screen resolution. If the resolution is lower than
1024 x 768 only part of the interface is displayed. However, if the resolution is higher than 1024 x 768 the
program is displayed in a separate window.
Resolution settings.
Start -> Settings -> Control Panel ->
Display -> Settings
WARNING !
NOVUS DVR SYSTEM software requires using Windows admin account for both installation and
proper operation. You must not use standard user account for installation and operation.
All rights reserved © NOVUS Security Sp. z o.o.
11
NOVUS DVR SYSTEM - User’s manual ver. 2.0
FOREWORD INFORMATION
WARNING !
Before NOVUS DVR NET software installation with the Microsoft Windows Vista operating system you
have to disable the User Account Control function according to the procedure described below.
Run the Windows Control Panel (Start -> Control Panel)
Select the User Accounts category.
Select the user for NOVUS DVR NET
installation and select Turn User
Account Control on or off.
Turn off the Use User Account Control
(UAC) to help protect your computer
feature and click OK button.
All rights reserved © NOVUS Security Sp. z o.o.
12
NOVUS DVR SYSTEM - User’s manual ver. 2.0
FOREWORD INFORMATION
After turning off the Use User Account
Control (UAC) to help protect your
computer feature, to apply the changes
the Windows system have to be
restarted. Select
Restart Now for
restarting the system immediately or
Restart Later if you need to leave over
the system restart.
WARNING !
The system restart is a must to complete the UAC (User Account Control) feature turning off. The
NOVUS DVR NET software can be installed only after restarting the operating system. If you do not
follow the procedure above, the installation of NOVUS DVR NET software can be impossible or the application could not work properly / stable.
All rights reserved © NOVUS Security Sp. z o.o.
13
NOVUS DVR SYSTEM - User’s manual ver. 2.0
INSTALLATION OF CAPTURE CARD DRIVERS
2. Installation of capture card drivers
WARNING !
Please follow the instructions below to obtain proper operation of the image recording system.
Improper driver installation (automatic Windows installation included) may cause problems with
installation or starting of DVR_Main software, and, consequently its improper operation.
Before software installation, proper installation of capture card drivers is indispensable. After you put the card
in the PCI socket, switch the computer on and the system detects presence of a new device cancel automatic
process of Windows drivers’ installation.
To cancel automatic process of Windows
drivers’ installation please select
„Cancel”.
The operation needs to be repeated for
each driver of a particular capture card
type - more info on page 17.
After you insert the CD-ROM with Novus software please select interface language and capture card
model. After selecting “drivers” option please start „Installer.exe” software.
You select „Capture cards”, card model
and „Drivers” from the Programs
menu.
All rights reserved © NOVUS Security Sp. z o.o.
14
NOVUS DVR SYSTEM - User’s manual ver. 2.0
INSTALLATION OF CAPTURE CARD DRIVERS
To install the drivers please start the
Installer.exe software..
WARNING !
In case of problems with starting the CD-ROM with Novus software please go to
D:\fs\command\pl\karty\ (for CD-ROM driver seen in Windows under the letter D:) where all capture
card software can be found. Capture card drivers can be found in D:\fs\command\pl\karty\driver\.
After selecting it the following Windows appears:
To continue installation process please
select Next.
All rights reserved © NOVUS Security Sp. z o.o.
15
NOVUS DVR SYSTEM - User’s manual ver. 2.0
INSTALLATION OF CAPTURE CARD DRIVERS
Installer show the list of devices (and drivers that correspond to these devices) that have been found in the
system (please take a look below at the example of NVB-100/4MPG capture card ):
To continue the process of drivers
installation select Install.
WARNING !
In case of cards with software compression (A and B series) additional „NOVUS DVR Software Driver”
is not shown on the list. However, after proper card installation it should be seen in the Windows Device
Manager.
If it is not there it may be a sign that there was an error in the process of driver installation, the PC is
incompatible or the capture card itself is damaged.
WARNING !
The list of available drivers should be compared with the specification of the installed capture card (see
page 17). If some or all drivers are missing it may be a sign that the computer is incompatible or the
capture card itself is damaged.
All rights reserved © NOVUS Security Sp. z o.o.
16
NOVUS DVR SYSTEM - User’s manual ver. 2.0
INSTALLATION OF CAPTURE CARD DRIVERS
Name and number of drivers for particular capture card models
Capture card
model
Series
No of
drivers
NVB-25/4A
A
2
DVR Capture 1st
DVR Capture Secondary
NOVUS DVR A Series 25ips
NOVUS DVR Software Driver
NVB-50/4A
A
3
DVR Capture 1st
DVR Capture 2nd
DVR Capture Secondary
NOVUS DVR A Series 25ips
NOVUS DVR A Series 25ips
NOVUS DVR Software Driver
NVB-50/8A
A
3
DVR Capture 1st
DVR Capture 2nd
DVR Capture Secondary
NOVUS DVR A Series 25ips
NOVUS DVR A Series 25ips
NOVUS DVR Software Driver
NOVUS DVR A Series 25ips
NOVUS DVR A Series 25ips
NOVUS DVR A Series 25ips
NOVUS DVR A Series 25ips
NOVUS DVR Software Driver
Old drivers name
New drivers name
NVB-100/8A
A
5
DVR Capture 1st
DVR Capture 2nd
DVR Capture 3rd
DVR Capture 4th
DVR Capture Secondary
NVB-50/16A
A
3
DVR Capture 1st
DVR Capture 2nd
DVR Capture Secondary
NOVUS DVR A Series 25ips
NOVUS DVR A Series 25ips
NOVUS DVR Software Driver
NVB-100/16B
B
2
DVR Live Capture (Capture Section)
DVR Capture Secondary
NOVUS DVR B Series 100 ips
NOVUS DVR Software Driver
NVB-100/16BLV
B
3
DVR Live Capture (Capture Section)
DVR Live Capture (Live Section)
DVR Capture Secondary
NOVUS DVR B Series 100 ips
NOVUS DVR BLV Driver
NOVUS DVR Software Driver
NVB-200/16B
B
3
DVR Live Capture (Capture Section)
DVR Live Capture (Capture Section)
DVR Capture Secondary
NOVUS DVR B Series 100 ips
NOVUS DVR B Series 100 ips
NOVUS DVR Software Driver
NOVUS DVR B Series 100 ips
NOVUS DVR B Series 100 ips
NOVUS DVR BLV Driver
NOVUS DVR Software Driver
NVB-200/16BLV
B
4
DVR Live Capture (Capture Section)
DVR Live Capture (Capture Section)
DVR Live Capture (Live Section)
DVR Capture Secondary
NVB-200/32B
B
3
DVR Live Capture (Capture Section)
DVR Live Capture (Capture-Slave Section)
DVR Capture Secondary
NOVUS DVR B Series 100 ips
NOVUS DVR B Series 100 ips SLAVE
NOVUS DVR Software Driver
B
5
DVR Live Capture (Capture Section)
DVR Live Capture (Capture Section)
DVR Live Capture (Capture Slave-Section)
DVR Live Capture (Capture Slave-Section)
DVR Capture Secondary
NOVUS DVR B Series 100 ips
NOVUS DVR B Series 100 ips
NOVUS DVR B Series 100 ips SLAVE
NOVUS DVR B Series 100 ips SLAVE
NOVUS DVR Software Driver
NVB-100/4MPG
MPG
1
DVR MPEG 4 Capture Board
NOVUS DVR MPG Series 100 ips
NVB-200/8MPG
MPG
2
DVR MPEG 4 Capture Board
DVR MPEG 4 Capture Board
NOVUS DVR MPG Series 100 ips
NOVUS DVR MPG Series 100 ips
4
DVR MPEG 4 Capture Board
DVR MPEG 4 Capture Board
DVR MPEG 4 Capture Board
DVR MPEG 4 Capture Board
NOVUS DVR MPG Series 100 ips
NOVUS DVR MPG Series 100 ips
NOVUS DVR MPG Series 100 ips
NOVUS DVR MPG Series 100 ips
NVB-400/32B
NVB-400/16MPG MPG
All rights reserved © NOVUS Security Sp. z o.o.
17
NOVUS DVR SYSTEM - User’s manual ver. 2.0
INSTALLATION OF CAPTURE CARD DRIVERS
During the installation of each driver the system informs about conformity with Windows XP:
Select Continue Anyway, the operation
needs to be repeated for each driver of
a particular capture card model - more
info on page 17.
Installer informs about successful installation and the necessity to restart the system:
After the drivers have been installed
please select Reboot to restart the
system.
WARNING !
In case there isn’t a message informing about proper drivers installation or system restart during
drivers installation the process of drivers installation should be repeated in the Windows Rescue Mode.
All rights reserved © NOVUS Security Sp. z o.o.
18
NOVUS DVR SYSTEM - User’s manual ver. 2.0
INSTALACJA STEROWNIKÓW KARTY WIZYJNEJ
After successful drivers installation and restarting the system, ale the drivers can be found in the Windows
Device Manager (chart on page 17).
Print screen of correctly installed drivers for NVB-200/8MPG capture card:
After successful drivers installation you can start the installation process of DVR Main software.
All rights reserved © NOVUS Security Sp. z o.o.
19
NOVUS DVR SYSTEM - User’s manual ver. 2.0
INSTALLATION OF NOVUS DVR SYSTEM APPLICATION
3. Installation of NOVUS DVR SYSTEM application
WARNING !
The software is devoted to A, B and MPG Series NOVUS capture cards. The software is not suitable for
older capture cards versions that do not have a letter marking (i.e.: NVB-025/4, NVB-100/16 etc).
For such capture cards types please use the latest available software version (4.01.01) devoted to those
cards.
Video data base format has not been changed that is why after the installation of 7.xx version, the
recording from versions 5.xx and 6.xx will still be available.
If there is a previous version of NOVUS DVR SYSTEM software (i.e.: 6.02.07 or earlier) installed in the
system it needs to be uninstalled using the Start menu. After the software has been uninstalled PC will
automatically restart.
Select Programs, next DVR SYSTEM
and next Uninstall from the Start menu
WARNING !
NOVUS capture card software installation and operation requires the administrator rights for logged in
Windows user.
WARNING !
During 7.xx version software installation with existing on HDD 6.xx version video data base the selecting
of the first HDD to start record video data could be necessary. This problem concerns especially the
installations with multiple HDDs. The warning message
“Failed to open database” during DVR_MAIN application
start is displayed. The DBTOOL application have to be
used to correct this problem. After selecting the proper
HDD as first for video recording click Modify button and
then Close button.
All rights reserved © NOVUS Security Sp. z o.o.
20
NOVUS DVR SYSTEM - User’s manual ver. 2.0
INSTALLATION OF NOVUS DVR SYSTEM APPLICATION
After starting CD-ROM with NOVUS software please select interface language, capture card model,
and after selecting „DVR_MAIN software” start „Setup.exe” file.
Select „Capture cards”, card model
and DVR_MAIN software from the
Programs menu.
ATTENTION !!!
In case of problems with launching of the start interface of NOVUS CD-ROM you need to go to
D:\fs\command\pl\karty\ (for CD-ROM drive seen under the letter D: in the system) where all capture
card software can be found.
Selection of installation language is the first stage of software installation:
To start installation of NOVUS DVR
SYSTEM click on the Setup.exe icon.
Language selection is confirmed by
clicking „OK”.
All rights reserved © NOVUS Security Sp. z o.o.
21
NOVUS DVR SYSTEM - User’s manual ver. 2.0
INSTALLATION OF NOVUS DVR SYSTEM APPLICATION
After starting the installer information about version number, issue date and the symbol of automatically
detected capture card is displayed in the upper left corner:
Version
:7.00.01
Detected card series :B
Issue date
:2006/11/31
The letter which follows the series number informs about automatically detected card type.
The letter
A stands for A series capture cards,
B stands for B series capture cards (BLV included),
M stands for MPG series capture cards,
No letter - automatic capture card detection was not successful.
WARNING !
In case there is not any letter the software cannot automatically detect the installed capture card.
So please make sure if the PC fulfills NOVUS requirements and if the drivers have been properly
installed.
Next, the following window appears:
Click „Next” to proceed with the
installation.
Select „Anyone who uses his computer
(all users)” option for the Windows
multi-user installation or „Only for me”
for the single user installation (only for
currently logged in Windows user).
Click „Next” to proceed with the
installation.
All rights reserved © NOVUS Security Sp. z o.o.
22
NOVUS DVR SYSTEM - User’s manual ver. 2.0
INSTALLATION OF NOVUS DVR SYSTEM APPLICATION
Select the folder where the software is installed:
To change default software localization
press Browse and point to a folder
where the software is installed
Then press Next to continue the
installation. .
Select video format suitable for CCTV cameras:
Select PAL or NTSC depending on the
cameras you use.
Then press Next to continue the
installation.
Installation according to predefined criteria takes place. The process of installation ends when the system asks
you to give user name and password for the system admin or asks for correction of automatically detected
capture card parameters:
Click OK to register the admin account.
All rights reserved © NOVUS Security Sp. z o.o.
23
NOVUS DVR SYSTEM - User’s manual ver. 2.0
INSTALLATION OF NOVUS DVR SYSTEM APPLICATION
Admin Registration panel differs depending on the installed capture card series:
A-Series
B-Series
MPG-Series
All rights reserved © NOVUS Security Sp. z o.o.
24
NOVUS DVR SYSTEM - User’s manual ver. 2.0
INSTALLATION OF NOVUS DVR SYSTEM APPLICATION
After checking card parameters and their correction (if such a need arises), writing admin name and password,
the software confirms proper registration with the following message :
Click „OK” to finish installation
process.
WARNING !
In case of automatic capture card detection the only thing you should do is to correct detected card
parameters, however, in case of manual capture card selection the parameters are set randomly.
It is indispensable that you set the proper parameters based on the installed card specification.
If you improperly set the parameters of the installed card it may cause unstable software operation or
you may not be able to start the software at all.
After the installation is over the PC has to be restarted:
Click Finish to restart the PC.
WARNING !
PC restart is and indispensable stage of a proper software installation. In case the finishing stage of the
installation differs from the one described above, first, make sure your PC fulfills NOVUS requirements
and capture card drivers have been properly installed. Next, the installation process needs to be carried
out again.
All rights reserved © NOVUS Security Sp. z o.o.
25
NOVUS DVR SYSTEM - User’s manual ver. 2.0
INSTALLATION OF NOVUS DVR SYSTEM APPLICATION
In case the process of automatic card model detection fails (no letter after version number on the installation
screen - see page 17) he installer displays the following message:
Click OK to start manual installation
only when you are sure that the drivers
installation have been properly
installed.
After selecting video format the software displays a warning and asks you to select the card model manually:
Click OK to continue in the manual
mode of card model selection.
Select proper model of the installed
capture card (the print screen shows
NVB-200/8MPG capture card).
If you change default software
localization, click Browse and point to
a previously selected folder.
Click Next to continue the installation.
All rights reserved © NOVUS Security Sp. z o.o.
26
NOVUS DVR SYSTEM - User’s manual ver. 2.0
INSTALLATION OF NOVUS DVR SYSTEM APPLICATION
After successful software installation and PC restart icons of three main modules of NOVUS DVR SYSTEM
software appear on the desktop: DVR_Main (main program - monitoring), DVR_Search (recording material
playback) and DVR_Settings (registration system configuration).
DVR_Main - monitoring,
DVR_Search - playback
DVR_Settings - configuration
All the above mentioned elements and additional tools can be found in the Start menu -> Programs -> DVR
SYSTEM
Additional tools available in NOVUS DVR SYSTEM:
Auth_Tool - image authenticity
AVI_Viewer - playing MP4 files
Backup - backup copy
Backup_Viewer - copy playback
Log_Viewer - event (logs) viewing
Auth_Tool
AVI_Viewer
Backup
Backup_Viewer
Log_Viewer
- tool that allows users to verify the authenticity of saved in JPEG and AVI format
- program for playing exported MP4 files
- program for creating backup copy manually
- program for backup copy playback
- tool that allows users to view logs / system events
All rights reserved © NOVUS Security Sp. z o.o.
27
NOVUS DVR SYSTEM - User’s manual ver. 2.0
INSTALLATION OF NOVUS DVR SYSTEM APPLICATION
To access particular registration system modules you need to undergo verification process. After starting
selected program login window appears on the screen - it is necessary to give correct user name and password:
Input user name, password and click
OK.
To perform initial configuration of recording system you need to:
1. Start DVR_Settings, go to Disk Settings submenu and specify system disk area devoted to video recording,
following the clues on page 35.
2. Set registration parameters in the Camera Settings submenu, following the clues on page 42.
3. Configure user rights in the Users submenu, following the clues on page 56.
4. Save the changes and close DVR_Settings program.
5. Start DVR_Main.
WARNING !
To improve system security please use more sophisticated passwords. You can not use the special
characters (e.g. . , ; : etc) both for user name and password. It is advised that you create your own,
default user account and delete guest account especially as far as networking is concerned.
There two predefined, default user accounts in the system : admin (introduced at the installation stage)
and default user: guest. Guests rights allow him to start the system and assign the scope of user’s actions
without additional logging in. To obtain greater access you need to create an account with greater access
(requires logging in) or set the default user attribute for the user with greater access (it doesn’t require
additional logging in).
You cannot delete admin account in the Users submenu. The system requires one user with the default
user attribute.
All rights reserved © NOVUS Security Sp. z o.o.
28
NOVUS DVR SYSTEM - User’s manual ver. 2.0
DVR_MAIN
4. DVR_Main
After starting DVR_Main main panel of NOVUS DVR SYSTEM software appears.
Minimize
Network connection
Recording/HDDs
Logging in, PTZ panel
/ Image settings
PTZ panel selection
/ Image settings
Main window
camera images
Split screen panel
PTZ camera control
Date and time,
software version,
number of video
channels
Camera status
Relay outputs control
Alarm recording
Audio playback and
system shutdown
Starting of other
system modules
Date and time
Date is displayed in the MM-DD-RRRR format and time in the
GG:MM:SS format
Ver. 7.00.01B - 16 CH
- additionally software version (7.00.01) and
channel number (16 CH) of the installed card and the letter that stands for
card series are displayed :
A - A Series,
B - B Series (BLV cards included),
M - MPG Series
Buttons with camera numbers correspond to the status of particular video
channels. Button color means:
grey - inactive camera,
orange - active camera, currently displayed on the screen,
yellow - active camera, currently not displayed on the screen,
flashing orange or yellow - signal loss
Camera status indicator:
red - images from the camera are recorded
brown - images from the camera are not recorded
All rights reserved © NOVUS Security Sp. z o.o.
29
NOVUS DVR SYSTEM - User’s manual ver. 2.0
DVR_MAIN
Alarm output panel allows for direct relay 1 ~ 8 (only NVB-400/16MPG
capture card) or 1 ~ 4 outputs (other card models) control.
Alarm recording button - when you press this button the software starts
recording images from all the cameras regardless of schedule settings.
Switching to other system modules without closing DVR_Main program
Settings - registration system configuration (some options are available only
when DVR_Main is switched off i.e.: disk settings, camera activation, change
of the recording resolution).
Search - viewing of recorded video material (DVR_Search)
Smart Search - event search (changes in the image), text search
(Smart_Search)
Shutting down DVR_Main program (simultaneous end of recording).
You can restrict the usage of the button a proper configuration of user
accounts (see page 56).
Audio playback. When you press the button the software play back the first
recorded audio channel. To play back the audio connected with a particular
camera click on the image from this camera. More info about audio recording
(see page 40 and the NOVUS capture card installation manual).
PZT camera control.
When you configure PTZ camera settings in the DVR_Settings and test its
control from the main panel you can control camera’s movements, Zoom and
Sharpness as well as call and save presets and start pattern.
More about PTZ camera control (see page 50 and the NOVUS capture card
installation manual).
In the image adjustment panel, it is possible to control brightness, contrast,
saturation and hue for each camera independently.
All rights reserved © NOVUS Security Sp. z o.o.
30
NOVUS DVR SYSTEM - User’s manual ver. 2.0
DVR_MAIN
The buttons allow you to select the panel available below:
Camera - PTZ camera control,
Image - image setting.
The Open button allows users to access color or PTZ camera settings
depending on the selection by means of Camera and Image buttons.
The Close button closes PTZ camera or image settings button.
The Login button allows to log a user to the system
The Logout button logs out a user and default user rights are ON
Hard disk status panel - displays the disk where recording is taking place
(C:), box number on the disk (2000) currently saved box number (168), and
number of days with recordings that are in the archive(5 Days).
Additionally, the load of disk on which recording is taking place is
displayed graphically in the form that can be seen above the main window.
The windows shows the network connection status and the process of
creating backup copy.
Signaling of background backup copy creation.
Signaling of active network connection from the level of client DVR_Net
software, Internet Explorer browser or client PDA_Net.
Additionally, after placing mouse cursor over network connection panel users
get information about IP address from which client software originates the
connection.
The DVR_Main Minimization button
WARNING !
If you minimize DVR_Main causes the software to work in the background.
Starting additional applications requiring large RAM and/or CPU capacity may result in a faulty
operation of the program (recording a lesser number of frames than the nominal value).
In consequence the DVR_Main may malfunction and recording may be ceased.
All rights reserved © NOVUS Security Sp. z o.o.
31
NOVUS DVR SYSTEM - User’s manual ver. 2.0
DVR_MAIN
Split screen selection - 1, 4, 6, 10, 16 and 33 cameras (only 32-channel
cards).
The selection of next camera or camera group i.e.: in case of splitting the
screen into 4 and the first four cameras - 1, 2, 3, 4 it displays cameras
5, 6, 7 and 8.
Automatic change of the displayed camera or camera group.
Sequence time change is defined in the settings menu.
Settings -> System -> PC Screen sequence interval.
Zoom in / zoom out of the screen area for the camera images, it also hides
a part of control panel. You can achieve this by pressing F5. If you want to
return to the full screen view press F5 and F6.
If you first press F6 and then F5 the screen go back to its standard size.
Enlarging the screen area for camera pictures and
control panel reduction. This effect is also achieved by
pressing F5 key.
Next step of enlarging the screen area for camera pictures.
The full screen mode is achieved by key combination F5 and
F6. The reverse combination F6 next F5 returns the standard
picture size.
All rights reserved © NOVUS Security Sp. z o.o.
32
NOVUS DVR SYSTEM - User’s manual ver. 2.0
DVR_SETTINGS - RECORDING SYSTEM SETTINGS CONFIGURATION
5. Recording system configuration - DVR_Settings
DVR_Settings software enables recording system configuration based on capture card. To start it click
SETTINGS on the main panel of DVR_Main software or directly from a shortcut placed on the desktop.
Clicking SETTINGS on the main panel of DVR_Main software starts DVR_Settings application while the
main program (video recording) is in operation.. Some options directly connected with recording are
unavailable in this mode i.e.: disk settings, camera activation or change in the recording resolution for
particular cameras.
In there is a need to change the above mention settings close the main program (stop video recording)
and next start the DVR_Settings software using the desktop shortcut. All the configuration options of video
recording system are available in this mode.
The main screen of DVR_Settings software
All rights reserved © NOVUS Security Sp. z o.o.
33
NOVUS DVR SYSTEM - User’s manual ver. 2.0
DVR_SETTINGS - RECORDING SYSTEM SETTINGS CONFIGURATION
Particular system settings are grouped in the submenu sections:
1.
Disk Tool - disk management within the system:
- volume adding (allocating disk space devoted to video recording)
- volume deleting (creating free disk space)
- displaying information about free disk space
2.
System - main settings of video recording system:
- system name and localization,
- network connection configuration
- Watchdog settings
- automatic PC restart schedule
- automatic DVR_Main start settings
- system events (logs) saving
- PC screen and analogue video settings
- audio recording
- SMTP server settings (sending alarm email messages)
- CD recording
- automatic system user log-out
3.
Camera - recording parameters configuration for particular video channels:
- camera name, resolution, compression level and recording speed
- linking audio and video recording
- pre and post alarm recording
- system reaction settings when video loss occurs
- recording and remote event notification schedule
- motion detection and action on motion detection settings
- image settings (brightness, contrast, saturation, hue)
- PTZ camera settings
4.
Sensor - alarm inputs configuration,
- alarm inputs activation and configuration
- linking of alarm inputs with video channels
- action settings for activation of alarm inputs
5.
Backup - automatic creation of backup copy,
- backup cope mode and localization settings
- selection of cameras and time of copied recordings
- backup copy schedule
- backup copy overwriting and automatic start of copying process
6.
Users admin - user rights,
- setting user rights, entry level and password for video recording system user
7.
Text Inserting - setting cooperation parameters of video recording system with devices generating
ASCII/XML data: POS systems, access control systems, cash machines etc.
- settings of text data reception protocols
- settings of sent text data protocols
- linking of text data reception with a given camera or camera group
- settings of text display - font, color, script
All rights reserved © NOVUS Security Sp. z o.o.
34
NOVUS DVR SYSTEM - User’s manual ver. 2.0
DISK SETTINGS
5.1. Disk Tool
Disk Tool submenu allows users to configure disks devoted to video recording.
Information about
volume number
Information about used
disk space and volume
creation
Chart with disks
detected in the system
Volume creation
progress bar
Function buttons
Function buttons :
Delete Volumes
Deletes all the volumes from a selected hard disk.
Clear Volumes
Clears the whole volume content from a selected hard disk
(volume number remains unchanged).
Create Volumes
Creates volumes added to disk table.
Close
Closes Disk Tool submenu
The Volume Information panel:
Total volumes
Shows number of volumes available for video recording on all disks in the
system.
Current Volume
Shows volume number where video recording takes place.
WARNING !
Volume is a separate unit on a hard disk devoted to video recording. A 66 MB *.DAT file is a physical
representation of a volume.
All rights reserved © NOVUS Security Sp. z o.o.
35
NOVUS DVR SYSTEM - User’s manual ver. 2.0
DISK SETTINGS
The Disk Information shows the detailed information for selected hard disk:
Total Size (MB)
Disk capacity in megabytes (MB).
Used Space (MB)
Used disk space in megabytes (MB).
Free Space (MB)
Free disk space in megabytes (MB).
Max Volumes
Maximum number of volumes that can be created on a selected disk.
Volumes on Disk
Number of already created volumes on a disk.
Add New Volume
Adding (creating) new volumes.
Disks detected in the system:
Hard Disk
Hard disk letter mark in Windows.
Used / Total (MB)
The ratio of used disk space to the overall disk capacity (in megabytes).
Used Rate (%)
The ratio of used disk space to its capacity (in %).
Max Volumes
Maximum number of volumes that can be created on a selected disk.
Volumes on Disk
Number of volumes on a given disk.
Volume size
Number of volumes to be created on a given disk.
To create volumes, in the Add Volumes window put a required volume number (it cannot be bigger than the
Max. Volume Number) and confirm by clicking Add. After that in the Add Volumes position of the disk chart
appears the number of volumes you want to add. The process of creation of new volumes begins after pressing
Create Volumes.
The system overwrites video material by default. When the last volume is saved the first one (with the oldest
data) is overwritten. If you do not want the system to overwrite the data please go to System submenu of the
DVR_Settings program, tick the Full Disk - Notification option and in the open Properties panel select Stop
Recording.
All rights reserved © NOVUS Security Sp. z o.o.
36
NOVUS DVR SYSTEM - User’s manual ver. 2.0
SYSTEM SETTINGS
5.2 System settings
System submenu configures key parameters in the video recording system.
Information on server
localization, backup /
restore system settings
Start split screen settings
and sequence duration
Application launch
settings
Additional settings
System event recording
settings
Function buttons
Function keys:
Virtual keyboard
Enabling the on-screen keyboard
Apply
Applying changes introduced in the menu
Save & Close
Saving changes and closing the submenu
Cancel
Skipping the introduced changes and closing the submenu
The Site Name panel:
Site Name
Name of the server
Site Location
Localization of the server
Localization data is displayed in the camera window when connecting remotely using the DVR_Net net client.
This allows for a simple recognition of separate recording systems when connecting with several recorders
simultaneously.
WARNING !
Changes in the configuration of the submenu need to be confirmed with the Apply and Save & Close
buttons.
All rights reserved © NOVUS Security Sp. z o.o.
37
NOVUS DVR SYSTEM - User’s manual ver. 2.0
SYSTEM SETTINGS
Saving to file and restoring from file the DVR system settings.
DVR Settings Backup
The panel allows to save to specified file and restore from the pointed file the
NOVUS DVR SYSTEM settings.
The NOVUS DVR SYSTEM software configuration is saved to the *.bak file
and can be restored from the pointed *.bak file (with saved system
configuration).
Uruchomienie Aplikacji panel:
Auto Startup
The DVR_Main application will be started together with the Windows system
Windows user auto login.
The software automatically log in the pointed Windows user with defined
(in seconds) delay time of starting the DVR_Main application.
This function is particularly used when several Windows users operates on the
single PC and the NOVUS DVR SYSTEM application should start only on
one user account. The delay time allows the system to start services or other
application before the DVR_Main application launch.
Enable Hardware Watchdog Activation of the hardware Watchdog function (requires completing the
connection described in the NOVUS capture card installation manual.
Schedule Auto Reboot
Auto restart schedule of the Windows system.
Startup Even Notification
DVR_Main launch notification.
DVR_Main restart schedule of the Windows system.
Specifies the Windows system restart time in a weekly mode. The picture
illustrates the settings for restarting the system every Sunday at 23:45.
All rights reserved © NOVUS Security Sp. z o.o.
38
NOVUS DVR SYSTEM - User’s manual ver. 2.0
SYSTEM SETTINGS
DVR_Main software launch notification .
Email notification on launching the DVR_Main software .
In order to enter the subject and the content of the e-mail, SMTP Server must
be configured beforehand in E-mail Settings.
Another method of notification about application launch is selected relay
output activation.
Other notification options (General, Presets and Phone) are inactive with
notification on launching the DVR_Main software.
The Log Settings :
System Logs
Saving information on lauching and closing particular program modules
(DVR_Main, DVR_Search, DVR_Settings).
Motion Logs
Saving information on motion detection activation.
Video Loss Logs
Saving information on video loss.
Sensor Logs
Saving information on alarm input (sensor) activation
User Logs
Saving information on logins and logouts
Disk Overwriting Logs
Saving information on disk overwriting
Marking appropriate options allows to select events that will be saved in the system register. Viewing this
register is possible with the help of the LogViewer tool (read more on page 79).
The Screen panel
Initial Screen
Split screen settings (depending on the capture card series and model available
splits are 1,4,6,9,10,13,16,33) and sizes of the initial screen of the DVR_Main
software (Normal, Large, Full - normal, enlarged, full screen).
TV-Out Settings
Split screen settings (only for B-Series capture cards) and sequence time
settings (within the range of 1-10 second) on the CCTV monitor (on the
analogue output of the capture card).
PC Screen
Sequence Interval
Sequence time settings on a PC monitor (within the range of 1-10 seconds)
- concerns the Automatic change of the displayed camera or camera group
function from the level of the main menu of the DVR_Main application.
WARNING !
Split screens on a CCTV monitor are possible to achieve only for B-Series capture cards and, depending
on the model, allow for setting:
- copy of the PC screen, split screen into 1, 4 - NVB-100/16BLV, NVB-200/16BLV capture cards
- copy of the PC screen, split screen into 1,4,9,16 - NVB-100/16B, NVB-200/16B, NVB-200/32B,
NVB-400/32B capture cards.
All rights reserved © NOVUS Security Sp. z o.o.
39
NOVUS DVR SYSTEM - User’s manual ver. 2.0
SYSTEM SETTINGS
The Additional Functions panel:
Sound Recording
Activates sound recording and displays the audio recording control panel.
E-mail Settings
Activates e-mail notification and configures the email account.
Full Disk Notification
Setting the system action once the threshold value of low available disk space is
reached.
Warning on disk failure
Settings of hard disk failure notification.
Allow remote connection
Activates network
configuration panel.
Internal / External CDburning program
Selecting the mode of CD burning - an internal module or an external program
User Log off timeout
Setting the auto log-out delay in minutes (10, 20, 30, 40, 50, 60 or Never). The
system automatically returns to the default user rights. The detailed description
of user rights can be found on page 54.
connections
and
displays
the
remote
connection
Audio recording settings:
The audio panel (only A and B-Series capture cards) allows for selecting the
number of recorded audio channels 1,2 or 4 (when utilizing two sound cards)
and amplification (audio sound level upon entry).
For MPG-Series capture cards the audio panel is unavailable. When recording
with audio only the option Sound Recording should be marked.
Email account configuration for outgoing email messages.
The email account panel allows to specify the authorization method on the
SMTP server:
- Automatically (the software attempts to send the e-mail automatically)
- SMTP without authorization (the SMTP Server does not require
authorization)
- SMTP with authorization and without RSA
- SMTP with authorization and RSA
- SMTP with authorization, RSA and MD5
1
2
The test function helps with the proper choice, as it sends a test message once
the account is configured. Information on a successful email dispatch (1)
proves the proper choice of the SMTP server. Information on an unsuccessful
email dispatch (2) indicates an incorrect SMTP server configuration.
Depending on the chosen method, completing additional fields may be
required - SMTP Server IP address, user and email server password, as well as
e-mail addresses for dispatch and reception.
Settings of hard disk failure notification. The notification method is warning
message or specified system action - sound, relay output activation, sending
email or phone calling. The detailed description about the system default
actions can be found on page 49.)
All rights reserved © NOVUS Security Sp. z o.o.
40
NOVUS DVR SYSTEM - User’s manual ver. 2.0
SYSTEM SETTINGS
Configuration of system actions once the threshold value of low available disk
space is reached.
The threshold value of low available disk space may be supplied in two ways:
- filling the last-but-one empty volume
- specifying the HDD occupation percentage (60 ~ 99 %)
or after a specified period of time specified as a number of recording days
Warning After Days Of or form a specified start date Start From Date, Start
From Time).
The programmed threshold value may concern All Disks or only Current
recorded Disk.
Additionally, the action to be taken once the threshold value has been reached
should be specified, that is Overwrite or Stop Recording. HDD overwrite is
selected by default
In case the programmed threshold value has been reached, the programmed
action will be undertaken - sound, relay output activation, sending an email
message or calling (other options are not active - read more on page 49).
Remote connections configuration.
Supplying the unique Code (max 10 characters) is essential to remotely inform
the DVR_Net net client on alarm events.
The bandwidth used for network connections may be limited to 56kb/s,
128kb/s, 256kb/s, 512kb/s, 1,54Mb/s, 3,36Mb/s, 5,60Mb/s or MAX (without
limitation). Limiting the bandwidth denotes smaller utilization of network
capabilities for network connections and poorer picture quality on client
software. This option is available with A and B capture cards.
Marking the option Remote Notification of Events, specifying the Method
(TCP/IP, Server) and supplying the IP address of the net client (IP Number)
results in informing the DVR_Net net client about the defined alarm events.
The Block IP function enables the list of IP address from which the remote
connections are disabled.
Add - add the new IP to the list of blocked IP addresses
Delete - delete the pointed IP on the list of blocked IP addresses
Modify - edit the pointed IP on the list of blocked IP addresses
All rights reserved © NOVUS Security Sp. z o.o.
41
NOVUS DVR SYSTEM - User’s manual ver. 2.0
CAMERA SETTINGS
5.3. Camera settings
5.3.1 The General submenu
The Camera Setup submenu configures particular video recording channels.
Camera selection
Camera settings
submenu
Basic camera settings
Compression settings
Recording speed
settings
Additional settings
Covert camera settings
Function buttons
Function buttons:
Virtual Keyboard
Enabling the on-screen keyboard
Apply
Applying changes introduced in the menu
Save & Close
Saving changes and closing the submenu
Cancel
Skipping the introduced changes and closing the submenu
The Camera Selection panel:
Settings of the presently configured camera will be copied to all cameras in the
system.
Selecting the camera for configuration.
WARNING !
Once changes into the menu have been entered, these should be confirmed with the Apply and
afterwards Save & Close buttons.
All rights reserved © NOVUS Security Sp. z o.o.
42
NOVUS DVR SYSTEM - User’s manual ver. 2.0
CAMERA SETTINGS
Camera settings submenu :
General settings - resolution, number of frames, sound recording, pre-and postalarm recording, audio recording, video loss.
Graphic schedule for recording and alarm event notification in the weekly and
hourly mode
Picture settings (brightness, contrast, saturation, hue), motion detection and PTZ
settings.
The Basic Camera Settings panel:
Enable Camera
Enabling/disabling a video channel (camera).
Camera Name
Description (name) of the camera that is visible during monitoring and network
connections.
Resolution
Selection of camera resolution - CIF (352x288), 2CIF (704x288) (only cameras
of the B- and MPG-Series) or 4CIF (704x576). Depending on the capture card
variety, altering the one camera resolution may trigger the change in other
cameras served by the same video processing chip - more information can be
found in the NOVUS capture card instructions manual.
WARNING !
It is not possible to disable/enable a camera or to change the recording resolution during video
recording. In order to introduce the settings mentioned above, it is necessary to close the DVR_Main
program and start the DVR_Settings program directly.
The Recording speed settings panel :
Automatic - Average Frame Automatic assigning of the maximal possible (with the given number of active
cameras) number of recorded frames for all cameras.
Rate
Selected Frame Rate
Manual recording speed selection (0,1 ~ 25 kl/s (PAL) or 30 kl/s (NTSC),
separately for the normal and alarm mode.
The alarm recording option is useful only in case of alarm recording (Sensor,
Motion, Sensor+Motion, Normal+Event).
The Covert Camera Settings panel :
Hide camera (PC screen)
Marking an option results in not displaying pictures from a given camera when
conducting monitoring on a PC screen.
Hide on TV-Out (Analog
monitor)
Marking this option disables the display of images from a given camera when
viewing them on a CCTV monitor (analogue output).
Hide for Network
Connections
Marking this option disables the display of images from a given camera when
viewing them via network connection (computer network).
All rights reserved © NOVUS Security Sp. z o.o.
43
NOVUS DVR SYSTEM - User’s manual ver. 2.0
CAMERA SETTINGS
The Compression settings panel:
Compression level selection within the range of 0 to 90. The 0 value (Min)
results in the smallest size of the recorded frame but with the greatest
compression level and poorer image quality. The 90 value (Max) results in the
highest quality picture (lowest compression level) but with the largest frame
size.
Compression Rate
The Additional settings panel:
Sound Channel
Assigning audio from a selected channel to the currently configured camera.
The None option does not assign any audio channel to the given camera - no
audio is recorded. The same audio channel may be assigned to several video
channels.
This option requires prior configuration of the Sound Recording option in the
System menu.
Pre & Post Alarm
Recordings
Selects the number of frames recorded priori to and after an alarm event within
the range of 0 ~ 8 frames (for the pre-alarm) and 0 ~ 199 frames (for postalarm).
This option finds application only when recording in one of the alarm modes
(Sensor, Motion, Sensor + Motion, Normal + Event).
Video Loss
Once the video loss is detected for the configured camera, the notification mode
may be configured - sound, activation of the relay output, moving the PTZ
camera into a selected preset or calling (other options are inactive - read more on
page 49).
Camera Anti-masking
The Anti-masking function allows to define the notification for camera covert
event. The event is detected basing on the selected number of points (1 ~ 10) on
the camera picture screen.
The camera screen view for 10 points covert detection:
Once the camera covert is detected for the configured camera, the notification
mode may be configured - sound, activation of the relay output, moving the
PTZ camera into a selected preset or calling (other options are inactive - read
more on page 49).
All rights reserved © NOVUS Security Sp. z o.o.
44
NOVUS DVR SYSTEM - User’s manual ver. 2.0
CAMERA SETTINGS
5.3.2. The Schedule submenu
Camera selection
The camera setting
submenu
Recording schedule
Alarm event notification
schedule
Function buttons
Function buttons:
Virtual Keyboard
Enabling the on-screen keyboard
Apply
Applying changes introduced in the menu
Save & Close
Saving changes and closing the submenu
Cancel
Skipping the introduced changes and closing the submenu
Panel Camera selection:
Settings of the presently configured camera will be copied to all cameras in the
system.
Selecting the camera for configuration.
WARNING !
Once changes into the menu have been entered, these should be confirmed with the Apply and
afterwards Save & Close buttons.
All rights reserved © NOVUS Security Sp. z o.o.
45
NOVUS DVR SYSTEM - User’s manual ver. 2.0
CAMERA SETTINGS
Camera settings submenu :
General settings—resolution, number of frames, sound recording, pre-and
post-alarm recording, audio recording, video loss.
Graphic schedule for recording and alarm event notification in the weekly and
hourly mode
Picture settings (brightness, contrast, saturation, hue), motion detection and PTZ
settings.
The Recording Schedule panel:
Continuous recording with a fixed number of frames.
Recording only in case a sensor (alarm output) assigned to the camera is
activated. For setting alarm inputs, please read page 52.
Recording in case movement (alternation in image content) is detected.
For movement detection setting, please read page 47.
Only monitoring, images from the camera are not recorded.
Recording may be activated in case of activation of an alarm input assigned to
the given camera, as well as movement detection.
Continuous recording with a fixed number of frames (lower speed) when no
alarm events are detected. In case an alarm input is activated or movement is
detected, alarm recording is activated (higher speed). For setting recording
speed, please read page 43.
Holiday Settings
This function allows to define the days for individual independent from the
general recording schedule.
The Remote Notify Schedule panel:
Informing the network client on alarm events. For setting remote alarm
notification, please read page 41.
Lack of information on alarm events.
All rights reserved © NOVUS Security Sp. z o.o.
46
NOVUS DVR SYSTEM - User’s manual ver. 2.0
CAMERA SETTINGS
5.3.3. The Color & Motion submenu
Camera selection
Camera settings submenu
Motion detection area
settings
Color settings
Motion detection
notification
Detection settings
PTZ camera settings
Function buttons
Function buttons:
Virtual Keyboard
Enabling the on-screen keyboard
Apply
Applying changes introduced in the menu
Save & Close
Saving changes and closing the submenu
Cancel
Skipping the introduced changes and closing the submenu
Panel Camera selection:
Settings of the presently configured camera will be copied to all cameras in the
system
Selecting the camera for configuration.
WARNING !
Once changes into the menu have been entered, these should be confirmed with the Apply and
afterwards Save & Close buttons.
All rights reserved © NOVUS Security Sp. z o.o.
47
NOVUS DVR SYSTEM - User’s manual ver. 2.0
CAMERA SETTINGS
Camera settings submenu:
General settings—resolution, number of frames, sound recording, pre-and
post-alarm recording, audio recording, video loss
Graphic schedule for recording and alarm event notification in the weekly and
hourly mode
Picture settings (brightness, contrast, saturation, hue), motion detection and PTZ
settings.
The Motion detection area settings panel:
Whole Image
Full-screen motion detection - whole area of the camera image is used for
tracing changes in the image.
Selected Area
Motion detection is conducted only in areas selected (marked) by the user.
Add
Defining subsequent motion detection areas.
Delete All
Clearing the areas defined earlier.
Display Detected Area
With the enabled Detection Test option, spots where changes in the image
content have been detected are indicated.
Detection Test
The test mode allows to correctly adjust the extent of motion detection as well
as detection sensitivity and threshold.
The Camera masking panel :
Image erasing
The masked image is erased totally.
Add
Defining subsequent masking areas.
Delete All
Clearing the areas defined earlier.
The Detection settings panel :
Sensitivity
Adjusting the detection sensitivity within the range of 0 ~ 90 - decides how big a
change in the image content must be, so that it is classified as an instance of
motion. The 0 (Min) value results in the lowest sensitivity (a very distinct
change in the pixel color is treated as motion), while the 90 (Max) value denotes
the highest sensitivity (a small change in the pixel color is treated as motion).
Rate
Adjusting the activation threshold within the range of 0 ~ 90 - decides how big
the area of image content change must be to classify it as motion detection.
The 0 (Min) value denotes the smallest threshold value (a very large are of
change in the image content), while the 90 (Max) value denotes the highest
threshold value (a small area of change in the image content).
The Motion Detection Notification panel :
Enable Motion
Notification
Activates the function of notification on motion detection activation.
The Properties button opens the alarm activities panel for defining the
notification mode for motion detection.
WARNING !
The Image erasing option in Camera masking panel is disabled for MPG series capture cards.
All rights reserved © NOVUS Security Sp. z o.o.
48
NOVUS DVR SYSTEM - User’s manual ver. 2.0
CAMERA SETTINGS
Motion detection notification:
- sound signal (Beep - buzzer), utilizing the sound card.
- sound signal using the PC speaker - a soundcard is not required.
- Mark - a red dot in the lower right corner of the camera image
- PopUp - the window with the camera image is displayed in full-screen mode
- TV-Out - the camera image is displayed on the CCTV monitor (analogue
video output) for 20 ~ 60 seconds.
- Second Screen - camera image is displayed on the second PC monitor
(dual monitor work mode). Location of the second monitor in relation to the
first monitor is ascertained by means of two coordinates (X,Y).
- Remote Notification - remote notification of the network client concerning
an event (disregarding the schedule settings) or observing the remote
notification schedule (Use Notify Schedule).
Activation of selected relay outputs (Relay 1 ~ Relay 4) for a specified period
of time (1 ~ 60 seconds).
Sending an email message with a defined Subject and Content
with the possibility of adding a screenshot from the camera in the JPEG format
(Attach image). The number of e-mails informing about the same alarm event
may be limited using the option Interval within the range of 0,5 ~ 10 minutes.
special symbols may be used in the topic and the content of the message:
Symbol
Meaning
$$0
Camera number
$$1
Kind of event
$$2
Date and time
$$3
IP address of the PC
Ordering the PTZ camera (or a group of cameras) to go into a selected preset.
To utilize this function, PTZ settings must be configured (the detailed
description may be read on pages 50 and 104) and appropriate preset must be
programmed beforehand .
All rights reserved © NOVUS Security Sp. z o.o.
49
NOVUS DVR SYSTEM - User’s manual ver. 2.0
CAMERA SETTINGS
Calling a specified phone number and playing back a selected sound file in the
WAV format. Playback time may be set within the range of 20-60 seconds.
The number of phone calls informing about the same alarm event may be
limited using the Interval option within the range of 20 ~ 60 seconds. Lack of
connection with Number 1 starts the dialing of Number 2 and afterwards,
Number 3. The sound file may be selected with the help of the Browse button,
while playing back of a file selected earlier may be started with the Play
button. The sound file format utilized by the application is Mono, PCM, 16
bits, 8 kHz.
Recording WAV files in the Windows
sound recording application:
Start -> Programs -> Accessories ->
-> Entertainment -> Sound Recorder
And afterwards:
Plik -> Proprties -> Convert now ...
The PTZ camera settings panel:
Use PTZ Camera control
Activates the function of PTZ control. The Properties button pens the panel for
setting the PTZ cameras and the COM port
Proper configuration of a PTZ camera requires setting Protocol, Camera ID
transmission settings: COM port, Speed, Data Bit - number of bits, Parity and
Stop Bit. Additionally, speed for horizontal and vertical cameras movement
(P/T), zoom and focus (F/Z), as well as the AutoPan (AP) function may be set.
The Test button opens the PTZ control panel that facilitates advanced
functions of PTZ control.
Transmission settings (Protocol, Camera ID, Parity, Data, Stop, COM Port
and Baud Rate) are automatically copied from the previous panel, but there is
still a possibility to change them, once the option Manual settings is marked.
Opening a particular COM port of the PC computer with the Open button
allows for controlling PTZ cameras. Pressing Close button closes the COM
port for the application.
The Menu Open / Close buttons allow to enter and leave the PTZ camera
menu. The buttons Tour Set and Move program and enable pattern. Presets, 0
~ 9, Set, Move buttons program end enable presets (the program utilizes 2
digits - up to 99 presets). Additionally, the Clear button clears the window for
entering presets. The Zoom In, Zoom Out, Focus In, Focus Out buttons
control the zoom and focus functions. PTZ SPEED sets the speeds of: P/T pan and tilt; F/Z - zoom and focus; A/P - the AutoPan function; P.S movement speed once a preset is called. The Scan START and STOP buttons
enable and disable auto scans. The A1 ~A5 buttons are utilized with special
functions in various ways depending on camera protocol. The window for
entering commands (Manual command) allows for entering commands in the
hexadecimal code manually. The arrow buttons control camera movement.
All rights reserved © NOVUS Security Sp. z o.o.
50
NOVUS DVR SYSTEM - User’s manual ver. 2.0
CAMERA SETTINGS
PTZ Control with the mouse
When PTZ control mode is enabled the user can control the camera using the standard panel or the mouse.
To control the camera movement you have to click on the selected camera with the left mouse button and hold
it pressed then move the cursor to the specified picture area to control the PTZ camera movement. To zoom
in / zoom out click right mouse button, hold it pressed and move up for zoom in, move down for zoom out.
The Color control panel :
Brightness
Adjusts the brightness for the selected camera within the range of 0 ~ 255.
Contrast
Adjusts the contrast for the selected camera within the range of 0 ~ 255.
Saturation
Adjusts the saturation for the selected camera within the range of 0 ~ 255.
Hue
Adjusts the shade for the selected camera within the range of 0 ~ 255.
Default
Restores default color settings
All rights reserved © NOVUS Security Sp. z o.o.
51
NOVUS DVR SYSTEM - User’s manual ver. 2.0
SENSOR SETTINGS
5.4. Sensor settings
Alarm input selection
Alarm input (sensor)
settings
Function buttons
Function buttons:
Virtual Keyboard
Enabling the on-screen keyboard
Apply
Applying changes introduced in the menu
Save & Close
Saving changes and closing the submenu
Cancel
Skipping the introduced changes and closing the submenu
The Alarm input selection panel :
Selecting the camera for configuration.
WARNING !
Once changes into the menu have been entered, these should be confirmed with the Apply and
afterwards Save & Close buttons.
All rights reserved © NOVUS Security Sp. z o.o.
52
NOVUS DVR SYSTEM - User’s manual ver. 2.0
SENSOR SETTINGS
The Alarm input (sensor) settings panel:
Sensor Enable
Activates the selected alarm input (sensor).
Sensor Location
Assigns a name to the alarm input that is displayed in system logs later.
Sensor Type
Sensor variety selection: N.O. (normally open, closing the circuit is considered
as an alarm) or N.C (normally closed, breaking the circuit is considered as an
alarm).
Related Cameras
Assigning an alarm input with to a camera or a group of cameras. If the
selected cameras are set in the Schedule to Sensor, Motion+Sensor or
Normal+Event recording mode, recording will start once a sensor is activated.
Check Time
Sensor activation period can be set within the range of 0 ~ 3000 ms.
This allows to eliminate short impulses and noises on the alarm input that can
trigger a false alarm.
Emergency Notification
Motion detection notification with activated Remote Notification of Events
function or with the help of e-mail messages.
Sensor Activation
Notification
Alarm event notification panel - selection of notification options is described on
page 44.
All rights reserved © NOVUS Security Sp. z o.o.
53
NOVUS DVR SYSTEM - User’s manual ver. 2.0
BACKUP COPY SETTINGS
5.5. Backup copy Settings
Backup copy settings
Function buttons
Function buttons :
Virtual Keyboard
Enabling the on-screen keyboard
Apply
Applying changes introduced in the menu
Save & Close
Saving changes and closing the submenu
Cancel
Skipping the introduced changes and closing the submenu
WARNING !
Once changes into the menu have been entered, these should be confirmed with the Apply and
afterwards Save & Close buttons.
All rights reserved © NOVUS Security Sp. z o.o.
54
NOVUS DVR SYSTEM - User’s manual ver. 2.0
BACKUP COPY SETTINGS
The Backup copy settings panel:
Select Weekdays
Selection of week days when the backup copy is fabricated.
Select Time
Selection of the hour and the minute when the backup copy fabrication process
should start.
Backup Method
Data copying method selection:
Fast (volumes copying) - copies all cameras without an option of selection,
copied are complete volumes with the index files - owing to this, the whole
process takes little time.
Precise (selected cameras) - copying the images only from selected cameras,
selecting the material for copying and creating new volumes - this process is far
more time consuming.
Backup Device Path
Selecting the HDD, the catalogue or the network localization where the backup
copy will be created.
Limit backup size to
The backup copy files are automatically divided into catalogues with data of
specified size (in MB). The selected value may be for example 650MB and the
material is divided so that it may be burned on CD-ROMs.
Backup Schedule Table
Table containing 20 units defining the backup copy fabrication.
The Add, Modify and Delete buttons add, alter or delete particular units in the
schedule table.
Autostart Schedule Backup
Starts the backup copy fabrication process at a specified hour. Marking this
option is necessary for a periodically created backup copy.
Overwrite Backup Data
when Disk is filled
When this option is marked and the whole HDD space is used up by the backup
copy data, the software will overwrite older data.
WARNING !
Creating the backup copy has a progressive character - only the new data, recorded after the backup
copy has been fabricated, will be copied. For the first time, the full copy of all data stored on the HDD is
done.
All rights reserved © NOVUS Security Sp. z o.o.
55
NOVUS DVR SYSTEM - User’s manual ver. 2.0
USER SETTINGS
5.6. User settings
User settings
Function keys
Function keys:
Virtual Keyboard
Enabling the on-screen keyboard
Apply
Applying changes introduced in the menu
Save & Close
Saving changes and closing the submenu
Cancel
Skipping the introduced changes and closing the submenu
WARNING !
Once changes into the menu have been entered, these should be confirmed with the Apply and
afterwards Save & Close buttons.
All rights reserved © NOVUS Security Sp. z o.o.
56
NOVUS DVR SYSTEM - User’s manual ver. 2.0
USER SETTINGS
The User settings panel:
User Data
Registering a user in the system - Username, Password and Confirm Password
confirmation. The edited user may be a Default User, (so one who is logged
into the system by default upon the start of the program. Only one default user
may be defined in the system by default.
User Level
Selection of three pre-defined access levels - Guest - an account with the most
limited rights, User - an account with larger extent of rights and Admin - an
account with the widest rights.
Additionally, rights of each user may be limited using the User Permissions
panel Starting with the Administrator level, it is possible to freely modify user
rights.
User Permissions
These settings allow for a detailed adjustment of user rights in relation to:
system configuration (Settings), backup copy fabrication (Backup), PTZ
control and alternation of color settings (Control PTZ camera/Image settings),
keyboard lock and application minimalization authority (Keyboard Access),
remote connections (Network Access), access only to selected cameras (Related
Cameras), remote event notification (Remote Notification), playing back the
recorded video material (Search) and closing the system (System Shutdown).
Additionally, for the Remote Notification and Network Access options, the
time period before automatic disconnection of a network client (Timeout
(Min)) in minutes can be set.
Users List
The table of users and their rights defined in the system may contain up to 20
users: the Add, Modify and Delete buttons add, alter or delete particular units
from the user table.
WARNING !
The keyboard lock option blocks the Windows button key on the PC keyboard and additionally, the
combinations of keys, such as ALT+CTRL+DEL or ALT+TAB. Keyboard lock also disables the
minimalization of the DVR_Main application.
All rights reserved © NOVUS Security Sp. z o.o.
57
NOVUS DVR SYSTEM - User’s manual ver. 2.0
TEXT-IN FEATURE
5.7. Text-in feature
Text-in feature allows for the integration of the video recording system with systems generating data in ASCII /
XML (cash register, access control, electronic ATM devices etc.). The number of devices connected to
a computer with the capture card is limited to the number of channels in the system (number of cameras
connected to a particular card type) and the possibility of their connection.
Text messages are combined with a specific camera or camera group - these will placed over the images from
the camera and will become visible in live view, and in the playback mode. Additionally, if text is saved in a
data base, there will appear the possibility to search the video archive according to the defined keywords. Such
an option facilitates swift identification of the person using the access control card or finding images from the
camera securing the cash point at the moment specific product was sold.
Text data generated by an external device may be transmitted through the RS-232 interface or through the LAN
network. Connection through the RS-232 requires each device to be connected via a separate COM port with
the help of a standard transmission cable. With a greater number of devices, special card for enhancing the
number of COM ports in the computer is required. In case of LAN network connection, the only limitation is
the necessity to define a separate network port for each device. As for the devices generating the texts, network
transmission through a built-in LAN port or an RS-232 to LAN converter is required. The range of each COM
connection is 12m maximally, while the range of LAN connections is much bigger - practically limited only by
the capacity of the LAN network.
Video
Data - RS232 or LAN
All rights reserved © NOVUS Security Sp. z o.o.
58
NOVUS DVR SYSTEM - User’s manual ver. 2.0
TEXT-IN FEATURE
5.7.1. The Device submenu
POS settings submenu
POS devices
Function buttons
Function keys:
Apply
Applying changes entered in the menu.
Save & Close
Saving the entered changes and closing the submenu.
Cancel
Skipping changes and closing the submenu.
WARNING !
Once changes into the menu have been entered, these should be confirmed with the Apply and
afterwards Save & Close buttons.
All rights reserved © NOVUS Security Sp. z o.o.
59
NOVUS DVR SYSTEM - User’s manual ver. 2.0
TEXT-IN FEATURE
POS Devices panel
The list of devices generating ASCII/XML data, the protocols of which have
already been implemented. The position Undefined allows to utilize devices
without defined special signs (end-of-the-line, end-of-transaction etc.).
It is mostly recommended for testing or creating one’s own device protocols.
A new protocol of a device generating ASCII codes can be addend with the
New button and a protocol that is unused can be deleted with the help of the
Delete button. The >> button adds the highlighted protocol to the selected
(Mapped) device list.
Device
Click twice on the selected device or select the device from the list and click on
the Modify button to open the additional device configuration panel.
The Name allows to change the device description on the device list.
The XML Parsing option shows only the information that the XML device
defined in the protocol file has parsing option enabled.
Delete double lines - deletes the repeated data (lines) from the data base.
Trim spaces from right - deletes the repeated signs (spaces) from the right of
the text line.
Trim spaces from left - deletes the repeated signs (spaces) from the left of the
text line.
XML device - the device is defined as a XML data generating. By default the
devices are defined as ASCII code generating.
Number of sub devices - in case of a group of devices managed by one master
device (e.g. some access control systems) the use have to define the number of
sub devices.
List of selected devices generating ASCII/XML data. Only devices addend to
this list are later available for further configuration of the application. A device
can be removed from this list with the Delete button.
Mapped
POS settings submenu panel
Device
This submenu allows for choosing the devices (device protocols) generating the
ASCII/XML data.
Data
This submenu allows for creating a new protocol or modifying an existing one
for devices generating the ASCII/XML data.
Database
This submenu allows for configuring the string of the received signs (ASCII/
XML data) in an external data base. An external database is essential in
searching the archive according to key signs (words).
Search
This submenu allows to configure user filters for searching the archive
according to key signs (words).
XML
Additional settings for XML generating devices only.
Connecting
This submenu allows for configuring the on-screen display of text data
(position, color, font) and transmission through COM and LAN ports.
All rights reserved © NOVUS Security Sp. z o.o.
60
NOVUS DVR SYSTEM - User’s manual ver. 2.0
TEXT-IN FEATURE
5.7.2. Data submenu
POS settings submenu
POS devices
Function keys
Function keys:
Apply
Applying changes entered in the menu.
Save & Close
Saving the entered changes and closing the submenu.
Cancel
Skipping the changes and closing the submenu.
WARNING !
Once changes into the menu have been entered, these should be confirmed with the Apply and
afterwards Save & Close buttons.
.
All rights reserved © NOVUS Security Sp. z o.o.
61
NOVUS DVR SYSTEM - User’s manual ver. 2.0
TEXT-IN FEATURE
POS devices panel:
Device
Selecting the device (device protocol) from the Mapped list
Line break
Selecting the end-of-the-line sign for the chosen protocol. Appearance of this
sign (or a string of signs) automatically moves the text to another line and
facilitates displaying following signs in the new line.
Transaction break
Selecting the end-of-transaction sign for the chosen protocol. Appearance of
this sign (or a string of signs) automatically facilitates displaying from the first
line (if displaying whole transactions is enabled).
Include line with a string
Selecting a sign (or a string of signs) that facilitates the display of the complete
line that contains it. This selection is superior to Exclude line with a string.
Exclude line with a string
Selecting a sign (or a string of signs) that disables the display of the complete
line that contains it. This choice is subordinate to Include line with a string.
Invalid string or character
Selecting a sign that will not be displayed.
Replace string or character
Selecting a sign (or a string of signs) that will be substituted by another sign
(or a string of signs).
Event
Selecting an alarm string of signs the appearance of which will trigger a certain
reaction of the system - sound, activation of the relay output, moving the PTZ
camera into a selected preset or calling (read more on page 49).
Additional string
Implementing a sign (or a string of signs) in each displayed line.
Defining special signs - concerns the following menu entries: Line break, Transaction break, Include line
with a string, Exclude line with a string, Invalid string or character and Additional string.
List of defined special signs.
With the help of buttons: New, Edit and Delete it is possible to add, modify or
delete particular positions from the list. Upon attempting to add or modify
signs, a dedicated panel appears that allows to define the data type, sign
location, comparison, shift or definition of the sign (or a string of signs).
The definition of the special sign encompasses Data Type (hex decimal data or
ASCII codes), location of the sign within the line (None, Start, End), Offset
(Shift measured in the number of signs), Operation (=, <, <=, ~, =>, >),
Length (measured in the number of signs) and Data - a sign or a string of
signs.
All rights reserved © NOVUS Security Sp. z o.o.
62
NOVUS DVR SYSTEM - User’s manual ver. 2.0
TEXT-IN FEATURE
Defining special signs - concerns the definition Replace string or character.
List of defined positions of special signs
With the help of New, Edit and Delete buttons it is possible to add, modify or
delete items from the list. Upon attempting to add or modify and entry,
a dedicated panel appears that allows to define old (to be exchanged) and new
(exchanging) data.
Definition of a special sign encompasses Data Type (hexadecimal data
or ASCII codes), a sign (a string of signs) to be exchanged (Old data) and the
exchanging data (New data).
Defining special signs - concerns the Event definition.
List of defined alarm signs
With the help of New, Edit and Delete buttons it is possible to add, modify or
delete items from the list. Upon attempting to add or modify and entry,
a dedicated panel appears that allows to define the alarm sign or alarm sign
string.
Definition of an alarm sign encompasses Data Type (hexadecimal data or
ASCII codes), an alarm sign or a string of signs (New data) and notification
mode - sound, activation of the relay output, moving the PTZ
camera into a selected preset or calling (read more on page 49).
All rights reserved © NOVUS Security Sp. z o.o.
63
NOVUS DVR SYSTEM - User’s manual ver. 2.0
TEXT-IN FEATURE
5.7.3. The Database submenu
POS settings submenu
Settings for coupling the
device with a data base
Data base settings
Function keys
Function keys:
Apply
Applying changes entered in the menu.
Save & Close
Saving the entered changes and closing the submenu.
Cancel
Quitting entering changes and closing the submenu.
WARNING !
Once changes into the menu have been entered, these should be confirmed with the Apply and
afterwards Save & Close buttons.
All rights reserved © NOVUS Security Sp. z o.o.
64
NOVUS DVR SYSTEM - User’s manual ver. 2.0
TEXT-IN FEATURE
The Device panel:
Device
Choosing the device (device protocol) from the Mapped list
Select Database
Selection of the data base format: MS Access (storing text data in the
MS Access format - installation of MS Access software is not required) or
SQL Server / SQL Server 2005 - storing data to an external MS SQL Server
(Microsoft SQL Server is required).
The Data base settings panel for storing data in the MS Access format:
Database path
Path - selecting the HDD and the path to the data base in the MS Access
format.
Create Database
Creating a database under the given name.
Test Database
Testing connection with the created database.
Compact Database
Correctness test and potential file repair of the data base.
The Data base settings panel for storing data in the MS SQL-Server database:
Server
Server name (domain or IP address) of the computer with the installed
Microsoft SQL Server.
DB Name
Database name on the MS SQL Server where text data generated by the
configured equipment will be stored.
User
User in the MS SQL Server database under whose permission the text data will
be stored.
Password
Password in the MS SQL Server of the user under whose permission the text
data will be stored.
Create Database
Creating a new database on the MS SQL Server.
Test Database
Testing connection with the newly created database.
All rights reserved © NOVUS Security Sp. z o.o.
65
NOVUS DVR SYSTEM - User’s manual ver. 2.0
TEXT-IN FEATURE
5.7.4. The Search submenu
POS settings submenu
Settings for coupling
the device with a defined
text filters
Text filters settings
Function keys
Function keys:
Apply
Applying changes entered in the menu.
Save & Close
Saving the entered changes and closing the submenu.
Cancel
Quitting entering changes and closing the submenu.
WARNING !
Once changes into the menu have been entered, these should be confirmed with the Apply and
afterwards Save & Close buttons.
All rights reserved © NOVUS Security Sp. z o.o.
66
NOVUS DVR SYSTEM - User’s manual ver. 2.0
TEXT-IN FEATURE
The Device panel:
Choosing the device (device protocol) from the Mapped list
Device
The Text filter settings panel:
New
Add new text filer to the list of filters coupled with the selected device.
Modify
Edit selected filter from the list of filters coupled with the selected device.
Delete
Delete selected filter from the list of filters coupled with the selected device.
Defining the text filers:
Item Name - the description of the newly defined text filter
First Check - select the previously defined text filter to make a cascade of
a few text filters.
Text / Validate - Validating if the defined text line starts or ends with the
character or number defined as a Keyword.
Text / Keyword - character or number of which the analyzed line have to start
or ends.
Text / No Word - character or number of which the analyzed line have not
contains.
XML Device / Element - this option is enabled only for XML device - the
XML data element
XML Device / Attribute - this option is enabled only for XML device - the
XML data element attribute.
User Table / Table - this option is enabled only for XML device - the defined
User Table selection.
User Table / Field - this option is enabled only for XML device - the defined
User Table field selection.
Treat as Number - Selecting the string (first or last) to be treated as a number.
Only the ASCII codes treated as number can be used to search in the defined
value range. The XML data does not require this option.
Pre - Defined Value - the default value for the search data.
All rights reserved © NOVUS Security Sp. z o.o.
67
NOVUS DVR SYSTEM - User’s manual ver. 2.0
TEXT-IN FEATURE
TEXT –IN
5.7.4. The XML submenu
POS settings submenu
Settings for coupling
the device with a defined
text filters
XML data analyze
defining - parsing
or User Table
Function keys
Apply
Applying changes entered in the menu.
Save & Close
Saving the entered changes and closing the submenu.
Cancel
Quitting entering changes and closing the submenu.
Function keys:
WARNING !
Once changes into the menu have been entered, these should be confirmed with the Apply and
afterwards Save & Close buttons.
All rights reserved © NOVUS Security Sp. z o.o.
68
NOVUS DVR SYSTEM - User’s manual ver. 2.0
TEXT-IN FEATURE
TEXT –IN
The Device panel:
Device
Choosing the device (device protocol) from the Mapped list
The Parsing panel:
Browse
Select the XSL transformation file. This file is used for selecting the fields to
display from the XML data (XML parsing). Parsing is must for XML data
generating devices.
Validate
Validating the correctness of the used XSL transformation file.
The Database panel:
Database
Data base XSL transformation. If this option is not enabled it operates
identically as for parsing.
Browse
Select the XSL transformation file.
Validate
Validating the correctness of the used XSL transformation file.
User Defined Table
Allows the user to define the User Table from the transformed XML data for
easier and faster searching.
Make
Make a new User Table.
Defining the User Table:
Add Element - add the new table element
Delete Element - delete selected table element
Create - creating the User Table in the data base
Test - validating the table correctness
Close - ends the creating table process
Example of created User Table:
---------- Data formatted by Parsing ---------<html>
<Transaction>...</Transaction>
<Markup>...</Markup>
<Parameter="..." Value="...">
</html>
All rights reserved © NOVUS Security Sp. z o.o.
69
NOVUS DVR SYSTEM - User’s manual ver. 2.0
TEXT-IN FEATURE
5.7.4. The Connecting submenu
POS settings submenu
Transmission port
selection and display
settings panel
Transmission and display
settings
Function keys
Function keys :
Apply
Applying changes entered in the menu.
Save & Close
Saving the entered changes and closing the submenu.
Cancel
Quitting entering changes and closing the submenu.
WARNING !
Once changes into the menu have been entered, these should be confirmed with the Apply and
afterwards Save & Close buttons.
All rights reserved © NOVUS Security Sp. z o.o.
70
NOVUS DVR SYSTEM - User’s manual ver. 2.0
TEXT-IN FEATURE
The Transmission port selection and display settings panel :
COM Setup
Selecting the COM port from among the ports available in the given computer.
LAN Setup
Selecting the LAN port - the list of available net connections.
Display Setup
List of cameras with display settings.
The Transmission and display settings panel for RS-232 (COM) transmission:
Device
Selecting the device (device protocol) form the Mapped list
Device ID
The range of ID used for sub devices managed by the master device (some
access control systems).
Speed
Selecting data transmission speed from the device that generates the ASCII /
XML data within the range of 2400 ~ 921600 kb/s
Data Bit
Quantity of bits per word (within the range of 5 ~ 8.
Parity
Parity control - none (None), parity (Even), imparity bit (Odd), the last bit
equal to 1 (Mark), the last bit equal to 0 (Space).
Stop Bit
Number of bits denoting transmission stop - 1, 1.5 or 2
Flow Control
Flow control - lack (None), hardware (Hardware) or software (Xon/Xoff).
Test data capturing
Text data reception test - displays ASCII/XML data generated by the device
connected through the selected COM port.
The Transmission and display settings panel for LAN transmission:
Device
Selecting the device (device protocol) form the Mapped list
Device ID
The range of ID used for sub devices managed by the master device (some
access control systems).
Protocol
Selecting the transport protocol (TCP Server, TCP Client or UDP), utilized by
the device that generates text data. The TCP Client option is used only for
specific systems (i.e. access control systems), in case of other systems TCP
Server option should be used.
Port
Selecting the port within the range of 0 to 65535. It is not recommended to use
„generally known ports” within the range of 0 to 1023, assigned to standard
network services).
Address
IP address of the device generating the ASCII / XML data for the TCP Client
mode.
Test data capturing
Text data reception test - displays ASCII / XML data generated by the device
connected through the selected LAN port.
All rights reserved © NOVUS Security Sp. z o.o.
71
NOVUS DVR SYSTEM - User’s manual ver. 2.0
TEXT-IN FEATURE
WARNING !
Each device that generates the ASCII / XML data and transmits them via the Ethernet (LAN) network
must possess a unique port number.
For TCP Server mode the software scans the data from the given port and assigns the data sent to this
port with a given camera (camera group) and displays the data on the screen. The device transmitting
the ASCII / XML data via Ethernet (or via the RS-232 -> Ethernet converter) should facilitate the
selection of the IP address and the computer port number.
For TCP Client mode the software support with the ASCII / XML data generating devices that require
operation in client mode (require initiating the connection by the client) - this option is used only for
specific access control systems.
The Transmission and display settings panel for particular cameras:
Connection Type
Select the connection type (COM or LAN) for the ASCII / XML generating
device coupled with the defined camera.
Device ID
Select the device ID (for specific access control systems only).
Sub device ID
Select the sub device ID (for specific access control systems only).
Text Font
Selecting the font, its size and color, used for text data display. Once the Select
button appears, the font selection submenu appears.
This submenu allows to select the font from among all Windows fonts), its
style, size, additional effects, color and script (custom characters).
In the Sample window it is possible to view the example of the selected font
and custom characters.
WARNING !
Font size should be additionally checked by viewing the images recorded form the camera assigned to
the configured device. In playback mode, the font size is also influenced by the resolution of the
recorded material, for example: CIF resolution (352x288) enlarges the font.
Text Position
Shifting the string of ASCII / XML signs horizontally within the range of 0 to
255. 0 denotes the default text position - top left corner of camera picture
- while the number 255 denotes its the lower left corner.
Display Time
Display duration (in milliseconds - ms) of each text line.
Display Time
Displaying complete transactions (By Transactions) - the software displays one
line after another until the end-of-transaction sign appears or always displays
a set number of lines (Lines).
Overlay mode
Application of a special display mode (Overlay mode) for displaying text data
required by some graphic cards. The possible options are Active - the overlay
mode is on, None - the overlay mode is off and Hidden for hiding the text data
for live monitoring, however the text data are still visible during the playback.
All rights reserved © NOVUS Security Sp. z o.o.
72
NOVUS DVR SYSTEM - User’s manual ver. 2.0
DVR SEARCH
6. Recorded video playback - DVR_Search program
The DVR_Search program allows the user to playback the recorded the recorded video material. To start this
application, the SEARCH button on the main panel of the DVR_Main application must be pressed.
Alternatively, one may use the icon DVR Serach directly from the Windows desktop shortcut.
The main DVR_Search screen is presented below
Main window
- played back images
from cameras
Minimizing
the application
Function keys
Screen division
setup panel
Playback control
buttons
Resolution of the
presently played back
camera
Calendar/Date and time
panel
Calendar/Date and time
switch
Time and camera
selection panel
Additional function
button panel
All rights reserved © NOVUS Security Sp. z o.o.
73
NOVUS DVR SYSTEM - User’s manual ver. 2.0
DVR_SEARCH
Calendar/Date and time panel:
Display the current date in the following format: YYYY-MM-DD and the time
as HH:MM:SS
Additionally, information on the number of the played back camera, recording
mode, compression algorithm and playback mode (Single - Search - playing
back images from a single camera - or Multi - Search - playing back images
from many cameras in screen division) is displayed.
Data - Calendar/Date and time switch
Switches the monthly calendar for the Date/Time panel. In the calendar,
the days marked in red are those during which some images were recorded.
The Date / Time panel is available once the camera and playback time, and
allows access to such information as: recording and playback mode,
compression algorithm and the exact recording time.
Time and camera selection panel
The panel allows to select a camera and a specific time to precisely locate the
sought after recording. Camera selection is possible with ◄ i ► buttons that
change the presently observed quad picture for another 4 cameras.
Bigger blocks (color indicates the recording mode - see page 45) denote the
hours (0-24) when recording took place. Smaller blocks show individual
minutes (0-60).
Buttons for playback with audio and for closing the DVR_Search application.
Listening to the recorded audio stream is possible after pressing the button
with the loudspeaker symbol twice. Audio recording requires proper audio
connections described in the Capture Card manual. Audio recording
configuration is described on page 35.
The Go to button opens an additional panel allowing for moving the playback
to an exactly specified time and camera.
In order to move to a specific recording, it is necessary to enter the date
- Year, Month and Day, the time - Hour, Minute and Second and the Camera
number. Moving to the selected fragment of the recording must be confirmed
by pressing the Go to button. The Close button ends the operation of the
module.
All rights reserved © NOVUS Security Sp. z o.o.
74
NOVUS DVR SYSTEM - User’s manual ver. 2.0
DVR_SEARCH
The List button shows spots saved when searching through the archive. The
button
adds the presently played back image to the saved list.
The list of saved spots includes the spot number, the camera number and Date
and Time of the recording.
Moving to one of the saved spots requires pressing the Go to button, the Delete
button deletes a spot from the list, and the Close button closes the panel.
Information on the resolution of the camera that has recorded the presently
played back material. Possible values are CIF (352 x 288), 2CIF (704 x 288) only B and MPG series cameras - and 4CIF (704 x 576).
Playback button panel
Allows for playing back the recorded material with standard speed forward
▐▐► and backward ◄▌▌, frame-by-frame playback forward ►▌ and backward
▐◄ and for playing back with adjusted speed (0 to 10) forward ►► and
backward ◄◄.
Screen division selection buttons. Available divisions are 1,4,9 and 16.
Clicking on the 4 or 9 division button twice opens the camera selection panel,
clicking on the 16 division button changes the first 16 displayed cameras
(1-16) for the second 16 displayed cameras (17-32). This option is available
with 32 channel capture cards.
The selection panel facilitates easy selection of cameras to be displayed within
a particular screen division. After clicking on a selected field it is possible to
select a camera from that we want to play back the image.
The selected division is confirmed with the Ok button. Return to default settings is possible with the Default button. The Cancel button closes the panel.
Selecting the cameras is possible only in the 4 and 9 division.
Enlarging/Minimizing the camera image screen.
All rights reserved © NOVUS Security Sp. z o.o.
75
NOVUS DVR SYSTEM - User’s manual ver. 2.0
DVR_SEARCH
Enabling/disabling the display of text data within the played back images.
This concerns information on time and camera number as well as the received
text data (POS devices, access control, ATM machines).
DVR_Search minimizing button.
Search allows the user to come back to the standard playback mode.
Image Tool opens a tool panel that allows to sharpen and enlarge the picture,
among other things.
Sharpen and Soften buttons sharpen or blur the picture, while the B&W button
changes the color picture into black and white. Original reinstates the original
picture and Zoom I/O allows to select and enlarge any fragment of the picture.
The Cancel button cancels the last executed operation.
Smart Search starts the Smart_Search software.
Save JPG saves a frame from the current camera as a JPEG file.
Save AVI saves recordings from the current camera as a AVI, MP4 or
MP4+EXE (MP4 with a player imbedded) files.
Video recording export panel allows the user to specifically set the start (Start
Time) and stop (End Time) time of the fragment to be exported - Year, Month,
Day Hour, Minute, Second and the Camera to export the images from the
camera (or a group of cameras - in that case an appropriate number of files will
be created), the file path (Save Directory) and the file Format (AVI, MP4 or
MP4+EXE).
The Burn AVI files on the CD option facilitates the saving of the created files
onto the CD-ROM. The Message window displays software communicates
generated during operation.
The Start button engages the export operation, while the Stop button
disengages it. The Close button closes the module.
WARNING !
In order to secure data integrity, AVI files are not subjected to
recompression (these files contain uncompressed video material) and their
size may be significant.
In order to export bigger amounts of data, MP4 or MP4+EXE formats are
recommended, or a backup copy may be fabricated (see page 54 and 82).
Depending on the settings in the System submenu of the DVR_Settings
program (see page 37), the Burn CD button starts a an external program or an
internal module of the DVR SYSTEM application for recording CD-ROMs.
All rights reserved © NOVUS Security Sp. z o.o.
76
NOVUS DVR SYSTEM - User’s manual ver. 2.0
DVR_SEARCH
The internal module for CD-ROM burning displays info on a detected
CD-ROM drive, a list of files and catalogues recorded on the CD-ROM and
the size of free space available on it. The Add file and Add folder buttons
facilitate the addition of files and catalogues to a created compilation.
The Delete button removes the marked element form the list. Refresh
re-calculates the free space available, while Burn CD starts the recording
process. Exit closes the module.
Print Image prints currently played back images.
Size of the printed picture - Big, Medium or Little.
The Mode Select button selects the image display mode: Common Search,
Panorama Search or Icon Search.
Image display mode selection - standard (Common Search) - with any screen
divisions, panorama (Panorama Search) presenting in a 16 window screen
division consecutive frames from the selected camera, and Icon Search in that
the image from a selected camera is presented in consecutive close-ups in a 1
hour, 10 minutes or 1 minute division.
WARNING !
For 1 screen division right mouse button click on the played back camera picture enables the 2X digital
zoom feature. Another right mouse button click enlarges the zoom ratio to 3X. Third right mouse button
click on the picture restores the original picture size. The clicking area causes the proper part of the
camera image selection. The digital zoom ratio is displayed in right upper corner.
WARNING !
The built-in CD burning module requires the Windows XP or Widows Vista system. The internal
module is not operational with Windows 2000.
All rights reserved © NOVUS Security Sp. z o.o.
77
NOVUS DVR SYSTEM - User’s manual ver. 2.0
DVR_SEARCH
The Panorama Search view:
Each consecutive frame is displayed in a new window, so the user can easily compare 16 frames.
Icon Search view :
Images closing up to the designated moment (24 hours, 10 minutes, 1 minute until full screen) help to observe
changes in the content of images and quickly find the desired moment. Clicking with the left mouse button on a
chosen image takes the user to a more detailed time span. Clicking on the right mouse button takes the user
back to a higher (more general) time span.
24 hour mode - each window shows the first
recorded image from each hour (0 to 24)
10 minute mode - each window presents the
1st image recorded every 10 minute within a
given hour.
1 minute mode - each window shows the 1st image
recorded each minute within the selected 10
minutes.
The sought-after image
All rights reserved © NOVUS Security Sp. z o.o.
78
NOVUS DVR SYSTEM - User’s manual ver. 2.0
SMART_SEARCH
7. Playing back the recorded material - the Smart_Search program
The Smart_Search facilitates the playback of the recorded video material found on the basis of event search or
text-in search. (text strings from devices generating ASCII / XML data - POS devices, access control ATM
machines). To start the application use the SMART SEARCH button on the main panel of the DVR_Main
program or SMART SEARCH on the function panel of the DVR_Search program.
The main screen of the Smart_Search program is presented below
Main window
- played back images
Search mode
selection panel
Search buttons
Playback panel
Function buttons
Event list
Search progress bar
All rights reserved © NOVUS Security Sp. z o.o.
79
NOVUS DVR SYSTEM - User’s manual ver. 2.0
SMART_SEARCH
Event search settings panel allows the user to define the search scope within
the time range defined by the start (From) and end (To) criteria - year, month,
day, hour, minute and second. It also enables the selection of the cameras by
which the image was originally recorded and the Rate and Sensitivity
parameters for event detection. Additionally, with the help of a PC Mouse we
can mark the area within the picture from the camera to be analyzed.
By default, the complete image is analyzed.
Text-in search settings. With this panel the user can define the extent of search
within the time period defined from start (From) to finish (To) by giving the
year, day, hour, minute and second and by selecting the source Camera, with
this the text data from the text generating is combined. The last factor to
specify are the conditions (Filters) of searching. The Basic Search condition
shows all the signs received within the specified time period or only signs
similar to the entered template. Additional text filers defining - see page 66.
The Clear All button deletes all the search areas specified earlier. The Search
button starts analyzing/searching data, while Stop ends this operation.
The playback panel shows the number of sought-out events meeting the search
criteria and allows their viewing with the help of playback buttons :
forward - ►, backward - ◄ and stop - █.
During playback we can Skip frames within the range of 0 to 10, in order to
increase the playback speed with a large number of found events.
The found image may be saved (Save JPG) or printed (Print JPG) in the JPEG
format, with the help of appropriate buttons.
The Add to list button adds the found image to the list of saved images
(see page 75). The Close button closes the application.
The Progress bar graphically illustrates the search action according to the
defined criteria.
The list of events found in the event search mode includes information on the
event number (Nr), the Date and Time plus the Cameras number that is the
source of the analyzed image. After clicking twice on a selected event the
playback and saving panel appears.
The list of events found in the text search mode includes information on the
event number (Nr), the Date and Time, the Cameras number that is the source
of the analyzed image and the respective text. After clicking twice on a
selected event the playback and saving panel appears.
All rights reserved © NOVUS Security Sp. z o.o.
80
NOVUS DVR SYSTEM - User’s manual ver. 2.0
SMART_SEARCH
The playback and record panel for a given event allows for playing the chosen
event forward ►and backward ◄ with adjusting the speed from 1 to 10 and
frame by frame forward ►▌ and backward ▐◄. The Start button starts the
recording while Stop button ends it. The Browse button allows for selecting
the path of the AVI file the name of which is created automatically.
All rights reserved © NOVUS Security Sp. z o.o.
81
NOVUS DVR SYSTEM - User’s manual ver. 2.0
ADDITIONAL TOOLS OF THE DVR SYSTEM
8. Additional tools of the NOVUS DVR SYSTEM
8.1. The Backup program - manual creation of a backup copy
The Backup program creates backup copies of recordings, giving the user the opportunity to specify the time
span of the backed-up recordings and the source camera. To start the software, please select the following
option in the Start menu:
START -> PROGRAMY -> DVR SYSTEM -> UTILITIES -> BACKUP.
The main screen of the Backup program is presented below:
Recording path
selection panel
List of completed
operations
Backup scope panel
Function buttons
All rights reserved © NOVUS Security Sp. z o.o.
82
NOVUS DVR SYSTEM - User’s manual ver. 2.0
ADDITIONAL TOOLS OF THE DVR SYSTEM
Backup method selection:
Total - Copies all cameras without any adjustments, complete volumes are
copied with simultaneous creation of index files. Owing to this, the process
takes little time.
Part - Copies recordings from selected cameras only. The system selects the
material to be copied and creates new volumes, so the process is much more
time-consuming.
Backup material selection panel:
Total method - allows the user to select the day, the hour and the volumes
with the recordings from this hour (digits in the brackets show the time when
recording in a given volume was finished). There is no selection option of
the source cameras to be copied - copied is the material stemming from all
cameras.
Part method - allows the user to select the camera, the recording day, hour
and minute.
The Clear button deletes the elements marked for copying earlier. The Select
button starts a backup material selection panel.
The backup material selection panel, in the Part mode, allows the user to
precisely set time boundaries on the material to be copied.
It is possible to give the exact Start Time and End Time, specifying the year,
the month, the day, the hour, the minute and the second and cameras that the
images are stemming from.
The Ok button starts the operation of creating the backup copy, closing the
panel is possible once the Cancel button is pressed.
The button with the folder icon allows the user to select the path for saving of
the backed-up file. The Default path button sets the selected path as the
default path for all backup processes.
Marking the Auto startup enable option enables the auto start of the Backup
program once the Windows system is started.
Marking the Burning this backup file on the CD option starts an external
application for CD-ROM burning or an internal module of the DVR
SYSTEM for recording CDs.
Choosing the Unlimit option enables copying of the whole marked material
to a selected catalogue. Setting a Limit makes the system divide the copied
material into sub-catalogues with a designated size (i.e. 700 MB - to copy the
material to a CD-ROM. The limit should be bigger than 300 MB.
This button enables to calculate the disk space necessary for fabricating a
backup copy of the marked video material. This function is only active in
Total cbackup mode.
The ► button starts the backup process, while the █ stops it.
All rights reserved © NOVUS Security Sp. z o.o.
83
NOVUS DVR SYSTEM - User’s manual ver. 2.0
ADDITIONAL TOOLS OF THE DVR SYSTEM
List of selected actions continuously shows the backup progress, the source
camera number and the time when the recording was made.
This button triggers an external program for recording CD-ROMs or an
internal application of the DVR SYSTEM for recording CD-ROMs.
Backup_Viewer start button
Viewing logs of the backup program.
Backup program minimization button.
Backup program closing button.
All rights reserved © NOVUS Security Sp. z o.o.
84
NOVUS DVR SYSTEM - User’s manual ver. 2.0
ADDITIONAL TOOLS OF THE DVR SYSTEM
8.2. Backup_Viewer - backup copy viewing
The Backup_Viewer software allows for viewing the video material on the backup copy fabricated with the
help of the Backup program. To start the application, the following option must be selected in the Start menu:
START -> PROGRAMY -> DVR SYSTEM -> UTILITIES -> BACKUP VIEWER.
The main screen of the Backup_Viewer software is presented below:
Backup copy folder
selection button
The Backup_Viewer program is equipped with exactly the same functions as the DVR_Search program
described on page 73. The only difference is the possibility of selecting the folder with the backup copy to be
viewed. This is done with the help of the button marked with the folder icon. Backup folder names are created
by the software automatically according to the following scheme:
Automatic copy - AByyyymmdd_hhMMss (for example. AB20070301_094742)
Manual copy - MByyyymmdd_hhMMss (where y stands for year, m - for month, d - for day, h - for hour,
m - for minute, s - for second).
WARNING !
The Smart Search feature in the BackupViewer application has text-in search (POS Data) option
disabled.
All rights reserved © NOVUS Security Sp. z o.o.
85
NOVUS DVR SYSTEM - User’s manual ver. 2.0
ADDITIONAL TOOLS OF THE DVR SYSTEM
8.3. Auth_Tool - exported JPEG / AVI file verification
The Auth_Tool program verifies the origin and authenticity of JPEG / AVI files saved by the DVR_SYSTEM
application. To start the application, the following option must be selected from the Start menu:
START -> PROGRAMY -> DVR SYSTEM -> UTILITIES -> AUTH TOOL.
The main screen of the Auth Tool program is presented below:
JPEG / AVI file
selection
JPEG / AVI file
playback
JPEG / AVI file info
AVI files playback bar
Function buttons
Once the image saved in the DVR SYSTEM is uploaded, the user receives information on its status
(authenticity validation), the number of the camera by which the image was recorded, recording and export
time, resolution of the frame. Additionally, information allowing to identify the computer on which the file was
exported are displayed: the serial number of the Windows system, user name and company name.
When uploading an image not stemming from the DVR SYSTEM application or an image that has been altered
in some way, all the above information will be lost.
Selection of the application mode - JPEG or AVI file authentication
verification.
Selection on the JPEG or AVI file to be uploaded to the Auth_Tool program.
Printing of the uploaded JPEG file or AVI currently displayed frame.
Closing the Auth_Tool application.
AVI files playback, stop and frame-by-frame playback.
Saving of the uploaded JPEG file or AVI currently displayed frame.
All rights reserved © NOVUS Security Sp. z o.o.
86
NOVUS DVR SYSTEM - User’s manual ver. 2.0
ADDITIONAL TOOLS OF THE DVR SYSTEM
8.4. AVI_Viewer - MP4 file playback
The AVI_Viewer program allows for playing video files in the MP4 format saved by the DVR SYSTEM.
To start this application the following option should be selected from the Start menu:
START -> PROGRAMY -> DVR SYSTEM -> UTILITIES -> AVI VIEWER.
The main screen of the AVI_Viewer program is presented below:
Video playback
Function buttons
Returning to the beginning of the played-back file.
Playback buttons: forward ►, frame-by-frame forward - ►▌ backward- ▐◄
and pause ▐ ▌.
Forward ►► and backward ◄◄ playback with speed adjustment by means
of the bar.
Video playback button with audio and volume adjustment.
Buttons for program closing, played-back file selection and opening the
program menu.
Enlarging the played - back picture 1, 2 and 3 times. Clicking twice on the
played-back picture starts full-screen playback.
Program menu includes all functions of the function buttons.
All rights reserved © NOVUS Security Sp. z o.o.
87
NOVUS DVR SYSTEM - User’s manual ver. 2.0
ADDITIONAL TOOLS OF THE DVR SYSTEM
8.5. Log_Viewer - DVR SYSTEM log register viewing
Program Log_Viewer allows for viewing DVR SYSTEM logs and playing back the video material combined
with events. To start the application, the following option must be selected from the Start menu:
START -> PROGRAMY -> DVR SYSTEM -> UTILITIES -> LOG VIEWER.
The main screen of the Log_Viewer program is presented below:
Log_Viewer
program menu
Event list
Event selection panel
Events saved by the system are divided into the categories available in the event selection panel: System,
Sensor, Motion, User, Loss and Disk. Events from specific categories are available in the event list. Program
menu allows for adjusting the program layout and event display mode.
Buttons for selecting the log file and for refreshing the event list.
Selecting the log website.
Selecting the action to be initiated by clicking the event (from Sensor or
Motion categories) twice. P denotes an additional popup window and S starting a DVR_Search program with playing back the selected event.
All rights reserved © NOVUS Security Sp. z o.o.
88
NOVUS DVR SYSTEM - User’s manual ver. 2.0
ADDITIONAL TOOLS OF THE DVR SYSTEM
The popup event window displays images combined with an alarm event
from the category Sensor or Motion after clicking the event log on the event
list twice.
This window allows for forward ► and backward ◄ playback with the
option of altering playback speed within the range of 1 to 10, as well as frame
by frame ►▌ forward and backward ▐◄. The Go to moves the user to the
recording originating from a specific date, time and camera.
Event search panel finds events from a particular category, within specified
time boundaries and according to key words in the event description. It is
possible to combine the both modes (logical AND/OR).
All rights reserved © NOVUS Security Sp. z o.o.
89
NOVUS DVR SYSTEM - User’s manual ver. 2.0
ADDITIONAL TOOLS OF THE DVR SYSTEM
8.6. Start.exe - NOVUS DVR SYSTEM admin registration
The START program facilitates registration (and account change) of the system’s main administrator. Also, it
can change some settings unavailable from the level of the DVR_Settings software. The Start.exe can be found
at:
C:\PROGRAM FILES\DVR SYSTEM\
To launch the program, the main administrator’s account password must be typed in, given during installation
of the DVR SYSTEM.
The main screen of the Start.exe differs slightly depending on the capture card series:
A series capture cards
MPG capture cards
All rights reserved © NOVUS Security Sp. z o.o.
90
NOVUS DVR SYSTEM - User’s manual ver. 2.0
ADDITIONAL TOOLS OF THE DVR SYSTEM
B series capture cards
In the User tab it is request to enter the name and the password of the main system administrator of the
NOVUS DVR SYSTEM. In the General tab, parameters of the capture card are grouped. Depending on the
model these may be: number of channels, the video format, capture card variant, number of frames, the LIVE
card, display format, number of alarms inputs and outputs. These data are automatically detected during
program installation and, if it is not necessary, these should not be changed. In the Advanced tab, it is possible
to set the network ports utilized by the application and configuration of the Watchdog function.
Utilization of particular ports:
Port 1 (3000) - video transmission
Port 2 (3001) - control commands transmission
Port 3 (3003) - configuration
Port 4 (8800) - audio transmission
Port 5 (3007) - network transmission and bandwith control
Port alternation is possible within the range of 1024 ~ 65535 the
Default button restores original port settings.
The Audible Warning function activates an acoustic signal once the
DVR Main application is closed. Restarting the Windows system
after closing the DVR SYSTEM application is possible by clicking
the Restart Computer upon closing software by user option.
This function is particularly useful combined with the auto start
option of the DVR_Main program. Restart delay (Restart In) is
possible within the range of 30-60 second.
All rights reserved © NOVUS Security Sp. z o.o.
91
NOVUS DVR SYSTEM - User’s manual ver. 2.0
ADDITIONAL TOOLS OF THE DVR SYSTEM
WARNING !
Altering the ports utilized for network communication, in case of using connection via Internet Explorer,
necessitates simultaneous alternation of ports written in the file C:\PROGRAM FILES\DVR SYSTEM\WEB\index.html. This file must be opened with any text editor (for example Windows notepad)
and the alternation of ports there must be conducted adequately to alternations made in the Start.exe
program.
Port settings
All rights reserved © NOVUS Security Sp. z o.o.
92
NOVUS DVR SYSTEM - User’s manual ver. 2.0
ADDITIONAL TOOLS OF THE DVR SYSTEM
8.7. DBTool.exe - DVR SYSTEM data base playback
The DB TOOL program creates the main index file of the video database in the NOVUS DVR SYSTEM on the
basis of HDD index files. This allows to add recordings form one system to another (moving the disk over or
copying the \M4DATA) or to retrieving a damaged index of a video database. The DBTool.exe is to be found
at:
C:\PROGRAM FILES\DVR SYSTEM\.
Main screen of the DBTool.exe program:
Main index list
Function buttons
List of disk volumes
Disc selection panel
Information on the
selected disc
Function keys
All rights reserved © NOVUS Security Sp. z o.o.
93
NOVUS DVR SYSTEM - User’s manual ver. 2.0
ADDITIONAL TOOLS OF THE DVR SYSTEM
Main index list of the video database of the DVR SYSTEM software - the
number of volumes on individual HDDs in the system saved in a file of the
main index (C:\MP4DBINFO.dat).
Adding (↑) or deleting (↓) positions from the list of volumes on the HDDs to
the list of the main index.
List of volumes on HDDs is stored on each HDD in the HDD index file
(ex. for the HDD ”C:\” - C:\M4DATA\DVR_VOLUME_INFO.DAT).
Setting the current HDD where the recording should start after initializing the
DVR SYSTEM application. The user can alter the HDD by selecting the
appropriate New Position field and confirming the choice with the Modify
button.
Information concerning the HDD selected from the DB info found on disks:
the letter denoting the HDD in the Windows system, State of the database on
the HDD, Total Volumes created on the particular HDD, Start Time and End
Time (start and finish of recording) and Current Volume (volume currently
recorded in).
The Apply button saves the changes entered in the DBTool.exe software,
while the Close button closes the application.
All rights reserved © NOVUS Security Sp. z o.o.
94
NOVUS DVR SYSTEM - User’s manual ver. 2.0
ADDITIONAL TOOLS OF THE DVR SYSTEM
8.8. MCSetup.exe - alteration of sound card configuration
The MC SETUP (MEDIA CONTROL SETUP) program is useful in case of problems with the audio recording
devices integrated on computer motherboards (based on Intel i9xx chipset). Problems usually take the form of
muting or disabling the sound stream once the DVR_Main program has been started.. The MC SETUP
program helps to eliminate this unfavorable phenomenon. The MCSetup.exe software is to be found in the
catalogue: C:\PROGRAM FILES\DVR SYSTEM\.
The presented procedure is based on the configuration of the sound card integrated on the ASUS P5LD2
motherboard. For other capture cards the process may differ slightly.
Once the MCSetup.exe software is started, the following info is displayed:
In case of several sound cards, a list of
sound devices available in the system will
be generated.
A configurable sound card should be
selected confirmed with the Next button.
Displayed is the configuration window for audio playback. Items from the left-hand-side list should be selected
and appropriate volume bars should be assigned to them:
The Master volume control from the
Components menu should be selected
and the appropriate bar should be
chosen. The < and > buttons change the
sides to the left and to the right.
All rights reserved © NOVUS Security Sp. z o.o.
95
NOVUS DVR SYSTEM - User’s manual ver. 2.0
ADDITIONAL TOOLS OF THE DVR SYSTEM
All other volume control bars from the list should be adjusted the same way:
Select the Wave volume control from the
Components list and point the
appropriate bar.
The < and > buttons change the sides to
the left and to the right.
Select the CD Out volume control from
the Components list and point the
appropriate bar.
The < and > buttons change the sides to
the left and to the right.
Select the LineOut volume control from
the Component list and find the
appropriate bar.
The < and > buttons change the sides to
the left and to the right.
The recording volume is adjusted similarly:
Select the Microphone volume control
from the Components list and point the
appropriate bar .
The < and > buttons change the sides to
the left and to the right.
All rights reserved © NOVUS Security Sp. z o.o.
96
NOVUS DVR SYSTEM - User’s manual ver. 2.0
ADDITIONAL TOOLS OF THE DVR SYSTEM
All other volume control bars from the list should be adjusted the same way:
Select the CD In volume control from
the Components list and point the
appropriate bar.
The < and > buttons change the sides to
the left and to the right.
Select the Line In volume control from
the Components list and point the
appropriate bar and confirm with the
Next button.
The < and > buttons change the sides to
the left and to the right.
The whole process should be confirmed
with the Save&Done button.
All rights reserved © NOVUS Security Sp. z o.o.
97
NOVUS DVR SYSTEM - User’s manual ver. 2.0
ADDITIONAL TOOLS OF THE DVR SYSTEM
8.9. DirectWeb.exe - WWW server
The DIRECT WEB program allows for remote connection with the DVR SYSTEM application with the help
of the Internet Explorer web browser. The Directweb.exe application is to be found in the following catalogue:
C:\PROGRAM FILES\DVR SYSTEM\WEB\
The Directweb.exe application is installed together with the NOVUS DVR SYSTEM and by default set to
a startup with the Windows system. Its operation is indicated by an icon on the system bar.
Active software - WWW Server operational
Inactive software- WWW server not operational
Clicking on the DirectWeb icon with the right mouse button shows the program menu:
Choosing Direct Web Stop disconnects the WWW Server, while Direct Web Start re-establishes the
connection. The Setup submenu allows for changing the WWW interface path and the port where the WWW
server is running.
The Browse button allows for specifying the path for the WWW interface.
Port changes the Web port where the WWW interface is running. Changes
can be confirmed with the Save button, while Cancel leaves the menu
without saving changes.
All rights reserved © NOVUS Security Sp. z o.o.
98
NOVUS DVR SYSTEM - User’s manual ver. 2.0
ADDITIONAL TOOLS OF THE DVR SYSTEM
To check the operation of the WWW Server, the IP address of the capture-card-equipped PC must be tipped
into the Internet Explorer web browser.
The WWW interface of the NOVUS DVR SYSTEM will appear - to connect, login and password are
necessary.
If the given data is confirmed, information on establishing connection will appear (Connected) and images
from cameras will show:
Split screen buttons - available splits are: 1, 4, 6, 9, 10 and 16. Additional
buttons change the currently viewed camera (or camera group) to the
following one and enlarging the images from the chosen camera (by clicking
on the picture).
Control panel selection - Camera - controlling PTZ cameras or Image image settings.
Preset - opening the preset selection panel, Tour - starting the PTZ camera
pattern.
All rights reserved © NOVUS Security Sp. z o.o.
99
NOVUS DVR SYSTEM - User’s manual ver. 2.0
ADDITIONAL TOOLS OF THE DVR SYSTEM
The preset panel allows the user to choose presets within the range of 1 ~ 99,
camera movement begins once the Enter button is pressed.
PTZ camera control panel selects the camera (-/+), controls zoom
(Zoom -/+), focus (Focus -/+) and camera movement (with arrow keys).
A/P starts an automatic 360 degrees pan (AutoPan)
Controlling the PTZ camera demands proper camera configuration in the
Use PTZ Camera control section of the NOVUS DVR SYSTEM (see page
50).
Picture settings control panel allows for selecting the camera (Camera -/+),
and adjusting Brightness, Contrast, Saturation, and Hue within the range of
0 to 255.
The Search launches the program for playing back the recorded material.
The log-in panel requires typing in the Login and Password and confirming
these with the Log In button. To log out a user who has been logged in
earlier, the Log Out. button should be pressed.
Alarm outputs control panel allows for manual controlling alarm outputs
(relays).
Audio control panel allows for live monitoring of the sound recorded.
The sound channel is selected by clicking in camera picture that is linked
with requested sound channel.
All rights reserved © NOVUS Security Sp. z o.o.
100
NOVUS DVR SYSTEM - User’s manual ver. 2.0
ADDITIONAL TOOLS OF THE DVR SYSTEM
Viewing the recorded video material:
Monthly calendar with days when recordings were made marked in red.
Month is selected with the ◄◄ i ►► buttons. Clicking on an individual day
in the calendar moves the user to recordings from this specific day.
Screen split selection panel - available splits are 1,4,9 and 16.
The C button displays info on recording time and camera number.
Additionally, it activates/deactivates text data display from ASCII / XML
data generating devices.
Video data playback with sound.
Panel with playback buttons.
Plays back the recorded material with adjusted speed form 1 to 9 forward ►►
and backward ◄◄, plays back the recordings frame by frame forward ►▌
and backward ▐◄. The buttons ► and ◄ allows to playback the video
material with normal speed forward and backward.
Playback speed selection within the range of 1 to 9 (default value is 5).
Playback speed is dependent on the speed of network connection and for this
reason the achieved adjustment result may vary depending on the
localization.
All rights reserved © NOVUS Security Sp. z o.o.
101
NOVUS DVR SYSTEM - User’s manual ver. 2.0
ADDITIONAL TOOLS OF THE DVR SYSTEM
Closing the remote playback application and returning to the start screen.
Camera and recording time selection panel - hour 0 ~ 24 and minute 0 ~ 60.
Once the day of the recording is selected, its corresponding recording view
will be actualized. The color that represents the recording for a selected camera is similar to the schedule recording settings available in the
Camera Setup section of the DVR_Settings program.
To start the playback, a camera must be selected (camera selection is possible
with ◄ i ► buttons that change the presently observed quad picture for
another 4 cameras) and afterwards, the recording time - hour and minute.
In the end, the playback button must be pressed. A bigger number of cameras
can be played back in an analogous way (4, 9 or 16 screen division).
Saving the video material - as a BMP file (Save As) or AVI file (AVI
Saving). The AVI file name is generated automatically in the following
format CamNN[hh1_mm1_ss1-hh2_mm2_ss2].avi where NN denotes
camera number, hh1 - hour, mm1 - minute, ss1 - second of the recording start
and hh2 - hour, mm2 - minute, ss2 - second of the recording end.
The Motion Search button opens the panel for search recorded video material
found on the basis of event search.
The POS Search button opens the panel for search recorded video material
found on the basis of ASCII / XML data combined with the picture using the
text filters. Additional text filers defining - see page 66.
Motion search settings panel allows the user to define the search scope within
the time range defined by the start (From) and end (To) criteria - hour,
minute and second. It also enables the selection of the cameras by which the
image was originally recorded and the Sensitivity parameters for event
detection.
The list of events found in the motion search mode includes information on
the event number (Nr), the Date and Time plus the Cameras number that is
the source of the analyzed image. After clicking on a selected event the
playback of the related camera starts.
The Search button starts analyzing/searching data, while Stop ends this
operation. The End button closes the panel.
Text-in search panel allows the user to define the extent of search within the
time period defined from start (From) to finish (To) by giving the hour,
minute and second and by selecting the source Camera, with this the text
data from the text generating is combined. The last factor to specify are the
conditions (Filters) of searching. The Full Text Search condition shows all
the signs received within the specified time period or only signs similar to the
entered template. Additional text filers defining - see page 66.
The list of events found in the POS search mode includes information on the
event number (Nr), the Date and Time plus the Cameras number and the
Text data that is the source of the analyzed image. After clicking on
a selected event the playback of the related camera starts.
The Search button starts analyzing/searching data, while Stop ends this
operation. The End button closes the panel.
WARNING !
The Motion Search and POS Search features are available only for 1 screen division.
All rights reserved © NOVUS Security Sp. z o.o.
102
NOVUS DVR SYSTEM - User’s manual ver. 2.0
ADDITIONAL TOOLS OF THE DVR SYSTEM
WARNING !
In case of connection problems utilizing the Internet browser, Internet Explorer settings should be
checked. In the Tools -> Internet Options -> Security menu, the option Internet or Local Intranet
(depending on whether the connection is executed with a remote localization via the Internet or in a local
network) should be selected, and subsequently, Custom level should be ticked, and all options allowing
for downloading and executing Active-X formats (also unsigned) should be enabled.
All rights reserved © NOVUS Security Sp. z o.o.
103
NOVUS DVR SYSTEM - User’s manual ver. 2.0
PTZ CAMERA CONTROL
9. PTZ camera control
9.1. NOVUS CAMA-I camera (NOVUS-C protocol)
Buttons:
TOUR -> Calling the 1st tour
A1 -> Calling the 1st tour
A2 -> Calling the 1st pattern
A3 -> Calling the 1st autoscan
AP ON / OFF -> Enabling/Disabling AutoPan
SCAN START / STOP -> Enabling/Disabling the first AutoScan
MENU -> Entering the camera menu
CTRL + TOUR -> Tour programming menu (in the tour menu, introducing tours to an editable tour)
CTRL + A1 -> Auto scans menu (in the tour menu, introducing an autoscan to an editable tour).
CTRL + A2 -> Pattern programming menu (in the patrol menu, introducing a pattern to an editable tour).
CTRL + A3 -> Preset settings menu (In the preset menu, introducing presets to an editable tour).
CTRL + A4 -> In the tour menu, introducing Tours into an editable tour
CTRL + A5 -> In the tour menu, deleting a selected position in an editable tour
CTRL + AP ON -> Alarm confirmation
Utilizing the camera menu:
MENU -> Entering the camera menu
Up and down arrows (↕) -> moving around the camera menu
Right arrow (→) -> Confirmation (selection) of an option in the camera menu
Left arrow (←) -> Return to a higher level of the menu
CTRL + arrows (↕↔) -> Controlling the camera in the TURBO mode, programming patterns (pan, tilt) in the
camera menu
arrows (↕↔) -> in the programming mode, finishing programming a pattern
MENU -> in the camera menu confirmation (ENTER) of a selected option
CTRL + MENU -> return (ESC) to a higher level in the camera menu without saving settings.
ZOOM IN / OUT -> changing the perspective within the editable field in the camera menu, selecting preset,
tour, pattern, auto scan in the editable field,
CTRL + ZOOM IN / OUT -> in the camera menu, programming patterns (zooming in)
All rights reserved © NOVUS Security Sp. z o.o.
104
NOVUS DVR SYSTEM - User’s manual ver. 2.0
PTZ CAMERA CONTROL
Calling presents:
Preset 1 – 99 -> Calling presets 1 – 99
CTRL + Preset 1
CTRL + Preset 2
CTRL + Preset 3
CTRL + Preset 4
CTRL + Preset 5
CTRL + Preset 6
CTRL + Preset 7
CTRL + Preset 8
CTRL + Preset 9
CTRL + Preset 10
CTRL + Preset 11
CTRL + Preset 12
CTRL + Preset 13
CTRL + Preset 14
CTRL + Preset 15
CTRL + Preset 16
CTRL + Preset 17
CTRL + Preset 18
CTRL + Preset 19
CTRL + Preset 20
CTRL + Preset 21
CTRL + Preset 22
CTRL + Preset 23
CTRL + Preset 24
CTRL + Preset 25
CTRL + Preset 26
CTRL + Preset 27
CTRL + Preset 28
CTRL + Preset 29
CTRL + Preset 30
CTRL + Preset 31
CTRL + Preset 32
CTRL + Preset 33
CTRL + Preset 34
CTRL + Preset 35
CTRL + Preset 36
CTRL + Preset 37
CTRL + Preset 38
CTRL + Preset 39
CTRL + Preset 40
CTRL + Preset 41
CTRL + Preset 42
CTRL + Preset 43
CTRL + Preset 44
CTRL + Preset 45
CTRL + Preset 46
CTRL + Preset 47
CTRL + Preset 48
CTRL + Preset 49
CTRL + Preset 50
Calling the first autoscan
Calling the first pattern
Calling the first tour
Calling the first preset
Picture flip
Return to the normal picture after flip
Calling the first autoscan
Calling the second autoscan
Calling the third autoscan
Calling the fourth autoscan
Calling the fifth autoscan
Calling the sixth autoscan
Calling the seventh autoscan
Calling the eighth autoscan
Calling AutoPan
Calling the first tour
Calling the second tour
Calling the third tour
Calling the fourth tour
Calling the fifth tour
Calling the sixth tour
Calling the seventh tour
Calling the eighth tour
Calling the first pattern
Calling the second pattern
Calling the third pattern
Calling the fourth pattern
Enabling the first relay output
Disabling the first relay output
Enabling the second relay output
Disabling the second relay output
Enabling the third relay output
Disabling the third relay output
Enabling the fourth relay output
Disabling the fourth relay output
Altering work mode to black and white
Altering work mode from black and white to color
All rights reserved © NOVUS Security Sp. z o.o.
105
NOVUS DVR SYSTEM - User’s manual ver. 2.0
PTZ CAMERA CONTROL
9.2. NOVUS Cama-I camera (PELCO-D and PELCO-P protocol)
Buttons:
MENU , AUTOPAN ON/OFF, SCAN START/STOP do not work, as compatibility with the Pelco SPECTRA
III SE camera is maintained)
TOUR – calling the 1st pattern
A1 – Iris Open
A2 – Iris Close
Calling patterns:
CTRL + Preset 1 – Pattern 1
CTRL + Preset 2 – Pattern 2
CTRL + Preset 3 – Pattern 3
CTRL + Preset 4 – Pattern 4
Navigating in the camera menu:
Preset 95 – Entering the camera menu
Up and down arrows (↕) -> Moving around the camera menu
Right arrow (→) -> Confirming an option in the camera menu
Left arrow (←) -> Return to a higher menu level
Preset 95 -> in the camera menu, confirmation (ENTER) of a selected option; in the camera menu, entering/
leaving the pattern programming mode.
Preset 96 -> Return (ESC) to a higher menu level without saving settings
ZOOM IN / OUT -> changing values within the editable menu option, entering pattern names, selecting presets
within tours,
Calling presets:
Preset 1 – 32 calling presets 1 - 32
Preset 33 – 180º flip
Preset 60 – Entering the Autoscan menu (in the tour menu, entering autoscans in a tour)
Preset 61 – Calling the first Autoscan
Preset 62 – Calling the second Autoscan
Preset 63 – Calling the third Autoscan
Preset 64 – Calling the fourth Autoscan
Preset 65 – Calling the fifth Autoscan
Preset 66 – Calling the sixth Autoscan
Preset 67 – Calling the seventh Autoscan
Preset 68 – Calling the eighth Autoscan
Preset 69 – Disabling the first relay output
Preset 79 – Disabling the second relay output
Preset 89 – Disabling the third relay output
Preset 99 – Disabling the fourth relay output
All rights reserved © NOVUS Security Sp. z o.o.
106
NOVUS DVR SYSTEM - User’s manual ver. 2.0
PTZ CAMERA CONTROL
Preset 70 – Entering the tour menu (in the tour menu, entering Tours into an editable tour)
Preset 71 – Calling the first tour
Preset 72 – Calling the second tour
Preset 73 – Calling the third tour
Preset 74 – Calling the fourth tour
Preset 75 – Calling the fifth tour
Preset 76 – Calling the sixth tour
Preset 77 – Calling the seventh tour
Preset 78 – Calling the eighth tour
Preset 80 – Entering the pattern menu (in the pattern menu, entering patterns into an edited tour)
Preset 81 – Calling the first pattern
Preset 82 – Calling the second pattern
Preset 83 – Calling the third pattern
Preset 84 – Calling the fourth pattern
Preset 85 – Enabling the first relay output
Preset 86 – Enabling the second relay output
Preset 87 – Enabling the third relay output
Preset 88 – Enabling the fourth relay output
Preset 90 – Deleting an alarm
Preset 91 – Calling the park function, deleting a text field in camera menu
Preset 95 – Entering camera menu, enabling/disabling PTZ control in the camera menu
Preset 96 – Exit from the camera menu without saving settings
All rights reserved © NOVUS Security Sp. z o.o.
107
NOVUS DVR SYSTEM - User’s manual ver. 2.0
PTZ CAMERA CONTROL
9.3. PELCO SPECTRA camera (PELCO-D and PELCO-P protocols)
Buttons:
MENU -> Entering camera menu,
AUTOPAN ON/OFF -> Calling AutoPan,
SCAN START/STOP –> Calling AutoPan,
TOUR – Calling the first pattern
A1 – Iris Open
A2 – Iris Close
Calling patterns:
CTRL + Preset 1 – pattern 1
CTRL + Preset 2 – pattern 2
CTRL + Preset 3 – pattern 3
CTRL + Preset 4 – pattern 4
Navigating in the camera menu:
MENU –> Entering the camera menu,
Up and down arrows (↕) -> Moving around the camera menu
A1-> Iris Open
A2 -> Iris Close
Calling presets
Preset 1 – 80 -> Calling presets 1 - 80
Additional functions (SPECTRA III SE camera functions available through calling presets)
Preset 33 – 180º flip
Preset 34 – the point zero
Preset 96 – Freezing camera motion
Preset 98 – Interrupted scan
Preset 99 – Auto scan
All rights reserved © NOVUS Security Sp. z o.o.
108
NOVUS DVR SYSTEM - User’s manual ver. 2.0
PTZ CAMERA CONTROL
9.4. NOVUS CAMA-mini camera (NOVUS-C1 protocol)
ATTENTION - when implementing the NOVUS C1 protocol (CAMA MINI), selecting ID=32 denotes
ID=32.
Buttons:
TOUR -> Calling the first tour
A1 -> Calling the first auto scan
A2 -> Calling the first tour
A3 -> Calling the first preset
AP ON / OFF -> Enabling/disabling the first auto scan
SCAN START / STOP -> Enabling/disabling the first auto scan
MENU -> Entering the camera menu
SCAN START / STOP -> Alarm confirmation
Navigating in the camera menu:
MENU -> Entering the camera menu
Up and down arrows (↕) -> Moving around the camera menu
Right arrow (→) -> Confirming an option in the camera menu
Left arrow (←) -> Return to a higher menu level
CTRL + arrows (↕↔) -> Controlling the camera in TURBO mode, programming presets and auto scans (pan
and tilt) in the camera menu
Arrows (↕↔) -> in the camera programming mode, finishing pattern programming
MENU -> in the camera menu, confirming the selected option (ENTER)
ZOOM IN / OUT -> changing values within the editable menu option, entering pattern names, selecting presets
within tours
CTRL + ZOOM IN / OUT -> in the camera menu, programming the preset and auto scans (closing in)
CTRL + AP ON / OFF -> alarm confirmation
Calling presets:
Preset 1 – 60 -> Calling presets 1 – 60
CTRL + Preset 1
CTRL + Preset 2
CTRL + Preset 3
CTRL + Preset 4
CTRL + Preset 5
CTRL + Preset 6
CTRL + Preset 7
CTRL + Preset 8
CTRL + Preset 9
CTRL + Preset 10
CTRL + Preset 11
CTRL + Preset 12
CTRL + Preset 13
CTRL + Preset 14
Calling the first autoscan
Calling the first pattern
Calling the first tour
Calling the first preset
Calling the first autoscan
Calling the second autoscan
Calling the third autoscan
Calling the fourth autoscan
All rights reserved © NOVUS Security Sp. z o.o.
109
NOVUS DVR SYSTEM - User’s manual ver. 2.0
PTZ CAMERA CONTROL
CTRL + Preset 15
CTRL + Preset 16
CTRL + Preset 17
CTRL + Preset 18
CTRL + Preset 19
CTRL + Preset 20
CTRL + Preset 21
CTRL + Preset 22
CTRL + Preset 23
CTRL + Preset 24
CTRL + Preset 25
CTRL + Preset 26
CTRL + Preset 27
CTRL + Preset 28
CTRL + Preset 29
CTRL + Preset 30
CTRL + Preset 31
CTRL + Preset 32
CTRL + Preset 33
CTRL + Preset 34
Calling the first tour
Calling the second tour
Calling the third tour
Calling the fourth tour
All rights reserved © NOVUS Security Sp. z o.o.
110
NOVUS DVR SYSTEM - User’s manual ver. 2.0
PTZ CAMERA CONTROL
9.5. NOVUS CAMA-mini camera (PELCO-D protocol)
Buttons:
MENU , AUTOPAN ON/OFF, SCAN START/STOP do not work, as compatibility with the Pelco SPECTRA
III SE camera is maintained)
TOUR – calling the 1st pattern
A1 – Iris Open
A2 – Iris Close
Navigating in the camera menu:
Preset 95 – Entering the camera menu
Up and down arrows (↕) -> Moving around the camera menu
Right arrow (→) -> Confirming an option in the camera menu
Left arrow (←) -> Return to a higher menu level
Preset 95 -> in the camera menu, confirmation (ENTER) of a selected option; in the camera menu, entering
the preset and autoscan programming mode.
Preset 96 -> Return (ESC) to a higher menu level without saving settings, leasing the preset and autoscan programming mode.
ZOOM IN / OUT -> changing values within the editable menu option, entering pattern names, selecting presets
within Tours, zooming in and out within the preset and autoscan programming mode.
Calling presets:
Preset 1 – 60 calling presets 1 - 60
Preset 61 – Calling the first autoscan
Preset 62 – Calling the second autoscan
Preset 63 – Calling the third autoscan
Preset 64 – Calling the fourth autoscan
Preset 71 – Calling the first tour
Preset 72 – Calling the second tour
Preset 73 – Calling the third tour
Preset 74 – Calling the fourth tour
Preset 90 – Alarm confirmation
Preset 95 – Entering camera menu, engaging PTZ control in camera menu
Preset 96 – Leaving the camera menu without saving changes, disabling PTZ control in camera menu
All rights reserved © NOVUS Security Sp. z o.o.
111
NOVUS DVR SYSTEM - User’s manual ver. 2.0
PTZ CAMERA CONTROL
9.6. NOVUS NVC-625/660DN, NVC-HC520ZL, NVC-HC370ZL-2 cameras
(NOVUS – C1 protocol)
ATTENTION - when implementing the NOVUS C1protocol (NVC-625/660DN), selecting ID=32 denotes
ID=0
Buttons:
AUTOPAN ON/OFF, FOCUS IN/OUT, SCAN START/STOP, TOUR, PRESET MOVE/SET are not used
MENU -> Entering camera menu ,
ZOOM IN / OUT -> zoom in/out control
Navigating in the camera menu:
Up and down arrows (↕) -> Moving around the camera menu
Right arrow (→) -> Confirming an option in the camera menu
MENU -> Confirming (selecting) an option in the camera menu, confirming letters in the cameras description
9.7. NOVUS NVC-HC520ZL, NVC-HC370ZL-2 camera (PELCO-D and PELCO-P protocol)
Buttons:
MENU, AUTOPAN ON/OFF, FOCUS IN/OUT, SCAN START/STOP TOUR are not operational (maintained
compatibility with the Pelco SPECTRA III SE)
A1 – Iris Open
A2 – Iris Close
ZOOM IN / OUT -> zoom in/out control
Navigating in the camera menu:
Preset 95 –> entering cameras menu,
Up and down arrows (↕) -> Moving around the camera menu
Right arrow (→) -> Confirming an option in the camera menu
Preset 95 -> in camera menu, confirming (ENTER) of a selected option
Preset 96 -> return (ESC) to a higher level in camera menu without saving settings
9.8. NOVUS NVC-825/860DN camera (NOVUS C2 protocol)
Buttons:
AUTOPAN ON/OFF, FOCUS IN/OUT, SCAN START/STOP, TOUR, PRESET MOVE/SET – not used
MENU -> entering camera menu,
ZOOM IN / OUT -> zoom in/out control
Navigating in the camera menu:
Up and down arrows (↕) -> Moving around the camera menu
Right arrow (→) -> Confirming an option in the camera menu
Left arrow (←) -> Return (ESC) to a higher level in camera menu without saving settings
All rights reserved © NOVUS Security Sp. z o.o.
112
NOVUS DVR SYSTEM - User’s manual ver. 2.0
SELECTED CONFIGURATION ACTIVITIES „STEP BY STEP”
10. Selected configuration activities „step by step”.
10.1. Assigning disk space to video recording and creating volumes.
a)
b)
c)
d)
e)
f)
g)
h)
i)
Close the DVR_MAIN program
Start the DVR_SETTINGS program (desktop icon or START menu)
Enter the „Disk Tool” menu
In the disk table, indicate the disk where recording should take place
In the „Add New Volume” field, give the number of volumes that should be created - more
information on creating volumes you can find on page 35
Press the „Add” button - it will add volumes to the disk table
Press the „Create Volume” button
Volumes on the selected disk will be created
Analogically, volumes on other HDDs in the system should be created
10.2. Video recording with audio
a)
b)
c)
d)
e)
f)
g)
h)
i)
j)
k)
Complete audio connections described in the NOVUS capture card installation manual for the whole
capture card series
In case of integrated sound cards and mother boards based on the Intel i9xx chipset, it is
recommended to check the audio recording configuration described on page 95
Close the DVR_MAIN program
Start the DVR_SETTINGS program (desktop icon and START menu)
Enter the „System” menu
Mark the „Sound Recording” option and, in case of A and B series capture cards - select the number
of channels, sound card and sound level. Read more on page 40
Press the „Apply” button and then „Save & Close”
In the DVR_SETTINGS program, select the menu „Camera” and, subsequently, on the „Sound
Channel” panel, select the audio channel assigned to a specific camera - read more on page 44
Press the „Apply” button and afterwards, press „Save & Close”
From the level of the DVR_MAIN program, check audio using the button with the speaker icon
- read more on page 33
Configure other audio channel analogically
10.3. Video and audio playback
a)
b)
c)
Start the DVR_SEARCH program (desktop icon, START menu or the “Search” button form the
level of the DVR_MAIN program)
Click on the speaker icon twice-read more on page 74
Select the hour and minute when the recording was made, according to the guidelines on page 74
10.4. Motion detection recording
a)
b)
c)
d)
e)
f)
g)
h)
Start the DVR_SETTINGS program (desktop icon, START menu or “System” button from the level
of the DVR_MAIN program)
In the DVR_SETTINGS program, choose the “Camera” menu and, afterwards, “Schedule”. On the
„Recording Schedule” panel, select a camera and recording mode: „Motion” or “Sensor+Motion”.
Select an required area in the schedule with the help of the PC mouse - read more on page 45
Press the „Apply” button and afterwards, press „Save & Close”
In the „Camera” menu, select „Color & Motion” option
Select the detection area, sensitivity and threshold according to the instruction on page 48
Select an action to be triggered by motion detection according to the description on page 48
Press the „Apply” button and afterwards, press „Save & Close”
Configure the other video channels in an analogical way
All rights reserved © NOVUS Security Sp. z o.o.
113
NOVUS DVR SYSTEM - User’s manual ver. 2.0
SELECTED CONFIGURATION ACTIVITIES „STEP BY STEP”
10.5. Recording with variable speed (Normal + Event)
a)
b)
c)
d)
e)
f)
g)
Start the DVR_SETTINGS program (desktop icon, START menu or „System” button from the level
of the DVR_MAIN program)
In the DVR_SETTINGS program, select a camera and then, in the „Camera” menu, on the
„Camera Frame Rate” panel, select the option „Selected Frame Rate” and select the recording speed
for continuous recording (Normal) - usually a lower one and for alarm events (Event) - usually higher
one according to the description on page 43
Press the „Apply” button and afterwards, press „Save & Close”
In the DVR_SETTINGS program, choose the „Camera” menu and then „Schedule”. On the
„Recording schedule” panel, select a camera, recording mode (Normal+Event) and mark the required
area in the Schedule with the help of the PC Mouse - read more on page 45
Configure the detection and/or alarm inputs settings according to the description on page 47 and 52
Press the „Apply” button and afterwards, press „Save & Close”
Configure other video channels in an analogical way
10.6. E-mail notification configuration
a)
b)
c)
d)
e)
f)
g)
Start the DVR_SETTINGS program (desktop icon, START menu or the „System” button from the
level of the DVR_MAIN program)
Enter the „System” menu
Select the option „Email Settings”
Configure the SMTP mail server according to the description on page 40
Press the „Apply” button and afterwards, press „Save & Close”
In the notification on selected alarm events menu, choose the option of e-mail notification - according
to the description on page 48
Press the „Apply” button and afterwards, press „Save & Close”
10.7. Back-up copy
a)
b)
c)
d)
e)
f)
g)
Start the DVR_SETTINGS program (desktop icon, START menu or the „System” button from the
level of the DVR_MAIN program)
Enter the „Backup” menu
Mark the day of the week, the time, the copying mode and the localization of the copied material,
according to the description on page 54
Press the „Add/Modify” button to add an item to the table
In an analogical way, add other items to the „Backup Schedule Table”
Mark the „Auto Start Schedule Backup” option in the „Backup Start Settings” panel
Press the „Apply” button and afterwards, press „Save & Close”
10.8. Control and configuration of PTZ cameras
a)
b)
c)
d)
e)
f)
g)
h)
i)
j)
Complete PTZ and PTZ module connections according to the description in the NOVUS capture card
manual
Start the DVR_SETTINGS program (desktop icon, START menu or the „System” button from the
level of the DVR_MAIN program)
In the DVR_SETTINGS program, select the „Camera” menu and then camera number and the „Color
& Motion” menu
Select the „Use PTZ Camera Control” option and afterwards, click on the „Properties” button
Select the COM port and protocol settings according to the description on page 50
Press the „Test” button and start the PTZ camera control panel
Check transmission settings and press the „Open” button
Using the description on page 50, check the operation of PTZ camera control
Close the PTZ control panel and save the settings with the help of „Apply” and then
„Save & Close” buttons
Check the operation of the PTZ camera control from the level of the DVR_MAIN software panel
according to the description on page 30
All rights reserved © NOVUS Security Sp. z o.o.
114
NOVUS DVR SYSTEM - User’s manual ver. 2.0
SELECTED CONFIGURATION ACTIVITIES „STEP BY STEP”
10.9. Basic integration with the ASCII/XML data generating devices
a)
b)
c)
d)
e)
f)
g)
h)
i)
j)
k)
Complete connections with the ASCII code generating device via the RS-232 cable or Ethernet
network
Close the DVR_MAIN program
Start the DVR_SETTINGS program (desktop icon, START menu )
In the DVR_SETTINGS select the option „Text Inserting”
Select a protocol form among the previously defined ones or define one’s won protocol according to
the description on page 59
Select a database according to the description on page 64
Set the details of the RS-232 or LAN connection according to the description on page 70
Configure the display of text over camera images according to the description on page 72
Test the text-in reception with the help of the „Test Data Capturing” button
Check the correctness of data display in the DVR_MAIN program and the availability of text data
from the level of the DVR_SEARCH and SMART_SEARCH programs - description on page 79
Configure other ASCII/XML data generating devices in a similar way
10.10. Activation of network connections
a)
b)
c)
d)
Add the DVR_MAIN application and ports used to firewall rules or disable the firewall
Start the DVR_SETTINGS program (desktop icon, START menu or the „System” button from the
level of the DVR_MAIN program)
Mark the „Allow Remote Connections” option
Press the „Apply” button and then „Save & Close”
10.11. Remote alarm notification
a)
b)
c)
d)
e)
f)
g)
h)
Add the DVR_MAIN application and ports used to firewall rules or disable the firewall
Start the DVR_SETTINGS program (desktop icon, START menu or the „System” button from the
level of the DVR_MAIN program
Enter the „System” menu
Mark the „Allow Remote Connections” option
Press the „Properties” button and select settings according to the description on page 41
Select a camera in the DVR_SETTINGS program and then the „Camera” menu and
„Schedule”. On the „Remote Notify Schedule” panel, select alarm event notification („Notify”) and
mark the time period of the notification
Press the „Apply” button and then „Save & Close”
In the DVR_NET program configuration, when defining remote localizations, give exactly the same
code as given earlier on the server.
All rights reserved © NOVUS Security Sp. z o.o.
115
NOVUS Security Sp. z o.o.
Pulawska Street 431, 02-801 Warsaw, Poland
phone.: (22) 546 0 700, fax: (22) 546 0 719
www.novuscctv.com
2007-10-19 version 2.0