1
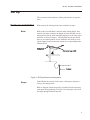
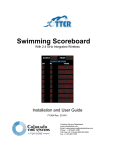
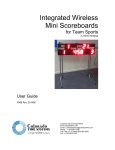
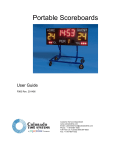
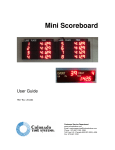
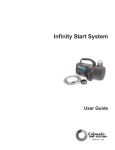
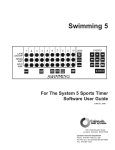
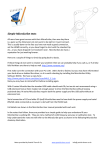
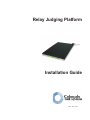
Relay Judging Platform
Installation Guide
F507 Rev. 1104
Colorado Time Systems
Corporate Office
1551 East 11th Street
Loveland, CO 80537 USA
Sales - 1-800-279-0111 or +1 970-667-1000
Service: 1-800-287-0653 x256 or +1 970-667-1000 x256
FAX: 970-667-1032
Web: www.coloradotime.com
Email: [email protected]
Part Number F507 Rev. 1104
© 2004. Colorado Time Systems. All rights reserved.
Table of Contents
Introduction
Features ............................................................................................1
Styles of RJPs ..................................................................................1
Accessories ......................................................................................2
Set Up
Hardware Installation.......................................................................3
Cabling.............................................................................................4
With Quick Connect Deck Plate ................................................5
With Speedlight Cable Harness .................................................5
Software Set Up ...............................................................................6
Maintenance
DIN connectors ................................................................................7
Dual banana connectors ...................................................................7
Introduction, Styles of RJPs
Introduction
Relay Judging
Thank you for purchasing RJPs (relay judging platforms) from Colorado Time Systems. Colorado Time Systems' RJP technology is the
most accurate way to judge relay exchanges. The RJP allows your
CTS timer to automatically compare the incoming swimmer's finish
on the touch pad with the departure of the swimmer leaving the starting platform. The RJP will collect the necessary information to judge
a relay exchange to 1/100th of a second.
RJPs can sense times accurately for swimmers weighing at least 90
pounds (40.8 Kg).
A CTS timer will display and print relay exchange results, splits, and
other relay data. This information is then stored with the other race
data.
Start reaction
time
On every start, the RJP senses when the swimmer leaves the block
and supplies that information to the timer, which compares it to the
start impulse from the starting system with 1/100th of a second accuracy.
In training, coaches and swimmers can use RJPs to provide this vital
information to improve start reaction times.
In competition, the start reaction times can be displayed on the scoreboard (through CTS sports timers that support this) at the beginning
of a race, adding excitement to the event for the audience.
Elegantly
engineered
Both the top and leading edge of the RJP are sensitive to the swimmer's departure. Extensive research and elegant engineering allow
the Colorado Time Systems RJP to decipher between weight shifts
and when a swimmer actually leaves the platform.
Features
Easy installation and removal
Stainless steel construction
Non-skid surface
Durable switch mechanism
Timing accuracy to 1/100th of a second
Styles of RJPs
Colorado Time Systems RJPs are available in several styles:
Classic
Classic RJPs, used in training and competition worldwide.
1
Introduction, Accessories
Lighted
Lighted RJPs are equipped with LEDs across the front edge of the
RJP. These Speedlights flash simultaneously with the start tone and
start strobe light from a CTS start system (Championship Start or
later). All athletes can benefit from the visual signal, which they can
easily see without altering their race-ready posture. Speedlights ensure the fairest of starts for hearing-impaired individuals.
RJPs enhanced with Speedlights provide the training tool to perfect
both start reaction times and relay exchanges.
Colorado Block
The Colorado Block is a combination of Paragon Aquatic's Track
Start Competitor starting block and Colorado Time System's Lighted
RJP, under-block speaker and connection hub.
Accessories
RJP Caddy
The relay judging platform caddy provides a convenient way to store
and transport your RJPs, start system, Quick Start and cables. The
aluminum frame with wheels accommodates up to ten RJPs and is
narrow enough to fit through standard commercial doorways.
Quick Connect
Deck Plate
System
The Quick Connect Deck Plate system enables Speedlight connection and simplifies connection of the other electrical components,
including RJP, touchpad, individual lane speaker and judges' backup
buttons. It is composed of two parts. The first is a connection hub
under the starting block, which replaces the traditional deck plate as
the place where all the electrical components plug in, including
Speedlights. The second is the deck plate connector. A military connector with gold-plated connections is mounted in the pool deck; one
short cable runs from this deck plate to the connection hub under the
starting block.
Speedlight Cable A Speedlight cable harness is the other option (besides the Quick
Connect Deck Plate system) for connecting Speedlights to the timing
Harness
system.
2
Set Up, Hardware Installation
Set Up
This section describes hardware, cabling and software set up procedures.
Hardware Installation
Bolts
RJPs attach to the starting blocks either with bolts or straps.
RJPs for the Colorado Block, and some other starting blocks, have
stainless steel bolts welded to the bottom. Position the RJP over the
starting block with the bend in the RJP hanging over the front end of
the block, as shown in Figure 1. Slide the bolts into the pre-drilled
holes in your starting blocks. Secure the RJP to the block by screwing the supplied nuts onto the bolts which are now protruding underneath the block.
RJP
Starting Block
4
Bend on front edge of RJP
Touchpad
Figure 1: RJP positioned on starting block
Straps
Each RJP that does not have bolts comes with straps to attach it securely to the starting block.
RJPs are shipped with the straps fully assembled, but the straps may
come apart during shipping. See Figure 2 for the proper way to feed
the straps through the metal fasteners.
3
Set Up, Cabling
Front of RJP
A
A
A
Hook
Buckle
B
Figure 2: Assembled RJP with mounting straps
On new RJPs, the straps must be adjusted to fit the starting platform.
1. Detach the hook from the buckle.
2. Place the RJP on the starting platform with the bend hanging over
the front end of the block. Slide the RJP back so it touches the front
edge of the starting platform
3. Adjust the fasteners at the positions marked A in Figure 2 to allow
the straps to go around the block and the hook to re-attach to the
buckle.
4. Attach the hook to the buckle
5. Pull on the strap at the position marked B to tighten the strap assembly. Apply tension until the straps are just snug. Then flip the
buckle to secure the RJP in place.
* Note
Cabling
After the initial setup to fit the RJP to the starting platform,
there is no need to re-adjust the straps. Simply place the
RJP on the starting platform, attach the hook to the buckle,
and flip the buckle.
Each RJP with Speedlights is supplied with two cables that connect
it to the timing system: an RJP cable and a Speedlight cable.
The RJP cable has dual banana connectors at each end: one end is a
molded connector; the other is a stackable, open-ended connector.
There are two different Speedlight cables; one for use with under-block connection hubs, and the other for use with Speedlight cable harnesses. Both have dual banana connectors of two different
sizes at one end, and a round, 2-pin DIN connector at the other end.
The Speedlight cable for connection hubs is a 6-foot cable with a
male 2-pin DIN connector. The Speedlight cable for a Speedlight cable harness is a 1.5-foot cable with a female 2-pin DIN connector.
4
Set Up, Cabling
Molded dual banana
connector on
RJP cable
Terminal Block
Top of RJP
Uneven
dual banana
connector on
Speedlight
cable
Figure 3: Cable connections to RJP with Speedlights
To flash with the start signal, Speedlights must be connected to a
CTS start system (Championship Start or later) through an under-block connection hub or a Speedlight cable harness.
With Quick Connect
Deck Plate
RJP cable: Plug the molded connector end of the cable into the terminal block at the rear corner of the RJP, as shown in Figure 3. Plug
the combination (female-to-male) stackable open-ended dual banana
plug into the Button A/RJP connector on the connection hub under
the starting block. Insert the Button A backup button cable into the
female side of the stackable combination banana plug from the RJP,
as shown in Figure 4. The RJP times and the backup button times
will both be recorded.
If you are not using three buttons for backup timing, plug the buttons
that you are using into Button B and/or C, and plug the RJP by itself
into the Button A/RJP connector.
Speedlight cable: Plug the uneven dual banana connector into the
terminal block at the rear corner of the RJP, as shown in Figure 3.
Plug the DIN connector into the Speedlight connector on the connection hub under the starting block.
With Speedlight
Cable Harness
RJP cable: Plug the molded connector end of the cable into the terminal block at the rear corner of the RJP, as shown in Figure 3. Plug
the combination (female-to-male) stackable open-ended dual banana
plug into the Button A/RJP connector on the deck plate or cable
harness. Insert the Button A backup button cable into the female side
of the stackable combination banana plug from the RJP, as shown in
5
Set Up, Software Set Up
RJP
Button A
Stackable
banana plug
Figure 4: Cabling diagram
Figure 4. The RJP times and the backup button times will both be recorded.
Speedlight cable: Plug the uneven dual banana connector into the
terminal block at the rear corner of the RJP, as shown in Figure 3.
Plug the DIN connector into the Speedlight cable harness connector
for that lane.
* Note:
Software Set Up
On older RJPs without Speedlights, or if you are not using
the Speedlights, use the RJP cable to connect the RJP to
the timing system as described above.
Set your timer for RJP input. This process varies among timers. Consult your timer documentation for details of doing this for your system.
Generally, there are two areas to set:
1. Set the timer to accept RJP input in hardware setups (platforms
rather than buttons)
2. Set the timer to print relay judging exchange results according to
your preferences. You may wish to turn this off for non-relay events.
* Note
6
The CTS System 5 requires Swimming software version
3.29.20 or later for RJP operation. Contact CTS Customer
Service if you need to upgrade your System 5.
Maintenance, Dual banana connectors
Maintenance
DIN connectors
During periods of heavy use, lightly lubricate the DIN connectors.
The recommended lubricant is Molykote 44 Medium. Use sparingly.
An amount the size of half a match head per contact is adequate.
Dual banana
connectors
Regularly inspect the dual banana connectors on the cables and the
connector inputs on the terminal block for corrosion. If corrosion is
beginning to occur, clean them with Lime-A-WayÒ and a cotton
swab or a soft brush. Take special care not to scratch the small gold
banana connector on the Speedlight cable when cleaning it.
7
Maintenance, Dual banana connectors
8
Sales: 1-800-279-0111 or 1-970-667-1000
Service: 1-800-287-0653, x256 or 1-970-667-1000
FAX: (970) 667-1032
Web: www.coloradotime.com
Email: [email protected]
Colorado Time Systems
1551 East 11th Street
Loveland, CO 80537 USA