1
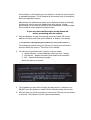
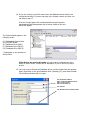
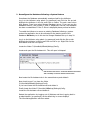
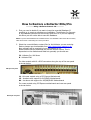
How to Restore a Kollector Elite/Pro
------------Using a Kollector Restore CD------------
1. First you need to decide if you want to keep the recorded Database (if
possible) or to create a complete new installation. The Kollector Pro has part
of the Database recorded on the Primary Hard Drive so if you are replacing
this Drive you will not be able to save the Database.
Note: To protect the Database from accidental erasure it is advisable to disconnect the secondary
Hard drives before commencing the restore procedure.
2. Select the correct Kollector restore Disc for the Kollector you are restoring.
Restore images are downloadable from http://www.vicon-support.co.uk
Nero software will be required to burn the image to a CD.
Please ensure that you download and use the correct version. This is
dependent on the motherboard fitted but generally you should use:
J2 - Kollector Pro, KN Server
K - Kollector Elite
For older models with 16 x RJ45 connectors along the top of the rear panel
as shown below
Old style rear panel
L1 - All newer models using a PCI Express Motherboard
L2 – As above with support for 915/RUBY Motherboards
N1 – As above with support for 945/965/RUBY Motherboards
For newer models using PCI Express motherboards and new rear panel
as shown below
New style rear panel
If the Kollector is still working you may be able to check the current version
of embedded software. This is displayed at the bottom right of the desktop
before the application begins.
Alternatively the motherboard model can be displayed at boot up although
the bios may need to be set to disable quick boot options. Further
identification can be found by looking at the motherboard. A model number
will normally be found adjacent to the processor.
If you are unsure which version to use please ask
before proceeding with the restore.
3. Once the Kollector is ready for restoring insert the restore CD into the
Kollector CD drive and Power up the Kollector or Reboot if on already.
** You will need a PS2 type Keypad and Mouse to carry out the restore. **
The Kollector should boot from the CD but if it doesn’t you will need to
enter the BIOS and ensure 1st Boot from CD is enabled.
4. You will now be presented with 3 options as shown below.
1. System Restore – Leaves Database intact (see note 1 above)
2. Full Restore – Deletes everything and Install Factory defaults
3. Exit – Cancel the Restore procedure
Select the option you require.
5. The Installation process will now begin and take about 10 minutes or so.
DO NOT press any buttons or switch off the Kollector during this process.
6. After this time you will be prompted to remove the CD and press any button
to continue. The Kollector will now reboot automatically.
7. When the Kollector restarts it will go through a Scan Disc procedure followed
by a Vicon Message as shown below. It is very important that the Kollector
is not touched during this time.
8. The Kollector will configure itself and will reboot where necessary before the
first part of the installation is completed. A countdown timer will appear
before finally rebooting and preparing for the next stage as shown below.
9. Once the Kollector has rebooted and completed loading you will see the
Desktop with the ViconNet logo displayed.
10. You now need to check that the screen resolution is set correctly for the
ViconNet software. Right Click on the Desktop and click on Properties from
the dropdown menu. The window shown below will be displayed.
11. Click on the Settings tab and set the screen resolution to 1024 by 768 and
Apply the changes.
Set the screen resolution to 1024 by 768
12. Right Click on the Start Button and click on Explore.
Go to Control Panel and click on the Region and Language options.
Warning This version of Windows XP Embedded does not support multiple
language settings and must not be changed from U.S. English. You can
however set the location that you are in at the bottom of the window as
shown below.
Click on customise and change the Date format to dd-MM-yyyy
and apply the changes.
Click on Customise
Do Not Change
Change the Date Format as shown
dd-MM-yyyy
13. Now set the Date and Time properties by clicking on the Icon within the
Control panel.
1.
Set Date and Time
2.
Set Time Zone
3.
Ensure that Automatically synchronise
with an Internet server is not checked
14. If you are carrying out a Full restore then the Database drives need to be
configured correctly. If you are carrying out a System restore only then you
can skip to step 17.
From the Control panel click on Administrative tools/Computer
management/Disk Management and a screen similar to the one
below will appear.
The Drives should appear in the
following order:
(C:) Embedded System Drive
(D:) CD/DVD Writer
(E:) Database Drive (DB-1)
(F:) Database Drive (DB-2)*
(G:) Database Drive (DB-3)*
* Depending on the number of
drives fitted
If the Drives are not in this order you will need to reallocate the drive
letters to be as shown. Please ask for assistance if you do not know how to
do this.
15. You now need to Format the Database drives, set the cluster size and rename
them. Right click on the first Database drive (normally (E:)) and select Format.
The following Window will now open.
Set the Volume Label to:
DB-1 for the first Database drive
DB-2 for the second
DB-3 for the third etc
Set to NTFS
Set Allocation size to 64K as shown
16. Check the Perform a quick format tab and Click on OK. The drive will then be
formatted with the settings entered and will appear in the computer
management screen as shown in step 14 above.
Repeat step 15. for all the Database drives.
17. Now we need to rename the Kollector so that it has a unique id.
From the Control panel click on the System icon and the following Window
will open. Click on the Computer name tab as shown below.
Enter a Description for the Kollector
For example ‘Kollector Cameras 1-16’
Click the Change button and rename the
Kollector as follows using the serial
number found on the front door of the
Kollector unit.
KP-Serial Number (Kollector Pro)
KE-Serial Number (Kollector Elite)
For Example KP-26044
Press OK and you will be prompted to reboot the Kollector.
18. Once the unit has rebooted you will need to install the ViconNet software and
Drivers. Please contact Vicon Support for the latest versions. It is important
that all units on the same Network are running the same version of ViconNet.
Please note that ViconNet Version 2.** and Version 3.** are not compatible.
Install the ViconNet software first. The set up program should auto-run when
inserted into the CD Drive and follow the on screen instructions. A reboot will
be required and Kollector will restart running the ViconNet application.
Log in to the Kollector using admin (no password) and click the Set up tab.
Highlight the Kollector in the list and Click on Exit to o/s. The VN Drivers can
then be installed in the same manner.
A reboot will be required and Kollector will restart again running ViconNet.
19. Once the software and driver installation have been completed it is time to
configure the Kollector’s Database. If you have carried out a Full restore
please follow the step 20. If you have carried out a System restore only
please skip to step 21.
20. Reconfigure the Database following a Full Restore
Log in to the Kollector using admin (no password) and Click the Set up tab.
Highlight the Kollector in the list and Click on Select. The main menu when
then appear. From here select Storage Database set up. The following
window will then be displayed.
a)
Click on Add Disk and the
bottom part of the Window
will display the storage
parameters.
b)
Click on Select Disk and
choose the first Database
drive DB-1 (normally E:\).
c)
Set the Directory size to the
maximum possible.
d)
Click Save. This drive will
now appear in the list of
drives above.
e)
Repeat the above steps for
the other Database drives as
appropriate.
f)
Highlight Drive C:\ in the list
and click on Delete. This
removes the system drive
from the Database.
Once you have added all the Database Drives they will appear in the list.
You may have 1 – 4 internal drives fitted so make sure if they can be seen
in Windows that they appear in the screen above. Don’t forget to always
Delete the C:/ drive from the list.
Important Note: You cannot edit the Storage Database if the Kollector is
recording. If it is, stop recording, Exit to o/s and restart the application.
Restart the application by Logging out of Windows and then Logging back
in as administrator (no password) as the default log in screen displays.
The ViconNet application will then restart. Now Skip to the final step 22.
21. Reconfigure the Database following a System Restore
Sometimes the Database automatically reassigns itself to the Kollector.
Log in to the Kollector using admin (no password) and Click the Set up tab.
Highlight the Kollector in the list and Click on Select. The main menu when
then appear. From here select Storage Database set up. If you can see the
Database drives E: and possibly F: and G: displayed in the list, the Database
has been re-established. If the C: Drive is displayed please proceed as below.
To enable the Kollector to access an existing Database following a system
restore the application has to be redirected to the starting point of the
Database. Do Not try to do this via the Storage Database set up in step 20.
Log in to the Kollector using admin (no password) and click the Set up tab.
Highlight the Kollector in the list and Click on Exit to o/s. Right Click on the
Start button and click on Explore.
Locate the folder C:\ViconNet\VNData\Settings\Config
Locate and open the file Assistant.ini. This will open in Notepad.
Edit the Drive letter from C: to the first Database drive letter.
This is normally E: and save the file as shown here.
Now locate the file Assistant.vsb in the same directory and delete it.
Now check to see if you have the folder
C:\ViconNet\VNBackup\Settings\Config
If you have locate the file Assistant.vsb and delete it.
Finally locate the folder E:\ViconNet\VNBackup\Settings\Config
Locate the file Assistant.vsb and delete it.
Restart the application by Logging out of Windows and then Logging back in
as administrator (no password) as the default log in screen displays.
The ViconNet application will then restart.
22. Finally we just need to check the final settings as unless you have carried
out a system restore your Kollector will be at Factory defaults.
Network Settings
If the Kollector is part of a Network system you will need to re-configure your IP
settings and define where the Nucleus is.
Auto Record
By default the Kollector will not be recording. Enter the Menu and Auto record set
up and include the cameras in the list that you wish to record with the
appropriate quality and frame rate settings.
Other Settings
Camera Titles, Macros and Schedules will all have to be set up. Once done it is a
good idea to save these configuration settings to another PC or memory stick as
a back up. Do not try to use another Kollector’s configuration settings.
Finally
Ensure that the Kollector is Recording and Playing back correctly and that it is
showing a reasonable number of Days recording on the GUI. If you have
reconfigured the Database this figure will change over the next few days.
If you only have 1 or 2 Days showing you need to recheck from step 20.
If you have any problems with the restore please recheck through this document.
For Programming issues please consult the user manual before calling support.
If you still are unable to rectify the problem please Telephone or e-mail Vicon
Customer Support as detailed below.
Vicon Customer Support
mailto:[email protected]
http://www.vicon-support.co.uk
+44 (0)1489 566330
Updated 01/10/07