1
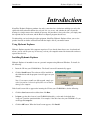
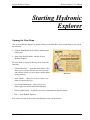
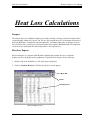
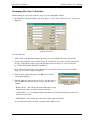
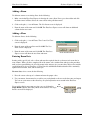
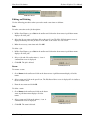
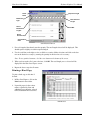
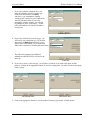
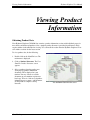
®
User Manual
Pub. No. HEX-40
Slant/Fin Corporation
100 Forest Drive
Greenvale, NY 11548
(516) 484-2600
www.slantfin.com
Hydronic Explorer User Manual
PROPRIETARY INFORMATION NOTICE
This document contains information proprietary to Slant/Fin Corporation. All
rights are reserved.
No part of this document may be reproduced, transmitted, processed or recorded
by any means or form, electronic, mechanical, photographic or otherwise, nor be
released to any third party without the express written consent of Slant/Fin
Corporation.
Microsoft, Windows, and Windows NT are either trademarks or registered trademarks of
Microsoft Corporation. Adobe, the Adobe logo, Acrobat, and the Acrobat logo are trademarks of
Adobe Systems.
Slant/Fin Corporation
ii
Table of Contents
Hydronic Explorer User Manual
Table of Contents
INTRODUCTION . . . . . . . . . . . . . . . . . . . . . . . . . . . . . . . . . . . . . . . . . . . . . . . . . . . . . . . .1
HYDRONIC EXPLORER . . . . . . . . . . . . . . . . . . . . . . . . . . . . . . . . . . . . . . . . . . . . . . . . . . . . . .1
USING HYDRONIC EXPLORER . . . . . . . . . . . . . . . . . . . . . . . . . . . . . . . . . . . . . . . . . . . . . . . .1
INSTALLING HYDRONIC EXPLORER . . . . . . . . . . . . . . . . . . . . . . . . . . . . . . . . . . . . . . . . . . . . .1
STARTING HYDRONIC EXPLORER . . . . . . . . . . . . . . . . . . . . . . . . . . . . . . . . . .2
OPENING THE MAIN MENU . . . . . . . . . . . . . . . . . . . . . . . . . . . . . . . . . . . . . . . . . . . . . . . . . .2
HEAT LOSS CALCULATIONS . . . . . . . . . . . . . . . . . . . . . . . . . . . . . . . . . . . . . . . .3
PURPOSE . . . . . . . . . . . . . . . . . . . . . . . . . . . . . . . . . . . . . . . . . . . . . . . . . . . . . . . . . . . . . . .3
HEAT LOSS EXPRESS . . . . . . . . . . . . . . . . . . . . . . . . . . . . . . . . . . . . . . . . . . . . . . . . . . . . . . .3
Menu Bar . . . . . . . . . . . . . . . . . . . . . . . . . . . . . . . . . . . . . . . . . . . . . . . . . . . . . . . . . . . . . . . . . . .4
Toolbar . . . . . . . . . . . . . . . . . . . . . . . . . . . . . . . . . . . . . . . . . . . . . . . . . . . . . . . . . . . . . . . . . . . . .4
Data Entry Area . . . . . . . . . . . . . . . . . . . . . . . . . . . . . . . . . . . . . . . . . . . . . . . . . . . . . . . . . . . . . .4
PERFORMING HEAT LOSS CALCULATIONS . . . . . . . . . . . . . . . . . . . . . . . . . . . . . . . . . . . . . . . .5
Adding a Room . . . . . . . . . . . . . . . . . . . . . . . . . . . . . . . . . . . . . . . . . . . . . . . . . . . . . . . . . . . . . . .6
Adding a Floor . . . . . . . . . . . . . . . . . . . . . . . . . . . . . . . . . . . . . . . . . . . . . . . . . . . . . . . . . . . . . . .6
Entering Room Data . . . . . . . . . . . . . . . . . . . . . . . . . . . . . . . . . . . . . . . . . . . . . . . . . . . . . . . . . . .6
EDITING AND DELETING . . . . . . . . . . . . . . . . . . . . . . . . . . . . . . . . . . . . . . . . . . . . . . . . . . . .9
Jobs . . . . . . . . . . . . . . . . . . . . . . . . . . . . . . . . . . . . . . . . . . . . . . . . . . . . . . . . . . . . . . . . . . . . . . . .9
Rooms . . . . . . . . . . . . . . . . . . . . . . . . . . . . . . . . . . . . . . . . . . . . . . . . . . . . . . . . . . . . . . . . . . . . . .9
Floors . . . . . . . . . . . . . . . . . . . . . . . . . . . . . . . . . . . . . . . . . . . . . . . . . . . . . . . . . . . . . . . . . . . . .10
Room Data . . . . . . . . . . . . . . . . . . . . . . . . . . . . . . . . . . . . . . . . . . . . . . . . . . . . . . . . . . . . . . . . .10
SELECTING BASEBOARD . . . . . . . . . . . . . . . . . . . . . . . . . . . . . . . . . . . . . . . . . . . . . . . . . . .10
Selecting Baseboard . . . . . . . . . . . . . . . . . . . . . . . . . . . . . . . . . . . . . . . . . . . . . . . . . . . . . . . . . .10
PRINTING A HARD COPY . . . . . . . . . . . . . . . . . . . . . . . . . . . . . . . . . . . . . . . . . . . . . . . . . . .11
SELECTING A BOILER . . . . . . . . . . . . . . . . . . . . . . . . . . . . . . . . . . . . . . . . . . . .12
FINDING THE RIGHT BOILER . . . . . . . . . . . . . . . . . . . . . . . . . . . . . . . . . . . . . . . . . . . . . . . .12
VIEWING PRODUCT INFORMATION . . . . . . . . . . . . . . . . . . . . . . . . . . . . . . . .15
OBTAINING PRODUCT DATA . . . . . . . . . . . . . . . . . . . . . . . . . . . . . . . . . . . . . . . . . . . . . . . . .15
QUICK ANSWERS . . . . . . . . . . . . . . . . . . . . . . . . . . . . . . . . . . . . . . . . . . . . . . . . .16
PURPOSE . . . . . . . . . . . . . . . . . . . . . . . . . . . . . . . . . . . . . . . . . . . . . . . . . . . . . . . . . . . . . .16
How do I create, edit, or delete a job? . . . . . . . . . . . . . . . . . . . . . . . . . . . . . . . . . . . . . . . . . . . . .16
How do I add, edit, or delete a floor in my heat loss calculations? . . . . . . . . . . . . . . . . . . . . . . .16
How do I add, edit, or delete a room in my heat loss calculations? . . . . . . . . . . . . . . . . . . . . . . .17
One of my entries for heat loss calculations is incorrect. How do I change it? . . . . . . . . . . . . . . .17
How do I save my work? . . . . . . . . . . . . . . . . . . . . . . . . . . . . . . . . . . . . . . . . . . . . . . . . . . . . . . .17
How do I select the right boiler for a job? . . . . . . . . . . . . . . . . . . . . . . . . . . . . . . . . . . . . . . . . . .18
How do I select and layout baseboard? . . . . . . . . . . . . . . . . . . . . . . . . . . . . . . . . . . . . . . . . . . . .18
How can I view Slant/Fins product literature? . . . . . . . . . . . . . . . . . . . . . . . . . . . . . . . . . . . . . .18
How can I get a hard copy of Slant/Fins product literature? . . . . . . . . . . . . . . . . . . . . . . . . . . . .18
What is Adobe Acrobat Reader, and how can I get it? . . . . . . . . . . . . . . . . . . . . . . . . . . . . . . . . .18
TABLE OF OUTDOOR DESIGN TEMPERATURES . . . . . . . . . . . . . . . . . . . . . . . . . . . . . . . . . . . . . . . . . . . . .19
Slant/Fin Corporation
iii
Hydronic Explorer User Manual
Introduction
Introduction
Slant/Fin s Hydronic Explorer performs fast and accurate heat loss calculations and helps you select the
right boiler and baseboard radiation for each job. It is easy to use, and, whether the job is to provide
heating for a single room or for a multilevel structure, the procedure is always the same: you simply enter
the required data for each room, and the Heat Loss Express program does the rest.
To further help you in selecting the right equipment, Slant/Fin s Hydronic Explorer allows you to view
product literature on boilers and baseboard with the simple click of your mouse button.
Using Hydronic Explorer
Hydronic Explorer requires little computer experience. If you already know how to use a keyboard and
mouse, you are well on your way. If necessary, refer to your computer manual for instructions on how to
operate these devices.
Installing Hydronic Explorer
Hydronic Explorer is intended for use on a personal computer using Microsoft Windows. To install, do
the following:
1.
Insert the CD into your CD-ROM drive. The Install screen will automatically appear.
2.
Click the Install button. The software will be installed in
the folder shown and the program icon will appear on your
desktop.
Note: If you want to install to a different path, simply type
in the new path or click on the open folder icon to browse
through your computer.
Install Screen
If the Install screen fails to appear after inserting the CD into your CD-ROM drive, do the following:
1.
Click the Start button on the taskbar, then click Run.
2.
In Open, type the drive letter of your CD-ROM followed by a colon and a backslash, then
"setup.exe" (omit the quotation marks). For example, if the drive letter for your CD-ROM is D, you
would type: D:\setup.exe.
3.
Click the OK button. When the Install screen appears, click Install.
Slant/Fin Corporation
1
Hydronic Explorer User Manual
Starting Hydronic Explorer
Starting Hydronic
Explorer
Opening the Main Menu
You can start Hydronic Explorer by double-clicking on the Slant/Fin icon on your desktop, or you can do
the following:
1. Click the Start button on the taskbar, and then point
to Programs.
2. Point to the Slant/Fin folder, and then click on
Hydronic Explorer.
The main menu is displayed allowing you to choose the
following:
• Calculate Heat Loss — opens Heat Loss Express. This
allows you to calculate the heat loss of the structure
and continues to help you select boiler and baseboard
heating products.
Main Menu
• Select a Boiler — allows you to select a boiler if you
know the required heat loss.
• View Product Information — allows you to view
product pages for boilers and baseboard heating.
• Technical Publications — installation and service information for Slant/Fin boilers.
• Exit — closes Hydronic Explorer.
Each of the selections is discussed in the following sections of this manual.
Slant/Fin Corporation
2
Hydronic Explorer User Manual
Heat Loss Calculations
Heat Loss Calculations
Purpose
The ultimate objective of Hydronic Explorer is to help you design a heating system that will provide the
required heating comfort for a specific job. The first step towards this goal is to determine the structure s
heat loss (BTU/hour). Construction, outside temperature, and indoor temperature are primary factors in
this calculation. The second step is selecting the proper boiler and heat distributors that will compensate
for the heat loss and maintain the indoor temperature at the required level.
Heat Loss Express
Heat Loss Express is a program within Hydronic Explorer that performs heat loss calculations,
helping you select the proper heating equipment. To open Heat Loss Express, do the following:
1. Double-click on the Slant/Fin icon. The main menu is displayed.
2. Click on Calculate Heat Loss. The Heat Loss Express screen appears.
Menu Bar
Toolbar
Data Entry Area
Heat Loss Express Screen
Slant/Fin Corporation
3
Heat Loss Calculations
Hydronic Explorer User Manual
The Heat Loss Express screen is divided into three sections: the menu bar, the toolbar, and the data entry
area. You choose commands from the menu bar or the toolbar, and enter room data in the data entry area.
This area also displays the heat loss calculations, and it is where you select the heating equipment.
Menu Bar
The following commands are available in the menu bar:
•
•
•
•
•
•
File — allows you to exit the program.
Jobs — allows you to create new jobs, make corrections by editing existing jobs, or delete a job.
Rooms — allows you to create new rooms, change the room name, or delete a room.
Floors — allows you to create new floors, change the floor names, or delete a floor.
Print — allows you to printout hard copies of your work.
Data Entry Mode — when you select All Rooms, you display a spreadsheet showing all the rooms of a
selected floor at the same time. When you select Single Room, the Single Room screen is displayed
allowing you view one room at a time.
• Help — opens the Hydronic Explorer User Manual for information to help you run the Hydronic
Explorer programs. This is a pdf format document which utilizes Adobe Acrobat Reader for viewing
or printing.
Toolbar
You can choose commands more quickly by simply clicking on the appropriate icon in the toolbar.
• To add a job, room or floor, click on the (+) icon.
• To edit a job, room or floor, click on the pencil
icon.
• To delete job, room or floor, click on the minus (-) icon.
In Data Entry Mode, click on the button with the grid pattern Show it to view all of the rooms of a
selected floor, or click the button Show it to its left to view the Single Room screen. If you are not sure
which is which, move your mouse to point to either button, and a message will appear identifying its
function.
• To obtain a hard copy printout of your work, click the Print button.
The toolbar has two commands that are not available in the menu bar: Select Boiler
and Exit. Once
you have completed all of the entries, click the Select Boiler button. The Boiler Selection screen will be
displayed showing the Btu/hr heat loss calculator. This screen will help you select the right boiler for your
job. See the Selecting a Boiler section in this manual for additional instructions.
•
To get information to help you run the Hydronic Explorer programs, click on the (?) icon. The
Hydronic Explorer User Manual will be opened.
• To leave Heat Loss Express, click the Exit button. You will be returned to the main menu in
Hydronic Explorer.
Data Entry Area
The Data Entry Area is where you will be entering the required data for each room. As you do this, the
heat loss calculations will be continuously updated, and the lower portion of the screen will show the
baseboard requirements for each room for Fine/Line 15, Fine/Line 30, and Multi/Pak 80.
Note: Unlike other programs you may have used, this program does not require you to save your work.
All entries are automatically saved by the system. Should you make an error, you can always edit it or
delete it. These procedures are described in more detail later in the manual.
Slant/Fin Corporation
4
Hydronic Explorer User Manual
Heat Loss Calculations
Performing Heat Loss Calculations
When working on a new project, the first step is to create a new job as follows:
1. In the Heat Loss Express toolbar, click on the plus (+) icon in "Jobs". The Create New Job screen is
displayed.
Create New Job Screen
Note the following:
•
Indoor Temp. is the minimum indoor temperature (F) to be maintained by the heating system.
•
You must determine the correct Outdoor Temp. (F) and Altitude (Ft.) for use in boiler selection for
the job s geographical location. Typical design temperatures for many U.S. cities are listed on
pg. 19-20 of the Hydronic Explorer User Manual.
•
The system will automatically enter 180 (degrees) as the default value for System Design Water
Temp. (F). This can be changed if required.
2. Enter all of the required data then click OK. The New Room
screen is then displayed.
3. Enter the name of a room on the 1st floor (i.e., kitchen, den, etc.)
and click OK. The Heat Loss Express screen will show three
columns:
New Room Screen
• Room Column — this will have the name of the room you just
identified, and where you will be entering room-data.
• 1st Floor Totals — as you add more rooms to this floor, this column will automatically show the
total for the entire floor.
• JOB TOTALS — this column shows the total of all the rooms on all floors.
As you add more rooms to the floor, a column will be added for each.
Slant/Fin Corporation
5
Hydronic Explorer User Manual
Heat Loss Calculations
Adding a Room
To add more rooms to an existing floor, do the following:
1. Make certain that Heat Loss Express is showing the correct floor. If not, go to the toolbar and click
the down-arrow in Floors. Select the correct floor in the pull-down menu.
2. Click on the plus (+) icon in Rooms. The New Room screen is displayed.
3. Enter the name of the room and click OK. The Heat Loss Express screen will show an additional
column for the new room.
Adding a Floor
To add more floors, do the following:
1. Click on the plus (+) icon in Floors. The Create New Floor
screen is displayed.
2. Enter the name of the new floor and click OK. The New
Room screen is displayed.
3. Enter the name of the room and click OK. The Heat Loss
Express screen will show the new floor and room.
Create New Floor Screen
Entering Room Data
Starting with a specific job, select a floor and enter the required data for each room (each room has its
own column). When you have completed all of the rooms, select another floor and repeat the procedure
until you have provided data for all of the rooms in the structure. As you enter data, the heat loss and the
required length (in feet) of Fine/Line 15, Fine/Line 30, and Multi/Pak 80 baseboard will be continually
updated for each room, floor, and the entire job.
To enter data, select a room, do the following:
1. Place the cursor at the top of a column and enter the proper value.
2. Use your mouse, down-arrow key or tab key on you keyboard to advance to the data entry and repeat.
You can use your mouse or the arrow keys on your keyboard to move around in the Heat Loss
Express screen.
All
Rooms
If you wish to display one room at a time, you can click on the
Single Room button in Data Entry Mode on the toolbar. The Single
Room screen will be displayed.
Single
Room
Multi/Single Room
Slant/Fin Corporation
6
Hydronic Explorer User Manual
Heat Loss Calculations
Single Room Screen
For some of the data, you simply type in the proper values. In other cases, the system helps you make the
necessary calculations or presents you with options then automatically enters the correct values.
Door & Glass (sq ft)
A calculator icon is displayed. When you click on the icon, the Door and Glass screen is displayed. Enter
the height and width for all of the windows in the room the click OK.
Note: You enter the height and width in inches, but the Heat Loss Express screen shows the total in
square feet.
Door & Glass Factor
A down-arrow is displayed. Click on the arrow and then click on one of the
options shown. The proper value is automatically inserted. You can enter a
factor if different from those presented, directly in the cell.
Exposed Wall Length
Door & Glass Factor
Enter the total length in feet of wall in the room exposed to the outdoors.
Exposed Wall Factor
Click in the cell for the exposed wall data for the room. A down-arrow is displayed. Do the following:
1. To enter the wall factor, click on the down-arrow. You are presented with a number of options that
refer to the general type of wall construction.
2. Use your mouse to point to the proper option. You will be presented with additional options. These
are primarily related to the amount of insulation. In most cases selecting the option with the correct
insulation is satisfactory. Click on that selection to select it.
If you need to be more precise, move your mouse pointer to the entry with the arrow under the proper
insulation thickness, and additional selections will appear to more closely match the detail of your
construction. Click on the approprite value to select. You can enter a known factor if different from those
presented, directly in the cell.
Slant/Fin Corporation
7
Hydronic Explorer User Manual
Heat Loss Calculations
Wall Factor Options
Cold Partition Length
Enter the total length in feet of wall in the room exposed to adjoining
unheated areas of the building.
Cold Partition Factor
Cold Patition Factor
A down-arrow is displayed. Click on the arrow and select one of the
options shown. The proper value is automatically inserted. You can
enter a factor if different from those presented, directly in the cell.
Ceiling Factor, Floor Factor, and Infiltration Factor
In ceiling factor, floor factor, and infiltration factor, a down-arrow is displayed. Do the following:
1. Click on the down-arrow. The factor options are displayed.
2. Use your mouse to point to one of the options. You will be presented with additional options. Repeat
until you find the correct factor and click on it. The proper value will be displayed in the Heat Loss
Express screen. The figures below show examples of finding ceiling, floor, and infiltration factors.
You can enter a factor if different from those presented, directly in the cell.
Ceiling Factor
Floor Factor
Slant/Fin Corporation
8
Heat Loss Calculations
Hydronic Explorer User Manual
Infiltration Factor
Editing and Deleting
Use the following procedures when you need to make corrections or deletions:
Jobs
To make corrections to the job description:
1. In Heat Loss Express, go to Jobs in the toolbar and click on the down-arrow. A pull-down menu
displays all of the jobs.
2. Select the job you want to edit then click on the pencil icon. The Edit Job Information screen is
displayed showing all of the job data. It is the same as the Create New Job screen.
3. Make the necessary corrections and click OK.
To delete a job:
1. In Heat Loss Express, go to Jobs in the toolbar and click on the down-arrow. A pull-down menu
displays all of the jobs.
2. Select a job and click on the minus (-) icon. A
confirmation screen is displayed.
3. Click OK. The job is deleted.
Rooms
Confirmation Screen
To rename a room:
1. Go to Rooms in the toolbar and click on the down-arrow. A pull-down menu displays all of the
rooms.
2. Select a room and click on the pencil icon. The Edit Room Name screen is displayed. It is similar to
the New Room screen.
3. Enter the new name and click OK.
To delete a room:
1. Go to Rooms in the toolbar and click on the downarrow. A pull-down menu displays all of the
rooms.
2. Select a room and click on the minus (-) icon. A
confirmation screen is displayed.
3. Click OK. The room is deleted.
Slant/Fin Corporation
Confirmation Screen
9
Heat Loss Calculations
Hydronic Explorer User Manual
Floors
To rename a floor:
1. Go to Floors in the toolbar and click on the down-arrow. A pull-down menu displays all of the floors.
2. Select a floor and click on the pencil icon. The Edit Floor Name screen is displayed. It is similar to
the Create New Floor screen.
3. Enter the new name and click OK.
To delete a floor:
1. Go to Floors in the toolbar and click on the down-arrow. A pull-down menu displays all of the floors.
2. Select a floor and click on the minus (-) icon. A
confirmation screen is displayed.
3. Click OK. The floor is deleted.
Room Data
Confirmation Screen
To change data that you entered for a specific room, use the mouse to highlight the existing data and type
in the new data.
Selecting Baseboard
Once you have entered the data for all of the rooms, you can proceed to select the proper baseboard.
Selecting Baseboard
The Heat Loss Express screen shows the required length (in feet) for Fine/Line 15, Fine/Line 30, or
Multi/Pak 80 baseboard for each room. To select baseboard, do the following:
1. For each room, click the cursor in feet selected cell in the desired baseboard section. A down-arrow
will appear.
2. Click on the down-arrow. The Select Baseboard screen is displayed. It shows:
a.
b.
c.
d.
e.
The room for which your selecting baseboard.
The type of baseboard you selected.
The length of baseboard (in linear feet) required.
Available lengths of baseboard.
Available accessories.
Slant/Fin Corporation
10
Hydronic Explorer User Manual
Heat Loss Calculations
Required Length
Room
Name
Baseboard
Type
Total Selected
Length
Select
Baseboard
lengths
Scroll Bar
Select
Accessories
View Product
Data
Select Baseboard Screen
3. For each length of baseboard, enter the quantity. The total length selected will be displayed. This
should equal or slightly exceed the required length.
4. Use the scroll bar on the right to view available accessories. Make selections and click on the box
next to the desired accessory by entering the quantity in this box for each accessory.
Note: To view product literature, click the view button on the bottom of the screen.
5. When you have made all of your selections, click OK. The total length you ve selected will be
displayed in the Heat Loss Express screen.
6. Repeat the above steps for all rooms.
Printing a Hard Copy
To print a hard copy at this time if
desired:
1. In Heat Loss Express, click on the
Print button in the toolbar.
2. It provide pages for the various
rooms, separated by floor and
additional pages showing selected
boiler, baseboard and accessories.
Print Preview
Slant/Fin Corporation
11
Hydronic Explorer User Manual
Selecting a Boiler
Selecting a Boiler
Finding the Right Boiler
If you used the Heat Loss Express, the total Btu/hr will be entered in the Btu/hr load after clicking select
a boiler
in the tool bar. If you already know the building s heating load, you can use Hydronic
Explorer to help you select the right boiler without performing the heat loss calculations.
Do the following:
1. Double-click on the Slant/Fin icon. The main menu is displayed.
2. Click on Select a Boiler. The Boiler Selection screen appears.
The Boiler Selection screen is divided into four panes. The top pane allows you to enter load requirements
(Btu/Hr) and the type of fuel to be used. The second pane starts off blank but then requests additional
information based on the fuel type you selected. The third panel identifies the boilers that meet your
requirements, and the fourth panel allows you to select a boiler or cancel.
Pane #1: Enter load and fuel
type requirements.
Pane #2: Prompts for
additional data based on
fuel type selected. Also,
allows you to view product
literature pages.
Pane #3: Identifies boilers
that meet requirements.
Pane #4: Click OK to accept
or Cancel to quit program.
Boiler Selection Screen
3. Enter the load requirements (Btu/Hr) in pane #1. (If not entered by Heat Loss Express)
4. In Fuel Type, click on the down-arrow. A pull-down menu is displayed showing the fuel type choices
(natural or propane gas, #2 fuel oil, dual fuel, or electric). Select a fuel type. Depending on the fuel
type you selected, pane #2 may request additional information, as shown below.
Slant/Fin Corporation
12
Selecting a Boiler
Hydronic Explorer User Manual
a. If you select Natural or Propane Gas, you
must enter altitude and select venting type.
Click on the down-arrow in Venting
and select a type (atmospheric chimney
venting, power venting, or sealed combustion)
from the pull-down menu. If you select
atmospheric chimney venting, you will also
be prompted to select a boiler type — (boiler,
boiler with tankless coil, boiler with indirect
water heater.
Natural Propane Gas
b. If you select #2 Fuel Oil as the fuel type, you
will need to select the boiler type. Click on the
down-arrow in Boiler Type and select a type
(boiler, boiler with tankless coil, or boiler with
indirect hot water heater) from the pull-down menu.
c. You will not be prompted for additional
information when Dual Fuel is selected as the
fuel type.
#2 Fuel Oil
d. If you select electric as the fuel type, you will have to indicate if you need single phase or three
phase by clicking on the appropriate button. If you select single phase, you must also enter anticipated
jobsite voltage.
Electric-Single Phase
Electric-Three Phase
5. Click on the appropriate button to view the product literature pages for the available boilers.
Slant/Fin Corporation
13
Selecting a Boiler
Hydronic Explorer User Manual
6. Click on Select Boiler to display the available
boilers that meet your requirements.
7. Select a boiler. If you have not selected a Boiler
with Indirect Hot Water Heater ,
record your selection, then click OK
If you select an oil or gas-fired boiler under
Fuel Type menu, and then boiler with indirect
hot water heater in the Boiler Type menu, a
sizing guide button will appear —
8. Click the Sizing Guide button. The following screen will appear. On this screen, enter information in the
Quantity fields for each Fixture Type in Step 1, select the Number of Persons in Home in Step 2 and
the First Hour Rating water temperature requirement in step 3. Select a water heater from the Models
menu. When you have finished sizing the water heater, click the OK button.
You can now print out a hard copy of your boiler
and water heater selection.
Slant/Fin Corporation
14
Hydronic Explorer User Manual
Viewing Product Information
Viewing Product
Information
Obtaining Product Data
Your Hydronic Explorer CD-ROM also contains a product information section with individual pages for
most boiler and baseboard products. Also, complete product literature is provided in pdf format, which
requires Adobe Acrobat Reader for viewing. You can install the reader from the Hydronic Explorer CD or
visit Adobe s website for the latest version
To view product data, do the following:
1. Double-click on the Slant/Fin icon. The
main menu is displayed.
2. Click on Product Literature. The View
Slant/Fin Product Literature screen
appears.
3. Select a product from the product tree.
A single-page product information
document will be displayed on your
monitor. You may choose to read the
document on your monitor or print out a
hard copy. There is a link on each product
information page to open a .pdf document
of that product s complete catalog
literature.
Slant/Fin Corporation
View Slant/Fin Product Literature Screen
15
Hydronic Explorer User Manual
Quick Answers
Quick Answers
Purpose
This section serves as handy reference allowing you to find quick answers to specific questions.
How do I create, edit, or delete a job?
Creating a job:
1. In the Heat Loss Express toolbar, click on the plus (+) icon in Jobs. The Create New Job screen is
displayed.
2. Enter all of the required data then click OK.
Editing a job:
1. In the Heat Loss Express toolbar, click on the down-arrow under Jobs. A pull-down menu displays
all of the jobs saved.
2. Select the job you want to modify then click on the pencil icon.
3. Make changes in the Edit Job Information screen and click OK.
Deleting a job:
1. In the Heat Loss Express toolbar, click on the down-arrow under Jobs. A pull-down menu displays
all of the jobs.
2. Select a job and click on the minus (-) icon. A confirmation screen is displayed.
3. Click OK. The job is deleted.
How do I add, edit, or delete a floor in my heat loss calculations?
Adding a floor:
1. In the Heat Loss Express toolbar, click on the plus (+) icon in Floors. The Create New Floor screen is
displayed.
2. Enter the name of the new floor and click OK. The New Room screen is displayed.
3. Enter the name of the room and click OK. The Heat Loss Express screen will show the new floor and
room.
Slant/Fin Corporation
16
Quick Answers
Hydronic Explorer User Manual
Editing a floor:
1. In the Heat Loss Express toolbar, click on the down-arrow under Floors. A pull-down menu displays
all of the floors.
2. Select a floor and click on the pencil icon. The Edit Floor Name screen is displayed.
3. Enter the new name and click OK.
Deleting a floor:
1. In the Heat Loss Express toolbar, click on the down-arrow under Floors. A pull-down menu displays
all of the floors.
2. Select a floor and click on the minus (-) icon. A confirmation screen is displayed.
3. Click OK. The floor is deleted.
How do I add, edit, or delete a room in my heat loss calculations?
Adding a room:
1. In the heat Loss Express toolbar, click on the plus (+) icon in Rooms. The New Room screen is
displayed.
2. Enter the name of the room and click OK.
Editing a room:
1. In the Heat Loss Express toolbar, click on the down-arrow under Rooms. A pull-down menu displays
all of the rooms.
2. Select a room and click on the pencil icon. The Edit Room Name screen is displayed.
3. Enter the new name and click OK.
Deleting a room:
1. In the Heat Loss Express toolbar, click on the down-arrow under Rooms. A pull-down menu displays
all of the rooms.
2. Select a room and click on the minus (-) icon. A confirmation screen is displayed.
3. Click OK. The room is deleted.
One of my entries for heat loss calculations is incorrect. How do I change it?
Use your mouse to highlight the entry and type in the new data.
How do I save my work?
There is no need for you to save your work. The system saves it automatically.
Slant/Fin Corporation
17
Quick Answers
Hydronic Explorer User Manual
How do I select the right boiler for a job?
1. In the Hydronic Explorer main menu, click on Select a Boiler.
2. Enter the required data in the Boiler Selection screen. The system will display the boiler(s) that meets
your requirements.
3. Choose a boiler and click OK.
How do I select and layout baseboard?
1. Complete the heat loss calculations in Heat Loss Express. The system will display required lengths of
Fine/Line 15, Fine/Line 30, and Multi/Pak 80 for each room.
2. For each room, place the cursor in ft. selected below the desired baseboard. A down-arrow will
appear.
3. Click on the down-arrow. The Select Baseboard screen is displayed.
4. Select baseboard lengths and accessories.
5. Click OK.
How can I view Slant/Fin s product literature?
1. In Hydronic Explorer s main menu, click the Product Literature button. The View Slant/Fin
Product Literature screen appears.
2. Click on one of the down-arrows
3. Select a product from the pull-down menu. The document will be displayed on your monitor. You
may choose to read the document on your monitor or print out a hard copy.
How can I get a hard copy of Slant/Fins product literature?
Open the document and click on the print icon.
What is Adobe Acrobat Reader, and how can I get it?
Adobe Acrobat Reader is used to read portable document format (pdf) files. This is the format in which
documentation is stored on the CD-ROM. You can install Adobe Acrobat Reader to your computer from
the Heatloss Explorer CD, or you can download it from Adobe s website.
Slant/Fin Corporation
18
Outdoor Design Temperatures For Cities
ALABAMA
GEORGIA
Anniston . . . . . . . . . . . . . . . .22
Birmingham . . . . . . . . . . . . .21
Mobile . . . . . . . . . . . . . . . . .29
Montgomery . . . . . . . . . . . . .25
MICHIGAN
Atlanta . . . . . . . . . . . . . . . . .22
Augusta . . . . . . . . . . . . . . . .23
Macon . . . . . . . . . . . . . . . . .25
Savannah . . . . . . . . . . . . . . .27
-
IDAHO
ALASKA
-
Anchorage . . . . . . . . . . . . . . 18
Fairbanks . . . . . . . . . . . . . . . 47
Juneau . . . . . . . . . . . . . . . . . 1
Nome . . . . . . . . . . . . . . . . . . 27
Boise . . . . . . . . . . . . . . . . . .10
Coeur D Alene . . . . . . . . . . . 1
Lewiston . . . . . . . . . . . . . . . .6
Pocatello . . . . . . . . . . . . . . . . 1
-
MINNESOTA
-
Duluth . . . . . . . . . . . . . . . . . 16
Minneapolis . . . . . . . . . . . . . 12
St. Paul . . . . . . . . . . . . . . . . . 12
ILLINOIS
ARIZONA
Flagstaff . . . . . . . . . . . . . . . .4
Phoenix . . . . . . . . . . . . . . . .34
Tucson . . . . . . . . . . . . . . . . .32
Winslow . . . . . . . . . . . . . . . .10
Yuma . . . . . . . . . . . . . . . . . .39
Chicago . . . . . . . . . . . . . . . .0
Moline . . . . . . . . . . . . . . . . . 4
Peoria . . . . . . . . . . . . . . . . . . 4
Springfield . . . . . . . . . . . . . .2
Urbana . . . . . . . . . . . . . . . . .2
-
INDIANA
ARKANSAS
Fort Smith . . . . . . . . . . . . . .17
Little Rock . . . . . . . . . . . . . .20
Fort Wayne . . . . . . . . . . . . . .1
Indianapolis . . . . . . . . . . . . .2
Bakersfield . . . . . . . . . . . . . .32
Eureka . . . . . . . . . . . . . . . . .33
Fresno . . . . . . . . . . . . . . . . . .30
Los Angeles . . . . . . . . . . . . .43
Oakland . . . . . . . . . . . . . . . .36
Sacramento . . . . . . . . . . . . . .32
San Diego . . . . . . . . . . . . . . .44
San Francisco . . . . . . . . . . . .38
San Jose . . . . . . . . . . . . . . . .36
MISSISSIPPI
Meridian . . . . . . . . . . . . . . . .23
Vicksburg . . . . . . . . . . . . . . .26
MISSOURI
Columbia . . . . . . . . . . . . . . .4
Kansas City . . . . . . . . . . . . .6
St. Louis . . . . . . . . . . . . . . . .6
MONTANA
IOWA
CALIFORNIA
-5
-5
-7
-11
-7
Davenport . . . . . . . . . . . . . . .
Des Moines . . . . . . . . . . . . .
Dubuque . . . . . . . . . . . . . . . .
Mason City . . . . . . . . . . . . . .
Sioux City . . . . . . . . . . . . . .
NEBRASKA
KANSAS
Dodge City . . . . . . . . . . . . . .5
Topeka . . . . . . . . . . . . . . . . .4
Wichita . . . . . . . . . . . . . . . . .7
-10
-17
-16
-7
-15
Billings . . . . . . . . . . . . . . . . .
Butte . . . . . . . . . . . . . . . . . . .
Helena . . . . . . . . . . . . . . . . .
Kalispell . . . . . . . . . . . . . . . .
Miles City . . . . . . . . . . . . . . .
-
Lincoln . . . . . . . . . . . . . . . . . 2
North Platte . . . . . . . . . . . . . 4
Omaha . . . . . . . . . . . . . . . . . 3
NEVADA
COLORADO
Denver . . . . . . . . . . . . . . . . .1
Grand Junction . . . . . . . . . . .7
Pueblo . . . . . . . . . . . . . . . . .0
CONNECTICUT
Hartford . . . . . . . . . . . . . . . .7
New Haven . . . . . . . . . . . . . .7
DELAWARE
Dover . . . . . . . . . . . . . . . . . .15
Wilmington . . . . . . . . . . . . . .14
KENTUCKY
Louisville . . . . . . . . . . . . . . .10
Washington . . . . . . . . . . . . . .14
New Orleans . . . . . . . . . . . . .33
Shreveport . . . . . . . . . . . . . .25
MAINE
-3
-6
-13
-1
Augusta . . . . . . . . . . . . . . . .
Bangor . . . . . . . . . . . . . . . . .
Caribou . . . . . . . . . . . . . . . . .
Portland . . . . . . . . . . . . . . . .
MARYLAND
Baltimore . . . . . . . . . . . . . . .13
FLORIDA
Jacksonville . . . . . . . . . . . . .32
Miami . . . . . . . . . . . . . . . . . .47
Pensacola . . . . . . . . . . . . . . .29
Tampa . . . . . . . . . . . . . . . . . .40
Las Vegas . . . . . . . . . . . . . . .28
Reno . . . . . . . . . . . . . . . . . . .10
Winnemucca . . . . . . . . . . . . .3
LOUISIANA
DISTRICT OF COLUMBIA
MASSACHUSETTS
Boston . . . . . . . . . . . . . . . . .9
Nantucket . . . . . . . . . . . . . . .0
Springfield . . . . . . . . . . . . . .0
Worcester . . . . . . . . . . . . . . .4
NOTE: These values are the 97 ⁄2% figures recommended in energy conservation standards, like
1
ASHRAE 90A-1980. Adjustments may be made to reflect local climates which differ from
the tabulated temperatures, or local weather experience.
Slant/Fin Corporation
Battle Creek . . . . . . . . . . . . .5
Detroit . . . . . . . . . . . . . . . . .6
Flint . . . . . . . . . . . . . . . . . . .1
Grand Rapids . . . . . . . . . . . .5
Lansing . . . . . . . . . . . . . . . . .1
Sault St. Marie . . . . . . . . . . . 8
NEW HAMPSHIRE
-
Concord . . . . . . . . . . . . . . . . 3
Manchester . . . . . . . . . . . . . . 3
NEW JERSEY
Atlantic City . . . . . . . . . . . . .13
Newark . . . . . . . . . . . . . . . . .14
Trenton . . . . . . . . . . . . . . . . .14
NEW MEXICO
Albuquerque . . . . . . . . . . . . .16
Roswell . . . . . . . . . . . . . . . .18
NEW YORK
-
Albany . . . . . . . . . . . . . . . . . 1
Binghamton . . . . . . . . . . . . .1
Buffalo . . . . . . . . . . . . . . . . .6
Massena . . . . . . . . . . . . . . . . 8
New York . . . . . . . . . . . . . . .15
Rochester . . . . . . . . . . . . . . .5
Syracuse . . . . . . . . . . . . . . . .2
-
19
Outdoor Design Temperatures For Cities
NORTH CAROLINA
CANADA
TENNESSEE
Asheville . . . . . . . . . . . . .14
Charlotte . . . . . . . . . . . . . .22
Greensboro . . . . . . . . . . . .18
Raleigh . . . . . . . . . . . . . . .20
Wilmington . . . . . . . . . . . .26
Chattanooga . . . . . . . . . . .18
Knoxville . . . . . . . . . . . . .19
Memphis . . . . . . . . . . . . .18
Nashville . . . . . . . . . . . . .14
TEXAS
NORTH DAKOTA
-
Bismarck . . . . . . . . . . . . 19
Fargo . . . . . . . . . . . . . . . 18
OHIO
Akron . . . . . . . . . . . . . . . . .6
Cincinnati . . . . . . . . . . . . . .6
Cleveland . . . . . . . . . . . . . .5
Columbus . . . . . . . . . . . . . .5
Dayton . . . . . . . . . . . . . . . .4
Sandusky . . . . . . . . . . . . . .4
Toledo . . . . . . . . . . . . . . . .1
OKLAHOMA
Oklahoma City . . . . . . . . .13
Tulsa . . . . . . . . . . . . . . . . .13
OREGON
Baker . . . . . . . . . . . . . . . . .6
Eugene . . . . . . . . . . . . . . .22
Medford . . . . . . . . . . . . . .23
Portland . . . . . . . . . . . . . .23
Salem . . . . . . . . . . . . . . . .23
PENNSYLVANIA
Erie . . . . . . . . . . . . . . . . . . .9
Harrisburg . . . . . . . . . . . . .11
Philadelphia . . . . . . . . . . .14
Pittsburgh . . . . . . . . . . . . . .5
Scranton . . . . . . . . . . . . . . .5
RHODE ISLAND
Providence . . . . . . . . . . . . .9
SOUTH CAROLINA
Charleston . . . . . . . . . . . . .27
Columbia . . . . . . . . . . . . .24
Greenville . . . . . . . . . . . . .22
SOUTH DAKOTA
-
Huron . . . . . . . . . . . . . . . 14
Pierre . . . . . . . . . . . . . . . 10
Rapid City . . . . . . . . . . . . 7
Abilene . . . . . . . . . . . . . . .20
Amarillo . . . . . . . . . . . . . .11
Austin . . . . . . . . . . . . . . . .33
Brownsville . . . . . . . . . . .39
Corpus Christi . . . . . . . . . .35
Dallas . . . . . . . . . . . . . . . .22
Del Rio . . . . . . . . . . . . . . .31
El Paso . . . . . . . . . . . . . . .24
Fort Worth . . . . . . . . . . . .22
Galveston . . . . . . . . . . . . .36
Houston . . . . . . . . . . . . . .32
Port Arthur . . . . . . . . . . . .31
San Antonio . . . . . . . . . . .30
UTAH
Vernal . . . . . . . . . . . . . . . . .0
Salt Lake City . . . . . . . . . . .8
VERMONT
-
Burlington . . . . . . . . . . . . 7
VIRGINIA
Lynchburg . . . . . . . . . . . . .16
Norfolk . . . . . . . . . . . . . . .22
Richmond . . . . . . . . . . . . .17
Roanoke . . . . . . . . . . . . . .16
-23
-25
-37
-39
Calgary . . . . . . . . . . . . . .
Edmonton . . . . . . . . . . . .
Grand Prairie . . . . . . . . .
McMurray . . . . . . . . . . .
BRITISH COLUMBIA
-
Kamloops . . . . . . . . . . . . 10
Prince George . . . . . . . . . 31
Vancouver . . . . . . . . . . . . .19
Victoria . . . . . . . . . . . . . . .23
MANITOBA
-
Churchill . . . . . . . . . . . . . 39
Dauphin . . . . . . . . . . . . . 26
Winnipeg . . . . . . . . . . . . 27
NEW BRUNSWICK
-
Edmunston . . . . . . . . . . . 16
Fredericton . . . . . . . . . . . 11
Moncton . . . . . . . . . . . . . . 7
St. John . . . . . . . . . . . . . . 8
NEW FOUNDLAND
-
Gander . . . . . . . . . . . . . . . 1
Goose Bay . . . . . . . . . . . 25
St. Johns . . . . . . . . . . . . . . .7
NOVA SCOTIA
Halifax . . . . . . . . . . . . . . . .5
Yarmouth . . . . . . . . . . . . . .9
ONTARIO
WASHINGTON
Seattle . . . . . . . . . . . . . . . .26
Spokane . . . . . . . . . . . . . . .2
Yakima . . . . . . . . . . . . . . . .5
WEST VIRGINIA
Elkins . . . . . . . . . . . . . . . . .6
Parkersburg . . . . . . . . . . . .11
Hamilton . . . . . . . . . . . . . . .1
Kenora . . . . . . . . . . . . . . 28
London . . . . . . . . . . . . . . . .0
Ottawa . . . . . . . . . . . . . . 13
Sault Ste Marie . . . . . . . . 15
Timmins . . . . . . . . . . . . . 28
Toronto . . . . . . . . . . . . . . . 1
-
PRINCE EDWARD ISLAND
WISCONSIN
WYOMING
-
Charlottetown . . . . . . . . . . 4
-9
-9
-7
-4
Green Bay . . . . . . . . . . . .
LaCrosse . . . . . . . . . . . . .
Madison . . . . . . . . . . . . . .
Milwaukee . . . . . . . . . . . .
-
Cheyenne . . . . . . . . . . . . . 1
Lander . . . . . . . . . . . . . . 11
Sheridan . . . . . . . . . . . . . . 8
NOTE: These values are the 971⁄2% figures recommended in energy conservation standards, like
ASHRAE 90-75. Adjustments may be made to reflect local climates which differ from
the tabulated temperatures, or local weather experience.
Slant/Fin Corporation
ALBERTA
QUEBEC
-10
-12
-22
-27
Montreal . . . . . . . . . . . . .
Quebec . . . . . . . . . . . . . .
Sept Iles . . . . . . . . . . . . .
Vald Or . . . . . . . . . . . . .
SASKATCHEWAN
-
Prince Albert . . . . . . . . . . 35
Regina . . . . . . . . . . . . . . 29
Saskatoon . . . . . . . . . . . . 31
YUKON
-
Whitehorse . . . . . . . . . . . 43
20