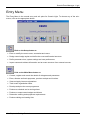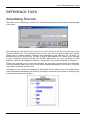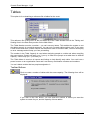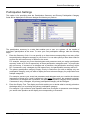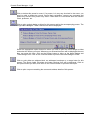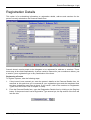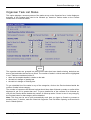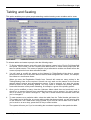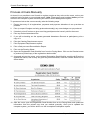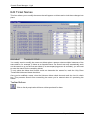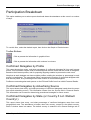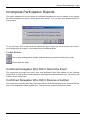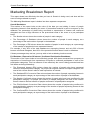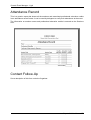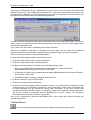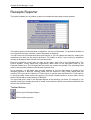
1
Summit
Event Manager
Light
User Manual
© MIE Software 1999-2003
COPYRIGHT
© MIE Software Pty Ltd
Summit Event Manager – Light Version 10.17 August 2003. All rights reserved.
TRADEMARKS
Summit and Microsoft
Microsoft®, MS-DOS®, Windows®, Windows 95®, Windows 98®, Windows NT®, Windows Me®,
Windows XP®, Microsoft Access®, Microsoft Word® and Microsoft Excel® are registered
trademarks of Microsoft Corporation.
Summit Event Management System operates in a graphics environment called Microsoft Windows,
created by Microsoft Corporation. An extension of the MS-DOS operating system, Microsoft
Windows gives a standard look and feel to Summit and all other Windows applications.
To run Summit Event Management System under Microsoft Windows, you need to license and
install Microsoft Windows.
Summit and Australia Post
The Australian postcode database has been reproduced from a database supplied by Australia
Post. The database remains at all times the property of Australia Post and reproduction is
prohibited without the permission of Australia Post. Australia Post shall not be liable for any loss or
damage of any kind whatsoever (including without limitation any loss of profit, indirect,
consequential or incidental loss or damage) arising from any act or omission, whether negligent or
otherwise, or from any use of or reliance placed on the contents of the database.
Manual written and printed in Australia.
Any comments or queries regarding this manual should be directed to:
MIE Software Pty Ltd
E-Mail:
[email protected]
Web Page: www.miesoftware.com
CONTENTS
CONTENTS............................................................................................................................... I
CHAPTER 1 GETTING STARTED .......................................................................................... 1
System Requirements .............................................................................................2
Minimum System .............................................................................................................................2
Recommended System ...................................................................................................................2
Conventions Used Within this Manual.....................................................................2
Summit in a Networked Environment ......................................................................3
Changing the Screen Resolution.............................................................................4
Installing Summit Light From CD or Web ................................................................5
Initiating the Installation Process from the Web.......................................................5
Initiating the Installation Process from the CD.........................................................6
Installing Access 2000 Runtime Environment .................................................................................7
Installing Summit Event Manager - Light.................................................................9
Starting Summit Event Manager - Light.................................................................12
Software Registration Details ................................................................................14
Creating a Desktop Shortcut to Summit ................................................................16
Entry Menu ............................................................................................................18
File ........................................................................................................................20
New Event......................................................................................................................................20
Open Event ....................................................................................................................................21
Compact and Repair Event File.....................................................................................................21
Update...................................................................................................................22
Conventions used within the software ...................................................................24
Navigating in Summit ............................................................................................25
Opening Forms, Reports and Processes ......................................................................................25
Closing Forms................................................................................................................................25
Printing Reports .............................................................................................................................26
Closing Reports .............................................................................................................................27
Help.......................................................................................................................28
General Help..................................................................................................................................28
About Summit ................................................................................................................................28
Displaying on-line help for the current form...................................................................................28
Displaying on-line help for the current report.................................................................................29
Entering Dates and Times .....................................................................................29
Shortcut Keys ........................................................................................................30
Miscellaneous ................................................................................................................................30
Copying..........................................................................................................................................30
Deleting..........................................................................................................................................30
Text Formatting..............................................................................................................................30
Undoing Changes ..........................................................................................................................31
Moving Around...............................................................................................................................31
Combo Boxes and List Boxes........................................................................................................31
CHAPTER 2 SCENARIOS..................................................................................................... 32
Large Conference..................................................................................................33
Set Up ............................................................................................................................................33
Before ............................................................................................................................................36
During ............................................................................................................................................38
After ...............................................................................................................................................40
In-House Seminar or Free Promotional Seminar...................................................41
Table of Contents - i
Summit Event Manager - Light
Set Up ........................................................................................................................................... 41
Before............................................................................................................................................ 43
During............................................................................................................................................ 45
After............................................................................................................................................... 46
Chargeable Training Course................................................................................. 47
Set Up ........................................................................................................................................... 47
Before............................................................................................................................................ 49
During............................................................................................................................................ 51
After............................................................................................................................................... 52
Recurring Meeting - Separate Events................................................................... 53
Set Up ........................................................................................................................................... 53
Before............................................................................................................................................ 54
During............................................................................................................................................ 56
Recurring Meeting - Combined in one Event ........................................................ 57
Set Up ........................................................................................................................................... 57
During............................................................................................................................................ 59
Gala Dinner........................................................................................................... 60
Set Up ........................................................................................................................................... 60
Before............................................................................................................................................ 62
During............................................................................................................................................ 64
After............................................................................................................................................... 65
CHAPTER 3 HOW TO ...........................................................................................................66
Add Your Own Listing to the Reporter .................................................................. 66
Align a Report ....................................................................................................... 67
Allocate a Payment: Person Unknown.................................................................. 68
Backup an Event File ............................................................................................ 69
Change Currency & Time Formats ....................................................................... 70
Check for Duplicate Records ................................................................................ 70
Check How Much Money has to be Banked or Processed ................................... 71
Correct an Incorrectly Entered Payment ............................................................... 72
Count Records in a Particular Category ............................................................... 72
Create an Event Programme ................................................................................ 73
Customise Summit................................................................................................ 75
Customise the Reporter Mail Merge Template ..................................................... 76
Deal With Dishonoured Cheques.......................................................................... 76
Delete a Record.................................................................................................... 77
Determine your Messaging Profile........................................................................ 78
Find a Postcode.................................................................................................... 80
Fix Mail Merge Problems ...................................................................................... 81
Follow Up Event Organisation Tasks.................................................................... 82
Issue a Call For Papers and Expressions of Interest ............................................ 84
Issue an Event Registration Programme or Brochure........................................... 85
Move Summit to the Event.................................................................................... 86
Optimise the Performance of Summit ................................................................... 86
Produce Name Badges for People who aren’t on the Database........................... 87
Refund a Payment ................................................................................................ 88
Reverse an Allocation Error .................................................................................. 90
CHAPTER 4 SETUP ..............................................................................................................91
Standard Form Design.......................................................................................... 92
Add-Ons, Catering Events and Sessions.............................................................. 94
EVENT DETAILS.................................................................................................. 96
Event Details......................................................................................................... 96
Secretariat Details ................................................................................................ 97
Table of Contents - ii
Summit Event Manager - Light
Venue Details ........................................................................................................98
Organisers.............................................................................................................99
Presenter Rules.....................................................................................................99
The Usual Registration........................................................................................101
OPTIONS ............................................................................................................102
Global Options.....................................................................................................102
Event Options......................................................................................................104
General Settings ......................................................................................................................... 104
User Defined ............................................................................................................................... 106
Event Documents........................................................................................................................ 108
System Checking ........................................................................................................................ 109
Name and Address Formats....................................................................................................... 110
WinFax Pro ................................................................................................................................. 111
Tax .............................................................................................................................................. 112
REFERENCE FILES ...........................................................................................114
Advertising Sources ............................................................................................114
Contact Types .....................................................................................................115
Equipment ...........................................................................................................115
Locations .............................................................................................................116
Profiles ................................................................................................................117
Tables .................................................................................................................119
IMPORT ..............................................................................................................120
Import Demographics ..........................................................................................120
Import from a previous event that used this software................................................................. 121
Import from a Summit Data Collector file.................................................................................... 121
Import from another MIE Software application ........................................................................... 122
Import from a Microsoft Excel Spreadsheet ............................................................................... 123
Import from a Comma Delimited Text File .................................................................................. 123
Import from a Microsoft Access Database.................................................................................. 124
Importer....................................................................................................................................... 125
Import Structure...................................................................................................127
Import Organiser Tasks .............................................................................................................. 128
FINANCIAL DETAILS..........................................................................................129
Registration Types ..............................................................................................129
Add-Ons ..............................................................................................................131
Lock Event Fees..................................................................................................133
Banking Details ...................................................................................................134
Payment Types ...................................................................................................135
THE ESSENTIALS ..............................................................................................136
Catering Events...................................................................................................136
Sessions..............................................................................................................140
Session Status ............................................................................................................................ 143
Name Badge and Ticket Design..........................................................................144
Participation Settings .................................................................................................................. 154
CHAPTER 5 MAIN MENU ................................................................................................... 155
DATA ENTRY......................................................................................................156
Personal Details ..................................................................................................156
Expression of Interest (EOI) and Profile ..............................................................164
Extra Details ........................................................................................................166
Registration Details .............................................................................................168
Individual Correspondence..................................................................................172
Letterhead Designer ................................................................................................................... 174
E-Mails ........................................................................................................................................ 176
Contact Details ....................................................................................................177
Table of Contents - iii
Summit Event Manager - Light
Money Menu ....................................................................................................... 178
Enter a Payment ................................................................................................. 179
Unallocated Payments ........................................................................................ 181
Allocate Payment................................................................................................ 182
Create Refund .................................................................................................... 184
Print Invoice ........................................................................................................ 184
Receipts.............................................................................................................. 185
Tax Invoices and Adjustment Notes ................................................................... 186
Group Invoice ..................................................................................................... 187
Group Receipt..................................................................................................... 187
Group Tax Invoices and Adjustment Notes......................................................... 187
Audit Trail............................................................................................................ 188
Billing Address .................................................................................................... 189
Financial Groups................................................................................................. 190
Presenter Details ................................................................................................ 192
Abstract Review Status ............................................................................................................... 195
Edit Tickets ......................................................................................................... 196
Ticket Preview Options ............................................................................................................... 197
Copy Activity ....................................................................................................... 198
Single Label, Envelope and Letter Choices ........................................................ 199
Organiser ............................................................................................................ 200
Contact Follow-Up....................................................................................................................... 203
Contacts Reporter ....................................................................................................................... 204
Reassign Organising Tasks ........................................................................................................ 205
Organiser Task List Status.......................................................................................................... 206
Running Sheet Notes .................................................................................................................. 207
Programmer........................................................................................................ 208
Abstract Status............................................................................................................................ 212
Abstract Review Status ............................................................................................................... 213
Tabling and Seating............................................................................................ 214
Registration Desk Worklist.................................................................................. 218
Process Arrivals Manually........................................................................................................... 219
Process Arrivals On-line.............................................................................................................. 220
Process Arrivals at Multiple Registration Points ......................................................................... 221
Add-On Results .................................................................................................. 222
Results Reports........................................................................................................................... 223
Introduction to MIE WebLink............................................................................... 224
Internet Assistant ................................................................................................ 225
REPORTS .......................................................................................................... 228
Delegate Lists ..................................................................................................... 228
Event Reports ..................................................................................................... 230
Attendance Certificates ............................................................................................................... 231
Attendance Certificates (without Session Details) ...................................................................... 231
Catering Events........................................................................................................................... 231
Catering Non-Attendance............................................................................................................ 231
Catering Requirements ............................................................................................................... 231
Delegates by Registration Date .................................................................................................. 231
Delegates by Registration Type.................................................................................................. 231
Draft Expression of Interest Form ............................................................................................... 231
Draft Programme Front Page...................................................................................................... 232
Draft Registration Form............................................................................................................... 232
Event Activity............................................................................................................................... 232
Event File Conversion Report ..................................................................................................... 232
Function Attendance…................................................................................................................ 232
Individual Schedules ................................................................................................................... 232
Menus.......................................................................................................................................... 232
Table of Contents - iv
Summit Event Manager - Light
Name, Organisation and Registration Type Details…................................................................ 233
Organisation, Name and Registration Type Details ................................................................... 233
Organisations by Registration Type............................................................................................ 233
Possible Duplicates (Matching Family Names) .......................................................................... 233
Profiles Breakdown ..................................................................................................................... 233
Running Sheet (Landscape and Portrait) ................................................................................... 233
Schedule ..................................................................................................................................... 233
Schedule by Location ................................................................................................................. 234
Session Attendance.................................................................................................................... 234
Session Attendance Summary ................................................................................................... 234
Session Chair Report.................................................................................................................. 234
Session Choice by Person.......................................................................................................... 234
Session Preferences and Attendance ........................................................................................ 234
Correspondence..................................................................................................235
Individual Receipts and Refunds ................................................................................................ 237
Organisation Receipts ................................................................................................................ 237
Receipts Processed on <Date> Report ...................................................................................... 237
Confirmation Letters ................................................................................................................... 238
Delegate Confirmation Letters (With Money Details) ................................................................. 238
Delegate Confirmation Letters (Without Money Details) ............................................................ 238
Presenter Confirmation Letters................................................................................................... 238
Presenter Confirmation Letter with Registration Details............................................................. 239
Invoices....................................................................................................................................... 239
Invoices for Anyone Who Owes Money...................................................................................... 239
Invoices for People from a Particular Organisation .................................................................... 239
Invoices for All People Who Haven’t Had Once Since ... ........................................................... 239
Invoices for Selected People ...................................................................................................... 239
Participation Records (With Money Details) ............................................................................... 240
Participation Records (Without Money Details) .......................................................................... 240
Tax Invoices and Adjustment Notes ........................................................................................... 240
Group Correspondence Tab ....................................................................................................... 241
Group Receipts ........................................................................................................................... 241
Invoices for Anyone Who Owes Money...................................................................................... 241
Invoices for All People Who Haven’t Had Once Since ... ........................................................... 241
Tax Invoices and Adjustment Notes ........................................................................................... 241
Form Letters ........................................................................................................243
Name Badges and Tickets ..................................................................................246
Edit Ticket Names....................................................................................................................... 249
Reporter ..............................................................................................................250
General ....................................................................................................................................... 250
Participation ................................................................................................................................ 252
Profile.......................................................................................................................................... 253
Saved Queries ............................................................................................................................ 254
Multi-Registration ........................................................................................................................ 255
Multi-Add-On............................................................................................................................... 256
Multi-Session .............................................................................................................................. 256
Reporter E-Mail........................................................................................................................... 260
Record Bulk Contact................................................................................................................... 261
Reporter Listing Choices ............................................................................................................ 262
Equipment Reports..............................................................................................264
Equipment Requirements by Catering Event ............................................................................. 264
Equipment Requirements by Catering Location ......................................................................... 264
Equipment Requirements by Presentation ................................................................................. 264
Equipment Requirements by Session......................................................................................... 264
Equipment Requirements by Session Location.......................................................................... 265
Presenter Reports ...............................................................................................266
Abstract Review Status............................................................................................................... 266
Abstract Status............................................................................................................................ 266
Presentation Status..................................................................................................................... 266
Presenter Abstracts .................................................................................................................... 266
Presenter Biographies ................................................................................................................ 266
Table of Contents - v
Summit Event Manager - Light
Presenter Follow-Up ................................................................................................................... 266
Participation Breakdown ..................................................................................... 268
Confirmed Delegates by Profile .................................................................................................. 268
Confirmed Delegates by Advertising Source .............................................................................. 268
Confirmed Delegates by State (or Country if not <Default Country>) ........................................ 268
Participation by Add-On .............................................................................................................. 269
Incomplete Participation Reports ........................................................................ 270
Confirmed Delegates Who Didn’t Attend the Event.................................................................... 270
Confirmed Delegates Who Didn’t Receive a Satchel ................................................................. 270
Marketing Breakdown Report ............................................................................. 271
Attendance Record ............................................................................................. 273
Contact Follow-Up .............................................................................................. 273
FINANCIALS....................................................................................................... 274
Payments In........................................................................................................ 274
Allocate Payments .............................................................................................. 274
Financial Reports................................................................................................ 276
Additional Charges...................................................................................................................... 276
Credit Card Commission Breakdown.......................................................................................... 276
Discounts .................................................................................................................................... 277
Financial Groups ......................................................................................................................... 277
Financial Status of Delegates ..................................................................................................... 277
GST Payment Record ................................................................................................................. 277
GST Receipts and Payments...................................................................................................... 277
Income Reconciliation Report ..................................................................................................... 277
Outstanding Payments................................................................................................................ 278
Overpaid...................................................................................................................................... 279
Participation and Financial Status............................................................................................... 279
Registration Desk Worklist .......................................................................................................... 279
Banking Run ....................................................................................................... 280
Re-Do Banking Run .................................................................................................................... 282
Payments In Reporter ......................................................................................... 283
Edit Incoming Payments ............................................................................................................. 284
Receipts Reporter............................................................................................... 285
Edit Receipts ............................................................................................................................... 286
Tax Invoices Reporter......................................................................................... 287
Edit Tax Invoices and Adjustment Notes .................................................................................... 289
CHAPTER 6 UTILITIES .......................................................................................................291
SUPPORT UTILITIES......................................................................................... 292
Database Table Access ...................................................................................... 292
Run Macro .......................................................................................................... 292
Update Bulk Mail Codes ..................................................................................... 293
TROUBLESHOOTING GUIDE.............................................................................................294
Difference in Numbers on Catering Requirements Report and Function Attendance Listing .... 294
Equipment Reports Don’t Show Correct Equipment in Sessions ............................................... 295
Error Messages........................................................................................................................... 295
Functions on Money Menu Don’t Work....................................................................................... 295
Name Badges Don’t Fit Properly on Stationery .......................................................................... 295
Name Badges With Pictures Have "Out of Memory" Problems When Printing .......................... 296
Presenters are Marked as Confirmed But Their Presentations Don’t Appear in the Draft Programme
.................................................................................................................................................... 296
GLOSSARY .........................................................................................................................297
INDEX...................................................................................................................................306
Table of Contents - vi
CHAPTER 1
GETTING STARTED
Welcome to Summit Event Manager - Light.
The Summit Event Management System is structured the way most events are organised. There
are things you do to set up the event, things you do before, during and after the event and
‘housekeeping’ activities. This is why we have separate Setup, Main and Utilities Menus.
The best way to start using Summit is to read this chapter first, then find the sample event that
most closely matches your event in Chapter 2, Scenarios. Use the steps in that scenario to guide
you through creating and managing your event.
This chapter covers the following topics:
• System Requirements
• Conventions used in this manual and the software
• Software Registration and Introduction to Summit forms.
• Navigating in Summit. What all the standard buttons are and what they do.
• Help. General and specific.
• Shortcut keys. How to perform tasks quickly and move around without using the mouse.
• Main Menu
• Creating a new event, opening an existing event, compact and repairing an event.
• Upgrading Summit.
Chapter 1: Getting Started - 1
Summit Event Manager - Light
System Requirements
Minimum System
Pentium 3 – 700 Mhz
Microsoft Windows 98
* Microsoft Windows 2000 must have Service Pack 2 or higher
250 Mb hard disk space
256 Mb RAM or higher
SVGA or higher resolution monitor
CD Drive
Recommended System
Pentium 4 – 2.4 Ghz
Microsoft Windows XP
40 Gb hard disk space
512 Mb RAM
SVGA or higher resolution monitor
CD Drive
WinZip – archive/compression program
WinFax Pro – for individual and broadcast faxing
MS Outlook – for individual and broadcast e-mails
Express ClickYes – assists with individual and broadcast e-mails
MS Access 2002
Conventions Used Within this Manual
This user manual has been designed with the following concepts in mind. It is a standard A4 size
so that most descriptions of forms and reports fit on a page and to allow for easy photocopying.
This practice is encouraged as the scenario section was designed for you to remove the
appropriate section, photocopy it and use it as a checklist. The text is in Arial 11 point so that it can
be read from a distance. The following is how the components of Summit are described within this
manual:
•
Forms, Reports and Menus
are in Title Case
•
Data fields and Buttons
are in Italics
•
File & folder names and computer commands are in Bold
User defined words are enclosed in angled brackets, i.e. < >. Every data entry form has on its
toolbar (form footer) as standard the OK button, the Cancel button and the Help button. For brevity,
when describing each form, these three buttons are not included.
2 - Chapter 1: Getting Started
Summit Event Manager - Light
Summit in a Networked Environment
If you have a multi-user copy of Summit, you are licensed to load it on up to ten computers on a
local area network (LAN). Illustrated below are two examples of network set-ups.
Client Server Network
File Server
Holds event data (.eve) files but
should not be loaded with Summit
User 1
User 2
User 3
User 4
Copy of Summit
Copy of Summit
Copy of Summit
Copy of Summit
User 1
User 2
User 3
User 4
Copy of Summit
and the event (.eve) files.
Copy of Summit
Copy of Summit
Copy of Summit
Peer to Peer Network
NOTE: The seml.mdb file should not be loaded on the network as a shared application, but onto
the local hard drive of each individual PC wishing to access event data (.eve) files (the shared
data). Using the seml.mdb file as a shared application will create conflicts with multiple users
overwriting and clearing each other’s work tables.
Chapter 1: Getting Started - 3
Summit Event Manager - Light
Changing the Screen Resolution
Prior to installing Summit, check your screen resolution. Summit forms have been designed to fit
on a screen resolution of 800 by 600 pixels - SVGA. If your current screen resolution is less than
this (for example, 640 by 480), the forms won’t fit and you’ll have to use the scroll bars to navigate.
To check and/or modify your screen resolution, take the following steps.
1. Choose Control Panel from
the Start Menu.
2. From the Control
choose Display.
Panel
3. Change the Settings to be the
same as those shown below,
800 by 600 pixels with small
fonts. Click on the Apply button,
then click on the OK button.
Slide this bar along
After you’ve set the display categories, press Start then Settings then Taskbar and set the
Desktop Taskbar to Auto Hide. You can set the Microsoft Office Taskbar to Auto Hide as well.
4 - Chapter 1: Getting Started
Summit Event Manager - Light
Installing Summit Light From CD or Web
There are two methods for installing Summit Light; either install it from an MIE Software Collection
CD or download it from the web. These have a different initial process but the actual installation of
Summit Light is the same. If you have an MIE Software Collection CD, follow the instructions
entitled ‘Initiating the Installation Process from CD’. If you are planning to download the software
from our website, follow the instructions entitled ‘Initiating the Installation Process from the Web’.
After that, follow the instructions entitled ‘Installing Summit Light’ to complete the installation
process.
Initiating the Installation Process from the Web
You can only download Summit Event Manager – Light if you have Access 2000/2002 running on
your computer. The Access 2000/2002 Runtime Environment required to run Summit is 150 Mb
and it too large to download. You will need to get our MIE Software Collection CD and install the
Runtime Environment from that.
If you have Access 2000 on your computer, on our website – www.miesoftware.com – go to Free
Downloads and click on the seml2000.exe or seml2002.exe file and save it to your hard disk. Note
which folder you save it to – it’s recommended that you download it to either the Downloads or the
Temp folder.
Double-click on the downloaded file (seml2000.exe or seml2002.exe) in Windows Explorer and
the following dialog box will be displayed.
Select the Setup button or just
press Enter.
Chapter 1: Getting Started - 5
Summit Event Manager - Light
Initiating the Installation Process from the CD
Place the CD in your CD ROM drive. The CD Browser screen will display. It may take up to 30
seconds depending on the speed of your machine. If the program doesn’t begin, open Windows
Explorer, double click on your CD drive to view the contents of the CD then double click on
‘mie.exe’.
You have two options to install the Summit Suite of Software:
1. Click the Summit Suite of Software logo on the left then click the Product Overview button. It is
from this screen that you choose the product that you wish to install.
2. Click the Installation Shortcut button
If you don’t have Access 2000 or 2002 on your machine you will need to install the Access 2000
Runtime Environment first. The following shows the process of installation. If you have a copy of
Access 2000 or 2002 on your computer, skip this section and go straight to Installing Summit Event
Manager - Light.
Select Install Access
2000 Runtime and
the message to the
right will be
displayed.
6 - Chapter 1: Getting Started
Summit Event Manager - Light
Installing Access 2000 Runtime Environment
IMPORTANT
NOTE:
If you have Access
97 and your
computer and would
like to keep it, then
you must select
Customize… and
enter a new path
and destination
folder. Otherwise
this Access 2000
Runtime will
overwrite your
Access 97.
Change the folder to
one that clearly
reflects the software
in it. In this example,
the folder name
selected is
Access2KRT (i.e.
Access 2000 Run
Time).
Click on the OK
button.
Chapter 1: Getting Started - 7
Summit Event Manager - Light
You can see that the
folder next to the
Install Now button
now reflects our
changed folder
name.
Now select Install
Now as the runtime
will not overwrite
your Access 97.
A message will be
displayed Verifying
installation tasks…
You will need to reboot your computer,
so ensure all
systems are closed.
Remove the CD
from the CD-ROM
drive then place it
back in to start up
the installation
program again.
Return to the
Product Overview
screen to continue
with the installation
of the Summit Suite
of Software.
8 - Chapter 1: Getting Started
Summit Event Manager - Light
Installing Summit Event Manager - Light
To install Summit Light from an MIE Software Collection CD, take the following steps. Be sure to
close down any applications you might have running (don’t forget any you may have minimised).
Place the CD in your CD ROM
drive. The dialog box to the right
will display (usually after a small
wait).
If you think the wait time is a little
too long, i.e., nothing is
happening, open Windows
Explorer and double-click on the
file seml.exe (or just seml).
Select the Setup button or just
press Enter.
The Setup program will
display the message
‘Unzipping setup.exe’ and a
few other files then it will
display the message
‘Copying …’ and flash some
more file names.
The dialog box to the right
will display.
Once you’ve checked that
this is the only program
running, select the OK button
or just press OK.
The dialog box to
the right will
display.
You can change
the default
directory or folder
if you like by
selecting the
Change Directory
button – but it’s not
recommended.
Select the large
button or just press
Enter.
Chapter 1: Getting Started - 9
Summit Event Manager - Light
The system will place the Summit
Event Manager - Light in it’s own
program group. You can change
the folder if you wish, but it’s not
recommended.
Don’t install Summit Light onto a
server. It needs to be installed onto
the C drive of each user’s
computer. See ‘Summit in a
Networked Environment’.
Select the Continue button or just
press Enter.
Once that’s finished, you will get
the message that the ‘MIE
Software Installer Setup was
completed successfully’.
Summit uses three Microsoft programs:
1) the Calendar Control [mscal.ocx],
2) the Slider Bars [comctl32.ocx] and
3) the File Open Dialog box
[comdlg32.ocx].
The message to the right will be
displayed if any of the above program
versions of yours are older than ours.
Always respond Yes to this question as
your version of the file may be required
by other programs you may be running.
If, part way through the installation,
the dialog box to the right is
displayed, click on the Ignore
button.
This file is often in use and by
ignoring it, does no harm.
The same goes for URLMON.DLL
& HLINK.DLL
10 - Chapter 1: Getting Started
Summit Event Manager - Light
If you
selected
Ignore at the
previous
error
message,
select Yes
when you
see this one.
When the Setup process is finished,
the message to the right is
displayed.
Chapter 1: Getting Started - 11
Summit Event Manager - Light
Starting Summit Event Manager - Light
When you first install Summit, a new submenu is added to the Programs menu. Press Start then
Programs and locate the Summit Event Manager - Light folder. It will probably be the last entry on
your program list.
The functions of these programs within this folder are as follows.
Compact and Repair Software
Select to repack, compact and repair the seml.mdb file. This file becomes fragmented when you
make changes to a database or it may become corrupted. An indication of a corrupted file is when
you can’t find a record you know is there. The seml.mdb file may become corrupted as a result of
a hardware or software failure during complex transaction processing. This can occur if the power
suddenly goes off or there is a power surge. The compacted seml.mdb file is usually smaller and
often provides better performance. This process should be run at least weekly during period of
frequent, heavy use.
On-Line Documentation
This will initiate the On-Line Help where you can search for specific items.
Summit Event Manager - Light
Select to start the Summit Event Manager – Light.
Reset Summit Code Library Reference
This will reset any library reference that Summit uses. The main criterion for selecting this option is
when you initiate Summit the following error message is displayed: ‘The expression you entered
has a function name that <event name> can’t find’.
After selecting the option, the following dialog box will be displayed.
12 - Chapter 1: Getting Started
Summit Event Manager - Light
If the application you have is listed, select Yes, if it is not listed, select No. After selecting Yes,
select the application for which you wish to reset the code library reference from the Files of type
pull-down list as shown below.
Once you have selected the application, locate the appropriate application file and then click OK.
The default locations for all the applications are:
Summit Event Manager - Pro
Version 9
c:\semp
Summit Event Manager - Light
Version 10
c:\seml10
Summit Contact Manager
Version 4
c:\scm4
Summit Membership Manager
Version 2
c:\smm
A message will be displayed stating that the code library has been reset. Click OK then open
Summit Light. Please note that it will take longer than usual to start as it will need to re-establish
the link to the code library.
Chapter 1: Getting Started - 13
Summit Event Manager - Light
Software Registration Details
When you start Summit for the first time, the form below is displayed. This Licence Agreement is
standard throughout the software industry and they are the conditions you agree to when using
Summit.
If you do not accept the Licence Agreement, Summit will close.
If you accept the Licence Agreement, Summit asks if you want to display the Agreement next time
you open Summit. You can elect to say Yes or No (most people say No).
If you select Accept, the message box below displayed.
If you have purchased a copy of Summit Light, and have been given a Registration Certificate,
select click on the Register menu at the top left corner of the screen.
14 - Chapter 1: Getting Started
Summit Event Manager - Light
The form below, where you register your Summit Event Manager software, is displayed.
To register the software, enter the serial number and name exactly as they are printed on your
Registration Certificate (upper and lower case, and dashes) and then click OK.
To close this form without registering your software, click on the Cancel button.
To obtain new registration details, click on the Request New Serial Number button. You can enter
your details directly into the displayed screen, or contact MIE Software (details at the front of this
manual) or your local distributor. The MIE Software website www.miesoftware.com has contact
details for MIE Software and all distributors.
When you first initiate Summit, you are connected to a sample event. The demo.eve datafile is the
sample conference upon which this user manual is based. You can explore this sample
conference, or if you want to create your own event, see the topic entitled File. It is recommended
that you read all the information prior to the File topic before creating your first event.
Chapter 1: Getting Started - 15
Summit Event Manager - Light
Creating a Desktop Shortcut to Summit
To create a desktop shortcut to Summit, take the following steps.
1. Select Programs then Summit Event Manager - Light then right mouse click on the final
Summit Event Manager - Light. Select Copy.
2. Display your desktop either by minimising all your open applications or by clicking on the
desktop icon, as shown below.
3. Right mouse click on your desktop and select Paste.
4. The Summit Light icon will be pasted as a shortcut.
16 - Chapter 1: Getting Started
Summit Event Manager - Light
5. If you find that you can’t position the shortcut where you want to, you may have Auto Arrange
set to Yes. To turn this off, click somewhere else on the desktop with the right mouse button
and select Arrange Icons. If there is a tick next to Auto Arrange, select it. This will turn it off.
Chapter 1: Getting Started - 17
Summit Event Manager - Light
Entry Menu
The Entry Menu is the normal entry and exit point for Summit Light. To choose any of the submenus, click on the appropriate button.
Click on the Setup button to:
• Enter or modify the event name, secretariat and venue.
• Design name badge styles and define the event and financial structure.
• Define presenter rules, system settings and user preferences.
• Import name and address information and an event structure from external sources.
Click on the Main Menu button to:
• Contact, register and record the details of delegates and presenters.
• Enter, allocate and bank payments, produce receipts and invoices.
• View and apply internet registrations.
• Track event organisation tasks.
• Develop and print the event programme.
• Produce a schedule and a running sheet.
• Produce or export name badges and tickets.
• Determine catering and equipment requirements
• Produce tabling and seating lists.
18 - Chapter 1: Getting Started
Summit Event Manager - Light
Click on the Utilities button to:
• Access the underlying data files (tables) directly.
• Run a macro.
• Update Bulk Mail Codes.
Click on the Update button to:
• Update your copy of Summit to the latest version either from the web or via diskette.
Click on the File button to:
• Create a new event, open another event or to repair and compact an event file.
Click on the Help button to:
•
display the on-line documentation for Summit.
Click on the Exit button to:
•
quit and close down Summit.
Chapter 1: Getting Started - 19
Summit Event Manager - Light
File
This menu enables you to create new events, connect to existing events, or compact and repair
existing events.
New Event
To create an event file for a new event, click on the New Event button.
Summit will ask you to provide a filename, and a new event with that filename will be created.
Replace the asterisk (*) with the name of your event and the filename you provide must end in
.eve. For example, our sample database is called demo.eve; yours could be called event2003.eve.
20 - Chapter 1: Getting Started
Summit Event Manager - Light
Open Event
To open an event that already exists, click on the Open Event button and the following form will be
displayed.
Summit will ask you to select or provide a filename, and this must be the name of an event you’ve
already created. If you click on the down arrow to the left of the Browse button, the system will
provide a list of event file names that have been created previously. If you’ve moved the event file
to another directory, or on a network drive, use the Browse button to find the file.
The demo.eve datafile, already in the SEML10 directory, is the sample conference this user
manual is based on. Open demo.eve by clicking on the Open Event button and the Browse button.
Compact and Repair Event File
Compacting an event file removes unwanted space and reduces the size of the file. Event files
may need repairing if you’ve had computer, power or network failures during transactions that
update multiple tables and indexes. You may suspect an event has become corrupted if some data
is unintelligible or missing.
To compact and repair an event file, click on the Compact and Repair Event File button.
Note: You cannot have the event file you want to compact and repair open, so open a different
event, for example demo.eve, the sample event that comes with Summit, or create a new event.
Summit will ask you to provide a filename, and this must be the name of an event you’ve already
created. Use the down arrow on the Event File to Open field or use the Browse button to find your
event.
You should compact on a regular basis, particularly if you’ve been deleting records or exporting
large amounts of data. If the file hasn’t been corrupted, repairing it will not damage it.
Chapter 1: Getting Started - 21
Summit Event Manager - Light
Update
When you click on the Update button on the Main Menu, the following form is displayed. This
option enables you to update your copy of Summit to the latest version. Note: You can perform an
update of this type at any time and without affecting any event files as only the new programs are
loaded.
To update Summit to the latest version, take the following steps.
Update via Diskette
1. Insert the diskette in your disk drive. Open Windows Explorer and double-click on the .exe file
in your diskette drive (usually drive A).
2.
This will open the WinZip dialogue box. Click on the UnZip button. The updated SEMLu.udb
and SEML.hlp files will be unzipped into your SEML10 folder. If you’ve installed Summit into
another folder, change the location to where Summit is installed. On completion, close WinZip
and close Windows Explorer.
3.
If you haven’t already done so, open the Update Summit Software form by clicking on the
Update button on the main Summit menu.
Click on the Connect to the update database button at the top of the form. You will be asked to
specify the location of the update database, a file called SEMLu.udb. The location will be the
SEML10 folder (or wherever you’ve unzipped the files). Once you’ve specified where the
update database is, Summit will connect to it and check that it is at least as up to date as the
copy of Summit you currently have loaded. Summit won’t let you load an update from an
earlier version.
4.
Once Summit has determined that you have a valid update database, a report will be
produced showing the objects (forms, queries, tables, macros and modules) that will be loaded
into Summit. If you’ve made any modifications to an object in Summit, you should ensure that
you have copies of the objects you’ve modified in another place, so you can reapply your
changes after the update. If you haven’t made any changes to Summit, you can ignore this
report by closing it.
5.
Click on the Complete the update button at the bottom of the form. Your copy of Summit will
be updated.
22 - Chapter 1: Getting Started
Summit Event Manager - Light
Update via the Web
1. Connect to our web site at http://www.miesoftware.com/. Go first to the Free Downloads page
and then to the Summit Event Manager - Light (Version 10) page. If you want to proceed with
the update, go to Updates and Patches.
2. There are a number of update choices, for example, just the update database, just the updated
help file and one containing both. Or, you can download a complete overwrite database. These
will be in the form of .exe files. Depending where you’re up to in your updates, select the most
appropriate file by clicking on the associated Download Now button or click directly onto the file
name.
3. You will be asked whether you want to run the selected program now or save it to disk. Select
the Save to Disk option. The Save As dialogue box will be displayed showing your default save
folder. Make sure you note into which folder or directory on your computer (or network) the
.exe file will be placed.
4. Once downloaded, disconnect from the web, open Windows Explorer and double-click on the
downloaded .exe file. The WinZip dialogue box will be displayed. The default folder for the files
to be unzipped is SEML10. If appropriate, change to the folder in which you’ve placed Summit.
Click on the UnZip button. On completion, close WinZip and close Windows Explorer.
5. If you haven’t already done so, open the Update Summit Software form by clicking on the
Update button on the main Summit menu.
6. Click on the Connect to the update database button at the top of the form. You will be asked to
specify the location of the update database, a file called either SEMLu.udb or SEMLu.cdb –
depending on whether is an update or an overwrite. The location will be the SEML10 folder (or
wherever you’ve unzipped the file). Once you’ve specified where the update database is,
Summit will connect to it and check that it is at least as up to date as the copy of Summit you
currently have loaded. Summit won’t let you load an update from an earlier version.
7. Once Summit has determined that you have a valid update file, a report will be produced
showing the objects (forms, queries, tables, macros and modules) that will be loaded into
Summit. If you’ve made any modifications to an object in Summit, you should ensure that you
have copies of the objects you’ve modified in another place, so you can reapply your changes
after the update. If you haven’t made any changes to Summit, you can ignore this report by
closing it.
8. Click on the Complete the update button at the bottom of the form. Summit will be updated to
the latest version. After the update has been completed, delete the downloaded .exe file.
Chapter 1: Getting Started - 23
Summit Event Manager - Light
Conventions used within the software
The software has been divided into two menus that match the phases of an event. These are the
Setup Menu and the Main Menu. All the functions required for each phase of an event are on the
appropriate menu, so you don’t need to skip around the system. The other buttons on the Entry
Menu are Utilities, Update, File, Help and Exit. The philosophy of entering data only once is used
throughout this system.
The software is in the colours of blue, grey and white; blue text, grey background and white data
entry fields. These colours have been proven to be the easiest on the eyes. The data entry fields
are white where data is permitted and grey when it’s a display-only field. Data entry within Summit
can be via the mouse or keyboard, so you can click in either a data entry field using the mouse or
press Tab or Enter to get to the next field. Where possible, the requirement to use the mouse when
doing batch data entry has been eliminated.
All reports are first displayed in print preview, that is, printed to the screen. You can decide if you
want a hard copy, how many copies and/or if only a section of the report is to be printed. See the
topic Printing Reports further on.
Reference files have been used to enable the tailoring of the system to match your event.
Examples of reference files include Advertising Sources, Equipment, and Catering Events. The
reference files, found in the Setup Menu, have a limit of 32,767 items you can enter up to in each.
The information in the reference file is used as a pull-down list of allowable entries during data
entry. This enables consistent data being entered - data that can be used as a reliable source for
analysis. A field that has a reference file behind it is called a combo box (see further on).
Field
A field is anywhere you can enter data. Fields can be normal, a combo box, an option box or a
check box.
Combo Box
The presence of a combo box indicates that there is a reference file behind the field and usually,
but not always, limits the data entry to one of the list (limit-to-list). To see the list of possible entries,
click on the down arrow to the right of the field.
Combo box
Display field
Option Box
An option box has a minimum of two options from which you may choose one. If you click in one
option box, you’ve effectively selected that option to the exclusion of the rest. The selected option
is black. Option boxes are always round and are on a raised square.
Selected option
Check Box
Check boxes are used to indicate Yes or No. If you want to indicate Yes - you ‘mark’ the check box
by clicking in it or pressing the space bar. This puts a cross in the square. Clicking in it again
‘unmarks’ it to indicate No. Check boxes are always square.
Marked check box = Yes
Unmarked check box = No
24 - Chapter 1: Getting Started
Summit Event Manager - Light
Navigating in Summit
Opening Forms, Reports and Processes
Forms, reports and processes can be opened in one of the following ways:
• Click on the left mouse button once on the desired command button.
• Tab to the desired button, then press the Enter key.
If you’re not in the section of the form containing the command button, pressing the F6 key will
cycle between the form header, detail and footer (or toolbar) sections.
The currently selected button is indicated by a rectangle on the button as shown below.
Selected
Not Selected
Once selected, pressing the Enter key has the same effect as clicking on it.
In some areas of Summit, command buttons are disabled and can’t be selected unless further
information is provided by you. Examples of this are the Previous and Next buttons associated with
finding a person’s record by family name or organisation. These command buttons are disabled if
you don’t have anything entered in the Family Name or the Organisation field.
Note: All forms and dialogue boxes in Summit are modal. This means that you can’t do anything
on the form underneath the currently active one until you’ve closed the currently active or top form.
Closing Forms
The forms in Summit don’t have the system menu icon on the top left hand side of the title bar and
must be closed using the command buttons found in each form’s toolbar.
Any of the following command buttons will close the active form.
Closes a menu or other non data entry form.
Cancels all changes made to the current record and closes the form. Note that changes
made to sub-records will not be cancelled when you exit the main form in this way.
Saves all changes made to the current record and closes the form.
Chapter 1: Getting Started - 25
Summit Event Manager - Light
Printing Reports
When you click on the Preview button
or the Listing button
, all reports and listings
are printed in print preview, i.e., they are printed to the screen. If you want to do more than just
look at the report on the screen, click on File in the top left hand corner of the screen.
• If you select Close, you close the report.
• If you select Print Setup..., you can change the margins of the report.
• If you select Print..., you can direct the report to any printer, print part of the report, print multiple
copies, alter the print setup, etc.
• The Send... button (if enabled) interfaces to the Mailing system on your network.
• If you select Output to Excel, the report will be exported to Excel.
• If you select Output to Rich Text Format, the report will be exported to an RTF file – most word
processors can read Rich Text Format and most of the report formatting is retained.
• If you select Output to Text, the report will be exported to a text file.
• If you select Output to HTML, the report will be exported as a web page.
26 - Chapter 1: Getting Started
Summit Event Manager - Light
Closing Reports
You can close reports in Summit in three ways.
1. Select File then the Close or press Alt+F+C as shown below.
2. Press Ctrl+F4
3. Press the Esc button. This last option is the easiest.
Chapter 1: Getting Started - 27
Summit Event Manager - Light
Help
General Help
If you click on Help at the top of the screen, a list of options is available as shown below.
• Contents is the table of contents to the help documentation. Click on the area you’d like to see.
• How to Use Help enables you to type in a keyword and a list of topics is returned.
• Where am I will tell you which event you’re currently working on (the short name, the long name
and the event file name and its path).
• About Summit... displays your registration details and version number.
• MIE on the Web will display a list of topics on the software. You have to be connected to the
Internet.
About Summit
To display the About Summit… form, select About Summit... from the Help menu. This form
displays details of the version of Summit Event Manager that is installed and to whom this copy of
it is licensed.
If the information in the This product is licensed to: box is “Evaluation Software Only” you’re
running the evaluation software and there are no restrictions on its use, however there is a limit on
the number of records you can enter and import. If the information in the This product is licensed
to: box is not “Evaluation Software Only” and is not your details you’re probably using the Summit
Event Manager illegally. If you’re using the software illegally you should be aware that this
computer program is protected by copyright law and international treaties.
The licence for the Summit Event Manager software can be single or multi-user. If it’s the latter, it’s
a group licence that allows the software to be loaded on to up to ten computers provided they are
on the same local area network (LAN) and under the control of the same organisation. The group
licence does not cover installation in different branches of the same organisation or different
organisations on the same local area network under the same licence.
If you’re in any doubt as to the legality of this copy of Summit Contact Manager, please contact
MIE Software immediately.
Displaying on-line help for the current form
Summit’s on-line help is context sensitive. This means whenever you want help, the help
displayed relates to the form you’re on. You can display on-line help for the current form
by pressing the F1 key on your keyboard or you can click on the Help button as illustrated.
28 - Chapter 1: Getting Started
Summit Event Manager - Light
Displaying on-line help for the current report
You can display on-line help for the currently open report by pressing the F1 key on your keyboard.
Entering Dates and Times
The quickest way to enter a date is ‘day space month’ or ‘day forward slash month’ and the current
century and year are assumed. For example, if you entered ‘9 4’ or ‘9/4’, the system will redisplay
‘9-Apr-03’. Every date field has a calendar next to it. You can click on it to select a date by moving
forward a day, week, month or year at a time. When you have the correct date, click on it then click
on the OK button. The date you selected will be brought through to the date field.
The times in Summit are all 12-hour clock. To quickest way to enter a time is ‘time space a’ for an
AM time or ‘time space p’ for a PM time. Minutes are indicated by the full stop or the colon. To
display 10am, you would enter ‘10 a’ or ‘10 p’ for 10pm. For 12:45pm, you would enter ‘12.45 p’ or
‘12:45 p’.
Select Date
This form enables you to select a date using a graphical calendar at the end of each date field. If
there was already a date in the field on the original form, the calendar is set to that date. If the field
on the original form was empty, the calendar is set to today’s date.
The bottom of the Select Date form displays the name of the field you’re working on and the date
you’ve selected. The calendar is set to display Sunday as the first column on the calendar. If you
wish to you can change this to any day of the week by selecting the day you want from the pulldown list of First Column.
The calendar displays one month at a time. If the date you want is currently displayed, position the
mouse on the date you want, then click on the left mouse button to select it. If the month or year
you want is not displayed, select them from the pull-down lists. Click on the OK button to update
the field on the original form. Click on the Cancel button to close the calendar without updating the
field on the original form.
Chapter 1: Getting Started - 29
Summit Event Manager - Light
Shortcut Keys
Shortcut keys are used to perform a function. The usual method is hold down the Ctrl (or control)
key on your keyboard and press another key. For example, Ctrl+G means you hold down the Ctrl
key and press the ‘g’ key. The ‘g’ doesn’t have to be in upper case.
Miscellaneous
Ctrl+D
In the Personal Details form, check if there are any Duplicates of the current
participants records, based on the current setting of Display Duplicate Person Warning
on the Event Options form on the Checking tab. If the current setting is Never, Ctrl+D
will check for duplicates on matching first initial and family name.
Ctrl+G
Get the postcode and pre-sort indicator for the displayed record on the Personal
Details form, and just the postcode for Venue, Secretariat, Hotels and the Suppliers
form.
Ctrl+F
Fill in the organisation name and address details from a record already in Summit when
you’re entering a new record in the Personal Details form. If you enter Ctrl+F anywhere
in the form, the Organisations form is displayed. Select the required organisation and
click on the OK button. Summit will fill in all the details for you. Alternatively, click on
the Fill button next to the Organisation field.
Ctrl+O
Display the Event Options form. If you enter Ctrl+O anywhere in the system, the Event
Options form will be displayed. This is handy for changing the report name format when
you are switching between correspondence and listings.
Ctrl+W
Where am I? or What event is this? If you enter Ctrl+W anywhere in the system, it will
respond by printing the short and long name of the event you’re currently in.
Copying
Ctrl+C
Copy the selection onto the clipboard.
Ctrl+X
Cut the selection and copy it onto the clipboard.
Ctrl+V
Paste the contents of the clipboard at the insertion point.
Ctrl+’
Inserts the same value that’s in the same field in the previous record.
Deleting
Backspace Delete the selection or the character to the left of the insertion point.
Delete
Delete the selection or the character to the right of the insertion point.
Text Formatting
Ctrl+U
Change current field to UPPER CASE.
Ctrl+L
Change current field to lower case.
Ctrl+T
Change current field to Title Case.
30 - Chapter 1: Getting Started
Summit Event Manager - Light
Undoing Changes
Ctrl+Z or
Alt+Backspace
Undo typing.
Esc
Undo changes in the current field or current record. If both have been
changed, press Esc twice to undo changes first in the current field and then
in the current record.
Moving Around
Right Arrow (→)
Move one character to the right.
Ctrl+→
Move one word to the right.
End
Move to the end of the line.
Ctrl+End
Move to the end of the field in multiple-line fields.
Left Arrow (←)
Move one character to the left.
Ctrl+←
Move one word to the left.
Home
Move to the beginning of the line.
Ctrl+Home
Move to the beginning of the field in multiple-line fields.
Tab, →, or Enter
Move to the next field. Enter key moves to the next line in multiple line fields.
Shift+Tab
Move to the previous field.
F5
Move to the record number box; then type the number of the record you want
to go to and press Enter.
F6
Cycle forward through the header, detail and footer of a form.
Ctrl+Tab
Exit the subform and move to the next field in the master form; if not in a
subform, move to the next field.
Ctrl+Shift+Tab
Exit the subform and move to the previous field in the master form; if not in a
subform, move to the previous field.
Combo Boxes and List Boxes
F4 or Alt+↓
Open/close a combo box or list box.
Down Arrow (↓)
Move down one line in a combo box or list box.
Page Down
Move down one set of values in a combo box or list box.
Up Arrow (↑)
Move up one line.
Page Up
Move up one set of values.
Tab
To exit the combo box or list box.
Chapter 1: Getting Started - 31
CHAPTER 2
SCENARIOS
These scenarios are to guide you through setting up Summit to suit your event. A description of
each scenario is given to help you select the one that matches most closely to your event. The
basic tasks involved in setting up Summit are listed, as well as the functions to be performed
before, during and after your event.
For details of ad hoc and one-off type tasks, such as issuing a call for papers, consult Chapter 3,
How To.
As no two events are identical, even after following the scenario you may still need to make some
modifications to match your event’s specific requirements.
In each scenario is the assumption that you’ve already installed the Summit software.
The following is a list of scenarios covered:
• Large conference
• In house conference or promotional seminar
• Chargeable training course
• Recurring meeting – separate events
• Recurring meeting – combined in one event
• Gala dinner.
Chapter 2: Scenarios - 32
Summit Event Manager - Light
Large Conference
This scenario describes the traditional large international conference.
Characteristics
• Held on a regular basis, usually annually or less frequently.
• Attendees pay to attend.
• Promoted through direct mailings to members of related professional associations and
advertisements in trade publications and other media. Previous participants are generally
targeted.
• Includes pre-, during and post-conference functions that are not attended by all participants.
Examples include workshops, dinners, cocktail parties, social outings and an accompanying
person programme.
• Has a large catering component with a conference dinner that has set tabling.
• Presentations may be solicited in a call for papers.
With the exception of installing the software and locking event fees, the steps shown here don’t
need to be taken sequentially and any information entered may be added to, deleted or modified at
a later date.
Note: It is advisable prior to entering details into each screen, to open this user manual at the
appropriate screen in Chapter 4, Setup Menu. In this section, each screen is pictured and a
detailed account of the screen and the data is given. It will help you understand the way Summit
uses the data and where it will be used.
Set Up
1.
Click on the File button on the Front Menu to open the File screen.
2.
Create a new event by clicking on the New Event button. Refer to the File, New Event section
in Chapter 1, Getting Started for more details.
3.
Update the Event Details screen. The key fields to update are Short Name and Full Name (for
display on the logon menu and correspondence) and Starting Date (especially if you’re going
to import the structure from an earlier event).
If the structure of this event is similar or even identical to a previous event that was run using
Summit, it is easier to import the structure from a previous event and modify it than it is to set
up this event from scratch. If you wish to import the structure from a previous event, open the
Import Structure screen and import as much of the structure as will be appropriate for this
event. For example, if this event is being held at a different venue from the previous event,
don’t import the venue details. Even if you have started defining the structure of this event, you
can still import the structure from a previous event as Summit can check with you before
overwriting anything you’ve already entered. Summit will automatically adjust the dates of
sessions and catering events from the previous event to match the start date of this event. If
you have imported all the structure from a previous event, the following setup steps are only to
assure that the imported information matches the requirements of this event.
4.
Open the Advertising Sources screen and enter any advertising sources you will be using to
promote the event. If you enter these advertising sources as people register for the event, you
will be able to determine what were the most effective means of advertising by running the
Chapter 2: Scenarios - 33
Summit Event Manager - Light
Confirmed Attendees by Advertising Source report under Participation Breakdown on the Main
Menu.
5.
Open the Banking Details screen and enter details of the bank account being used for this
event. These details will be displayed on the Bank Deposit Slips printed during a Banking Run.
6.
Open the Equipment screen and enter details of equipment that may be used during the event.
Enter both technical equipment to be used during presentation sessions (such as lecterns,
slide projectors and data panels) and catering equipment to be used during catering events
(such as coffee urns and plate warmers). Equipment requirements are shown on the various
equipment reports.
7.
Open the Options screen and set any applicable options.
8.
Open the Payment Types screen and enter any additional payment types you wish to be able
to use when receiving payments for the event. The standard payment types are Cash,
Cheque, Refund and Reversal. You may enter as may additional payment types as you wish.
A summary report will be produced for each payment type.
9.
Open the Presentation Types screen and enter details of the presentation types applicable to
this event. The presentation type, for example, demonstration, paper or poster is printed on
the presenter’s confirmation letter.
10. Open the Presenter Rules screen and mark the check boxes corresponding to the rules that
apply to presenters at this event.
11. If you’re planning to target people who have attended, or had expressed interest in previous
events, you now need to decide whether you wish to use the same interest profiles as were
used for the previous event from which you will import people’s name and address details, or
create new interest profiles for this event. If you want to create new profiles for this event,
open the Profiles screen and enter up to 20 profiles. If you plan to use the profiles from a
previous event that you will be importing name and address details from, skip this step and
import the profiles as part of the name and address details import (see step 21).
12. Open the Secretariat Details screen from the Setup Menu and enter details of the secretariat
(office address for correspondence and inquiries) for this event. If you have your own
letterhead, this screen may not be necessary.
13. If you’re having any catering events with fixed tabling, open the Tables screen and enter
details of each table and its capacity. Use the clone facility if you have a large number of
tables.
14. Open the Venue Details screen and enter details of the venue of this event. These details are
shown on the cover of the event programme.
15. In the Financial Details section, open the Registration Types screen and enter details of the
registration fees for full attendance. Partial registrations, such as single day or single session
registration, should be entered as add-ons. These registration fees may be modified or deleted
until event fees are locked. New registration fees may be added after event fees have been
locked and existing registration fees may have the descriptions modified.
16. Open the Add-Ons screen and enter the description and costs of workshops, dinners, cocktail
parties, social outings, partner programmes and similar functions as add-ons for this event.
These add-ons may be modified or deleted until event fees are locked. New add-ons may be
added after event fees have been locked and existing add-ons may have the descriptions
modified.
17. In the Programme Section, open the Locations screen and enter details of any locations where
sessions or catering events will take place within the venue. Locations are displayed on
catering reports, equipment reports, schedules and in the draft programme.
34 - Chapter 2: Scenarios
Summit Event Manager - Light
18. Open the Catering Events screen and enter details of the catering events (functions)
associated with this event. Catering events should be entered after equipment and location
details have been entered as these are specified within a catering event.
19. Open the Sessions screen and enter details of the presentation sessions for this event.
Sessions should be entered after location details have been entered as these are specified
within a session.
20. Open the Import Demographics screen in the Utilities Menu and import name and address
details from as many sources as you wish. While it is possible to import demographic
information at any time, it is best done before you start entering details of people, to minimise
the risk of duplication. After you’ve imported demographics, open the Reporter screen on the
Main Menu and print a full database listing and use this to identify and delete any duplicate
records that resulted from the import(s). You can delete peoples’ records until they become
financially involved with the current event.
21. Open the Name Badge and Ticket Design screen from with Name Badges and Tickets on the
Main Menu and define the name badge and ticket styles for this event.
22. Open the Correspondence Text screen from the Correspondence screen on the Main Menu by
clicking on the appropriate letter type and then the Edit button and enter any additional text
you want to appear at the top and bottom of receipts, confirmation letters and itineraries.
23. Open the Event Reports screen on the Main Menu and print a Schedule and a Schedule by
Location report. These reports show the ‘skeleton’ of the event by printing the catering events
and the sessions in chronological sequence to ensure neither overlap.
24. Open the Event Reports screen on the Main Menu and print a draft expression of interest
form, a draft registration form and a draft front page. These are used to ensure all the details
you’ve entered so far tally with your registration brochure or can be used as the basis for
preparing your registration brochure.
25. Check all the information on the reports created above and change where necessary.
26. Once you’re certain that registration fees and add-on fees are set and you’re happy for them to
be locked into place, open the Lock Event Fees screen on the Utilities Menu and lock the fees
into place. You won’t be able to register attendees until event fees have been locked. Once
locked, event fees may be unlocked only if you haven’t started registering people. Once you
have started registering people, event fees can no longer be unlocked.
Chapter 2: Scenarios - 35
Summit Event Manager - Light
Before
This section is divided into two sections. The first section shows how to process expressions of
interest, registrations and other incoming information in regular data entry sessions. These
sessions might be daily, every two days, weekly or other interval depending on the volume of
information. The second section covers other tasks that may be performed regularly before the
event or may be performed only once, depending on the size of your event.
Regular Data Entry Sessions
Take as many of the following steps as apply to each person.
1.
Open the Personal Details screen on the Main Menu.
2.
Find the person’s record by entering his or her family name (surname) into the Find by Family
Name field and then pressing Tab or Enter. Use the Previous and Next buttons to cycle
through all records with that family name. If you find the person’s record, skip to step 6.
3.
Once you’re satisfied that this is a genuine new record, click on the New button beside the
Next button.
4.
Enter as much of the person’s name, address and contact details as you have.
5.
If you have accompanying person, dietary or other extra information about this person, click on
the Extra Details button to open the Extra Details screen.
6.
If the person is expressing interest, providing historical participation or profile information, click
on the EOI and Profile button to open the Expression of Interest (EOI) and Profile Details
screen.
7.
If the person is registering for the event, click on the Registration button to open the
Registration Details screen. Remember that you can’t enter registration details until you have
locked the event fees.
8.
If you have details of a presentation being given by the person, click on the Presenter button to
open the Presenter Details screen and enter presentation and equipment requirements details.
9.
If you have a payment that has not yet been entered into the system, click on the Money Menu
button and then select Enter a Payment.
10. If you wish to allocate a payment that has been entered into the system, but is not yet fully
allocated, click on the Money Menu button and then select Allocate a Payment to allocate all
or part of the payment against the current person.
Once you have entered all the information for people, take the following steps to complete the data
entry session.
11. Do a Banking Run to summarise all payments received since the last banking run and prepare
bank deposit slips for cash and cheque payments and a summary report for each of the other
payment methods allowed.
12. Open the Correspondence screen and produce the desired correspondence type - invoices,
receipts, confirmation letters, etc.
13. Print an Income Reconciliation Report to see how the event is going and check that all
financial data is correct.
14. Exit Summit.
15. Back up the event file. For further information on backing up, refer to the ‘Backup an Event’
topic in Chapter 3, How To.
36 - Chapter 2: Scenarios
Summit Event Manager - Light
Other Before Tasks
Produce name badges and tickets
Name badges and tickets may be printed directly from within Summit, or the information for badges
and tickets can be exported and given to a name badge manufacturer. To produce name badges in
either way, take the following steps.
1.
From the Main Menu open the Name Badges and Tickets screen.
2.
Click on the Produce Name Badges option button.
3.
If you only want to produce new badges, click on the Only Produce New Badges or Tickets
option button. If you want to produce all badges, regardless of whether or not they’ve already
been produced, click on the Produce All Badges or Tickets option button. The usual selection
after your first name badge run is Only Produce New Badges or Tickets.
4.
To have the badges produced in family name (surname) order, click on the Sort by Family
Name then Organisation option button. To have the badges produced in organisation order,
click on the Sort by Organisation then Family Name option button.
5.
Select the badge format you want to use from the Name Badge or Ticket Format pull-down list.
If you’re uncertain what a particular format looks like, or want to modify it or create a new
format, click on the Design button to open the Name Badge and Ticket Design screen.
6.
Select for whom you are producing name badges from the Restrict Name Badges Produced
list box. The normal selection is All People Automatically Entitled or All People Automatically
Entitled plus Accompanying Persons. The other choices are used when you want to have
different badge styles for different participation categories.
7.
Click on the Preview button to display the name badges in Print Preview or click on the Export
button to export the name badge information. Which ever production method you choose, you
will be given the option of editing the details that will appear on the badges before they’re
produced. If you’re exporting, you’ll be asked for the export format you wish to use and the
name of the file that you want to export the name badge information to.
8.
After you have either exported or printed the name badges, you’ll be asked if you want to have
these name badges marked as having been produced. Once you have checked that the export
or print worked correctly, you should answer Yes. This will prevent these badges being
reprinted or exported during the next new badges production run.
9.
Repeat steps 2 to 8 for tickets, but you click on the Produce Tickets option.
Print Confirmation Letters
Confirmation letters are produced for people who are confirmed as attendees or presenters. There
is a different letter for each category, and letters are only produced for people who haven’t yet had
a confirmation letter produced. When people have been sent a confirmation letter, the date the
letter was produced is shown in the Confirmation Letter Sent date field on the Registration or
Presenter Details screen. To re-send a confirmation letter to a person, clear the date from this field
and another letter will be produced for them when you next print confirmation letters for that
participation category. To produce confirmation letters take the following steps.
1.
From the Main Menu open the Correspondence screen.
2.
Select the appropriate Correspondence Type option button.
3.
Click on the Edit button and check that the modifiable section of the letter matches your
requirements, then exit the Edit screen.
4.
Click on the Preview button. This will produce the confirmation letters and associated address
labels.
Chapter 2: Scenarios - 37
Summit Event Manager - Light
5.
After you have printed the letters and labels, you will be asked to confirm that they printed
correctly. When you confirm this, the Confirmation Letter Sent field for each person will be set
to the current date.
Follow-up presenters
It is often necessary to follow-up presenters to make sure they’ve registered, have submitted their
papers, biographies, photographs and technical requirements. To follow up presenters, take the
following steps.
1.
From the Setup Menu open the Presenter Rules screen. Ensure that the check boxes for rules
that apply to your event are marked.
2.
On the Main Menu select Presenter Follow-Up from the Event Reports screen. This will
produce a report showing only those presenters that are not complying with the rules of your
event. The report also shows their telephone numbers and e-mail addresses to enable you to
easily follow them up. This is an exception report, so you’re aiming for a blank report.
Determine catering requirements
1. From the Setup Menu open the Catering Events screen. Check that all catering events have
been entered and that the three areas that form the basis for calculating the number to cater
for are correct. The three areas are Full Registrations, Discretionary Adjustment and Add-Ons
Covered. Click on the People button to produce an Attendance Listing.
2.
On the Main Menu select Catering Requirements from the Event Reports screen. This will
produce a report showing how many people need to be catered for at each catering event.
Check that the numbers on the two reports match. If not, refer to the Catering Events section
in Chapter 4 for an explanation.
Determine equipment requirements
1. From the Setup Menu open the Catering Events screen. Check that the equipment
requirements of each catering event have been correctly entered.
2.
From the Setup Menu open the Sessions screen. Check that the standard equipment
requirements of each session have been correctly entered.
3.
On the Main Menu under Event Reports select the Presenter Follow-Up report. This will
produce a report showing where presenters are not complying with the rules of your event.
Check that all presenters have submitted their technical requirements.
4.
From the Main Menu open the Equipment Requirement Reports screen. Select the report that
you want to print, then click on the Preview button.
During
During the event, the focus is on processing people rapidly as they arrive at the event. Frequently,
these arrivals come in bursts at the beginning of a session, followed by a lull when the session
actually commences. This section is divided into four parts; Before the day’s arrivals, During
arrivals, After arrivals and End of each day.
Before the day’s arrivals
1. From the Main Menu open the Registration Desk Worklist screen.
2. Click on the Preview button to produce one or more paper copies of the Registration Desk
Worklist. This is done so you can keep processing arrivals if you have a system failure and it
also enables you to have multiple arrival points at high peak periods with some points using the
paper copies.
38 - Chapter 2: Scenarios
Summit Event Manager - Light
During arrivals
1. From the Main Menu open the Registration Desk Worklist screen.
2.
As the people arrive, locate their records by entering all or part of their names in the Find by
Full Name field, and then pressing Tab or Enter.
3.
Mark the At Event check box for the person’s record.
4.
If you have given the person any materials associated with the event, mark the Satchel Given
check box for the person’s record.
After arrivals
If you processed arrivals using the computer version of the Registration Desk Worklist you don’t
need to take any further steps. However, if you processed all or some of the arrivals using paper
copies of the Registration Desk Worklist take the following steps.
1.
After the arrivals have been processed, collect all the copies of the printed registration desk
worklist that were marked manually at the registration points. Open the Registration Desk
Worklist screen and update the computer version of the worklist from the printed copies.
2.
When you’re certain that the details from all printed copies of the worklist have been entered,
destroy the original printed copies. This prevents people making entries on the old printed
copies that would not be entered onto the computer system.
End of each day
1. From Financial Reports on the Main Menu, print an Income Reconciliation Report to see how
the event is going and check that all financial data is correct.
2.
Exit Summit.
3.
Back up the event file.
Chapter 2: Scenarios - 39
Summit Event Manager - Light
After
After the event, there are two main concerns: chasing up any outstanding money owing and
analysing the completed event to make sure the next event is even more successful and profitable.
Regular session to chase up outstanding money and process payments
First, process all the information related to people making payments for the event. Take as many of
the steps as apply to each person.
1.
From the Main Menu open the Personal Details screen.
2.
Find the person’s record.
3.
If you have a payment that hasn’t been entered into the system, click on the Money Menu
button and then select Enter a Payment.
4.
If you wish to allocate a payment that has been entered, but is not yet fully allocated, click on
the Money Menu button and click on the Allocate a Payment button to allocate all or part of the
payment against the current person.
Once you’ve entered all the information for people, take the following steps to complete the data
entry session.
5.
Do a Banking Run to summarise all payments received since the last banking run and prepare
bank deposit slips for cash and cheque payments and a summary report for each of the other
payment methods allowed.
6.
Open the Correspondence screen and produce the desired correspondence type, ie, invoices
and receipts.
7.
Click on the Financial Reports button and print an Income Reconciliation Report to see how
the event is going and check that all financial data is correct.
8.
Print any of the other financial reports you deem necessary; Financial Status, Outstanding
Payments, Credit Card Commission Breakdown, etc.
9.
Exit Summit.
10. Back up the event file.
Analysis of the event
1. From the Main Menu, open the Participation Breakdown screen. You should produce all of the
reports available from this screen as they each serve a different purpose. Select each report
then click on the Graph or Preview button to produce it. Each report is explained more fully in
Chapter 5, Main Menu.
2.
On the Main Menu, click on the Marketing Breakdown button and produce the Marketing
Breakdown report. This report shows how effectively the data you have in Summit is being
used, and how well the event is being marketed to people.
40 - Chapter 2: Scenarios
Summit Event Manager - Light
In-House Seminar or Free Promotional Seminar
For the in-house seminar, examples include a sales conference, an annual kick-off meeting or the
introduction of a new product line to staff or franchisees. The free promotional seminar describes a
presentation or a series of linked presentations put on by an organisation to showcase goods or
services to existing and prospective clients.
Characteristics
• Can be held on a regular basis or in conjunction with the release of a new product or service.
• Free of charge to attendees.
• Pre- and post-event functions are attended by all participants.
• Has a catering component.
• No external exhibitors, advertisers or sponsors.
• Has promotional materials in satchels.
• Members of the hosting organisation give the presentations - presenters are not solicited.
• The in-house seminar is not normally promoted outside the organisation.
•
The promotional seminar gathers registrants through direct mailings to existing and prospective
clients.
Set Up
1.
Click on the File button on the Front Menu to open the File screen.
2.
Create a new event by clicking on the New Event button. For more information, refer to the
File, New Event section in Chapter 1, Getting Started.
3.
Update the Event Details screen. The key fields to update are Short Name and Full Name (for
display on the logon menu and correspondence) and Starting Date (especially if you’re going
to import the structure from an earlier event).
4.
If the structure of this event is similar, or identical, to a previous event that was run using
Summit, it is easier to import the structure from a previous event and modify it than it is to set
up this event from scratch. If you wish to import the structure from a previous event, open the
Import Structure screen and import as much of the structure as will be appropriate for this
event. If you have imported all the structure from a previous event, the following setup steps
are only to ensure that the imported information matches the requirements of this event.
5.
Open the Registration Types screen and enter one record with any description you wish and a
price of $0.00.
6.
Open the Equipment screen and enter details of equipment that may be used during the event.
Enter technical equipment to be used during sessions (such as lecterns, slide projectors and
data panels) and catering equipment to be used during catering events (such as coffee urns
and plate warmers). Equipment requirements are shown on the various equipment reports.
7.
Open the Options screen and set any applicable options.
8.
Open the Presentation Types screen and enter details of the presentation types applicable to
this event. The presentation type is a means of grouping presentations that may require
different preparations or instructions to presenters (for example, demonstration, paper or
poster).
Chapter 2: Scenarios - 41
Summit Event Manager - Light
9.
Open the Presenter Rules screen and mark the check boxes corresponding to the rules that
apply to presenters at this event.
10. If you’re planning to target people who have attended, or expressed interest in previous
events, you now need to decide whether you wish to use the same interest profiles as were
used for the previous event from which you will import people’s name and address details, or
create new interest profiles for this event. If you want to create new profiles for this event,
open the Profiles screen and enter up to 20 profiles. If you plan to use the profiles from a
previous event that you will be importing name and address details from, skip this step and
import the profiles as part of the name and address details import.
11. Open the Secretariat Details screen and enter details of the secretariat (office address for
correspondence and enquiries) for this event.
12. If you’re having any catering events with fixed tabling, open the Tables screen and enter
details of each table and its capacity.
13. Open the Venue Details screen and enter details of the venue of this event.
14. Open the Locations screen and enter details of any locations where sessions or catering
events will take place. Locations are displayed on catering reports, equipment reports,
schedules and in the draft programme.
15. Open the Catering Events screen and enter details of the catering events (functions)
associated with this event. Catering events should be entered after equipment and location
details have been entered as these must be specified within a catering event.
16. Open the Sessions screen and enter details of the sessions for this event. Sessions should be
entered after location details have been entered as these must be specified within a session.
17. Open the Import Demographics screen on the Utilities Menu and import name and address
details from as many sources as you wish. While it is possible to import demographic
information at any time, it is best done before you start entering details of people to minimise
the risk of duplication. After you’ve imported demographics, open the Reporter screen on the
Main Menu and print a full database listing and use this to identify and delete any duplicate
records that resulted from the import(s). You can delete people’s records until they become
financially involved with the current event.
18. Open the Correspondence Text screen from the Correspondence screen on the Main Menu by
clicking on the Edit button and enter any additional text you want to appear at the top and
bottom of confirmation letters and itineraries.
19. Open the Name Badge and Ticket screen and click on the Design button to define the name
badge style for this event.
20. Open the Events Report screen and print a schedule and a schedule by location.
21. Open the Event Reports screen and print a draft expression of interest form, a draft
registration form and a draft front page.
22. Check all the information on the reports created above and change where necessary.
23. Open the Lock Event Fees screen on the Utilities Menu and lock the fees into place.
42 - Chapter 2: Scenarios
Summit Event Manager - Light
Before
This section is divided into two sections. The first section shows how to process registrations and
other incoming information in regular data entry sessions. These sessions might be daily, every
two days, weekly or other interval depending on the volume of information. The second section
covers other Before tasks that may be performed regularly before the event or may be performed
only once, depending on your event size.
Regular Data Entry Sessions
First, process all the information related to people and the event. Take as many steps as apply to
each person.
1.
Open the Personal Details screen.
2.
Find the person’s record by entering his or her family name (surname) into the Find by Family
Name field and then pressing Tab or Enter. Use the Previous and Next buttons to cycle
through all records with that family name. If you find the person’s record, skip to step 6.
3.
Once you’re satisfied that this is a genuine new record, click on the New button beside the
Next button.
4.
Enter as much of the person’s name, address and contact details as you have.
5.
If you have accompanying person, dietary or other extra information about this person, click on
the Extra Details button to open the Extra Details screen.
6.
If the person is expressing interest, providing historical participation or profile information, click
on the EOI and Profile button to open the Expression of Interest (EOI) and Profile Details
screen.
7.
If the person is registering for the event, click on the Registration button to open the
Registration Details screen and enter the details. Remember that you can’t enter registration
details until you have locked the event fees.
8.
If you have details of a presentation being given by the person, click on the Presenter button to
open the Presenter Details screen and enter presentation and equipment requirements details.
9.
Open the Correspondence screen and produce the desired correspondence⎯confirmation
letter, participation record, etc.
10. Print an Income Reconciliation or Event Activity report to see how the event is going. The
Income Reconciliation Report is on the Financial Reports menu and the Event Activity report is
on the Event Reports menu.
11. Exit Summit.
12. Back up the event file.
Other Before Tasks
Produce name badges and tickets
Name badges and tickets may be directly printed from within Summit, or the information for badges
and tickets can be exported and given to a name badge manufacturer. To produce name badges in
either way, take the following steps.
1.
From the Main Menu open the Name Badges and Tickets.
2.
Click on the Produce Name Badges option button.
Chapter 2: Scenarios - 43
Summit Event Manager - Light
3.
If you only want to produce new badges, click on the Only Produce New Badges or Tickets
option button. If you want to produce all badges, whether or not they’ve already been
produced, click on the Produce All Badges or Tickets option button. The usual selection after
your first name badge run is Only Produce New Badges or Tickets.
4.
To have the badges produced in family name (surname) order, click on the Sort by Family
Name then Organisation option button. To have the badges produced in organisation order,
click on the Sort by Organisation then Family Name option button.
5.
Select the badge format you want to use from the Name Badge or Ticket Format pull-down list.
If you’re uncertain what a particular format looks like, or want to modify it or create a new
format, click on the Design button to open the Name Badge and Ticket Design screen.
6.
Select for whom you are producing name badges from the Restrict Name Badges Produced
list box. The normal selection is All People Automatically Entitled or All People Automatically
Entitled plus Accompanying Persons. The other choices are used when you want to have
different badge styles for different participation categories.
7.
Click on the Preview button to display the name badges in Print Preview or click on the Export
button to export the name badge information. Whichever production method you choose, you
will be given the option of editing the details that will appear on the badges before they’re
produced. If you’re exporting, you’ll also be asked for the export format you wish to use and
the name of the file that you want to export the name badge information to.
8.
After you have either exported or printed the name badges, you’ll be asked if you want to have
these name badges marked as having been produced. Once you’ve checked that the export or
print worked correctly, you should answer Yes. This will prevent these badges being reprinted
or exported during the next new badges production run.
9.
Repeat steps 2 to 8 for tickets, but you click on the Produce Tickets option.
Follow-up presenters
It is often necessary to follow-up presenters to make sure they’ve registered, have submitted their
papers, biographies, photographs and technical requirements. To follow up presenters, take the
following steps.
1. From the Setup Menu open the Presenter Rules screen. Ensure that the check boxes for rules
that apply to your event are marked.
2. On the Main Menu select Presenter Follow-Up from the Event Reports screen. This will
produce a report showing only those presenters that are not complying with the rules of your
event. The report also shows their telephone numbers and e-mail addresses to enable you to
easily follow them up. This is an exception report, so you’re aiming for a blank report.
Determine catering requirements
1. From the Setup Menu open the Catering Events screen. Check that all catering events have
been entered and that the three areas that form the basis for calculating the number to cater for
are correct. The three areas are Full Registrations, Discretionary Adjustment and Add-Ons
Covered. Click on the People button to produce an Attendance Listing.
2. On the Main Menu select Catering Requirements from the Event Reports screen. This will
produce a report showing how many people need to be catered for at each catering event.
Check that the numbers on the two reports match. If not, refer to the Catering Events section in
Chapter 4 for an explanation.
Determine equipment requirements
1. From the Setup Menu open the Catering Events screen. Check that the equipment
requirements of each catering event have been correctly entered.
44 - Chapter 2: Scenarios
Summit Event Manager - Light
2. From the Setup Menu open the Sessions screen. Check that the standard equipment
requirements of each session have been correctly entered.
3. On the Main Menu under Event Reports select the Presenter Follow-Up report. This will
produce a report showing where presenters are not complying with the rules of your event.
Check that all presenters have submitted their technical requirements.
4. From the Main Menu open the Equipment Requirement Reports screen. Select the report that
you want to print, then click on the Preview button.
During
During the event, the focus is on processing people rapidly as they arrive at the event. Frequently,
these arrivals come in bursts at the beginning of a session, followed by a lull when the session
actually commences. This section is divided into four parts; Before the day’s arrivals, During
arrivals, After arrivals and End of each day.
Before the day’s arrivals
1. From the Main Menu open the Registration Desk Worklist screen.
2. Click on the Preview button to produce one or more paper copies of the Registration Desk
Worklist. This is done so that you can keep processing arrivals if you have a system failure and
it also enables you to have multiple arrival points at high peak periods with some points using
the paper copies.
During arrivals
1.
From the Main Menu open the Registration Desk Worklist screen.
2.
As the people arrive, locate their records by entering all or part of their names in the Find by
Full Name field, and then pressing Tab or Enter.
3.
Mark the At Event check box for the person’s record.
4.
If you have given the person any materials associated with the event, mark the Satchel Given
check box for the person’s record.
After arrivals
If you only processed arrivals using the computer version of the Registration Desk Worklist you
don’t need to take any further steps. If you processed all or some of the arrivals using paper copies
of the Registration Desk Worklist, take the following steps.
1.
After the arrivals have been processed, collect all the copies of the printed registration desk
worklist that were marked manually at the registration points. Open the Registration Desk
Worklist screen from the Main Menu and update the computer version of the worklist from the
printed copies.
2.
When you’re certain that the details from all printed copies of the worklist have been entered,
destroy the original printed copies. This prevents people making entries on the old printed
copies that would not be entered onto the computer system.
End of each day
1.
Print an Income Reconciliation Report to see how the event is going and check that all
financial data is correct.
2.
Exit Summit.
3.
Back up the event file.
Chapter 2: Scenarios - 45
Summit Event Manager - Light
After
After the event, the main concern is analysing the completed event to make sure the next event is
even more successful and profitable.
Analysis of the event
3. From the Main Menu open the Participation Breakdown screen. You should produce all of the
reports available from this screen as they each serve a different purpose. Select each report
and then click on the Graph or Preview button to produce it.
4.
On the Main Menu click on the Marketing Breakdown button to produce the Marketing
Breakdown report. This report shows how effectively the data you have in Summit is being
used, and how well the event is being marketed to people.
46 - Chapter 2: Scenarios
Summit Event Manager - Light
Chargeable Training Course
This scenario relates to a training course provided to external parties. This can also cover
professional development (PD) activities, short courses, workshops and in-service programs.
Characteristics
• Held on a regularly scheduled basis.
• Participants pay to attend.
• Presenters are not also participants.
• Generally have an identical, or nearly identical structure to previous training courses, but
presenters may vary.
• Promoted mainly through advertisements in trade and general publications. Previous
participants are not targeted, except for next level of a particular course (for example, people
who have attended an ‘Introduction to...’ course may be targeted for an ‘Advanced...’ course).
• No pre- and post-training course functions.
• No accommodation or travel component.
• May have a catering component.
• Course materials provided to each participant.
Set Up
1.
Click on the File button on the Main Menu to open the File screen.
2.
Create a new event by clicking on the New Event button.
3.
Update the Event Details screen. The key fields to update are Short Name and Full Name (for
display on the logon menu and correspondence) and Starting Date (especially if you’re going
to import the structure from an earlier event).
4.
If the structure of this event is similar, or identical, to a previous event that was run using
Summit, it is easier to import the structure from a previous event and modify it than it is to set
up this event from scratch. If you wish to import the structure from a previous event, open the
Import Structure screen on the Utilities Menu and import as much of the structure as will be
appropriate for this event. If you have imported all the structure from a previous event, the
following setup steps are only to ensure that the imported information matches the
requirements of this event.
5.
On the Setup Menu, open the Registration Types screen and enter details of the registration
fees for the training course. These registration fees may be modified or deleted until event
fees are locked. New registration fees may be added after event fees have been locked and
existing fees may have the descriptions altered.
6.
Open the Advertising Sources screen and enter any advertising sources you will be using to
promote the event. If you enter these advertising sources as people register for the course,
you will be able to determine which were the most effective means of advertising from the
Confirmed Attendees by Advertising Source report under Participation Breakdown on the Main
Menu.
7.
Open the Banking Details screen and enter details of the bank account being used for this
event.
Chapter 2: Scenarios - 47
Summit Event Manager - Light
8.
Open the Equipment screen and enter details of equipment that may be used during the event.
Enter technical equipment to be used during sessions (such as lecterns, slide projectors and
data panels) and catering equipment to be used during catering events (such as coffee urns
and plate warmers). Equipment requirements are shown on the various equipment reports.
9.
Open the Options screen and set any applicable options.
10. Open the Payment Types screen and enter any additional payment types you wish to use
when receiving payments for the event. The standard payment types are Cash, Cheque,
Refund and Reversal. You may enter as may additional payment types as you wish. A
summary report will be produced for each payment type.
11. Open the Presentation Types screen and enter details of the presentation types applicable to
this event. The presentation type is a means of grouping presentations that may require
different preparations or instructions to presenters (for example, demonstration, paper or
poster).
12. Open the Secretariat Details screen and enter details of the secretariat (office address for
correspondence and enquiries) for this event.
13. If you’re planning to target people who have attended, or expressed interest in previous
events, you now need to decide whether you wish to use the same interest profiles as were
used for the previous event from which you will import people’s name and address details, or
create new interest profiles for this event. If you want to create new profiles for this event,
open the Profiles screen and enter up to 20 profiles. If you plan to use the profiles from a
previous event that you will be importing name and address details for, skip this step and
import the profiles as part of the name and address details import.
14. Open the Venue Details screen and enter details of the venue of this event.
15. Open the Locations screen and enter details of any locations where sessions or catering
events will take place at the venue. Locations are displayed on catering reports, equipment
reports, schedules and in the draft programme.
16. Open the Catering Events screen and enter details of the catering events (functions)
associated with this event. Catering events should be entered after equipment and location
details have been entered as these may be specified within a catering event.
17. Open the Sessions screen and enter details of the sessions for this event. Sessions should be
entered after location details have been entered as these may be specified within a session.
18. Open the Import Demographics screen on the Utilities Menu and import name and address
details from as many sources as you wish. While it is possible to import demographic
information at any time, it is best done before you start entering details of people, to minimise
the risk of duplication. After you have imported demographics, open the Reporter screen on
the Main Menu and print a full database listing and use this to identify and delete any duplicate
records that resulted from the import(s). You can delete people’s records until they become
financially involved with the current event.
19. Open the Correspondence Text screen from the Correspondence screen on the Main Menu by
clicking on the Edit button and enter any additional text you want to appear at the top and
bottom of receipts or confirmation letters.
20. Open the Name Badge and Ticket screen and click on the Design button and define the name
badge style for this event.
21. Open the Event Reports screen and print a Schedule and a Schedule by Location.
22. Open the Event Reports screen and print a draft expression of interest form, a draft
registration form and a draft front page.
23. Check all the information on the reports created above and change where necessary.
48 - Chapter 2: Scenarios
Summit Event Manager - Light
24. Once you’re certain that registration fees are set and you’re happy for them to be locked into
place, open the Lock Event Fees screen on the Utilities Menu and lock the fees into place.
You will not be able to register attendees until event fees have been locked. Once locked,
event fees may be unlocked only if you have not yet started registering people. Once you have
started registering people, event fees can’t be unlocked.
Before
This section is divided into two sections. The first section shows how to process expressions of
interest, registrations and other incoming information in regular data entry sessions. These
sessions might be daily, every two days, weekly or other interval depending on the volume of
information. The second section covers other Before tasks that may be performed regularly before
the event or may be performed only once, depending on your event size.
Regular Data Entry Sessions
First, process all the information related to people and the event. Take as many of steps as apply
to each person.
1.
Open the Personal Details screen.
2.
Find the person’s record by entering his or her family name (surname) into the Find by Family
Name field and then pressing Tab or Enter. Use the Previous and Next buttons to cycle
through all records with that family name. If you find the person’s record, skip to step 6.
3.
Once you’re satisfied that this is a genuine new record, click on the New button beside the
Next button.
4.
Enter as many of the person’s name, address and contact details as you have.
5.
If you have special dietary or other extra information about this person, click on the Extra
Details button to open the Extra Details screen.
6.
If the person is expressing interest, providing historical participation or profile information, click
on the EOI and Profile button to open the Expression of Interest (EOI) and Profile Details.
7.
If the person is registering for the event, click on the Registration button to open the
Registration Details screen. Remember that you can’t enter registration details until you have
locked the event fees.
8.
If you have a payment that has not yet been entered into the system, click on the Money Menu
button and then select Enter a Payment.
9.
If you wish to allocate a payment that has been entered into the system, but is not yet fully
allocated, click on the Money Menu button and then select Allocate a Payment to allocate all
or part of the payment against the current person.
Once you have entered all the information for people, take the following steps to complete the data
entry session.
10. Do a Banking Run to summarise all payments received since the last banking run and prepare
bank deposit slips for cash and cheque payments and a summary report for each of the other
payment methods allowed.
11. Open the Correspondence screen and produce the desired correspondence.
12. Print an Income Reconciliation Report to see how the event is going and check that all
financial data is correct.
13. Exit Summit.
14. Back up the event file.
Chapter 2: Scenarios - 49
Summit Event Manager - Light
Other Before Tasks
Produce name badges and tickets
Name badges may be printed directly from within Summit, or the information for badges can be
exported and given to a name badge manufacturer. To produce name badges in either way, take
the following steps.
1.
From the Main Menu open the Name Badges and Tickets screen.
2.
Click on the Produce Name Badges option button.
3.
If you only want to produce new badges, click on the Only Produce New Badges or Tickets
option button. If you want to produce all badges, whether or not they’ve already been
produced, click on the Produce All Badges or Tickets option button. The usual selection after
your first name badge run is Only Produce New Badges or Tickets.
4.
To have the badges produced in family name (surname) order, click on the Sort by Family
Name then Organisation option button. To have the badges produced in organisation order,
click on the Sort by Organisation then Family Name option button.
5.
Select the badge format you want to use from the Name Badge or Ticket Format pull-down list.
If you’re uncertain what a particular format looks like, or want to modify it or create a new
format, click on the Design button to open the Name Badge and Ticket Design screen.
6.
Select for whom you are producing name badges from the Restrict Name Badges Produced
list box. The normal selection is All People Automatically Entitled or All People Automatically
Entitled plus Accompanying Persons. The other choices are used when you want to have
different badge styles for different participation categories.
7.
Click on the Preview button to display the name badges in Print Preview or click on the Export
button to export the name badge information. Whichever production method you choose, you’ll
be given the option of editing the details that will appear on the badges before they’re
produced. If you’re exporting, you’ll be asked for the export format you wish to use and the
name of the file that you want to export the name badge information to.
8.
After you have exported or printed the name badges, you’ll be asked if you want to have these
name badges marked as having been produced. Once you’ve checked that the export or print
worked correctly, you should answer Yes. This will prevent these badges being reprinted or
exported during the next new badges production run.
Determine catering requirements
1. From the Setup Menu open the Catering Events screen. Check that all catering events have
been entered and that the three areas that form the basis for calculating the number to cater for
are correct. The three areas are Full Registrations, Discretionary Adjustment and Add-Ons
Covered. Click on the People button to produce an Attendance Listing.
2. On the Main Menu select Catering Requirements from the Event Reports screen. This will
produce a report showing how many people need to be catered for at each catering event.
Check that the numbers on the two reports match. If not, refer to the Catering Events section in
Chapter 4 for an explanation.
Determine equipment requirements
1. From the Setup Menu open the Catering Events screen. Check that the equipment
requirements of each catering event have been correctly entered.
2. From the Setup Menu open the Sessions screen. Check that the standard equipment
requirements of each session have been correctly entered.
50 - Chapter 2: Scenarios
Summit Event Manager - Light
3. On the Main Menu under Event Reports select the Presenter Follow-Up report. This will
produce a report showing where presenters are not complying with the rules of your event.
Check that all presenters have submitted their technical requirements.
4. From the Main Menu open the Equipment Requirement Reports screen. Select the report that
you want to print, then click on the Preview button.
During
During the event, the focus is on processing people rapidly as they arrive. Frequently, these
arrivals come in bursts at the beginning of a session, followed by a lull when the session actually
commences. This section is divided into four parts; Before the day’s arrivals, During arrivals, After
arrivals and End of each day.
Before the day’s arrivals
1. From the Main Menu open the Registration Desk Worklist screen.
2. Click on the Preview button to produce one or more paper copies of the Registration Desk
Worklist. This is done so that you can keep processing arrivals if you have a system failure and
it also enables you to have multiple arrival points at high peak periods with some points using
the paper copies.
During arrivals
1.
From the Main Menu, open the Registration Desk Worklist screen.
2.
As the people arrive, locate their records by entering all or part of their names in the Find by
Full Name field, then pressing Tab or Enter.
3.
Mark the At Event check box for each person’s record.
4.
If you are giving the person any materials associated with the event, mark the Satchel Given
check box for the person’s record.
After arrivals
If you only processed arrivals using the computer version of the Registration Desk Worklist, you
don’t need to take any further steps. If you processed all or some of the arrivals using paper copies
of the Registration Desk Worklist take the following steps.
1.
After the arrivals have been processed, collect all the copies of the printed registration desk
worklist that were marked manually at the registration points. Open the Registration Desk
Worklist screen and update the computer version of the worklist from the printed copies.
2.
When you’re certain that the details from all printed copies of the worklist have been entered,
destroy the original printed copies. This prevents people making entries on the old printed
copies that would not be entered onto the computer system.
End of each day
1.
Print an Income Reconciliation Report to see how the event is going and check that all
financial data is correct.
2.
Exit Summit.
3.
Back up the event file.
Chapter 2: Scenarios - 51
Summit Event Manager - Light
After
After the event, there are two main concerns; chasing up any outstanding money owing and
analysing the completed event to make sure the next event is even more successful and profitable.
Regular session to chase up outstanding money and process payments
First, process all the information related to people making payments for the event. Take as many
steps as apply to each person.
1.
Open the Personal Details screen.
2.
Find the person’s record.
3.
If you have a payment that hasn’t been entered into the system yet, click on the Money Menu
button and then select Enter a Payment.
4.
If you wish to allocate a payment that has been entered into the system, but is not yet fully
allocated, click on the Money Menu button and then select Allocate a Payment button to
allocate all or part of the payment against the current person.
Once you’ve entered all the information for people, take the following steps to complete the data
entry session.
5.
Do a Banking Run to summarise all payments received since the last banking run and prepare
bank deposit slips for cash and cheque payments and a summary report for each of the other
payment methods allowed.
6.
Open the Correspondence screen and produce the desired correspondence.
7.
Print an Income Reconciliation Report to see how the event is going and check that all
financial data is correct.
8.
Exit Summit.
9.
Back up the event file.
Analysis of the event
1. From the Main Menu open the Participation Breakdown screen by clicking on the Participation
Breakdown button. You should produce all of the reports available from this screen as they
each serve a different purpose. Select each report and then click on the Graph or Preview
button to produce it. Each report is explained more fully in Chapter 5, Before.
2. On the Main Menu click on the Marketing Breakdown button. This will produce the Marketing
Breakdown report. This report shows how effectively the data you have in Summit is being
used, and how well the event is being marketed to people. This report is explained more fully in
Chapter 7, After.
52 - Chapter 2: Scenarios
Summit Event Manager - Light
Recurring Meeting - Separate Events
Meetings that occur on a regular basis, usually involving the same group of people. Examples are
user groups, organisation meetings, oversight committees, management meetings and the annual
general meeting of shareholders.
Setting up each meeting as a separate event is used when you want to use the full functionality of
Summit to provide catering reports, programmes and so on. This method uses Summit in much the
same way as you would for a conference.
Characteristics
• Held on a regular basis.
• Participants do not pay to attend.
• Can be structured presentations or completely unstructured meetings.
• Not formally promoted.
• No pre- and post-meeting functions.
• No accommodation or travel component.
• May have a minor catering component.
• There may or may not be materials provided to each participant.
Set Up
1.
Click on the File button on the Front Menu to open the File screen.
2.
Create a new event by clicking on the New Event button.
3.
Update the Event Details screen. The key fields to update are Short Name and Full Name (for
display on the logon menu and correspondence) and Starting Date (especially if you’re going
to import the structure from an earlier event).
4.
If the structure of this event is similar, or identical, to a previous event that was run using
Summit, it’s easier to import the structure from a previous event and modify it than it is to set
up this event from scratch. If you wish to import the structure from a previous event, open the
Import Structure screen on the Utilities menu and import as much of the structure as will be
appropriate for this event. If you have imported all the structure from a previous event, the
following setup steps are only to ensure that the imported information matches the
requirements of this event.
5.
On the Setup Menu, open the Registration Types screen and enter one record with any
description you wish and a price of $0.00.
6.
Open the Equipment screen and enter details of equipment that may be used during the event.
Enter technical equipment to be used during presentation sessions (such as lecterns, slide
projectors and data panels) and catering equipment to be used during catering events (such
as coffee urns and plate warmers). Equipment requirements are shown on the various
equipment reports.
7.
Open the Options screen and set any applicable options.
8.
Open the Secretariat Details screen and enter details of the secretariat (office address for
correspondence and enquiries) for this event.
9.
Open the Venue Details screen and enter details of the venue of this event.
Chapter 2: Scenarios - 53
Summit Event Manager - Light
10. Open the Locations screen and enter details of any locations where sessions or catering
events will take place. Locations are displayed on catering reports, equipment reports,
schedules and in the draft programme.
11. Open the Catering Events screen and enter details of the catering events (functions)
associated with this event. Catering events should be entered after equipment and location
details have been entered these may be specified within a catering event.
12. Open the Sessions screen and enter details of the presentation sessions for this event.
Sessions should be entered after location details have been entered as these may be
specified within a session.
13. Open the Import Demographics screen from the Utilities Menu and import name and address
details from as many sources as you wish. While it is possible to import demographic
information at any time, it is best done before you start entering details of people to minimise
the risk of duplication. After you have imported demographics, open the Reporter screen on
the Main Menu and print a full database listing and use this to identify and delete any duplicate
records that resulted from the import(s). You can delete people’s records until they become
financially involved with the current event.
14. Open the Correspondence Text screen from the Correspondence screen by clicking on the
Edit button and enter any additional text you want to appear at the top and bottom of
confirmation letters. The Correspondence screen is on the Main Menu.
15. Open the Name Badge and Ticket screen and click on the Design button to define the name
badge style for this event.
16. Open the Event Reports screen on the Main Menu and print a Schedule and a Schedule by
Location report. Check all the information on the reports and change where necessary.
17. Open the Lock Event Fees screen on the Utilities Menu and lock the fees into place.
Before
This section is divided into two sections. The first section shows how to process expressions of
interest, registrations and other incoming information in regular data entry sessions. These
sessions might be daily, every two days, weekly or other interval depending on the volume of
information. The second section covers other Before tasks that may be performed regularly before
the event or may be performed only once, dependent on your event size.
Regular Data Entry Sessions
First, process all the information related to people and the event. Take as many steps as apply to
each person.
1.
Open the Personal Details screen.
2.
Find the person’s record by entering his or her family name (surname) into the Find by Family
Name field and then pressing Tab or Enter. Use the Previous and Next buttons to cycle
through all records with that family name. If you find the person’s record, skip to step 6.
3.
Once you’re satisfied that this is a genuine new record, click on the New button beside the
Next button.
4.
Enter as many of the person’s name, address and contact details as you have.
5.
If you have special dietary or other extra information about this person, click on the Extra
Details button to open the Extra Details screen.
6.
If the person is expressing interest, providing historical participation or profile information, click
on the EOI and Profile button to open the Expression of Interest (EOI) and Profile Details.
54 - Chapter 2: Scenarios
Summit Event Manager - Light
7.
If the person is attending the event, click on the Registration button to open the Registration
Details screen and enter the registration details. Remember that you can’t enter registration
details until you have locked the event fees, even if the fee is zero.
8.
Open the Correspondence screen and produce the desired correspondence.
9.
Exit Summit.
10. Back up the event file.
Other Before Tasks
Produce name badges and tickets
Name badges may be printed directly from within Summit or the information for badges can be
exported and given to a name badge manufacturer. To produce name badges in either way, take
the following steps.
1.
From the Main Menu open the Name Badges and Tickets screen.
2.
Click on the Produce Name Badges option button.
3.
If you only want to produce new badges, click on the Only Produce New Badges or Tickets
option button. If you want to produce all badges, whether or not they’ve already been
produced, click on the Produce All Badges or Tickets option button. The usual selection after
your first name badge run is Only Produce New Badges or Tickets.
4.
To have the badges produced in family name (surname) order, click on the Sort by Family
Name then Organisation option button. To have the badges produced in organisation order,
click on the Sort by Organisation then Family Name option button.
5.
Select the badge format you want to use from the Name Badge or Ticket Format pull-down list.
If you’re uncertain what a particular format looks like, or want to modify it or create a new
format, click on the Design button to open the Name Badge and Ticket Design screen.
6.
Select for whom you are producing name badges from the Restrict Name Badges Produced
list box. The normal selection is All People Automatically Entitled or All People Automatically
Entitled plus Accompanying Persons. The other choices are used when you want to have
different badge styles for different participation categories.
7.
Click on the Preview button to display the name badges in Print Preview or click on the Export
button to export the name badge information. Whichever production method you choose, you
will be given the option of editing the details that will appear on the badges before they’re
produced. If you’re exporting, you’ll also be asked for the export format you wish to use and
the name of the file that you want to export the name badge information to.
8.
After you have either exported or printed the name badges, you’ll be asked if you want to have
these name badges marked as having been produced. Once you’ve checked that the export or
print worked correctly, you should answer Yes. This will prevent these badges being reprinted
or exported during the next new badges production run.
Determine catering requirements
1. From the Setup Menu open the Catering Events screen. Check that all catering events have
been entered and that the three areas that form the basis for calculating the number to cater for
are correct. The three areas are Full Registrations, Discretionary Adjustment and Add-Ons
Covered. Click on the People button to produce an Attendance Listing.
2. On the Main Menu select Catering Requirements from the Event Reports screen. This will
produce a report showing how many people need to be catered for at each catering event.
Check that the numbers on the two reports match. If not, refer to the Catering Events section in
Chapter 4 for an explanation.
Chapter 2: Scenarios - 55
Summit Event Manager - Light
Determine equipment requirements
1. From the Setup Menu open the Catering Events screen. Check that the equipment
requirements of each catering event have been correctly entered.
2. From the Setup Menu open the Sessions screen. Check that the standard equipment
requirements of each session have been correctly entered.
3. On the Main Menu under Event Reports select the Presenter Follow-Up report. This will
produce a report showing where presenters are not complying with the rules of your event.
Check that all presenters have submitted their technical requirements.
4. From the Main Menu open the Equipment Requirement Reports screen. Select the report that
you want to print, then click on the Preview button.
During
At the start of the meeting, the focus is on processing people rapidly as they arrive. These arrivals
come in a burst at the beginning of the meeting, followed by a lull when the meeting actually
commences. This section is divided into three parts; Before the meeting, During arrivals and End of
the meeting.
Before the meeting
1. From the Main Menu open the Registration Desk Worklist screen.
2. Click on the Preview button to produce one or more paper copies of the Registration Desk
Worklist. This is done so that you can keep processing arrivals if you have a system failure and
it also enables you to have multiple arrival points at high peak periods with some points using
the paper copies.
During arrivals
1.
If you’re using the computer for marking attendance, from the Main Menu open the
Registration Desk Worklist screen.
2.
As the people arrive, locate their records by entering all or part of their names in the Find by
Full Name field, then press Tab or Enter. If you’re using the printed worklist, find the person in
the alphabetical listing.
3.
Mark the At Event check box for each person.
4.
If you are giving the person any materials associated with the event, mark the Satchel Given
check box for the person’s record.
End of the meeting
If you processed arrivals using the computer version of the Registration Desk Worklist you don’t
need to take any further steps. If you processed all or some of the arrivals using the printed
Registration Desk Worklist take the following steps.
1.
After the arrivals have been processed, collect all the copies of the printed registration desk
worklist that were marked manually at the registration points. Open the Registration Desk
Worklist screen from the Main Menu and update the computer version of the worklist from the
printed copies.
2.
When you’re certain that the details from all printed copies of the worklist have been entered,
destroy the original printed copies. This prevents people making entries on the old printed
copies that would not be entered onto the computer system.
56 - Chapter 2: Scenarios
Summit Event Manager - Light
Recurring Meeting - Combined in one Event
Meetings that occur on a regular basis, usually involving the same group of people. Examples are
user groups, organisation meetings, oversight committees, management meetings and the annual
general meeting of shareholders.
Combining all meetings into the one event is used when there is little variation in the people
attending the meetings and you want to be able to track attendance over a series of meetings. This
method treats the whole series of meetings as a single event, with each individual meeting being
treated as an add-on.
Characteristics
• Held on a regular basis.
• Participants do not pay to attend.
• Can be structured presentations or completely unstructured meetings.
• Not formally promoted – the same people attend
• No pre- and post-meeting functions.
• No accommodation or travel component.
• May have a minor catering component.
• There may or may not be materials provided to each participant.
Set Up
1.
Click on the File button on the Front Menu to open the File screen.
2.
Create a new event by clicking on the New Event button.
3.
Update the Event Details screen. The key fields to update are Short Name and Full Name (for
display on the logon menu and correspondence) and Starting Date (especially if you’re going
to import the structure from an earlier event).
4.
If the structure of this event is similar, or identical, to a previous event that was run using
Summit, it’s easier to import the structure from a previous event and modify it than it is to set
up this event from scratch. If you wish to import the structure from a previous event, open the
Import Structure screen on the utilities Menu and import as much of the structure as will be
appropriate for this event. If you have imported all the structure from a previous event, the
following setup steps are only to ensure that the imported information matches the
requirements of this event.
5.
Open the Registration Types and enter one record with any description you wish and a price of
$0.00.
6.
Open the Add-Ons screen and enter each meeting as an add-on with a price of $0.00. Include
the meeting date as part of the description and set the Display Sequence such that the
meetings will be reported in date order.
7.
Open the Options screen and set any applicable options.
8.
Open the Secretariat Details screen and enter details of the secretariat (office address for
correspondence and enquiries) for this event.
9.
Open the Venue Details screen and enter details of the venue of this event.
Chapter 2: Scenarios - 57
Summit Event Manager - Light
10. On the Utilities Menu, open the Import Demographics screen and import name and address
details from as many sources as you wish. While it is possible to import demographic
information at any time, it is best done before you start entering details of people to minimise
the risk of duplication. After you have imported demographics, open the Reporter screen on
the Main Menu and print a full database listing and use this to identify and delete any duplicate
records that resulted from the import(s). You can delete a person’s record until they become
financially involved with the current event.
11. On the Main Menu, open the Name Badge and Ticket screen and click on the Design button to
define the name badge style for this event.
12. On the Utilities Menu, open the Lock Event Fees screen and lock the fees into place.
Before
This section is divided into two sections, the first section shows how to process registrations and
other incoming information in regular data entry sessions. These sessions might be daily, every
two days, weekly or other interval depending on the volume of information. The second section
covers other Before tasks that may be performed regularly before the event or may be performed
only once, depending on your event size.
Regular Data Entry Sessions
First, process all the information related to people and the event. Take as many of the steps as
apply to each person.
1.
Open the Personal Details screen.
2.
Find the person’s record by entering his or her family name (surname) into the Find by Family
Name field and then pressing Tab or Enter. Use the Previous and Next buttons to cycle
through all records with that family name. If you find the person’s record, skip to step 6.
3.
Once you’re satisfied that this is a genuine new record, click on the New button beside the
Next button.
4.
Enter as many of the person’s name, address and contact details as you have.
5.
If the person lets you know he or she will be coming to a particular meeting, click on the
Registration button to open the Registration Details screen, select the add-on that refers to this
meeting. Remember that you can’t enter registration details until you have locked the event
fees.
6.
Open the Reporter screen on the Main Menu, select the appropriate add-on in the Other
section of the screen and click on the Listing button. Select the Name, Organisation and
Quantity by Add-on report which lists all people attending the selected add-on.
7.
Exit Summit.
8.
Back up the event file.
Other Before Tasks
Produce name badges
Name badges may be printed directly from within Summit, or the information for badges can be
exported and given to a name badge manufacturer. To produce name badges in either way, take
the following steps.
1.
From the Main Menu open the Name Badges and Tickets screen by clicking on the Name
Badges and Tickets button.
2.
Click on the Produce Name Badges option button.
58 - Chapter 2: Scenarios
Summit Event Manager - Light
3.
If you only want to produce new badges, click on the Only Produce New Badges or Tickets
option button. If you want to produce all badges, whether or not they’ve already been
produced, click on the Produce All Badges or Tickets option button. The usual selection after
your first name badge run is Only Produce New Badges or Tickets.
4.
To have the badges produced in family name (surname) order, click on the Sort by Family
Name then Organisation option button. To have the badges produced in organisation order,
click on the Sort by Organisation then Family Name option button.
5.
Select the badge format you want to use from the Name Badge or Ticket Format pull-down list.
If you’re uncertain what a particular format looks like, or want to modify it or create a new
format, click on the Design button to open the Name Badge and Ticket Design screen.
6.
Select for whom you are producing name badges from the Restrict Name Badges Produced
list box. The normal selection is All People Automatically Entitled or All People Automatically
Entitled plus Accompanying Persons. The other choices are used when you want to have
different badge styles for different participation categories.
7.
Click on the Preview button to display the name badges in Print Preview or click on the Export
button to export the name badge information. Whichever production method you choose, you’ll
be given the option of editing the details that will appear on the badges before they’re
produced. If you’re exporting, you’ll also be asked for the export format you wish to use and
the name of the file that you want to export the name badge information to.
8.
After you have exported or printed the name badges, you’ll be asked if you want to have these
name badges marked as having been produced. Once you’ve checked that the export or print
worked correctly, you should answer Yes. This will prevent these badges being reprinted or
exported during the next new badges production run.
During
During the event, the focus is on processing people rapidly as they arrive. This section is divided
into three parts; Before the day’s arrivals, During arrivals and End of the meeting.
Before the day’s arrivals
From the Main Menu, open the Reporter screen and print a listing for the add-on representing this
meeting.
During arrivals
Tick each person off the listing as he or she arrives at the meeting.
End of the meeting
1.
For each person who is on the list who didn’t come to the meeting, open the Registration
Details screen and delete the line referring to the add-on representing this meeting.
2.
For each person who isn’t on the list who did come to the meeting, open the Registration
Details screen, select the add-on that refers to this meeting.
Chapter 2: Scenarios - 59
Summit Event Manager - Light
Gala Dinner
A gala dinner or awards night.
Characteristics
• Participants may pay to attend.
• May be formally promoted, both for participants and audience.
• No trade exhibition.
• No pre- and post-event functions.
• No formal sessions.
• Will have a catering component.
• May have fixed tabling and/or seating.
• No accommodation or travel components.
Set Up
1.
Click on the File button on the Front Menu to open the File screen.
2.
Create a new event by clicking on the New Event button. For further information, refer to the
File, New Event section in Chapter 1, Getting Started.
3.
Update the Event Details screen. The key fields to update are Short Name and Full Name (for
display on the logon menu and correspondence) and Starting Date (especially if you’re going
to import the structure from an earlier event).
4.
If the structure of this event is similar, or identical, to a previous event that was run using
Summit, it is easier to import the structure from a previous event and modify it than it is to
setup this event from scratch. If you wish to import the structure from a previous event, open
the Import Structure screen and import as much of the structure as will be appropriate for this
event. If you have imported all the structure from a previous event, the following setup steps
are only to ensure that the imported information matches the requirements of this event.
5.
Open the Registration Types screen and enter details of the registration fees for those
attending. These registration fees may be modified or deleted until event fees are locked. New
registration fees may be added after event fees have been locked and existing registration
descriptions may be changed.
6.
Open the Add-Ons screen and enter the description and costs of accompanying people and
any other extras. These add-ons may be modified or deleted until event fees are locked. New
add-ons may be added after event fees have been locked and existing add-ons may have the
descriptions modified.
7.
Open the Advertising Sources screen and enter any advertising sources you will be using to
promote the event. If you then enter these advertising sources as people register for the event,
you will be able to determine which were the most effective means of advertising from the
Confirmed Attendees by Advertising Source report.
8.
Open the Banking Details screen and enter details of the bank account being used for this
event.
9.
Open the Options screen and set any applicable options.
60 - Chapter 2: Scenarios
Summit Event Manager - Light
10. Open the Payment Types screen and enter any additional payment types you wish to be able
to use when receiving payments for the event. The standard payment types are Cash,
Cheque, Refund and Reversal. You may enter as many additional payment types as you wish.
A summary report will be produced for each payment type.
11. If you’re planning to target people who have attended a previous event or who had expressed
interest in previous events, you now need to decide whether you wish to use the same interest
profiles as were used for the previous event from which you will import people’s name and
address details, or create new interest profiles for this event. If you want to create new profiles
for this event, open the Profiles screen and enter up to 20 profiles. If you plan to use the
profiles from a previous event, skip this step and import the profiles as part of the name and
address details import.
12. Open the Secretariat Details screen and enter details of the secretariat (office address for
correspondence and enquiries) for this event.
13. If the function has fixed tabling, open the Tables screen and enter the details of each table and
its capacity. Use the cloning function if you have a large number of tables.
14. Open the Venue Details screen and enter details of the venue of this event.
15. Open the Locations screen and enter details of any locations used at the function. Locations
are displayed on catering reports, equipment reports, schedules and in the draft programme.
16. Open the Catering Events screen and enter details of the catering event associated with this
event. Catering events should be entered after equipment and location details have been
entered as these may be specified within a catering event.
17. Open the Import Demographics screen from the Utilities Menu and import name and address
details from as many sources as you wish. While it is possible to import demographic
information at any time, it is best done before you start entering details of people to minimise
the risk of duplication. After you have imported demographics, open the Reporter screen on
the Main Menu and print a full database listing by clicking on the Listing button and use this to
identify and delete any duplicate records that resulted from the import(s). You can delete
people’s records until they become financially involved with the current event.
18. Open the Correspondence Text screen from the Correspondence screen on the Main Menu by
clicking on the Edit button and enter any additional text you want to appear at the top and
bottom of receipts and/or confirmation letters.
19. Open the Name Badge and Ticket screen and click on the Design button to define the name
badge and/or ticket style for this event.
20. Once you’re certain that registration fees and add-on fees are set and you’re happy for them to
be locked into place, open the Lock Event Fees screen on the Utilities menu and lock the fees
into place. You will not be able to register attendees until event fees have been locked. Once
locked, event fees may be unlocked if you haven’t started registering people yet. Once you’ve
started registering people, event fees can’t be unlocked.
Chapter 2: Scenarios - 61
Summit Event Manager - Light
Before
This section is divided into two sections. The first section shows how to process registrations and
other incoming information in regular data entry sessions. These sessions might be daily, every
two days, weekly or other interval depending on the volume of information. The second section
covers other Before tasks that may be performed regularly before the event or may be performed
only once, depending on your event size.
Regular Data Entry Sessions
First, process all the information related to people and the event. Take as many steps as apply to
each person.
1.
Open the Personal Details screen.
2.
Find the person’s record by entering his or her family name (surname) into the Find by Family
Name field and then pressing Tab or Enter. Use the Previous and Next buttons to cycle
through all records with that family name. If you find the person’s record, skip to step 6.
3.
Once you’re satisfied that this is a genuine new record, click on the New button beside the
Next button.
4.
Enter as many of the person’s name, address and contact details as you have.
5.
If you have accompanying person, special dietary or other extra information about this person,
click on the Extra Details button to open the Extra Details screen.
6.
If the person is expressing interest, providing historical participation or profile information, click
on the EOI and Profile button to open the Expression of Interest (EOI) and Profile Details
screen.
7.
If the person is registering for the event, click on the Registration button to open the
Registration Details screen. Remember that you can’t enter registration details until you have
locked the event fees.
8.
If you have a payment that has not yet been entered into the system, click on the Money
Menu button and then select Enter a Payment.
9.
If you wish to allocate a payment that has been entered into the system, but is not yet fully
allocated, click on the Money Menu button and then select Allocate a Payment to allocate all
or part of the payment against the current person.
Once you’ve entered all the information for people, take the following steps to complete the data
entry session.
10. Do a Banking Run (found on the Main Menu under Financials) to summarise all payments
received since the last banking run and prepare bank deposit slips for cash and cheque
payments and a summary report for each of the other payment methods allowed.
11. Open the Correspondence screen and produce the desired correspondence⎯receipts,
invoices, confirmation letters, etc.
12. Print an Income Reconciliation Report from Financial Reports to see how the event is going
and check that all financial data is correct.
13. Exit Summit.
14. Back up the event file.
62 - Chapter 2: Scenarios
Summit Event Manager - Light
Other Before Tasks
Produce name badges and tickets
Name badges and tickets may be printed directly from within Summit, or the information for badges
and tickets can be exported and given to a name badge manufacturer. To produce name badges in
either way, take the following steps.
1.
From the Main Menu open the Name Badges and Tickets screen by clicking on the Name
Badges and Tickets button.
2.
Click on the Produce Name Badges option button.
3.
If you only want to produce new badges yet, click on the Only Produce New Badges or Tickets
option button. If you want to produce all badges, whether or not they’ve already been
produced, click on the Produce All Badges or Tickets option button. The usual selection after
your first name badge run is Only Produce New Badges or Tickets.
4.
To have the badges produced in family name (surname) order, click on the Sort by Family
Name then Organisation option button. To have the badges produced in organisation order,
click on the Sort by Organisation then Family Name option button.
5.
Select the badge format you want to use from the Name Badge or Ticket Format pull-down list.
If you’re uncertain what a particular format looks like, or want to modify it or create a new
format, click on the Design button to open the Name Badge and Ticket Design screen.
6.
Select for whom you are producing name badges from the Restrict Name Badges Produced
list box. The normal selection is All People Automatically Entitled or All People Automatically
Entitled plus Accompanying Persons. The other choices are used when you want to have
different badge styles for different participation categories.
7.
Click on the Preview button to display the name badges in Print Preview or click on the Export
button to export the name badge information. Whichever production method you choose, you
will be given the option of editing the details that will appear on the badges before they’re
produced. If you’re exporting, you’ll be asked for the export format you wish to use and the
name of the file that you want to export the name badge information to.
8.
After you have either exported or printed the name badges, you’ll be asked if you want to have
these name badges marked as having been produced. Once you’ve checked that the export or
print worked correctly, you should answer Yes. This will prevent these badges being reprinted
or exported during the next new badges production run.
9.
Repeat steps 2 to 8 for tickets, but click on the Produce Tickets option.
Print Confirmation Letters
Confirmation letters are produced for people who are confirmed as participants. Letters are only
produced for people who have not yet had a confirmation letter produced. When people have had
a confirmation letter produced, the date the letter was produced is shown in the Confirmation Letter
Sent date field on the Registration or Presenter Details screen. To resend a confirmation letter to a
person, clear the date from this field and another letter will be produced for them when you next
produce confirmation letters for that participation category. To produce confirmation letters take the
following steps.
1.
From the Main Menu, open the Correspondence screen by clicking on the Correspondence
button.
2.
Select the participation category for whom you wish to produce confirmation letters by clicking
on the corresponding option button.
3.
Click on the Edit button and check that the modifiable section of the letter matches your
requirements, then exit the Edit screen.
Chapter 2: Scenarios - 63
Summit Event Manager - Light
4.
Click on the Preview button. This will display the confirmation letters and associated address
labels to the screen. Select File and Print from the menu bar at the top of the screen to send
the letters and the labels to the printer.
5.
After you have printed the letters and labels, you will be asked to confirm that they printed
correctly. When you confirm this, the Confirmation Letter Sent date field for each person will
be set to the current date in the appropriate screen.
Determine catering requirements
1. From the Setup Menu open the Catering Events screen. Check that all catering events have
been entered and that the three areas that form the basis for calculating the number to cater for
are correct. The three areas are Full Registrations, Discretionary Adjustment and Add-Ons
Covered. Click on the People button to produce an Attendance Listing.
2. On the Main Menu select Catering Requirements from the Event Reports screen. This will
produce a report showing how many people need to be catered for at each catering event.
Check that the numbers on the two reports match. If not, refer to the Catering Events section in
Chapter 4 for an explanation.
Assign Tables
If you have fixed tabling, from the Main Menu open the Tabling and Seating screen and allocate
people to tables. Click on the Listing button and determine what tabling or seating reports you
need.
During
During the event, the focus is on processing people rapidly as they arrive at the event.
Before the people arrive
1. From the Main Menu open the Registration Desk Worklist screen.
2. Click on the Preview button to produce one or more paper copies of the Registration Desk
Worklist. This is done so that you can keep processing arrivals if you have a system failure and
it also enables you to have multiple arrival points at high peak periods with some points using
the paper copies.
As they arrive
1. From the Main Menu open the Registration Desk Worklist screen.
2.
If you have a computer at the event, as people arrive, locate their records by entering all or
part of their names in the Find by Full Name field, then press Tab or Enter. Mark the At Event
check box for each person. If you have given the person any materials associated with the
event, mark the Satchel Given check box for the person’s record.
3.
If you don’t have a computer at the event, find the person’s name on the printed Worklist and
place a tick in the At Event box. If some materials are to be given, tick in the Satchel Given
box.
After they have arrived
If you processed arrivals using the computer version of the Registration Desk Worklist you don’t
need to take any further steps. If you processed all or some of the arrivals using paper copies of
the Registration Desk Worklist take the following steps.
1.
After the arrivals have been processed, collect all the copies of the printed registration desk
worklist that were marked manually at the registration points. Open the Registration Desk
64 - Chapter 2: Scenarios
Summit Event Manager - Light
Worklist screen from the Main Menu and update the computer version of the worklist from the
printed copies.
2.
When you’re certain that the details from all printed copies of the worklist have been entered,
destroy the original printed copies. This prevents people making entries on the old printed
copies that would not be entered onto the computer system.
End of event
1. Print an Income Reconciliation Report to see how the event went and check that all financial
data is correct.
2.
Exit Summit.
3.
Back up the event file.
After
After the event there are two main concerns; chasing up any outstanding money owing and
analysing the completed event to make sure the next event is even more successful and profitable.
Regular session to chase up outstanding money and process payments
First, process all the information related to people making payments for the event. Take as many
steps as apply to each person.
1.
Open the Personal Details screen and find the required person’s record.
2.
If you have a payment that hasn’t been entered into the system yet, click on the Money Menu
button and then select Enter a Payment.
3.
If you wish to allocate a payment that has been entered into the system, but is not yet fully
allocated, click on the Money Menu button and then select Allocate a Payment button to
allocate all or part of the payment against the current person.
Once you’ve entered all the information for people, take the following steps to complete the data
entry session.
4.
Do a Banking Run to summarise all payments received since the last banking run and prepare
bank deposit slips for cash and cheque payments and a summary report for each of the other
payment methods allowed.
5.
Open the Correspondence screen and produce the desired correspondence – receipts and
invoices.
6.
Print an Income Reconciliation Report to see how the event is going and check that all
financial data is correct.
7.
Exit Summit.
8.
Back up the event file.
Analysis of the event
1. From the Main Menu open the Participation Breakdown screen by clicking on the Participation
Breakdown button. You should produce all of the reports available from this screen as they
each serve a different purpose. Select each report and then click on the Graph or Preview
button to produce it. Each report is explained more fully in Chapter 5, Main.
On the Main Menu click on the Marketing Breakdown button. This will produce the Marketing
Breakdown report. This report shows how effectively the data you have in Summit is being used,
and how well the event is being marketed to people.
Chapter 2: Scenarios - 65
CHAPTER 3
HOW TO
This chapter gives you practical advice on changing, fixing and altering elements within Summit so
that they reflect your own environment. This chapter also gives practical advice on those functions
that cover more than one form.
How to...
Add Your Own Listing to the Reporter
If you have Microsoft Access 2000 loaded on your computer, you can add your own listings to
those available from the Reporter.
To work correctly with Summit, these listings must be based on the ReporterListingTemplate report
and only refer to fields in the Personal Details table.
To add a listing to the Reporter, take the following steps.
1.
Read the precautions and variations to the License Agreement detailed in the Customising
Summit topic.
2.
Start Microsoft Access
3.
From the File Menu choose Open Database.
4.
Locate and open the seml.mdb database, holding down the Shift key while the database
opens to prevent the Autoexec macro from running.
5.
Open the ReporterListingTemplate report in Design view.
6.
Save the ReporterListingTemplate report under the new report name you wish to use.
7.
Change the text in the report’s On Open property to the name of your report as shown.
=SetAlternateRecordSource(“Your Report Name”).
8.
Make any desired changes and additions to your report, but don’t delete or change the names
of any existing controls.
9.
Open the ReporterListings table and add the details of your report to the table. Leave
TopOfList as No and AlternateSorts as 0.
Chapter 3: How To - 66
Summit Event Manager - Light
How to...
Align a Report
All reports in Summit are designed to display correctly on A4 stationery in portrait or landscape
layout.
If the printer you’re using has a smaller paper size, you may find the ends of some lines are printed
on a second page. If the printer you’re using has a larger non-printable area around the margins
than a Hewlett Packard Laserjet 4000, you may find that some of the text on the far left and/or right
of each line or top and/or bottom of each page is missing.
To correct either of these problems, you will need to realign the report by altering its margins. To
do this, take the following steps.
1.
Open the report that is not displaying correctly.
2.
Select Print Setup from the File menu in the top left hand corner of the screen. The current
margins for the report will be displayed at the bottom of the Print Setup form as shown below.
3.
Decrease the Margins settings to correct text overflowing to a second page and then click on
the OK button. Increase the Margins settings to correct missing text and then click on the OK
button.
4.
Select Print from the File menu in the top left hand corner of the screen and print one or two
pages of the report to ensure that the new settings are correct.
5.
Repeat the last two steps until you’re satisfied with the alignment and text display.
6.
Select Close from the File menu in the top left hand corner of the screen. You will be asked if
you wish to save the changes to the report. Click on the OK button and the new settings
you’ve specified will be used each time the report is opened.
You don’t have to repeat this procedure until the next time you change paper size or printer type.
Note: For those using American Letter paper (8½" x 11"), go into Page or Print Setup and change
your paper type to Letter. You won’t have any problems with portrait reports, however for
landscape reports, decrease your left margin from 15mm to 7.5 mm and all your data will fit on the
report.
Chapter 3: How To - 67
Summit Event Manager - Light
How to...
Allocate a Payment: Person Unknown
This situation can arise when you are paid by an organisation or institution, and the payment
paperwork doesn’t mention what or for whom is the payment. To find the likely person, take the
following steps.
1.
From the Main Menu, click on the Payments In button. This will open the Payments In form.
2.
Enter the payment details and then click on the Allocate Payment button. This will open the
Allocate Payments form. The Allocate Payments form will open at the record of the first person
on the database.
3.
To find the record of the person to whom you wish to allocate this payment, use the pull-down
lists and filters in the form header or cycle between records using the navigation buttons. As
we don’t know the person’s name we’ll base our search on organisation and amount. In this
example, we have a cheque for $400.00 from Ace Computer Sellers.
4.
If you click on the Find by Organisation (Outstanding Balances Only) button, a pull-down list of
all people on the database with a non-zero amount owing will be displayed in organisation
order and then family name order. This could give the following pull-down list.
5.
You could find the record this way, but if you apply a filter, you can reduce the size of the pulldown list you need to search through. If you entered ‘Ace’ into the Restrict to (Part)
Organisation field as shown over the page and then clicked on the Find by Organisation
(Outstanding Balances Only) button, the pull-down list (using the same database) would be
reduced to this.
6.
If you also entered ‘400’ into the Restrict to Matching Amount Owed field as shown here, then
clicked on the Find by Organisation (Outstanding Balances Only) button, the pull-down list
would now be reduced to this.
7.
Once you’ve located and switched to the desired record the payment can be allocated.
8.
If you have Auto Allocate in Event Options turned off, enter the amount of the payment against
each participation category for that money is owed in the This Payment column.
9.
Click on the OK button to confirm the allocation.
68 - Chapter 3: How To
Summit Event Manager - Light
How to...
Backup an Event File
The only files used by Summit that need to be backed up regularly are the event files (all files with
a .eve suffix). These files contain all the information you’ve entered into Summit. To ensure that
information is not lost, these files should be backed up at the end of each data entry session. If
you’ve modified the formltr.doc mail merge document this should also be backed up if you wish to
keep your changes.
If the event files are small enough to fit on a single diskette, they can be backed up by taking the
following steps:
1.
Insert a diskette in the a: or b: drive of your computer.
2.
Open Windows Explorer.
3.
Locate the .eve file you want to back up.
4.
Click on the .eve file and keeping the left mouse button depressed, drag the file until it’s over
the icon for the drive you put the diskette in and then release the left mouse button.
5.
Windows will ask you to confirm the copy.
6.
Click on the Yes button and your file will be copied onto the diskette.
Once the event files become too large to fit on a single diskette, the fastest, most secure backup is
to a tape drive. If a tape drive is not available, these files can be either zipped using a product such
as WinZip or backed up to multiple diskettes using the Microsoft Backup utility. The program file for
this is backup.exe and is usually located by pressing Start, selecting Programs, then Accessories,
then System Tools then Backup.
All other files required by Summit can be recovered by re-installing Summit.
You can restore an event file from the backup by using the Microsoft Backup utility and selecting
the Restore tab.
Chapter 3: How To - 69
Summit Event Manager - Light
How to...
Change Currency & Time Formats
If you are changing the currency symbol from the dollar sign “$” to another symbol, or you want to
change the time format from Medium Time (4.30pm) to Short Time (1630), you can have this
change carried through the software by running the GlobalFormFormatChange and
GlobalReportFormatChange macros after closing all forms and reports. You can change any other
formatting as well.
Note that you need Microsoft Access 2000 loaded on your computer to be able to run these
macros as they need to open both reports and forms in design view. This feature is not available in
the run-time version of Microsoft Access provided with the software.
If your copy of Windows 95 does not support the Euro currency symbol, download the
w95euro.exe file from www.miesoftware.com or the Microsoft web site.
Check for Duplicate Records
The system will automatically check for duplicate records each time you update the Family Name
field on the Personal Details form. How the system checks depends on the setting of the Display
Duplicate Person Warning field on the Event Options form in the Setup Menu.
The possible settings are:
Never
The system will not check and warn of possible duplicate records at all (this will give the fastest
performance).
Matching Family Name Only
The system will check and warn you if it finds one or more other records with the same family
name as the one you’ve just entered.
Matching Given Name and Family Name
The system will check and warn you if it finds one or more other records with the same given name
and family name as the one you’ve just entered.
Matching First Initial and Family Name
The system will check and warn you if it finds one or more other records with the same first letter of
the given name and the same family name as the one you’ve just entered.
Note: The more checking the system does, the better the integrity of the database, but the slower
the performance.
You can also check for possible duplicates of the current participation record at any time by
pressing Ctrl+D in any field on the Personal Details form. This check will use the same settings as
the automatic check. If current setting is Never, Ctrl+D will check for duplicates on matching first
initial and family name.
70 - Chapter 3: How To
Summit Event Manager - Light
How to...
Check How Much Money has to be Banked or
Processed
To see how much money has yet to be processed (still has to have bank deposit slips or credit
card transaction summary reports produced), take the following steps.
1.
Click on the Banking Run button on any menu.
2.
Click on the OK button on the Multi-User Conflict Warning dialogue box.
3.
This will open the Payment Types Requiring Processing form that displays details of payments
that haven’t been processed yet.
4.
The form displays the number of items, the total amount and the earliest and latest date of the
outstanding payments for each payment type.
5.
Click on the Exit button to close the form without continuing the Banking Run.
Chapter 3: How To - 71
Summit Event Manager - Light
How to...
Correct an Incorrectly Entered Payment
Some of the details of a payment can be edited or altered. These details are the payment type, the
cheque details or the credit card details. If these are incorrect, edit them through the Payments In
Reporter. For a full description, refer to the Edit Incoming Payments section under the Payments In
Reporter in Chapter 5, Main Menu.
Payment not allocated
If you haven’t allocated the payment (in full or in part), you can delete an incorrectly entered
payment by displaying the erroneous payment from the Allocate Payments form. If the Delete
button (rubbish bin) is displayed, you can click on it to delete the payment.
If the button is disabled, it means that the payment has been allocated and can’t be deleted. You
can delete a banked payment as long as it hasn’t been allocated.
Payment allocated
If the payment has been allocated, you can reverse the allocation, then delete the payment. Refer
to the topic ‘Reverse an Allocation Error’ in this chapter.
How to...
Count Records in a Particular Category
You may want to know how many people fall into a particular category without necessarily printing
a report. For example, you might want to know how many people within a particular participation
category are going to a particular add-on.
To count records in a particular category, take the following steps.
1.
Open the Reporter form from any menu by clicking on the Reporter button on the Before,
During or After Menus.
2.
Define the category you wish to count records by marking the check boxes in the Participation
and/or Profile sections of the form and/or selecting an Add-On.
3.
Click on any one of the output format buttons in the form footer. A dialogue box will be
displayed showing how many records there are in the category you’ve defined.
4.
You will be asked if you want Summit to go ahead and produce the output. Click on the No
button in the dialogue box and the output of the records will be cancelled.
72 - Chapter 3: How To
Summit Event Manager - Light
How to...
Create an Event Programme
Contents of Programme
The event programme is drawn together in the following way:
• The front cover comes from the details entered on the Event Details form and the Venue Details
form.
• The main sections within the programme come from the sessions entered in the Sessions form
and the catering events entered in the Catering Events form.
• The presentations entered in the Presenter Details form will appear within the section on the
programme that matches the Session against which the presentation was allocated.
Order of Appearance in Programme
All catering events and sessions are sorted into ascending date, then ascending time order.
Each new day starts on a new page of the programme.
Where two or more sessions start at the same time (a normal occurrence for conference
concurrent sessions) they will appear in the programme in the order specified in the Programme
Sequence (if Concurrent) field on the Sessions form, with the sessions with the lowest programme
sequence appearing first.
Within each session, presentations will appear in the order specified by the Order In Session of
each presentation, with the presentations with the lowest order appearing first.
To create an event programme take the following steps.
1.
Enter the details required for the programme front cover on the Event Details and Venue
Details forms.
2.
Enter any session types you will be using to describe event sessions on the Session Types
form.
3.
Determine the code, name, type, location, date, start and end time for each session, and enter
the details for each session on the Session form. Don’t worry too much about getting details
exactly right at this stage as all details can be changed later as you refine the programme.
If this event is similar in structure to a previous event that used Summit, it may be quicker to
import the structure from the previous event and then modify the session details, rather than
enter new sessions. If you import the structure from a previous event, Summit will
automatically reset the dates of the sessions to have the same relationship to the starting date
of this event as they had to the starting date of the event from which you’re importing the
structure.
4.
Make sure that any add-ons that are not catering events but should appear in the programme
(such as a pre- or post-event workshop) are also entered as sessions.
5.
Determine the description, location, date, start and end time for each catering event, and enter
the details for each catering event on the Catering Events form.
6.
Open the Event Reports form on the Main Menu and print a Schedule and Schedule by
Location report. Use these reports to eliminate any conflicts of date, time and location in the
Chapter 3: How To - 73
Summit Event Manager - Light
event programme. Make the necessary modifications to the dates, times and locations on the
Catering Events and Sessions forms and then reprint these reports.
Repeat this step until you’re happy with the date, time and location of all sessions and catering
events.
7.
Once you’re happy with the order of sessions and catering events, enter any additional
description you wish to appear in the programme in the Additional Description for Programme
field on the Sessions or Catering Events form.
8.
Open the Personal Details form and for each presenter, open the Presenter form and enter his
or her presentation details. Assign each presentation to a session and, if there are two or more
presentations in the session, also assign an Order in Session. If appropriate, enter the start
time for the presentation.
9.
Please note the following when assigning a presentation to a session. Once you enter a
Session Counter for a presentation, the Session Counter can’t be set to zero again. The only
way to set a Session Counter to zero is to delete, and then re-enter the whole presentation.
This is an attribute of a limit-to-list combo box. If the sessions are not finalised, you could
create a temporary session called ‘To Be Advised’ and assign to it all those presentations that
have not been finalised.
10. In the Programmer form, all presentations that have been entered so far will be displayed.
Click on the Session Date/Time option button in Sort Order and then click on the Refresh
button to see your progress in assigning presentations to sessions. Each time you click on the
Refresh button, any unassigned presentations will be displayed at the top of the list.
11. Remember that presentations must have the Confirmed Presenter check box marked
and the abstract must have a status of ‘Selected’ to appear in the programme.
12. From within the Programmer form, click on the Draft Programme button to print a draft
programme.
Once you’re happy with the event programme, you can use the programme printed by Summit, or if
you want a different format, you can click on the Export Programme button to export a copy of the
program to a file called program.rtf. This program can then be edited using Microsoft Word or any
other word processing package able to translate RTF (Rich Text Format).
74 - Chapter 3: How To
Summit Event Manager - Light
How to...
Customise Summit
If you have Microsoft Access 2000 loaded on your computer, you can customise Summit to meet
your own particular needs or preferences.
To modify Summit, take the following steps.
1. Read the precautions and variations to the license agreement detailed below.
2. If you still want modify Summit, start Microsoft Access.
3. From the File menu choose Open Database.
4. Locate and open the seml.mdb database, holding down the Shift key while the database opens
to prevent the Autoexec macro from running, or just press the F11 key after Summit Light has
loaded.
5. Make the desired modifications to the objects in the database.
6. Note down all your changes so you can reapply them after you have updated Summit.
Please note the following when customising Summit. Failure to comply with all of the following may
result in loss of some or all data and/or corruption of some or all data and/or partial or complete
failure of the Summit software.
1. Do not delete any fields, tables, queries, forms, reports, macros, modules or controls in the
seml.mdb, template.mdb or any .eve databases. If you don’t want them appearing, set them to
invisible.
2. Do not change the names of any of any fields, tables, queries, forms, reports, macros, modules
or controls in the seml.mdb, template.mdb or any .eve databases.
3. If you are changing the properties of fields, tables, queries, forms, reports, macros, modules or
controls (for example to alter the appearance or size of a control) only alter properties that affect
appearance. The following are properties that may be modified without causing software failure.
BackColor, FillColor, FillStyle, FontBold, FontItalic, FontName, FontSize, FontUnderline,
ForeColor, Height, Width
Chapter 3: How To - 75
Summit Event Manager - Light
How to...
Customise the Reporter Mail Merge Template
The template used by the Reporter for the Microsoft Word mail merge is a Microsoft Word 97
document called formltr.doc. This file is stored in the same directory in that Summit is installed.
Each time you run the Reporter Mail Merge function, this document is opened in Microsoft Word.
To customise the template, modify the document while it is open and save your changes. If you
don’t want to save the changes you make each time you do a mail merge, click on the No button
whenever you’re asked whether or not you wish to save the changes to formltr.doc. If you want to
keep a copy of your changes without modifying formltr.doc, use File then Save As to save the
formltr.doc under another name. You can then put that new filename against the relevant
document in the Event Documents tab within Event Options on the Setup Menu. This then
becomes the new default document for the specific participation category.
Note: You should never open the document directly from Microsoft Word as errors may occur as
Word is unable to locate the data source of a mail merge document.
How to...
Deal With Dishonoured Cheques
If you have a cheque dishonoured, and you’ve already processed and allocated the payment, take
the following steps.
1.
Locate the person’s record on the Personal Details form. Click on the Enter a Payment button.
This will open the Payment Entry form.
2.
Enter the Payment Amount as a negative amount that matches the amount of the dishonoured
cheque. Go to the Payment Type field and change it to Reversal. You will be taken to the
Comments field. Enter the details of the dishonoured cheque and the person.
3.
Click on the Allocate Payment button. This will open the Allocate Payment form. As you
started from the Personal Details form, Summit assumes that you want to allocate the
payment to the same person, and opens the Allocate Payment form for that particular person.
4.
Enter the amount being reversed as a negative number against each participation category
until the total reversed equals the total of the dishonoured cheque. In most cases where a
single payment has been made, the totals previously paid for in each participation category will
equal the amount of the dishonoured cheque.
5.
Click on the OK button to confirm the allocation. This will return you to the Personal Details
form.
6.
If you wish to impose the dishonour fee on the person, click on the Registration button. This
will open the Registration Details form.
7.
Enter the dishonour fee in the PLUS <Additional Charges> field, with details of the dishonour
fee in the Reason for <Additional Charges> field. To save the changes, click on the OK button.
This will return you to the Personal Details form.
Note: Text within < > indicates that it is user defined. This can be changed in the User Defined tab
from within Event Options on the Setup Menu.
76 - Chapter 3: How To
Summit Event Manager - Light
How to...
Delete a Record
To delete the currently displayed record on forms that display records one at a time (such as the
Advertising Sources form) click on the Delete button illustrated below.
The system will ask you to confirm that you wish to delete the record prior to you deleting it, so you
can’t delete a record by accident.
If a form doesn’t have a Delete button or the button is disabled, the information is required by the
system and should not be deleted.
Deleting Sub-Records
To delete sub-records take the following steps.
1.
Click on the record selector bar on the left hand side of the sub-record you wish to delete. The
record selector bar will change colour from light grey to dark grey as shown below.
2.
Press the Delete key on your keyboard. The system will ask you to confirm that you wish to
delete the record prior to you deleting it.
If you confirm record deletion, the selected sub-record will be deleted and the display will be
updated as shown below.
Chapter 3: How To - 77
Summit Event Manager - Light
How to...
Determine your Messaging Profile
While the actual icons may vary depending upon which mail system you are using, in most cases
you can determine your messaging profile by taking the following steps.
From the desktop select Start, then Settings then Control Panel.
From within Control Panel select Mail and Fax by double-clicking on the Mail and Fax icon.
Click on the Show Profiles… button.
78 - Chapter 3: How To
Summit Event Manager - Light
This will display the Mail and Fax form.
You then select the profile you want to use for sending e-mails. In this case there is only one profile
“Microsoft Outlook” so that is the profile we will use.
Chapter 3: How To - 79
Summit Event Manager - Light
How to...
Find a Postcode
If you don’t know the post code or bulk mail code for an Australian address, enter the Suburb/Town
and State then double-click in either the Postal Code or Bulk Code fields and Summit will get the
postcode and bulk mail presort indicator code for you. The bulk code is Australia Post’s pre-sort
indicator – a regional mail centre.
Alternatively, if you don’t want to use the mouse, you can enter Ctrl+G in either the Postal Code or
the Bulk Code field. You do this by pressing the Control key - usually labelled ‘Ctrl’ on the keyboard
and the ‘G’ key at the same time.
Note: The Ctrl+G is short for ‘Get Postcode’.
In order for the system to find the postcode for you, it must match the suburb and state against the
official Australia Post list of postcodes, so you must be accurate in your spelling of the suburb and
you must use the standard Australia Post abbreviations of ACT, NSW, NT, QLD, SA, TAS, VIC and
WA for the State.
If you’re not sure about the spelling of the suburb, enter the first few letters and click on the down
arrow to the side of the Suburb/Town field. This will list all the suburbs alphabetically. Select the
one you want by clicking on it.
Again, if you don’t want to use the mouse, press Alt+↓ (that is the ‘Alt’ key and the down arrow key
together) in the Suburb/Town field. On the standard keyboard, there are two sets of arrows. If you
want to use the one on the number pad, be sure to turn ‘Num Lock’ off first.
80 - Chapter 3: How To
Summit Event Manager - Light
How to...
Fix Mail Merge Problems
When the mail merge function is called, it creates a text file mail merge data source called
summitmm.txt in the Summit directory, starts Microsoft Word and then opens the formltr.doc
document. With this structure, mail merge problems can arise in two main areas.
1. Microsoft Word doesn’t start at all
This will occur if Microsoft Word is not correctly loaded on your system, or there is not a
pointer to the directory containing the Microsoft Word software. In order for merge to work,
Summit requires that you have in your path statement directions on where it can find Microsoft
Word.
Open the Global Options form in the Setup menu and enter the full path to Microsoft Word in
the Word Processor field. To find the full path, press the Start key and select Find File or
Folder or alternatively open Windows Explorer and select Tools, then Find then Files or
Folders. Type in winword.exe to find the full path to Microsoft Word. The default path in
Summit is c:\program files\microsoft office\office\winword.exe. Change this if it’s different on
your machine.
2. The form letter template is loaded, but will not merge as there is no data source
This will occur if you’re running a copy of Summit that is resident on another computer on your
network. Some versions of Microsoft Word have problems recognising a data source on a
network drive.
Using Summit on your computer solves this problem. This runs faster than using a copy of
Summit that resides on another computer (as all the software and help files are local to your
system and don’t have to be passed over the network) and ensures that the temporary tables
created for mail merge are local to your computer.
Chapter 3: How To - 81
Summit Event Manager - Light
How to...
Follow Up Event Organisation Tasks
To follow up the tasks involved in organising your event, take the following steps.
When you first install Summit for this event
1. On the Organisers form on the Setup Menu, enter the names of all the people or committees
who will be taking part in organising the event.
2.
Open the Organiser form on the Main Menu.
3.
Delete any tasks from the default list that don’t apply to your event by clicking on the record
selector bar on the left hand side of the tasks you wish to delete. The record selector bar will
change colour from light grey to dark grey as shown below.
Press the Delete key on your keyboard. The system will ask you to confirm that you wish to
delete the task prior to you deleting it. If you confirm deletion, the selected task will be deleted
and the display will be updated as shown below.
4.
Add any new tasks specific to your event by clicking on the New button and entering the tasks
or you can type over an existing task.
5.
For as many tasks as possible, assign a person, a start date and a finish date.
6.
It may not be possible to assign these details to all tasks at this early stage of the event
organisation process.
On a regular basis - usually weekly, depending on event complexity
1. Check for any tasks still not assigned to anyone.
Mark the Unassigned check box. Only tasks that have not yet been assigned to anyone will be
displayed. Assign these tasks if possible.
2.
Check for any tasks that don’t have a start date.
Click on the Show All Tasks button and then mark the No Start Date check box. Only tasks
that have not yet had a due start date entered will be displayed. Set a start date if possible.
3.
Check for any tasks that don’t have a finish date.
Click on the Show All Tasks button and then mark the No Finish Date check box. Only tasks
that have not yet had a due finish date entered will be displayed. Set a finish date if possible.
82 - Chapter 3: How To
Summit Event Manager - Light
4.
Update any tasks that have started or finished.
Mark the Started and Finished check boxes for any tasks that you know have actually been
started or finished.
5.
Follow up late starting tasks.
Click on the Show All Tasks button, then enter the current date in the Start Date Before field
and then mark the Unstarted Tasks check box. Only tasks with a due start date before the
date you entered that also have not yet been marked as started will be shown. Follow up these
tasks with the people they are assigned to. Depending on the results of the follow up, alter the
planned start date and/or planned finishing date and/or reassign the task to somebody else.
6.
Follow up late finishing tasks.
Click on the Show All Tasks button, then enter the current date in the Finish Date Before field
and then mark the Unfinished Tasks check box. Only tasks with a due finish date before the
date you entered that have not yet been marked as finished will be shown. Follow up these
tasks with the people they are assigned to. Depending on the results of the follow up, alter the
planned finishing date and/or reassign the task to somebody else.
7.
Update the list of tasks.
Add and assign any new tasks and delete any tasks that are no longer needed.
8.
Follow up potentially late starting tasks.
Click on the Show All Tasks button and then enter the current date in the Start Date After field,
enter the current date plus eight days in the Start Date Before field and then mark the
Unstarted Tasks check box. Only tasks due to start within the next week that have not yet
been marked as started will be shown. Follow up these tasks with the people they are
assigned to. Depending on the results of the follow up, alter the planned start date and/or
planned finishing date and/or reassign the task to somebody else.
9.
Follow up potentially late finishing tasks.
Click on the Show All Tasks button and then enter the current date in the Finish Date After
field, enter the current date plus eight days in the Finish Date Before field and then mark the
Unfinished Tasks check box. Only tasks due to finish within the next week that have not yet
been marked as finished will be shown. Follow up these tasks with the people they are
assigned to. Depending on the results of the follow up, alter the planned start date and/or
planned finishing date and/or reassign the task to somebody else.
10. Produce updated task list for each organiser.
For each person, click on the Show All Tasks button and then enter the person’s name in the
Assigned To field. Only tasks assigned to that person will be displayed. Click on the Preview
button to produce a report for that person. Send a copy of the list to each person and have
them return the list to you, with starts, finishes and any other alterations marked. Use this to
update the Organiser task list.
Chapter 3: How To - 83
Summit Event Manager - Light
How to...
Issue a Call For Papers and Expressions of
Interest
This activity takes place after the date and venue of the event have been decided, but before the
event structure and programme have been fully defined.
It is important to ensure that the information you collect from people is accurate and reflects the
information categories you’ve set up within Summit. The information gathered here will assist you
in creating an event programme that most appeals to your target audience and attracts the
greatest number of attendees.
To issue a call for papers and expressions of interest, take the following steps.
1.
From the Setup Menu, open the Profiles form and check that the profiles are accurate and that
you’re collecting enough profiles to be able to target prospective attendees.
2.
From the Main Menu, open the Event Reports form and print a Draft Expression of Interest
Form. Check that all the details are correct. If you’re creating your own brochure rather than
using the draft, make sure that the expression of interest form in your brochure has all the
fields shown on the draft expression of interest form.
3.
From the Main Menu, open the Reporter and select the records of those to whom you wish to
send a brochure. Note that if you don’t mark any check boxes at all, you’ve selected the
complete database.
4.
Click the Label button for address labels in family name alphabetical order or for address
labels in ascending presort indicator order then postcode order with the presort indicator
shown.
5.
If you wish to personalise the mailout by sending an accompanying letter, click on the Merge
button and a mail merge letter will be created for each person.
84 - Chapter 3: How To
Summit Event Manager - Light
How to...
Issue an Event Registration Programme or
Brochure
This activity takes place after the date and venue of the event have been decided and the event
structure, programme and costs have been defined.
The purpose of this activity is to get people to start registering for your event.
It is important to ensure that the information you collect from people is accurate and complete, so
that you don’t have to contact registrants to clarify details.
To issue a registration programme or registration brochure, take the following steps.
1.
From the Main Menu, open the Programmer form and check that you’ve completed entering all
presentations and allocating them to sessions.
2.
Print a draft programme by clicking the Draft Programme button and check that all details are
correct.
3.
If you’re creating your own programme, rather than use the draft, export the draft programme
by clicking the Export Programme button, incorporate it into your own document and check
that all details are correct.
4.
From the Main Menu, open the Event Reports form and print a Draft Registration Form. Check
that all the details are correct. If you’re creating your own registration form, make sure that the
registration form in your programme has all the fields shown on the draft registration form.
5.
From the Main Menu, open the Reporter form and select the records of those to whom you
wish to send a programme. Note that if you don’t mark any check boxes at all, you’ve selected
the complete database.
6.
Click on the Label button for address labels in family name, organisation or in postal code
order.
7.
If you wish to personalise the mailout by sending an accompanying letter, click on the Merge
button and a mail merge letter will be created for each person.
Chapter 3: How To - 85
Summit Event Manager - Light
How to...
Move Summit to the Event
If, at the event, you’re going to be using a different computer from the one you’ve been using prior
to the event, take the following steps.
1.
Backup the event file (.eve suffix) for the relevant event as described in the ‘Backup an Event
File’ topic in this chapter. To determine the name and path of your event data file, press
Ctrl+W at the Main Menu or select Help in the top left corner of the screen, then select Where
Am I.
2.
Once you’re sure that you have successfully loaded the event file onto a diskette, rename the
event file on your normal computer to something like <event filename>.bak instead of .eve.
This will prevent the inadvertent updating of separate databases in two locations that would
result in information errors. There is no facility within Summit to merge two datafiles.
3.
Install Summit on the computer at the event and then load the event file to the SEML directory.
4.
Before leaving the event computer, backup the event file to diskette and delete the SEML
folder. Copy your backed up event from a: to c:\SEML when you return to your normal
computer. Delete the old copy of the event file that you renamed. It should not be necessary to
re-install Summit.
How to...
Optimise the Performance of Summit
There are a number of steps you can take to improve the performance of Summit on your
computer system. These include the following.
1. If your computer has less than the recommended processor speed (Pentium 400) or memory
(128Mb), increase your system configuration to the recommended configuration as a minimum.
The more processor speed and memory you have, the faster Summit will run. If you have to
choose between upgrading your processor or increasing your memory, always opt for more
memory as the amount of RAM on your computer is the single most important factor for Summit
Light’s performance.
2. If you’re using Summit in a multi-user environment, ensure that all systems, other than the one
containing the SEML.mdb live database file, are using the Summit software locally to access
the live database. This minimises the network traffic by holding software and help files locally on
each system and only passing actual data across the network.
3. Make sure that your Microsoft Windows Virtual Memory swap file setting is as large as the
recommended size, and is permanent rather than temporary.
4. Compact and repair Summit and the event file regularly, particularly if you’ve been deleting
records or creating large reports. See The Summit Programs and the Main Menu File sections
in Chapter 1, Getting Started for further information.
5. Defragment your hard disk regularly.
86 - Chapter 3: How To
Summit Event Manager - Light
How to...
Produce Name Badges for People who aren’t on
the Database
There are two ways to produce name badges for people who aren’t on the database. Use the first
method to produce the name badges immediately and use the second method to add the name
badges to your next name badge print run.
Producing the name badges immediately
1.
From the Menu, open the Name Badges and Tickets form.
2.
Mark the Produce Name Badges option button.
3.
Select I Will Enter All Badge Details from the Restrict Name Badges Produced section of the
form.
4.
Click on the Preview button. This will open the Edit Badge or Ticket Details form.
5.
Enter the details you want to appear on each line of the name badge in the appropriate
spaces. Use a new line for each person.
6.
When you have entered all the details, click on the OK button. If you decide you don’t want to
produce the name badges, click on the Cancel button.
Adding the name badges to your next name badge print run
1.
From the Menu, open the Name Badges and Tickets form.
2.
Select for whom you want to produce name badges and then click on the Preview button. After
the name badge table has been built, a dialogue box is displayed saying ‘Do you wish to make
any changes to the information on the badges or tickets before they are produced?’ Click on
the Yes button. This will open the Edit Badge or Ticket Details form.
3.
Scroll to the bottom of the displayed records. Enter the details you want to appear on each line
of the name badge in the appropriate spaces on the blank line at the bottom. Use a new line
for each person.
4.
When you have entered all the details, click on the OK button. If you decide you don’t want to
produce the name badges, click on the Cancel button.
Chapter 3: How To - 87
Summit Event Manager - Light
How to...
Refund a Payment
It can be necessary to refund payments if people pay too much for the selected activities, or cancel
from the event, or reduce the activities they’re participating in after they’ve paid. In some cases, a
full refund is not given as a cancellation fee is charged.
To refund a payment, take the following steps.
1. Locate the person’s record on the Personal Details form.
2. If the person has overpaid and you have not yet allocated the payment, register their activities
and allocate the full amount of the cheque. For example, a cheque was sent for $950 but this
person only owed $910. After you enter the payment, Summit will take the amount needed from
the cheque of $950, to match this person’s liability of $910. The person’s liability is displayed in
the Total Amount column and Summit has automatically matched that liability with amounts in
the This Payment column. Note: you can turn off Summit’s automatic allocation function in the
Event Options form in the Setup menu.
If we clicked OK at this point, we have $40 left unallocated on the original cheque and this
person is not deemed to have overpaid, so no refund can be given. Only if a person has
overpaid (their payment exceeds what they owe, i.e., their liability) can you refund a payment.
To record an overpayment, you must overtype the amount Summit has displayed in the This
Payment field on the Payment Allocation form with the amount of their liability plus the amount
they’ve overpaid. In this example, we must overtype the $400 Summit has displayed with $440.
The Still Owing column will display the amount overpaid in red and in brackets and a red
‘Overpaid’ should be displayed next to that. The Total Allocated should match the amount of the
cheque ($950) and Remaining Available to Allocate is zero.
Note: In this example it is assumed that the one cheque is paying for one person. If the cheque
is for multiple people, allocate only what each person thought they had to pay. Click the OK
button. To create the refund, go to step 8.
3. If the person is reducing or eliminating delegate activities and they’ve already paid, click on the
Registration button to open the Registration Details form. Cancel the registration and/or reduce
the add-ons until the registration details match his or her revised involvement. To cancel a
registration, click on the Cancel Registration button in the toolbar. This has the effect of
emptying the Registration Type field and reducing the registration fee to zero. For more
information on deleting an add-on, refer to the ‘Deleting Records’ topic in this chapter.
4. If you’re going to impose a cancellation fee, enter the amount in the PLUS <Additional
Charges> field, with details of the cancellation charges in the <Additional Charges> Reason
field.
88 - Chapter 3: How To
Summit Event Manager - Light
This field (or prompt) can be defined by you to be anything you wish, for example, you could call
it ‘Cancellation Fee’ or ‘Administration Charges’, etc. You can change it by clicking on the User
Defined tab in the Event Options form in the Setup Menu. The default is ‘Additional Charges’,
i.e., this is what this field is called when you first install Summit.
5. When you’ve made all the changes you wish, the form should look like the following. If the
person is cancelling coming to the event, there should be a Total Amount Due of zero and the
Amount Still Owing should be in red and in brackets, indicating that it’s a negative number, i.e.,
you owe them money. If the person is not coming to a specific event, for example, not coming to
the dinner but have paid for it, the Total Amount Due has been reduced by the amount of the
dinner and the amount of the dinner should be in red in brackets in the Amount Still Owing field.
If this is correct, click on the OK button.
6. The amount showing as Total Outstanding in the At a Glance section of the Personal Details
form should be in red and in brackets (to indicate a negative amount) and should equal exactly
the amount of money you’re planning to refund to this person, i.e., the amount they’ve overpaid.
If the amount doesn’t match exactly, go through the process of reducing his or her activities until
it does.
7. On the Personal Details form, click on the Money Menu button and then the Create Refund
button. A refund will be created for that person for the exact amount showing as overpaid.
That person’s refund will be printed the next time you choose the Receipts option (individual or
organisation) on the Correspondence form. To check on a refund, look in either the Printed
Receipts or the Unprinted Receipts options on the Money Menu. Summit sees refunds as
negative receipts.
You can then send a cheque with the Refund Notice to the person.
Chapter 3: How To - 89
Summit Event Manager - Light
How to...
Reverse an Allocation Error
Even if you’ve issued a receipt for an incorrectly allocated payment, you can still delete the receipt,
which effectively reverses the allocation. To delete a receipt, printed or unprinted, take the
following steps.
1.
In the Personal Details form, find the required person, click on the Money Menu button then on
the Receipts button.
2.
Locate the incorrect receipt by cycling through the receipts using the navigation keys at the
bottom of the form.
3.
Once you’ve located the required receipt, click on the Delete button (the rubbish bin icon). The
following form will be displayed:
If you click on the Yes button, the receipt will be deleted and the following will happen:
• the amount of the receipt will be added back to the original payment as an unallocated
payment - you can then allocated it against another person
• the delegate amounts showing as paid by the person will be reduced by the amount of the
receipt.
90 - Chapter 3: How To
CHAPTER 4
SETUP
This chapter describes the options on the Setup Menu.
These options enable you to:
• enter or modify event secretariat, name, venue and other details
• define the event structure – catering events and sessions
• define the financial structure and lock it in place
• set up parameter and reference files
• define presenter rules
• define the user preferences and system settings
• import demographic information and event details from external sources
• design your own name badges and tickets.
Chapter 4: Setup - 91
Summit Event Manager - Light
Standard Form Design
All the forms within this menu are divided into parameter files (only one record, for example,
Secretariat Details) and reference files (can have many records, for example, Advertising Sources)
and all have standard toolbar buttons at the bottom of the form. The example here is the
Advertising Sources form.
Go to the first record
Go back one record
Go forward one record
Create a new record
Go to the last record
In the reference file forms, the navigation buttons at the bottom of the form indicate how many
records you have (you can have up to 32,767 records) and which record you’re currently on. In the
above example, we’re on record 1 of 8 records. This is also the method you use to move from one
record to the next.
The Advertising Source combo box or pull-down list is found on the Personal Details form. To enter
the advertising source you require, you click on the down arrow to the right of the field.
Click
once here
A list of the advertising sources is displayed and you select the one you require by clicking on it.
Or, if you’re familiar with the contents of the file, you can enter the first few letters of the advertising
source you require and the system will ‘auto-expand’ the rest of the letters.
Another way to select data from a combo box without using the mouse is to press Alt+↓ (press the
Alt key at the same time with the down arrow key on your keyboard) when in the required field.
Remove your finger from the Alt key and select the required data by using the down arrow key (↓)
to move to it, then press Enter or Tab to select it.
92 - Chapter 4: Setup
Summit Event Manager - Light
If you have a new advertising source that is not yet in the file, you can enter it ‘on-the-fly’ without
leaving the form you’re in by double clicking in the Source field. This opens the Advertising
Sources form and you can enter the data. When you click on the OK button, you’re returned to the
original form and you can select the new advertising source.
This method of using the reference files is standard throughout the system as it enables uniform
data entry that will ensure statistics based on that data are accurate.
If the reference file has a Counter as the first field, for example, Equipment, it means the counter,
or the index to that record, is stored in the main file, not the text. This means you can alter the text
in the reference file and it will be reflected throughout the system immediately. If there is no
counter, then the text itself is stored in the file. In this case, if you alter the text in the reference file,
it will not be changed in all old records that contain that item.
Toolbar Buttons
The following are the standard toolbar buttons found on most forms.
Label Opens the Single Label, Envelope and Letter Choices form to print an address label
or an envelope for the secretariat, venue, displayed hotel and displayed supplier. For a full
description of this function, refer to the Single Label, Envelope and Letter Choices section
in Chapter 5, Main.
New Clears the form ready for the entry of a new record. You can also use the New
button on the navigation buttons.
Delete Deletes the displayed record. Some records may not be deleted if they’re in use.
Summit always confirms a deletion in case you accidentally press the button.
Listing Prints the contents of the underlying file. The reference file listing will be displayed
in print preview.
Help Displays the on-line help appropriate for where you are.
Cancel Cancels any changes made to the record and quits the form.
OK Saves any changes you’ve made to the data and exits the form.
Chapter 4: Setup - 93
Summit Event Manager - Light
Add-Ons, Catering Events and Sessions
Looked at in isolation, add-ons, catering events and sessions, and the relationships between them
can appear daunting. It becomes clearer when you look at what each one is, and how each one is
used by Summit.
An add-on is anything to which all participants are not automatically entitled - it is an ‘optional
extra’ for the event. An add-on can range from a pre-conference workshop or dinner, to an
individual race at a sports carnival, to an item such as a video or a t-shirt that may be purchased.
An add-on will appear on the Registration Details form as something that people may select, be
enrolled for or purchase. As the definition of an add-on doesn’t have a time or place component,
anything defined only as an add-on will not appear on the schedules, draft programme or catering
requirements report.
A catering event is any function held in relation to the event that requires the provision of
refreshments to a defined number of people. A catering event may fall within the body of the event
and be available to all participants, for example, morning tea during conference sessions. A
catering event may itself also be an add-on, for example, a conference dinner. The numbers for a
catering event may depend on add-ons, for example, a lunch between two workshops that is only
for those attending either or both workshops.
A session is normally a grouping of presentations in a single place at a given time. Within Summit,
a session also refers to any event activity, that is not a catering event and that you want to appear
on the schedules and draft programme.
To tie all these together when setting up your event, use the following checklists.
When defining a catering event
Question
Answer
all
If yes, then no further action is needed. You do not
need to define this thing as an add-on as well.
Is this a function that applies only to some
participants (such as a gala dinner or board
luncheon)?
If yes, then this function needs to be entered as an
add-on as well and entered in the Add-Ons
Covered By This Catering Event section of the
Catering Events form.
Is this something that applies
participants automatically?
94 - Chapter 4: Setup
to
Summit Event Manager - Light
When defining a session
Question
Answer
Is this something that is included in the If yes, then no further action is needed. You do not
event fee structure for all participants?
need to define this thing as an add-on as well.
Is this a session that applies only to some If yes, then no further action is needed. You do not
participants, such as a workshop or need to define this thing as an add-on as well.
committee meeting and is included in the
event fee?
Is this a session that is chargeable, optional If yes, then this session needs to be entered as an
and is not included in the event fee?
add-on as well.
When defining an add-on
Question
Is this something that applies
participants automatically?
Answer
to
all If yes, then this is not an add-on. It is either a
registration type, a catering event or a session.
Is this a thing (such as an item that can be If yes, then it is an add-on. You don’t need to define
purchased or membership fees paid in this thing as a catering event or session as well.
conjunction with the event) that doesn’t
require catering and doesn’t need to appear
in the programme?
Is this a function to that people elect to If yes, then this function also needs to be defined as
attend and needs to be catered for (such as a catering event as well. When defining the catering
a gala dinner)?
event, enter this add-on in the Add-Ons Covered By
This Catering Event section of the Catering Events
form.
Is this a thing that doesn’t require catering, If yes, then this thing also needs to be defined as a
but should appear in the programme and on session.
the schedules (such as a pre- or post-event
workshop) and is chargeable?
Is this a thing that doesn’t require catering, If yes, then this is not an add-on. It is a session.
but should appear in the programme and on
the schedules (such as a pre- or post-event
workshop) and not chargeable?
Chapter 4: Setup - 95
Summit Event Manager - Light
EVENT DETAILS
Event Details
This option is for maintaining information related to the name, description, date and time of the
event.
The information from this form is used on name badges, report headers, the Main Menu,
correspondence, the draft Expression of Interest (EOI) form, Registration form and the draft
Programme. The start date is used when importing the event structure from a previous event and
is used to determine how many days to the event on the Organiser Task List. To access the
Calendar function to select a date, click on the Calendar button to the right of the date field.
The Theme, Description and Organised by fields are only used on the front page of the Draft
Programme
96 - Chapter 4: Setup
Summit Event Manager - Light
Secretariat Details
This option is for maintaining information related to the address of the event secretariat.
The information from this form is used as the contact point for the event and is displayed in the
page footers of correspondence such as confirmation letters, form letters, invoices and receipts.
If there is no external secretariat and/or you have your own letterhead, then this form need not be
filled in. To turn the footer off, refer to the General tab of Event Options further on.
If you double-click in the postcode field, Summit will return the postcode for you based on you entry
in the Suburb/Town and State fields. For more information on how Summit finds a postcode, refer
to the ‘Find a Postcode’ topic in Chapter 3, How To.
Chapter 4: Setup - 97
Summit Event Manager - Light
Venue Details
This option is for maintaining information related to the venue being used for the event, conference
or meeting. This information is to be used by you when contacting the venue.
The Name of Venue from this form is used on the Draft Programme front page. If the event is being
held at your own premises, then you’re not likely to require any more details than the Name of
Venue.
98 - Chapter 4: Setup
Summit Event Manager - Light
Organisers
This option is for maintaining the names of people, committees or organisations who are involved
in organising the event.
This information is used when allocating, controlling and monitoring event organisation tasks using
the Organiser form. The names used here are not restricted to the names of individual people. If
preferred, you might wish to use the names of sub-committees, departments or organisations.
The information in this reference file is the source of the entries in the Assigned To combo box or
pull-down lists on the Organiser form, the Catering Events form, the Sessions form and the Ad Hoc
Notes form. These pull-down lists are not limit-to-list so that any name can be entered.
The Organisers form may also be opened within any of these forms to enable additions, deletions
and alterations to this reference file by double-clicking in the Locations combo box.
Presenter Rules
This option is for maintaining information related to the rules (if any) for confirmed presenters at the
event.
This information need only be filled in if your event has one or more of these rules for presenters.
Mark each field that’s appropriate for your event. In the above case, the presenters do not have to
send in a photo.
Chapter 4: Setup - 99
Summit Event Manager - Light
The information from this form is used by Summit in preparing the Presenter Follow-Up report. This
is an exception report that lists any presenter who doesn’t conform with the associated rule. If
presenters conform to all marked rules, they are not shown on the report - the aim is to have a
blank report.
This report can be run from within the Programmer or Event Reports.
100 - Chapter 4: Setup
Summit Event Manager - Light
The Usual Registration
This option enables you to enter what is the most likely registration, and is used in cases where
most people have the same registration details. When entering details into the Personal Details
form, instead of entering a person’s registration details by going into the Registration Details form,
you can click on The Usual button on the Personal Details form and Summit will automatically
register the person with the details entered here.
You can enter a Registration Type, one or more Add-Ons and one or more Sessions. For all the
rules relating to registering a person, refer to the Registration section in Chapter 5, Main Menu.
Chapter 4: Setup - 101
Summit Event Manager - Light
OPTIONS
Global Options
This option is used to define global options that operate across all events. The information from
this form is used throughout Summit.
To define the global options that every event using Summit will use, take the following steps.
1.
If you mark Check the Organiser Task List When Opening an Event check box, when you
open an event, Summit will check the task list on the Organiser form for tasks that are
unassigned, late starting or late finishing in relation to that event and display a summary. It will
also summarise all tasks that have been marked on the Contact form as having a ‘do-by’ date
of today. This task list can also be accessed with the Organiser.
2.
If you mark the Check Payment Details Before Banking Run, you can check each individual
payment and alter any obvious mistakes prior to the Banking Run.
3.
If you mark Prompt for Alternative Reporter and Delegate Listing Headings check box, Summit
will give you the opportunity of changing the headings of listings generated using the Reporter
or from Delegate Lists.
4.
If you mark Print Salutation on Invoices and Receipts, Summit will do so.
5.
If you mark Print an Invoice Number on Invoices, Summit will do so. The number is made up of
the Invoice/Statement Number Text from the User Defined tab in Event Options and the
person number (PIN) each person is assigned when entered onto the database.
6.
Mark the Warn Before Updating Master Database with Name and Address Changes, check
box if you want the system to warn you before updating name and address details on your
master database with changes you have made in this event file. This option only applies to
records that have been sent to this event file from either a Summit Contact Manager or
Summit Membership Manager database. For this option to work, you must have also defined
the path to the master database on the Event Options screen.
102 - Chapter 4: Setup
Summit Event Manager - Light
7.
Mark the Notify of Successful Event File Open if you would like Summit to display a message,
on opening an event file, indicating which event file you are now connected to. You must then
press OK to continue.
8.
If you want the system to print a Correspondence Log after each Correspondence Run, mark
the Show Correspondence Log when Correspondence Run is Completed. If you don’t mark
this field and you want to check the Correspondence Log, press the Preview button in the
Correspondence Log section of the Correspondence form.
9.
Enter the name of the program that runs the word processor you wish to use in Summit for
templates, form letters and mail merge in Word Processor Path and Program Name. The
default c:\Program Files\Microsoft Office\Office\winword.exe for Microsoft Word 97 or
higher. If you want to use another word processor to open templates, mail merge and form
letters, it will need to be able to open Microsoft Word 2000 documents or you can create a
document to replace the default document, formltr.doc. The replacement document must be
a mail merge document with c:\summitmm.txt as its data source and must be stored in the
c:\SEML10 directory and you must change the name of the document on the Event
Documents form. Note that c:\SEML10 is the default location for Summit installation. If you’ve
installed Summit in another location, store the document in that location.
10. Select the Address Label Stationery you usually use from the pull-down list and whenever you
print address labels for event participants, the secretariat and the venue, the labels will be
designed to fit your selected stationery. Note: Always select a label type with a large margin
as Microsoft Access will not allow a zero margin any more. Access will pick up your printer’s
non-printable area from your own printer driver and use that to determine if the data to be
printed will fit across the page (left margin plus data plus any column space plus right margin
must be equal to or less than the width of your selected paper). If it determines the data won’t
fit, you will get the message “Data cannot be displayed..” error message and depending on the
size of your printer’s non-printable area, it may stop Access from running.
11. Enter the name of a custom label report in Custom Report Label Report Name that you want
the Reporter to use instead of the standard name and address labels. You can use this, for
example, to create customised luggage tags. Leave this field blank if you want to use the
standard address label from the Reporter.
12. Enter the number of labels per sheet in Custom Report Labels per Sheet for your custom label
report. The Reporter will use this information to calculate how many sheets of stationery are
required.
13. Enter the normal Last Day of the Working Week. This information is used when checking the
organiser task list to determine tasks what should be started or finished this week.
Chapter 4: Setup - 103
Summit Event Manager - Light
Event Options
This option is used to define how Summit will fit in with your preferences and requirements. The
information from this form is used throughout Summit and is only valid for the current event.
General Settings
To set your options to customise Summit to your requirements, take the following steps.
1.
Enter the Default Country as the country where most people will be from. If the person’s
address is in the default country, on name badges and address labels, State will be displayed
rather than country. The country will not be printed on letters addressed to event participants
belonging to the default country. On geographic participation reports, attendance is broken
down into country, except for the default country, which is broken down into states, i.e., areas
within the default country are dealt with by the system one level below the national level.
Whatever is stored in this field (it can’t be left blank) will be automatically entered into the
Country field on each new record in the Personal Details form. The value in this field can be
accepted by pressing Enter or Tab or a new value (country) can be typed over the old one.
2.
Whatever is stored in Default State (or it can be left blank) will be automatically entered in the
State field on each new record in the Personal Details form. The value in this field can be
accepted by pressing Enter or Tab or a different State can be typed over the old one.
3.
Summit will establish a link to your master database (if you have installed one) either to the
Summit Contact Manager software or to the Summit Membership Manager software at the
location you enter in Location of Master Database. This link is implemented when you ‘send
people to an event’ from within your master database as the person’s PIN is brought in with
their name and address details. If you alter those name and address, or demographic, details
within this program, the system can automatically update those details back in the master
104 - Chapter 4: Setup
Summit Event Manager - Light
database. If you mark the Warn Before Updating Master Database with Name and Address
Changes check box in Global Options, the system will ask you prior to updating as the details
kept here may be temporary.
4.
Select the Format for E-Mailed Correspondence you wish to use to format correspondence
that is sent by e-mail from the Correspondence form. Re the three possible formats: Text is the
most universally readable (with products such as Notepad) but also gives the poorest
formatting; HTML (Hypertext Markup Language) requires the recipient to have software
capable of reading HTML pages, such as Internet Explorer and RTF (Rich Text Format)
requires the recipient to have software capable of reading RTF files (such as Microsoft Word).
The default value is RTF.
5.
Mark the Warn When Special Stationery Required check box if you wish the system to warn
you when label, name badge or ticket stationery should be loaded in the printer. Clear the
check box for the system to start label and name badge printing jobs without displaying the
warning.
6.
Mark the Auto Allocate Payments check box if you wish the system to automatically allocate
payments. Clear the check box to manually allocate payments. When a payment is allocated
against a particular person, the payment must be allocated against the amount the person
owes for Delegate activities. When you choose to auto allocate, the system automatically
allocates the payment. The allocation made by the system can be changed by you before the
allocation is confirmed. It is recommended that you mark this check box for ease of use.
7.
Mark the Print Page Header on Correspondence check box if you wish to have the standard
report header (event short name and event long name) printed on all correspondence. Clear
the check box if you’re using your own pre-printed letterhead stationery.
8.
Mark the Print Page Footer on Correspondence check box if you wish to have the standard
report footer (secretariat address details) printed on all correspondence. Clear the check box if
using stationery with the address details of your secretariat pre-printed on your stationery.
9.
Mark the Print PIN on Correspondence check box if you wish to have the person’s PIN
(Personal Identification Number) printed on all correspondence, i.e., confirmation letters,
receipts and invoices. This number can be used by people to alter demographic details via the
web if they can enter a combination of their surname and PIN. Clear the check box if you don’t
require the person’s PIN to be printed on your correspondence.
10. Mark the Create Contact Record When Form Letters Sent check box if you want the system to
automatically record a contact against each person receiving the form letter. If you choose this
option you will be prompted for the name of the person who produced the form letters. This will
be used in the contact record as the name of the person with whom the contact was made.
Select the appropriate Contact Type you want the system to put against each person’s contact
when a form letter is produced.
11. Mark this Create Contact Record When Form Letters Sent check box if you want the system to
automatically record a contact against each person receiving standard correspondence. If you
choose this option you will be prompted for the name of the person who produced the
correspondence. This will be used in the contact record as the name of the person with whom
the contact was made.
Select the appropriate Contact Type against which you want the system to put each person’s
contact when you print correspondence.
Chapter 4: Setup - 105
Summit Event Manager - Light
User Defined
The fields within this form enable you to change the prompts of the associated fields to be those
that are pertinent to you.
To define your own fields within Summit, take the following steps.
1. Enter the Invoice/Statement Number Text part of the invoice number, for example, something
to identify the event, ie, DEMO2001. This will be printed on each person’s invoice with the
person’s PIN to enable you to identify to whom an invoice (or subsequent payment) belongs.
2. Enter the Invoice/Statement Heading Text to appear at the top of invoices. For example,
Invoice or Tax Invoice.
3. Enter the Receipt Heading Text to appear at the top of receipts. For example, Official Receipt.
4. Enter the Refund Heading Text to appear at the top of refunds. For example, Refund.
5. Enter the Event Charges Text you wish used to identify the registration and add-on charges for
your delegate or attendee, for example, event charges, registration charges, delegate fees etc.
This prompt will be displayed on the Allocate Payment form and the Delegate Confirmation
Letters.
6. Enter the Additional Charges Text you wish used to identify extra charges, for example, Extra
Charges, Cancellation Fee, Incidental Charges, etc. This text is displayed on the Registration
Details form, Delegate Confirmation Letters and the Income Reconciliation Report.
7. The Report Footer Text will appear at the bottom of all internal reports. The default is ‘Summit
Event Manager.
8. Enter the name of a data element in User Defined Field <1-5> Name. You have five fields that
can collect additional data relating to each person. These fields then act as data entry prompts
and can be found by clicking on the Extra Details button on the Personal Details form. These
106 - Chapter 4: Setup
Summit Event Manager - Light
prompts can be a maximum of 20 characters long whereas the data that can be collected can
be up to 255 characters long. Examples include T-Shirt Size, Ski Boot Size, Immediate
Superior, Favourite Destination, Golf Handicap, etc. In fact, almost any information that Summit
doesn’t already collect. The collected data can be printed and/or grouped using the user
defined reports facility from within Delegate Lists and the Reporter.
9. If you are going to have session assistants, enter the name for the first type in Session
Assistant Type 1 and the second type in Session Assistant Type 2. Examples include Room
Monitor, Presenter Assistant, Rapporteur, AV Monitor, Chair Assistant, etc. People who fill
these positions are entered against each session and reported on the Running Sheet, the
Session Chair Report and the Individual Schedules.
Chapter 4: Setup - 107
Summit Event Manager - Light
Event Documents
This option is used to identify the names of word processing documents used by Summit for form
letters and mail merge. By default, Summit uses a single document (formltr.doc) for all mail merge
and form letters.
If you wish to use a different document for each category, insert the name of your document in the
appropriate field. Use the Browse button to find the appropriate document.
The best method for creating a different document for each category type is to open Formltr.doc
and Save As a different name. This then takes into the new document the correct merge source
and merge fields. The merge source is a text file called summitmm.txt (for Summit Mail Merge)
stored in the root folder (C:).
If you’re not using Microsoft Word 97 or higher, make sure that the setting for Word Processor
Executable Program Name on the Global Options form is set to the name of the program that runs
your word processor.
The settings on this form only apply to the current event, they are not global across all events.
108 - Chapter 4: Setup
Summit Event Manager - Light
System Checking
This is where you determine how much checking the system does automatically for you and how
much checking it forces you to do as you are using the software.
1. Mark the Check Internet Requests Before Processing check box if you want the system to
force you to look at Internet requests before you can process them. If this box is not marked,
you are able to check your incoming mail for Internet requests and then process them without
having to check them.
2. Select the Duplicate Person Check option that best suits your office environment. If there is
more than one person entering data, it’s best to have some level of duplicate checking. This
checking is performed each time you enter a family name on the Personal Details form.
Although the system warns you, you can still enter the record if appropriate.
If you choose Never, the system will not check for duplicates. This option will give the fastest
performance. If you click Matching Family Name Only, the system warns you if it finds another
record on the system with the same family name. If you click Matching Family Name and Given
Name, the system will warn you if there is another record on the system with the same family
name and given name as the one you’ve just entered. The system will match family name and
first initial of the given name if you click Match First Initial and Family Name. This last option is
the most common method for checking as it takes into account that a person may be on file as
Sue Smith, Susan Smith or Susie Smith.
Remember, the more checking the system does, the greater the integrity of your database, but the
slower the system performance.
Chapter 4: Setup - 109
Summit Event Manager - Light
Name and Address Formats
Define how you want people’s names to be displayed on reports, correspondence and the event
programme.
1. In Name Format for Reports, select the way you wish the names to appear on reports and
listings.
2. In Name Format for Draft Programme, select the way you would like the presenter’s details to
appear in the draft programme.
3. In the Name Format for Financial Groups, select the way you would like the Financial Groups
to be displayed.
4. Select the Default Postal Code Style for Addresses you want people to have when you enter
new records on the Personal Details screen. Each person can have a different style of address
depending on where they live, for example, in the US, the last line of the address is ‘City,
STATE Postcode/Zip’ whereas in Europe it’s ‘Postcode/Zip City State’. If most of your
attendees will be from the US, select that style of address label layout as the default.
5. Mark the Force Suburb or City into UPPER CASE check box if you want the suburb or city
automatically forced into UPPER CASE as you enter new records. If you don’t mark this box,
the Suburb/City will remain exactly as you type it in, for example, Title Case.
6. Mark the Force State into UPPER CASE check box if you want the state automatically forced
into UPPER CASE as you enter new records. If you don’t mark this box, the State will remain
as you type it in.
7. Mark the Force Postal Code into UPPER CASE check box if you want the postal code
automatically forced into UPPER CASE as you enter new records. If you don’t mark this box,
the Postal Code will remain as you type it in.
110 - Chapter 4: Setup
Summit Event Manager - Light
8. Mark the Force Country into UPPER CASE check box if you want the country automatically
forced into UPPER CASE as you enter new records. If you don’t mark this box, the Country will
remain as you type it in.
9. Select the Salutation Text option representing the type of salutation you wish the system to
generate when you enter new records on the Personal Details form - formal or informal. After
you press Tab or Enter in the Family Name field, the system will insert either the Title and
Family Name or the Given Name into the Salutation field. The salutation appears on
correspondence generated by the system, i.e., it is the way the person is addressed after the
‘Dear ...’. The system-generated salutation may be overwritten with any other salutation of your
choice.
Note: after you update the Salutation Text choice field, Summit will give you the opportunity to
reset all the salutations on the database to your new choice.
WinFax Pro
This form enables you to define the settings required for the interface to WinFax Pro.
The settings here relate to correspondence faxed from the Correspondence form. When you
initiate a correspondence run from the Correspondence menu, Summit will automatically fax
correspondence to anyone on the system who has Fax marked as their Correspondence Method
on the Personal Details form. Enter the Time To Send Faxes nominating which time you want
WinFax Pro to send your faxes. This allows you to schedule fax transmission for off-peak periods.
If you leave this field blank, the faxes will be transmitted immediately.
Chapter 4: Setup - 111
Summit Event Manager - Light
Tax
The settings here relate to taxation and the naming of prompts on financial correspondence.
Australian users see the notes at the end of this section.
1.
Enter the Goods & Services Tax Text you wish to describe your Goods and Services Tax (for
example, GST, VAT, Government Charges, etc). This prompt is displayed on the Registration
Types, Add-Ons and Registration Details forms.
2.
Enter the Service Provider's Goods & Services Tax Details for Invoices text you wish to appear
on receipts, invoice/statements and tax invoices relating to your GST/VAT/Sales Tax number.
3.
Enter the GST Invoice Heading Text to appear at the top of tax invoices. Eg, Invoice or Tax
Invoice.
4.
Enter the GST Invoice Total Text to appear at the bottom of tax invoices beside the total. For
example, Total or Total Including GST.
5.
Enter the GST Credit/Adjustment Note Heading Text to appear at the top of receipts. For
example, Official Receipt.
6.
Enter the GST Credit/Adjustment Note Total Text to appear at the bottom of receipts beside
the total. For example, Total or Total Including GST.
7.
Enter the Default Adjustment Note Reason for the GST Credit/Adjustment notes.
8.
Enter the tax percentage amount you will be charging on Additional Charges and/or Discounts
in the Registration form.
9.
Mark the Prompt for Alternative Adjustment Note Text box if you want the system to give you
the opportunity to enter a different adjustment note reason when producing GST
Credit/Adjustment Notes.
112 - Chapter 4: Setup
Summit Event Manager - Light
Australian GST Notes
There have been a number of changes made for the introduction of a Goods & Services Tax on
July 1 2000.
Major Changes
Registration Types (set up on the Registration Types screen on the Setup Menu)
Each registration type can have a GST either as a percentage or a specific amount added to it.
Each registration type can be set up to include a specified amount of GST in the price. This
information is entered on the Registration Types screen on the Setup menu. The GST amounts are
calculated automatically as you make changes on the Registration Details screen.
Add-Ons (set up on the Add-Ons screen on the Setup Menu)
Each add-on can have either a GST either as a percentage or a specific amount added to it. Each
add-on can be set up to include a specified amount of GST in the price. This information is entered
on the Add-Ons screen on the Setup menu. The GST amounts are calculated automatically as you
make changes on the Add-Ons screen.
Billing Address (set up from the Money Menu accessed from the Personal Details screen)
To allow GST to be claimed by a registered organisation rather than an event attendee, all financial
documents (Receipts, Invoice/Statements and GST/VAT/TAX Invoices) can have an alternate
billing address specified.
Chapter 4: Setup - 113
Summit Event Manager - Light
REFERENCE FILES
Advertising Sources
This option is for maintaining a reference file of advertising sources that are used to attract people
to the event.
The information in this reference file is the source of the entries in the Source combo box on the
Personal Details form. The Advertising Sources form may also be opened within the Personal
Details form to enable additions, deletions and alterations to this reference file ‘on-the-fly’ by
double-clicking in the Source field. The field, Include in MIE WebLink File, relates to the inclusion
of each nominated Advertising Source into the MIE WebLink file. For more information on MIE
WebLink – the Internet Registration software – please refer to the Internet Assistant in Chapter 5.
Deleting an advertising source from this reference file won’t alter records where that advertising
source has already been used, but will mean that the deleted advertising source may no longer be
used unless reinstated using this form.
Information on the Confirmed Delegates by Advertising Source report (found on the Main Menu
under Participation Breakdown) can assist in promoting current and future events by identifying the
most effective means of advertising.
114 - Chapter 4: Setup
Summit Event Manager - Light
Contact Types
This option is for maintaining a reference file of the difference types of contacts you can have with
the event participants, such as confirmation letters, brochure mailouts and thank you letters.
You can’t delete a Contact Type from this reference file if it has been used anywhere in Summit.
Equipment
This option is for maintaining a reference file of any equipment required during the event. This
reference file covers both catering equipment (such as water stations and coffee urns) and
technical equipment for presentations (such as data panels, slide projectors and lecterns).
Equipment requirements are reported in the following reports: Equipment Requirements by
Catering Event; Equipment Requirements by Catering Location; Equipment Requirements by
Session Location; Equipment Requirements by Presentation and Equipment Requirements by
Session.
The information in this reference file is the source of the entries in the Equipment Required combo
box pull-down list on the Catering Events, Session and Presenter Details forms. The Equipment
form may also be opened within those forms to enable additions, deletions and alterations to this
reference file by double-clicking in the Equipment Required combo box.
You can’t delete a piece of equipment from this reference file if it has been used anywhere in
Summit.
Chapter 4: Setup - 115
Summit Event Manager - Light
Locations
This option is for maintaining a reference file of locations at the event. A location is any place
where a catering event or session takes place.
The information in this reference file is the source of the entries in the Location combo box on the
Sessions and Catering Events forms. The Locations form may also be opened to enable additions,
deletions and alterations to this reference file by double-clicking in the Location combo box.
You can’t delete a location once it has been used in either a session or a catering event.
116 - Chapter 4: Setup
Summit Event Manager - Light
Profiles
This option is for defining up to 20 ways to describe a person. This information can be used for
marketing the event and designing the event programme to best meet the needs of your audience.
It can also to be used to target groups of people.
You can also mark whether each profile is to be included in the MIE WebLink file. For more
information on MIE WebLink – the Internet Registration software – please refer to the Internet
Assistant in Chapter 5.
The information is collected on the EOI and Profile form from the Personal Details form when you
assign profiles to people on the database. One person can have many profiles. The information
from this form is displayed on the draft Expression of Interest (EOI) report and the draft
Registration report in Event Reports. Interest and involvement by profile is reported on in the
Profiles Breakdown and Participation Breakdown reports. Any profiles you define may be used as
selection criteria when you’re using the Reporter, for example, give me a list of all people who are
CEOs in the Metropolitan area.
If you’re going to import name and address details from an earlier event that used this software, or
from another MIE software package, it is possible to import the profiles and profile. If you choose to
import profiles, any profile settings you make here will be overwritten by the profiles from the import
source.
Chapter 4: Setup - 117
Summit Event Manager - Light
Toolbar Buttons
The reset button enables you to re-use a profile number for another profile name. You
may wish to do this if a very low number of people had that profile while a large
number had a profile you were not tracking previously. When you click on the Reset a
Profile button you will be asked which of the 20 profiles you wish to reset. All records
on the database with that profile set to Yes will then have that profile number set to
No. That profile number can then be re-used for a different profile name.
118 - Chapter 4: Setup
Summit Event Manager - Light
Tables
This option is for maintaining a reference file of tables for the event.
This reference file is the source of the pull-down list of the Table Number field in the Tabling and
Seating form in the Data Entry section on the Main Menu.
The Table Number must be a number – you can’t use any letters. This enables the system to sort
the tables properly in numerical sequence. You can only use each table number once. If you enter
a new record and enter a table number that has been used for another table, Summit will display
an error message and will stop you from proceeding.
The number in the Table Capacity is used when assigning people to a table and when compiling
the event status. Summit will warn you if you try to seat more people at a table than its defined
capacity. It won’t stop you – just warn you.
The Table Name is used on all reports and listings to help identify each table. You could use a
person’s name or an organisation name and it can be any combination of letters and numbers.
You can’t delete a table that has people assigned to it.
Toolbar Buttons
Click to create a number of tables with the same capacity. The following form will be
displayed.
If you click on the Yes button, you can enter the number of tables you want the
system to create for you, and the capacity of those tables.
Chapter 4: Setup - 119
Summit Event Manager - Light
IMPORT
Import Demographics
This option enables you to import name and address records into Summit, rather than re-enter all
records each time you set up a new event.
Click on the option button corresponding to the source of the data you wish to import, then click on
the Import button to proceed with the import.
If you’ve already entered records into your database, there is a risk, dependent on the source of
the data, that you will inadvertently create duplicate records when you import data. If records have
already been entered, the system will warn you of the risk of duplication. If you then choose to
continue with the import, the next step in the process will depend on the source of the data being
imported. Summit will not check for duplicates during the import process.
Toolbar Buttons
Click to start the import process.
120 - Chapter 4: Setup
Summit Event Manager - Light
Import from a previous event that used this software
This method of importing records should be used where you’ve already run an event using Summit
and wish to include the target audience from the previous event in the target audience for this
event. You will be asked to specify the location of the previous event. This event will always be in a
file with a .eve suffix (an event file) unless this has been changed for archiving purposes. For
example, if the conf01.eve file was on your c: drive in a folder called ‘oldevent’, you would enter
c:\oldevent\conf01.eve as the file location for the previous event. If you’re uncertain of the file
location, click on the Browse to find the file. If you enter an invalid file location, the import process
will be terminated.
The import process will then give you the choice of importing the profile settings of the records
from the previous event. The importing of profiles has the potential to either save or create a large
amount of extra data entry work. It is recommended that you use the following guidelines when
deciding whether or not to import profiles.
Do not import profiles if:
• You are not using profiles.
• The majority of profiles being used for this event are different from the ones used at the event
from which you’re importing data.
Do import profiles if:
• The profiles being used for this event are identical in name and order to the ones used at the
event from which you’re importing data.
Consider importing profiles if:
• The majority of profiles being used for this event are identical in name and order to the ones
used at the event from which you’re importing data. To ensure that profiles are recorded
correctly, you should reset the non-identical profiles on the Profiles form for this event, before
you import the profiles from the other event.
If you choose to import profiles, any profile settings you’ve already made on the Profiles
form will be overwritten by the profiles from the import source.
The system will then convert the participation details of the records being imported into historical
participation details. For example, presenters will be converted into past presenters.
Following conversion of participation details into historical participation details, the records will be
imported. You will be given the chance to cancel the import. If you don’t wish to import all records
from a previous event, or you don’t wish to import historical participation details, import the records
using the Import from Another MIE Software Application method of importing records.
Import from a Summit Data Collector file
This method of importing records should be used where you have been provided with a database
generated by the Summit Data Collector. The Summit Data Collector is a free-of-charge application
available from www.miesoftware.com. It enables people (for example, your clients) to build an
event database with name, address and other details along with user defined fields and profiles
without them having to purchase a retail copy of Summit. You will be asked to specify the location
of the Data Collector file. The data collector file will always end in .sdc. During the import process,
Summit will check for conflicts between the user defined fields and profiles in the event file and the
data collector file. If a conflicting name is found, and there are people in both files with that
particular profile or user defined field, you will be given the option of which profile or user defined
field you wish to use.
Chapter 4: Setup - 121
Summit Event Manager - Light
Import from another MIE Software application
This method of importing records should be used where you’ve generated an interchange table of
records to be imported using the Reporter form in another MIE Software application. This process
will import only those records that are currently in the interchange table in the other MIE Software
application.
You will be asked to specify the location of the other MIE Software application. The location of the
software will always be on the computer where you generated the interchange table of records
(this refers to the multi-user environment). This will always be in a file with a name ending in .mdb.
If you’re importing from a previous event, the file name will have a .eve suffix (an event file). If
you’re uncertain, you should check with your system administrator.
For example, if the myclub.mdb file was on your c: drive in a folder called MEMBER, you would
enter c:\member\myclub.mdb as the file location for MIE Software from which you wish to import.
If you’re uncertain of the file location, click on the Browse to find the file. If you enter an invalid file
location, the import process will be terminated.
The import process will then give you the choice of importing the profile settings of the records
from the other MIE Software application. The importing of profiles has the potential to either save
or create a large amount of extra data entry work. It is recommended that you use the following
guidelines when deciding whether or not to import profiles.
Do not import profiles if:
• You are not using profiles.
• The majority of profiles being used for this event are different from the ones used in the other
MIE Software application.
Do import profiles if:
• The profiles being used for this event are identical in name and order to the ones used in the
other MIE Software application.
Consider importing profiles if:
• The majority of profiles being used for this event are identical in name and order to the ones
used in the other MIE Software application from which you’re importing data. To ensure that
profiles are recorded correctly, you should reset the non-identical profiles on the Profiles form
for this event, before you import the profiles from the other MIE Software application.
If you choose to import profiles, any profile settings you’ve already made on the Profiles
form will be overwritten by the profiles from the import source.
If you don’t choose to import profiles, the profile settings in the interchange table will all be set to
No before the import commences. If you wish to re-use the interchange table, and include profile
information, you must regenerate the interchange table using the Reporter in the other MIE
Software application.
122 - Chapter 4: Setup
Summit Event Manager - Light
Import from a Microsoft Excel Spreadsheet
This method of importing records should be used where you’ve either stored name and address
records using Microsoft Excel, or used Microsoft Excel to convert records from another
application’s format.
To successfully import from Microsoft Excel, the records you wish to import may be stored in Excel
with one record per row, optimally in the following format. The columns don’t have to match as the
Link Fields process is used (see Importing from an Access Database further on). If you have no
column headings in your Excel spreadsheet, you are asked during the import process if you would
like to add them. Then it’s easier to use the Link Fields option.
You will be asked to specify the location of the Microsoft Excel spreadsheet. For example, if the
spreadsheet was called demodata.xls and was located on the a: disk drive, you would enter
a:\demodata.xls. If you’re uncertain of the file location, use the file open dialogue box to determine
the location on your system or network of the Microsoft Excel spreadsheet.
If you enter an invalid file location, the import process will be terminated.
Once you’ve entered the location of the spreadsheet, Summit will import the spreadsheet into a
temporary storage area and then display the incoming data on the Importer form exactly as it will
appear after it is imported. At this point, you may alter information or delete records before
confirming that you wish to complete the import, or you may choose to cancel the import process.
See the section on Importer further on for more details on how the manipulate the data prior to
importing it.
Import from a Comma Delimited Text File
This method of importing records should be used where you have name and address records in
comma delimited format provided by another application. Comma delimited means that each field
in the file is delimited or separated from the next field by a comma. To successfully import from the
comma delimited file, the records you wish to import must be stored with one record per line, with
each text field surrounded by double quotes, and with each field separated by commas. If the
information in a particular field doesn’t apply to your data, leave the field blank, don’t omit the field.
The following is the beginning of a sample line where Job Title is not used:
You will be asked to specify the location of the comma delimited text file. For example, if the file
was called othernms.txt and was located on the a: disk drive, you would enter a:\othernms.txt. If
you’re uncertain of the file location, use the file open dialogue box to determine the location on
your system or network of the comma delimited text file. If you enter an invalid file location, the
import process will be terminated. Once you’ve entered the location of comma delimited text file,
Summit will ask if the first row contains headings. If it does (and it should) Summit will open the
Link Fields forms (see under Import from an Access Database further on) so you can link your data
fields with Summits. Once that’s done, Summit will import the data into a temporary storage area
and then display the incoming data on the Importer form exactly as it will appear after it is
imported.
At this point, you may alter information or delete records before confirming that you wish to
complete the import, or you may choose to cancel the import process.
See the section on Importer further on for more details on how the manipulate the data prior to
importing it.
Chapter 4: Setup - 123
Summit Event Manager - Light
Import from a Microsoft Access Database
This method of importing records should be used where you have name and address records in
other Microsoft Access databases. This process will only work for Access 2000 or earlier
databases.
Once you’ve entered the location of an Access database, Summit will display a list of the tables in
that database. After you’ve chosen the required table name, Summit will open the Link Fields form
so you can match up the fields in the other database with those in the Summit database.
After you click on the OK button, the system will inquire as to whether or not you want it to set all
the incoming record’s Work Address to Yes. Once you’ve done this, Summit will import the data
into the data interchange table and then display the incoming data exactly as it will appear after it is
imported. This display form is called the Importer and is described in more detail further on.
At this point, you may alter information or delete records before confirming that you wish to
complete the import, or you may choose to cancel the import process.
124 - Chapter 4: Setup
Summit Event Manager - Light
Importer
This option is used when data is being imported into Summit from a source other than another MIE
software application. It displays the data in exactly the format it will be imported, if you choose to
complete the import.
This option is used when data is being imported into Summit from a source other than another MIE
software application. It displays the data in exactly the format in which it will be imported. It allows
you to modify and manipulate the data before completing or abandoning the import.
As this form opens, the system will check for incoming records having the Work Address flag set. If
no records have work address set, the system gives you the option of setting all records to work
address. If a record is not set as being a work address, the system will not print the person’s
Position, Division or Organisation on letters and labels.
On this form you may:
• Correct or modify the details of any fields of the records, by editing directly in the field of the
record to be altered. The records will be imported with your changes included. You can use the
buttons along the bottom of the form to manipulate the data.
• Delete any records that you don’t wish to import, by clicking on the record selector bar to the left
of each record, and then pressing the Delete key on your keyboard. Any rows you delete on this
form will not be imported.
Note: Always check the record on the first row to see if it contains data or column heading
names. If it contains heading names, delete the row.
• Choose to abandon the import process by clicking on the Exit button.
• Choose to continue by clicking on the Import button.
Chapter 4: Setup - 125
Summit Event Manager - Light
Toolbar Buttons
Click to fill the fields of all records in a particular column with a single value. For
example, if the records being imported have a blank Country field, you could insert
the name of the country in all the records.
Click to delete the data in a particular field from all records if one column contains
incorrect or nonsensical information.
Click to move the information from one column to another. This will replace all data in
the column you are moving the information to. This is also used if the information you
are importing is not in the same order as that required by Summit, but is not
transposed with another column.
Click to swap the information in one column with another if the information you are
importing is not in the same order as that required by Summit. For example, if the
Division and Organisation columns are transposed.
Click to extract the family name (surname) from the given name field if the data you
have been given combines the first name and family name in the given name field.
Click to extract the given name from the surname field if the data you’ve been given
combines the given name and family name in the surname field.
Click to set all address flags to home address.
Click to set all address flags to work address.
Click to confirm that you wish to complete the import. When you click on this button, the
records are added to the records already on the database. Note: the system will not check
for duplicates during or after the import process. Go to the Reporter on the Main Menu
and click on the Listing button to produce a report of all people on the database sorted by
family name. Use the report to find any duplicates and delete them.
126 - Chapter 4: Setup
Summit Event Manager - Light
Import Structure
This option enables you to import as much or as little as you wish of the setup and structure of a
previously defined event into the setup and structure of this event. This can save re-entry of
information, and can save time if the structure of this event is similar or identical to a previously
defined event. Examples can be a weekly training course or a conference having the same
structure as last year. Once the structure has been imported, you may modify it in any way you
wish.
If you’re importing either Catering Events or Sessions, they will be placed the same number of
days ahead of or behind the new event’s start date as they were positioned ahead of or behind the
old event’s start date. To be able to do this, Summit needs to know the start date of both the new
and the old event. If Summit is unable to determine these dates, you will be asked to provide them.
If you’re unable to provide these dates, the Catering Events and Sessions will be imported without
any dates set.
When you first open the form, the Equipment, Locations and Session Types check boxes are
marked and disabled (they can’t be cleared). This is because these fields are related to the
Catering Events and Sessions fields, which are marked when this form is first opened. To clear
these associated fields, you must first clear the Catering Events and Sessions fields.
If event fees have been locked in the new event, you will not be able to import Registration Fees or
Add-Ons. You must first unlock the fees before importing.
In the Overwrite Choice option box, you can decide whether you want the system to overwrite any
data already in the new event with data from the imported event, or whether you want the system
to stop each time it finds existing data and ask you if you want it overwritten.
Clear the check box beside any component you don’t wish to import. Once you’ve selected the
components of the structure you wish to import, click on the Import button. You will be asked to
specify the location of the old event.
The old event will always be a file with a .eve suffix (unless it has been renamed for archiving).
Double click on the .eve file you want to import from. If you enter an invalid file location, the import
process will be terminated.
Toolbar Buttons
Click to clear all the marked check boxes.
Click to continue the import process.
Chapter 4: Setup - 127
Summit Event Manager - Light
Import Organiser Tasks
If you’ve elected to import the organiser tasks from a previous event, the Import Organiser Tasks
form will be displayed. It enables you to tailor the import process to suit your requirements.
There are six categories, each with two or three options to select from. You can elect to add to
your existing task list or replace the task list that is supplied with the product, i.e., once you’ve
finalised the task list that is appropriate for your organisation, it can used for each event.
The other areas that can be tailored are: the Start Date, the Finish Date, the Started indicator, the
Finished indicator and to whom the task is assigned.
Toolbar Buttons
Click to continue the import process.
128 - Chapter 4: Setup
Summit Event Manager - Light
FINANCIAL DETAILS
Registration Types
This option is for maintaining the registration fees for full registrations for the event.
Partial registrations, such as single day or single session registration, should be entered as addons. Entry of partial registrations on this form, rather than as add-ons, can result in Summit
overstating your catering requirements.
To create a new registration type, take the following steps.
1.
Enter a Description of the registration type, for example, Early Bird Member, Student Discount,
Late Non Member, etc.
2.
Enter the price you will be charging the delegate in the Price field.
3.
If a goods and services tax (GST) or value added tax (VAT) or similar tax applies to this
registration type then:
•
If the tax is to be added on to the price of registration, enter either the percentage it is to
be increased by in GST Rate (enter 10% as 10) or the amount by which the price is to be
increased in GST Amount (this field is used to eliminate the possibility of rounding errors)
and select the Price Does Not Include GST option button. This charge will be added to
each delegate’s liability. Any non-inclusive GST charged will be detailed in the Income
Reconciliation Report against the field called ‘Plus Additional <GST>’.
•
If the tax is to be included in the price of registration, you can only enter an amount that is
included in the Price then select the Price Includes GST option button. You cannot enter a
percentage. The Price and Price with <GST> fields will always be the same.
Note: the prompt for these fields can be modified by you to reflect the name of the tax in your
country. To do this, click on the User Defined tab in Event Options. Whatever text you enter
there will be displayed here.
4.
Whichever option above is chosen, the system will display the total cost to the delegate being
the price of the Registration Type plus GST in the Price with GST field. This is a display only
Chapter 4: Setup - 129
Summit Event Manager - Light
field to enable you to check that you have all pricing components correct prior to locking the
event fees.
5.
Mark the Ticket Required box if anyone registering with this registration type needs an
admission ticket to be printed for them.
6.
Mark the Include with MIE WebLink File box if it’s appropriate. For more information on MIE
WebLink – the Internet Registration software – please refer to the Internet Assistant in Chapter
5
Registration fees and descriptions may be added, modified and deleted until event fees are locked.
Only once event fees are locked can you register delegates. Once event fees are locked, new fees
may be added but no changes may be made to the existing registration prices, however, a
registration type may be deleted if no one has been registered against it, or the description
modified.
The information from this form is the basis of the pull-down list of Registration Types on the
Registration Details form within Personal Details, and is used when calculating delegate
registration costs, determining overall event income for the Income Reconciliation Report, and is
displayed on delegate Participation Records and Confirmation Letters.
Toolbar Buttons
Click to display a report with the names of all people who have registered under this
registration type.
130 - Chapter 4: Setup
Summit Event Manager - Light
Add-Ons
This option is for maintaining the details of add-ons or optional extras associated with the event.
Add-ons need to be defined for anything to that all participants at your event are not automatically
entitled – it is an optional extra. An add-on is any function or thing related to the event that could
affect the catering requirements, and/or the amount paid by participants, and/or time and space
allocations at the venue. An add-on will appear on the Registration Details form as something that
people may select/be enrolled for/purchase.
To create a new add-on, take the following steps.
1. Enter a Description of the add-on. An add-on can range from a social outing, to an individual
race at a sports carnival, to an item such as a video that may be purchased. Other examples
include membership subscriptions that can be paid for when registering, a golf tournament,
additional tickets to an inclusive function for the accompanying person, etc.
2. Enter the Price you will be charging the participants. If a goods and services tax (GST) or value
added tax (VAT) or similar tax applies to this registration type then:
•
If the tax is to be added on to the price of the add-on, enter either the percentage it is to be
increased by in GST Rate (enter 10% as 10) or the amount by which the price is to be
increased in GST Amount (this field is used to eliminate the possibility of rounding errors)
and select the Price Does Not Include GST option button. This charge will be added to each
person’s liability. Any non-inclusive GST charged will be detailed in the Income
Reconciliation Report against the field called ‘Plus Additional <GST>’.
•
If the tax is to be included in the price of registration, you can only enter an amount that is
included in the Price then select the Price Includes GST option button. You cannot enter a
percentage. The Price and Price with <GST> fields will always be the same.
Whichever option above is chosen, the system will display the total cost to the delegate being
the price of the Add-On plus GST in the Price with GST field. This is a display only field to
enable you to check that you have all pricing components correct prior to locking the event fees.
Chapter 4: Setup - 131
Summit Event Manager - Light
3. Enter the Display Sequence you require. Add-on records are displayed on pull-down lists and in
reports in the order specified in this field. The display sequence is in ascending order. For
example, a display sequence of 1 will display before a display sequence of 2. Any add-ons that
don’t have a display sequence will be displayed before add-ons that do have a display
sequence. Any add-ons with the same display sequence will be displayed in alphabetical order.
4. If there is a limit to the number of places or items, enter the Maximum Number allowable and
the system will warn you if you’ve used up the number allowed and no places or items left to
allot. The system will not stop you - just warn you.
5. Mark the Ticket Required check box if you want the system to produce an admission ticket for
each person who has selected this add-on.
6. Mark the Registration Type Add-On check box if this add-on is a partial registration type. If so
marked, the system will place this add-on in the Registration Type field on such delegate
correspondence as Confirmation Letters and Participation Records. Partial registrations can be
selected from the reporter. People with a Partial Registration add-on are deemed by the system
to be Partial Delegates.
7. Mark the Accompanying Person Add-On check box if this add-on is only relating to
accompanying person activities. This will have the effect of the accompanying person’s name
being printed on the attendance listing rather than the primary person’s name.
8. Mark the Hide Add-On on Participation Record check box if this add-on is no longer available.
This will have the effect of making this add-on unavailable in the pull-down lists of add-ons and
the add-on will no longer show on the Participation Record but will still be included on all other
correspondence and all financial reports such as the Income Reconciliation report. This feature
was designed for events that cover, say, a year’s training or a series of seminars over a long
period of time.
9. Mark the Include with MIE WebLink File box if it’s appropriate. For more information on MIE
WebLink – the Internet Registration software, please refer to the Internet Assistant in Chapter 5.
Add-on fees, descriptions and display sequences may be added, modified and deleted until event
fees are locked. Once event fees are locked, existing add-on fees may not be changed. New addons may be added after event fees have been locked and changes to the description and display
sequence of existing add-ons may also be made. Even after event fees have been locked, an addon may still be deleted if it hasn’t been selected by anyone or the description modified.
The information from this form is the basis of the pull-down list of Add-Ons on the Registration
Details form with Personal Details and is used when calculating delegate costs, determining overall
event income for the Income Reconciliation Report, and is displayed on delegate Participation
Records and Confirmation Letters.
If this add-on is a thing that needs to be catered for, such as a gala dinner, it also needs to be
defined as a catering event. When defining the catering event, enter this add-on in the Add-Ons
Covered section of the Catering Events form. If this add-on is a thing that should appear in the
programme and on the schedules, such as a pre- or post-event workshop, then it also needs to be
defined as a session, so it can be included in the programme.
Before creating a new add-on, check that this thing is not something that applies to all participants
automatically. If it is, it is not an add-on. Check whether it is either a catering event or a session.
Examples of catering events that are not add-ons are morning teas and lunches that are available
to all participants. Examples of sessions that are not add-ons are a conference plenary session or
sporting event opening ceremony that all participants are entitled to attend.
Toolbar Buttons
Click to display a report detailing the names of all people who have selected this add-on.
132 - Chapter 4: Setup
Summit Event Manager - Light
Lock Event Fees
The system will not allow registration fees or add-on fees to be altered after registration
commences, as this would result in corruption of the financial information held within Summit.
Locking is the process where you tell Summit that you’re happy with the fees you’ve set, and now
wish to be able to register delegates.
Before you lock the event fees, you can create, alter and delete registration fees and add-on
details, but you can’t register people for the event. After you lock the event fees, you can register
people and create new registration fees and add-ons, but you can’t alter existing registration and
add-on fees. However, you can enter new ones, alter the descriptions of existing ones and if
nobody is registered with a specific registration type or add-on, you can delete it.
You can unlock your fees if you haven’t registered anyone. Once you start registering people for
the event, the Unlock button is disabled. Before you lock the fees, it’s advisable to backup your
event.
Toolbar Buttons
Click to display the on-line help for backing up your event.
Click to unlock event fees that have been previously locked.
Click to lock event fees to allow you to start registering delegates.
Chapter 4: Setup - 133
Summit Event Manager - Light
Banking Details
This option is for maintaining information related to the bank account being used for the event.
The information from this form is used on the cheque and cash Bank Deposit Slips produced when
you do a Banking Run.
134 - Chapter 4: Setup
Summit Event Manager - Light
Payment Types
This option is for maintaining payment types that may be used when entering payments for the
event.
The information in this reference file is the source of the entries in the Payment Type combo box
on the Payment Entry form. To enter additional payment types, take the following steps.
1. Enter a description of the Payment Type. There are four standard payment types that are
required by Summit: cash, cheque, refund and reversal. These standard payment types may not
be deleted from the system and the fields are grey and disabled. Only a non-standard payment
type may be deleted until you’ve used it. Once used, you can’t delete it.
A separate summary report is produced for each additional payment type when you do a
Banking Run. Examples of payment types are Bankcard/Mastercard/Visa, Diners Club and
American Express (these come with the system). If you enter a credit card as a new payment
type, and it is not one of the standard three, you can select the Summary Report Format of
Generic. The Diners Club and American Express format are specific to those cards, whereas
the generic format will use the payment type you entered as it’s heading. In the case of cash
and cheque payment types, the summary reports are produced as bank deposit slips.
2. The Commission Percentage is only used for calculating the commission to be deducted for the
associated payment type on the Credit Card Commissions Breakdown report. Commissions are
not deducted on the Income Reconciliation Report.
3. The Merchant Number, Merchant Name and Merchant Location are only used if you select
other than the Default Listing summary report format for reporting this payment type during a
Banking Run. If you click on the New button, once you’ve entered data once into the Merchant
Name and Merchant Location fields, the system will insert the same data into the fields for each
new Payment Type you enter.
Select the Summary Report Format appropriate to the payment type. If you’ve chosen the Diners
Club or American Express report formats, the words Diners Club International and American
Express will appear as the heading on the respective reports, regardless of the text you entered for
the Payment Type. If you’ve chosen the American Express report format, anything you enter into
the Comments field in the Payment Entry form will appear under the Description of Order section of
the summary report.
Chapter 4: Setup - 135
Summit Event Manager - Light
THE ESSENTIALS
Catering Events
This option is for maintaining a reference file of catering events that occur in your event. A catering
event is any function that requires the provision of food and/or beverages.
Catering events can occur within the main event programme, for example, morning tea, lunch and
afternoon tea during the conference, or in conjunction with add-ons, for example, a welcome
reception, optional conference dinner or a supper following a social programme function.
As catering events are not linked directly to event fees, there is no restriction on the creation,
modification or deletion of catering events based on whether or not event fees have been locked.
To create a new catering event, take the following steps.
1.
Open the Catering Events form from the Setup Menu and click on the New button.
2.
Enter a description of the catering event in the Description field. This is the description that will
appear in the Draft Programme, Schedule and Schedule by Location and Catering
Requirements reports.
3.
Select the location of this catering event from the pull-down list for the Location field. If you
need to add a new location, double-click in the Location field.
4.
Enter the date, start time and end time of the function in the Date, Start Time and End Time
fields. Click on the calendar to the right of the date field if required.
5.
If all participants in this event are entitled to go to this function, mark the Inclusive Function for
Full Registrations check box. Summit will use this field when compiling the catering
requirements by counting the number of full registrations in the database at the time.
6.
If you think more or less people are likely to come to the function than are entitled to, enter a
positive number to increase the number catered for, or a negative number to reduce the
136 - Chapter 4: Setup
Summit Event Manager - Light
number catered for in the Discretionary + or - for Catering Requirements report field. The
number to cater for on the Catering Requirements report will be adjusted up or down by the
number you enter here. The discretionary adjustment must be between -32,767 and 32,767.
You can use the two buttons on the right hand side of this field to increase or decrease the
discretionary adjustment.
An example of a situation where you would use this adjustment is where you have a Welcome
Reception the evening before the start of your event. Frequently, these events are available to
all participants, but some participants who are travelling to the event don’t arrive in time or
locals may not bother coming. In this case you would enter a negative number, equal to the
number of people that you estimate will not come to the function, even though they are entitled
to. Use of this field helps reduce the wastage associated with overcatering.
7.
Mark the Tabled field if this function will have people seated at specific tables. The process of
allocating people to tables is performed in the Tabling and Seating form on the Main Menu.
8.
Enter the menu for this function. All menus will be printed on the Running Sheet and the
Menus report that can be run by clicking the Menus button or run from Event reports.
9.
Enter any Running Sheet Notes and Setup Tasks and the person responsible for its
completion for any task associated with this event you wish to note in the Running Sheet.
There are two versions of the Running Sheet; Portrait and Landscape. These reports are
situated in the Organiser form and in Event reports. When entering the person Assigned To for
the activity described by the Setup Task and the Running Sheet Note, select a name from the
combo box or enter any other name you wish. This combo box is not limit-to-list, so any value
will be accepted. To add another name to the list, double-click in the Assigned To field. Enter a
Time for the Setup Task.
10. Enter any additional description you wish to appear in the Draft Programme, for example,
dress requirements or culinary highlights in the Additional Description for the Programme field.
11. If the number of people to be catered for at this function depends on how many people are
enrolled in a particular add-on (or add-ons), enter this information in the Add-Ons Covered
section of the form.
In this section of the form, select each Add-On covered by this catering event from the combo
box until all add-ons covered by this catering event are displayed. Each add-on can only be
selected once. The number of entitlements for each person to each selected add-on will be
added to the catering requirements for this event. To delete an add-on, click on the record
selector bar on the left hand side of the add-on you wish to delete and then press the Delete
key on your keyboard.
An example of a catering event covering multiple add-ons is four morning workshops; two at
9am and two at 11am with morning tea at 10.30am. Anyone going to any of the workshops is
entitled to morning tea. In this case, you would enter all four workshops as add-ons covered by
this event. Even if someone is going to more than one of the add-ons, Summit will only count
that person once. Make sure you clear the Inclusive Function for Full Registrations check box.
12. The final step in defining a new catering event is to specify any equipment. The equipment
required for catering events is shown on the Equipment Requirements by Catering Event
report and the Equipment Requirements by Catering Location report. Both catering and noncatering equipment may be required in relation to the function. For example, a breakfast
meeting might require plate warmers and coffee urns and also require a lectern, microphone
and slide projector for a speaker.
Chapter 4: Setup - 137
Summit Event Manager - Light
In the Equipment Required section of the form, select the Equipment number relating to each
piece of equipment required for this catering event from the combo box. As you select each
piece of equipment, the system will default to a quantity of one. If more than one unit is
required, enter the number required in the Qty field. To delete a piece of equipment, click on
the record selector bar on the left hand side of the piece of equipment you wish to delete and
then press the Delete key on your keyboard.
13. Save the catering event by clicking the OK button or the New button to enter another Catering
Event, or by moving to another record using the navigation buttons.
Example of a Catering Event
This example is based on a Welcome Reception for a conference being held the evening before
the conference commences. The following applies to the Welcome Reception:
• All delegates are entitled to attend the Welcome Reception. There are 500 delegates.
• Extra tickets may be purchased for the Welcome Reception as an add-on. This has been
entered in the Add-On form and has been called ‘Extra Ticket for Welcome Reception’. This
enables delegates to bring accompanying people. Fifty people have bought one extra ticket, 20
people have bought two extra tickets and one person has bought five extra tickets.
• As the Welcome Reception is being held the evening before the conference commences, it is
anticipated that approximately 100 people who are entitled to attend will not do so as they’re
locals and people who will not arrive in time.
To determine the numbers for this function, the following steps would be taken.
1.
The Inclusive Function for Full Registrations check box would be marked as all delegates are
entitled to attend.
2.
It was thought that 100 people who were entitled would not attend so -100 was entered into
the Discretionary + or - for Catering Requirements field.
3.
In the Add-Ons Covered section of the form, the add-on called ‘Extra Welcome Reception
Ticket’ was selected from the combo box.
4.
When the Catering Requirements report is run, it will show that 495 people need to be catered
for at the Welcome Reception.
Catering events are displayed on the draft programme, Schedule, Schedule by Location and
Running Sheet. In the draft programme, catering events are displayed with the Description as the
heading. The following line contains, in the following order, Location, Start Time and End Time. If
an Additional Description for Programme has been entered, this will follow on the next line.
Toolbar Buttons
Click to produce a report of the menus for each catering event.
Click to refresh the actual number attending the event. This may need to be done if
you’ve added a new add-on.
138 - Chapter 4: Setup
Summit Event Manager - Light
Click to copy one day’s catering events, for example morning tea, lunch, afternoon
tea to another day. Remember to adjust the Add-Ons as appropriate.
Function Attendance Listing. Click to produce a report of all people entitled to attend the
displayed catering event. You will be asked by the system whether or not you require
special dietary requirements to be displayed on the report. The report is sorted by family
name and a total is printed at the bottom. Check the number carefully as the Catering
Requirements report may be more accurate, depending on your add-ons. See above for
more details.
Chapter 4: Setup - 139
Summit Event Manager - Light
Sessions
This option is for maintaining a reference file of the sessions within the event. A session is usually
a grouping of presentations at a single location starting at a given time, for example, plenary
session, concurrent session, workshop, forum, panel discussion, etc.
When allocating a person to a session, you can indicate if the person has just stated a preference
to attend that session of if the attendance is confirmed.
Sessions need to be defined for a presentation or group of presentations to appear in the event
programme. As sessions are not linked directly to event fees, there is no restriction on the creation,
modification or deletion of sessions based on whether or not event fees have been locked.
Sessions are reported in the Schedule, Schedule by Location, Draft Programme, Session
Attendance reports and the Attendance Record. All reports are found in Event Reports.
The information in this reference file is the source of the entries in the Session combo box on the
Registration Details, Presenter Details and Programmer forms.
To create a new session, take the following steps.
1.
Open the Sessions form from the Setup Menu and click on the New button.
2.
Enter a session code in the Session Code field. Session codes may be alphabetical, numerical
or a combination. Examples of typical session codes are P1 for Plenary Session, 1, 2 and 3 for
concurrent sessions or W3 for Workshop 3. This field is optional.
140 - Chapter 4: Setup
Summit Event Manager - Light
3.
Enter a session name in the Session Name field.
4.
Enter a session type in the Session Type field. You only have to enter a session type once,
thereafter it’s available from the pull-down list. This field is auto-expand, meaning you can
begin typing and if that word is on file, the system will expand the word.
5.
Enter the Date, the Start Time and End Time details for the session. The programme is sorted
in ascending date order and then in ascending start time order.
6.
Enter a location in the Location field. The location you enter is limited to the values in the pulldown list of the combo box. Locations are defined on the Locations form. This form can be
opened by double-clicking in the Locations field.
7.
Select a Chairperson from a limit-to-list, pull-down list of all people of the database. Summit
makes the assumption that in order to chair a session, a person will have been entered onto
the database to be registered or catered for. If you decide not to have a chairperson for this
event, you can remove them by deleting the person number. Double-click in Chairperson field
to display the Find Session Chair form – an easier method to find a specific person.
8.
The next two fields, in this example, Room Monitor and Rapporteur, can be defined in the User
Defined tab in Event Options as Session Assistant Type 1 and Session Assistant Type 2.
Select a Session Assistant from a limit-to-list, pull-down list of all people of the database.
Summit makes the assumption that in order to assist a session, a person will have been
entered onto the database to be registered or catered for. If you decide not to have an
assistant for this event, you can remove them by deleting the person number. Double-click in
either Session Assistant field to display the Find <Session Assistant> form – an easier method
to find a specific person.
9.
If you have more than one session starting at the same time, you can determine the order in
which each session will appear in the programme by entering a Programme Sequence
number. The sessions with the lowest programme sequence will appear first, i.e., session with
a programme sequence of 1 will appear before a session with a programme sequence of 2, if
they both have the same start date and time.
10. Enter a number in the Maximum Number That May Attend field for those sessions that have a
limit to the number of people that can be seated. The system will warn you when you’ve
confirmed a session attendance on the Registration Details form that results in a number
greater than the number specified here. The system will only warn you but will not stop you
from confirming the attendance of that person.
11. If you will be using the system generated attendance certificates for participants to verify their
attendance at the event and at particular sessions, enter a value in the Professional Education
Credits field. This will appear on the Attendance Certificate and make it easier for participants
to calculate the professional education credits they’ve achieved.
12. Mark the field Ticket Required if entry to this session is by ticket only. A ticket will be created
for a person when this session is entered on the Registration Details form. Tickets are
produced by opening the Name Badges and Tickets form on the Main Menu.
13. Mark the field Include in MIE WebLink File if you wish this session to be included. For more
information on MIE WebLink – the Internet Registration product - please refer to the section on
Internet Assistant in Chapter 5.
14. Enter any Running Sheet Notes, and the person responsible, if there is any task associated
with this session you wish to note in the Running Sheet. This report is found in Event Reports.
When entering the person Assigned To for the activity described by the Setup Task and the
Running Sheet Note, select a name from the combo box or enter any other name you wish.
This combo box is not limit-to-list, so any value will be accepted. To add another name to the
list, double-click on the down arrow to the right of the Assigned To field.
Chapter 4: Setup - 141
Summit Event Manager - Light
15. A session may have standard pieces of equipment assigned to it. Equipment requirements for
sessions are reported in Equipment Requirements by Session Location, Equipment
Requirements by Session reports and the Running Sheet.
16. Save the session by clicking the OK button to close the form or the New button to enter a new
session, or by moving to another record using the navigation buttons.
When sessions are reported, they are sorted firstly in ascending Date order, then in ascending
Start Time order, then in ascending Programme Sequence order.
When entering session details, note that in the Draft Programme, sessions are displayed with the
Session Name as the heading. The following line contains, in the following order, Session Type,
Session Code, Date, Location, Start Time and End Time. If an Additional Description for
Programme has been entered this will follow on the next line.
Deleting a Session
A session may only be deleted if there are no presentations assigned to it. If you want to delete a
session but you’re not sure if there are still presentations assigned to it, click on the Presentations
in Session button. Every person that has a presentation assigned to this session, whether the
person has been confirmed as a presenter or not, will be displayed.
Toolbar Buttons
Click to show details of the presentations that are currently assigned to the
displayed session. The presentations belong to presenters who can be either
potential or confirmed.
Click to display the Session Status form (see over page for more information). This form
displays the attendance statistics and enables you to change the Preferred status of
attendees to Confirmed.
Click to display a report of all people listed as either Preferred or Confirmed to attend this
session.
142 - Chapter 4: Setup
Summit Event Manager - Light
Session Status
This option shows you how attendance at the session is going in terms of:
• the number of people who have indicated a preference for the session but haven’t been
confirmed as attending
• the number of people who have been confirmed as attending the session.
This option also provides a mechanism for automatically filling up (populating) a session with
people who have indicated a preference for the session but haven’t been confirmed as attending.
To automatically populate a session, take the following steps.
1.
Select the population method you want to use by clicking on the appropriate option button in
the Session Population Options section of the form.
Note that if you select Only move Preferences to Confirmed until maximum number is reached
and no maximum number has been stipulated, all preferences will be moved to confirmed.
2.
Once you’ve selected the method you want, click on the Populate button at the bottom of the
form.
3.
To obtain a list of preferred and confirmed attendances, return to the Sessions form, and click
on the People button at the bottom of the form.
4.
If you don’t want to use the automatic population mechanism, the only way to move someone
from indicating a preference to confirmed as attending is on each person’s Registration Details
form.
Toolbar Buttons
Click to populate the session, i.e., change Preference to Confirmed according to the
rule selected in Session Population Options.
Chapter 4: Setup - 143
Summit Event Manager - Light
Name Badge and Ticket Design
This option is for designing name badges and admission tickets to suit your stationery and content
requirements.
You can create badges and tickets in any size from 6 centimetres wide by 2 centimetres high to
10.8 centimetres wide by 11 centimetres high (approximately 2½ inches by ¾ inch to 4¼ inches by
4¼ inches).
Each badge or ticket design can contain a picture and up to five lines of detail. You can define the
size of the picture and lines to any size that will fit on the stationery you’re using.
You can create any number of new badge and ticket styles or you can modify the default styles
provided with the system.
There are three main steps to take when designing a badge or ticket.
1. Determine the stationery you wish to use for the badges or tickets.
2. Insert and format the badge picture, if required.
3. Determine and format the content of the lines on the badge or ticket.
The three steps are explained further in the following pages.
If you have custom stationery, see the last topic, Custom Badges.
144 - Chapter 4: Setup
Summit Event Manager - Light
1. Determine the stationery you wish to use
Stationery can be Custom or Standard. Click on the Standard toggle button and go through the
list of standard stationery types to see if any of them match your stationery. If you find your
stationery type, select it. The dimensions of the stationery, together with its default print setup
settings will be displayed. If your stationery is not standard, the next two topics illustrate how to
create your badges and the topic Custom Badges will show how to size the badges.
2. Insert and format the badge picture
If you don’t wish to have a picture on your badge or ticket, mark the Hide check box.
To insert a picture on a name badge, copy and paste it using the Windows clipboard. To do this
take the following steps.
1.
Open the Name Badge and Ticket Design form and use the Width, Height, Left Margin and
Top Margin scroll bars to set the size of the picture frame and it’s position on the badge.
2.
Open the file containing the picture you wish to use in the picture’s application. Examples of
typical applications are Microsoft’s Paint (for .bmp pictures) and Corel Draw (for .cdr pictures).
To make the picture as small as possible in order to prevent an “Out of Memory” error, save
the picture as either a monochrome or 16 colour bitmap – select File then Save As then select
the type.
3.
Select the section of the picture you want to display on the name badge. You can select all or
part of the picture. The example here is a picture in Paint.
4.
From the application’s Edit menu choose Copy. This will copy the selected part of the picture
onto the clipboard.
Chapter 4: Setup - 145
Summit Event Manager - Light
5.
Switch back to the Summit Event Management System and click on the picture frame. After
you’ve clicked on it, it will appear as shown below.
6.
Press Ctrl+V to paste the picture from the clipboard into the picture frame. The picture should
now be displayed in the picture frame.
7.
Decide how you want the picture displayed. You have three options.
If you choose Clip, the picture will be displayed at actual size. If the picture is smaller than the
picture frame the rest of the frame will remain empty. If the picture is larger than the picture
frame, only the part of the picture that can fit in the frame will be displayed.
If you choose Stretch, the picture will be stretched or shrunk to fill the picture frame. If the
picture frame is a different shape to the picture the image may be distorted.
146 - Chapter 4: Setup
Summit Event Manager - Light
If you choose Zoom, the picture will be stretched or shrunk to fill as much of the picture frame
as possible without distorting the image.
If necessary, use the scroll bars to match the size of the picture frame to the size of the
picture.
3. Formatting and determining the content of the lines on the badge or ticket
The final step in badge or ticket design is to determine how many lines of information you want,
where you want them, what you want to appear on each line and the appearance of each line. To
do this take the following steps.
1.
Click on the button corresponding to the line you wish to work on. You can have up to five
details lines per badge.
2.
The line you’re currently working on will be highlighted with a thick black border. If you’re
creating a new line it will not be visible until you increase it’s width and height.
If you don’t wish to have this line on your badge or ticket, mark the Hide check box.
3.
Use the Width, Height, Left Margin and Top Margin scroll bars to set the size of the line and
it’s position on the badge. If you’re creating a new badge, the line will initially start without any
size and will not be visible. As you increase the width and height of the line you will be able to
view it.
4.
Select the information you wish to display on this line from the Content pull-down list. In this
case, Event Long Name is selected.
If you select User Defined Text, you can enter the text you wish to appear in the Text field. The
content can be either a field on file, for example organisation, add-on name or registration
type, the person’s Primary Participation Category or Participation Summary (for more
information, see Participation Settings) or a user defined text field, for example, ‘Number:’.
This text will appear on all badges.
Chapter 4: Setup - 147
Summit Event Manager - Light
5.
Select the characteristics you want for the text. Choose a font from the pull-down Font list,
then enter a font size in the Size field. If you wish the text to be bold, italics or underlined, click
on the appropriate buttons. For the above line, Arial, Font Size 12 and Bold is selected as
shown below. If you want to display the all data in a line into UPPERCASE, for example, Given
Name in capitals, select the “C” button.
6.
Determine how you want the software aligned in the space you’ve created for it by clicking on
the appropriate toggle button.
In this case, centre alignment is selected.
7.
Determine the text colour for this line, the default is black.
In this case, the text colour is left black.
8.
Determine the background colour for this line. The default is white (clear).
In this case, the background colour of light grey is selected.
The badge would now look like this on the design form.
The badge would now look like this on the Preview form with sample data.
148 - Chapter 4: Setup
Summit Event Manager - Light
Finally, give the design a name and enter this in the space provided.
The more meaningful the name you give the design the better, as all the names will be displayed
for you to choose from when you print name badges or tickets. After you have named your design,
save the design by clicking on the OK button.
4. Creating Custom Badges
If you don’t find an exact match for your stationery type, you’ll need a Custom badge. To create a
custom badge, take the following steps.
1.
Determine exactly what size your badges are by measuring your badge size as well as
margins and spacings between the badges. Open the Global Options form and enter the
Number of Badges per Sheet. For standard stationery, this step is not necessary.
2.
Click on the Custom button and enter the Width and Height of the badge and select the
measurement type; centimetres, millimetres or inches.
Chapter 4: Setup - 149
Summit Event Manager - Light
3.
Determine the number of lines and type of data you want on your badge. In the example
below, we have only three lines: Event Short Name, Badge Name or Given Name and
Organisation (All Badges) so that the accompanying people will have their partner’s
organisation on their badge.
150 - Chapter 4: Setup
Summit Event Manager - Light
4.
Click on the Preview button. The following page will be displayed.
5.
Select File from the left corner of the screen, then Print Setup. The following form will be
displayed. Modify the Margins to match your stationery requirements.
Chapter 4: Setup - 151
Summit Event Manager - Light
6.
On the Page tab, select the Paper Size and the Source.
152 - Chapter 4: Setup
Summit Event Manager - Light
7.
On the Columns tab, enter the space between the badges.
8.
Click on the OK button to see the effect of your entries. Repeat the above procedure until it
matches your custom stationery. You can test this by printing one page and matching it
against the badges.
Toolbar Buttons
Click to define your own participation codes and text. The Badge and Ticket
Participation Settings form is displayed.
Click to see what your badge or ticket design will look like in production. Summit uses
sample data to display your layout.
Chapter 4: Setup - 153
Summit Event Manager - Light
Participation Settings
This option is for specifying how the Participation Summary and Primary Participation Category
fields will be displayed on the name badges and tickets you produce.
The participation summary is a code that enables you to see, at a glance, all the details of
someone’s participation at the event. To enter your own participation settings, take the following
steps.
1.
Enter the Summary Code. You can specify up to three letters corresponding to as many of the
ten participation categories as apply to your event. You can also specify a three letter code for
anyone who still owes money in relation to the event.
For example, assume your event has delegates and presenters and you assign participation
summary codes of D and P respectively to these participation categories and * to people who
still owe money. If someone is a delegate and a presenter, the participation summary will be
DP. If someone is only a delegate, but still owes money, the participation summary will be D*.
2.
The primary participation category Display Priority is used when you wish to display only one
participation category, and you wish to display the most relevant category for people who have
multiple categories.
For example, assume your event has presenters and delegates and you consider the relevant
importance of these to be 1 and 2 respectively (the higher the number, the greater the priority).
If someone is a delegate and a presenter, the primary participation category will be presenter.
If someone is only a delegate, the primary participation category will be Delegate.
3.
Enter the Display Text. The display text fields enable you to decide what is actually printed on
the badge when you’re printing the primary participation category.
For example, if you wanted to print Speaker rather than Presenter on presenter name badges,
you would enter Speaker as the display text corresponding to Presenter.
154 - Chapter 4: Setup
CHAPTER 5
MAIN MENU
This chapter describes the options on the Main Menu. These options enable you to:
• register and record the requirements of delegates and presenters
• retrieve expressions of interest, registrations, demographic updates and speaker information
from the internet
• correspond with your event participants
• record all contacts made with your event participants
• enter, allocate and bank payments
• produce receipts and invoices individually and in batches
• track event organisation tasks
• develop the event programme
• produce a schedule and a running sheet
• produce a draft expression of interest brochure, draft registration form and draft programme
• produce or export name badges and tickets
• finalise tabling and seating arrangements
• determine catering and equipment requirements.
Chapter 6: Main Menu - 155
Summit Event Manager - Light
DATA ENTRY
Personal Details
This is the main form for locating and maintaining name and address details of every person and/or
organisation within Summit.
On entering this form, if there are no records in the database, the form will be blank and the cursor
will be in the Find by Family Name field. Use the mouse or press F6 to move to the first data entry
field. If there are records present, the first record in the database will be displayed. Just as an
aside… every time you open this screen, you will see the same person’s details, so it had better be
someone you like – we suggest you put yourself on as the first record.
Enter a New Person’s Record
To enter a new person’s details into Summit, take the following steps.
1.
Click on the Personal Details button on the Main Menu. This will open the Personal Details
form.
2.
Check that the person is not already on the database by entering his or her family name
(surname or last name) or the start of it into the Find by Family Name field and then pressing
Tab or Enter. The search is not case sensitive, so there is no need to enter the letters in
leading upper case or all upper case. The system will move to the first record with a family
name starting with the letters you’ve entered. If there are more records with that criterion, the
system will display the message ‘x records located with family name starting with ...’. Use the
Previous and Next buttons to cycle through all records found to ensure that the person’s
record is not already there. If the system doesn’t find any matches for the letters you’ve
entered, you will remain at the record you were on when you started the search.
156 - Chapter 6: Main Menu
Summit Event Manager - Light
If you’re uncertain of the spelling of the person’s name, try finding it using a partial name or
misspelt name. Alternatively, you could click on the down arrow, to the right of the Find by
Family Name field, for a list of all people on the database. The system will display, in
alphabetical order, all the people on the database in the following manner: Surname, Given
Name Middle Initial.
Click on the down
arrow to list all the
people on the
database
Another way to find a person is to cycle through the records using the navigation buttons at the
bottom of the form until you locate the person you’re looking for.
Another search method is to search is by organisation. Click in the Find by Organisation field
and enter all or part of the organisation name you wish to locate, then press Tab or Enter. The
system will move to the first record with an organisation with the letters you have entered
anywhere in the organisation name. For example, if you entered ‘valley’ the system would
locate Valley Repairs and would also locate The Valley Hospital. If you are uncertain of the
spelling of an organisation name, clicking on the down arrow at the right of the organisation
combo box will list all organisations in ascending alphabetical order for you to choose from.
Note: Only one occurrence of each organisation will be displayed, even though there may be
more on file. Watch for the message that tells you how many instances of that organisation are
on file.
3.
If you’re satisfied that the person is not already on file, you can search your Master Database
by clicking on the M button to the right of the New button. Your master database will be either
Summit Contact Manager or Summit Membership Manager. Summit will find the location of
your master database using the path you entered in Event Options, General Settings tab,
Location of Master Database. When you click on the M button, the Master Database Record
Display form will enable you to interrogate your master database. See that topic further on for
details.
4.
Once you’re satisfied that this is a genuine new record, click on the New button.
5.
Enter the person’s Title, Given Name (or first name), Middle Initials, Family Name (or last
name) and any Post Nominals (or letters after the person’s name, for example, PhD). As you
exit the Family Name field, the system will check for potential duplicates of the displayed
record based on the current setting of the Display Duplicate Person Warning field in the
System Checking tab in Event Options on the Setup Menu. You can check for potential
duplicates at any time by pressing Ctrl+D in any field on the Personal Details form. Even if the
current warning setting on the Event Options form is Never, Ctrl+D will check for duplicates on
matching first initial and family name.
6.
When you exit the Family Name field, if Salutation is null (empty), Summit will automatically
insert the Salutation. It will be set to either Given Name or Title and Family Name, depending
Chapter 5: Main Menu - 157
Summit Event Manager - Light
on the setting defined in the Salutation Text field in the Name Formats tab in Event Options. If
the Salutation field isn’t null, and you double-click in the field, the system will overwrite
whatever is there with either Given Name or Title and Family Name, depending on the setting
defined in Event Options. You can type over this if you wish to change it.
7.
Leave the Badge Name blank if this person’s Title, Given Name and Family Name are the
same as those required on the badge name. When designing badges, you decide on the
format you want for the badge name. For example, you could choose Given Name Family
Name or Title Given Name Family Name or FAMILY NAME, Given Name etc. If the badge
name is different (badge name Bob not Robert) then what ever you enter in this field will be
printed EXACTLY as is on the person’s badge. The Print button to the right of the Badge
Name field will print a name badge for this person only if you have a specific printer physically
attached to your computer. See Special Fields further on for more details.
8.
Enter the person’s Position, Division and Organisation as appropriate. All fields have a pulldown list to the right of the field that contains all data entered so far for each field. Click on the
down arrow to select a previously entered position, division and/or organisation. If you already
have somebody on the database from the same organisation at the same address, click on the
Fill button to the right of the Organisation field. A list of all organisations and their addresses
on file will be displayed. Click on the one you want and the organisation’s name, address and
phone numbers will be inserted into the new record. This means you only have to enter an
organisation’s details once. See Special Fields for more information.
9.
If the address is in Australia and you don’t know the postcode or bulk code, enter the
Suburb/Town and State then double-click in the Postcode field. Summit will insert the correct
postcode and bulk code for you. For more information, tips and hints about the quickest way to
find a person’s postcode, refer to the ‘Find a Postcode’ topic in Chapter 3, How To. Both the
Suburb/Town and State are set to upper case on entry. The country will be what ever you
typed in Default Country in Event Options. It is not set to upper case.
10. Enter the advertising source in the Source field. This field is limited to the values in the pulldown list of the combo box. The advertising sources are defined on the Advertising Sources
form on the Setup Menu. If you need to add a new advertising source, double-click in the field.
This field is used in the report Confirmed Delegates by Advertising Source in Participation
Breakdown.
11. Enter any Notes for this person. These notes are for your information only and are not printed
anywhere. However, they can be included if you create your own reports in Delegate Lists and
the Reporter.
12. Mark the Asian Name check box if you want this person’s name to be presented differently on
reports and listings. The default is a European name format. Depending on how you define the
Name Format For Reports in the Names tabs of Event Options, the system will display this
name in a specific manner, usually Family Name Given Name. For example, if the Given
Name was ‘Su Li’ and the Family Name is ‘Wong’, if Asian Name is marked, the name will be
displayed as Wong Su Li on reports and if not marked, Su Li Wong.
13. Mark the Work Address check box to ensure that the person’s position, division and
organisation will appear on address labels and correspondence address details. If this check
box is not marked, it’s the home address and the position, division and organisation is for
information only and won’t be printed. Each new record will have Work Address marked as a
default.
14. The Name Badge Produced check box is marked by the system when a person has had a
name badge printed or exported. Clear this check box for the system to produce another name
badge for this person the next time you produce new name badges.
15. The Attended Event check box is marked by you on the Registration Desk Worklist form on the
During Menu as each person arrives at the event. If this check box is not marked and the
158 - Chapter 6: Main Menu
Summit Event Manager - Light
person is a confirmed delegate, he or she will appear on the Incomplete Participation Report
found on the After Menu.
16. The Satchel Given check box is marked by you on the Registration Desk Worklist form once
the person has been given all the materials associated with attending the event, for example,
proceedings, programme etc. If this check box is not marked and the person is a confirmed
delegate, he or she will appear on the Incomplete Participation Report found on the After
Menu.
17. Save the person’s record by clicking on the OK button to close the form, the New button to
enter a new person, or by moving to another record using the navigation buttons or the ‘find
by’ fields.
Note: As you leave this record, the system will check to see if you have imported this record from
your master database – either from the Summit Contact Manager (was called MIE People) or
Summit Membership Manager. If you have, and you have set the check box Warn Before Updating
Name and Address Details in Master Database in Global Options to Yes, the system will ask you if
you want these name and address details to overwrite the details held in your master database.
You can say either Yes or No. If the check box is not marked, the system will update the master
database automatically.
Special Fields
At a Glance
The At a Glance section of the form gives a summary of participation for the displayed person. If a
check box is marked in the Potential column against one of the participation categories, this
indicates that this person has been so marked on the Expression of Interest (EOI) and Profile form.
If a check box is marked in the Confirmed column against one of the participation categories, this
indicates that, in the case of delegates, this person has been registered on the Registration Details
form. For presenters, this means that the records have been marked as confirmed on the
Presenter Details forms.
If there is a date in the Kit Sent column against either of the participation categories, the kit sent
date has been entered on the Registration or Presenter form, or the kit sent date has been
automatically updated by Summit when producing Form Letters. If Session Chair is marked, this
person was nominated as chair in the Sessions form. You can mark whether or not a person is a
VIP or an organiser. These and the other participation categories can be recorded on name
badges and tickets.
The Last Invoiced field will hold the date the person’s invoice was last printed.
The amount of money shown in the Amount Due, Amount Paid and Amount Outstanding fields is
the sum of all delegate financial activities, whether due, paid or outstanding.
The Entered field in the bottom right corner of the form is the date this person’s record was added
to the database. The Last Update field lets you know the date data on this form was last updated
and the By field captures who changed the data.
Note: When you open this form or move to a new record, don’t start entering any information until
the Outstanding field in the At a Glance section has been updated. If you don’t wait, the
Outstanding field may have ‘#Error’ displayed as you have interrupted the system before
processing is complete. If this happens, move to another record, then come back again.
Chapter 5: Main Menu - 159
Summit Event Manager - Light
Master Record Display
By clicking on the M (for Master Database) button to the right of the Find by Family Name or
the Find by Organisation field, you can initiate a search of your master database for a
specific person’s record.
Master Record Search button
This form is displayed when you are in the Personal Details form and want to import
records from a master database. Enter the name of the person you are looking for. Click on
the M button under Find by Family Name to search your master database for all records
beginning with that family name; or click on the M button under Find by Organisation to
search your master database for all records where Organisation contains that organisation.
Once you are on this form, you can search further within the selected records by using the
pull-down list at the top of the screen to locate the family name, given name combination
you want. You can also use the navigation buttons at the bottom of the screen to move
between the records.
If you notice any spelling or other errors in a master database record while this screen is
displayed, you can correct them here and they will be automatically corrected in the master
database. The default address to import is the Work Address. To import another address
160 - Chapter 6: Main Menu
Summit Event Manager - Light
instead of the work address, mark the appropriate option button in the Import which
address? section of the screen.
Once you have located the record you wish to import, click on the Import button. The
person’s record, with the address you have selected, will be imported into your event file.
They will be marked as a potential delegate and the Personal Details screen will move to
their record. To close the screen without importing a record, click the Exit button.
This button enables you to print a name badge directly from your own label printer attached
to your computer. In order to connect the two machines, you need to insert your own code
into the InstantBadge function in InstantBadgeGF module. Note: you will need Access
2000 on your machine to achieve this.
If you click on the Fill button, the following screen will be displayed. There is one entry for
each unique organisation on file. For an organisation to be unique it must have one of the
following fields different from the others: Organisation, Address line 1, Address line 2,
Suburb/City and State. Select the organisation you want by clicking anywhere along the
line. When you see the black triangle to the left of the required organisation, click on the OK
button the pull through the details.
Toolbar Buttons
All these forms are described further under their own headings.
Click to open the Expression of Interest (EOI) and Profile form to enter potential
participation and profile details and to see the type of involvement this person had
in past events.
Click to open the Extra Details form. It’s through here you enter the accompanying
person details, diet etc. for this person.
Chapter 5: Main Menu - 161
Summit Event Manager - Light
Click to open the Registration Details to register this person, as well as enter addon and session details. Note: This form can’t be opened until event fees have
been locked. See Lock Event Fees on the Setup Menu for more information.
Click to open the Money Menu. This menu has the following buttons:
Click to open the Payment Entry form to enter a payment.
Click to open the Allocate Payment form to allocate one or more
existing payments against this person.
Click to produce an invoice for this person.
Click to see/print/delete any receipts for this person.
Click to see/print/delete any tax invoices and adjustment notes for this
person.
Click to produce an audit trail that details all financial activity relating to
payments and receipts that involve this person.
Click to produce a refund for this person.
Click to enter an alternate billing address for this person.
Click to open the Presenter Details form to enter speaker details.
Click if you want to edit this person’s details on the tickets prior to production.
Click to open the Individual Correspondence form.
Click to open the Contact Details form to record each contact made with this
person as well as any tasks you must do and the associated do-by-date.
Click to apply registration, add-on and/or session details to this person either from The
Usual Registration or from another person. For more information on how to set up The
Usual, refer to the Usual Registration form on the Setup Menu.
162 - Chapter 6: Main Menu
Summit Event Manager - Light
Click to delete this person’s record. If a person is in any way involved in the event, you
won’t be able to delete the record. Cancel their registration, remove any payments and
delete any add-ons this person may have. Check also for involvement such as Session
Chair, presenter, etc.
Click to print a single badge or ticket for this person and/or the accompanying person. The
Single Name Badge & Ticket Choices form will be displayed.
Select the appropriate option button for whom you wish to print the name badge or ticket
and select the format you want. Whatever you selected last time will be displayed the next
time you enter this form. Click on the Design button to bring up the Name Badge and
Ticket Design form. Click on the Preview button to produce the name badge or ticket.
Click to print either an address label, an addressed envelope or a merge letter for this
person. The Single Label, Envelope and Letter Choices form will be displayed. Click on
the option button you wish, then click on the Preview button to produce the output.
Click to print a report containing the name and address details of this person.
Chapter 5: Main Menu - 163
Summit Event Manager - Light
Expression of Interest (EOI) and Profile
This option is for maintaining details of participation in previous events, level of interest in the
current event and a profile of the person currently selected on the Personal Details form.
Previous Event(s)
The check boxes in the Previous Event(s) section of the form will be updated automatically by
Summit when you import demographics from a previous event that used this software. For
imported records, this section of the form shows cumulative historical participation information.
For example, if William Smith participated in one event as a delegate, had his record imported to
another event where he took part as a presenter, then had his record imported to this event, he
would be shown as a past delegate and a past presenter.
The Last Imported Event area of the form shows the event from that this person’s information was
most recently imported. If this area of the form is blank, the Participated as a... information has
been entered manually, not imported.
You may mark or clear the Participated as a... check boxes for manually entered records, or when
imported historical information becomes outdated. For example, if Jim Smith was a presenter five
events ago and has not been one since, you might want to clear the Participated as a... presenter
check box so that he was no longer selected with other past presenters.
Once you’ve cleared a Previous Event(s) check box, the person will no longer be shown as a past
participant in that participation category when the demographics are imported for a new event.
People will be shown in a Participated as a... category once they have participated in that category
again, and had their records imported for a new event.
164 - Chapter 6: Main Menu
Summit Event Manager - Light
This Event
The Has Expressed Interest check box in the This Event section of the form will be marked
automatically by the system when a person is marked as potential or confirmed in any participation
category. This check box can’t be cleared while the person is still shown as potential or confirmed
in any participation category.
Marking a person as Potential in any participation category in the This Event section of the form
enables you to track and contact them using the participation category filters in the Reporter and
Form Letter functions. These check boxes can be marked or cleared until a person becomes
confirmed in that category.
A person can’t be both potential and confirmed in any participation category. Once a person is
confirmed in any participation category, Confirmed (in red) is displayed alongside that participation
category and the relevant Potential check box is disabled.
Delegates become confirmed when they have a Registration Type allocated on the Registration
Details form. A delegate moves from Confirmed back to Potential when the Registration Type field
is cleared by clicking the Cancel Registration button on the Registration Details form.
Presenters become confirmed when the Confirmed as Presenter check box is marked on either the
Presenter Details or Programmer forms. A presenter moves from Confirmed back to Potential
when the Confirmed as Presenter check box is cleared on either the Presenter Details or
Programmer forms.
Profiles
A profile is a method of describing a person or putting them on a defined category. Profiles are
defined in the Profiles form in the Setup Menu.
You can target specific profiles by using the Reporter. Examples are Board Member, Technician,
CEO, Administrator, etc.
Each person can have zero to many profiles.
Chapter 5: Main Menu - 165
Summit Event Manager - Light
Extra Details
This option is used for the collection of extraneous details regarding the primary person and the
accompanying person.
All fields on this form are optional. To enter extra details for the displayed person, take the
following steps.
1.
Enter any Special Diet requirements. There is a pull-down list of standard diets, however this
is not a limit-to-list field so you can enter any text you like. This information is printed in the
Tabling & Seating reports and the Catering reports.
2.
Click on the Smoker check box if this person is a smoker. If appropriate, enter the person’s
gender - this field is limited to one character and the system does no checking as to the
validity of your entry. Enter the Spoken Language, Membership Number and Group details, as
appropriate. All these fields are not reported anywhere, however, you can create your own
reports either in Delegate Lists or by clicking on the Listings button in the Reporter. See those
topics for further information.
3.
The five fields under the Group field are user-defined fields. You can alter the prompt from
User Defined Field 1 to 5 to whatever you wish in the User Defined tab in Event Options. See
Event Options for further details. These fields are not reported anywhere, however you can
create your own reports and include and/or sort by these fields. In the illustrated example, we
have decided to collect such data elements as Colour of Eyes and T-Shirt Size. Each field can
hold up to 250 characters. Click on the down arrow for a selection of previously entered data.
4.
If there is an accompanying person, enter the Title, Given Name and Family Name. Doubleclick in the Family Name field if it’s the same as the primary person. Summit will enter the
salutation based on what was selected in the Name Formats tab in Event Options. The
accompanying person salutation is not used anywhere within the system.
5.
Enter a badge name if it’s different from the given name and family name. Whatever you enter
here will be printed on this person’s badge. Leave this field blank if there is no change to the
given or family names.
6.
Enter any Special Diet requirements. There is a pull-down list of standard diets, however this
is not a limit-to-list field so you can enter any text you like. This information is printed in the
Tabling & Seating reports and the Catering reports.
166 - Chapter 6: Main Menu
Summit Event Manager - Light
7.
Click on the Smoker check box if this person is a smoker. If appropriate, enter the person’s
gender. This field is limited to one character and the system does no checking as to the
validity of your entry. This field is not printed anywhere.
8.
Enter any Notes relating to this person. This field is not on any report.
Chapter 5: Main Menu - 167
Summit Event Manager - Light
Registration Details
This option is for maintaining information on registration details, add-ons and sessions for the
person currently selected on the Personal Details form.
Summit doesn’t require people to be delegates to be registered for add-ons or sessions. These
areas may all be used independently. A person could be entered for just a conference dinner, just
a session, just a registration type or any combination of the three.
Registering a Person
To register a person, take the following steps.
1.
If they haven’t been entered yet, enter the person’s details on the Personal Details form. It’s
assumed at this point that you’ve entered all your registration types and the associated fees
and have locked the event fees in place. If you haven’t, refer to the sections on Registration
Types and Lock Event Fees in Chapter 4, Setup.
2.
From the Personal Details form, open the Registration Details form by clicking on the Register
button. If the person hasn’t had a Registration Type entered yet, the top section of the form will
look like this:
168 - Chapter 6: Main Menu
Summit Event Manager - Light
3.
Click on the down arrow (or press Alt+↓) to display the list of possible registration types. The
cost to the delegate (the cost of registration plus any tax) will be displayed. Select the
appropriate registration type by clicking on it or press the down arrow key on your keyboard
(↓) then press Tab or Enter to select it.
The number in the Registration Type field is the Registration Counter - the key to the
Registration Types reference file. The Registration Type you enter is limited to the values in
the pull-down list of the combo box. When you select a Registration Type, the system will
calculate and display the registration amount. Once you’ve entered a Registration Type, you
can’t remove it (if you get stuck in an error message loop, press the ESC key). Press the
Cancel Registration button on the toolbar to remove a Registration Type (see below for more
information).
To change a person’s registration, just select a different registration type.
4.
Enter any discounts you’re giving this person in the LESS Discount field, together with a
reason in the Discount Reason field. Any tax on this amount will be calculated by the inclusive
percentage you entered in Event Options Tax tab.
5.
Enter any extra charges for this person in the PLUS <Additional Charges> field, together with
a reason in the <Additional Charges> Reason field. The text used on both the Registration
Details form and the Income Reconciliation Report to describe additional charges is defined by
clicking on the User Defined tab in Event Options. Any tax on this amount will be calculated by
the inclusive percentage you entered in Event Options Tax tab.
Cancelling a Registration
To cancel a person’s registration, click on the Cancel Registration button on the toolbar. The
system will automatically recalculate the Registration and the Total Amount Due amounts when
you enter or alter the registration type. If a person has already paid and requires a refund, refer to
the Refund section under the Money Menu section further on. .
Selecting an Add-On
To register a person for add-ons, take the following steps.
1.
If you haven’t entered any add-ons for the person previously, the Add-Ons section of the form
will look like this:
2.
Click on the down arrow to display the list of possible add-ons. This will look something like
this:
Down arrow for
listing add-ons
3.
Select the appropriate add-on by selecting it. In this example, we’ll select add-on number 1,
Award Night Ticket. The number in the Add-On field is the Add-On Counter - the key to the
Add-Ons reference file. Add-ons are sub-records.
4.
After selecting the add-on, the Add-On section will look like this:
Chapter 5: Main Menu - 169
Summit Event Manager - Light
A pencil means the
record has not
been saved yet
5.
As you select each add-on, the quantity will default to 1. If more than one is required, enter the
number required in the Qty field.
6.
Each add-on may be selected only once. As each add-on is selected and saved (the pencil
turns into a triangle on the record selector bar), Summit will recalculate the Amount Due for
add-ons (Qty x Add-On Cost), Total Add-Ons and the Total Amount Due. To save an add-on,
click on any other field within the form.
7.
In the Add-Ons form on the Setup Menu, if you enter a Maximum Number, the system will
warn you if you’re about to exceed your maximum. At this point you can continue or not as the
system will not stop you as Summit deems you know what you’re doing.
Repeat the above steps until all the add-ons have been entered for the person, then click on the
OK button.
Deleting an Add-On
To delete an add-on, click on the record selector bar on the left hand side of the add-on you wish
to delete, then press the Delete key on your keyboard. The system will automatically recalculate
the Total Add-Ons and the Total Amount Due amounts as you add or delete each add-on.
Entering Session Preferences and Attendance
People can be registered for each individual session and can have the status of either Preferred or
Confirmed. To register a person for a session, take the following steps.
1.
If you have not entered any sessions for the person previously, the Session Preferences and
Attendance section of the form will look like this:
2.
Click on the down arrow to display the list of possible sessions. Select the appropriate session
by clicking on it. The number in the Session field is the Session Counter - the key to the
Sessions reference file. Sessions are sub-records. As you select each session, you must enter
a status for this person, that is, has only a preference been given to attend this session or is it
confirmed. Press the space bar or click in the field to mark or unmark a check box.
3.
Each session may be selected only once.
4.
In the Sessions form, if you enter a Maximum Number That May Attend, the system will warn
you if you’re about to exceed your maximum. At this point you can continue or not as the
system won’t stop you.
Repeat the above steps until all the sessions have been entered for the person, then click on the
OK button.
170 - Chapter 6: Main Menu
Summit Event Manager - Light
Special Fields
Full Database Form Letter Sent, Delegate Kit Sent or Last Form Letter Sent
While you may enter or modify the dates in the Full Database Form Letter Sent, Delegate Kit Sent
or Last Form Letter Sent fields, Summit will automatically update these dates when producing
Form Letters.
Confirmation Letter Sent or Participation Record Sent
The system puts in the current date in these fields if you print them from the Correspondence form.
You may clear these dates manually in order for another letter to be printed.
Date Registered or Date Cancelled
The system puts in the current date in these fields as soon as you register this person or cancel
this person’s registration. These fields are used as date filters on Delegate Lists, for example, ‘give
me a list of all delegates who have registered since 1st April’.
Date Declined
Use Date Declined to record the date that a person had declined an invitation to attend the event,
as opposed to a person who has been invited but has not yet replied. Once you’ve entered a date
in the Date Declined field, you won’t be able to register the person or allocate them add-ons or
sessions. To do any of these things, first clear the Date Declined field. You won’t be able to enter a
date in the Date Declined field if the person is registered or has any add-ons. Date declined is a
field on the Reporter, so you can report on these people.
Toolbar Buttons
Click to open the Payment Entry form to enter a payment for this person.
Click to open the Allocate Payment form to allocate one or more existing payments
against this person.
Click if you want to edit this person’s details on the tickets prior to production. The
Edit Tickets form will be displayed. For more details, go to the Edit Tickets section
further on
Click to register this person as not attending an inclusive function. The Inclusive
Catering Event Non Attendance form will be displayed. Select the Catering Event
from a pull-down list of only those events marked as Inclusive Function for Full
Registrations on the Catering Events form. When calculating exact numbers for
each event, Summit will subtract all those people designated as not attending.
Click to cancel the registration. This will clear the Registration Type and set the
registration amount to zero. If the person has paid and by cancelling the registration
is now deemed to have overpaid they may require a refund. For more information on
the refunding options, refer to the section entitled Refund under Money Menu further
on.
Chapter 5: Main Menu - 171
Summit Event Manager - Light
Individual Correspondence
This option allows you to both edit and produce the standard correspondence for all categories of
participation at your event. Unlike the main Correspondence form, from this form you will produce
correspondence only for the person currently selected on the Personal Details form.
To use this form, mark the option button corresponding to the desired Correspondence Type and
click on the appropriate button in the footer. Each of the correspondence types is described in
detail in the Correspondence section further on. In the above example, Invoice is disabled as the
person does not owe any money.
To modify the letterhead that’s displayed at the top of all correspondence, select Letterhead. See
the next topic for further information on designing your letterhead.
Select Edit to modify the text of the selected correspondence type before producing the
correspondence.
If you select E-Mail, the selected correspondence will be sent to them as an e-mail attachment.
Note that Summit only places the correspondence in your e-mail system’s out tray. Depending on
how your e-mail system is set up, you may need to start it to actually send the e-mail. The E-Mail
button will be disabled if there is no e-mail address.
If you select Fax, the selected correspondence will be sent to WinFax Pro for faxing. If you have
specified a Time To Send Faxes on the WinFax Pro tab of Event Options the fax will not be sent
until that time. If it is already past that time, the fax will be sent immediately. The Fax button will be
disabled if there is no fax number.
If you select Preview, Summit will display the selected correspondence for this person on the
screen. You can print that report by selecting File in the top left corner of the screen, then Print.
When you close the report, you will be asked to confirm that the letter printed correctly. If you
confirm that it printed correctly, the system will update the<Correspondence Type> Date Sent field.
172 - Chapter 6: Main Menu
Summit Event Manager - Light
This will prevent the person being sent another letter from the Correspondence form on the Main
Menu.
If you select the Mail Merge Document option, the word processor nominated in Word Processor
Path and Program Name field in Global Options will be run. The displayed person’s name and
address details will be put in the interim merge file summitmm.txt in the root directory, i.e., in C:. If
your computer doesn’t have a C drive, this feature won’t work.
Toolbar Buttons
Click to design your own letterhead.
Click to edit the top and bottom text of the selected correspondence prior to printing the
letter.
Click to e-mail the correspondence.
Click to fax the correspondence.
Click to print the selected correspondence.
Chapter 5: Main Menu - 173
Summit Event Manager - Light
Letterhead Designer
This form enables you to design the letterhead for the standard correspondence for this event.
There are three main steps to take when designing the letterhead for standard correspondence.
1.
Inserting and formatting a picture if required.
2.
Formatting and determining the content of each of the two text lines on the letterhead.
3.
Formatting the dividing lines at the bottom of the letterhead.
Inserting and formatting a picture
If you do not wish to have a picture on your letterhead click the Hide checkbox. For detailed
instructions on how to insert a picture, see the topic Name Badge and Ticket Design in Chapter 4.
Formatting and determining the content of the lines
The next step in letterhead design is to determine how many lines you want, where you want them,
what you want to appear on each line and the appearance of each line. To do this, take the
following steps.
1. Click on the button corresponding to the line you wish to work on. You can have up to two detail
lines.
2. The line you are currently working on will be highlighted with a thick border. If you are creating a
new line it will not be visible until you increase its width and height.
3. If you don’t wish to have this line on your letterhead click the Hide checkbox.
4. Use the scroll bars to set the size of the line and its position on the letterhead.
5. Select the characteristics you want for the text. Choose a font from the pull-down Font list or
enter the name of another font on your system, then enter a font size in the Size field. If you
wish the text to be bold, italics or underlined, click the appropriate buttons.
6. For this line, we will choose Times New Roman, Font Size 18 and bold as shown below.
174 - Chapter 6: Main Menu
Summit Event Manager - Light
7. Caution: If you are using a non-standard font (one that is not on the pull-down list) and you plan
to move your event file to another computer or use other computers to produce name badges or
tickets, you should only use fonts that you are certain are on all computers.
8. Determine how you want the text aligned in the space you have created for it by clicking on the
appropriate toggle button.
In this case we have chosen centre alignment.
9. Determine the text colour for this line - the default is black.
In this case we have left the text colour black.
10.Determine the background colour for this line - the default is white (clear).
In this case we have chosen light grey.
To enter the text for each line, click on the line and type in the text you want. If you double-click on
Line 1 you will get the event short name. If you double-click on Line 2 you will get the event full
name.
Formatting the dividing lines at the bottom of the letterhead
You have the option of two lines separating the letterhead from the body of the document.
To show either line mark the appropriate Show Dividing Line check box and then select the line
thickness you want from the appropriate Dividing Line Thickness pull-down list.
To not display either dividing line, clear the appropriate Show Dividing Line check box.
If you do not wish to have a picture on your letterhead click the Hide checkbox.
Chapter 5: Main Menu - 175
Summit Event Manager - Light
E-Mails
To send e-mails using this software you must let the software know what messaging profile you
want to use. If you don’t know your messaging profile, go to the topic “Determining your Messaging
Profile” in Chapter 3, How to…
When you first open this form (by double-clicking in the E-Mail field on Personal Details), the
details you entered on your last e-mail will be displayed. You can change any of these details
before clicking the Send button to send the e-mail. To send an e-mail, take the following steps.
1. If you enter anything in Salutation Text, whatever you entered plus the person’s salutation
followed by a blank line will be placed at the top of the body of the e-mail. If you don’t have
anything in Salutation Text then only the actual message content will be displayed. The default
is Dear, but you can change it to say Hi or Hello.
2. Whatever you enter in Message Subject will be displayed as the subject of the message in your
mail system’s out tray and the recipient’s mail system’s in tray.
3. The Message field is where you enter the actual details of the message you want to send.
4. This where you say which Messaging Profile you want to use when sending e-mail. The profile
you enter here must match exactly one of the profiles found under Mail and Fax in Control
Panel. You will not be able to send a message until you have entered your messaging profile.
See the “Determining your Messaging Profile” topic in Chapter 3, How to… for more
information.
5. Once you have set up your message, click on the Send button to send it. Click on the Exit
button to close this form without sending any message.
Note that sending a message places the mail message in the out tray of your mail application. The
messages created here will not actually be sent until you start your mail application and send them.
Toolbar Buttons
Click to send the e-mail.
176 - Chapter 6: Main Menu
Summit Event Manager - Light
Contact Details
This option enables you to keep track of the things you’ve said to people in relation to your event. It
also enables you to create follow up notes of tasks you’ve said you will do for a person.
To enter notes of a contact, take the following steps.
1.
Enter the date of the contact. This defaults to today, however, if the contact took place on a
date other than today, change the Date field to the date the contact was made.
2.
Enter your name in the Contact With field. You have a pull-down list of Organisers with autoexpand, however you can enter any name – it’s not limit-to-list.
3.
Select the type of contact this is. You can enter each type of contact you want to track in the
Contact Types table on the Setup menu.
4.
Enter the details in the Contact Details field.
5.
To create a follow-up note, make sure that the Contact Details field shows what has to be
done. Enter the date the follow-up has to be done by in the Do By Date field. Once you’ve
completed the task, mark the Done check box.
Details of all tasks that still need to be followed up are shown on the Contact Follow-Up form on
the Main Menu and from within the Organiser.
If you want a list of all outstanding tasks each time you logon to Summit, mark the Check the
Organiser Task List When Opening an Event box in Global Options on the Setup Menu.
Deleting a Contact Note
You can delete any contact records that you don’t want by clicking on the record selector bar on
the left hand side of the date (the black triangle) and then pressing the Delete key on your
keyboard.
Toolbar buttons
Click to print a Contact History report of all the displayed person’s contacts.
Chapter 5: Main Menu - 177
Summit Event Manager - Light
Money Menu
Choose this menu from the Personal Details form to perform the following tasks for the displayed
person:
• Enter a payment
• Allocate some or all of a payment that has already been entered
• Display, re/print or delete receipts and refunds
• Display, re/print or delete tax invoices
• Produce an audit trail report of payments and receipts
• Print an invoice
• Create a refund
• Enter an alternate billing address
• Create a new Financial Group or join a person to an existing group.
178 - Chapter 6: Main Menu
Summit Event Manager - Light
Enter a Payment
The Payment Entry option enables payments to be entered into the system. This form doesn’t
connect the payment with a person or activity - this connection is made on the Allocate Payment
form.
To enter a payment, take the following steps.
Open the Payment Entry form from the Personal Details form by clicking on the Money Menu
button then the Enter a Payment button.
1.
Enter the amount of the payment into the Payment Amount field. It’s not necessary to enter the
‘$’ or ‘£’ as the system will insert your currency (based on your Windows setting) for you. You
can enter a negative amount to indicate a refund or a reversal. If you’ve entered a negative
amount, you will be required to enter an explanation in the Comments field, for example, to
whom does this payment belong and why it is being entered. This can be helpful later when
reading the associated reports.
2.
If the date you want recorded as the date the payment was received is not the current date,
change the Date Received field.
3.
The Payment Type will default to Cheque. If the payment is not a cheque, select the required
payment type from the pull-down list. The payment type you enter is limited to the values in the
pull-down list of the combo box. Payment Types are defined on the Payment Types form on
the Setup Menu. If you need to add another Payment Type, the Payment Types form can be
opened by double-clicking in the Payment Types field.
4.
Enter the details in the Drawer or Cardholder field. Whatever you type in one field will be
displayed in the other - they are the same field. Double-click in the field for the system to insert
Chapter 5: Main Menu - 179
Summit Event Manager - Light
the Organisation from the Personal Details screen. If the person is the Drawer or Cardholder
rather than the organisation, you will have to enter those details yourself.
5.
If your payment is a cheque, enter as much of the Bank, Branch and Cheque Number details
as you require for your records and your bank requires for the bank deposit slips. For example,
some banks will accept the BSB (or branch) number on deposit slips rather than requiring the
full branch name.
For a credit card payment, enter the Card Number, Authorisation Number, Expiry Date and
Security Code details. Then select the type of credit card transaction it was. The choices are
Telephone Order, Mail Order or Sales Voucher - and the default is Mail Order. Sales vouchers
have a different credit card summary layout than telephone and mail orders. These reports are
produced when you do a Banking Run.
6.
Enter any Comments or notes in the space provided. To exit the Comments field, you will need
to click into another field with the mouse or press the Tab key as Enter enables you to enter a
blank line in Comments. If the Payment Type is American Express, anything you enter here
will be printed in the Description of Order column on the American Express Summary Report.
7.
If you want to allocate the payment immediately, click on the Allocate Payment button. This will
open the Allocate Payment form. If you want to record the payment without allocating it
immediately, click on the OK button. The payment will be on the list of payments available to
be allocated when you click on the Allocate Payments button. It is deemed to be an
Unallocated Payment.
Whichever option you choose, you will be asked to confirm the amount to ensure that it is
correct.
8.
Once the amount is confirmed, depending on the button you clicked, either the Allocate
Payments form will be displayed or you will be returned to the Personal Details form.
Deleting or Changing a Payment
Payments may be edited through the Payments In Reporter. A payment entered in error may be
deleted from within the Unallocated Payment Display form if it hasn’t been allocated or partially
allocated. For further information on deleting payments, see Unallocated Payments on the next
page.
Toolbar Buttons
Click to open the Allocate Payment form.
180 - Chapter 6: Main Menu
Summit Event Manager - Light
Unallocated Payments
This form is displayed if the Allocate Payments form is entered directly, i.e., not through the Enter
Payments form. Choose a payment to allocate that has already been entered into the system.
To find an unallocated payment, take the following steps.
1.
Use the navigation buttons at the bottom of the form to cycle through the payments that are
still fully or partly unallocated. In this example, we’re on payment 1 of 1 unallocated payments.
2.
Once you’ve found the payment you want to allocate, click on the Allocate Payment button.
This will open the Allocate Payment form.
3.
If you wish to delete a payment entered in error, cycle through the payments as above until
you find the required payment. If the Delete button is enabled, clicking on it will delete the
displayed payment. You will be asked to confirm the deletion, so if you accidentally clicked it,
you can cancel the delete process. If the Delete button is blank, you can’t delete the payment.
It’s been fully or partially allocated (check the Remaining Unallocated field). You can reverse
the allocation, then delete the payment. Refer to the ‘Reverse an Allocation Error’ topic in
Chapter 3, How To.
Toolbar Buttons
Click to open the Allocate Payment form.
Click to delete the displayed payment.
Chapter 5: Main Menu - 181
Summit Event Manager - Light
Allocate Payment
The Allocate Payment form enables payments that have already been entered into the system to
be allocated against people and their activities.
Summit separates the process of money coming in and being receipted into two separate and
discrete steps.
The first step is to enter a payment into the system. This payment could be a cheque, credit card
transaction or cash. The second step is to allocate all or part of that payment to a person. By
separating the recording of a payment from the allocation of that payment, Summit is able to make
one payment pay for many people or many payments pay for one person. For example, an
organisation sends you a cheque to cover the registration of five of their employees but the cheque
doesn’t cover the event dinner. So each employee who wants to attend the dinner pays for it by
personal cheque; one payment for many people and many payments for one person.
The steps taken in entering and allocating a payment vary depending on from where you start the
process. There are three ways you may allocate a payment.
1.
You can enter the payment and allocate the money all from within the Personal Details form.
This is the recommended method for entering and allocating a payment where the person is
known. This method is described here in more detail.
2.
You can enter the payment separately through the Payments In form on the menu and then
allocate it through the Personal Details form. This method is useful if you want to enter all the
payments in a batch. For example, open the mail, enter all the cheque details, do a Banking
Run to get the bank deposit slip then race down to the bank. Then, at your leisure, allocate all
the payments through the Personal Details form. This could be dangerous if there is no
obvious link from the payment to a person, i.e., the drawer on the cheque and the participant
are not the same.
3.
You can enter all the payments through the Payments In form on the menu then allocate all
the payments through the Allocate Payments option on the menu.
Choose the method that best suits you.
182 - Chapter 6: Main Menu
Summit Event Manager - Light
To allocate a payment, take the following steps.
1. Before you allocate a payment or payments to a person, you should enter the participation
details on the Registration Details form. This will ensure that there are amounts owing to be
allocated against, i.e., it sets up a liability. If you allocate payments before you enter a person’s
participation details, every payment allocation will appear to be an overpayment.
2. As you started from the Personal Details form, Summit assumes that you want to allocate the
payment to the same person and opens the Allocate Payment form for that particular person so the search filters at the top of the screen have been disabled.
3. If you’ve marked the Auto Allocate Payments check box on the General Settings tab in Event
Options, Summit will allocate the payment based on the amount owing in Event Charges
(includes the registration fee and any add-ons). You can change the allocation made by the
system before the allocation is confirmed.
4. If you haven’t marked the Auto Allocate Payments, enter the amount of this payment for Event
Charges in the This Payment column. The payment amount doesn’t need to match the Still
Owing amount. If the payment amount exceeds the amount owing, a red Overpaid will be
displayed. While Summit will accept an overpayment, it is a pointer towards a possible error in
the person’s registration record, and this should be checked.
Summit won’t let you allocate more than is available to allocate from a payment, but you don’t
need to allocate all the payment at once. Any amount you leave unallocated will be available for
allocation to another person by clicking the Allocate Payment button on the Personal Details
form or the Allocate Payments button on the menu.
Note: You can change the field ‘Event Charges’ in the User Defined tab in Event Options to
reflect the accurate nature of the charge. Examples are Registration Charges, Training Fees,
Conference Charges, Delegate Amount, etc.
5. Click on the OK button to confirm the allocation. A receipt line will be created for each separate
allocation when you do an Individual Receipt Run or an Organisation Receipt Run (see
Correspondence). All new allocations are summarised on the Receipts report that is printed
after you confirmed the Receipts Run.
6. If you want to cancel the allocation, click on the Cancel button. The following form is displayed.
By cancelling the allocation, you haven’t cancelled the payment entry and the payment is still
in the system. If you want to allocate the payment at a later stage, click on the Allocate
Payment button, don’t re-enter the payment.
Chapter 5: Main Menu - 183
Summit Event Manager - Light
Create Refund
It may be necessary to refund payments when people have paid, then cancelled from the event or
reduced the number of event activities.
In some cases, a full refund is not given as a cancellation fee is charged.
To refund a payment, take the following steps.
1. Locate the person’s record on the Personal Details form.
2. If the person is reducing or eliminating delegate activities, click on the Register button to open
the Registration Details form. Reduce the add-ons and/or cancel the registration by clicking on
the Cancel Registration button on the toolbar until the registration details match the revised
involvement. If you’re going to impose a cancellation fee, enter it in the Additional Charges field,
with details of the cancellation charges in the Reason for Additional Charges field.
You can change the name of the Additional Charges field to something more appropriate like
‘Cancellation Fee’ or ‘Administration Charges’ in the User Defined tab in Event Options.
Whatever you change it to will be printed on the Income Reconciliation report and all
confirmation letters.
3. Note the amount showing as Total Outstanding in the At a Glance section of the Personal
Details form. This should be red and in brackets (to indicate a negative amount) and should
equal the amount of money you’re planning to refund to this person. If the amount doesn’t
match exactly, reduce the activities until it does.
4. When the Total Outstanding amount is correct, click on the Money Menu button. Click on the
Create Refund button. A refund will be created for the amount in Total Outstanding. The refund
notice will be printed when you do your next Receipts Run from the Correspondence form. A
refund is deemed by Summit to be a negative receipt. If you want to print the refund notice
immediately, remain in the Money Menu and click on the Receipts button. The refund notice will
be the last record displayed. Once you’ve located it, click on the Preview button to print it.
Note: To customise the refund notice, you can enter your own text for the top and bottom of the
notice. This facility is found on the Correspondence form by selecting Receipts then clicking on the
Edit button. If you don’t require customised text, leave these fields blank.
Print Invoice
The system will print an invoice for any outstanding activity. If an amount is still owing in relation to
any event activity, the invoice will be printed in print preview.
If you want a salutation on the invoice, mark the Print Salutation on Invoices and Receipts check
box in Global Options in the Setup Menu. You can customise your invoice with user defined text
after the salutation and at the bottom by clicking on the Edit button. See Correspondence further
on.
184 - Chapter 6: Main Menu
Summit Event Manager - Light
Receipts
This option is for displaying receipts that have been previously issued to enable you to print, reprint
or delete a receipt.
If more than one receipt has been issued for this person, you can select the receipt you require by
clicking on the navigation buttons at the bottom of the form.
Once you’ve located the receipt you wish to print, you can choose whether or not you wish to have
the word ‘Copy’ printed on the receipt.
If you delete a receipt, you are in effect reversing the original allocation or unallocating the
payment. For more details, refer to the ‘Reverse an Allocation Error’ topic in Chapter 3, How To.
Toolbar Buttons
Click to delete the displayed receipt.
Click to print the displayed receipt.
Chapter 5: Main Menu - 185
Summit Event Manager - Light
Tax Invoices and Adjustment Notes
This screen is for displaying existing tax invoices and adjustment notes. From this screen you can
print or delete them, or you can alter the adjustment note text.
The system will alter the display depending if it’s a tax invoice or adjustment note. If it’s an
adjustment note there will be an area to alter the default adjustment note text under the line item
display. In the case above, you could scroll through the rest of items as only the first five are
displayed. It is strongly recommended that you do not delete tax invoices as:
1. If the tax invoice has been printed the information in your event file may no longer reflect the tax
invoices you have issued.
2. If you have produced reports for taxation purposes showing GST receipts and payments the
information in your event file may no longer reflect the figures on that report.
You can move between tax invoice records by using the navigation buttons at the bottom of the
screen until you locate the tax invoice you wish to print. Once you have located the tax invoice you
want, you can reprint it by clicking on the Preview button. If it is an adjustment note you can modify
the reason for the adjustment note.
Mark the Mark Tax Invoice As Copy check box if you wish the system to stamp the word Copy on
the tax invoice. Clear this check box if you do not want the word copy stamped on the tax invoice.
Note that you can only mark previously printed tax invoices as copies.
186 - Chapter 6: Main Menu
Summit Event Manager - Light
Toolbar Buttons
Click to delete the displayed tax invoice or adjustment note.
Click to print the displayed tax invoice or adjustment note.
Group Invoice
The system will print an invoice for any outstanding activity with a Group. If an amount is still owing
in relation to any event activity, the invoice will be printed in print preview. If you want a salutation
on the invoice, mark the Print Salutation on Invoices and Receipts check box in Global Options in
the Setup Menu.
Group Receipt
This option is for creating a receipt comprising payments received for the Group but not yet had a
receipt printed.
Group Tax Invoices and Adjustment Notes
This screen is for creating a Tax Invoice amalgamating all Tax Invoices and Adjustment Notes from
members of the Group.
Chapter 5: Main Menu - 187
Summit Event Manager - Light
Audit Trail
This report shows all payments and receipts connected in any way with the person who is currently
selected on the Personal Details form.
The report is sorted in payment order. Any payment that had one or more receipts allocated from it
for the current person is included on the report. Under each payment, all the receipts allocated
from that payment are shown. The receipts for the currently selected person are shown first,
followed by any receipts allocated to other people. Receipts that are not for the currently selected
person are marked with an asterisk (*).
188 - Chapter 6: Main Menu
Summit Event Manager - Light
Billing Address
If you want all financial documentation to go to a different name and address than that of the
attendee, enter the full name and address details here, including ABC, ABN or other tax related
information.
Billing address is a memo field, capable of storing up to 64,000 characters. To enter a new line,
press the Enter key. To exit, press the Tab key.
If you use a billing address, it will be used on:
•
Invoice/Statements
•
Receipts
•
Tax/GST/VAT Invoices
•
and the associated address labels.
If the billing address is left blank, all financial documentation will be addressed to the attendee.
Billing address will not affect confirmation letters or other correspondence. Other correspondence
will continue to have the attendee’s name and address details on it.
Chapter 5: Main Menu - 189
Summit Event Manager - Light
Financial Groups
This screen allows you to either set this person up as a financial group leader or join an existing
financial group.
With Financial Groups, all financial correspondence such as receipts, invoices and tax invoices will
be addressed to the Group Leader and the financial details of all members of the group will be
included on the one document.
You can either check the Nominate as Group Leader check box or select an existing group from
the Join a Group led by pull-down list.
As an example, you could set up a Financial Group for each organisation. This would mean that
there would only be one invoice, receipt or tax invoice per organisation.
If you nominate a person as a Group Leader, the Join a Group field is disabled and their details are
inserted.
You can determine the format of the name of the Financial Group in Event Options, Name and
Address Formats tab. The format selected on the above example is PIN, Name, Organisation and
City.
190 - Chapter 6: Main Menu
Summit Event Manager - Light
If you want a person to join an existing group, the combo box Join a Group lead by will only contain
records of existing Group Leaders.
By selecting the appropriate Group, the Group Leader details as well as the name of the Financial
Group are displayed.
If you want to work on all the people in a particular financial group you can do this by using the
Apply Filter feature on the Personal Details form. To apply a filter, press Ctrl+F1 when you have
the Personal Details form open.
To get a list of all Financial Groups, select the Financial Groups report from the Financial Reports
menu.
Toolbar Buttons
Click to display a report with the names of all people who are in the displayed Financial
Group.
Chapter 5: Main Menu - 191
Summit Event Manager - Light
Presenter Details
This option is for maintaining information on people giving presentations, the presentations
themselves and equipment required for the presentations.
Details of presentations are reported in the Draft Programme. Details of the equipment required for
presentations are reported the Equipment Requirements by Session Location, Equipment
Requirements by Presentation and Equipment Requirements by Session reports.
This information is also included on the Running Sheet.
To enter a person as a presenter, take the following steps.
1.
Locate the person on the Personal Details form.
2.
Open the Presenter Details form by clicking on the Presenter button on the toolbar.
3.
If the person has been confirmed as a presenter, mark the Confirmed as Presenter check box.
Any presentations by this person will appear in the draft programme only if the person is
marked as a confirmed presenter. If you clear the Confirmed as Presenter check box, the
person will move from Confirmed presenter back to Potential presenter.
4.
If you’ve received the person’s photo, mark the Photo Received check box. If this check box is
not marked, and you’ve marked the Presenters must send in Photos field on the Presenter
Rules form on the Setup Menu, this will be marked as a non-compliance on the Presenter
Follow-Up report. This report is found in Presenter Reports.
5.
If you’ve received the person’s biography (used by the session chairperson when introducing
the presenter) mark the Biography Received check box and enter the biography text. This text
will appear on the Session Chair Report. This report can be printed from within the
Programmer form or from Event Reports. If this check box is not marked, and you’ve marked
192 - Chapter 6: Main Menu
Summit Event Manager - Light
the Presenters must send in Biographies field on the Presenter Rules form, this will be marked
as a non-compliance on the Presenter Follow-Up report.
6.
The next step is to enter details of the person’s presentation(s) and equipment requirements
for each presentation. Enter a reference number for the presentation in the Abstract Number
field. This can be any combination of up to six letters and numbers. It is an optional field
provided to enable abstracts to be tracked and identified while being reviewed by the
Programme Committee. The abstract number can be useful if you wish to review presentations
prior to acceptance, without the reviewers knowing who is the author of the presentation (a
blind review). This number is printed on the Presentation Details Listing from within the
Reporter and the merge Abstract Review Forms in Templates.
7.
Enter the description, or title of the presentation in the Title field. The description you enter
here will be displayed in the Draft Programme. To fully view or modify a Title if it will not fit in
the space provided, click in the field and then press Shift+F2, i.e., hold down the shift key and
press F2. This applies to all fields.
8.
If you don’t enter anything in the author’s name field, the programme will display the current
person’s given name and family name. If you want a different name (or names) displayed in
the programme, enter exactly what you want displayed in the Author’s names for programme
field.
9.
Select a session from the pull-down list of sessions. The number in the Session field is the
Session Counter - the key to the Sessions reference file. The description of the session will be
displayed to the right of the field. To add or alter a session, the Sessions form may be opened
by double-clicking in the Session field.
10. Enter the person’s order in this session in the Order in Session field. On the Draft Programme,
presentations are sorted within each session in the order specified by Order In Session in
ascending order.
11. If you’re recording the start time of each paper, enter a time in the Paper’s Start Time field,
else leave it blank. This information is printed on the Presenter Confirmation Letter and the
Draft Programme.
12. The field Paper’s Duration is recorded on the Session Chair Report and also on the Presenter
Confirmation Letter. This is a text field with a maximum of 10 characters. The system does not
determine start times based on the duration of the last paper, or let you know that the total
length of all the papers is greater than the length of the session. It is up to you to determine
that the time and duration of each paper within the session is accurate.
13. Select the type of paper from the pull-down list of presentation types (for example, paper,
poster, workshop, demonstration, etc.). This information is used on the Presenter Confirmation
Letter. If the type of presentation you require is not on the list, double-click in the Presentation
Type field and you can enter it directly into the Presentation Types form.
14. In the Abstract Status field, click on the appropriate status of the abstract. Only abstracts with
the status of ‘Selected’ will appear on the Draft Programme. Each new presentation will have a
default status of Selected, so that unless stated otherwise, all presentations will appear in the
programme if the person is marked as a confirmed presenter.
You can update the status of abstracts in bulk on the Programmer form by clicking on the
Abstract Status button in the toolbar.
15. Mark the Paper Rec’d check box when you receive the person’s final paper. If this check box
is not marked, and you’ve marked the Presenters must submit final Papers field on the
Presenter Rules form, this will be marked as a non-compliance on the Presenter Follow-Up
report.
16. Enter the abstract text in the Abstract Text field if you want it to appear in the Draft
Programme.
Chapter 5: Main Menu - 193
Summit Event Manager - Light
17. Enter any further information or comments in the Notes field. This information is printed on the
Session Chair Report.
18. You can record where you have stored the paper or abstract on file in the Location field. Use
the Browse button to the right of the field to open the File Location dialog box.
19. In the Equipment Required area of the form, enter the quantity and description of each piece
of equipment required for this presentation. Bear in mind that each session can have its own
standard pieces of equipment. The Equipment Required section of the form always refers to
the currently selected presentation as indicated by the record selector bar (the black triangle)
in the Presentation Details section of the form. Select the equipment from the pull-down list in
the Equipment field. The number in the Equipment field is the Equipment Counter - the key to
the Equipment reference file. If you need to add a new piece of equipment, double-click in the
Equipment field. If there is no equipment for this person, and you’ve marked the Presenters
must send in Technical Requirements field on the Presenter Rules form, this will be marked as
a non-compliance on the Presenter Follow-Up report.
20. If you wish to track whether or not you’ve sent the person a letter confirming that they will be
presenting at your event, you can enter the date you sent them a confirmation letter in the
Confirmation Letter Sent field. If you’re sending the person a system generated confirmation
letter, you can have the system update this field automatically when the Presenter
Confirmation Letter is produced. See Correspondence.
21. If you wish to track whether or not you’ve sent the person a presenter’s kit or form letter, you
can enter the date you sent them a form letter in the Last Form Letter Sent field or an author’s
kit in the Presenter Kit Sent field. If you’re sending the person a system-generated form letter,
you can have the system update either of these fields automatically whenever a Form Letter is
produced.
Note: Information contained in this form can be updated in bulk from within the Programmer form
on the Main Menu, however you must enter the details in this form first as you can’t enter a new
presentation within the Programmer.
Toolbar Buttons
Click on the button to display the Review Status form.
194 - Chapter 6: Main Menu
Summit Event Manager - Light
Abstract Review Status
This form enables you to track where each abstract is in relation to its review.
To enter the status of each abstract within the review process, take the following steps.
1. Locate the person on the Personal Details form.
2. Open the Presenter form by clicking on the Presenter button on the toolbar.
3. Open the Abstract Review form by click on the Review Status button.
4. Enter the name of each reviewer. Click on the down arrow to the right of the Reviewer field for
a list of all reviewers entered so far.
5. Enter the date the abstract was sent to each reviewer and the date it was returned from the
reviewer.
To enter abstract review details in bulk, go to the Programmer form and click on the Review Status
button.
To see status of all the abstracts, print the Abstract Review Status report from Presenter Reports.
Chapter 5: Main Menu - 195
Summit Event Manager - Light
Edit Tickets
This option enables you to modify the names that will appear on tickets when they’re produced and
to lock those changes into place.
You may need to modify the names on tickets when a person selects multiple instances of the
same add-on, for example, five tickets to a conference dinner.
When you save the Registration Details form, Summit will create as many tickets as are required.
Summit can only work out the names for the first two tickets (primary person and accompanying
person, if one is present on the Extra Details form), so it puts the primary person’s name on the
remaining tickets. You may want to enter the names of the other people who will need those
tickets.
To only show the tickets for whom Summit could not determine the names, click on the Only Show
Tickets With Unknown Name check box.
Once you have modified a name, clear the Unknown Name check box and mark the Lock In check
box. This will prevent Summit from overwriting the name you’ve just entered when the tickets are
produced.
If you’ve opened this form from Registration Details, only the tickets for the currently selected
person will be displayed and you can print the tickets directly from this form.
If you’ve opened this form from Name Badges and Tickets, all tickets will be displayed. To locate
the tickets for a particular person, enter the name in Find by Name and press Tab or Enter or use
the scroll bar on the right of the form. The tickets are sorted in primary person family name order.
Toolbar Buttons
Prints a report of all the tickets to which this person is entitled.
196 - Chapter 6: Main Menu
Summit Event Manager - Light
Click to view and print the tickets for the displayed person. The Ticket Preview Options
form is displayed (over page).
Ticket Preview Options
Select if you want to see all tickets for this person, or only ones that haven’t been printed yet.
Select the ticket format you want to use from the Ticket Format pull-down list.
If you are not certain which ticket format you want, click on the Design button. This opens the
Name Badge and Ticket Design form to allow you to view each format and decide which one you
want to use.
When you have selected the format you want to use, click on the Preview button to produce the
Tickets.
Toolbar Buttons
Click to view and print the tickets for the displayed person. You will be asked if you want
to change any of the information on the tickets prior to printing them. If you say Yes, the
Edit Badge or Ticket detail form is displayed. Change any detail you require, then click on
the OK button to complete the printing process.
Click to open the Name Badge and Ticket Design form.
Chapter 5: Main Menu - 197
Summit Event Manager - Light
Copy Activity
Copy Activity is a way of automating the entry of registration information. It is most suitable when
you have a number of people doing exactly the same thing for example, it’s suitable for events
such as dinners where there is no choice of registration type or add-on.
There are two methods for copying activity. One is to copy the activity of someone for whom you’ve
already entered all the details, for example, a Group Leader. The second method is to set up
what’s known as ‘The Usual’.
If you elect to copy the activity already entered against another person, you can select that person
from the database. You can then select which of the activities you want to apply to the currently
displayed person. If one of the activities is not available, i.e., the person has no activity of that kind
selected (in the above example, Sessions is not available), it will be disabled. If you don’t want to
copy one of the available elements, for example, Add-Ons, simply unmark the appropriate box.
You can set up The Usual Registration on the Setup Menu. Enter the usual registration type, addons selection and session attendance if appropriate. Once you have applied The Usual to a
person, you can amend the registration details just as if you had entered the details yourself.
Prior to applying the selected activities, a message box will be displayed stating all activities that
will be applied. You can elect to cancel the procedure.
If as a result of applying the usual, the person owes you money, Summit will give you the
opportunity of entering and allocating a payment.
198 - Chapter 6: Main Menu
Summit Event Manager - Light
Toolbar Buttons
Click to copy the selected activities to the displayed person’s record.
Single Label, Envelope and Letter Choices
This option will enable you to print an address directly onto an envelope or a mailing address
label.. It is displayed when you click on the envelope button as shown.
The envelopes are available in C4 size (for unfolded A4 size documents), DL size (normal
business correspondence size) and C6 size (for cards). These addressed envelopes may also be
printed with or without a return address in the top left hand corner.
The address label used will be the one nominated in the Address Label Stationery field in Global
Options in the Setup Menu.
When you’ve selected the option you require, click on the Preview button.
If you’re not certain whether to put envelopes into your printer face-up or face-down, or back-tofront or right-way-round, print a single copy on blank paper to test and determine your printer’s
requirements, before printing on to an envelope.
Toolbar Buttons
Click to print the selected option.
Chapter 5: Main Menu - 199
Summit Event Manager - Light
Organiser
The purpose of this form is to assist you in determining, organising, managing and monitoring the
tasks that need to be undertaken before, during and after the event. The Organiser is a selfcontained process. With the exception of the Organisers form on the Setup Menu, no other parts of
Summit provide information used by the Organiser, and the information from the Organiser is not
used anywhere else in Summit. The Running Sheet Notes and reports have been put on this form
to facilitate the alignment of tasks within the event.
The Organiser comes preloaded with a list of some of the organisational tasks common to large
conference type events.
To create, modify and allocate tasks, take the following steps.
1.
Click on the task to be modified and overwrite the existing data. To delete a task click on the
record selector bar to the left of the task and press the Delete key on your keyboard. To enter
additional tasks click on the New button.
2.
Each task is then Assigned To a person, sub-committee, department or organisation,
depending on the organising structure for your event. Use the Organisers form on the Setup
Menu to add, delete or modify the values in the Assigned To combo box pull-down list. This
form may also be opened by double-clicking in the Assigned To field.
3.
Each task may also be assigned a Start Date and an End Date to reflect when the task should
start and finish.
4.
When the task has been started, mark the Started check box. When the task has been
finished, mark the Finished check box.
200 - Chapter 6: Main Menu
Summit Event Manager - Light
Following up on Tasks
Organisational tasks are followed up by using a combination of the options available in the Sort
Tasks By and Restrict Displayed Records To areas of the form. Sort Tasks By determines the
order in which the tasks are both displayed on the form and printed when you click on the Preview
button. Restrict Displayed Records To determines what tasks are actually displayed on the form
and printed when you click on the Preview button.
Organiser Follow Up Reports
All tasks
Click on the Show All Tasks button. This will remove any existing task display restrictions and
display all existing tasks.
Unassigned tasks
Mark the Unassigned check box. Only tasks that haven’t been assigned to anyone or are without a
due start date will be displayed.
Tasks without a due finish date
Mark the No Finish Date check box. Only tasks without a finish date will be displayed.
Late starting tasks
Enter the current date in the Start Date Before field and then mark the Unstarted Tasks check box.
Only tasks with a due start date before the date you entered and that haven’t been marked as
started will be shown.
Late finishing tasks
Enter the current date in the Finish Date Before field and then mark the Unfinished Tasks check
box. Only tasks with a due finish date before the date you entered and that haven’t been marked
as finished will be shown.
Tasks due to start in the next week that haven’t been started yet
Enter the current date in the Start Date After field and enter the current date plus eight days in the
Start Date Before field. Mark the Unstarted Tasks check box. Only tasks due to start within the next
week that haven’t been marked as started will be shown.
Tasks due to finish in the next week that haven’t been finished yet
Enter the current date in the Finish Date After field and enter the current date plus eight days in the
Finish Date Before field. Mark the Unfinished Tasks check box. Only tasks due to finish within the
next week that haven’t been marked as finished will be shown.
Tasks assigned to a particular person
Select the person from the pull-down list of organisers in the Assigned To field. Only tasks
assigned to that person will be displayed.
In order to keep the task list updated, produce a separate list of tasks assigned to each person on
a regular basis. Send the list to each person and have them return the list to you, with starts,
finishes and any other alterations marked. Update the Organiser task list.
Chapter 5: Main Menu - 201
Summit Event Manager - Light
Toolbar Buttons
Click to display the Contact Follow-Up form. All contacts entered through the
Contact Details form in Personal Details with a Do by Date and where the Done
check box is not marked will be displayed. See Contact Follow-Up.
Click to move all the event organisation tasks currently assigned to one person to
another person. See Reassign Organising Tasks.
Click to display the Organiser Task List Status form. This form summarises all
tasks based on their start and end dates and whether or not they’ve been started
and/or finished. See Organiser Task List Status.
Click to open the Running Sheet Notes form to enter a note to be included on the
Running Sheet. See Running Sheet Notes.
Click to print a Running Sheet in landscape layout.
Click to print a Running Sheet in portrait layout.
Click to enter a new task. All new tasks are added to the bottom of the list.
Click to print a report that shows all tasks currently selected on the Organiser form based
on the settings in the Restrict Displayed Records To area of the form. Tasks are reported
in the order specified in the Sort Tasks By area of the form. To show all tasks on this
report, click on the Show All Tasks button. To have the tasks reported in a different order,
choose another option in the Sort Tasks By area of the form.
202 - Chapter 6: Main Menu
Summit Event Manager - Light
Contact Follow-Up
This screen displays a list of all contacts to be followed up, and the dates by which they are to be
done.
The display is sorted by the Do by Date with the oldest task shown first. You can’t enter new
follow-up tasks here, these must be entered through the Contact Details form for the person.
You can get to a person’s record quickly by positioning the cursor on that person’s record selector
bar, and then clicking the Zoom button.
As you complete each task, mark the Done check box. To remove all completed follow-up tasks
from the display, click Refresh button.
You can delete any records that you don’t want to keep by clicking on the record selector bar on
the left hand side of the date and then pressing the Delete key on your keyboard.
Toolbar Buttons
Click to display the Contacts Reporter form. You can produce a report of contacts using
user-defined criteria. See over page for more information.
Click to remove any Done actions.
Click to ‘drill down’ to the currently selected person’s Personal Details form.
Click to print a report in Print Preview of the tasks that still need to be followed up.
Chapter 5: Main Menu - 203
Summit Event Manager - Light
Contacts Reporter
This screen enables you to select Contacts that have already been entered into the system and
then produce a report.
The Contacts Reporter is not restricted to outstanding contacts. You can select all Contacts that
have been entered or you can restrict the Contacts selected by entering the restrictions you wish
into the spaces provided.
Enter the selection restrictions (if any) that you want and then click the Preview button to produce a
report of the selected Contacts.
As an example, if you wanted a report of all Incoming Enquiry contact types between 1 January
2001 and 31 March 2001, you would enter 01/01/01 in Restrict to Original Contact Date on or after,
31/03/01 in Restrict to Original Contact Date on or before and select Incoming Enquiry from the
Restrict to Contact Type pull-down list. To see the result, click the Preview button.
Note that you can choose from two styles of report. One style will sort the report in date order, the
other style will group the contacts with the same contact type together and then sort in date order
within each contact type.
Toolbar Buttons
Click to print a report in Print Preview of the contacts selected.
204 - Chapter 6: Main Menu
Summit Event Manager - Light
Reassign Organising Tasks
This option enables all the tasks currently assigned to one person to be reassigned to another
person.
The Reassign Tasks button can be found on the Organiser.
Select or enter the name of the person you’re reassigning all tasks from in the Remove Tasks
From field. The name you enter doesn’t have to match the entries in the combo box pull-down list
as you may already have deleted the person from the Organisers table. However, if the name
doesn’t match any of the Assigned To fields on the organiser, no reassignment will take place.
To add, delete or alter Organiser name records, open the Organisers form on the Setup Menu.
This form may be also opened by double-clicking in either the Remove Tasks From or To field.
Select the name of the person you’re reassigning the tasks to in the Reassign Tasks To field.
Toolbar Buttons
Click to carry out the reassignment.
Chapter 5: Main Menu - 205
Summit Event Manager - Light
Organiser Task List Status
This option displays a summary status of the tasks set up on the Organiser form. It also displays a
summary of the contacts that need to be followed up, based on entries made on the Contact
Details form in Personal Details.
Preview
button
The organiser tasks are grouped into three areas: tasks that have details missing, tasks that are
due to start and tasks that are due to finish. The number of tasks in critical areas will be highlighted
in red. Tasks are considered critical if:
• there are incomplete details in relation to the task
• the task is in danger of starting late
• the task is in danger of finishing late.
To get a detailed list of the tasks in any of the categories, click on the Preview button beside the
number of tasks in that category.
The number of contacts to be followed up that should have been followed up today or earlier will be
displayed in red if it is greater than zero. To get a detailed list of the contacts to be followed up,
click on the Preview button beside the number of follow-up tasks. If there is zero in any category,
the Preview button for that category will be disabled.
Note: This form can be set to open automatically each time you logon to Summit or connect to
another event. To do this, mark the Check the Organiser Task List When Opening an Event check
box in Global Options.
206 - Chapter 6: Main Menu
Summit Event Manager - Light
Running Sheet Notes
Running Sheet notes are ad hoc tasks that must be done during the event and that are not
connected with a session or a catering event. These notes are used to ‘flesh out’ the Running
Sheet.
To enter a Running Sheet note, take the following steps.
1.
Enter a Date. Use the calendar if necessary. The day of the week is displayed as a check to
ensure that the date is correct.
2.
Enter a Time that this task must be done.
3.
Select or enter a person that this task has been Assigned To. The person you enter as being
responsible doesn’t have to match an entry on the Organisers form on the Setup Menu.
4.
Enter the text of the task. This is a memo field so it can be up to 64,000 characters in length.
Toolbar Buttons
Click to re-order the tasks by date and time.
Click to prepare the form to enter a new task.
Click to produce a report of just Running Sheet notes.
Chapter 5: Main Menu - 207
Summit Event Manager - Light
Programmer
The primary purpose of this form is the creation of the event programme. All the areas of Summit
necessary to construct the programme can be accessed directly from this form
The form is useful for rapidly updating the Confirmed as Presenter, Paper Received, Biography
Received or other fields for a large number of presenters or presentations.
In order for a presentation to appear here, it must have been entered in the Presenter Details form
from Personal Details. The presenter doesn’t have to be Confirmed, however the presentation
must have an Abstract Status of either Received, In Review or Selected. Once a presentation has
been Rejected or Withdrawn it is no longer displayed here, however, ALL presentations are
displayed in the Abstract Status form.
The name, location, date and time details of the session for the currently selected presentation (as
indicated by the triangle in the record selector bar) are shown at the top of the form in the Session
Details for the Current Record section of the form.
Locating a Particular Presentation
Enter all or part of the presenter’s name in the Find by Full Name field and press Tab or Enter. Use
the Previous and Next buttons to cycle through presentations for the same person, or presenters
with similar names. Alternatively, you can use the scroll bar on the right hand side of the form.
Sorting Presentations
Presentations may be sorted in either presenter family name order or session date and time order.
To set the sort order select the appropriate Sort By button. If you’ve been making changes to the
programme, you can see the effect of these changes by clicking on the Refresh button.
208 - Chapter 6: Main Menu
Summit Event Manager - Light
Creating an Event Programme
Ways of achieving various tasks associated with creating an event programme are shown below,
but, to fully utilise the Programmer, it is useful to know how Summit constructs a programme.
The first page of the draft programme is based on the information in the Event Details and Venue
Details forms.
Having constructed the first page, Summit combines sessions and catering events to form the
basic units of the schedule or programme. Sessions and catering events are then sorted into
ascending date, and then ascending start time order. If there are any sessions commencing at the
same time, they are sorted in ascending order of the Programme Sequence (if Concurrent) field,
which is on the Sessions form.
Sessions are displayed with the Session Name as the heading. The following line contains (in the
following order) Session Type, Session Code, Date, Location, Start Time and End Time. If an
Additional Description for Programme has been entered, this will follow on the next line. This is
followed by the Session Chair if one has been allocated, then the Presentation Title, Abstract Text
and Author Name for all presentations that have the same Session Code. Within each session, the
presentations will be sorted in ascending Order In Session. Note: Only presentations for
Confirmed Presenters with Selected presentations will appear in the programme.
Catering events are displayed with the Description as the heading. The next line contains (in the
following order) Location, Start Time and End Time. If an Additional Description for Programme
has been entered this will follow on the next line.
Modifying a Programme
The following will detail how to fine-tune a programme.
Add a session to the programme
Create a new session using the Sessions form by clicking on the Sessions button on the toolbar.
Include an add-on in the programme
Only sessions and catering events appear in the programme, so you’ll have to create a new
session to cover the date, time and location of the add-on using the Sessions form. Create a new
Session Type if necessary.
Remove a session from the programme
Move any presentations currently allocated to that session to another session. Delete the session
using the Sessions form. Sessions can’t be deleted if there are presentations still allocated to
them. To find out if this is the case, click on the Presentations in Sessions button on the Sessions
form.
Change the order of a session in the programme
If there are no sessions commencing at the same time as the session you wish to move, change
the start date/time of the session you wish to move or the start date/time of sessions around it. If
you wish to change the display sequence of a concurrent session, change the setting of the
Programme Sequence (if Concurrent) field on the Sessions form.
Add a new presentation to the programme
If a presentation hasn’t been entered yet, close the Programmer form and open the Personal
Details form and locate or enter the person’s details. Enter the presentation in the Presenter
Details form. Assign the presentation a Session Code and an Order In Session. Make sure that the
Confirmed Presenter box is marked, and the Abstract Status is Selected or the presentation won’t
appear in the draft programme.
Chapter 5: Main Menu - 209
Summit Event Manager - Light
Move a presentation within the programme
Assign the presentation a different Session or give the presentation a new Order In Session. Make
sure that the Conf. Pres. (confirmed presenter) box is marked and the Abstract Status is Selected.
Remove a presentation from the programme
If you wish to remove a presentation completely from the system, delete it. If you wish to keep the
presentation on the system for possible inclusion in the programme at a later date, change the
Abstract Status to Rejected or Withdrawn through the Abstract Status form. This can be reversed
at a later date through the same form. Alternatively, create a temporary dummy session for papers
you’re undecided about.
See the effect of changes made
If you’re currently sorting by family name, select the Sort By Session Date/Time option. If you’re
already sorting by session date/time, click on the Refresh button. If you want a paper copy of the
effect of changes made, click on the Draft Programme button.
See which presentations still have to be allocated to a session
If you’re currently sorting by family name select the Sort By Session Date/Time option. If you’re
already sorting by session date/time, click on the Refresh button. The presentations that still have
to be allocated to a session are displayed first.
Have a different presenter/author name in the programme
Enter the author or authors’ names exactly as you wish them to appear in the draft programme in
the Authors’ Name (if not default) field, for example, if you have two or more authors. If a value is
entered in this field, it will be printed exactly as entered in the draft programme. If no value is
entered, the format of person’s name is based on the format selected in the Name Format for Draft
Programme field in the Name Formats tab in Event Options.
Note: The Confirmed as Presenter, Biography Received and Photo Received refer to the
presenter, not to each individual presentation. If you update these fields for a particular
presentation, the field will be updated for all presentations for that person.
Toolbar Buttons
Click to print a draft programme based on the information currently in the
Programmer, Event Details and Venue Details forms. If you wish to have a
programme that you can edit further, use the Export Programme button on the
Programmer form.
Click to export a draft programme in Rich Text Format (.RTF). RTF is an industry
standard format used to transfer text documents between word processors. The
exported programme (program.rtf) can be modified using most word processors.
Click to open the Sessions form.
Click to open the Abstract Status form. See the Abstract Status topic further on.
Click to open the Review Status form. See the Abstract Review Status further on.
210 - Chapter 6: Main Menu
Summit Event Manager - Light
Click to print a report on the status of all presentations. This report can also be run
from Event Reports.
Click to print the Presenter Follow-Up report. This report can also be run from Event
Reports.
Click to open the Personal Details form for the person whose presentation is
currently selected.
Click to print a report that shows the information on the Programmer form, sorted in
the same order.
Chapter 5: Main Menu - 211
Summit Event Manager - Light
Abstract Status
This option, called from the Programmer form, enables you to alter the status of an abstract or
presentation.
All abstracts held within the system are displayed, regardless of the status of the presenter. The
abstracts are displayed in family name order.
You can find an abstract by either searching from the Find by Full Name field, or by using the scroll
bar on the right side of the form. The navigation buttons at the bottom will tell you how many
abstracts there are.
An abstract can only have one status. Select either Received, In Review, Selected, Rejected or
Withdrawn from the Abstract Status option box.
Only Selected abstracts appear on the draft programme and Rejected or Withdrawn abstracts will
not appear on the Programmer form. When entering a new presentation, it will have a default
status of Selected.
Toolbar Buttons
Click on this button to ‘drill down’ to the selected person’s Personal Details form.
212 - Chapter 6: Main Menu
Summit Event Manager - Light
Abstract Review Status
This option, called from the Programmer form, enables you to alter the review details of an
abstract.
All abstracts held within the system are displayed, regardless of the status of the abstract or the
presenter. The abstracts are displayed in family name order.
You can find an abstract by either searching from the Find by Full Name field, or by using the scroll
bar on the right side of the form. The navigation buttons at the bottom will tell you how many
abstracts there are.
Enter or alter the names in Reviewer 1 and/or Reviewer 2, the Date Sent or the Date Returned.
Toolbar Buttons
Click on this button to ‘drill down’ to the selected person’s Personal Details form.
Chapter 5: Main Menu - 213
Summit Event Manager - Light
Tabling and Seating
This option enables you to place people attending a tabled catering event at tables and/or seats.
To allocate tables and seats to people, take the following steps.
1.
To find a particular person, enter all or part of the person’s name in the Find by Full Name field
and press Tab or Enter. Use the Previous and Next buttons to locate other people with the
same or similar names. The names of people not yet allocated to a table are shown before the
names of people who have been allocated a table.
2.
You will need to modify the names on the Names for Table/Seating Lists when a person
selects more than one of the same add-on that has been designated as ‘Tabled’, for example,
five tickets to a conference dinner.
When you save the Registration Details form, Summit will create as many entries in the
Tabling/Seating Lists as are required. Summit can only work out the names for the first two
spaces (primary person and accompanying person, if one is entered), so it puts the primary
person’s name in the remaining spaces. You may need to overwrite the primary person’s
name with the name of the person attending, for example, a guest of the primary person.
3.
Once you’ve modified a name, clear the Unknown Name check box and mark the Lock In
check box to prevent Summit from overwriting the name you’ve entered. You don’t need to
lock in a name if you haven’t changed it – only lock in those marked as unknown name and
you’ve changed it.
4.
To seat someone at a particular table, select the table from the Table Number pull-down list.
This combo box is limit-to-list, so once a table number has been entered, you will need to click
on the Remove From Table button on the toolbar if you need to remove them from a table. If
you’re stuck in an error loop, press the ESC key or select a table.
The system will warn you if you’re exceeding the nominated capacity for that particular table.
214 - Chapter 6: Main Menu
Summit Event Manager - Light
5.
If you want the system to allocate people to tables based a specified criteria, click on the Auto
Table button. See below for more details.
Toolbar Buttons
Click to re-sort the records in table order and to show those without a table at the
top of the list.
Click to open the Tabling Status form. This form will give you a clear picture of the
status of your event – number of tables and seats allocated, number still to be
allocated and the excess or shortfall.
Click to open the Tables form to enable you to add/modify details of tables. See
Tables in the Setup Menu for more information.
Click to swap all the people at one table with the people at another table. The
process will check that there is sufficient capacity at each table.
Chapter 5: Main Menu - 215
Summit Event Manager - Light
Click to clear people from one to many tables.
Click to set the Table Number to zero for the person whose record is currently
selected. This effectively removes them from a table.
Click to open the Auto Table form. This form enables you to automatically seat
people at tables based on the criteria you choose.
Select the option that is best suited to your requirements. If you choose either of
the last two options, you will be asked to select a profile.
Click on the OK button to run the tabling process. Click on the Cancel button if you
don’t want to continue.
Click to drill down to the Personal Details form for the currently selected person.
216 - Chapter 6: Main Menu
Summit Event Manager - Light
Click to choose from a number of different reports on tabling and seating. The reports are
all variations on a theme.
Click on the record selector bar to the left of the required report (for example, Special Dietary
Requirements by Seat) and click on the Preview button. For reports you want to print often, mark
the Favourite check box. This will move the report to the top of the form.
Toolbar Buttons
Click to print the selected report.
Chapter 5: Main Menu - 217
Summit Event Manager - Light
Registration Desk Worklist
The main purpose of this form is to rapidly process delegates arriving at the event.
All people who are confirmed delegates and/or who have one or more add-ons will be included on
this form and report. The records are displayed in family name order.
There are three methods of processing your delegates. You can process them manually using the
printed report, you can process them on-line using the one computer and you can process them at
multiple registration points using many computers. All three methods are explained in more detail
over the page.
Toolbar Buttons
Click to ‘drill down’ to the currently selected person’s Personal Details record. You only
have access to this person’s data. Clicking on the OK button in Personal Details will
bring you back to the Registration Desk Worklist.
Click to print the Registration Worklist Report. This report can be used if you are
processing arrivals manually, or with multiple registration points.
218 - Chapter 6: Main Menu
Summit Event Manager - Light
Process Arrivals Manually
At times it’s not possible to use Summit to register people as they arrive at the event, so they are
noted as having arrived on a pre-printed report. Note: These steps must be taken before you lose
access to the computer system containing the Summit Event Management System.
To process arrivals at the event manually, take the following steps.
1.
Ensure that entry of all registrations, payments and payment allocations is as up-to-date as
possible.
2.
Print (or export if badges are being produced externally) any name badges not yet produced.
3.
If desired, print off invoices to give to arriving participants who haven’t paid for the event.
4.
Print any desired attendance lists.
5.
If you will be handing out the system-generated Attendance Records to participants, print a
copy of it.
6.
Print the Catering Requirements report.
7.
Print Equipment Requirements reports.
8.
Print a final pre-event Reconciliation Report.
9.
Print out the Running Sheet.
10. Open the Registration Desk Worklist form from the During Menu. Click on the Preview button
to produce a printed copy of the registration desk worklist.
11. As people arrive at the event, on the printed Registration Desk Worklist, mark the At Event box
against the names, and as they are given any event materials, mark the Satchel Given box as
shown below.
12. After the event, open the Registration Desk Worklist form on the During Menu and update the
information from the printed copy that you marked manually. Once you’ve updated the
computer system, you will be able to run the Incomplete Participation reports.
Chapter 5: Main Menu - 219
Summit Event Manager - Light
Process Arrivals On-line
On-line processing means you’re able to process arrivals using a computer running Summit at a
single point.
To process arrivals at the event on-line, take the following steps:
1.
Open the Registration Desk Worklist form from the During Menu. All delegates are displayed
showing their organisation, how much money they still owe and if they are a full registration or
not.
2.
As people arrive, locate their records by entering all or the part their names in the Find by Full
Name field, then press Tab or Enter. You can also scroll down the form using the scroll bar on
the right side of the form as all names are in family name order.
You can use the person’s full name here, you’re not restricted to a family name only for
searching. This is to minimise the time required to locate the record for a person with a
frequently occurring family name.
The system will move to the first record with a name containing the letters you have entered.
The search is not case sensitive, so there is no need to enter the letters in leading upper case
or all upper case. If the system doesn’t find any matches for the letters you’ve entered, you’ll
remain at the record you were on when you started the search. If you’re uncertain of the
spelling of a family name, clicking on the down arrow at the right of the family name combo
box will list all family names in ascending alphabetical order for you to choose from.
To move between records where the name matches the letters you’ve entered, click on the
Previous or Next buttons.
3.
Mark the At Event check box for the person’s record.
4.
If you have given the person any materials associated with the event, mark the Satchel Given
check box for the person’s record.
5.
If you have a person querying the registration details, find his or her record and click on the
record selector bar to the left of the delegate’s name to select them. Click on the Zoom button.
This takes you to the person’s Personal Details form where you can discuss all recorded
details with them.
220 - Chapter 6: Main Menu
Summit Event Manager - Light
Process Arrivals at Multiple Registration Points
Multiple registration points are a means of reducing the registration desk bottleneck when you have
a large event, or expect to have a large number of delegates arriving over a very short period of
time.
You could use a series of networked computers to register the arrival of the delegates, however,
this is not recommended. As everyone would be using the same screen at the same time for the
same task, and as Microsoft’s Access locks a ‘page’ of data at a time (a few records either side of
the selected record as opposed to a single record), there could be data and network conflicts.
The method described here is a mixture of manual and on-line activities.
To ensure an even flow through multiple registration points, each registration point should be set
up for family name commencing with specific letters of the alphabet (for example, A-K, L-P and RZ).
To process arrivals at the event using multiple registration points, take the following steps.
1.
Open the Registration Desk Worklist form from the During Menu. Click on the Preview button
and produce one printed copy of the Registration Desk Worklist for each registration point.
2.
As people arrive at each registration point, on the printed Registration Desk Worklist, mark the
At Event box against their names, and as they are given any event materials, mark the Satchel
Given.
3.
After the arrivals have been processed, collect all the copies of the printed Registration Desk
Worklist that were marked manually. Open the Registration Desk Worklist form from the
During Menu and update the computer version of the worklist from the printed copies.
4.
When you are certain that the details from all printed copies of the worklist have been entered
into the computer, destroy the original printed copies. This prevents people making entries on
the old printed copies.
5.
Reprint the Registration Desk Worklist for the next batch of arrivals. All data entered so far will
be printed onto the report.
Chapter 5: Main Menu - 221
Summit Event Manager - Light
Add-On Results
This option is for entering the results of any add-on that is competitive in nature, for example, a golf
tournament during a sporting afternoon.
The system caters for events that require scoring on the basis of either points or times. You can
enter placings or have the system place people automatically by clicking the Auto Place button.
To locate a particular add-on, select it from the Find by Add-On field or use the navigation buttons
at the base of the form to cycle through the records.
Once you’ve found the desired add-on, the Person combo box contains the names of all people
taking part in this add-on. Click on the down arrow and select a name or you can enter the name of
each person competing in the event. To allow the use of team names or nicknames, you’re not
restricted to the values in this list. Enter the person’s score and/or time.
If you’re going to use Auto Place, select the option corresponding to the placing method you wish
Summit to use, then click on the Auto Place button. If two people have the same score, they will be
placed equally and the next place will be jumped. For example, if two people tie on first place, the
next place would be third – second place is skipped.
Toolbar Buttons
Click to automatically place the scores displayed on the form.
Click to print the Results Report.
222 - Chapter 6: Main Menu
Summit Event Manager - Light
Results Reports
This option allows you to print the results of add-ons that are competitive in nature.
To print an Add-On Results report, take the following steps.
1. Click on the check box beside each field you want displayed on your report
2. Select the option to print Results for the current Add-On only or to Print results for all Add-Ons.
3. Click on the Preview button to print the report. The report is sorted in ascending place order.
Each time you open this form, the initial settings for fields to display and print will be the ones you
last used.
Toolbar Buttons
Click to print a Results Report.
Chapter 5: Main Menu - 223
Summit Event Manager - Light
Introduction to MIE WebLink
MIE WebLink enables potential attendees to enter registration information onto an event
registration page on Internet and have that information passed into your event database without
you having to re-enter the information.
Instead of using static pages that need to be updated any time the information in your event file
changes, MIE WebLink creates registration forms on-the-fly based on a subset of your event data;
if your event data changes, the registration form can be updated automatically.
The specific interfaces are:
•
Registration Without Payment using MIE WebLink
•
Secure Registration With Payment using MIE WebLink
Step by Step
1.
Complete the setup of your event file as you would normally do.
2.
Click on the Create Event Web File button on the Internet Assistant. This creates a very small
subset of your event file (an evw file) that contains only the information needed to build a
registration page. It does not contain any financial data or attendee information.
3.
E-mail us the event web file (the evw file) and any logo you want displayed and fill in the online setup form with your preferences for the registration page.
4.
We setup a URL (web page) for the registration page and an administration area for you to
monitor the event and then we e-mail the details to you.
5.
Link to the registration form and your attendees/delegates can start registering.
Advantages
The best part about MIE WebLink is that from this point onwards the registration page is
completely under your control. Your Administration Page enables you to:
1.
Dynamically update the information displayed on your registration page at any time. If anything
changes in your event file, for example you add new registration types or add-ons, you can
create another event web file and upload it directly via your administration area. Once the
event web file has been uploaded the registration page will reflect the updated data. You can
also use the administration area to modify the appearance of the registration page.
2.
You can retrieve lost registrations. You can use the Internet Transmissions Report (on the
Internet Assistant) to determine if any registrations have been lost between the registration
page and your e-mail. If any are missing you can log on to your administration area and have
the registrations retransmitted to you.
3.
Reconcile credit card payments. You can log on to your administration area and display all the
credit card payments received (no card details). You can restrict the payments displayed to a
specific date range to reconcile with the payments in Summit over the same date range.
Secure Credit Card Payments
The secure credit card payments facility is through Camtech (http://www.camtechcorporation.com/)
and the Commonwealth Bank. All monies received via the secure payment gateway are deposited
into a separate MIE Software Trust Account. We will transfer all monies due to your bank account,
after subtracting costs, on a daily basis - with an e-mailed tax invoice/summary.
224 - Chapter 6: Main Menu
Summit Event Manager - Light
Internet Assistant
The Internet Assistant is where you control, process and monitor registration details received via
the Internet.
The incoming data is kept in a temporary file until you View/Edit each request. This eliminates the
possibility of garbage data being saved onto your database.
The Internet Assistant will keep a detailed log of all activities and processing. After any Internet
activity session, the Internet Activity log will be displayed for you to print. The information held in
the log include the warning of possible duplicates, the content of each e-mail, etc
You can set the auto-reply content to be None, Brief and Detailed and if you choose Detailed, you
can edit the actual message.
The workflow and interaction between the Internet Assistant and your mail application are as
follows:
1. A potential attendee connects with your Web site using a browser such as Microsoft Internet
Explorer and fills out a Secure Registrations With Payment (e-commerce) form that records
information.
2. The web server (where your web site is located) e-mails this information to your e-mail
address.
3. When you check for e-mail using your messaging system, for example, Microsoft Outlook,
these messages are picked up along with any other e-mail to you and placed in your in-tray.
4. In Summit you click on the Internet Assistant button and Summit will check the contents of your
in-tray and extract all messages related to all Summit events.
5. The number of each of these forms is displayed in Unprocessed Requests. You can check
these entries before they are added to your database by clicking on the View/Edit button. Any
Chapter 5: Main Menu - 225
Summit Event Manager - Light
messages for events other than the one you’re connected to will be displayed with the
message ‘Unable to process’. Do not delete these as they can be processed when you connect
to that event. Once connected to the second event, you don’t need to Check Mail Now as all
the mail is in.
6. People who sent in an Internet request that was successfully added to the database may be
sent an e-mail confirming receipt of their message, automatically, if you choose.
The main requirements to set up the Internet interface are that:
•
your e-mail software package is MAPI compliant
•
the form on your web page are set up to provide the information in exactly the format Summit
is expecting – this is automatic using MIE WebLink
•
your web server supports the mailto protocol to be able to send you the e-mail messages
•
the payments come through a secure e-commerce site. This means that as soon as the
potential attendee submits the registration form that includes payment via credit card, the
payment is authorised immediately and only the authorisation number is transmitted to you as
Secure Registrations with Payment.
Important Before you open the Internet Assistant, you should have opened your mail application
and checked for new mail (this puts the mail in the mail system’s in tray).
E-Mail Checking
This is the first step in collecting requests that have been sent on the Internet. When you click on
the Check Mail Now button, the Internet Assistant will cycle through your mail system’s in tray and
pick up all messages that it has not picked up previously. It will check for possible duplicates and
produce a report on the messages that have been collected. At this stage no information has been
added to your event file as you have not yet had the chance to check the requests – they remain
as Unprocessed Requests.
Normally, you would not alter the data in the Check for Mail Received Since (Server Time) field.
The only time you would alter this information is if you re-installed Summit while you still had
unprocessed requests (as re-installing would mean that those unprocessed requests would be
lost). If this happened, you would set this date and time back to just before the last e-mail request
was sent to you. Note that it is not unusual for there to be a discrepancy between the time on your
computer and the time on the server computer of your ISP.
Unprocessed Requests
This section enables you to check the unprocessed requests before allowing the information into
your event file. To view the unprocessed requests, click on the View/Edit button. With the requests
displayed in a spreadsheet-like table, you can modify any of the details and delete duplicate or
‘rubbish’ requests. Only when you’re happy with the content and validity of all requests should you
click on the Process Requests button. This will then process the requests and update your event
file a detailed report on all the processing will be produced.
Internet Activity Log
When you click Check Mail Now or Process Requests, a report is produced detailing all the activity
that took place in that activity session. All this information is stored in the Internet Activity log and
can be reprinted at any time.
You can reprint the log from and/or to specific dates by entering the dates in the From and/or To
fields and then click on Preview. As well as this you can restrict the report to only those log entries
that contain specific text by entering the text you are looking for in the Containing Text field.
You can also delete some or all of the Internet Activity log if you no longer want to keep the activity
history information on file.
226 - Chapter 6: Main Menu
Summit Event Manager - Light
To delete all of the log, click on the Delete button. To only delete part of the log, enter the earliest
date to delete in the From field and the latest date to delete in the To field and then click the Delete
button. As well as this you can restrict the deletion to only those log entries that contain specific
text by entering the text you are looking for in the Containing Text field.
Internet Processing Status
When you click Check Mail Now or Process Requests, this section of the form will display what
activities are taking place.
Toolbar Buttons
Click to print an Internet Transmission Report. This report was designed to
ensure that no e-mails from prospective delegates goes missing. This report
prints the details, especially the sequence number, of all transmissions since a
date nominated by you. If there are missing numbers in the sequence, you can
go to your Administration Page and re-send the missing e-mail.
Click to create a subset of your event file to be used as the data for a
registration page hosted on the MIE Software ColdFusion server. The Event
Web File created does not contain any information about delegates on your
database or any credit card or banking information. Specifically, the event web
file only contains the following information to populate your registration form:
Conference Variable Parameters Table (contains event name, dates,
description, themes etc venue and organiser information only), Profiles,
Registration Types and Add-Ons – but only those marked with “Include in MIE
WebLink File”.
Chapter 5: Main Menu - 227
Summit Event Manager - Light
REPORTS
Delegate Lists
This option enables you to design and print reports that list delegates or to produce mailing labels
for a selected group of delegates.
The form is divided into four sections:
1.
Participation Category - what kind of delegate to list
2.
Date Filters - a date from which new registrations or cancellations are listed
3.
Report Format - how many columns, portrait or landscape
4.
Report Content - what to put in the columns, what to group the data by and whether or not to
count people within those groups.
To create your own delegate listing, take the following steps.
1.
Select what kind of delegate you want to list. You can choose from Confirmed Delegates
(these include full and partial registrations), Confirmed Full Delegates, Confirmed Partial
Delegates, New Cancellations, New Registrations and Potential Delegates.
2.
If you choose New Registrations, you can enter a date from which all new registrations will be
listed. The date you enter will include those people who registered on or after that date. You
can’t leave the Only Show New Registrations Since field blank, however this field is only used
for the New Registrations listing.
3.
If you choose New Cancellations, you can enter a date from which all new cancellations will be
listed. The date you enter will include those people who cancelled their registration on or after
that date. You can’t leave the Only Show New Cancellations Since field blank, however this
field is only used for the New Cancellations listing.
228 - Chapter 6: Main Menu
Summit Event Manager - Light
4.
Select the Report Format you wish to use. You can have up to five columns plus the person’s
name.
5.
Selected what data you want shown in each column by clicking on the pull-down list on the
right of the Column 1 - 5 combo boxes. These fields are limit-to-list (if you get stuck in an error
loop, press the ESC key on your keyboard).
6.
Select what you would like to group the data by, for example, you might like to group your
listing by State.
7.
Decide whether or not you need the system to count the number of delegates in each group.
8.
Click on the Preview button to produce the listing.
To produce mailing labels, take the following steps.
1.
Select what kind of delegate you want to list. You can choose from Confirmed Delegates
(these include full and partial registrations), Confirmed Full Delegates, Confirmed Partial
Delegates, New Cancellations, New Registrations and Potential Delegates.
2.
If you choose New Registrations, you can enter a date from which all new registrations will be
listed.
3.
If you choose New Cancellations you can enter a date from which all new cancellations will be
listed.
4.
Click on the Label button. The labels will use the stationery selected in Global Options on the
Setup Menu.
Toolbar Buttons
Click to run the report to the screen, i.e., this report layout has no page breaks and you
can edit the information on the screen. Note: This will change the information within the
data file.
Click to produce mailing labels for the selected delegates.
Click to produce a listing.
Chapter 5: Main Menu - 229
Summit Event Manager - Light
Event Reports
This menu contains the most common event reports. Some of these reports appear on the relevant
forms, for example, Menus is also on the Catering Events form.
Click
on the
scroll
bar for
more
reports
To use this form, click on the record selector bar beside each report you want to print, then click on
the Preview button. Alternatively you can use the up and down arrows on your keyboard to
navigate to the report you require. For those reports you print often, mark the Favourite check box
to move them to the top of the form.
230 - Chapter 6: Main Menu
Summit Event Manager - Light
All the reports are displayed in print preview. This enables you to print all or some of the report to
hard copy, nominate the number of copies and nominate the printer.
Attendance Certificates
These report will produce, one for each person, an attendance certificate listing all sessions
marked as confirmed as attending, and if appropriate, the professional education credits gained. If
no sessions are marked for a person, no certificate is produced.
Attendance Certificates (without Session Details)
This report will produce, for all delegates listed as ‘At Event’, a generic Attendance Certificate.
Catering Events
This is the reference file listing from the Catering Events form.
Catering Non-Attendance
This report shows the name and organisation of people who will not be attending an inclusive
catering function. To register someone as a non-attendance, click on the Not Attending button on
the toolbar of the Registration Details form. The report starts each catering event on a new page
and sorts the detail of the report by family name then given name.
Catering Requirements
This report shows the number of people to be catered for at each catering event, based on the
details entered in the Catering Events form. The system will determine the number for each
catering event by looking at the number of delegates (if you’ve indicated that the catering event is
for all full registrants) and the number of attendees at the associated add-on functions. The report
is sorted in chronological order of catering event. To check catering requirements for a single event
quickly, the actual number attending is displayed in the field Actual in the Catering Budget section
of the Catering Events form.
Delegates by Registration Date
This report shows the name, position, division and organisation of full delegates grouped by
registration date. All partial registrants (those that are registered by an add-on) are grouped
together under the heading Partial Registrations.
Delegates by Registration Type
This report shows the name, position, division and organisation of full delegates grouped by
registration type. All partial registrants (those that are registered by an add-on) are grouped
together under the heading Partial Registrations.
Draft Expression of Interest Form
While the Draft Expression of Interest Form, Draft Registration Form and Draft Programme Front
Page could be used for your event, the primary purpose of these forms is for checking against the
brochures and forms you create, to make sure that those brochures and forms are accurate and
that they contain all the information you have entered into Summit. This will ensure that you
capture the information you need to get the most from Summit. Unlike templates, drafts will change
each time the information within the system changes. In the Draft Expression of Interest Form, the
Chapter 5: Main Menu - 231
Summit Event Manager - Light
heading comes from the Short Name and Full Name entered on the Event Details form on the
Setup Menu. The name and address fields are those required for the Personal Details form. The
information on official venue and official carrier is entered on the Expression of Interest (EOI) and
Profile form and is reported, in summary, on the Interest To Date report. The profile information is
based on the profiles you’ve entered on the Profiles form. The address information in the document
footer comes from the address details entered on the Secretariat Details form on the Setup Menu.
Draft Programme Front Page
All the information, except for the event venue name, is based on the information entered on the
Event Details form on the Setup Menu. The venue name comes from the Venue Name entered on
the Venue Details form on the Setup Menu.
Draft Registration Form
The heading comes from the Short Name and Full Name entered on the Event Details form on the
Setup Menu. The name and address fields are those required for the Personal Details form. The
profile information is based on the profiles you’ve entered on the Profiles form. The registration
types information is based on the fees and descriptions set on the Registration Types form on the
Setup Menu. The add-ons information is based on the costs and descriptions set on the Add-Ons
form on the Setup Menu. The add-ons are displayed in order of the display sequence specified on
that form. The address information in the document footer comes from the address details entered
on the Secretariat Details form on the Setup Menu.
Event Activity
This report prints the same information as the Income Reconciliation report but without any
financial data. It displays the number of people involved in each separate event activity, viz.,
registrations (partial and full) and add-ons.
Event File Conversion Report
This report details all incidents in relation to converting an event from Summit Version 3 to Version
4. An incident is something the program had difficulty with that you may need to follow up.
Function Attendance…
There are four function attendance reports: Function Attendance by Family Name with Special Diet
(includes all people in alphabetical order), Function Attendance by Organisation (includes all
people in organisation order), Function Attendance with Accompanying People and Function
Attendance with Accompanying People with Special Diet.
Individual Schedules
A schedule is produced for anyone involved as either a presenter, chairperson or session aide at
the event. Each person begins on a new page and all activities are listed chronologically.
Menus
This report details the menu entered against each catering event. It is sorted by catering event
date and time. If nothing was entered into the Menu field in the Catering Event form, the catering
event would still be listed but the words ‘No menu specified’ is be printed.
232 - Chapter 6: Main Menu
Summit Event Manager - Light
Name, Organisation and Registration Type Details…
This report prints the delegates’ name, organisation and their Registration Type. The first report
includes full and partial delegates (partial is with a Registration Type Add-On), the second reports
only full delegates.
Organisation, Name and Registration Type Details
This report prints all delegates, both full and partial and groups them by organisation.
Organisations by Registration Type
For each registration type, all registrants are sorted by family name within organisation. All partial
registrants (those that are registered by an add-on) are grouped together under the heading Partial
Registrations.
Possible Duplicates (Matching Family Names)
This report lists every occurrence where a family name appears on the database more than once.
It displays the Person Number as well as the full name and address so that duplicate person
details can be seen.
Profiles Breakdown
This report shows each interest Profile and the number of people who have been marked with it in
each participation category. This information can be valuable when preparing marketing material
and the event programme to ensure that the event is targeted at the most popular profiles. As the
use of this information is general rather than exact, and the report can take quite a long time to run,
you’re given the choice of creating new report data, or using the last calculated report data. The
‘Pot.’ and ‘Con.’ at the top of each column of the report refer to potential and confirmed
respectively in each participation category. There is one row of the report for each profile you’ve
set up on the Profiles form.
Running Sheet (Landscape and Portrait)
This report contains all sessions (with the associated presentations and equipment requirements,
as well as the running sheet notes and setup tasks), all catering events (with the catering running
sheet notes and setup tasks, plus the menu) and all ad hoc running sheet notes in chronological
order. Each day starts on a new page. The report prints all the activities that are to happen at the
event; it shows in date and time order what is to happen, where and at what time it is to happen
and any additional instructions to a person or organisation who is responsible for ensuring a task is
performed. You can choose whether or not to show sessions that do not contains presentations.
The report can be either landscape or portrait - both reports have the same data so it’s a matter of
preference. These reports can also be run from within the Organiser form.
Schedule
This report shows the flow or structure of the event by listing all the sessions and catering events in
date and time order. This enables the organisers to see at a glance that there are no overlapping
activities scheduled.
Chapter 5: Main Menu - 233
Summit Event Manager - Light
Schedule by Location
This report is a schedule of all sessions and catering events grouped into the locations where the
sessions and catering events will occur. This enables the organisers to ensure that each location is
not ‘double booked’, nor is it under utilised.
Session Attendance
This report lists all people, and their organisations, who have been confirmed as attending a
session. Each session starts on a new page and the number of people is totalled. The report is
sorted by family name then given name within each session.
Session Attendance Summary
This report lists all sessions, against which the number of people preferred and confirmed to attend
is totalled. The report is sorted by the date and time of the session.
Session Chair Report
This report is for use by the session chair and contains details on the session’s date, time, location,
description and standard equipment. For each presenter in that session, the start time,
presentation title and abstract, the author, the duration of the presentation and the equipment
requirements are printed in the order specified in Order in Session. If the presenter’s biography
has been entered into the system, it is printed on the report. If not, a box is printed into which the
chair can hand write the biography. Any notes that have been entered against the presentation will
be printed. Each session starts on a new page and the presentations are sorted by Order in
Session. Each session will printed even if a session chair has not been specified for that session.
Session Choice by Person
This report lists for each person who has selected sessions, the person’s name, organisation, all
sessions selected and the associated status – preferred or confirmed. The report is in family name
order.
Session Preferences and Attendance
This report prints the name and organisation of anyone who has indicated a preference to attend a
session, or who has been confirmed as attending. The report totals the number in each column.
Each session starts on a new page and if no one has been registered for that session, it does not
appear on the report.
234 - Chapter 6: Main Menu
Summit Event Manager - Light
Correspondence
This option enables you to correspond with your participants in a variety of ways. There are two
tabs: Individual and Group. You can create a Financial Group from within Personal Details →
Money Menu → Financial Group.
To correspond with your event participants, take the following steps.
1.
Select whether you require correspondence to be sent to the individual participant or to
Financial Group Leaders and select the appropriate tab.
2.
Select the Correspondence Type you require.
3.
Each correspondence type, with the exception of the Participation Record and the
Organisation Receipt, can have user defined text both at the top (after the ‘Dear...’) and the
bottom of the letter. To define your own text, after you select the Correspondence Type from
the list, click on the Edit button. The way this text is used in constructing correspondence is as
follows:
•
•
•
•
•
•
•
•
Heading (if marked on Event Options form)
Date
Address Details
Salutation (if appropriate)
The text you’ve entered as text for the top of the document
The information for the correspondence type
The text you’ve entered as text for the bottom of the document
Footer (if marked on Event Options form).
Refund notices are printed with the Receipt Run.
4.
In the Produce option group, select New Correspondence Only if you want to send the
selected correspondence only to those people who haven’t been sent this particular letter.
Select Redo Correspondence from <date> to <date> if the last batch of letters didn’t print
correctly and you confirmed the print, i.e., these letters have a date printed in the associated
letter printed fields. For example, the Confirmation Sent field on the Registration Details form.
Chapter 5: Main Menu - 235
Summit Event Manager - Light
5.
If you require address labels, select the Produce Address Labels option in the Address Labels
option group. The format of the address labels will depend on the Address Label Stationery
selected in Global Options. Select the Don’t Produce Address Labels option if none are
required.
6.
Click on the Preview button to print the letters. All letters will be sorted by family name except
for the Organisation Receipts. The labels are printed in the same order. If you have selected to
have some of your correspondence faxed, you should ensure that WinFax Pro (version 9.0 or
later) is running before you click Preview.
If you marked the check box Create Contact Record when Correspondence Sent in Event
Options, you will be asked for the name of the person sending the correspondence. A contact
entry, with your selected Contact Type (again in the Event Options form), will be created for all
people being sent the letter.
7.
After printing the hard copy correspondence, Summit will fax correspondence to people who
have Fax as their Correspondence setting and then place e-mails with the correspondence as
attachments in your mailing system out tray for people who have ‘E-Mail’ as their
Correspondence setting.
8.
To modify the letterhead that appears at the top of all correspondence for this event, select
Letterhead.
9.
After printing the letters, Summit will ask you if everything printed to your satisfaction. If you
say Yes, Summit will write the current date in the associated letter printed field for each
person. If you say No, these fields are not updated and you can re-run the correspondence.
Correspondence Log
Each time you do a correspondence run, a report is produced detailing all the correspondence
produced in that session. All this information is stored in the Correspondence log and can be
reprinted at any time.
You can reprint the log from and/or to specific dates by entering the dates in the From and/or To
fields and then click on the Preview button. You can restrict the report to only those log entries that
contain specific text by entering the text you are looking for in the Containing Text field. For
example, you could use this to find when correspondence for a particular person was produced
and how it was sent to them (letter, fax or e-mail).
You can delete some or all of the Correspondence log if you no longer want to keep the history
information on file. To delete all of the log, click on the Delete button. To only delete part of the log
enter the earliest date to delete in the From field and the latest date to delete in the To field then
click the Delete button. You can restrict the deletion to only those log entries that contain specific
text by entering the text you are looking for in the Containing Text field.
236 - Chapter 6: Main Menu
Summit Event Manager - Light
Toolbar Buttons
Click to select individual people to receive invoices. Only available when you select
the Invoices Only for Selected People option.
Click to edit the standard Summit letterhead.
Click to edit the top and bottom text of the selected correspondence prior to printing the
letter.
Click to print the selected correspondence.
Individual Receipts and Refunds
This process produces receipts and refunds with address labels for all payments allocated since
the last receipts were printed. A receipt contains all payments made for an individual since the last
time a receipt was issued. Each payment has it’s own receipt. A refund is deemed a negative
receipt. This process is independent of the Banking Run that produces bank deposit slips and
payment summary reports. Receipts are produced in family name order. Note: As this process will
update the Receipts table, it can’t be run while anyone else is allocating payments.
You can choose if you want the standard header (the short and long name of the event) and the
footer (the secretariat details) printed on each receipt as you may have your own letterhead. You
can turn them off by unmarking the Print Page Header/Footer on Correspondence fields in Event
Options. You can edit the standard Summit header by clicking on the Letterhead button. Summit
will print a salutation on the receipt if you have selected it in Global Options.
If you confirm that everything has been printed correctly, a summary report of all receipts
processed will be produced and all receipts will be marked as having been printed. If you don’t
confirm that everything has been printed correctly, the receipts you’ve processed this receipt run
will not be marked as printed and can be printed again. After you’ve completed or cancelled the
Individual Receipts and Refunds run, other users may resume allocating payments.
Organisation Receipts
An Organisation Receipt contains details of payments made to all people who haven’t been printed
a receipt, and who belong to the same organisation at the same address (i.e. matching address
line 1, address line 2, suburb/town and state). Note: The best way to ensure you have the same
address for people of the one organisation is to use the Fill button to the left of the Organisation
field on Personal Details.
The receipt amount will not match the payment amount if a) not all of the payment has been
allocated or b) the people are not at the same address.
Receipts Processed on <Date> Report
This report is created after you confirm that a Receipt Run has completed successfully. This report
shows all receipts issued today. The report shows the person’s name, organisation, receipt
number, the related payment number, the date the receipt was issued and the date the payment
was received, the breakdown of how the receipt was allocated and any payment notes. It’s sorted
in family name order. This is a cumulative report, so if you’ve done multiple receipt runs today, this
report will show the receipts issued by all the receipt runs.
Chapter 5: Main Menu - 237
Summit Event Manager - Light
Confirmation Letters
Confirmation letters are used to advise the different participation categories of their inclusion in the
event. The categories are delegate and presenter. Sending a confirming letter ensures that you
have in writing what is understood by you to be the facts. This may reduce the risk of a
misunderstanding at a later stage.
Confirmation letters are normally produced once for each person. When you print confirmation
letters, Summit selects all records in the nominated participation category that have been marked
as confirmed, but don’t have a date in the corresponding Confirmation Letter Sent field. After the
letters have been produced, and on confirmation from you, Summit updates the relevant
Confirmation Letter Sent field to the current date. These fields are found on the Registration Details
form (delegate) and Presenter Details form (presenter).
If you wish to produce a second letter for a person, clear the Confirmation Letter Sent field in the
associated form on the person’s record. Another confirmation letter will be produced for that person
next time you print confirmation letters for that participation category. Alternatively, if you wish to
redo the letters for all people for that date, select the Redo Correspondence for Date option on the
Produce option group.
Delegate Confirmation Letters (With Money Details)
A person will receive a delegate confirmation letter if there is no date in the Confirmation Letter
Sent field on the Registration Details form and there has been some delegate type activity
recorded against them - a registration type, an add-on and/or a session. If just a presentation is
recorded for them, they are not deemed to be delegates and no letter would be produced for them.
Both delegate confirmation letters (with and without money details) include the registration details,
the add-ons, the sessions and the associated status. They use the same top and bottom user
defined text. This confirmation letter includes any money involved under the three headings:
Amount Due, Amount Paid and Amount Still Owing. It then totals all activities under those
headings.
If you wish to reprint a confirmation letter for a delegate, remove the date in Confirmation Letter
Sent field on the Registration Details form.
Delegate Confirmation Letters (Without Money Details)
This delegate confirmation letter has the same layout as the above letter without any reference to
money.
Presenter Confirmation Letters
This letter can be sent to presenters once the Programme Committee has selected their abstract to
be included in the event programme (i.e., ‘Congratulations, your abstract has been selected for
inclusion...etc.’). In order for a person to have a letter printed for them, you must first confirm them
by marking the check box Confirmed as Presenter on the Presenter Details form or the Conf Pres.
check box on the Programmer form. You must also set the abstract status to Selected. Only
Confirmed Presenters with Selected abstracts who don’t have a date in the Confirmation Letter
Sent field on the Presenter Details form will have a confirmation letter produced for them.
This enables this process to be run more than once as the programme is being fine-tuned and not
select the same people. The user-defined text is printed before and after the data regarding the
abstract and session placement.
If a person has submitted more than one abstract, all abstracts that have a status of Selected will
be included in the one confirmation letter.
238 - Chapter 6: Main Menu
Summit Event Manager - Light
Presenter Confirmation Letter with Registration Details
This will produce a letter containing all presenter information as well as all delegate information
(see above). It will update both the Delegate Confirmation Letter Printed Date and the Presenter
Confirmation Letter Printed Date on confirmation from you.
Invoices
All the invoice options will produce an invoice for each person who owes money (depending on the
selection criteria) and an address label, if requested. All invoices are printed in family name order.
All invoices use the same user defined top and bottom text and will print a salutation if you’ve
marked the Print Salutation on Receipts and Invoices field in Global Options. The invoice will detail
all liabilities (what they owe money for), the amount due, the amount paid to date and the amount
still owing. It will then total these fields into the Current Financial Status box.
Invoices for Anyone Who Owes Money
This process produces invoices and address labels for all people who owe money. This option,
even though it will ask to confirm the current date on the internal field Invoice Printed, will always
print an invoice for whomever owes money. If you want to do, say, a weekly invoice run, select the
option Invoices for People Who Haven’t Had Once Since <date> or if you want to target selected
people, chose the option Invoices for Selected People.
Invoices for People from a Particular Organisation
If desired, invoices can be restricted to a particular organisation. Select the organisation to which
you wish to restrict the Invoice Run in the field to the right of the option box by clicking on the down
arrow. Click on the Preview button to produce the invoices. One invoice will be produced for each
person in the selected organisation who owes money.
Invoices for All People Who Haven’t Had Once Since ...
This option is useful if you’re printing invoices on a weekly or monthly basis. Select this option then
enter a date. An invoice will be produced for all those people who have never been sent an invoice
or who have an Invoice Printed date of less than the date you enter.
Invoices for Selected People
When you select the Invoices for Selected People option, the Select Invoices button will be
displayed on the toolbar. If you click on this button, the form below displays the details of the
amounts outstanding for all people who still owe money, and enables you to produce invoices for
selected people.
Chapter 5: Main Menu - 239
Summit Event Manager - Light
To locate a record for a particular person, click in the Find by Family Name field and enter all or the
start of the family name and then press Tab or Enter. Mark the Selected for Next Print Run check
box for each person for whom you wish to produce an invoice. Once you’ve marked all the required
records, click on the Exit button. This will close that form. Click on the Preview button to print the
invoices. On confirmation of the print, all marked check boxes will be cleared.
Participation Records (With Money Details)
Participation Records don’t have any user defined text or a salutation. You will be asked ‘Do you
wish fields with a zero value to be shown on the participation record?’. Click Yes or No as required.
The Participation Record details all registration activities (registration type, add-ons and sessions).
If there is no activity in any area, no heading is printed for that area. The data in the record is right
aligned.
Participation Records (Without Money Details)
This Participation Record looks the same as the one above except it contains no money details
and the data in this record is left-aligned.
Tax Invoices and Adjustment Notes
Generating and printing tax invoices is a multi-step process. When you select this option, you have
a choice of only printing unprinted tax invoices, or you can ask the system to re-check every
previously issued tax invoice to see if any of the original requirements have altered, for example, a
person has cancelled their Harbour Cruise.
If any requirements have changed, the system will issue an Adjustment Note (detailing the original
requirements) and re-issue a new Tax Invoice with the new details. In a large database, this
process could take a while. You can set the system to stop and ask you for the reason for each
Adjustment Note or you can have the system use the default reason. This is set in Setup -> Event
Options -> Tax tab.
240 - Chapter 6: Main Menu
Summit Event Manager - Light
Group Correspondence Tab
Group Receipts
A receipt will be printed with the details of all payments (which have not yet been printed) made to
people from within each Group – regardless of where the payments have come from. Receipts are
only printed for Group Leaders, i.e., those people not in a group will not have a receipt printed for
them.
Invoices for Anyone Who Owes Money
This process produces invoices and address labels for Group Leaders and/or people within the
group who owe money. This option, even though it will ask to confirm the current date on the
internal field Invoice Printed, will always print an invoice for whomever owes money. If you want to
do, say, a weekly invoice run, select the option Invoices for People Who Haven’t Had Once Since
<date> or if you want to target selected people, chose the option Invoices for Selected People.
Invoices for All People Who Haven’t Had Once Since ...
This option is useful if you’re printing invoices on a weekly or monthly basis. Select this option then
enter a date. An invoice will be produced for all those Group Leaders and their people who have
never been sent an invoice or who have an Invoice Printed date of less than the date you enter.
Tax Invoices and Adjustment Notes
Generating and printing tax invoices is a multi-step process. When you select this option, you have
a choice of only printing unprinted tax invoices, or you can ask the system to re-check every
previously issued tax invoice to see if any of the original requirements have altered, for example, a
person has cancelled their Harbour Cruise.
If any requirements have changed, the system will issue an Adjustment Note (detailing the original
requirements) and re-issue a new Tax Invoice with the new details. In a large database, this
Chapter 5: Main Menu - 241
Summit Event Manager - Light
process could take a while. You can set the system to stop and ask you for the reason for each
Adjustment Note or you can have the system use the default reason. This is set in Setup → Event
Options → Tax tab.
Group Tax Invoices are still created against each individual but are amalgamated into the one
document and addressed to the Group Leader
242 - Chapter 6: Main Menu
Summit Event Manager - Light
Form Letters
Form letters are a quick and easy way of contacting people who are either potential or confirmed in
any of the participation categories.
To help you monitor correspondence and materials you may be sending to people, Summit
enables you to track when form letters were last sent to people in each participation category or to
the entire database. The Last Form Letter Sent Date, as well as an optional Kit Sent Date can be
used when selecting recipients of form letters. A kit is any set documentation provided by you to
the participant. An example is an Author’s Kit that details the format in which a presentation is
required.
These dates, Form Letter and Kit Sent, may be used in any way you wish, as they are not used
anywhere else in Summit. This form enables you to edit the text of the form letters, select the form
letters to print or commence the merge process.
To create and send a form letter without using the Merge option, take the following steps.
1.
Select the option corresponding to the desired participation category and click on the Edit
button.
2.
The Letter Text form will be displayed for you to modify the text for the selected participation
category. Every category can have its own text.
This is a memo field, so it can hold up to 64,000 characters. To create a new line, press Enter.
The text can’t be formatted as with a word processor, so the text you enter here will be printed
in a 12 point Times New Roman font. Click on the OK button to save your text. You will be
taken back to the menu. Click on the Form Letters button again.
3.
Click on the Preview button and Summit will open the Send Form Letters to Which
<Participation Category> form to enable you to further select records for form letters, based on
last form letter sent date and/or kit sent date.
Chapter 5: Main Menu - 243
Summit Event Manager - Light
To produce form letters for all records in the participation category, select the All option.
To produce form letters for only those records that have not had a Kit Sent Date entered,
select the With No <Participation Category> Kit Sent Date option.
To produce form letters for only those records that have a Kit Sent Date before a nominated
date, select the With <Participation Category> Kit Sent Date Before option. This can be useful
if you’re sending out information that was revised on a given date, and only wish it to go to
people who were advised prior to that date. To produce form letters for only those records that
have not had a Form Letter Sent Date entered, select the With No <Participation Category>
Form Letter Sent Date option. To produce form letters for only those records that have a Form
Letter Sent Date before a nominated date, click on the With <Participation Category> Form
Letter Sent Date Before option button.
Select the option corresponding to the restriction you wish to make and then click on the
Preview button to produce the form letters.
4.
Summit will produce the form letters and the corresponding address labels.
5.
It will then give you the opportunity to set the Kit Sent Date and/or the Form Letter Sent Date
to the current date for all people for whom you’ve just produced a letter. The Update
<Participation Category> Sent Dates form will be displayed.
•
Mark the Set or Reset the <Participation Category> Kit Sent Date for These Records To
Today’s Date check box to have the kit sent date for these records set to the current
date.
244 - Chapter 6: Main Menu
Summit Event Manager - Light
•
6.
Mark the Set or Reset the <Participation Category> Form Letter Sent Date for These
Records To Today’s Date check box to have the form letter sent date for these records
set to the current date.
Click on the OK button to confirm that you wish the dates to be set. Click on the Cancel button
to redo this form letter run.
To produce form letters through the Merge facility, take the following steps.
1.
Click on the Merge button.
2.
The next form to be displayed is the Send Form Letters to Which <Participation Category>
form. See above for an explanation of all the options available through this form.
3.
On clicking the Preview button, Summit will start up whatever word processor you nominated
in Word Processor Program Name and Path in Global Options on the Setup Menu. The name
and address details of the people from the selected participation category are loaded as the
data source called summitmm.txt file in the c: directory.
Summit uses the default formltr.doc for all its merge letters but you can save it to whatever
you want and store the new file name in the Event Documents tab in Event Options on the
Setup Menu. Within the word processor, you can enter any text as appropriate and commence
your merge to new document process. Print as required. The address labels will be produced.
Note: If you find that the system has started the word processor, but you are presented with
the Label Skipping form, press Alt+Tab to get back to your document.
4.
On exiting the word processor, the Update <Participation Category> Mailing Dates form is
displayed. See above for an explanation of all the options available through this form.
Toolbar Buttons
Click to create a merge letter for the selected participation category. See Event Options,
Event Documents for producing different letters for each participation category.
Click to enter or edit appropriate text for a form letter to be sent to the selected
participation category.
Click to print a form letter for the selected participation category. The letter will be printed
with the previously edited text for that participation category.
Chapter 5: Main Menu - 245
Summit Event Manager - Light
Name Badges and Tickets
This option enables you to undertake all the tasks related to producing name badges and tickets.
The different sections of this form enable you to decide exactly what you want to produce.
Whenever you open this form, the settings on the form will be the settings you used last.
To produce name badges or tickets, take the following steps.
1. In the Produce What section of the form, select either the Produce Name Badges option or the
Produce Tickets option.
2. In the For Whom section of the form, if you only want to produce badges or tickets for people
who haven’t have one produced, select the Only Produce New Badges or Tickets option. If you
want to produce all badges, whether or not they’ve already been produced, select the Produce
All Badges or Tickets option. The usual method is to select the Produce All Badges or Tickets
option first then after your first print run, select the Only Produce New Badges or Tickets
option.
3. In the Sort Order section of the form, select either the Sort by Family Name then Organisation
option or the Sort by Organisation then Family Name option.
Note: This option only affects the sorting of name badges. It does not affect the sorting of
tickets as they are always produced in family name order.
4. If you’re producing name badges, in the Restrict Name Badges Produced section of the form,
select for whom you are producing name badges from the list box. The usual selection is All
People Automatically Entitled or All People Automatically Entitled plus Accompanying Persons.
The other choices can be used when you want to have different badge styles for different
participation categories. For example, if you had a different name badge style for presenters,
you might select Only for Presenters, print the presenter badges, and then select All People
Automatically Entitled and Only Produce New Badges or Tickets.
5. This list box will be enabled only if you have selected Produce Name Badges. If you want to
produce a number of name badges for special purposes, or for people who are not on the
database, select I Will Enter All Badge Details at the bottom of the Restrict Name Badges
246 - Chapter 6: Main Menu
Summit Event Manager - Light
Produced list box. This will open the Edit Badge or Ticket Details form so you can directly enter
the details to appear on each name badge line.
6. If you are producing tickets, in the Restrict Tickets Produced section of the form, select the
tickets you want to produce from the list box. For tickets, you would only select No Restrictions
if all the tickets for registration types, add-ons and sessions were identical or if only one aspect
of your event was ticketed. If you had a number of functions requiring tickets and were using
different ticket formats, you would do a separate production run for each function.
This list box will only be enabled if you have selected Produce Tickets.
7. In the Name Badge or Ticket Format field, select the format you want to use from the pull-down
list. If you’re uncertain what a particular format looks like, or want to modify it or create a new
format before producing name badges or tickets, click on the Design button to open the Name
Badge and Ticket Design form.
8. To print name badges or tickets, click on the Preview button to display the name badges or
tickets in Print Preview. You will be given the option of editing the details that will appear on the
badges or tickets before they are produced.
If you click on Yes, the Edit Badge or Ticket Details form is displayed.
Edit any information you like then click on the OK button to continue with the process. If you
want to stop the process, click on the Cancel button.
9. If you are exporting, click on the Export button to export the name badge or ticket information to
a file. You will be asked for the export format you wish to use. You will be given the option of
Chapter 5: Main Menu - 247
Summit Event Manager - Light
editing the details that will appear on the badges or tickets before they are exported. See
above for more details on the Edit Badge or Ticket Details form.
You will be asked the name of the file you want to export the name badge or ticket information
to. Once the data has been exported, a Data Export report is printed. This report contains the
details of the export - the filename, format, number of records, etc. and can be given to the
recipient of the diskette.
10. After you have exported or printed the name badges or tickets, you will be asked if you want to
have them marked as having been produced. Once you’ve checked that the export or print
worked correctly, you should answer Yes. This will prevent these badges or tickets being
reprinted or exported during the next production run.
Toolbar Buttons
Click to edit the ticket information before you print it. The Edit Ticket Name form is
displayed. See next page for more details.
Click to open the Name Badge and Ticket Design form.
Click to export the selected details to file. See above for more information.
Click to print the name badges or tickets in print preview.
248 - Chapter 6: Main Menu
Summit Event Manager - Light
Edit Ticket Names
This form allows you to modify the names that will appear on tickets and to lock those changes into
place.
You usually need to modify the names on tickets when a person selects multiple instances of the
same add-on, for example, 5 tickets to an Awards Dinner. As Summit can only automatically work
out the names to go on the first two tickets (if an accompanying person is recorded), you will need
to enter the names for the remaining tickets.
To only show the tickets that Summit could not determine the names for, mark the Only Show
Tickets With Unknown Name check box.
Once you’ve modified a name, clear the Unknown Name check box and mark the Lock In check
box. This prevents Summit from overwriting the name you’ve entered when it’s producing the
tickets.
Toolbar Buttons
Click to list all people who will have a ticket produced for them.
Chapter 5: Main Menu - 249
Summit Event Manager - Light
Reporter
This form is the main mechanism for ad hoc reporting within Summit.
General
It enables you to select records from the database based on historical participation in previous
events, potential or confirmed participation in the current event, profile, participation in add-ons,
and a variety of other criteria. There are seven tabs to the Reporter: General, Participation, Profile,
Saved Queries, Multi-Registration, Multi Add-on and Multi-Session.
These selection criteria can be combined to produce narrower selections or wider selections if
required. Once you’ve selected the records on which you wish to report, Summit will advise you
how many records fall into that category, and enable you to report on those records in a number of
formats.
From the Reporter you can print a listing, print address labels (in family name, organisation or
postcode order), export to a diskette, print name badges, satchel badges and outer wrappers,
create an intermediary table, produce Word merge letters, export information for name badges to
be sent to Tradevent and export card file details to MYOB version 6.
To use the Reporter, take the following steps.
Select the required records
When you first open the Reporter, all records in the event database are available for reporting.
1.
You can select people with a specific Position. To select people who have a particular position,
select that position from the pull-down list. The contents of the pull-down list are all the
positions you have entered into the system so far. The combo box is not limit-to-list, so you
can enter what you want. However, if it doesn’t match anything in the list, nobody will be
selected. To select people who don’t have a particular position, select the position then select
the <> sign in the column to the left of the Position field.
250 - Chapter 6: Main Menu
Summit Event Manager - Light
The same rules apply to the selection of Family Name, Division, Organisation, Suburb/Town,
State and Country.
2. You can select people with specific data in the five user defined fields. The names of the user
defined fields are defined by you on the User Defined tab in Event Options. The data in the user
defined fields is entered in the Extra Details form, accessed from the Personal Details form.
3. You can select records with a specific PIN (Person Number) range. Enter a number in the From
PIN field and a number in the To field. All records that fall within those boundaries will be
selected.
4. You can select records based on a Postal Code range
5. You can select people based on Registration Date ranges or Reporter E-Mail and Mail Merge
date ranges.
6. You can select people who don’t have a name badge. To restrict selection to only those people
who haven’t had a name badge produced yet, mark the No Name Badge check box.
7. You can select people who have Asian Name marked
8. You can select people based on missing contact data, for example, phone, fax and e-mail.
Decide what sort selection you wish to make
When you select multiple fields on the Reporter, you can choose whether to have an ‘AND’ or an
‘OR’ selection. An example of an AND selection would be ‘Find all people who are confirmed
delegates AND who are from NSW’. An AND selection reduces the number of people you select.
An example of an OR selection would be ‘Find all people who are from NSW OR from VIC OR
from TAS’. An OR selection increases the number of people you select.
The default selection method for the Reporter is an AND selection. If you want an OR selection,
select the Select If Any Fields Match (OR) option in the When I Make Multiple Selections section of
the form (bottom right corner). To switch back from an OR selection to an AND selection, select the
Only Select Where All Fields Match (AND) option.
Chapter 5: Main Menu - 251
Summit Event Manager - Light
Participation
Another mechanism for restricting record selection is by Participation. To include people in one of
these participation categories simply mark the check box in the Are column beside that
participation category. To include people who aren’t in one of these participation categories simply
mark the check box in the Not column beside that participation category.
If you’re making an AND selection, marking more than one participation category restricts the
selection to people to whom each marked participation category applies. If you’re doing an OR
selection, marking more than one participation category increases the selection to people to whom
any of the marked participation categories apply. A person’s record can’t be both potential and
confirmed within the same category, so if you select potential and confirmed within the same
participation category, there will never be any records selected.
•
You can select people with a specific Registration Type. To select people with a particular
registration type, select that registration type from the pull-down list.
•
You can select people with a specific Add-On. To select people who have a particular add-on,
select that add-on from the pull-down list.
•
You can select people with a specific Session. To select people who have a particular session,
select that session from the pull-down list.
The next type of selection relates specifically to delegates. To select people who are either
confirmed full or partial delegates, mark the check box in the Are column beside Confirmed Full
and Partial Delegates. To select people who are not confirmed full or partial delegates, mark the
check box in the Not column beside Confirmed Full and Partial Delegates. To select people who
are full delegates only, mark the check box in the Are column beside Confirmed Full Delegates
Only. To select people who are not confirmed full delegates, mark the check box in the Not column
beside Confirmed Full Delegates Only. To select people who are partial delegates, only mark the
check box in the Are column beside Confirmed Partial Delegates Only. To select people who are
not confirmed partial delegates, mark the check box in the Not column beside Confirmed Partial
Delegates Only. To select people who are definitely not attending, mark the Declined check box.
252 - Chapter 6: Main Menu
Summit Event Manager - Light
Profile
Another mechanism for record selection is by Profile. The number of profiles displayed on the
Reporter will depend on the number of profiles you have defined on the Profiles form. The
maximum number of profiles is 20.
If you haven’t defined any profiles, none will be displayed on the Reporter form. Profiled are
defined on the Setup Menu. As with participation, to include people with a particular profile, simply
mark the check box in the Are column beside that profile. To include people who don’t have a
particular profile, simply mark the check box in the Not column beside that profile.
Chapter 5: Main Menu - 253
Summit Event Manager - Light
Saved Queries
If you have very complex queries, you can save them and retrieve them for later use. You can also
delete unwanted queries.
Select the reporting method you wish to use
Once you’ve determined the records you wish to select, you can specify how you wish to report
those records. Whatever method of reporting you choose, the Reporter will first count the records
you have selected and then give you the opportunity of cancelling or continuing with the report.
This provides a quick and easy way to count records in a particular category.
In the above example we have chosen to select people who are not from Australia and who are
confirmed full or partial delegates and who have a profile of Industry. If we click on the Listing
button, a screen is displayed asking you to confirm the selection. Click on the Yes button to
continue.
254 - Chapter 6: Main Menu
Summit Event Manager - Light
Multi-Registration
You can select multiple Registration Types to report on to create a consolidated report. In the
example below, the people who registered early are selected.
You cannot combine the multiple tab data, i.e., you cannot select Multi-Registration and Multi-AddOn and/or Multi-Session.
You can, however, select from a Multi- tab and from General, Participation, Profile and/or Saved
Queries.
Chapter 5: Main Menu - 255
Summit Event Manager - Light
Multi-Add-On
Select any of the required add-ons from the pull-down list.
Multi-Session
Select any of the required sessions from the pull-down list.
256 - Chapter 6: Main Menu
Summit Event Manager - Light
Toolbar Buttons
Click to export the name and address details for the selected records in the format
required for M.Y.O.B. Version 6 customer card files. Please note the following in
relation to the file produced by this process.
Data Truncation
Only the first 15 characters of Family Name will be used (Summit maximum 30)
Only the first 15 characters of Given Name will be used (Summit maximum 25)
Only the first 80 characters of Job Title will be used (Summit maximum 100)
Only the first 80 characters of Organisation will be used (Summit maximum 100)
Only the first 15 characters of Salutation will be used (Summit maximum 50)
Only the first 25 characters of Contact Name will be used (Summit maximum 82)
Only the first 255 characters of Notes will be used (Summit maximum approximately
64,000)
Data Conversion
The MYOB Address 1 Line 1 field is drawn from the Summit Job Title field.
The MYOB Address 1 Line 2 field is drawn from the Summit Organisation field.
The MYOB Address 1 Line 3 field is drawn from the Summit Street Line 1 field.
The MYOB Address 1 Line 4 field is drawn from the Summit Street Line 2 field.
The MYOB Address 1 details are identical to the Address 1 details.
The MYOB Phone 1 field is drawn from the Summit Phone (W) field.
The MYOB Phone 2 field is drawn from the Summit Phone (M) field.
The MYOB Fax field is drawn from the Summit Fax (W) field.
The MYOB Contact Name field is derived by combining the Summit Title, Given Name
and Family Name fields.
Click to export the name and address details of the selected records in the format
required by the Tradevent Registrations software package. Send each participation
category in a separate file. Please note the following in relation to the file produced by
this process.
Data Truncation
Only the first 4 characters of Title will be used (Summit maximum 25)
Only the first 30 characters of Job Title will be used (Summit maximum 100)
Only the first 30 characters of Organisation will be used (Summit maximum 100)
Only the first 30 characters of Suburb/City will be used (Summit maximum 50)
Only the first 4 characters of Postcode will be used (Summit maximum 10)
Only the first 3 characters of State will be used (Summit maximum 20)
Data Conversion
The Tradevent Phone field is drawn from the Summit Phone (W) field.
The Tradevent Fax field is drawn from the Summit Fax (W) field.
The one character Tradevent Attendee Type field is determined in the following order:
Attendee Type is initially set to V (Visitor).
If the person is also a confirmed delegate, Attendee Type is set to D (Delegate).
If the person is also a confirmed presenter, Attendee Type is set to K (Speaker).
If the person is also a confirmed other, Attendee Type is set to Z (Other).
If the person is also a confirmed sponsor, Attendee Type is set to Z (Other).
If the person is also a confirmed advertiser, Attendee Type is set to Z (Other).
If the person is also a confirmed exhibitor, Attendee Type is set to X (Exhibitor).
If the person is also an organiser, Attendee Type is set to O (Organiser).
Chapter 5: Main Menu - 257
Summit Event Manager - Light
If the person is also a VIP, Attendee Type is set to G (Special Guest).
If the Notes field on the Personal Details form contains the word MEDIA, Attendee
Type is set to M (Media).
Click to send an e-mail the selected people. See further on for more details.
Click to create a mail merge document with the name and address details of the
selected records inserted. When merged, one document is created for each selected
record. The documents are sorted in family name order.
Click to place the name and address information of the selected records into an
interchange table called Demographics. This table may be used as a data source for
Microsoft Office products or for exporting data to other MIE Software applications. The
table is sorted in family name order.
Click to create one magazine outer wrapper (outsert) for each selected record
displaying the name and address details. The wrappers are sorted in bulk code then
postal code order.
Click to create one label for each selected record displaying the name of the person
only. These labels are suitable for attaching to delegate satchels for identification
purposes.
Click to produce a name badge for each person selected. You will be asked to select a
style. This feature should not be used for tickets. After you close the print preview
window, you will be asked if you want the system to update the Badge Produced field
for each person to the current date.
Click to export the name and address details for the selected records using a number
of different formats. As exports are frequently to provide details to external name badge
manufacturers, after you’ve exported the records, the system will ask you if you wish to
update the people’s records as having had their name badges produced. If you click on
the Yes button, the records will be marked as having had name badges produced and
name badges will not be produced for these records if you do a new name badge
production run.
Click to create one address label for each selected record. The address labels are
sorted in family name, organisation or bulk code then postcode order. Bulk code is the
Australia Post Pre-Sort Indicator Code, i.e., Regional Mail Centre codes. The size of
258 - Chapter 6: Main Menu
Summit Event Manager - Light
the labels is determined by which address label stationery you selected in Global
Options.
Click to open the Reporter Listing Choices form. See the next page for a full
description.
Chapter 5: Main Menu - 259
Summit Event Manager - Light
Reporter E-Mail
This button is used to send an e-mail to the selected people. This form is where you enter the
details of an e-mail before sending it. On selecting E-Mail, Summit will offer to print details of any
people selected who have no e-mail address on file.
When you first open this form the details that you entered on your last e-mail will be displayed. You
can change any of these details before clicking the Send button to send the e-mail or e-mails.
If you enter anything in Salutation Text, whatever you entered plus the person’s salutation followed
by a blank line will be placed at the top of the body of the e-mail. If you don’t have anything in
Salutation Text then only the actual message content will be displayed.
Whatever you enter in Message Subject will be displayed as the subject of the message in your
mail system’s out tray and the recipient’s mail system’s in tray.
The Message field is where you enter the actual details of the message you want to send.
This where you say which Messaging Profile you want to use when sending e-mail. The profile you
enter here must match exactly one of the profiles found under Mail and Fax in Control Panel. You
will not be able to send a message until you have entered your messaging profile. See the
Determining And Entering Your Messaging Profile for more information.
Once you have set up your message, click on the Send button to send it. Click on the Exit button to
close this form without sending any message.
Note that sending a message places the mail message in the out tray of your mail application. The
messages created here will not actually be sent until you start your mail application and send them.
Toolbar Buttons
Click to send the e-mails.
260 - Chapter 6: Main Menu
Summit Event Manager - Light
Record Bulk Contact
After sending an e-mail or printing mailing labels, Summit will ask if you want to record a contact
each person selected. If you say Yes, the following screen is displayed.
Chapter 5: Main Menu - 261
Summit Event Manager - Light
Reporter Listing Choices
There are a number of different listing layouts to choose from, depending on the type of data you
want to see on the listing. You are also given the option of designing your own reports.
Click
on the
scroll
bar for
more
reports
262 - Chapter 6: Main Menu
Summit Event Manager - Light
To print a standard listing from the reporter, take the following steps.
1.
It is assumed that you’ve already made your selection on the data you want to report. After
you click on the Listing button, Summit will count the number of records in your selection and
ask if you still want to produce a listing. Sometimes you may just want the numbers, not the
names. If you want to produce a listing, click on the Yes button.
2.
On the Reporter Listing Choices form, select the listing you require by clicking on the record
selector bar to the left of the report. When selected, the bar will change colour to dark grey
with a white triangle. Click on the Preview button.
3.
If you have marked the Prompt for Alternative Reporter and Delegate Listing Headings check
box on the Global Options form, you will be given the opportunity to modify the listing heading
before it is printed. Change the heading or leave it as is and click on the OK button. The listing
will be displayed in print preview.
To create your own listing, take the following steps.
1.
Again it’s assumed you’ve made your selection and clicked on the Listing button. Select the
report layout you want by deciding how many columns you require. Each of the reports will
display the primary person’s name and then one, two three, four or five columns of data.
2.
Click on the Columns Content button on the toolbar. The following form is displayed.
3.
Select the data you want in each column by clicking on the down arrow to the right of each
field. All the fields are limit-to-list combo boxes so you can’t have data that’s not in the list.
4.
If you elect to have data in the Group By field, the report will effectively be sorted (grouped) by
that data.
5.
If you mark the Show Number in Each Group field, Summit will total the number of people in
the selected Group. Each time you open the User Specified Report Columns form, the data
you selected last time will be displayed. Note: This same feature is available in the Delegate
Lists option.
Toolbar Buttons
Click to define your own report.
Click to print the selected listing.
Chapter 5: Main Menu - 263
Summit Event Manager - Light
Equipment Reports
This form enables you to print reports of equipment requirements. Equipment is either technical or
catering equipment, depending if you entered the requirements in the Catering Events or the
Presenter Details form.
To use this form, click on the record selector bar beside each report you want to print, then click on
the Preview button. Or you can use the up and down arrows on your keyboard to navigate to the
report you require. For those reports you print often, mark the Favourite check box to move them to
the top of the form.
Equipment Requirements by Catering Event
This report shows all the equipment specified as required for each catering event. The report is
sorted in date and time order of the catering event. Only those catering events that have any
requirements entered against them are listed.
Equipment Requirements by Catering Location
This report shows all the equipment specified as required for catering events at each location. The
report is sorted in date and time order of the catering event within each location. This report could
be used for determining if equipment should be moved from one location to another between
catering events. Only those catering events that have any requirements entered against them are
listed.
Equipment Requirements by Presentation
This report shows the equipment required for each individual presentation. The report is sorted in
date and time order of the session. The report details the standard equipment of each session,
each presentation within the session and the equipment required for it. This report could be used
by session monitors to check that all equipment is present and working for each speaker.
Equipment Requirements by Session
This report summarises the equipment required for each session and is divided into standard
equipment and equipment for presenters. The report is sorted in date and time order of the session
and each session is present - even if there is no equipment. This report is the most useful for
determining overall equipment requirements.
264 - Chapter 6: Main Menu
Summit Event Manager - Light
Equipment Requirements by Session Location
This report shows the equipment specified as required for sessions at each location. The report is
sorted by location, and then in date and time order of session within each location. This report
could be used for determining if equipment should be moved from one location to another between
sessions.
Chapter 5: Main Menu - 265
Summit Event Manager - Light
Presenter Reports
This form enables you to print reports of abstract, presentation and presenter details.
Abstract Review Status
This report lists, by presenter, each abstract and the status of the review process, i.e. for each
reviewer, the date sent and the date returned.
Abstract Status
This report lists all abstracts by abstract status and totals the number of abstracts within each
status. The report is then sorted by the presenter’s family name then given name.
Presentation Status
This report lists every presentation in this event and against each one prints what is known about it
and what its status is. The report is sorted by the presenter’s family name then given name. This
report can also be run from within the Programmer form.
Presenter Abstracts
This report will list the presenter, the title of the presentation and the abstract of a presentation
(entered underneath the presentation title on the Presenter Details form) only if the presentation
has been selected. The presenter need not be confirmed. You will be asked if you wish to display
the abstract number reference on the report.
Presenter Biographies
This report lists the biographies of presenters. You can restrict the listing to only those presenters
who are confirmed or report on all biographies held on file, regardless of the person’s status as a
presenter. The report is sorted by family name.
Presenter Follow-Up
This report shows to what extent presenters have complied with your selected requirements, and it
enables you to follow up presenters individually to ensure compliance. The presenter’s position,
266 - Chapter 6: Main Menu
Summit Event Manager - Light
division and organisation and e-mail address and all recorded telephone numbers are printed to
enable ease of contact. The requirements defined in Presenter Rules on the Setup Menu.
Non-compliance with a requirement is marked with an X, whereas compliance is left blank.
Presenters who have complied with all the requirements will not be printed on the report. The aim
is to get a blank report.
For those rules you have not selected on the Presenter Rules form, the report heads that column
with N/A, for Not Applicable.
Chapter 5: Main Menu - 267
Summit Event Manager - Light
Participation Breakdown
This option enables you to select reports that break down the attendance at the event in a number
of ways.
To use this form, select the desired report, then click on the Graph or Preview button.
Toolbar Buttons
Click to present the information in graphical form.
Click to present the information with numbers in columns.
Confirmed Delegates by Profile
This report shows how many, and what percentage of confirmed delegates fell into each interest
profile. This information can be used for examining how well the event met the needs of delegates,
based on their interest profiles, and for preparing targeting material to promote the next event.
Note that as each delegate can have multiple profiles, totalling the numbers or percentage in each
profile is meaningless. The percentage figure represents the number of confirmed delegates with
that interest profile, as a percentage of the total number of confirmed delegates.
Profiles are entered against each person on the EOI and Profile form from within Personal Details.
Confirmed Delegates by Advertising Source
This report shows how many, and what percentage of confirmed delegates heard about the event
from each advertising source. This information comes from the Source field in Personal Details.
This information can be used for determining promotional strategies for future events.
Confirmed Delegates by State (or Country if not <Default
Country>)
This report shows how many, and what percentage of confirmed delegates came from each
geographical area. The attendance is broken down into country, except for the default country,
which is broken down into states. The default country is entered in the General Settings tab of
268 - Chapter 6: Main Menu
Summit Event Manager - Light
Event Options on the Setup Menu. This information can be used in determining where to promote
future events.
Participation by Add-On
This report shows how many people selected/attended each add-on. The report also shows how
many add-ons people subscribed to. This information can be used for designing future event
programmes. For example, if all add-ons were well subscribed, and most people took a number of
add-ons, there is probably scope for increasing the number of add-ons in the next event’s
programme.
Chapter 5: Main Menu - 269
Summit Event Manager - Light
Incomplete Participation Reports
This option enables you to print reports of confirmed delegates who are not marked on the system
as having attended the event or being given their satchel. You can also print address labels for
these people.
To use this form, click on the check box beside the type of report you want to print, then click on
the Listing button for a listing, or the Label button for address labels.
Toolbar Buttons
Click to print mailing address labels. Address labels are printed in family name order.
Click to print the listing.
Confirmed Delegates Who Didn’t Attend the Event
This report lists all people who don’t have their Attended Event field marked on the Personal
Details form, or their At Event field marked on the Registration Desk Worklist form. The names are
sorted in family name order.
Confirmed Delegates Who Didn’t Receive a Satchel
This report lists all people who don’t have their Satchel Given field marked on the Personal Details
form or the Registration Desk Worklist form. The names are sorted in family name order.
270 - Chapter 6: Main Menu
Summit Event Manager - Light
Marketing Breakdown Report
This report shows how effectively the data you have in Summit is being used, and how well the
event is being marketed to people.
The Marketing Breakdown report is broken into three separate components.
Overall Breakdown
This section of the report looks at the value of the data you are holding in terms of people
expressing interest in and attending the event. If promotional material is sent to everyone on the
database, the percentage of these being converted to expressions of interest and confirmed
delegates can have a large influence on the promotional costs of the event on a per participant
basis.
•
The Number column shows the number of people in each category.
•
The Percentage of Database column shows the number of people in each category as a
percentage of the total number of people in the database.
•
The Percentage of EOI column shows the number of people in each category as a percentage
of the number of people who have expressed interest.
For example, if only 40% of the total database are expressing interest, and only 50% of these
become confirmed delegates, then 80% of the promotional effort doesn’t result in attendees.
If these percentages drop too low, you may wish to look at deleting inactive records.
Full Database / Expression Of Interest / Confirmed Participation Breakdown
This section of the report looks at how effectively people have been converted from prospects to
expressions of interest and from expressions of interest to confirmed participants in each of the
participation categories. This is a measure of how effectively the event is being promoted and how
well leads are being followed up.
•
The Expressed Interest (EOI) column shows the number of people who have expressed
interest in that participation category. As people can express interest in multiple categories, the
total of this column doesn’t relate to total expressions of interest.
•
The Database/EOI Conversion Rate column shows the number of people expressing interest in
each participation category as a percentage of the total number of people in the database.
•
The Number Confirmed column shows the number of people who have been confirmed in that
participation category. As people can confirm in multiple categories, the total of this column
doesn’t relate to the total number of people confirmed in all participation categories.
•
The EOI/Confirmed Conversion Rate column shows the number of people being confirmed in
each participation category as a percentage of the number of people expressing interest in that
participation category.
•
The Confirmed/EOI Conversion Rate column shows the number of people being confirmed in
each participation category as a percentage of the total number of people in the database.
Chapter 5: Main Menu - 271
Summit Event Manager - Light
Repeat Participation Breakdown
This section of the report provides a good indicator of how your event was really rated by
participants by examining the amount of repeat business you are generating. This is a measure of
the perceived quality and value of your event.
Repeat rates mainly apply to events that are marketed to approximately the same group each year,
such as a professional association or business type annual conference.
•
The Past EOIs category refers to people who have expressed interest in past events in some
way, regardless of whether or not they have eventually participated. Because this category only
refers to expressions of interest the Number Confirmed and Repeat Rate (for confirmed)
columns have no meaning.
•
The Number on Database column shows the number of people who have participated in past
events in each category.
•
The Expressed Interest (EOI) column shows the number of people expressing interest in each
participation category who have participated in past events in the same category.
•
The Repeat Rate column shows the number of people expressing interest in each participation
category as a percentage of those who have participated in past events in the same category.
•
The Number Confirmed column shows the number of people confirmed in each participation
category who have participated in past events in the same category.
•
The Repeat Rate column shows the number of people confirmed in each participation category
as a percentage of those who have participated in past events in the same category.
272 - Chapter 6: Main Menu
Summit Event Manager - Light
Attendance Record
This is a generic report that shows all the sessions and associated professional education credits
in an attendance record format. It can be used by delegates to verify their attendance at the event.
The information on session names and professional education credits is entered on the Sessions
form.
Contact Follow-Up
See a description of this form under the Organiser.
Chapter 5: Main Menu - 273
Summit Event Manager - Light
FINANCIALS
Payments In
The Payments In form enables you to enter payments you have received. The functionality of this
form is the same as the Enter a Payment form called from within the Money Menu on Personal
Details. Refer to that section for instructions on the use of this form.
Allocate Payments
The Allocate Payment form enables payments that have already been entered into the system to
be allocated against people and activities.
When you click on the Allocate Payment button, the Unallocated Payments form is displayed.
Select the appropriate payment by using the navigation buttons at the bottom left of the form and
click on the Allocate Payment button. In the above example, we only have 1 of 1 (Filtered) record.
Allocating a payment is a two-step process, involving firstly the location of the person’s record
against which the allocation will be made, and then the distribution of the payment across the event
activities for that person.
Toolbar Buttons
Click to allocate the selected payment.
Click to delete the displayed payment.
274 - Chapter 6: Main Menu
Summit Event Manager - Light
Locating a record
As you’ve opened the Allocate Payment form from the menu, it will initially be opened at the record
of the first person on the database To locate a specific person’s record, use the pull-down lists and
filters in the form header or cycle through records using the navigation buttons.
If you click on the Find by Family Name (Outstanding Balances Only) button, a pull-down list of all
people on the database with a non-zero amount owing will be displayed in family name order. If
you click on the Find by Family Name button, a pull-down list of all people on the database will be
displayed in family name order, whether or not they have any amount owing.
If you click on the Find by Organisation (Outstanding Balances Only) button, a pull-down list of all
people on the database with a non-zero amount owing will be displayed in organisation order and
then family name order. If you click on the Find by Organisation button, a pull-down list of all
people on the database will be displayed in organisation order and then family name order,
whether or not they have any amount owing.
Select the record of the person to whom you wish to allocate the payment by clicking on the entry
in the pull-down list. Once you’ve located and switched to the desired record, the payment can be
allocated.
If you don’t know to whom you must allocate the payment, as the cheque has no delegate name or
event details on it, go to the ‘Allocate a Record: Person Unknown’ topic in Chapter 3, How To.
Allocating the payment
If you’ve elected that Summit automatically allocate the payments in Event Options, the system will
apportion the amount of this payment for Registration Charges in the space provided matching the
liability. The payment amount doesn’t need to match the Still Owing amount, but it isn’t possible to
allocate more than is remaining unallocated on the selected payment. It is possible to allocate less
than is remaining unallocated, for example, if the one payment was covering a number of different
people. If the payment amount exceeds the amount owing, a red Overpaid will be displayed.
Overpayment may indicate that the person’s details are incomplete or incorrect.
Click on the OK button to complete the payment allocation.
Note: The Restrict to Matching Amount Owed filter uses pattern comparison, not arithmetical
comparison. This means that if you enter ‘5’ the system will find matches with $5.00, $500.00 and
$195.00.
Chapter 5: Main Menu - 275
Summit Event Manager - Light
Financial Reports
This option enables you to print a number of financial reports.
To use this form, click on the record selector bar beside each report you want to print, then click on
the Preview button. Alternatively you can use the up and down arrows on your keyboard to
navigate to the report you require. For those reports you print often, mark the Favourite check box
to move them to the top of the form.
All the reports are displayed in print preview. This enables you to print all or some of the report to
hard copy, nominate the number of copies and nominate the printer.
Additional Charges
This report lists all records that have data in the Additional Charges field on the Registration
Details form. The report is sorted by family name and lists the reason for the additional charge and
the amount. It totals the amount.
Credit Card Commission Breakdown
This option enables you to produce a report on commissions paid on payments that have been
entered into the system.
276 - Chapter 6: Main Menu
Summit Event Manager - Light
You can report on all payments that have been entered, or you can restrict the payments reported
to a specified Payment Type, or the date the payment was banked or processed. Enter the
restrictions (if any) you want on the report and, click on the Preview button. Note: The payment
received date is the date the payment is entered into Summit. The payment banked date is the
date you ran the Banking Run that included the payment - not the date on the Bank Deposit Slip.
Discounts
This report shows all people who have been given a discount and the reason the discount was
given. Discounts are entered on the Registration Details form. The report is sorted in descending
discount amount.
Financial Groups
This report lists all people and their associated Financial Groups that have been set up within this
event. First it will list all those people not in a Group, then the name of each Group. The format of
the name is selected within the Event Options → Name and Address Format tab. All Financial
Group Name Formats begin with the group leader’s PIN. All people within each Group are then
listed along with their position and organisation, suburb/city and state/country. The number in each
Group is counted and the number of people reported is counted.
Financial Status of Delegates
This report will only total event charges incurred by each delegate. It’s sorted by family name and
totals the amounts of Delegate Amount Due, Delegate Amount Paid and Currently Owes.
GST Payment Record
This report is a record of the goods and services tax (GST) payments made to the government. It
is not a record of payments to other suppliers.
GST Receipts and Payments
This report summarises, for a date range, the total amount of income generated (Summit is based
on an accrual system), any GST-free sales, the GST component of the income generated, any
GST paid to Suppliers and what GST amount is still to be paid to the government. This report
provides the figures required for the Australian Business Activity Statement (BAS).
Income Reconciliation Report
This report has two main purposes. Firstly, it shows participation in the event to date in terms of
people in each registration category and people enrolled in or subscribing to each add-on. It also
shows the amount of money owed for all event activities. Secondly, this report reconciles the three
key financial areas of:
•
the total of the amounts paid and owed by all people based on the activities for which they are
enrolled
•
the total of receipts issued
•
the total of payments received.
If there is any imbalance between these areas, it is shown in the variance section at the bottom of
the report. Any imbalance shown means that either the data files have been tampered with or there
was a system failure midway through a transaction. If there are any variances, you should not
Chapter 5: Main Menu - 277
Summit Event Manager - Light
enter any more information until you’ve corrected the reason for the imbalance. See next
page for more information.
You should close and then re-open the Reconciliation Report and the system will assist you in
correcting the errors. The three possible variances are:
1. Surplus/(Deficiency): Paid plus Owing compared to Calculated Income
If this is a positive figure, it means that the total of receipts issued, plus the amount still owed by
participants is greater than the total amount of income due for the event (based on total
activities multiplied by the appropriate registration and add-on fees).
If this is a negative figure, it means that the total of receipts issued, plus the amount still owed
by participants is less than the total amount of income due for the event (based on total
activities multiplied by the appropriate registration and add-on fees).
2. Surplus/(Deficiency): Individual Payments compared to Payments Allocated
If this is a positive figure, it means that the total of amounts showing as paid on each person’s
record in each participation category is greater than the total amount issued in receipts.
If this is a negative figure, it means that the total of amounts showing as paid on each person’s
record in each participation category is less than the total amount issued in receipts.
3. Surplus/(Deficiency): Individual Payments compared to Receipts Issued
If this is a positive figure, it means that the total showing in payments as having been allocated
to receipts is greater than the total amount of issued receipts.
If this is a negative figure, it means that the total showing in payments as having been allocated
to receipts is less than the total amount of issued receipts.
When Summit attempts to correct these errors, it takes the following steps in the following order.
1.
It checks each person’s add-ons and ensures that the amount due for the add-ons is equal to
the quantity of that add-on multiplied by the fee for that add-on.
2.
It checks that each person’s registration fee matches his or her registration type.
3.
It checks that only people with a valid registration type are shown as confirmed attendees.
4.
It resets each person’s amount due for attendee activities based on the above revised
registration and add-on amounts.
5.
It checks that the amount allocated for each payment matches up to the total of receipts with
that payment number. For any out-of-balance payment allocations, you will be prompted to
allow Summit to reset the amount allocated from the payment to match the total issued in
receipts against that payment.
6.
It checks that each receipt points to a valid payment. If it doesn’t, you will be prompted to allow
Summit to create a new payment for that receipt, with a payment type of ‘Adjustment’.
7.
It checks that the amount showing as paid on each person’s record in each participation
category matches the total of receipts issued for that person in each participation category. If it
doesn’t match, you will be prompted to allow Summit to adjust the amount showing as paid to
the total of receipts for the person.
If Summit carries out all the above procedures, your event will be restored to a state of financial
balance.
Outstanding Payments
This report sorted, in family name order, shows all people who still owe money in relation to the
event.
278 - Chapter 6: Main Menu
Summit Event Manager - Light
Overpaid
This report shows all people who have overpaid in relation to the event, sorted in family name
order.
Participation and Financial Status
This report shows only people who have a Registration Type and/or an Add-on, their event
participation and their current financial status, sorted in family name order.
Registration Desk Worklist
This report shows all people who are deemed delegates or participants, i.e., they have a
Registration Types and/or an add-on. It lists against every person their organisation, whether
they’re a full delegate or not, amount still owing (if any), if they have been registered as being at
the event and if they have been given a satchel. This report is the listing from the Registration
Desk Worklist form, and is used for registering delegates on arrival.
Chapter 5: Main Menu - 279
Summit Event Manager - Light
Banking Run
This process summarises all payments received since the last Banking Run and prepares bank
deposit slips for cash and cheque payments and a summary report for each of the other payment
types used.
As this process will update the Payments File, it can’t be run while anyone else is entering or
allocating payments. The following form is displayed to warn you.
If you have marked the check box Check Payment Details Before Banking Run in Global Options,
you can check and perhaps edit the payments before they’re processed. The following screen is
displayed.
280 - Chapter 6: Main Menu
Summit Event Manager - Light
Once you’ve checked that all your payments are correct, click on the OK button and Summit will
display the Payment Types Requiring Processing form. This form summarises the payments not
yet processed. It displays, for each payment type, the number of payments, the total amount and
the earliest and the latest date of the outstanding payments.
You can overwrite the displayed date with an alternate date for the bank deposit slips. This can be
useful if you’re running this process after banking hours, and want to have the bank deposit slips
marked with tomorrow’s date.
If you click on the Exit button, the Banking Run will be cancelled.
After you’ve specified a new date, or accepted the current date, you can leave all the Payment
Types as marked to be processed, or select only those payment types you want processed.
Click on the Preview button to start the Banking Run.
Summit will do the following tasks in the following order:
1. Produce a bank deposit slip for Cheque payments.
2. Produce a bank deposit slip for Cash payments.
3. Produce summary reports for all other (user defined) payment types:
• a Summary of Mail Order/Telephone Order transactions for American Express,
Bankcard/Mastercard/Visa and ‘Generic’ credit cards
• a Summary of Sales Voucher transactions for Bankcard/Mastercard/Visa, American Express
and ‘Generic’ credit cards
• a Debit Mail Order Summary of charges for Diners Club.
4. Produce a summary report for Reversals.
5. Produce a summary report for Refunds.
6. Prompt to check if everything has been printed correctly. If you confirm that everything has been
printed correctly, the Payments Processed on <the current date> Report will be produced and
all listed payments will be marked as having been processed. If you don’t confirm that
everything has been printed correctly, no summary report will be produced, and the payments
will not be marked as processed and the Banking Run may be re-done. The Payments
Processed report is sorted in Payment Type order.
After you’ve completed or cancelled the Banking Run, other users may resume entering and
allocating payments.
Toolbar Buttons
Click to process the payments and print the deposit slips and summary reports.
Chapter 5: Main Menu - 281
Summit Event Manager - Light
Re-Do Banking Run
You can re-do a Banking Run even though you have confirmed the Run was completed
successfully. If there are no unprocessed payments, the following message is displayed.
If you click OK, the Select Date form will be displayed so you can choose which Banking Run date
to re-do. The date defaults to today’s date. After selecting a date. The following message is
displayed.
If you select Yes, the Confirm Banking Run message is displayed and you can re-do the Banking
Run now or later.
282 - Chapter 6: Main Menu
Summit Event Manager - Light
Payments In Reporter
This option enables you to produce a report on payments that have been entered into the system.
It also enables you to edit an incorrectly entered payment.
This option reports on payments, not the allocation of payments. To determine how a payment has
been allocated, use the Receipts Reporter.
If you want a report on the payments held in the system, enter the restrictions (if any) you want on
the report, then click on the Preview button.
As an example, if you wanted to summarise the payments you’ve received by payment type by
week, you would select the Payment Type from the pull-down list in the Payment Types field and
enter the start of the week in the Restrict to Payments received on or after field and the last day of
the week in the Restrict to Payments received on or before field.
The payment received date is the date the payment is entered into Summit. The payment banked
date is the date you ran the Banking Run that included the payment - that is not necessarily the
date that was printed on the bank deposit slip. For example, you may do a Banking Run on a
Thursday night and put Friday’s date for the bank deposit slip. In this case, the system will record
the date you processed the payment (Thursday), not the date you banked the payment. The
remaining fields relate to the equivalent fields on the Payment Entry form.
You may edit a payment after it has been entered into Summit. Please refer to the next page for
more details.
Toolbar Buttons
Click to print a Payments Report. You will be asked if you want to include receipts on the
report.
Click to edit a payment.
Chapter 5: Main Menu - 283
Summit Event Manager - Light
Edit Incoming Payments
In order to correct minor errors after you’ve entered a payment, you can edit it through this form.
Use the Payments In Reporter to narrow down the selection criteria for the payment, then use the
navigation buttons on the bottom of the form to find the required payment.
You can’t change the payment counter, the amount of the payment, the date it was received or
banked, however, all the other fields can be changed.
284 - Chapter 6: Main Menu
Summit Event Manager - Light
Receipts Reporter
This option enables you to produce a report on receipts that have been issued (printed).
This option reports on the allocation of payments, not entry of payments. To determine whether or
not a payment has been received, use the Payments In Reporter.
You can report on all receipts that have been issued, or you can restrict the report by entering the
restrictions you wish into the spaces provided. This facility is useful if you’re trying to determine
whether a receipt has been issued to the correct person.
Enter the restrictions (if any) that you want on the report, then click on the Preview button. The
Person Number, Family Name and Organisation fields relate to the equivalent fields on the
Personal Details form. The Receipt Date is the date the receipt was printed. The remaining fields
relate to the equivalent fields on the Allocate Payment form.
As an example, if a Mr Smith was querying whether or not you had issued a receipt for his
delegate payment of $250.00, entering ‘smith’ into the Restrict to (Part) Family Name field and
entering ‘250’ into both the Restrict to Total equal to or greater than and Restrict to Total equal to
or less than fields would restrict the report to only those receipts issued to anyone with a family
name of Smith with a receipt amount of $250.00.
The report will print a total on the Receipts Report of the selection you made. For example, if you
wanted to total your receipts by week or month, enter the date criteria in the restrict date fields and
click on the Preview button.
Toolbar Buttons
Click to print a Receipts Report.
Click to edit a payment.
Chapter 5: Main Menu - 285
Summit Event Manager - Light
Edit Receipts
This option is for displaying receipts that have been previously issued to enable you to reprint or
delete any receipt.
When you open this form, all previously issued receipts will be displayed. You can locate a receipt
by clicking in the Find by Family Name field and entering all or the start of the family name you
wish to locate and then pressing Tab or Enter. Alternatively, you can move between receipt
records by using the navigation buttons at the bottom of the form until you locate the receipt you
wish to reprint or delete.
Once you’ve located the required receipt, click on the Preview button if you wish to reprint it (you
can elect to have the word ‘Copy’ printed on the receipt in red if you’ve a colour printer), or press
the Delete button to delete it.
Receipts can only be printed one at a time from within this form.
Deleting a receipt effectively reverses an allocation. For further information on how to delete a
receipt, refer to the topic ‘Reverse an Allocation Error’ in Chapter 3, How To. A message will be
displayed warning you of the consequences of deleting a receipt that has been printed.
This function is also available from the Money Menu on the Personal Details form.
Toolbar Buttons
Click to delete the displayed receipt and reverse the allocation.
Click to reprint the selected receipt.
286 - Chapter 6: Main Menu
Summit Event Manager - Light
Tax Invoices Reporter
This screen allows you to select tax invoices that have already been created and then view them
and modify the reason for the adjustment note or produce a report of the selected tax invoices and
adjustment notes.
You can select all tax invoices that have been entered or you can restrict the tax invoices selected
by entering the restrictions you wish into the spaces provided.
Enter the selection restrictions (if any) that you want and then click the Edit button to view the tax
invoices individually or to make changes to the adjustment note reason. Click on the Preview
button to produce a report of the selected tax invoices.
You can also use this screen to generate tax invoices without printing them or reset your tax
invoices which will delete all existing tax invoices and adjustment notes before regenerating them.
You may want to generate tax invoices and adjustments without printing them to determine your
GST inputs for your activity statement as inputs are determined from the tax invoices.
To generate all unproduced tax invoices click Generate Tax Invoices. To delete all existing tax
invoices and adjustment notes before regenerating all tax invoices and adjustment notes.
Toolbar Buttons
Click to print a Tax Invoices Report.
Click to view (only) a tax invoice or to change the adjustment note reason.
Click to delete existing tax invoices and generate them all ‘from scratch’ without
printing them.
Chapter 5: Main Menu - 287
Summit Event Manager - Light
Click to generate new tax invoices without printing them.
288 - Chapter 6: Main Menu
Summit Event Manager - Light
Edit Tax Invoices and Adjustment Notes
Click to view (only) or delete a tax invoice or adjustment note or to just change the adjustment note
reason from the default (entered in the Tax tab of Event Options).
The system will alter the display depending if it’s a tax invoice or adjustment note. If it’s an
adjustment note there will be an area to alter the default adjustment note text under the line item
display. In the case above, you would scroll through the rest of items as only the first five are
displayed. It is strongly recommended that you do not delete tax invoices or adjustment notes as:
1. If the tax invoice has been printed the information in your event file may no longer reflect the tax
invoices you have issued.
2. If you have produced reports for taxation purposes showing GST receipts and payments the
information in your event file may no longer reflect the figures on that report.
You can move between tax invoice records by using the navigation buttons at the bottom of the
screen until you locate the tax invoice you wish to print or you could Fine by Family Name. Once
you have located the tax invoice you want, you can reprint it by clicking on the Preview button.
Mark the Mark Tax Invoice As Copy check box if you wish the system to stamp the word Copy on
the tax invoice. Clear this check box if you do not want the word copy stamped on the tax invoice.
Note that you can only mark previously printed tax invoices as copies.
Chapter 5: Main Menu - 289
Summit Event Manager - Light
Toolbar Buttons
Click to print the displayed Tax Invoice.
Click to delete the displayed Tax Invoice.
290 - Chapter 6: Main Menu
CHAPTER 6
UTILITIES
This chapter describes the options on the Utilities Menu.
These options enable you to:
• perform support functions
• updatebulk mail codes.
Chapter 6: Utilities - 291
Summit Event Manager - Light
SUPPORT UTILITIES
Database Table Access
This utility enables you to directly edit the underlying tables in Summit and should only be used if
you know what you’re doing. The following form is displayed.
Run Macro
This utility can run specialised macros and should only be used under the direct supervision of
your qualified support centre.
292 - Chapter 6: Utilities
Summit Event Manager - Light
Update Bulk Mail Codes
This process inserts the national presort indicator for all records with an Australian address that
don’t have one. This process can take quite a while.
The national presort indicator is a method of sorting mail into mail centres. This attracts discounts
from Australia Post for large volume mailouts. Each Presort Indicator (Mail Centre) covers multiple
postcodes.
This process takes each person’s Suburb/Town and State and matches it against the 13,600
postcodes on file. If it can’t find a match, it leaves the Bulk Code field blank.
If you don’t know the postcode or bulk mail code for an Australian address, double-click in either
the Postal Code or Bulk Code fields on the Personal Details form and Summit will get the postcode
and bulk mail presort indicator code for you.
For more information, tips and hints on the quickest way to find a postcode, refer to the ‘Find a
Postcode’ topic in the Chapter 3, How To.
Chapter 6: Utilities - 293
TROUBLESHOOTING GUIDE
For more information, please visit our website www.miesoftware.com and go to the Support Online section.
Difference in Numbers on Catering Requirements Report
and Function Attendance Listing
The Catering Requirements report on the Event Reports menu and the Function Attendance
Listing (obtained by clicking on the People button) can produce different totals of people attending
a catering event. Which total is correct depends on the relationship between the add-ons and the
catering event.
1.
Catering Requirements Report Is Correct
This report is designed to minimise the number of people to cater for in circumstances where a
single person can sign on for multiple add-ons that apply to the same catering event but
should not get multiple catering entries. For example, assume you had four pre-conference
workshops on the same day with the following rules:
• anyone could go to any or all of the workshops
• anyone going to any of the workshops was entitled to lunch.
The Catering Requirements report will look at what each person is doing and will only add one
to the number requiring lunch, regardless of whether that person is going to one, two, three or
four workshops. In this case the Catering Requirements report would provide the correct total
of people to be catered for.
Were you to print out a Function Attendance List, each person would be listed once for each
add-on subscribed to, and the total to be catered for would therefore be exaggerated. You can
still use the report to print names, but note the duplicated names and use the total from the
Catering Requirements report.
2.
Function Attendance Listing Is Correct
In some circumstances though, the above method of working can produce incorrect figures
where you want all instances of an add-on to be included and there is more than one add-on.
For example, assume you had a gala dinner with one add-on being an additional adult ticket
and another add-on being an additional child ticket and a person orders one additional adult
ticket and one additional child ticket. In this case, the Catering Requirements report would
follow its normal processing method and only add one to the number of people requiring the
dinner, instead of two.
In cases like this, don’t use the Catering Requirements figure, use the figure on the Function
Attendance Listing.
294 – Troubleshooting Guide
Summit Event Manager - Pro
Equipment Reports Don’t Show Correct Equipment in
Sessions
This problem can occur if you have concurrent sessions but have not entered a Programme
Sequence for each of the concurrent sessions on the Sessions screen. Summit requires this
information to be able to determine in what order to place sessions that start at the same time on
the same date. To correct this problem, open the Sessions screen and enter programme
sequences for all your concurrent sessions.
Error Messages
Unrecoverable Error: 429
This error message will be displayed if you are trying to send on e-mail and Summit cannot create
a MAPI session, i.e., it cannot connect with your messaging system in order to place the e-mail into
your out-tray. Most often this message is displayed if your default messaging system is Microsoft’s
Outlook Express and not the full Outlook. Outlook Express is not fully MAPI (or Messaging
Application Programmer Interface) compliant. To check to see if your environment is fully MAPI
compliant, run our MAPI Test from our website at www.miesoftware.com -> Free Downloads ->
Click here to download developer information and tools -> mapitest.exe.
Functions on Money Menu Don’t Work
When you open the Personal Details screen or move to a new record on it, it’s very important that
you don’t start entering any information until the Outstanding field in the “At a Glance” section of
the form has been updated. If you do the Outstanding field may have “#Error” displayed as you
have interrupted the system before processing is complete. If Outstanding has an error, the money
menu will not function correctly. If this happens, close the money menu by clicking on the Exit
button. Then close and re-open the Personal Details screen.
Name Badges Don’t Fit Properly on Stationery
There are four possible causes:
1.
Your printer setup is for a different type of stationery. The majority of name badges are set up
for A4 Portrait. Check that your printer setup does not indicate Letter or other paper size.
2.
The height settings on one or more of the name badge lines is too great. For reasons that we
have not yet been able to determine, increasing the height of lines can cause badges and
tickets to increase in depth over their actual size. If you are having this problem, reduce the
height of the text lines on the name badge or ticket.
3.
The margins on the badge layout are smaller than your printer’s non-printable area. Some
printers, particularly Desk Jet printers have a very large non-printable area. To test what your
printer’s non printable area is, bring up the badge in print preview and in the top left corner of
the screen, select File then Print Setup. Note down the current margins then change all of
them to zero. Windows will not allow a zero margin and by reading your printer’s driver, it can
determine what it’s non-printable area is and put that into the margins. You can then reduce
the width of the 5 lines of data in the badge design screen and bring them in from the edges.
The best solution is to purchase stationery with larger margins.
4.
The system displays the message “Some data may not be displayed. There is not enough
horizontal space…”. To fix this, bring the badge up in print preview and in the top left corner of
the screen, select File then Print Setup and gradually reduce your margins (starting with the
left margin) until the badge data fits within each badge.
Troubleshooting Guide - 295
Summit Event Manager - Pro
Name Badges With Pictures Have "Out of Memory"
Problems When Printing
The usual cause of this problem is that the picture on the badge is too large for your computer or
printer. This can happen quite easily as your computer/printer needs sufficient memory to hold the
badge multiplied by the number of badges on each page. The best format for pictures to minimise
their size is monochrome bitmaps. Take the following very simple picture as an example.
As a high resolution TIFF 5.0 (.tif) file, it occupies 89732 bytes
As a high resolution Encapsulated Postscript (.eps) file, it occupies 69324 bytes
As a pattern (.pat) file, it occupies 14156 bytes
As a Corel Draw (.cdr) file, it occupies 10530 bytes
As a Windows Metafile (.wmf) file, it occupies 7110 bytes
As a 24 bit bitmap, it occupies 6966 bytes
As a Compuserve bitmap (.gif) file, it occupies 5938 bytes
As a 256 colour bitmap, it occupies 3382 bytes
As a 16 colour bitmap, it occupies 1270 bytes
As a WordPerfect 5.0 Graphic (.wpg) file, it occupies 14156 bytes
As a Paintbrush picture, it occupies 1173 bytes
As a monochrome bitmap, it occupies 446 bytes.
To save a picture as a monochrome bitmap, open the picture in Paintbrush (Windows 3.x) or Paint
(Windows 95 or higher) and open or paste in the picture. Select Save As from the File menu and
then select Monochrome Bitmap from the Save File As Type pull-down list.
Presenters are Marked as Confirmed But Their
Presentations Don’t Appear in the Draft Programme
This problem occurs if the presentations are not marked as Abstract Selected. To correct this,
mark each presentation as Abstract Selected. This can be done for individual presentations on
each person’s Presenter Details screen or for a large group of papers by opening the Abstract
Status screen from the Programmer.
296 - Troubleshooting Guide
GLOSSARY
Abstract
An abstract is a brief description of a presentation that a person or organisation wishes to give at
the conference or meeting. Abstracts may vary from just the title of the presentation to a detailed
description of the material to be covered by the presentation. The abstract title entered on the
Presenter Details or Programmer forms is used by Summit as the presentation subject for the draft
programme.
Add-On
An add-on is any event or thing related to the event, conference or meeting that could affect the
catering requirements and/or the amount paid by participants and/or time and space allocations at
the event venue. Examples of add-ons include:
• Pre- or post-conference workshops not attended by all delegates
• Dinners, welcome receptions, pre- or post-meeting refreshments or any other catering event not
attended by all delegates
• Events related to the social programme
• Association membership charges paid in conjunction with event fees
• Separate purchase of conference proceedings, audio or video tapes
• Board, executive, committee or other meetings requiring space, equipment or catering
• A sporting event in a conference social programme such as a golf tournament
• An accompanying person’s programme or a component of an accompanying person’s
programme
• Individual events at a sporting function such as the individual races at an athletics carnival.
If an add-on refers to a function that must be catered for (for example, an extra charge dinner) it
must also be entered as a catering event. If you wish an add-on that is not a catering event to
appear in the schedules and draft programme, it must also be entered as a session. See also
Catering Events and Sessions.
Application
An application is a computer program, (or group of programs), that performs a specific task, such
as word processing. Summit is another example of an application.
At conference
At Conference are individuals or organisations who have had the Attended Event check box
marked on the Personal Details form or the At Event check box marked on the Registration Desk
Worklist form.
Auto allocate
When a payment is allocated against a particular person, the payment must be allocated against
the amount the person owes for Delegate activities. When you auto allocate, the system allocates
the payment based on the amount owing. The allocation made by the system can be changed by
you before the allocation is confirmed.
Bulk mail code
The national presort indicator is a method of sorting mail into mail centres. This attracts discounts
from Australia Post for large volume mailouts. Each Presort Indicator (Mail Centre) covers multiple
postcodes. If you’re using the software in Australia and don’t know the postcode or bulk mail code
297 – Glossary
Summit Event Manager - Pro
for the current address, double click on the left mouse button in either the Postal Code or Bulk
Code fields on the Personal Details form and Summit will get the postcode and bulk mail presort
indicator code for you. In order to do this, the system must have the suburb and the state.
Calling screen or form
The form or menu on which you pressed an option button to open the form that you currently have
open.
Catering event
A catering event is any function that requires the provision of food and/or beverages for the people
attending the function. Catering events can occur within the main conference programme (for
example, morning tea, lunch and afternoon tea during the conference), or in conjunction with addons (for example, a welcome reception, optional conference dinner or supper following a social
programme function). See also Add-Ons and Sessions.
Check box
A check box is an on/off field that indicates whether a condition is yes or no, for example, whether
or not the address displayed or the person’s work address. When you click in a check box that
doesn’t have an X displayed, an X will appear in it to indicate that the condition is yes; otherwise,
the condition is no. When you select the check box again, the X disappears, indicating the
condition is no.
Indicates Yes (or True).
Indicates No (or False).
Combo box - limit to list
A pull-down list of available choices for a particular field. The data entered in the field must match
one of the entries in the pull-down list. The entries in the list are normally based on the entries in a
reference file. Adding a new record to the appropriate reference file will add it as an entry to the
pull-down list. To display the pull-down list, click on the small down arrow to the right of the field.
To select a value from the pull-down list, click directly on the entry in the pull-down list.
Combo box - not limit to list
A pull-down list of available choices for a particular field. The data entered in the field doesn’t have
to match any of the entries in the pull-down list. The entries in the list are normally based on the
entries in a reference file. Adding a new record to the appropriate reference file will add it as an
entry to the pull-down list. To display the pull-down list, click on the small down arrow to the right of
the field. To select a value from the pull-down list, click directly on the entry in the pull-down list. To
enter a value not on the pull-down list, type it directly into the field.
Confirmed delegate
A delegate becomes potential when the Potential Delegate check box on the Expression of Interest
(EOI) and Profile form is marked. A delegate becomes confirmed when a Registration Type is
allocated on the Registration Details form. A delegate moves from confirmed back to potential
when their registration type is cleared by clicking the Cancel Registration button on the
Registration Details form.
Confirmed presenter
A presenter becomes potential when the Potential Presenter check box on the Expression of
Interest (EOI) and Profile form is marked. A presenter becomes confirmed when the Confirmed as
Presenter check box is marked on either the Presenter Details or Programmer forms. A presenter
298 - Glossary
Summit Event Manager - Pro
moves from confirmed back to potential when the Confirmed as Presenter check box is cleared on
either the Presenter Details or Programmer forms.
Current EOI
Current EOI are individuals or organisations who have expressed interest in the current event in
any way, regardless of whether they are confirmed in any specific category. This covers both
general expressions of interest (no specific participation specified) and specific expressions of
interest in the participation categories of Delegate and Presenter.
Database file
The files containing the actual data tables. These files are readily identified by a .eve suffix (for
event file). For example event2001.eve.
Date format
Date fields require dates to be entered in formats that can be readily translated to a valid date. As
an example, for 14th June 2001 the following are all valid ways of entering a date:
•
•
•
•
•
14-Jun-01
14 Jun 2001
14 6 01
14/06/2001
14/6 or 14 6 (the system assumes the current year).
Delegate
A delegate is an individual or organisation taking part in the event or meeting as a normal
attendee. Within Summit, any person may be a member of multiple participation categories. When
you mark a person or organisation as having expressed interest in being a delegate on the
Expression of Interest (EOI) and Profile form, they are marked as a Potential delegate. When you
confirm them as a delegate by entering a registration type on the Registration Details form, they
are automatically changed from a Potential to a Confirmed delegate. If you cancel the person’s
registration, this will clear their registration type and they will change from a Confirmed back to a
Potential delegate.
Delete allowed
It is not always possible to delete records used in Summit. Records may never be deleted from
single record forms. Single record forms don’t have a delete button. In most cases, records may be
deleted from multiple record forms unless the records are being used by other parts of Summit. For
example, you may not delete registration fee records, once event fees have been locked, as
delegates may already have been registered using the registration fee you wish to delete.
Similarly, you may not delete a person’s record if there are any financial transactions for the
current event. If deleting is allowed, the delete button will be enabled. If deleting is not allowed, the
delete button will be absent or disabled.
Dialogue box
A dialogue box is a rectangular box from which Windows either displays or requests information.
Examples are the dialogue boxes that ask you to confirm that printing has been successful before
continuing processing.
Disabled button
The option button is visible but no action is taken if you click on the button. The picture or text on a
disabled option button will be grey or missing rather than black if the option button is disabled.
Glossary - 299
Summit Event Manager - Pro
Display only field
A display only field is one where information is displayed on a particular form, but may not be
altered.
In Summit, fields that may be modified are displayed on a white background (above) and display
only fields are displayed on a grey background (below).
Expression of interest (EOI)
An expression of interest (EOI) is the registration of any interest in the event. The system caters for
both general expressions of interest (no specific participation specified) and specific expressions of
interest in the participation categories of Delegate and Presenter. When you mark a person as
having expressed interest in any type of participation on the Expression of Interest and Profile
form, they are marked as Potential in that participation category. When they are confirmed in a
participation category, they are automatically changed from Potential to Confirmed in that
participation category. When a person is marked as either potential or confirmed in any
participation category their general expression of interest is automatically set to Yes.
Form (or screen) layout
Each form is divided up into three sections. The form header section, at the top of the form, usually
contains record location mechanisms. The form detail section, in the centre of the form, usually
contains details of the record being viewed or edited. The form footer section, at the bottom of the
form, usually contains the Help, Cancel, and OK buttons and any other buttons required to perform
additional tasks or open additional forms. You can cycle between the header, detail and footer
sections by pressing the F6 key.
Form (or screen) types
The following form types are used within Summit.
• Current Person forms are used for information relating to the person whose record is currently
selected on the Personal Details form. For example, the Presenter and Registration Details
forms.
• Single Record forms are used for setting parameters that are used throughout Summit. For
example, Venue Details and Banking Details. Records may not be deleted from single record
forms.
• Multiple Record forms are used for any information that may have multiple occurrences. For
example, reference files, participant details and catering events. Some multiple record forms
have record location mechanisms, but all multiple record forms have navigation buttons to
enable movement between records. Deleting of individual records is permitted on some multiple
record forms.
• Process Choice forms are not used for collecting information, but are used to determine how
you wish a particular process to be executed. For example, the type of import to perform or that
form letters to edit or print. Clicking the Exit button on a process choice form will cancel the
process.
• Menu forms don’t perform any information collection or processing functions. These forms offer
choices of other forms or processes you might wish to use. To use a menu form, simply press
300 - Glossary
Summit Event Manager - Pro
the button corresponding to the action you wish to take. Clicking the Exit button on a menu form
will return you to the previous menu. Clicking the Exit button on the entry menu will exit Summit.
• Add Only forms are used to enter information that can’t be altered or deleted once it has been
entered. For example, entering and allocating payments.
Forms
Forms (or screens) are data entry forms (such as Personal Details) and forms for record selection
(such as the Reporter). The terms ‘Forms’ and ‘Screens’ can be used interchangeably. In terms of
web sites, a form is a set of data entry fields that are processed on a web server. The data is sent
to the server when a user clicks a Send/Submit or similar button. The server then e-mails the data
to your e-mail address.
Group icon
A group icon is the graphical representation of a minimised group window. Double-clicking on a
group icon will open the group window.
Housekeeping
Housekeeping is the process of managing document files on the network. This involves the logical
grouping and naming of documents and the deletion of documents that are no longer required.
Housekeeping also includes other tasks such as the backing up of data and off-site storage of
data.
HTML
Hypertext Markup Language. The standard language for describing the contents and appearance
of pages on the World Wide Web.
Icon
An icon is the graphical representation of an object, normally an application or group window.
Interest profile
See Profile
Locking event fees
The system will not allow registration fees or existing add-on fees to be altered after registration
commences, as this would result in corruption of the financial information held within Summit.
Locking is the process where you tell the system that you’re happy with the fees you’ve set, and
now wish to be able to register delegates. Before you lock the event fees, you can create, alter and
delete registration fees and add-on details, but you can’t register people for the event. After you
lock the event fees, you can register people and create new add-ons, but you can’t alter or delete
existing registration fees and add-ons if anyone is using them. Fees can be unlocked for further
modification provided that you’ve not yet started registering people for the event.
Mailto
The Internet protocol used to send electronic mail.
MAPI
MAPI stands for Messaging Application Programming Interface. MAPI is a messaging architecture
enabling multiple applications to interact with multiple messaging systems across a variety of
hardware platforms. Examples of e-mail software packages which are MAPI compliant are
Microsoft Exchange and Microsoft Outlook.
Glossary - 301
Summit Event Manager - Pro
Maximise
Maximising results in a window taking all the available space on the screen. The maximise button
is a small button to the right of a Windows title bar containing an upward pointing arrow. Once
maximised, a window can be restored to it’s previous size. The restore button is a small button to
the right of a Windows title bar containing both a downward and an upward pointing arrow.
Minimise
Minimising closes a window and reduces it to an icon. The minimise button is a small button to the
right of a Windows title bar containing a down arrow.
Name badge stationery
The software is designed to use most of the industry standard name badge formats on an A4
sheet.
National presort indicator
See Bulk Mail Code
Navigation buttons
The navigation buttons are on forms that can access multiple records. The navigation buttons are
normally at the bottom left hand corner of the form and appear as shown below:
The use of the navigation buttons is as follows:
Move to first record
Move to previous record
Move to next record
Move to last record
If you know the record number you wish to move to, you may move directly to that record by
entering the record number in the field indicated below.
Option buttons
An option button is a small round button within a dialogue box used to select an option. Within a
group of related option buttons, you can select only one button.
Selected option button.
Unselected option button.
Organiser
Organiser is only updated from within the At a Glance section of the Personal Details form.
Organiser status is deemed to be a participation category and special badges can be printed for
them and they can be targeted from within the Reporter.
302 - Glossary
Summit Event Manager - Pro
Paper
A paper is the full content of a presenter’s presentation, normally in written form for inclusion in the
conference proceedings. The system doesn’t require the content of the papers to be entered. The
abstract title entered on the Presenter Details or Programmer forms is used by Summit as the
presentation subject when preparing a draft programme.
Participation categories
The two participation categories are delegate and presenter. These can be further divided into
Potential or Confirmed. Form letters can be sent to any of these categories. A person may also be
an Organiser, a Session Chair and/or a VIP. All participation categories can have special badges
printed for them and they can be targeted from within the Reporter.
Past EOI
Past EOI are individuals or organisations who expressed interest in previous events, regardless of
whether or not they attended. This information is entered on the Expression of Interest (EOI) and
Profile form. This field is automatically marked when you import demographics from a previous
event that used this software for individuals or organisations who were marked as expressing
interest in the previous event or any previous events. A person can also be marked as being a past
delegate or presenter depending on the type of involvement in the last event.
Potential delegate
Potential Delegates are individuals or organisations who wish to take part in the current event as a
normal participant but are not confirmed. When you mark a person or organisation as having
expressed interest in being a delegate on the Expression of Interest (EOI) and Profile form they are
marked as a Potential delegate. When you confirm them as a delegate by entering a registration
type on the Registration Details form, they are automatically changed from a Potential to a
Confirmed delegate. If you cancel the person’s registration, this will clear their registration type and
they will change from a Confirmed back to a Potential delegate.
Potential presenter
Potential Presenters are individuals or organisations who wish to take part in the current event as
presenters but are not confirmed. When you mark a person or organisation as having expressed
interest in being a presenter on the Expression of Interest (EOI) and Profile form they are marked
as a Potential presenter. When you confirm them as a presenter on the Presenter Details or
Programmer forms, they are automatically changed from a Potential to a Confirmed presenter.
Presenter
A presenter is an individual or organisation who is speaking, presenting or displaying a poster at
the conference or meeting. If stipulated as required for the conference or meeting, Summit tracks
whether presenters have submitted papers, sent biographies and photos, given their technical
requirements and registered as delegates. Within Summit, any person may be a member of
multiple participation categories.
PreSort indicator
See Bulk Mail Code
Profile
Profiles (or interest profiles) are a means of categorising and grouping the people on the database.
Up to 20 profiles may be defined, and each person on the database may have one or more of the
defined profiles assigned to them. These profiles can then be used for marketing the event and
designing the event programme to best meet the needs of your audience. For example, if you were
running a conference in the healthcare area you could define profiles for Vendor, Hospital
Administrator, Nursing, Medical, Pathology, Pharmacy, Research and Development etc.
Glossary - 303
Summit Event Manager - Pro
Program icon
A program item icon is the graphical representation of an application or document. Double-clicking
on a program item icon will open the application or document.
Record selector bar
The record selector bar is displayed on the left hand side of records. The display on the record
selector bar will vary dependent on the state of the record.
Record selector displays include:
The current record, no alterations have been made.
The current record, alterations have been made, but not saved.
The current record, selected for further action (such as deletion).
The next available position for entering a new record.
Reference file
A Reference File is a user defined list of valid items, for example, a list of valid fee categories or
membership types that is to be used by the organisation. Reference files usually have only the one
item on a form and the data is entered one record at a time. The valid items are then displayed for
selection via a combo box in a main data entry form.
Running sheet
A running sheet shows, in date and time order, everything that will happen during and around the
event, when and where it is to happen, who has to do it and what equipment is required. It is
arguably the most important collection of information for an event organiser. The Summit running
sheet combines information from sessions, catering events, presentations, equipment
requirements and ad hoc running sheet notes.
Satchel
The materials that are given to event delegates, usually at the registration desk. Typically, the
satchel contains the final programme, conference proceedings and promotional material. Satchel
can also refer to any materials that are handed out in conjunction with your event, for example,
promotional golf balls or towels. Within Summit, the satchel is used as a way of tracking whether or
not each person attending has been given the materials to which they are entitled.
Screens
See Forms
Scroll bars
Scroll bars are bars along the right edge or bottom of a field or window. They let you scroll the
contents of the window to display data that would not normally fit. Vertical scroll bars are used to
scroll through records when there are more records than will fit down the form. Horizontal scroll
bars are used to scroll through fields (or columns) when there are more fields than will fit across
the form.
Secretariat
The secretariat is the office or other place responsible for the secretarial, clerical and
administrative aspects of organising the event, conference or meeting. This is normally the place to
which registrations, enquiries and other correspondence related to the event is directed.
304 - Glossary
Summit Event Manager - Pro
Session
A session is usually a grouping of presentations at a single location starting at a given time. Within
the main section of a conference type event, there are two basic types of sessions. These are
plenary sessions, where only one session is taking place at a given time, and concurrent (or
breakout) sessions where multiple sessions are taking place at the same time, but in different
locations. If you wish any add-on (such as a pre-conference workshop) to appear in the draft
programme it must be defined as a session. See also Add-Ons and Catering Events.
Session chair
A session chair is someone who has been defined as having that role through the Sessions form. If
so designated, the field Session Chair is marked on the At a Glance section of the Personal Details
form.
Special fields
Most fields on forms within Summit simply record information, these are normal fields. Special
fields are ones that not only hold information, but also cause different actions to be taken by
Summit, dependent on the contents of the field. Examples of special fields are the Default Country
and the Salutation Text fields. Other examples of special fields are the yes/no fields that are shown
as check boxes. The information in these fields is normally used for grouping and selecting records
for reporting.
Sub-records
A sub-record is a subsidiary record that defines an element of a one to many relationship for the
main record to which it belongs. Examples of sub-records within Summit include the add-ons for
which a particular person is registered (this information is shown on the Registration Details form),
or the add-ons covered by a particular catering event and the equipment required for a particular
catering event (this information is shown on the Catering Events form). Sub-records are usually
shown as many records on the main form of a single record.
Toolbar
The toolbar on Summit forms is located in the footer of each form. Clicking once on a toolbar
button will execute the process or function indicated on the button.
Update
A field or record is updated when it is initially entered, altered in any way or deleted. A field is also
classified as being updated if a value is selected for that field from a combo box, even if the value
selected is the same as the original value.
VIP
VIP is anyone designated as such on the At a Glance section of the Personal Details form. VIP
status is deemed to be a participation category and special badges can be printed for them and
they can be targeted from within the Reporter.
Glossary - 305
INDEX
#Error..........See Functions on Money Menu Don't Work
About Summit Event Manager ....................................28
Abstract
definition ...............................................................297
in confirmation letters ...........................................238
review status ........................................................195
review status entry................................................213
Review Status report ............................................266
status....................................................................212
Status report.........................................................266
Access 97
keeping it with Access 2000 .....................................7
Add
your listing to the Reporter .....................................66
Additional Charges report .........................................276
Add-Ons
compared to catering events and sessions ............94
definition ...............................................................297
deleting.................................................................170
Participation by Add-On report .............................269
reference file screen .............................................131
registering for .......................................................169
results...................................................................222
Address formats........................................................110
Address labels ..........................................................199
changing stationery ..............................................103
printing from the Reporter.....................................259
Adjustment notes
change reason......................................................287
edit/print................................................................289
generate but don't print.........................................287
printing and deleting .............................................186
printing in bulk ......................................................240
reporter.................................................................287
set default reason .................................................112
set prompt for alternative reason when generating
.........................................................................112
start again from scratch ........................................288
Advertising sources
Confirmed Delegates by Advertising Source ........268
entry against an attendee .....................................158
reference file screen .............................................114
Aligning reports...........................................................67
Allocate payments
one payment covering many people.....................182
setting the auto-allocate feature ...........................105
Allocating payments
from personal details screen ................................182
from the menu ......................................................274
person unknown .....................................................68
American Express.....................................................135
American Letter paper ................................................67
Analysis
Marketing Breakdown report ................................271
Participation Breakdown reports...........................268
Application - definition...............................................297
At conference - definition ..........................................297
Attendance Certificates.............................................231
Attendance record ....................................................273
Audit trail .................................................................. 188
Auto allocate - definition........................................... 297
Auto table................................................................. 216
Backup ....................................................................... 69
Badges..............................................See Name badges
Bank deposit slips .................................................... 280
Bankcard.................................................................. 135
Banking details......................................................... 134
Banking Run ............................................................ 280
re-do for a date .................................................... 282
Billing address.......................................................... 189
Bulk mail code
definition .............................................................. 297
updating database ............................................... 293
Buttons
on Personal Details.............................................. 161
Calendars................................................................... 29
Call for papers............................................................ 84
Calling screen or form - definition ............................ 298
Cancel
a registration ........................................................ 169
an add-on ............................................................ 170
Catering events
compared to add-ons and sessions ....................... 94
definition .............................................................. 298
example ............................................................... 138
reference file screen ............................................ 136
Catering non-attendance
Catering Non-Attendance report .......................... 231
data entry............................................................. 171
Catering reports
discrepancy in numbers....................................... 294
Catering Requirements report.................................. 231
Change
report margins ....................................................... 67
Check
duplicate records ................................................... 70
unbanked money ................................................... 71
Check box
an introduction ....................................................... 24
definition .............................................................. 298
Combo box
an introduction ....................................................... 24
limit to list - definition ........................................... 298
not limit to list - definition ..................................... 298
Commissions
credit card breakdown report ............................... 276
Compact event file ..................................................... 21
Conference
in-house................................................................. 41
large....................................................................... 33
Confirmation letters .................................................. 238
to delegates ......................................................... 238
to presenters........................................................ 238
Confirmed delegates
definition .............................................................. 298
reports ................................................................. 269
Confirmed presenter - definition............................... 298
Contact details
Index - 306
Summit Event Manager - Pro
follow-up............................................................... 203
Contact types............................................................ 115
Contacts
record from the Reporter ...................................... 261
Contacts Reporter .................................................... 204
button ................................................................... 203
Conventions.................................................................. 2
Copy activity ............................................................. 198
Correspondence
for the one person ................................................ 172
log ........................................................................ 236
to groups of people .............................................. 235
turn off correspondence log.................................. 103
turn off footer........................................................ 105
turn off header...................................................... 105
turn off or on PIN number inclusion...................... 105
Counting records ........................................................ 72
Create refund............................................................ 184
Credit card
commissions breakdown report............................ 276
entry ..................................................................... 166
summaries............................................................ 280
Credit notes ................................. See Adjustment notes
Currency
changing the symbol .............................................. 70
Current EOI - definition............................................. 299
Custom badges ........................................................ 149
Database file - definition ........................................... 299
Database table access ............................................. 292
Date declined............................................................ 171
Date format - definition ............................................. 299
Date formats ............................................................... 29
Declined ................................................................... 171
Delegate
confirmation letter................................................. 238
definition............................................................... 299
lists....................................................................... 228
Delegates
by Registration Date report .................................. 231
by Registration Type report .................................. 231
Delete
receipt .................................................................. 185
Delete allowed - definition ........................................ 299
Deleting records ......................................................... 77
Demographics import ............................................... 120
Design
custom name badges ........................................... 149
letterhead ............................................................. 174
name badges and tickets ..................................... 144
Dialogue box - definition ........................................... 299
Diet entry ................... See Special dietary requirements
Diners Club International .......................................... 135
Disabled button - definition ....................................... 299
Discount report ......................................................... 277
Dishonoured cheques................................................. 76
Display only field - definition ..................................... 300
Duplicate person
record checking...................................................... 70
shortcut key............................................................ 30
Duplicate person warning check............................... 109
Duplicates
Possible Duplicates report.................................... 233
Edit
payments in.......................................................... 284
tax invoices & adjustment notes........................... 289
the event files directly........................................... 292
Edit names on tickets................................................249
E-mail
determining your messaging profile........................78
send button...........................................................176
sending from the Reporter....................................260
setting the format..................................................105
Enter
a new person’s details ..........................................156
a payment.............................................................179
a presenter ...........................................................192
expression of interest details ................................164
many people from the one organisation ...............158
personal details ....................................................156
Entry menu .................................................................18
Envelopes .................................................................199
Equipment
reference file screen .............................................115
Equipment reports
discrepancies .......................................................295
Error #429.................................................................295
Error installing.............................................................10
Error message
The expression you entered has a function name
that <event name> can’t find..............................12
Error messages ........................................................295
Event activity report ..................................................232
Event details ...............................................................96
Event documents screen ..........................................108
Event file
notify when open ..................................................103
Event file conversion report ......................................232
Event options ............................................................104
Event reports ............................................................230
Export
badge data in Tradevent format ...........................250
badge data in Tradevent format ...........................257
data to MYOB Card File .......................................257
name and address details to diskette ...................258
reports as web pages .............................................26
reports to a text file .................................................26
reports to Excel ......................................................26
reports to RTF or Word...........................................26
to data interchange table ......................................258
to diskette .............................................................250
Expression of interest (EOI)
data entry screen..................................................164
definition ...............................................................300
issuing ....................................................................84
Extra details ..............................................................166
Faxing correspondence
settings .................................................................111
Field – an introduction ................................................24
Fill
in organisation details...........................................158
shortcut key ............................................................30
Fill button ..........................................................158, 161
Financial groups
naming..................................................................110
Financial Groups.......................................................190
Financial groups report .............................................277
Financial reports .......................................................276
Financial Status of Delegates report .........................277
Find
a bulk code .............................................................80
a postcode..............................................................80
Form
Index - 307
Summit Event Manager - Pro
definition ...............................................................301
layout - definition ..................................................300
types - definition ...................................................300
Form letters...............................................................243
Frequent flyer details
entry .....................................................................166
Front page ................................................................232
Function Attendance reports.....................................232
Functions on Money Menu Don't Work .....................295
Gala dinner scenario...................................................60
Getting started ..............................................................1
Global options...........................................................102
Group Adjustment Notes
bulk.......................................................................242
Group icon - definition...............................................301
Group invoices
bulk.......................................................................241
Group Invoices
individual ..............................................................187
Group receipt
individual ..............................................................187
Group receipts
bulk.......................................................................241
Group Tax Invoices
bulk.......................................................................242
individual ..............................................................187
Groups ......................................................................190
GST
figures for BAS .....................................................277
notes for Australians.............................................113
Payment Receipts and Payments report ..............277
Payment Record report ........................................277
Setting up .............................................................112
Guest
name on Table Listing ..........................................214
Housekeeping - definition .........................................301
HTML
definition ...............................................................301
Icon - definition .........................................................301
Import
demographics .......................................................120
demographics table ..............................................125
from a comma delimited text file ...........................123
from a Microsoft Access database .......................124
from a previous event that used this software ......121
from a Summit data Collector file .........................121
from Access..........................................................124
from an Excel spreadsheet...................................123
from another MIE Software application.................122
structure ...............................................................127
Importer ....................................................................125
Income Reconciliation report ....................................277
Incomplete Participation report .................................270
In-house conference scenario.....................................41
Interchange table
demographic contents ..........................................125
Interest profile ............................................... See Profile
Internet
assistant ...............................................................225
MAPI definition .....................................................301
registration............................................................225
transmission report ...............................................227
Internet registration ............................ See MIE WebLink
activity log.............................................................226
check requests before processing ........................109
e-mail checking ....................................................226
308 - Index
processing status................................................. 227
unprocessed requests ......................................... 226
Invoices
for selected people .............................................. 239
print...................................................................... 239
printing from participant screen ........................... 184
Issue
call for papers ........................................................ 84
expressions of interest........................................... 84
registration programme or brochure ...................... 85
Label stationery........................................................ 102
Large conference scenario......................................... 33
Letterhead
design .................................................................. 174
secretariat details in footer..................................... 97
using your own or Summits ................................. 105
Listings
delegates ............................................................. 228
from the Reporter................................................. 262
Locations
reference file screen ............................................ 116
Locking event fees ................................................... 133
definition .............................................................. 301
Locking fees
Add-Ons .............................................................. 132
Registration Types............................................... 130
Macros ..................................................................... 292
Mail merge
creating different documents ............................... 108
customising............................................................ 76
fixing problems ...................................................... 81
Mail merge document names................................... 108
Mailto
definition .............................................................. 301
protocol................................................................ 226
MAPI
compliance .......................................................... 226
definition .............................................................. 301
Marketing Breakdown report .................................... 271
Master database
display ................................................................. 160
initiate search ...................................................... 157
search.................................................................. 160
setting location..................................................... 105
MasterCard .............................................................. 135
Maximise - definition ................................................ 302
Menu report.............................................................. 232
Merge
different documents for different categories......... 108
form letters........................................................... 245
from Form Letters ................................................ 243
from the Reporter................................................. 258
to a Word letter .................................................... 250
Messaging profile ....................................................... 78
MIE WebLink
Add-ons ............................................................... 132
Advertising sources ............................................. 114
Internet assistant ................................................. 225
Introduction.......................................................... 224
Profiles................................................................. 117
Registration types ................................................ 130
Sessions .............................................................. 141
Minimise - definition ................................................. 302
MYOB card file export .............................................. 257
Name and address formats...................................... 110
Name badge
Summit Event Manager - Pro
printing for a single person ................................... 163
produced indicator................................................ 158
Name badges ........................................................... 144
custom.................................................................. 149
definition............................................................... 302
for those not on the database................................. 87
from the Reporter ................................................. 258
print ...................................................................... 246
print to specific label printer.................................. 161
won't fit on stationery............................................ 295
Name format
for draft programme ............................................. 110
for Financial Group............................................... 110
for reports............................................................. 110
National presort indicator................. See Bulk mail code
Navigation buttons - definition .................................. 302
New
entering a new person’s details............................ 156
Open existing event.................................................... 21
Option box .................................................................. 24
Option buttons - definition......................................... 302
Options
for each event ...................................................... 104
global - for all events ............................................ 102
shortcut key............................................................ 30
Organisation
many people from the one - entry ........................ 161
Organisation receipts................................................ 237
Organisations by Registration Type report ............... 233
Organiser
data entry screen ................................................. 200
definition............................................................... 302
how to monitor tasks .............................................. 82
reassigning tasks ................................................. 205
running sheet notes.............................................. 207
task list status....................................................... 206
Outstanding payment report ..................................... 278
Overpayment .............................................................. 88
Overpayments report................................................ 279
Paper ......................................................... See Abstract
definition............................................................... 303
review status ........................................................ 195
Participation
breakdown............................................................ 268
Participation and Financial Status report .................. 279
Participation categories
definition............................................................... 303
Participation record
print run ................................................................ 240
Past EOI - definition.................................................. 303
Payment
entry ..................................................................... 179
Payment types.......................................................... 135
Payments
allocating from personal details screen ................ 182
amount unprocessed.............................................. 71
deleting................................................................... 72
edit or delete ........................................................ 283
entered incorrectly.................................................. 72
Outstanding Payments report............................... 278
Overpayments report ........................................... 279
refunds ................................................................... 88
Payments in
editing .................................................................. 284
Payments Reporter................................................... 283
People button
add-ons ................................................................132
catering - function attendance listing ....................139
financial groups ....................................................191
registration types ..................................................130
sessions ...............................................................142
Personal details
data entry screen..................................................156
PIN numbers
in correspondence ................................................105
Possible Duplicates report ........................................233
Postal code style.......................................................110
Postcode............................................. 80, 158, 293, 298
shortcut key ............................................................30
Presentation
review details entry...............................................195
Presentation Status report ........................................266
Presenter
Abstracts report ....................................................266
Biographies report ................................................266
confirmation letters ...............................................238
defining the rules ....................................................99
definition ...............................................................303
Follow-Up report ...................................................267
Presenter Reports.....................................................266
PreSort indicator .............................. See Bulk mail code
Print
a listing .................................................................250
address labels ......................................................250
an address label ...................................................199
an envelope..........................................................199
name badges................................................246, 250
single badge .........................................................163
tickets ...................................................................246
Process arrivals
at multiple registration points................................221
manually ...............................................................219
on-line...................................................................220
Professional education credits
allocating to a session ..........................................140
record ...................................................................273
Profile
Confirmed Delegate by Profile report ...................268
definition ...............................................................303
determining your messaging profile for e-mails ......78
parameter screen .................................................117
Profiles Breakdown report ....................................233
Profiles..............................................................164, 165
Program icon - definition ...........................................304
Programme
how to create and modify .......................................73
printing or exporting..............................................208
Programmer
data entry screen..................................................208
Receipt run ...............................................................237
Receipts
by organisation .....................................................237
delete....................................................................185
edit........................................................................286
print ......................................................................185
Receipts and Refunds
printing for all........................................................237
Receipts Reporter.....................................................285
Record selector bar - definition .................................304
Records
counting..................................................................72
deleting...................................................................77
Index - 309
Summit Event Manager - Pro
Recurring meeting
method 1 ................................................................53
method 2 ................................................................57
Re-do Banking Run ..................................................282
Reference file - definition ..........................................304
Refund a payment ......................................................88
Refund notice
print run ................................................................235
Refunds ....................................................................184
printing..................................................................237
Register Summit Contact Manager.............................15
Registering
many people with the same details ......................198
Registration
cancelling .............................................................169
data entry screen..................................................168
fees.......................................................................129
for the event .........................................................168
issuing the programme or brochure........................85
Registration Desk Worklist listing..............................279
Repair event file..........................................................21
Reporter
listings ..................................................................262
multi-add-ons........................................................256
multi-registration ...................................................255
multi-sessions.......................................................256
selection screen ...................................................250
Reports
changing margins ...................................................67
closing ....................................................................27
from the Reporter ................................... See Listings
output to Excel, RTF, text & HTML.........................26
printing....................................................................26
Reprint receipt ..........................................................185
Reset Summit code library reference..........................12
Restore an event file ...................................................69
Results
reports ..................................................................223
Reverse an allocation .................................................90
Review status ...........................................................195
Run macro ................................................................292
Running sheet...........................................................233
definition ...............................................................304
printing..................................................................200
Salutation text
setting the format..................................................110
Satchel - definition ....................................................304
Satchel labels ...........................................................258
Scenarios....................................................................32
Schedule...................................................................233
Schedule by location.................................................234
Screens - definition ...................................................304
Scroll bars - definition ...............................................304
Search
master database...................................................160
Secretariat
definition ...............................................................304
entering details .......................................................97
Seminar
in-house..................................................................41
Sequence..................................................................141
Session chair
definition ...............................................................305
Session Chair report.............................................234
Session Choice by Person report .............................234
Sessions
310 - Index
compared to add-ons and catering events............. 94
definition .............................................................. 305
how to create and modify..................................... 140
reference file screen ............................................ 140
sequence ............................................................. 141
Session Attendance report .................................. 234
Session Attendance Summary report .................. 234
Session Preferences and Attendance report ....... 234
Special dietary requirements
entry..................................................................... 166
report ....................................................139, 217, 263
Special fields - definition .......................................... 305
Starting Summit Light................................................. 12
Structure import ....................................................... 127
Sub-records - definition ............................................ 305
Summit
backing up ............................................................. 69
moving it to the event............................................. 86
optimising performance ......................................... 86
Summit Contact Manager
registering it ........................................................... 15
Summit Event Manager
the About Summit form .......................................... 28
Support utilities ........................................................ 292
System checking ...................................................... 109
System requirements ................................................... 2
Tables
reference file ........................................................ 119
Tabling & Seating
adding a guest ..................................................... 214
Tabling and seating
status of event ..................................................... 215
Tabling and Seating listings ..................................... 217
Tax
amount in additional charges and discounts........ 112
notes for Australians ............................................ 113
set credit/adjustment note heading on receipts ... 112
set credit/adjustment note total text on receipts... 112
set invoice heading .............................................. 112
set invoice total text ............................................. 112
set name.............................................................. 112
set Provider details for invoices ........................... 112
setting up ............................................................. 112
Tax invoices
generate but don't print ........................................ 287
print report of all/some ......................................... 287
printing in bulk ..................................................... 240
printing, or deleting .............................................. 186
reporter ................................................................ 287
reset/regenerate .................................................. 287
start again from scratch ....................................... 288
view/print ............................................................. 289
The Usual........................................... See Copy Activity
button................................................................... 162
registration ........................................................... 101
Tickets...................................................................... 144
print...................................................................... 246
Time formats
how to change ....................................................... 70
Toolbar - definition ................................................... 305
Tradevent data export .............................................. 257
Training course
chargeable............................................................. 47
Unallocate a payment ................................................ 90
Update - definition .................................................... 305
Updating Summit ....................................................... 22
Summit Event Manager - Pro
US Paper size............................................................. 67
User defined fields.................................................... 106
Venue details.............................................................. 98
Version number .......................................................... 28
VIP - definition .......................................................... 305
Visa...........................................................................135
Where am I shortcut key .............................................30
WinFax Pro
settings .................................................................111
Wrappers (outserts) ..................................................258
Index - 311