1
IBM Optim
Compare User Manual
Version 7 Release 3
IBM Optim
Compare User Manual
Version 7 Release 3
Note
Before using this information and the product it supports, read the information in “Notices” on page 141.
Version 7 Release 3 (September 2010)
This edition applies to version 7, release 3 of IBM Optim and to all subsequent releases and modifications until
otherwise indicated in new editions.
© Copyright IBM Corporation 1994, 2010.
US Government Users Restricted Rights – Use, duplication or disclosure restricted by GSA ADP Schedule Contract
with IBM Corp.
Contents
About this Guide . . . . . . . . . . . v
Organization .
.
.
.
.
.
.
.
.
.
.
.
.
. v
Chapter 1. Introduction . . . . . . . . 1
Common Elements . . . . .
Optim Directory and Common
Common Utilities . . . . .
Options . . . . . . . .
. . . . .
Optim Objects
. . . . .
. . . . .
.
.
.
.
.
.
.
.
1
2
2
3
Chapter 2. Processing Flow . . . . . . 5
Overview . . . . . . . . . . .
Sample Database Tables . . . . . .
Process Flow . . . . . . . . . .
Create a Compare Request. . . . .
Define the Table Map . . . . . .
Define Match Keys . . . . . . .
Process the Compare Request . . .
Save Information from a Compare File
Output File Formats . . . . . .
Compare Process Report . . . . .
Save the Compare Request . . . .
Summary . . . . . . . . . .
.
.
.
.
.
.
.
.
.
.
.
.
.
.
.
.
.
.
.
.
.
.
.
.
.
.
.
.
.
.
.
.
.
.
.
.
. 5
. 5
. 6
. 6
. 10
. 11
. 12
. 21
. 21
. 23
. 24
. 24
Chapter 3. Compare . . . . . . . . . 25
Open the Compare Request Editor. . . . . .
Create a New Compare Request . . . . .
Alternate Methods to Creating a Compare
Request. . . . . . . . . . . . . .
Select an Existing Compare Request . . . .
Open a Compare Request Dialog . . . . .
Using the Editor . . . . . . . . . . . .
General Tab . . . . . . . . . . . .
Source Tab – Single Table Comparison Mode .
Source Tab – Multiple Tables Comparison Mode
Notify Tab . . . . . . . . . . . . .
Process a Compare Request . . . . . . . .
Using the Match Key Editor . . . . . . .
Run the Compare Request . . . . . . .
Schedule the Compare Request . . . . . .
Compare Request Progress Dialog . . . . .
Compare Process Report . . . . . . . .
Saving a Compare Request . . . . . . . .
. 25
. 26
.
.
.
.
.
.
.
.
.
.
.
.
.
.
27
27
28
29
30
33
38
47
47
47
50
50
51
52
54
Chapter 4. Extract . . . . . . . . . . 55
Cross-Platform Compatibility . .
Run or Schedule . . . . . . .
Naming Conventions . . . . .
Contents . . . . . . . . .
Open the Extract Request Editor .
Create an Extract Request . .
Alternate Methods to Creating an
Select an Extract Request to Edit
Open an Extract Request Dialog
Using the Editor . . . . . . .
© Copyright IBM Corp. 1994, 2010
. . .
. . .
. . .
. . .
. . .
. . .
Extract
. . .
. . .
. . .
. . .
. . .
. . .
. . .
. . .
. . .
Request
. . .
. . .
. . .
55
55
55
55
56
56
56
57
57
58
General Tab . . . . . . . . . . .
Objects Tab . . . . . . . . . . .
Point and Shoot Tab . . . . . . . .
Variables Tab . . . . . . . . . . .
Object List Tab . . . . . . . . . .
Convert Tab . . . . . . . . . . .
Notify Tab . . . . . . . . . . . .
Process an Extract Request . . . . . . .
Validate the Access Definition . . . . .
Locate the Extract File . . . . . . . .
Validate Variable Value . . . . . . .
Validate Point and Shoot . . . . . . .
Extract Data and Generate an Extract Process
Report . . . . . . . . . . . . .
Schedule an Extract Process . . . . . .
Run a Process Request. . . . . . . .
Error Messages . . . . . . . . . .
Warning Messages . . . . . . . . .
Extract Request Progress . . . . . . .
Extract Process Report . . . . . . . .
.
.
.
.
.
.
.
.
.
.
.
.
.
.
.
.
.
.
.
.
.
.
.
.
59
61
62
64
65
67
69
69
69
69
69
69
.
.
.
.
.
.
.
.
.
.
.
.
.
.
70
70
70
70
71
72
74
.
.
.
.
.
.
.
.
.
.
.
.
.
.
.
.
.
.
.
.
.
.
.
.
.
.
Chapter 5. Browse Compare File Data
Contents . . . . . . . . . . . .
Open a Compare File to Browse . . . .
Tables Tab . . . . . . . . . . .
Information Tab . . . . . . . . .
Extended Compare Table Information .
Display Compare File Table Data . . . .
Column Data Display . . . . . . .
LOB Columns . . . . . . . . .
Printing Options. . . . . . . . . .
Browse Compare File Dialog . . . .
Browse Compare File Table Data Dialog .
Save Information from a Compare File . .
Output File Formats . . . . . . .
.
.
.
.
.
.
.
.
.
.
.
.
.
77
77
77
78
79
80
81
85
87
90
90
90
90
91
Chapter 6. Report . . . . . . . . . . 93
Run or Schedule . . . . . . .
Naming Conventions . . . . .
Contents . . . . . . . . .
Open the Report Request Editor .
Create a Report Request . . .
Alternate Methods to Creating a
Select a Report Request to Edit .
Open a Report Request Dialog .
Using the Editor . . . . . . .
General Tab . . . . . . .
Source File Tab . . . . . .
Compare Details Tab . . . .
Formatting . . . . . . .
Notify Tab . . . . . . .
Process a Report Request . . .
Schedule a Report Process . .
Run a Report Request . . .
Report Output . . . . . .
. . . . . . 93
. . . . . . 93
. . . . . . 93
. . . . . . 93
. . . . . . 94
Report Request 94
. . . . . . 94
. . . . . . 94
. . . . . . 96
. . . . . . 97
. . . . . . 98
. . . . . . 100
. . . . . . 101
. . . . . . 103
. . . . . . 103
. . . . . . 103
. . . . . . 103
. . . . . . 104
iii
Chapter 7. Row List Files . . . . . . 105
Example 1 . . . .
Character Data . . .
Date/Time . . . .
Numeric Data . . .
Partial Primary Key .
Example 2 . . . .
Example 3 . . . .
Using the Row List File
.
.
.
.
.
.
.
.
.
.
.
.
.
.
.
.
.
.
.
.
.
.
.
.
.
.
.
.
.
.
.
.
.
.
.
.
.
.
.
.
.
.
.
.
.
.
.
.
.
.
.
.
.
.
.
.
.
.
.
.
.
.
.
.
.
.
.
.
.
.
.
.
Chapter 8. Command Line Interface
.
.
.
.
.
.
.
.
105
105
106
106
106
106
107
107
109
Command Line Tasks . . . . . . . . . . 109
Guidelines . . . . . . . . . . . . . . 109
Syntax Conventions . . . . . . . . . . . 110
Compare, Extract, and Report Processes . . . . 110
Compare, Extract, and Report Syntax . . . . 110
Command-line Keywords . . . . . . . . 111
Override Keywords . . . . . . . . . . 114
Examples . . . . . . . . . . . . . . 118
Return Codes . . . . . . . . . . . . . 120
Appendix A. Row List Files . . . . . 123
Example 1 . . .
Character Data . .
Date/Time . . .
Numeric Data . .
Partial Primary Key
iv
.
.
.
.
.
.
.
.
.
.
.
.
.
.
.
.
.
.
.
.
.
.
.
.
.
.
.
.
.
.
IBM Optim: Compare User Manual
.
.
.
.
.
.
.
.
.
.
.
.
.
.
.
.
.
.
.
.
.
.
.
.
.
123
123
124
124
124
Example 2 . . . . .
Example 3 . . . . .
Using the Row List File .
.
.
.
.
.
.
.
.
.
.
.
.
.
.
.
.
.
.
.
.
.
.
.
.
. 124
. 125
. 125
Appendix B. Command Line Interface
127
Command Line Tasks . . . . . . . . .
Guidelines . . . . . . . . . . . . .
Syntax Conventions . . . . . . . . . .
Compare, Extract, and Report Syntax . . . .
Command-line Keywords . . . . . . .
Override Keywords . . . . . . . . .
Return Codes . . . . . . . . . . . .
Examples . . . . . . . . . . . . . .
Browse a Compare File . . . . . . . .
Run a process from the command line . . .
Run one or more processes as a scheduled job
from the command line . . . . . . . .
Run one or more processes using a parameter
file . . . . . . . . . . . . . . .
Run one or more processes using a parameter
file with overrides . . . . . . . . . .
Run a process using an override file. . . .
.
.
.
.
.
.
.
.
.
.
127
127
128
128
129
132
136
137
137
137
. 137
. 138
. 138
. 138
Notices . . . . . . . . . . . . . . 141
Trademarks .
.
.
.
.
.
.
.
.
.
.
.
.
. 143
Index . . . . . . . . . . . . . . . 145
About this Guide
™
™
The IBM Optim solution includes the components Archive, Compare, Edit, and
Move. This User Manual provides information on how to use Compare to compare
sets of relational data and browse the results.
This release runs in the Microsoft™ Windows™ environment and supports the IBM
DB2™, Oracle, Sybase Adaptive Server Enterprise (ASE), Microsoft SQL Server, and
IBM Informix™ database management systems. Additional database management
systems may be supported in future releases.“Organization”
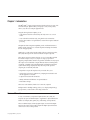
Organization
The information in this guide is organized into the following sections:
Chapter 1, “Introduction,” on page 1
General information about Compare.
Chapter 2, “Processing Flow,” on page 5
An overview of the sample database included with Optim and a sample
scenario that describes the process of using Compare to compare data.
Actions
Chapter 3, “Compare,” on page 25
Using Compare to provide a consistent method for retrieving and
comparing subsets of relational data.
Chapter 4, “Extract,” on page 55
Using an Extract Request to extract data from source tables and save that
data to an Extract File. Compare allows you to extract sets of relationally
intact data according to your specifications.
Chapter 5, “Browse Compare File Data,” on page 77
Using the Browse Utility to review summarized results of a comparison
between tables and to browse data in selected pairs of compared tables.
You can also use the Browse Utility to browse the contents of a Source File
and determine that the data is as expected.
Chapter 6, “Report,” on page 93
Using a Report Request to report on data in a Compare File.
Appendices
Chapter 7, “Row List Files,” on page 105
Creating a row list file without using Compare facilities and using the file
when extracting data.
Chapter 8, “Command Line Interface,” on page 109
Using the Command Line Interface to run one or more process requests, or
run a scheduled job, automatically.
© Copyright IBM Corp. 1994, 2010
v
vi
IBM Optim: Compare User Manual
Chapter 1. Introduction
The IBM® Optim™ solution manages enterprise data throughout every stage of the
information lifecycle. Optim enables your company to assess, classify, subset,
archive, store, and access enterprise application data.
Using the archiving features in Optim, you can
v Isolate historical data from current activity and safely remove it to a secure
archive.
v Access archived historical data easily, using familiar tools and interfaces.
v Restore archived data to its original business context when it requires additional
processing.
The Optim test data management capabilities provide an efficient alternative to
database cloning, allowing you to create development and testing environments
that are sized appropriately.
Optim helps you achieve these benefits with the following components: Archive,
Move, Edit, and Compare. This section describes the Compare component.
The Compare component compares data from one set of source tables with data
from another. Compare is easy to use, simple in concept, yet powerful in
supporting complex database structures. Programmers and DBAs can easily inspect
and compare sets of related data. Compare eliminates the time-consuming efforts
of manually “assembling” data from different tables and database management
systems. Intuitive dialogs simplify data entry tasks and provide options for
comparing sets of relationally intact data.
A comprehensive report and complete row-by-row results allow you to:
v Analyze data used to test an application by comparing the results before and
after the application is executed.
v Compare archived data with current data.
v Identify similarities and differences in separate databases.
v Track database changes.
Client access to the database, whether local or network, is required.
Intelligent window handling technology allows you to display multiple dialogs,
pop-up windows, context sensitive online help, and tutorials.
Common Elements
To carry out its functions, components of Optim (Archive, Move, Edit, and
Compare) rely upon userdefined objects as supplements to objects defined to the
database (for example, tables, primary keys, relationships, stored procedures).
These user-defined objects (collectively, Optim objects) are stored in the Optim
Directory. The Common Elements Manual explains the Optim objects and features
common to all or most of these products.
© Copyright IBM Corp. 1994, 2010
1
Optim Directory and Common Optim Objects
The Optim Directory is a set of tables that store objects needed for processing. You
must use the Configuration program to create or configure the Optim Directory
tables and stored procedures needed to access the Directory.
Objects in the Optim Directory that are common to these products include:
v Access Definitions. An Access Definition identifies a set of related data to be
processed. It references the database tables and their relationships, and provides
criteria to select specific rows within tables. An Access Definition is sometimes
used in a Compare Process.
v Column Maps. A Column Map provides specifications needed to match columns
between two tables referenced in a Table Map. Also, a Column Map can be used
to transform data, age dates in tables, and exclude one or more columns from
processing.
A Column Map is used in a single table Compare Process and can be referenced
in a Table Map used in a Compare Process.
v Column Map Procedures. A Column Map Procedure facilitates data
transformations in a process that are beyond the scope of native Column Map
functions.
v DB Aliases. A DB Alias provides parameters needed to connect with a specific
database. It is used as a high-order qualifier for an object or table name, in order
to access the appropriate database.
A DB Alias is needed anytime you reference a database object; for example, to
qualify the name of an Optim primary key, Optim relationship, or a database
table referenced in an Access Definition, Column Map, or Table Map.
v Primary Keys. Primary key columns uniquely identify each row in a database
table. A primary key can be used to create an Optim relationship, and is
required for a table that is visited more than once in an Extract Process. A
primary key is also required to enable the row selection (Point and Shoot)
feature for an Access Definition or an Extract Process.
v Relationships. A relationship is a defined connection between the rows of two
tables that determines the parent or child rows to be processed and the order in
which they are processed.
Relationships are used to retrieve related rows from tables and may be available
to the database. However, you can also define relationships to supplement those
in the database. Generally, a relationship is needed in a process that uses an
Access Definition.
v Table Maps. A Table Map identifies and matches two tables or sets of tables in
an Insert or Load Process used in a Restore Process and can exclude one or more
tables from processing. A Table Map is required for a Compare Process.
Common Utilities
Utilities common to the Optim components include:
v Schedule. Use the Schedule Utility to schedule processes and monitor
processing.
v Browse. Use the Browse Utility to review the contents of an Extract or Control
File.
v Export/Import. Use the Export/Import Utilities to copy Optim objects from one
Optim Directory to another.
These utilities are discussed in detail in the Common Elements Manual.
2
IBM Optim: Compare User Manual
Options
Options are used to maintain the environment. Generally, Product Options
parameters enforce site and system requirements, while Personal Options
customize Optim for use at each workstation.
Refer to the Installation and Configuration Guide for Product Options and the
Common Elements Manual for Personal Options.
Security options allow you to establish as many as three levels of security for using
Optim. Functional security allows you to control user access to the interface for
functions provided by Optim, object security allows you to control access to
specific objects in the Optim Directory, and Archive File security allows you to
control access to data in Archive Files. All security options are documented in the
Installation and Configuration Guide .
The Compare processes and utilities are discussed in the following sections.
Chapter 1. Introduction
3
4
IBM Optim: Compare User Manual
Chapter 2. Processing Flow
This section provides an overview of the functions and features of Compare and
the basic processing flow. The sample scenario proceeds through the basics of
selecting and comparing data, using tables that correlate to those in the sample
database distributed with Optim.
Use the comprehensive Help facility in Compare at any time to obtain more
information about a specific topic or function. You can select Help from the menu
in most dialogs or right-click and select What's This from the shortcut menu to
obtain context-specific help. Help is also available by pressing F1.
Overview
Using a sample scenario, this section briefly describes the sample database and
provides an overview of the key functions for comparing data.
Included are functions to:
v Create a Compare Request.
v Specify the sources of data to compare.
v Define a Table Map to match the tables being compared.
v Define match keys.
v Process the Compare Request and browse the results of the comparison.
v Save the Compare Request.
Sample Database Tables
The sample database tables distributed with Optim correlate to the tables used in
these examples.
The Optim sample database tables are:
OPTIM_SALES
OPTIM_MALE_RATES
OPTIM_CUSTOMERS
OPTIM_FEMALE_RATES
OPTIM_ORDERS
OPTIM_SHIP_TO
OPTIM_DETAILS
OPTIM_SHIP_INSTR
OPTIM_ITEMS
OPTIM_STATE_LOOKUP
Note: The tables used here do not contain the prefix “OPTIM_” in their names.
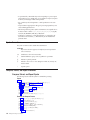
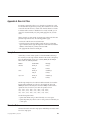
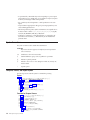
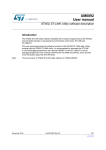
The major relationships between pairs of tables in the sample database are shown
in the following diagram. The arrows indicate the flow from parent to child.
© Copyright IBM Corp. 1994, 2010
5
The sample database includes four additional tables: OPTIM_CUSTOMERS2,
OPTIM_ORDERS2, OPTIM_DETAILS2, OPTIM_ITEMS2.
These four tables are distributed empty and are related in the same way as the
similarly named tables above. The empty tables are provided for demonstrating the
facilities in Optim.
For a complete description of the sample database tables, see the Installation and
Configuration Guide.
Process Flow
The following scenario directs you through the process of comparing a set of
relational data in a Source File, in this case an Extract File, to the data currently in
a database.
The scenario is intended to represent a typical situation in which the Extract File
represents the data as it existed before testing your application and the database
tables represent the same data after testing the application.
Note: A sample Extract File for use with this scenario is provided on the product
CD. The data in the sample Extract File is similar to, but different from the data
provided in the sample database. The name of the Extract File is CSB4data.xf.
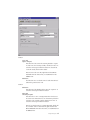
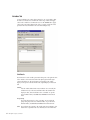
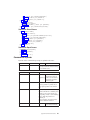
Create a Compare Request
You must create a Compare Request to identify the two sources of data to
compare, the name of a Compare File in which to save the results, and the
parameters needed to run the comparison.
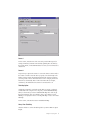
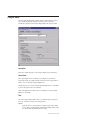
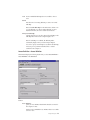
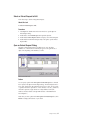
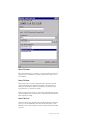
To begin, select New from the File menu in the main window. Select Compare
from the Actions submenu to display the Compare Request Editor. The General
tab is shown first.
6
IBM Optim: Compare User Manual
Description
Enter a description in Description to indicate the purpose or function of the
Compare Request. This optional description can help you identify the Compare
Request later, should you wish to reuse it.
Server Name
In the standard configuration, Optim operates as a client application with all
processing taking place directly on the Windows workstation. Unless the database
is installed locally, Optim uses the appropriate DBMS client software to
communicate with the remote database over a network.
The Optim Server option allows you to define tasks on the workstation and direct
resource-intensive data processing functions to a machine more suited to the task.
When a task requires the movement, processing, or storage of very large volumes
of data, the request can be defined at the workstation in the normal way and
directed for remote processing on a machine hosting the Optim Server.
If the optional Optim Server component is installed, you process the request locally
or select a server on which to process the request, using Server Name. If the
Optim Server option is not enabled at your site, the Server Name box is
unavailable. If this option is enabled (as in this scenario), retain the default setting,
(Local).
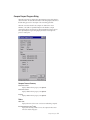
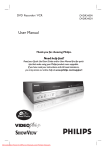
Specify Compare Process Parameters on the General tab
The General tab, lets you establish parameters for the Compare Process. Use this
tab to indicate the source of the data that is compared and the set up for the
Compare Process.
Chapter 2. Processing Flow
7
Compare File
The Compare File describes the results of the comparison. Enter a name for the
Compare File, for example, Sample1. Compare completes your entry by adding the
default extension .cmp.
Browse Results Immediately
Select the Browse Results Immediately check box to display the results of the
comparison upon completion of the Compare Process.
Create Report Immediately
Select this check box to enable the Report Options group box. You can use Report
Options to name a Report Request and enable access to the Report Request Editor,
where reporting parameters can be defined. For this scenario, leave the Create
Report Immediately check box cleared.
Comparison Mode
The mode you select depends on the sources of data you intend to compare. Since
the sources of data to compare for this scenario are an Extract File and tables from
the sample database, select the Multiple Tables: Source File – All Database Tables
comparison mode.
Compress Extract Files
Compare automatically performs two Extract Processes before performing the
Compare Process. Select this check box to automatically compress the Extract Files
for storage.
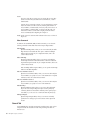
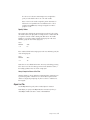
Specify Data Sources on the Source tab
Click the Source tab to specify the sources of the data to compare. The Source tab
displays different fields depending on the Comparison Mode you select on the
General tab.
8
IBM Optim: Compare User Manual
Source 1
For this scenario, enter the name of the Source File provided with Compare (for
example, PSTDEMO.xf). Enter the name and fully qualified path to the directory
that contains the file, or click the Browse button to search your list of directories to
select the file.
Source 2
Compare always compares the contents of a Source File (Extract or Archive File) to
the contents of another Source File. When you specify source data directly from a
database, Compare extracts the data before beginning the comparison. Therefore,
you must provide a name for the Extract File for Source 2. Compare performs the
Extract Process automatically. Enter a name for the Extract File (for example,
CSB4DATA.xf). The default file name extension for an Extract File is .xf.
Table Map Option
A Table Map is required to correlate the specific tables to compare or selectively
exclude tables from a comparison. You can specify a Local or Named table Map.
When you select Local, you create an embedded Table Map that is used only by
this Compare Request, and is not available to share or reuse. When you select
Named, you can specify the name of an existing Table Map or create a new named
Table Map.
For this scenario, select Local to create an embedded Table Map.
Always View Table Map
Select this check box to review the Table map before you Save or Run a Compare
Request.
Chapter 2. Processing Flow
9
Note: If you clear this check box, the Table Map Editor opens only when the Table
Map is not properly defined (for instance, when the specified Table Map does not
include all of the tables in the Extract File).
For this scenario, keep the Always View Table Map check box cleared.
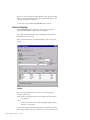
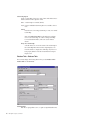
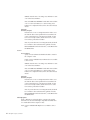
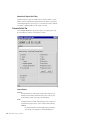
Define the Table Map
Select Edit Table Map from the Tools menu of the Compare Request Editor to
display the Table Map Editor and define the Local Table Map.
Since a Table Map must be defined, Compare will display the Table Map Editor
automatically if you try to proceed.
Note: For detailed information on the Table Map Editor, see the Common Elements
Manual
Qualifier
Enter the two-part qualifier for the Source 2 data to compare. The Qualifier
consists of: dbalias.creatorid
dbalias DB Alias of the database where the sample database tables are defined (1
to 12 characters).
creatorid
Creator ID, Owner ID, or Schema Name (depending on DBMS) assigned to
the tables (1 to 64 characters).
For this scenario, specify the qualifier that identifies the sample database included
with Compare. Click the down arrow to select from a list of the most recently used
10
IBM Optim: Compare User Manual
qualifiers, or click the browse button to select from a list of DB Aliases and Creator
IDs.
Description
Enter a description in the box labeled Description to indicate the purpose or
function of the Table Map. This field is optional.
Column Map ID
For any pair of tables in the Table Map, you can specify a Column Map to map
columns with unlike names or exclude columns from the comparison. Refer to the
Common Elements Manual for detailed information.
For this sample scenario, all of the columns in both pairs of tables have the same
names and should be included in the comparison. Therefore, Column Maps are not
required and this field should be left blank.
Server Name
Displays the name of an Optim Server or Local, to indicate where processing will
take place.
Tables Tab
The Tables tab displays the Source 1 tables and the corresponding Source 2 tables.
The Source 2 Table column populates with the same table names as the Source 1
Table column initially, by default. You can change a Source 2 table name to
compare the Source 1 data to a different database table or clear the Source 2 table
name to exclude the Source 1 table from the comparison.
If you have correctly entered the Qualifier to specify the Optim sample database
tables, no changes to the Table Map grid are required for this scenario. Select
Update and Return from the File menu on the Table Map Editor to return to the
Compare Request Editor.
Note: See the Common Elements Manual, for detailed information about Table Maps.
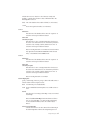
Define Match Keys
To compare specific rows in Source 1 with the corresponding rows in Source 2,
Compare needs a match key for each pair of tables. A match key consists of one or
more corresponding columns from each table. When the match key value in Source
1 is identical to the match key value in Source 2, Compare compares the remaining
columns in that pair of rows. By default, the primary key is used as the match key.
You can review the match keys for the active Compare Request using the Match
Key Editor. When a primary key does not exist or is unacceptable as the match key
for a specific comparison, you can define a match key using the Match Key Editor.
Select Edit Match Keys from the Tools menu in the Compare Request Editor to
display the Match Key Editor.
The Match Key Editor displays the list of tables specified in the Compare Request.
The Focus arrow in the first column of the table list indicates the pair of tables for
which the corresponding Match Key column information is displayed.
Chapter 2. Processing Flow
11
For this scenario, the Source 1 primary key is used as the match key for each pair
of tables, by default. If you have correctly entered the source information to specify
the sample Extract File and the Optim sample database tables, no changes are
required. Select Close from the File menu on the Match Key Editor to return to the
Compare Request Editor.
Note: See “Using the Match Key Editor” on page 47 for detailed information about
the Match Key Editor.
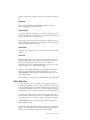
Process the Compare Request
In the Compare Request Editor, select Run from the File menu to process the
Compare Request. The Compare Request Progress dialog displays as the Compare
Request is processed.
Note: Depending on the configuration at your site, you may encounter a logon
prompt during processing. See the Common Elements Manual, for information about
the Optim Directory Connection Logon dialog and for the DB Alias Connection
Logon.
You can use the Compare Request Progress dialog to monitor each step of the
Compare processing. The number and type of steps depends on the parameters
you selected for the Compare Request.
For example, Compare may perform one or two Extract Processes (depending on
the sources you select) or reorganize and sort data in an existing Extract File before
beginning the comparison of the selected tables.
12
IBM Optim: Compare User Manual
When the Compare Process completes, one of two dialogs displays, depending on
whether you selected the Browse Results Immediately check box on the General
tab of the Compare Request Editor before you ran the request.
v If you selected the Browse Results Immediately check box, the Browse Compare
File dialog displays when the Compare Process completes.
v If you cleared the Browse Results Immediately check box, the Compare Process
Report dialog displays when the Compare Process completes.
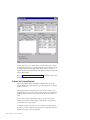
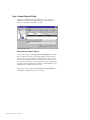
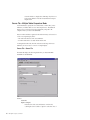
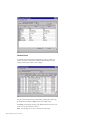
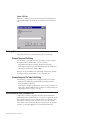
Open a Compare File to Browse
Since you selected the Browse Results Immediately check box for this scenario,
the Browse Compare File dialog displays upon completion of the Compare Process.
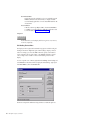
The Browse Compare File dialog lists the tables compared, and summarizes the
results of the comparison for each pair of tables.
Chapter 2. Processing Flow
13
The Browse Compare File dialog displays information about the selected file.
When you open a Compare File to browse, the name of the file appears in the title
bar. Compare Files are saved with the default extension .cmp. However, files can
be saved or renamed with other extensions, or without extensions.
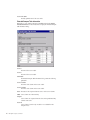
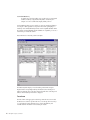
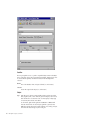
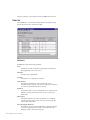
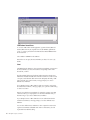
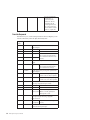
Tables Tab
Each time you open the Browse Compare File dialog, the Tables tab is shown first.
Use the Tables tab to view information about the tables in the selected Compare
File. This information can be viewed, but not edited.
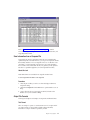
Grid Details
The Tables tab contains the following grid details:
Source
Indicates the Source File for the table. Note that tables are listed in pairs,
alternating between Source 1 and Source 2.
Table Name
The names of the compared tables.
Total Rows
The number of rows compared from each table.
Unmatched Rows
The number of unmatched rows in the compared table. A row is
Unmatched when the match key value does not correspond to a match key
value in the compared table in the other Source File.
Equal Rows
The number of equal rows in the compared table. A row is Equal when the
match key value and all other column values in Source 1 and Source 2
match exactly.
Different Rows
The number of different rows in the compared table. A row is different
when the match key values in Source 1 and Source 2 match exactly, but
values in other columns differ.
14
IBM Optim: Compare User Manual
Rows with Duplicate Match Keys
The number of rows in the compared table that have duplicate match keys.
A row with a duplicate match key contains a non-unique value in the
Match Key column(s) and cannot be compared.
You can use the Find option, available on the grid heading shortcut menu, to assist
in locating specific information in a large display. (See the Common Elements Manual
for detailed information about the Find option.)
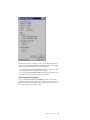
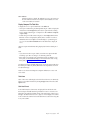
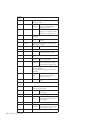
Information Tab
Use the Information tab to review information about the selected Compare File.
The Information tab contains the following details:
Created By
User ID of the person that ran the process that created the file.
Date Created
Date and time the file was created.
Created on Machine
Identifier for the machine from which the file was created.
Server Name
Name of the Optim Server from which the file is accessed or Local if the
file is accessed from the workstation.
Number of Sets
The number of pairs of tables compared.
Source 1 File Name
The fully qualified name of the Source 1 File.
Chapter 2. Processing Flow
15
Source 2 File Name
The fully qualified name of the Source 2 File.
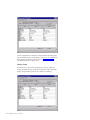
Extended Compare Table Information
Right-click on a pair of tables in the grid on the Tables tab and select Display
Extended Information from the shortcut menu to display the Extended Compare
Table Information dialog.
Source 1
The name of the Source 1 table.
Source 2
The name of the Source 2 table.
Grid Details
The Extended Compare Table Information dialog contains the following
grid details:
Source 1 Column
The names of the columns in the Source 1 table.
Source 2 Column
The names of the columns in the Source 2 table.
Status The status of the comparison between Source 1 and Source 2 columns:
Match Source columns are in the match key.
Compare
Source columns are compared when the values in the paired Match Key
columns are the same.
Not Used
Source column is found in only one table or was excluded from the
Compare Process.
16
IBM Optim: Compare User Manual
Same Attributes
When the check box is selected, the attributes for Source 1 and Source 2 are
the same. When the check box is cleared, the column attributes for Source
1 and Source 2 tables do not match.
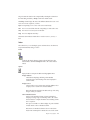
Display Compare File Table Data
To display the rows for a pair of tables listed on the Tables tab:
v Select a pair of tables in the grid, then right-click the pair of tables to display the
shortcut menu. Select Display Rows, then select an option from the cascading
menu to display particular types of compared rows: All → Different → Duplicate
→ Equal → Only
v Double-click a pair of table names in the grid, or select Display Rows from the
File menu. All rows are displayed by default, unless a selection was made on
the Browse tab in Personal Options to limit the display to a particular type of
row (you can select Show Excluded Rows from the Tools menu to display all
rows).
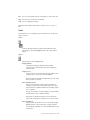
A Browse Compare File Table Data dialog displays data from the selected pair of
tables.
Note:
v If you select more than one pair of tables, several Browse Compare File Table
Data dialogs open. Move one dialog to see other dialogs beneath.
v Binary data is not displayed. Cells containing binary data are shaded. To view
binary data, use the hexadecimal display. For more information about viewing
binary data, see “Display Hexadecimal” on page 86.
Use the Browse Compare File Table Data dialog to review the compared data from
the selected pair of tables. By default, differences in the compared data are shown
in bold, italicized type.
Note: You can select Personal Options to emphasize differences in Source 1 and
Source 2 data.
Table Name
Name of the Source 1 table displays to the left of the toolbar. You can alternatively
display Source 2 table information by selecting Display Source 2 from the toolbar
Options menu.
Side Label Format
In side label format, the column names are displayed down the left side of the
Browse Compare File Table Data dialog and data from Source 1 and Source 2 are
displayed to the right of the headings. Names of the Primary Key column(s) are in
bold type. Side label format focuses on a single row and can display more columns
for the row than the columnar format. Side label format is useful for browsing data
in very wide columns.
Chapter 2. Processing Flow
17
Use the navigation buttons on the Browse Compare File Table Data dialog toolbar
when in side label format to scroll the display to another row, or to switch the data
display between side label and columnar format. See “Toolbar” on page 19 for
more detailed information on display options.
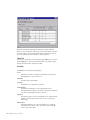
Columnar Format
In columnar format, column names are displayed across the top of the Browse
Compare File Table Data dialog and the data is displayed in columns beneath the
headings. The grid headings of Primary Key column(s) are in bold type.
18
IBM Optim: Compare User Manual
The grid contains the data from the compared tables, including the columns from
the named table, preceded by a Change column and a Source column.
The Change column displays the status of the difference between the Source 1 and
Source 2 rows in the comparison, as follows:
Equal Corresponding rows in Source 1 and Source 2 match exactly.
Diff
Row in one source differs from the corresponding row in the other source.
Only
Row exists in one source, but not in the other.
Dupl
Rows have duplicate match keys.
The Source column indicates whether the row resides in Source 1, Source 2, or
both.
Toolbar
The toolbar allows you to select display options and menu choices for the Browse
Compare File Table Data dialog, as follows:
Format
or
Switch the data display between columnar and side label format. The
default format is set in Personal Options. Refer to the Common Elements
Manual.
Options
Display the Browse Compare File Table Data dialog Options menu.
Display Attributes
Switch between displaying and hiding column attribute
information in the column headings when data is displayed in
columnar format.
Display Source 2
Select to display Source 2 column names and data attributes. Clear
to display Source 1 column names and data attributes.
Note: The table name and label of the table at the top of the dialog
change to reflect your selection.
Show Unmatched Columns
Display or hide unmatched columns (columns excluded from
Compare processing, using a Column Map). Refer to the Common
Elements Manual for complete information about excluding columns
from a comparison.
This option is available in a columnar display only, and is disabled
for tables that do not have unmatched columns.
Note: Names of unmatched columns are shown in the column
header with a number prefix to indicate the Source for the column.
Chapter 2. Processing Flow
19
Show Excluded Rows
Display all previously excluded rows (rows are excluded using the
Exclude command on the shortcut menu). To display excluded
rows individually, rightclick a row and select Show Next from the
shortcut menu.
Access Definition
If the file contains Large Objects (LOBs), select Access Definition
to establish an association between a LOB and an application used
to view the LOB. See “LOB Columns” on page 87.
Navigation
In side label format, scroll to display the first row, previous row, next row,
or last row, respectively.
Grid Heading Shortcut Menu
The display can be navigated and customized using options available on the grid
heading shortcut menu. Right-click a grid column heading to display a shortcut
menu. For example, you can use the Find command to specify search criteria to
locate a particular value in a grid column, or the Exclude command to specify a
value or string used to exclude rows that contain matching values from the
display.
To focus on specific rows of interest, right-click in the Change column heading and
select Exclude from the shortcut menu to display the Exclude dialog. Type ‘Equal'
in the Find What box, then select Exclude All.
The Browse Compare File Table Data dialog refreshes to exclude the equal rows.
20
IBM Optim: Compare User Manual
Refer to Chapter 5, “Browse Compare File Data,” on page 77 for detailed
information on the grid heading shortcut menu, grid column shortcut menu, and
Large Object (LOB) columns.
Save Information from a Compare File
Compare Files are stored in a proprietary format; they are not readable when
opened directly with a text editor. However, you can open a Compare File with the
Browse Utility and then save it as an output file. Choose to save the file in a text
(.txt) format or a comma-separated (.csv) format. You can save the information
from one table or from several tables. The file, once generated, can be opened in a
text editor or a spreadsheet application (for comma-separated format files).
About this task
Note: LOB columns are not included in an output file in either format.
To save Compare File information as an output file:
Procedure
1.
Select the pairs of tables you wish to save from the display in the Browse
Compare File dialog.
Select Save as Output File from the File menu to open the Windows Save As
dialog.
3. Assign a file name, choose a format and save the file (for details on the
Windows Save As, refer to Windows Help).
2.
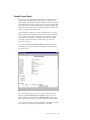
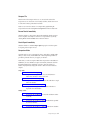
Output File Formats
Following are descriptions and examples of Compare Files in different formats.
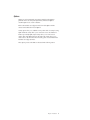
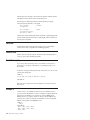
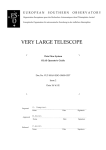
Text Format
This is an example of a portion of a text document version of a Compare File. If
you select more than one pair of tables to include in the text document,
information for each pair of tables is separated by a header.
Chapter 2. Processing Flow
21
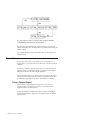
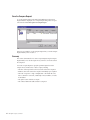
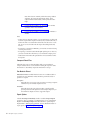
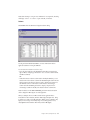
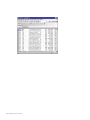
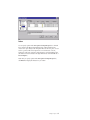
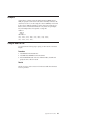
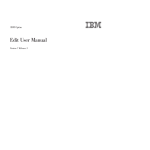
Comma-Separated Variable Format
This is an example of a portion of a comma-separated variable version of a
Compare File, opened using Microsoft Excel.
22
IBM Optim: Compare User Manual
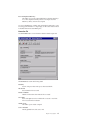
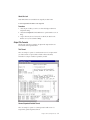
Compare Process Report
The Compare Process Report displays specific details of the completed Compare
Process. If the Compare Request has been named and saved, the name of the
request displays on the first line of the header information. The header information
also includes the name and type of the data sources, Compare File and Table Map
names, User ID of the person who initiated the process, and the start, finish, and
elapsed time of the Compare Process. Process status information summarizes the
number of warnings and errors issued, if any.
Following the header information, a summary of the tables and rows compared
displays, including the total number of each, the number of equal and dissimilar
rows, and the names of the tables compared from each source. If the Compare
Process performs any Extracts prior to performing the comparison, an Extract
Process Report that contains the details of each Extract Process follows the
Compare Process Report.
If you had cleared the Browse Results Immediately check box in the Compare
Request Editor, the Compare Process Report dialog displays upon completion of
the Compare Process.
If you close the report and want to refer to it again, use the Compare Request
Editor and select: File → Redisplay Results → Current (To display a list of all
retained Compare Process Reports, from the Redisplay Results submenu, select
All.) For details about retaining process reports, see the Common Elements Manual.
To save the Compare Process Report, from the File menu, select Save As to display
the Save dialog. To print the report, from the File menu, select Print .
Chapter 2. Processing Flow
23
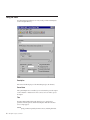
Save the Compare Request
To save the Compare Request, select Save from the File menu in the Compare
Request Editor C to display the Save a Compare Request dialog. Enter a two-part
name in the box labeled Enter pattern for Compare Request.
Note: You are prompted to save the Compare Request when you exit the Compare
Request Editorif you have not done so.
Summary
This scenario demonstrated how to create a Compare Request using the Compare
Request Editor, how to run the Compare Process, and how to review the results of
the comparison.
You create a Compare Request to specify the parameters required to run the
Compare Process and the sources of data to compare, including:
v The name of the Compare File in which to store the results of the comparison.
v Whether to browse the results of the comparison immediately upon completion.
v The mode of comparison – single or multiple tables – and whether the source
data is contained in a Source File, is defined by an Access Definition, or resides
in the database.
v The specific location of the data to compare.
v The correlation between the tables selected for comparison.
24
IBM Optim: Compare User Manual
Chapter 3. Compare
Compare provides a full-function comparison capability that enables you to
compare sets of relational data and browse the results. Use Compare to compare
data from a variety of DBMSs including DB2®, Oracle, Sybase ASE, SQL Server,
and Informix®.
Using a Compare Request, you can compare two sets of relationally intact data
from multiple tables. Create a Compare Request to:
v Identify two sources of relational data to compare (Source 1 and Source 2).
v Provide parameters to run or schedule the Compare Process.
You can name a Compare Request and save it to be reused and made available to
other users.
The fully qualified name of a Compare Request consists of: identifier.name.
identifier
Identifier that serves as the prefix for the Compare Request name (1 to 8
characters).
name
Name assigned to the Compare Request
(1 to 12 characters).
When you name a Compare Request, it is helpful to use a logical set of naming
conventions to organize definitions for easy identification.
This section explains how to compare relationally intact sets of data and browse
the results of the comparison, including how to perform the following tasks:
v Create a new Compare Request.
v Open an existing Compare Request.
v Specify parameters in a Compare Request.
v Use the tools of the Compare Request Editor.
v Specify the sets of data to compare.
v Define match keys to correlate the data to compare.
v Save a Compare Request.
Open the Compare Request Editor
Use the Compare Request Editor to create or modify a Compare Request. Specify
the parameters needed to run the Compare Process including the name of a
Compare File to record the results of the data comparison, the Comparison Mode
(Single Table or Multiple Tables), and the explicit sources of data to compare.
© Copyright IBM Corp. 1994, 2010
25
In Single Table mode, you can compare the data in one table to another. The source
data can be contained in an existing Source File (Extract or Archive File) or
extracted from a database table. You can use an optional Column Map to compare
columns with unlike names or to exclude specific columns from the comparison.
In Multiple Tables mode, you can compare two sets of data in related tables. The
source data can be contained in an existing Source File (Extract or Archive File) or
extracted from a database using an Access Definition. A Table Map is required to
match the tables to compare, correlating tables with unlike names, or selectively
excluding tables from the comparison. You can reference optional Column Maps in
the Table Map to compare columns with unlike names or to exclude specific
columns from the comparison.
There are different ways to open the Compare Request Editor, depending on
whether you want to create a new Compare Request or use an existing Compare
Request.
Create a New Compare Request
To Create a New Compare Request:
About this task
Procedure
1. Select New from the File menu in the main window.
2. Select Compare from the Actions submenu to open the Compare Request
Editor.
3. Specify a name for the Compare File.
4. Select a Comparison Mode.
5. Specify the Run Mode for Extract (Sequence or Parallel, when required for the
type of comparison selected).
26
IBM Optim: Compare User Manual
6. Click the Sources tab. Specify Source 1 and Source 2 parameters.
7. Specify a Column Map or Table Map.
v For Single Table mode, specify a Column Map, if necessary, to map columns
with unlike names or exclude columns from the comparison. Enter the name
of an existing Column Map, specify a name for a new Column Map, or select
Local to create an embedded Column Map. Select Edit Column Map from
the Tools menu to define a new or Local Column Map, or to edit an existing
Column Map.
v For Multiple Tables mode, specify a Table Map to correlate the tables to
compare. Enter the name of an existing Table Map, specify a name for a new
Table Map, or select Local to create an embedded Table Map. Select Edit
Table Map from the Tools menu to define a new or Local Table Map or to
edit an existing one. (You can also specify optional Column Maps.)
8. When a primary key is unavailable or to specify a match key other than a
primary key, select Edit Match Keys from the Tools menu. Define a match key
for each pair of tables.
9. Select the appropriate command from the File menu to Run, Save, or Schedule
the request.
Results
These are the minimum steps required to create a Compare Request.
Alternate Methods to Creating a Compare Request
An alternate method for opening the Compare Request Editor is to select Compare
from the Actions menu in the main window. By default, the last Compare Request
used is displayed. Your next step depends on your purpose:
v To create a new Compare Request, select New from the File menu in the
Compare Request Editor.
v To create a new Compare Request modeled on an existing one, open the existing
Compare Request, make any changes you require, then select Save As from the
File menu.
v To create and store a copy of the current Compare Request and continue editing,
select Save Copy As from the File menu.
Select an Existing Compare Request
To Select an Existing Compare Request:
Procedure
1. Select Open from the File menu in the main window to open the Open a
Compare Request dialog.
2. Double-click Compare Request in the Identifier list to expand the Compare
Request object list.
3. Double-click the Compare Request Identifier to display the corresponding list
of Compare Requests.
4. Double-click the desired Compare Request to open the Compare Request
Editor.
Chapter 3. Compare
27
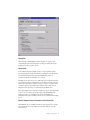
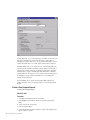
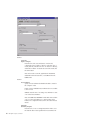
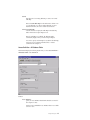
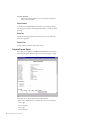
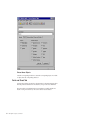
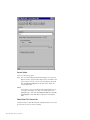
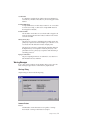
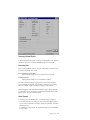
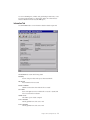
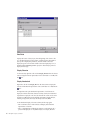
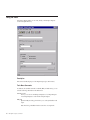
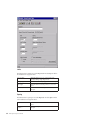
Open a Compare Request Dialog
The Open a Compare Request dialog is divided into two areas. The object
identifiers are on the left and associated objects appear on the right. The list of
objects varies depending on the identifier you select.
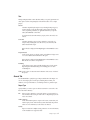
Enter pattern for Compare Request
You can specify a pattern in the Enter pattern for Compare Request box to limit
the list of requests in the Open a Compare Request dialog. A Compare Request
name consists of two parts: identifier.name. The pattern must also have two parts.
You can use the % (percent) wild card to represent one or more characters or use
the _ (underscore) wild card to represent a single character in an object definition
name (the check box that designates the underscore as SQL LIKE Character on the
General tab of Personal Options must be selected).
Note: After you specify a pattern in the Enter pattern for Compare Request box,
click Refresh to redisplay the list based on your criteria.
28
IBM Optim: Compare User Manual
Using the Editor
Use the Compare Request Editor to identify subsets of relational data to compare
and to specify the parameters required to control the process. This section
describes the components of the Compare Request Editor and options available.
Description
Enter text to describe the purpose of the Compare Request (up to 40 characters).
Server Name
If the optional Optim Server is installed, you can delegate resource-intensive
Compare processing (for example, when the source files contain a large number of
tables or rows) to a machine hosting the Optim Server.
Click the down arrow to select a machine hosting the Optim Server, or select Local
to process the request on the local workstation.
Note: If the Optim Server machine option is not enabled at your site, the Server
Name box is unavailable.
Tabs
Tabs on the Compare Request Editor allow you to define the type of comparison,
the source of the data to compare, and other parameters.
General
Specify the name of a Compare File for storing the results of the Compare
Process. Select a Comparison Mode (Single Table or Multiple Tables). When
you open the editor, the General tab is shown first.
Chapter 3. Compare
29
Source
The source of the data to compare. You can compare data in Source Files
(Extract or Archive Files), data defined in Access Definitions, or data in
database tables.
Compare always compares the contents of a Source File (Extract or Archive
File) to the contents of another Source File, extracting data defined in an
Access Definition, or database tables, if necessary. Thus, if the source is an
Access Definition or database tables, you must provide the name of an
Extract File in which to store the data. Compare performs the Extract
Process automatically before beginning the comparison.
Notify Specify options for automatic email notification of the success or failure of
the process.
Menu Commands
In addition to the standard File, Edit, and Tools commands, you can select the
following commands from the Tools menu in the Compare Request Editor.
Edit Table Map
Opens the Table Map Editor, where you can review and modify the Table
Map referenced on the Source tab. This option is enabled for Multiple
Tables Comparison Mode only. For complete information, refer to the
Common Elements Manual .
Edit Column Map
Opens the Column Map Editor, where you can review and modify the
Column Map referenced on the Source tab. This command is enabled for
Single Table Comparison Mode only. For complete information, refer to the
Common Elements Manual .
Note: In Multiple Table Comparison Mode, you can open the Column Map
Editor from the Table Map Editor.
Edit Access Definition (Source 1)
Opens the Access Definition Editor, where you can review and modify the
Access Definition you specify for Source 1 on the Source tab. For complete
information, refer to the Common Elements Manual .
Edit Access Definition (Source 2)
Opens the Access Definition Editor, where you can review and modify the
Access Definition you specify for Source 2 on the Source tab.
Edit Match Keys
Opens the Match Key Editor, where you can review and modify match
keys for the active Compare Request. Compare uses the primary key
columns by default. You must define a match key when a primary key is
unavailable, or you choose to use a column other than the primary key.
Edit Report Request
Opens the Report Request Editor, where you can review and modify
specifications for creating a report on the contents of the Compare File
created.
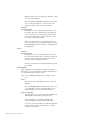
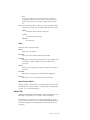
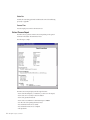
General Tab
Use the General tab to specify the Compare File, set the browsing option, select a
Comparison Mode and select the run mode when performing more than one
Extract Process.
30
IBM Optim: Compare User Manual
Compare File
Enter the name of the Compare File to use or to create for the results of the
Compare Process. To select from a list of recently used files, click the down arrow.
To select from a directory, click the browse button.
Note: You can review the contents of a Compare File by rightclicking the
Compare File name and selecting Browse Compare File from the shortcut menu.
Browse Results Immediately
Select this check box to browse the Compare File immediately after the Compare
Process completes successfully. You can browse a Compare File at any time by
selecting Browse from the Utilities menu in the main window.
Create Report Immediately
Select this check box to enable the Report Options group box and select options
for reporting on the Compare Process.
Comparison Mode
Specify the mode to use for comparing data from a single table or multiple tables.
After you select a mode, click the Source tab on the Compare Request Editor to
provide the parameters necessary to support your selection.
Note: When you select a Comparison Mode that compares data in the database or
identified by an Access Definition, Compare automatically extracts the data from
the database table(s) before starting the comparison. Since the contents of a
database may dynamically change, this ensures a stable and constant dataset to
compare.
Single Table
“Source File – Source File” on page 33
Compare data in a single table in one Source File (Extract or
Archive File) with that in another Source File.
“Source File – Database Table” on page 34
Compare data in a single table in a Source File with that in a single
table in the database.
“Database Table – Database Table” on page 36
Compare data in a single table in one database with that in a
single table in another database.
Multiple Tables
“Source File – Source File” on page 38
Compare the data in tables in one Source File with that in another
Source File.
“Source File – Access Definition” on page 39
Compare the data in tables in a Source File with the data specified
in an Access Definition.
“Source File – All Database Tables” on page 41
Compare the data in tables in a Source File with that in a database.
Chapter 3. Compare
31
Note: This selection is extremely useful when testing a database
application. The Source File represents the “before” image
compared with the database tables, which represent the “after”
image.
“Access Definition – Access Definition” on page 43
Compare the data specified in one Access Definition with that
specified in another Access Definition.
“Access Definition – All Database Tables” on page 45
Compare the data specified in an Access Definition with that in a
database.
Note:
v Compare does not change the contents of a Source File, but may sort data in the
Source File to perform the comparison. Read-only files, secured Archive Files, or
Archive Files with an associated Archive Index File cannot be used as a Source
File. You can convert an Archive File and compare the resulting Extract File,
however.
v If comparing a Source File from DB2 MVS, you must first convert the file using
a Convert process in Move.
v If comparing a Source File created with the Optim products prior to release 6.0,
you must convert the file or files before you can execute the Compare process.
v Pseudocolumns in the Extract File generated from an Access Definition cannot
be compared.
Compress Extract Files
When both data sources are from the database (table or Access Definition),
Compare extracts both sets of source data before starting the comparison. Select
this check box to automatically compress the Extract Files for storage.
Run Mode for Extract
Run Mode for Extract is enabled when both sources are in a database (tables or
specified in an Access Definition). Indicate whether to perform the extracts in
parallel or in sequence.
In Sequence
Extract data from one source at a time, in sequence. Processing in sequence
is beneficial if you have limited computer resources.
In Parallel
Extract data from both sources at the same time, in parallel. Parallel
processing reduces the time required to run the Compare Request if your
environment has adequate resources to support the request.
Report Options
Select the Create Report Immediately check box to enable the Report Options
group box to allow you to define a local Report Request, or use a named Report
Request. Select Edit Report Request from the Tools menu to open the Report
Request Editor to define reporting parameters. For more detailed information on
report options, see Chapter 6, “Report,” on page 93.
32
IBM Optim: Compare User Manual
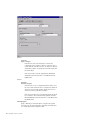
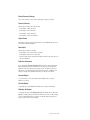
Source Tab – Single Table Comparison Mode
Use the Source tab to specify the Source Files or database tables to use for the
Compare Process. The Source tab displays Source 1 and Source 2 boxes that
correspond to the comparison mode you select on the General tab.
Note: An Archive File that is registered in the Archive Directory can be used as a
Source in a Compare Request, unless:
v The Archive File references a File Access Definition.
v An Archive Index File is associated with the Archive File.
An unregistered Archive File, which has not been secured using a File Access
Definition, can also be used as a source in a Compare Request.
Source File – Source File
The Source tab displays the following details when you select Source File –
Source File on the General tab:
Source 1
Source File:
(Input to Compare)
Enter the name of the Source File (Extract or Archive File)
containing the table to compare. To select from a list of recently
used files, click the down arrow. To select from a directory, click
the browse button. To select the last Source File created, click the
retrieve button.
Note: To browse the Source File, right-click and select Browse
Source File from the shortcut menu, or select Browse from the
Utilities menu.
Chapter 3. Compare
33
Table Name
Click the down arrow to select the name of the table from the list
of tables in the specified Source File.
Source 2
Source File:
(Input to Compare)
Enter the name of the Source File containing the second table.
Table Name
Enter the name of the table from the specified Source File.
Column Map Options
Specify a Column Map, if necessary, to map columns with unlike names or
exclude columns from the comparison. Select:
None
A Column Map is not needed (default).
Local
Create an embedded Column Map that is not available to share or
reuse.
Named
Enter the name of an existing Column Map or create a new named
Column Map.
Note: Select Edit Column Map from the Tools menu to define a
new or Local Column Map, or to edit an existing Column Map.
For more detailed information, see the Common Elements Manual .
Always View Column Map
Select the check box to display the named Column Map in the
Column Map Editor each time the Compare Request is run.
Clear the check box to display the Column Map only if it has not
been properly defined or must be corrected before running the
Compare Request.
Source File – Database Table
The Source tab displays the following details when you select Source File –
Database Table on the General tab.
34
IBM Optim: Compare User Manual
Source 1
Source File:
(Input to Compare)
Enter the name of the Source File containing the table to compare.
To select from a list of recently used files, click the down arrow. To
select from a directory, click the browse button. To select the last
Source File created, click the retrieve button.
Note: To browse the Source File, rightclick and select Browse
Source File from the shortcut menu, or select Browse from the
Utilities menu.
Table Name
Click the down arrow to select the name of a table from the list of
tables in the specified Source 1 File.
Source 2
Table Name
Enter the name of the database table to extract for comparison. To
select from a directory, click the browse button.
Extract File:
(Created by Compare)
Enter the name of a new or existing Extract File in which to store
the Source 2 data. Extract Files have an .xf extension by default. To
select from a list of recently used files, click the down arrow. To
select from a directory, click the browse button.
Note: If you enter the name of an existing Extract File, the file will
be overwritten. To browse the Extract File, right-click and select
Browse Extract File from the shortcut menu, or select Browse from
the Utilities menu.
Chapter 3. Compare
35
Column Map Options
Specify a Column Map, if necessary, to map columns with unlike names or
exclude columns from the comparison. Select:
None
A Column Map is not needed (default).
Local
Create an embedded Column Map that is not available to share or
reuse.
Named
Enter the name of an existing Column Map or create a new named
Column Map.
Note: Select Edit Column Map from the Tools menu to define a
new or Local Column Map, or to edit an existing Column Map.
For more detailed information, refer to the Common Elements
Manual .
Always View Column Map
Select the check box to review the contents of the Column Map in
the Column Map Editor whenever the Compare Request is run.
Clear the check box to display the Column Map only if it has not
been properly defined or must be corrected before the Compare
Request is run.
Database Table – Database Table
The Source tab displays the following details when you select Database Table –
Database Table on the General tab:
Default Qualifier
Enter the two-part qualifier to serve as a prefix to unqualified table names.
36
IBM Optim: Compare User Manual
Click the down arrow to select from a list of the most recently used
qualifiers, or click the browse button to select a different DB Alias. The
Default Qualifier consists of:
dbalias Alias of the database where a table is defined (1 to 12 characters).
creatorid
Creator ID assigned to the table (1 to 64 characters).
Source 1
Table Name
Enter the name of the database table to extract for comparison. To
select from a directory, click the browse button.
Extract File
(Created by Compare)
Enter the name of a new or existing Extract File in which to store
the Source 1 data. Extract Files have an .xf extension by default. To
select from a list of recently used files, click the down arrow. To
select from a directory, click the browse button.
Note: An existing Extract File is overwritten. To browse the Extract
File, right-click and select Browse Extract File from the shortcut
menu, or select Browse from the Utilities menu.
Source 2
Table Name
Enter the name of the database table to extract for comparison. To
select from a directory, click the browse button.
Extract File
(Created by Compare)
Enter the name of a new or existing Extract File in which to store
the Source 2 data. Extract Files have an .xf extension by default. To
select from a list of recently used files, click the down arrow. To
select from a directory, click the browse button.
Note: An existing Extract File is overwritten.
Column Map Options
Specify a Column Map, if necessary, to map columns with unlike names or
exclude columns from the comparison. Select:
None
A Column Map is not needed (default).
Local
Create an embedded Column Map that is not available to share or
reuse.
Named
Enter the name of an existing Column Map or create a new named
Column Map.
Note: Select Edit Column Map from the Tools menu to define a
new or Local Column Map, or to edit an existing Column Map.
For more detailed information, refer to the Common Elements
Manual .
Always View Column Map
Select the check box to review the contents of the Column Map in
the Column Map Editor whenever the Compare Request is run.
Chapter 3. Compare
37
Clear the check box to display the Column Map only if it has not
been properly defined or must be corrected before the Compare
Request is run.
Source Tab – Multiple Tables Comparison Mode
Use the Source tab to specify the Source Files (Extract or Archive Files), Access
Definitions, or database tables to use for the Compare Process. The Source tab
displays Source 1 and Source 2 boxes that dynamically correspond to the
comparison mode you select on the General tab.
Note: An Archive File that is registered in the Archive Directory can be used as a
Source in a Compare Request, unless:
v The Archive File references a File Access Definition.
v An Archive Index File is associated with the Archive File.
An unregistered Archive File, which has not been secured using a File Access
Definition, can also be used as a source in a Compare Request.
Source File – Source File
The Source tab displays the following details when you select Source File –
Source File on the General tab:
Source 1
Source File:
(Input to Compare)
Enter the name of the Source File (Extract or Archive File)
containing the Source 1 tables to compare. To select from a list of
38
IBM Optim: Compare User Manual
recently used files, click the down arrow. To select from a directory,
click the browse button. To select the last Source File created, click
the retrieve button.
Note: To browse the Source File, right-click and select Browse
Source File from the shortcut menu, or select Browse from the
Utilities menu.
Source 2
Source File:
(Input to Compare)
Enter the name of the Source File containing the Source 2 tables to
compare.
Table Map Options
Specify a Table Map to correlate the tables to compare in the specified
Source Files. You can use the Table Map to map tables with unlike names
or to exclude tables from the comparison. Select:
Local
Create an embedded Table Map that is not available to share or
reuse.
Named
Enter the name of an existing Table Map or create a new named
Table Map.
Note: Select Edit Table Map from the Tools menu to define a new
or Local Table Map, or to edit an existing Table Map. For more
detailed information, see the Common Elements Manual .
Always View Table Map
Select the check box to review the contents of the Table Map in the
Table Map Editor whenever the Compare Request is run.
If a Table Map is not defined, the Table Map Editor displays
automatically when you run the Compare Request.
You can also specify a Column Map for any table in the Table Map,
if necessary, to map columns with unlike names or exclude
columns from the comparison.
Source File – Access Definition
The Source tab displays the following details when you select Source File – Access
Definition on the General tab:
Chapter 3. Compare
39
Source 1
Source File:
(Input to Compare)
Enter the name of the Source File (Extract or Archive File)
containing the Source 1 tables to compare. To select from a list of
recently used files, click the down arrow. To select from a directory,
click the browse button. To select the last Source File created, click
the retrieve button.
Note: To browse the Source File, rightclick and select Browse
Source File from the shortcut menu, or select Browse from the
Utilities menu.
Source 2
Access Definition
Specify an Access Definition that identifies the tables to extract for
this comparison. Select:
Local to create an embedded Access Definition that is not available
to share or reuse.
Named to enter the name of an existing Access Definition or create
a new named Access Definition.
Note: Select Edit Access Definition from the Tools menu to define
a new or Local Access Definition, or to edit an existing Access
Definition. For complete information, refer to the Common Elements
Manual .
Extract File
(Created by Compare)
Enter the name of a new or existing Extract File in which to store
the relational subset of data specified in the Access Definition for
40
IBM Optim: Compare User Manual
Source 2. Extract Files have an .xf extension by default. To select
from a list of recently used files, click the down arrow. To select
from a directory, click the browse button.
Note: If you enter the name of an existing Extract File, the file will
be overwritten. To browse an Extract File, right-click and select
Browse Extract File from the shortcut menu, or select Browse from
the Utilities menu.
Table Map Options
Specify a Table Map to correlate the tables to compare in the specified
Source Files. You can use the Table Map to map tables with unlike names
or to exclude tables from the comparison.
Local
Create an embedded Table Map that is not available to share or
reuse.
Named
Enter the name of an existing Table Map or create a new named
Table Map.
Note: Select Edit Table Map from the Tools menu to define a new
or Local Table Map, or to edit an existing Table Map. For more
detailed information, refer to the Common Elements Manual .
Always View Table Map
Select the check box to review the contents of the Table Map in the
Table Map Editor whenever the Compare Request is run.
Note: If a Table Map is not defined, the Table Map Editor
automatically displays when you run the Compare Request.
You can also specify a Column Map for any table in a Table Map,
if necessary, to map columns with unlike names or exclude
columns from the comparison.
Source File – All Database Tables
The Source tab displays the following details when you select Source File – All
Database Tables on the General tab:
Chapter 3. Compare
41
Source 1
Source File:
(Input to Compare)
Enter the name of the Source File (Extract or Archive File)
containing the Source 1 tables to compare. To select from a list of
recently used files, click the down arrow. To select from a directory,
click the browse button. To select the last Source File created, click
the retrieve button.
Note: To browse the Source File, rightclick and select Browse
Source File from the shortcut menu, or select Browse from the
Utilities menu.
Source 2
Extract File
(Created by Compare)
Enter the name of a new or existing Extract File in which to store
the Source 2 data. Extract Files have an .xf extension by default. To
select from a list of recently used files, click the down arrow. To
select from a directory, click the browse button.
Note: If you enter the name of an existing Extract File, the file will
be overwritten. To browse the Extract File, right-click and select
Browse Extract File from the shortcut menu, or select Browse from
the Utilities menu.
Table Map Options
Specify a Table Map to correlate the tables to compare in the specified
Source Files. You can use the Table Map to map tables with unlike names
or to exclude tables from the comparison. Select:
42
IBM Optim: Compare User Manual
Local
Create an embedded Table Map that is not available to share or
reuse.
Named
Enter the name of an existing Table Map or create a new named
Table Map.
Note: Select Edit Table Map from the Tools menu to define a new
or Local Table Map, or to edit an existing Table Map. For more
detailed information, refer to the Common Elements Manual .
Always View Table Map
Select the check box to review the contents of the Table Map in the
Table Map Editor whenever the Compare Request is run.
Note: If a Table Map is not defined, the Table Map Editor
automatically displays when you run the Compare Request.
You can also specify a Column Map for any table in the Table Map,
if necessary, to map columns with unlike names or exclude
columns from the comparison.
Access Definition – Access Definition
The Source tab displays the following details when you select Access Definition –
Access Definition on the General tab:
Source 1
Access Definition
Specify an Access Definition that identifies the tables to extract for
this comparison. Select:
Local to create an embedded Access Definition that is not available
to share or reuse.
Chapter 3. Compare
43
Named to enter the name of an existing Access Definition or create
a new named Access Definition.
Note: Select Edit Access Definition from the Tools menu to define
a new or Local Access Definition, or to edit an existing Access
Definition. For complete information, refer to the Common Elements
Manual .
Extract File
(Created by Compare)
Enter the name of a new or existing Extract File in which to store
the relational subset of data specified in the Access Definition for
Source 1. Extract Files have an .xf extension by default. To select
from a list of recently used files, click the down arrow. To select
from a directory, click the browse button.
Note: If you enter the name of an existing Extract File, the file will
be overwritten. To browse the Extract File, right-click and select
Browse Extract File from the shortcut menu, or select Browse from
the Utilities menu.
Source 2
Access Definition
Specify an Access Definition that identifies the tables to extract for
this comparison. Select:
Local to create an embedded Access Definition that is not available
to share or reuse.
Named to enter the name of an existing Access Definition or create
a new named Access Definition.
Note: Select Edit Access Definition from the Tools menu to define
a new or Local Access Definition, or to edit an existing Access
Definition. For complete information, refer to the Common Elements
Manual .
Extract File
(Created by Compare)
Enter the name of a new or existing Extract File in which to store
the relational subset of data specified in the Access Definition for
Source 2. Extract Files have an .xf extension by default. To select
from a list of recently used files, click the down arrow. To select
from a directory, click the browse button.
Note: If you enter the name of an existing Extract File, the file will
be overwritten. To browse the Extract File, right-click and select
Browse Extract File from the shortcut menu, or select Browse from
the Utilities menu.
Table Map Options
Specify a Table Map to correlate the tables to compare in the specified
Source Files. You can use the Table Map to map tables with unlike names
or to exclude tables from the comparison. Select:
Local
44
IBM Optim: Compare User Manual
Create an embedded Table Map that is not available to share or
reuse.
Named
Enter the name of an existing Table Map or create a new named
Table Map.
Note: Select Edit Table Map from the Tools menu to define a new
or Local Table Map, or to edit an existing Table Map. For more
detailed information, refer to the Common Elements Manual .
Always View Table Map
Select the check box to display the Table Map in the Table Map
Editor whenever the Compare Request is run.
Note: If a Table Map is not defined, the Table Map Editor
automatically displays when you run the Compare Request.
You can also specify a Column Map for any table in the Table Map,
if necessary, to map columns with unlike names or exclude
columns from the comparison.
Access Definition – All Database Tables
The Source tab displays the following details when you select Access Definition –
All Database Tables on the General tab:
Source 1
Access Definition
Specify an Access Definition that identifies the tables to extract for
this comparison. Select:
Local to create an embedded Access Definition that is not available
to share or reuse.
Chapter 3. Compare
45
Named to enter the name of an existing Access Definition or create
a new named Access Definition.
Note: Select Edit Access Definition from the Tools menu to define
a new or Local Access Definition, or to edit an existing Access
Definition. For details, see the Common Elements Manual .
Extract File
(Created by Compare)
Enter the name of a new or existing Extract File in which to store
the relational subset of data specified in the Access Definition for
Source 1. Extract Files have an .xf extension by default. To select
from a list of recently used files, click the down arrow. To select
from a directory, click the browse button.
Note: If you enter the name of an existing Extract File, the file
will be overwritten. To browse an Extract File, right-click and select
Browse Extract File from the shortcut menu, or select Browse from
the Utilities menu.
Source 2
Extract File
(Created by Compare)
Enter the name of a new or existing Extract File in which to store
the Source 2 data. Extract Files have an .xf extension by default. To
select from a list of recently used files, click the down arrow. To
select from a directory, click the browse button.
Note: If you enter the name of an existing Extract File, the file will
be overwritten.
Table Map Options
Specify a Table Map to correlate the tables to compare in the specified
Extract Files. You can use the Table Map to map tables with unlike names
or to exclude tables from the comparison. Select:
Local
Create an embedded Table Map that is not available to share or
reuse.
Named
Enter the name of an existing Table Map or create a new named
Table Map.
Note: Select Edit Table Map from the Tools menu to define a new
or Local Table Map, or to edit an existing Table Map. For more
detailed information, refer to the Common Elements Manual .
Always View Table Map
Select the check box to review the contents of the Table Map in the
Table Map Editor whenever the Compare Request is run.
Note: If a Table Map is not defined, the Table Map Editor
automatically displays when you run the Compare Request.
You can also specify a Column Map for any table in the Table Map,
if necessary, to map columns with unlike names or to exclude
columns from the comparison.
46
IBM Optim: Compare User Manual
Notify Tab
Use the Notify tab to specify options and addresses for automatic email
notification of the success or failure of the process.
The process report generated when the process completes is automatically sent as
an attachment. See the Common Elements Manual for detailed information.
Process a Compare Request
After you define the required parameters on the General and Source tabs, you can
begin the final preparation for processing the Compare Request.
When you compare multiple tables, you must define a Table Map. A Table Map
correlates the tables to compare in the Source 1 and Source 2 files. You can use the
Table Map to map tables with unlike names or to exclude tables from the
comparison. Compare automatically prompts you to define a Table Map and
displays the Table Map Editor if you have not already done so when you run or
save the Compare Request. For more detailed information on Table Maps, refer to
the Common Elements Manual.
You can also define an optional Column Map for any pair of tables to map
columns with unlike names or to exclude columns from the comparison. When
comparing single tables, you can define a Column Map from within the Compare
Request. When comparing multiple tables, you can specify optional Column Maps
in the Table Map. For more information on Column Maps, refer to the Common
Elements Manual.
Finally, in order to compare specific rows in Source 1 with the corresponding rows
in Source 2, Compare needs a match key for each pair of tables. A match key
consists of one or more corresponding columns from each table. When the match
key value in Source 1 is identical to the match key value in Source 2, Compare
compares the remaining columns in that pair of rows. By default, Compare uses
the primary key in one of the source tables as the match key. If a primary key is
unavailable, or you choose not to use the primary key for the comparison, you can
define a match key using the Match Key Editor.
Using the Match Key Editor
Compare evaluates columns for use as match keys in the following sequence, by
default.
Source 1 Primary Key
If the primary key in Source 1 matches (or is mapped to) a compatible
column in Source 2, the columns are automatically used as the match key.
Note: If primary key consists of more than one column, all of the primary
key columns must match or be mapped to compatible columns to be used
as the match key.
Source 2 Primary Key
If Source 1 does not have a primary key or the primary key is not mapped
to a compatible column in Source 2, Compare checks Source 2 for a
primary key.
If Source 2 has a primary key that matches (or is mapped to) a compatible
column in Source 1, those columns are used as the match key.
Chapter 3. Compare
47
User-Defined Match Key
If a primary key value from neither source can be used, you are prompted
to define a match key using the Match Key Editor. A match key can
comprise one or more columns that uniquely identify each row.
Use the Match Key Editor to review, modify, or assign new match key definitions
for each pair of tables specified for comparison. The columns participating in a
match key can be named differently but must contain compatible attributes. When
the columns are named differently, but the attributes are compatible, you can use a
Column Map to correlate the columns.
Note: The limit for a match key column is 512 bytes.
The Match Key Editor displays a list of the tables specified in the Compare
Request and the corresponding match key information for the selected pair of
tables. Use the Focus arrow in the first column of the table list to select the pair of
tables for which match key information is displayed.
Focus Arrow
The first column of the upper grid on the dialog contains the Focus arrow. Click
the Focus arrow column to reposition the arrow, or use the up/down arrow keys
on your keyboard. Position the Focus arrow to review the Match Key and
Available Columns information for the selected pair of tables.
48
IBM Optim: Compare User Manual
Source 1 Table
Displays the fully qualified name of the table specified as Source 1 in the Compare
Request.
Source 2 Table
Displays the fully qualified name of the table specified as Source 2 in the Compare
Request.
Status
Indicates the match key status for Source 1 and Source 2 tables:
Using Source 1 Primary Key
Rows to be matched on primary key columns specified for table in Source
1.
Using Source 2 Primary Key
Rows to be matched on primary key columns specified for table in Source
2.
Match Key is Required
You must specify a match key to proceed with Compare Request
processing.
Valid user-defined Match Key
Specified match key is valid.
Invalid user-defined Match Key
Specified match key is invalid (for example, columns have incompatible
data types).
Being Edited
You are currently defining the match key.
No Valid Column Mapping
Source columns are not mapped.
Match Key and Available Columns
Lists the Match Key Columns selected and the Available Columns remaining in the
pair of tables indicated by the Focus arrow. Each line displays the Source 1 and
corresponding Source 2 columns as mapped by default, or as specified in the
applicable Column Map.
You can drag columns between the Available Columns box and the Match Key
Columns box, or right-click and select Add or Remove from the shortcut menu.
You can also select Add All or Remove All to move all of the columns at once.
Hide Data Type Columns
Data-type information is displayed for each column in both the Match Key and
Available Columns box, by default. Click this check box to hide the data-type
information and display the column name only.
Tools Menu Commands
The following commands are available from the Tools menu:
Chapter 3. Compare
49
Clear All
Select Clear All to restore the default match key selection for each pair of
tables. The default match key selection is the primary key.
Show All
Select Show All to list every pair of tables defined in the Compare Request
and display the status of the match key for each.
Show Required
Select Show Required to limit the list of tables shown to pairs of tables
that require a user-defined match key. (To show the complete list, select
Show All.)
Set Source 1 as Default
Select to set the Source 1 match key as the default for the pair of tables
indicated by the Focus arrow. The default is noted below the Match Key
Columns box and in the Status grid column.
Set Source 2 as Default
Select to set the Source 2 match key as the default for the pair of tables
indicated by the Focus arrow. The default is noted below the Match Key
Columns box and in the Status grid column.
Run the Compare Request
To process a Compare Request immediately, select Run from the File menu. It is
not necessary to save the Compare Request before it is run.
Note: Depending on the configuration at your site, you may encounter a logon
prompt during processing. Refer to the Common Elements Manual for information
about the Optim Directory Connection Logon and for the DB Alias Connection
Logon.
v Before processing begins, the request is verified. If warning conditions exist, you
can review the parameters in the Warnings dialog, and choose to continue or
cancel processing.
v During processing, if an error occurs, processing stops.
A progress dialog and status messages provide information while the request is
processing. When processing completes, or stops because of an error, you can
review the details in the Compare Process Report.
Schedule the Compare Request
To schedule a Compare Process to run once or repeatedly at a specified future
time, save the Compare Request, and select Schedule from the File menu.
v Processing is initiated at the scheduled time; you do not review the process as it
is performed.
v If warning conditions exist, processing continues without prompting, depending
on the Stop on Error parameter you specified on the Steps tab of the Scheduling
Job dialog.
v If an error occurs, processing stops.
For more detailed information on scheduling requests, refer to the Common
Elements Manual .
50
IBM Optim: Compare User Manual
Compare Request Progress Dialog
When the Compare Process begins, the Compare Request Progress dialog displays
status information. The Status Bar at the bottom of the dialog displays the name of
the table being processed or a description of the action being performed.
When the source data selected for the comparison is defined in an Access
Definition, or the tables are specified directly from the database, Compare
automatically performs an Extract Process before beginning the Compare Process.
The Compare Request Progress dialog displays the status of each step in the
process as it takes place.
Compare Process Summary
Extract from Source 1
Displays Active when in progress, or Completed.
Extract from Source 2
Displays Active when in progress, or Completed.
Compare
Displays Active when in progress, or Completed.
Status
Table Name
Displays the names of the Source 1 and Source 2 tables being compared.
Rows Remaining in Current® Table
Displays the remaining number of rows to be compared in the Source 1
and Source 2 tables in progress.
Chapter 3. Compare
51
Total Rows Remaining
Displays the remaining number of rows to be compared in all specified
Source 1 and Source 2 tables.
Cancel Process
To stop the process, click Cancel Process. Click Yes on the confirmation dialog to
stop the process and return to the Compare Request Editor, or click No to continue
processing.
Status Bar
Describes the action being performed and indicates the name of the table being
processed, as applicable.
Process Time
Lists the elapsed process time for the Compare Process.
Compare Process Report
The Compare Process generates a Compare Process Report that provides general
information and statistics about the Compare Process. The following is a sample:
The Compare Process Report displays the following information:
v
v
v
v
v
52
Name of the Compare Request (or “Untitled” if you did not save the request)
Source 1 Type
Source 1 File Name
Source 2 Type
Source 2 File Name
IBM Optim: Compare User Manual
v
v
v
v
v
Compare File Name
Name of the Table Map or LOCAL, as specified in the Compare Request
User IDs of the user requesting the Compare Process
Date and time the Compare Process started
Date and time the Compare Process completed
v Elapsed time for the Compare Process to complete
v Process Status.
Errors
If any errors or warnings occur during processing, a list of the errors or warnings
is provided. Review the list of errors that caused processing to stop. For example,
an internal error condition exists when the process exceeds the discard row limit or
if you are not authorized to access a particular database table.
Process Summary
The Table Summary statistics are provided for the compared data:
v Total sets of tables compared
v Number of Non-Equal Sets.
Row Details
Information is provided for each table:
v Total number of rows
v
v
v
v
v
Number of rows unmatched
Number of equal rows
Number of different rows
Number of duplicate rows
List of tables used in the Compare Process.
Additional Information
If the Compare Process performs any Extracts prior to performing the comparison,
an Extract Process Report that contains the details of each Extract Process follows
the Compare Process Report.
Save the Report
To save the report to a file, select Save As from the File menu to open the
Windows Save dialog.
Print the Report
To print the report, select Print from the File menu to open the Windows Print
dialog.
Redisplay the Report
If you close the report and want to refer to it again, select Redisplay Results from
the File menu in the Compare Request Editor.
Then select Current to redisplay the report from the last Compare Process run, or
All to display a list of all retained Compare Process Reports. For details about
retaining process reports, see the Common Elements Manual .
Chapter 3. Compare
53
Browse Compare File
You can review the contents of a Compare File by right-clicking on the Compare
File name on the General tab in the Compare Request Editorand selecting Browse
Compare File from the shortcut menu.
You can also use the Browse Utility to review the contents of a Compare File.
Select Browse from the Utilities menu in the main window. For detailed
information about the Browse Utility, refer to Chapter 5, “Browse Compare File
Data,” on page 77.
Saving a Compare Request
You can save a Compare Request by selecting from the following commands on
the File menu in the Compare Request Editor:
Save
Save a new request or definition, or update an existing request.
Save As
Save a request under a new name, preserve the original, and display the
newly named version for editing.
Save Copy As
Save a copy of the original request under a new name, preserve the copy,
and display the original for additional editing.
Set as Default
Save the current entries in the editor as default specifications for that
editor. If you select the Set as Default command, the next time you open
the editor to create a new request or definition, the default entries display
automatically.
When you close the Compare Request Editor, you are prompted to save the request
if you have not already done so.
54
IBM Optim: Compare User Manual
Chapter 4. Extract
Use the Extract Process to copy a set of related rows from one or more tables and
save the rows to an external Extract File. Specifications for the Extract Process are
stored as an Extract Request. The Extract Request specifies the set of parameters
needed to extract data and object definitions from source tables and the Extract File
in which to store the extracted information.
Optim always extracts definitions for tables and columns. These definitions can be
used to create destination tables, if necessary. You can also choose to extract other
object definitions, including primary keys, relationships, and indexes.
You use an Extract File whenever you compare data. You can create Extract Files in
separate Extract processes before comparing or you can allow Compare to create
Extract Files automatically by choosing to compare one or more Access Definitions
or database tables.
Cross-Platform Compatibility
An Extract Process can access data from a variety of databases (DB2, Oracle,
Sybase ASE, SQL Server, and Informix). An Extract File created on MVS can also be
processed in a Windows, UNIX™, or Linux™ environment. (However, an Extract
File created in a Windows environment cannot be processed in MVS.)
Run or Schedule
You can process an Extract Request immediately (by selecting Run from the File
menu) or you can schedule the request for processing at a later time (by selecting
Schedule from the File menu). You must save the request before it is scheduled,
but it is not necessary to save the request before it is run.
Naming Conventions
The fully qualified name of an Extract Request consists of: identifier.name.
identifier
Identifier that serves as the prefix for the Extract Request name (1 to 8
characters).
name
Name assigned to the Extract Request (1 to 12 characters).
When you create Extract Requests, it is helpful to use a logical set of naming
conventions to identify the use for each and to organize definitions for easy access.
Contents
This section explains how to create, maintain, and process an Extract Request,
including how to:
v Specify the Extract File to store data.
v Select or create the Access Definition for an Extract Request.
v Select the types of objects to extract (e.g., primary keys, relationships, and
indexes).
© Copyright IBM Corp. 1994, 2010
55
v Choose Point and Shoot list options. The Point and Shoot list is the set of rows
from the Start Table with which to begin the Extract.
v Assign variable default values.
v Run, save, and schedule an Extract Request.
v Review, save, and print the Extract Process Report.
Open the Extract Request Editor
Use the Extract Request Editor to create and maintain requests to extract data.
These requests are stored in the Optim Directory. There are different ways to open
the editor depending on whether you want to create a new Extract Request or
select an Extract Request to edit.
Create an Extract Request
About this task
To Create an Extract Request
Procedure
1. Select New from the File menu in the main window.
2. Select Extract from the Actions submenu to open the Extract Request Editor.
3. Specify an Extract File.
4. Specify an Access Definition:
If you select Local, select Edit Access Definition from the Tools menu to create
an Access Definition
or
If you select Named, specify the name of an existing Access Definition or
specify a name and select Edit Access Definition from the Tools menu to
define a new Access Definition.
5. Optionally, specify parameters for the Items to Extract.
6. Optionally, specify a Row Limit.
Results
These steps are the minimum required to create an Extract Request. After you
create a request, you can run the process immediately, or save the request and
schedule it.
Alternate Methods to Creating an Extract Request
An alternate method for opening the Extract Request Editor is to select Extract
from the Actions menu in the main window. By default, the last Extract Request
you edited is shown. Your next step depends on your purpose:
v To create a new Extract Request, select New from the File menu in the Extract
Request Editor.
v To create a new Extract Request modeled on an existing one, open the desired
Extract Request and select Save As from the File menu in the Extract Request
Editor.
v To create and store a copy of the current Extract Request and continue editing,
select Save Copy As from the File menu in the Extract Request Editor.
56
IBM Optim: Compare User Manual
Select an Extract Request to Edit
Follow these steps to edit an existing Extract Request.
About this task
To Select an Extract Request to Edit:
Procedure
1. Select Open from the File menu in the main window to open the Open an
Extract Request dialog.
2. Double-click to select Extract Request and expand the object list.
3. Double-click the Extract Request Identifier to display a list of Extract Requests.
4. Double-click the desired Extract Request entry in the grid to open the Extract
Request Editor.
Open an Extract Request Dialog
The Open an Extract Request dialog is divided into two areas. The object
identifiers are on the left and associated objects appear on the right. The list of
objects varies depending on the identifier you select.
Pattern
You can specify a pattern in the Enter pattern for Extract Request box to limit the
list of requests in the Open an Extract Request dialog. An Extract Request name is
in two parts: identifier.name. The pattern must also have two parts. You can use the
% (percent) wild card to represent one or more characters or use the _ (underscore)
wild card to represent a single character in an object definition name. (The
underscore must be selected as the SQL LIKE character on the General tab of
Personal Options.)
Note: After you enter a pattern in the Enter pattern for Extract Request box, click
Refresh to redisplay the list based on your criteria.
Chapter 4. Extract
57
Using the Editor
From the Extract Request Editoryou can create, modify, or delete Extract Requests
stored in the Optim Directory.
Description
Enter text to describe the purpose of the Extract Request (up to 40 characters).
Server Name
If the optional Optim Server is installed, you can select Local to process the request
on the workstation or click the down arrow to select a server on which to process
the request.
Tabs
The Extract Request Editor displays tabs that allow you to specify extract
parameters and select options to define Extract Requests. Each tab in the editor
serves a unique purpose:
General
Specify parameters required by the Extract Process, including the Extract
58
IBM Optim: Compare User Manual
File name, the Access Definition, the items to extract, and a limit for the
number of rows to extract. Each time you open the editor, the General tab
is shown first.
Objects
Specify the type of objects to extract. When you open the Extract Request
Editorfor the first time, all objects are selected by default. Otherwise, this
tab appears only when you select Objects or Both in the Items to Extract
box on the General tab.
Point and Shoot
Specify options for using a Point and Shoot list other than the Point and
Shoot list defined in the Access Definition.
Variables
Define values for substitution variables, if variables are used in the Access
Definition. (This tab appears only if variables are used.)
Object List
Specify other non-related objects for extraction.
Convert
Specify parameters for an optional Convert Process following the Extract
Process. (This tab appears only when you select Run Convert After Extract
on the General tab.)
Notify Specify options for automatic email notification of the success or failure of
the process.
Menu Commands
In addition to the standard File, Edit, and Tools menu commands, you can select
the following commands from the Tools menu:
Edit Access Definition
Opens the Access Definition Editor. You can edit the list of tables,
relationships, and selection criteria in the Access Definition used to specify
the data to extract. For complete information, see the Common Elements
Manual .
Edit Point and Shoot
Opens the Point and Shoot Editor. Create a Point and Shoot list of rows
from the Start Table to extract. For details on using Point and Shoot, see
the Common Elements Manual .
Edit Match Keys
Opens the Match Key Editor. See “Using the Match Key Editor” on page
47 for details on match keys.
Edit Convert Request
Opens the Convert Request Editor. You can specify parameters for
converting the Extract File at the completion of the Extract Process. For
details, see the Move User Manual .
General Tab
Use the General tab to specify parameters to define the data to extract.
Chapter 4. Extract
59
Extract File
Enter the name of a new or existing Extract File to store the extracted data. Extract
Files have an .xf extension by default.
Note: You can browse the contents of an existing Extract File by right-clicking and
selecting Browse from the shortcut menu. For details on the Browse Utility, refer to
the Common Elements Manual .
If you have specified a file name that already exists, a confirmation dialog prompts
you to confirm that you want to overwrite the file when you run the Extract
Request. To disable this feature, refer to the Common Elements Manual .
Access Definition
Local
Select this option to create an Access Definition that is stored with the
Extract Request.
Named
Select this option to specify the name of a new or existing Access
Definition. The name of an Access Definition is composed of two parts:
identifier.name.
identifier Qualifier (1 to 8 characters) to identify the Access Definition.
name Name of the Access Definition (1 to 12 characters).
An Access Definition specifies the Start Table and other tables to be traversed
during the Extract, as well as the relationships that govern traversal paths. You can
define an Access Definition to include:
v Selection criteria for one or more tables.
v A Point and Shoot list. Use Point and Shoot to select specific rows from a Start
Table to begin extracting data. For details on using Point and Shoot, refer to the
Common Elements Manual .
When you specify the name of an existing Access Definition in the Extract Request,
you can use the definition as it is, or you can edit it. If changes have been made to
database tables since the last time the Access Definition was used, the
specifications may no longer be valid. If any specification is invalid, a warning
message is displayed when you open the Access Definition, when you save the
Access Definition, or when you use the Access Definition.
To edit an Access Definition, open the Access Definition Editor by selecting Edit
Access Definition from the Tools menu in the Extract Request Editor. For
complete information, refer to the Common Elements Manual .
Items to Extract
Select the types of objects to extract.
Data
Extract data rows only.
Objects
Extract object definitions only.
Both
Extract data rows and object definitions.
Note: When you choose Objects or Both, you can select types of objects to extract
on the Objects tab, or specify explicit objects to extract on the Object List tab.
60
IBM Optim: Compare User Manual
Row Limit
Maximum number of rows to extract. You can specify a row limit if you are
extracting rows by selecting Data or Both. Clear the check box to use the
maximum limit. The row limit for an Extract Process can be any number from 1 to
the limit specified in Product Options. Refer to the Installation and Configuration
Guide .
Database Connections
Increase the number of concurrent database connections for the Extract Process.
Increasing database connections improves performance when processing large
quantities by allowing multiple threads to process rows concurrently.
To increase the maximum number of connections, select an even number from 2 to
the site maximum specified in Personal Options. (This option is available only if
Maximum Database Connections on the Database tab of Product Options is 2 or
greater.)
Run Convert after Extract
Select this check box to display the Convert tab in the Extract Request Editorto
specify parameters for running a Convert Process immediately following the
Extract Process. Use this tab to specify whether to use a named or local Convert
Request.
The Convert Process can transform or mask data in the Extract File. To specify or
modify Convert Process parameters, select Edit Convert Request from the Tools
menu to display the Convert Request Editor. For details, refer to the Move User
Manual .
Compress Extract File
Select this check box to automatically compress the Extract File for storage.
Generate Statistical Report
Select this check box to include statistical information in the Extract Process
Report. Statistical information may indicate whether you can improve performance
by overriding the default method (scan or key lookup) of accessing a table. (For
details, see the Common Elements Manual .)
Objects Tab
Object definitions for tables and columns listed in the Access Definition are
automatically extracted. Use the Objects tab to also select other objects to extract.
Note: The Objects tab appears only when you select Objects or Both as the items
to extract. You make these selections on the General tab.
Chapter 4. Extract
61
Extract these Objects
Select the corresponding check box to extract the corresponding objects. To exclude
an object, clear the corresponding check box.
Point and Shoot Tab
Use this tab to define Point and Shoot list parameters for this Extract Request other
than the parameters defined for Point and Shoot, if any, in the Access Definition.
The Point and Shoot list defined in the Access Definition is used by default. For
details on using Point and Shoot, refer to the Common Elements Manual .
62
IBM Optim: Compare User Manual
Start Table
Displays the name of the Start Table defined in the Access Definition selected on
the General tab.
File Options
Select the Override AD Point and Shoot Definition check box to disregard the
specifications defined for a Point and Shoot list in the Access Definition. Then,
select one of the following options:
None
Indicates that a Point and Shoot list is not to be used. If the Access
Definition contains a Point and Shoot list, it is ignored by the active Extract
Request.
Local
Specifies a Local Point and Shoot list to be used only with the active
Extract Request. This Local list is unavailable to other Extract Requests or
Access Definitions. To create a new Local Point and Shoot list, select Local,
then select Edit Point and Shoot List from the Tools Menu. The Point and
Shoot Editor is displayed. A name for the Point and Shoot list is not
required because the list is stored with the Extract Request.
File
Specifies an existing or new Point and Shoot File to be used. This file is
available to other Extract Requests or Access Definitions. To use an existing
file or to create a new named Point and Shoot File, select File, then type a
file name in the Name box.
Name Point and Shoot Files are saved in ASCII format and have a .pns
extension by default.
Chapter 4. Extract
63
Variables Tab
An Access Definition can contain selection criteria for one or more tables to limit
the data to be extracted. You can define this criteria using variables and supply
values for the variables for each Extract Process. Use the Variables tab to supply
values for the active Extract Request. The values you supply override the values
specified in the Access Definition for the active Extract Request only.
Grid Details
The information for each variable is presented in three parts on the grid. The name
of the variable is shown in the left column. The adjacent grid cell in the right
column is divided in two. The prompt string corresponding to the variable
displays in the top half of the cell and the value assigned displays in the bottom
half.
Variable
Lists the variables defined in the Access Definition. You can modify the
Variable name only in the Access Definition Editor. The Variable name
displays in italics, unless the default value is overridden. To open the
Access Definition Editor, select Edit Access Definition from the Tools
menu.
Prompt String
Shows text that prompts for a value at run time. You can modify the
prompt string only in the Access Definition Editor. To open the Access
Definition Editor, select Edit Access Definition from the Tools menu.
Value Shows default value assigned to the variable in the Access Definition. If no
default value is specified in the Access Definition, the cell is blank. Enter
64
IBM Optim: Compare User Manual
the value to use for the active Extract Request. You can right-click to
specify to use the default value for one or all of the variables.
Note: A value for each variable is required to perform the Extract. If a
default value is not specified in the Access Definition and no value is
specified on the Variables tab, a message is displayed at run time to
prompt for a value.
Specify Values
The assigned values should be the appropriate data type and size for the column
and should conform to the SQL syntax. For example, assume a variable named ST
is assigned to a character column containing state abbreviations. The variable
delimiter is a colon. If the variable is defined with single quotes in the Access
Definition, specify the value without single quotes:
Access
Definition
Value
= ':ST'
CA
If the variable is defined without single quotes in the Access Definition, specify the
value with single quotes:
Access
Definition
Value
= :ST
'CA'
Note: Values are not validated until run time. Errors may result during processing
if the value is not of the correct data type and size for the destination column, or
the resulting specification does not conform to SQL syntax.
Always Prompt for Values at Run Time
Select this check box to always display the prompt string before an Extract Process
is performed, regardless of whether or not a value has been assigned. Clear the
check box to display the prompt string only when a value for a variable has not
been assigned.
Object List Tab
Use the Object List tab to specify other non-related objects for extraction.
Note: Objects you specify on the Object List tab are extracted only when you
select Objects or Both as the items to extract on the General tab.
Chapter 4. Extract
65
Qualifier
The two-part qualifier serves as a prefix to unqualified object names in the Object
List. To select from a list of the most recently used qualifiers, click the down arrow.
To select a different qualifier, click the browse button. The Default Qualifier
consists of:
dbalias
Alias of the database where an object is defined (1 to 12 characters).
creatorid
Creator ID assigned to the object (1 to 64 characters).
Object
Type
Enter the type of object to extract: Default, Function, Package, Procedure,
Rule, Sequence, UDT, or View. Click the grid cell to display a down arrow,
then click the arrow to select from a list. You must specify an object type
for each entry. The last line can be blank.
To clear entries, right-click the grid and select Remove or Remove All
from the shortcut menu. To add an object, right-click a grid cell, select
Add, then select the object type from the submenu. You can drag an object
name from the Select dialog to any line in the grid.
66
IBM Optim: Compare User Manual
Note:
If you drag an object name to an existing object name in the list, the
existing entry is replaced by the new entry. If you drag an object name
below the last entry, the new object name is added to the bottom of the
list.
Name Name of the explicit object to extract. You cannot specify duplicate object
names for the same type object. The fully qualified object name consists of:
dbalias
Identifies the database where the object resides.
creatorid
Creator ID assigned to the object.
tablename
Base object name.
Status
Indicates the status of the specified object.
Defined
Object exists in the database.
Inaccessible
Cannot connect to the database indicated by the DB Alias.
Incomplete
Object type is not specified, or the object name is not fully qualified. Select
an object type, or specify a Qualifier or a three-part object name, as
appropriate.
Pending
When you select an object type, the object is pending until you specify an
object name.
Unavailable
Object type is not supported for the specified DB Alias (DBMS type).
Unknown
Object does not exist. To create an object, use the Create Utility.
Ignore Unknown Objects
Select this check box to ignore Unknown or Unavailable objects when you run the
Extract Request. If you clear this check box, all objects must have a Defined status
in order to save or run the Extract Request.
Convert Tab
Select Convert after Extract on the General tab to display the Convert tab. Use the
Convert tab to specify whether to use a named or local Convert Request.
The Convert Process can transform or mask data in an Extract File. To specify or
modify parameters for the Convert Process, select Edit Convert Request from the
Tools menu to display the Convert Request Editor. For details, refer to the Move
User Manual .
Chapter 4. Extract
67
Convert Options
Select one of the following options:
Local
Use a Local Convert Request with the Extract Request. (A Local Convert
Request is stored as part of the Extract Request and is unavailable to other
process requests.) To create or edit a Local Convert Request, select Local,
then select Edit Convert Request from the Tools menu to display the
Convert Request Editor.
Named
Use an existing or new Convert Request with the Extract Request. To use
an existing Convert Request or to create a new named request, select
Named, then type a name in the Convert Request Name box. Select Edit
Convert Request from the Tools Menu to display the Convert Request
Editor.
Delete Extract File if Convert fails
Select this check box to delete the Extract File created by the Extract Process when
the Convert Process does not execute successfully.
68
IBM Optim: Compare User Manual
Notify Tab
Use the Notify tab to specify options and addresses for automatic email
notification of the success or failure of the process.
The process report generated when the process completes is automatically sent as
an attachment. Refer to the Common Elements Manual for more detailed
information.
Process an Extract Request
An Extract Request processes in several steps. There are a few differences
depending on whether you schedule the process or run the Extract immediately.
The steps are described in the following paragraphs.
Validate the Access Definition
Compare validates the specifications in the Access Definition. If the Access
Definition is valid, processing continues. If the Access Definition is invalid,
processing proceeds as follows:
v If Schedule is selected, the Stop on Error parameter on the Steps tab of the Job
Details dialog determines whether processing continues.
v If Run is selected, Compare displays an appropriate error message, such as
“Access Definition does not exist,” or “Invalid Access Definition” and processing
stops.
Locate the Extract File
Compare locates the Extract File and if it does not exist, creates it. If the Extract
File does exist, processing proceeds as follows:
v If Schedule is selected, processing continues. The file will be overwritten.
v If Run is selected, a confirmation dialog prompts you to specify whether the
data in the file is to be overwritten. To disable this feature, refer to the Common
Elements Manual .
Validate Variable Value
Compare verifies that variables are defined in the Access Definition and that
values are defined for each variable.
v If the values are valid, processing continues.
v If the values are invalid (for example, the data type, size, or resulting SQL
syntax are invalid), processing stops and errors are recorded on the Extract
Process Report.
v If values are missing or the Always Prompt for Values at Run Time check box
is selected on the Variables tab, the Extract File Variable Valuesdialog is
displayed. Enter values for variables, as required, to continue processing.
Validate Point and Shoot
If a Point and Shoot list is specified, Compare verifies that the rows are valid.
v If the rows in the Point and Shoot list are valid, processing continues.
v If a Point and Shoot list file is specified and cannot be found, processing stops.
v If the rows in a Point and Shoot list are invalid, missing, or if primary key
values in the file do not exist in the Start Table, processing proceeds as follows:
– If Schedule is selected, the Stop on Error parameter you specified on the
Steps tab of the Job Details dialog determines whether processing continues.
Chapter 4. Extract
69
– If Run is selected, you are prompted to specify how to proceed. You can
select to continue Extract processing without using the Point and Shoot list, or
select to cancel the Extract Process.
Extract Data and Generate an Extract Process Report
Compare performs the Extract for each table specified in the Access Definition and
generates an Extract Process Report.
v If Schedule is selected, the Extract proceeds when scheduled. The Extract
Process Report is saved to a file. Open and print the report from the Scheduler
after the Extract completes.
v If Run is selected, the Extract Request Progress dialog displays a status message
as rows of data are extracted from each table. The Extract Process Report
displays automatically when the Extract completes. Review and print the report,
as required.
Schedule an Extract Process
To schedule an Extract Process to run once or repeatedly at a specified future time,
save the Extract Request, and select Schedule from the File menu.
v Processing is initiated at the scheduled time; you do not review the Extract
Process as it is performed.
v If warning conditions exist, processing continues without prompting, depending
on the Stop on Error parameter you specified on the Steps tab of the Scheduling
Job dialog.
v If an error occurs during the Extract Process, processing stops.
For details on scheduling, see the Common Elements Manual .
Run a Process Request
To process an Extract Request immediately, select Run from the File menu. It is not
necessary to save the Extract Request before it is run.
v Before processing begins, the Extract Request is verified. If errors exist, you can
review the details on the message bar at the bottom of the Extract Request
Editor.
v After the Extract Request has been verified, the process parameters are verified.
If warnings or errors exist, you can review the details in the Warnings dialog
and choose to continue or cancel the Extract.
v If an error occurs during the Extract Process, processing stops.
Error Messages
If error conditions are detected in the Access Definition or the Extract Request
when the Extract Process is run, processing stops and an error message is
displayed. For example, errors can occur if tables change after the Access
Definition is created.
Error messages display in the message bar of the Extract Request Editor.
Duplicate Table Entries
A single table is specified in the Access Definition twice. You cannot
specify a table and one or more views or aliases of that table, or specify
more than one view or alias of a table.
70
IBM Optim: Compare User Manual
No Valid Table
No valid table is specified. The list of tables in the Access Definition does
not include any valid tables. These tables may have been dropped from the
database.
Invalid WHERE Clause
An SQL WHERE Clause is invalid. Selection criteria for one or more tables
are invalid. (For example, a column used in an SQL WHERE Clause has
been dropped from the table.)
Invalid Start Table
The Start Table is invalid. This can occur when the table is dropped or the
Creator ID changed. The table is then marked as Unknown and cannot be
used as the Start Table.
Missing Primary Keys
The primary key is missing in a child table that has multiple parents. The
primary key is required to ensure that multiple copies of the same row are
not extracted when the child table is related to multiple parents.
The primary key is missing in a parent table. The relationships defined in
the Optim Directory are not required to include the primary key of the
parent table. However, a primary key is required to enable the tracking of
outstanding parent rows.
Improper Authorization
The person requesting the Extract is not authorized to access data from a
table included in the Access Definition.
Warning Messages
If one or more warning conditions exist, the Warnings dialog opens to report the
details. Warning messages indicate a condition that may require attention.
Warnings Dialog
Sample warnings are shown in the following dialog.
Command Buttons
Proceed
Click Proceed to continue the Extract Process regardless of warnings.
Review details of warnings in the Extract Process Report.
Chapter 4. Extract
71
Abort Click Abort to cancel the Extract Process.
Warning Messages
The following are categories of warning messages that may appear.
New Status
A relationship is in New status indicating that a relationship is new to the
Access Definition, and not explicitly selected.
v To view the relationship list and select or unselect individual
relationships, use the Relationships tab on the Access Definition Editor.
v To specify whether New relationships are selected or unselected by
default, use the check box Use New Relationships on the Relationships
tab on the Access Definition Editor.
Unknown Relationship
A relationship is in Unknown status. This occurs when the Creator IDs of
the tables have changed or the relationship has been dropped from the
database.
Unknown Table
A table is in Unknown status. This occurs when the table has been
dropped from the database or the identifier has changed.
Untraversed Table
A table specified in the Access Definition will not be traversed by the
Extract. This indicates that the selected relationships do not include a path
from the Start Table to this table.
Untraversed Relationship
A relationship listed in the Access Definition will not be traversed by the
Extract.
Runstats Error
RUNSTATS has not been applied to a DB2 table in the Access Definition.
This can affect performance if the table is large.
Extract Request Progress
When the Extract Process begins, the Extract Request Progress dialog displays
status information.
72
IBM Optim: Compare User Manual
Processing Related Objects
If objects are included, the number of each type of object displays as the objects are
extracted. If objects are not included, the Objects group box is unavailable.
Processing Data
Rows are extracted table by table, traversing the relationships. Some tables may be
revisited as relationships are traversed.
Rows Extracted from current table
Displays the total number of rows extracted from the current table.
Total Rows Extracted
Displays the total number of rows extracted from all tables.
The totals in the Extract Request Progress dialog are revised after a number of
rows are extracted for each table, after a number of seconds pass, and when the
extract for one table completes and the process begins for the next table.
Note: The frequency with which the Extract Request Progress dialog is updated
(i.e., the number of rows and seconds) is specified on the Actions tab in Personal
Options. Refer to the Common Elements Manual .
Cancel Process
To stop the process, click Cancel Process. A confirmation dialog is displayed:
v To cancel the Extract Process, click Yes to return to the Extract Request Editor.
You can review the Extract Process Report, respecify the parameters, and restart
the Extract Process.
v To continue processing, click No. The confirmation dialog closes and the Extract
Process resumes.
Chapter 4. Extract
73
Status Bar
Describes the action being performed and indicates the name of the table being
processed, as applicable.
Process Time
Lists the elapsed process time for the Extract Process.
Extract Process Report
The Extract Process generates an Extract Process Report that provides general
information and statistics about the Extract Process.
The following is a sample:
The Extract Process Report displays the following information:
v Name of the Extract Request (or “Untitled” if you did not save the request).
v Name of the Server or (Local), for client workstation.
v Name of the generated Extract File.
v
v
v
v
v
74
Name of the Access Definition for the Extract Request or LOCAL.
User IDs of the user requesting the Extract Process.
Date and time the Extract Process started.
Date and time the Extract Process completed.
The elapsed time.
IBM Optim: Compare User Manual
Extract Process Warnings
A list of any warnings or errors that occur during processing is provided.
Process Summary
Statistics are provided for the data extracted:
v Total number of Tables Processed.
v Total number of Rows Extracted.
v Total number of Rows with Errors.
v Total number of First Pass Table Rows.
Object Details
The number of objects copied to the Extract File, or Not Selected if the object was
not selected in the Extract Request.
Row Details
Statistics are provided for each table:
v Total number of rows extracted from each table.
v Total number of failed rows for each table.
v Names of tables used in the Extract. The tables are listed in the same order as in
the Access Definition.
Statistical Information
If you selected the Generate Statistical Report check box on the Extract Request
Editor, detailed performance information for each step in the traversal path is
displayed at the end of the report. Each step consists of a Table entry, and may
include one or more Relationship entries, Primary Key entries, or DBMS Access
entries. For details about statistical information, see the Move User Manual .
Save the Report
To save the report to a file, select Save As from the File menu to open the
Windows Save dialog.
Print the Report
To print the report, select Print from the File menu to open the Print dialog.
Redisplay the Report
To redisplay the report, select Redisplay Results from the File menu. Then select
Current to redisplay the report from the last Extract Process run, or All to display
a list of all retained Extract Process Reports. For details about retaining process
reports, see the Common Elements Manual .
Chapter 4. Extract
75
76
IBM Optim: Compare User Manual
Chapter 5. Browse Compare File Data
Use the Browse Utility to view the contents of a Compare File. The Browse Utility
allows you to review a summary of the results of a comparison between each pair
of tables. You can also browse table data in selected pairs of compared tables. Table
data is displayed in a dialog that allows you to view Source 1 data, Source 2 data,
or data from both sources, side by side.
You can also use the Browse Utility to browse the contents of a Source File (an
Extract or Archive File). When selecting from several Source Files for a Compare
Process, browse Source File data to determine that the data is as expected. When
browsing a Source File, you can browse data in individual tables, or join tables to
view related data. For detailed information about browsing a Source File, refer to
the Common Elements Manual .
When browsing table data, you can exclude selected rows from the display, find
specific data, display character data in hexadecimal, and easily navigate the data.
Contents
This section explains how to browse data in a Compare File, manipulate the
display, and perform the following tasks:
v Use the components of the Browse dialog.
v Browse table data and change the display using grid facilities.
Open a Compare File to Browse
You can open a Compare File as follows:
About this task
From the Main Menu:
1. In the Utilities menu, select Browse to open the Browse dialog.
2. In the File menu:
v Select Open to display the Open dialog to locate and open a file
OR
v Select Last Created Compare File to open the most recently created Compare
File.
From the Compare Request Editor or list of files:
v Right-click the file name and select Browse from the shortcut menu.
From Windows Explorer:
v In Windows Explorer, double-click a file name or drag the file name to the
Optim icon on the workstation desktop to open the selected file.
Results
The Browse dialog displays information about the selected file. The name of the
file appears in the title bar. Compare Files are saved with the default extension
.cmp. However, files can be saved or renamed with other extensions, or without
© Copyright IBM Corp. 1994, 2010
77
extensions. Each time you open the Browse dialog, the Tables tab is shown first.
Tables Tab
Use the Tables tab to view information about the tables in the selected Compare
File. This information can be viewed, but not edited.
Grid Details
The Tables tab contains the following grid details:
Source
Indicates the Source File for the table. Note that tables are listed in pairs,
alternating between Source 1 and Source 2.
Table Name
The names of the compared tables.
Total Rows
The number of rows compared from each table.
Unmatched Rows
The number of unmatched rows in the compared table. A row is
Unmatched when the match key value does not correspond to a match key
value in the compared table in the other Source File.
Equal Rows
The number of equal rows in the compared table. A row is Equal when the
match key value and all other column values in Source 1 and Source 2
match exactly.
Different Rows
The number of different rows in the compared table. A row is different
when the match key values in Source 1 and Source 2 match exactly, but
values in other columns differ.
Rows with Duplicate Match Keys
The number of rows in the compared table that have duplicate match keys.
A row with a duplicate match key contains a non-unique value in the
Match Key column(s) and cannot be compared.
78
IBM Optim: Compare User Manual
You can use the Find option, available on the grid heading shortcut menu, to assist
in locating specific information in a large display. (Refer to the Common Elements
Manual for detailed information about the Find option.)
Information Tab
Use the Information tab to review information about the selected Compare File.
The Information tab contains the following details:
Created By
User ID of the person that ran the process that created the file.
Date Created
Date and time the file was created.
Created on Machine
Identifier for the machine from which the file was created.
Server Name
Name of the Optim Server from which the file is accessed or (Local) if the
file is accessed from the workstation.
Number of Sets
The number of pairs of tables compared.
Source 1 File Name
The fully qualified name of the Source 1 File.
Source 2 File Name
The fully qualified name of the Source 2 File.
Chapter 5. Browse Compare File Data
79
Extended Compare Table Information
Right-click and select Display Extended Information from the shortcut menu to
display the Extended Compare Table Information dialog.
Source 1
The name of the Source 1 table.
Source 2
The name of the Source 2 table.
Grid Details
The Extended Compare Table Information dialog contains the following grid
details:
Source 1 Column
The names of the columns in the Source 1 table.
Source 2 Column
The names of the columns in the Source 2 table.
Status The status of the comparison between Source 1 and Source 2 columns:
Match Source columns are in the match key.
Compare
Source columns are compared when the values in the paired Match
Key columns are the same.
Not Used
Source column is found in only one table or was excluded from the
Compare Process.
80
IBM Optim: Compare User Manual
Same Attributes
When the check box is selected, the attributes for Source 1 and Source 2 are
the same. When the check box is cleared, the column attributes for Source
1 and Source 2 tables do not match.
Display Compare File Table Data
You can display the rows for a pair of tables listed on the Tables tab:
v Select a pair of tables in the grid, then right-click the pair of tables to display the
shortcut menu. Select Display Rows, then select an option from the cascading
menu to display particular types of compared rows: All, Different, Duplicate,
Equal or Only.
v Double-click a pair of table names in the grid, or select Display Rows from the
File menu. All rows are displayed by default, unless a selection was made on
the Browse tab in Personal Options to limit the display to a particular type of
row (you can select Show Excluded Rows from the Tools menu to display all
rows).
A Browse Compare File Table Data dialog displays data from the selected pair of
tables.
Note:
v If you select more than one pair of tables, several Browse Compare File Table
Data dialogs open. Move one dialog to see other dialogs beneath.
v Binary data is not displayed. Cells containing binary data are shaded. To view
binary data, use the hexadecimal display. For more information about viewing
binary data, see “Column Data Display” on page 85.
Use the Browse Compare File Table Data dialog to review the compared data from
the selected pair of tables. By default, differences in the compared data are shown
in bold, italicized type.
Note: You can select Personal Options to emphasize differences in Source 1 and
Source 2 data.
Table Name
Name of the Source 1 table displays to the left of the toolbar. You can alternatively
display Source 2 table information by selecting Display Source 2 from the toolbar
Options menu.
Side label Format
In side label format, the column names are displayed down the left side of the
browse window and data from Source 1 and Source 2 are displayed to the right of
the headings. Names of the Primary Key column(s) are in bold type. Side label
format focuses on a single row and can display more columns for the row than the
columnar format. Side label format is useful for browsing data in very wide
columns. Use the navigation buttons on the browse window toolbar when in side
label format to scroll the display to another row.
Chapter 5. Browse Compare File Data
81
Columnar Format
In columnar format, column names are displayed across the top of the browse
window and the data is displayed in columns beneath the headings. The grid
headings of Primary Key column(s) are in bold type.
The grid contains the data from the compared tables, including the columns from
the named table, preceded by a Change column and a Source column.
The Change column displays the status of the difference between the Source 1 and
Source 2 rows in the comparison, as follows:
Equal Corresponding rows in Source 1 and Source 2 match exactly.
82
IBM Optim: Compare User Manual
Diff
Row in one source differs from the corresponding row in the other source.
Only
Row exists in one source, but not in the other.
Dupl
Rows have duplicate match keys.
The Source column indicates whether the row resides in Source 1, Source 2, or
both.
Toolbar
The toolbar allows you to select display options and menu choices for the browse
window, as follows:
Format
or
Switch the data display between columnar and side label format. The
default format is set in Personal Options. Refer to the Common Elements
Manual .
Options
Display the browse window Options menu.
Display Attributes
Switch between displaying and hiding column attribute
information in the column headings when data is displayed in
columnar format.
Display Source 2
Select to display Source 2 column names and data attributes. Clear
to display Source 1 column names and data attributes.
Note: The table name and label of the table at the top of the dialog
change to reflect your selection.
Show Unmatched Columns
Display or hide unmatched columns (columns excluded from
Compare processing, using a Column Map). Refer to the Common
Elements Manual for complete information about excluding columns
from a comparison.
This option is available in a columnar display only, and is disabled
for tables that do not have unmatched columns.
Note: Names of unmatched columns are shown in the column
header with a number prefix to indicate the Source for the column.
Show Excluded Rows
Display all previously excluded rows (rows are excluded using the
Exclude command on the shortcut menu). To display excluded
rows individually, rightclick a row and select Show Next from the
shortcut menu.
Chapter 5. Browse Compare File Data
83
Access Definition
If the file contains Large Objects (LOBs), select Access Definition
to establish an association between a LOB and an application used
to view the LOB. Refer to “LOB Columns” on page 87.
Navigation
In side label format, scroll to display the first row, previous row, next row,
or last row, respectively.
Grid Heading Shortcut Menu
The display can be navigated and customized using options available on the grid
heading shortcut menu. Right-click a grid column heading to display a shortcut
menu. Select from the following commands:
Find
Open the Find dialog where you can specify search criteria to locate a
particular value in a grid column.
Exclude
Open the Exclude dialog where you can specify a value or string used to
exclude rows that contain matching values from the display.
Include
Open the Include dialog where you can specify a value or string used to
include only rows that contain matching values.
Hide
Hide a grid column. To redisplay the grid column, select Unhide All or
Reset Grid Attributes from the shortcut menu.
Unhide All
Display hidden grid columns.
Note: Unmatched columns are not shown unless Show Unmatched
Columns is selected from the Options menu.
Lock
Move a grid column to the left and lock in place. When you lock more
than one column, the locked columns are positioned to the left in the order
locked. The Lock menu selection changes to Unlock for locked columns.
To unlock a column, select Unlock.
Note: To unlock all locked grid columns, select Reset Grid Attributes from
the shortcut menu.
Reset Grid Attributes
Return the grid components to the original settings, display hidden grid
columns, and unlock locked grid columns. Sorted data remains unchanged.
Print
Open the Print dialog to print the rows in the grid.
Save
Open the Save dialog to save all or selected rows.
Grid Patterns
Display the Grid Patterns dialog. Refer to this dialog for a brief description
of any cross-hatching patterns used in the dialog from which you
right-clicked.
Refer to the Common Elements Manual for complete information about the Find,
Exclude, Include, Hide, and Lock options.
84
IBM Optim: Compare User Manual
Grid Column Shortcut Menu
Right-click a grid column to display a shortcut menu. Select from the following
commands:
Display
Open the Column Data Display dialog for viewing character or
hexadecimal value of a cell in a column defined as a character, BLOB, or
CLOB data type. Select the format of the data, Character or Hex. For more
information, see “Column Data Display.”
Character
Displays, in character format, the data in the selected grid cell.
Hex
Displays, in hexadecimal format, the data in the selected grid cell.
Side label/Columnar
Switches the display between side label and columnar format.
Exclude
Excludes the selected row from the display.
Show Next
Restores the next excluded row to the display, as applicable.
Show All
Restores all excluded rows to the display.
Access Definition
If the file contains Large Objects (LOBs), select Access Definition to
associate the LOB data with an application used to view the LOB data.
Refer to“LOB Columns” on page 87.
Run Associated Application
If the file contains Large Objects (LOBs), select Run Associated
Application to start the application associated with the LOB data.
Export LOB
If the file contains Large Objects (LOBs), select Export LOB to export LOB
data to a file. Refer to “LOB Columns” on page 87.
Column Data Display
Use the Column Data Display dialog to display a character or hexadecimal
representation of data.
Chapter 5. Browse Compare File Data
85
Data Offset
Displays the location of data, in bytes, from the beginning of the column or file.
For a hexadecimal display of data in UTF-8 or multi-byte format, the number of
bytes per line is displayed in parentheses, and if the number of characters
displayed is greater or less than the number of characters displayed per row (as
determined by the Characters per Row option), the offset and bytes per line are
displayed in italic type.
Display Character
For character data, right-click a cell and select Display, Character from the shortcut
menu to display the character representation of the column data. For a CLOB, click
the
icon.
Display Hexadecimal
Right-click a cell and select Display, Hex from the shortcut menu to display the
character and hexadecimal representations of the column data. For a LOB, click the
icon.
The digits that make up the hexadecimal representation of each character are
displayed on the lines below that character. For binary columns, the hexadecimal
representation is displayed on two lines (the character line contains no data and is
shaded). For CLOB columns, the hexadecimal representation includes all bytes,
including carriage returns, line feeds, and the byte order mark (BOM).
For the hexadecimal display of character columns, the following applies:
v UTF-16 and Extract File or Archive File data will display the hexadecimal
representation on four lines.
v UTF-8 or multi-byte data will display the character over the first byte, and a
period will be displayed over any additional bytes. For example, the UTF-8
86
IBM Optim: Compare User Manual
French character À is displayed as two bytes:
À.
C8
30
Note:
– For data in multi-byte format (for example, Oracle JA16SJIS), the character
and hexadecimal representations are each displayed in different fonts and
may not be aligned.
– For release 5.3 or earlier Extract Files and Archive Files, the hexadecimal
representation is displayed on two lines only.
Options Button
Click the options button to display the following:
Characters per Row
Select the number of characters to display per row: 64, 128, 256, or 512.
File Type
For CLOB data only. If the correct encoding scheme for the CLOB file is
not displayed, select the encoding scheme, UTF-8 or UTF-16. For UTF-8,
the hexadecimal representation is displayed on two lines. For UTF-16, the
hexadecimal representation is displayed on four lines.
If a file does not include a byte order mark, the default encoding scheme is
based on the data type, CLOB (UTF-8) or NCLOB (UTF-16).
LOB Columns
When you browse a Compare File that contains LOB data, the background in the
grid column may contain a bitmap pattern of dots to indicate that a difference
exists between the Source 1 LOB column and the Source 2 LOB column.
Three icons are displayed in grid columns to represent LOB data. The icons
provide the following options:
icon to start the application associated with a LOB. If an
v Click the
association has not been created, you are prompted to create one.
v Click the
icon to browse a CLOB in character mode.
v Click the
icon to browse the LOB in hex mode.
Chapter 5. Browse Compare File Data
87
LOB Column Associations
To associate a LOB column with the application (e.g. Microsoft Word, Microsoft
NotePad, Microsoft Paint, etc.) required to browse the LOB data, right-click the
Source 1 or Source 2 grid column for the LOB and select Access Definition from
the shortcut menu.
Choose Select or Columns from the submenu.
Note: If the rows are equal, the Access Definition you select is for Source 1, by
default.
Select
Click Select from the submenu to select a named Access Definition. Associations in
the Access Definition you select are matched to corresponding columns in the
browsed file, as follows.
The fully qualified (dbalias.creatorid.tablename) table names in the selected Access
Definition are matched with table names in the browsed file. If no match is found,
a two-part (creatorid.tablename) table name match is attempted, and finally, a table
name only match. If no match is found, a message prompts you to select a
different Access Definition.
If you attempt to browse a LOB column for which an association is not found in
the selected Access Definition, a message prompts you to open the Columns dialog
to create an association.
Note: If you modify the Access Definition (for example, by creating a new LOB
column association), you are prompted to save the Access Definition when you
finish browsing, or if you select a different Access Definition.
If you attempt to browse a LOB column that is not in a table referenced in the
selected Access Definition, a message prompts you to select a different Access
Definition.
You can select a different Access Definition as often as required. To return to the
original Access Definition (embedded in the Archive or Extract File), close and
reopen the Browse Table Data dialog.
88
IBM Optim: Compare User Manual
Note: When selecting or saving an Access Definition for a Compare File, the dialog
will display “Source 1” or “Source 2” as part of the title, for reference.
Columns
Click Columns from the submenu to display the Columns dialog.
Use the grid column labeled Association to associate a LOB column with an
application suitable for viewing the LOB data.
You can create an association in one of two ways:
v Type a file name extension in the Association column that corresponds to the
type of LOB (for example, type the extension .doc to associate a Word document
with Microsoft Word).
OR
v If the table contains a reference column used to identify the LOB data, you can
enter the name of the reference column in the Association grid column. The first
three characters in the reference column are used as the file name extension for
the LOB in the same row. The reference column must be a character-type
column. Click the Association grid column to display a drop-down list of
charactertype columns in the table, and select the reference column name.
Note: The check box in the Native LOB Mode grid column must be selected in
order to display the LOB using the associated application.
When you attempt to browse a LOB associated with an application that is
inaccessible from the workstation, Windows 2000 displays the Open with... dialog
to enable you to select an accessible application. (Older versions of Windows may
display an error message. To manually assign an accessible application to use,
select Options from the Windows View menu, and then File Types.)
Chapter 5. Browse Compare File Data
89
Export LOB Data
Right-click on a LOB in the grid on the Browse Compare File Table Data dialog
and select Export LOB to export LOB data to a file. Enter a name for the Export
File.
Printing Options
These dialogs offer choices in printing data from a file you are browsing.
Browse Compare File Dialog
From this dialog, you can print information about the file you are browsing, the
list of tables in the file, and the number of rows for each table.
v Select Print from the File menu to display the Windows Print dialog.
v Use the Windows Print dialog to print information about the file and the list of
table names (for details, refer to Windows Help).
Note: You can also select Print from the grid heading shortcut menu to print the
list of tables in the file, and the number of rows for each table only.
Browse Compare File Table Data Dialog
From this dialog, you can print a list of rows displayed in the browse window.
v Right-click in the grid heading and select Print from the shortcut menu to
display the Windows Print dialog.
v Use the Windows Printdialog to print the list of rows in the browse window (for
details, refer to Windows Help). The data is printed in a columnar format, in the
order displayed. Each row starts on a new line.
Save Information from a Compare File
Compare Files are stored in a proprietary format; they are not readable when
opened directly with a text editor. However, you can open a Compare File with the
Browse Utility, and then save it as an output file. Choose to save the file in a text
(.txt) format or a comma-separated (.csv) format. You can save the information
from one table, or from several tables. The file, once generated, can be opened in a
text editor or a spreadsheet application (for comma-separated format files).
90
IBM Optim: Compare User Manual
About this task
Note: LOB columns are not included in an output file, in either format.
To save Compare File information as an output file:
Procedure
Select the pairs of tables you wish to save from the display in the Browse
Compare File dialog.
2. Select Save as Output File from the File menu to open the Windows Save As
dialog.
3. Assign a file name, choose a format, and save the file (for details on the
Windows Save As, refer to Windows Help).
1.
Output File Formats
The following section shows examples of Compare File output stored in text
format and in comma-separated format.
Text Format
This is an example of a portion of a text document version of a Compare File. If
you select more than one pair of tables to include in the text document,
information for each pair of tables is separated by a header.
Comma-Separated Variable Format
This is an example of a portion of a comma-separated variable version of a
Compare File, opened using Microsoft Excel.
Chapter 5. Browse Compare File Data
91
92
IBM Optim: Compare User Manual
Chapter 6. Report
Use the Report Process to summarize data in a Compare File, according to your
specifications. The Report Process runs on the client machine only (not on an
Optim Server).
Specifications for a Report Process are stored as a Report Request. The Report
Request contains the set of parameters needed to select data from the Compare File
and send the output to a file, a printer, or both.
Note: Additionally, you can use the Report Request to create a report on the
contents of an Archive File or list Archive Directory entries that meet criteria you
supply. For more information, refer to the Archive User Manual .
Run or Schedule
You can process a Report Request immediately (by selecting Run from the File
menu) or you can schedule the request for processing at a later time (by selecting
Schedule from the File menu).
You must save the request before it is scheduled, but it is not necessary to save the
request before it is run.
Naming Conventions
The fully qualified name of a Report Request consists of: identifier.name.
identifier
Identifier that serves as the prefix for the Report Request name (1 to 8
characters).
name
Name assigned to the Report Request (1 to 12 characters).
When you create Report Requests, it is helpful to use a logical set of naming
conventions to identify the use for each and to organize definitions for easy access.
Contents
This section explains how to create, maintain, and process a Report Request,
including how to:
v Specify the Source File and tables to analyze for the report.
v Select output options for the report.
v Select layout, row display, format, and notification options.
v Run, save, and schedule a Report Request.
Open the Report Request Editor
Use the Report Request Editor to create and maintain requests for reports on data
in Compare Files. These requests are stored in the Optim Directory. There are
different ways to open the editor depending on whether you want to create a new
Report Request or select a Report Request to edit.
© Copyright IBM Corp. 1994, 2010
93
Create a Report Request
These are the minimum steps required to create a Report Request. After you create
a request, you can run the process immediately, or save the request and schedule
it.
About this task
To Create a Report Request
Procedure
1.
2.
3.
4.
Select New from the File menu in the main window.
Select Report from the Actions submenu to open the Report Request Editor.
Specify a Source File and the tables on which to report.
Specify an output option and a file name, or printer selection for the report.
5. Specify layout and row display options for the report.
Results
Because the options to create a Report Request and to modify a Report Request are
similar, refer to “Using the Editor” on page 96 for complete details.
Alternate Methods to Creating a Report Request
An alternate method for opening the Report Request Editor is to select Report
from the Actions menu in the main window. By default, the last Report Request
you edited is shown. Your next step depends on your purpose:
v To create a new Report Request, select New from the File menu in the Report
Request Editor.
v To create a new Report Request modeled on an existing one, open the desired
Report Request and select Save As from the File menu in the Report Request
Editor.
v To create and store a copy of the current Report Request and continue editing,
select Save Copy As from the File menu in the Report Request Editor.
Select a Report Request to Edit
To Select a Report Request to Edit:
About this task
Procedure
1. Select Open from the File menu in the main window to open the Open a
Report Request dialog.
2. Double-click to select Report Request and expand the object list.
3. Double-click the Report Request Identifier to display a list of Report Requests.
4. Double-click the desired Report Request to open the Report Request Editor.
Open a Report Request Dialog
The Open a Report Request dialog is divided into two areas. The object identifiers
are on the left and associated objects appear on the right. The list of objects varies
depending on the identifier you select.
94
IBM Optim: Compare User Manual
Pattern
You can specify a pattern in the Enter pattern for Report Request box to limit the
list of requests in the Open a Report Request dialog. A Report Request name
consists of two parts: identifier.name. The pattern must also have two parts. You can
use the % (percent) wild card to represent one or more characters or use the _
(underscore) wild card to represent a single character in an object definition name.
(The underscore must be selected as the SQL LIKE character on the General tab of
Personal Options.)
Note: After you specify a pattern in the Enter pattern for Report Request box,
click Refresh to redisplay the list based on your criteria.
Chapter 6. Report
95
Using the Editor
In the Report Request Editor you can create, modify, or delete Report Requests
stored in the Optim Directory.
Description
Enter text to describe the purpose of the Report Request (up to 40 characters).
Tools Menu Commands
In addition to the standard commands on the File, Edit, and Tools menus, you can
select the following commands from the Tools menu:
Convert to Local
Allows you to convert a named Report Request to a local Report Request.
A local Report Request is saved with the Compare Request.
Edit Joins
Opens the Edit Joins dialog, which allows you to select joined tables in the
report.
Note: This dialog is disabled when the Source File is a Compare File.
96
IBM Optim: Compare User Manual
Tabs
The Report Request Editor contains tabs that enable you to specify parameters and
select options to define a Report Request. Each tab in the editor serves a unique
purpose:
General
Parameters required by the Report Process, including the Report type (i.e.,
Archive Directory or File), the Report title, output options, Report File
name, and printer specifications, as applicable. Each time you open the
editor, the General tab is shown first.
For information about Archive Directory reports, refer to the Archive User
Manual .
Source File
Parameters required to report on data contained in a Source File (e.g.,
Compare File), including the Source File Server, Source File name, and
tables included in the report.
Note: This tab is displayed when Report Type on the General tab is set to
File.
Compare Details
Specify layout options, row display options, and whether to display Source
1 or Source 2 table header information for the report.
Note: This tab is displayed when Report Type on the General tab is set to
File and the Source File is a Compare File.
Formatting
Specify limits, spacing options and table heading options for the specific
Report Request. The default settings for formatting options are set in
Product Options.
Notify Specify options for automatic email notification of the success or failure of
the process.
General Tab
Use the General tab to specify the type of Report and the title of the Report. You
can also select output options for the report, including the text format, and
whether to save report information to a named Report File or to print the report.
Report Type
Specify whether you want to report on the data contained in a Source File or the
files in the Archive Directory.
File
Report on data contained in a Source File (Archive or Compare File). For
more information about using an Archive File in a Report Request, see the
Archive User Manual .
Archive Directory
Create and maintain requests to report on the location, creation date, and
retention policy for the Archive Directory entries that match the specified
criteria. For more information, see the Archive User Manual .
Security
Report on Functional or Object Security permissions. For more information,
see the Installation and Configuration Guide .
Chapter 6. Report
97
Report Title
Enter a title for the report. The title appears on every page of the report.
Output Options
:
Local File
Select this check box and enter a Report File name to save the output of
the Report Process as a text file.
Local Printer
Select this check box to submit the output of the Report Process to the
specified printer.
Rich Text Format
Select this check box to use the Rich Text Format (RTF) standard for text
and graphics. RTF can be used with different output devices, operating
environments, and operating systems. For the Report Process output, the
default font is Courier, and differences are displayed in bold and italicized
text.
Note: You can modify RTF files (e.g., colors, fonts) using Microsoft Word.
Plain Text Format
Select this check box to use Plain Text Format for data in ASCII format.
Plain text is more portable than RTF because it is supported by nearly
every application on every machine. It is quite limited, however, because it
cannot contain any formatting.
Note: If you select Plain Text Format, you must also select Local File.
(Local Printer is ignored.)
Report File
Enter the name of the Report File. The Report File is available if Local File
is selected. If the file exists, a dialog prompts to confirm that you want to
overwrite the file. To disable the confirmation prompt, use Personal
Options.
Note: You can browse the contents of an existing Report File by
right-clicking the file name and selecting View from the shortcut menu.
Report Printer
The name of the default printer displays, if Local Printer is selected. To
change the printer for the report, click the Print Options button to display
the Windows Print Setup dialog.
Source File Tab
Use the Source File tab to enter the name of the Source File for the report and
identify tables in the Source File from which to compile the report information.
The Source File tab is only displayed if you selected File as the Report Type on
the General tab.
98
IBM Optim: Compare User Manual
Source File Server
If the optional Optim Server is available on your network, click the down arrow to
select the server on which the file is located, or select (Local) to specify a file on
the workstation.
Source File Name
Enter the name of the Source File containing the data to summarize. Enter the
complete path and file name, click the Browse button to select the file from a
directory, or click the retrieve button to select the last Source File you created.
Compare Files have a .cf extension by default.
Note: You can browse the contents of a Source File by right-clicking the file name
and selecting Browse from the shortcut menu. See the Common Elements Manual for
details on the Browse Utility.
Source Table List
Select the check box next to the table name to include the table data in the Report
Process. You can click Select All to select all of the table names listed, or click
Clear All to clear all of the check boxes. At least one table name must be checked
to proceed.
Chapter 6. Report
99
Automatically Report New Tables
Select this check box to report on all tables in the Source File, whether or not the
tables are named or selected in the original Table List. This feature is useful when
a named Report Request is used to report on a Source File that contains a different
set of tables, or additional tables, than the original Source File.
Compare Details Tab
Use the Compare Details tab to specify layout options, row display options, and
the Source Table from which to show table data, as follows.
Layout Options
Summary
Select this check box to summarize the results of the Compare Process.
Information in the summary includes the name of the source file, date
created, number of tables, source types, and table statistics.
Details
Select this check box to include all the information from all of the rows
compared in the Compare Process. Select a format from the following:
Columnar
In columnar format, the column headings display horizontally
across the top of the reported row, and the data displays in
100
IBM Optim: Compare User Manual
columns beneath the headings. Note that the headings for Primary
Key column(s) display in bold type.
Side Labels, all columns
In side label format, the column headings for each row are
displayed down the left side of the report and the data is
displayed to the right of the headings. This format focuses on a
single row and can display more columns for the row than the
columnar format. Side Labels, all columns displays data for all
columns for each row.
Side Labels, different columns
Column headings for each row are displayed down the left side of
the report and the data is displayed to the right of the headings, as
above. Side Labels, different columns limits the column data
displayed to Match Key column(s) and those columns where
differences exist between Source 1 and Source 2 data.
Show Empty Tables
Select this check box to display headers for tables that, due to the criteria
specified, do not contain rows to report.
Row Display Options
You can select any number of these check boxes, as follows:
Equal Select this check box to display rows that the Compare Process found to be
equal.
Different
Select this check box to display rows that the Compare Process found to be
unequal.
Only in Source 1
Select this check box to display rows that the Compare Process found only
in Source 1.
Only in Source 2
Select this check box to display rows that the Compare Process found only
in Source 2.
Duplicate Keys in Source 1
Select this check box to display rows in Source 1 that contain the same
match key.
Duplicate Keys in Source 2
Select this check box to display rows in Source 2 that contain the same
match key.
Show Tables From
Select from which Source the table headers and columns are displayed, Source 1 or
Source 2.
Formatting
Use the Formatting tab to define the format and other parameters for the Report
Process output.
Chapter 6. Report
101
Limits
The default values for Limits are set on the Report tab in Product Options. Refer to
the Installation and Configuration Guide .
Rows per Table
Maximum number of rows (1 to 99999999) that can be
reported on during a single Report Process.
Lines per Page
Maximum number of lines per page (1 to 999) for the report.
Line Length
Maximum number of characters per line (1 to 999) for the
report.
Character Column Width
Maximum number of characters per column (1 to 999) for
the report.
Spacing
The default values for Spacing are set on the Report tab in Product Options. Refer
to the Installation and Configuration Guide .
102
Blank Lines Between Rows
Number of blank lines to insert between each row in the
report.
Minimum Spaces Between
Columns
Number of blank spaces to insert between each column in
the report.
IBM Optim: Compare User Manual
Adjust Oversized Lines
Truncate
End each row of the report after the maximum number of characters
(including spaces) per line is reached.
Wrap
When the row length exceeds the maximum number of characters
(including spaces) per line, wrap the row to the next line of the report.
Show Table Headings
Include column names with data reported from each table.
Get Site Defaults
Inserts Limits and Spacing defaults as set in Product Options. Refer to the
Installation and Configuration Guide .
Notify Tab
Use the Notify tab to specify options and addresses for automatic email
notification of the success or failure of the process. The process report generated
when the process completes is automatically sent as an attachment.
Refer to the Common Elements Manual .
Process a Report Request
A Report Request processes in several steps. There are a few differences depending
on whether you schedule the process or run the Report immediately. The steps are
described in the following paragraphs.
Schedule a Report Process
To schedule a Report Process to run once or repeatedly at a specified future time,
save the Report Request, and select Schedule from the File menu.
v Processing is initiated at the scheduled time; you do not review the Report
Process as it is performed.
v If warning conditions exist, processing continues without prompting, depending
on the Stop on Error parameter you specified on the Steps tab of the Scheduling
Job dialog.
v If an error occurs during the Report Process, processing stops.
For details on scheduling, refer to the Common Elements Manual .
Run a Report Request
To process a Report Request immediately, select Run from the File menu. It is not
necessary to save the Report Request before it is run.
v Before processing begins, the Report Request is verified. If errors exist, you can
review the details on the message bar at the bottom of the Report Request
Editor.
v After the Report Request has been verified, the process parameters are verified.
If warnings or errors exist, you can review the details in the Warnings dialog
and choose to continue or cancel the process.
v If an error occurs during the Report Process, processing stops.
Chapter 6. Report
103
Report Output
You can choose report output as a Summary or Detailed Report. Both report types
are described in the following section.
Summary Report
The following is an example of a Summary Report:
12/13/2005 10:59:04
Page: 1
Compare File
C:\Program Files\IBM Optim\RT\DATA\sample12.cmp
Created on
12/13/2005 10:59:03
Number of table pairs 1
Source 1
Type
Database Tables
Name
NONE
Created on
12/13/2005 10:58:57
Source 2
Type
Database Tables
Name
NONE
Created on
12/13/2005 10:59:00
Table Statistics
1: DBMS.ANTHONYC.CUSTOMERS 2:
DBMS.PSTDOC.CUSTOMERS
Total Rows in Source 1:
704
Total Rows in Source 2:
704
Equal Rows:
668
Different Rows:
36
Unmatched Rows in Source 1:
0
Unmatched Rows in Source 2:
0
Duplicate Rows in Source 1:
0
Duplicate Rows in Source 2:
0
The Summary Report output contains the following information:
v Date and time the Report Process ran.
v
v
v
v
v
Page number.
Name of the Source File.
Date and time the Source File was created.
Number of table pairs included in the report.
Information about each Source used in the Compare Process.
v Table Statistics, including:
– Total rows in Source 1
–
–
–
–
–
–
–
Total rows in Source 2
Equal rows
Different Rows
Unmatched rows in Source 1
Unmatched rows in Source 2
Duplicate rows in Source 1
Duplicate rows in Source 2.
Detailed Report
Detailed Reports include information from all of the rows in the Compare File,
according to the specifications you select on the Compare Details tab.
104
IBM Optim: Compare User Manual
Chapter 7. Row List Files
In Compare, Point and Shoot allows you to select the rows (primary key values)
from the Start Table to begin Extract processing. These selected rows are stored in
a Point and Shoot File. However, to extract values from data that does not reside
in a database table or resides in a database that is not easily accessible, you can
create a Row List File manually or by using a utility appropriate for your data
source.
The Row List File you create outside of Compare must conform to the file format
generated using Point and Shoot. The following guidelines apply:
v Each record in the file cannot exceed 80 characters.
v Data in the file must conform to database syntax and rules for column data
types. In addition, the data type and length of the column data must match the
attributes of the Primary Key column(s) in the Start Table.
v The appropriate file extension should be .pns.
Example 1
Assume that you want to extract specific rows from the DETAILS table using a
Row List File you create using a method other than Point and Shoot. The primary
key for the DETAILS table consists of two columns, ORDER_ID and ITEM_ID.
These columns are defined by database:
Database
Column Name
Data Type
DB2/MVS
ORDER_ID
DEC(5,0)
ITEM_ID
CHAR(5)
ORDER_ID
NUMBER(5,0)
ITEM_ID
CHAR(5)
ORDER_ID
DECIMAL(5,0)
ITEM_ID
CHAR(5)
Oracle
Sybase ASE
The following example shows how the list should be structured. (You create this
list using Microsoft NotePad.) For each row to be extracted, the value in the
ORDER_ID column is followed by the value in the ITEM_ID column. Commas
separate the values for each row, and a semicolon separates each row.
00123, 'CH001'; 00124, 'CH002'; 00125, 'CH003'; 00126, 'CH004';
00133, 'CH001'; 00134, 'CH002'; 00135, 'CH003'; 00146, 'CH004';
00153, 'CH001'; 00154, 'CH002'; 00155, 'CH003'; 00156, 'CH004';
Use the following data formats:
v Separate data elements using a comma followed by one or more spaces.
v Separate the primary key values for each row using a semicolon followed by one
or more spaces.
Character Data
Character data must be enclosed in single quotes. Embedded quotes must be in the
form of two single quotes.
© Copyright IBM Corp. 1994, 2010
105
Character data can be wrapped to the next line. The segments of the data must be
individually enclosed in quotes without an intervening colon.
The following is an abbreviated example of character data that is wrapped
followed by character data that is not wrapped:
'This is an example'
'of wrapped data.'
: No commas
'This is an example',
'of data that does not wrap.',
'Note the use of commas.',
: Commas
Character data stored in fixed-length columns is truncated or padded appropriately
to fit the column. Character data stored in variable length columns is truncated, as
necessary, but is not padded.
Date/Time
All date and time data must be enclosed in single quotes. Any valid database
format for these values is acceptable and is handled appropriately.
Numeric Data
Numeric data is not enclosed in quotes. The decimal can be indicated by either a
comma or a period and is handled appropriately.
Partial Primary Key
If you want to extract non-unique values or values that do not correspond to a
primary key, you can specify an alternate key or a partial primary key in your
Row List File.
To indicate to Compare that the data in this file contains values for some set of the
columns, prefix the file with:
COLUMN-LIST
(List the names of the columns for which data is supplied)
END-COLUMN-LIST
Note: The order of column names in the list indicates how the column data is to
be processed.
Example 2
Assume you have a set of ITEMS rows that are not in your database. However,
you want to extract the DETAILS rows from your database for specific ITEMS. The
primary key for the DETAILS rows comprises two columns, ORDER_ID and
ITEM_ID. However, you prefer to extract rows based on only the ITEM_ID. You
can create a Row List File to extract the several DETAILS rows for each specified
ITEM_ID value regardless of the ORDER_ID value.
COLUMN-LIST
ITEM_ID
END-COLUMN-LIST
'CH001'; 'CH002'; 'CH003'; 'CH004';
'CH005'; 'CH006'; 'CH007'; 'CH008';
'CH009'; 'CH010';
106
IBM Optim: Compare User Manual
Example 3
Assume that two columns comprise the partial primary key, ORDER_ID and
ITEM_ID. Specify the column values in the order in which they are listed for the
column list. For each row, in this example, the values for ORDER_ID are followed
by the values for ITEM_ID separated by commas. Semicolons separate the rows.
Because commas and semicolons delimit each value, entries can span multiple
lines, and multiple entries can be specified on a single line.
COLUMN-LIST
ORDER_ID
ITEM_ID
END-COLUMN-LIST
00123, 'CH001'; 00124, 'CH002'; 00125, 'CH003'; 00126, 'CH004';
00133, 'CH005'; 00134, 'CH006'; 00135, 'CH007'; 00146, 'CH008';
00153, 'CH009'; 00154, 'CH010';
Using the Row List File
You can perform the following steps to specify your Row List File in an Extract
Request:
Procedure
1. Select Extract from the Actions menu.
2. Select Edit Access Definition from the Tools menu.
3. In the Point and Shoot tab of the Access Definition Editor, select File and
specify the name of the Row List File.
Results
The file you name is used to extract rows from the Start Table when the Extract
Process is performed.
Chapter 7. Row List Files
107
108
IBM Optim: Compare User Manual
Chapter 8. Command Line Interface
Compare provides a command line interface that allows you to browse an Extract
or Compare File, run one or more processes from a file, or run a scheduled job,
without opening the graphical user interface for Compare. The command line
interface can be run from the command line, or automatically—in a batch file, or
from another program.
Command Line Tasks
Use the Command Line Interface to:
v Browse a Compare File.
v Run an Extract, Compare, or Report Process.
v Run multiple processes from a file.
v Run a scheduled job that includes several action requests.
v Override original specifications for a process.
The following sections explain and describe how to perform each type of task.
Process return codes are listed in the last section of this chapter.
Guidelines
The typical command begins with PR0CMND followed by commandline
keywords and associated arguments. The following guidelines apply:
v The first operation argument must be prefixed with a forward slash (/) or dash
(-). To run a process, for example, use /R or -R.
v A command-line keyword may be prefixed by a forward slash (/) or dash (-),
but it is not required. Example: PST, /PST, and -PST are equal and valid
keywords.
v Generally, command-line keywords can be specified in any order, separated by
one or more spaces without commas. When overrides are specified for a process
defined in a parameter file, the OV keyword must follow other command-line
keywords and precede the override parameters. The first override keyword and
associated argument must begin on the following line, and each additional
override must be on a separate line. The END keyword must follow the last
override, and must also be on a separate line.
v A command-line keyword and associated argument are separated by an equal
sign (=) or a colon (:), with no intervening spaces.
v An override keyword and associated argument are separated by a blank space.
v Keywords are recognized without regard to case. (Most keywords are shown in
this chapter using bold and uppercase for emphasis.)
v An argument associated with a keyword that includes spaces must be enclosed
in single or double quotes.
v Use double quotes to enclose a command-line keyword argument that includes a
macro.
v You can include all keywords and arguments in a parameter file and reference
the parameter file on the command line.
© Copyright IBM Corp. 1994, 2010
109
v In a parameter file, command-line keywords corresponding to a process request
can be entered on one or multiple lines. You can include several process requests
in the file; each must begin with the TYPE parameter.
v Use override keywords and arguments to override specifications in an action
request.
v A keyword that is inappropriate for the type of processing requested may cause
a fatal conflicting-parameter error.
v The following relational operator symbols and mnemonics are acceptable for use
in selection criteria overrides: =, <, >, <=, >=, !=, !<, !>, <>, ^=, ^<, ^>, EQ, NE,
LT, GT, LE, GE, BETWEEN, LIKE, IN, IS, NOT, NULL.
v Comments in a parameter or override file must begin on a separate line and
start with two forward slashes (//). Blank lines may also be included in the
parameter stream.
Syntax Conventions
The syntax conventions used to describe these statements are:
KEYWORD
Keywords are shown in uppercase for emphasis, but can be specified in
lower or mixed case.
text
Variable text is shown in lowercase italics.
()
Statement delimiter to group a series of qualifiers for a parameter.
[]
Indicates an optional parameter.
{}
Indicates a choice of two or more settings from which one (and only one)
must be selected.
|
Separates options.
Compare, Extract, and Report Processes
Compare, Extract, and Report Syntax
The following sections contain the syntax for command line processing.
Syntax
PR0CMND
{/X={ [ “ ]ext file name.xf[ ” ] | [ “ ]cmp file name.cf[ ” ] } |
/R { JOB = jobname | @path.parameter filename.txt |
TYPE={ COMPARE | EXTRACT | REPORT }
REQUEST=identifier.name
[ STOP={ N | I | W | F } ] [ OUTPUT=filename[ + ] ]
[ QUIET{ + | - } ] [ MONITOR{ + | - } ]
[ SERVER={ optservername | (local) } ]
[ PST=optimdirectory ]
[ OV={ [ “ ]override file name.txt[ ” ] | * } ] } } }
Overrides for Compare Process
[ XFFILE[ { 1 | 2 } ] { [ “ ]arc file name.af[ ” ] |
[ “ ]ext file name.xf[ ” ] }]
[ CMPFILE [ “ ]cmp file name.cf[ ” ] ]
[ RUNMODE { SEQUENCE | PARALLEL } ]
[ TABNAME{ 1 | 2 } [ [ dbalias. ]cid. ]tablename ]
[ COLMAP identifier.columnmapname ]
[ ADNAME[ { 1 | 2 } ] identifier.adname ]
[ [ AD{ 1 | 2 } ]
{ DEFQUAL dbalias.creatorid |
110
IBM Optim: Compare User Manual
STARTTAB [ [ dbalias. ]cid. ]tablename |
SEL [ [ dbalias. ]cid. ]tablename columnname
operator value |
SQL [ [ dbalias. ]cid. ]tablename sqlwhereclause |
TABEVERYNTH [ [ dbalias. ]cid. ]tablename n |
TABROWLIM [ [ dbalias. ]cid. ]tablename n } ]
[ TMNAME tablemap ]
[ COLMAPID identifier ]
[ DESTQUAL dbalias.creatorid ]
[ DESTTABNAME tablename1 [ [ dbalias. ]cid. ]tablename2 ]
[ COLMAP [ [ dbalias. ]cid. ]tablename identifier.colmap ]
Overrides for Extract Process
[ ADNAME identifier.adname ]
[ DEFQUAL dbalias.creatorid ]
[ ROWLIMIT n ]
[ SEL [ [ dbalias. ]cid. ]tablename columnname operator value ]
[ SQL [ [ dbalias. ]cid. ]tablename sqlwhereclause ]
[ TABEVERYNTH [ [ dbalias. ]cid. ]tablename n ]
[ TABROWLIM [ [ dbalias. ]cid. ]tablename n ]
[ STARTTAB [ [ dbalias. ]cid. ]tablename ]
[ VAR variablename value ]
[ XFFILE xffile.xf ]
Overrides for Report Process
[
[
[
[
REPORTNAME identifier.rptname ]
SOURCEFILE xffilename.xf ]
TITLE string ]
AUTOREPORTNEW { Y | N } ]
Command-line Keywords
Keywords used for command line processing are explained in this section.
General
PR0CMND
Type PR0CMND to initiate command line
processing. Note that the character following
PR is the number 0 (zero).
/X=
Command to start the Browse Utility.
extfilename.xf Name of the Extract or
|
Compare File to browse. If
cmpfilename.cf the file is not in the default
Data Directory, specify the
full directory path.
/R
Command to run the specified job, action
request(s) specified in a parameter file, or
action request specified on the command
line.
JOB=
Use the JOB keyword to run a scheduled job
from the command line. A scheduled job can
include one or more action requests and
corresponding overrides. Use the Scheduling
Editor to define the parameters for a
scheduled job.
Note: Note: Refer to the Common Elements
Manual for additional information.
jobname
Name or description of the
job (30 character maximum).
Chapter 8. Command Line Interface
111
@path.parameterSpecify @ followed by the
filename.txt
fully qualified path and name
of a text file containing the
parameters for the process(es)
to be run.
Parameters
Use the following parameters, whether in a parameter file or
specified on the command line, as needed:
TYPE=
REQUEST=
Type of process as one of the following:
COMPARE
Compare data.
EXTRACT
Extract data.
REPORT
Create a report from data in a
Compare or Extract File.
The action request to be processed.
identifier.name Two-part name of the action
request.
STOP=
Error processing indicator. Can be used only
in a parameter file, not on the command line
or for scheduled jobs. The error code is
applied for the action request identified by
preceding REQUEST parameter before the
next process, if any, begins.
Indicate the level of error for which
processing must stop as one of the following:
OUTPUT=
N
None; continue processing,
regardless of errors (default).
I
Stop processing if an
informational, warning, or
fatal error occurs (return code
of 4 or greater).
W
Stop processing if a warning
or fatal error occurs (return
code of 8 or greater).
F
Stop processing if a fatal error
occurs (return code 12).
File for process reports for all processes in a
parameter file. If you use the OUTPUT
keyword more than once, the last file
specified is used for all processes.
If you do not use this keyword, the report is
displayed after each process and you must
close the report dialog to execute the next
process. In a UNIX or Linux environment,
the report is displayed to the console.
112
IBM Optim: Compare User Manual
filename
The name of the file. If you
do not provide the full path,
the file is saved in the default
Data Directory, identified in
Personal Options.
+
Append the report to an
existing file.
QUIET
Indicator for displaying prompts or error
dialogs during all processes in a parameter
file. If you use the QUIET keyword more
than once, the last specification is used for
all processes.
In a UNIX or Linux environment, prompts
and error dialogs are unavailable and the
QUIET setting is ignored.
MONITOR
+
Do not display prompts or
error dialogs (default).
–
Display prompts and error
dialogs. If functional security
is enabled, Invoke privilege is
required to run a process that
displays editor interfaces. For
example, the Invoke Archive
Request and the Invoke Insert
Request privileges are
required to run an Archive
Process that uses a named
Insert Process when QUIET–
is used.
Indicator for displaying progress dialogs
during all processes in a parameter file. If
you use the MONITOR keyword more than
once, the last specification is used for all
processes.
In a UNIX or Linux environment, prompts
and error dialogs are unavailable and
MONITOR setting is ignored.
SERVER=
+
Display progress dialogs.
–
Do not display progress
dialogs (default).
The server on which to process. Overrides
any server specification in the action requests
processed from the command line.
optservername The name of an Optim Server
that is referenced in the
Product Configuration File.
PST=
The Optim Directory for processing. If
processing uses the current (default) Optim
Directory, this keyword is not needed.
optimdirectory Optim Directory name.
OV=
Source of process overrides. The OV
keyword must follow all other command line
keywords.
override
filename.txt
The name of a text file
containing process overrides
only, with each override on a
separate line.
Chapter 8. Command Line Interface
113
*
If you use a parameter file,
overrides follow on
successive lines of the
parameter file. The first
override (keyword and
associated argument) must
begin on the following line,
and each additional override
must be on a separate line.
Override Keywords
Overrides allow you to override certain parameters in the Action Requests you run
from the command line, and in the objects referenced by them.
Compare
Process
XFFILE
Override for an Archive or Extract File referenced in the
Compare Request.
1
Identifier for Source 1.
2
Identifier for Source 2.
arcfilename.af
Name of the Source Archive or Extract
File. Provide the full path if the file is
not in the default Archive File or Data
Directory.
extfilename.xf
CMPFILE
Override for the Compare File referenced in the Compare
Request.
cmpfilename .cmp Name of a new or existing Compare
File. Provide the full path if the file is
not in the default Data Directory.
RUNMODE
TABNAME
Override for the extract processing mode specified in the
Compare Request.
SEQUENCE
Extract data for Compare processing
from one source at a time, in sequence.
PARALLEL
Extract data for Compare processing
from all sources at one time, in parallel.
Override for a table referenced in the Compare Request
when using a single-table Comparison Mode.
1
Identifier for Source 1 table.
2
Identifier for Source 2 table.
[
One-, two-, or three-part table name. If
[dbalias.]cid.]tablename
tablename is not fully qualified, the
default qualifier is used.
COLMAP
Override for a named or local Column Map referenced in
the Compare Request when using a single-table
Comparison Mode.
identifier.
columnmapname
ADNAME
114
IBM Optim: Compare User Manual
Two-part name of a Column Map in the
Directory.
Override for a named or local Access Definition
referenced in the Compare Request.
Compare
Process
AD
DEFQUAL
1
Identifier for Source 1 Access Definition
(default when Comparison Mode is
Access Definition - All Database
Tables).
2
Identifier for Source 2 Access Definition
(default when Comparison Mode is
Source File - Access Definition).
identifier.adname
Two-part name of an Access Definition
in the Directory.
Source identifier for the DEFQUAL STARTTAB, SEL,
SQL, TABEVERYNTH, and TABROWLIM overrides (e.g.,
AD1.DEFQUAL) when the Comparison Mode uses an
Access Definition.
1
Identifier for Source 1 Access Definition
override.
2
Identifier for Source 2 Access Definition
override.
Override for the Default Qualifier.
dbalias [.cid ]
STARTTAB
One- or two-part default qualifier for
tables referenced in Access Definition.
Override for the name of the Start Table.
[
One-, two-, or three-part Start Table
[dbalias.]cid.]tablename
name. If tablename is not fully qualified,
the default qualifier is used.
SEL
Override for, or addition to, selection criteria specification.
Selection criteria must conform to SQL syntax with each
override on a separate line.
[
One-, two-, or three-part tablename. If
[dbalias.]cid.]tablename
tablename is not fully qualified, the
default qualifier is used.
SQL
columnname
Name of column to which criteria
applies.
operator
Logical operator appropriate for your
DBMS.
value
Value or list of values appropriate for
the operator, expressed as literals or
substitution variables (:variablename)
Override for SQL WHERE specification. Each override
must be on a separate line.
[
One-, two-, or three-part tablename. If
[dbalias.]cid.]tablename
tablename is not fully qualified, the
default qualifier is used.
sqlwhereclause
TABEVERYNTH
The SQL WHERE clause.
Override for sampling factor.
[[
One-, two-, or three-part tablename. If
dbalias.]cid.]tablename
tablename is not fully qualified, the
default qualifier is used.
n
A numeric value from 1 through 9999.
Chapter 8. Command Line Interface
115
Compare
Process
TABROWLIM
TMNAME
Override for setting to limit the number of rows
processed from a table.
[ [ dbalias. ]
cid.]tablename
One-, two-, or three-part tablename. If
tablename is not fully qualified, the
default qualifier is used.
n
A numeric value for the maximum
number of rows to extract from a table.
Valid values are 1 through 99999999.
Override for the Table Map used when comparing
multiple tables.
identifier.tablemap Two-part name of a Table Map in the
name
Directory.
COLMAPID
Override for the default identifier for the Column Maps
referenced in the Table Map.
identifier
DESTQUAL
Override for the default qualifier for the Source 2 tables.
dbalias.creatorid
DESTTABNAME
COLMAP
Extract
Processing
Override for the Source 1 and Source 2 tables in a Table
Map.
tablename1
The Source 1 table name.
[ [ dbalias. ]
cid.]tablename2
One-, two-, or three-part Source 2 table
name. If the table name is not fully
qualified, the default qualifier is used.
Override for the Column Map name for a specific Source
2 table in the Table Map.
Note: Note: A named Column Map can override a local
Column Map.
[ [ dbalias.]cid.]
tablename
One-, two-, or three-part tablename. If
tablename is not fully qualified, the
default qualifier is used.
identifier.colmap
Two-part name of an existing Column
Map.
Override for the local or named Access Definition
referenced in the Extract Request.
identifier.adname
DEFQUAL
STARTTAB
The one- or two-part qualifier (DB Alias
and Creator ID) for the tables in the
Access Definition.
Override for the name of the Start Table.
[ [ dbalias.]
cid.]tablename
ROWLIMIT
Two-part name of an Access Definition
in the Directory.
Override for the default qualifier.
dbalias.
[creatorid]
IBM Optim: Compare User Manual
The two-part qualifier (DB Alias and
Creator ID) for the Source 2 tables.
For an Extract Process, the following override parameters are available:
ADNAME
116
The 1- to 8-character identifier.
One-, two-, or three-part Start Table
name. If tablename is not fully qualified,
the default qualifier is used.
Override for the maximum number of rows to extract.
Compare
Process
n
SEL
A number from 1 to the maximum limit
specified in Product Options.
Override for, or addition to, selection criteria specification.
Selection criteria must conform to SQL syntax with each
override on a separate line.
[[
One-, two-, or three-part tablename. If
dbalias.]cid.]tablename
tablename is not fully qualified, the
default qualifier is used.
SQL
TABEVERYNTH
columnname
Name of column to which criteria
applies.
operator
Logical operator appropriate for your
DBMS.
value
Value or list of values appropriate for
the operator, expressed as literals or
substitution variables (:variablename)
Override for SQL WHERE specification. Each override
must be on a separate line.
[ [ dbalias.
]cid.]tablename
One-, two-, or three-part tablename. If
tablename is not fully qualified, the
default qualifier is used.
sqlwhereclause
The SQL WHERE clause.
Override for sampling factor.
[[
One-, two-, or three-part tablename. If
dbalias.]cid.]tablename
tablename is not fully qualified, the
default qualifier is used.
n
TABROWLIM
A numeric value from 1 through 9999.
Override for setting to limit the number of rows
processed from a table.
[[
One-, two-, or three-part tablename. If
dbalias.]cid.]tablename
tablename is not fully qualified, the
default qualifier is used.
n
VAR
XFFILE
Value for substitution variable used in the process.
variablename
Name of the substitution variable.
value
The corresponding value for the
variable.
Override for Extract File referenced in the Extract Request.
xffilename.xf
Report
Processing
A numeric value for the maximum
number of rows to extract from a table.
Valid values are 1 through 99999999.
Name of the Extract File. Provide the
full path if the file is not in the default
Data Directory.
For a Report Process, the following override parameters are available:
REPORTNAME
Override for the local or named Report Request
referenced in a Compare Request.
Chapter 8. Command Line Interface
117
Compare
Process
identifier.rptname
SOURCEFILE
Override for the Source File name in the standalone
Report Request.
xffilename.xf
TITLE
Two-part name of the Report Request.
The name of an Extract File for the
report. Provide the full path if the file is
not in the default Data Directory.
Override for report title.
string
Up to 40 characters to appear on each
page of the report.
AUTOREPORTNEWOverride for the Automatically Report New Tables
setting.
Y
Include all Source File tables in the
report.
N
Include only tables in the original
Source File in the report.
Examples
This section contains syntax examples for various command line processes.
Browse a Compare File
To start the Browse Utility from the command line, enter:
PR0CMND /X C:\SALESCON.CMP
Run a process from the command line
To run a process directly from the command line, specify:
PR0CMND /R TYPE=type
REQUEST=identifier.name
v To run a Compare Request named SALES.COMPR and display results, enter:
PR0CMND /R TYPE=COMPARE
REQUEST=SALES.COMPR
v To run an Extract Request named SALES.MONTHLY and add the results to an
existing output file named PLAN.TXT, enter:
PR0CMND /R TYPE=EXTRACT
REQUEST=SALES.MONTHLY OUTPUT=PLAN.TXT+
v To run a Compare Request named MARKET.TRENDS, display prompts and
error dialogs during the process, and write results to an output file named
RESULTS.TXT, enter:
PR0CMND /R TYPE=COMPARE
REQUEST=MARKET.TRENDS OUTPUT=RESULTS.TXT
QUIET
Run one or more processes as a scheduled job from the
command line
To run a scheduled job directly from the command line, use:
You can create scheduled jobs using the Scheduling Editor. Refer to the Common
Elements Manual for details.
PR0CMND /R JOB='jobname'
v To run a job named CUSTDATA and write the results to an output file named
CUSTOUT.TXT, specify:
118
IBM Optim: Compare User Manual
PR0CMND /R JOB='CUSTDATA'
OUTPUT=C:\CUSTOUT.TXT
v To run the same job and display prompts and error dialogs during the process,
specify:
PR0CMND /R JOB='CUSTDATA'
OUTPUT=C:\CUSTOUT.TXT QUIET-
v To run a job named PAYROLL and display information dialogs during the
process, specify:
PR0CMND /R
MONITOR+
JOB='PAYROLL' OUTPUT=PAY.TXT
Run one or more processes using a parameter file
To run one or more processes from a file, use:
PR0CMND /R @filename
For example, to run processes in a parameter file named STATS.TXT, enter:
PR0CMND /R @C:\STATS.TXT
File Format
In this example, STATS.TXT includes the following:
TYPE=EXTRACT REQUEST=MONTHLY.SALES
TYPE=EXTRACT REQUEST=MONTHLY.QUOTAS
TYPE=COMPARE REQUEST=SALES.YTD STOP=FATAL
Run one or more processes using a parameter file with overrides
Following are examples of command line processing when overrides are specified
in a parameter file:
Extract
To run an Extract process in a parameter file named LEADS.TXT, enter:
PR0CMND /R @C:\temp\LEADS.TXT
File Format
In this example, LEADS.TXT includes the following:
TYPE=EXTRACT REQUEST=SALES.CUST OV=*
DEFQUAL ORACLE1.TELEM
STARTTAB CUSTOMERS
ROWLIMIT 600
SEL CUSTOMERS CUST_ID>'12345'
END
Compare
To run a Compare process in a parameter file named COMP.TXT, enter:
PR0CMND /R
@C:\TEMP\COMP.TXT
File Format
In this example, COMP.TXT includes the following:
TYPE=COMPARE REQUEST=CMPR.ORDERS OV=*
XFFILE1 APRIL.XF
XFFILE2 MAY.XF
END
Chapter 8. Command Line Interface
119
Run a process using an override file
Following are examples of command line processes that use override files:
Extract
To run an Extract Request named SALES.MTHLY from the command line, and
apply overrides from a file named CHANGES.TXT, enter:
PR0CMND /R TYPE=EXTRACT
REQUEST=SALES.MTHLY OV=CHANGES.TXT
File Format
In this example, CHANGES.TXT includes the following:
DEFQUAL ORACLE1.TELEM
STARTTAB CUSTOMERS
ROWLIMIT 600
SQL CUSTOMERS ST='NJ' AND ZIP='08540'
Return Codes
In a batch file, you can direct the processing that follows the PR0CMND
processing using the return code in the following statement:
IF ERRORLEVEL n GOTO x
The following list explains the meaning of possible return codes:
Return Code
Explanation
0
No errors
4
In all of the requests, the highest return code was Informational
8
In all of the requests, the highest return code was Warning
12
In all of the requests, the highest return code was Fatal
16
There was a syntax error on the command line. A popup window also
displays, unless you specified Quiet+
24
Could not open the output file specified in the Output= parameter
Since the return code value is evaluated as equal to or greater than, query each
ERRORLEVEL in reverse order:
PR0CMND /R TYPE=EXTRACT REQUEST=identifier.name
IF ERRORLEVEL 24 GOTO Badout
IF ERRORLEVEL 16 GOTO Syntax
IF ERRORLEVEL 12 GOTO Fatal
IF ERRORLEVEL 8 GOTO Warning
IF ERRORLEVEL 4 GOTO Info
Note: For example:
:Badout
120
IBM Optim: Compare User Manual
echo The Output File could not be opened.
GOTO End
...
:End
Chapter 8. Command Line Interface
121
122
IBM Optim: Compare User Manual
Appendix A. Row List Files
In Compare, Point and Shoot allows you to select the rows (primary key values)
from the Start Table to begin Extract processing. These selected rows are stored in
a Point and Shoot File. However, to extract values from data that does not reside
in a database table or resides in a database that is not easily accessible, you can
create a Row List File manually or by using a utility appropriate for your data
source.
The Row List File you create outside of Compare must conform to the file format
generated using Point and Shoot. The following guidelines apply:
v Each record in the file cannot exceed 80 characters.
v Data in the file must conform to database syntax and rules for column data
types. In addition, the data type and length of the column data must match the
attributes of the Primary Key column(s) in the Start Table.
v The appropriate file extension should be .pns.
Example 1
Assume that you want to extract specific rows from the DETAILS table using a
Row List File you create using a method other than Point and Shoot. The primary
key for the DETAILS table consists of two columns, ORDER_ID and ITEM_ID.
These columns are defined by database:
Database
Column Name
Data Type
DB2/MVS
ORDER_ID
DEC(5,0)
ITEM_ID
CHAR(5)
ORDER_ID
NUMBER(5,0)
ITEM_ID
CHAR(5)
ORDER_ID
DECIMAL(5,0)
ITEM_ID
CHAR(5)
Oracle
Sybase ASE
The following example shows how the list should be structured. (You create this
list using Microsoft NotePad.) For each row to be extracted, the value in the
ORDER_ID column is followed by the value in the ITEM_ID column. Commas
separate the values for each row, and a semicolon separates each row.
00123, 'CH001'; 00124, 'CH002'; 00125, 'CH003'; 00126, 'CH004';
00133, 'CH001'; 00134, 'CH002'; 00135, 'CH003'; 00146, 'CH004';
00153, 'CH001'; 00154, 'CH002'; 00155, 'CH003'; 00156, 'CH004';
Use the following data formats:
v Separate data elements using a comma followed by one or more spaces.
v Separate the primary key values for each row using a semicolon followed by one
or more spaces.
Character Data
Character data must be enclosed in single quotes. Embedded quotes must be in the
form of two single quotes.
© Copyright IBM Corp. 1994, 2010
123
Character data can be wrapped to the next line. The segments of the data must be
individually enclosed in quotes without an intervening colon.
The following is an abbreviated example of character data that is wrapped
followed by character data that is not wrapped:
'This is an example'
'of wrapped data.'
: No commas
'This is an example',
'of data that does not wrap.',
'Note the use of commas.',
: Commas
Character data stored in fixed-length columns is truncated or padded appropriately
to fit the column. Character data stored in variable length columns is truncated, as
necessary, but is not padded.
Date/Time
All date and time data must be enclosed in single quotes. Any valid database
format for these values is acceptable and is handled appropriately.
Numeric Data
Numeric data is not enclosed in quotes. The decimal can be indicated by either a
comma or a period and is handled appropriately.
Partial Primary Key
If you want to extract non-unique values or values that do not correspond to a
primary key, you can specify an alternate key or a partial primary key in your
Row List File.
To indicate to Compare that the data in this file contains values for some set of the
columns, prefix the file with:
COLUMN-LIST
(List the names of the columns for which data is supplied)
END-COLUMN-LIST
Note: The order of column names in the list indicates how the column data is to
be processed.
Example 2
Assume you have a set of ITEMS rows that are not in your database. However,
you want to extract the DETAILS rows from your database for specific ITEMS. The
primary key for the DETAILS rows comprises two columns, ORDER_ID and
ITEM_ID. However, you prefer to extract rows based on only the ITEM_ID. You
can create a Row List File to extract the several DETAILS rows for each specified
ITEM_ID value regardless of the ORDER_ID value.
COLUMN-LIST
ITEM_ID
END-COLUMN-LIST
'CH001'; 'CH002'; 'CH003'; 'CH004';
'CH005'; 'CH006'; 'CH007'; 'CH008';
'CH009'; 'CH010';
124
IBM Optim: Compare User Manual
Example 3
Assume that two columns comprise the partial primary key, ORDER_ID and
ITEM_ID. Specify the column values in the order in which they are listed for the
column list. For each row, in this example, the values for ORDER_ID are followed
by the values for ITEM_ID separated by commas. Semicolons separate the rows.
Because commas and semicolons delimit each value, entries can span multiple
lines, and multiple entries can be specified on a single line.
COLUMN-LIST
ORDER_ID
ITEM_ID
END-COLUMN-LIST
00123, 'CH001'; 00124, 'CH002'; 00125, 'CH003'; 00126, 'CH004';
00133, 'CH005'; 00134, 'CH006'; 00135, 'CH007'; 00146, 'CH008';
00153, 'CH009'; 00154, 'CH010';
Using the Row List File
You can perform the following steps to specify your Row List File in an Extract
Request:
Procedure
1. Select Extract from the Actions menu.
2. Select Edit Access Definition from the Tools menu.
3. In the Point and Shoot tab of the Access Definition Editor, select File and
specify the name of the Row List File.
Results
The file you name is used to extract rows from the Start Table when the Extract
Process is performed.
Appendix A. Row List Files
125
126
IBM Optim: Compare User Manual
Appendix B. Command Line Interface
Compare provides a command line interface that allows you to browse an Extract
or Compare File, run one or more processes from a file, or run a scheduled job,
without opening the graphical user interface for Compare. The command line
interface can be run from the command line, or automatically—in a batch file, or
from another program.
Command Line Tasks
Use the Command Line Interface to:
v Browse a Compare File.
v Run an Extract, Compare, or Report Process.
v Run multiple processes from a file.
v Run a scheduled job that includes several action requests.
v Override original specifications for a process.
The following sections explain and describe how to perform each type of task.
Process return codes are listed in the last section of this chapter.
Guidelines
The typical command begins with PR0CMND followed by commandline
keywords and associated arguments. The following guidelines apply:
v The first operation argument must be prefixed with a forward slash (/) or dash
(-). To run a process, for example, use /R or -R.
v A command-line keyword may be prefixed by a forward slash (/) or dash (-),
but it is not required. Example: PST, /PST, and -PST are equal and valid
keywords.
v Generally, command-line keywords can be specified in any order, separated by
one or more spaces without commas. When overrides are specified for a process
defined in a parameter file, the OV keyword must follow other command-line
keywords and precede the override parameters. The first override keyword and
associated argument must begin on the following line, and each additional
override must be on a separate line. The END keyword must follow the last
override, and must also be on a separate line.
v A command-line keyword and associated argument are separated by an equal
sign (=) or a colon (:), with no intervening spaces.
v An override keyword and associated argument are separated by a blank space.
v Keywords are recognized without regard to case. (Most keywords are shown in
this chapter using bold and uppercase for emphasis.)
v An argument associated with a keyword that includes spaces must be enclosed
in single or double quotes.
v Use double quotes to enclose a command-line keyword argument that includes a
macro.
v You can include all keywords and arguments in a parameter file and reference
the parameter file on the command line.
© Copyright IBM Corp. 1994, 2010
127
v In a parameter file, command-line keywords corresponding to a process request
can be entered on one or multiple lines. You can include several process requests
in the file; each must begin with the TYPE parameter.
v Use override keywords and arguments to override specifications in an action
request.
v A keyword that is inappropriate for the type of processing requested may cause
a fatal conflicting-parameter error.
v The following relational operator symbols and mnemonics are acceptable for use
in selection criteria overrides: =, <, >, <=, >=, !=, !<, !>, <>, ^=, ^<, ^>, EQ, NE,
LT, GT, LE, GE, BETWEEN, LIKE, IN, IS, NOT, NULL.
v Comments in a parameter or override file must begin on a separate line and
start with two forward slashes (//). Blank lines may also be included in the
parameter stream.
Syntax Conventions
The syntax conventions used to describe these statements are:
KEYWORD
Keywords are shown in uppercase for emphasis, but can be specified in
lower or mixed case.
text
Variable text is shown in lowercase italics.
()
Statement delimiter to group a series of qualifiers for a parameter.
[]
Indicates an optional parameter.
{}
Indicates a choice of two or more settings from which one (and only one)
must be selected.
|
Separates options.
Compare, Extract, and Report Syntax
The following sections contain the syntax for command line processing.
Syntax
PR0CMND
{/X={ [ “ ]ext file name.xf[ ” ] | [ “ ]cmp file name.cf[ ” ] } |
/R { JOB = jobname | @path.parameter filename.txt |
TYPE={ COMPARE | EXTRACT | REPORT }
REQUEST=identifier.name
[ STOP={ N | I | W | F } ] [ OUTPUT=filename[ + ] ]
[ QUIET{ + | - } ] [ MONITOR{ + | - } ]
[ SERVER={ optservername | (local) } ]
[ PST=optimdirectory ]
[ OV={ [ “ ]override file name.txt[ ” ] | * } ] } } }
Overrides for Compare Process
[ XFFILE[ { 1 | 2 } ] { [ “ ]arc file name.af[ ” ] |
[ “ ]ext file name.xf[ ” ] }]
[ CMPFILE [ “ ]cmp file name.cf[ ” ] ]
[ RUNMODE { SEQUENCE | PARALLEL } ]
[ TABNAME{ 1 | 2 } [ [ dbalias. ]cid. ]tablename ]
[ COLMAP identifier.columnmapname ]
[ ADNAME[ { 1 | 2 } ] identifier.adname ]
[ [ AD{ 1 | 2 } ]
{ DEFQUAL dbalias.creatorid |
STARTTAB [ [ dbalias. ]cid. ]tablename |
SEL [ [ dbalias. ]cid. ]tablename columnname
operator value |
128
IBM Optim: Compare User Manual
SQL [ [ dbalias. ]cid. ]tablename sqlwhereclause |
TABEVERYNTH [ [ dbalias. ]cid. ]tablename n |
TABROWLIM [ [ dbalias. ]cid. ]tablename n } ]
[ TMNAME tablemap ]
[ COLMAPID identifier ]
[ DESTQUAL dbalias.creatorid ]
[ DESTTABNAME tablename1 [ [ dbalias. ]cid. ]tablename2 ]
[ COLMAP [ [ dbalias. ]cid. ]tablename identifier.colmap ]
Overrides for Extract Process
[ ADNAME identifier.adname ]
[ DEFQUAL dbalias.creatorid ]
[ ROWLIMIT n ]
[ SEL [ [ dbalias. ]cid. ]tablename columnname operator value ]
[ SQL [ [ dbalias. ]cid. ]tablename sqlwhereclause ]
[ TABEVERYNTH [ [ dbalias. ]cid. ]tablename n ]
[ TABROWLIM [ [ dbalias. ]cid. ]tablename n ]
[ STARTTAB [ [ dbalias. ]cid. ]tablename ]
[ VAR variablename value ]
[ XFFILE xffile.xf ]
Overrides for Report Process
[
[
[
[
REPORTNAME identifier.rptname ]
SOURCEFILE xffilename.xf ]
TITLE string ]
AUTOREPORTNEW { Y | N } ]
Command-line Keywords
Keywords used for command line processing are explained in this section.
General
PR0CMND
Type PR0CMND to initiate command line
processing. Note that the character following
PR is the number 0 (zero).
/X=
Command to start the Browse Utility.
extfilename.xf Name of the Extract or
|
Compare File to browse. If
cmpfilename.cf the file is not in the default
Data Directory, specify the
full directory path.
/R
Command to run the specified job, action
request(s) specified in a parameter file, or
action request specified on the command
line.
JOB=
Use the JOB keyword to run a scheduled job
from the command line. A scheduled job can
include one or more action requests and
corresponding overrides. Use the Scheduling
Editor to define the parameters for a
scheduled job.
Note: Note: Refer to the Common Elements
Manual for additional information.
jobname
Name or description of the
job (30 character maximum).
Appendix B. Command Line Interface
129
@path.parameterSpecify @ followed by the
filename.txt
fully qualified path and name
of a text file containing the
parameters for the process(es)
to be run.
Parameters
Use the following parameters, whether in a parameter file or
specified on the command line, as needed:
TYPE=
REQUEST=
Type of process as one of the following:
COMPARE
Compare data.
EXTRACT
Extract data.
REPORT
Create a report from data in a
Compare or Extract File.
The action request to be processed.
identifier.name Two-part name of the action
request.
STOP=
Error processing indicator. Can be used only
in a parameter file, not on the command line
or for scheduled jobs. The error code is
applied for the action request identified by
preceding REQUEST parameter before the
next process, if any, begins.
Indicate the level of error for which
processing must stop as one of the following:
OUTPUT=
N
None; continue processing,
regardless of errors (default).
I
Stop processing if an
informational, warning, or
fatal error occurs (return code
of 4 or greater).
W
Stop processing if a warning
or fatal error occurs (return
code of 8 or greater).
F
Stop processing if a fatal error
occurs (return code 12).
File for process reports for all processes in a
parameter file. If you use the OUTPUT
keyword more than once, the last file
specified is used for all processes.
If you do not use this keyword, the report is
displayed after each process and you must
close the report dialog to execute the next
process. In a UNIX or Linux environment,
the report is displayed to the console.
130
IBM Optim: Compare User Manual
filename
The name of the file. If you
do not provide the full path,
the file is saved in the default
Data Directory, identified in
Personal Options.
+
Append the report to an
existing file.
QUIET
Indicator for displaying prompts or error
dialogs during all processes in a parameter
file. If you use the QUIET keyword more
than once, the last specification is used for
all processes.
In a UNIX or Linux environment, prompts
and error dialogs are unavailable and the
QUIET setting is ignored.
MONITOR
+
Do not display prompts or
error dialogs (default).
–
Display prompts and error
dialogs. If functional security
is enabled, Invoke privilege is
required to run a process that
displays editor interfaces. For
example, the Invoke Archive
Request and the Invoke Insert
Request privileges are
required to run an Archive
Process that uses a named
Insert Process when QUIET–
is used.
Indicator for displaying progress dialogs
during all processes in a parameter file. If
you use the MONITOR keyword more than
once, the last specification is used for all
processes.
In a UNIX or Linux environment, prompts
and error dialogs are unavailable and
MONITOR setting is ignored.
SERVER=
+
Display progress dialogs.
–
Do not display progress
dialogs (default).
The server on which to process. Overrides
any server specification in the action requests
processed from the command line.
optservername The name of an Optim Server
that is referenced in the
Product Configuration File.
PST=
The Optim Directory for processing. If
processing uses the current (default) Optim
Directory, this keyword is not needed.
optimdirectory Optim Directory name.
OV=
Source of process overrides. The OV
keyword must follow all other command line
keywords.
override
filename.txt
The name of a text file
containing process overrides
only, with each override on a
separate line.
Appendix B. Command Line Interface
131
*
If you use a parameter file,
overrides follow on
successive lines of the
parameter file. The first
override (keyword and
associated argument) must
begin on the following line,
and each additional override
must be on a separate line.
Override Keywords
Overrides allow you to override certain parameters in the Action Requests you run
from the command line, and in the objects referenced by them.
Compare
Process
XFFILE
Override for an Archive or Extract File referenced in the
Compare Request.
1
Identifier for Source 1.
2
Identifier for Source 2.
arcfilename.af
Name of the Source Archive or Extract
File. Provide the full path if the file is
not in the default Archive File or Data
Directory.
extfilename.xf
CMPFILE
Override for the Compare File referenced in the Compare
Request.
cmpfilename .cmp Name of a new or existing Compare
File. Provide the full path if the file is
not in the default Data Directory.
RUNMODE
TABNAME
Override for the extract processing mode specified in the
Compare Request.
SEQUENCE
Extract data for Compare processing
from one source at a time, in sequence.
PARALLEL
Extract data for Compare processing
from all sources at one time, in parallel.
Override for a table referenced in the Compare Request
when using a single-table Comparison Mode.
1
Identifier for Source 1 table.
2
Identifier for Source 2 table.
[
One-, two-, or three-part table name. If
[dbalias.]cid.]tablename
tablename is not fully qualified, the
default qualifier is used.
COLMAP
Override for a named or local Column Map referenced in
the Compare Request when using a single-table
Comparison Mode.
identifier.
columnmapname
ADNAME
132
IBM Optim: Compare User Manual
Two-part name of a Column Map in the
Directory.
Override for a named or local Access Definition
referenced in the Compare Request.
Compare
Process
AD
DEFQUAL
1
Identifier for Source 1 Access Definition
(default when Comparison Mode is
Access Definition - All Database
Tables).
2
Identifier for Source 2 Access Definition
(default when Comparison Mode is
Source File - Access Definition).
identifier.adname
Two-part name of an Access Definition
in the Directory.
Source identifier for the DEFQUAL STARTTAB, SEL,
SQL, TABEVERYNTH, and TABROWLIM overrides (e.g.,
AD1.DEFQUAL) when the Comparison Mode uses an
Access Definition.
1
Identifier for Source 1 Access Definition
override.
2
Identifier for Source 2 Access Definition
override.
Override for the Default Qualifier.
dbalias [.cid ]
STARTTAB
One- or two-part default qualifier for
tables referenced in Access Definition.
Override for the name of the Start Table.
[
One-, two-, or three-part Start Table
[dbalias.]cid.]tablename
name. If tablename is not fully qualified,
the default qualifier is used.
SEL
Override for, or addition to, selection criteria specification.
Selection criteria must conform to SQL syntax with each
override on a separate line.
[
One-, two-, or three-part tablename. If
[dbalias.]cid.]tablename
tablename is not fully qualified, the
default qualifier is used.
SQL
columnname
Name of column to which criteria
applies.
operator
Logical operator appropriate for your
DBMS.
value
Value or list of values appropriate for
the operator, expressed as literals or
substitution variables (:variablename)
Override for SQL WHERE specification. Each override
must be on a separate line.
[
One-, two-, or three-part tablename. If
[dbalias.]cid.]tablename
tablename is not fully qualified, the
default qualifier is used.
sqlwhereclause
TABEVERYNTH
The SQL WHERE clause.
Override for sampling factor.
[[
One-, two-, or three-part tablename. If
dbalias.]cid.]tablename
tablename is not fully qualified, the
default qualifier is used.
n
A numeric value from 1 through 9999.
Appendix B. Command Line Interface
133
Compare
Process
TABROWLIM
TMNAME
Override for setting to limit the number of rows
processed from a table.
[ [ dbalias. ]
cid.]tablename
One-, two-, or three-part tablename. If
tablename is not fully qualified, the
default qualifier is used.
n
A numeric value for the maximum
number of rows to extract from a table.
Valid values are 1 through 99999999.
Override for the Table Map used when comparing
multiple tables.
identifier.tablemap Two-part name of a Table Map in the
name
Directory.
COLMAPID
Override for the default identifier for the Column Maps
referenced in the Table Map.
identifier
DESTQUAL
Override for the default qualifier for the Source 2 tables.
dbalias.creatorid
DESTTABNAME
COLMAP
Extract
Processing
Override for the Source 1 and Source 2 tables in a Table
Map.
tablename1
The Source 1 table name.
[ [ dbalias. ]
cid.]tablename2
One-, two-, or three-part Source 2 table
name. If the table name is not fully
qualified, the default qualifier is used.
Override for the Column Map name for a specific Source
2 table in the Table Map.
Note: Note: A named Column Map can override a local
Column Map.
[ [ dbalias.]cid.]
tablename
One-, two-, or three-part tablename. If
tablename is not fully qualified, the
default qualifier is used.
identifier.colmap
Two-part name of an existing Column
Map.
Override for the local or named Access Definition
referenced in the Extract Request.
identifier.adname
DEFQUAL
STARTTAB
The one- or two-part qualifier (DB Alias
and Creator ID) for the tables in the
Access Definition.
Override for the name of the Start Table.
[ [ dbalias.]
cid.]tablename
ROWLIMIT
Two-part name of an Access Definition
in the Directory.
Override for the default qualifier.
dbalias.
[creatorid]
IBM Optim: Compare User Manual
The two-part qualifier (DB Alias and
Creator ID) for the Source 2 tables.
For an Extract Process, the following override parameters are available:
ADNAME
134
The 1- to 8-character identifier.
One-, two-, or three-part Start Table
name. If tablename is not fully qualified,
the default qualifier is used.
Override for the maximum number of rows to extract.
Compare
Process
n
SEL
A number from 1 to the maximum limit
specified in Product Options.
Override for, or addition to, selection criteria specification.
Selection criteria must conform to SQL syntax with each
override on a separate line.
[[
One-, two-, or three-part tablename. If
dbalias.]cid.]tablename
tablename is not fully qualified, the
default qualifier is used.
SQL
TABEVERYNTH
columnname
Name of column to which criteria
applies.
operator
Logical operator appropriate for your
DBMS.
value
Value or list of values appropriate for
the operator, expressed as literals or
substitution variables (:variablename)
Override for SQL WHERE specification. Each override
must be on a separate line.
[ [ dbalias.
]cid.]tablename
One-, two-, or three-part tablename. If
tablename is not fully qualified, the
default qualifier is used.
sqlwhereclause
The SQL WHERE clause.
Override for sampling factor.
[[
One-, two-, or three-part tablename. If
dbalias.]cid.]tablename
tablename is not fully qualified, the
default qualifier is used.
n
TABROWLIM
A numeric value from 1 through 9999.
Override for setting to limit the number of rows
processed from a table.
[[
One-, two-, or three-part tablename. If
dbalias.]cid.]tablename
tablename is not fully qualified, the
default qualifier is used.
n
VAR
XFFILE
Value for substitution variable used in the process.
variablename
Name of the substitution variable.
value
The corresponding value for the
variable.
Override for Extract File referenced in the Extract Request.
xffilename.xf
Report
Processing
A numeric value for the maximum
number of rows to extract from a table.
Valid values are 1 through 99999999.
Name of the Extract File. Provide the
full path if the file is not in the default
Data Directory.
For a Report Process, the following override parameters are available:
REPORTNAME
Override for the local or named Report Request
referenced in a Compare Request.
Appendix B. Command Line Interface
135
Compare
Process
identifier.rptname
SOURCEFILE
Override for the Source File name in the standalone
Report Request.
xffilename.xf
TITLE
Two-part name of the Report Request.
The name of an Extract File for the
report. Provide the full path if the file is
not in the default Data Directory.
Override for report title.
string
Up to 40 characters to appear on each
page of the report.
AUTOREPORTNEWOverride for the Automatically Report New Tables
setting.
Y
Include all Source File tables in the
report.
N
Include only tables in the original
Source File in the report.
Return Codes
In a batch file, you can direct the processing that follows the PR0CMND
processing using the return code in the following statement:
IF ERRORLEVEL n GOTO x
The following list explains the meaning of possible return codes:
Return Code
Explanation
0
No errors
4
In all of the requests, the highest return code was Informational
8
In all of the requests, the highest return code was Warning
12
In all of the requests, the highest return code was Fatal
16
There was a syntax error on the command line. A popup window also
displays, unless you specified Quiet+
24
Could not open the output file specified in the Output= parameter
Since the return code value is evaluated as equal to or greater than, query each
ERRORLEVEL in reverse order:
PR0CMND /R TYPE=EXTRACT REQUEST=identifier.name
IF ERRORLEVEL 24 GOTO Badout
IF ERRORLEVEL 16 GOTO Syntax
IF ERRORLEVEL 12 GOTO Fatal
IF ERRORLEVEL 8 GOTO Warning
IF ERRORLEVEL 4 GOTO Info
136
IBM Optim: Compare User Manual
Note: For example:
:Badout
echo The Output File could not be opened.
GOTO End
...
:End
Examples
This section contains syntax examples for various command line processes.
Browse a Compare File
To start the Browse Utility from the command line, enter:
PR0CMND /X C:\SALESCON.CMP
Run a process from the command line
To run a process directly from the command line, specify:
PR0CMND /R TYPE=type
REQUEST=identifier.name
v To run a Compare Request named SALES.COMPR and display results, enter:
PR0CMND /R TYPE=COMPARE
REQUEST=SALES.COMPR
v To run an Extract Request named SALES.MONTHLY and add the results to an
existing output file named PLAN.TXT, enter:
PR0CMND /R TYPE=EXTRACT
REQUEST=SALES.MONTHLY OUTPUT=PLAN.TXT+
v To run a Compare Request named MARKET.TRENDS, display prompts and
error dialogs during the process, and write results to an output file named
RESULTS.TXT, enter:
PR0CMND /R TYPE=COMPARE
REQUEST=MARKET.TRENDS OUTPUT=RESULTS.TXT
QUIET
Run one or more processes as a scheduled job from the
command line
To run a scheduled job directly from the command line, use:
You can create scheduled jobs using the Scheduling Editor. Refer to the Common
Elements Manual for details.
PR0CMND /R JOB='jobname'
v To run a job named CUSTDATA and write the results to an output file named
CUSTOUT.TXT, specify:
PR0CMND /R JOB='CUSTDATA'
OUTPUT=C:\CUSTOUT.TXT
v To run the same job and display prompts and error dialogs during the process,
specify:
PR0CMND /R JOB='CUSTDATA'
OUTPUT=C:\CUSTOUT.TXT QUIET-
v To run a job named PAYROLL and display information dialogs during the
process, specify:
PR0CMND /R
MONITOR+
JOB='PAYROLL' OUTPUT=PAY.TXT
Appendix B. Command Line Interface
137
Run one or more processes using a parameter file
To run one or more processes from a file, use:
PR0CMND /R @filename
For example, to run processes in a parameter file named STATS.TXT, enter:
PR0CMND /R @C:\STATS.TXT
File Format
In this example, STATS.TXT includes the following:
TYPE=EXTRACT REQUEST=MONTHLY.SALES
TYPE=EXTRACT REQUEST=MONTHLY.QUOTAS
TYPE=COMPARE REQUEST=SALES.YTD STOP=FATAL
Run one or more processes using a parameter file with
overrides
Following are examples of command line processing when overrides are specified
in a parameter file:
Extract
To run an Extract process in a parameter file named LEADS.TXT, enter:
PR0CMND /R @C:\temp\LEADS.TXT
File Format
In this example, LEADS.TXT includes the following:
TYPE=EXTRACT REQUEST=SALES.CUST OV=*
DEFQUAL ORACLE1.TELEM
STARTTAB CUSTOMERS
ROWLIMIT 600
SEL CUSTOMERS CUST_ID>'12345'
END
Compare
To run a Compare process in a parameter file named COMP.TXT, enter:
PR0CMND /R
@C:\TEMP\COMP.TXT
File Format
In this example, COMP.TXT includes the following:
TYPE=COMPARE REQUEST=CMPR.ORDERS OV=*
XFFILE1 APRIL.XF
XFFILE2 MAY.XF
END
Run a process using an override file
Following are examples of command line processes that use override files:
Extract
To run an Extract Request named SALES.MTHLY from the command line, and
apply overrides from a file named CHANGES.TXT, enter:
138
IBM Optim: Compare User Manual
PR0CMND /R TYPE=EXTRACT
REQUEST=SALES.MTHLY OV=CHANGES.TXT
File Format
In this example, CHANGES.TXT includes the following:
DEFQUAL ORACLE1.TELEM
STARTTAB CUSTOMERS
ROWLIMIT 600
SQL CUSTOMERS ST='NJ' AND ZIP='08540'
Appendix B. Command Line Interface
139
140
IBM Optim: Compare User Manual
Notices
This information was developed for products and services offered in the U.S.A.
IBM may not offer the products, services, or features discussed in this document in
other countries. Consult your local IBM representative for information on the
products and services currently available in your area. Any reference to an IBM
product, program, or service is not intended to state or imply that only that IBM
product, program, or service may be used. Any functionally equivalent product,
program, or service that does not infringe any IBM intellectual property right may
be used instead. However, it is the user's responsibility to evaluate and verify the
operation of any non-IBM product, program, or service.
IBM may have patents or pending patent applications covering subject matter
described in this document. The furnishing of this document does not grant you
any license to these patents. You can send license inquiries, in writing, to:
IBM Director of Licensing
IBM Corporation
North Castle Drive
Armonk, NY 10504-1785
U.S.A.
For license inquiries regarding double-byte (DBCS) information, contact the IBM
Intellectual Property Department in your country or send inquiries, in writing, to:
IBM World Trade Asia Corporation
Licensing 2-31 Roppongi 3-chome, Minato-ku
Tokyo 106-0032, Japan
The following paragraph does not apply to the United Kingdom or any other
country where such provisions are inconsistent with local law:
INTERNATIONAL BUSINESS MACHINES CORPORATION PROVIDES THIS
PUBLICATION “AS IS” WITHOUT WARRANTY OF ANY KIND, EITHER
EXPRESS OR IMPLIED, INCLUDING, BUT NOT LIMITED TO, THE IMPLIED
WARRANTIES OF NON-INFRINGEMENT, MERCHANTABILITY OR FITNESS
FOR A PARTICULAR PURPOSE. Some states do not allow disclaimer of express or
implied warranties in certain transactions, therefore, this statement may not apply
to you.
This information could include technical inaccuracies or typographical errors.
Changes are periodically made to the information herein; these changes will be
incorporated in new editions of the publication. IBM may make improvements
and/or changes in the product(s) and/or the program(s) described in this
publication at any time without notice.
Any references in this information to non-IBM Web sites are provided for
convenience only and do not in any manner serve as an endorsement of those Web
sites. The materials at those Web sites are not part of the materials for this IBM
product and use of those Web sites is at your own risk.
IBM may use or distribute any of the information you supply in any way it
believes appropriate without incurring any obligation to you.
© Copyright IBM Corp. 1994, 2010
141
Licensees of this program who wish to have information about it for the purpose
of enabling: (i) the exchange of information between independently created
programs and other programs (including this one) and (ii) the mutual use of the
information which has been exchanged, should contact:
IBM Corporation
Software Interoperability Coordinator, Department 49XA
3605 Highway 52 N
Rochester, MN 55901
U.S.A.
Such information may be available, subject to appropriate terms and conditions,
including in some cases, payment of a fee.
The licensed program described in this information and all licensed material
available for it are provided by IBM under terms of the IBM Customer Agreement,
IBM International Program License Agreement, or any equivalent agreement
between us.
Any performance data contained herein was determined in a controlled
environment. Therefore, the results obtained in other operating environments may
vary significantly. Some measurements may have been made on development-level
systems and there is no guarantee that these measurements will be the same on
generally available systems. Furthermore, some measurements may have been
estimated through extrapolation. Actual results may vary. Users of this document
should verify the applicable data for their specific environment.
Information concerning non-IBM products was obtained from the suppliers of
those products, their published announcements or other publicly available sources.
IBM has not tested those products and cannot confirm the accuracy of
performance, compatibility or any other claims related to non-IBM products.
Questions on the capabilities of non-IBM products should be addressed to the
suppliers of those products.
All statements regarding IBM's future direction or intent are subject to change or
withdrawal without notice, and represent goals and objectives only.
All IBM prices shown are IBM's suggested retail prices, are current and are subject
to change without notice. Dealer prices may vary.
This information is for planning purposes only. The information herein is subject to
change before the products described become available.
This information contains examples of data and reports used in daily business
operations. To illustrate them as completely as possible, the examples include the
names of individuals, companies, brands, and products. All of these names are
fictitious and any similarity to the names and addresses used by an actual business
enterprise is entirely coincidental.
COPYRIGHT LICENSE:
This information contains sample application programs in source language, which
illustrate programming techniques on various operating platforms. You may copy,
modify, and distribute these sample programs in any form without payment to
IBM, for the purposes of developing, using, marketing or distributing application
programs conforming to the application programming interface for the operating
142
IBM Optim: Compare User Manual
platform for which the sample programs are written. These examples have not
been thoroughly tested under all conditions. IBM, therefore, cannot guarantee or
imply reliability, serviceability, or function of these programs.
Each copy or any portion of these sample programs or any derivative work, must
include a copyright notice as follows:
© (your company name) (year). Portions of this code are derived from IBM Corp.
Sample Programs. © Copyright IBM Corp. _enter the year or years_. All rights
reserved.
If you are viewing this information softcopy, the photographs and color
illustrations may not appear.
Trademarks
IBM, the IBM logo, DB2, Informix, Optim, and ibm.com® are trademarks or
registered trademarks of International Business Machines Corporation in the
United States, other countries, or both. If these and other IBM trademarked terms
are marked on their first occurrence in this information with a trademark symbol
(® or ™), these symbols indicate U.S. registered or common law trademarks owned
by IBM at the time this information was published. Such trademarks may also be
registered or common law trademarks in other countries. A current list of IBM
trademarks is available on the Web at “Copyright and trademark information” at
www.ibm.com/legal/copytrade.shtml.
Linux is a registered trademark of Linus Torvalds in the United States, other
countries, or both.
Microsoft, Windows, and Windows NT are trademarks of Microsoft Corporation in
the United States, other countries, or both.
UNIX is a registered trademark of The Open Group in the United States and other
countries.
Other company, product, or service names may be trademarks or service marks of
others.
Notices
143
144
IBM Optim: Compare User Manual
Index
A
Access Definition to Access Definition
compare multiple tables 43, 45
specify a Table Map 44
Access Definition to Database Tables
compare multiple tables 45, 46
specify a Table Map 46
Access Definitions
edit 30
in a Compare Request 26
in an Extract Request 60
B
Browse Table Data 17, 81
Browse Utility 77, 91
Extended Compare Table
Information 16, 80
Extract and Control Files 77
Information tab 15, 79
printing options 90
save Compare File information
91
table data 17, 21, 81, 90
Tables tab 14, 78
21,
C
Column Maps 30
Command Line Interface 109, 121, 127,
137
keywords 111, 129
override keywords 114, 118, 132, 136
return codes 120, 136
run process request 118, 137
run scheduled job 118, 137
syntax guidelines 109, 127
Compare Files
browsing 54, 77, 91
Compare Request 29, 47
Compare Processing
monitor progress 51
print/redisplay report 53
review process report 52
select a match key 47
Compare Request Editor
browse results immediately 31
create report immediately 32
edit match keys 11, 30
edit Report Request 30
email notification 47
General tab 29, 32
menu commands 30
Multiple Tables mode 26
Notify tab 47
processing information 26
run mode for Extract 32
select comparison mode 31
select options 29
Single Table mode 26
© Copyright IBM Corp. 1994, 2010
Compare Request Editor (continued)
Source tab 30, 33, 46
specify a Compare File 31
Compare Requests 29, 47
create 26
definition 25
run the request 50
save 54
schedule 50
select 28
Comparison Mode
Multiple Tables 38, 46
Single Table 33, 38
single/multiple tables 31
Compress Extract File 61
Control Files
browsing 77
example 21, 91
Cross-Hatching 84
Extract Request Editor (continued)
items to extract 60
limit rows to extract 61
menu commands 59
objects to extract 62
Point and Shoot options 63
run Convert Process after Extract
substitution variables 64
Extract Requests 58, 68
create 56
edit 58
open 57
run 70
schedule 70
Start Table 63
use a Row List File 107, 125
Extract Run Mode
in parallel 32
in sequence 32
D
G
Database Connections 61
Database Table to Database Table
compare single tables 36, 38
single table sources 37
specify a Column Map 37
Dialogs and Editors
grid column shortcuts 85
grid heading shortcuts 20, 84
Display Column Attributes 19, 83
Grid Heading Shortcut Menu
Grid Patterns 84
E
Edit Window
components 81
toolbar buttons 83
Environment v, 55
Error Messages 70
Exclude 20
Extract Files
browsing 77
Extract Request 60
Extract Processing
description of 55, 69
error messages 70
Extract Process Report 74
monitor progress 73
print/redisplay report 75
statistical report 75
warning messages 71
Extract Request Editor
Access Definition options 60
always prompt for values 65
compress Extract File 61
Convert Request options 68
database connections 61
Email notification 69
Extract Files 60
generate statistical report 61
61
20
M
Match Key
description of 11, 47
edit 11, 30
Match Key Editor
hide data types 49
menu commands 49
select available columns 49
status 49
Multiple Tables Mode
AD to AD 43, 45
AD to Database Tables 45, 46
description of 26
Source File to Access Definition 39,
41
Source File to Database Tables 42, 43
Source File to Source File 38, 39
N
Notify tab
Compare Request 47
Extract Request 69
Report Request 103
O
Optim Directory
2
P
Point and Shoot
create a Row List File
105, 123
145
Point and Shoot (continued)
Extract Request 62
PR0CMND 109, 127
R
Report Options 31, 32
Report Processing 103
Report Request Editor
Email notification 103
Report Requests
edit 30, 97
run 103
schedule 103
select 95
Row Limit 61
Row List Files
data formats 106, 124
external row lists 105, 123
in an Extract Request 107, 125
S
Sample Database 5
Save
Compare File information 21
Show
excluded rows 20, 83
unmatched columns 19, 83
Single Table Mode
Database Table to Database Table 36,
38
description of 26
Source File to Database Table 34, 36
Source File to Source File 33, 34
Source File to Access Definition
compare multiple tables 39, 41
multiple table sources 40
specify a Table Map 41
Source File to Database Table
compare single tables 34, 36
single table sources 35
specify a Column Map 36
Source File to Database Tables
compare multiple tables 42
multiple table sources 42
Source File to Source File
compare multiple tables 38, 39
compare single tables 33, 34
multiple table sources 38
single table sources 33
specify a Column Map 34
specify a Table Map 39
Start Table 63
Statistical Information
Extract Process Report 61, 75
T
Table Maps 30
Table Map Editor
Toolbar Buttons 19
146
11, 96
IBM Optim: Compare User Manual
V
Variables
always prompt for values
default values 64
Extract Request 64
prompt string 64
SQL syntax 65
W
Warning Messages
Extract Process 71
65
Printed in USA