1
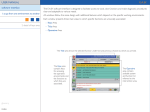
Computer-Based
Instruments
NI 6830 User Manual
NI 6830 User Manual
December 1998 Edition
Part Number 322024A-01
Internet Support
E-mail: [email protected]
FTP Site: ftp.natinst.com
Web Address: http://www.natinst.com
Bulletin Board Support
BBS United States: 512 794 5422
BBS United Kingdom: 01635 551422
BBS France: 01 48 65 15 59
Fax-on-Demand Support
512 418 1111
Telephone Support (USA)
Tel: 512 795 8248
Fax: 512 794 5678
International Offices
Australia 03 9879 5166, Austria 0662 45 79 90 0, Belgium 02 757 00 20, Brazil 011 288 3336,
Canada (Ontario) 905 785 0085, Canada (Québec) 514 694 8521, Denmark 45 76 26 00, Finland 09 725 725 11,
France 01 48 14 24 24, Germany 089 741 31 30, Hong Kong 2645 3186, Israel 03 6120092, Italy 02 413091,
Japan 03 5472 2970, Korea 02 596 7456, Mexico 5 520 2635, Netherlands 0348 433466, Norway 32 84 84 00,
Singapore 2265886, Spain 91 640 0085, Sweden 08 730 49 70, Switzerland 056 200 51 51, Taiwan 02 377 1200,
United Kingdom 01635 523545
National Instruments Corporate Headquarters
6504 Bridge Point Parkway Austin, Texas 78730-5039
USA Tel: 512 794 0100
© Copyright 1998 National Instruments Corporation. All rights reserved.
Important Information
Warranty
The NI 6830 is warranted against defects in materials and workmanship for a period of one year from the date of shipment,
as evidenced by receipts or other documentation. National Instruments will, at its option, repair or replace equipment that
proves to be defective during the warranty period. This warranty includes parts and labor.
The media on which you receive National Instruments software are warranted not to fail to execute programming
instructions, due to defects in materials and workmanship, for a period of 90 days from date of shipment, as evidenced
by receipts or other documentation. National Instruments will, at its option, repair or replace software media that do not
execute programming instructions if National Instruments receives notice of such defects during the warranty period.
National Instruments does not warrant that the operation of the software shall be uninterrupted or error free.
A Return Material Authorization (RMA) number must be obtained from the factory and clearly marked on the outside
of the package before any equipment will be accepted for warranty work. National Instruments will pay the shipping costs
of returning to the owner parts which are covered by warranty.
National Instruments believes that the information in this manual is accurate. The document has been carefully reviewed
for technical accuracy. In the event that technical or typographical errors exist, National Instruments reserves the right to
make changes to subsequent editions of this document without prior notice to holders of this edition. The reader should
consult National Instruments if errors are suspected. In no event shall National Instruments be liable for any damages
arising out of or related to this document or the information contained in it.
EXCEPT AS SPECIFIED HEREIN, NATIONAL INSTRUMENTS MAKES NO WARRANTIES, EXPRESS OR IMPLIED, AND SPECIFICALLY DISCLAIMS
ANY WARRANTY OF MERCHANTABILITY OR FITNESS FOR A PARTICULAR PURPOSE. CUSTOMER’S RIGHT TO RECOVER DAMAGES CAUSED
BY FAULT OR NEGLIGENCE ON THE PART OF NATIONAL INSTRUMENTS SHALL BE LIMITED TO THE AMOUNT THERETOFORE PAID BY THE
CUSTOMER. NATIONAL INSTRUMENTS WILL NOT BE LIABLE FOR DAMAGES RESULTING FROM LOSS OF DATA, PROFITS, USE OF PRODUCTS,
OR INCIDENTAL OR CONSEQUENTIAL DAMAGES, EVEN IF ADVISED OF THE POSSIBILITY THEREOF. This limitation of the liability of
National Instruments will apply regardless of the form of action, whether in contract or tort, including negligence.
Any action against National Instruments must be brought within one year after the cause of action accrues. National
Instruments shall not be liable for any delay in performance due to causes beyond its reasonable control. The warranty
provided herein does not cover damages, defects, malfunctions, or service failures caused by owner’s failure to follow
the National Instruments installation, operation, or maintenance instructions; owner’s modification of the product;
owner’s abuse, misuse, or negligent acts; and power failure or surges, fire, flood, accident, actions of third parties,
or other events outside reasonable control.
Copyright
Under the copyright laws, this publication may not be reproduced or transmitted in any form, electronic or mechanical,
including photocopying, recording, storing in an information retrieval system, or translating, in whole or in part, without
the prior written consent of National Instruments Corporation.
Trademarks
NI-DAQ™ is a trademark of National Instruments Corporation.
Product and company names referenced are trademarks or trade names of their respective companies.
WARNING REGARDING MEDICAL AND CLINICAL USE OF NATIONAL INSTRUMENTS PRODUCTS
National Instruments products are not designed with components and testing intended to ensure a level of reliability
suitable for use in treatment and diagnosis of humans. Applications of National Instruments products involving medical
or clinical treatment can create a potential for accidental injury caused by product failure, or by errors on the part of the
user or application designer. Any use or application of National Instruments products for or involving medical or clinical
treatment must be performed by properly trained and qualified medical personnel, and all traditional medical safeguards,
equipment, and procedures that are appropriate in the particular situation to prevent serious injury or death should always
continue to be used when National Instruments products are being used. National Instruments products are NOT intended
to be a substitute for any form of established process, procedure, or equipment used to monitor or safeguard human health
and safety in medical or clinical treatment.
Conventions
The following conventions are used in this manual:
<>
Angle brackets enclose the name of a key on the keyboard—for example,
<shift>. Angle brackets containing numbers separated by an ellipsis
represent a range of values associated with a bit or signal name—for
example, DBIO<3..0>.
»
The » symbol leads you through nested menu items and dialog box options
to a final action. The sequence File»Page Setup»Options»Substitute
Fonts directs you to pull down the File menu, select the Page Setup item,
select Options, and finally select the Substitute Fonts options from the
last dialog box.
♦
The ♦ symbol indicates that the text following it applies only to a specific
ISDN network type.
This icon to the left of bold italicized text denotes a note, which alerts you
to important information.
bold
Bold text denotes the names of menus, menu items, parameters, dialog
boxes, dialog box buttons or options, icons, windows, Windows 95 tabs,
or LEDs.
bold italic
Bold italic text denotes an activity objective, note, caution, or warning.
italic
Italic text denotes variables, emphasis, a cross reference, or an introduction
to a key concept. This font also denotes text from which you supply the
appropriate word or value, as in NI-DAQ 6.x.
monospace
Text in this font denotes text or characters that you should literally enter
from the keyboard, sections of code, programming examples, and syntax
examples. This font is also used for the proper names of disk drives, paths,
directories, programs, subprograms, subroutines, device names, functions,
operations, variables, filenames and extensions, and for statements and
comments taken from programs.
NI 6830
NI 6830 refers to the NI 6830 Basic Rate ISDN Tester.
paths
Paths in this manual are denoted using backslashes (\) to separate drive
names, directories, folders, and files.
Contents
Chapter 1
Using the NI 6830 Basic Rate ISDN Tester
Startup Tests ..................................................................................................................1-2
Status Bar .......................................................................................................................1-4
Interface...........................................................................................................1-4
Channels ..........................................................................................................1-6
Power Supply...................................................................................................1-6
Run Test Sequence.........................................................................................................1-6
Bit Error Rate Test .........................................................................................................1-11
Speech and 3.1 kHz Audio Test.....................................................................................1-14
Teleservices Verification ...............................................................................................1-16
Supplementary Services Verification ............................................................................1-17
Power Supply Checks ....................................................................................................1-19
Protocol Decode.............................................................................................................1-20
Options...........................................................................................................................1-22
Terminal ..........................................................................................................1-23
ISDN Interface.................................................................................................1-25
General ............................................................................................................1-27
Stored Numbers ...............................................................................................1-28
Filters...............................................................................................................1-29
About ...............................................................................................................1-30
Chapter 2
Using the NI 6830 Sequence Editor
File Menu .......................................................................................................................2-2
Edit Menu ......................................................................................................................2-3
Help Menu .....................................................................................................................2-3
Toolbar Icons .................................................................................................................2-3
Adding a New Test ........................................................................................................2-4
Changing Test Parameters .............................................................................................2-5
Modifying an Existing Test Sequence ...........................................................................2-5
Editing Sequence Properties ..........................................................................................2-6
Organizing Test Sequences............................................................................................2-7
© National Instruments Corporation
v
NI 6830 User Manual
Contents
Customer Communication
Glossary
Index
Figures
Figure 1-1.
Figure 1-2.
Figure 1-3.
Figure 1-4.
Figure 1-5.
Figure 1-6.
Figure 1-7.
Figure 1-8.
Figure 1-9.
Figure 1-10.
Figure 1-11.
Figure 1-12.
Figure 1-13.
Figure 1-14.
Figure 1-15.
Figure 1-16.
Figure 1-17.
Figure 1-18.
Figure 1-19.
Figure 1-20.
Figure 1-21.
Figure 1-22.
Figure 1-23.
Figure 1-24.
Figure 1-25.
Main Screen .......................................................................................... 1-1
Customer Numbers Dialog Box wIthout SPID..................................... 1-3
Customer Numbers Dialog Box with SPIDs ........................................ 1-4
Status Bar .............................................................................................. 1-4
Select Test Sequence without SPID...................................................... 1-7
Select Test Sequence with SPID........................................................... 1-8
NI ISDN Test Sequencer ...................................................................... 1-9
NI ISDN Test Sequencer Dialog Box While Tests are in Progress ...... 1-10
Bit Error Rate Test ................................................................................ 1-12
Speech and 3.1 kHz Audio Test............................................................ 1-14
Speech and 3.1 kHz Audio Test Showing Keypad ............................... 1-15
Teleservices Test................................................................................... 1-16
Supplementary Services Test ................................................................ 1-17
Power Supply Checks ........................................................................... 1-19
Protocol Decode.................................................................................... 1-20
Detailed Decode Packet View .............................................................. 1-21
Terminal Tab without SPID.................................................................. 1-23
Terminal Tab with SPID ....................................................................... 1-24
ISDN Interface Tab............................................................................... 1-25
Advanced ISDN Settings ...................................................................... 1-26
General Tab........................................................................................... 1-27
Stored Numbers Tab ............................................................................. 1-28
Properties .............................................................................................. 1-29
Filters Tab ............................................................................................. 1-29
About Tab ............................................................................................. 1-30
Figure 2-1.
Figure 2-2.
Figure 2-3.
Figure 2-4.
ISDN Test Sequence Editor .................................................................. 2-2
Add Test................................................................................................ 2-4
BERT Parameters.................................................................................. 2-5
Sequence Properties .............................................................................. 2-6
NI 6830 User Manual
vi
© National Instruments Corporation
Using the NI 6830 Basic Rate
ISDN Tester
1
Thank you for purchasing a National Instruments NI 6830 Basic Rate
ISDN Tester. The NI 6830 allows you to perform the most common tests
for the installation and basic maintenance of integrated digital services
network (ISDN) lines.
The NI 6830 makes ISDN testing simple. To start the software, double click
the ISDN Tester icon on the desktop of your computer. You can access all
the functions of the NI 6830 from a single main screen. The NI 6830 main
screen is shown in Figure 1-1.
Figure 1-1. Main Screen
© National Instruments Corporation
1-1
NI 6830 User Manual
Chapter 1
Using the NI 6830 Basic Rate ISDN Tester
You can select any of the functions on the main screen using a pointing
device such as a mouse, mousepad, or trackball; by pressing the associated
function key <Fx>; or by pressing <Alt> and the letter underlined in the
function. All the main screen features are discussed in detail later in this
chapter.
Note
You can run all the tests except the Power Supply Checks on either the U or S/T
interface. Power Supply Checks are for the S/T interface only. You can select the
U or S/T interface under Options»ISDN Interface.
The following items are found on the main screen:
•
The status bar at the top of the screen shows the status of the U or S/T
interface, B channel activity, and the S/T power supplies.
•
Run Test Sequence runs a predefined sequence of ISDN tests.
•
Bit Error Rate Test performs a Bit Error Rate Test (BERT) or a Bit
Errored Seconds Test (BEST).
•
Speech and 3.1 kHz Audio tests speech and audio carried on a
B channel.
•
Teleservices verifies the teleservices programmed at the central office
for the ISDN line you are testing.
•
Supplementary Services verifies the supplementary services
programmed at the central office for the ISDN line you are testing.
•
Power Supply Check verifies the status of the S/T interface power
supplies. This function is hidden when you select the U interface.
•
Protocol Decode displays the layer 2 and layer 3 messages that are
exchanged between the central office and the NI 6830.
•
Options changes the general settings of the NI 6830 Basic Rate ISDN
Tester.
•
Exit exits the NI 6830 software.
Startup Tests
♦
Networks without service profile identifier (SPID)
Before you start testing the ISDN line, enter the phone numbers
provisioned for this location. On startup, you see the dialog box shown in
Figure 1-2. Enter customer numbers into the appropriate fields. If only one
NI 6830 User Manual
1-2
© National Instruments Corporation
Chapter 1
Using the NI 6830 Basic Rate ISDN Tester
number is assigned, leave the second field blank. If both numbers are the
same, you can use the Copy Numbers button to copy the number from first
field into the second. Once you finished entering the numbers, click the OK
button.
Figure 1-2. Customer Numbers Dialog Box wIthout SPID
To change these numbers later, use Options»Terminal page. If you do not
want to be prompted to enter customer numbers, you can disable this
feature on the Options»General page.
♦
Networks with SPID
Before you can conduct any tests, you must enter the directory numbers and
SPIDs provisioned for this line. You are prompted with the dialog box
shown in Figure 1-3 to input this information. Enter directory numbers and
SPIDs into the appropriate fields. If the SPID format has been configured,
the software automatically generates the SPID based on the phone number
entered. You can also click the SPID button next to the Customer Number
field to generate a SPID based on predefined format. If the SPID is not
© National Instruments Corporation
1-3
NI 6830 User Manual
Chapter 1
Using the NI 6830 Basic Rate ISDN Tester
generated automatically, you must enter it manually. Once you finished
entering the numbers and SPIDs, click the OK button.
Figure 1-3. Customer Numbers Dialog Box with SPIDs
To change the directory numbers and SPIDs later, use the
Options»Terminal page. If you do not want to be prompted to enter
customer numbers and SPIDs, you can disable this feature on the
Options»General page.
Status Bar
The NI 6830 has the status bar, shown in Figure 1-4, at the top of the main
screen.
Figure 1-4. Status Bar
The status bar is divided into boxes showing ISDN interface status, bearer
channel usage, and the state of the ISDN power supply.
Interface
The interface box displays the status of the ISDN connection between the
central office and the subscriber on the U or S/T interface. You can select
the U or S/T interface under Options»Interface. See Options later in this
chapter for more information.
NI 6830 User Manual
1-4
© National Instruments Corporation
Chapter 1
Using the NI 6830 Basic Rate ISDN Tester
A green LED for Sync (Layer 1) indicates connection at protocol layer 1
(physical layer). If the green light does not come on, it could mean one of
the following:
•
The NI 6830 is not connected to the line.
•
A cable is connected to the wrong interface.
•
The line is not connected to the ISDN line card in the central office.
•
There is a problem with the twisted pair wiring between the central
office and the customer.
A green LED for Ready (Layer 2) indicates that the connection was
established at protocol layer 2 (data link layer) and the line is ready for
placing calls.
♦
Networks without SPID
If the green light does not come on, the central office switch is probably
unable to assign a terminal end-point identifiers (TEI) to this line. Check
with the central office personnel to make sure that the switch is operating
correctly.
♦
Networks with SPID
If the green light does not come on, the central office switch is probably
unable to assign a TEI to this line. Check with the central office personnel
to make sure that the switch is operating correctly.
If the yellow light comes on, the tester is ready to download SPID
information. Make sure that you entered the correct SPIDs by checking the
Options»Terminal page.
If the red light comes on, it means that the tester tried to download the
SPIDs, but they were rejected by the central office. Make sure that the SPID
information is correct by checking the Options»Terminal page.
© National Instruments Corporation
1-5
NI 6830 User Manual
Chapter 1
Using the NI 6830 Basic Rate ISDN Tester
Channels
The Channels box indicates activity on the B1 and B2 channels. An orange
LED indicates that the corresponding B channel is active. A gray LED
indicates that the corresponding B channel is inactive. The LEDs remain
disabled if the NI 6830 is not connected to the line.
Power Supply
This Power Supply box shows the status of the S/T power supplies PS1 and
PS2. A green LED indicates normal power supply voltage. A yellow LED
indicates restricted supply voltage. A red LED indicates no power supply
voltage, or that the power supply is too high.
Note
The Power Supply box is hidden if you are testing the U interface.
Run Test Sequence
Run Test Sequence allows you to quickly perform a predefined sequence
of tests. You can create sequences with the Sequence Editor. See Chapter 2,
Using the NI 6830 Sequence Editor, for more information on the Sequence
Editor.
NI 6830 User Manual
1-6
© National Instruments Corporation
Chapter 1
♦
Using the NI 6830 Basic Rate ISDN Tester
Networks without SPID
You see the dialog box shown in Figure 1-5 when you select the Run Test
Sequence icon.
Figure 1-5. Select Test Sequence without SPID
© National Instruments Corporation
1-7
NI 6830 User Manual
Chapter 1
Using the NI 6830 Basic Rate ISDN Tester
♦
Networks with SPID
You see the dialog box shown in Figure 1-6 when you select Run Test
Sequence.
Figure 1-6. Select Test Sequence with SPID
The dialog box shows the numbers assigned to the customer. You can
change the customer numbers by typing over the displayed numbers.
The dialog box also lists the available sequences. You can highlight a test
sequence by moving up and down the list with the pointing device or with
the up and down arrow keys.
Note
Your dialog box shows different sequences if they have been created using the
Sequence Editor, described in Chapter 2, Using the NI 6830 Sequence Editor.
Click Cancel to exit without selecting a test sequence.
NI 6830 User Manual
1-8
© National Instruments Corporation
Chapter 1
Using the NI 6830 Basic Rate ISDN Tester
Highlight a sequence in the Available Test Sequences list box, then click
Select to run the sequence you selected. The NI 6830 displays an ISDN
Test Sequencer screen similar to the one shown in Figure 1-7.
Figure 1-7. NI ISDN Test Sequencer
© National Instruments Corporation
1-9
NI 6830 User Manual
Chapter 1
Using the NI 6830 Basic Rate ISDN Tester
The NI 6830 displays a list of the tests on the left side of the screen, the user
interface of each individual test, as it is performed, in the upper right side
of the screen, and a log of results in the lower right area of the screen.
Figure 1-8 shows the NI ISDN Test Sequencer dialog box while tests are
ongoing.
Figure 1-8. NI ISDN Test Sequencer Dialog Box While Tests Are in Progress
Click the Run button to run the test sequence.
Click the Save icon to save the test sequence results to a file. If you select
Save, a dialog box prompts you for the name and location of the file you
want to save.
Click the Exit icon to return to the main screen.
Click the Stop button, if highlighted, to stop the test sequence. You cannot
stop some test sequences. For these test sequences the Stop button is grayed
out.
The tests in a sequence are identical to the individual tests run directly from
the main screen. See the individual function tests for additional
information.
NI 6830 User Manual
1-10
© National Instruments Corporation
Chapter 1
Using the NI 6830 Basic Rate ISDN Tester
Bit Error Rate Test
The BERT is the most common test performed on an ISDN line after you
make the connection. There are two ways to perform a BERT—either
end-to-end or self-call.
When performing an end-to-end test, the NI 6830 sends a digital pattern
from one B channel to a Basic Rate Interface Test Line (BRITL) at the
central office or to another NI 6830. The far-end device loops the pattern
back on the same channel. A bit error indicates a difference of one bit
between the transmitted and received patterns.
When performing the self-call test, the ISDN tester sends a digital pattern
from one B channel to the other through the central office switch. A bit
error indicates a difference of one bit between the transmitted and received
patterns.
If you receive no bit errors for a certain period of time, the connection is
considered good. A BERT performed over time is also called a Bit Errored
Second Test (BEST), or a Severely Errored Second Test. Check your local
procedures to determine the duration of this test.
Bit errors do not occur very often on pairs that are properly prequalified.
Bit errors usually indicate problems with either the line or the equipment.
© National Instruments Corporation
1-11
NI 6830 User Manual
Chapter 1
Using the NI 6830 Basic Rate ISDN Tester
Figure 1-9 shows the Bit Error Rate Test dialog box.
Figure 1-9. Bit Error Rate Test
The Bit Error Rate Test dialog box has the following setup options:
•
Phone number—Type in the number to dial or use the down arrow
button to select the telephone number to dial. You can select recently
dialed numbers, numbers for this location, or stored numbers. You can
add phone numbers to the list under Options»Stored Numbers.
•
Channel—Use the down arrow button to select the bearer channel, B1
or B2, or to select Auto-select, allowing the NI 6830 to choose the
channel.
•
Bearer—Use the down arrow button to select the bearer
service—either 64 kbps data or speech.
•
Pattern—Use the down arrow button to select the pseudorandom
pattern PRN9 (511 bits), PRN11 (2047 bits), or PRN15 (32767 bits)
you want to send.
•
Test time—Use the down arrow button to select the duration of the Bit
Error Rate Test at either 1 min, 5 min, 15 min, or 1 hour. You can also
choose to run the test continuously or to enter a custom period of time.
Click the Call button when you are ready to start the Bit Error Rate Test.
While the test is running, you see the elapsed time in the status bar and the
NI 6830 User Manual
1-12
© National Instruments Corporation
Chapter 1
Using the NI 6830 Basic Rate ISDN Tester
results as they are calculated. You also have the following options while
running the test:
•
Inject Bit Error—Click this button to inject a single bit error into the
transmitted bit stream. You should then see the number of detected bit
errors increase by one.
•
Reset Counters—Click this button to reset all test results to zero.
•
Stop—Click this button to stop the test.
•
View Log—Click this button to view the contents of the Bit Error Rate
Test log. The log contains parameters and results of all BERTs
obtained in the current session, as well as lost synchronization
conditions.
You see the following test results during the Bit Error Rate Test and after
the test is completed:
•
Total errors—This is the total number of bit errors.
•
Errored seconds—This is the number of seconds that had at least one
bit error.
•
Severely errored seconds—This is the number of seconds that had
substantial bit errors.
•
Unavailable seconds—This is the number of seconds that were not
available for receiving data.
•
Lost synchronization—This is the number of times that
synchronization pattern was lost during the test.
© National Instruments Corporation
1-13
NI 6830 User Manual
Chapter 1
Using the NI 6830 Basic Rate ISDN Tester
Speech and 3.1 kHz Audio Test
The Speech and 3.1 kHz Audio test is a common ISDN test used to check
the quality of speech on a B channel. As with a BERT, you can perform
either an end-to-end or a self-call test. For either test, you can listen to the
received audio on your computer speaker to verify the transmitted quality.
Figure 1-10 shows the Speech and 3.1 kHz Audio Test dialog box.
Figure 1-10. Speech and 3.1 kHz Audio Test
NI 6830 User Manual
1-14
© National Instruments Corporation
Chapter 1
Using the NI 6830 Basic Rate ISDN Tester
The Speech and 3.1 kHz Audio Test screen has the following setup
options:
•
Dialing mode—Select Overlap to dial one digit at a time, or En-bloc to
dial all the digits at one time. A keypad appears when you click the
Call button as shown in Figure 1-11.
Figure 1-11. Speech and 3.1 kHz Audio Test Showing Keypad
•
Phone number—Type in the number to dial or use the down arrow
button to select the telephone number to dial. You can select recently
dialed numbers, numbers for this location, or stored numbers. You can
add phone numbers to the list under Options»Stored Numbers.
•
Channel—Use the down arrow button to select the bearer channel,
B1 or B2, or select Auto-select, allowing the NI 6830 to choose the
channel.
•
Bearer—Use the down arrow button to select the bearer
service—either Speech or 3.1 kHz Audio.
Click the Call button when you are ready to start the Speech and 3.1 kHz
Audio test. The NI 6830 shows the call status of the call in progress in the
call status box.
© National Instruments Corporation
1-15
NI 6830 User Manual
Chapter 1
Using the NI 6830 Basic Rate ISDN Tester
Once the connection is made, you can see the name of the last file that was
audio selected in the Audio Check box. Click Send Audio Check to use the
displayed file.
Click Hang up call to end the call. Click Exit to return to the main screen.
Teleservices Verification
Teleservices verification is a test used to confirm that the central office is
programmed with the teleservices the subscriber requested. All teleservices
may not be available in your region. Check your local operating procedures
before proceeding. Figure 1-12 shows the Teleservices Test dialog box.
Figure 1-12. Teleservices Test
The Teleservices Test dialog box has the following features:
NI 6830 User Manual
•
Phone number—Type in the number to dial or use the down arrow
button to select the telephone number to dial. You can select recently
dialed numbers, numbers for this location, or stored numbers. You can
add phone numbers to the list under Options»Stored Numbers.
•
Teleservices—Click the name of the teleservice to highlight a single
service that you want to test. Click to the left of the teleservice name
to mark a teleservice to be tested with a group.You can mark several
tests and run the tests all at once.
1-16
© National Instruments Corporation
Chapter 1
Using the NI 6830 Basic Rate ISDN Tester
Click Mark All to mark all of the Teleservices. Click Clear All to
unmark all the Teleservices selected.
•
Test (highlighted service)—Click this button to run only the
highlighted test. The test button changes to correspond to the
highlighted service.
•
Test Marked—Click this button to test all the teleservices marked for
group testing. This button is gray if no tests are marked.
•
Test All—Click this button to test all of the teleservices.
•
Exit—Click this button to return to the main screen.
Supplementary Services Verification
Supplementary Services verification is a test to confirm that the central
office is programmed with the supplementary services the subscriber
requested. All these supplementary services may not be available in your
region. Check your local procedures before proceeding. Figure 1-13 shows
the Supplementary Services Test dialog box.
Figure 1-13. Supplementary Services Test
© National Instruments Corporation
1-17
NI 6830 User Manual
Chapter 1
Using the NI 6830 Basic Rate ISDN Tester
The Supplementary Services Test dialog box has the following features:
•
Phone number—Type in the number to dial or use the down arrow
button to select the telephone number to dial. You can select recently
dialed numbers, numbers for this location, or stored numbers. You can
add phone numbers to the list under Options»Stored Numbers.
•
Supplementary services—Click the name of the supplementary
service to highlight a single service that you want to test. Click to the
left of the supplementary service name to mark a teleservice for group
testing. Click Mark All to mark all of the supplementary services
numbers. Click Clear All to unmark all the supplementary services
selected.
•
Test (highlighted service)—Click this button to run only the
highlighted test. The test button changes to correspond to the
highlighted service.
•
Test Marked—Click this button to test marked for group testing
services. This selection is gray if no tests are marked.
•
Test All—Click this button to test the service selected.
•
Exit—Click this button to return to the main screen.
•
The binary value of the octet.
•
Plain text explanation of the field.
Click the Previous button to show the previous packet in the Protocol
Decode view.
Click the Next button to show the next packet in the Protocol Decode view.
Click the Close button to return to Protocol Decode.
NI 6830 User Manual
1-18
© National Instruments Corporation
Chapter 1
Using the NI 6830 Basic Rate ISDN Tester
Power Supply Checks
This test checks to see if power supply 1 (PS1) and power supply 2 (PS2)
on the S/T interface are operating correctly. Figure 1-14 shows the Power
Supply Checks screen.
Note
This test cannot be run if the U interface is selected from the Options menu.
Figure 1-14. Power Supply Checks
The following list shows possible power supply LED colors and their
meaning:
•
A green LED indicates a normal power supply.
•
A yellow LED indicates a restricted power supply.
•
A red LED indicates no power supply or that the power supply is too
high.
Click the Retest button to repeat the power supply checks.
Click the Exit button to return to the main screen.
© National Instruments Corporation
1-19
NI 6830 User Manual
Chapter 1
Using the NI 6830 Basic Rate ISDN Tester
Protocol Decode
The Protocol Decode dialog box gives you the ability to look at the layer 2
and layer 3 messages that are sent between the NI 6830 and the central
office. Figure 1-15 shows the Protocol Decode dialog box.
Figure 1-15. Protocol Decode
The Protocol Decode dialog box shows the list of messages sent and
received by the NI 6830, including the following items, shown from left to
right:
•
The sequential number of the packet, transmitted or received, since
you stated the ISDN tester.
•
The time, in seconds, since the last packet.
•
The source of the packet—either user or network (central office).
•
Service access point identifiers (SAPI) and TEIs, as well as, call
reference numbers (CRNs) with layer 3 messages.
•
An explanation of the packet type.
The following icons are in the toolbar of the Protocol Decode dialog box.
Click one of the following icons to select the desired option:
NI 6830 User Manual
•
Resume—Click this icon to continue the protocol decode after
pausing.
•
Pause—Click this icon to pause the protocol decode.
1-20
© National Instruments Corporation
Chapter 1
•
Using the NI 6830 Basic Rate ISDN Tester
Save—Click this icon to save information from the Protocol Decode
dialog box to a file. You have three choices under save:
–
Save Packet saves the list for this view only.
–
Save Full Packet Decode saves the complete packet details.
–
Save Raw Packet Data saves the raw binary data.
•
View—Click this icon to view a detailed decode of the highlighted
packet described in the next section.
•
Delete—Click this icon to clear the packet list.
•
Configure—Click this icon to configure the filters. Refer to the Filters
section for further information.
Click the Close button to return to the main screen.
Note
You can leave the Decode Packet screen active while you run other test functions
with the NI 6830.
Figure 1-16 shows the Detailed Decode Packet view.
Figure 1-16. Detailed Decode Packet View
The Detailed Decode Packet view shows the following information, from
left to right:
•
The zero-based octet number for this field.
•
The hexadecimal value of the octet.
© National Instruments Corporation
1-21
NI 6830 User Manual
Chapter 1
Using the NI 6830 Basic Rate ISDN Tester
Options
Click the Options button to change the NI 6830 settings.
The NI 6830 Options dialog box contains the following tabs:
•
Terminal—This tab sets the telephone numbers and SPIDs, if
applicable, assigned to the subscriber.
•
ISDN Interface—This tab selects the U or S/T interface for testing
and permits access to other advanced features.
•
General—This tab sets the general parameters of the ISDN tester and
the loopback features for incoming calls.
•
Stored Numbers—This tab allows you to store numbers for use in the
individual test functions.
•
Filters—This tab lets you set the protocol filters used for protocol
decoding.
•
About—This tab gives you information about the NI 6810 tester and
allows you to perform a self-test.
Click the OK button to accept changes and return to the main screen.
Click the Cancel button to cancel changes and return to the main screen.
The various options are described in detail in the following sections.
NI 6830 User Manual
1-22
© National Instruments Corporation
Chapter 1
Using the NI 6830 Basic Rate ISDN Tester
Terminal
♦
Networks without SPID
Use the Terminal tab, shown in Figure 1-17, to change the telephone
numbers assigned to the customer.
Figure 1-17. Terminal Tab without SPID
Enter the directory numbers assigned to the customer in the Customer
Numbers fields.
© National Instruments Corporation
1-23
NI 6830 User Manual
Chapter 1
Using the NI 6830 Basic Rate ISDN Tester
♦
Networks with SPID
Use the Terminal tab, shown in Figure 1-17, to change the telephone
numbers assigned to the customer.
Figure 1-18. Terminal Tab with SPID
Enter the directory numbers assigned to the customer in the Customer
Numbers fields.
NI 6830 User Manual
1-24
© National Instruments Corporation
Chapter 1
Using the NI 6830 Basic Rate ISDN Tester
ISDN Interface
Use the ISDN Interface tab, shown in Figure 1-19, to change the line
interface and other advanced settings.
Figure 1-19. ISDN Interface Tab
Use the down arrow button of the Line Interface list box to select either the
S/T or U interface. If you select the S/T interface, you can then select one
of the following items:
•
Point-to-multipoint if you can connect more than one piece of terminal
equipment (TE) to the line. This is the most common configuration.
•
Point-to-point if you can connect only one TE to the line. You may
need to specify terminal endpoint identifier if it is not zero.
Click the Advanced button, shown in Figure 1-20, to change the ISDN
protocol, SPID format, and activation timeout.
Note
Check your local procedures before changing any advanced ISDN settings.
© National Instruments Corporation
1-25
NI 6830 User Manual
Chapter 1
Using the NI 6830 Basic Rate ISDN Tester
Figure 1-20. Advanced ISDN Settings
Use the down arrow button of the Network type list box to select the
network type. You can choose any one of the following formats:
Note
•
National ISDN-1—North American format
•
Euro-ISDN— European harmonized standard
The European harmonized standard may also apply in other countries.
•
AT&T Custom—older North American format
•
Northern Telecom Custom—older North American format
•
Siemens Custom—older European format
•
NTT—Japanese format
•
VN4—older French format
•
1TR6—older German format
•
ISDN2—United Kingdom format
•
AusTel—Australian format
If you choose a network type that requires SPID, the NI 6830 prompts you
to enter the format of the SPID. Enter the format used in your area. For
example if you enter 0<>01, the software automatically generates SPID
0555123401 for a customer number of 5551234.
NI 6830 User Manual
1-26
© National Instruments Corporation
Chapter 1
Using the NI 6830 Basic Rate ISDN Tester
Adjust the pointer on the Activation Timeout bar between Short and Long
to set the time during which the NI 6830 attempts to activate the ISDN line.
The time you select displays on the screen to the right of the bar.
Click the OK button to accept changes and return to the Options dialog
box.
Click the Cancel button to cancel changes and return to the Options dialog
box.
General
Use the General tab, shown in Figure 1-21, to change general settings and
define which types of calls to loop back.
Figure 1-21. General Tab
Check each box in the General Settings box to activate or deactivate the
following options:
•
Prompt for customer numbers—The NI 6830 prompts you for the
subscriber numbers each time you run the application software.
•
Remember last customer numbers—The NI 6830 stores the dialed
numbers in memory.
© National Instruments Corporation
1-27
NI 6830 User Manual
Chapter 1
Using the NI 6830 Basic Rate ISDN Tester
Note
•
Perform power supply check when line activated—The NI 6810
automatically checks the PS1 and PS2 power supplies when the S/T
interface is activated.
•
Use full-duplex audio for speech and 3.1 kHz calls—The NI 6830
enables the use of simultaneous audio input and output. Some
computer sound cards do not support full-duplex operation.
Your PC must support full-duplex audio to use this function.
Check each box in the Loopback Incoming Calls box to activate or
deactivate the following options:
•
Data (64 kbps)—The NI 6830 loops back data calls.
•
Speech—The NI 6830 loops back speech calls.
•
3.1 kHz—The NI 6830 loops back 3.1 kHz calls.
Stored Numbers
Use the Stored Numbers tab, shown in Figure 1-22, to change the list of
stored numbers available for outward-bound calls.
Figure 1-22. Stored Numbers Tab
To add a new number to the list of stored numbers, click the Add button.
The dialog box shown in Figure 1-23 appears. Enter the number you want
NI 6830 User Manual
1-28
© National Instruments Corporation
Chapter 1
Using the NI 6830 Basic Rate ISDN Tester
to store and an optional description. The description appears along with the
number in the Phone number field in tests that require outward dialing.
Figure 1-23. Properties
To delete a number, highlight it in the list and click the Delete button.
To edit a phone number or its description, select the number in the list and
click Properties. A dialog box appears similar to the Add Number dialog
box above. From this dialog box you can edit the number or its description.
Filters
Use the Filters tab, shown in Figure 1-24, to set the protocol filters for the
Protocol Decode function.
Figure 1-24. Filters Tab
© National Instruments Corporation
1-29
NI 6830 User Manual
Chapter 1
Using the NI 6830 Basic Rate ISDN Tester
Check the Show packets from checkboxes if you want to display packets
from the user, the network (central office), or both.
You can disable the display of individual protocol messages. To hide a
particular message type, clear the checkmark next to the message name.
You can choose from the following protocols:
•
LAPD (Q.921)
•
TEI Management
•
Q.931 Messages
Click to the left of the message name to mark a message type. Click the
Mark All button to mark all the messages. Click the Clear All button to
unmark all the messages.
About
The About tab, shown in Figure 1-25, displays the version of the NI 6810
software and allows you to perform a self-test.
Figure 1-25. About Tab
NI 6830 User Manual
1-30
© National Instruments Corporation
Chapter 1
Using the NI 6830 Basic Rate ISDN Tester
Click the Self-Test button to run a diagnostic test on the NI 6810 PCMCIA
card.
Note
This self-test tests only the NI 6810 hardware and software, not the ISDN line.
© National Instruments Corporation
1-31
NI 6830 User Manual
Using the NI 6830 Sequence
Editor
2
You use the Test Sequence Editor to modify or create new test sequences
for the NI 6830. You can use it to add or remove tests, modify test
parameters, and control sequence execution.
To launch the editor, click Start»Programs»National Instruments ISDN
Tester»Test Sequence Editor.
Figure 2-1 shows the main screen of the Test Sequence Editor. The main
screen contains menus and a toolbar for easy access to common operations,
and the sequence display area. When you launch the Test Sequence Editor,
it starts with a blank test sequence. If you are creating a new sequence, you
can start adding tests immediately. To modify an existing sequence, select
Open from the File menu and chose the sequence you want to edit.
© National Instruments Corporation
2-1
NI 6830 User Manual
Chapter 2
Using the NI 6830 Sequence Editor
Figure 2-1. ISDN Test Sequence Editor
File Menu
The File menu contains operations that affect the test sequence as a whole
and includes the following items:
NI 6830 User Manual
•
New—Create a new sequence.
•
Open—Open an existing sequence.
•
Save—Save the sequence with an existing name.
•
Save As—Save the sequence with a new name.
•
Properties—Modify the properties of the sequence.
•
Exit—Exit the application.
2-2
© National Instruments Corporation
Chapter 2
Using the NI 6830 Sequence Editor
Edit Menu
The Edit menu contains operations that affect individual tests and includes
the following items:
•
Add test before—Add a new test in the sequence before the
highlighted test.
•
Add test after—Add a new test in the sequence after the highlighted
test.
•
Move Test Up—Move an existing test up in the sequence.
•
Move Test Down—Move an existing test down in the sequence.
•
Rename Test—Rename the highlighted test.
•
Delete Test—Delete the highlighted test.
•
Configure Test—Configure the highlighted test. You can also
double-click a highlighted test to configure the test.
Help Menu
The Help menu contains the About item, which you use to view
information about the Sequence Editor.
Toolbar Icons
The most common operations are also found under the toolbar icons and
include the following items:
•
New—Create a new sequence.
•
Open—Open an existing sequence.
•
Save—Save the sequence with an existing file name.
•
Add before—Add a new test in the sequence before the highlighted
test.
•
Add after—Add a new test in the sequence after the highlighted test.
•
Move up—Move the highlighted test above the previous test
•
Move down—Move the highlighted test below the next test
•
Delete—Delete the highlighted test.
•
Configure—Configure the parameters of the highlighted test.
© National Instruments Corporation
2-3
NI 6830 User Manual
Chapter 2
Using the NI 6830 Sequence Editor
Adding a New Test
To add a new test, click either the Add Before or Add After button on the
toolbar. You can add more than one instance of a test. For example, you
may want to run a Speech test twice, once on each bearer channel.
When you add a new test, you are prompted with the dialog box shown in
Figure 2-2. In the Test name field, enter a short name for this test. For
example, if you are adding a Bit Error Rate Test that you plan to run for
1 minute, you can call it 1 min BERT. Next, pick an operation you want to
perform as part of the test from the Function control. Currently, the
following operations are available:
•
Line Status Test
•
Bit Error Rate Test
•
Speech and 3.1 kHz Audio
•
Teleservices
•
Supplementary Services
•
Power Supply Checks
Figure 2-2. Add Test
You can also configure the behavior of the sequence when the test fails. The
failing condition depends on the individual test. You can choose from the
following options:
NI 6830 User Manual
•
Ask user (default)—The test sequencer notifies you that the test failed.
You can then select to either continue with the sequence or to abort
sequence execution.
•
Fail sequence and stop—The test sequence aborts the sequence
execution and considers the sequence failed.
•
Continue—The sequencer continues running the tests in sequence.
2-4
© National Instruments Corporation
Chapter 2
Using the NI 6830 Sequence Editor
When you click OK, the test is added to the sequence and shown in the test
sequence display area. You see the test name as well as the type of the
operation.
Changing Test Parameters
When you add a test, it is configured with the default parameters. For
example, the Bit Error Rate Test by default is configured to perform a
self-call, one minute test using a PRN15 (2047-bit) pattern. To change
these settings, double-click the test name or select the test and click
Configure on the toolbar. A test-specific configuration dialog box opens.
For instance, the BERT Parameters dialog box is shown in Figure 2-3.
The set of parameters you can change is similar to the BERT test dialog box
in the ISDN Tester software.
Figure 2-3. BERT Parameters
Modifying an Existing Test Sequence
To remove a test, simply highlight the test and click the Delete button on
the toolbar.
To rename a test, select the test and then choose Rename from the Edit
menu. The name of the test turns into an edit field, allowing you to change
the name of the test.
© National Instruments Corporation
2-5
NI 6830 User Manual
Chapter 2
Using the NI 6830 Sequence Editor
You can also modify the order of tests in the sequence. To move the test
closer to the start of the sequence, select the test and click the Move up
button on the toolbar. Similarly, you can move the test later in the sequence
using the Move down button.
Editing Sequence Properties
Each test sequence has a number of parameters that control the execution
of the sequence. You can configure these by selecting Properties from the
File menu. The Sequence Properties dialog box is shown in Figure 2-4.
Figure 2-4. Sequence Properties
From this dialog box you can set the following parameters:
NI 6830 User Manual
•
Description—Type in a short description of the sequence.
•
Disable STOP button during execution—Select this option if you do
not want the ability to stop during a sequence.
•
Always prompt to save results—Select this option if you want the
NI 6830 to prompt you to save the results when the execution of this
test sequence completes.
2-6
© National Instruments Corporation
Chapter 2
Using the NI 6830 Sequence Editor
Organizing Test Sequences
When you click the Run Test Sequence button in the ISDN Tester
application, it looks for available sequences in the subdirectory called
Sequences located in the directory where the ISDN Tester application is
installed.
This path is typically C:\Program Files\National Instruments
\ISDN Tester\Sequences. The Test Sequence Editor defaults to this
directory when showing file dialog boxes during open and save operations.
© National Instruments Corporation
2-7
NI 6830 User Manual
Customer Communication
A
For your convenience, this appendix contains forms to help you gather the information necessary
to help us solve your technical problems and a form you can use to comment on the product
documentation. When you contact us, we need the information on the Technical Support Form and
the configuration form, if your manual contains one, about your system configuration to answer your
questions as quickly as possible.
National Instruments has technical assistance through electronic, fax, and telephone systems to quickly
provide the information you need. Our electronic services include a bulletin board service, an FTP site,
a fax-on-demand system, and e-mail support. If you have a hardware or software problem, first try the
electronic support systems. If the information available on these systems does not answer your
questions, we offer fax and telephone support through our technical support centers, which are staffed
by applications engineers.
Electronic Services
Bulletin Board Support
National Instruments has BBS and FTP sites dedicated for 24-hour support with a collection of files
and documents to answer most common customer questions. From these sites, you can also download
the latest instrument drivers, updates, and example programs. For recorded instructions on how to use
the bulletin board and FTP services and for BBS automated information, call 512 795 6990. You can
access these services at:
United States: 512 794 5422
Up to 14,400 baud, 8 data bits, 1 stop bit, no parity
United Kingdom: 01635 551422
Up to 9,600 baud, 8 data bits, 1 stop bit, no parity
France: 01 48 65 15 59
Up to 9,600 baud, 8 data bits, 1 stop bit, no parity
FTP Support
To access our FTP site, log on to our Internet host, ftp.natinst.com, as anonymous and use
your Internet address, such as [email protected], as your password. The support files and
documents are located in the /support directories.
© National Instruments Corporation
A-1
NI 6830 User Manual
Fax-on-Demand Support
Fax-on-Demand is a 24-hour information retrieval system containing a library of documents on a wide
range of technical information. You can access Fax-on-Demand from a touch-tone telephone at
512 418 1111.
E-Mail Support (Currently USA Only)
You can submit technical support questions to the applications engineering team through e-mail at the
Internet address listed below. Remember to include your name, address, and phone number so we can
contact you with solutions and suggestions.
[email protected]
Telephone and Fax Support
National Instruments has branch offices all over the world. Use the list below to find the technical
support number for your country. If there is no National Instruments office in your country, contact
the source from which you purchased your software to obtain support.
Country
Telephone
Fax
Australia
Austria
Belgium
Brazil
Canada (Ontario)
Canada (Québec)
Denmark
Finland
France
Germany
Hong Kong
Israel
Italy
Japan
Korea
Mexico
Netherlands
Norway
Singapore
Spain
Sweden
Switzerland
Taiwan
United Kingdom
United States
03 9879 5166
0662 45 79 90 0
02 757 00 20
011 288 3336
905 785 0085
514 694 8521
45 76 26 00
09 725 725 11
01 48 14 24 24
089 741 31 30
2645 3186
03 6120092
02 413091
03 5472 2970
02 596 7456
5 520 2635
0348 433466
32 84 84 00
2265886
91 640 0085
08 730 49 70
056 200 51 51
02 377 1200
01635 523545
512 795 8248
03 9879 6277
0662 45 79 90 19
02 757 03 11
011 288 8528
905 785 0086
514 694 4399
45 76 26 02
09 725 725 55
01 48 14 24 14
089 714 60 35
2686 8505
03 6120095
02 41309215
03 5472 2977
02 596 7455
5 520 3282
0348 430673
32 84 86 00
2265887
91 640 0533
08 730 43 70
056 200 51 55
02 737 4644
01635 523154
512 794 5678
NI 6830 User Manual
A-2
© National Instruments Corporation
Technical Support Form
Photocopy this form and update it each time you make changes to your software or hardware, and use
the completed copy of this form as a reference for your current configuration. Completing this form
accurately before contacting National Instruments for technical support helps our applications
engineers answer your questions more efficiently.
If you are using any National Instruments hardware or software products related to this problem,
include the configuration forms from their user manuals. Include additional pages if necessary.
Name __________________________________________________________________________
Company _______________________________________________________________________
Address ________________________________________________________________________
_______________________________________________________________________________
Fax ( ___ ) ________________Phone ( ___ ) __________________________________________
Computer brand____________ Model ___________________ Processor_____________________
Operating system (include version number) ____________________________________________
Clock speed ______MHz RAM _____MB
Mouse ___yes ___no
Display adapter __________________________
Other adapters installed _______________________________________
Hard disk capacity _____MB Brand_________________________________________________
Instruments used _________________________________________________________________
_______________________________________________________________________________
National Instruments hardware product model _____________ Revision ____________________
Configuration ___________________________________________________________________
National Instruments software product ___________________ Version _____________________
Configuration ___________________________________________________________________
The problem is: __________________________________________________________________
_______________________________________________________________________________
_______________________________________________________________________________
_______________________________________________________________________________
_______________________________________________________________________________
List any error messages: ___________________________________________________________
_______________________________________________________________________________
_______________________________________________________________________________
The following steps reproduce the problem: ___________________________________________
_______________________________________________________________________________
_______________________________________________________________________________
_______________________________________________________________________________
_______________________________________________________________________________
NI 6830 Hardware and Software Configuration Form
Record the settings and revisions of your hardware and software on the line to the right of each item.
Complete a new copy of this form each time you revise your software or hardware configuration, and
use this form as a reference for your current configuration. Completing this form accurately before
contacting National Instruments for technical support helps our applications engineers answer your
questions more efficiently.
National Instruments Products
Hardware revision _______________________________________________________________
Interrupt level of hardware _________________________________________________________
Base memory address of hardware ___________________________________________________
Programming choice _____________________________________________________________
National Instruments software ______________________________________________________
Other boards in system ____________________________________________________________
Other Products
Computer make and model ________________________________________________________
Microprocessor __________________________________________________________________
Clock frequency or speed __________________________________________________________
Type of video board installed _______________________________________________________
Operating system version __________________________________________________________
Operating system mode ___________________________________________________________
Programming language ___________________________________________________________
Programming language version _____________________________________________________
Other boards in system ____________________________________________________________
Base I/O address of other boards ____________________________________________________
DMA channels of other boards _____________________________________________________
Interrupt level of other boards ______________________________________________________
Documentation Comment Form
National Instruments encourages you to comment on the documentation supplied with our products.
This information helps us provide quality products to meet your needs.
Title:
NI 6830 User Manual
Edition Date:
December 1998
Part Number:
322024A-01
Please comment on the completeness, clarity, and organization of the manual.
_______________________________________________________________________________
_______________________________________________________________________________
_______________________________________________________________________________
_______________________________________________________________________________
_______________________________________________________________________________
_______________________________________________________________________________
_______________________________________________________________________________
If you find errors in the manual, please record the page numbers and describe the errors.
_______________________________________________________________________________
_______________________________________________________________________________
_______________________________________________________________________________
_______________________________________________________________________________
_______________________________________________________________________________
_______________________________________________________________________________
_______________________________________________________________________________
Thank you for your help.
Name _________________________________________________________________________
Title __________________________________________________________________________
Company _______________________________________________________________________
Address ________________________________________________________________________
_______________________________________________________________________________
E-Mail Address __________________________________________________________________
Phone ( ___ ) __________________________ Fax ( ___ ) _______________________________
Mail to: Technical Publications
National Instruments Corporation
6504 Bridge Point Parkway
Austin, Texas 78730-5039
Fax to:
Technical Publications
National Instruments Corporation
512 794 5678
Glossary
Prefix
Meaning
Value
p-
pico
10 –12
n-
nano-
10 –9
µ-
micro-
10 – 6
m-
milli-
10 –3
k-
kilo-
10 3
M-
mega-
10 6
G-
giga-
10 9
t-
tera-
10 12
Numbers/Symbols
2B1Q
The U interface line code used in NI1 (National Implementation) ISDN and
Euro-ISDN.
4B3T
An older U interface line code found in Europe, but not used with
Euro-ISDN.
A
AMI
alternate mark inversion—An older U interface line code used in North
America, but not part of National Implementation ISDN.
analog signals
Electrical signals that are a copy or analog of speech or data. A POTS
telephone set converts speech into analog signals. A POTS modem
translates data into analog signals.
AT&T custom
An older AMI-based U interface line used in North America with some
AT&T switches, but not part of National Implementation ISDN.
© National Instruments Corporation
G-1
NI 6830 User Manual
Glossary
B
B channel
One of two bearer channels available on a basic rate ISDN line for carrying
voice or data. Each B channel carries 64 kbps of data.
BRI
basic rate ISDN—The basic ISDN service available to subscribers. BRI is
made up of two B channels and one D channel.
C
central office
The location where telephone company switches are located.
D
D channel
A third channel on basic rate ISDN used mainly for signaling between the
subscriber and the central office. The D channel carries 16 kbps of data.
digital signals
Electrical signals that use discrete voltage levels to represent the amplitude
of an analog signal at any point in time. The digital signals are transmitted
on the telephone line then converted back to electrical signals at the far end.
Digital signals are not affected by noise as much as analog signals.
I
ISDN
integrated services digital network—ISDN offers a large number of voice
and data services that have been integrated onto a single line. ISDN is
transmitted by digital signals over the public telephone network.
L
Layer 1 (physical layer)
The protocol layer that is responsible for managing the flow of raw data on
the ISDN line.
Layer 2 (data layer)
The protocol layer that is responsible for initiating ISDN calls. Layer 2
adds addresses and controls to the data in the ISDN signal.
NI 6830 User Manual
G-2
© National Instruments Corporation
Glossary
Layer 3 (network layer)
The protocol layer that is responsible for the setup of ISDN call. Layer 3
adds messages to communicate between the subscriber and the central
office switch. For example, setting up a call between two ISDN subscribers
through a central office switch would involve the following exchange of
messages:
The Caller sends a SETUP message to the Switch.
The Switch replies with a CALL PROC (proceed) message to the Caller.
The Switch sends a SETUP message to the Receiver.
The Receiver replies with an ALTERTING message to the Switch.
The Switch sends an ALERTING message to the Caller.
The Caller sends a CONNECT message to the Switch.
The Switch sends a CONNECT message to the Receiver.
The Receiver sends a CONNECT ACK (acknowledge) message to the
Switch.
The Switch sends a CONNECT ACK (acknowledge) message to the Caller.
line code
A means of encoding digital data. 2B1Q uses four signal levels to encode
data. AMI uses three signal levels to encode data.
N
NT1
network termination 1—A device that converts the two-wire U interface
from the central office to the four-wire S/T interface of the customer
terminal equipment.
northern telecom custom An older U interface line found in North America with some DMS central
office switches, but not used with National Implementation ISDN.
P
POTS
plain old telephone service—The basic analog telephone service found in
the world.
protocols
Basic rules for sending digital data on an ISDN line, similar to the rules of
a language for putting letters together to form words and words together to
form sentences.
© National Instruments Corporation
G-3
NI 6830 User Manual
Glossary
S
S/T Interface
The four wires (two pairs) that run from the network termination to the
customer’s ISDN equipment. Data on the S/T interface is independent of
the U interface line coding (2B1Q, 4B3T, etc.).
SAPI
service access point identifier—A Layer 2 message that identifies the
origin of ISDN data.
SPID
service provider ID—An identification code that must be sent to setup the
ISDN call. The SPID usually consists of the telephone number plus
additional digits to identify different ISDN services. If the SPID is not sent
correctly, the call will initiate at Layer 2, but will not setup at Layer 3.
SPIDs are used in North America, but not in most of the rest of the world.
supplementary services
Additional ISDN services available in some areas. These services must be
enabled in both the central office switch and the customer equipment.
Supplementary services include:
calling line identification presentation (CLIP)
calling line restriction (CLIR)
direct dial in (DDI)
multiple subscriber number (MSN)
subaddressing (SUB)
T
TA
terminal adapter—A device or circuit that lets non-ISDN devices function
on the S/T interface.
TE1
terminal equipment 1—Any equipment on the S/T bus that is designed to
work directly with ISDN.
NI 6830 User Manual
G-4
© National Instruments Corporation
Glossary
teleservices
Additional ISDN services available in some areas. These services must be
enabled in both the Central Office switch and the customer equipment.
Teleservices include:
Telephony
Telefax, and Telefax 4
Teletex
Videotex
Mixed mode teletex/telefax
OSI
Telex
TEI
terminal endpoint identifier—A Layer 2 message that identifies the
destination for ISDN data.
U
U Interface
The single pair that runs from the central office (or remote cabinet) to the
customer’s Network Termination device.
© National Instruments Corporation
G-5
NI 6830 User Manual
Index
A
E
About tab, Options dialog box, 1-30 to 1-31
adding new tests, 2-4 to 2-5
audio test. See Speech and 3.1 kHz Audio Test.
Edit menu, NI 6830 Sequence Editor, 2-3
Editor. See NI 6830 Sequence Editor.
electronic support services, A-1 to A-2
e-mail support, A-2
B
F
Bit Error Rate Test (BERT), 1-11 to 1-13
Bit Error Rate Test dialog box (figure), 1-12
end-to-end test, 1-11
options while running test, 1-13
self-call test, 1-11
setup options, 1-12
test results, 1-13
Bit Errored Second Test (BEST), 1-11
bulletin board support, A-1
fax and telephone support numbers, A-2
Fax-on-Demand support, A-2
File menu, NI 6830 Sequence Editor, 2-2
Filters tab, Options dialog box, 1-29 to 1-30
FPT support, A-1
G
General tab, Options dialog box, 1-27 to 1-28
C
H
Channels box, on status bar, 1-6
conventions used in manual, iv
customer communication, A-1 to A-2
customer numbers, setting general preferences
for, 1-27
Customer Numbers dialog box
networks with SPID, 1-4
networks without SPID, 1-3
Help menu, NI 6830 Sequence Editor, 2-3
I
Interface box, on status bar, 1-4 to 1-5
ISDN Interface tab, Options dialog box,
1-25 to 1-27
Advanced ISDN settings, 1-26
Network types, 1-26
S/T interface, 1-25
ISDN Test Sequencer screen, 1-9 to 1-10
illustration, 1-9
NI ISDN Test Sequencer dialog box, 1-10
D
deleting test sequence, 2-5
Detailed Decode Packet view, 1-21
directory numbers
changing in Terminal tab
networks with SPID, 1-4, 1-24
networks without SPID, 1-3, 1-23
entering for startup tests, 1-3
© National Instruments Corporation
I-1
NI 6830 User Manual
Index
L
NI 6830 Sequence Editor, 2-1 to 2-7
adding new test, 2-4 to 2-5
changing test parameters, 2-5
Edit menu, 2-3
editing sequence properties, 2-6
File menu, 2-2
Help menu, 2-3
launching, 2-1
main screen
contents, 2-1
illustration, 2-2
modifying existing test sequence,
2-5 to 2-6
organizing test sequences, 2-7
toolbar icons, 2-3
NI ISDN Test Sequencer dialog box, 1-10
launching NI 6830 Sequence Editor, 2-1
LEDs
Channels box, 1-6
Interface box, 1-5
Power Supply box, 1-6
Power Supply Checks screen, 1-19
Loopback Incoming Calls box, 1-28
N
Network types, in Advanced ISDN Settings
dialog box, 1-26
NI 6830 Basic Rate ISDN Tester
Bit Error Rate Test, 1-11 to 1-13
main screen
illustration, 1-1
items found on, 1-2
selecting functions, 1-2
Options dialog box, 1-22 to 1-31
About tab, 1-30 to 1-31
Filters tab, 1-29 to 1-30
General tab, 1-27 to 1-28
ISDN Interface tab, 1-25 to 1-27
Stored Numbers tab, 1-28 to 1-29
Terminal tab, 1-23 to 1-24
Power Supply Checks, 1-19
Protocol Decode dialog box, 1-20 to 1-21
Run Test Sequence, 1-6 to 1-10
running self-test, 1-31
Speech and 3.1 kHz Audio Test,
1-14 to 1-16
starting, 1-1
startup tests, 1-2 to 1-4
status bar, 1-4 to 1-6
Supplementary Services Verification
dialog box, 1-17 to 1-18
Teleservices Verification dialog box,
1-16 to 1-17
NI 6830 User Manual
O
Options dialog box, 1-22 to 1-31
About tab, 1-30 to 1-31
Filters tab, 1-29 to 1-30
General tab, 1-27 to 1-28
ISDN Interface tab, 1-25 to 1-27
Stored Numbers tab, 1-28 to 1-29
Terminal tab, 1-23 to 1-24
order of test sequence, changing, 2-6
organizing test sequences, 2-7
P
parameters for tests, changing, 2-5
phone numbers. See telephone numbers.
Power Supply box, on status bar, 1-6
Power Supply Checks
purpose and use, 1-19
setting preferences, 1-28
properties of test sequence, editing, 2-6
Protocol Decode dialog box, 1-20 to 1-21
Detailed Decode Packet view, 1-21
icons on toolbar, 1-20 to 1-21
I-2
© National Instruments Corporation
Index
starting
NI 6830 Basic Rate ISDN Tester, 1-1
NI 6830 Sequence Editor, 2-1
startup tests, 1-2 to 1-4
networks with SPID, 1-3 to 1-4
networks without SPID, 1-2 to 1-3
status bar, 1-4 to 1-6
Channels box, 1-6
illustration, 1-4
Interface box, 1-4 to 1-5
Power Supply box, 1-6
Stored Numbers tab, Options dialog box,
1-28 to 1-29
Supplementary Services Verification dialog
box, 1-17 to 1-18
Sync LED, in Interface box, 1-5
illustration, 1-20
information displayed on, 1-20
setting filters using Filters tab,
1-29 to 1-30
protocol filters, setting, 1-29 to 1-30
R
Ready LED, in Interface box, 1-5
removing test sequence, 2-5
renaming test sequence, 2-5
Run Test Sequence dialog box, 1-6 to 1-10
ISDN Test Sequencer screen, 1-9 to 1-10
illustration, 1-9
NI ISDN Test Sequencer dialog
box, 1-10
networks with SPID, 1-8
networks without SPID, 1-7
T
technical support, A-1 to A-2
telephone and fax support numbers, A-2
telephone numbers
changing in Terminal tab
networks with SPID, 1-3, 1-24
networks without SPID, 1-4, 1-23
Customer Numbers dialog box
networks with SPID, 1-4
networks without SPID, 1-3
entering for startup tests, 1-2 to 1-3
Stored Numbers tab, 1-28 to 1-29
Teleservices Verification dialog box,
1-16 to 1-17
Terminal tab, Options dialog box, 1-23 to 1-24
changing telephone numbers
networks with SPID, 1-3, 1-24
networks without SPID, 1-4, 1-23
test parameters, changing, 2-5
Test Sequence Editor. See NI 6830
Sequence Editor.
S
self-test for NI 6830 Basic Rate ISDN
Tester, 1-31
Sequence Editor. See NI 6830
Sequence Editor.
sequences. See test sequences.
service provider identifiers. See SPIDs
(service provider identifiers).
Speech and 3.1 kHz Audio Test, 1-14 to 1-16
dialog box (figure), 1-14
keypad (figure), 1-15
setting full-duplex audio, 1-28
setup options, 1-15
SPIDs (service provider identifiers)
changing directory numbers in Terminal
tab, 1-4, 1-24
changing telephone numbers in Terminal
tab, 1-3, 1-24
entering for startup tests, 1-3 to 1-4
Run Test Sequence dialog box, 1-8
© National Instruments Corporation
I-3
NI 6830 User Manual
Index
test sequences. See also Run Test Sequence
dialog box.
adding new test, 2-4 to 2-5
changing test parameters, 2-5
editing properties, 2-6
modifying, 2-5 to 2-6
organizing, 2-7
toolbar icons
NI 6830 Sequence Editor, 2-3
Protocol Decode dialog box, 1-20 to 1-21
NI 6830 User Manual
I-4
© National Instruments Corporation