1
1
Proteus Tutorials
I. Creating a Proteus Session: The Basics
In this tutorial we’ll create, edit, save and download a session into Proteus. If you
haven’t already installed at least Version 1.7 of the Proteus Editor and Operating
System, please do so before starting, as we will be discussing some features only
found in that release.
The process of creating and editing a new session includes the following basic steps:
1) Create and name a New File
2) Insert segment(s) into that file
3) Edit each segment
4) Test segments in realtime using PC mode (optional)
5) Save the finished session
6) Transfer it to Proteus, alone or as part of an Album.
1. Create and name a new file. Follow these steps:
a. Open Proteus Session Editor, and click on the New File button. A single
segment will appear at the bottom of the screen.
b. Save your session by clicking the Save File button, typing in a filename,
and selecting (if necessary) the directory folder that the session will be
stored in.
2. Insert segment(s) into the session. Click the Insert Segment button. All
Proteus sessions require at least two segments in order to allow both “soft on” and
“soft off” to be used. The settings you see are arbitrary. However, each time you
insert a new segment, it will contain the same values as the segment which precedes
the insertion point. Your new segment will be inserted below the heavy black
horizontal line; this always appears below the currently selected segment. You select
a segment by clicking your mouse on it; it changes color when you do this as an
additional cue.
3. Edit each segment. This is where things get more complicated, because there
are so many options available to you. The following is a brief guide to what they are
and how to use them. But first, a brief review of what a segment is.
2
A segment is the basic organizational unit of the session. It can be run for one
second or many minutes, and is bounded by the light/sound pulse rates and
brightness levels at the beginning and at the end of the segment. For example,
suppose you have constructed a twenty second segment with the following
parameters:
Red light pulse rate starts at 7.83 hz and ends at 40.0 hz;
Red light brightness starts at 2 (low brightness) and ends at 15 (maximum
brightness);
Green light pulse rate starts at 40.0 hz and ends at 7.83 hz;
Green light brightness starts at 7 (middle brightness) and ends at 7.
[Note: the red channel is called “LFO 1” and the green one “LFO 2”; this is because
you can use other color combinations with Proteus, such as red + blue.]
The Proteus software automatically calculates all of the values in between the starting
and ending values as a linear ramp.
Segment Parameters. Each segment can have a variety of other parameters
assigned to it:
Sound Pitch. Use this to tune the audio waveform. Frequency range is from
40.0 to 600.0 hz, and it can smoothly ramp from one pitch to another during the
segment.
Time. Use this to control how long the segment will run for.
Light Frames and Sound Active checkboxes. These control whether the sound
and light are active during the selected segment.
Soft On and Soft Off checkboxes. Determines whether the currently selected
segment will run through a “soft on” or “soft off” phase; this can be set independently
for both light(frames) and sound. You cannot include both soft on and soft off in a
single segment.
Bin. Beat. Check this box if you want the selected segment to include binaural
beats. This works best when the audio waveform is a sine wave; this is Sound Table
1 if you are using the tables which were preloaded into Proteus at the factory.
Dual LFOs. Check this box if you want to assign different pulse rates to the
two color channels. If you leave this unchecked, Proteus will automatically assign
Channel 1 frequency information to channel 2. However, you will still be able to
control Channel 1 and 2 brightness information independently. Leave this box
3
unchecked if you want the frequencies to be locked together—it will save you some
time.
Sync. This checkbox is only available if you have not checked the Dual LFOs
box. That is, it only works when the two channels are frequency-locked together. If
you select this feature, then the lights will alternate between the two colors (redgreen-red-green…) every pulse. Use this to create especially vivid visuals, or if you
are using monochrome lightframes it will alternate left/right.
Do Spcl LF1, etc. These are “supplemental” commands, which allow even finer
control of certain parameters than normally available; they can be only be used with
fixed rather than varying frequencies, and will be described in detail in a later tutorial.
No BioFd Ctrl. If you have inserted a biofeedback segment into your session,
but don’t want it to affect a specific segment, then check this box.
Sound Table. Last—but by no means least—are the Sound Table selection
boxes. The first table is a sine wave (pure tone with no harmonics), which is what
you should use for binaural beats. The other tables include a sampler of other “tone
colors”.
[Note: A later tutorial will describe how to create and use your own sound tables
(sometimes called “wavetables”).]
4. Test segments in real time. One of the most powerful features of the Proteus
Editor program is its real time preview capability. This basically gives you the fast
feedback and control you would expect with a PC-resident system, together with the
portability of the very compact Proteus. With the “View Realtime” command you can
preview a single segment, or group of segments, or the entire program. You can also
quickly toggle between the Start and Finish parameters. Here’s the sequence of
events:
1. Connect Proteus to your PC and select the serial port you’re using if you haven’t
already done so (using the Serial Port popdown menu)
2. Turn Proteus on and press the Mode (middle) button until the display reads PC
3. Select a segment to preview by clicking on it once (or select several segments by
clicking on the first and while holding the button down, dragging the mouse pointer
over all of the segments you wish to select).
4. Click on the “View Realtime” button; this will cause several new buttons to appear
on the upper right side of the Session Editor window (Run Segment, Run Segments,
Run Session, and Cancel). Select an appropriate one. A bar appears at the top left,
showing you which segment in the selected segment group (if this is what you’ve
chosen to do) is being run. You can cancel the preview at any time.
4
Tip: Once you’ve run a segment you can click on the Start or Finish portion of
any segment and Proteus will immediately “play” those parameters. (Actually,
Proteus “crossfades” between sound tables at the boundary between segments to
smooth the transition between them)
5. Save the finished session. Once you’re through experimenting, simply select
File/Save As and type in a filename. Now you’re ready to transfer it into Proteus.
6. Transfer it to Proteus. The example I’m going to give here is how to transfer a
single session into the User memory bank; we’ll get into albums and how they work in
a later tutorial. Here are the steps:
a.Be sure Proteus is in DL mode.
b.Open the Session Manager (by clicking the Session Mangr. Button)
c.Click on Open New Album, then select the session you’ve just created
d.Click Add To List; the session name should now appear in the right window
(the large one underneath Album Name)
e.Select Send To User Area. The session data will now transfer to the User
Area as U01.
That’s all there is to it! You’re ready to run the session you’ve just downloaded.
Note: remember that whenever you download any number of programs into either
the Program or User memory bank, it will erase any programs currently residing in
that bank. We prefer to leave the default session bank in the Pxx (Program) bank, and
to transfer the ones we're experimenting with into the Uxx (User) bank.
With the addition of the User memory area, the total number of programs you can
store in Proteus increases to 199!
5
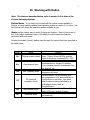
II: Working with Modes.
Note: The features described below refer to version 2.0 or later of the
Proteus Operating System.
Proteus Modes. If you have not yet explored the various modes available in
Proteus, or have recently updated your operating system to version 2.0 or later, this
brief tutorial will review the operating modes available to you.
Modes are the various ways in which Proteus can function. Much of the power of
the three-button interface is due to this ability to quickly select the features
associated with each mode.
Pressing the middle ('mode') button steps through the various functions described in
the table below.
Mode
Pxx
Uxx
Usr
PC
AS
DL
Name
Function
One of two separate program storage
Program memory bank areas. Proteus ships with fifty sessions
stored in this area, numbered P00 – P49.
A second internal memory area,
recommended for storage of sessions
User memory bank
you’ve created yourself, downloaded from
the Internet, etc.
Use this mode to select individual
User (manual) mode
frequencies by hand.
Use this mode if you are creating your
own programs on a PC and would like to
PC (personal
preview them in real time. Also used
computer) mode
when Proteus is being controlled by a
biofeedback device, such as
ThoughtStream.
Use this to play AudioStrobeR encoded
AudioStrobe mode
audio (CD’s, etc.) through Proteus.
For downloading firmware (OS) upgrades
Download mode
and session(s).
6
Here's a description of how each of the modes operate:
Pxx
1. Press the Mode Select (middle) button until the display reads “Pxx”, where
“xx” is a number between 01 and 99. (Program 00 is permanently set as the
“random” program).
2. Select a session by pressing the bottom button. A single press causes the
display to increment one step at a time, while pressing and holding it causes
the display to increment automatically. Notice that the rate at which the
session number is displayed speeds up when you hold the button down.
3. TIP: you can cause the display to decrement rather than increment if you
press the Start (top) button together with the bottom button. Be sure you
press and hold the bottom button first then press the top button.
4. Press the Start (top) button to start a session.
Uxx
1. Press the Mode Select (middle) button until the display reads “Uxx”,
where “xx” is a number between 00 and 99.
Note: If there are no sessions stored in the Uxx area or if they have been
overwritten by a download to the “Pxx” area the Proteus will not display the “Uxx”
mode.
2. Select a session by pressing the bottom button. A single press causes the
display to increment one step at a time, while pressing and holding causes the display
to increment automatically. Notice that the rate at which the session number is
displayed increases as you hold the button down.
3. TIP: you can cause the display to decrement rather than increment if you
press the Start (top) button together with the bottom button. Be sure you press and
hold the bottom button first then press the top button.
4. Press the Start (top) button to start a session.
7
USr
Use this mode to manually select and run specific frequencies without the use of a PC
connection.
1. Press the Mode Select button until the display shows "Usr".
2. Press the Start/Stop (top) button once. The light and sound will begin an eight
second soft-on sequence. If you press it twice the soft-on sequence will be skipped
and the session will begin at full brightness and volume.
At this point, the lights and sound will run steadily at whatever frequency is shown in
the display. If you'd like to change to another pulse rate, or between on/off and
left/right modes, do this:
3. Press and hold the select key to increment the current flash rate in 0.1 hz
increments.
TIP: you can cause the display to decrement rather than increment if you press the
Start (top) button together with the bottom button. Be sure you press and hold the
bottom button first then press the top button.
4. Press the mode/pause key to toggle between LightFrame+audio on/off and
left/right. If the left and right decimals on the display are flashing left/right, then so
are the lights and sound.
Note: While in user mode you can also adjust the LightFrame color mode or switch
between external audio and digital data input.
5. You can change the audio pitch by holding down the middle and bottom buttons at
the same time. The pitch will increase to 400 Hz then shut off for one second before
starting over at 40 Hz. The pause is for those people who want to use external audio
without any internal sound.
PC
This powerful feature, introduced with the release of version 1.6 of the Proteus
operating system, is used for two primary functions: real-time preview of sessions
you are editing with Proteus Editor, and for setting Proteus to be controlled via
biofeedback (initialu, ThoughtStream). To use this mode, just press Mode Select
until PC is displayed, and follow the instructions in your software documentation for
proper use of this mode.
8
AS
AudioStrobeR is one of the most powerful features included in Proteus. When you
select this mode, any AudioStrobe-encoded compact disc will control the LightFrames,
allowing precise synchronization between the lights and the audio on the disc.
We've included an AudioStrobe sampler CD with your system, and suggest that you
explore this disc to gain a clear idea of what it is capable of. Contact your dealer for
more information about the various available titles.
Tip: for best results, connect the Proteus audio input to the line output on your CD
player. Then plug your headphones into the headphone jack on your CD player.
Eliminating the audio path through Proteus improves the audio quality of your
experience.
To use AudioStrobe:
1. Press the Mode Select (middle) button until the display reads “AS”.
2. Connect your audio source (CD player or PC) to the AUX input on the lower right
side of Proteus.
3. Start your CD and settle back! Use the volume control on your CD player to
adjust the audio volume; light brightness is adjusted as usual via the top right control
knob on Proteus.
dL
Use this mode to download sessions and operating system upgrades into Proteus.
You will always know if data is actually making its way into the system because the
display digits will rapidly change during download.
To use this mode, select it by pressing the Mode Select button. Then follow the
instructions included with the reference guide included with the operating system
version you are currently using.
9
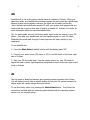
Tutorial: Using the Randomize feature with Proteus Editor
The Random Options feature of Proteus Editor allows you to select a group of
segments within a session (or even the entire session) and automatically and
randomly vary certain of the segment parameters within ranges you’ve set. Some of
the applications for this feature include:
•
•
•
Quickly creating novel, visually interesting stimulation paradigms
Varying the precise stimulation frequency within a target band (for example,
alpha)
Creating broadband stimulation protocols for overall activation (this approach is
called “Brain Brightening” by Dr. Thomas Budzynski)
This tutorial will describe how to create your own randomly-varied programs, using
the above three applications as examples.
You can access the Random Options via the Utilities menu. Two menu items are
available: Randomize Selected Segments, and Edit Random Preferences. The first
step in creating a program with randomized parameters is to select which of the
parameters will be affected. Choices available include Channel 1 (red light) and 2
(green or blue light) frequency range and brightness, audio pitch, and segment time.
In every case you choose maximum and minimum values, which set the range within
the randomization will take place. An important detail is that the light frequencies are
varied in one-tenth hertz increments; this is important when the goal is to stimulate a
particular frequency range (for example, the 13-15 hz “peak performance” frequency
range) since the most effective stimulation frequency for a give person is not likely to
happen to be an integer.
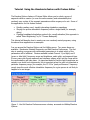
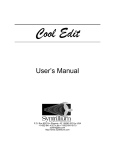
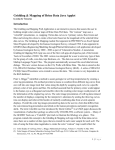
Figure 1: the Set Random Preferences menu choices, accessed via Utilities/Random
Options.
10
Notice also that each parameter has a check box associated with it, so you don’t have
to randomize all of the parameters in order to use this function.
Example 1: exploring visual imagery
In this exercise we’ll create a 50 segment session with a broad range of visual
stimulation frequencies—but all are within the 8 to 13 hz range within which the most
interesting “patterns” seem to appear.
Step 1: Create a new file. Do this either by clicking the “New File” button on the
button bar at the top of the Proteus Editor screen; using File/New; or pressing F1.
When the dialog box asking how many segments for the session appears, enter 50.
Step 2: Select all segments. Do this either via Edit/Select All or by pressing CtrlA.
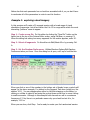
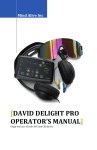
Step 3: Set the Random Preferences. Utilities/Random Options/Edit Random
Preferences takes you there. Once this dialog box is open, set it up to look like this:
When you click on one of the numbers in the bottom set of display boxes, controls will
appear (in the above example, I’ve clicked on the Segment Time max. length box, the
number 10.0). You can change values either by left-click-dragging on the sliders, or
clicking on a slider to select it and using the up and down arrow keys to move it along
is small increments. Although in this example both channels are set to a maximum
frequency of 13 hz, there is no particular reason why you should not set it to, for
example, 13.3 hz.
When you are done, click Okay. You’re ready to create your first randomized session.
11
Step 4: Create a new session. Left-click the New File button, and enter 100 for
the number of segments in the session. Next, select Edit/Select/All (or Ctrl-A) to
select all the segments for randomization. Finally, choose Utilities/Random
Options/Randomize Selected Segments (or Ctrl-R). Notice what has happened to the
values entered into the various segments. Each time you Randomize Selected
Segments all (more precisely, nearly all) of the numbers will change to new values.
Step 5: Save the session. Finally, save the session in preparation for uploading to
the Proteus using the File/Save As (or Shift-F3) and save it into a folder, preferably a
subfolder of the Proteus Editor. Try randomizing these 100 segments again several
times, saving each with a new name; this way, you can collect them into an album
and upload a group of them to the Proteus for later experimentation.
Variations:
•
•
•
•
Open the Edit Random Preferences dialog box again and change the minimum
and maximum times—for example, to between 4 and 15 seconds.
Select the first 50 segments (by left-clicking in the “1” Segment Number box
and dragging downwards until the first 50 segments are highlighted) and
randomize them with one set of times, then change the times in the Edit
Random Preferences dialog, select the second 50 segments, and randomize
those.
Set the Channel 1 frequency range to a slightly different set of values than
Channel 2; for example, 8.5 to 12.5 hz.
Set Channel 2 (green or blue) to vary between brightness levels 9 and 12,
while Channel 1 varies between 0 and 15.
When running a visualization session created in this manner, notice when the visuals
are especially interesting, then take your glasses off and notice where you are in the
program time. You can then locate which segment was running by clicking through
the segments while watching the Time To End of Selected Segment box at the bottom
right of the Proteus Editor main window.
In this way you can begin constructing “libraries” of visual effects—segments which
are especially powerful or visually interesting.
Exercise 2: Varying frequencies within a target band
In this exercise we’ll create a program which varies only within a limited frequency
range—high alpha (in this case, 12-14 hz). This is a range which some researchers
have correlated with enhanced cognitive performance, so it is possible that increasing
the amplitude in this range could lead to enhanced cognitive performance.
12
Also, let’s set the brightness range fairly high—since our goal here is stimulation
rather than visualization. Try starting with 12-15 for the brightness range for both
colors; the reason for not simply setting them both to maximum is that some variation
in brightness can increase overall attention, as the brain automatically increases
attention when sensory stimulation changes noticeably. Also, set the segment times
to shorter intervals—say, one to five seconds per segment. This will allow more rapid
activation of networks close to one another in resonant frequency.
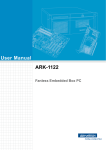
Here’s how the Random Settings should appear:
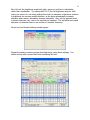
Repeat the session creation process described above, using these settings. You
should end up with a screen that looks something like this:
13
Notice that the total session time in this case is only 4 minutes 35 seconds long—you
might find experimentation with short sessions like this beneficial, since it is usually
much easier to find an extra five minutes for a session during the day than, say, half
an hour!
Variations:
•
•
•
Change the segment time range to longer periods—say, 2 to 8 seconds—while
keeping the total number of segments at 100.
Change the segment time range to shorter periods, such as 0.5 to 2 seconds—
but this time create a session with 400 segments.
Narrow or broaden the frequency range. For example, set the frequencies to
12.5 and 13.5 hz. Notice how you feel during and after this session and
compare it to the earlier 12 to 14 hz example. Does one of them make you
feel better than the other? Compare a 12.5 to 13.5 hz session to another set
to 13.5 to 14.5 hz. Which one makes you feel more alert?