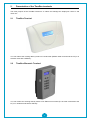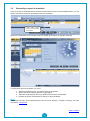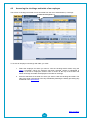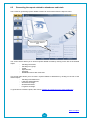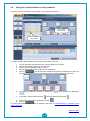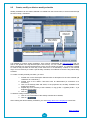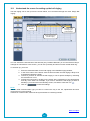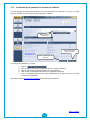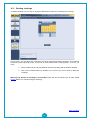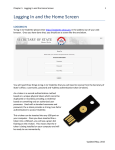
1
TIMEBOX User support BODET Software CS 40211 Boulevard du Cormier F - 49302 CHOLET Cedex www.bodet-software.com [email protected] 1 ENGLISH Ref. 640141 C1 Pour toute remarque concernant l’utilisation de ce produit ou nos prestations, vous pouvez nous écrire à l’adresse suivante : [email protected] TABLE OF CONTENTS TABLE OF CONTENTS .......................................................................................................................... 2 IMPORTANT NOTICE............................................................................................................................. 4 GENERAL ............................................................................................................................................... 5 1. TIMEBOX APPLICATION .................................................................................................................. 5 1.1 1.2 2. Philosophy of the System .................................................................................................................. 5 About ................................................................................................................................................. 5 PRESENTATION OF THE TIMEBOX TERMINALS .................................................................................. 7 2.1 2.2 2.3 TimeBox Terminal.............................................................................................................................. 7 TimeBox Biometric Terminal .............................................................................................................. 7 Setup of the TimeBox Biometric terminal........................................................................................... 8 3. OVERALL OPERATION ................................................................................................................... 11 DESCRIPTION OF THE SCREENS ..................................................................................................... 12 1. ACCESS TO THE SOFTWARE .......................................................................................................... 12 1.1 1.2 1.3 1.4 1.5 2. Accessing the software .................................................................................................................... 13 Customising the password to access the software .......................................................................... 14 Accessing the aid manual ................................................................................................................ 15 Understanding the various entry points ........................................................................................... 16 Understanding and using the filtering of employees ........................................................................ 18 CLOSING THE SOFTWARE ............................................................................................................. 19 2.1 2.2 2.3 3. Exit the software .............................................................................................................................. 20 Save the data................................................................................................................................... 20 Transfer data from the terminal........................................................................................................ 21 CLOCKING ANOMALY .................................................................................................................... 22 3.1 3.2 3.3 4. Understand the screen of anomalies ............................................................................................... 23 Access clocking anomalies and correct them .................................................................................. 24 Generating a report of anomalies .................................................................................................... 25 CLOCKINGS AND TOTALS .............................................................................................................. 26 4.1 4.2 4.3 4.4 4.5 4.6 4.7 5. 6. Understanding the screen of clockings and totals............................................................................ 27 Accessing the clockings and totals of an employee ......................................................................... 29 Accessing the monthly clockings and totals of an employee ........................................................... 30 Modifying, entering or deleting a clocking time manually ................................................................. 31 Setting up the time display in the software ...................................................................................... 32 Modifying totals by Add/Deduct and Adding comments ................................................................... 33 Generating the reports related to attendance and totals .................................................................. 34 CLOCKING RESULTS ..................................................................................................................... 35 GLOBAL ADMINISTRATION OF CLOCKINGS AND TOTALS ................................................................... 37 6.1 6.2 6.3 6.4 6.5 7. Understanding the screen of the global administration of clockings and totals ................................ 38 Accessing clockings and totals of several employees ..................................................................... 40 Modifying or deleting manually the clocking times of one or more employees ................................ 41 Modifying the totals by Add/Deduct and inserting a comment for one or more employees.............. 42 Generating the reports related to attendance and totals .................................................................. 43 REPORTS .................................................................................................................................... 44 7.1 7.2 7.3 7.4 8. Understanding the screen for selecting the reports ......................................................................... 45 Setting up a report for one or more employees................................................................................ 46 Understanding the viewing screen of a report ................................................................................. 51 Generate a report ............................................................................................................................ 52 CREATING AND SETTING UP EMPLOYEES........................................................................................ 54 8.1 8.2 8.3 9. Understanding the screen of managing employees' file................................................................... 55 Creating a new employee’s file ........................................................................................................ 56 Modifying/deleting the parameters of an employee already created ................................................ 57 CREATE AND MANAGE SCHEDULES ................................................................................................ 58 9.1 9.2 9.3 9.4 9.5 10. 10.1 10.2 11. 11.1 11.2 12. 12.1 12.2 12.3 12.4 Understanding the screen for setting up the schedules ................................................................... 59 Understanding the operation of the various windows ...................................................................... 60 Creating, duplicating, modifying or deleting a daily schedule .......................................................... 62 Using the creation wizard of a daily schedule .................................................................................. 64 Create, modify or delete a weekly schedule .................................................................................... 65 SET UP THE BELL RINGING ........................................................................................................ 66 Understand the screen for setting up the bell ringing....................................................................... 67 Select the bell ringing of the TimeBox Biometric terminal ................................................................ 68 SETTING UP THE BELL RINGING CALENDAR ................................................................................. 69 Understanding the screen for setting up the calendar ..................................................................... 70 Setting up a lockout window ............................................................................................................ 71 GLOBAL CONFIGURATION.......................................................................................................... 72 Understanding the software setup screen ....................................................................................... 73 Understanding and setting up the results locking date .................................................................... 74 Understanding the concept of maximum range of the day............................................................... 75 Defining the roundings on clockings ................................................................................................ 77 2 12.5 12.6 13. 13.1 13.2 13.3 14. 14.1 14.2 14.3 15. 15.1 15.2 15.3 15.4 16. 16.1 16.2 16.3 17. 17.1 17.2 17.3 17.4 17.5 17.6 Defining the overtime and special hours .......................................................................................... 78 Create one or more sections............................................................................................................ 79 SETTING THE TIME ................................................................................................................... 80 Set up the summer/winter clock change .......................................................................................... 81 Manually setting the time of the TimeBox terminal .......................................................................... 82 Manually setting the time of the TimeBox Biometric terminal .......................................................... 82 SET UP THE HARDWARE............................................................................................................ 83 Understanding the screen for setting up the terminal ...................................................................... 84 Setting up the connection of the terminal......................................................................................... 85 Setting up the display of the terminal ............................................................................................... 86 SOFTWARE CONFIGURATION ..................................................................................................... 87 Understanding the software setup screen ....................................................................................... 88 Entering the data of your company .................................................................................................. 89 Customising the password to access the software .......................................................................... 90 Defining the language to use the software....................................................................................... 91 MAINTENANCE ......................................................................................................................... 92 Initializing the USB key .................................................................................................................... 93 Restoring a backup .......................................................................................................................... 94 Deleting clockings ............................................................................................................................ 95 BIOMETRICS ............................................................................................................................ 96 Advices for the use of biometrics ..................................................................................................... 97 The quality of enrolments ................................................................................................................ 98 Registering the employees by fingerprint......................................................................................... 99 Registering the employees using a badge number .......................................................................... 99 Clocking of employees using a badge (if badge reader option) ..................................................... 100 Deleting fingerprints or a badge code from the terminal ................................................................ 100 THEMATIC INDEX .............................................................................................................................. 101 GLOSSARY ........................................................................................................................................ 102 3 IMPORTANT NOTICE Your manual has been designed in order to make the use of your TimeBox software as easy as possible. ® ® Your manual can be accessed directly from the software in Adobe Reader format, clicking on However, it can also be printed in order to have a hard copy at hand. . The first part titled General explains the philosophy and overall operation of the TimeBox time and attendance management software. The next section offers a detailed description of the TimeBox capabilities, together with screen explanations. In the last part, you will find two sections that will help you make the most of this manual: The glossary for understanding the formulas or expressions used in the manual. The thematic index to simplify your search for explanations. Similarly, depending on the requirements that you have expressed, you will not necessarily have access to all the capabilities described in this manual. 4 GENERAL 1. TimeBox Application 1.1 Philosophy of the System TimeBox has been designed in order to make its use as simple and intuitive as possible. You can view the information that you are searching at first glance and on a single screen. The Web style architecture of TimeBox allows you to switch easily and rapidly from one menu to another. 1.2 About In the overbar of each screen, you can find the button which allows you to access the "About" section with a click : Access button to About 5 This screen allows you to find the following information: - The version of the TimeBox software installed on your PC, The name of your company, The software language, Your customer file number (if required), The terminal and the firmware version if you use a Biometric terminal, System start date (no data available before this date) and results locking date (no results can be recalculated before this date), The address, phone and facsimile numbers of the technical support, as well as the e-mail addresses to which you can contact us. The activated commercial options (valid number of employees and options), The information found in the About section will be useful if you contact our customer support department. 6 2. Presentation of the TimeBox terminals The main purpose of the TimeBox terminal is to collect and manage the employees' check in and check out. 2.1 TimeBox Terminal You can retrieve the clocking data by means of a serial cable (RS232 cable connected to the PC) or in wireless mode with a USB key. 2.2 TimeBox Biometric Terminal You can retrieve the clocking data by means of an Ethernet connection (RJ 45 cable connected to the PC) or in wireless mode with a USB key. 7 2.3 Setup of the TimeBox Biometric terminal Before clocking in on the terminal, you first have to enter the IP address (with option IP connection) and to register the employees. To do so, enter the main menu. Then press consecutively the F2 key on the terminal, enter the administration code (1234 by default) and finally press the E key. + 1234 + F2 E After the first connection with the software the administration code will be your software password. If you are authorised, the main menu is displayed: The sketch below will be useful for the configuration of your terminal: Welcome screen: 1 0 : 4 2 0 9 / 0 4 / 2 0 1 0 F2 Main menu: B I O = 1 N U M = 2 R E T = F 1 C O N F = 3 Return to the upper level F1 Submenu: 3 Heure E + Administration code (4 digits) + 1 H O U R S E T = 1 R E T = F 1 S H F T = 2 E T H I P = 2 B O O T = 1 P I N G = 3 1 Date and time setup (p. 82) 2 Time drifting setup (p. 82) 2 IP address, subnet mask and gateway setup I Pof the terminal (p. 9) R E T = F 1 T O T = 2 1 Clearing the terminal data 2 Total clearing (purge) of the terminal (factory settings) S O U N D ? = 1 R E T = F 1 O N ( 1 ) 1 Listen subsequently to the 5 tunes or OFF mode (p. 68) F1 Validate your choice B E E P E R ? = 1 O N R E T = F 1 1 F1 Choice between keyboard beeper ON or OFF (p. 9) Validate your choice N U M A D D = 1 R E T = F 1 D E L = 2 1 Non biometric enrolment (p. 99-100) B I O A D D = 1 R E T = F 1 D E L = 2 1 Biometric enrolment (p. 98) 2 Deleting a biometric enrolment (p. 100) 2 IP* 1 2 1 2 Purge 1 P U R G E P A R T = 1 2 Sound 1 2 Beeper *Only if IP option 1 2 E T H = 2 Deletion of a non biometric enrolment (p. 100) After 20 seconds without any activity, the display returns progressively from the sub-menus to the welcome screen. 8 2.3.1 Terminal address (with option IP connection) The default IP address of the terminal is configured at 192.168.1.233, the subnet mask at 255.255.255.0 and the gateway at 0.0.0.0. If you have to change the configuration: Press the key 3 (menu CONF=3) in the main menu to access the setup of the terminal (see above). Press the key 2 in order to scroll through the menu. Press the key 1 for setting up the IP address, then the key 2. Press the key 1 and enter the address of the terminal, confirm by pressing the E key. I P 1 9 2 1 6 8 . 0 0 1 . 1 1 5 If necessary; change the subnet mask and the gateway by proceeding in the same way. Press the key F1 to exit the submenu and start a reboot of the terminal by pressing the key 1. After the reboot, the terminal displays the welcome screen. E T H I P = 2 B O O T = 1 P I N G = 3 2.3.2 Beeper You can disable the sound of the keys. The keyboard then will stay silent while clocking or pressing a key. Press the key 3 (menu CONF=3) in the main menu. Press 4 times the key 2. Press the key 1 for setting up the beeper. Press the key 1 again to switch between ON/OFF. Press the key 1 to confirm your choice. B E E P E R ? = 1 O F F R E T = F 1 2.3.3 Adjusting the display contrast The LCD’s screen contrast can be adjusted. The contrast adjustment is activated for a maximum of 3 seconds when the terminal boots up. - Press the F1 function key to reduce the contrast, - Press the F2 function key to increase the contrast. The keys return to their main function once these 3 seconds have expired. 9 2.3.4 Error messages These are the main error messages that may be displayed by the terminal: The detected key is not a key for downloading the clockings. K E Y U N K O W N The maximum number of employees (bio + non bio) is achieved (> to 100). M A X N U M B E R E M P L O Y E E S The finger does not correspond to an employee's fingerprint. E M P L O Y E E E N R O L L E D An employee tries to clock with his badge number (or a card) although he is registered as a biometric user. N O T F U N C T I O N A U T H O R I S E D The badge number is neither in the list of badge numbers that are authorised to clock without biometric identification nor in the list of badge numbers with biometric identification. U N K N O W N C O D E The list is empty or the badge number which is being deleted does not exist. 10 N O T N O E M P L O Y E E E N R O L L E D 3. Overall operation When you start TimeBox, you must enter your password in order to connect to the application. This password was defined at the time of installation but can be modified later at any time. To understand the layout of your software screens, also refer to Access to the software. 11 DESCRIPTION OF THE SCREENS 1. Access to the software What do you want to do? Access the software Customise the password to access the software Access the help menu Understand the various entry points of the software Understand how the filters operate Go to the thematic index 12 1.1 Accessing the software When you start TimeBox, the following screen is displayed: To start TimeBox, you have to: - Enter the password in 4 characters in the field provided for this purpose, Click on the Connect button to validate. To exit the screen, click on the Cancel button. TimeBox will not be launched. Back to subject 13 1.2 Customising the password to access the software At any time, you can change the password that allows you to start TimeBox. To do so, you must click on the System | Software buttons. Then the following screen is displayed: Button to create a new password Button to cancel the password change Button to validate the new password To change your password, you must: - Click on . Click on the Former password field and enter the current password, Click on the Password field and enter the new password, Click on the Confirm field and enter the new password selected, Click on Validate to take account of the modifications or on Cancel if you do not wish to save the modifications. Back to subject 14 1.3 Accessing the aid manual There is a manual available on line for rapid access to the information that you are seeking. You can access this manual from any TimeBox screen by clicking on . Then you will display the help page of the manual where the TimeBox companion offers you to access the information specific to the screen from which you activated the help. You can also access a thematic index offering information on all the screens in the software. What do you want to do? You can also consult and print this manual by opening the PDF file supplied on the TimeBox CD-Rom, as well as in the TimeBox installation directory on the hard disk. Back to subject 15 1.4 Understanding the various entry points Your TimeBox software is as follows: This organisation is identical in most screens of the manual: Part This is the screen menu. It includes the 5 entry points of the application distributed in 3 blocks: Administration Functional block Reports Anomalies Setup Setup block System This entry point includes all the capabilities to be used on a day-to-day basis, in particular the clockings and results. This entry point includes all the printouts available in your application (clockings, totals, parameters, etc.). This entry point includes all forgotten clockings. It allows you to display and quickly correct the possible forgotten clockings for each employee. This entry point allows you to set up the items related to results processing and calculations (employees, schedules, etc.). This entry point includes the capabilities concerning the system configuration, date changes, hardware installation and maintenance. It will be mainly used for doing the maintenance of your application. Back to subject 16 Part The "master" area is used to select one or more employees in order to display the information but it is not always visible depending on the screen that is being displayed. Part The top part of the screen is the "detail" area, which allows you to view the information selected for the employee selected in the master area. Here, for example, you are viewing the clocking details for the employee selected in the master area. The Clockings, Totals and Events buttons allow you to select the items to be displayed in this area. When these buttons are in blue, the corresponding items are not displayed. On the contrary, if the buttons are in yellow, the corresponding items are displayed. This part also includes an area called "action" area. It offers all the actions available for the current screen. Here, it allows you to validate or cancel the addition or modification of a clocking and print or display clockings on a monthly basis. Part The last part is an information bar which provides access to the About or Help section, allows you to modify the size of the window or to exit the application. It is also used to indicate in which window you are (browsing aid) and displays the name, date and time, as well as the name of the TimeBox terminal used. Back to subject 17 1.5 Understanding and using the filtering of employees In many screens, the master area allows you to select the employee or group of employees for which you want to obtain information. In some screens, you cannot select directly an employee and you must select a group of employees from the Timebox filter. The main part of the screen is as shown : List of employees Selection of the filter to be applied to employees In order to make the choice simpler, you can apply a filter to the list of employees (or to the list of employees with anomalies for the screen of anomalies). When clicking on , the pop-down menu offers 4 filters: - All employees (the list of employees is not filtered), - One or more employees (the list of employees can be filtered using the name, first name, id. number and/or badge number), - Sections (you can display the employees from one or more sections), - Schedule (you can display the employees assigned to one or more weekly schedules). The employee is selected with a simple click on the desired employee. Then the matching line is highlighted in orange. When you can select several employees, the filtering principle remains the same; however, the employees are selected by activating the corresponding boxes: Box to be activated to select the employee List of employees Selection of the filter to be applied to employees Link for selecting or deselecting all employees The two additional links All and None at the bottom of the screen, allow you to deselect all employees or select all filtered employees. NOTES: When switching from one entry point to another, the selected filter and the sorting of employees are preserved. The employees can be sorted in alphabetical order or counter-alphabetical order with one click on the Name column header. Back to subject 18 2. Closing the software What do you want to do? Exit the software Save the data Transfer the data from the terminal Go to the thematic index 19 When you wish to exit the TimeBox application, you must click on the Exit button in the top right-hand side of the screen. The following window will be shown: Then you have 3 possibilities: - 2.1 exit the software, data backup, transfer terminal data. Exit the software To exit the software, you must: - 2.2 Select Exit the software. Click on OK to put the system in sleep mode. Click on Cancel to go back to TimeBox. Save the data To save the data, you must: - Select Data backup. Click on OK. A backup file is created in the SaveAll directory of TimeBox on your hard disk. The path of this directory can however be modified. It is essential to perform regular backups and to copy the folder containing the backups onto a secure media (CD-Rom for example). Back to subject 20 2.3 Transfer data from the terminal To transfer the data from the terminal to the TimeBox workstation, you must: USB mode: 1. Check if the USB key is initialised (Menu System | Hardware). 2. Connect the USB key to the USB Port on the terminal for downloading the clockings. 3. Wait until the end of the downloading process! Connect the key to the TimeBox PC after being asked to remove it from the terminal. 4. Disconnect the USB key from the terminal and connect it to the Administration PC. 5. Select Transfer terminal data. 6. Make sure that the USB key for data transfer is connected to the TimeBox PC. Click on OK. 7. Specify if All data must be downloaded or only the data after the last transfer must be retrieved. 8. Click on Validate. Wired mode (RS232 serial or RJ 45 Ethernet connection) 1. Select Transfer terminal data. 2. Click on OK. 3. Specify if All data must be downloaded or only the data after the last transfer must be retrieved. 4. Click on Validate. The last clocking data can then be processed and even backed up on your TimeBox workstation. NOTICE : Downloading data Since the last transfer allows you to retrieve all clockings done after the last clocking recorded on the TimeBox PC. Back to subject 21 3. Clocking anomaly What do you want to do? Understand the screen of anomalies Access clocking anomalies and correct them Generate a report of clocking anomalies Go to the thematic index 22 3.1 Understand the screen of anomalies You can access the screen of anomalies with one click on Anomalies in the left-hand side menu of the display: Select the viewing period Button to enlarge or reduce the top and bottom parts of the display Employee selection box Button to access the screen for setting up the report of anomalies List of employees with anomalies over the requested period Select a filter for the employees Select or deselect all employees The Anomalies entry point includes all the anomalies of forgotten clockings. In this way, you can rapidly view the days of forgotten clockings in order to correct them quickly. From this screen, you can also print a report of anomalies. When entering the software, the icon of the Anomalies button turns red in the menu if at least one employee has an anomaly. The red colour disappears as soon as you enter the screen of anomalies. By default, you will view all the anomalies of the last 7 days, classified from the latest to the earliest and sorted out per name. These anomalies are displayed in the top part of the screen, with: The employee's surname and first name, The date of the anomaly, The daily schedule, The clockings of the day for this employee. Also refer to Access clocking anomalies and correct them and Generate a report of anomalies. Back to subject 23 3.2 Access clocking anomalies and correct them The Anomalies button in the menu on the left-hand side of the screen turns red if at least one employee has an anomaly when opening the screen. A click on this button will open the screen of anomalies which summarises all the employees with one or more forgotten clockings: Employee' s surname and first A click on this box allows you to access the week of the employee's clockings Employee's clockings for the day with anomalies Date of the anomaly Daily schedule To correct anomalies on one employee and for the desired period, you must: 1. 2. 3. 4. 5. 6. 7. 8. Select the desired viewing period using the arrows located on the right of the field The ‘X’ last days, Specify the selection of employees using one of the Filters in the pop-down menu of the bottom part of the screen (All employees, One or more employees, Sections or Schedule). Only the employees with anomalies are shown in the list, If necessary, select the employees on which you want to make corrections, Click on the field which corresponds to the forgotten clocking (by default, the cursor will be on the first free field of the clocking day), Enter the employee's clocking manually, Press the Enter key, Resume steps 4 to 6 for each day with anomalies, Click on the Validate button to save the modifications. The anomaly will disappear from the list if corrected, as well as the employee concerned if the anomaly has disappeared, the objective being to correct all anomalies in order to empty the list completely. NOTE: From the screen of anomalies, you can also access the employee's clocking week directly by clicking on the button located on the right-hand side of the selected employee's name-first name or on the button. Then you can correct the anomalies and view the previous and next days. The button allows you to go back to the previous screen. Warning, any deletion of clockings is irreversible! That's why we recommend you to make a data backup before any manual change of clockings. Back to subject 24 3.3 Generating a report of anomalies From the screen of anomalies which can be accessed with one click on the Anomalies button, you can directly access the screen for generating a report of anomalies: List of anomalies PRINT button: allows you to access the report of anomalies Click on the Print button to access the screen for setting up the report on forgotten clockings: To generate a report of anomalies, you must: 1. 2. 3. 4. Select the period for which you want to view the anomalies, Specify the desired layout (position of page skips), Select the employees for whom you want to have a report of anomalies, Execute the report of anomalies by clicking on the Print button. NOTE: This screen can also be accessed directly from the menu Reports | Forgotten clockings; for more information, see Reports. Back to subject 25 4. Clockings and totals What do you want to do? Understand the screen of clockings and totals Access the clockings and totals of an employee Access the monthly clockings and totals of an employee Modify or enter or delete manually the clocking times of an employee Set up the time display format (hours-minutes, hours-hundredths) Modify the totals by Add/Deduct, Add comments Generate the reports related to attendance and totals Go to the thematic index 26 4.1 Understanding the screen of clockings and totals The screen of clockings and totals can be accessed from the menu Administration | Clockings: Select the viewing period Employees' clockings Select a filter for the l Employees' totals Forgotten clocking indicator Button to switch to the monthly view Button for accessing the screen showing the clocking report 4.1.1 Screen philosophy The bottom part of the screen, called "master area", allows you to select the employee for whom you wish to view the clockings, totals and events. The top part of the screen displays the information related to the employee selected. 4.1.2 The data displayed This screen allows you to view the clockings and/or totals and/or events for an employee. When the buttons Clockings, Totals and Events are active, they are orange. By default, only the clockings can be viewed but one click on the Totals button also displays the Total, Add/Deduct, Comment and Total columns. One click on the Clockings button will deactivate and delete the display of the clockings. One click on the Events button will display an additional column for each overtime or special hour set up in the system. Also refer to Global setup. 4.1.3 The display period The clockings are shown from date to date over one week, with the possibility of changing to the next or previous week using the icons and . It is also possible to extend the period to the whole month by clicking on the button . It is also possible to extend the period of clockings to a maximum of 35 days by entering the data directly in the date-to-date fields of the monthly view. Back to subject 27 4.1.4 The clockings The clockings are displayed in "Clocking in/Clocking out" pairs next to the schedule for each day of the week (the schedules are shown only if they have been created and assigned to the employee selected). There are icons to indicate the following: - : that the clocking has been modified, - : that there is a clocking anomaly, : that other clockings than those displayed have been performed in the day (to view them, click on the icon). The clockings which correspond to early departures or late arrivals are displayed in bold characters. From this screen, you can also modify the employees' clockings, create the reports related to the clockings and totals and request a monthly display of the results. 4.1.5 The totals The screen of totals is divided into 4 columns (with the totals for the week displayed at the bottom of each column): - The totals of the clockings in the day, - The corrections by Add/Deduct (+/-) for each of the days in the week, - The global total (total + corrections by Add/Deduct) for each of the days in the week, - The comments related to the Add/Deduct. The results are displayed in red until modifications are validated. Some columns may not be displayed although the corresponding commercial options are valid. In this case, check that the corresponding option has been selected in the employee's file and that it has been set up in the Setup | Global menu. In the same way as for the clockings, you can also view the monthly totals for the employee selected. 4.1.6 The events The events mean additional columns which correspond to the overtime and special hours set up in the Global setup of the software. The overtime and special hours allowed are defined in the employee's file. Back to subject 28 4.2 Accessing the clockings and totals of an employee The screen of clockings and totals can be accessed from the menu Administration | Clockings: Select the viewing period To access an employee’s clockings and totals, you must: 1. Select the employee for whom you wish to view the clockings and/or totals, using the filters if necessary. When an employee has been selected, he/she is highlighted in orange in the list of employees, his/her name is shown at the top of the screen and his/her clockings and totals are displayed in the table of clockings, 2. Enter the start date of the week for which you want to view the clockings and totals. The start of the week corresponds to the day immediately following the weekly processing day as defined in the global setup. Back to subject 29 4.3 Accessing the monthly clockings and totals of an employee The screen of clockings and totals can be accessed from the menu Administration | Clockings: Button to switch to the monthly view The screen above allows you to view the weekly clockings and totals for the employee selected. You can access the clockings and totals up to 35 days by clicking on the button . It is also possible to access it by clicking on the buttons located in the column with the icon next to the days of the week. Button to switch to the weekly view Once you are in the monthly view (above), you have the same possibilities as for the weekly display. You can go back to the weekly view by clicking on the button located in the column with the icon next to the days of the week. or on the buttons Back to subject 30 4.4 Modifying, entering or deleting a clocking time manually The screen of clockings and totals can be accessed from the menu Administration | Clockings: The screen above allows you to view the weekly clockings and totals for the employee selected. Each clocking can be modified manually. To do so, you must: 1. Select the employee concerned with the modification, 2. Click on the clocking time to be modified or deleted, or on the box which corresponds to the clocking that you wish to enter, 3. Enter the desired time in the case of an addition or modification or press Del on the keyboard to delete, 4. Press Enter on the keyboard to validate the entry, 5. Repeat steps 1 to 4 for a new addition, modification or deletion, 6. Save the entry with one click on the Validate button. A clocking entered manually can be identified with the icon (if chosen during setup). The new totals are displayed in red for information until the entry is saved with one click on the Validate button. NOTE: You can also modify your totals by using the add/deduct function. It is also possible to insert clockings by placing the mouse cursor between two cells; when the cursor appearance changes, you can insert a new cell with one click and enter a clocking. Warning, any deletion of clockings is irreversible! That's why we recommend you to make a data backup before any manual change of clockings. Back to subject 31 4.5 Setting up the time display in the software The screen for setting up the time display on the terminals can be accessed from the menu System | Hardware | Display: Area for selecting the display format of the date on the terminal Area for selecting the display format of the results in the software Access to the clock display setup This screen is divided into 2 parts: - A menu area (in the bottom right-hand corner) which allows you to select the item to set up on the terminal. A setup area (top part) which allows you to enter or tick the various setup options. In this screen, select the display mode of the results in the software. These results can be in hours and minutes or in hours and hundredths: (for example 39h30 is written as 39.5h in hours and hundredths display): 1. Tick the button which corresponds to the selected mode. 2. Click on Validate to save the new configuration or on Cancel if you do not want to validate the modifications. Back to subject 32 4.6 Modifying totals by Add/Deduct and Adding comments The screen of clockings and totals can be accessed from the menu Administration | Clockings: Add/Deduct column Total shown in red after an hour addition entered but still not validated Field provided for comments The screen above allows you to view the weekly totals for the employee selected. The 4 columns of the totals can be viewed by clicking on the Totals button: - Total: shows the total of the clockings of the day, - (+/-): allows you to enter the hour additions/deductions for each day of the week, - Total: shows the global total taking into account the Add/Deduct function, - Comment: allows you to enter a justification for the hour additions/deductions. Using the Add/Deduct function, you can modify the employees' totals by adding or deducting hours from the totals of the days. To create an hour addition/deduction, you must: 1. Click on the add/deduct field of the desired day, 2. Enter the number of hours with a "-" before if these hours must be deducted or a "+" if the hours must be added, 3. Press Enter on the keyboard to validate the time entered; the new totals are shown in red, 4. Click on the Validate button to save. 5. Enter a comment if necessary to justify the Add/Deduct. The comments and Add/Deduct can be entered for 5 weeks in the future. NOTES: For a more global view, you can also display the monthly totals. For further explanations on the totals, also refer to Clockings and totals. Back to subject 33 4.7 Generating the reports related to attendance and totals The screen for generating reports related to totals can be accessed from the Reports menu: Links for selecting the report in the list of reports related to attendance Links for selecting the report in the list of reports related to totals The screen above allows you to access 6 reports related to totals by clicking on the link of the desired report: - Clockings and totals, - Clockings of a group, - Totals, - Special hours, - Overtime, - Add/deduct with comments. This screen also allows you to access 5 reports related to attendance: - Clockings calculation time, - Lateness and departures, - Amended clockings, - Absentees/Present, - Forgotten clockings. Two other reports are available in Setup in order to allow you to generate the report of the parameters of your software or of the list of employees. To generate one of these reports, also refer to: Setting up a report for one or more employees. Back to subject 34 5. Clocking results What do you want to do? Understand the screen of an employee’s results Go to the thematic index 35 The screen of the results allows you to directly access the periodic totals for an employee over the period selected. It can be accessed from the menu Administration | Results: Detail of the results Start printing Select the period for the results Select the employee Select a filter for the employees This screen allows you to view or print the results. To view an employee’s results, you must: 1. Apply a filter to the list of employees if necessary, in order to facilitate the selection of the employee of whom you want to view or print the results, 2. Click on the employee selected, 3. Select the calculation period for the results. The results are automatically displayed in the top right-hand part of the screen: - The total number of hours for the period selected, - The Add/Deduct entries if any, - The global total (total + add/deduct), - The overtime and special hour totals. You can also generate a report of totals from this screen by clicking on the Print button. For further explanations, see Reports subject. NOTES: For a more global view, you can also display the monthly totals. For further explanations on totals, also refer to Clockings and totals and Clockings and totals. Back to subject 36 6. Global administration of clockings and totals What do you want to do? Understand the screen of the global administration of clockings and totals Access the clockings and totals of several employees Modify the clocking times of one or more employees manually Modify the totals by Add/Deduct and insert comments for one or more employees Generate the reports related to the totals Generate the reports related to attendance Go to the thematic index 37 6.1 Understanding the screen of the global administration of clockings and totals To obtain the clockings and totals for one group of employees, click on the button Administration | Group: Select the viewing day Clockings Buttons for accessing the weekly clockings of the employee selected Totals Button for accessing the screen showing the clocking report to be printed Select a filter for the employees Select the employees . This screen allows you to enter information or consult the clockings, totals and/or events in the same day. 6.1.1 Screen philosophy The bottom part of the screen called "master area", allows you to select the employees of whom you want to view the clockings and/or totals, applying a filter if necessary. The top part of the screen displays the information which corresponds to the employees selected and for the day selected. 6.1.2 The data displayed This screen allows you to view the clockings and/or totals and/or events for an employee. When the buttons Clockings, Totals and Events are active, they are orange. By default, only the clockings can be viewed but one click on the Totals button also displays the Totals, Add/Deduct and Total columns. One click on the Clockings button will deactivate and delete the display of the clockings. One click on the Events button will display an additional column for each overtime or special hour set up in the system. Also refer to Global setup. Back to subject 38 6.1.3 The display period The data are displayed on one day for all the employees selected, but you can display a weekly or monthly view for one employee at a time. Just click on the changeover button at the employee desired. 6.1.4 The clockings For each employee, the clockings are displayed in Clock in/Clock out pairs next to the schedule for each day of the week. There are icons to indicate the following: - : that the clocking has been modified, - : that there is a clocking anomaly, : that other clockings than those displayed have been performed in the day (to view them, click on the icon). The clockings which correspond to early departures or late arrivals are displayed in bold characters. From this screen, you can also modify the employees' clockings and create the reports related to attendance. 6.1.5 The totals The screen of totals is divided into 4 columns (with the totals for the week displayed at the bottom of each column): - The totals of the clockings in the day, The Add/Deduct values (+/-) for each of the days in the week, The global total (total + Add/Deduct hours) for each of the days, The comments related to the Add/Deduct. From this screen, you can also create reports related to totals. 6.1.6 The events The events mean additional columns which correspond to the overtime and special hours set up in the Global setup of the software. The overtime and special hours allowed are defined in the employee's file. Back to subject 39 6.2 Accessing clockings and totals of several employees The screen of clockings and totals for a group of employees can be accessed from the menu Administration | Group: Select the viewing day Clockings of the selected employee Employee's totals Select employee Select a filter for the employees To access an employee’s clockings and totals, you must: 1. Select the employees of whom you want to view the clockings and/or totals, using the filters available if necessary. The number of employees selected is shown at the bottom of the list of employees 2. Enter the desired date in the Date field or select the viewing date using the calendar to be accessed with the icon . NOTE: To create a new employee, see Create a new employee's file. Back to subject 40 6.3 Modifying or deleting manually the clocking times of one or more employees The screen of clockings and totals for a group of employees can be accessed from the menu Administration | Group: The screen above allows you to view the clockings for the employees selected. Each clocking can be modified manually. To do so, you must: 1. Click on the clocking time to be modified, or on the box which corresponds to the clocking that you wish to add, 2. Enter the time selected to modify or press Del on the keyboard to delete, 3. Press Enter on the keyboard to validate the time entered, 4. Repeat steps 1 to 3 for a new modification or deletion, 5. Click on the Validate button to save. A clocking entered manually can be identified with the icon after validation. The new totals are displayed in red for information until the entry is saved with one click on the Validate button. Note: You can also modify your totals by using the add/deduct function. It is also possible to insert clockings by placing the mouse cursor between two cells; when the cursor appearance changes, you can insert a new cell with one click and enter a clocking. Back to subject 41 6.4 Modifying the totals by Add/Deduct and inserting a comment for one or more employees The screen of clockings and totals for a group of employees can be accessed from the menu Administration | Group: Add/Deduct column Field provided for comments The screen above allows you to view the totals for the employees selected. These totals can be viewed immediately after the clocking columns. They are divided into 4 columns: - Total: shows the total of the clockings of the day, (+/-): shows the Add/Deduct hour values for each day of the week, Total: shows the global total after including the Add/Deduct hours for each day, Comment: allows you to enter a justification for the hour additions/deductions. Using the Add/Deduct function, you can modify the employees' totals by adding or deducting hours from the totals of the days. To do so, you must: 1. Click on the add/deduct field which corresponds to the day for which you want to modify the total number of hours, 2. Enter the number of hours with a "-" before if these hours must be deducted or a "+" if the hours must be added, 3. Press Enter on the keyboard to validate the time entered, 4. Click on the Validate button to save. The totals will not be recalculated and will be shown in red before validation, 5. Enter a comment if necessary to justify the Add/Deduct. The comments and Add/Deduct can be entered for 5 weeks in the future. Back to subject 42 6.5 Generating the reports related to attendance and totals The screen for generating reports related to totals can be accessed from the Reports menu: Links for selecting the report in the list of reports related to totals The screen above allows you to access reports related to totals by clicking on the link of the desired report: - Clockings and totals, - Clockings of a group, - Totals, - Special hours, - Overtime, - Add/Deduct hours with comments. This screen also allows you to access 5 reports related to attendance by clicking on the link of the desired report: - Clockings calculation time, - Lateness and departures, - Amended clockings, - Absentees/Present, - Forgotten clockings. To generate one of these reports, also refer to: Setting up a report for one or more employees. Back to subject 43 7. Reports What do you want to do? Understand the screen for selecting the reports Set up a report for one or more employees Understanding the viewing screen of a report Generate a report Go to the thematic index 44 7.1 Understanding the screen for selecting the reports The screen for generating reports related to totals can be accessed from the Reports menu: Examples of reports Links to reports related to Links to reports related to the software parameters Links to reports related to the b l The screen above is divided into two parts: - The bottom part which allows you to select a report, The top part which provides an example of the organisation of the report which corresponds to the link that you have just browsed with the mouse. The reports are classified into 3 categories: - Setup: reports on parameters or list of employees, Totals: reports on clockings, totals, Add/Deduct, etc., Balances: reports of anomalies, amended clockings, etc. To access the screen for generating a report, click on the desired report in the list. NOTE: To set up a report, see Setting up a report for one or more employees. Back to subject 45 7.2 Setting up a report for one or more employees The screen for setting up a report can be accessed with one click on the Reports button then on the desired report: Select the report period Report page layout Customise the report Select the employees to be shown in the report The layout of screens for setting up a report is always the same: - The master area (bottom part) allows you to select the employees for whom you wish to generate a report, - The detail area (top part) allows you to define the period on which you want to generate the report, the layout (Page skip) and type of data to be displayed (Customisation). Back to subject 46 Generally speaking, to set up a report, you must: 1. Select the employees for whom you wish to obtain a report, using the available filters, then activating the boxes which correspond to the employees selected, 2. Define the period for which you want to obtain this report, using the calendar (keep the L.H. button of the mouse depressed and browse the whole period to be selected then release the mouse button) or clicking on icons to select the start and end dates of the period: The period concerned with the report is shown in orange Start and end dates selected for the period 3. Define the page layout of the report (page skip at the end of the data related to an employee, a section or a schedule): 4. Customise the report by activating, in the Customising the report frame, the boxes which correspond to the results that you wish to display. Important: not all reports can be customised; as a result the Customise frame may not be present, 5. Click on Print to execute the report or on View to obtain the preview, 6. For the report on Clockings and totals you can click on the Export button to automatically generate an Excel file which summarises all the information concerning the clockings and totals. These information are gathered in different sheets: employees, totals from date to date, monthly totals, weekly totals, daily totals. Back to subject 47 7.2.1 Non customisable reports The following reports cannot be customised; this is the reason why the Customise frame of the report is not displayed in the top R.H. part of the screen for generating the report: - Parameters, - Totals, - Forgotten clockings, - Special hours, - Add/Deduct with comments, - Clockings calculation time, - Amended clockings, - Forgotten clockings. For these reports, you can therefore select only the employees concerned, the period and page layout. 7.2.2 Customisable reports All the following reports are customisable: Report of the list of employees: You can take account of the employees' contract dates. Depending on the mode selected, the software will define automatically the employees who must be shown in the report. You can display: - The employees whose contract start and end dates are included in the period selected for generating the report, The employees whose contract ends in the selected period, The employees whose contract starts in the selected period. Back to subject 48 Report on the clockings and totals: You can choose to display or not the following: - The legends and abbreviations which explain the events displayed on the report, The roundings on clockings, The attendance time, The global total (displaying an additional column Total of clockings), A limit for the number of clockings to be displayed per day for each employee, The Add/Deduct and the comments, Daily and/or weekly overtime and special hours. NOTE: You can request an export of clockings and totals. Reports of the clockings of a group: You can choose to display or not the following: - The legends and abbreviations which explain the events displayed on the report, The roundings on clockings, A limit for the number of clockings to be displayed per day for each employee. The pop-down menu also allows you to determine if you wish to display only the clockings, the clockings and totals or the clockings and totals of Add/Deduct. Back to subject 49 Report of overtime hours: You can display: - Only daily overtime, Only weekly overtime, Daily and weekly overtime. Report of the late arrivals and early departures: You can request the generation of a report for: - All late arrivals, All early departures, All late arrivals and all early departures. Back to subject 50 Report of absentees/present: The options proposed allow you to select either the report of all employees, or only of those present or only of the absentees. Depending on your option, the title of the report will be "Present", "Absentees" or "Absentees and Present". 7.3 Understanding the viewing screen of a report The viewing screen of a report can be accessed from all the report setup screens with one click on the View button: Back to subject 51 The viewing screen of reports contains several buttons which allow you to skip easily from one page of the report to another or to change the viewing mode (Expand, Reduce, Adjust to page or Adjust to width): - : go to the first page of the report, - : go to the previous page, - : go to the next page, - : go to the last page of the report, - : generate a report, - : zoom in, - : zoom out, - : display the whole page, - : adjust page to screen height, - : adjust page to screen width. From this screen, one click on the Print button allows you to execute the report and with one click on the Back button, you will go back to the report setup screen. 7.4 Generate a report The screen for generating a report is available from the report viewing screen with one click on the icon : Back to subject 52 You can choose between two types of output peripherals: - File: your report will be exported as a file in Adobe Acrobat© (.pdf), text (.txt) or rich text (.rtf) format depending on your choice. - Printer: your report will be printed on the printer selected, To start the generation of the report, you must: 1. Select the desired output peripheral (Printer for a hard copy or File for an export), 2. Depending on your choice, you will then access either the Windows printing setup window, or the window which allows you to select the extension (type) of the export file, its name and its location. Complete the fields proposed, 3. Press Enter on your keyboard to validate, 4. Click on the Print button to start printing or exporting the report. Back to subject 53 8. Creating and setting up employees What do you want to do? Understand the screen for setting up employees Create a new employee's file Modify/Delete the parameters of an employee already created Go to the thematic index 54 8.1 Understanding the screen of managing employees' file This screen can be accessed from the menu Setup | Employees: Employee's data Set up employee's rights Select the employee of whom you wish to view or modify the file This screen allows you to create a new employee's file or access the employees' files already created. To do so, you must select, in the master area, the employee for whom you wish to consult or modify the file. In order to help you select the employee, filters are available to you. The employee's file is broken down into 2 parts: - The data specific to the employee (name, first name, id. number, contract start and end, section, weekly schedule, etc.), The setup of rights. Back to subject 55 8.2 Creating a new employee’s file A new employee's file can be created from the screen below, to be accessed through the menu Setup | Employees: Employee's data Set up employee's rights Button for creating a new file Button for validating the creation Button to cancel the creation of an employee's file To create a new employee's file, you must: 1. 2. 3. 4. 5. 6. Click on Create, Enter the name, badge number and first name and id. number if necessary, Specify contract start and end dates if necessary, Select the Section and theweekly schedule of the employee in the pop-down lists, Specify the employee's rights by activating the corresponding boxes, Click on the Validate button to save the file or on the Cancel button to cancel the creation. NOTE: You can also modify an employee's file or delete it by clicking on the Delete button. You can duplicate it by clicking on the Duplicate button, which allows you to create a new employee from the data derived from an employee already created; then you must modify the file according to the information concerning the new employee to be entered. Back to subject 56 8.3 Modifying/deleting the parameters of an employee already created An employee's file can be modified from the screen below, to be accessed through the menu Setup | Employees: Employee's data Set up rights Button for validating the modification Button for cancelling the modification of an employee's file You may have to modify the data contained in an employee's file in the following cases: - When creating an employee's file by duplication: - When modifying the data of an employee already created following a schedule change, for example or a badge change etc. To modify an employee's file, you must: 1. Select, in the master area, the employee of whom you wish to modify the file, 2. Perform the desired modifications on the employee's data, his/her rights, his/her access control or the management of his/her periodic totals, 3. Click on the button to save the modifications or on the Cancel button to cancel them. NOTE: You can also delete an employee's file by clicking on the Delete button. Back to subject 57 9. Create and manage schedules What do you want to do? Understand the screen for setting up schedules Understand the operation of the various windows Create, duplicate, modify or delete a daily schedule Use the wizard for creating a daily schedule Create, modify or delete a weekly schedule Go to the thematic index 58 9.1 Understanding the screen for setting up the schedules Schedules are created and managed from the screen below, to be accessed through the menu Setup | Schedules: List of daily schedules Button for viewing a daily schedule schematically Access button to wizard Detail of the windows of the daily schedule selected Weekly schedules You create a list of daily schedules (20 as a maximum, listed in the top left-hand part of the screen, including the desired windows ) that you will use subsequently to prepare 1 weekly schedule (bottom part of the screen). The daily schedules can be worked out: - Using a wizard which offers pre-determined windows which correspond to a simple day (graphic mode) - Using an expert mode providing access to all available windows, which allows you to work out more comprehensive schedules. When all your schedules have been created, you can assign them to the employees as you choose in their respective files. Back to subject 59 9.2 Understanding the operation of the various windows When creating a daily schedule in the screen Setup | Schedule, you use time windows each with a specific function and operating mode. In the detail of the daily schedule, the windows are shown as follows: For each window selected, you must indicate the start time and end time. However, some windows require additional information to operate. The complement for each window is indicated in italics in the "Complement" column as soon as the window has been selected. This column is grey by default in the windows that do no require any complement. 9.2.1 Automatic clock out window This window allows you to avoid errors in the totals when many employees must clock out at the same time on the same terminal. Any clocking in performed between the start time and end time of this window allows you to generate a clocking out automatically at the time set up in the complement. If you do not enter any complement, the automatic clocking out time is equivalent by default to the end time of the window. 9.2.2 Unpaid break window This window allows you to stop the total during the break time. The minimum time that you wish to debit can be specified in the complement, whether the break has been taken or not. If no information is entered in the Complement field, the minimum break time is equivalent by default to the duration of the window. 9.2.3 Clocking in allowance window This window allows you to bring back any clocking in performed between the start time and end time of the window, to the end time of this window. It is a means of preventing the employees from starting work before the planned schedule. 9.2.4 Clocking out allowance window This window allows you to bring any clocking out performed between the start time and end time of the window, to the start time of this window. It is a means of preventing the employees from continuing to work after the planned schedule. Back to subject 60 9.2.5 Early departure window This window allows you to report the early departures of the employees. The report of the late arrivals and early departures allows you to list all the employees who left earlier than the time planned in their schedule. 9.2.6 Late arrival window This window allows you to report the late arrivals of the employees. The report of the late arrivals and early departures allows you to list all the employees who arrive later than the time planned in their schedule. In the clocking screen, early departures are shown in bold characters. 9.2.7 Clock in position window This window allows you to define a time period during which all clockings are considered as clockings in. 9.2.8 Clock out position window This window allows you to define a time period during which all clockings are considered as clockings out. 9.2.9 Overtime window This window allows you to define a time period during which the hours worked by the employees will be overtime. In the complement, you must enter the maximum number of overtime hours allowed in this window. 9.2.10 Special hours window This window allows you to define a time period during which the hours worked by the employees will be special hours. In the complement, you must enter the days to which this window applies (all days, public holidays or working days). Back to subject 61 9.3 Creating, duplicating, modifying or deleting a daily schedule A daily schedule can be created, modified or deleted from the screen below, to be accessed through the menu Setup | Schedules: You can create up to 20 daily schedules; these schedules can be used subsequently to work out the weekly schedules. It is therefore possible to create a daily schedule for each day of the week but it is not mandatory. Indeed, for non worked days, it is not necessary to create a specific daily schedule; it is sufficient to leave the day without daily schedule. To create or modify a daily schedule (in the schedules grid on the left), you must: 1. Click on the field Daily schedules and enter a description for this schedule (40 characters as a maximum), 2. Click on the associated colour (on the left of the Daily schedules field), click on the colour selected then on the OK button, 3. Click on Abbrev. field and enter an abbreviation (5 characters as a maximum). By default, the system will propose an abbreviation, 4. In the frame Daily schedule windows (on the right), click on the field Window type to enter or modify the desired time interval by means of the pop-down list, 5. Click on the Start field and enter the start time of the window, 6. Click on the End field and enter the end time of the window, 7. Enter the complement if required (according to the type of window), 8. Repeat steps 4 to 7 for each time window (within a limit of 40 windows), 9. Click on Back to subject 62 To duplicate a daily schedule, you must: 1. Click on one of the fields of the daily schedule to be duplicated, 2. Click on , 3. Enter the description of the new schedule. The new schedule includes the same windows as the duplicated schedule. To modify these windows, follow steps 4 to 7, 4. Click on the Description field then enter the description with 40 characters as a maximum, 5. In the frame Daily schedule windows, click on the Window type field of the window to be modified and select the desired time interval in the pop-down list, 6. Click on the Start field and enter the start time of the window, 7. Click on the End field and enter the end time of the window, 8. Enter the complement if required (according to the type of window), 9. Repeat steps 5 to 8 for each window of the schedule, 10. Click on . To delete a daily schedule, you must: 1. Click on one of the fields of the daily schedule to be deleted, 2. Click on . NOTES: After creating the desired daily schedules, you can create the subsequently assigned to the employees in their files. weekly schedules that will be After each modification, the system will ask you to enter a new locking date for the results. This means that the system will apply the modifications and perform the calculations as from the new date. In a daily schedule, you can add a new window between two existing windows. To do so, you must click with the mouse on the location where you wish to insert the window when your cursor takes the shape of a cross. WARNING: The locking date will apply to the whole system. Back to subject 63 9.4 Using the creation wizard of a daily schedule To open the screen for setting up schedules, click on Setup | Schedules: Daily schedule creation wizard Daily schedule being created To create a simple daily schedule with the help of the wizard, you must: 1. 2. 3. 4. 5. Click on the Daily schedule field of the new schedule to be created, Enter the desired description for this schedule, Click on the corresponding Abbrev. Field, Enter an abbreviation with 5 characters as a maximum, Click on . The wizard shows a diagram proposing a simple day for which you just have to complete the start and end times of the windows that you wish to use: 6. If necessary, define the clocking in allowances , 7. If necessary, define the late arrivals and clocking out allowances and early departures windows , 8. If necessary, define the unpaid break window , 9. Click on . For further information about the use of windows, also refer to Understanding the operation of the various windows. Back to subject 64 9.5 Create, modify or delete a weekly schedule Weekly schedules can be created, deleted or modified from the screen below, to be accessed through the menu Setup | Schedules: Button to validate creations and modifications Button to delete a weekly schedule Detail of weekly schedules It is possible to create 5 weekly schedules. They must be created after the daily schedules that you wish to use (listed in the top left-hand part of the screen). You can create up to 20 daily schedules; these schedules can be used subsequently to work out the weekly schedules. It is therefore possible to create a daily schedule for each day of the week but it is not mandatory. Indeed, for non worked days, it is not necessary to create a specific daily schedule; it is sufficient to leave the day without daily schedule. To create or modify a weekly schedule, you must: 1. Double click on the Description field and enter a description for the new schedule (40 characters as a maximum), 2. Double click on the Abbrev. field and enter an abbreviation (5 characters as a maximum), 3. Click on the Monday field and select, in the pop-down list, the daily schedule to be assigned to this day, 4. Repeat step 3 for each day of the schedule, or copy (CTRL + C)/paste (CTRL + V) to duplicate the schedule, 5. Click on . To delete a weekly schedule, you must: 1. Click on one of the fields of the weekly schedule to be deleted, 2. Click on . After creating the desired weekly schedules, you must assign them to the employees in their files. Back to subject 65 10. Set up the bell ringing What do you want to do? Understand the screen for setting up the bell ringing Select the bell ringing of the TimeBox Biometric terminal Go to the thematic index 66 10.1 Understand the screen for setting up the bell ringing The bell ringing can be set up from the screen below, to be accessed through the menu Setup| Bell ringing: Bell ringing duration Activation of the bell ringing for public holidays Days and times for the bell ringing You can activate the internal bell of the terminal (only TimeBox Biometric) or use the terminal relay to manage an external bell. In this screen, you can set up the day and time on which the bell shall ring. To set them up, you must: 1. Enter the desired duration for the bell ringing in the field Bell ringing duration, 2. In the Time column of the board, enter the times at which the bell ringing is likely to be activated throughout the week, 3. Choose if you wish to activate the bell ringing or not for public holidays by activating the relevant box or not, 4. Activate the bell rings by clicking on the boxes at the intersection of the desired time and day of the week. For example, if you wish to activate the bell ringing at 8:00 on Mondays, you must click on the Monday column, line 8:00 to show the icon , 5. Click on to save the settings. NOTE: With the USB communication type you have to connect the key to the PC, upload data and then connect the key to the terminal. In Ethernet or serial mode, data must be synchronised via a clocking transfer. Back to subject 67 10.2 Select the bell ringing of the TimeBox Biometric terminal You can activate the internal bell of the TimeBox Biometric terminal or use the terminal relay to manage an external bell (see Quick start guide). On the TimeBox Biometric terminal: Press the key 3 (menu CONF=3) in the main menu. Press 3 times the key 2. Press the key 1 for setting up the bell ringing. Press the key 1 again to switch between ON/OFF. S O U N D ? = 1 O F F R E T = F 1 You can choose between 5 tunes. Press the key 1 in order to scroll through the menu. S O U N D ? = 1 O N ( 1 ) R E T = F 1 Press the key 1 to confirm your choice. The bell will be ringing at the times set up in the TimeBox software. Back to subject 68 11. Setting up the bell ringing calendar What do you want to do? Understanding the screen for setting up the calendar Create a lockout window Go to the thematic index 69 11.1 Understanding the screen for setting up the calendar The bell ringing can be set up from the screen below, to be accessed through the menu Setup | Calendar: Year shown Action area (create, delete etc.) Lockout calendar This calendar allows you to lock bell ringing during periods to be selected by you, for example during the annual closure of your company. It also allows you to define holidays for each year. The calendar provides the bell ringing lockout windows for the requested year. The top part of the screen is a menu area which allows you to add lockout windows. These windows prevail over the setup performed in the bell ringing setup. Back to subject 70 11.2 Setting up a lockout window A bell ringing lockout window can be set up from the calendar to be accessed through the menu Setup | Calendar: Action area (create, delete etc.) Year shown Limits of the window Area for selecting the type of window (bell ring lockout, access or public holiday lockout) Comment providing details of the window by mouseover This calendar allows you to lock bell ringing during periods to be selected by you, for example during the annual closure of your company. It also allows you to define holidays for each year. To set up a lockout window, you must: 1. Select the type of window to be created, modified or deleted (bell ringing or public holiday lockout) in the selection area, 2. Select the action to be performed (create, delete or select) in the action area, 3. Click on the day(s) when you wish to add, delete or select a window, 4. Define the limits of the window in the case of a lockout (start and end times), 5. Click on to save the settings. Note: You can create up to 30 bell ringing lockout windows. These windows prevail over the bell ringing setup. Back to subject 71 12. Global configuration What do you want to do? Understand the software setup screen Understand and set up the results locking date Understand the concept of maximum range of the day Define the rounding on clockings Define overtime and special hours Create one or more sections Go to the thematic index 72 12.1 Understanding the software setup screen This screen can be accessed with one click on the Setup | Global buttons: The screen for the global setup of your software is divided into several parts: - Roundings which allows you to define the rounding on clockings in, out, the rounding on daily totals and the tolerance, - Processing which allows you to define the system calculation parameters (locking date, day change date, maximum range of the day, processing day). It is also here where you must specify that you wish to see the amended clocking indicator in the screen of clockings, - Sections which allows you to modify the description of the 10 sections created by default when installing the system, - Weekly, daily Overtime and special hours allows you to define the various types of overtime and special hours. This will allow you subsequently to use windows in the daily schedules in order to calculate the overtime and special hour totals. Back to subject 73 12.2 Understanding and setting up the results locking date In the Setup | Global screen, the processing block allows you in particular to set up the system locking date. This date corresponds to the calculation limit of TimeBox. Results locking date All results earlier than the locking date are no longer modified in case of setup change. This allows you to avoid recalculating the totals earlier than this date should the rounding management have changed, for example. The locking date can be modified from the screen above but under no circumstance can it be earlier than the System start date (approximately 540 days for an average of 8 clockings a day). EXAMPLE: st The system was installed on 1st January. The rounding management changes on 1 July. Then the locking date is redefined to 01/07/2010 in order to avoid recalculating the st former results, which allows you to manage the roundings differently before and after 1 July. To modify the results locking date, you must: 1. 2. 3. 4. Click on the field Results locking date, Enter a date between the installation date of your system and the date of the day, Press Enter on your keyboard, Click on Validate to save the modifications or on Cancel to ignore them. Back to subject 74 12.3 Understanding the concept of maximum range of the day In the Setup | Global screen, the processing block allows you in particular to set up the day change time and the maximum range of the day. Time at which the day must be closed Maximum range of the day The “Maximum range of the day” and the “Day change time” are two concepts which allow the software to define the reference day for the clockings. - The “Day change time” is the time when the daily schedule is closed (default: 24:00 o’clock) - When employees work on 2 consecutive days, they clock-in on the first day and clock-out on the next day, which can create a system misunderstanding. The “Maximum range of the day” allows you to define on which day the clocking-out must be recorded. Even if the clocking-out is on the next day, the system can decide to record it on the 1st day, according to the “Maximum range of the day”. To record the clocking-out on the correct day, the system compares the clocking-out time with the clocking-in time + “Maximum range of the day”. EXAMPLES: - Day change time: 24:00 o’clock - Maximum range of the day: 10 hours - Clocking-in at 21:00 o’clock on the 2 December and clocking-out on the 3 December If the clocking-out is after midnight (i.e. 3 December), it will be recorded on the 2 December, till 7:00 am (i.e. 10 hours after the last clocking-in at 21:00). A clocking after 7:00 will be considered as a clocking-in on the 3 December. Back to subject 75 To define the day change time, you must: 1. 2. 3. 4. Click on the field Day change time, Enter the time at which the day must be closed (minimum 12:00), Press Enter on your keyboard, Click on Validate to save the modifications or on Cancel to ignore them. To define the maximum range of the day, you must: 1. 2. 3. 4. Click on the field Maximum range of the day, Enter a duration (minimum 5h, maximum 24h), Press Enter on your keyboard, Click on Validate to save the modifications or on Cancel to ignore them. The maximum range prevails over the day change time. Back to subject 76 12.4 Defining the roundings on clockings In the Setup | Global screen, the Rounding block allows you to set up the application rules of the rounding on clockings and totals. Rounding setup If you wish to activate the use of rounding, you must: 1. Activate the box which corresponds to the desired rounding, 2. Enter the rounding: the clockings and/or totals will be rounded according to the value selected. With 5 minutes, a clocking at 8:05 will give 8:00, 3. Enter the tolerance which will allow you to know from what time the clocking will be rounded, 4. Click on Validate, to save the new setup. With the setup performed in the screen above (5 minute rounding and 1 minute tolerance on clockings in and out and on totals), you will have the following results: - Clocking in at 8:00 or 8:01, clocking is saved at 8:00, Clocking in from 8:02 to 8:06, clocking is saved at 8:05, Clocking in from 8:07 to 8:11, clocking is saved at 8:10, Clocking out from 17:59 to 18:03, clocking is saved at 18:00, Clocking out from 18:04 to 18:08, clocking is saved at 18:05, Clocking out from 18:09 to 18:13, clocking is saved at 18:10, etc. The totals are rounded according to the same principle. NOTE: The system will give you the possibility of modifying the locking date so that you can define the date from which the rounding must apply. Back to subject 77 12.5 Defining the overtime and special hours In the Setup | Global screen, the boards Weekly overtime, Daily overtime and Special hours allow you to define the various types of overtime and special hours. Corresponding windows can be used subsequently when creating daily schedules. Overtime and Special hours Deduct overtime or special hours from the daily total (yes/no) Overtime hours are generally used to count hours exceeding the planned schedules and pay for them differently for example. As far as special hours are concerned, they consist of hours performed in unusual conditions or time windows (public holidays, night work etc.). To set up a type of weekly overtime hours, you must: 1. Enter the desired description, 2. Define the weekly hour total beyond which the hours will be considered as overtime, 3. Click on the Validate button to save the modifications or on the Cancel button to cancel them. To set up a type of daily overtime or special hours, you must: 1. Enter the desired description, 2. Enter an abbreviation, 3. Select the possibility to deduct the overtime hour and special hours from the daily total by activating the box in the column (1), 4. Click on the Validate button to save the modifications or on the Cancel button to cancel them. You can set up a maximum number of 4 types of weekly overtime hours, 2 types of daily overtime hours and 2 types of special hours. This means that you are creating 4 limits and 4 weekly accounts on the one hand, and 2 limits and 2 daily accounts on the other hand. The limits on daily overtime hours and the application mode for overtime hours are set up in the screen of schedules. Back to subject 78 12.6 Create one or more sections In the Setup | Global screen, the Sections board allows you to create various sections to which you can assign your employees. List of existing sections At the time of installation, TimeBox created 10 sections by default (SECTION 1 to SECTION 10) the descriptions of which can be modified if you wish. As a result, the creation of sections as such in TimeBox does not exist: the term modification is more appropriate. To modify a section, you must: 1. 2. 3. 4. Click on the description of the section to be modified, Enter the new description, Click on Enter on your keyboard to validate, Click on the Validate button to save the modifications or on the Cancel button to cancel them. NOTES: An employee is assigned to a section in his/her employee's file. The fields of the descriptions of sections must never be empty. Back to subject 79 13. Setting the time What do you want to do? Set up the summer/winter clock change Manual time setup on the terminals Go to the thematic index 80 13.1 Set up the summer/winter clock change This screen can be accessed from the menu System | Date/Time: Select the clock change mode Manual time setup (only in wired mode) Next winter time changeover Next summer time changeover This screen allows you to set up clock change dates. To do so, you must: 1. Select the clock change mode which corresponds to your geographical location, 2. Click on Validate. In this case, the clock change dates are automatically calculated by your system according to the geographical location that you have selected. They are displayed for information in the bottom part of the screen. You can also select the Manual clock change mode. In this way, you can indicate the date and time of the next clock changes. In this case, after the last clock change set up, a message will indicate to the user that he/she must enter a new date. NOTE: With a cable communication mode you can manually change the date and time in this screen. When validating the message with a click on OK, a data transfer is starting automatically after which the time on the terminal will be set up. Back to subject 81 13.2 Manually setting the time of the TimeBox terminal To set the time of the terminal manually, connect the USB key, wait until the clockings are entirely downloaded, and perform the following steps with the USB key still connected: Button [1] Button [2] 1. Keep the button [1] pressed in order to select the day (the day flashes). 1 4 : 1 4 1 5 / 0 6 / 2 0 1 0 2. Increment the day using the button [2]. 3. Press the button [1] to access the month, year, hour, minutes setting and increment using button [2]. 4. Press the button [1] to validate the time and date setting. 10 seconds of inactivity returns the terminal to the initial state. 13.3 Manually setting the time of the TimeBox Biometric terminal To set up the terminal manually, enter the main menu with the administration code, then follow the steps below: Press the key 3 (menu CONF=3) in the main menu. Press the key 1. H O U R S E T = 1 Press the key 1 for setting up the date and time. Enter the date and the time. Confirm with the E key, return with the F1 key. R E T = F 1 S H F T = 2 1 0 : 4 2 0 9 / 0 2 / 2 0 1 0 The terminal has its own time reference. This time might be drifting after a while. Therefore, it is possible to compensate the drifting by +10.0 seconds maximum (terminal time base too slow) to -10.0 seconds maximum (terminal time base too fast) per day. In the hour submenu, press the key 2 (SHFT=2). Then the following screen is displayed: 2 = + 1 = S H I F T = + 0 0 , 0 s Each time you press the key 1, the compensation value is decreased by 0.1 seconds. The key 2 increases it by the same interval. Confirm with the E key. 2 = + 1 = S H I F T = + 0 0 , 1 s Back to subject 82 14. Set up the hardware What do you want to do? Understand the screen for setting up the terminal Setting up the connection of the terminal Set up the display of a terminal Go to the thematic index 83 14.1 Understanding the screen for setting up the terminal This screen can be accessed from the menu System | Hardware: Setup area Menu This screen allows you to set up the terminal installed with TimeBox. It is broken down into 2 parts: - A menu area (in the bottom right-hand corner) which allows you to select the item to set up on the terminal. - A setup area (top part) which allows you to define the setup of each of the items of the system. By default, you will open the hardware setup on the connection of the terminal. Back to subject 84 14.2 Setting up the connection of the terminal This screen can be accessed from the menu System | Hardware | Connection: Select the type of terminal installed Select the terminal description Menu Biometric terminal (not available in France) Clocking terminal You can change the description of your terminal by clicking on the relevant field. From this screen, you can also define the download mode for the clocking data collected by the terminal: - USB key and BIO USB key mode: You can then download the data by connecting a USB key successively to the terminal and to your TimeBox PC. In this case, the Initializing download USB key button allows you to copy a file on your key in order to automatically download the data upon connection. - Serial mode: Downloading of data will be done by the serial link between the terminal and the PC operating TimeBox. It is then possible to request for automatic detection of the link when the connecting cable is connected. - BIO IP Network mode: Downloading of data will be done by a RJ 45 cable between the terminal and the TimeBox PC. You can enter a new IP address if necessary. Note, please refer to the setup of the TimeBox Biometric terminal for changing the IP address of the terminal! After any setup change, the system will inform you when leaving the software and ask you to carry out a data transfer. Back to subject 85 14.3 Setting up the display of the terminal The screen for setting up the time display on the terminals can be accessed from the menu System | Hardware | Display: Area for selecting the display format of the date on the terminal Area for selecting the display format of the results in the software Access to the clock display setup This screen is divided into 2 parts: - A menu area (in the bottom right-hand corner) which allows you to select the item to set up on the terminal. A setup area (top part) which allows you to enter or tick the various setup options. For setting up the date display on the terminal, just tick the desired format and confirm with a click on Validate. When you validate your modifications, the new setup does not change anything to the date format of your PC which corresponds to the Windows date format. In this screen, select the display mode of the results in the software. These results can be in hours and minutes or in hours and hundredths: (for example 39h30 is written as 39.5h in hours and hundredths display): 1. Tick the button which corresponds to the mode selected 2. Click on Validate to save the new configuration or on Cancel if you do not want to validate the modifications. Warning, as the results cannot be displayed on the terminal, only the software screens are concerned by this setup. Back to subject 86 15. Software configuration What do you want to do? Understand the software setup screen Enter the data of your company Customise the password to access the software Define the language to use the software Go to the thematic index 87 15.1 Understanding the software setup screen The setup screen of your software can be accessed with one click on System | Software: Information specific to your company Distributor references Your commercial options This screen allows you to find the information contained in the About section: - The PC software version, The name of your company, Your customer file number, The expiry date of the system and the locking dates, The language used currently by TimeBox, The directory path used for TimeBox backups , The address, phone and facsimile numbers of the technical support, as well as the email addresses to which you can contact us. In this information, the data related to your company can be modified: - The name of your company, Your customer file number, The language used currently by TimeBox, Your password to access the software, The backup directory. Back to subject 88 15.2 Entering the data of your company To enter the data of your company, you must open the following screen using the buttons System | Software: Company name Customer number To enter the data of your company, you must: 1. Enter the name of your company in the Company field, 2. Enter your customer number (if required) in the Customer number field, 3. Click on the Validate button to validate your entry or on Cancel to ignore the modifications. The TimeBox software will automatically write the name of your company and your customer number on the reports that you print. Also refer to how to change the password to access the software. Back to subject 89 15.3 Customising the password to access the software You can change the password that allows you to get connected to a terminal. To do so, you must open the following screen using the buttons System | Software: Button to change the password Button to cancel the password change Button to validate the new password To change your password, you must: 1. 2. 3. 4. 5. Click on , Click on theFormer password field and enter the current password, Click on the Password field and enter the new password, Click on the Confirm field and enter the new password selected, Click on Validate to take account of the modifications or on Cancel if you do not wish to save the modifications. Also refer to subject Access to the software for the use of the password. Back to subject 90 15.4 Defining the language to use the software You can change the language of the TimeBox software. To do so, you must open the following screen using the buttons System | Software: Select the language Button to cancel the language change Button to validate the new language To change the language of your application and of your terminal, you must: 1. Select the language that you wish to use in your TimeBox software, using the popdown menu Language, 2. Click on the Validate button to validate or on Cancel if you do not wish to save the modifications. To take account of the new language setup, you must exit the application and start it again. NOTE: The language of the terminal will be updated after the next data transfer. Back to subject 91 16. Maintenance What do you want to do? Initializing the USB key Restoring a backup Deleting clockings Go to the thematic index 92 16.1 Initializing the USB key You can access the USB key initialization screen by clicking on System | Hardware: This screen allows you to re-initialize your USB key or a brand new one in order to connect it to the TimeBox or TimeBox Biometric terminal and to the Administration PC. To initialize a USB key you have to: - Insert the key in the USB port of the PC, Click on Initialising download USB key. After a few seconds a progress bar from this initialization screen will show you the action is completed. This operation will copy two files on your USB key: Param.fir & Progemb.fir. Back to subject 93 16.2 Restoring a backup To restore a backup you can click on System | Maintenance and then on Restoration: In this screen you can restore a backup of your TimeBox database. The default path to record backups is \Bodet\TIMEBOX\SaveAll on your hard drive. This path can be changed in System | Hardware, field File to restore. Backups can give you the opportunity to restore the database as it was at the time of the last backup. Beware if you restore a backup all data coming from after this backup will be lost. To restore a backup you have to: - Click on , Select the backup file to restore, Click on Restore, Click on OK to validate warning message. Restoration is in progress and then the software will close automatically and restart with the restored backup. Back to subject 94 16.3 Deleting clockings To delete clockings you can click on System | Maintenance and then on Deleting the clockings: In this screen, you can delete the clockings of the whole personnel between two dates. This might be necessary in the beginning period, if you wish to erase results after a testing phase. To do so, you must: 1. Select a start and an end date between which all clockings will be definitely deleted, 2. Click on the Validate button to validate or on Cancel if you do not wish to delete the clockings. Warning, any deletion of clockings is irreversible! That's why we recommend you to make a data backup before any manual change of clockings. Back to subject 95 17. Biometrics What do you want to do? Consulting advices for the use of biometrics Consulting the quality of enrolments Registering the employees by fingerprint Registering the employees using a badge number Deleting fingerprints or a badge code from the terminal Go to the thematic index 96 17.1 - Advices for the use of biometrics It is strongly recommended to enrol the index finger. It is strongly recommended to keep the fingers clean and dry to clock or enrol. You must not press too much or too little on the sensor glass surface. Keep the finger placed until the red light goes off. Every time a finger is placed on the glass surface, it leaves an impression. It is therefore recommended to clean the surface regularly in order to avoid any confusion by the sensor. CAUTION! If you enrol your finger too quickly there is a risk it will not be saved. In this case, each clocking results in an error message. You must therefore take your time when you enrol. To guarantee the correct level of recognition, the score obtained during enrolment must be greater than 90. If you want to restart an enrolment, you must delete the enrolment of all the fingers of the employee and restart the entire procedure. Back to subject 97 17.2 The quality of enrolments The quality of enrolments screen can be accessed with one click on System | Biometrics if you have got a TimeBox Biometric terminal: The screen below shows the list of all employees, giving their surname, first name, badge number and the 4 possible scores for the biometric registration (enrolment). By default, the "score" column is empty. If the employee is not enrolled on the terminal but authorised to clock with its badge number, a red 0 is displayed in the "score" column (for example: Elisabeth Page). The "score" column of an employee declared in the software but not on the terminal (case of an employee who has not been registered on the terminal yet or who uses a card for clockings) is empty (for example: Peter Jones). The scores of an employee who is enrolled on the terminal are displayed in black if they are higher than 90 and in red if they are inferior. The quality of enrolment is rated on a scale from 0 to 100. When the score is inferior to 90, it is recommend to restart the enrolment. These scores are downloaded each time you carry out a data transfer with the terminal (either by IP connection or USB key). When carrying out the data transfer without leaving this screen, the Refresh button refreshes the display of the scores Back to subject 98 17.3 Registering the employees by fingerprint We recommend you to first create the employees in the software and to assign them a badge number (= 5 digits number inferior to 65000, which has to be entered in the Badge field in the employees' setup screen). Afterwards, print out the list of employees and start the enrolment equipped with this list. Every user must enrol two fingers. On the TimeBox Biometric terminal: Press the key 1 (menu BIO=1) in the main menu. Press the key 1 to start the enrolment. The employee being enrolled must be identified by entering his badge number. The blinking cursor will help you with the entry. Confirm with the E key. O K = E 1 2 3 4 5 The enrolment begins: P U T If there are no errors, the terminal displays: X X X R E M O V E R E T = F 1 R E T = F 1 F I N G E R R E T = F 1 F I N G R Place and remove the finger as many times as requested. XXX is the quality of the enrolment executed out of 100. When the score is inferior to 90, it is recommend to restart the enrolment. P U T O T H E R If there are no errors, the terminal displays: R E T = F 1 F I N G E R Repeat the enrolment procedure for another finger. When both fingers are enrolled, the terminal displays: E M P L O Y E E E N R O L L E D Just place the finger on the biometric reader for clocking in or out. When the clocking is successful, the time and the employee's badge number are displayed on the terminal. 17.4 Registering the employees using a badge number The employees who cannot be enrolled or whose enrolment quality is not sufficient can clock without biometric identification by entering their badge number on the keyboard of the terminal. Before being used for a non biometric identification, a badge number must be authorised in the system. Press the key 2 (menu NUM=2) in the main menu. Press the key 1 for adding the badge number of an employee who will use a code for clocking. N U M A D D = 1 R E T = F 1 D E L = 2 Enter the number and confirm with the E key. B A D G E N U M B E R S T O R E D If there are no errors, the terminal displays: Back to subject 99 The employee must press the F1 key for clocking, the following message appears: Y R S L F I D E N T . Then, he has to enter the badge number and confirm with the E key. When the clocking is successful, the time and the employee's badge number are displayed on the terminal. 17.5 Clocking of employees using a badge (if badge reader option) The employees who cannot be enrolled or whose enrolment quality is not sufficient can clock without biometric identification by using a card (option). In this case, just assign the badge number written on the card to the employee in the software and swipe the card. When the clocking is successful, the time and the employee's badge number are displayed on the terminal. 17.6 Deleting fingerprints or a badge code from the terminal When an employee leaves the company, you might need to delete his fingerprints from the terminal or to forbid clockings with a certain badge number. Press the F2 key on the biometric terminal and enter the administration code to get to the main menu. Once you are in the right submenu (menu BIO=1, menu NUM=2), press the key 2 for accessing the options for deletion. Then the following screen is displayed: B D G = 1 L S T = 2 Press the key 1 in order to delete the data by entering the badge number. Confirm with the E key. The following message appears: R E T = F 1 D E L . S U C C E S S F Press the key 2 in order to delete the data by selecting the badge number from a list. Scroll through the list with key 1 and 2. Confirm with the E key. < 1 2 > 1 2 3 4 5 R E T = F 1 R E T = F 1 Back to subject 100 THEMATIC INDEX What do you want to do? General/Manual Access to the software Stop the software Create/Set up employees Create and manage schedules Set up the bell ringing Set up the bill ringing calendar Clockings and totals Group of employees Clocking results Clocking anomalies Reports Global configuration Software configuration Set up the hardware Time of the terminal Biometrics Glossaire 101 GLOSSARY Add/deduct: Number of hours to be added or deducted from the totals to take account of an event such as a leave. For example, it is possible to create a +8h00 add/deduct for an employee who was visiting customers and has therefore not been able to clock in and out. Add/deduct comment: Allows you to justify a possible add/deduct. The comments can be entered for 5 weeks in the future. Add/deduct total: Total of all the daily Add/Deduct for a week or a period. Enrolment Action of registering a fingerprint on a biometric terminal in order to clock with a finger. Ethernet connection: Communications protocol which allows the clocking terminals to communicate via wire link (RJ 45) with the PC on which TimeBox is installed. Expiry date of the system: The earliest date to which you can go back. This date is calculated according to the number of clockings contained in the terminal. As an indication, with an average of 8 clockings a day, the system can go back to 540 days in the past. Report: SUMMARY OF A TYPE OF DATA SELECTED FOR AN EMPLOYEE OR A GROUP OF EMPLOYEES AND FOR A GIVEN PERIOD. A REPORT CAN BE CONSULTED ON THE SCREEN, PRINTED OR EXPORTED. Results locking date: The results locking date is the date before which no result can be recalculated. By default, this date is equal to the expiry date of the system. RS232: Communications protocol which allows the clocking terminals to communicate via wire link (RS232) with the PC on which TimeBox is installed. 102