1
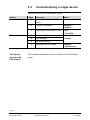
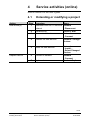
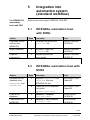
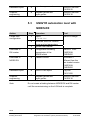
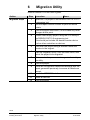
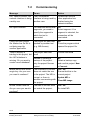
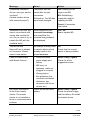
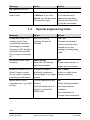
s
DESIGO™ RXT10.2
Engineering and commissioning
Quick guide
CM110758en
30.09.2005
Building Technologies
Building Automation
2/32
Building Technologies
Building Automation
CM110758en
30.09.2005
Contents
1
About this document ............................................ 5
1.1
Before you start.................................................... 6
2
Creating a new project (offline) ............................ 7
2.1
Configuring the devices........................................ 7
2.2
Creating bindings ................................................. 9
2.3
Creating/modifying topologies .............................. 9
2.4
Creating groups ................................................. 10
2.5
Printing the project data, saving and closing the
project ................................................................ 10
2.6
Copying rooms ................................................... 11
3
Commissioning (online)...................................... 12
3.1
Connecting the PC to the network ........................ 12
3.2
Processing the “To do” list ................................. 12
3.3
Loading the project data..................................... 13
3.4
Disconnecting from the network ......................... 13
3.5
Commissioning a single device.......................... 14
4
Service activities (online) ................................... 15
4.1
Extending or modifying a project ........................ 15
4.2
Resetting the project (Reset Project) ................. 16
4.3
Replacing the master device.............................. 17
4.4
Deleting a device................................................ 18
4.5
Monitoring and diagnostics ................................ 18
5
Integration into automation system (standard
workflow)............................................................ 19
3/32
Building Technologies
Building Automation
DESIGO RXT10.2 Kurzanleitung
Contents
CM110758en
30.09.2005
5.1
INTEGRAL automation level with NITEL............ 19
5.2
INTEGRAL automation level with NCRS............ 19
5.3
UNIGYR automation level with NIDES.RX......... 20
5.4
VISONIK automation level with NIDES.RX ........ 21
6
Migration Utility .................................................. 22
7
Dialog boxes and error handling ........................ 23
7.1
Tool installation .................................................. 23
7.2
Commissioning .................................................. 24
7.3
Service errors..................................................... 27
7.4
Special engineering notes.................................. 28
4/32
Building Technologies
Building Automation
DESIGO RXT10.2 Quick guide
Contents
CM110758en
30.09.2005
1
About this document
This condensed guide briefly describes the engineering and
commissioning procedures for DESIGO RX projects. It
covers both the activities to be carried out with the RXT10
commissioning and service tool, and the steps required for
integration into the DESIGO building automation and control
system.
Engineering
workflow
The standard procedure for project engineering normally
involves the use of the System Design component of
DESIGO TOOLSET. In this case the RXT10 is used only for
commissioning and service activities.
5/32
Building Technologies
Building Automation
DESIGO RXT10.2 Quick guide
About this document
CM110758en
30.09.2005
1.1
Before you start
Validity
This document is valid for the RXT10 commissioning and
service tool from Version 2.3.
Content and
target
readership
The RXT commissioning and service tool is used to
engineer, install and maintain LON networks incorporating
DESIGO RXC and LONMARK-compliant third-party devices.
This document contains basic information and operating
instructions, and is written for engineering, commissioning
and service specialists in the field of HVAC.
How the
contents are
structured
All the tables have the same structure. The Action and
Procedure columns are followed by a Menu column
containing the command sequence. In addition to crossreferences within this document (chapter x.x), reference is
also made to the relevant section of the User’s guide
(CA110412en), where the procedures are described in
more detail.
Faulty product/
Incomplete
documentation
Should you experience any faults or shortcomings in the
product or the product literature, please contact the Common
Support department of Siemens Building Technologies,
Building Automation. This will help us further improve the
product.
Support address
Siemens Switzerland Ltd. Building Technologies Group
Common Support Entry 5500
Gubelstrasse 22
6301 Zug, Switzerland
Tel.
+41 41 724 5500
Fax
+41 41 724 5501
E-mail: [email protected]
6/32
Building Technologies
Building Automation
DESIGO RXT10.2 Quick guide
About this document
CM110758en
30.09.2005
2
Creating a new project
(offline)
Refer to Section 5 of the User’s guide.
Action
Set up project
Enter the project
data
Notes
Step
1
Create a new project
Procedure
Menu Project >
New
2
Enter project name, engineer,
and comments
Properties >
Overview tab
3
4
Enter the project version
Select the relevant options
General tab
Network tab
5
Master device, network
interface
Integration tab
• One project must be created for each PXR or NIDES.RX.
• If you are using the same RXC devices in succession in
different projects (for test purposes, for example), a
different domain must be selected for each project.
2.1
Configuring the devices
Refer to Section 6 of the User’s guide.
Action
Register first device
Configure
first device
Register other
identical devices
Step
1
Procedure
Add a new device
Menu Device >
Add
2
Location, description
Summary tab
3
Select application
Application tab
4
Select device type
Device Type tab
5
Set parameters
Settings tab
6
Save configuration
OK
7
1
Select binding to
master device
Copy device
Copy
2
Paste device(s)
Paste or
Paste Special
7/32
Building Technologies
Building Automation
DESIGO RXT10.2 Quick guide
Creating a new project (offline)
CM110758en
30.09.2005
Action
Step
3
4
Register other
dissimilar devices
Notes on thirdparty devices
Procedure
Menu Device >
Modify location and description Configure
> Overview
(and settings if required)
or
Configure
> List view
Save configuration
OK
As Step 1
• Third-party devices from the applications library:
rd
same as RXC devices (application = 3 party devices)
• Third-party devices with LNS plug-ins (application type:
LNS plug-in support)
Devices can only be configured online.
8/32
Building Technologies
Building Automation
DESIGO RXT10.2 Quick guide
Creating a new project (offline)
CM110758en
30.09.2005
2.2
Creating bindings
Refer to the User’s guide, Sections 6.1.6 and 7.
Action
Create bindings
between devices
Step
1
2
3
2.3
Procedure
Menu View >
Tree view
Switch to the tree view
Click source device or object
and drag mouse pointer to
target device or object.
Binding template
It may be necessary to create a
binding template if no suitable
binding template exists already:
Menu: Tools >
Binding Template Editor
Creating/modifying topologies
Refer to the User’s guide, Section 6.10 to 6.12.
Action
Define topology
(offline)
Step
1
2
or
3
Modify topology
(online)
Create router
topology (offline)
1
Procedure
Open the relevant topology
dialog box
Menu Tools >
Device topology
or
Router topology…
Adding segments
Device topology >
Create
Delete segment
Device topology >
Remove
Highlight the segment, select
device(s), and highlight new
(target) segment
Highlight the device
placeholder
Device topology >
Move
Highlight router and highlight
two new segments
Router
Topology…
Device topology >
Move
9/32
Building Technologies
Building Automation
DESIGO RXT10.2 Quick guide
Creating a new project (offline)
CM110758en
30.09.2005
Action
Reconfigure router
topology
Step
or
2
2.4
Procedure
Highlight the required
segments
Complete the reconfiguration
process
Menu Tools >
Router
Topology…
> Change
Router
Topology…
> Assign
Creating groups
Refer to Section 6.9 of the User’s guide.
Note
Action
Group the devices
Useful for commissioning the plant; not to be confused with
the Groups in the PXR).
Step
1
2.5
Procedure
Display Group Editor
Menu: Tools >
Group Editor...
Printing the project data, saving
and closing the project
Refer to the User’s guide, Section 5.7 to 5.9.
Action
Print the
project data
Save the project
Step
1
Close the project
3
2
Procedure
Select and print the required
report type
Save the project. (Files will be
generated for system
integration.)
Close the project
Menu: Project >
Print Report…
Save or
Save as…
Close
If you are ready to commission the RXC devices, you can
now go to the "Commissioning" section, (see chapter 3)
without closing the project.
10/32
Building Technologies
Building Automation
DESIGO RXT10.2 Quick guide
Creating a new project (offline)
CM110758en
30.09.2005
2.6
Copying rooms
Refer to Section 6.4 of the User’s guide.
Action
Register all the
devices in a room
Step
1
2
3
Create bindings
between registered
devices
4
Copy room
5
Create bindings
between rooms
6
Procedure
Menu:
Register the first device,
see chapter 2.1
Register remaining devices,
as Step 1
Create bindings, see
chapter 2.2
Device > Add
View > Tree View
Highlight all the devices for this Device > Copy
room and copy (including
bindings)
Device > Paste or
Paste the copy once
> Paste Special
or more than once
View > Tree View
Create bindings between
rooms, see chapter 2.2
11/32
Building Technologies
Building Automation
DESIGO RXT10.2 Quick guide
Creating a new project (offline)
CM110758en
30.09.2005
3
Commissioning (online)
3.1
Connecting the PC to the network
Refer to Section 8 of the User’s guide.
Action
Step
Connect the PC to
the LON bus
1
Activate the
“To do” list
2
3
4
Important
Procedure
Menu:
Tools > Options
Check that the correct LON
interface type has been
specified.
Select the Show Todo dialog Tools > Options
box on connection check box
If there are routers on the
network, specify the segment
to which the RXT10 is
connected.
Connect to network
Network >
Connect
If you make an incorrect choice here, it will not be possible to
install the network. At a later stage during installation, errors
will occur indicating an incorrect "channel".
3.2
Processing the “To do” list
RXT10 identifies outstanding tasks automatically. The “Todo”
list appears as soon as you select Network > Connect. The
check boxes marked with a cross indicate those items in the
network which still need to be modified or installed. Click
Process to start the first step.
These steps correspond to the steps in the basic
“Commissioning” procedure.
12/32
Building Technologies
Building Automation
DESIGO RXT10.2 Quick guide
Commissioning (online)
CM110758en
30.09.2005
3.3
Loading the project data
Refer to Section 8.4 of the User’s guide.
Action
Install the devices
with the following
options:
Note
Step
1
Procedure
Menu: Network
> Install…
3
4
Select the devices to be
installed
Load Settings
Set Device Online
5
Update application
Device >
Configure…
> Application >
Settings
Both the installation of the master device and the loading of
project data can be automated by use of the Connect
Wizard.
3.4
Disconnecting from the network
Refer to Section 8.10 of the User’s guide.
Action
Step
1
2
Procedure
Disconnect from network
Menu:
Network,
Disconnect
Select and print the required
reports
Project
> Print Report…
13/32
Building Technologies
Building Automation
DESIGO RXT10.2 Quick guide
Commissioning (online)
CM110758en
30.09.2005
3.5
Commissioning a single device
Refer to Section 8.5 of the User’s guide.
Action
Install devices
Step
1
2
3
Define options
Third-party
devices with
LNS plug-in
4
5
6
7
Procedure
Connect the PC to the RXC
device
Connect to network
Menu:
Network >
Connect
Select device from the list view View
> List View
Device
Assign address
> Install...
Load settings
Set device online
Disconnect from network
Network
> Disconnect
For a detailed description, refer to Section 8.6 of the User’s
guide.
14/32
Building Technologies
Building Automation
DESIGO RXT10.2 Quick guide
Commissioning (online)
CM110758en
30.09.2005
4
Service activities (online)
Refer to Section 9 of the User’s guide.
4.1
Action
Add device(s)
Replace device
Step
1
Extending or modifying a project
Procedure
Menu:
Disconnect the RXT10 from the Network
> Disconnect
network
2
3
Add device(s)
Connect to network
4
Address the new devices
5
Install the new devices
6
Connect to network
7
Replace device
Device > Add
Network
> Connect
Network > Assign
devices.
Network
> Install...
> Select Changed
Devices
Network
> Connect
Device > Replace
15/32
Building Technologies
Building Automation
DESIGO RXT10.2 Quick guide
Service activities (online)
CM110758en
30.09.2005
4.2
Resetting the project
(Reset Project)
Refer to Section 5.10 of the User’s guide.
In the event of a problem, it is possible to reset the devices in
a project, i.e. restore their default values.
STOP
Caution
Note
Action
Save the project
Disconnect from
network
Reset project
Important:
Resetting a project has significant consequences for any
devices which have already been addressed. These devices
must be reinstalled to maintain the consistency of the
network. Projects should therefore only be reset in extreme
circumstances.
Make sure you create a backup first (see the User’s guide,
Section 5.8).
Step
1
Procedure
Create a backup
Menu:
Project > Backup
2
Disconnect from network
3
Reset the project (deletes LNS
database)
If the assignment is correct,
answer No to the prompt
Delete Neuron ID?
Network
> Disconnect
Project
> Reset…
4
De-energize PXR
De-energize
NIDES.RX
Connect to network
5
Use reset button
(do NOT remove battery!)
Remove battery for min.10 s
6
7
Network >
Connect to network
> Connect
Answer No to the prompt
Install MD?
(to save time, do not install MD
until later)
Network
Re-install devices (without
Application download)
> Install …
Reinstall devices
8
Disconnect from
network
9
Disconnect from network
Network
> Disconnect
16/32
Building Technologies
Building Automation
DESIGO RXT10.2 Quick guide
Service activities (online)
CM110758en
30.09.2005
Action
Save the project
Step
10
Procedure
Save the project
Connect to network
11
Connect to network
Install master
device
12
Install master device
Read network
status
Disconnect from
network
Save the project
13
Read network status
14
Disconnect from network
Save the project
4.3
Menu:
Project
> Save…
Network >
> Connect…
Device
> Install…
Network > Get
status
Network
> Disconnect
Project
> Save…
Replacing the master device
Refer to Section 6.7 of the User’s guide.
Action
Disconnect from
network
Delete master
device
Reset new
master device
(NIDES.RX only)
Replace device
Connect to network
Install master
device
Important
Step
1
2
3
Procedure
Disconnect from network
Delete master device from
database
Remove battery for approx. 10
seconds
4
5
Replace master device
Connect to network
6
Install master device
Menu:
Network
> Disconnect
Tools > Clear MD
image
Network
> Connect
Device
> Install…
For technical reasons, the RXC devices are reset twice upon
connection to the network. This can affect lighting and blinds
(depending on the controller settings).
17/32
Building Technologies
Building Automation
DESIGO RXT10.2 Quick guide
Service activities (online)
CM110758en
30.09.2005
4.4
Notes:
Deleting a device
This process deletes existing bindings. The device must also
be deleted at the automation level and the management
level.
4.5
Monitoring and diagnostics
Refer to Section 9.1 of the User’s guide.
The Commissioning Support option is an efficient tool for
commissioning and maintenance of DESIGO RXC systems.
The following processes can be carried out for several RXC
devices at once:
• Monitor process values
• Override outputs
• Modify settings
Action
Connect to network
Step
1
2
Connect the PC to the LON
bus
Connect to network
Menu:
Network
> Connect
3
Display commissioning support Tools,
> Commissioning
support…
4
5
Select devices
View process values. Select
the View check box.
6
Override outputs:
select the Override check box.
Change settings: click Settings
7
8
Note
Procedure
Disconnect from network
Network
> Disconnect
Remember to reset the devices to "Auto" before closing the
Commissioning Support dialog box.
18/32
Building Technologies
Building Automation
DESIGO RXT10.2 Quick guide
Service activities (online)
CM110758en
30.09.2005
5
For DESIGO PX
automation
level with PXR
Integration into
automation system
(standard workflow)
Refer to the online-help in DESIGO TOOLSET.
5.1
INTEGRAL automation level
with NITEL
Action
Download Infolist
and text into
NIDES.RX
Import database
Graphics
engineering
Step
1
Procedure
Tool
Download the Infolist and
Split.asc file
DESIGO INSIGHT
CA1Z9125
2
DB Import: import the
Split.asc file
DESIGO INSIGHT
CA1Z9125
3
Integrate genies and
super genies
DESIGO INSIGHT
CA1Z9130
5.2
INTEGRAL automation level with
NCRS
Action
Generate NCRS
database from
SAPIM.ASC and
NIOPEN.ASC
Load NCRS
database
Load Infolist into
NIDES.RX
Step
1
Procedure
Read the NIOPEN.ASC and
SAPIM.ASC files into
INTEGRAL PLAN
Tool
2
Create the NCRS database
and Infolist
e.g. (sta_ncrs.dbs)
INTEGRAL PLAN
Folder M3
3
Database > Restore
(sta_ncrs.dbs)
4
Database > NICO Infolist
(infolst1.inf)
NCRS Access
CA1Z9125
NCRS Access
CA1Z9125
INTEGRAL PLAN
Folder M3
19/32
Building Technologies
Building Automation
DESIGO RXT10.2 Quick guide
Integration into automation system (standard workflow)
CM110758en
30.09.2005
Database import
5
Import sta_ncrs.dbs
DESIGO INSIGHT
CA1Z9125
Graphics
engineering
6
Integrate genies and
super genies
DESIGO INSIGHT
CA1Z9130
5.3
UNIGYR automation level with
NIDES.RX
Action
Create RXC
configuration
Step
1
2
3
Procedure
Tool
Import
NIOPEN.ASC
UNIGYR Design
Generate UNIGYR function
blocks and set parameters
Update user manual
Download to
RX master
4
Download to
NIDES.RX
5
Configuration including
transmission of the
NIDES Infolist
Transmit Infolist
Database import
6
UNIGYR DB Import
Graphics
engineering
7
Integrate genies and
super genies
Note
UNIGYR Tools
CA2Z3299
CM2Z8021
Automatic if
different from the
last loaded version
CA2Z3299
CM2Z8021
TagTool
CA1Y9122
DESIGO INSIGHT
CA1Z9130
Do not create a binding between NIDES.RX and RX master
until the commissioning on the LON side is complete.
20/32
Building Technologies
Building Automation
DESIGO RXT10.2 Quick guide
Integration into automation system (standard workflow)
CM110758en
30.09.2005
5.4
VISONIK automation level with
NIDES.RX
Action
Step
Create RXC project
1
2
3
Define groups
4
General VISONIK
engineering
5
6
Database import
7
Graphics
engineering
8
Note
Procedure
Tool
The following files are created:
“Project data”
"NIOPEN.ASC"
"RxNiBps.COL", containing:
– TSK111.TXT
(project image for BPS)
– TSK110.TXT
(Infolist for NIDES.RX)
Adapt GroupConfig.COL
manually to the project
RXT10
CA110412
Download RX coupling (CFE
application) to the BPS.
Carry out general VISONIK
engineering
DB Import: Import global and
project-specific data
VISOTOOL Editor
CA2Z8339
Integrate genies and
super genies
DESIGO INSIGHT
CA1Z9130
VISOTOOL
CA2Z8339
DESIGO INSIGHT
CA1Z9125
Do not create a binding between NIDES.RX and
VISONIK BPS until commissioning on the LON side is
complete.
21/32
Building Technologies
Building Automation
DESIGO RXT10.2 Quick guide
Integration into automation system (standard workflow)
CM110758en
30.09.2005
6
Migration Utility
Refer to Section 10 of the User’s guide.
Action
Migration Steps
Step
1
2
3
4
5
Procedure
Menu:
Open old v1.x project in the DESIGO RXT10.2 V2.3
engineering tool
Use the report function to save or print full device
details
Save the project and close it, do not make any other
changes at this point.
Create a new empty project using the v2.x library in
the DESIGO RXT10.2 engineering tool.
This should just include the desired master device
and no other controllers or devices.
Save this new project using a different name and
location to the original.
6
Start the ‘Migration Utility’ from the tools menu, and
select the project to be migrated.
7
10
Make a note of any errors or changes indicated by
the utility.
Save the project.
Check all configuration details and bindings with the
report generated previously to ensure all details are
correct.
Install the NIDES.RX interface.
11
Install all devices
12
Save the project
8
9
22/32
Building Technologies
Building Automation
DESIGO RXT10.2 Quick guide
Migration Utility
CM110758en
30.09.2005
7
Note
Dialog boxes and
error handling
For online help in the RXT10, press <F1> in the error view.
7.1
Tool installation
Message
Cause
The system is not
installed correctly. Please
add the directory
LonWorks\Bin to your
“Path” environment
variable and restart the
computer.
The path entered under
System properties
> Environment
is not correct
Action
OK
Complete the
System properties
> Environment path:
C:\Lonworks\Bin
The files NMSndMsg.ocx
and LNS_FTP.ocx are
not in the registry
Register NMSndMsg.ocx
and LNS_FTP.ocx with
regsvr32. DOS
command:
regsvr32 NMSndMsg.ocx
regsvr32 LNS_FTP.ocx
LNS not installed
Check whether the LNS
software is installed
under Control panel >
Add/Remove programs
23/32
Building Technologies
Building Automation
DESIGO RXT10.2 Quick guide
Dialog boxes and error handling
CM110758en
30.09.2005
7.2
Message
Commissioning
Cause
The LON network
interface is being used by
another user.
Action
No object selected
For networks with several
segments, you need to
specify the segment to
which the tool is
connected.
OK
Select segment. If no
segment is selected, the
connection will be
terminated.
Could not open project
file. Make sure the file is
not being used by
another application.
The project file has been
opened by another tool
(e.g. MS Access)
OK
Close the program which
opened the project file.
There is already a
binding to this project, but
the LNS database is
missing. Do you want to
create a new database?
The project has been
reset
Confirm with YES
Instead of creating a
backup of the project,
only the project file was
copied.
No
Obtain a backup copy
and use this project. New
> Connect.
The checksum in the MD
does not match the one
in the project. The MD is
corrupt, or there is
another user working with
the project
Yes / No
Ensure that this is the
current project
The data in the MD does
not match the project;
Yes / No
Re-install MD
RXT cannot connect: the
network interface is being
used by xxx
Master device has a bad
magic key. Are you sure
you want to continue?
Invalid Private data file
Are you sure you want to
continue?
Please wait until the
other application has
finished using the
network interface.
Update MD or
Clear MD image
24/32
Building Technologies
Building Automation
DESIGO RXT10.2 Quick guide
Dialog boxes and error handling
CM110758en
30.09.2005
Message
Cause
Action
Timestamp mismatch!
Are you sure you want to
continue?
(Update master device
with selected project?)
The project was not
saved after the last
connection.
Yes: loading current
project into MD.
Old backup. The MD has
since been changed.
NO: Establishing
connection without
updating the MD.
Cancel: Connection
terminated
Validation found that MD
data is inconsistent with
device with module No.
xxx. Do you want to try to
update the MD with the
available data?
If the response to the
Incorrect time-stamp
error was Yes, the
modules being updated
are displayed.
Yes / No
Yes to update MD
The device with
NeuronID xxx is already
in this project. Please
select a new device.
An attempt is being made
to install a device which
already exists in the
project database.
OK
Check that the correct
device is being installed
Cannot communicate
with Master Device!
– Check the cable,
power supply and
battery.
– MD busy, no
response, cable not
plugged in correctly.
– Wrong project.
– Bus problems (bus
overload, termination
resistance, bus
connector with loose
contact etc.)
Power failure with faulty
battery
Abort / Retry / Ignore
Check for all the
suggested causes
No project information
found in the master
device. The master
device is not installed or
there is a communication
problem.
Abort / Retry / Ignore
Check the power supply
and the battery. Re-install
the master device.
25/32
Building Technologies
Building Automation
DESIGO RXT10.2 Quick guide
Dialog boxes and error handling
CM110758en
30.09.2005
Message
Cause
Action
xxx devices are
integrated into this
project, but you can only
integrate yyy devices with
the selected master
device.
The new master device
you have selected (PXR)
cannot accommodate the
number of devices
already set up (change
from PXR12 to PXR11).
OK
Integrate fewer devices
or select PXR12 as the
master device
Could not save project
under C:\xx
The project is writeprotected because it was
copied from a CD.
OK
Remove the
write-protection from the
project file.
Could not open LNS
network and/or system.
Invalid parameter values
(subsystem: NS, 44#)
LNS will not enable the
file “db”.
OK
Save project
Important:
Reboot the RXT tool.
(LNS will enable the data
after the next restart).
26/32
Building Technologies
Building Automation
DESIGO RXT10.2 Quick guide
Dialog boxes and error handling
CM110758en
30.09.2005
7.3
Service errors
Message
Cause
Replace device:
Error preparing to replace
device
Could not initialize the
new device to be
replaced.
Error replacing device!
Could not download
settings into new device.
OK
Repeat the process.
If this does not help: Test
the device by
commissioning it in a
separate project (function
test)
The new device could not
be registered in the
master device.
OK
Check the master device
and then repeat the
process.
No network interface
selected! Are you sure
you want to continue
without a network
connection?
No network interface
selected in the Tools >
Options menu.
Yes / No
This may be intentional
(to reduce waiting time on
the site).
If not, select the network
interface under Tools >
Options.
Do you want to read the
device information from
the network?
When re-installing the
MD, the device data
needed by the master
device can be read from
the network or from the
database.
Yes / No
Read from network: The
database will be updated
again.
The project has been
updated from a previous
version. If you save the
project now, you may not
be able to open it with the
Action
OK
Initialize the device in a
test project, to check
basic operation. Check
the cable.
Reading from the
database is faster.
OK
To keep the old project,
save the new project
under a new name.
27/32
Building Technologies
Building Automation
DESIGO RXT10.2 Quick guide
Dialog boxes and error handling
CM110758en
30.09.2005
Message
Cause
Action
Network test
> Backup. If you click
Cancel, you will be asked
for a new file name.
Yes / No / Cancel
If you choose not to
append the new data,
then the old data in the
file will be overwritten.
old version of the tool.
Do you want to append
data to xxx?
7.4
Special engineering notes
Message
Cause
Action
A template named "xxx"
already exists. If you
overwrite this template,
the changes you made
will apply to ALL bindings
made with this template.
Do you want to overwrite
it?
Warning! Existing
bindings will also be
changed.
Yes / No
No space for xxx more
device(s).
Paste special:
More than 150 devices
have been created.
OK
Create fewer devices, or
Network interface xxx not
found! Cannot connect.
Do you want to continue
preparing the database?
A network interface
previously installed on
this computer is no longer
present.
OK / Cancel
Select or install a new
network interface
Master device limits
exceeded (xxx > yyy data
points).
Only 889 data points are
allowed
OK
Modify binding template;
(total 900 data points, of
which 11 reserved for
NIDES-RX).
Use fewer network
variables;
Rename the binding if
there is any doubt as to
whether or not this
binding is already being
used.
create a second project
Use fewer devices;
Create a second project.
28/32
Building Technologies
Building Automation
DESIGO RXT10.2 Quick guide
Dialog boxes and error handling
CM110758en
30.09.2005
Message
Cause
Action
Device xxx has more
than yyy network
variables bound to the
master device!
More than 25 network
variables per binding
template (or several
binding templates
between device and
master device).
OK
Modify binding template.
Project validation failed!
You may have loaded the
wrong database, or are
not properly connected to
the network. If you are
absolutely sure that the
right database is loaded,
click Yes. Otherwise click
No.
The data in the master
device does not match
the data in the open
project:
Yes / No
If you are sure you are
working with the right
project, click YES to
update the master
device.
Clicking NO terminates
the network connection.
One or more remote
servers have been found.
More than one LNSbased tool is connected
to the network.
OK
Check that only one
LNS-based tool is
connected to the network.
The master device
cannot be the source for
a binding.
Tree view:
Master device is marked
as source
OK
Draw binding from RXC
device to master device
An old version of the
project is open, or the
project was modified on
another PC.
29/32
Building Technologies
Building Automation
DESIGO RXT10.2 Quick guide
Dialog boxes and error handling
CM110758en
30.09.2005
Message
Cause
Action
The locations are not
unique. Deleting
integration files!
Locations do not have
unique definitions, or
syntax is faulty.
OK
Enter unique locations.
Note: Unique location
strings are only required
with VISONIK. The check
for unique strings can be
disabled in the Options
menu.)
Some devices/routers
have been marked in
preparation for a move,
but have not been
moved. Do you still want
to disconnect from the
network?
In the engineering
process, devices were
moved to other
segments, or segments
were linked to other
routers.
Yes / No
These changes must also
be carried out in the
network. If you
disconnect from the
network now, the
changes prepared will not
be carried out.
DESIGO RXT10.2 Quick guide
Dialog boxes and error handling
CM110758en
30.09.2005
30/32
Building Technologies
Building Automation
31/32
Building Technologies
Building Automation
DESIGO RXT10.2 Quick guide
Dialog boxes and error handling
CM110758en
30.09.2005
Siemens Schweiz AG
Building Technologies
Gubelstrasse 22
CH-6301 Zug, SWITZERLAND
Tel. +41 41-724 24 24
Fax +41 41-724 35 22
www.sbt.siemens.com
© 2005 Siemens Schweiz AG
Subject to alteration
32/32
Building Technologies
Building Automation
DESIGO RXT10.2 Quick guide
CM110758en
30.09.2005