1
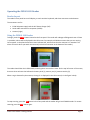
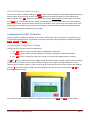
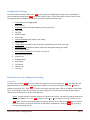
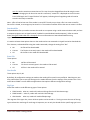
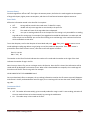
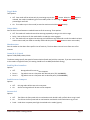
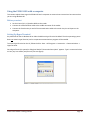
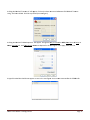
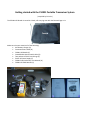
Getting started with the FS2001 Portable Transceiver System (compiled by Ernie Lin) The FS2001‐ISO Reader is stored in a black, soft carrying case with the Biomark logo on it: Make sure the case contains all of the following: • AVT Battery Charger (A) • Communications cable (B) • FS2001‐ISO Reader (C) • Coated Racket Antenna with cable (D) • Two packets of 134.2 kHz ISO tags (E) • ELPAC AC Power Supply (F) • FS2001F‐ISO Preliminary User Manual (G) • FS2001 ISO Field Manual (H) Contents Contents ........................................................................................................................................................................ 2 Operating the FS2001‐ISO Reader ................................................................................................................................ 3 Reader Layout ............................................................................................................................................................ 3 Using the FS2001‐ISO Reader .................................................................................................................................... 3 FS2001‐ISO Reader Status Overview ......................................................................................................................... 4 Configuring the FS2001‐ISO Reader ............................................................................................................................. 4 Navigating the Configuration Settings ....................................................................................................................... 4 Configuration Settings ............................................................................................................................................... 5 Explanation of each configuration setting ................................................................................................................. 5 Using the FS2001‐ISO with a computer ...................................................................................................................... 10 Before you start ....................................................................................................................................................... 10 Setting Up HyperTerminal ....................................................................................................................................... 10 Download and Save Files ......................................................................................................................................... 12 Other Commands .................................................................................................................................................... 12 Setting Up puTTY (alternate program) .................................................................................................................... 13 Alarm List .................................................................................................................................................................... 14 FS2001 Reader Battery Care ....................................................................................................................................... 15 FS2001‐Iso Reader: Getting Started Page 2 Operating the FS2001ISO Reader Reader Layout The reader's front panel has an LCD display, a touch sensitive keyboard, and three connectors at the bottom. The connectors are for: • • • ELPAC AV power supply and the AVT Power Charger (left) Serial cable connection to computer (middle) Antenna (right) Using the FS2001ISO Reader To begin, press the POWER button located on the front panel. The reader will undergo self‐diagnostic tests. If there is a problem, alarms will be displayed in the LCD screen. For example, a POW alarm means that you are running low on power. In the photo below the screen indicates ANT, which means that the antenna isn’t attached. The alarm will vanish when you attach the antenna (to the third connector at the bottom of the reader). The reader should then be in SCAN mode, assuming there are no other issues. On the top left corner of the screen, there are three columns that indicate the battery level (1), memory use (2), antenna activity (3). When a tag is detected by the antenna, the tag I.D. is displayed in the LCD screen (as in the figure below). To stop scanning, press the READ button in the front panel and the reader will go into STANDBY mode. To resume scanning, press the READ button again. FS2001‐Iso Reader: Getting Started Page 3 FS2001ISO Reader Status Overview From the scan mode or standby mode, press ENTER and the reader will display a screen depicting Battery, Memory, Antenna signal, and current File number. Press ENTER again and the reader will display a screen depicting the Antenna current. Press ENTER again to see the alarm screen. See the Alarm Section for the full alarm list in detail. Press ENTER again to see the file summary screen (this will display the current file number in use, the number of tags stored in the file, the Site ID number and the User ID number). Press once more to see the last screen, which displays the Time and Date. If the Date says 01‐01‐1996 then the lithium battery needs to be replaced (not the same as the rechargeable main battery for the reader). Configuring the FS2001ISO Reader Going through the configuration settings on the reader is confusing at first, but Ernie says it is actually easy and just needs some getting used to. Three buttons on the front panel are used to configure the FS2001‐ISO Reader: MENU↓, ESCAPE↑, and ENTER←. Navigating the Configuration Settings To begin, ignore the arrows on the first two buttons: • • • The MENU button is used to scroll through the configuration settings and the ESCAPE button is used to exit the configuration settings, returning the reader to SCAN mode. The ENTER button is used either to go into a setting, or to confirm the changes made to a setting. The ↓and ↑ buttons functions are used to toggle through the options within a setting. They only come into effect when an asterix (*) and an arrow are shown on the LCD screen. For example in the figure below the current selection of the create file option is * No ; the up arrow ↑ on the right of the LCD screen indicates which button to press (↑) to see other options. If both ↑ and ↓are indicated in the LCD screen, pressing either ↑or ↓ will both toggle between options. if no arrows are shown on the LCD screen, the buttons will function as the MENU and ESCAPE buttons instead. FS2001‐Iso Reader: Getting Started Page 4 Configuration Settings From scan mode or standby mode, press MENU and to access the configuration settings. Press it repeatedly to scroll through the settings (press ESCAPE to exit the settings). Here’s a list of the settings. The ones you are most likely going to want to change are underlined. Each item is explained further below. • • • • • • • • • • • • • • • • • • • • Create File (to store tagging data) Download File Erase File (when finished downloading, to free up memory) User Profile Tag Type Antenna Power Store mode Continuous Mode (keep reader in scan mode) Toggle Mode Unique Mode (to set delay interval between recorded instances of the same tag) Shutdown Time (extend time before reader shuts down (NB: settings are saved) Comm (N,8,1) speed Send Tag ID to CommPort (set to Form 1 or Form 2) Send Alarms to CommPort Antenna Led Backlight Mode Beep Sound Click Sound Decimal Tag Time Tag Explanation of each configuration setting Create File To create a file, press the MENU key until "Create File" appears on the screen and press ENTER. The word "No" will appear between an asterisk and an up arrow on the display as seen the previous figure. Press the ↑ button to change the setting to “Yes”. Press ENTER to confirm the change, which will cause “Site ID” to appear on the screen. This is a sub‐setting of Create File; it and the next sub‐setting (“User ID”) allow you to provide unique codes to identify owner and location in the file name (optional). Site ID: Used to associate a research location (or replicate, etc) to a file. Can take on numbers between 00 and 99; the default is 01. Press ENTER and then use the ↑ or ↓ to change the first digit (“tenths”). Press ENTER again to confirm the selection and to change the second (“ones”) digit. Press ENTER again to confirm the site ID number. At this point the arrow on the display will disappear. Press the MENU key to scroll to the next sub‐setting: User ID. FS2001‐Iso Reader: Getting Started Page 5 User ID: Used to associate a researcher to a file. User ID can be changed from 00 to 99 using the same method as changing site ID. Once the user ID is confirmed, "create file" is displayed on the LCD screen. Press ENTER again and "Create File Done" will appear, indicating that all tags being read will now be stored in the newly created file. Note: A file will not be lost even if the reader is turned off. The only way to close a file is to create a new file. Once a file is closed, no new tags may be stored in it. The maximum number of files that one can create is 22 files. Download File To download the files you need to connect the reader to a computer using a serial communications cable, and use a computer program such as HyperTerminal (included in most Windows based computers). Refer to section below: Using the FS2001‐ISO with a Computer for more information on how to download files using HyperTerminal. It is easiest to leave these options alone on the reader and to use commands in HyperTerminal to download the files. However, to download files using the reader commands, change the setting from “No”: • • • No: No files will be downloaded. Current: The file that is currently open in the reader will be downloaded. All: All the files in the reader will downloaded. Erase File Three options: • • • No: No files will be erased. Current: File that is currently open in the reader will be erased. All: All files in the reader will be erased. User Profile Three options: #1, #2, #3 By default, all configuration settings you made to the reader will be saved in user profile #1. Switching to a new user profile allows you to save new settings on the reader different from the settings of the previous user. This is useful when FS2001 is use for different applications that requires different configuration settings. Tag Type Allows the reader to read different tag types. Three options: • • • FDXA Decode: when on, reader will read non‐ISO tags like the 125 kHz Destron tags. FDXB Decode*: when on, reader will read 134.2 kHz ISO tags. HDX Decode: when on, reader will read half‐duplex tags. *Our tags are of this type. One, two or all three options can be turned on. Turning on more than one of the tag types reduces the read range. If read range is important, turn on only the decode for the specific tag type in use. FS2001‐Iso Reader: Getting Started Page 6 Antenna Power Can be changed from 10% to 100%. The higher the antenna power, the further the read range but at the expense of larger blind spots, higher power consumption, and chance of interference between adjacent antennas. Store Mode Affects the information stored in the data file. Four options: • • • • Off: No tags will be stored in the reader even if a data file is open. Search: Reader will only store tags that are not already in the open file. All: The reader will store all the tag codes that are detected. ID: Lets you re‐read tag codes that are in the open file. This setting is only intended for re‐reading tags and not for storing tags. For example If you tagged and recorded 50 sticklebacks in a cattle tank and some sculpins are introduced, you can use the ID setting to re‐read the tags in the cattle tank to find out which sticklebacks remain alive. To use the ID option, scroll to the ID option in Store Mode and press ENTER. Then, press ESCAPE to return to scan mode and begin reading tags. When a tag is being re‐read, the reader will beep twice. If the ENTER button is pressed four times from the main screen, a file staus screen will appear as follows: Site:03, User:01 ID# 0 = 40/ 60 The number on the left of the slash indicates the number of re‐reads and the number to the right of the slash indicates the number of tags in the file. Note: Once you close a file, you can no longer use the ID function. Once the file is closed, the information will be saved and still be displayed on the status screen. When a file is downloaded to a computer, the re‐read tags will have the word "found" after the tag code. For example: 19‐06‐2009 07:07:07 7D7.1AK8888RR Found Once you download a file to a computer, the re‐read tag information saved on the file status screen will disappear and reset to 0. And if you download the same file again, the re‐read tags will not have the word "Found" after the tag code. Continuous Mode Two options: • • Off: The reader will automatically go into standby mode after a tag is read. To start reading, activation of the scan mode will have to be done manually by pressing the read button. On: The reader stays in Scan mode at all times. FS2001‐Iso Reader: Getting Started Page 7 Toggle Mode Two Options: • • Off: Scan mode will be activate only by continuing to press the READ button. When the READ button is released, the reader immediately goes into standby mode. To read a tag, the READ button must be pressed again and held. On: The reader stays in Scan mode (no need to continue to hold the READ button). Unique Mode: Sets the time interval between recorded instances of the same tag. Three options: • • • Off: The reader will read and record the same tag repeatedly as long as it is within range. Delay: Sets an idle time for the reader before it reads the same tag again. On: The reader will not register the same tag until a different tag is detected or until the reader has been reset to scan mode (set reader to standby mode and then press the READ button to enter scan mode). Shutdown time Sets the reader to shut down after specific time of inactivity. The shut down time can be set from one to five minutes. Comm (N, 8, 1) Speed Options: 2400, 9600, 19200, 57600 The above settings specify the speed of communication (baud rate) with the computer. If you are communicating to the reader via HyperTerminal, this setting should be set to 9600 (the default setting). Send Tag ID to CommPort Options: • • • Off: No tag code will be sent to the computer. Form 1: Tag code is sent to a Computer with decimal point (7D7.1AK8888RR). Form 2: Tag code is sent to a Computer with no decimal point (7D71AK8888RR). Send Alarms to Commport Options: • • Off: Only tag codes will be sent to the computer. On: Alarms and tag codes will be sent to the computer. Antenna Led Options: • • • Off: The LED on the front panel with an exclamation mark beside it will not flash when a tag is read. On: The LED on the front panel with an exclamation mark beside it will flash when a tag is read. Panel: Used when a separate panel light is attached to the reader (ignore). FS2001‐Iso Reader: Getting Started Page 8 Backlight Mode Three options: • • • Off: The backlight in the LCD Screen is turned off. On: The backlight in the LCD sceen is turned on. Saving: The backlight in the LCD screen deactivates when the reader is not in use and will turn on automatically when a tag is read or the reader is in use. Beep Sound Two Options: • • Off: There will be no audible indication of a tag being read . On: The reader will produce a beeping sound when a tag is read. Click Sound Two Options: • • Off: Pressing buttons on the reader will not produce clicking sounds. On: The reader produces a clicking sound when the buttons on the reader is pressed. Decimal Tag Two Options: • • Off: The reader will display and download tag code in hexadecimal format. Hexadecimal format contains letter "A" to "F" as well as numbers in the tag ID. On: The reader will display and download tag code in decimal format, which contains only numbers. Time Tag Two Options: • • Off: The reader does not put a date and time stamp to the tags being read. On: The reader puts a date and time stamp to the tags being read. When the tag is sent to a computer, the format is as follows: 19‐06‐2009 07:07:07 7D7.1AK8888RR FS2001‐Iso Reader: Getting Started Page 9 Using the FS2001ISO with a computer This section explains how to get the FS2001‐ISO and a computer to communicate. Instructions here assume that you are using Windows XP. Before you start • • • Set the Comm (N, 8, 1) Speed to 9600 on the reader. Connect the communication cable to the middle connector of the reader. Connect the Female nine‐pin end of the communication cable to the male nine‐pin serial port on the computer. Setting Up HyperTerminal Any Microsoft PC that is Windows XP or older should have HyperTerminal included. The Vista operating system does not contain HyperTerminal, and so a separate communications program will be needed. To access HyperTerminal on the PC, follow the links: Start ‐> All Programs ‐> Accessories ‐> Communications ‐> HyperTerminal. Once HyperTerminal is opened, a dialog box labeled "Connection Description" appears. Type in a name and select an icon (any icon will do) and press ok (see next figure). FS2001‐Iso Reader: Getting Started Page 10 ect to" will ap ppear. Click o on the down aarrow at the b bottom field llabeled "Conn nect A dialog box laabeled "Conne Using" and seleect COM1. Click Ok to proceed (see nexxt figure). 1 Properties" will appear. Change the B Bits per secon nd to 9600, Daata bits to 8, Parity to A dialog box laabeled "COM1 one, Stop bitss to 1, and Flo ow control to o none as dep picted in the n next figure. Press apply, th hen press Ok. no A HyperTermin nal Box should now appear as seen in the next figuree. You are no ow connected d to the FS200 01‐ISO. FSS2001‐Iso Reeader: Gettin ng Started Page 11 Download and Save Files Once the reader is connected to HyperTerminal, • • • Go to the “Transfer” tab on the HyperTerminal menu and select “Capture Text”. Indicate the path and folder name in which the downloaded files will be stored. Then click “Start”. Enter the command “FDA” in the HyperTerminal window to download all files from the reader. (Enter “FD” Click on the “Transfer” tab on HyperTerminal, select “Capture Text,” and then click “Stop”. The downloaded files are now saved in the designated place in the computer. Open a file to make sure that the file is saved correctly. Other Commands Several commands can be inputted via HyperTerminal to configure or monitor the reader. • • • • • • Type "H" or "?" into the HyperTerminal Window to see all the commands. “DS” to display the current reader settings. “RT13:33:00” to change the time to 1:33 pm. “RD03‐07‐2009” to change the date to 3 July, 2009. “FC01,02” to create a new file on the reader corresponding to site “01” and user “02”. “FEA” to erase all the data files on the reader. FS2001‐Iso Reader: Getting Started Page 12 Setting Up puTTY (alternate program) PuTTY is another terminal program that can be used to communicate with the reader through the serial port. Start up puTTY and follow these steps. 1. Select “Session” in the Category Menu (left pane of the window). Then click “Serial” under Connection Type. Serial line should be “COM1” and speed should be “9600” 2. Select “Logging” under “Session” in the left pane. On the right pane, under Session logging, select “Printable output”. Then click “Browse” and choose a destination file and folder to save the data. This will automatically save all output to the named file. 3. Select “Serial” in the left pane (under the “Connection” heading and “SSH” subheading). In the right pane of the window select "COM1” for the serial line. Set speed to 9600, Data bits to 8, Stop bits to 1, Parity to “None”, and Flow control to “None”. 4. Select “Session” again from the Category Menu in the left pane. In the right pane, under Saved Session, type “F2001F” or something like it. Click “Save” to save the session options for the next time. 5. In the same pane, at the bottom, click the “Open” button. A puTTY command window will open up. 6. In the command window, hit the “Enter” button to start. 7. Enter “FDA” to download all files. 8. See the Other Commands section above for information on other terminal commands available. 9. Kill the puTTY window to end the session. This will also close your data file, so you can open it in a text editor and view the results. 10. The next time you are connected to the reader and start up the puTTY program, choose “F2001F” from the saved sessions list and click “Load”. Then click “Open” at the bottom of the pane. You will not need to re‐enter any of the other information. If your data file already exists you will be asked whether to append the new data or overwrite the previous file. FS2001‐Iso Reader: Getting Started Page 13 Alarm List The following is a list of alarm displays that might appear on the LCD of the reader and what they indicate. ANC ANF ANT LIT MMF MML MNF OVR POW There is a communication problem between the analog board and the reader. This indicates either an analog board failure or that the reader is overloaded. Remove tags from the antenna field and remove any noise sources from the area (i.e. metallic and electronic objects). If the problem still persists, The analog board may be damaged and the reader might have to be returned for repair. The analog board in the reader has been damaged. Reader needs to be returned for repair. The antenna cannot be detected by the reader. Check to see if the antenna cable is properly connected to the reader. Remove any noise source from the antenna (i.e. metallic and electronic objects). The lithium battery is running low or has been depleted. Replace it with a CR2032 lithium battery. This alarm causes the reader display to blink on and off. It indicates that the reader memory is full. Free up the memory space by downloading files and delete them from the reader. Reader memory is close to being full (90%). Free up memory space by downloading and deleting files from the reader. This alarm appears when no files have been created and the reader is reading tags. Therefore no tags are stored in the reader. Create a file to fix this problem. The reader cannot read tags due to overwhelming environmental noise. Remove noise sources from the antenna (i.e. metallic and electronic objects) or relocate the antenna to fix this problem. The rechargeable Nickel‐Metal Hydride (NiMH) battery is running low. Recharge the battery using the AVT Battery Charger. FS2001‐Iso Reader: Getting Started Page 14 FS2001 Reader Battery Care The FS2001‐ISO reader runs on two batteries, a Nickel‐Metal Hydride (NiMH) battery which is the power source of the reader and a lithium battery which saves the reader setting and data files. AVT power Charger The AVT Power Charger has two indicator lights: Power and status. The power light turns green when the charger is plugged into a power source. The status light has three possible indications, each corresponds to the status of the battery charging progress: • • • Blinking yellow: charge is pending. Solid yellow: battery is charging. Solid green: battery charging is complete. It is recommended that you charge the reader for four hours prior to use. The battery level indicator may be grossly overestimated by the reader when it is turned on while it is charging. The AVT Power Charger is not meant to be used as a power source as it may drain the battery instead and reduces battery life. ELPAC Power Supply Connect the ELPAC Power supply to an AC power source and the reader can be used for an indefinite period of time. Cycling the Battery Cycling the battery is a process to prolong the NiMH battery pack. To cycle the battery, charge the battery completely, and turn the unit on until the battery runs dry. Then recharge it completely again. Cycling the battery should be performed every three month. Lithium Battery Lithium battery in the reader is used to save personal settings and the tag code files in the reader memory. When the lithium battery is running low, LIT alarm will appear on the LCD screen upon reader start‐up. Download all the files from the reader before replacing the battery or it will be lost. The FS2001‐ISO in the Schluter lab uses CR2032 lithium battery. See the manual for replacing lithium battery for detailed instructions. NickelMetal Hydride battery care The Nickel‐Metal Hydride battery will discharge slowly over time when stored away. After the NiMH battery pack is depleted, the lithium battery will then be drained by the reader. Therefore, before storing the reader for extend period of time, fully charge the reader. Then take the reader out every month to fully recharge the NiMH battery pack. FS2001‐Iso Reader: Getting Started Page 15