1
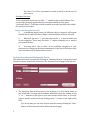
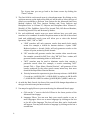
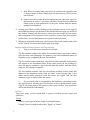
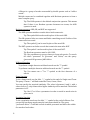
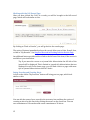
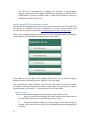
USER GUIDE FOR L’ANNÉE PHILOLOGIQUE ON THE INTERNET
Tip: You can use the Bookmarks to navigate through the guide.
Accessing L’Année philologique
Individual Membership
Individual membership accounts are available for access to the APh Online
Database. The homepage for the APh Online Database has a link that will allow you
to purchase such a membership. Payments are processed in 3-5 business days, and
you will be contacted via email with your login information.
Institutional Membership
Log in from within your Institution
Please make sure that your institution is a subscriber to L’Année philologique
Online Database. Access to the APh Online Database from within your institution
should be automatic.
Tip: If you experience problems accessing the service while at your
institution, please contact your reference librarian or the administrator in
charge of your online database access services.
Log in from a Remote Location (i.e. Off Campus)
1.
Go to the library website of the participating institution of which you
are a member.
2.
Locate L’Année in the library catalog and click on the link for the
Online Bibliographic Database.
3.
You may be prompted to provide your login information for your
institution’s library system, if you are not already logged in.
4.
Once logged in to your institution’s library system, you should be
brought to the L’Année website.
Tip: Not all institutions will offer remote access to L’Année philologique. If
you are having difficulty accessing L’Année, please contact your reference
librarian for assistance.
1
Customize your experience: Sign in / Register
The APh website allows users to customize their experience by creating their own
personal user accounts. These accounts allow users to save preferences (e-mail
address, sorting option, number of results per page), to store and access previous
searches (max. 10), to create alerts (max. 10), and to store and access specific
records (max. 50). See Your Personal APh Online Database Account.
Tip: These accounts do not provide remote access to APh. Remote Access
can only be obtained with an institutional or personal membership.
A personal account is created automatically for users who log in with a personal
membership.
Other users must register by clicking on the ‘Not registered yet?’ link. You will be
asked to provide an e-mail address and a password.
Each time you log in, you must sign in.
Tip: By clicking on the “Forgot Password?” link, you will be asked to
provide the e-mail address associated with your account and your Login
Info will be sent to this address.
Navigating L’Année philologique Online Database
Choose your language
Clicking on the flags at the upper right of the webpage, below the APh graphic, will
allow you to toggle between English, French, Italian, Spanish, and German (as the
languages become available).
Return to previous pages
Clicking on a page title at the upper left of the webpage, below the APh graphic, will
allow you to back up to the next higher page in the site tree. The Bibliography
System homepage will always be available for immediate return.
Accessing the Advanced Search
Click on “Advanced Search,” located immediately below the right hand drop-down
menu and to the left of the “Search” button in the Basic Search bar located across
every screen.
Need Help?
At the bottom right hand corner of every page of the APh Bibliographic Database
website you will find links to the Site Plan, this User Guide, and to Contact
Information for the APh staff.
2
Performing a Basic Bibliographic Search
The basic search bar is available across the top of every screen of the APh Online
Database, and looks like this:
1. The first field is a dropdown menu. By clicking on the up/down arrows on
the right of the field you will be able to select the type of search you would
like to perform. Your options are Modern Authors, Full Text, Ancient Authors
and Texts, Subjects and Disciplines Prior to Volume 67, and Subjects and
Disciplines After Volume 67.
2. The form that the second field takes is determined by the type of search you
have chosen to perform.
3. The third field is also a dropdown menu. Again, clicking on the up/down
arrows to the right of the field you will be able to choose how the results of
your search will be organized. Your options are Sort by Author, Sort by Title,
Sort by Date (oldest first), Sort by Date (newest first), and Sort by Relevance.
4. When you are satisfied with your Search selections, click the “Search” button
on the far right.
Modern Authors/Ancient Authors and Texts Searches
1.
Type your search terms into the second field.
Tip: Use modern authors’ last names. For ancient authors and texts,
L’Année uses the Latin form (Homerus, for instance), but well-established
names in English are also recognized (Homer, for instance).
Tip: The Ancient Authors and Texts search is limited to ancient authors
and anonymous texts. Specific works of ancient authors are not indexed.
Tip: For ancient authors and texts, only the first fifteen possible search
terms will appear in the dropdown menu. If the search term you are
looking for does not appear continue to type to further limit the search,
until the search term you are looking for appears.
Tip: For modern authors, only the first fifteen possible search terms will
appear in the dropdown menu. Click on “Next” at the bottom right to see
other search terms associated with the terms you typed. You can also
continue to type to further limit the search.
2.
If your search term is recognized by the database, a dropdown menu
will appear below, allowing you to select one or more specific search terms.
Click on the boxes next to the terms to select your choices. Your selections
will be marked with a checkmark.
3
Full Text
Type your query in the second field. A query is broken up into terms and
operators.
Terms
There are two types of terms: Single Terms and Phrases.
A Single Term is a single word such as “Egypt” or “consul”.
A Phrase is a group of words surrounded by double quotes such as “suffect
consul”.
Multiple terms can be combined together with Boolean operators to form a
more complex query.
Tip: The AND operator is the default conjunction operator. This means
that if there is no Boolean operator between two terms, the AND
operator is used.
Boolean operators: AND, OR, and NOT are supported.
The AND operator matches records where both terms exist.
Tip: The symbol && can be used in place of the word AND.
The OR operator links two terms and finds a matching record if either of the
terms exist in a record.
Tip: The symbol || can be used in place of the word OR.
The NOT operator excludes records that contain the term after NOT.
Tip: The symbol ! can be used in place of the word NOT.
Tip: Boolean operators must be ALL CAPS.
Tip: Use parentheses to group clauses to form sub queries. To search
for either “proconsul” or “governor” and “Africa,” use the query:
(proconsul OR governor) AND Africa.
Wildcard Searches
To perform a single character wildcard search use the “?” symbol.
To perform a multiple character wildcard search use the “*” symbol.
Tip: You cannot use a “?”or “*” symbol as the first character of a
search.
Fuzzy Searches
To do a fuzzy search use the tilde, “~”, symbol at the end of a Single word Term.
The query “Caesar~” will find terms like César, Cesare, Cäsar.
You can specify the required similarity. The value is between 0 and 1; with a
value closer to 1, only terms with a higher similarity will be matched. The default
parameter is 0.5.
4
Tip: Use 0.7 or 0.8 as a parameter in order to avoid to much noise in
your search.
Proximity Searches
To do a proximity search use the tilde, "~", symbol at the end of a Phrase. You
can specify how many words away the two terms should be. The query
“proconsul Africa”~5 will find records in which proconsul and Africa are within
five words of each other.
Subjects and Disciplines Searches
1.
A dropdown menu listing 10 different subject categories will appear
beneath the second field when a Subject and Disciplines search is selected.
2.
Wherever you see a “+”, you may click on the “+“ to open a further list
of sub-categories. These may also have “+” marks, allowing you to narrow
your search further.
3.
You may select one or more of the available categories or subcategories by clicking on the boxes immediately to the left of the Subject title.
Your selections will be marked with a check.
Performing an Advanced Bibliographic Search
The Advanced Search is reached by clicking on “Advanced Search,” below the second
drop-down menu in the Basic Search bar. The Advanced Search page looks like this:
1. The Advanced Search allows you to use as many or as few search terms as
you would like. You may add or subtract additional terms by clicking on the
“+” or “-“ buttons to the right of your last current search term, or you may
remove specific search terms by clicking on the “-“ button to the right of the
field.
Tip: At any time you can clear all your search terms by clicking the “Clear”
button at the bottom left of the Advanced Search page.
5
Tip: At any time you can go back to the home screen by clicking the
“Cancel” button.
2. The first field for each search term is a dropdown menu. By clicking on the
up/down arrows on the right of the field you will be able to select the type of
search you would like to perform. Your options for the Advanced Search are
Modern Authors, Full Text, Ancient Authors and Texts, Subjects and
Disciplines Prior to Volume 67, Subjects and Disciplines After Volume 67,
Word(s) of Title, Publisher, Series Title, Journal Title, APh Record Number,
Reviews by Journal Title, and Reviews by Author.
3. For each additional search term you must indicate how you wish your
searches to be combined. A smaller dropdown menu to the left of the second
(and each additional) search term will allow you to select the desired
operation, “AND”, “OR” or “NOT.”
a. “AND” searches will only generate results that match both search
terms. For example, a search for Ancient Authors = Lysias “AND”
Modern Authors = Avezzù, Guido, will only generate results on the
subject of Lysias, written by Guido Avezzù.
b. “OR” searches will generate results that contain either search term.
For example a search for Full Text = dog “OR” Full Text = canine, will
generate results containing either or both words.
c. “NOT” searches may be used to eliminate results that contain a
particular search term. For example, a search containing “NOT”
Journal Title = “Bryn Mawr Classical Review”, will generate all the
results produced by the other search terms, minus any that were
found in the Bryn Mawr Classical Review.
d. Priority between the operators is given from up to down: A AND B OR
C is read as (A AND B) OR C; A OR B AND C is read as (A OR B) AND
C; A AND B OR C AND E is read as ((A AND B) OR C) AND E, and so on.
4. As with the Basic Search, the form of the search field changes dependent on
the type of search term you have selected.
5. You may also apply filters to your search using the Advanced Search page.
a. Click on the “+” next to the left of Filters in the lower portion of the
Advanced Search page.
b. Language Filters: You can now limit your search results to one or
more languages. Select one or more languages by clicking on the box
to the left of the language. The box will turn blue and a check mark
will appear. You may also deselect a language by clicking on the box a
second time.
6
c. Date Filters: You may limit your search to results from a specific year
or from a range of years. Simply type the desired year (YYYY) in the
search fields.
d. Limit to interim records: By selecting this box you limit your search to
the interim records, i. e. the latest available records from the different
offices prior to their publication in the print volume and the annual
update of the database.
6. Sorting your Search results: Clicking on the up/down arrows to the right of
the dropdown menu at the bottom of the Advanced Search page (to the left of
the “Search” button) will allow you to choose how the results of your search
will be organized. Your options are Sort by Author, Sort by Title, Sort by Date
(oldest first), Sort by Date (newest first), and Sort by Relevance.
7. When you are satisfied with your search terms, filters, and results order, click
on the “Search” button at the bottom right of the page.
Modern Authors/Ancient Authors and Texts Searches
1.
Type your search terms into the second field.
Tip: Use modern authors’ last names. For ancient authors and texts, L’Année
uses the Latin form (Homerus, for instance), but well-established names in
English are also recognized (Homer, for instance).
Tip: For ancient authors and texts, only the first fifteen possible search terms
will appear in the dropdown menu. If the search term you are looking for
does not appear continue to type to further limit the search, until the search
term you are looking for appears.
Tip: For modern authors, only the first fifteen possible search terms will
appear in the dropdown menu. Click on “Next” at the bottom right to see
other search terms associated with the terms you typed. You can also
continue to type to further limit the search.
2.
If your search term is recognized by the database, a dropdown menu
will appear below, allowing you to select one or more specific search terms.
Click on the boxes next to the terms to select your choices. Your selections
will be marked with a checkmark.
Full Text
Type your query in the second field. A query is broken up into terms and
operators.
Terms
There are two types of terms: Single Terms and Phrases.
A Single Term is a single word such as “Egypt” or “consul”.
7
A Phrase is a group of words surrounded by double quotes such as “suffect
consul”.
Multiple terms can be combined together with Boolean operators to form a
more complex query.
Tip: The AND operator is the default conjunction operator. This means
that if there is no Boolean operator between two terms, the AND
operator is used.
Boolean operators: AND, OR, and NOT are supported.
The AND operator matches records where both terms exist.
Tip: The symbol && can be used in place of the word AND.
The OR operator links two terms and finds a matching record if either of the
terms exist in a record.
Tip: The symbol || can be used in place of the word OR.
The NOT operator excludes records that contain the term after NOT.
Tip: The symbol ! can be used in place of the word NOT.
Tip: Boolean operators must be ALL CAPS.
Tip: Use parentheses to group clauses to form sub queries. To search
for either “proconsul” or “governor” and “Africa,” use the query:
(proconsul OR governor) AND Africa.
Wildcard Searches
To perform a single character wildcard search use the “?” symbol.
To perform a multiple character wildcard search use the “*” symbol.
Tip: You cannot use a “?”or “*” symbol as the first character of a
search.
Fuzzy Searches
To do a fuzzy search use the tilde, “~”, symbol at the end of a Single word Term.
The query “Caesar~” will find terms like César, Cesare, Cäsar.
You can specify the required similarity. The value is between 0 and 1; with a
value closer to 1, only terms with a higher similarity will be matched. The default
parameter is 0.5.
Tip: Use 0.7 or 0.8 as a parameter in order to avoid to much noise in
your search.
Proximity Searches
To do a proximity search use the tilde, "~", symbol at the end of a Phrase. You
can specify how many words away the two terms should be. The query
“proconsul Africa”~5 will find records in which proconsul and Africa are within
five words of each other.
8
Subject and Disciplines Searches
1.
A dropdown menu listing 10 different subject categories will appear
beneath the second field when a Subject and Disciplines search is selected.
2.
Wherever you see a “+”, you may click on the “+ “to open a further list
of sub-categories. These may also have “+” marks, allowing you to narrow
your search further.
3.
You may select one or more of the available categories or subcategories by clicking on the boxes immediately to the left of the Subject title.
Your selections will be marked with a check.
4.
When you are satisfied with your selections, click the “OK” button at
the bottom of the dropdown menu. Your selection will now appear in the
Search Term field.
Other Searches
Word(s) of Title
Type your search term in the second field. The search is limited to word(s) of the
title.
Publisher
Type your search term in the second field. For instance, a search for “Belles
Lettres” will retrieve all the books published by Les Belles Lettres.
Series Title
Type your search term in the second field. For instance, a search for “Universités
France” will retrieve all the volumes of the series Collection des Universités de
France.
Journal Title
1.
Type your search terms into the second field.
Tip: You can search for a full title or for its abbreviation.
2.
If your search term is recognized by the database, a dropdown menu
will appear below, allowing you to select one or more specific search terms.
Click on the boxes next to the terms to select your choices. Your selections
will be marked with a checkmark.
APh Record Number
Type your search term in the second field. The APh Record Number is displayed
at the bottom right on the record page. The format is $$-$$$$$.
Reviews by Journal Title
1.
Type your search terms into the second field. The search is limited to
the reviews of monographs. For instance, a search for “JRS” will retrieve all
the reviews published by the Journal of Roman Studies.
9
Tip: You can search for a full title or for its abbreviation.
2.
If your search term is recognized by the database, a dropdown menu
will appear below, allowing you to select one or more specific search terms.
Click on the boxes next to the terms to select your choices. Your selections
will be marked with a checkmark.
Reviews by Author
1.
Type your search terms into the second field. The search is limited to
the reviews of monographs. For instance, a search for “Syme, Ronald” will
retrieve all the reviews published by Ronald Syme.
2.
If your search term is recognized by the database, a dropdown menu
will appear below, allowing you to select one or more specific search terms.
Click on the boxes next to the terms to select your choices. Your selections
will be marked with a checkmark.
Working with the Results Page
After you have clicked the “Search” button to perform either a Basic or Advanced
Search, you will be brought to the results page, which will look similar to this:
The top line provides a description of your search set. It allows you to see your
search string, which is a list of all your search terms and the operations used to
combine them, and the number of results.
The bar below this allows you to manipulate your search: you may view your search
history by clicking the “Search History” button, modify your current search by
clicking on the “Modify Search” button, or save the current search to your personal
account by clicking on the “Save to ‘My Searches’” button.
Viewing and Organizing your Search Results
1. Your search results are presented in two separate tabs. The main tab, which
is automatically selected, are APh Records. These are records which have
already been published in the APh. The second tab, which you can view by
10
clicking on the grey tab, are Interim Records, i. e. the latest available records
from the different offices prior to their publication in the print volume and
the annual update of the database.
2. The small drop down menu to the right of the tabs allows you to select how
many results are displayed on each page. The number of results per page by
default is 10, but you may click on the up and down arrows to choose 15 or
20. This can also be set in ‘My Preferences’.
3. To the right of the number of results per page menu, are the results
navigation controls. The two numbers tell you which page of results you are
currently viewing, and how many pages of results there are in total. You can
type in a particular page number that you wish to jump to in the white box,
typing over the current page number, and then clicking on the “OK” button.
You may also navigate through the results pages using the arrows. The inner
arrows will move you one page at a time, while the outer arrows will move
you to the first or last pages.
Tip: The same navigation controls are also found at the bottom of each
results page, on the right hand side.
4. Your results are presented in the order you selected while performing your
initial search. However, you can change this order by clicking on the up and
down arrows at the right of each column header. The first time you click the
arrows it will organize your results by that column in ascending order (i.e.
alphabetic A to Z, or Oldest Date to Newest), and if you click the arrows again
it will switch to descending order.
5. Clicking on the title in a result will open the full record, as it appears in the
APh database.
Selecting Records from the Results Page
1. You may view individual records by clicking on the title. This will bring you
to a new page where you can view the full record as it appears in the APh.
Tip: You may return to your main results page at any time, by clicking on
the button that reads, “Return to results” on the left side above the
record.
2. You may select multiple records to work with:
a. To select specific records, click on the box to the left of the record.
When selected the box will turn blue and a checkmark will appear.
b. Bulk actions are available immediately above your results list. Here
you can Select All, Select Current Page, or Deselect All, by clicking on
the desired action.
11
Refine Results (Faceted Search)
The Refine Results Panel is displayed to the right of the screen under the
Customization Panel.
Six types of facet are available: modern authors, ancient authors and texts,
subjects and disciplines, date, language, and document type.
Click on the + displayed to the left of the facet to display a ranked list of five
values. The most frequently occurring values appear at the top of the list. The
number in parentheses shows the number of records on the result list that
contain the value.
Select one or more check boxes and click on the button “Refine” to view only
those results.
Tip: You can select more than one value. Click the “More values” link to
display the first twenty values in that facet.
Tip: You can go back and deselect any value.
12
Output of Records
The series of buttons immediately above the results on the Results page or above
the record on the Full Record page allow you to Print, E-mail, Save, or Add to “My
Records”.
Tip: If you select one of these options while you have an individual record
open, it will perform that operation for only that record. If multiple
records have been selected, the operation will be performed on the
selection.
Tip: A Maximum of 100 records may be selected for the Print, E-mail, and
Save operations, and a maximum of 50 references may be selected for the
Add to “My Records” operation. If your selected records exceed this limit,
only the first 100 or 50, respectively, will be used.
Print records
Clicking on the “Print” button will open a new window where you will choose
which references to print. Click on the circle to the left of the your choice. The
selection will turn blue and be marked with a black dot. Your options are
Selected Records, Unselected Records, All Records, or a Range of Records (you
must then enter the range you wish to have printed, for example results 5
through 20). When you are satisfied with your selection click the “Print” button
at the bottom right of the window.
Tip: you can close this window at any time by clicking the “Cancel” button
or by clicking the “x” in the top right corner of the Print window.
E-mail records
Clicking on the “E-mail” button will open a new window where you will choose
which references you wish to have e-mailed, the format you wish to send the
records in, and the address where you wish them sent.
1. Choose which records you wish to e-mail. Your options are Selected Records,
Unselected Records, All Records, or a Range of Records (you must then enter
the range you wish to have printed, for example results 5 through 20). Click
on the circle to the left of your choice. The circle will turn blue and be marked
with a black dot.
2. Choose the format you wish to have them sent in. They can be sent in an
attached file as plain text, PDF, or RIS format (tag format developed by
Research Information Systems).
3. Choose the e-mail address you wish the records to be sent to. The field will
be automatically filled with the address associated with your account, if you
signed in. You may select a different address by deleting the current one, and
typing in a new one.
4. When you are satisfied with your selections click the “E-mail” button at the
bottom right of the window.
13
Save records
Clicking on the “Save” button will open a new window where you will choose
which records you wish to have saved to your personal computer and the format
you wish to save them as.
1.
Choose which records you wish to save. Your options are Selected
Records, Unselected Records, All Records, or a Range of Records (you must
then enter the range you wish to have printed, for example results 5 through
20). Click on the circle to the left of your choice. The circle will turn blue and
be marked with a black dot.
2.
Choose the format you wish to export the selected records in. They
can be exported as a plain text file, as a PDF, as an RIS format file, or directly
to your RefWorks account.
3.
When you are satisfied with your selections click the “Save” button at
the bottom right of the window.
Add records to “My Records”
Clicking on the “Add to ‘My Records’” button will open a new window where you
will choose which records you wish to save to your APh Online Database account
for future use.
1.
Choose which records you wish to save. Your options are Selected
Records, Unselected Records, All Records, or a Range of Records (you must
then enter the range you wish to have printed, for example results 5 through
20). Click on the circle to the left of your choice. The circle will turn blue and
be marked with a black dot.
Tip: You can save a maximum of 50 records in ‘My Records’. If you want to
save more than 50 records, you may save the search set corresponding to
these results.
2.
When you are satisfied with your selection click the “Add to ‘My
Records’” button at the bottom right of the window.
14
Working with the Full Record Page
After you have clicked the “title” in a result, you will be brought to the full record
page, which will look similar to this:
By clicking on “Back to Results”, you will go back to the results page.
The series of buttons immediately above the record allow you to Print, E-mail, Save,
or Add to “My Records”. See Output of Records in Working with the Results Page.
An additional button provides a direct link to the full text of the item, if the service is
available at your institution.
Tip: if you move the cursor on a journal title abbreviation the full title of the
journal will be displayed. This is limited to journal title abbreviations that are
displayed in red. On the home page, you will find a link to a page with more
tips on journal abbreviations used in L’Année.
Saving Searches and Creating Alerts
A click on the Add to “My Searches” button will bring you to a page, which look
similar to this:
You can edit the name of your search in the text entry box and have the option of
creating an alert for this search by clicking the mouse on the check box. You can
save a maximum of 10 searches and create a maximum of 10 alerts.
15
You will be notified by an e-mail sent to the address saved in “My Preferences” each
time a new record matches the search criteria of your alerts.
Working with the Search History Page
A click on the Search History button will bring you to a page, which look similar to
this:
A click on “Back to Results” will bring back the results page.
Search History Table
The first part of the page is a table listing the searches you did during the current
session: the number of the search set is listed in the first column, the number of
results in the second with the number of interim records noted in parenthesis,
the search statement in the third column.
A click on the number of a search set will bring the results in a Results Page.
Tip: Sets are listed in reverse numerical order, the most recently created set
is at the top of the table.
Combining Search Sets
On the same page, you have the possibility to combine search sets created from
previous searches. In the field below “Combine Search Sets”, type the search set
number (for instance, “Q1”), click on one of the Boolean operators to the right,
then type a second search set number.
Combine Search Examples:
Q1 AND Q2 finds all records that appear in both set Q1 and set Q2.
Q2 OR Q3 finds all records that are in set Q2 and all records that are in set Q3,
including records common to both sets.
Q1 AND Q2 NOT Q3 AND Q6 finds all records that are common to sets Q1
andQ2, excluding records that are in set Q3.
16
Tip: The use of parentheses to combine the operators is not available;
priority is given from left to right: A AND B OR C is read as (A AND B) OR C;
A OR B AND C is read as (A OR B) AND C; A AND B OR C AND E is read as ((A
AND B) OR C) AND E, and so on.
Your Personal APh Online Database Account
The APh Online Database allows users to set up a personal account. This will allow
the system to remember the user’s preferences, to access saved searches and
records, and to access created alerts. See Saving Searches and Creating Alerts.
When you are signed into your personal account, the following window will appear
on the right on your APh Online Database screen at all times:
If the name at the top right of this window is not yours, or you wish to login to
another account, click on the words “Sign Out” in the top right.
Your preferences, saved searches, saved alerts, and saved records are always
accessible via the personal account window on the right of every screen. To open a
particular menu, click on the “+” button on the left or on the words.
My Preferences
These are the default settings associated with your personal account.
1.
Here you can view and change the e-mail address associated with the
account. Delete the current e-mail and type in a new one.
2.
Change the default number of results per page on the Results Page by
clicking on the arrows to the right of the dropdown menu and changing your
selection.
17
3.
Change the default order that your results will appear in by clicking
on the arrows to the right of the dropdown menu and selecting a different
sorting option.
My Searches
Here you can view any searches that you have saved (max. 10), and you can
return to the search results by clicking on the desired search.
1.
Click on the desired search set to display it in the results page.
2.
Select one or more searches for deletion by clicking on the box to the
left of the searches, or select all the searches using the “Select All” option at
the bottom of the “My Searches” window. Click on the trashcan icon at the
bottom right of the menu to delete the selected searches. A window will
appear asking if you are sure. If you aren’t, click “Cancel.” Otherwise, click
“OK.”
My Alerts
Here you can view any alerts that you have created (max. 10), and you can display
the associated results by clicking on the desired alert.
1.
Click on the desired alert set to display it in the results page.
2.
Select one or more alerts for deletion by clicking on the box to the left
of the alerts, or select all the alerts using the “Select All” option at the bottom
of the “My Alerts” window. Click on the trashcan icon at the bottom right of
the menu to delete the selected alerts. A window will appear asking if you are
sure. If you aren’t, click “Cancel.” Otherwise, click “OK.”
My Records
Here you can view any records (max. 50) you have chosen to save.
1.
You can navigate through your saved records using the arrows at the
bottom, which will allow you to view 10 at a time. The inner arrows will
move you one page at a time, and the outer arrows will move you to the first
or last page.
2.
You can view a record in a Full Record Page by clicking on its title. You
can view all your saved records in a Results Page by clicking on “View All My
Records” at the top of the “My Records” window.
3.
Select one or more individual records for deletion by clicking on the
box to the left of the records, or select all the records using the “Select All”
option at the bottom of the “My Records” window. Click on the trashcan icon
at the bottom right of the menu to delete the selected records. A window will
appear asking if you are sure. If you aren’t, click “Cancel.” Otherwise, click
“OK.”
18