1
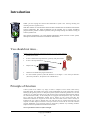
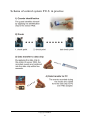
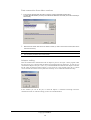
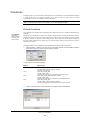
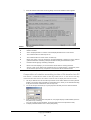
TOMST WinKontrol 2000 User manual Copyright 2002 TOMST Copyright TOMST 2 Contents Contents..................................................................................................................................... 3 Introduction .............................................................................................................................. 5 You should not miss.............................................................................................................................5 Principle of function.............................................................................................................................5 Schema of control system P.E.S. in practice ........................................................................................6 Portable Electronic Sensor P.E.S. ........................................................................................................7 Sensor function ................................ ................................ ................................ ................................ ............................. 7 Sensor types ................................ ................................ ................................ ................................ ................................ .. 7 Sensor designs................................ ................................ ................................ ................................ ............................... 7 Sensor operation................................ ................................ ................................ ................................ ............................ 7 Sensor signalling................................ ................................ ................................ ................................ ........................... 7 Maintenance................................ ................................ ................................ ................................ ................................ .. 8 Battery replacement ................................ ................................ ................................ ................................ ...................... 8 Identification chips ...............................................................................................................................8 Description and function of identification chip ................................ ................................ ................................ ............. 8 Data chips.............................................................................................................................................8 Description and function of data chip ................................ ................................ ................................ ........................... 8 Basic function ................................ ................................ ................................ ................................ ............................... 8 Work with data chip................................ ................................ ................................ ................................ ...................... 8 Setting ................................ ................................ ................................ ................................ ................................ ........... 9 Operating the data chip ................................ ................................ ................................ ................................ ................. 9 Adapter TMC .......................................................................................................................................9 Function of adapter ................................ ................................ ................................ ................................ ....................... 9 Placing ................................ ................................ ................................ ................................ ................................ .......... 9 Evaluation program WinKontrol........................................................................................................10 Description................................ ................................ ................................ ................................ ................................ .. 10 PC hardware and operation system ................................ ................................ ................................ ............................. 10 License................................ ................................ ................................ ................................ ................................ ........ 10 What's new in hardware?....................................................................................................................11 What's new in software?.....................................................................................................................11 Software installation .............................................................................................................. 12 Recommendation before installation..................................................................................................12 Installation of program WinKontrol...................................................................................................12 Start of the installation ................................ ................................ ................................ ................................ ................ 12 First start of WinKontrol ....................................................................................................................13 Data conversion from older versions................................ ................................ ................................ ........................... 13 Adapter setting ................................ ................................ ................................ ................................ ............................ 14 Input of the license................................ ................................ ................................ ................................ ...................... 15 Program upgrade ................................................................................................................................15 Hardware installation ............................................................................................................ 16 How to install hardware .....................................................................................................................16 Entering the sensors ...........................................................................................................................16 Inserting the sensor ................................ ................................ ................................ ................................ ..................... 17 Entering the guards.............................................................................................................................17 Entering the checkpoints ....................................................................................................................17 Placing of hardware components .......................................................................................................18 Sensors................................ ................................ ................................ ................................ ................................ ........ 18 Guard's identification chips................................ ................................ ................................ ................................ ......... 18 Checkpoints ................................ ................................ ................................ ................................ ................................ 18 Work with WinKontrol program ......................................................................................... 19 Start of program .................................................................................................................................19 Control................................................................................................................................................19 Help ....................................................................................................................................................19 Menu description................................................................................................................................20 Data................................ ................................ ................................ ................................ ................................ ............. 20 Copyright TOMST 3 Notations................................ ................................ ................................ ................................ ................................ ..... 20 Chip ................................ ................................ ................................ ................................ ................................ ............ 20 Settings ................................ ................................ ................................ ................................ ................................ ....... 20 Info................................ ................................ ................................ ................................ ................................ .............. 20 Data ....................................................................................................................................................21 Sensors .......................................................................................................................................................... 21 Guards........................................................................................................................................................... 21 Checkpoints ................................................................................................................................................... 21 Routes............................................................................................................................................................ 21 Entering the routes ................................ ................................ ................................ ................................ ...................... 21 Edit, print and route index................................ ................................ ................................ ................................ ........... 22 Tours ............................................................................................................................................................. 22 Schedules....................................................................................................................................................... 22 Exit ................................................................................................................................................................ 22 Notations ............................................................................................................................................23 Detailed notation........................................................................................................................................... 23 Composition of notation according to the time interval ................................ ................................ .............................. 23 Composition of notation according to date of file transfer into PC ................................ ................................ ............. 24 Short notation................................................................................................................................................ 25 Point notation................................................................................................................................................ 25 Guard notation .............................................................................................................................................. 25 Sensor notation.............................................................................................................................................. 25 Route notation ............................................................................................................................................... 25 Tour notation................................................................................................................................................. 25 Schedule notation .......................................................................................................................................... 25 Chip ....................................................................................................................................................25 Information about chip .................................................................................................................................. 25 Chip reading.................................................................................................................................................. 25 Chip setting ................................................................................................................................................... 26 Settings...............................................................................................................................................26 Adapter ................................ ................................ ................................ ................................ ................................ ....... 26 Language................................ ................................ ................................ ................................ ................................ ..... 26 Printer setting................................ ................................ ................................ ................................ .............................. 26 License................................ ................................ ................................ ................................ ................................ ........ 26 Passwords ................................ ................................ ................................ ................................ ................................ ... 26 Archive and delete... ................................ ................................ ................................ ................................ ................... 27 Login protocol................................ ................................ ................................ ................................ ............................. 27 Colours................................ ................................ ................................ ................................ ................................ ........ 27 Date................................ ................................ ................................ ................................ ................................ ............. 27 Notation order ................................ ................................ ................................ ................................ ............................. 27 Information.........................................................................................................................................27 Work in computer network ................................................................................................................27 Automatic evaluation ............................................................................................................. 28 Principle of function of automated evaluating ...................................................................................28 Tour ....................................................................................................................................................28 Setting the tour................................ ................................ ................................ ................................ ............................ 28 Tour notation................................ ................................ ................................ ................................ ............................... 29 Edit, print and list of tours ................................ ................................ ................................ ................................ .......... 29 Schedule .............................................................................................................................................30 Setting the schedule ................................ ................................ ................................ ................................ .................... 30 Schedule notation................................ ................................ ................................ ................................ ........................ 30 Edit, print and list of schedules ................................ ................................ ................................ ................................ ... 31 What to do with problems? ................................................................................................................32 Help with problems ....................................................................................................................................... 32 Behaviour of PES sensor....................................................................................................................33 Acoustic signalling ........................................................................................................................................ 33 Technical parameters..........................................................................................................................34 Portable electronic sensor PES profi and PES forte ..................................................................................... 34 Control chips ................................................................................................................................................. 35 Data chips ..................................................................................................................................................... 35 Program WinKontrol..................................................................................................................................... 35 Copyright TOMST 4 Introduction Thank you for buying the control and identification system P.E.S. allowing checking and recording activities of guard services. With this manual we will introduce all the facilities and functions of hardware and software system components. We shall recommend you the simplest way to install evaluation program and to perform common operation; and give help and tips for effective using of control system P.E.S. Next chapter familiarizes you with detailed information about structure of the system, description of functions and news in hardware and software. You should not miss... Check if you have following components necessary for correct system function: • portable sensor P.E.S. • at least 1 identification chip DS1990A, optionally with plastic holder • at least 1 data chip DS1996-L5 • adapter TMC • installation CD-ROM with program WinKontrol • PC with installed operation system MS Windows 95 and higher + 1 free serial port RS-232C (The more powerful PC, the quicker work of WinKontrol.) Principle of function Control system P.E.S. enables very simply to make a complete overview about routes held by individual guards. The portable sensor P.E.S. forms a fundamental part of this system and is used for identifying the guard's presence at checkpoints placed anywhere within the guarded area. The unit operation is very simple since there are no other external control components and checkpoint readings are indicated audio-visually. All the checkpoints are equipped with identification chips. The sensor P.E.S. reads the chip identification number into its memory by easy contact with chip. The identification numbers are assigned to current time and saved. Data saved in sensor's memory are transferred by easy contact to DS1996 data chip and later they are exported from data chip into computer via TMC adapter connected to serial port. Data are saved in the PC and with evaluation program WinKontrol can be checked, printed or displayed by different ways including automatic comparison between predefined and indeed realized routes. Once exported data cannot be anyhow changed. Copyright TOMST 5 Schema of control system P.E.S. in practice Copyright TOMST 6 Portable Electronic Sensor P.E.S. Sensor function The P.E.S. (portable electronic sensor) is a portable reading device used for contact chips. There are two basic designs manufactured. Each design has its own specific capacity for saving a certain volume of data in its memory and is equipped with unique features. The sensor provides following: • Time entry recording of the identification chip reading (check point readings) • Transfer of data into the data chip • Setting of precise time using the time chip • Keeping the precise time • Power supply using a special built-in long-life battery The sensors use the latest electronic technology and their structure provides high reliability with resistance to bad weather for a long-term operation. Sensor types The P.E.S. is manufactured in 2 designs, which differs in capacity of memory and protection elements. Each design is able to store a certain number of entries (one entry means one touch of the sensor to identification chip). The protection elements limit several kinds of damage and battery discharge. Portable Electronic Sensor P.E.S. PES profi PES forte • Capacity of memory 2000 events • Protection elements ANTI-VANDAL • Capacity of memory 2000 events • Protection elements MINI-VANDAL Sensor designs Sensors P.E.S. are sealed in cylindrically shaped compact aluminium-magnesium case. There is a label attached to it stating the sensor serial no., also a LED indicator, and a loop used for its han ging and handling. The sensors are equipped with a probe used for sensory communication with chips. These probes are waterproof and resistant to impact. Sensor operation The sensor operation is very simple: contact of the sensing head with the contact chip is the only possible operation. Once the successful reading of the control chip is done, the sensor beeps. Following a successful transaction between the sensor and the data chip, the sensor plays an ascending melody. An error occurs if you try to enter more data into a data chip with already full memory or if you try to read more checkpoints by the sensor with already full memory. Such a situation is indicated by a descending melody and it is necessary to free the sensor or the data chip memory. Sensor signalling The sound signalling is accompanied by a flashing LED indication. This is also suitable for operation in noisy environments (more in chapter Behaviour of PES sensor). Copyright TOMST 7 Maintenance There is no need for sensor maintenance. Please take account of the temperature range for use and storage. We also recommend not to expose the sensors to any sources of electrostatic discharge (the sensor might "lose" the loaded data). For fluent chip reading even during frequent use we recommend to clean from time to time the reading surface with spirit. i ATTENTION Please note that an unqualified replacement can lead to a sensor block (an error tune plays when the chip is placed in the sensory device). Battery replacement For power supply, the sensors use lithium cells with a high capacity. The standard service life of such a battery is approximately 5 years. The battery needs replacement, if the sensor does not work with the data chips any more, or if it cannot read the control chip. Only professional servicemen can carry out such replacement, together with a device testing. Identification chips Description and function of identification chip . i ATTENTION Chips are not to be exposed to any electrostatic discharges. They are almost indestructible and lifetime guaranteed if used properly. The identification chips (also called control chips) are used to identify the routes and for guard identification. This media consists of a silicon chip which is hermetically sealed in stainless steel casing which resembles a button 3,10 mm (type DS1990A-F3) or 5 mm (type DS1990A-F5) thick with a diameter of 17,35 mm. Every chip has its own code which inimitableness is guaranteed by the producer. Note: Identification chips don't have to be specially maintained. Only in winter there might appear a glaze on the surface. In such case wipe the surface with a piece of clout. Data chips Description and function of data chip Unlike the identification chips (DS1990A), which only contain a fixed identification code (ROM memory), these chips consist of NV RAM memory backed up by the internal lithium cell. The lithium cell provides reliable data storage for 10 years. Basic function The basic function of data chip is to transfer data concerning entries (checkpoints) from the P.E.S. sensor into PC. The control system P.E.S. uses the DS1996 data chips with a memory capacity of 1000 entries (1 entry =1 checkpoint). Work with data chip The data transfer into the data chip takes place when the chip is placed onto the sensory head of the portable sensor. The transfer time depends on the amount of data transferred, starting with a tenth of a second to several seconds. Therefore it is important to place the chip into the sensory head for reading at the checkpoint. The end of the transfer is indicated audio-visually. The P.E.S. sensor buffer becomes empty once the data is transferred and a sound signal indicates a successful data transfer. Copyright TOMST 8 An error beep (descending tune) indicates that the data chip capacity is insufficient for saving all the data (and/or the battery is flat). If the transfer has not taken place and all the data stayed in the sensor, then it is necessary to use another reading chip or empty the original chip by transferring all the data into a computer. One reading chip can store more than one data block from the sensor as long as the chip capacity allows. This is useful if data is being transferred from several sensors at the same time. Note: Work with data chips is simple. However it is important to take care about not to exchange the transfer and time chip. We recommend to reprogram time chip immediately after use back to transfer mode to prevent any data loose. Setting It is possible to set the chip modes using the WinKontrol program. The setting runs by choosing the type of data chip in the window, which appears in WinKontrol after selecting Chip - Chip setting. 1. The transfer chip - This chip allows a data transfer between PC and PES sensor. Once the data from the transfer sensor is read it stays only in the chip. Note: If the sensor does not contain any data, there is no entry formed in the transfer chip. Such a measure saves space on the data chip and allows a multiple reading equivalent to a single reading. i ATTENTION By correcting the time you will also delete the sensor data (this security measure makes the guard unable to enter wrong time entries using the time chip). 2. Time setting chip - The P.E.S. is equipped with a precision crystal oscillator, which operates on a scale of accuracy that ranges within ± 30 s/month. It is important to correct the time in case of a long-term operation. We use the WinKontrol program for processing a chip carrying a time entry. By placing this chip into the portable sensor, the time of the senso r is corrected. The time difference between loading the time entry into the data chip and loading this time entry into the sensor should be as short as possible in order to secure the maximum accuracy of setting. Once the time is correct, it is necessary to set the chip back into the transfer mode. The time in new sensor is set by the manufacturer. Operating the data chip To transfer data from data chip to PC choose item Chip reading in main menu of program WinKontrol and apply the data chip (program gives you instruction) to the TMC adapter probe. The process of data transfer is displayed on the monitor. After successful 100% transfer all the data are in PC memory prepared for further processing. Adapter TMC Function of adapter i ATTENTION The adapter also serves as a hardware key to the software license. Without connecting the adapter you can start the WinKontrol program only in DEMO mode. An adapter is used for reading the control chips when entering data concerning checkpoints and guards into the WinKontrol program and also for communication with the data chips. There is no need to worry about a bad contact between the sensory head and the chip during the data tran sfer: the transfer protocol design and the data order ensure that the system is totally resistant to losing contact (after using the sensory head in dusty environments such as building sites it may require cleaning). A successful reading/entry in the PC is indicated on the monitor. As long as the indication is not displayed, there is a guarantee that the data chip content has not been changed in any way. Placing The plastic part together with the sensory head used for a chip reading can be placed onto the keyboard or any other suitable surface. In case of a permanent fixation, it is possible to use a Velcro strip or a glue that does not corrode plastic. The other end connect to PC serial port RS -232C. The CANON 9F terminal of the adapter is connected to the serial port of the PC, usually COM 1. For connecting to a different COM-port, you will often need the CANON9M - 25F conversion, which can be purchased in any computer shop or contact your distributor who will supply you with this conversion. Copyright TOMST 9 Evaluation program WinKontrol Description Program WinKontrol 2000 is designed to input, supervise, view and print primary tables - databases (checkpoints, guards, routes). The list of events, if it is transferred to PC from a transfer chip, consists only of date, time and identification chip code (checkpoint or ID chip of a guard). If you create a list of checkpoints described by clear names (hall, store, garage etc.) in the beginning of using the whole system, them the program will be able to process the evaluation and show results with name of the checkpoints and name of the guard who performed the route. To use fully the abilities of WinKontrol you can automatically evaluate data from performed routes in time and progression. If the way how to execute the route is predefined, you can simply detect mistakes in guard's work in few seconds. = See also For more information about program WinKontrol find a chapter Installation of software, Installation of hardware, Work with program. PC hardware and operation system Program WinKontrol is suitable for operation system Windows since version 95 (problems might appear on some versions of Windows XP home edition - in such case contact the producer on e-mail address [email protected]). WinKontrol is the quicker (especially in phase of chip reading) the higher your PC configuration is. For easy running we recommend at least 32 MB RAM and 20 MB free space on HDD. License TIP! In version WinKontrol Standard it is possible to work with max. 2 sensors, 10 guards and 50 check points. Version Profesional brings unlimited database capacity. The owner of WinKontrol copyright is company Tomá š Haase - TOMST. User license of the program is tied to the serial number of the adapter TMC or TMA. Running of more copies on 1 or more computers is regarded as a serious infraction of copyright and is prohibited. The news is possibility to order a license for another sensor over the ´two sensor limit´ in basic Standard version. It is allowed to copy the program WinKontrol for promotion purposes in case that the program is copied complete and unchanged. We recommend to contact the producer. Only official distributors with the producer's agreement are allowed to resell the software WinKontrol, the other situations are regarded as a serious infraction of copyright and is prohibited. Copyright TOMST 10 What's new in hardware? The latest types of sensors PES profi and PES forte are equipped with maximum protection level against mechanical damage and intentional battery discharge. The ANTI-VANDAL (PES profi) and MINI-VANDAL (PES forte) elements allow even to record the attempts of sensor destruction and to export this information to the evaluation program WinKontrol. The risk of a breakdown within intentional hits decreases to minimum. The other system components are improved mostly aesthetic. What's new in software? Let us describe at least some improvements: • If you use a version Standard and you buy the third sensor, you can save money with buying a license just for 1 sensor for nice price. It is not necessary to buy a complete Profesional version any more. • For better route evaluation - minimum intervals between reading of individual checkpoints can be set. • The route executed contrariwise can be (but does not have to be) evaluated as correct (depends on your setting). • The routes can be entered into PC by reading of identification chips to the sensor and by transferring them from the sensor to PC with a data chip. • All the functions of overview have been much developed. Now you can form reports limited by time interval or by time of data transfer into PC. Both options allow showing imported files or time intervals with the sensor names, from which the data were read. • The news is the network connection and split of manipulation rights to more users. Copyright TOMST 11 Software installation If you are new users of the control system P.E.S., this chapter leads you how to install the program WinKontrol on your computer. You find some notes, advices, tips that facilitate your work and help to prevent unnecessary mistakes in operating the program. The user, who wants just to upgrade WinKontrol, finds in this chapter the best way how to do it. Recommendation before installation Before you start the installation, here are some tips to do it easily and comfortably: • In the beginning restart your PC. • When you start the program first time, you should enter all the information about the sensors, checkpoints, guards and routes. See chapter Hardware installation. • Setting of different routes enables transparent control and it is necessary for using the functions Tour and Schedule. With this setting you can apply the function Time restriction. Installation of program WinKontrol Start of the installation 1. Before the installation, connect the TMC adapter to serial port with 9-pin connector. TMC adapter is one of the system components. If your computer is not equipped with 9-pin but with 25-pin connector, use a 25to9-pin reduction. = See also... 2. Put an installation CD to CD-ROM, choose the file setup.exe and by double-click on it you start the installation. 3. The window with information about copyright appears. In the next window you can confirm or change the preset way, where WinKontrol will be installed (see the picture). For less experienced users we recommend just to accept offered options. Next window shows the overview of accepted settings confirm it or make changes by clicking the Back button and adjusting the information. More info about WinKontrol you find in chapter- Evaluation program WinKontrol, What's new in software, Installation of hardware, Work with the program. Copyright TOMST 12 4. Now the setup creates new files on HDD. The process is displayed on the left side of the windows. After its finish the installation is complete. First start of WinKontrol 1. You can start the program either with the icon on Windows desktop or with Start button menu Start/Programs/WinKontrol. 2. After first start of WinKontrol next window appears. You can set the port for communication with the adapter and convert data from older program version. Copyright TOMST 13 Data conversion from older versions 1. In the first start window press the button Conversion of data? New dialog window opens. The older data identification process (to find data about databases and routes) can be done manually or automatically. 2. Mark the found version and click on the button Transfer. (In case of more versions found, take care to mark the correct one). Note: If you are connected to the network, all the connected network disks will be searched. 3. The conversion process is seen on the monitor. Adapter setting After the installation the communication with an adapter is preset to serial port 2. If the program within the start process gives a message that the adapter was found and that you should set it, in such case you connected the adapter to the port 1 (not 2) or you installed WinKontrol without TMC adapter connected. Do the setting in following window Adapter. If you do not set it, the program works only as a demo version and will not be able to read any data from a data chip n or to install new identification chips. In the windows you can set the port, to which the adapter is connected and through which the communication will run. After this change you have to restart WinKontrol. Copyright TOMST 14 = See also Complete info about license numbers you find in chapter Work with WinKontrol program - Settings License and Work with WinKontrol program Setting - Adapter. Input of the license If the program is successful in detecting the adapter in some serial port, it displays a frame License. Input your license number of Standard version into the frame. You received the number together with the software. =See also Complete info about setting the version of program WinKontrol you find in chapter Work with WinKontrol program - Menu description Settings - License. i TIP To use the program together with the complete system it is useful to check the time and date on your PC. The deflection should not exceed ± 10 second. The Standard version of WinKontrol is unlike the version Profesional limited in the capacity of database size and some functions are not available. For instance it does not recognize an authorization to enter for individual persons, does not sort databases in alphabetical order, does not let you viewing a log in protocol. Note: The Standard or Profesional version you can buy at your local distributor. Now the program runs. For higher safety we recommend you to set the password individually for each user (see the chapter Work with WinKontrol program - Menu description - Settings - Password). Program upgrade = See also More info about data conversion you find in chapter Software installation - First start of WinKontrol - Data conversion from older versions. The upgrade of an older version of WinKontrol is the same as installation. Within the first run after installation don't forget to convert data. It enables you to use them in the upgraded version. Copyright TOMST 15 Hardware installation To use fully all the abilities and advantages of the control system P.E.S., take good care to install correctly all the hardware components. However the installation is not complicated, next chapter will show you how to go through the complete process swimmingly. You find also some tips to avoid mistakes. How to install hardware To acquire the most benefit from WinKontrol program, it is necessary to input particular hardware components into appropriate databases and then divide them according to their functions in practice. The whole process looks following: i ATTENTION The same chips DS1990A are used to identify the checkpoints as well as to identify the guards. • Input sensors PES into database of sensors. • Input personal identification chips into guard's database. • Input identification chips into checkpoint database. • Deliver sensors to the guards in the working place. • Deliver the personal identification chips to the guards or fix them in the workroom. • Place and fix the identification chips at the checkpoints. Entering the sensors Database control Program WinKontrol has 6 databases. Manipulation with them is similar. So we describe a complete work with database windows only of sensor's database. In case of other databases only specific functions are described. Note: The way of program control and movement inside the dialog windows are described in the chapter Work with WinKontrol program. If you open the database from the main menu, a dialog box Sensors appears. It contains a space, where sensors will be later entered and displayed and few buttons with specific f unctions. Copyright TOMST 16 Inserting the sensor 1 To enter new sensor, click on the button Insert. ç 2 The window New sensor appears. Insert the name and serial number, optionally also a license number. ç Items in dial. box Serves for ... Name Serial number License number Ignore double touch events … name of sensor (best according to the place of service) ...documentation of sensor serial number (placed on the handle of sensor) ...used only if you use more than 2 sensors in WinKontrol Standard version ...allows to read the same chip more times with effect of recording only the first reading Entering the guards i ATTENTION Be careful to keep order in which id. chip belongs to which guard. Entering the guards is similar to entering the sensors. There are 2 ways of inputing the chip ID number to the database: 1. Manual insert of 6 last numbers from the 12number code on the chip case. 2. Automatic reading of the chip code through the TMC adapter connected to PC. Entering the checkpoints i ATTENTION Be careful to keep order in which id. chip belongs to which checkpoint. The checkpoints database differs from the guard's database only with the names given to chip id. numbers. We recommend to choose places of checkpoints on such way, that the guards has to visit strategic places, which might not be otherwise visited. On the other way it is useless to increase the amount of checkpoints without any reason. The names of particular checkpoints should describe the place, where they are fixed. Copyright TOMST 17 Placing of hardware components Sensors Place the portable electronic sensors P.E.S. at guard's working place. Usually more employees use 1 sensor; we recommend to make a record book to register when and who uses the tool. Guard's identification chips Enter the guard's personal identification chips into the database of guards. The chips can be fixed in a plastic key pendant. The other option is to fix them (the best with glue) in the guard's office, where the route starts. It is approved to make a table with names of guards and to glue their personal identification chips under the names. Checkpoints The identification chips assigned to signalise the checkpoints can be fixed on more ways. The first one is to glue them with epoxy glue on the smooth metal surface. If such surface is not available, it is possible to put the chip into a plastic holder, which is screwed down to the wall. Another possibility is to glue the chip into a sheet metal box (optionally can be lockable). Copyright TOMST 18 Work with WinKontrol program Next chapter helps you to understand how does the program work, shows the methods of control and gives you some tips to use the program on the most effective way. Start of program Program WinKontrol is started with the file WINKONTROL.EXE in the folder where it is installed (usually C:\Program files\TOMST\WinKontrol). There is more ways how to start the program (see the chapter Software installation). The most comfortable is to start from the Windows desktop. WinKontrol start doesn't need any password as long as you don't set it up. To run the program you need at least 20 MB free space on your HDD. Control The program control is simple and graphical - with the keyboard or mouse. The control by a mouse means that you place a cursor by a movement of mouse to the item or button and press left mouse button. If you use a keyboard you can work with following keys: Key [Tab] [Shift] + [Tab] [F1] [Delete] [Enter] [Esc] [↑] [↓] Function move to next item move to previous item help delete the item choose the item, confirmation of chosen operation step back move in menu up move in menu down Help There is a wide system of help in the program, which can be activated by placing the cursor on the indefinite line or item and pressing [F1] on the keyboard or by choosing of Info - Help in program menu. The move inside the help window is the same as in the program itself - using mouse or keys on the keyboard. To extend the help, it is possible to open new dialog windows - with the bold words in the text or by the offer of dialog windows in the header of each help. If you mark any bold word and press [Enter] or you click on it with the left mouse button, you run a new he lp dialog window. Every item, list box or button contains help. To stop the help press [Esc] key. Copyright TOMST 19 Menu description For quick and intuitive orientation, the main menu is divided into thematic wholes. Frequently used functions are also displayed as icons under the main menu toolbar. Data This menu serves to gather information about components of the system P.E.S. It enables to enter, change and delete items, view and print listings. It contains also an item End to exit the program. Notations In this main menu item you can view and print reports from realized routes. The reports can be created in more variants. Chip The Chip menu cooperates with the adapter. It arranges cooperation with data chips, it means the transfer of data recorded during the route from the data chip to PC. With the Chip menu items you can set the data chip functions and you can get information about the chip applied to the adapter. The items do not work in program demo version (see the picture above - item ´Chip´ is not bold). Settings In this menu you find functions to set parameters of program (printer, colours, passwords etc.) and also of manipulation with data (back up, delete and recovery of data files). Info Besides the program help there are some info about the connected adapter, filling of databases and about the system producer, distributor and software programmer. Copyright TOMST 20 Data Sensors The item allows entering, changing, viewing and printing the list of sensors. It is necessary to enter not only name but also product number. More information about this menu item you find in the chapter Hardware installation - Entering the sensors. = See also Complete info about guards you find in chapter Hardware installation - Entering the guards. Guards With this point you can enter, adjust and delete guards in the database. You can also print and view the list of guards. Checkpoints = See also Complete info about checkpoints you find in Hardware installation Entering the checkpoints. Here you can enter, adjust and delete checkpoints (points on the guard's route). You can print and view their index. To simplify the evaluation of executed routes you can predefine the way in which the routes should be executed. It automates the evaluating of collected data. For this purpose there were implemented functions Routes, Tours, Schedules. Routes This function enables to view executed routes in Short Notation, which reduces the time spent on viewing the routes and saves paper during print. In database of routes you can enter, adjust, delete the routes, view and print their index. During creating the route the user groups the checkpoints registered in database to demanded sequence and gives a logic name to this configuration according to the place (direction, sense etc.). We recommend to create the routes that are simple to remember. Note: Successful evaluation of the routes is conditioned by applying the identification chip, which was entered into the database Guards before start of each route. Only this procedure enables WinKontrol to divide individual routes. If any guard doesn't keep this method in practice, the program will not be able to evaluate neither the route neither any other process of automatic evaluation (Tour, Schedule), which is dependent on correctly performed route. As well the evaluation will not be accomplished if any of the checkpoints misses or the order of checkpoints is incorrect. Entering the routes 1. In menu Data choose the item Routes and confirm with [Enter] key. 2. In the next window Routes choose the button Insert. (This window allows also to set some more specific functions for work with databases Routes like following: Edit, Print, Details and Cancel.) 3. The window New route appears. Enter the route name. 4. The function Apply time restriction enables you to set and adjust the minimum time intervals between recording the individual checkpoints. Copyright TOMST 21 5. Another optional function is Possibility to go conversely, which allows the guard to execute the route also in the reverse order. If you mark this function, you don't have to set the route in the reverse order. WinKontrol recognizes it and in the notation it is labelled as route in reverse order. 6. Then the checkpoints have to be transferred from the left side Checkpoints in database to the right side Checkpoints in route. This transfer has to be done in the order, in which the route should be accomplished in practice. Mark the chosen checkpoint and click on the appropriate arrow indicating the move direction. In case you activated the function Time restriction, it is necessary to fill the minimum length of interval between neighbour checkpoints in the field Time. Now the route is assembled. 7. The button From chip you can use to set the route using a data chip. It has following functions: Phase 1 - entering the route into sensor in desired order (loading the checkpoint chips as they will be loaded during the route) Phase 2 - data transfer from sensor to data chip (apply a data chip to the contact surface of the sensor) Phase 3 - data transfer from data chip to computer (choose the button „From chip“ and apply the data chip to the adapter's probe) In this phase data are not deleted from data chip. So it is possible to enter more routes from one data chip (in Standard version only 1 route can be set). To delete data chip, set it again to transfer mode. Edit, print and route index These operations can be performed with following buttons in dialog window Routes, which is displayed after selecting the item Data in main menu: = See also Button Function Edit enables to edit the route settings or to delete it Print prints the index of entered routes Details shows the contents of routes selected by cursor Cancel returns to main menu Tours Complete info about tours you find in chapter Automatic Evaluation - Tours. This database is connected with the database Routes. The selected routes are set together to ´time blocks´, in which the guard routes are performed. The Tours database enables more comfortable evaluation of executed routes overview. = See also Schedules Complete info about checkpoints you find in chapter Automatic Evaluation Schedules. Schedules is another function of automatic evaluation that enables simple evaluation of executed guard routes. It can be defined as setting of Tours to longer time period. Exit Exit the program WinKontrol. Copyright TOMST 22 Notations Program enables to process the data transferred and saved on HDD in several modifications adjusted to needs of the user. Next chapter introduces all of them to help you choose the one, which accommodates your way of using the control system P.E.S. Note: Next chapter Detailed notation describes the ways of entering parameters to display particular notation. These ways are similar in other notations, so we don't repeat them again. Detailed notation i ATTENTION The Detailed notation contents the setting of the function Routes. This alternate is the simplest form of generating the notation and serves to check the detailed activity of guards. Parameters for evaluating are entered into windows displayed after choosing the Detailed notation. WinKontrol offers two ways of processing the notation. The first one is the notation created according to the time interval, in which you want to display data. The second one is the notation according to the date of data transfer into PC. Both ways are valid for all the notations except the Tours notation and Schedule notation. Composition of notation according to the time interval 1. Select Notations - Detailed in the main menu. The window Selection of extent displays. Enter the time period in which you want to verify the activity of guards. The input can be done in following ways: Method Way of input No. 1 From: day, month, year, time (hour, minute) To: day, month, year, time (hour, minute) Notation in the input range No. 2 From: day, month, year To: day, month, year No. 3 From: day, month, year, time (hour, minute) To: day, month, year No. 4 From: day, month, year To: day, month, year, time (hour, minute) Notation in the input range, time automatically from 00.00 to 23.59 Notation in the input range, time automatically from input time to 23.59 Notation in the input range, time automatically from 00.00 to input time 2. When you enter and confirm time parameters, the program shows a table Statistic. Copyright TOMST 23 3. Number 1 2 Press OK with left mouse button or the key [Enter]. New window Detailed notation appears. Description Program version, date and time of notation. Notation character. 3 Source of displayed data. It is useful in case that displayed data are from more sensors. 4 Time of data transfer from data chip into PC. 5 Time of data transfer from sensor P.E.S. into data chip. 6 Name of the guard - has to be entered into the guards database in advance. It informs that this guard executed each of following checkpoint records until next guard entered the system. 7 Information about applying of following checkpoints. 8 Name of the route displays if you use the function Routes and it is correctly performed. 9 Amount of lines in the notation and complete amount of records (guards + checkpoints), which can be used for quick check by comparison of usual amount with the checked amount. Composition of notation according to date of file transfer into PC Each data file is created after the transfer of data chip contents into PC. In case that one data chips contains data from more sensors, the notation of such file will also display data from more sensors. 1. The way to data files runs via the button By download in the window Selection of extend (see last chapter). The program offers next table List downloading to PC, where you can find data according to the year and month of data transfer from the chip to PC. 2. You can set the year and month (or only the year) when the data you look for were transferred. 3. When you enter time parameters and press OK, the program displays a table Statistic (similar to the previous way of entering). (If you do not enter any time parameter, the program offers the list of all performed routes). 4. To display a Detailed notation click on OK or press [Enter]. Copyright TOMST 24 Short notation = See also More info about ways of evaluation of Short notation and Point notation you find in chapter Detailed notation The notation displays the name of guard, date and time of the start and finish of performed route. This notation reduces the form of Detailed notation, because it uses a function Routes. If the routes are not entered, the notation shows only basic fields about the data file. Point notation This notation offers complete data fields about particular checkpoints - when and by whom they were checked. Guard notation Guard notation provides information about individual guard in the shape of detai led notation. Sensor notation = See also More info about ways of evaluation of Guard notation, Sensor notation and Route notation you find in chapter Detailed notation. Sensor notation can be used best if only 1 sensor is allocated in each building (object, factory etc.). The report data are in detailed notation. Route notation You can find information about selected route in requested time period. Tour notation = See also More info about ways of evaluation tours and schedules you find in chapter Automatic Evaluation - Tours, Schedules. This notation serves to display an automatic daily evaluation of executed tours. Schedule notation It displays an automatic weekly evaluation of guard's work. Chip The items of the Chip menu provide primarily the communication between WinKontrol and data chips. You can also activate an item that displays information about any chip (data or identification). The Chip menu is not active in demo version. Information about chip This function helps to detect information about identificatio n or data chips and their current setting. If you select this function, you are asked to apply a chip. Connect the chip to the reading probe of TMC adapter. The screen immediately displays acquired specifications. The identification chips show their number, name and database sorting (guard or checkpoint). The data chip set to transfer mode shows its number, mode of use, capacity of memory and current memory filling (in %). The data chip set to time mode shows its number, mode of use and set date and time. Chip reading = See also More info you can find in the chapter Data chip. If you select Chip reading and apply a data chip to the reading probe of TMC adapter, the data transfer starts from data chip to PC (program). The process of transferring is seen in the info window on the monitor. Copyright TOMST 25 Chip setting = See also More info about the ways of data chip setting you find in chapter Data chip Settings. With this function you can set different modes of data chip. To set it, select the Chip - Chip setting in main menu and choose the data chip mode. You can set any data chip either to transfer mode (to transfer data between sensor and PC) or to time mode (to update the time in sensors). Settings This menu item enables you to change some settings of WinKontrol program to accommodate your needs and also to manipulate with transferred data. After choosing this function in the main menu, you see following contents of possible settings: Adapter Setting of adapter - choose the computer port and kind of adapter. Language The Czech language is default. You can choose any other delivered version. Printer setting It enables to set the parameters of connected printer. = See also More info about license conditions you find in chapter Evaluation program WinKontrol. License Enter the license number assigned to activate the version Profesional into this field. The Standard version of program WinKontrol (unlike Profesional) in limited in database capacity and some program functions are not accessible - for example it does not differ the competence to enter for individual persons, does not allow to sort databases in alphabetical order or to view the login protocol. Passwords This item is divided in two parts, which define the rights to work with program. Password change enables to change the main program password. The user who knows this password (administrator) is allowed to do the settings of program and databases (Sensors, Guards, Checkpoints etc.) and also of other user passwords (including his own). i TIP This function is accessible only in Profesional version. Other passwords change enables the setting of all other passwords. The logging in the program can be extended or reduced by applying an identification chip. Only administrator is allowed to delete databases and transferred files or to change passwords, other users can only transfer, view and print data from sensors. Copyright TOMST 26 Archive and delete... With this function you can backup, restore and delete transferred data of all sensors together or separately of each of them. Login protocol The function Login protocol is useful especially in the Profesional version if more users operate the program. It gives information about exact time of user's logging in and logging off. Colours You can change the colour setting of all the program sections. Date It enables to set the demanded style of date and time in notations. Notation order You can set up the items of your notations into discretionary order. Information Here you get information about the producer of the control system P.E.S., his other products and current filling of databases. The item Adapter number is special. To run the full version of WinKontrol (Standard of Profesional) you need to deliver this adapter number to your distributor. Afterwards you receive a license number that has to be filled in Settings - License window. To run a demo version you don't need any license. Work in computer network One of the WinKontrol news is a possibility to start it from different PC than where it was installed. This eventuality can be used particularly for simple check of users, who work with the program independently. In the network the program works in demo version, so the notations and databases can be viewed and printed without a chance to communicate with data chips. The transfer of data and installation of new components is possible only on th at PC, where WinKontrol is installed and where TMC adapter is connected. In the network version it is useful to divide the access rights in the main menu item Settings Password. Copyright TOMST 27 Automatic evaluation The automatic evaluation enables to check the guard's work during chosen time period without necessity of time consuming viewing of performed routes notations. This function is for more experienced users, who understand the sense of automated evaluating and who are able to use the advantages of it. Principle of function of automated evaluating i ATTENTION To run the function Schedules it is necessary to activate the function Tours, but it is no valid by contraries. The automated evaluation consists of functions Tours and Schedules, which simplify the check of executed routes. You can daily (Tours) or weekly (Schedules) define the route variants, which the guards should perform. In the Tours or Schedules notation you can simply compare the executed guard's work with your predefined variant. The result is clearly organized on the monitor. Note: We recommend to use these functions when you understand the basic functions of WinKontrol. The meaningful setting of tour and schedule variants should be done carefully and not headlong. Tours The function Tours is continuation of the function Routes. The selected routes are assembled into time blocks, in which the guarding should be performed. The routes are set up into Tours with the time of their start and finish. Their order can be combined at random. One tour can take max. 24 hours; it means that 1 tour is a route plan for max. 1 shift (day). Setting the tour 1. In menu select the item Data - Tours and confirm with the key [Enter]. 2. In next dialog window Tours select the button Insert. This window enables also some more functions for work with the Tours database like Edit, Print, Details. i ATTENTION Time of start and finish must differ at least of 1 minute. Else the time collision occurs. 3. Next window New tour appears. Enter new name of the tour. We recommend to choose names according to the week days or system of guarding (Weekday, Weekend, Night shift etc.). 4. For some settings you need to use the same tour names. Such tour can be assigned to some of the sensors, which can be chosen in the field Sensor. It helps later in setting the notations and better orientation in the list of tours. 5. To differ among particular tours it is necessary to input the time of start and finish of the shift (tour). Copyright TOMST 28 6. Also before entering of each route to the list of Routes in tour it is necessary to input the time of its start and finish. 7. You can move the route from list of Routes in database to list of Routes in tour in the middle of the window with the arrows. Tour notation 1. In menu select the item Notations - Tours and confirm with the key [Enter]. 2. In the next dialog window List of the tours select the demanded kind of tour and input the date, which you want to check. Confirm it with the button OK or the key [Enter]. 3. In the notation you find out, what is the result of comparison. If the result is OK, the tour was performed as it was predefined. 4. In case of result KO, you can find out, why the tours have not been performed as they were predefined or if they have been performed at all. By pressing the space bar you activate a cursor. Set this cursor on ´KO´ and press [Enter]. 5. Now you see the Detailed notation, which displays all the tours performed within the checked day. Here you can find the reason, why the tour was not correctly executed. Edit, print and list of tours This all can be performed using the operating buttons in the window Tours. To display this window select item Data - Tours in the main menu. Copyright TOMST 29 Schedules Schedule is another function enabling comfortable viewing and evaluating of the guard's work. It consists of setting the tours to longer period then 1 shift (day). The maximum interval is 7 days. Individually defined tours are simply assigned to days of week. Setting the schedule 1. In main menu choose the item Data - Schedules and confirm with the key [Enter]. 2. In next window Schedule select the button Insert. This window enables also some more functions for work with the Schedule database like Edit, Print, Details. 3. There is another window New schedule. Enter the new schedule name. We recommend to entitle it according to the period, when it is used (April, Quarter III., Year 2002 etc.). Now you can assign the tours to the particular days of week. 4. If it happens that the holiday is in the chosen period or you just need to make an exception in the schedule, you don't have to do complicated replanning. You just select Data - Schedules - Exceptions in the main menu. Enter the date you want to adjust and assign another kind of tour to it. Note: We recommend to create a special tour for the official Holidays with individual start and finish of the shift. This tour will be assigned to the exceptions. If the tours are not the same in all the holidays and free days, you can create more kind of special tours with different names (Company holidays, New Year etc.). These exceptions will be assigned to the dates according to the user needs. These tours have to be set to the database Tours. Schedule notation 1. In main menu choose the item Notations - Schedules and confirm with the key [Enter]. 2. The dialog window List of schedules appears. Select the kind of schedule and enter the week you want to check. There are 2 ways, how to choose the week. 3. If you mark Select data based on date on the upper right part of the window, enter the date of Monday of the week you want to check. If the entered date is not Monday, the program finds immediate next Monday. Confirm the selection with OK the key [Enter]. Copyright TOMST 30 4. If you mark Select data based on number of the week on the upper right part of the window, enter the ordinal number of the week you want to check. Confirm the selection with OK or [Enter]. 5. In the notation you find out, what is the result of comparison. The tours with result OK were performed in accordance with the plan. 6. In case of result KO, you can find out, why the tours have not been performed as they were predefined or if they have been performed at all. By pressing the space bar you activate a cursor. Set this cursor on ´KO´ and press [Enter]. Now you see the Detailed notation, which displays all the tours performed within the checked day. Here you can find the reason, why the schedule and the tour were not correctly executed. Example of schedule notation Edit, print and list of schedules This all can be performed using the operating buttons in the window Schedules. To display this window select item Data - Schedules in the main menu. Copyright TOMST 31 What to do with problems? This chapter characterizes maximum situations, which might happen during work with the system. Behind the problem description we indicate its reason or instruction how to solve it. In standard situation the help can be evocated by pressing button F1 on the keyboard. In non-standard situations look at following lines. The behaviour of sensor PES is described independently in next chapter. Help with problems Program stops without visible reason - If the program writes a message „runtime error n (n=<1,255>) at address xxxx:yyyy“ or error (xy) after incorrect stop, write down the message and contact the software distributor. After start program displays message, that the adapter is not connected - The adapter is really not connected. - The connection is not fixed enough. Connector has to be screwed up. - Try to reconnect the adapter and mouse connection and restart PC. - Set the adapter connection to correct port in menu Setting - Adapter. Program reports that new sensor, checkpoint etc. cannot be input. - You run out of database capacity. To increase the capacity, contact your distributor. There is a message ´Unknown identification chip´ instead of name of the checkpoint in the Detailed report after data transport to PC - The values of date and time in your PC are not identical with values in the PES sensor. - The records had been input to the sensor PES before the hardware components were entered to the program databases. Copyright TOMST 32 Behaviour of PES sensor Acoustic signalling loading of data from chip loading of data from chip (less than 50% of free capacity in memory) you are using an old version of WinKontrol free upgrade is necessary ASCENDING successful data transfer, successfully executed command ASCENDING sensor seriously damaged, intervention of authorized service necessary! ASCENDING unauthorized sensor fixing, sensor will stop working, intervention of authorized service necessary! ANNOTATION: short beep long beep Copyright TOMST 33 Technical parameters Portable electronic sensor PES profi and PES forte Cooperation with contact chips iButton - types: Capacity: PES profi: PES forte: DS1990A-F3/F5 DS1996-L5 2000 events 1000 events Stored chip identification: 3 LSB bytes Function with data chips: - transfer and delete of data in the chip - setting of time according to the chip Signalling: acoustic - beeper visual - blue LED Power supply: lithium cell 3,6 V - 950mAh Serial number: 8 numbers, saved in the backup memory Real time clock: backed up from the battery accuracy < 50 ppm (max. ± 1sec/1day) Operating temperature: PES profi: -30 to +70 °C PES forte: -30 to +60 °C Temperature for storage: -40 to +80°C Operating life: Weight: min. 5 years PES profi: PES forte: 49g 44g Copyright TOMST 34 Control chips Model: each iButton instead of DS1996-L5 mostly: DS1990A-F3 (F3 Micro Can) DS1990A-F5 (F5 Micro Can) Positioning: - by gluing - plastic holder - plastic key case for personal identification chip Operating temperature: -40 to +85°C Dimensions: F3 Micro Can: ∅ 17,35 x 3,10 mm F5 Micro Can: ∅ 17,35 x 5,89 mm Data chips Model: DS1996-L5 Capacity: 1000 events Case: F5 Micro Can Modes: - transfer chip - time chip Operating temperature: -40 to + 70°C Dimensions: ∅ 17,35 x 5,89 mm Program WinKontrol Operating system: MS Windows 95 and higher Memory: 32 MB RAM HDD: 20 MB free space Copyright TOMST 35