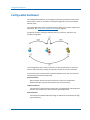
1
CA Role & Compliance Manager
Portal User Guide
r12.5 SP3
This documentation, which includes embedded help systems and electronically distributed materials, (hereinafter referred to as
the “Documentation”) is for your informational purposes only and is subject to change or withdrawal by CA at any time.
This Documentation may not be copied, transferred, reproduced, disclosed, modified or duplicated, in whole or in part, without
the prior written consent of CA. This Documentation is confidential and proprietary information of CA and may not be disclosed
by you or used for any purpose other than as may be permitted in (i) a separate agreement between you and CA governing
your use of the CA software to which the Documentation relates; or (ii) a separate confidentiality agreement between you and
CA.
Notwithstanding the foregoing, if you are a licensed user of the software product(s) addressed in the Documentation, you may
print or otherwise make available a reasonable number of copies of the Documentation for internal use by you and your
employees in connection with that software, provided that all CA copyright notices and legends are affixed to each reproduced
copy.
The right to print or otherwise make available copies of the Documentation is limited to the period during which the applicable
license for such software remains in full force and effect. Should the license terminate for any reason, it is your responsibility to
certify in writing to CA that all copies and partial copies of the Documentation have been returned to CA or destroyed.
TO THE EXTENT PERMITTED BY APPLICABLE LAW, CA PROVIDES THIS DOCUMENTATION “AS IS” WITHOUT WARRANTY OF ANY
KIND, INCLUDING WITHOUT LIMITATION, ANY IMPLIED WARRANTIES OF MERCHANTABILITY, FITNESS FOR A PARTICULAR
PURPOSE, OR NONINFRINGEMENT. IN NO EVENT WILL CA BE LIABLE TO YOU OR ANY THIRD PARTY FOR ANY LOSS OR DAMAGE,
DIRECT OR INDIRECT, FROM THE USE OF THIS DOCUMENTATION, INCLUDING WITHOUT LIMITATION, LOST PROFITS, LOST
INVESTMENT, BUSINESS INTERRUPTION, GOODWILL, OR LOST DATA, EVEN IF CA IS EXPRESSLY ADVISED IN ADVANCE OF THE
POSSIBILITY OF SUCH LOSS OR DAMAGE.
The use of any software product referenced in the Documentation is governed by the applicable license agreement and such
license agreement is not modified in any way by the terms of this notice.
The manufacturer of this Documentation is CA.
Provided with “Restricted Rights.” Use, duplication or disclosure by the United States Government is subject to the restrictions
set forth in FAR Sections 12.212, 52.227-14, and 52.227-19(c)(1) - (2) and DFARS Section 252.227-7014(b)(3), as applicable, or
their successors.
Copyright © 2010 CA. All rights reserved. All trademarks, trade names, service marks, and logos referenced herein belong to
their respective companies.
Contact CA Technologies
Contact CA Support
For your convenience, CA Technologies provides one site where you can access the
information you need for your Home Office, Small Business, and Enterprise CA
Technologies products. At http://ca.com/support, you can access the following:
■
Online and telephone contact information for technical assistance and customer
services
■
Information about user communities and forums
■
Product and documentation downloads
■
CA Support policies and guidelines
■
Other helpful resources appropriate for your product
Provide Feedback
If you have comments or questions about CA Technologies product documentation, you
can send a message to [email protected].
If you would like to provide feedback about CA Technologies product documentation,
complete our short customer survey, which is available on the CA Support website at
http://ca.com/docs.
CA Technologies Product References
This document references the following CA Technologies products:
■
CA Role & Compliance Manager (CA RCM)
■
CA Identity Manager
■
CA SiteMinder
■
CA Enterprise Log Manager
■
CA Service Desk Manager
Contents
Chapter 1: Introduction
13
About This Guide ................................................................................. 13
Audience ........................................................................................ 13
Typical Processes ................................................................................. 14
Chapter 2: Using The CA RCM Portal Interface
17
Open the CA RCM Portal ...........................................................................
User Interface....................................................................................
User Interface for Non-Administrators ...............................................................
Language Support ................................................................................
Chapter 3: Getting Started
19
Step 1: Creating a Universe ........................................................................
Step 2: Create Import Connectors ...................................................................
Step 3: Import Entity Data .........................................................................
Entities and Links: How CA RCM Presents Privilege Information ......................................
Step 4: Generating Master/Model Configurations .....................................................
Step 5: Creating a Campaign .......................................................................
Step 6: Exporting Entity Data .......................................................................
Chapter 4: The CA RCM Universe
17
18
18
18
19
20
20
20
22
22
22
23
CA RCM Universe Overview ........................................................................
Connectors ..................................................................................
Components of a Universe .........................................................................
Create a Universe ................................................................................
Customize Tables for a Universe ....................................................................
Customize Workflow Display Settings ................................................................
Define Default Process Mapping for the Universe .....................................................
Pre-Approved Violations ...........................................................................
Add Pre-Approved Violations ...................................................................
Configure Pre-Approved Violations ..............................................................
Configure Cleanup Task for Expired Pre-Approved Violations ........................................
Use Case: Pre-Approved Violations ..............................................................
User Account Information .........................................................................
How CA RCM Imports Account Information from CA Identity Manager Endpoints.......................
23
24
24
25
27
28
29
29
30
30
31
32
32
33
Contents 5
Implicit Accounts ............................................................................. 33
Import CSV Data into an Account Configuration ................................................... 34
Chapter 5: Using Business Workflows
37
Business Workflows in CA RCM .....................................................................
Actions, Tasks, and Worflow Processes ..............................................................
Types of Actions ..............................................................................
Business Workflow Users ..........................................................................
Business Workflow Process ........................................................................
Participating in a Business Workflow ................................................................
Complete Workflow Actions....................................................................
Filter the My Tasks Queue .....................................................................
Complete General Tasks .......................................................................
Reassign Links to Another Reviewer .............................................................
How to Attach a Comment, File, or Link ..........................................................
Consult Other Reviewers.......................................................................
Customize Columns in My Task Tables ...........................................................
Managing Requests ...............................................................................
Filter the Workflow List ........................................................................
Monitor Your Requests ........................................................................
View Workflow Progress by Entities or Reviewers .................................................
Administer Business Workflows.....................................................................
Filter the Workflow List ........................................................................
Manage Workflows in the Administration Tab.....................................................
Monitor Workflow Progress ....................................................................
Fields in Workflow Screens.........................................................................
Chapter 6: Running Certification Campaigns
61
Certification Campaigns ...........................................................................
How to Use Campaigns ............................................................................
Define and Launch a Campaign .....................................................................
Basic Information Screen ......................................................................
Filter Screen .................................................................................
Enable Grouped Review of Actions ..............................................................
Custom Workflow Processes in a Campaign .......................................................
Automatic Handling of Redundant Reviews .......................................................
Define E-mail Behavior for a Campaign ...........................................................
Customize Display of Campaign Actions ..........................................................
Launch Options for Campaigns..................................................................
Types of Campaigns...............................................................................
Entity Certification Campaigns ..................................................................
6 Portal User Guide
37
38
39
40
41
41
42
43
44
44
45
47
48
49
49
50
51
51
53
54
55
56
61
62
63
66
66
68
68
69
70
71
72
72
73
Recertification Campaigns .....................................................................
What You Can Do During a Campaign ................................................................
Initiate the Approval Phase of a Campaign ........................................................
Re-Use of Certification Decisions ................................................................
Certification and Approval Stages of a Campaign ......................................................
How CA RCM Assigns Certifiers .................................................................
Immediately Invoke Approval Processes..........................................................
Bypass Approval Processes for a Campaign .......................................................
Audit Card Violations in a Campaign .................................................................
How Campaigns Apply Pre-approved Violations ...................................................
The Scope of a Campaign ..........................................................................
Attribute Value Filters .........................................................................
Link Type Filters ..............................................................................
Audit Card Filters .............................................................................
Previously Reviewed Links .....................................................................
Updated Links ................................................................................
Usage Information from CA Enterprise Log Manager in a Campaign ......................................
DNA-based Approval Process .......................................................................
How to Upgrade Campaigns from Earlier Versions .....................................................
Chapter 7: Using Dashboards
74
78
79
80
82
82
90
90
91
91
92
92
93
93
94
95
95
95
96
97
Configuration Dashboard .......................................................................... 98
Configuration Dashboard Settings ............................................................... 99
Audit Card Dashboard ............................................................................. 99
Compliance Dashboard ........................................................................... 100
Roles Coverage Dashboard........................................................................ 100
Certification Dashboard .......................................................................... 100
Chapter 8: Running Self-Service Tasks
101
General Self-Service Functions.....................................................................
Test Compliance .............................................................................
How CA RCM Suggests Entities.................................................................
Manage My Team's Role Assignments ..............................................................
General Section (MMT-Role Screen) ............................................................
Users Table (MMT-Role Screen)................................................................
Currently Enrolled Roles Table (Manage My Roles Screen) .........................................
Other Roles Table (MMT-Role Screen) ..........................................................
Manage My Role Assignments .....................................................................
General Section (Manage My Roles Screen)......................................................
Currently Enrolled Roles Table (Manage My Role Screen) ..........................................
Other Roles Table (Manage My Role Screen) .....................................................
103
103
104
106
107
107
109
110
112
113
114
115
Contents 7
Manage My Team's Resources.....................................................................
General Section (MMT-Resources Screen) .......................................................
Users Table (MMT-Resources Screen)...........................................................
Currently Enrolled Resources Table (Manage My Roles Screen) .....................................
Other Resources Table (MMT-Resources Screen) .................................................
Manage My Resources ...........................................................................
General Section (Manage My Resources Screen) .................................................
Currently Enrolled Resources Table (Manage My Resources Screen) .................................
Other Resources Table (Manage My Resources Screen)............................................
Defining a New Role .............................................................................
Request New Role Definition Screen ............................................................
Definitions for Role Name [New Role Name] .....................................................
Updating Role Definitions .........................................................................
Introducing the Requests Table ....................................................................
Chapter 9: Entity Browser
116
118
119
120
121
123
124
125
126
127
128
131
133
134
137
User, Role, and Resource Details ................................................................... 138
Modify the Organization Chart .................................................................... 139
Chapter 10: Generating Reports
141
How to Generate Reports .........................................................................
Report Types ...................................................................................
Parameters and Filters for Report Generation........................................................
Display a Report's Index ..........................................................................
Change Report Parameters .......................................................................
Export a Report to a File ..........................................................................
Print a Report ...................................................................................
Chapter 11: Editing Business Process Rules
149
Business Process Rule Concepts ...................................................................
Business Process Rule Types ......................................................................
How to Create and Edit Business Process Rules in the CA RCM Portal ....................................
How to Work with Business Policies in the CA RCM Portal .............................................
Create a Business Policy File in the CA RCM Portal ................................................
Run Business Policy Rules in the CA RCM Portal ..................................................
Edit a Business Policy File in the CA RCM Portal ..................................................
Chapter 12: Using Administration Functions
141
142
143
146
146
146
147
149
150
156
157
157
158
159
161
Using the Ticket Management System .............................................................. 161
8 Portal User Guide
Inbox Views.................................................................................
TMS Administration ..........................................................................
Import and Export Connectors.....................................................................
CA RCM Connectors..........................................................................
How to Define Connectors in the CA RCM Portal .................................................
Define an Import Connector ...................................................................
Define an Export Connector ...................................................................
Run or Schedule a Connector Job ..............................................................
Import and Export Tickets.....................................................................
How to Define and Run a Multi-Import Job ......................................................
Workflow and Campaign Administration ............................................................
Define Table Formats for the My Tasks Overview Screen...........................................
Default Workflow Action Options ..............................................................
How to Customize Email Behavior ..............................................................
System Properties for Business Workflows ......................................................
Job Scheduling ..................................................................................
Run or Schedule a Job on the CA RCM Portal .....................................................
The Jobs Table ..............................................................................
CA Enterprise Log Manager Integration .............................................................
Prerequisites for Integration with CA Enterprise Log Manager ......................................
Import CA RCM Queries Into CA Enterprise Log Manager ..........................................
Create a CA Enterprise Log Manager Security Certificate ...........................................
Register CA RCM on the CA Enterprise Log Manager Server ........................................
Update CA RCM Properties....................................................................
Set the Application Attribute in the Universe ....................................................
Map CA Enterprise Log Manager Endpoints ......................................................
Update Usage Data ..........................................................................
Viewing a User's Usage Data During a Campaign ..................................................
Update Mapping of CA Enterprise Log Manager Applications .......................................
Help Desk Integration ............................................................................
Set Properties for Help Desk Integration ........................................................
The Transaction Log .............................................................................
Track Portal Usage in the Transaction Log ...........................................................
Cache Manipulation .............................................................................
Load Cache .................................................................................
Clear the Cache .............................................................................
Repair CA RCM Configuration, User, and Resource Files ...............................................
Purging Data ....................................................................................
Purge Selected Documents ....................................................................
Purge Data by Date ..........................................................................
Purge Portal Users from the Permissions Configuration............................................
Purge Workpoint Jobs Associated with a Workflow ...............................................
161
165
165
167
170
171
173
176
177
178
182
182
183
184
191
191
192
192
193
194
194
195
196
197
198
198
199
200
200
201
201
204
205
206
207
207
207
209
209
210
211
213
Contents 9
Properties Settings ..............................................................................
Access the Common Properties Settings Page ....................................................
Create a Property Key ........................................................................
Edit a Property Key ..........................................................................
RACI Operations.................................................................................
Create RACI Configuration Files ................................................................
Synchronize RACI ............................................................................
System Checkup.................................................................................
SMTP Checkup ..............................................................................
Workpoint Checkup ..........................................................................
JMS Queue Checkup .........................................................................
How to Extract CA RCM Data ......................................................................
How to Enable the External Report Database ....................................................
Create a Data Extraction Profile ................................................................
Run or Schedule a Data Extraction Job ..........................................................
Track Data Extraction Jobs ....................................................................
Delete Data Extraction Profiles or Data Snapshots ................................................
Chapter 13: Security and Permissions
227
Security ........................................................................................
Enabling Security ............................................................................
Authentication Settings .......................................................................
Encryption..................................................................................
Permissions ....................................................................................
The Permissions Configuration File .............................................................
Assign a Resource to a Role .......................................................................
Use Case: Filter to Provide Self-Service Access to a User ...............................................
Chapter 14: Troubleshooting
Error Messages
227
227
228
228
229
229
234
234
237
.................................................................................
Appendix A: CA RCM Properties
213
215
215
216
218
218
219
220
220
221
221
221
222
223
223
224
226
237
247
tms.delegate.filter ............................................................................... 247
tms.escalate.filter ............................................................................... 248
tms.campaign.[campaign-type].reassign.filter........................................................ 248
10 Portal User Guide
Appendix B: Portal Structure (XML)
249
Appendix C: CA RCM Data Files
251
User Database File ............................................................................... 251
Resource Database File ........................................................................... 252
Configuration File ............................................................................... 253
Glossary
257
Index
261
Contents 11
Chapter 1: Introduction
This section contains the following topics:
About This Guide (see page 13)
Audience (see page 13)
Typical Processes (see page 14)
About This Guide
This guide provides an overview and step-by-step instructions on how to use the CA
RCM portal. The CA RCM portal is a web based interface that gives users access to the
role management and compliance management features of CA RCM.
Audience
This guide is intended for Role Engineers, system administrators and organizational
managers who are in charge of granting and certifying entitlements. Role Engineers are
typically well-trained professionals, familiar with the target organization. This manual
assumes that the Role Engineer has had professional training on CA RCM client tools and
is familiar with the CA RCM documentation that accompanied the client tools
installation package.
System administrators should be familiar with the CA RCM software, downloading and
uploading of users and resources databases, role discovery and audit operations. This
guide is also intended for general administrators and organizational managers who are
in charge of various processes, and therefore have to access the portal in the course of
their daily activities. Other users will have limited access to the CA RCM Portal’s options.
Familiarity with the Microsoft operating system and applications and relevant peripheral
and remote equipment is also assumed.
More information:
Security and Permissions (see page 227)
Chapter 1: Introduction 13
Typical Processes
Typical Processes
The CA RCM Portal provides access to both information and processes necessary for
system-wide role management, compliance management, certification campaigns and
relevant security management oversight.
Typical processes that users perform in the CA RCM Portal include the following:
Running Campaigns
Campaigns use CA RCM’s basic auditing tools to run an enterprise certification and
attestation process by designated approvers. The purpose of the campaign is to
certify that granted privileges comply with the business and regulatory needs, and
that they are not over allocated. This process is supported by the CA RCM Audit
Card facility which allows the presentation of out-of-pattern and non-compliance
information to the approver. The campaign administrator can apply pattern
recognition tools and policy enforcement rules to analyze a configuration and run a
comprehensive audit. The output of an audit is the Audit Card, which contains a list
of all suspicious records and the type of suspicion involved (currently about 50
different types).
Part of the cleansing process and an important step before starting the role
engineering process is for business managers (Approvers) to review the access
rights. A manager can be in charge of a team of users, one or more roles or one or
more resources. In a business with over 1000 users, the help of the managers is
required to speed up the cleansing process. Depending on the campaign definitions,
the business managers may be required to review the access rights of their
employees and/or resources under their jurisdiction, and report the change
requests to the CA RCM Administrator. Campaigns are used not only in the
enterprise cleansing phase, but also for periodic certification as required by
regulation.
Self-Service
Managers can use the CA RCM Portal to manage their team’s role definitions and
access to corporate resources. Users can also manage their own personal privileges
with regard to system roles and resources.
Entity Browser
This browser aids the administrator/business manager who is using the CA RCM
Portal in viewing entities (i.e. users, roles, and resources) associated with a specific
Universe under a selected configuration. The information is displayed in table
format. The tables contain basic information for each entity.
Running reports
Provides access to a variety of reports, such as reports that list users, resources, or
roles, and their links to other entities, reports that track the status of a campaign,
and others.
Note: For more information about the reports that CA RCM supports, see Report
Types (see page 142).
14 Portal User Guide
Typical Processes
Dashboards
Automatically shows users useful statistical information as they go about their
tasks. CA RCM includes the following dashboards:
–
Configuration dashboard
–
Audit card dashboard
–
Compliance dashboard
–
Roles coverage dashboard
–
Certification dashboard
Administration
Administrators can create a universe, generate import/export connectors and
define their scheduling. They can also perform other functions available only to
senior administrators.
More information:
Using The CA RCM Portal Interface (see page 17)
Chapter 1: Introduction 15
Chapter 2: Using The CA RCM Portal
Interface
The user interface, menus and options are fully described in this chapter. Not all users
will have full administrative privileges and therefore, not all the described options will
be available for all users.
This section contains the following topics:
Open the CA RCM Portal (see page 17)
User Interface (see page 18)
User Interface for Non-Administrators (see page 18)
Language Support (see page 18)
Open the CA RCM Portal
Once you install and start CA RCM, you can open the web-based interface from a
remote computer using the URL for CA RCM portal.
To open the CA RCM Portal
1.
Open a web browser and enter one of the following URLs:
■
To use a non-SSL connection, enter the following URL:
http://ServerName:Port/eurekify
■
To use an SSL connection, enter the following URL:
https://ServerName:HTTPSPort/eurekify
The Login screen opens.
2.
Enter your credentials.
Note: The Password is case-sensitive.
3.
Click Log In.
The CA RCM portal Home page appears.
More information:
Using The CA RCM Portal Interface (see page 17)
Chapter 2: Using The CA RCM Portal Interface 17
User Interface
User Interface
You can use the following general usability features in the screens of the CA RCM portal:
■
Autocomplete–in fields that reference field names or values of a data file, the portal
completes your typing with matching values from the data file. You can also press
the Down Arrow key to scroll through a list of available field values.
■
Mandatory fields–fields marked with an orange dot are mandatory. You cannot
proceed to the next stage of a process without filling in these fields.
■
Customizable Tables–click Customize in the header bar of a table to change the
columns shown and the order in which they are displayed. Click a column header to
sort the table by the values of that column. You can also use the Records per page
drop down to limit or extend the size of a long table.
User Interface for Non-Administrators
Several types of users connect to the CA RCM portal:
■
Administrators and role engineers use CA RCM to model and maintain the data
universe. They configure data connectors that update the universe model and
export changes in privilege settings to provisioning endpoints. They define and run
certification campaigns to verify user privileges.
■
Business managers interact with CA RCM primarily as participants in certification
campaigns. They can also use the role management features of the portal to change
the privileges related to users or resources they manage. All these tasks are
supported using a ticket-based task management system.
When users log in to the CA RCM portal, they can access only the portal features that
are relevant to them. Business managers can only access their own Inbox, the Role
Management area, and other relevant areas of the portal. Administrators can access all
areas of the portal. They can define data universes and connectors and create
campaigns.
More information:
Security and Permissions (see page 227)
Language Support
The CA RCM portal interface appears in the language you selected during installation. To
help ensure that text direction, date formats, and other aspects of the user interface
conform to the selected language, set the language of your browser to the language of
the interface.
18 Portal User Guide
Chapter 3: Getting Started
This chapter describes the order of procedures to be carried out when running the CA
RCM Portal on a system whose user, role and resource data has not yet been
downloaded by the CA RCM system. The step-by-step details, for each step in the
procedures mentioned here, are described in later chapters.
This section contains the following topics:
Step 1: Creating a Universe (see page 19)
Step 2: Create Import Connectors (see page 20)
Step 3: Import Entity Data (see page 20)
Step 4: Generating Master/Model Configurations (see page 22)
Step 5: Creating a Campaign (see page 22)
Step 6: Exporting Entity Data (see page 22)
Step 1: Creating a Universe
A universe is a virtual location that encompasses the data collected from the enterprise
security and identity management systems. This data is stored in the CA RCM
configuration files. A universe consists of a specific pair of master-model configurations,
enabling tracking of differences between the real-world configuration imported from
the system (master) and the desired configuration generated after a campaign (model).
You need the following information to create a universe (see page 25):
■
Master configuration file name and path
■
Model configuration file name and path
■
(Optional) Approved Audit Card
■
Audit Settings file name and path
■
Names of the fields (in the configuration files) that contain the following
information:
–
Login
–
Email
–
User manager
–
Role manager
–
Resource manager
Note: You can provide names of configuration files that do not yet exist. Because
you do not have the field names, you create the master/model configuration files
later and then update the universe with the correct field names.
Chapter 3: Getting Started 19
Step 2: Create Import Connectors
Step 2: Create Import Connectors
After defining the universe that you intend to audit, you can import user and user
privileges from various endpoints. This process requires you to define import
connectors.
Importing refers to downloading user, resource, and role information from an endpoint
system into CA RCM. Exporting refers to uploading changes in user, resource, and role
information that is generated after an audit.
Note: For more information about connectors, see the Using Administration Functions
section of this guide.
More information:
Import and Export Connectors (see page 165)
Step 3: Import Entity Data
“Import” refers to downloading the system’s current user, resource and role (when
available) configuration data. You can use the import-connector that you created in Step
2 to download the entity data from the enterprise endpoints.
You can also use the Import option on the CA RCM Data Management menu bar to
import the entity data (see the Data Management Guide).
The output of the import process is a Sage configuration document (.cfg file), which sets
the stage for the role discovery process.
Entities and Links: How CA RCM Presents Privilege Information
After you import current user, resource and role (when available) configuration data, CA
RCM parses and stores the provisioning and user access information in your enterprise
into entities and links.
Entities are the users and resources in your enterprise. Similarly, the roles that CA RCM
uses to manage access privileges are entities.
20 Portal User Guide
Step 3: Import Entity Data
Links are connections between any two entities that define access privileges. For
example:
■
A link between a user and a resource lets the user access the resource. You review
and approve links of this type when you certify the privileges of a worker you
manage.
■
A link between a role and a resource includes the resource in the role. All users who
are assigned the role can access the resource.
■
A link between a role and another role defines parent-child relationships in the role
hierarchy that CA RCM creates.
Two entities can be linked in the following ways:
Direct links
A single link connects two entities.
Indirect links
Two or more links connect the entities through other entities. For example, when a
user is assigned a role that includes a resource, the user and resource are linked
indirectly through the role.
Dual links
Both direct and indirect links connect two entities. For example, a direct link grants
a user access to a resource, and they are also assigned a role which includes that
resource.
Direct links and dual links are examined during the various review processes, for
example, during campaigns, or when assigning a role to a specific corporate team.
Indirect links are listed for completeness, but are not subject to the review process.
Chapter 3: Getting Started 21
Step 4: Generating Master/Model Configurations
Step 4: Generating Master/Model Configurations
When you create a Universe, you provide the names of two configurations files, one is
the master configuration file and the other is the model configuration file. The master
configuration file contains the data imported from endpoint systems. The model
configuration file is initially a copy of this data, which is processed and updated as the
role modeling and audit processes proceed.
Use the instructions in Appendix A: Duplicating a Configuration, to generate the master
and model configuration files using the CA RCM DNA module. If necessary, edit the
universe so that the listed master and model configurations match the ones you
generated.
After you create or edit a universe, enter the users associated with the universe into the
CA RCM permissions configuration, so that the users will have access to the CA RCM
Portal. Typically this process involves RACI synchronization to assign each user the rights
they need on the portal.
More information:
RACI Operations (see page 218)
Step 5: Creating a Campaign
A campaign is an audit process which entails reviewing links between users, roles, and
resources. Managers in charge of various entities are notified that a campaign has
begun. The tasks assigned during the campaign are presented to the campaign owner
and approvers as tickets. The tickets include information necessary to review, and
approve or reject the task.
Step 6: Exporting Entity Data
The differences between the original real-world configuration that was imported from
system endpoints (Master) and the updated and corrected configuration that has gone
through an auditing process (Model) are exported to the original endpoints, thus
updating the corporate and platform user and user privileges information so that they
are now in compliance with corporate policies and regulations.
More information:
Define an Export Connector (see page 173)
22 Portal User Guide
Chapter 4: The CA RCM Universe
After you create a universe, you can edit universe-specific settings. To access these
settings, go to Administration, Settings, Universe Settings, and click Edit next to the
universe you want to edit. The edit universe screen appears and displays multiple tabs
for changing various settings related to the universe.
This section contains the following topics:
CA RCM Universe Overview (see page 23)
Components of a Universe (see page 24)
Create a Universe (see page 25)
Customize Tables for a Universe (see page 27)
Customize Workflow Display Settings (see page 28)
Define Default Process Mapping for the Universe (see page 29)
Pre-Approved Violations (see page 29)
User Account Information (see page 32)
CA RCM Universe Overview
A universe is a view into a management namespace that lets CA RCM administrators
manage entities such as users, roles, and resources collected from identity management
systems. Entity data is stored in configuration files. A universe contains a pair of
master-model configurations, enabling the tracking of differences between the
real-world configuration imported from the system (master) and the desired
configuration generated (model).
Every connector you configure for data import and export within CA RCM must be
associated with its own universe. For example, if you want to import data from CA
Identity Manager, using the Connector for CA Identity Manager, that data would be
stored and managed in one universe. If you then wanted to import data from a
third-party resource into CA RCM using a custom executable connector, you create a
separate universe for storing and managing that third-party resource data.
Chapter 4: The CA RCM Universe 23
Components of a Universe
Connectors
Connectors are defined for importing and exporting user and user privileges (entities
and the links between them) from corporate systems into CA RCM.
Import connectors are used to collect the data from corporate systems. Once that data
is in CA RCM, Role Managers can modify the data based on corporate policies and
regulatory compliance.
At the end of change process, CA RCM compares the original configuration to the new
configuration and creates a variance log (DIFF file). Export connectors then push the
resulting configuration changes back to the corporate system.
Components of a Universe
A universe contains related configuration files and data files. Every universe contains the
following configuration files:
■
Master configuration—a file that contains real-world user and user privileges
information.
■
Model configuration—a file that starts as a copy of the Master configuration, but is
updated to reflect any user privilege or role hierarchy changes.
Note: All configuration files in a universe share a common structure. When you
define a universe, you specify which fields store the unique ID, email, and other
data for each user. These fields are used in CA RCM certification, analysis, and
report processes. All configuration files in the universe must comply with these field
designations. For more information about configuration files, see the CA RCM Data
Files appendix.
■
RACI configurations—Four files created after analyzing the Model configuration file
to determine the users who are responsible, accountable, consulted, and informed
for each resource.
■
Accounts configurations—files related to the Master and Model configurations;
they correlate user accounts defined on endpoints with users in the configuration.
You can define other configuration files that contain subsets of Master and Model data,
or newly imported data. Other files associated with a universe can include the following:
24 Portal User Guide
■
(Optional) Approved Audit Card—a file that defines pre-approved business rule
violations that are ignored in the certification processes.
■
Audit Settings—a file that determines audit behavior for universe configuration
files.
Create a Universe
Create a Universe
To manage entities such as users, roles, and resources collected from identity
management systems, create a Universe.
To create a CA RCM Universe
1.
In the CA RCM Portal, go to Administration, Settings, Universe Settings.
The Universes list appears.
2.
Click Add new.
The Create New Universe screen appears.
3.
Provide values for the following fields:
Universe Name
Defines the name of the universe.
Note: You cannot change the name of an existing universe.
Master configuration name
Specifies the master configuration of the universe.
Model configuration name
Specifies the model configuration of the universe.
Note the following:
–
Master and model configurations must be unique for each Universe. Do
not create more than one universe that uses the same master or model
configuration.
–
Example configuration file names: CA_IMmaster.cfg, CA_IMmodel.cfg.
–
Configuration file names cannot contain slash ("/" or "\") characters.
–
You can specify configuration files that do not yet exist. They are created
with the names you specify when you first import data.
(Optional) Approved Audit Card
Defines the list of pre-approved violations (see page 29) for the Universe.
Approved Alerts are
Specifies whether pre-approved violations are ignored (hidden) or grayed
out in the audit card.
Chapter 4: The CA RCM Universe 25
Create a Universe
Configuration login field
Specifies the user login ID field in the universe configuration files (located in the
user database file).
Note: If you do not have the field names at this stage, the master/model
configuration files are still created during the initial import, and you can update
the universe with the correct field names at that time.
Configuration email field
Specifies the user email address field in the universe configuration files (located
in the user database file).
Configuration user manager field
Specifies the user manager ID field in universe configuration files (user
approver).
Configuration role manager field
Specifies the role manager ID field in configuration files of the universe (role
approver).
Configuration resource manager field
Specifies the field in universe configuration files that contains the resource
manager ID (resource approver).
26 Portal User Guide
Customize Tables for a Universe
Configuration resource Application field
Specifies the field in the universe configuration files that identifies the endpoint
or source application of a resource.
Audit settings file
Specifies parameters and settings that define the audit and pattern-based
checks performed on the master configuration each time an import occurs.
4.
Click Save.
The universe is created and appears in the Universes list.
Customize Tables for a Universe
For each universe, you can customize the table layout that the entity browser and role
management screens use to display the configuration data.
Note: These table definitions are also applied by default to campaign tickets based on
the universe.
To customize entity browser display settings
1.
In the CA RCM Portal, go to Administration, Settings, Universe Settings.
The Universes list screen appears.
2.
Click Edit beside the universe you want to edit.
The Edit screen appears.
3.
Select the Entity Browser - Display Settings tab.
This tab contains three table headers. The Users, Roles, and Resources views display
the layout of each entity table in the entity browser.
4.
Customize the table layout as follows:
a.
Click Customize on the table header you want to modify.
The Customize dialog appears.
b. Use the arrow keys to add or remove columns, and to order the columns.
Chapter 4: The CA RCM Universe 27
Customize Workflow Display Settings
c.
When you finish customizing the columns, click OK.
d. Click the lock icon next to the column name to make the column mandatory.
Users can move a mandatory column, but they cannot remove it.
Note: Mandatory columns appear in red.
5.
Click OK.
The entity browser displays configurations of this universe in the table formats you
specified.
Customize Workflow Display Settings
For each universe, you can customize the table layout that the Inbox uses to display
actions when you open a workflow task under My Tasks.
Mandatory columns cannot be removed from table displays. Red text and a locked
padlock icon indicate mandatory columns in customization screens. CA RCM requires
some hard-coded mandatory columns by default. Administrators can define additional
mandatory columns if necessary.
To customize workflow display settings
1.
In the CA RCM Portal, go to Administration, Settings, Universe Settings.
The Universes list screen appears.
2.
Click Edit for the universe you want to edit.
The Edit screen appears.
3.
Select the Workflow Display Settings tab.
This tab contains four table headers. The General Actions, User Actions, Role
Actions, and Resources Actions headers display the table layouts for the My Tasks
screen.
4.
Customize the table layout as follows:
a.
Click Customize on a table header you want to modify.
The Customize dialog appears.
b. Use the arrow keys to add or remove columns, and to order the columns.
c.
When you finish customizing the columns, click OK.
d. Click the lock icon next to the column name to make the column mandatory.
Users can move a mandatory column, but they cannot remove it.
Note: Mandatory columns appear in red.
5.
Click OK.
The My Tasks screen in the Inbox displays tables in the format you specified.
28 Portal User Guide
Define Default Process Mapping for the Universe
Define Default Process Mapping for the Universe
To assign process mappings to CA RCM business workflows within a universe, use the
Default Process Mapping tab under Universe Settings. CA RCM uses the processes
specified to implement business workflows.
Note the following:
■
Universe mappings override global default mappings set under Administration,
Workflow Settings.
■
You can override these default assignments when you apply a specific process
mapping to a workflow. Do this in the CA RCM Portal by in Administration,
Workflow Settings, Workflow Process Mapping.
To edit a universe default process mapping, click the Default Process Mapping tab. This
tab has the following sections:
Certification Campaign
Lists business workflows related to certification campaigns.
Access Request
Lists business workflows related to self-service requests.
Change Approval
Lists business workflows related to configuration changes launched from CA RCM
client tools.
Each row represents a type of business workflow. A drop-down list displays available
process mappings for that type of workflow.
Pre-Approved Violations
To gray out or ignore (hide) specific violations when performing compliance and pattern
checks, you can add pre-approved violations within a specific universe. Pre-approved
violations appear on a campaign and self service violation screens.
When adding pre-approved violations, you can provide an expiration date. Once the
date expires, the violation is no longer pre-approved and behaves as a regular violation
once again. You can also provide a comment to explain the reason to approve the
violation.
If a pre-approved violation has an expiration date or explanation provided, both appear
in the violation tooltip when you hover over the violation.
A scheduled task runs at a configurable interval, searches through all universes that
have an approved audit card, and deletes all expired alerts.
Chapter 4: The CA RCM Universe 29
Pre-Approved Violations
Add Pre-Approved Violations
For each universe, you can set violations as pre-approved. These pre-approved
violations are hidden (ignored) or grayed out in compliance and pattern check audit
cards.
Note: You need administrator-level rights in the CA RCM Portal to perform this
procedure.
To add pre-approved violations
1.
In the DNA, connect to the CA RCM server.
2.
Open the audit card that contains violations you want to pre-approve.
Note: A violation must be saved to the database before you set it as pre-approved.
3.
(Optional) Provide an expiration date or a comment, as follows:
a.
Right-click the violation and select Edit.
b. If you want to provide an expiration date, select the Expiration Date check box
and provide a date.
c.
If you want to provide a reason for the pre-approval, go to the Pre-Approve
comment field and enter text.
d. Click OK.
4.
Right-click the violation you want to pre-approve and select Always Approve this
Violation.
5.
Verify that the violation appears in the audit card titled universe_name
Pre-Approved Violations.
Configure Pre-Approved Violations
If you added pre-approved violations to a universe, you can specify whether the
violation appears grayed out or is ignored (hidden) altogether. You configure
pre-approved violations under Universe Settings.
To configure pre-approved violations
1.
In the CA RCM Portal, go to Administration, Settings.
2.
Click Universe Settings.
3.
Locate the universe with the pre-approved violations to configure, and click Edit.
The Edit screen for the universe appears.
30 Portal User Guide
Pre-Approved Violations
4.
Next to 'Approved alerts are:', select the display configuration you want for
pre-approved violations.
Default: Grayed out
5.
Click Save.
Configure Cleanup Task for Expired Pre-Approved Violations
In CA RCM, you can enable or disable a scheduled task to search through all universes
that have an approved audit card, and delete all expired alerts. This scheduled task can
be configured using the CA RCM portal.
To configure the scheduled task to clean up expired violations
1.
In the CA RCM portal, go to Administration, Settings.
2.
Click Property Settings.
3.
Click Edit and change either of the following settings:
■
audit.delete.expired.alerts.enabled—enables or disables the cleanup of expired
pre-approved violations
Default: True (enabled)
■
audit.delete.expired.alerts.interval.seconds—second interval between each
cleanup
Default: 86400 (one day)
Note: To override the default behavior for a specific universe, create a
universe-specific property, for example, you can create the property
universe.property.Universe \ Name.audit.delete.expired.alerts.enabled and set it
appropriately for that universe. Spaces in a universe name are replaced with a
backslash followed by a space (\ ).
4.
Click Save.
By default, web services do not include pre-approved violations. To include
pre-approved violations, set the following property:
audit.approved.alerts.webservices.include=true
If you want to override the default behavior for a specific universe, create a
universe-specific property and set it to true, as follows:
universe.property.My\ Universe\
Name.audit.approved.alerts.webservices.include=true
Note: Spaces in a universe name are replaced with a backslash followed by a space (\ ).
Chapter 4: The CA RCM Universe 31
User Account Information
Use Case: Pre-Approved Violations
You need a few people from the Human Resources department to help the Finance
department during a busy time at the end of the year.
To help out, the employees from the Human Resources department must access
financial resources that would normally generate a violation within CA RCM.
Once you provide the Human Resources employees access to the financial resources,
you then test for compliance, and add the resulting violations to the pre-approved
violations list. Finally, set the expiration date of each pre-approved violation to the first
day of the next year.
Note: Be sure that you enable the scheduled job that deletes expired pre-approved
violations.
All violations generated by this temporary work situation are suppressed until the end
of the year. Depending on universe settings, these violations are hidden or grayed out in
campaign tickets or self-service validation screens based on the universe.
User Account Information
In many environments, user accounts on various endpoints define user access to
resources. You can import this account information into special Accounts configuration
files in the universe.
The Account configurations are based on the master and model configurations of the
universe, and map users to their accounts on provisioning endpoints.
The Account configurations are created automatically when you import account
information. These configuration files are named using the following convention:
modelconfig_Accounts.cfg
masterconfig_Accounts.cfg
Note: modelconfig is the name of the model configuration in the universe. masterconfig
is the name of the master configuration in the universe.
When you use the entity browser to examine any configuration of a universe that
contains Account configurations, the entity browser shows account information for each
user.
32 Portal User Guide
User Account Information
How CA RCM Imports Account Information from CA Identity Manager Endpoints
CA RCM can import account information from CA Identity Manager endpoints. When
you create a connector for CA Identity Manager, the import process identifies changed
account information and updates the account configurations with the master and model
configurations of the universe.
Note: Account information is retrieved only when you run an import connector from the
CA RCM portal. If you run the import from CA RCM Data Management, CA RCM does not
retrieve account information. For more information about the connector for CA Identity
Manager, see the Connector for CA Identity Manager Guide.
Implicit Accounts
When a universe does not have account configurations, or a user has no accounts on
external endpoints, account information is not available. CA RCM creates an implicit
account to relate resources to users even when account information is not available
from external endpoints.
The following system parameters control implicit accounts:
implicit.accounts.enabled
Specifies if CA RCM creates implicit accounts for users.
Valid values; True, False
Default: True
implicit.accounts.field.name
Specifies the field of user records that is used to name implicit accounts. Typically
this is the loginID field.
implicit.accounts.field.name.universe
Specifies the field of user records that is used to name implicit accounts in the
specified universe. This value overrides the value of the
implicit.accounts.field.name property for the specified universe.
universe
Defines the universe that uses the field specified to name implicit accounts.
Implicit accounts have the following structure;
■
The account name is taken from the field specified in the
implicit.accounts.field.name property.
■
The default mapped endpoint is taken from the Configuration resource application
field specified for the universe.
Chapter 4: The CA RCM Universe 33
User Account Information
Import CSV Data into an Account Configuration
You can import account information from a file of comma-separated values (CSV) into a
special configuration that parallels the model configuration of the universe.
Note: Because file-based import is a one-time process, only use a CSV file for initial
import or occasional administrative updates to account information. To keep account
information updated, define a data connector job that imports account information
from endpoints at regular intervals.
Note: You need administrator-level rights in the CA RCM Portal to perform this
procedure.
To import CSV data into an account configuration
1.
Prepare the data file.
2.
Click Administration, Accounts from the main menu of the CA RCM portal.
The Import Accounts screen appears.
3.
Specify the target universe and the CSV file to import, and click Import.
CA RCM copies new, unique records from the CSV file to the Account
configurations. Existing information in the Account configurations is preserved.
4.
(Optional) To verify imported account data, view the model configuration in the
entity browser or open the account configurations in the Data Manager application
CSV File Structure
Each record of the CSV accounts data file must contain the following fields:
PersonID
Defines the user in the target universe who owns the imported account. This field
has the same content and format as the PersonID field in the universe.
Endpoint
Defines the name of the endpoint that hosts the account. This field has the same
content and format as the Configuration resource Application field specified for the
universe.
Account
Defines the account name as it is exists on the endpoint.
The first line of the CSV file must be the following header:
personID,endpoint,account
Each line of the file must contain three values, separated by commas.
34 Portal User Guide
User Account Information
Example: CSV acounts data file
The following example shows a CSV file with four data records. The first two records
map accounts to the same user, John Meade:
personID,endpoint,account
5467238,UNXMARKT,jmeade
5467238,NT-Security,john_meade
7635097,RACFTEST,marcus432
6523876,NT-Security,kim_bell
Chapter 4: The CA RCM Universe 35
Chapter 5: Using Business Workflows
This section contains the following topics:
Business Workflows in CA RCM (see page 37)
Actions, Tasks, and Worflow Processes (see page 38)
Business Workflow Users (see page 40)
Business Workflow Process (see page 41)
Participating in a Business Workflow (see page 41)
Managing Requests (see page 49)
Administer Business Workflows (see page 51)
Fields in Workflow Screens (see page 56)
Business Workflows in CA RCM
A business workflow is a set of related tasks that fulfill a business requirement, such as
certifying user privileges, or requiring approvals for privilege changes.
Business workflows implement a company's procedures for determining compliance
with internal and external policies in CA RCM. Implementing these procedures in CA
RCM can help ensure that a company has a reliable and repeatable method for
validating compliance.
For example, a company wants to perform a quarterly audit of their employees’ access
to company resources. The compliance officer initiates a certification campaign that
requires managers to certify the privileges of their direct reports. The compliance officer
further requests that resource owners approve any rejected privileges for the resources
they manage. In this example, the certification and approval steps comprise a business
workflow. The company can initiate that workflow on a quarterly basis, or more
frequently, as required.
You can define business workflows for the following activities in CA RCM:
■
Certification campaigns
■
Self service requests, such as a manager requesting a privilege change for an
employee, or requesting a change to roles that they own
Note: Self service requests are initiated through the Role Management menu in the
Portal.
■
Approval requests for changes to the role model made through the DNA client tools
Chapter 5: Using Business Workflows 37
Actions, Tasks, and Worflow Processes
Actions, Tasks, and Worflow Processes
A business workflow includes the following components:
Action
An action is a single decision taken by a business user in a workflow. The most
common action is for a manager or resource owner to approve or reject access
privileges related to a user, role, or resource entity. Other examples of actions
include starting a certification campaign, or consulting with another user before
deciding to approve or reject a privilege.
Note: For more information about actions, see Types of Actions (see page 39).
One or more actions comprise a task.
Task
A task is a collection of actions that CA RCM users must complete to satisfy a
requirement in a business workflow. For example, a user certification campaign
contains a task for each user under review. Each user certification task consists of
review actions for each role or resource that the user can access. CA RCM assigns
each action to the appropriate reviewers, tracks responses, and implements any
required changes.
A task is associated with a workflow process.
Workflow process
A workflow process is a set of activities and decision points in Workpoint process
management software (installed with CA RCM) that control the flow of a task. A
workflow process is associated with a task type in a business workflow.
Note: Task types are associated with a default workflow process. If the default
workflow processes do not address certain business requirements, system
administrators can create custom processes. For more information, see the
Programming Guide.
38 Portal User Guide
Actions, Tasks, and Worflow Processes
Types of Actions
CA RCM assigns actions to business users. Most actions involve review of a link which
defines an access privilege between two entities. Typically CA RCM assigns an action to a
user who is related to the entities under review, such as the manager of a user, or the
owner of a role or resource.
The type of an action provides a general idea of its purpose in the workflow, and the
task that generated it. The following types of actions are used in CA RCM business
workflows:
Certify
Presents an existing link for review. Rejection of the link indicates that a privilege
should be removed, and requires a change to the underlying CA RCM database.
Typically this task is part of the initial certification phase in a certification campaign
workflow.
Suggest
Proposes a new link for the entity under review. Approval of the link indicates that a
privilege is added, and requires a change to the underlying CA RCM database.
Typically this task is part of the initial certification phase in a certification campaign
workflow.
Approve
Presents a new, changed, or deleted link for approval. Typically this task is part of a
self-service workflow, or the change approvals phase in a certification campaign
workflow. For example, if a manager rejects an existing link between their user and
a resource, or requests a new link to the resource - those changes must be
approved by the owner of the resource.
Consult
Presents a link to another reviewer for their recommendation. When you accept or
reject the link in a Consult action, your decision is returned to the original reviewer.
They can see your choice before they submit a decision.
Other/Custom
Presents workflow control decisions or other custom actions generated by a
process.
Chapter 5: Using Business Workflows 39
Business Workflow Users
Business Workflow Users
Business workflows include the following types of activities, which different types of
users in a company perform:
■
Starting and managing business workflows
Users, such as compliance officers, role engineers, role and resource owners, and
managers, initiate business workflows in one of the following ways:
–
Starting a certification campaign
–
Making changes to the role model in the DNA that require approvals
–
Requesting a change to their roles or the roles of their employees
During a business workflow, these users can monitor the progress of the tasks in
the workflow
■
Participating in business workflow tasks
Once a business workflow starts, CA RCM assigns users, such as managers and
resource owners, actions. An example of an action is reviewing user privileges and
other resource links, and approving or rejecting them, as needed.
Depending on the workflow associated a task, these users may also be able to
reassign a task, or consult with other users for more information before approving
or rejecting a privilege or resource link.
■
Customizing business workflows
CA RCM includes default workflow processes that administrators can map to tasks
in a business workflow. In some cases, the default workflow processes do not
address all business requirements. System integrators and other advanced users
can customize default processes, as needed. For example, a system integrator can
create a custom workflow process to support multiple approvers for a certain type
of task.
Note: For more information about customizing workflow processes, see the
Programming Guide.
The Portal provides three interfaces for business users to view and complete business
workflow activities:
40 Portal User Guide
■
The My Requests screen, which is available in the Inbox menu, allows managers and
other users to track self-service requests and other workflows that they initiate.
■
The My Tasks screen, which is available in the Inbox menu, supports all users who
participate in workflows with a personalized "To Do" list. The My Tasks screens
organize all the actions that CA RCM assigns to an individual.
■
The Workflows screen, which is available in the Administration menu, allows
administrators to track and control active business workflows.
Business Workflow Process
Availability of Workflow Administration, My Requests, and My Task screens depends on
the permissions defined for each user account on the CA RCM server. Typically, all CA
RCM users have a My Tasks list, but only users with administration-level permissions can
access the workflow administration screens.
Business Workflow Process
The following process describes the high level steps in a business workflow:
1.
CA RCM initiates a business workflow when one of the following events occur:
■
An administrator starts a certification campaign
■
A manager or other business user submits a request for a resource or a role
■
An administrator makes changes in the DNA that changes the role model and
initiates an approval process
Each business workflow includes a set of tasks that must complete before the
business workflow completes.
Each type of task is associated with a workflow process, which specifies the actions
and decisions required to complete the task.
2.
CA RCM creates actions for the users involved in the business workflow in the My
Tasks screen in the Portal, and sends emails to notify the users of pending work.
3.
Users view a list of their actions in the My Tasks screen.
The actions are grouped by entity.
Users can open each item in the list to view the actions that they are assigned,
make decisions about each action, or consult with other users.
4.
Once all of the users complete the work required for an action, the action moves to
the next step as defined in the workflow process, or completes.
Participating in a Business Workflow
Managers and other business users in the company receive email notifications when CA
RCM assigns them actions. When they log in to the CA RCM portal, these actions are
listed in their My Tasks screen.
In most cases, users complete actions in the interactive display of the My Tasks screen.
For example, the My Tasks queue for each business manager participating in a
certification campaign shows a personalized list of the privilege links that they must
review. Each manager indicates their review decisions, and submits the completed
actions to CA RCM.
Chapter 5: Using Business Workflows 41
Participating in a Business Workflow
Complete Workflow Actions
You complete workflow actions in My Task screens. You can complete their required
actions at one time, or complete some actions, save their progress, and complete their
work at a later time.
To complete workflow actions
1.
In the CA RCM portal main menu, go to Inbox, My Tasks.
The My Tasks screen appears. This screen provides an overview of the actions that
are assigned to you.
The tables group actions based on the entity under review. For example, The Role
Tasks table lists actions related to users, resource, or other roles linked to roles.
Each line of the table represents an action or group of actions of one type, from one
workflow, for one role.
2.
(Optional) Filter the actions (see page 43) that are displayed.
Note: Filters determine which actions are displayed. They do not determine which
actions are assigned to you. Entries hidden by a filter remain active.
3.
Click the Open button beside a group of actions.
An action details screen displays an action or group of actions of one type, from one
workflow, related to one primary entity. The title of the screen indicates the type of
the actions that are listed the screen, and the primary entity under review. For
example, a screen of user certification actions shows a table of roles linked to the
user, and a table of resources linked to the user.
4.
Use the information fields and interactive options (see page 56) of the screen to
review links.
5.
The following decisions complete your handling of an action:
■
Approve the link
■
Reject the link
■
Reassign the action to another reviewer
Note: You can choose other options for Consult actions (see page 48) or Workflow
Control actions (see page 44).
6.
Do one of the following:
■
Click Save to save the review decisions and other operations you performed,
without submitting them to CA RCM. CA RCM displays these decsions the next
time you log in to the portal.
■
Click Submit to submit your decisions to CA RCM. Completed actions are
removed from your My Tasks queue.
■
Click Cancel to return to the overview screen without saving your decisions.
The My Tasks overview screen appears.
42 Portal User Guide
Participating in a Business Workflow
Filter the My Tasks Queue
You can filter the actions displayed in the My Tasks screen. This can help you organize
your work. For example, you can identify actions related to specific workflows, or
handle review actions of the same type in a single session.
You can also combine filters. For example, you can view only Consult actions related to a
certain workflow.
To filter the My Tasks Queue
1.
Click the Filter button on the My Tasks page header.
The Filter Actions dialog appears.
2.
Select actions related to specific workflows:
a.
Select the Specific Workflows option and click the plus icon.
The Select Workflows dialog appears.
b. Under Available Workflows, choose the type of workflow you want, specify a
starting date, and press Search.
The table lists workflows that match the search criteria.
c.
Select workflows and click the Add arrow.
The workflows appear in the Selected Workflows list.
d. (Optional) Repeat the search with different conditions, and add more
workflows to the Selected Workflows list.
e.
Click OK to define the filter.
Only actions related to the selected workflows are displayed.
The Filter Actions screen appears.
3.
Select the types of actions to display. Select the All option to select all types of
actions, or to clear your selection.
Note: this filter is applied in addition to any other filter you define.
4.
Select the Action States to display. The following options are availalbe:
Pending
Actions that you did not yet submitted to CA RCM.
Complete
Actions that you submitted to CA RCM.
Note: this filter is applied in addition to any other filter you define.
5.
Click OK.
The My Tasks screen displays only actions that meet your filter criteria.
Chapter 5: Using Business Workflows 43
Participating in a Business Workflow
Complete General Tasks
When you click Open in the General table of the My Tasks overview screen, a screen
appears that shows actions you can take to control the progress of the workflow.
Only a few of the action information fields and operations (see page 56) are relevant to
these workflow control actions. The Show Related Info operation displays the progress
of related tasks and actions in the workflow. This information can help you decide what
control actions to take, and when to take them.
Example: Start Change Approvals in a Certification Campaign
Standard CA RCM certification campaigns have distinct certification and change
approval phases. Approval actions for changed links are held until all certification
actions are complete.
When a campaign launches, the campaign owner receives a workflow control action.
The action stops initial certification actions, and begins change approvals.
The Related Info displayed for this action shows the progress of the certification phase
of the campaign.
When the campaign owner submits this workflow control action, the approval phase of
the workflow begins, and any incomplete certification actions are canceled.
Example: Create New Role
When users requests new roles, they specify an owner for the new role.
This owner receives a workflow control action. The action approves creation of the role.
The Related Info displayed for this action shows the progress of child actions that
approve the privileges associated with the new role.
When the role owner submits this workflow control action, CA RCM creates the role
with currently approved privileges. Privileges that are not yet approved are not included
in the new role.
Reassign Links to Another Reviewer
You can transfer review actions that CA RCM assigns to you to another reviewer.
Reassign options and controls appear in My Tasks and My Requests queues, and in the
Workflow Management screens used by administrators.
Note: The CA RCM administrator can selectively enable these options and controls in
the portal.
44 Portal User Guide
Participating in a Business Workflow
To reassign actions in these screens, do one of the following:
■
Click the Reassign icon beside an action or group of actions.
■
To reassign all items in a table, select the checkbox in the Reassign column header
of the table.
■
In My Requests and Workflow Management screens:
a.
Click the Reviewers icon beside a link under review.
b. A dialog lists all the reviewers for that link.
c.
Click the Reassign icon beside reviewers you want to change.
When you reassign an action or group of actions, the target user appears beside the
Reassign icon. The action is reassigned to this user. The Default Assignee field at the
bottom of the screen indicates the default target for reassigned actions.
Note: In some My Request dialogs, the default reviewer is the workflow owner or their
manager.
To change the target user, do one of the following:
■
Click the Default Assignee field to select another user. When you reassign tasks,
they target the new Default Assignee.
Note: The target user of previously reassigned actions does not change when you
change the Default Assignee.
■
Click the target user of an individual link to change its value.
Reassignment decisions are saved when you click Save in your My Tasks queue. When
you click Submit, the actions are moved to the My Tasks queue of the target user. The
reassigned links count toward your progress in handling actions.
How to Attach a Comment, File, or Link
You can attach data files with supporting information to an action or group of actions.
Similarly, you can add text comments to an action or group of actions.
The following examples show typical uses for this additional information:
■
Delegation: Add data or comments when you reassign the action to another
reviewers.
■
Consultation: When a review action is shared with other reviewers, you can share
additional information to support the decision process.
■
Mandatory Documentation: In some campaigns, you are required to comment on
your decisions - for example, you may be asked to justify approval for a link that
violates business policy rules.
Chapter 5: Using Business Workflows 45
Participating in a Business Workflow
Each link under review has one comment queue and one attachment queue. All
comments and attachments are visible to all entity owners, consultants, and reviewers.
You can attach a comment or file to a group of actions, such as the groups listed in the
My Tasks screen. In this case the attachment is associated with the common entity of
the group. For example, if you attach a comment to a group of links related to a single
user, the comment is associated with that user.
Attach a Comment
You can add text comments to an action or group of actions to assist yourself or other
reviewers.
To attach a comment:
1.
Click the Comment icon beside an action, group of actions, or link under review.
The Comments pop-up appears.
2.
Edit your comment.
3.
Click OK.
The Comment icon shows the number of comments.
Attach a File
To support review decisions, you can attach data files to an action or group of actions
To attach a file
1.
Click the Attachment icon beside an action or group of actions.
The Attachments pop-up appears.
2.
Enter a description and browse to a file.
3.
Click Upload.
File contents are uploaded to the CA RCM database. The file is added to the
Attachments list as a clickable link.
4.
Click Close.
The Attachment icon shows the number of attachments.
46 Portal User Guide
Participating in a Business Workflow
Consult Other Reviewers
You can consult with others when you review a link or entity. Consulted reviewers
indicate their review decision, and can share notes or attach files of supporting data.
You can view these decisions and supporting information when you make your decision.
To consult other reviewers
1.
In an action details screen, click the Consult icon beside a link or workflow control
action.
The Consult dialog appears.
2.
Select consultants:
a.
Click the plus icon to add a consultant.
The Select Consultant dialog appears.
b. Use the drop-down fields to define a filter, and click Search.
CA RCM filters the list of users.
c.
Click Select beside the user you want to consult, and click Apply.
The user appears in the To field of the Consult dialog.
Repeat these steps to select additional consultants.
Click the minus icon beside a name in the To field to delete a consultant.
3.
(Optional) Enter a short message to the consultants in the Comment field.
4.
Click Send
CA RCM places a copy of the action in the My Tasks queue of each consultant. Each
consultation appears in the Consulting Queries list.
5.
Click Close.
The Consult dialog closes. The consult icon indicates the number of consultants and
the number of responses.
6.
(Optional) attach data files, links, or additional comments to the action. Consultants
can view this supporting information.
7.
Monitor the action.
Note: You can submit your review decision at any time, whether consultants
respond or not. If you submit your decision before a consultant responds, CA RCM
displays the consultant's action as canceled in workflow progress charts (see
page 55).
Chapter 5: Using Business Workflows 47
Participating in a Business Workflow
8.
When the Consult icon indicates that consultants have responded, click the icon.
The Result field indicates the recommended decision of each reviewer.
The Comment and Attachment fields indicate comments or files attached by
consultants.
Note: When a consultant dismisses the consult action without responding, the
Result field is empty.
9.
Click Close.
10. In the action details screen, indicate your decision for the action.
How to Handle Consult Actions
Other reviewers can request your opinion about a link under review or other actions.
These requests appear in your My Tasks queue as Consult actions.
You handle these actions like your own review actions. When you click Submit, CA RCM
displays your decision to the original reviewer as a recommendation. The original
reviewer makes the final review decision.
The original reviewer can include comments or attachments to direct you. Similarly, you
can add comments or attachments to support your recommendation.
In additional to typical review options, the following option is available for Consult
actions:
Dismiss
Removes a Consult action from your My Tasks queue without returning a response
to the original reviewer. This is the equivalent of refusing to consult. Comments or
attachments you add to the link under review are visible to the other reviewers.
Customize Columns in My Task Tables
You can customize the table layouts that CA RCM uses to display workflow actions.
Mandatory columns cannot be removed from table displays. Red text and a locked
padlock icon indicate mandatory columns in customization screens and dialogs. Some
mandatory columns are hard-coded defaults in CA RCM. Administrators can define
additional mandatory columns.
To customize columns in task tables
1.
Click Customize on a table header you want to modify.
The Customize dialog appears.
2.
48 Portal User Guide
Use the arrow keys to add or remove columns, and to order the columns.
Managing Requests
Note: Mandatory columns appear in red. You cannot remove these columns from
the table.
3.
Click OK.
CA RCM displays tasks or actions for this entity in the table format you specified.
Managing Requests
Managers and other business users can initiate workflows by requesting a privilege
change for an employee, or requesting changes to roles that they own.
The My Requests screens in the Inbox menu allow these users to monitor the progress
of their requests.
Filter the Workflow List
You can filter the list of workflows to help you find specific workflows or groups of
workflows.
To filter the workflow list
1.
Click Filter in the page header.
The Filter Workflows dialog appears.
2.
Define filter criteria as follows:
Due Date
Use the From and To fields to specify a time period. The filter selects workflows
with a due date within that period.
Workflow Types
Select the types of workflows to display. Select the All option to select all types
of workflows, or to clear your selection.
Workflow States
Select the states of workflows to display. Select the All option to select all
states, or to clear your selection. The filter selects workflows that are currently
in the specified states.
Note: You can combine these filter criteria.
3.
Click OK.
The list displays only workflows that meet your filter criteria.
Chapter 5: Using Business Workflows 49
Managing Requests
Monitor Your Requests
Use the My Requests interface to monitor business flows that you initiate.
To monitor your CA RCM workflows
1.
In the CA RCM portal main menu, go to Inbox, My Requests.
The screen lists the active workflows that you initiated. You can customize the fields
(see page 48) displayed in the table.
2.
(Optional) Filter the workflows (see page 49) that appear in the list.
3.
Click a workflow to view its details.
The workflow detail screen appears. It contains the following tabs:
■
Overview - shows the progress of the flow in graphs and charts. This tab is open
by default.
■
Flow Progress by Affected Entities - lists tasks by the entities under review in
each task, and shows their progress.
■
Flow Progress by Reviewers - lists actions by their reviewers, and shows their
progress.
4.
(Optional) Click Customize to modify the charts of the Overview tab.
5.
Click one of the Flow Progress tabs.
Actions are listed in groups. The table shows the progress of each group.
Note: When the scope of the workflow is large, or additional large workflows are
active, the progress bars may not update immediately. It may take several minutes
for submitted actions to be counted as complete in the progress bars.
6.
Click the Open button beside a group.
A table lists actions in the group.
7.
Click the Open button or the Reviewers icon.
An action details screen displays an action or group of actions of one type, from one
workflow, related to one primary entity.
Actions that are already submitted to CA RCM are dimmed.
8.
Use the information fields and interactive options (see page 56) of the screen to
review links.
Only Reassign, Comment, and Attachment operations are available for actions that
are assigned to others.
Approve and Reject options are available only for actions that are assigned to you.
50 Portal User Guide
Administer Business Workflows
9.
Do one of the following:
■
Click Submit to submit your decisions to CA RCM.
■
Click Cancel to return to the overview screen without saving your decisions.
View Workflow Progress by Entities or Reviewers
The My Requests and Workflows screens present two ways to view the progress of a
workflow.
■
The Workflow Progress by Affected Entities tab groups tasks of the workflow by the
entities under review in each task. The entries in these tables are tasks generated
by CA RCM for the workflow, based on the workflow type, base configuration,
scope of entities under review, and other settings.
■
The Workflow Progress by Reviewer tab groups actions of the workflow by the
reviewer to whom they are assigned, and shows their progress. The entries in these
tables are actions generated by the Workpoint jobs that implement tasks of the
workflow.
When a workflow is in progress, you can drill down from either tab to view individual
actions. The Workflow Progress by Affected Entities tab displays high-level tasks created
by CA RCM. The main views of this tab are populated when CA RCM completes its
analysis of the links under review in the workflow.
Each of these tasks spawns many Workpoint jobs when they are implemented. The Flow
Progress by Reviewer tab displays the resulting low-level Workpoint jobs, and the
reviewers that were assigned to each link. This tab is populated only when Workpoint
jobs are initiated, and its contents depend on the logic implemented for each task by
the corresponding Workpoint process.
Administer Business Workflows
Role engineers and administrators use the Workflows screen to track and control
campaigns and other active CA RCM workflows.
The Workflow screens are similar to the My Requests screens, however, they provide
additional management and control options that are not available in the My Requests
screens.
Chapter 5: Using Business Workflows 51
Administer Business Workflows
To use this screen, users must have Admin-level permissions in the CA RCM portal.
To administer business workflows
1.
In the CA RCM portal main menu, go to Administration, Workflows.
The screen lists the active CA RCM workflows. When a workflow concludes, it is
removed from the list.
2.
(Optional) customize the information fields (see page 48) displayed in the table.
3.
(Optional) Filter the workflows displayed in the table (see page 49).
4.
Click a workflow to view its details.
The workflow detail screen appears. It contains the following tabs:
5.
■
Overview - a dashboard that shows the progress of the flow in graphs and
charts. This tab is open by default.
■
Administration - provides advanced workflow control options to stop or restart
the workflow, or to send escalation emails (see page 54) for incomplete
actions.
■
Workflow Progress by Affected Entities - lists tasks by the entities under review
in each task, and shows their progress.
■
Workflow Progress by Reviewers - lists actions by their reviewers, and shows
their progress.
Manage workflow tasks and actions in detail:
a.
Click one of the Workflow Progress tabs.
Actions are listed in groups. The table shows the progress of each group.
Note: When the scope of the workflow is large, or additional large workflows
are active, the progress bars may not update immediately. It may take several
minutes for submitted actions to be counted as complete in the progress bars.
b. Click the Open button next to a group.
A table lists actions in the group.
c.
Click the Open button or the Reviewers icon to view more detail.
An action details screen displays an action or group of actions of one type, from one
workflow, related to one primary entity.
Actions that are already submitted to CA RCM are dimmed.
6.
Use the information fields and interactive options (see page 56) of the screen to
review links.
Only Reassign, Comment, and Attachment operations are available for actions that
are assigned to others.
Approve and Reject options are available only for actions that are assigned to you.
52 Portal User Guide
Administer Business Workflows
7.
Do one of the following:
■
Click Submit to submit your decisions to CA RCM.
■
Click Cancel to return to the overview screen without saving your decisions.
Filter the Workflow List
You can filter the list of workflows to help you find specific workflows or groups of
workflows.
To filter the workflow list
1.
Click Filter in the page header.
The Filter Workflows dialog appears.
2.
Define filter criteria as follows:
Due Date
Use the From and To fields to specify a time period. The filter selects workflows
with a due date within that period.
Workflow Types
Select the types of workflows to display. Select the All option to select all types
of workflows, or to clear your selection.
Workflow States
Select the states of workflows to display. Select the All option to select all
states, or to clear your selection. The filter selects workflows that are currently
in the specified states.
Note: You can combine these filter criteria.
3.
Click OK.
The list displays only workflows that meet your filter criteria.
Chapter 5: Using Business Workflows 53
Administer Business Workflows
Manage Workflows in the Administration Tab
You can manage business workflows in the Administration tab of the Workflows
screens, which are located in the Administration Menu. The Administration tab lets you
review general workflow information, and start, stop, and archive a workflow. This tab
contains the following options:
Start Workflow
Launches a campaign created with the Disabled option.
Stop Workflow
Suspends a workflow. Actions of this workflow appear in the My Tasks queues of
participants, but Approve, Reject, and Reassign options are not available. Changes
resulting from campaign decisions are no longer exported to provisioning
endpoints.
Note: You cannot re-start a workflow after you stop it.
Archive
Removes the workflow from all My Task queues, and stores the current state of the
workflow. Changes resulting from campaign decisions are no longer exported to
provisioning endpoints.
Escalation Emails
Lets you define and send reminder email (see page 54)s during a campaign. This
option is only available for campaign workflows.
Define and Send Escalation Emails
Administrators can send emails to remind reviewers to complete their tasks for a
certification campaign.
To define and send escalation emails
1.
In the Workflows screen, select an active workflow.
The workflow details screen appears.
2.
Click the Administration tab.
3.
Click Escalation Emails.
The Escalation Emails pop-up appears.
Note: The Escalation Emails button appears for certification campaigns only.
4.
54 Portal User Guide
Configure the following information for each email you want to send:
■
Completion criteria
■
Email template
■
Email target
Administer Business Workflows
5.
To add more emails, click the plus icon. To remove emails from the set, click the x
icons.
6.
(Optional) To save email criteria, complete the following steps:
a.
Click Save.
The Save Escalation criteria pop-up appears.
b. Define a name for the email criteria, and click Save.
The email criteria are saved.
7.
(Optional) To load email criteria, complete the following steps:
a.
Click Load.
The Load Escalation criteria pop-up appears.
b. Select a set of email criteria, and click Load.
The email criteria are loaded.
8.
Click Send Now.
Escalation emails are sent to reviewers with task completion that satisfies the
criteria.
Monitor Workflow Progress
Workflow owners can monitor the progress of a workflow process that they initiate by
using the Overview tab in a workflow details screen. Users access the Overview tab by
opening Administration, Workflows, and selecting a workflow process to view its details.
The Overview tab displays workflow progress in charts. You can view progress in each
chart as a percentage or as a value by selecting the appropriate option above each
chart. If you select Value, CA RCM displays workflow progress based on the number of
completed tasks in the workflow.
To update the chart to reflect the current status without reopening the Overview tab,
click Draw Chart.
Note: To view additional details about tasks in a workflow progress, use the Workflow
Progress by Reviewers and the Workflow Progress by Affected Entity tabs (see page 51).
Chapter 5: Using Business Workflows 55
Fields in Workflow Screens
View Workflow Progress by Entities or Reviewers
The My Requests and Workflows screens present two ways to view the progress of a
workflow.
■
The Workflow Progress by Affected Entities tab groups tasks of the workflow by the
entities under review in each task. The entries in these tables are tasks generated
by CA RCM for the workflow, based on the workflow type, base configuration,
scope of entities under review, and other settings.
■
The Workflow Progress by Reviewer tab groups actions of the workflow by the
reviewer to whom they are assigned, and shows their progress. The entries in these
tables are actions generated by the Workpoint jobs that implement tasks of the
workflow.
When a workflow is in progress, you can drill down from either tab to view individual
actions. The Workflow Progress by Affected Entities tab displays high-level tasks created
by CA RCM. The main views of this tab are populated when CA RCM completes its
analysis of the links under review in the workflow.
Each of these tasks spawns many Workpoint jobs when they are implemented. The Flow
Progress by Reviewer tab displays the resulting low-level Workpoint jobs, and the
reviewers that were assigned to each link. This tab is populated only when Workpoint
jobs are initiated, and its contents depend on the logic implemented for each task by
the corresponding Workpoint process.
Fields in Workflow Screens
Use the following information fields and interactive options to handle CA RCM workflow
actions. The operations available for a specific action or group of actions depend upon
the type of each action, the assigned reviewer, and workflow or system settings.
The following fields identify the parent workflow that generated the actions:
Workflow ID
Displays the unique numerical identifier that CA RCM assigns to each workflow.
Workflow
Displays the name of the workflow that generated the actions.
Workflow Description
Hover over the icon in the Flow Description field to view the Description text of the
workflow that generated the actions.
Workflow Type
Displays the type of workflow that generated the actions.
56 Portal User Guide
Fields in Workflow Screens
Initiator
Displays the PersonID field value of the user who initiated the workflow.
Due Date
Displays the date by which the workflow initiator expects you to complete the
actions.
The following fields and operations apply to a group of actions in the My Tasks overview
screen, or to individual actions:
Action
Indicates the type of action (see page 39) for this action or group of actions.
User/Role/Resource
Identifies the primary entity common to all actions in a group. Click this field to view
the entity record for the entity.
User Name/Role Name/Resource Name
Identities the secondary entity unique to each link under review. For example, in a
screen of user certification links, this column shows roles and resources linked to
the user under review. Click this field to view the entity record for the entity.
Progress
Indicates your progress in handling this group of actions.
Comment
Click the icon in the Comment column to add a comment (see page 45) to an action
or group of actions.
Attachment
Click the icon in the Attachment column to attach a file (see page 45) to an action or
a group of actions.
Alert
Indicates whether the link or group of links violates audit card or business process
rules. The value in this field indicates the number of rules that the link violates. Click
the field value to review a detailed list of violations.
Action ID
Displays the unique numerical identifier that CA RCM assigns to each action.
Approve
Click the icon in the Approve column to approve a link between the entity under
review and another entity.
Note: If group selection is enabled for the campaign, click the checkbox in the
Approve column header to approve all links in the table.
Chapter 5: Using Business Workflows 57
Fields in Workflow Screens
Reject
Click the icon in the Reject column to reject a link between the entity under review
and another entity.
Note: If group selection is enabled for the campaign, click the checkbox in the
Reject column header to reject all links in the table.
Reassign
Click the icon in the Reassign column to transfer an action to another reviewer (see
page 44).
Note: If group selection is enabled for the campaign, click the checkbox in the
Reassign column header to reassign all links in the table.
Related Info
Click the Show button to display other actions related to this action and additional
information relevant to this task.
Membership
Indicates whether a direct link, an indirect link, or dual links connect the entities
under review . For suggested links, this field has the value Not Linked.
Reviewers
Click the icon in the Reviewers column to view a list of other reviewers for this link.
Usage
Indicates the level of usage based on information from CA Enterprise Log Manager.
Note: This information is only displayed when CA RCM integrates with CA
Enterprise Log Manager in your environment (see page 193).
58 Portal User Guide
Fields in Workflow Screens
Consult
Click the icon in the Consult column to get advice about an action (see page 47)
from other reviewers.
Dismiss
Removes a Consult action from your My Tasks queue without returning a response
to the original reviewer. This is the equivalent of refusing to consult. Comments or
attachments you add to the link under review are visible to the other reviewers.
Save
Saves your review decisions and reassign, consult, and other operations, and
returns to the My Actions overview screen. These decisions count toward your
progress in handling the group of actions. Your decisions to approve or reject links
are not yet submitted to CA RCM, and you can review and change these decisions
the next time you log in to CA RCM.
Submit
Passes your decisions to approve or reject links to CA RCM, and removes these
actions from your My Actions screens.
Cancel
Exits the My Actions detail screen without saving your review decisions or other
operations.
More information:
Administrator View / User View (see page 162)
Chapter 5: Using Business Workflows 59
Chapter 6: Running Certification Campaigns
This section contains the following topics:
Certification Campaigns (see page 61)
How to Use Campaigns (see page 62)
Define and Launch a Campaign (see page 63)
Types of Campaigns (see page 72)
What You Can Do During a Campaign (see page 78)
Certification and Approval Stages of a Campaign (see page 82)
Audit Card Violations in a Campaign (see page 91)
The Scope of a Campaign (see page 92)
Usage Information from CA Enterprise Log Manager in a Campaign (see page 95)
DNA-based Approval Process (see page 95)
How to Upgrade Campaigns from Earlier Versions (see page 96)
Certification Campaigns
Certification campaigns open the role hierarchy, user privileges, and business rules you
define in CA RCM to review. When you initiate a certification campaign, CA RCM
automatically invites managers to review and certify the access privileges of the users or
resources they administer. CA RCM provides tools to customize, track, and manage the
certification process, and to implement changes indicated by reviewers.
Certification campaigns support the following business cases:
■
Confirm data security compliance—Where there is a legal requirement to
demonstrate data security measures, certification campaigns document periodic
review of access to data by employees.
■
Refine Role-based Access Control—Review of the resources and child roles included
in each role confirms that the role hierarchy suits actual patterns of usage, and that
role definitions are useful.
Chapter 6: Running Certification Campaigns 61
How to Use Campaigns
How to Use Campaigns
You can customize certification workflows to support many business needs. The basic
campaign process is as follows:
1.
A role engineer or high-level administrator creates the campaign in CA RCM based
on business needs. The campaign owner specifies the following information for the
campaign:
■
The universe on which the campaign is based, and additional data such as audit
cards and member lists that the campaign uses.
■
Filters that reduce the scope of the campaign to a subset of entities or links in
the configuration.
■
How the campaign identifies reviewers for each entity and privilege link.
■
How to handle changes made by reviewers.
CA RCM creates the campaign, and automatically assigns the entities and links
under review to managers and administrators.
2.
When the campaign launches, CA RCM sends these managers email invitations that
include links to the CA RCM server. Managers log in to the CA RCM portal to
perform the review actions assigned to them.
3.
When certifiers reject existing links or suggest new links, the configuration file must
be changed. CA RCM contacts the managers of the entities involved, and requests
approval of the change. Approved changes are then implemented in the target
configuration file.
Example: Certify User Privileges Following an Acquisition
New users and resources were added to the CA RCM model configuration following an
acquisition. Administrators run a certification campaign to verify that the privileges
assigned to these new users are appropriate.
The stages of the campaign are as follows:
62 Portal User Guide
1.
The role engineer creates a campaign that certifies user entities and their privilege
links. The role engineer defines user attribute filters that limit the scope of the
campaign to the new employees. A member list maps managers to the new users
and resources.
2.
Each manager reviews the privileges assigned to their workers. Bob Smith reviews
the privileges given to Hector Torres, and suggests access to a database that Hector
needs in his new position.
3.
CA RCM sends an email to Deepak Chamarti, the owner of the database. Deepak
approves the change, and CA RCM updates the configuration file. Hector Torres
now can access the database.
Define and Launch a Campaign
Define and Launch a Campaign
Use the campaign creation wizard as follows to create a campaign, assign data files, and
configure filters and other aspects of the campaign.
1.
Plan the type, scope, and other features of the campaign (see page 72) to meet
your strategic business needs.
2.
Verify that the data used in the campaign is updated and accurate, and create
additional files needed for the campaign. These files can include:
3.
■
Configuration files based on the model configuration of the universe
■
Audit cards that provide violation alerts or suggested links in the campaign
■
Member lists and RACI configuration files that map reviewers in the campaign
■
Customized email templates for the various messages CA RCM sends to
campaign participants
In the CA RCM portal, go to Administration, Add Campaign.
The campaign creation wizard appears.
4.
5.
Specify the following parameters of the campaign in the Scope screen of the wizard:
■
The type of campaign to create.
■
The target universe
■
Audit cards and other data sets of the campaign.
Specify the following aspects of the campaign in the Basic information (see page 66)
screen of the wizard:
■
A name and short description of the campaign
■
Estimated duration of the campaign.
■
Whether to include audit card violations (see page 91) in the campaign.
6.
Define the entities and links to include in the campaign (see page 92) in the Filter
screen (see page 66) of the wizard.
7.
Specify how a certifying reviewer is assigned (see page 82) to each link or entity
under review. These settings appear in the Reviewers screen of the wizard. You can
also allow reviewers to certify groups of entities, or require them to review and
certify each entity individually.
8.
In this screen, you can also allow reviewers to apply review decisions to groups of
links or entities.
Chapter 6: Running Certification Campaigns 63
Define and Launch a Campaign
9.
Specify how suggested changes to the configuration are implemented. You can
configure the following behaviors:
■
Custom Workflow Processes (see page 68) - each task of the campaign is
implemented using a predefined process. When administrators have defined
alternative processes, you can specify which set of processes control the
execution of campaign tasks.
■
Rolling Approvals (see page 90)—you can aggregate approval tasks in a second
phase of the campaign, or implement approval/change processes on a rolling
basis.
■
Implement Changes target - when you base a campaign on a configuration file
other than the model configuration of the universe, you can implement
changes from the campaign in the referenced configuration, or in the model
configuration.
These settings appear in the Execution screen of the wizard.
10. Specify how CA RCM sends e-mails (see page 70) to campaign participants, and
what e-mail templates are used. These settings appear in the Notifications screen of
the wizard.
64 Portal User Guide
Define and Launch a Campaign
11. The Properties screen of the wizard displays optional campaign behaviors. The
options displayed depend on the type of campaign, and the process mapping used
to implement the campaign. By default, CA RCM displays the following standard
option areas:
Notifications
CA RCM can automatically export changes that result from the campaign to the
relevant provisioning endpoints. Select the Enable model change notifications
for export option to export changes to endpoints.
Approvals administration
Select options related to the change approval review phase of the campaign.
■
Bypass Approval Processes (see page 90)—you can implement changes
directly, without a secondary change approval process.
■
Redundant Approvals (see page 69) - you can avoid redundant review
actions when the initial certifier of an entity also reviews changes to the
entity.
In this screen you can also specify how CA RCM assigns reviewers for changes that
are proposed in the certification review. The following areas of the screen let you
specify how reviewers are selected for each type of entity:
Resource changes reviewer selection
Specify reviewer selection criteria for changes to resource entities.
Role changes reviewer selection
Specify reviewer selection criteria for changes to resource entities.
User changes reviewer selection
Specify reviewer selection criteria for changes to resource entities.
12. Customize the table layout in task tickets of the campaign.
13. Create and launch the campaign (see page 72) in the Summary screen. You can
launch the campaign immediately, or schedule launch for a later time.
The campaign appears in the Workflows screen in the Administration menu.
CA RCM generates review actions based on the previous campaign settings,
distributes them to the My Tasks queues of participating reviewers, and notifies
these reviewers by email of the new actions items.
CA RCM also generates workflow control actions, which appear in the My Tasks
queue of the campaign initiator.
Chapter 6: Running Certification Campaigns 65
Define and Launch a Campaign
Basic Information Screen
Use this screen of the campaign creation wizard to specify a name, description, and
other information for the campaign. The following fields are not self-explanatory:
Estimated Time
Defines the estimated duration of the campaign. After this time period, tickets
related to the campaign are flagged as overdue, but the campaign continues.
Audit Card Alerts
Specifies whether to include violations from an audit card (see page 91) in the
campaign. Options include the following:
None
Campaign does not include audit card information.
From this Audit Card
Campaign tickets flag links under review that appear in the specified audit card.
Generate an Audit Card for the campaign
During campaign initialization, an audit card is generated using the audit
settings file specified for the target universe. Campaign tickets flag links under
review that appear in this audit card.
Require comments when approving privileges with violations
If reviewers approve a link with audit card violations, they must add a comment
that explains their decision to approve the link. This option is only available
when you choose to apply an audit card to the campaign.
Filter Screen
Use this screen to limit the scope of entities and links that are included in a certification
campaign. Depending on the type of campaign you create, the following areas appear in
the screen:
Select Users/Roles/Resources
Defines which entities to include in the campaign based on attribute values.
Links
Specifies which direct, indirect, or dual links to include in the campaign.
Suggested Links
Specifies whether CA RCM suggests new links to certifiers in this campaign, based
on links in the audit card, and which suggested links to include in the campaign.
66 Portal User Guide
Define and Launch a Campaign
When you specify an audit card for the campaign, the following fields appear:
Filter by Audit Card
Specifies how audit card data is used to filter the links that are included in the
campaign. Options include:
No Audit Card Filter
Audit card violations are not used to filter the links in the campaign.
Include if in Audit Card
The campaign includes only links that are listed in the Audit Card. This
campaign reviews links that violate business rules.
Include if not in Audit Card
The campaign includes only links that are not listed in the Audit Card.
For recertification and differential campaigns, the following fields appear:
Select States
Specifies which links are included in a recertification or differential campaigns,
based on their last status in the previous campaign. Options include:
Pending
Includes links that were not reviewed in the previous campaign.
Approved
Includes links that were approved in the previous campaign.
Rejected
Includes links that were rejected in the previous campaign.
When you specify the Approved or Rejected options, specify one of the following
options to specify how the decisions of the previous reviewers are handled:
Reset Approver's Selection
Omits the decisions of previous reviewers from the current campaign.
Keep Approver's Selections
Displays the decisions of previous reviewers in tickets of the current campaign.
Reviewers can override the previous decision. This is the default setting.
Chapter 6: Running Certification Campaigns 67
Define and Launch a Campaign
Update Links
Specifies whether to add links from the configuration that were not in the previous
campaign. Options include:
Add links that were not included in the source campaign
New and excluded links in the configuration are included in this campaign. An
icon indicates these new links in certification tickets of the campaign.
Do not update
This campaign includes only links that were in the previous campaign.
Enable Grouped Review of Actions
CA RCM administrators can let participants in a campaign handle related actions as a
group. When group handling is enabled, My Tasks screens that list campaign actions
display checkboxes in the Approve, Reject, and Reassign column headers. Reviewers
check these boxes to apply a decision to all the links in the table.
To enable group handling of related campaign actions, check the Enable managers to
select an entire column option in the Reviewers screen of the Add Campaign wizard.
Custom Workflow Processes in a Campaign
CA RCM uses a set of predefined processes to execute the tasks of a campaign.
Administrators can create alternative processes, which change how CA RCM implements
campaign tasks. For example, administrators can define a set of processes that involve
higher management levels in certification reviews. When you create a campaign, you
can specify which set of processes controls the execution of campaign tasks.
Before you can apply alternative processes to your campaign, administrators must
create the processes, import them to CA RCM, and map them to tasks of the campaign
business workflow.
68 Portal User Guide
Define and Launch a Campaign
Specify the process mapping for your campaign in the Execution screen of the campaign
creation wizard. The following options are available under Processes:
System defaults
Uses the default workflow processes installed with CA RCM to implement the
campaign. Standard campaign behaviors are executed.
Customized Processes
Uses the process mapping set you select from the drop-down to implement the
campaign.
Processes
Displays the processes that CA RCM invokes to execute the major tasks of the
campaign, based on your selection.
Automatic Handling of Redundant Reviews
Often the same reviewer participates in both the initial certification review and the
subsequent change approval review.
For example, during certification review a manager changes the privileges of a worker in
their team. To approve those changes, the campaign assigns reviewers based on the
RACI configuration - but this manager is commonly designated as the Accountable user
for the worker in the RACI configuration. Following the logic defined for the campaign,
CA RCM assigns the change approval review to the same manager who initially
requested the change.
By default CA RCM automatically assumes that the reviewer approves the change that
they requested during certification. When you create a campaign, you can force
reviewers to re-examine the changes that they requested earlier.
Note: A review task can require input from several reviewers. This option automatically
determines the response of previous reviewers - it does not automatically approve the
change.
Use the following options in the Approvals administration area of the Properties screen
to control this behavior:
Request reviewer(s) for modifications
When new or deleted links result from initial certification review, CA RCM initiates
change approval review before it modifies the configuration file.
Initial certifier of a suggested link automatically approves addition of the link
Reviewers who approved a suggested link in initial certification review are
automatically assumed to approve addition of the link to the configuration file.
Chapter 6: Running Certification Campaigns 69
Define and Launch a Campaign
Initial certifier of an existing link automatically approves changes to the link
Reviewers who rejected an existing link during initial certification review are
automatically assumed to approve its deletion from the configuration file.
More information:
Bypass Approval Processes for a Campaign (see page 90)
Define E-mail Behavior for a Campaign
CA RCM uses a set of pre-defined templates to send e-mail notifications related to the
campaign. Administrators can create alternative templates for one or more email trigger
events in campaigns. When you create a campaign, you can specify which template to
use for each email trigger event of the campaign.
Before you can assign alternative templates for your campaign, administrators must
create the templates.
You specify the e-mail templates to use in the Notifications screen of the campaign
creation wizard. This screen lists e-mail evens that are relevant to the type of campaign
you create.
Set e-mail behavior for each e-mail event as follows:
1.
Select the Active box beside an email event to enable email notifications for that
event.
2.
Select an email template for the event from the Template drop-down list for the
event.
More information:
Default Email Templates (see page 187)
How to Customize Email Behavior (see page 184)
70 Portal User Guide
Define and Launch a Campaign
Customize Display of Campaign Actions
You can customize the table layout that is used to display campaign actions.
Table layouts for workflow actions are defined at three levels:
■
Per Universe: Administrators define default table layouts for all workflows based on
the universe.
■
Per Campaign: Campaign initiators can define table layouts for the actions of a
campaign. Customization at this level takes precedence over universe defaults.
■
Per User: Users can customize the table layouts in the action details screens of their
My Tasks queue. Customization at this level takes precedence over campaign
settings or universe defaults.
Mandatory columns cannot be removed from table displays. Red text and a locked
padlock icon indicate mandatory columns in customization screens and dialogs. Some
mandatory columns are hard-coded defaults in CA RCM. Administrators can define
additional mandatory columns.
To customize campaign display settings
1.
In the Summary screen of the Add Campaign wizard, open the Display Settings
header.
This section contains four table headers. The General Actions, User Actions, Role
Actions, and Resources Actions headers show the table layouts used to display
actions in My Tasks detail screens.
2.
Customize the table layout as follows:
a.
Click Customize on a table header you want to modify.
The Customize dialog appears.
b. Use the arrow keys to add or remove columns, and to order the columns.
c.
When you finish customizing the columns, click OK.
d. Click the lock icon next to the column name to make the column mandatory.
Users can move a mandatory column, but they cannot remove it.
Note: Mandatory columns appear in red.
3.
Click OK.
CA RCM displays actions for this campaign in the table formats you specified.
Chapter 6: Running Certification Campaigns 71
Types of Campaigns
Launch Options for Campaigns
You can choose when to launch a campaign. The following launch options appear in the
final Summary screen of the campaign creation wizard:
Auto Start
Specifies how the campaign is launched. Options include:
Manual Start
CA RCM generates the campaign, but does not send notifications to
participating reviewers. The campaign owner launches the campaign from the
workflow control action in their My Tasks list.
Immediate Start
CA RCM generates the campaign and sends notifications to participating
reviewers.
Scheduled Launch
CA RCM generates the campaign, but only sends notifications to participating
reviewers at the scheduled date and time.
Note: If you specify Manual Start or Scheduled Launch, all data processing for the
campaign is done immediately, based on the current contents of the configuration and
other data files.
When you create a recurring series of campaigns, only the Manual Start and Immediate
Start options are available. These options control launch of the first campaign in the
series. In addition, use the following fields to define recurrence of the series:
First Recurrence
Defines the date and time at which CA RCM initiates the second campaign in the
series.
Recur Every
Defines the interval, in days, between campaigns in the series.
Iterations
Defines the number of campaigns in the series.
Types of Campaigns
Certification campaigns support various business needs. CA RCM provides the following
types of certification campaigns:
72 Portal User Guide
■
Entity Certification—Certify the links associated with selected user, role, or
resource entities.
■
Recertification—Repeat the certification process based on a previous campaign.
Types of Campaigns
Entity Certification Campaigns
Entity certification campaigns let reviewers examine and certify links between user, role,
and resource entities in a CA RCM configuration.
Each entity certification campaign focuses on one type of entity, and its links. The
following campaigns are possible:
■
User-centric campaigns certify the roles and resources linked to each user. These
links define the privileges assigned to each user. Typically, managers review the
privileges of their workers.
Use this type of campaign to document compliance with legally-mandated data
security measures.
■
Role-centric campaigns certify the resources, parent or child roles, and users linked
to each role. Typically, the owner of each role reviews the links that define their
role, and the users who were assigned the role.
Use this type of campaign to maintain the role hierarchy.
■
Resource-centric campaigns certify the users and roles that link to each resource.
Typically, the administrator of each resource reviews the roles and users that have
access to the resource.
Use this type of campaign to monitor access to resources.
To implement an entity certification campaign, select the User Privileges, Role
Definitions, or Resource Links option in the Campaign type field of the campaign
creation wizard.
Self-Attestation Campaigns
A self-attestation campaign is a user certification campaign in which each user under
review certifies their own privileges.
This type of campaign satisfies some legal requirements for data security certification.
This type of campaign is also useful during construction of the role hierarchy, and as a
starting point for subsequent certification by managers.
When you plan your campaign, consider how you want to use the campaign results.
Typically, the active configuration is not changed based on self-certification. If you want
to create a configuration file that reflects user changes, base the campaign on a copy of
the desired configuration file.
Chapter 6: Running Certification Campaigns 73
Types of Campaigns
To implement a self-attestation campaign, select the Self-Attestation option in the
Campaign type field of the campaign creation wizard. The wizard presents options
relevant to this type of campaign:
■
Because each user is their own reviewer, you cannot assign reviewers based on a
member list or RACI configuration. These options are not available in the Reviewers
screen of the wizard. However, you can specify a default reviewer for the campaign.
■
By default, approval and implementation tasks are aggregated into a second, later
phase of the campaign, which you must launch manually. The campaign owner
receives a workflow control action that allows them to initiate the approvals phase.
Depending on your business goals, you can export information from the finished
campaign as an Audit Card for further processing, or implement changes from the
campaign on the target configuration. You can also use the campaign as the basis for a
recertification or differential campaign.
Recertification Campaigns
A recertification campaign creates a set of certification tasks based on a previous
campaign.
Use this type of campaign when you require multiple reviews before changes are
implemented. For example, you can recertify a user self-attestation campaign, with
managers instead of workers. The managers can see the results of user self-certification
as they perform their review.
To implement a recertification campaign, select the Recertification option in the
Campaign type field of the campaign creation wizard. The wizard presents options
relevant to this type of campaign:
74 Portal User Guide
■
The wizard prompts you to specify an existing campaign in the universe. The
recertification campaign is based on this previous campaign.
■
Because the base set of review actions is inherited from the previous campaign, you
cannot filter included links by entity attributes.
■
You can specify which direct, indirect, or dual links to include (see page 93) in the
campaign.
■
You can filter included links by the final state of each review task (see page 75) in
the previous campaign.
■
You can have CA RCM suggest new links based on the audit card specified for the
campaign.
■
You can update the campaign (see page 95) with links in the configuration that
were not included in the previous campaign. An icon indicates new links.
■
To assign reviewers (see page 82), you can use the reviewer from the previous
campaign, or the manager of the previous reviewer.
Types of Campaigns
■
By default, approval and implementation tasks are aggregated into a second, later
phase of the campaign, which you must launch manually. The campaign owner
receives a workflow control action that allows them to initiate the approvals phase.
Depending on your business goals, you can export information from the finished
campaign as an Audit Card for further processing, or implement changes from the
campaign on the target configuration. You can also use the campaign as the basis for a
recertification or differential campaign.
Previously Reviewed Links
When you create a recertification campaign, you can filter the review tasks carried
forward to the new campaign based on their status in the old campaign. In the Filter
screen of the campaign creation wizard, select any of the following options under
States:
Pending
Includes link certification actions that were not decided in the previous campaign.
Approved
Includes links that were approved in the previous campaign.
Rejected
Includes links that were rejected in the previous campaign.
Note: Recertification campaigns do not duplicate campaign control actions from the
reference campaign. Only link or entity certification tasks are duplicated.
When you include previously approved or rejected links, the following options control
how the decisions of previous reviewers are handled.
Reset Approver's Selections
Previous review decisions are not carried forward into the recertification campaign.
Keep Approver's Selections
Show Approver's Selections
Reviewers in the recertification campaign see previous review decisions.
Chapter 6: Running Certification Campaigns 75
Types of Campaigns
The following system property controls how previously reviewed links are presented to
reviewers in recertification campaigns.
campaign.settings.recertification.allowOneClickResubmit
Determines if previous review decisions are presented as live choices in
recertification tasks. Valid values are:
True
Previous Approve or Reject decisions are selected by default in recertification
tasks. Reviewers in the recertification campaign can accept these decisions by
clicking Submit in the My Tasks screen. The campaign creation wizard displays
the option Keep Approver's Selections.
False
Previous Approve or Reject decisions are indicated by grayed icons in
recertification tasks, but these decisions are not selected by default. Reviewers
in the recertification campaign must select a review decision for each link
under review. The campaign creation wizard displays the option Show
Approver's Selections.
Differential Campaigns
A differential campaign is a recertification campaign that certifies new links added to
the configuration that were not included in a previous campaign.
To implement a differential campaign, select the Differential option in the Campaign
type field of the campaign creation wizard. The wizard presents options relevant to
recertification campaigns, with the following special settings:
■
No links from the previous campaign are included.
■
The campaign includes only links that were added to the configuration after the
previous campaign was created.
Depending on your business goals, you can export information from the finished
campaign as an Audit Card for further processing, or implement changes from the
campaign on the target configuration. You can also use the campaign as the basis for a
recertification or differential campaign.
76 Portal User Guide
Types of Campaigns
Recurring Campaigns
You can define a series of recertification campaigns that repeat at regular intervals. Each
campaign in the series is based on its predecessor.
To implement a recurring campaign, select the Recertification option in the Campaign
type field of the campaign creation wizard. The wizard presents options relevant to this
type of campaign:
■
You can define a naming convention for campaigns in the series. Timestamp
variables in the naming convention give each campaign in the series a unique name.
■
You can define the time intervals at which CA RCM implements the campaigns in
the series.
■
You can apply all optional filters and configurations that apply to recertification
campaigns. For example, you can create a series of differential campaigns that
certify only new entities and links.
Depending on your business goals, you can export information from the finished
campaign as an Audit Card for further processing, or implement changes from the
campaign on the target configuration. You can also use the campaign as the basis for a
recertification or differential campaign.
Naming Conventions for Recurring Campaigns
Every campaign must have unique values for the Name and Description fields.
When you create a series of recurring campaigns, you use system variables to give each
campaign in the series unique Name and Description values. Typically these fields are
based on the source campaign for the series. CA RCM replaces system variables with
actual text and date values when it creates each campaign.
Chapter 6: Running Certification Campaigns 77
What You Can Do During a Campaign
Use the following system variables to create string values for the Name and Description
fields:
$sourceCampaignName
Inserts the text string in the Name field of the source campaign for the series.
$reoccurring
Inserts a number that indicates what iteration the named campaign is in the series.
$date
Inserts the date that the named campaign is created.
$sourceCampaignDescription
Inserts the text string in the Description field of the source campaign for the series.
Example: Recurring Campaign Names
When you create a recurring series in the campaign creation wizard, the Name field of
the Basic Information screen is automatically populated with the following formula:
$sourceCampaignName Recurring # $reoccurring @ $date
If the source campaign is named UserCert and the series repeats daily, the first three
campaigns in the series are named as follows:
UserCert Recurring # 1 @ 12Nov2010
UserCert Recurring # 2 @ 13Nov2010
UserCert Recurring # 3 @ 14Nov2010
What You Can Do During a Campaign
During an active campaign, the administrator can perform the following actions:
78 Portal User Guide
■
Review and certify any links directly assigned to them
■
Reassign review tasks
■
Attach a comment, file or link to a group of tasks
■
Monitor campaign progress
■
Send escalation emails to participating reviewers
■
Suspend and restart the campaign
■
Save certification decisions (see page 80) to an audit card
■
Initiate the approval and implementation phase of the campaign
What You Can Do During a Campaign
A certifying reviewer can perform the following actions:
■
Review and certify any links directly assigned to them
■
Reassign review tasks
■
Attach a comment, file or link to a task or group of tasks
More information:
Initiate the Approval Phase of a Campaign (see page 79)
Re-Use of Certification Decisions (see page 80)
Initiate the Approval Phase of a Campaign
By default, certification campaigns are divided into certification and change approval
phases (see page 82). The campaign initiator or CA RCM administrator manually stops
the certification phase and initiates the change approvals phase.
If you configured rolling approvals for the campaign, review and approval tasks are not
separated into distinct phases, and you do not need to manually initiate change
approvals.
Important! When you initiate the approval phase, all incomplete certification tasks are
canceled. This can affect the completeness of the certification campaign and the
usability of its results. Use the Workflow Administration interface to check the progress
of the campaign before you initiate approval of changes.
Chapter 6: Running Certification Campaigns 79
What You Can Do During a Campaign
To initiate the change approval phase of a campaign
1.
Open the workflow control action for the campaign:
■
Campaign owners: In your My Tasks queue, click the action related to the
campaign that appears in the General Tasks table.
■
Administrators: In the Workflow Administration screen, click the Flow Progress
By Reviewers tab and apply the Other action type filter to locate the workflow
control action.
The action displayed has the following Message field:
Press Start Approvals to stop the campaign certification and continue the approval
process.
2.
(Optional) Click Reassign to transfer control of the campaign to another user.
3.
In the Related Info column, click Show to review campaign progress. Verify that
certification tasks have progressed sufficiently for your business goals.
4.
In the Custom column, select Start Approvals.
5.
Click Submit.
CA RCM cancels certification actions that are not yet completed, and removes them
from the My Tasks queues of participating reviewers.
CA RCM initiates approval review for any changes to entities or links under review
that were requested during initial certification.
Re-Use of Certification Decisions
You can save the decisions made by certifiers in a campaign to a data file. This data can
form the basis for additional campaigns or analytical processes.
The data file is a variation of the standard audit card format. This audit card records the
results of the initial certification review. The audit card does not filter those decisions
based on the final approval phase of the campaign. All certification decisions are saved,
even if resource owners or managers did not allow the requested changes.
Save Certification Decisions to an Audit Card
You can save the decisions certifiers make in a campaign to a data file. This data can
form the basis for additional campaigns or analytical processes.
To save certification decisions to an audit card
1.
In the CA RCM portal, go to Administration, Campaign Administration.
The Campaign Administration screen appears.
80 Portal User Guide
What You Can Do During a Campaign
2.
Click Export Campaign Progress to Audit Card.
Note: To export from a campaign created in CA RCM release 3.2, click Export v3.2
Campaign to Audit Card.
The Export Campaign Progress to Audit Card screen appears.
3.
Select an active campaign, and enter the name of the audit card that contains saved
data.
Note: If you specify an existing audit card, its data is overwritten.
4.
Click Export.
An audit card is created that records the initial certification phase of the campaign
you specified. The audit card does not contain decisions from the final approval
phase of the campaign.
Import Certification Decisions Into a Campaign
You can import the decisions certifiers made in a previous campaign into a new
campaign.
To import certification decisions into a campaign
1.
Create a campaign. In the Summary screen of the campaign creation wizard, specify
the Disabled option in the Auto Start field.
CA RCM generates the campaign, but does not launch it.
2.
In the CA RCM portal, go to Administration, Campaign Administration.
The Campaign Administration screen appears.
3.
Click Import Certification Progress from Audit Card.
The Import Certification Progress from Audit Card screen appears.
4.
Specify the inactive campaign and the audit card that contains saved data.
5.
(Optional) Select the Delete Unchanged Tasks option to delete entities and links
that do not match decisions in the audit card from the campaign.
The campaign contains only decisions that appear in the audit card.
Note: To use this option effectively, create a campaign that closely matches the
scope and settings of the original campaign.
6.
Click Import.
Review decisions from the audit card that reference entities and links in the
campaign are copied to the campaign.
7.
Go to your My Tasks list to launch the campaign.
Chapter 6: Running Certification Campaigns 81
Certification and Approval Stages of a Campaign
Certification and Approval Stages of a Campaign
Most certification campaigns involve two phases:
■
Certification—Managers and resource owners review the links of the users, roles,
and resources they administer. For example, a manager reviews the privileges of
their staff members, or a role owner examines the resources included in the role.
■
Approval—If a link is rejected during the review phase, or a new link is suggested,
the manager of the linked resource must approve the proposed change. For
example, if a manager rejects access to a certain resource for their worker, the
owner of that resource must approve the change. Only rejected links or new links
trigger approval tasks, because they change the base configuration.
By default, campaigns have distinct review and approval phases. Approval tasks are held
until all certification tasks are complete. The campaign owner initiates the approval
phase from the root ticket of the campaign. Approval tasks and notifications are
consolidated, simplifying the work of resource owners.
You can configure the campaign so that approval tasks are initiated immediately when a
reviewer submits a rejected link. The review and approval phases of the campaign
overlap, and both review and approval tasks are active throughout most of the
campaign. This campaign structure has several disadvantages, especially for campaigns
with a large scope. Because approval tasks are not consolidated, resource owners and
managers receive a separate email notification for each change they must approve. The
approval phase is extended, and the volume of notifications and approval tasks can be
distracting and unmanageable. Resource owners cannot assess the overall impact of
changes resulting from the campaign.
How CA RCM Assigns Certifiers
CA RCM analyzes entity attributes to locate a manager or resource owner for each
entity or link under review.
In entity certification campaigns, CA RCM can assign reviewers as follows:
■
Search a predefined member list in the server for a user related to the entity.
■
Search the RACI configuration of the universe for a user who is Accountable or
Responsible for the entity.
Note: In user certification campaigns, CA RCM first queries the Configuration user
manager field defined in the target universe to identify the manager of each user.
82 Portal User Guide
■
Assign the task to a default reviewer defined for the campaign.
■
Let users approve their own links. This option is only relevant to self attestation
campaigns.
Certification and Approval Stages of a Campaign
In recertification and differential campaigns, CA RCM can assign reviewers as follows:
■
Search a predefined member list in the server for a user related to the entity.
■
Search the RACI configuration of the universe for one of the following:
■
■
A user who is Accountable or Responsible for the entity in the current
configuration
■
The reviewer who was assigned in the previous campaign
■
The manager of the previous reviewer, based on the Configuration user
manager field specified for the target universe.
Assign the task to a default reviewer defined for the campaign.
When you create a campaign you can define which of these techniques CA RCM uses to
locate a certifier, and in what order they are used.
Example: Assign a Reviewer
You can specify the following sequence to find reviewers for an entity:
1.
CA RCM first consults a member list. If a reviewer is found in the member list, the
process stops.
2.
If no reviewer is found in the member list, CA RCM then consults the RACI
configuration. If a reviewer is found, the process stops.
3.
If no reviewer is found in the RACI configuration, the certification task is assigned to
a default reviewer.
Member Lists
A member list is a data set that contains user names and attributes. You use a member
list to assign reviewers in a certification campaign.
Each record in a member list contains the following three fields:
Login
Defines a user account in CA RCM. This field has the same content and format as
the LoginID field of a user or configuration file.
Category
Defines a user, role, or resource attribute. This field can have a different value for
each record in the member list. To match entities in the campaign, specify
attributes that exist in the configuration file on which the campaign is based.
Value
Defines the value of the attribute listed in the Category field.
Chapter 6: Running Certification Campaigns 83
Certification and Approval Stages of a Campaign
To assign a reviewer for an entity, CA RCM scans the member list, comparing attribute
values in the member list to the attribute values of the entity. CA RCM assigns review
tasks for the entity to the user specified by the first record in the member list that
matches an attribute value of the entity.
Note: A member list can only contain attributes for one entity type–user, role, or
resource. However, one member list can contain attributes and values from several
universes. Only the LoginID field must be uniformly defined in all universes that are used
with the member list.
You can import member list files into CA RCM or use administrative screens of the portal
to create and edit member lists.
Example: Match Reviewers to Resource Attributes
The following member list associates users with various resource attribute values:
Login
Category
Value
DOMAIN\Hector_Torres
ResName3
Solaris
DOMAIN\Anna_Chiu
Location
Atlanta
DOMAIN\Alex_Patrick
ResName3
WinNT
DOMAIN\Kim_Bell
Organization
Marketing Sun Server
This member list is used to assign reviewers in a resource certification campaign. The
following resources are under review:
■
The Domain_Users resource with the following attribute values:
ResName3 = Solaris
Location = Atlanta
CA RCM uses the first matching record in the list, and assigns Hector Torres to
review links for this resource.
■
The Purchasing resource with the following attribute values:
Organization = Headquarters
No records in the member list match this entity. CA RCM cannot assign a reviewer
based on the member list.
84 Portal User Guide
Certification and Approval Stages of a Campaign
More information:
Create a Member List (see page 85)
Create a Member List from a CSV File (see page 86)
Clone a Member List (see page 87)
Edit a Member List (see page 87)
Special Characters for Member Lists (see page 89)
Create a Member List
You use a member list to assign reviewers for a campaign. There are several ways to
create a member list. Use this procedure to interactively create a member list in the CA
RCM portal.
To create a member list
1.
From the CA RCM portal main menu, click Administration, Workflow Settings,
Manage Member Lists.
The Member List main screen appears.
2.
In the Add Member List area, define a new member list. the following field is not
self-explanatory:
Campaign Type
Specifies the type of campaign that uses the member list. For example, a
member list that contains role attributes works with a role certification
campaign.
3.
Unselect the Use CSV file option.
4.
Click Add.
The Edit member list screen appears.
5.
Use the Add, Edit, and Delete options (see page 87) to compose the member list.
6.
Click Save.
Changes are saved to the member list. The main Member lists administration
screen appears. The new list appears in the table of member lists.
More information:
Create a Member List from a CSV File (see page 86)
Clone a Member List (see page 87)
Edit a Member List (see page 87)
Special Characters for Member Lists (see page 89)
Chapter 6: Running Certification Campaigns 85
Certification and Approval Stages of a Campaign
Create a Member List from a CSV File
You use a member list to assign reviewers for a campaign. There are several ways to
create a member list. Use this procedure to create a member list based on an imported
file of comma-separated values.
To create a member list from a CSV file
1.
Prepare the data file. The first line of the CSV file must be the following header:
login,category,value
Note: Use only lower-case letters in this header line.
Each line of the file must contain three values, separated by commas. The following
example shows a CSV file with two data records:
login,category,value
DOMAIN\Alex_Patrick,ResName3,WinNT
DOMAIN\Kim_Bell,Organization,Marketing Sun Server
2.
From the CA RCM portal main menu, click Administration, Workflow Settings,
Manage Member Lists.
The Member List main screen appears.
3.
In the Add Member List area, define a new member list. the following field is not
self-explanatory:
Campaign Type
Indicates the type of campaign that uses the member list. For example, a
member list that contains role attributes works with a role certification
campaign.
4.
Select the Use CSV file option and browse to the CSV file you prepared.
5.
Click Add.
CA RCM creates a member list file based on the CSV file. The member list is stored
in the CA RCM database, and the new file appears in the list of member lists.
6.
86 Portal User Guide
(Optional) Click Edit beside the new file to verify or modify its contents.
Certification and Approval Stages of a Campaign
Clone a Member List
You use a member list to assign reviewers in a campaign. There are several ways to
create a member list. Use this procedure to create a member list based on a copy of an
existing member list.
To clone a member list
1.
From the CA RCM portal main menu, click Administration, Workflow Settings,
Manage Member Lists.
The Member List main screen appears. A table lists the member lists in the CA RCM
database.
2.
Click the Copy icon of the member list that you want to copy.
The Copy member list screen appears.
3.
Define a new name for the member list, and click OK.
Note: You cannot edit this name after the list is created.
A new member list appears in the table, with the name you defined. The list
contains the same records as the base list.
4.
Click the Edit icon of the new list.
The Edit member list screen appears.
5.
Use the Add, Edit, and Delete options (see page 87) to modify the list.
6.
Click Save.
Changes are saved to the member list. The main Member lists administration
screen appears.
Edit a Member List
You use a member list to assign reviewers in a campaign. Use this general procedure to
edit member lists in the CA RCM portal.
To edit a member list
1.
From the CA RCM portal main menu, click Administration, Workflow Settings,
Manage Member Lists.
The Member List main screen appears. A table lists the member lists in the CA RCM
database.
2.
Click the Edit icon of the member list you want to edit.
The Edit member list screen appears.
Chapter 6: Running Certification Campaigns 87
Certification and Approval Stages of a Campaign
3.
Add a new record to the member list as follows:
a.
Select the configuration file on which this record is based. The drop-down lists
available configurations.
b. Click Add.
The Add entry pop-up appears.
c.
Select a user, attribute field, and value. Only values in the base configuration
are available.
d. Click OK.
The record is added to the member list, and appears in the table.
4.
Edit a record in the member list as follows:
a.
Find the record in the table, and click the Edit icon of that record.
The Edit pop-up appears.
b. Select a user, attribute field, and value. Only values in the base configuration of
this record are available.
c.
Click OK.
The record is updated. New values for this record appear in the table.
5.
To delete a record, find the record in the table, and click the Delete icon of that
record.
The record is deleted from the member list.
6.
Click Save.
Changes are saved to the member list. The main Member lists administration
screen appears.
88 Portal User Guide
Certification and Approval Stages of a Campaign
Special Characters for Member Lists
The following system properties define special characters used to parse
comma-separated values (CSV) files for member lists.
memberlist.csv.reader.separator
Defines the character that separates fields in each line of the file. The comma (,)
character is used by default.
memberlist.csv.reader.quotechar
Defines the character that encloses field values that have spaces of other special
characters. The double-quote (") character is used by default.
memberlist.csv.reader.escape
Defines the escape sequence used in the file. The backslash (\) character is used by
default.
Example: Backslash Characters in CSV Input
Often CSV input for a member list contains backslash characters in pathnames, as in the
following example:
Login, Category, Value
DOMAIN\Hector_Torres, ResName3, Solaris\HTorres
DOMAIN\Alex_Patrick, Location, Atlanta
By default, the CSV parser in CA RCM treats the backslash character as an escape
character. The resulting member list omits backslashes, as follows:
Login, Category, Value
DOMAINHector_Torres, ResName3, SolarisHTorres
DOMAINAlex_Patrick, Location, Atlanta
To include the backslash character in field values, edit the memberlist.csv.reader.escape
system property to define a different escape character.
Note: Select an escape character that does not appear in your data. Do not use the
double quote character as an escape character.
Chapter 6: Running Certification Campaigns 89
Certification and Approval Stages of a Campaign
Immediately Invoke Approval Processes
You can create a campaign that initiates approval tasks immediately when each
reviewer submits changes. The review and approval phases of the campaign overlap,
and both certification and change approval actions are active throughout most of the
campaign.
To immediately invoke approval processes, select the As each certifier submits changes
option In the Execution screen of the campaign creation wizard under Initiate Approvals.
CA RCM initiates change approval reviews immediately, as each certifier submits their
changes.
Bypass Approval Processes for a Campaign
Typically, when changes result from a certification review, the owners of the entities
involved must approve the changes. You can bypass this approval process in a
campaign. CA RCM immediately implements all changes indicated during the
certification review.
Important! Bypassing change approval reviews can corrupt the data in the target
configuration. Only an experienced campaign manager should implement such a
campaign, after consultation with the role engineer.
Because of the increased possibility of mistakenly overwriting configuration data, we
recommend that you bypass approvals only in campaigns that are based on a copy or
subset of configuration data. Do not use this option with campaigns that are based on
the model configuration of the active universe or an original version of a configuration
file.
To bypass approval processes for a campaign:
1.
Verify that the value of the allowModifiedCampaignProcess system property is
True.
allowModifiedCampaignProcess
Specifies whether campaign processes that bypass the approval task are
available in the portal.
True
Makes review processes that bypass approval available during campaign
creation.
False
Hides review processes that bypass approval. Only standard review processes which include approval tasks - can be selected during campaign creation.
2.
90 Portal User Guide
Copy a configuration file or create a partial file containing relevant data.
Audit Card Violations in a Campaign
3.
Create a campaign based on the configuration file you created.
4.
In the Properties screen of the campaign creation wizard, clear the checkbox for the
following option:
Request reviewer(s) for modifications
Initiates secondary approval review for any changes requested by certifiers in
the campaign.
Audit Card Violations in a Campaign
Audit cards list entities and links that are out-of-pattern or violate business process
rules. This information can be useful to the certifier as they review entities and links
during a campaign.
When you define a campaign, you can include information from an audit card in the
base universe, or generate an audit card for the campaign. If a violation in the audit card
refers to an entity under review, the entity is flagged in certification tickets of the
campaign. Certifiers can click the item to view details of the violation.
How Campaigns Apply Pre-approved Violations
When a list of pre-approved violations has been defined for the universe, the list filters
violations in all campaigns based on that universe.
In this case there are two audit cards: the audit card you specify as a source of violations
when you create the campaign, and the audit card of pre-approved violations specified
for the universe. Audit card violations are processed as follows for the campaign:
1.
CA RCM identifies entities and links under review that appear in the audit card you
specify when you create the campaign.
2.
CA RCM filters this group of entities and links based on the audit card of
pre-approved violations in the universe. If a violation from the campaign audit card
appears in the pre-approved audit card, it is handled as configured for
pre-approved violations in the universe: the alert is either ignored and not
displayed, or it is dimmed.
More information:
Pre-Approved Violations (see page 29)
Chapter 6: Running Certification Campaigns 91
The Scope of a Campaign
The Scope of a Campaign
When you create a campaign, you can define filtering criteria that limit the entities and
links included in the campaign. The filters you define can dramatically alter the
character of the campaign to support specific business needs. For example, you can
restrict campaigns to subsets of users or resources using geographical location or other
attributes. You can also combine multiple filters based on different criteria.
The Filter screen (see page 66) of the campaign creation wizard displays filter options
relevant to the type of campaign you create.
Attribute Value Filters
You can filter the entities included in a campaign using entity attribute values.
You can also combine several attribute-based criteria.
Define these filters in the Filter screen of the campaign creation wizard.
Example: Roles Pending Approval
To certify roles that have been proposed, but not yet approved, define a role
certification campaign with the following entity filter:
■
Select roles with the Approval Status field equal to Pending Approval.
The campaign includes only roles that have not yet been approved.
Example: User Certification by Function and Location
To certify the privileges of sales staff in the Texas region, define a user certification
campaign with the following entity filters:
■
Select users with the Organization field equal to Sales.
■
Select users with the Location field equal to Texas.
■
Specify the All conditions option.
The campaign includes only users that match both conditions.
92 Portal User Guide
The Scope of a Campaign
Link Type Filters
You can limit the scope of a campaign to certain types of links.
Entities in a configuration can be connected in three ways:
Direct Connection
Only an explicit, direct link connects two entities. There are no implicit links
between them due to parent-child inheritance in the role hierarchy.
Indirect Connection
Two entities are connected only through a role, or through parent-child inheritance
of links in the role hierarchy. There is no direct link between them.
Dual Connection
Two entities are linked both directly through an explicit link, and indirectly through
the role hierarchy.
Define these filters in the Filter screen of the campaign creation wizard. In the Select
Links area of the screen, specify the direct, indirect, and dual links you want to include in
the campaign. To refine your selection, open the Direct, Indirect, and Dual fields to show
a tree of links relevant to the type of campaign you are creating.
Audit Card Filters
If you associate an Audit Card with the campaign, you can use the audit card to filter
which links are included in the campaign. The following options are available:
■
No audit card filter–Audit card information is used to flag violations, but not to limit
the scope of the campaign.
■
Include only links that are in the audit card–Use this option to create a campaign
that focuses on violations.
■
Exclude links that are in the audit card–Reviewers do not waste time on links that
are likely to be deleted.
■
Suggest new links–Typically, reviewers certify the existing links between entities in
a configuration. CA RCM can also suggest new links based on the audit card
associated with the campaign. If a reviewer approves a suggested link, it is added to
the configuration.
Chapter 6: Running Certification Campaigns 93
The Scope of a Campaign
Previously Reviewed Links
When you create a recertification campaign, you can filter the review tasks carried
forward to the new campaign based on their status in the old campaign. In the Filter
screen of the campaign creation wizard, select any of the following options under
States:
Pending
Includes link certification actions that were not decided in the previous campaign.
Approved
Includes links that were approved in the previous campaign.
Rejected
Includes links that were rejected in the previous campaign.
Note: Recertification campaigns do not duplicate campaign control actions from the
reference campaign. Only link or entity certification tasks are duplicated.
When you include previously approved or rejected links, the following options control
how the decisions of previous reviewers are handled.
Reset Approver's Selections
Previous review decisions are not carried forward into the recertification campaign.
Keep Approver's Selections
Show Approver's Selections
Reviewers in the recertification campaign see previous review decisions.
The following system property controls how previously reviewed links are presented to
reviewers in recertification campaigns.
campaign.settings.recertification.allowOneClickResubmit
Determines if previous review decisions are presented as live choices in
recertification tasks. Valid values are:
True
Previous Approve or Reject decisions are selected by default in recertification
tasks. Reviewers in the recertification campaign can accept these decisions by
clicking Submit in the My Tasks screen. The campaign creation wizard displays
the option Keep Approver's Selections.
False
Previous Approve or Reject decisions are indicated by grayed icons in
recertification tasks, but these decisions are not selected by default. Reviewers
in the recertification campaign must select a review decision for each link
under review. The campaign creation wizard displays the option Show
Approver's Selections.
94 Portal User Guide
Usage Information from CA Enterprise Log Manager in a Campaign
Updated Links
Recertification campaigns are based on the review tasks of a previous campaign. When
you create a recertification campaign, you can include links in the configuration that
were not part of the previous campaign. These links can be new links that did not exist
when the previous campaign was initiated, or existing links that were excluded from the
previous campaign.
Usage Information from CA Enterprise Log Manager in a
Campaign
When CA Enterprise Log Manager is deployed in your environment, CA RCM can display
usage information drawn from CA Enterprise Log Manager in the tickets of a campaign.
Reviewers can use this information when they certify links.
In campaign tickets, a colored icon indicates frequency of use. Reviewers can click the
icon to open a window with more detailed usage information from CA Enterprise Log
Manager. This window shows all usage data for the entity under review—CA Enterprise
Log Managerdoes not filter usage data based on the CA RCM user hierarchy.
Note: The connection between CA RCM and CA Enterprise Log Manager is protected by
a security certificate. Reviewers are prompted to install the security certificate on their
computers the first time they view information from CA Enterprise Log Manager.
Data polling between CA RCM and CA Enterprise Log Manager is enabled and configured
separately for each universe. When you enable polling of CA Enterprise Log Manager for
a universe, all campaigns based on that universe display usage information.
More information:
CA Enterprise Log Manager Integration (see page 193)
DNA-based Approval Process
You can create an Audit Card in CA RCM client tools that reflects changes between two
configurations. When you submit the audit card, CA RCM initiates approval actions for
the changes.
Note: When you delete a role directly in the client tools, the resulting audit card
contains a general Delete Role action and separate child actions for each user, role, or
resource link associated with the deleted role. Submit only the parent Delete Role
action to the CA RCM server. CA RCM automatically generates the child actions
associated with the role.
Chapter 6: Running Certification Campaigns 95
How to Upgrade Campaigns from Earlier Versions
How to Upgrade Campaigns from Earlier Versions
Certification campaigns that you created using release 12.5 SP1 or earlier of CA RCM are
incompatible with the data schemas, system properties, and campaign management
controls of this release. You can upgrade these campaigns and continue working with
their data.
■
For 4.x releases, and release 12.0, 12.5, and 12.5 SP1–use the Upgrade Legacy
Campaigns screen in the CA RCM portal.
■
For 3.x releases–save campaign data to an audit card, and apply this data to a
new campaign.
Note: For more information, see the relevant upgrade section of the Installation Guide
for this release.
96 Portal User Guide
Chapter 7: Using Dashboards
Dashboards use graphs and charts to provide a useful overview of role-based
configurations and the results of statistical and rule-based analysis.
Click Dashboards on the CA RCM portal main menu to access these screens.
Some of these screens are also displayed by default on your home page.
Depending on the content of the dashboard, some or all of the following controls
appear in the headers of the dashboard:
Settings
Opens a dialog you use to select data sets to include in the dashboard.
Customize
Opens a dialog you use to change how graphs and charts are displayed.
Draw Charts
Regenerates the graphs and charts of the dashboard.
Value, Percent
Specifies if graphs show absolute values or percentages.
This section contains the following topics:
Configuration Dashboard (see page 98)
Audit Card Dashboard (see page 99)
Compliance Dashboard (see page 100)
Roles Coverage Dashboard (see page 100)
Certification Dashboard (see page 100)
Chapter 7: Using Dashboards 97
Configuration Dashboard
Configuration Dashboard
The configuration dashboard is a portal page that provides a graphical overview of the
entities (users, resources, and roles) in a specified configuration, and the connections
between them.
The Customize button invokes the Settings window where you can set bar and pie chart
parameters. See Configuration Dashboard Settings (see page 99)
A graphic at the top of the page summarizes the users, resources, and roles in the
specified configuration.
In the configuration shown, there are 69 users, 97 roles, and 83 resources. There are
345 user-role connections, and the role hierarchy contains 23 role-role connections.
A series of bar charts summarize the connections between users, roles, and resources.
The following types of links are described:
Direct Connection
Only an explicit, direct link connects two entities. There are no implicit links
between them due to parent-child inheritance in the role hierarchy.
Indirect Connection
Two entities are connected only through a role, or through parent-child inheritance
of links in the role hierarchy. There is no direct link between them.
Dual Connection
Two entities are linked both directly through an explicit link, and indirectly through
the role hierarchy.
98 Portal User Guide
Audit Card Dashboard
Configuration Dashboard Settings
The Configuration Dashboard bar and pie charts can be customized by the user for
display purposes.
■
■
Bar Charts - The following parameters can be set in the Bar chart histogram:
■
Max number - The maximum number of histogram chart bars displayed.
■
Auto - CA Role & Compliance Manager determines the histogram chart
members displayed.
■
Fixed - Set the desired number in the chart of displayed values.
■
No Zero - Do not display in the chart values that include zero members.
Pie Charts - The following parameters can be set in the Pie charts:
■
Type - Select 2D or 3D display type.
■
Transparent - Set the desired displayed transparency value with the drop down
arrow.
■
Slice Control - Determine how pie chart information as slices are displayed. Use
the drop down arrow to set the desired value for minimal and maximum
number of slices.
Audit Card Dashboard
The audit card dashboard is a portal page that provides a graphical overview of the
analytical alerts recorded in a specified audit card. By reviewing these violations, the
Role Engineer can determine the current role configuration's goodness of fit and decide
which direction to take to refine the configuration.
Note: The alert criteria reported in the audit card dashboard reflect the pattern analysis
settings used to generated the selected audit card. For detailed information about these
pattern analysis options, refer to the Sage DNA User Guide.
Chapter 7: Using Dashboards 99
Compliance Dashboard
Compliance Dashboard
The compliance dashboard is a portal page that provides a graphical summary of
possible violations of Business Policy Rules (BPRs).
Typically several audit cards affiliated with the same configuration file are selected for
display on the dashboard. Use these graphs to compare the impact of different BPR
rulesets, and to identify business policies that generate significant violations in the role
configuration.
To populate the dashboard, scroll to the bottom of the page, select an audit card from
the CA RCM database, and click Add to include the audit card's BPR alerts in the
dashboard's graphs.
Note: The compliance dashboard accepts only audit cards that contain alerts related to
Business Policy Rules (BPRs). Only BPR-related alerts are graphed; pattern-based alerts
in the audit card are ignored.
Roles Coverage Dashboard
The roles coverage dashboard is a portal page that provides a graphical summary of the
current role hierarchy, and how well the role hierarchy matches the underlying user,
resource, and permission data.
The graphs of the dashboard show key measures in two related areas:
■
Coverage Indicators—What portion of the actual user and resource privileges in the
enterprise are included in the role hierarchy? How complete is the role hierarchy,
and how well does it reflect actual permission patterns?
■
Quality Indicators—How well-formed and efficient is the defined set of roles and
business process rules? What portion of roles are sparsely populated with users, or
in conflict with BPRs?
Certification Dashboard
The certification dashboard provides a graphical summary of the certification campaigns
you participate in. It provides information about approved, rejected, reassigned, and
pending review tasks for each campaign, and lists information about the performance of
reviewers and approvers.
You can filter campaigns by type or by start date, and select individual campaigns to
include in the dashboard.
100 Portal User Guide
Chapter 8: Running Self-Service Tasks
The CA RCM Portal's Self-Service feature provides local managers with the ability to do
their own provisioning and/or provision their team-members on-the-fly, by adding or
removing links between themselves/their team members and the corporation's roles
and resources. The Self-Service tasks include the ability to create new roles or update
existing one (only available to managers with appropriate permissions). Each task
involves the functionality of one or more screens, which will be documented in this
chapter.
In Adding Campaigns, we stated that managers do not update entity links during
campaigns. They are limited to approving or rejecting the current links. At times, either
following a campaign or following changes in corporate regulations or policies, it is
necessary to update the actual links between the corporate users and the systems' roles
and resources, or to generate new roles. This need is fulfilled by using the Self-Service
tasks.
Note: The general functionality available in Self-Service task screens is already
documented in Using the CA RCM Portal Interface (see page 17), and therefore, will not
be documented in this chapter.
Chapter 8: Running Self-Service Tasks 101
Certification Dashboard
This chapter documents all the Self-Service tasks available via the CA RCM Portal.
Managers will have access only to those features for which they have been provisioned.
For the purpose of this manual, the Self-Service tasks are divided into two groups:
Provisioning Tasks
Includes all the tasks that manage a user's roles/resources:
■
Manage my team's role assignments
■
Manage my role assignments
■
Manage my team's resource assignments
■
Manage my resource assignments
Defining Roles Tasks
Includes the role definition tasks:
■
Request a new role definition
■
Request changes to a role definition
Note: If you find it necessary to run a Self-Service task that does not appear in your
Self-Service menu, please report this to your system administrator.
The CA RCM Portal lets you add links to your favorite Self-Service tasks on the Home
Page under My Business Processes.
This section contains the following topics:
General Self-Service Functions (see page 103)
Manage My Team's Role Assignments (see page 106)
Manage My Role Assignments (see page 112)
Manage My Team's Resources (see page 116)
Manage My Resources (see page 123)
Defining a New Role (see page 127)
Updating Role Definitions (see page 133)
Introducing the Requests Table (see page 134)
102 Portal User Guide
General Self-Service Functions
General Self-Service Functions
The Self-Service tasks functionality depends on the specific task that you undertake.
Nevertheless, several functions are shared by several tasks.
This section describes two such functions:
■
Test Compliance
■
Suggest Entity
It is important to realize that you can use the Suggest Entity service to obtain a list of
recommended entities, and yet the Test Compliance utility will find that the suggested
links are in violation of system BPRs. The reason is that the Suggest Entity service is
based on analytical pattern-based technology, while the Test Compliance utility
examines the rules written by the system's administrators, rules that may or may not
override the findings of the analytical pattern-based examination of the corporation's
configuration files.
For example, the system may find that under certain conditions a specific application
role is recommended for a group of users, and yet the Test Compliance utility will record
this as a violation because the application is licensed and there are no free licenses
available at this time.
More information:
Test Compliance (see page 103)
How CA RCM Suggests Entities (see page 104)
Test Compliance
During a Self-Service provisioning task, you can test the compliance of your selections
with the existing BPRs, security regulations and policies.
Note: For more information on violations stemming from non-compliance and other
security issues see the DNA User Guide.
The Violations screen lists link entities that have a violation associated with them. If
there are no violations,no records are listed.
The Violations screen groups entities by the rule or pattern condition that triggered the
violation. All link entities that violate a specific rule or pattern are listed together. in
addition to link information, the following field is displayed for each entity:
Score
The risk as defined for the specific BPR. The value is usually between 0 and 100.
Chapter 8: Running Self-Service Tasks 103
General Self-Service Functions
To run the compliance testing
1.
Click Test Compliance. The Violations screen opens in a separate browser window.
2.
Click
in the upper right-hand corner to close the window.
How CA RCM Suggests Entities
You can use CA RCM pattern recognition algorithms to suggest new privileges for
yourself, for your team, or for roles that you manage.
For example, when you review your team's role assignments, you can click Suggest
Roles to generate a weighted list of roles based on pattern analysis.
Note: For more information about CA RCM pattern recognition algorigthms see the DNA
User Guide.
CA RCM bases its suggestions on several alogrithms. Depending on the self-service
request that is active, the following algorithms are available:
Matching Rights
CA RCM finds roles with rights that correlate (according to a given %) to those of a
reference role. This algorithm is equivalent to the "In/Out of Pattern: User
matching" option in the DNA client tool.
HR Pattern
CA RCM finds privileges assigned to users with similar human resources attribute
values. This algorithm is equivalent to the "In/Out of Pattern: Propose new roles for
users (by Human Resources)" option in the DNA client tool.
Privileges Pattern
Compares the privileges of the current users to a general pattern of privileges in the
configuration. This algorithm is equivalent to the "In/Out of Pattern: Propose new
roles for users (by Privileges)" option in the DNA client tool.
Matching Rule
Finds users that match the rule used to assign a role who do not yet have the role.
This algorithm is equivalent to the "In/Out of Pattern: Identify users matching rule
based roles" option in the DNA client tool.
These algorithms suggest entities based on both direct and indirect links.
The pattern matching results appear in the columns of the relevant table:
104 Portal User Guide
■
For provisioning tasks, the results appear in the Other Roles table.
■
For role definition tasks, the results appear in the entity's designated table.
General Self-Service Functions
When you request suggestions for more than one user, the table lists the number of
users that match out of the number of selected users ([matching]/[selected]).
Click Suggest [Entity] to activate this service as part of a provisioning task. The table in
which it is located changes and contains following columns:
Service
Added Columns
Suggest Roles
Four pattern columns plus a Details column.
Suggest Resources
Suggest Users
■
For Provisioning task screens: Two
pattern columns plus a Details
column.
■
For Role Definition task screens:
The Enrolled column
The Enrolled column.
In a Provisioning task screen, click a highlighted link in the Details column and further
information about the users and how they match the specific role/resource appears in a
separate browser window.
Click
in the upper right-hand corner to close the window.
The Enrolled column, which appears in Role Definition task screens, provides the
number of selected users/resources linked to this resource/user.
Chapter 8: Running Self-Service Tasks 105
Manage My Team's Role Assignments
Manage My Team's Role Assignments
For the purposes of the CA RCM Portal, your team is essentially the users that you were
assigned to manage. As a team manager, you may find it necessary to update role
assignments because of corporate changes, personnel changes or following an audit
process. The Manage My Team’s Roles (MMT-Role) screen allows you to manage your
team’s roles, by generating a request to enroll your team in one or more roles, or by
generating a request to enroll a specific user in one or more roles; or by severing the
link between selected users and their current roles.
The role management utility allows you to manually select a specific target role, but it
also provides you with a list of suggested roles and their pattern based behavior, thus
giving you the information necessary to make an informed choice.
The screen is divided into four sections:
General
Provides descriptive information concerning the current action.
Users
Your team members. Select one or more users for the current action.
Currently Enrolled Roles
The current roles linked to the selected users.
Other Roles
Recommended roles for the selected users.
The Users and Other Roles sections present customizable tables.
As the MMT-Role screen allows many options and great flexibility, the task’s procedures
will be broken up by section:
■
The fields in the General section
■
The Users table options and functionality
■
The Currently Enrolled Roles table options and functionality
■
The Other Roles table options and functionality
To manage my team’s role assignments, click Mange My Team’s Role Assignments on
the Self-Service menu. The Manage My Team’s Roles screen opens.
More information:
General Section (MMT-Role Screen) (see page 107)
Users Table (MMT-Role Screen) (see page 107)
Currently Enrolled Roles Table (Manage My Roles Screen) (see page 109)
Other Roles Table (MMT-Role Screen) (see page 110)
106 Portal User Guide
Manage My Team's Role Assignments
General Section (MMT-Role Screen)
The General section of the Managing My Team's Roles screen contains the following
fields:
Universe
Select the Universe you wish to work with. The users' table and the available roles
depend on the universe.
Business Area
General information (descriptive). This information will appear in the Description
field of the ensuing Self-Service Approval-Root ticket.
Business Process
General information (descriptive). This information will appear in the Description
field of the ensuing Self-Service Approval-Root ticket.
Description
Provide a concise and meaningful description of the changes you intend to make to
your team's roles.
Submit
Click to submit your request for changes.
To enter the data in the MMT-Role General section
1.
Select a Universe from the drop-down list.
2.
Enter the Business Area for the current action.
3.
Enter the Business Process associated with the current action.
4.
Enter a Description.
Users Table (MMT-Role Screen)
The Users table displays a list of the users in the selected Universe's configuration files.
The members of your team are marked with a green dot next to their Person ID.
The Users table provides the following options:
Add
A column of check boxes, one per user. Select one or more. When you check
multiple users, all the changes you make will be implemented for all selected users.
Person ID
Click any highlighted ID listed in this column to open the associated User's Card.
Chapter 8: Running Self-Service Tasks 107
Manage My Team's Role Assignments
Get Roles
Provides a list of Currently Enrolled Roles for the selected users.
Customize
Allows you to determine the columns that will appear in the Users table.
Records per page
Select the number of records that will appear in the Users table.
Find Users
Opens the Select User filter screen to assist you in finding specific users.
Once you have selected the user(s) you want to manage at this time, you can click Get
Roles to obtain a list of the roles currently associated with these users.
Note: If the actions you want to take do not involve the currently enrolled roles
associated with the selected user, you can skip the Currently Enrolled Roles table and go
to the Other Roles table.
To select users and obtain their roles
1.
In the Users table, select one or more users. You can click Find Users to open the
Select User screen.
2.
Click Get Roles.
The roles linked to the selected user(s) appear in the Currently Enrolled Roles table.
A list of roles that are not linked to the currently selected user(s) appears in the
Other Roles table.
At this point you can choose to:
■
Manage the current enrollment list
■
Add additional roles to the selected users
■
Do both.
If you do not want to manage the currently enrolled roles, skip to add roles to the
selected users.
108 Portal User Guide
Manage My Team's Role Assignments
Currently Enrolled Roles Table (Manage My Roles Screen)
This section allows you to manage the current roles enrollment for your selected users.
The options available to you depend on how many users you have selected for the
current action.
In the case of single-user selection, click Get Roles to view the list of roles linked to your
selected user.
In this case, the only option available to you in this section is to select the Remove check
box next to a role thereby severing the link between the user and the selected role.
If you choose more than one user, the Currently Enrolled Roles table will present an
additional column: Enrollment.
In the case of multiple-user selection, you can:
■
Select the Remove check box next to a role thereby severing the link between the
users and the selected role.
■
Select the Add check box next to a role to which only some of the selected users
were enrolled, thereby linking all the chosen users to the selected role.
The Currently Enrolled Roles table provides the following options:
Add
A column of check boxes, one per role. Select one or more. The check boxes next to
roles that are already linked to all selected users will be disabled.
Remove
A column of check boxes, one per role. Check one or more to remove the link
between the selected users and the selected roles.
Enrollment
This column appears only when selecting multiple users. Numerically displays [# of
users enrolled]/[total # of users selected], for example 2/3 means that two of the
three selected users are enrolled to this role. This column also provides the value as
a percentage, for example: 1/3 (33%).
Role Name
Click any highlighted role name listed in this column to open its Role Card.
Depending on the type of action you wish to take, you may find that after selecting the
appropriate check boxes in this section you have completed the task. In this case you
can ignore the Other Roles section and skip submit your requests by clicking Submit at
the bottom of the Manage My Team's Roles screen.
Chapter 8: Running Self-Service Tasks 109
Manage My Team's Role Assignments
To make selections in the Currently Enrolled Roles table, in the Currently Enrolled Roles
table, click the relevant check boxes in the Add and/or Remove columns.
At this point you can choose to:
■
End the process at this point
■
Add additional roles to the selected users.
If you do not want to add new roles, submit your requests.
Other Roles Table (MMT-Role Screen)
This section allows you to enroll your selected user(s) to additional roles of your choice.
The actual enrollment will take place following a review process.
Note: When you click Get Roles in the Users section, a list of roles that are not linked to
the currently selected user(s) appears in the Other Roles table.
In addition to managing the roles currently linked to the members of your team, you can
also request that the system provide a list of recommended roles for your selected
users. This list of roles will be displayed in the section Other Roles.
The Other Roles section provides the following options:
Add
A column of check boxes, one per role. Select one or more to link the selected users
to additional roles.
Role Name
Click any highlighted role name listed in this column to open its Role Card.
Customize
Allows you to determine the columns that will appear in the Other Roles table.
Records per page
Select the number of records that will appear in the Other Roles table per page.
Find Roles
Opens the Select Role filter screen to assist you in locating specific roles.
Test Compliance
Checks whether the selections made in the Other Role table comply with existing
policies and BPRs (Business Practice Rules).
Suggest Roles
Provides a list of possible roles based on the CA RCM pattern recognition
technology.
110 Portal User Guide
Manage My Team's Role Assignments
This table presents you with several options:
■
You can manually select one or more roles that you wish to link to the selected
users.
■
You can use the Find Roles filter option to find specific roles and then make a
selection from the filtered list of roles.
■
You can click Suggest Roles and use the information provided by this feature to link
roles to the selected users.
After making your selection(s) you can test the compliance of your selections with the
existing BPRs and policies.
You can decide to make the request despite any listed violations, or you can amend your
selections.
Important! Remember that when selecting multiple users, all role-related choices apply
equally to all the users. If at any point you alter the selected users, click Get Roles again.
To link roles to selected users
1.
In the Manage My Team's Roles screen scroll down to the Other Roles table.
2.
(Optional) Click Find Roles to access the Select Role filter screen.
3.
(Optional) Click Suggest Roles to see the CA RCM Portal's recommendations.
4.
Select one or more roles to link to the chosen users.
5.
(Optional) Click Test Compliance to review your selections and check for possible
violations.
The Violations screen opens in a separate browser window.
6.
Click
to close the Violations window.
7.
Click Submit.
The Requests screen opens.
More information:
Test Compliance (see page 103)
How CA RCM Suggests Entities (see page 104)
Introducing the Requests Table (see page 134)
Chapter 8: Running Self-Service Tasks 111
Manage My Role Assignments
Manage My Role Assignments
As a user, you may find it necessary to request an update to your roles because of
corporate changes, personnel changes or following an audit process. The Manage My
Role Assignment screen allows you to manage your roles, by generating a request to
add new roles or by deleting existing roles.
The role management utility allows you to select a specific target role, but it also
provides you with suggested roles and the information necessary to make an informed
choice.
The screen is divided into three sections:
General
Provides descriptive information concerning the current action.
Currently Enrolled Roles
The current roles linked to the selected users.
Other Roles
A list of available roles.
The Other Roles section displays a customizable table.
As the Manage My Roles screen allows many options and great flexibility, the
procedures will be broken up by section:
■
The fields in the General section
■
The Currently Enrolled Roles table options and functionality
■
The Other Roles table options and functionality
To manage my role assignments, click Mange My Role Assignments on the Self-Service
menu. The Manage My Roles screen appears.
More information:
General Section (Manage My Roles Screen) (see page 113)
Currently Enrolled Roles Table (Manage My Role Screen) (see page 114)
Other Roles Table (Manage My Role Screen) (see page 115)
112 Portal User Guide
Manage My Role Assignments
General Section (Manage My Roles Screen)
The General section of the Managing My Roles screen contains the following fields:
Universe
Select the Universe you wish to work with. The users' table and the available roles
depend on the universe.
Business Area
General information (descriptive). This information will appear in the Description
field of the ensuing Self-Service Approval-Root ticket.
Business Process
General information (descriptive). This information will appear in the Description
field of the ensuing Self-Service Approval-Root ticket.
Description
Provide a concise and meaningful description of the changes you intend to make to
your roles.
Submit
Click to submit your request for changes.
To enter the data in the Manage My Roles General section
1.
Select a Universe from the drop-down list.
The Currently Enrolled Roles table and the Other Roles table will show roles
belonging to the selected Universe's configuration.
2.
Enter the Business Area for the current action.
3.
Enter the Business Process associated with the current action.
4.
Enter a Description.
Note: If the actions you want to take do not involve your currently enrolled roles, you
can skip the Currently Enrolled Roles table and skip to the Other Roles table.
If you do not wish to manage the currently enrolled roles, add roles to the selected
users.
More information:
Currently Enrolled Roles Table (Manage My Role Screen) (see page 114)
Other Roles Table (Manage My Role Screen) (see page 115)
Chapter 8: Running Self-Service Tasks 113
Manage My Role Assignments
Currently Enrolled Roles Table (Manage My Role Screen)
This section lets you manage your current roles enrollment. When you selected the
Universe, the CA RCM Portal provided the list of your current roles, within the universe's
configuration.
The Currently Enrolled Roles table, for the Manage My Roles task, provides only option:
to select a Remove check box next to a role thereby severing the link between you and
the selected role.
The Currently Enrolled Roles table provides the following functionality:
Add
A column of check boxes, one per role. This column is inactive in this screen.
Remove
A column of check boxes, one per user. Check one or more to remove the link
between the selected users and the selected roles.
Role Name
Click any highlighted role name listed in this column to open its Role Card.
Depending on the type of action you wish to take, you may find that after selecting the
appropriate check boxes in this section you have completed the task. In this case you
can ignore the instructions in the Other Roles and submit your requests by clicking
Submit at the bottom of the Manage My Roles screen.
To make selections in the Currently Enrolled Roles table, in the Currently Enrolled Roles
table click the relevant check boxes in the Remove column.
At this point you can choose to:
■
End the process at this point
■
Add roles.
If you do not want to add new roles, submit your requests.
More information:
Other Roles Table (Manage My Role Screen) (see page 115)
114 Portal User Guide
Manage My Role Assignments
Other Roles Table (Manage My Role Screen)
This section allows you to enroll in additional roles of your choice. The actual enrollment
will take place following a review process.
In addition to managing the roles that you are currently linked to, you can also request
that the system provide you with a list of recommended roles for yourself. This list of
roles will be displayed in the section Other Roles.
The Other Roles section provides the following options:
Add
A column of check boxes, one per role. Select one or more.
Role Name
Click any highlighted role name listed in this column to open its Role Card.
Customize
Allows you to determine the columns that will appear in the Other Roles table.
Records per page
Select the number of records that will appear in the Other Roles table per page.
Find Roles
Opens the Select Role filter screen to assist you in locating specific roles.
Test Compliance
Checks whether the selections made in the Other Roles table comply with existing
policies and BPRs (Business Practice Rules).
Suggest Roles
Provides a list of possible roles based on the CA RCM pattern recognition
technology.
This table presents you with several options:
■
You can manually select one or more roles to which you wish to enroll.
■
You can use the Find Roles filter option to find specific roles and then make a
selection from the filtered list of roles.
■
You can click Suggest Roles and use the information provided by this feature to find
roles to which you should enroll.
After making your selection(s) you can test the compliance of your selections with the
existing BPRs and policies.
You can decide to make the request despite any violations, or you can amend your
selections.
Chapter 8: Running Self-Service Tasks 115
Manage My Team's Resources
To link to additional roles
1.
In the Manage My Roles screen scroll down to the Other Roles table.
2.
(Optional) Click Find Roles to access the Select Role filter screen.
3.
(Optional) Click Suggest Roles to see the CA RCM Portal's recommendations.
4.
Select one or more roles to link to the chosen users.
5.
(Optional) Click Test Compliance to review your selections and check for possible
violations.
The Violations screen opens in a separate browser window. Click
Violations window.
6.
to close the
Click Submit.
The Requests screen opens.
More information:
Test Compliance (see page 103)
How CA RCM Suggests Entities (see page 104)
Introducing the Requests Table (see page 134)
Manage My Team's Resources
For the purposes of the CA RCM Portal, your team is essentially the users that you were
assigned to manage. As a team manager, you may find it necessary to update resources
because of corporate changes, resource updates or following an audit process. The
Manage My Team’s Resources (MMT-Resources) allows you to manage your team’s
resources:
■
By generating a request to add new resources, for either a specific user or a for a
group of users
■
By severing the link between selected users and their current resources
The resource management utility allows you to manually select a specific target
resource, but it also provides you with a list of suggested resources and their pattern
based behavior, thus giving you the information necessary to make an informed choice.
116 Portal User Guide
Manage My Team's Resources
The screen is divided into four sections:
General
Provides descriptive information concerning the current action.
Users
Your team members. Select one or more users for the current action.
Currently Enrolled Roles
The current resources linked to the selected users.
Other Roles
Recommended resources for the selected users.
The Users and Other Resources sections present customizable tables.
As the MMT-Resources screen allows many options and great flexibility, the task’s
procedures will be broken up by section:
■
The fields in the General section
■
The Users table options and functionality
■
The Currently Enrolled Resources table options and functionality
■
The Other Resources table options and functionality
To manage my team’s resource assignments, click Mange My Team’s Resource
Assignments on the Self-Service menu. The Manage My Team’s Resources screen opens.
More information:
General Section (MMT-Resources Screen) (see page 118)
Users Table (MMT-Resources Screen) (see page 119)
Currently Enrolled Resources Table (Manage My Roles Screen) (see page 120)
Other Resources Table (MMT-Resources Screen) (see page 121)
Chapter 8: Running Self-Service Tasks 117
Manage My Team's Resources
General Section (MMT-Resources Screen)
The General section of the Managing My Team's Resources screen contains the
following fields:
Universe
Select the Universe you wish to work with. The users' table and the available
resources depend on the universe.
Business Area
General information (descriptive). This information will appear in the Description
field of the ensuing Self-Service Approval-Root ticket.
Business Process
General information (descriptive). This information will appear in the Description
field of the ensuing Self-Service Approval-Root ticket.
Description
Provide a concise and meaningful description of the changes you intend to make to
your team's resources.
Submit
Click to submit your request for changes.
To enter the data in the MMT-Resource General section
118 Portal User Guide
1.
Select a Universe from the drop-down list.
2.
Enter the Business Area for the current action.
3.
Enter the Business Process associated with the current action.
4.
Enter a Description.
Manage My Team's Resources
Users Table (MMT-Resources Screen)
The Users table displays a list of the users in the selected Universe's configuration files.
The members of your team are marked with a green dot next to their Name.
The Users table provides the following options:
Add
A column of check boxes, one per user. Select one or more. When you select
multiple users, all the changes you make will be implemented for all selected users.
Person ID
Click any highlighted ID listed in this column to open the associated User's Card.
Get Resources
Provides a table of Currently Enrolled Resources for the selected users.
Customize
Allows you to determine the columns that will appear in the Users table.
Records per page
Select the number of records that will appear in the Users table.
Find Users
Opens the Select User filter screen to assist you in finding specific users.
Once you have selected the users you want to manage at this time, you can click Get
Resources to obtain a list of the resources currently associated with these users.
Note: If the actions you want to take do not involve the currently enrolled resources
associated with the selected user, you can skip the Currently Enrolled Resources table
and go to the Other Resources table.
Chapter 8: Running Self-Service Tasks 119
Manage My Team's Resources
To select users from the MMT-Resources Users table and obtain their roles
1.
In the Users table, select one or more users. You can click Find Users to open the
Select User screen.
2.
Click Get Resources.
The resources linked to the selected user(s) appear in the Currently Enrolled
Resources table. A list of resources that are not linked to the currently selected
user(s) appears in the Other Resources table.
At this point you can choose to:
■
Manage the current enrollment list
■
Add additional resources to the selected users
■
Do both.
If you do not want to manage the currently enrolled resources, add resources to the
selected users.
More information:
Currently Enrolled Resources Table (Manage My Roles Screen) (see page 120)
Other Resources Table (MMT-Resources Screen) (see page 121)
Currently Enrolled Resources Table (Manage My Roles Screen)
This section allows you to manage the current resources enrollment for your selected
users. The options available to you depend on how many users you have selected for
the current action.
In the case of single-user selection, click Get Resources, and you will receive the list of
resources linked to your chosen user.
In this case, the only option available to you in this section is to click the Remove check
box next to a resource thereby severing the link between the user and the selected
resource.
If you choose more than one user, the Currently Enrolled Resources table will present an
additional column: Enrollment.
In the case of multiple-user selection, you can:
120 Portal User Guide
■
Click the Remove check box next to a resource thereby severing the link between
the users and the selected resource.
■
Click the Add check box next to a resource to which only some of the selected users
were enrolled, thereby linking all the chosen users to the selected resource.
Manage My Team's Resources
The Currently Enrolled Resources table provides the following options:
Add
A column of check boxes, one per resource. Select one or more. The check boxes
next to resources that are already linked to all selected users will be disabled.
Remove
A column of check boxes, one per resource. Check one or more to remove the link
between the selected users and the selected resources.
Enrollment
This column appears only when selecting multiple users. Shows numerically [# of
users enrolled]/[total # of users selected], for example 2/3 means that two of the
three selected users are enrolled to this resource. This column also provides the
value as a percentage. For example: 1/3 (33%).
Resource Name
Click any highlighted resource name listed in this column to open its Resource Card.
Depending on the type of action you wish to take, you may find that after selecting the
appropriate check boxes in this section you have completed the task. In this case you
can ignore the Other Resources and submit your requests by clicking Submit at the
bottom of the Manage My Team's Resources screen.
To make selections in the Currently Enrolled Resources table, in the Currently Enrolled
Resources table click the relevant check boxes in the Add and/or Remove columns.
At this point you can choose to:
■
End the process at this point
■
Add additional resources to the selected users.
If you do not want to add new resources, submit your requests.
Other Resources Table (MMT-Resources Screen)
This section allows you to enroll your selected user(s) to additional resources of your
choice. The actual enrollment will take place following a review process.
Note: When you click Get Resources in the Users section, a list of resources that are not
linked to the currently selected user(s) appears in the Other Resources table
In addition to managing the resources currently linked to the members of your team,
you can also request that the system provide a list of recommended resources for your
selected users. This list of resources will be displayed in the section Other Resources.
Chapter 8: Running Self-Service Tasks 121
Manage My Team's Resources
The Other Resources section provides the following options:
Add
A column of check boxes, one per role. Select one or more to link the selected users
to additional resources.
Res Name 1
Click any highlighted resource name listed in this column to open its Resource Card.
Customize
Allows you to determine the columns that will appear in the Other Resources table.
Records per page
Select the number of records that will appear in the Other Resources table.
Find Resources
Opens the Select Resources filter screen to assist you in locating specific resources.
Test Compliance
Checks whether the selections made in the Other Resources table comply with
existing policies and BPRs (Business Process Rules).
Suggest Resources
Provides a list of possible resources based on the CA RCM pattern recognition
technology.
This table presents you with several options:
■
You can manually select one or more resources that you wish to link to the selected
users.
■
You can use the Find Resources filter option to find specific roles and then make a
selection from the filtered list of resources.
■
You can click Suggest Resources and use the information provided by this feature to
link resources to the selected users.
After making your selection(s) you can test the compliance of your selections with the
existing BPRs and policies.
You can decide to make the request despite any listed violations, or you can amend your
selections.
Important! Remember that when selecting multiple users, all resource-related choices
apply equally to all the users. If at any point you alter the selected users, click Get
Resources again.
122 Portal User Guide
Manage My Resources
To link resources to selected users
1.
In the Manage My Team's Resources screen scroll down to the Other Resources
table.
2.
(Optional) Click Find Resources to access the Select Resource filter screen.
3.
(Optional) Click Suggest Resources to see the CA RCM Portal's recommendations.
4.
Select one or more resources to link to the chosen users.
5.
(Optional) Click Test Compliance to review your selections and check for possible
violations.
The Violations screen opens in a separate browser window. Click
Violations window.
6.
to close the
Click Submit.
The Requests screen opens.
More information:
How CA RCM Suggests Entities (see page 104)
Test Compliance (see page 103)
Manage My Resources
As a user, you may find it necessary to request an update to your resources because of
corporate changes, resource changes or following an audit process. The Manage My
Resources screen allows you to manage your resources, by generating a request to add
new resources or by deleting existing resources.
The screen is divided into three sections:
General
Provides descriptive information concerning the current action.
Currently Enrolled Resources
The current resources linked to the selected users.
Other Resources
A list of available resources.
Chapter 8: Running Self-Service Tasks 123
Manage My Resources
The Other Resources section displays a customizable table.
As the Manage My Resources screen allows many options and great flexibility, the
procedures will be broken up by section:
■
The fields in the General section
■
The Currently Enrolled Resources table options and functionality
■
The Other Resources table options and functionality
To manage my resources, click Mange My Resource Assignments on the Self-Service
menu. The Manage My Resources screen appears.
More information:
General Section (Manage My Resources Screen) (see page 124)
Currently Enrolled Resources Table (Manage My Resources Screen) (see page 125)
Other Resources Table (Manage My Resources Screen) (see page 126)
General Section (Manage My Resources Screen)
The General section of the Managing My Resources screen contains the following fields:
Universe
Select the Universe you wish to work with. The users' table and the available
resources depend on the universe.
Business Area
General information (descriptive). This information will appear in the Description
field of the ensuing Self-Service Approval-Root ticket.
Business Process
General information (descriptive). This information will appear in the Description
field of the ensuing Self-Service Approval-Root ticket.
Description
Provide a concise and meaningful description of the changes you intend to make to
your resources.
Submit
Click to submit your request for changes.
124 Portal User Guide
Manage My Resources
To enter the data in the Manage My Resources General section
1.
Select a Universe from the drop-down list.
The Currently Enrolled Resources table and the Other Resources table shows
resources belonging to the selected Universe's configuration.
2.
Enter the Business Area for the current action.
3.
Enter the Business Process associated with the current action.
4.
Enter a Description.
Note: If the actions you want to take do not involve your currently enrolled resources,
you can skip the Currently Enrolled Resources table and skip to the Other Roles table.
If you do not want to manage the currently enrolled resources, add resources to the
selected users.
Currently Enrolled Resources Table (Manage My Resources Screen)
This section lets you manage your current resource enrollment. When you originally
selected the Universe, the CA RCM Portal provided the list of your current resources,
within the universe's configuration.
In this case, the only option available to you in this section is to click the Remove check
box next to a resource thereby severing the link between you and the selected resource.
The Currently Enrolled Resources table provides the following options:
Remove
A column of check boxes, one per user. Check one or more to remove the link
between the selected users and the selected resources.
Res Name 1
Click any highlighted resource name listed in this column to open its Resource Card.
Depending on the type of action you wish to take, you may find that after selecting the
appropriate check boxes in this section you have completed the task. In this case you
can ignore the Other Resources and submit your requests by clicking Submit at the
bottom of the Manage My Resources screen.
Chapter 8: Running Self-Service Tasks 125
Manage My Resources
To make selections in the Currently Enrolled Resources table, in the Currently Enrolled
Resources table click the relevant check boxes in the Remove column.
At this point you can choose to:
■
End the process at this point
■
Add resources
If you do not want to add new resources, submit your requests.
Other Resources Table (Manage My Resources Screen)
This section allows you to enroll in additional resources of your choice. The actual
enrollment will take place following a review process.
In addition to managing the resources that you are currently linked to, you can also
request that the system provide you with a list of recommended resources for yourself.
This list of resources will be displayed in the section Other Resources.
The Other Resources section provides the following options:
Add
A column of check boxes, one per resource. Select one or more.
Res Name 1
Click any highlighted resource name listed in this column to open its Resource Card.
Customize
Allows you to determine the columns that will appear in the Other Resources table.
Records per page
Select the number of records that will appear in the Other Resources table.
Find Resources
Opens the Select Resource filter screen to assist you in locating specific resources.
Test Compliance
Checks whether the selections made in the Other Resource table comply with
existing policies and BPRs (Business Practice Rules).
Suggest Resources
Provides a list of possible resources based on the CA RCM pattern recognition
technology.
126 Portal User Guide
Defining a New Role
This table presents you with several options:
■
You can manually select one or more resources to which you wish to enroll.
■
You can use the Find Resources filter option to find specific resources and then
make a selection from the filtered list of resources.
■
You can click Suggest Resources and use the information provided by this feature to
find resources to which you should enroll.
After making your selection(s) you can test the compliance of your selections with the
existing BPRs and policies.
You can decide to make the request despite any violations, or you can amend your
selections.
To link to additional resources
1.
In the Manage My Resources screen scroll down to the Other Resources table.
2.
(Optional) Click Find Resources to access the Select Resource filter screen.
3.
(Optional) Click Suggest Resources to see the CA RCM Portal's recommendations.
4.
Select one or more resources to link to the chosen users.
5.
(Optional) Click Test Compliance to review your selections and check for possible
violations.
The Violations screen opens in a separate browser window. Click
Violations window.
6.
to close the
Click Submit.
The Requests screen opens.
More information:
Test Compliance (see page 103)
How CA RCM Suggests Entities (see page 104)
Introducing the Requests Table (see page 134)
Defining a New Role
In addition to the role hierarchy generated by CA RCM, you can define new roles.
More information:
Request New Role Definition Screen (see page 128)
Definitions for Role Name [New Role Name] (see page 131)
Chapter 8: Running Self-Service Tasks 127
Defining a New Role
Request New Role Definition Screen
The first step in defining a new role is to define its characteristics and general
definitions. For example, for a new role called Security Officer, provide the role name,
corporate definitions, and rules that govern this role.
The Request New Role Definition screen is divided into the following two sections:
■
Task definitions
■
Role definitions
The Task Definitions area includes the following fields:
Universe
Defines the Universe you want to work with. The new role is associated with this
universe configuration. The users table and the available resources provided in the
Definitions for Role Name [New Role] screen depend on the universe.
Business Area
General information (descriptive). This information appears in the Description field
of the ensuing Self-Service Approval-Root ticket.
Business Process
General information (descriptive). This information appears in the Description field
of the ensuing Self-Service Approval-Root ticket.
Request Description
Provides a concise and meaningful description of the new role and its purpose.
The role definitions area includes the following fields:
Role Name
The name of the new role (concise and descriptive).
Description
Describes the new role.
Owner
Defines the user in the universe who owns the new role. By default, you are the
owner of the role you request. Leave this field blank to accept ownership, or specify
another user in the universe.
Type
Provides the role type (use autocomplete).
Organization
Provides the name of the main organization (use autocomplete).
128 Portal User Guide
Defining a New Role
Organization 2
Provides the name of the secondary organization (use autocomplete).
Organization 3
Provides the name of the tertiary organization (use autocomplete).
Rule
(Optional) Provides a rule for the new Role. You can use the Add Rule function to
construct a rule.
To define a new role
1.
Click Request a New Role Definition on the Self-Service menu.
The Request New Role Definition screen opens.
2.
Select a Universe from the drop-down list.
The newly defined role is associated with the configuration belonging to this
universe. The users and resources to link with this role are taken from this universe
configuration.
3.
Enter the Business Area for the current action.
4.
Enter the Business Process associated with the current action.
5.
Enter the Request Description.
6.
Enter the Role Name.
7.
Enter the Description of the new role.
8.
Enter the Owner's ID. (Optional) Click Find to access the Find User filter screen.
9.
Select a user from the User list generated by your filter. Click OK.
10. Enter a Type (use autocomplete).
11. Enter an Organization name (use autocomplete).
12. Enter an Organization 2 name (use autocomplete).
13. Enter an Organization 3 name (use autocomplete).
14. Create a Rule. Click Add Rule for assistance in constructing a rule.
15. Click Next. The Definitions for Role Name [Role Name] screen opens.
More information:
Constructing a Rule (see page 130)
Definitions for Role Name [New Role Name] (see page 131)
Chapter 8: Running Self-Service Tasks 129
Defining a New Role
Constructing a Rule
The CA RCM Portal provides you with the Add Rule utility to assist you in constructing a
rule for the new role you are requesting.
This screen has the following text boxes and functions:
Field
Use autocomplete to select a field name.
Value
Enter a value or use autocomplete to provide an appropriate value.
Add
Lets you add another constraint to the rule.
Remove
Removes the last added constraint.
Cancel
Cancels the rule construction.
Note: Adding a rule is optional. Not every Role has to be rule-based.
To construct a rule
1.
Click Add Rule in the Request New Role Definition screen.
The Rule Construction screen opens.
2.
Enter a Field name.
3.
Enter a Value.
4.
(Optional) Click Add to add additional constraints.
5.
Repeat step 2 to step 4 as necessary.
6.
Click OK.
The constructed rule appears in the Rule text box in the Request New Role
Definition screen.
130 Portal User Guide
Defining a New Role
Definitions for Role Name [New Role Name]
Now that you have requested a new role, you can start assigning users and resources to
the newly constructed role. Roles can be linked to users, resources and to other roles in
a hierarchal relationship as either a parent role or a child role. The Definitions for Role
Name [New Role Name] screen provides you with a fast and easy way to select which
links your new role will have.
When you have completed your selections, you can test those selections for violations.
If you are satisfied with the results, click Submit, located below the entity tables, to
generate a request for a new role definition. The request can be checked by you, and if
you have no corrections to make, click Submit below the request table, and generate
the approval process tickets necessary to confirm the role definitions that you have
created.
Note: The users marked with a green dot next to their name in the Users table, are
users that are accountable to you (RACI).
This screen is divided into three sections:
■
Resources
■
Users
■
Role Hierarchy - which can expand into two sections:
■
Parent Roles
■
Children Roles
Role hierarchy evolves from role trees that are present in many corporate systems. For
example, an Identity Manager application can have two levels of roles: Provisioning Role
and Provisioning Policy. Users are always linked to a Provisioning Role that is linked to a
specific Provisioning Policy. This hierarchal structure is maintained during
import/export. When generating a new role, it is important to know whether there are
system rules that demand specific hierarchal connections between roles.
Each section contains a customizable entity table listing all the relevant entities. To
assist you in your selection the following functions are available:
Find Entities
Provides a filter screen.
Suggest Entities
Provides suggested users for selected resources or suggested resources for selected
users. This service is not available for the Role Hierarchy tables.
Chapter 8: Running Self-Service Tasks 131
Defining a New Role
Highlighted Column
In each customizable table there is one pre-defined column that is highlighted. Click
the name of the entity to access its data card.
Customize
Provides the option to select the fields that will appear in the specified table.
Records per page
Select the number of records per page.
Test Compliance
Tests the selections you made for violations.
If you select to apply the Suggest Entities service to both users and resources, you see
data on the enrollment of the users and resources.
To assign users, resources and role hierarchy to the new role
1.
Select users, resource and/or role hierarchy entities. Utilize the Find Entity filter and
the Suggest Entity utility when necessary.
2.
Click Test Compliance to check your selections for violations.
3.
Click Submit to submit the new role definition request.
The Requests screen opens. The Requests screen provides both the new role's
attributes and links.
4.
Click Back to amend the data.
5.
Click Submit to forward the request to generate a new role.
More information:
Request New Role Definition Screen (see page 128)
How CA RCM Suggests Entities (see page 104)
Test Compliance (see page 103)
Introducing the Requests Table (see page 134)
132 Portal User Guide
Updating Role Definitions
Updating Role Definitions
The CA RCM Portal allows you to update role attributes and links on-the-fly.
When the need arises to update an existing role, whether following an audit or in the
course of an enterprise's roles and privileges maintenance life cycle, you can do so
directly and quickly. The procedure includes finding the role within a specific universe
and then following the procedure described in Defining a New Role, though in this case,
the fields have already been filled, the attributes defined and the links listed and your
goal is to edit these selections to match your corporation's new needs.
In the Request Role Update screen, you are required to select a Universe. Selecting the
Universe opens the Select Role screen.
This is a search screen with built-in filters and a RACI based advanced search feature.
Note: The universe's model configuration is listed in the upper right-hand corner of the
Select Role screen.
Once you have successfully constructed a search pattern, a list of roles is displayed in
the Role table.
To update an existing role
1.
Click Request Changes to a Role Definition on the Self-Service menu.
The Request Role Update screen opens.
Select a Universe from the drop-down list.
2.
Click OK.
3.
The Select Role screen opens.
4.
Filter the data table to create a search pattern.
5.
(Optional) You can use the RACI based Advanced Search feature to include
additional constraints on the search.
6.
Click Search.
A list of roles is displayed in the customizable Role table.
7.
Select the Add check box for the role you want to update.
8.
Click OK.
The Request Role Update screen opens.
More information:
Defining a New Role (see page 127)
Request New Role Definition Screen (see page 128)
Definitions for Role Name [New Role Name] (see page 131)
Chapter 8: Running Self-Service Tasks 133
Introducing the Requests Table
Introducing the Requests Table
Each Self-Service task requires you to submit a request to perform the changes
generated via the task's screens. When you have finished your selections in the selected
Self-Service screen and have clicked Submit, the Requests screen appears. This screen
summarizes the requests you have made while performing the Self-Service task.
Depending on the Self-Service task, the Request screen may contain additional
information. For example, when generating a new role request, the Requests screen will
also include the Attribute data for the new role.
The columns in the Links table provided in this screen depend on the type of Self-Service
request you have just processed. Highlighted data gives you access to the relevant entity
cards and further information. This information always includes the following two
columns:
Request
Presents the nature of the Self-Service request. The options are Remove or Add.
Violations
Presents the number of violations associated with the specific request. Click on the
number to view further details.
At this point the CA RCM Portal supplies you with two functions:
Back
To return to the previous screen and edit your selections.
Submit
Sends your request to the CA RCM for processing. The Generating Tickets progress
bar appears.
In the case of provisioning type Self-Service tasks, if no errors are found, a Self-Service
ticket tree will be generated and placed in your inbox. For each request listed in the
Request table, one branch appears in the Self-Service ticket tree.
When generating a new role or updating an existing one, other tickets will be generated
as needed.
1.
(Optional) Click Back to return to the previous screen to amend your selections.
2.
Click Submit to generate the Self-Service request tickets. The Requests Sent screen
appears.
The Requests Sent screen lists the new ticket ID (the ID of the ticket owner's root ticket).
You can view the new ticket tree in the Inbox.
134 Portal User Guide
Introducing the Requests Table
More information:
Running Self-Service Tasks (see page 101)
Chapter 8: Running Self-Service Tasks 135
Chapter 9: Entity Browser
The Entity Browser screen lets you view details of a configuration.
The Entity Browser initially displays the following fields:
Universe
Specifies the universe from which you select a configuration. Select the All option to
view all configurations in the database.
Configuration
Specifies the configuration you want to browse.
Use these fields to select a configuration. The following tabs appear:
Users
Displays a table of users in the configuration, and basic attribute values. You can
customize the table by adding additional attribute columns.
Click on a user to view its details (see page 138).
Roles
Displays a list of roles in the configuration, and basic attribute values. You can
customize the table by adding additional attribute columns.
Click on a role to view its details (see page 138).
Resources
Displays a list of resources in the configuration, and basic attribute values. You can
customize the table by adding additional attribute columns.
Click on a resource to view its details (see page 138).
Statistics
Displays the number of entities and links in the configuration.
Organization Chart
Displays a configurable tree (see page 139) of the user and manager hierarchy of
the configuration.
This section contains the following topics:
User, Role, and Resource Details (see page 138)
Modify the Organization Chart (see page 139)
Chapter 9: Entity Browser 137
User, Role, and Resource Details
User, Role, and Resource Details
When you click a user, role, resource, or account in the entity browser, a popup window
shows details for that entity. The window can contain the following tabs, depending on
the type of entity you are examining:
Users
Displays the users that link to the entity.
Roles
Displays the roles that link to the entity.
Sub Roles
Displays the child roles of the role.
Parent Roles
Displays the parent roles of the role.
Resources
Displays the resources that link to the entity. When the target universe includes
usage data from a CA Enterprise Log Manager instance, you can specify Usage View
to display this usage data in this tab.
Accounts
Displays the user accounts on external endpoints that link to the entity. This tab
only appears if the target universe contains account configurations.
Approvals
Displays the approval tasks of the user in currently active campaigns.
RACI
Displays the users linked to the entity by RACI analysis of the configuration.
138 Portal User Guide
Modify the Organization Chart
Modify the Organization Chart
The Organization Chart tab of the entity browser displays the users in the target
configuration in a clickable tree. Each level of the tree groups users based on the value
of a user attribute in the target configuration.
You can configure the levels of the tree to show users in various ways. For example, you
can create a tree that shows geographical distribution of users. You can also create a
tree that shows the management structure of the organization.
Note: When you modify the organization chart, you change only the display of users in
the tree. You do not change any user data in the configuration.
To modify the organization chart
1.
In the entity browser, click the Organization Chart tab.
2.
In the Select Fields area of the tab, specify the user attribute that sorts the top level
of the tree in the Level 1 drop-down list.
3.
Specify the user attribute that sorts the next level of the tree in the Level 2
drop-down list.
4.
Continue to specify levels of the tree:
■
To add more levels, click the plus icon at the lowest level of the tree.
A new drop-down list appears.
■
To delete a level, click the minus icon beside that level.
The drop-down list is removed, and lower levels are renumbered.
5.
Click Update Organization Chart.
The tree display reflects the structure you specified.
Chapter 9: Entity Browser 139
Chapter 10: Generating Reports
This section contains the following topics:
How to Generate Reports (see page 141)
Report Types (see page 142)
Parameters and Filters for Report Generation (see page 143)
Display a Report's Index (see page 146)
Change Report Parameters (see page 146)
Export a Report to a File (see page 146)
Print a Report (see page 147)
How to Generate Reports
Reports provide customized views of role-based configurations you create in CA RCM.
You can generate reports to do the following:
■
Track the progress of import/export, role management, or certification campaigns
■
Analyze role hierarchies and user/resource assignments in detail
■
Share management-level information about role-based access control and
compliance activities
CA RCM provides a range of predefined report types, which can be customized by
specifying filter, sorting, and threshold parameters.
The following table describes the steps to generate a report in CA RCM:
Step
Refer to...
1. Select a report to run.
Report Types (see page 142)
2. Select data files, specify customization
parameters, and generate the report.
Parameters and Filters for Report
Generation (see page 143)
3. View the report in your browser.
Display a Report's Index (see page 146)
and
Change Report Parameters (see page 146)
4. Export the report to a file, or print it.
Export a Report to a File (see page 146) or
Print a Report (see page 147)
Chapter 10: Generating Reports 141
Report Types
Report Types
Reports are accessed from the CA RCM Portal by selecting Reports from the main menu.
Reports are grouped into the following categories:
142 Portal User Guide
■
Configuration Reports—detailed listings of users, resources, or roles, and their links
to other entities. These reports let managers review in detail the privileges assigned
to users or resources under their responsibility.
■
Privileges Quality Management—graphical presentations of the most common,
significant pattern-based analytical metrics of the configuration (similar to those
used during the audit phase of role management). These reports give a quick, visual
indication of how well the current role hierarchy matches usage patterns, and what
proportion of users have suspect patterns of access.
■
Role Management—reports used to analyze the role hierarchy, and perform 'before
and after' and what-if comparisons of different configurations.
■
Policy Management—reports used to verify use of Business Process Rules (BPRs).
■
Campaigns—reports used to track the progress of certification campaigns, and
summarize changes made during a campaign.
Parameters and Filters for Report Generation
Parameters and Filters for Report Generation
To generate a report, specify the configuration file or universe on which to base the
report. You may have to specify other parameters for some reports.
You can also specify parameters that filter the report contents. This allows you to limit
the report to specific data sets based on user account attributes, geographic location,
network structure, or organization/business unit. Additional parameters let you control
the sorting of records in some reports, or set statistical thresholds for charts and graphs.
The following parameters are used to generate reports. Not all parameters are used for
every report.
Configuration
Specifies the configuration file on which the report is based. The drop-down lists all
configuration files in the CA RCM database.
Use the following parameters to filter the report based on user, role, or resource
attributes:
by Field
Specifies a data field in the configuration file that is used to filter and sort records.
The drop-down list shows existing data fields in the configuration file specified by
the Configuration parameter. Only relevant data fields are shown - for example,
only user attributes are shown for reports organized by user account.
From/To
Specifies the range of records to include in the report based on the data field
specified in the by Field parameter. The drop-down lists show existing field values
drawn from the specified configuration file.
Pattern
Defines a pattern-matching string that selects records from the specified
configuration file to include in the report. The string is applied as a filter to the data
field specified in the by Field parameter. The pattern must follow the usage defined
for the java.utils.regex.Pattern class in the Java version supported by this release.
Use the following parameters when working with analytical/statistical reports based on
the selected configuration's audit card:
Audit Card
Specifies the audit card from which analytical information is drawn to generate the
report. The drop-down lists all audit cards associated with the specified
configuration file.
Min Score
Chapter 10: Generating Reports 143
Parameters and Filters for Report Generation
Specifies a threshold for including information in the report. This filter is applied to
the audit card specified by the Audit Card parameter. Audit criteria with a score
lower than the threshold are not included in the report. Use this filter to exclude
audited conditions that are not prevalent or significant in the specified
configuration.
From Alert ID/To Alert ID
Specifies a range of Alert IDs to include in the report. The drop-down lists show
existing Alert ID values in the audit card specified by the Audit Card parameter.
Alert Type
Specifies an analytical alert that is used as a filter. Only alerts of the type specified
are included in the report. The drop-down shows all the standard analytical alerts
that are present in the audit card specified by the Audit Card parameter.
From Date/To Date
Specify a time-based filter for audit card data. The report includes only analytical
alerts that were recorded in the specified time frame. This filter is applied to the
audit card specified by the Audit Card parameter.
Use the following parameter with the Policy Verification Report for business rules:
Policy
Specifies a Business Policy Rule (BPR) file used to filter report data. Only alerts
related to the specified BPR are included in the report. The drop-down shows all
BPR files in the CA RCM database.
Use the following parameters with the Role Modeling Methodologies Comparison
report:
Master Configuration
Specifies the configuration used as a reference in comparing several configurations.
The drop-down shows all configuration files in the database.
Master Configuration Label
Defines a text label for the reference configuration.
Configuration n
Specifies a configuration that is compared to the master configuration. The
drop-down shows all configuration files in the database.
144 Portal User Guide
Parameters and Filters for Report Generation
Label
Defines a text label for the corresponding configuration.
Use the following parameters when working with campaign-related reports:
Campaign
Specifies the campaign the report references. The drop-down list shows all
campaigns defined in the Portal.
All Approvers
All participants who must approve privileges for users or resources they manage are
included in the report.
Select by Field
Specifies a user attribute field used to select participants. The drop-down shows all
user attributes defined in the campaign's affiliated configuration file. Select an
attribute, and existing values in the configuration file are listed. Click a value to use
it as a filter. Only participants with that attribute value are included in the report.
Use the following parameters with the Life Cycle Report:
Universe
Specifies the universe the report references. The drop-down list shows all universes
defined in the Portal.
Configurations
Specifies the configurations in the universe to use for the report.
Entity Type
Specifies the entity the report covers.
by Field
Specifies a data field used to filter participants. The drop-down list shows all data
fields defined for the selected entity type in the specified configuration file or files.
Select an attribute, and existing values are listed. Click a value to use it as a filter.
From Date
Specifies the report start date. Changes to selected entities since the start date are
included in the report.
Show Current Links
Includes existing links to other entities in the report.
Chapter 10: Generating Reports 145
Display a Report's Index
Display a Report's Index
Some reports are indexed by the data field used to filter and sort the report. You can
use this index to navigate the report in your browser.
To display a report's index, click
. A navigation pane appears on the left of the screen.
Change Report Parameters
You can regenerate the report with different parameter settings. If the scope of the
report is not what you planned, or if you want to compare parallel subsets of
information - for example, different locations or business units.
To regenerate the report
1.
Click the Show Parameters link on the left of the report display.
The parameters dialog for this report opens, with current settings displayed.
2.
Change any parameter settings you want, and click OK.
The same report is generated, using the new settings.
Note: The previous version of the report is overwritten. To save the older version,
print or export it before you regenerate the report with new parameters.
Export a Report to a File
You can save reports in several common formats. This allows you to share them with
others and include them in other documents.
To export a report to a file
1.
Click
on the left side of the window.
The Export Report dialog appears.
2.
Select the document format, output range, and sizing options. Click OK.
A prompt appears when the document is generated.
3.
146 Portal User Guide
Do one of the following:
■
Select Save to save the file.
■
Select Open to view the file.
Print a Report
Print a Report
You can send reports to a printer to share or archive information, or to simplify review
of longer-format reports.
To print a report
1.
Click
on the left side of the report window.
The Print Report dialog appears.
2.
Select an output format and print range, and click OK.
A print preview appears in a new browser window.
3.
Configure printer settings and print.
Chapter 10: Generating Reports 147
Chapter 11: Editing Business Process Rules
This section contains the following topics:
Business Process Rule Concepts (see page 149)
Business Process Rule Types (see page 150)
How to Create and Edit Business Process Rules in the CA RCM Portal (see page 156)
How to Work with Business Policies in the CA RCM Portal (see page 157)
Business Process Rule Concepts
A Business Process Rule (BPR) expresses business, provisioning, or security constraints
as a logical condition that can be applied to the entities and links in a CA RCM
configuration. For example:
<Purchasing> forbidden to be <Subcontractor Payments>
You can apply this statement to a CA RCM configuration to help ensure that workers,
with privileges to order stock from subcontractors, do not have roles with privileges to
issue checks to those subcontractors.
Typically a BPR is defined by specifying the following information:
■
The type of rule—CA RCM provides a broad range of rules that let you examine and
compare various entity values. The role type used in the example mentioned
previously is Restrict access of users to roles by role access. This type of rule
restricts the roles a user can have based on other roles they already have.
■
The logical condition—in our example, users with certain roles are forbidden from
having other roles. But you can also use this type of rule to allow or require users
with certain roles to have other roles.
■
Data sets and limit values—in our example, we define a set of roles related to
purchasing functions, and another set of roles that grant payment privileges.
A Business Policy is a set of BPRs. This policy (saved as BPR document) exists
independently of any specific configuration. The rules that comprise the policy can be
adapted and applied to any CA RCM configuration to verify its logic, integrity, and
compliance with policy.
More information:
Business Process Rule Types (see page 150)
Chapter 11: Editing Business Process Rules 149
Business Process Rule Types
Business Process Rule Types
Most rules describe a relationship between two groups of entities. You specify the
members of these groups when you create or edit a rule. These groups are identified as
A and B or Left and Right in BPR editing screens. The following table describes the
various rule types available and the logical operator that each rule implements.
Role – Role (by Users)
If a configuration includes role sets A, B then the following is true:
Only <L> May have <R>
Only users that have roles in A (left) may have roles in B (right).
<L> Must have <R>
Users that have roles in A (left) must have roles in B (right).
<L> Forbidden to have <R>
Users that have roles in A (left) must not have roles in B (right).
<L> Only allowed to have <R>
Users that have roles in A (left) can only have roles in B (right), and no others.
Role – Role (by Roles)
If a configuration includes role sets A, B then the following is true:
Only <L> May have <R>
Only roles that have child roles in A (left) may have roles in B (right) as children
<L> Must have <R>
Roles that have child roles in A (left) must have roles in B (right) as children.
<L> Forbidden to have <R>
Roles that have child roles in A (left) must not have roles in B (right) as children.
<L> Only allowed to have <R>
Roles that have child roles in A (left) can only have roles in B (right) as children,
and no others.
Role – Resource (by Users)
If a configuration includes role set A and resource set B then the following is true:
Only <L> May have <R>
Only users that have roles in A (left) may access resources in B (right).
<L> Must have <R>
Users that have roles in A (left) must access resources in B (right).
150 Portal User Guide
Business Process Rule Types
<L> Forbidden to have <R>
Users that have roles in A (left) are must not access resources in B (right).
<L> Only allowed to have <R>
Users that have roles in A (left) can only access resources in B (right), and no
others.
Role – Resource (by Roles)
If a configuration includes role set A and resource set B then the following is true:
Only <L> May have <R>
Only roles that are parents of roles in A (left) may access resources in B (right).
<L> Must have <R>
Roles that are parents of roles in A (left) must access resources in B (right).
<L> Forbidden to have <R>
Roles that are parents of roles in A (left) must not access resources in B (right).
<L> Only allowed to have <R>
Roles that are parents of roles in A (left) can access only resources in B (right),
and no others.
Resource – Resource (by Users)
If a configuration includes resource sets A, B then the following is true:
Only <L> May have <R>
Only users that can access resources in A (left) may access resources in B
(right).
<L> Must have <R>
Users that can access resources in A (left) must access resources in B (right).
<L> Forbidden to have <R>
Users that can access resources in A (left) must not access resources in B
(right).
<L> Only allowed to have <R>
Users that can access resources in A (left) can access only resources in B (right),
and no others.
Chapter 11: Editing Business Process Rules 151
Business Process Rule Types
Resource – Resource (by Roles)
If a configuration includes resource sets A, B then the following is true:
Only <L> May have <R>
Only roles that include resources in A (left) may include resources in B (right).
<L> Must have <R>
Roles that include resources in A (left) must include resources in B (right).
<L> Forbidden to have <R>
Roles that include resources in A (left) must not include resources in B (right).
<L> Only allowed to have <R>
Roles that include resources in A (left) can include only resources in B (right),
and no others.
User Attribute - Role
If a configuration includes User Attribute set A, and Role set B then the following is
true:
Only <L> May have <R>
Only users with user attributes in A (left) may have roles in B (right).
<L> Must have <R>
Users with user attributes in A (left) must have roles in B (right).
<L> Forbidden to have <R>
Users with user attributes in A (left) are forbidden to have roles in B (right).
<L> Only allowed to have <R>
Users with user attributes in A (left) can have only roles in B (right), and no
others.
User Attribute - Role Attribute
If a configuration includes User Attribute set A, and Role Attribute set B then the
following is true:
Only <L> May have <R>
Only users with attributes in A (left) may have roles with attributes in B (right).
<L> Must have <R>
Users with attributes in A (left) must have roles with attributes in B (right).
152 Portal User Guide
Business Process Rule Types
<L> Forbidden to have <R>
Users with attributes in A (left) are forbidden to have roles with attributes in B
(right).
<L> Only allowed to have <R>
Users with attributes in A (left) can have only roles with attributes in B (right),
and no others.
User Attribute - Resource
If a configuration includes User Attribute set A, and Resource set B then the
following is true:
Only <L> May have <R>
Only users with user attributes in A (left) may access resources in B (right).
<L> Must have <R>
Users with user attributes in A (left) must access resources in B (right).
<L> Forbidden to have <R>
Users with user attributes in A (left) are forbidden to access resources in B
(right).
<L> Only allowed to have <R>
Users with attributes in A (left) can access only resources in B (right), and no
others.
User Attribute - User Attribute
If a configuration includes User Attribute sets A and B then the following is true:
Only <L> May have <R>
Only users with user attributes in A (left) may have attributes in B (right).
<L> Must have <R>
Users with user attributes in A (left) must have attributes in B (right).
<L> Forbidden to have <R>
Users with user attributes in A (left) are forbidden to have attributes in B
(right).
<L> Only allowed to have <R>
Users with attributes in A (left) can have only attributes in B (right), and no
others.
Chapter 11: Editing Business Process Rules 153
Business Process Rule Types
Segregation of Duty Roles
For a set of roles L and a numeric value R:
Should have no more than <R> of <L>
Users should have no more than R of the roles in L.
Should have at least <R> of <L>
Users should have at least R of the roles in L.
Should have exactly <R> of <L>
Users must have exactly R of the roles in L.
Segregation of Duty Resources
For a set of resources L and a numeric value R:
Should have no more than <R> of <L>
Users should have no more than R of the resources in L.
Should have at least <R> of <L>
Users should have at least R of the resources in L.
Should have exactly <R> of <L>
Users must have exactly R of the resources in L.
User Counter of Roles
For a set of roles L and a numeric value R:
Should have no more than <R> Users
Roles in L should have no more than R users.
Should have at least <R> Users
Roles in L should have at least R users.
Should have exactly <R> Users
Roles in L must have exactly R users.
User Counter of Resources
For a set of resources L and a numeric value R:
Should have no more than <R> Users
Resources in L should have no more than R users.
Should have at least <R> Users
Resources in L should have at least R users.
Should have exactly <R> Users
Resources in L must have exactly R users.
154 Portal User Guide
Business Process Rule Types
User Attribute Value
Number <L> must be greater than <R>
The numeric value of the User Attribute for the Left Entity must be greater than
the numeric value listed in the Right Entity.
Number <L> must be less than <R>
The numeric value of the User Attribute for the Left Entity must be less than
the numeric value listed in the Right Entity.
Number <L> must be equal to <R>
The numeric value of the User Attribute for the Left Entity must be equal to the
numeric value listed in the Right Entity.
Date <L> must be earlier than <R>
The date for the User Attribute selected in the Left Entity must be earlier than
the date listed in the Right Entity.
Date <L> must be later than <R>
The date for the User Attribute selected in the Left Entity must be later than
the date listed in the Right Entity.
<L> Must match regular expression <R>
The value for the User Attribute selected in the Left Entity must match the
value defined by the regular expression listed in the Right Entity.
<L> Must not match regular expression <R>
The value for the User Attribute selected in the Left Entity must not match the
value defined by the regular expression listed in the Right Entity.
<L> Should be empty
The value for the User Attribute selected in the Left Entity should be empty.
<L> Should not be empty
The value for the User Attribute selected in the Left Entity should not be
empty.
Chapter 11: Editing Business Process Rules 155
How to Create and Edit Business Process Rules in the CA RCM Portal
How to Create and Edit Business Process Rules in the CA RCM
Portal
The BPR wizard simplifies creation of business process rules.
Note: When you edit an existing rule, the Edit BPR screen contains a subset of options
from the wizard that are relevant to the type of rule you are editing.
Step through the screens of the wizard in the following way:
1.
In the Basic Information screen, provide information that describes the scope and
purpose of the rule. The following fields are not self-explanatory:
Score
A numeric value that defines the importance of a violation of this rule relative
to violations of other rules in the policy.
Owner
Defines the user responsible for the rule.
Business Area/Business Process
Text fields that define the scope and purpose of the rule. These fields are
descriptive and do not affect processing of the rule.
2.
In the logic screen, specify values for the following fields to define the underlying
logic of the rule:
Type
Specifies the type of entities, links, or attributes that are examined to identify
violations.
Restriction
Specifies the constraint applied to examined entities.
3.
In the Data screen, you define the entities that are examined. You can select
individual entities, or specify attribute values to select a group of entities.
Many types of rules compare two sets of entities. In these cases the Data screen is
divided into two areas, left and right, and the logic of the rule is stated in terms of
these two groups.
For other types of rules you define numerical thresholds, date ranges, or text
matching patterns.
4.
156 Portal User Guide
The Summary screen displays rule settings, and lets you test the rule against the
reference configuration before you create the rule.
How to Work with Business Policies in the CA RCM Portal
How to Work with Business Policies in the CA RCM Portal
Follow these general procedures when you work with BPRs in the CA RCM Portal.
Note: You can also work with BPRs using the DNA client tool. There are several
differences between the two editing interfaces. For example, in the DNA interface you
can specify groups of entities by selecting them from an open configuration file. In the
Portal, a wizard simplifies file editing. You can also use the Data Manager client tool to
import BPRs into the database. For more information about BPR editing in DNA, see the
DNA User Guide and the Data Management User Guide.
To access BPR tools, click Administration, BPR Management from the Portal. The BPR list
screen appears. The table lists all business policy files in the database.
From this screen, you can perform the following actions:
■
To create a business policy file click Create New.
■
To edit an existing business policy file click Edit beside the file you want to edit.
■
To run an existing business policy file on a configuration, click Run.
■
To remove a business policy file from the database, click Delete beside the file you
want to remove.
Create a Business Policy File in the CA RCM Portal
Create a business policy file to apply a set of BPRs to a CA RCM configuration.
To create a business policy file in the CA RCM Portal
1.
In the CA RCM Portal, go to Administration, BPR Management.
The BPR list screen appears. The table lists all business policy files in the database.
2.
Click Add New.
The Create BPR screen appears.
3.
Specify the settings for the policy. The following field is not self-explanatory:
Reference Configuration
The configuration used to create and test the policy file.
Note: Business policy files are independent of configuration files. The reference
configuration is only used to create and test the policy. You can apply the finished
business policy to any configuration.
Chapter 11: Editing Business Process Rules 157
How to Work with Business Policies in the CA RCM Portal
4.
Specify optional behaviors for the policy file under Policy Attributes. Options
include the following:
Read Only
Specifies whether you can edit the file.
Logged
Specifies whether changes to the file are recorded in the Transaction log.
Completed
This field is not currently used.
5.
Click Save.
The business policy file is created in the database.
The Edit BPR screen appears.
6.
Use the editing tools of this screen (see page 159) to define and modify rules in the
policy.
More information:
Edit a Business Policy File in the CA RCM Portal (see page 159)
Run Business Policy Rules in the CA RCM Portal
When you apply a business policy file to a configuration, CA RCM analyzes the
configuration to find entities and links that violate the rules of the policy. The result is an
audit card that contains all violations of policy that were found in the configuration.
To run business policy files in the CA RCM portal
1.
Click Administration, BPR Management from the Portal main menu.
The BPR list screen appears. The table lists all business policy rules in the database.
2.
Click Run.
The Run BPRs screen appears.
3.
Specify values for the following fields:
Audit Card
Defines the name of the audit card that contains any violations found in the
target configuration.
Configuration
Specifies a configuration file in the database that is the target for business
policy analysis.
158 Portal User Guide
How to Work with Business Policies in the CA RCM Portal
4.
In the Select BPRs area of the screen, select the business policy files you want to
apply to the target configuration.
5.
Click Run.
The audit card is created, and analysis of the configuration file begins. If no
violations are found, the empty audit card is deleted from the database.
Edit a Business Policy File in the CA RCM Portal
You can change various settings of business policy file, or edit the policy rules in the file.
To edit a business policy file in the CA RCM Portal
1.
Click Administration, BPR Management from the Portal main menu.
The BPR list screen appears. The table lists all business policy files in the database.
2.
Click Edit next to the file you want to edit.
The Edit BPR screen appears.
3.
Modify settings for the policy file. The following fields are not self-explanatory:
Reference Configuration
The configuration used to create and test the policy file.
Note: Business policy files are independent of configuration files. The reference
configuration is only used to create and test the policy file. You can apply the
finished business policy to any configuration.
4.
Specify optional behaviors for the policy file in the Policy Attributes area of the
screen. Options include:
Read Only
Specifies whether others can edit the file.
Logged
Specifies whether changes to the file are recorded in the Transaction log.
Completed
This field not currently used.
5.
The table in the center of the screen lists rules in the policy. To modify the rules,
perform one of the following actions:
■
Click Add Rule to create a rule (see page 156).
■
Click Edit next to a rule to modify an existing rule (see page 156).
Chapter 11: Editing Business Process Rules 159
How to Work with Business Policies in the CA RCM Portal
6.
■
Click Delete next to a rule to remove it from the policy file.
■
Click Test to test the rule set against the reference configuration.
Click Save.
Changes to the policy file are saved in the database.
160 Portal User Guide
Chapter 12: Using Administration Functions
The administration menu provides a number of important processes that can be run
only by administrators with the appropriate permissions.
This section contains the following topics:
Using the Ticket Management System (see page 161)
Import and Export Connectors (see page 165)
Workflow and Campaign Administration (see page 182)
Job Scheduling (see page 191)
CA Enterprise Log Manager Integration (see page 193)
Help Desk Integration (see page 201)
The Transaction Log (see page 204)
Track Portal Usage in the Transaction Log (see page 205)
Cache Manipulation (see page 206)
Repair CA RCM Configuration, User, and Resource Files (see page 207)
Purging Data (see page 209)
Properties Settings (see page 213)
RACI Operations (see page 218)
System Checkup (see page 220)
How to Extract CA RCM Data (see page 221)
Using the Ticket Management System
CA RCM implements data connector jobs and other administrative tasks using a
ticket-based process management system. You administer these ticket queues in
different screens from the screens used for business workflows.
Inbox Views
Access the following predefined ticket queue screens under Inbox on the CA RCM main
menu:
Open/New/Done
Presents tickets whose state is Open, New or Done.
New Tickets
Presents new tickets.
Overdue Tickets
Presents the tickets whose end date has already passed.
Chapter 12: Using Administration Functions 161
Using the Ticket Management System
Approver Tickets
Presents the current user's Approver tickets.
Note: This screen is always empty. Use the My Tasks, My Requests, or Workflows
screens to work with approval actions of business workflows.
Campaign Tickets
Presents Campaign tickets.
Note: This screen is always empty. Use the My Tasks, My Requests, or Workflows
screens to work with tasks and actions of certification campaigns.
Archived Tickets
Presents tickets that were sent to be archived.
Tickets are grouped in tree structures based on the administrative process to which they
are related.
More information:
Fields in Workflow Screens (see page 56)
Administrator View / User View
The Admin View/User View button toggles between two views of the ticket queue:
User View
The queue displays only tickets for processes that the user initiated..
Admin View
The queue displays all tickets in the system, even those that were created by other
managers.
The Admin View option is only available to the super administrator. The buttons only
appear for users that are linked to the role defined in eurekify.properties as the system
administrator role. The default, out-of-the-box option is:
sage.admin.role=CA RCM Admin Role
More information:
Security and Permissions (see page 227)
CA RCM Properties (see page 247)
The Ticket Properties Form
When you click on a ticket a dialogue window shows detailed information for the ticket.
The content of this window depends on the type of ticket you view.
162 Portal User Guide
Using the Ticket Management System
The top part of the screen is always the same and contains the ticket information:
Field
Description
<Ticket Title>
The type of ticket you are viewing appears in the screen's first line.
Ticket ID
Each ticket has a distinct ticket ID number.
Owner
The owner of the specific ticket. The functionality of the ticket
changes according to who is viewing the ticket. Only the owner will
have access to all the functions available for the specific ticket type.
Previous Owner During campaigns or approval processes, tickets may be
delegated/escalated to other managers. If a ticket was sent to the
owner from another user, that user's name (not the current owner)
appears in this field.
Status
Provides the ticket status.
Due Date
Each ticket has a due date, by which the action(s) ascribed to the
ticket have to be performed.
Priority
Shows the current priority level. The available options are:
Severity
State
Modified Date
■
Low
■
Normal
■
Rush
■
Critical
Shows the current severity level. The available options are:
■
Minimal
■
Medium
■
Serious
■
Urgent
■
Critical
Shows the current ticket's state. The possibilities are:
■
New
■
Open
■
Hidden
■
Done
■
Archived
■
Canceled
Shows the date and time when the content of the ticket was last
modified.
Chapter 12: Using Administration Functions 163
Using the Ticket Management System
Field
Description
Date Created
Shows the date and time when the ticket was first created.
Title
The ticket's title.
Description
A description of the ticket.
Advanced Ticket Functions
Advanced ticket functionality depends on the ticket type and is available only to the
ticket owner. Click Advanced at the bottom of the Ticket Properties Form to access the
advanced ticket functions.
Most non-info type tickets have the following functionality:
Add Comments
Click to add a comment to the ticket.
Add Attachments
Click to add an attachment to the ticket.
View Transaction Log
Click to view the ticket's transaction log.
Additional functions such as the option to view the ticket initiators, view violations or
view the relevant user depend on the ticket type.
View Transaction Log
The transaction log provides a history of the ticket-related actions executed since the
creation of the ticket.
The View Transaction Log table provides the following information:
Date
The date when the transaction took places.
User
Full user name.
Action
The type of action taken.
Message
A full description of the action taken.
164 Portal User Guide
Import and Export Connectors
To view the campaign's transaction log
1.
Click Advanced at the bottom of the Ticket Properties Form.
2.
Click View Transaction Log.
The View Transaction Log table opens in a separate browser window.
3.
Click Close to close the pop-up.
TMS Administration
CA RCM implements data connector jobs and other administrative tasks using a
ticket-based process management system. To access global administration tools for the
Ticket Management System (TMS), go to Administration, Settings, TMS Administration.
Tickets generally remain in the system, and are archived.
Important! We recommended you back up your system before deleting the system
ticket and ticket types.
The TMS Administration utility enables you to delete the following:
■
All Tickets
■
All Tickets Types
Click Delete next to the option that you want to execute. After deletion, a confirmation
message appears.
Import and Export Connectors
Connectors are defined for importing and exporting user and user privileges (entities
and the links between them) from corporate systems into CA RCM. At the end of an
audit process, CA RCM compares the original configuration that was imported from an
endpoint to the new configuration. CA RCM then applies changes that result from
implementing corporate policies and regulatory compliance to the configuration
variance between the original and the updated configuration. The resulting
configuration is exported back to the endpoint using export connectors.
The type of connector that you are using determines where you perform the import and
export. The CA RCM Portal enables you to define these import or export connectors:
■
Import Connectors
–
Custom Executable
–
CA RCM Configuration Document (CFG)
–
Generic Feed (CSV)
Chapter 12: Using Administration Functions 165
Import and Export Connectors
–
Database Configuration
–
CA Identity Manager
–
Pentaho Data Integration (PDI)
–
CA RCM Client Batch (SBT)
Note: Running the CA RCM Client Batch (SBT) connector from the portal is not
supported on AIX and Linux.
Note: CFG files created on a Windows machine cannot be imported on a Linux
machine.
■
Export Connectors
–
Custom Executable
–
Database Configuration
–
CA Identity Manager
Note: Connectors are defined explicitly as either an import connector or an export
connector.
Some user and user privileges must be imported directly into CA RCM using the Import
option in the CA RCM Data Management (DM) client tool. The Import option enables
importing from the following endpoints:
■
■
166 Portal User Guide
Import
–
CSV files
–
LDIF files
–
Active Directory
–
RACF
–
TSS
–
UNIX
–
SAP
–
Windows Shared Folder
–
ITIM
–
Control SA
Export:
–
Active Directory
–
RACF
–
SQL Database
–
CSV files
Import and Export Connectors
–
ITIM V4.5 and V4.6
–
Control SA
Note: For more information, see the DNA Data Management User Guide.
Important! Some connectors exist in both the CA RCM portal and the CA RCM Data
Management client tool. In these cases, we recommend running the connector located
in the CA RCM portal for the following reasons:
■
The job definition is saved on the portal, letting you repeat import and export tasks.
■
Retrieved data is integrated directly into the universe.
■
New data can be automatically synchronized with RACI definitions of the
configuration.
■
New user records can be automatically enriched with data from Human Resources
records or other sources.
CA RCM Connectors
The following import connectors are available through the CA RCM portal:
Custom Executable
Allows you to write a script or executable in any language (Perl, C++, C#, Java, and
so on) for importing data into CA RCM.
The executable must create 7 CSV files (Users.udb, Resources.rdb, Roles.csv,
UserRole.csv, UserResource.csv, RoleRole.csv, RoleResource.csv), and CA RCM
imports the information from those files.
CA RCM Configuration Document (CFG)
Reads a CA RCM file that represents a snapshot of privileges and role definitions.
Note: CFG files created on a Windows machine cannot be imported on a Linux machine.
Generic Feed (CSV)
Reads CSV files as input, then creates a CA RCM configuration. The CSV (Comma
Separated Values) format is the most common import and export format for
spreadsheets and databases. CSV files can then be manipulated and extended using
simple tools such as Excel, if necessary.
The Generic Feed uses seven CSV files as input, with each individual file
representing one entity type (such as users database and resources databases) or
one relation between two entity types (roles). Some of the files are optional and if
not specified at the time of import are assumed to be empty. The connector
produces one output file, which is the CA RCM configuration file.
Chapter 12: Using Administration Functions 167
Import and Export Connectors
Database Configuration
Allows for importing information from a CA RCM configuration (in the database)
into the master and model configurations.
CA Identity Manager
Integrates CA RCM with CA Identity Manager by automatically synchronizing
role-based privileges between the two systems. Use the connector to import CA
Identity Manager data.
Note: For more information about the connector for CA Identity Manager, see the
Connector for CA Identity Manager Guide.
Pentaho Data Integration (PDI)
Invokes Pentaho Data Integration (PDI) transformations and jobs. This feature
allows for complex ETL (Extract, Transform, and Load) operations during data
import. To use the PDI connector, set the pdi.home property to the path where PDI
is located on your system.
CA RCM Client Batch (SBT)
Executes batch processing. You may need to specify dynamic parameters for file
names that are defined in the SBT files.
Note: Running the CA RCM Client Batch (SBT) connector from the portal is not
supported on AIX and Linux.
The following export connectors are available through the CA RCM portal:
Custom Executable
Allows you to write a script or executable in any language (Perl, C++, C#, Java, and
so on) for exporting data from CA RCM.
The executable must create a DIFF file (see page 169) in the CA RCM DIFF file
format, and CA RCM reads the DIFF file and applies the changes.
Database Configuration
Allows for exporting information from one CA RCM model configuration to another
configuration in the database.
CA Identity Manager
The connector for CA Identity Manager lets you integrate CA RCM with CA Identity
Manager by automatically synchronizing role-based privileges between the two
systems. Use the connector to export updated data from CA RCM to CA Identity
Manager.
168 Portal User Guide
Import and Export Connectors
The DIFF File
When comparing two configurations in CA RCM, one file generated is the differences
(DIFF) file. The DIFF file identifies the changes that occur in a configuration, and is the
basis for all custom executable (see page 167) connectors.
Each line in a DIFF file identifies one difference. The following table shows examples of
lines that appear in a CA RCM DIFF file with an explanation of what each line indicates:
Line in DIFF File
Explanation
DIFF,ORIGCFG,SQL://[email protected] The first line of a DIFF file that defines the
original configuration the DIFF file was
kify_sdb/ConfigWithRoles.cfg
created from.
DIFF,UPDCFG,SQL://[email protected] The second line of a DIFF file that defines
the updated configuration the DIFF file
kify_sdb/ConfigWithRoles2.cfg
was created from.
DIFF,REMOVEDROLE,"RBR"
A line whose second field is
REMOVEDROLE denotes that a role is
deleted from the configuration. The third
field is the name of the removed role.
DIFF,REMOVEDROLERES,"RBR","e-mail","
outlook","WinNT"
A line whose second field is
REMOVEDROLERES denotes that a
resource is removed from a role. The third
field is the name of the role and the
following fields are the resource names.
DIFF,REMOVEDROLEUSER,"RBR","546729
10"
A line whose second field is
REMOVEDROLEUSER denotes that a user is
removed from a role. The third field is the
name of role and the fourth field is the
name of the user.
DIFF,NEWROLE,"NewRole",DESCRIPTION:
"New Role
Description",ORG:"IT",ORG2:"IT2",ORG3:"
Coorporate",OWNER:"67762440",TYPE:"O
rg
Role",REVIEWER:"",FILTER:"Organization=
IT;",CREATE DATE:"Thu Dec 02 11:12:09
2010",APPROVAL DATE:"Thu Dec 02
11:11:29 2010",EXPIRATION DATE:"None"
A line whose second field is NEWROLE
denotes that a role is added to the
configuration. The following fields are the
attributes of the new role.
Chapter 12: Using Administration Functions 169
Import and Export Connectors
Line in DIFF File
Explanation
DIFF,NEWROLEUSER,"NewRole","6728347 A line whose second field is
NEWROLEUSER denotes that a user is
0"
added to a role. The third field is the name
of the role and the fourth field is the name
of the user.
DIFF,NEWROLERES,"NewRole","UG5AVE
MGR","NT5AVE","WinNT"
A line whose second field is NEWROLERES
denotes that a resource is added to a role.
The third field is the name of the role and
the following fields are the resource
names.
DIFF,NEWROLEROLE,"NewRole","ADMPU A line whose second field is
NEWROLEROLE denotes that a sub-role is
R"
added to a role. The third field is the name
of the parent role and the fourth field is
the name of the child role.
DIFF,COMMONROLEDIFFFIELD,"ADMNMG A line whose second field is
R",DESCRIPTION,"Sage Role","A modified COMMONROLEDIFFFIELD denotes that a
role is updated. The following fields are
description"
the attributes that were updated.
DIFF,COMMONUSERNEWRES,"84774660" A line whose second field is
COMMONUSERNEWRES denotes that a
,"Domain Users","NTSTAM","WinNT"
resource is added to a user. The third field
is the name of the user and the following
fields are the resource names.
DIFF,COMMONUSERREMOVEDRES,"9988 A line whose second field is
3110","\\Documents\\Employees","NT5A COMMONUSERREMOVEDRES denotes that
a resource is removed from a user. The
VE","WinNT"
third field is the name of the user and the
following fields are the resource names.
How to Define Connectors in the CA RCM Portal
Define import and export connectors in the CA RCM portal by using the Connector
Settings screen. The Connector Settings screen provides the following connector tables:
■
Imports
■
Exports
Each table displays a list of available connectors, and provides the options to Edit,
Delete, Run, or Schedule a connector. The Add New button, located above each table,
enables you to configure a new import or export connector.
170 Portal User Guide
Import and Export Connectors
Define an Import Connector
CA RCM import connectors import data from endpoint systems.
Note: For more information, see the DNA Data Management User Guide.
To define an import connector
1.
Log in to the CA RCM portal as an administrator.
2.
Go to Administration, Settings.
The list of available options appears.
3.
Click Connector Settings.
The Connector Settings screen opens.
4.
Above the Imports table, click Add New.
The Add New Import screen appears.
5.
Provide the following information for the connector in the Workflow Information
section:
Import client name
Defines the name for the import connector.
Description
Defines the description of the import connector, such as the connector's use,
timing, and so on.
Universe
Specifies the universe that is associated with the import connector. The data
obtained through this connector is imported into the universe's master
configuration files. If it is an initial import and there are no pre-existing
configuration files, the import process creates the configuration files.
Note: Before you can run a connector job, explicitly declare a login field for the
universe and verify that the connector maps the endpoint data to this field (see
page 176).
(Optional) Enrichment User Database
Defines an existing user database (.udb) file that CA RCM uses to enrich new
user records during data polling. Data is imported from a specific endpoint,
however, you can enrich the original data by adding additional information
from a second source. For example, you can download user information from a
security-related endpoint, and then enrich the data by accessing additional
information from a human resources database. This data could include user
addresses which were not available from the primary source of information.
Note: Enter the file name, but do not enter the .udb suffix. For example, enter
enrich to reference the enrich.udb file.
Chapter 12: Using Administration Functions 171
Import and Export Connectors
Ticket Template
Specifies the ticket format that is used to track the job in your Inbox. Select
FlowTicketforImport_V0.8.
Workflow process name
Specifies the Workpoint business process that CA RCM uses to implement the
connector job. Select Import Configuration.
Max duration time
Defines an estimated processing time for the job. If the job continues beyond
this time limit, CA RCM lists the job as overdue in your Inbox, but continues to
process it.
Priority
Specifies the importance of the job relative to other tasks in your Inbox.
Severity
Specifies the importance of errors generated during job processing, relative to
other tasks in your Inbox.
6.
Select the Connector Type in the Connector Information section and provide values
for all the properties that appear. On-screen text provides more information beside
each property.
7.
Click Save.
The import connector is defined and now appears in the Imports table.
Enrichment User Database
During data import, CA RCM can add information to the empty fields of new user
records. For example, human resources data or other organizational information is used
to enrich new user records.
The enrichment values are drawn from an existing user database. To implement data
enrichment, specify the database when you define the connector job. The data in this
enrichment database overwrites any imported field values.
172 Portal User Guide
Import and Export Connectors
The following CA RCM system properties control this feature.
hr.enrichment.clear_empty
Specifies how empty fields in the enrichment database affect imported data.
True
Omits values during data import when the corresponding field in the
enrichment database is empty.
False
Writes imported values to the target CA RCM configuration when the
corresponding field in the enrichment database is empty.
hr.enrichment.clear_missing
Specifies how missing fields in the enrichment database affect imported data.
True
Omits values during data import when the corresponding field in the
enrichment database is missing.
False
Writes imported values to the target CA RCM configuration when the
corresponding field in the enrichment database is missing.
Automatic RACI Synchronization
The CA RCM server uses RACI subconfigurations (see page 218) to control end-user
access to CA RCM portal functions. When you import new user records into a
configuration, you can automatically enroll these new users in that configuration's RACI
hierarchy.
If an imported user does not have a login name (LoginID field is blank), they cannot
access the CA RCM portal. The automatic RACI synchronization process flags these
users, and notifies the portal administrator.
Define an Export Connector
CA RCM export connectors export data to endpoint systems.
Note: For more information, see the DNA Data Management User Guide.
To define an export connector
1.
Log in to the CA RCM portal as an administrator.
2.
Go to Administration, Settings.
The list of available options appears.
Chapter 12: Using Administration Functions 173
Import and Export Connectors
3.
Click Connector Settings.
The Connector Settings screen opens.
4.
Above the Exports table, click Add New.
The Add New Export screen appears.
5.
Provide the following information for the connector:
Export client name
Defines the name for the export connector.
Description
Defines the description of the export connector, such as the connectors use,
timing, and so on.
Universe
Specifies the universe to be associated with the connector.
Note: Before you can run a connector job, explicitly declare a login field for the
universe and verify that the connector maps the endpoint data to this field.
Ticket Template
Specifies the ticket format that is used to track the job in your Inbox. Select
FlowTicketforExport_V0.4.
Workflow process name
Specifies the Workpoint business process that CA RCM uses to implement the
connector job. Select one of the following:
■
Export Master Model Deltas with model auto fix—creates an audit card
that contains all the new roles that need to be created in order to fix the
model. Use with CA Identity Manager connector only.
■
Export Master Model Deltas
■
Export Master Model Deltas with model fix—creates an error ticket with
links to the audit card, when errors are found in the model. Use with CA
Identity Manager connector only.
Max duration time
Defines an estimated processing time for the job. If the job continues beyond
this time limit, CA RCM lists the job as overdue in your Inbox, but continues to
process it.
Priority
Specifies the importance of the job relative to other tasks in your Inbox.
Severity
Specifies the importance of errors generated during job processing, relative to
other tasks in your Inbox.
174 Portal User Guide
Import and Export Connectors
6.
Select the Connector Type and provide values for all the properties that appear
under Connector Information. On-screen text provides more information beside
each property.
7.
Click Save.
The export connector is defined and now appears in the Exports table.
Export to CA Identity Manager AutoFix
The export process to CA Identity Manager has been enhanced to automatically fix
errors in the model configuration. When creating a CA Identity Manager connector, you
can select one of the following new workflow processes:
■
Export Master Model Deltas with model auto fix—creates an audit card that
contains all the new roles to create to fix the model.
■
Export Master Model Deltas with model fix—if errors are found in the model,
creates an error ticket with links to the audit card.
If you select one of the previous workflow processes, the following logic is applied to CA
RCM data before exporting it into CA Identity Manager:
■
When connecting a resource to a provisioning role, the resource is linked to the
account template belonging to the same provisioning role on the endpoint where
the account template resides. If there is no such account template, CA RCM creates
it.
■
When connecting a parent account template to a child provisioning role, the link
direction is inverted.
■
When creating a CA RCM role, the type is set as follows:
–
If the role type is "Role" or "Provisioning Role", it is exported as a provisioning
role.
The role type is set to the default value of the connector.
If the role has directly linked resources, they are moved to the linked account
templates, as mentioned previously.
–
If the role type is "Policy", "Provisioning Policy", or "Account Template", it is
exported as an account template.
The role type is set to the default value of the connector.
If the role does not start with a valid endpoint type, the creation fails with a
detailed message.
If the role has directly linked users, the addition fails with a detailed message.
If the role has resources that are not of the relevant endpoint type, the
addition fails with a detailed message.
–
If a role has no type, it is exported as a provisioning role. All details for this
export are as previously described.
Chapter 12: Using Administration Functions 175
Import and Export Connectors
Run or Schedule a Connector Job
You can run predefined connector jobs that exchange data with external systems.
To run or schedule a connector job
1.
Declare a login field for the universe (see page 176), and verify that the connector
maps endpoint data to this field.
2.
In the CA RCM portal, go to Administration, Settings, and click Connector Settings.
The Connector Settings screen appears.
3.
Do one of the following:
■
Click Run adjacent to the connector job you want to run. A confirmation
window appears. Click OK.The connector job begins immediately.
■
Schedule the future execution of a connector job, as follows:
a.
Click Schedule.
The New Connector Scheduled Task dialog appears.
b. Complete the following fields:
–
First execution—Specifies the date and time at which the job is first run.
–
Additional repeats—Defines the number of times you want to run the job.
Enter the value -1 to define an unending series.
–
Repeat interval—Defines the time period between executions in the series.
a.
Click OK.
The schedule is saved and the connector job runs at the scheduled times.
Verify Mapping of the Login Field
When CA RCM creates new user records based on endpoint data, it automatically
creates accounts for these users in the CA RCM portal. To support this, the connector
job must map a valid value to the login field of the target universe.
To verify mapping of the login field
1.
Verify that the target universe has a defined login field, as follows:
a.
In the CA RCM portal, go to Administration, Settings, and click Universe
Settings.
The Universe settings screen appears.
b. Locate the universe you specified for the connector job, and click Edit.
The Edit screen appears.
176 Portal User Guide
Import and Export Connectors
c.
Verify that the Configuration login field refers to an existing field in the
Universe. If the Configuration login field is blank, define it by selecting a field.
d. Note the name of the Configuration login field.
2.
Verify that the connector maps data to the login field, as follows:
a.
Open the mapping XML file you specified for the connector job.
b. Locate the line that maps the Login field. The line contains the following term:
host='Login'
c.
Verify that endpoint data is mapped to this field in the guest term. If this
mapping is blank, define it by specifying an endpoint data field.
Import and Export Tickets
When an import or export operation fails, the CA RCM portal generates an Error Ticket.
The Error ticket provides the following functionality:
Close
Closes the ticket.
Save
Saves any changes made to the ticket.
Delegate
Transfers the ticket to another manager.
Escalate
Transfers the ticket to another manager.
Acknowledge
Disabled until the process is completed. Click this button to complete and archive
the ticket.
Handle
Verifies that if multiple users received this error ticket, only one will handle it. After
one user clicks this button, the functional buttons for this ticket will be disabled in
the other users' ticket.
Terminate job
Manually terminates the currently running job.
Chapter 12: Using Administration Functions 177
Import and Export Connectors
(CA Identity Manager Export only) Fix (see page 175)
Fixes the job and continues with the export.
Clean up
Cleans up the temp files prior to terminating the job.
More information:
The Ticket Properties Form (see page 162)
How to Define and Run a Multi-Import Job
You can use the multi-import feature to group several import jobs that update a single
universe. The result is a single job that imports data from several sources and merges
them into one configuration file.
The following two steps implement a multi-import job:
1.
Define a multi-import job (see page 178) and each of its connectors in the CA RCM
portal.
2.
Run or schedule (see page 176) this multi-import job using the job scheduling tools
of the CA RCM portal.
When the multi-import job merges data from several sources, it reconciles the data
mappings of the various sources. The resulting configuration file may not match the
data scheme of existing configurations in the universe. Note the following:
■
If you use a multi-import job to populate a new, empty universe (see page 180), the
merged configuration defines the default data scheme of the universe. This
example is the most common use of multi-import.
■
If you use multi-import to import data into an existing universe, verify that all the
data sources have data mappings that match each other and the universe.
Define a Multi-Import Job
You can define a multi-import job in the CA RCM portal. Run this job to import data
from several sources automatically.
Note the following:
178 Portal User Guide
■
When using multiple configuration files as data sources, all the files must have the
same schema as the target universe, for example, all files must use the same field
for PersonID, the same field for email, and so on.
■
Multi-import does not correlate imported user information from several data
sources. To identify likely matches, overlap, and duplicates between multiple data
sources, see the UUID documentation in the Data Management User Guide.
Import and Export Connectors
To define a multi-import job
1.
Log in to the CA RCM portal as an administrator.
2.
Go to Administration, Settings, and click Multi Import.
The Multi Import main screen appears.
3.
Click Add New.
The Multi Import editing screen appears.
4.
Enter values for the Name and Description fields of the multi-import job.
5.
Specify the Universe to update from the Universe drop-down list.
6.
Add an import task to the multi-import job, as follows:
a.
Select the type of import job you want from the Select Connector Import
Implementation drop-down list.
b. Click Configure & Add To Merge.
A configuration screen appears. Fields for the type of import job you selected
are listed.
c.
Provide values for all connector properties that appear.
d. Click Done.
The new import task appears in the table.
7.
Repeat Step 6 to define as many import tasks as you need.
8.
(Optional) Click Delete in the row of an import task you want to remove.
9.
Set the completion level for the job as follows:
a.
Click Manage Groups link at the top right of the screen.
The Manage groups window appears.
b. Click Edit to edit the default group.
The Group window appears.
Chapter 12: Using Administration Functions 179
Import and Export Connectors
c.
Edit the Completion Level field.
Note: This field defines the percentage of import tasks that must complete
successfully for the multi-import job to be successful. For example, if a
multi-import job contains 20 tasks, and its Completion Level is set to 75, then
the job is successful if 15 of those tasks complete successfully (15/20=75
percent). Default: 100
d. Click Save twice.
The completion level is set for the job, and the Multi Import screen displays.
10. In the Multi Import editing screen, click Save.
The Multi Imports main screen appears. The new multi-import job is listed in the
Multi Imports table.
Use a Multi-Import Job to Populate an Empty Universe
A multi-import job enables you to build a new universe with CA RCM data. You can
define and run a single job that automates the following processes:
■
Data import from several provisioning nodes or other sources
■
Reconciliation of field mapping across data sources
■
Data merges from various import connectors
■
Configuration generation with a best-fit data scheme
■
Universe population with imported data
The multi-import process expects to find a master and model configuration in the target
universe. When you run a multi-import job based on an empty universe, you use the
process ticket in the Inbox to create the master and model configuration files.
To use a multi-import job to populate an empty universe
1.
Define a new universe in the CA RCM portal. Specify dummy names for the master
and model configurations. Do not use names of existing configurations.
2.
Define a multi-import job (see page 178). Select the universe defined in Step 1.
3.
Run the job (see page 176).
4.
Click Inbox on the CA RCM portal main menu.
Your Inbox appears, containing a Multi Import ticket and an Error Handling ticket
for the multi-import job.
5.
Double-click the Error Handling ticket.
A Ticket Properties Form dialog opens.
180 Portal User Guide
Import and Export Connectors
6.
Open the More section of the form. The following message appears:
Results for checking if database contains master and model configuration as
defined in universe [universe_name]: The master configuration [master_name] Does
not exist in the database, The model configuration [model_name] Does not exist
in the database
Note: universe_name, master_name, and model_name are the names you specified
when you defined the new universe.
7.
Click Handle.
The Create Universe button appears.
8.
Click Create Universe.
The error is resolved.
9.
Return to the Inbox and click Refresh.
The queue lists a new Error Handling ticket.
10. Double-click the Error Handling ticket.
A Ticket Properties Form dialog opens.
11. Open the More section of the form. The following message appears:
Failed to compare the universe master configuration with the Permissions
configuration. The universe [universe_name] does not have "LoginID" field
mapping, please go to Administration > Settings > Universe Settings and map the
"LoginID" field.
12. Click Handle.
The Skip Synchronization button appears.
13. Click Skip Synchronization.
The error is resolved. The Multi Import job proceeds.
Note: You can open the Multi Import ticket to monitor the progress of the job.
Chapter 12: Using Administration Functions 181
Workflow and Campaign Administration
Workflow and Campaign Administration
Define Table Formats for the My Tasks Overview Screen
You can customize the table layout that is used to display groups of workflow actions in
the My Tasks queues of participating reviewers.
Mandatory columns cannot be removed from table displays. Red text and a locked
padlock icon indicate mandatory columns in customization screens and dialogs. Some
mandatory columns are hard-coded defaults in CA RCM. Administrators can define
additional mandatory columns.
Use the following procedure to define default table layouts for the My Tasks overview
screen.
Note:You use another procedure to define default table layouts for action details
screens of the My Tasks queue.
To define table formats for the My Tasks overview screen
1.
In the CA RCM portal, go to Administration, Workflow Settings, Workflow Inbox
Display Settings.
The Workflow Inbox Display Settings screen contains four table headers. The
General Tasks, User Tasks, Role Tasks, and Resources Tasks headers show the table
layouts used to display groups of actions in the My Tasks overview screen.
2.
Customize the table layout as follows:
a.
Click Customize on a table header you want to modify.
The Customize dialog appears.
b. Use the arrow keys to add or remove columns, and to order the columns.
c.
When you finish customizing the columns, click OK.
d. Click the lock icon next to the column name to make the column mandatory.
Users can move a mandatory column, but they cannot remove it.
Note: Mandatory columns appear in red.
3.
Click Apply Changes.
CA RCM displays groups of user actions in the table formats you specified.
182 Portal User Guide
Workflow and Campaign Administration
Default Workflow Action Options
You can control the tools that are available to business users when they handle actions
in their My Tasks queue, or manage business workflows in their My Requests queue.
The following system properties enable optional controls in these screens.
Note: These properties also affect the Workflow Administration screens used by CA
RCM administrators.
The following system property controls group handling of actions in action details
screens:
businessflows.reviewers.default.allowSelectAll
Determines whether reviewers can handle all actions in a table as a group. When
this Boolean property is true, action detail tables display checkboxes in the
Approve, Reject, and Reassign column headers. Reviewers select these check boxes
to apply a decision to all the links in the table. This property also determines the
default behavior for campaigns: when this property is true, the Enable managers to
select an entire column option in the Reviewers screen of the Add Campaign wizard
is selected by default.
The following system properties let users handle groups of actions from the My Tasks
overview screen:
businessflows.inbox.approveRejectAll.enabled
Determines whether reviewers can approve or reject groups of actions in the My
Tasks overview screen. When this Boolean property is true, the My Tasks overview
screen displays Assign and Reject columns. Users can approve or reject groups of
actions listed in the screen. They can also select checkboxes in the Approve and
Reject column headers to apply a decision to the entire contents of a table.
businessflows.inbox.reassignAll.enabled
Determines whether reviewers can reassign groups of actions in the My Tasks
overview screen. When this Boolean property is true, the My Tasks overview screen
displays the Reassign column. Users can reassign groups of actions listed in the
screen. They can also select check boxes in the Reassign column headers to reassign
the entire contents of a table.
More information:
Enable Grouped Review of Actions (see page 68)
Reassign Links to Another Reviewer (see page 44)
Chapter 12: Using Administration Functions 183
Workflow and Campaign Administration
How to Customize Email Behavior
By default, the CA RCM server sends emails at various stages of certification campaigns,
and for self-service requests. These emails use a set of templates stored in the server.
You can customize this behavior in several ways:
■
You can create customized templates that include additional explanations or
comments specific to your organization.
■
You can disable emails by default for certain events.
When you create a certification campaign, you can enable or disable emails for each
event of the campaign, and specify which template is used for each type of email.
Create a Custom Email Template
You can customize templates to include additional explanations or comments specific to
your organization, or to particular business cases. For example, you can create a set of
email templates for certification of user privileges by direct managers, and another set
of templates for recertification by higher level managers. You select which templates to
use when you create each campaign.
Templates can use parameter fields to insert personalized data in the email, similar to a
mail-merge facility.
Email aggregation consolidates multiple email requests of the same type addressed to
the same person. For example: In a user certification campaign, a manager certifies the
privileges of all their workers. The campaign generates several review action emails to
the manager, one for each worker. CA RCM aggregates these email requests, and sends
only one email to the manager.
When you compose an e-mail template, consider aggregation. The same template is
used for one or several actions.
We recommend that you base your first customized template for an email trigger event
on the default CA RCM template (see page 187) defined for that event.
184 Portal User Guide
Workflow and Campaign Administration
To create a custom email template
1.
In the CA RCM portal, go to Administration, Settings, E-mail, Templates.
The E-mail Templates screen appears.
2.
(Recommended) To base the new template on an existing template for the email
trigger:
a.
Click Load.
The New Template dialog appears.
b. Select an existing template from the Select drop-down list and click OK.
The existing template appears in an editing screen. The Save button is dimmed.
c.
3.
Click Save As and rename the template.
To start with a new, blank template:
a.
Click New.
The New Template dialog appears.
b. Select the trigger event that uses this template from the E-mail Event
drop-down list.
c.
Specify a name for the template.
d. Click OK.
The template editing screen appears.
4.
Edit the template text.
5.
(Optional) To add a parameter field:
a.
In the Subject or Body areas of the template, position your cursor where you
want to insert the field.
b. Locate the parameter in the Parameters list below the template editing
window.
c.
Click Add to Subject or Add to Body next to the field.
The parameter is inserted into the template. When e-mails are sent, the parameter
is replaced with actual data.
6.
(Optional) Insert HTML code in the template (see page 186) text.
7.
Click Save to save the template.
Chapter 12: Using Administration Functions 185
Workflow and Campaign Administration
HTML Elements in Email Templates
You can insert HTML elements in email templates to add hyperlinks or to format text.
Because CA RCM converts the template into an email with HTML formatting, you
enclose html elements in <html> tags. CA RCM inserts content within the <html> tags
directly into the email body.
Email templates do not support style sheets or JavaScript code.
Note: If you are using a Lotus Notes email client, issues with the <br> tag in an HTML
template may occur. The issues occur because CA RCM adds an escape character (/) to
the <br> tag by default, as follows: <br/>. To prevent these issues, add the following
system property in Administration, Settings, Property Settings:
html.linebreak
Set the value of the property to <br>.
Once this property is set, you can change <br/> to <br>.
Example: Insert a Hyperlink
The following code in a template creates hyperlinks to information pages on the
CompanyWeb website:
For more information:
<html>
<a href="http://CompanyWeb.com/Certfication.html">What is a Certification
Campaign?</a><br>
<a href="http://CompanyWeb.com/RBAC.html">What is Role Based Access Control?</a>
</html>
The code generates the following hyperlinks in the email sent to users:
More information:
What is a Certification Campaign?
What is Role Based Access Control?
186 Portal User Guide
Workflow and Campaign Administration
Enable Emails and Assign a Template
Several events trigger emails. You can disable emails for any event, or assign a custom
template for emails triggered by the event.
You must create a custom template (see page 184) before you can assign it to an event.
Note: You need administrator-level rights in the CA RCM Portal to perform this
procedure.
To enable emails and assign a template
1.
In the CA RCM portal, click Administration, Settings, E-mail, Events.
The E-mail Events window displays a list of events that trigger emails.
Note: This screen displays legacy events and templates from previous versions of
CA RCM. Legacy events are listed at the top of the table, and have separate
Aggregation Templates. Do not activate these events.
2.
Select the events you want to trigger emails. Clear events that you do not want to
trigger e-mails.
3.
(Optional) Select an alternative template for the event in the Template drop-down
list of the event.
4.
Click Save to save settings.
The selected events are enabled and templates assigned.
Default Email Templates
CA RCM provides the following default email templates:
Reassign Campaign Tasks
Sent to the user who receives a reassigned certification task.
Default templates: CampaignReassignDefault, Agg.CampaignReassignDefault
Campaign Escalation Email
Sent when the campaign owner initiates escalation emails.
Default templates: ApproverDefault, Agg.ApproverDefault, ManagerDefault,
Manager2-Default, Manager3-Default
Start User Campaign
Sent to a user who creates a user certification campaign.
Default templates: UserCampaignNotificationDefault,
Agg.UserCampaignNotificationDefault
Chapter 12: Using Administration Functions 187
Workflow and Campaign Administration
Start Role Campaign
Sent to a user who creates a role certification campaign.
Default templates: RoleCampaignNotificationDefault,
Agg.RoleCampaignNotificationDefault
Start Resource Campaign
Sent to a user who creates a resource certification campaign.
Default templates: ResourceCampaignNotificationDefault,
Agg.ResourceCampaignNotificationDefault
Campaign Settings Completed Successfully
Sent to the owner of a campaign when campaign creation succeeds.
Default template: CampaignSettingsCompletdSuccDefault
Campaign Settings Completed Unsuccessfully
Sent to the owner of a campaign when campaign creation fails.
Default template: CampaignSettingsCompletdUnsuDefault
Import process - no login for some users
Sent when an import process identifies new user records that do not have a value in
the user login field specified for the target universe.
Default template: ImportUsersNoLoginWarningDefault
New Campaign Certification Task
Sent when a campaign generates initial certification review tasks.
Default template: CertificationOpenCertifyUserActionDefault
New Campaign Approval Task
Sent when a campaign generates change approval review tasks for existing links.
Default template: CertificationOpenApproveUserActionDefault
New Campaign Suggestion Task
Sent when a campaign generates initial certification review tasks for proposed links.
Default template: CertificationOpenSuggestUserActionDefault
New Campaign Consult Task
Sent when a reviewer consults with other reviewers in a campaign.
Default template: CertificationOpenConsultUserActionDefault
Reassigned Campaign Certification Task
Sent when a reviewer reassigns initial certification review tasks in a campaign.
Default template: CertificationReassignCertifyUserActionDefault
188 Portal User Guide
Workflow and Campaign Administration
Reassigned Campaign Approval Task
Sent when a reviewer reassigns change approval review tasks in a campaign.
Default template: CertificationReassignApproveUserActionDefault
Reassigned Campaign Suggestion Task
Sent when a reviewer reassigns initial certification review tasks for proposed links in
a campaign.
Default template: CertificationReassignSuggestUserActionDefault
Reassigned Campaign Consult Task
Sent when a reviewer reassigns consultation review tasks in a campaign.
Default template: CertificationReasssignConsultUserActionDefault
New Approval Task
Sent when CA RCM generates approval tasks for changes to the model
configuration.
Default template: ApprovalOpenApproveUserActionDefault
New Approval Consult Task
Sent when CA RCM generates consultation review tasks for changes to the model
configuration.
Default template: ApprovalOpenConsultUserActionDefault
Reassigned Approval Task
Sent when a reviewer reassigns approval tasks for changes to the model
configuration.
Default template: ApprovalReassignApproveUserActionDefault
Reassigned Approval Consult Task
Sent when a reviewer reassigns consultation review tasks for changes to the model
configuration.
Default template: ApprovalReassignConsultUserActionDefault
New Self Service Approval Task
Sent when CA RCM generates approval tasks for self service requests.
Default template: SelfServiceOpenApproveUserActionDefault
New Self Service Approval Consult Task
Sent when CA RCM generates consultation review tasks for self service requests.
Default template: SelfServiceOpenConsultUserActionDefault
Chapter 12: Using Administration Functions 189
Workflow and Campaign Administration
Reassigned Self Service Approval Task
Sent when a reviewer reassigns approval tasks for self service requests.
Default template: SelfServiceReassignApproveUserActionDefault
Reassigned Self Service Approval Consult Task
Sent when CA RCM reassigns consultation review tasks for self service requests.
Default template: SelfServiceReassignConsultUserActionDefault
Error Sending Email
Sent to the CA RCM administrator when an attempt to send an email fails.
Default template: ErrorSendingEMail
email.event.title.noEvent
Used for emails to users who do not have access to the CA RCM portal.
Default template: BasicEmail
System Properties for Emails
Use the following system properties to configure CA RCM connection to an SMTP server,
and to define email behavior.
Note: Some of these properties are set automatically during CA RCM installation.
mail.Server
Defines the URL of the SMTP server.
mail.ServerPort
Defines the port used for communication with the SMTP server.
mail.user
Defines the user account of CA RCM on the SMTP server.
mail.password
Defines the password of the CA RCM account on the SMTP server.
mail.from
Defines the originating e-mail address of the CA RCM server. Default: [email protected]
mail.useSSL
Determines whether communication with the SMTP server uses SSL encryption.
mail.max.attempts
Defines how many times CA RCM attempts to send an email.
190 Portal User Guide
Job Scheduling
mail.sending interval
Defines the time, in seconds, ,between attempts by CA RCM to send emails.
portalExternalLink.inboxUrl
Defines the value of the inboxLink parameter in e-mail templates. This is a general
target URL on the CA RCM server that serves each user their My Tasks queue.
System Properties for Business Workflows
Administrators use CA RCM DNA and Data Management client applications to analyze
and directly edit CA RCM data files. When the administrators change a configuration file,
they can submit these changes to the CA RCM server. The server initiates the
appropriate workflow to approve and implement the changes.
Because no business user initiates these workflows, the following system properties
define default owners:
approvals.flowOwner
Defines the default owner of workflows submitted from CA RCM client applications.
By default the CA RCM system administrator is the owner for these workflows. To
implement this property for a universe, create a property with the following name:
universe.property.universe_name.approvals.flowOwner
Note: universe_name is the name of the target universe.
role.defaultOwner.enable
Determines whether the approval.role.defaultOwner system property defines the
default owner for new role requests from CA RCM client applications. When this
Boolean property is false, the CA RCM administrator is the owner of these roles,
and the value of approval.role.defaultOwner is ignored.
approval.role.defaultOwner
Defines the default owner of a proposed new role submitted from CA RCM client
applications. This user must be in the target universe for role creation. If this
property is null, or if the specified user is not in the target universe, CA RCM creates
the role without an owner. In this case the user specified by the
approval.defaultManager system property reviews the role request.
Job Scheduling
Job Scheduling enables you to set up automatic and repeated CA RCM jobs. Each job is
assigned to a universe and an appropriate ticket is sent to the administrator's Inbox
when the job is completed.
To access Job Scheduling information, go to Administration, Job Scheduler.
Chapter 12: Using Administration Functions 191
Job Scheduling
Run or Schedule a Job on the CA RCM Portal
You can run predefined connector jobs or other processes in the CA RCM Portal.
To run or schedule a job in the CA RCM Portal
1.
In the CA RCM Portal, go to Administration, Job Scheduler.
2.
Locate the job or process you want to run.
3.
Do one of the following:
■
Run the job immediately by clicking Run in the row of that process.
The job begins immediately.
■
Schedule one or more future jobs, as follows:
a.
Click Schedule in the row of that process.
The Schedule Task dialog appears.
b. Complete the following fields:
First execution—Defines the date and time at which the first job is
initiated
Additional repeats—Defines the number of job instances you want to
generate. Enter the value -1 to define an unending series of jobs.
Repeat interval—Defines the time period between jobs in the series.
c.
Click OK.
The schedule is saved. CA RCM automatically initiates the jobs according to the
schedule.
The Jobs Table
The Jobs table lists all the jobs that have been entered into the system. The table
contains the following fields:
Job Name
Defines the name of the job.
Description
Provides a description of what the job does.
Job Class
Lists the Java Class of the job.
Start Time
Provides the date and time on which the job will begin.
192 Portal User Guide
CA Enterprise Log Manager Integration
Previous Execution
When a job repeats, defines the previous date and time it ran is listed here.
Next Execution
Defines the date and time when the job is scheduled to repeat.
Delete
Allows you to delete the job.
CA Enterprise Log Manager Integration
With CA Enterprise Log Manager integration, you can import CA Enterprise Log Manager
usage data into CA RCM. CA RCM then displays this usage data during certification
reviews. Applications in CA Enterprise Log Manager correspond to resources in CA RCM.
CA Enterprise Log Manager records user access to an application and CA RCM then
retrieves this usage data to display during a campaign.
For example, before you certify user access to a resource (application), you can review
the usage data on how often the user actually accesses the resource.
You enable CA RCM integration with CA Enterprise Log Manager per universe.
Perform the following process to enable CA Enterprise Log Manager integration.
1.
Review the prerequisites for CA Enterprise Log Manager integration (see page 194).
2.
Configure communication between CA RCM and CA Enterprise Log Manager, as
follows:
a.
Import CA RCM queries into CA Enterprise Log Manager.
b. Create a CA Enterprise Log Manager security certificate in the keystore of the
CA RCM server.
c.
Register CA RCM on the CA Enterprise Log Manager server.
d. Update CA RCM properties.
3.
Map data between CA RCM and CA Enterprise Log Manager, as follows:
a.
Set the application attribute in the CA RCM Universe.
b. Map CA Enterprise Log Manager applications to applications in the CA RCM
universe.
c.
4.
Update usage data from CA Enterprise Log Manager to CA RCM.
To confirm feature setup, open a configuration of the universe in the entity
browser, and verify that usage icons appear for users and resources.
Chapter 12: Using Administration Functions 193
CA Enterprise Log Manager Integration
Prerequisites for Integration with CA Enterprise Log Manager
Before configuring CA RCM and CA Enterprise Log Manager to work together, be sure to
do the following:
■
Be sure you have a working CA RCM universe with imported CA RCM entities. If you
are using CA Identity Manager in your environment, the account configuration is
automatically created. If you are not using CA Identity Manager, manually import
the account information to CA RCM (see page 34).
■
Install CA Enterprise Log Manager and create a user with permissions to view
events.
■
If necessary, create event sources (applications) in CA Enterprise Log Manager.
Applications correspond to resources in CA RCM. CA Enterprise Log Manager
records user access to an application and CA RCM then retrieves this usage data to
display during a campaign.
Note: For more information about creating CA Enterprise Log Manager event
sources, see the CA Enterprise Log Manager documentation.
Import CA RCM Queries Into CA Enterprise Log Manager
To import CA Enterprise Log Manager usage data into CA RCM, add the CA RCM data
queries to the CA Enterprise Log Manager query list.
To import CA RCM query files into CA Enterprise Log Manager
1.
Log in to CA Enterprise Log Manager as an administrator.
2.
Navigate to Queries and Reports, Queries.
3.
Under Query List, click Options, Import Query Definition.
4.
Specify the RCM_Queries.xml file located in the following directory of the CA RCM
server:
RCM_install\Server\ELM
where RCM_install is the CA RCM installation directory.
CA Enterprise Log Manager imports the queries.
CA RCM calls these queries to display CA Enterprise Log Manager query results when
users click monitored resources.
194 Portal User Guide
CA Enterprise Log Manager Integration
Create a CA Enterprise Log Manager Security Certificate
To allow CA RCM to communicate with CA Enterprise Log Manager, create a CA
Enterprise Log Manager security certificate and update the keystore with the new
certificate.
Note: The following steps are specifically for Internet Explorer 8. If you use another
browser, see that browser's documentation on creating a security certificate.
Create a CA Enterprise Log Manager security certificate in the keystore of the CA RCM
server
1.
From the CA RCM server, use Internet Explorer to log in to the CA Enterprise Log
Manager API portal. Use the following URL to access the API portal:
https://calm_hostname:port/spin/calmapi/calmapi.csp
A security certificate error appears.
2.
Click Continue to this website.
A certificate error button appears to the right of the browser's address bar.
3.
Click Certificate Error, View certificates.
The Certificate dialog appears and displays information about the CA Enterprise Log
Manager security certificate.
4.
Click the Details tab and select Copy to File.
The Certificate Export Wizard appears.
5.
Export the certificate using the wizard, as follows:
a.
In the Export Format screen, select Base-64 encoded X.509 (.CER).
b. Set the file name for the certificate to 'elm_cer.cer'.
c.
Click Finish.
The certificate is saved on the CA RCM server.
6.
Update the keystore with the certificate, as follows:
a.
Open a command prompt on the CA RCM server.
b. Navigate to the directory that contains the exported certificate.
c.
Enter the following command:
“%JAVA_HOME%\bin\keytool.exe” -import -file “pathname_cer” -keystore
"%JAVA_HOME%\jre\lib\security\cacerts" -trustcacerts
where pathname_cer is the pathname of the exported certificate.
You are prompted for a password.
Chapter 12: Using Administration Functions 195
CA Enterprise Log Manager Integration
d. Enter the following password, or the default cacerts password for your system:
'changeit'
e.
At the Trust this certificate? prompt, enter y and press Enter.
The CA Enterprise Log Manager certificate is installed in the keystore.
7.
Verify that the new certificate appears, as follows:
a.
Enter the following command:
“%JAVA_HOME%\bin\keytool.exe” -list –keystore
"%JAVA_HOME%\jre\lib\security\cacerts"
b. Enter the cacerts password.
A list of certificates appears.
c.
8.
Verify that the new certificate appears in the list.
Restart the application server hosting CA RCM.
Register CA RCM on the CA Enterprise Log Manager Server
To allow CA Enterprise Log Manager to recognize the CA RCM server, register CA RCM
with the CA Enterprise Log Manager server.
To register CA RCM on the CA Enterprise Log Manager server
1.
Log in to the CA Enterprise Log Manager server as the EiamAdmin administrator,
using the following URL address:
https://ELM_host:5250/spin/calmapi/products.csp
where ELM_host is the hostname of the CA Enterprise Log Manager server.
2.
Under Registered Products, click Register.
The New Product Registration window appears.
3.
Enter the name and password you specified for the CA Enterprise Log Manager
security certificate and click Register.
The CA Enterprise Log Manager server recognizes the certificate and allows
connection to CA RCM.
196 Portal User Guide
CA Enterprise Log Manager Integration
Update CA RCM Properties
For the CA RCM server to communicate with CA Enterprise Log Manager, update the CA
RCM system properties.
To update the CA RCM properties
1.
In the CA RCM Portal, go to Administration, Settings, Property Settings.
2.
Set the Property Keys filter for keys containing 'logmanager'.
3.
Click Apply Filter.
4.
Edit the following CA RCM system properties:
usage.import.logmanager.odbc.host
Defines the hostname of the target CA Enterprise Log Manager server.
usage.import.logmanager.odbc.port
Defines the default CA Enterprise Log Manager database port.
Default: 17002
Note: To verify the database port CA Enterprise Log Manager is listening on,
open Administrative Tools in Windows, and select Services, ODBC Server. Click
on the CA Enterprise Log Manager server and check the Server Listening Port
field.
usage.import.logmanager.odbc.user
Defines the username of the CA Enterprise Log Manager account that CA RCM
uses to log in to CA Enterprise Log Manager. Must be an administrator account
in CA Enterprise Log Manager or an account that has read access to everything.
usage.import.logmanager.odbc.password
Defines the password of the CA Enterprise Log Manager account that CA RCM
uses to log in to CA Enterprise Log Manager.
usage.online.logmanager.https.host
Defines the hostname of the target CA Enterprise Log Manager server.
usage.online.logmanager.https.port
Defines the listening port on the target CA Enterprise Log Manager server
portal.
Default: 5250
usage.online.logmanager.https.certificate
Specifies the CA Enterprise Log Manager security certificate name provided
when registering CA RCM on the CA Enterprise Log Manager server.
5.
Go back to the Property Settings screen and set the Property Keys filter for keys
containing 'accounts'.
Chapter 12: Using Administration Functions 197
CA Enterprise Log Manager Integration
6.
Click Apply Filter.
7.
Review the following CA RCM properties. Usually these properties are left to their
defaults, but they are useful to know about:
implicit.accounts.field.name
Defines the CA RCM attribute that is used to match against CA Enterprise Log
Manager account IDs. If you want to match against another CA RCM attribute,
such as PMFkey or UUID, specify that attribute in this property.
implicit.accounts.enabled
Specifies if automatic implicit matching of accounts occurs between CA RCM
and CA Enterprise Log Manager.
Default: True
Set the Application Attribute in the Universe
To map applications between CA RCM and CA Enterprise Log Manager, first specify
which ResName (see page 252) attribute within the CA RCM Universe is associated with
an application. ResName2 is often the correct attribute, but this attribute depends on
how data was imported into CA RCM.
To define this attribute in the universe, go to Administration, Settings, Universe Settings
and edit the universe. Under the Configuration resource Application field, select the
attribute that defines the application.
Map CA Enterprise Log Manager Endpoints
You must map CA Enterprise Log Manager applications to CA RCM resources. An event
source or application in CA Enterprise Log Manager can correspond to an individual
resource in CA RCM.
Map applications in CA Enterprise Log Manager to each resource in the target CA RCM
universe. CA Enterprise Log Manager usage data is then correctly associated with CA
RCM resources.
To map CA Enterprise Log Manager applications to CA RCM
1.
In the CA RCM Portal, go to Administration, Settings, Universe Settings.
The Universe Settings screen appears.
2.
Select the target universe and click Edit.
The Edit screen appears.
198 Portal User Guide
CA Enterprise Log Manager Integration
3.
Under the Actual Usage tab, Settings, select the 'Import and show usage data for
this universe' check box.
4.
Click Refresh Usage Data.
Note: You must first import data from CA Enterprise Log Manager to get a list of all
applications before mapping the applications to CA RCM resources.
5.
Click the Application Mapping tab.
6.
Map CA Enterprise Log Manager applications to CA RCM, as follows:
a.
The left pane contains a list of all the applications in the CA RCM Universe.
Select a CA RCM application.
b. The right pane contains a list of all the applications in CA Enterprise Log
Manager. Select the CA Enterprise Log Manager application you want to map to
the selected CA RCM application.
c.
Click Add.
Mapped applications appear in the center pane.
d. Repeat these steps for all applications.
7.
Click Finish to save settings.
Update Usage Data
When you import CA Enterprise Log Manager usage data for a universe, the usage data
appears in all certification and approval screens for that universe. Usage data also
appears when you view a configuration of the universe in the entity browser.
To update usage data
1.
In the CA RCM Portal, go to Administration, Settings, Universe Settings.
The Universe Settings screen appears.
2.
Click Edit for the universe you want to edit.
The Edit universe screen appears.
3.
Click the Actual Usage tab.
4.
To update CA Enterprise Log Manager usage data, select Import and show usage
data for this universe.
5.
(Optional) Define usage thresholds that determine the icon displayed in
certification and entity screens.
Based on these thresholds, resources are flagged as Frequently Used or Rarely
Used, and users are flagged as Frequent Users or Occasional Users.
Chapter 12: Using Administration Functions 199
CA Enterprise Log Manager Integration
6.
(Optional) Edit the default time period settings. If you expand the Time Periods
pane, you can edit the default settings for Short, Medium, and Long time periods.
Editing these values changes the available values in the 'days' drop-down list of the
Thresholds pane.
7.
Click Save.
8.
Click Refresh Usage Details.
Viewing a User's Usage Data During a Campaign
After you configure integration with CA Enterprise Log Manager, campaign reviewers
are then able to view a user's usage information before approving or rejecting a User
Task in their Inbox.
To view User usage data during a campaign
1.
Go to Inbox, My Tasks.
2.
Under User Tasks, click the link for the user whose usage data you want to review.
A new window appears with the user information.
3.
Click the Resources tab.
The Resource Usage screen appears.
4.
In the Show drop-down list, select Usage View.
Usage information per application appears for that user.
Update Mapping of CA Enterprise Log Manager Applications
Over time, new applications are added to CA Enterprise Log Manager. Similarly, new
resources are added to the CA RCM configuration, which represent new external
applications. Update the application mapping in the universe periodically so that usage
information is imported for these new resources.
Use the standard procedure to map new CA Enterprise Log Manager applications (see
page 198).
200 Portal User Guide
Help Desk Integration
Help Desk Integration
CA RCM can be configured to integrate with other help desk systems, such as CA Service
Desk Manager. In this release, the help desk integration is limited to viewing
information in the CA RCM ticket. Once you configure integration, you are able to view
this information within a help desk ticket.
Note: No custom CA RCM properties or operations are currently provided with this
integration.
To configure help desk integration within CA RCM, perform the following process.
1.
Set help desk integration properties within CA RCM.
2.
Import help desk user information into CA RCM.
Set Properties for Help Desk Integration
To set up Help Desk integration, set basic and ticket type mapping properties within the
CA RCM Portal.
To set properties for help desk integration
1.
In the CA RCM Portal, go to Administration, Settings, Property Settings.
The Properties screen appears.
2.
Click Add New (or Edit, if the property exists) and set the following properties:
tmsEvent.create.enable
Defines whether to delegate CA RCM ticket creation events to clients, such as a
help desk application.
Values: True/False
integration.unicenter.servicedesk.username
Defines the help desk user name used to access CA RCM, such as administrator.
integration.unicenter.servicedesk.password
Defines the password for the help desk user.
integration.unicenter.servicedesk.webservice.url
Defines the help desk Web Service URL.
Note: CA Help Desk r12 exposes a new web service, but CA RCM only supports
the r11 Web Service.
Chapter 12: Using Administration Functions 201
Help Desk Integration
integration.unicenter.servicedesk.user.field
Defines the field in the permission configuration user database (eurekify.udb)
that states the login ID of the user in the help desk system.
Note: If not specified, PersonID is used.
integration.unicenter.servicedesk.type.mapping
Defines the mapping between CA RCM ticket types and the help desk ticket
types, using a key-value pair.
Example: TMS:TestTicket=ChangeOrder,SAGE:*RoleTicket=Bug,
SAGE:ErrTicket=Issue
The previous example details the following:
■
Maps the CA RCM test ticket to the help desk ChangeOrder
■
Maps the CA RCM error ticket to the help desk 'Issue' ticket
■
Maps any CA RCM ticket with a type that ends in 'RoleTicket' to a help desk
ticket of 'Bug' type. (SAGE:*RoleTicket=Bug)
integration.unicenter.servicedesk.object.type.ChangeOrder
Defines the help desk object type of the ChangeOrder ticket.
integration.unicenter.servicedesk.attributes.ChangeOrder
Defines attributes of the ChangeOrder ticket. Use the velocity template
language to set the values for this property. Predefined variables (see
page 202) are available to set these values.
Examples:
chg_ref_num, RCM_1_${ticket.getTicketId()}_${currentTime},
description, ${ticket.getDescription()},
summary, ${ticket.getTitle()},
affected_contact, ${ticketOwnerHandle},
requestor, ${loginUserHandle} =
Note: For more information about the velocity template language, see
http://velocity.apache.org/engine/releases/velocity-1.6.2/user-guide.html.
Predefined Variables
The following variables can be used to populate help desk ticket attributes. These
variables are used in setting the
integration.unicenter.servicedesk.attributes.ChangeOrder property.
202 Portal User Guide
■
sid—the result of the service.login() method
■
ticket—the ticket VO instance. See the TicketVO class documentation in the open
API.
■
service—the web service instance, generated from
http://some_server:8080/axis/services/USD_WebServiceSoap?wsdl
Help Desk Integration
■
ticketOwnerHandle—the handle returned by the service.getHandleForUserid()
method of the user the ticket relates to
■
loginUserHandle—the handle returned by the service.getHandleForUserid() method
of the user specified at "integration.unicenter.servicedesk.username"
■
currentTime—System.currentTimeMillis();
■
currentDateObject—java.util.Date representation of System.currentTimeMillis
■
currentTimeFormatted—SimpleDateFormat.getTimeInstance().format(currentDate
Object)
■
currentDateFormatted—SimpleDateFormat.getDateInstance().format(currentDate
Object)
■
ticketLinkHtml—an html link element (Action:) with a reference to the CA RCM
ticket
■
ticketQueueUrl—the value of the portalExternalLink.ticketQueueUrl property. For
example, http://localhost:8080/eurekify/
Import Help Desk User Information to the eurekify.udb
To complete help desk integration, set the permission configuration of the help desk
user in the CA RCM user database (eurekify.udb).
To import help desk user information
1.
In CA RCM Data Management, go to File, Open from Database.
The Data Management Settings screen appears.
2.
In the Choose File Type drop-down list, select User Database Files.
3.
Select Eurekify_Users.udb and click Next.
4.
Go to File, Save to File as, and save the Eurekify_Users.udb as a file.
5.
Edit the saved file and add the help desk account name information as an additional
field.
6.
In CA RCM Data Management, go to Management, Merge User Database and
merge the saved file into the database, as follows:
a.
In the Files dialog, enter the following values:
■
First Users DB: the path to the saved database file that you edited in Step
5.
■
Second Users DB: the path to the original CA RCM database
■
Output Users DB: the path to the output CA RCM database
b. Click Merge.
Chapter 12: Using Administration Functions 203
The Transaction Log
The Transaction Log
The CA RCM Transaction Log (TxLog) provides detailed information about actions taken
in the CA RCM server. The transaction log also records all changes to user, role, and
resource entities.
Note: The transaction log records entity changes only for the data files you specify. For
more information, see the Data Management User Guide or the DNA User Guide.
A table summarizing transaction log entries is located in the Developer Resource
directory of the CA-RCM-rel#-Language-Files.zip file of the CA RCM installation package.
When you first open the Transaction Log page, the table is empty and you can view a
filter that you can use to select which transactions you want to view. The entries are
listed by date.
<Column>
Select the column that determines which transactions are viewed in the Transaction
Log table. You can filter the table contents based on the following options:
■
Source: The subsystem where the transaction originates
■
Owner: Owner or ticket ID
■
SData1
■
SData2
■
SData3
<text box>
Enter any data that may appear in the selected column to further filter the
transactions. The text is case-sensitive.
OK
Updates the data presented in the transaction log table. If no filter was supplied, all
the existing transactions are listed.
Delete All
Deletes all the transactions saved by the CA RCM system.
Records per page
Select the number of records that appear in the table.
204 Portal User Guide
Track Portal Usage in the Transaction Log
To view transactions in the Transaction Log table
1.
In the CA RCM Portal, go to Administration, Transaction Log.
The Transaction Log screen opens.
2.
(Optional) Filter the data you want to view in the Transaction Log table: Select a
field from the Column drop-down list and enter the field content.
3.
Click OK.
The requested transaction logs appear in the Transaction Log table.
4.
(Optional) Click Delete All to delete all the transactions currently saved by the
system.
Track Portal Usage in the Transaction Log
The CA RCM server records user actions and changes to entities in its transaction log
file. You can track user interaction with the CA RCM Portal in the transaction log.
Note: You need administrator-level rights in the CA RCM Portal to perform this
procedure.
To track Portal usage in the transaction log
1.
In the CA RCM Portal, go to Administration, Settings, Property Settings.
The Properties Settings window appears.
2.
Modify the following CA RCM system properties to enable and configure tracking of
portal usage.
Note: To see all system properties that control transaction log tracking, filter the
properties list using the string txlog.
txlog.portal.login.enable
Specifies whether to record an event in the transaction log when a user logs in
to the CA RCM Portal.
Values: True, False
txlog.portal.logout.enable
Specifies whether to record an event in the transaction log when a user logs
out of the CA RCM Portal.
Values: True, False
txlog.webservice.login.enable
Specifies whether to record an event in the transaction log when a web service
logs in to the CA RCM Portal.
Values: True, False
Chapter 12: Using Administration Functions 205
Cache Manipulation
txlog.portal.pageaccess.enable
Specifies whether to record events in the transaction log when users navigate
in the CA RCM Portal.
Values: True, False
txlog.portal.pageaccess.include.pageclasses
Specifies the pages of the portal to include when tracking user navigation in the
CA RCM portal. Identify pages of the portal by their class names, and format
the list as comma-separated values.
Example: The following string enables tracking of user navigation to the portal
homepage and the top-level dashboard and entity browser pages:
com.eurekify.web.portal.homepage.HomePage,com.eurekify.web.dashboards.Con
figurationDashboardPage,com.eurekify.web.entitybrowser.EurekifyBrowserPag
e
txlog.portal.pageaccess.exclude.pageclasses
Specifies the pages of the portal to exclude when tracking user the navigation
in the CA RCM portal. Identify pages of the portal by their class names, and
format the list as comma-separated values.
Default: com.eurekify.web.portal.EmptyPage
3.
Save changes to system properties.
Interactions with the CA RCM Portal are recorded in the transaction log as defined.
More information:
Edit a Property Key (see page 216)
Cache Manipulation
Using the CA RCM server's cache improves performance. This is achieved by uploading
the current Universe and configuration data to the cache. Accessing the server's cache is
much faster than accessing the hard drives, so users can receive information more
quickly than if they had to receive content from the server hard drives.
This section covers the following topics:
■
Loading the cache
■
Clearing the cache
More information:
Load Cache (see page 207)
Clear the Cache (see page 207)
206 Portal User Guide
Repair CA RCM Configuration, User, and Resource Files
Load Cache
Use this utility to swiftly load a specific configuration into the CA RCM server's memory
cache.
To load a specific configuration into the CA RCM server's memory cache
1.
On the Administration menu click Cache and then select Load Cache.
The Load Cache screen opens.
2.
Select a Configuration from the drop-down list and click OK.
The information bar indicates that the selected configuration is loaded.
Clear the Cache
Use this utility to clear the CA RCM server's memory cache. The utility is useful in the
case where you updated the configuration data in the DNA, such as permissions, and
you want to be sure that anyone running the system uses the updated data.
To clear the cache
1.
On the Administration menu click Clear Cache.
The Clear Cache screen opens.
2.
Click Clear Caches to clear the CA RCM server's memory cache.
The information bar indicates that the selected configuration is loaded.
Repair CA RCM Configuration, User, and Resource Files
Editing and data enrichment may, rarely, introduce inconsistencies in user, resource, or
configuration files. You can analyze a configuration and its related user and resource
data files, and correct any inconsistencies that you find. If you cannot open a user (.udb)
resource (.rdb), or configuration (.cfg) file, analyze it for errors using this procedure.
Note: You need administrator-level rights in the CA RCM Portal to perform this
procedure.
Chapter 12: Using Administration Functions 207
Repair CA RCM Configuration, User, and Resource Files
To repair CA RCM configuration, user, and resource files
1.
In the CA RCM Portal, go to Administration, Settings, Fix Configuration.
The Fix Configuration screen appears.
2.
Select a configuration file from the drop-down list and click Analyze.
CA RCM analyzes the configuration file and its related user and resource files. It
identifies the following errors:
3.
■
Orphaned users or resources—The configuration file lists a user or resource
that is not in the source user (.udb) or resource (.rdb) file.
■
Broken links—A link references a user, resource, or role that no longer exists in
the configuration.
■
Non-sequential user or resource file—Each record in user and resource files is
assigned an internal ID number. If these internal ID numbers are not
consecutive, CA RCM cannot open the file.
Do any of the following:
■
If analysis found orphaned users, orphaned resources, or broken links in the
configuration, click Fix Configuration.
Orphaned entities and their related links are removed. Broken links are also
removed.
■
If analysis found a non-sequential user file, click Fix UDB.
The user (.udb) file is renumbered. In addition, all configurations that reference
this user file are cleansed of orphaned users and broken user links. Then the
user list and user links of all these configurations are revised with the new
internal ID numbers.
Note: This function affects other configurations in addition to the configuration
you analyzed. Examine related configurations and verify their content before
you run this function.
■
If analysis found a non-sequential resource file, click Fix RDB.
The resource (.rdb) file is renumbered. In addition, all configurations that
reference this resource file are cleansed of orphaned resources and broken
resource links. Then the resource list and resource links of all these
configurations are revised with the new internal ID numbers.
Note: This function affects other configurations in addition to the configuration
you analyzed. Examine related configurations and verify their content before
you run this function.
208 Portal User Guide
Purging Data
Purging Data
Good management practice requires you to purge old, unneeded data files from the CA
RCM database server periodically. The purge utility simplifies this maintenance task.
Important! Purging removes data completely and permanently from CA RCM databases.
Back up all data before you purge, and verify that the data you purge is unnecessary.
The purge utility enables you to purge data in the following manners:
■
Purge selected documents and data files.
■
Purge by date—Clear the database or system logs of entries older than a specified
date.
■
Purge inactive portal users—Remove CA RCM portal users who are not associated
with at least one universe.
The purge utility does not clear jobs in the Workpoint database. You must manually
select and purge Workpoint jobs (see page 213).
Purge Selected Documents
Use the CA RCM Portal purge utility to delete outdated or unneeded data files from the
CA RCM database.
Important! Purging removes data completely and permanently from CA RCM databases.
Back up all data before you purge, and verify that the data you purge is unnecessary.
When you purge a universe or configuration file, the following associated files are also
purged:
■
Related configuration files such as master, model, and RACI configurations.
■
Audit Cards
■
Campaigns
■
Log Entries
Note: You need administrator-level rights in the CA RCM Portal to perform this
procedure.
To purge selected documents
1.
In the CA RCM Portal, go to Administration, Settings, Purge Data.
The Purge Data screen appears.
2.
Select the By Document option in the Purge Type drop-down, and click Next.
Chapter 12: Using Administration Functions 209
Purging Data
3.
Select the type of document you want to purge in the Document Type drop-down.
The Select Values screen appears. All existing data files of the type you specified are
listed.
4.
Select all the documents you want to purge.
Note: Press Shift or drag your mouse to select a section of the list, or press Ctrl and
click to select individual files from the list.
5.
Click Next.
The Confirmation screen appears.
6.
Review the scope of the data purge:
■
In the Document Types area, expand the tree to view the data files selected for
the purge. This list includes files based on, or derived from, the files you
selected.
■
In the Counters area, verify the scope of related log and ticket data selected for
the purge.
If the scope you specified includes data that you do not want to purge, do one of
the following:
7.
■
Click Back to redefine the selection criteria.
■
Click Cancel to abort the purge, then copy or back up needed data.
Click Purge.
The specified data is permanently deleted from the CA RCM database. When the
purge is complete, a confirmation message appears in the Purge Data screen.
Purge Data by Date
Use the purge utility to delete workflow tickets, transaction (Tx) log entries, or portal
usage tracing data that is older than a specified date.
Important! Purging removes data completely and permanently from CA RCM databases.
Back up all data before you purge, and verify that the data you purge is unnecessary.
Note: You need administrator-level rights in the CA RCM Portal to perform this
procedure.
To purge data by date
1.
Click Administration, Settings, Purge Data from the CA RCM portal main menu.
The Purge Data screen appears.
2.
Select the By Date option in the Purge Type drop-down and click Next.
The Selection Type screen appears.
210 Portal User Guide
Purging Data
3.
Select the type of data you want to purge in the Select Type drop-down, and click
Next.
The Select Values screen appears.
4.
Complete the following field to define the scope of the purge;
Older Than
Defines the date of the oldest entry to retain. Entries older that this date are
purged.
5.
(Optional for Tx Log purge only) Filter transaction log entries using the following
additional fields:
Owner
Defines the UserID or TicketID of the initiating user or ticket.
Source
Defines the CA RCM subsystem that generated the log entry.
sdata1, sdata2
Defines values in string data fields of log entries.
6.
Click Next.
The Confirmation screen appears.
7.
Review the scope of the data purge.
8.
Click Purge.
The specified data is completely and permanently deleted from the CA RCM
database. When the purge is complete, a confirmation message appears in the
Purge Data screen.
Purge Portal Users from the Permissions Configuration
Users at various levels in the enterprise access the CA RCM Portal to participate in
review and certification campaigns, and to use self-service role management tools. Each
user must have a portal user account. CA RCM can create these user accounts created
automatically based on retrieved user data. The permissions configuration file stores the
portal user account information.
To preserve data integrity and the security of the CA RCM portal, remove users who no
longer require access.
Chapter 12: Using Administration Functions 211
Purging Data
The purge utility automatically identifies portal users who are not affiliated with a
currently existing universe. These users cannot participate in any CA RCM processes,
and are candidates for deletion.
Important! Purging removes data completely and permanently from CA RCM databases.
Back up all data before you purge, and verify that the data you purge is unnecessary.
Note: You need administrator-level rights in the CA RCM Portal to perform this
procedure.
To purge portal users from the permissions configuration
1.
Click Administration, Settings, Purge Data from the CA RCM portal main menu.
The Purge Data screen appears.
2.
Select the Permissions Configuration User option in the Purge Type drop-down and
click Next.
The CA RCM server compares portal permissions data with universe files in the
database. Any portal users who are not affiliated with a universe are listed as purge
candidates. If purge candidates are discovered, proceed with the purge process.
3.
Select the users that you want to purge, or click the column header check box to
select all users.
4.
Click Next.
The Confirmation screen appears.
5.
Review the scope of the data purge.
If the scope you specified includes data that you do not want to purge, do one of
the following:
6.
■
Click Back to redefine the selection criteria.
■
Click Cancel to abort the purge, then copy or back up needed data.
Click Purge.
The specified data is permanently deleted from the CA RCM database. When the
purge is complete, a confirmation message appears in the Purge Data screen.
212 Portal User Guide
Properties Settings
Purge Workpoint Jobs Associated with a Workflow
CA RCM initiates Workpoint jobs to implement review or control actions of business
workflows. For example, a Workpoint job is created for each link in the scope of a
certification campaign.
To reduce the size of the CA RCM Workpoint database, you can delete the records of
Workpoint jobs for workflows that have concluded.
1.
To identify workflows that are inactive, filter the Workflows screen of the CA RCM
portal to show workflows whose status is Stopped, Archived, or Complete. You can
also filter by the due date of the workflow. Note the Workflow ID numbers of these
inactive workflows.
2.
On your database server, search the CA RCM Workpoint database for job entities
with these Workflow ID values. Then delete the selected jobs.
Example: Job Purge Script in SQL
Typically you implement a database query script to search and purge the database. The
following example shows SQL commands that select and delete jobs associated with a
single workflow. Before you submit these commands to the database server, replace the
parameter flow_id with the actual workflow ID value.
update WP_PROCI set LU_ID = 'Delete Job'
where CONVERT(varchar(max), WP_PROCI.PROCI_ID)+':'+WP_PROCI.PROCI_DB in
(select CONVERT(varchar(max), WP_USER_DATA.PROCI_ID)+':'+WP_USER_DATA.PROCI_DB
from WP_USER_DATA
where WP_USER_DATA.VAR_NAME = 'flow_id'
and WP_USER_DATA.VAR_CVALUE like '?');
execute spWP_DELETE_JOBS;
Properties Settings
The Properties Settings utility provides access to the system property file CA
RCM.properties, where you create new property keys and access and edit existing
property key values.
Properties that are considered to be common properties, such as of the type
properties.headers.commonProperties are listed separately under the Settings
sub-menu as Common Properties Settings. This utility functions in the same way as the
general Properties Settings utility.
Chapter 12: Using Administration Functions 213
Properties Settings
The Properties table contains the following columns:
Type
The associated property file name.
Property Key
The property key name.
Property Value
The property key assigned value.
The CA RCM Properties page provides the following functions:
Add New
Use to add new Property Keys.
Edit
Use to edit existing Property Keys.
Apply Filter
Use to filter the properties list.
Records per page
The number used to determine properties that appear in the table.
When creating a key or editing an existing property, the data is saved to the CA RCM's
database. When you run the CA RCM Portal, the CA RCM server verifies the database
property listings. If the value of a property key in the database is different than the
value listed in the eurekify.properties, the system uses the value listed in the database.
Note: Database values do not change during system updates.
The CA RCM Portal provides you with the following databases to store your update key
values:
DB_dynamic_properties
The change is immediate. You do not have to wait for the server to go offline to
update the property values.
DB_static_properties
The change occurs the next time the server is restarted.
Note: Servers go offline for regular maintenance and backup. Changes made to the
property values designated DB_static_properties are implemented when the server
comes back online.
214 Portal User Guide
Properties Settings
To access the properties page
1.
On the Administration menu click Settings.
The list of available options appears.
2.
Click Properties Settings.
The CA RCM Properties Page screen opens.
More information:
Access the Common Properties Settings Page (see page 215)
CA RCM Properties (see page 247)
Access the Common Properties Settings Page
Common properties are properties of the type properties.headers.commonProperties.
For instructions on how to create or edit a new property key see:
■
Create a new Property key
■
Edit an existing property key
To access the Common Property Settings page
1.
On the Administration menu, click Settings.
The list of available Settings options appears.
2.
Click Common Property Settings.
The Common Property Settings page appears.
More information:
Create a Property Key (see page 215)
Edit a Property Key (see page 216)
Create a Property Key
Property keys are defined and provided as part of the CA RCM product, installed by
default by CA RCM. The Properties Settings utility enables you to add new property keys
to the CA RCM property file.
To create a property key, enter the key before you click Add New.
Chapter 12: Using Administration Functions 215
Properties Settings
After you enter the new property key name and click Create New, the Edit Property
screen appears.
Save is disabled. The reason is that, for security reasons, when you edit a property key,
the change is not saved directly to the properties file. Instead the updated property key
value is saved to the CA RCM database.
The CA RCM Portal provides you with two databases to store your update key values:
DB_dynamic_properties
The change is immediate. You do not have to wait for the server to go offline to
update the property values.
DB_static_properties
The change will take place the next time that the server is restarted.
To create a property key
1.
In the CA RCM Properties page enter a name of a property key in the Common
Properties text box.
2.
Click Add New.
The Edit Property screen appears.
3.
Enter a property value in the Property Value text box.
4.
Select a database type from the drop-down list.
5.
Click Save. The new property appears in the Common Property Settings screen.
Edit a Property Key
You may need to update the value of a property key following system changes. For
example, if you change the name of the SMTP (email) server, used by your corporation
to send out emails, the corresponding property keys must also be adjusted.
When you click Edit next to an existing property key, the Edit Property screen opens:
216 Portal User Guide
Properties Settings
When editing an existing property, the source of the property is listed in the Type
drop-down.
Save is disabled because when you edit a property key, the updated property key value
is saved to the CA RCM database.
The CA RCM Portal provides you with the following databases to store your update key
values:
DB_dynamic_properties
The change is immediate. You do not have to wait for the server to go offline to
update the property values.
DB_static_properties
The change will take place the next time that the server is restarted.
To edit a property key
1.
(Optional) In the CA RCM Properties page enter a name of a property key, or part of
one, in the filter Filter Properties Keys Containing text box and click Apply Filter.
The Properties table displays only keys that match the entered filter criteria.
2.
Click Edit next to the property key that you want to change.
The Edit Property screen displays.
3.
Enter a property value in the Property Value text box.
4.
Select a database Type from the drop-down list.
5.
Click Save.
The updated property appears in the Properties screen table.
Chapter 12: Using Administration Functions 217
RACI Operations
RACI Operations
The RACI model is a tool used for identifying roles and responsibilities during an
organizational audit, making the audit process easier and smoother. The model
describes what to be done and by whom during audits and when corporate changes
occur.
RACI is an abbreviation for:
R = Responsible, who owns the problem/project.
A = Accountable, to whom R is accountable, who must sign off (Approver) on work
before it is accepted.
C = Consulted, who is consulted, who has information and the capability necessary to
aid in completing the work.
I = Informed, who must be notified of results (but does not need to be consulted).
One of CA RCM RACI's main purpose is to identify entity managers (Approvers). Every
model-configuration that you want to audit must be run through the RACI generator so
that the Approvers are listed correctly.
The RACI utility obtains the data fields you identified when you defined the Universe as
manager fields, and tags them as the system's Accountables. The user manager data is
extracted from the configuration file's user database (*.udb). While any user can be
accountable for multiple entities, each entity has only a single person accountable for it.
Note: Run the RACI utility before running a campaign as the system cannot have users
identified as entity Accountables, and cannot send Approver tickets to the correct entity
managers. If you have not run RACI, you either receive an error message, or all the
entities are listed with the campaign-owner for approval.
Create RACI Configuration Files
Once a Universe is created, create its RACI configurations. The RACI configurations
control the assignments of certification/attestation or approval tasks to their respective
Accountable person. There are four RACI configurations, one for each of R,A,C,I. CA RCM
automatically creates the A configuration, based on the Owner or Manager fields of the
universe.
Note: Update the CA RCM user database before generating RACI for the universe.
218 Portal User Guide
RACI Operations
To create RACI configuration files
1.
On the Administration menu click Create RACI.
The Create RACI configurations screen opens.
2.
Select a Universe from the drop-down.
3.
Click Create RACI.
An appropriate notice appears when the process is completed.
Note: If the RACI configuration files become corrupted, you can access them through
the CA RCM DNA module. On the File menu, click Review Database. This allows you to
view/delete the files.
Synchronize RACI
You must update the RACI configurations periodically so that they reflect changes made
to the universe.
Note: When you import new user records into the universe's configuration files, the
data connector can automatically map them (see page 173) to the universe's RACI
configuration files.
By default, RACI synchronization adds new entity data or deletes entities that no longer
exist in the universe, but it does not update existing links in the RACI configurations. The
following system properties allow RACI synchronization to update existing links:
raci.sync.override.accountable.roles
Determines whether existing roles are updated in the Accountable configuration.
When this Boolean property is true, the Accountable configuration is updated when
the accountable user changes for a role entity. To implement this property for a
universe, create a new property with the following name:
universe.property.universe_name.raci.sync.override.accountable.roles
Note: universe_name is the name of the target universe.
raci.sync.override.accountable.resources
Determines whether existing resources are updated in the Accountable
configuration. When this Boolean property is true, the Accountable configuration is
updated when the accountable user changes for a resource entity. To implement
this property for a universe, create a new property with the following name:
universe.property.universe_name.raci.sync.override.accountable.roles
Note: universe_name is the name of the target universe.
Chapter 12: Using Administration Functions 219
System Checkup
To synchronize RACI configuration files
1.
In the CA RCM portal, go to Administration, Permissions and RACI, Synchronize
RACI.
The Synchronize RACI Configurations screen appears.
2.
Select a Universe from the drop-down list and click Synchronize RACI.
CA RCM updates the RACI configuration files of the universe.
System Checkup
Use CA RCM system checkup tools to verify that messaging processes are working
correctly.
The System Checkup option enables you to verify the following email systems:
SMTP Checkup
Verify Simple Mail Transfer Protocol communication with an e-mail server in the
environment.
Workpoint Checkup
Verify communication with the Workpoint server.
JMS Queue Checkup
Verify java Message Service communication.
SMTP Checkup
Simple Mail Transfer Protocol is used for the TMS's email connections
To verify SMTP communication
1.
In the CA RCM Portal, go to Administration, System Checkup, SMTP Checkup.
The Checkup Options screen appears.
2.
Enter a target e-mail address.
3.
Click Send.
An e-mail is sent to the target address from the sender specified in the mail from
system property.
4.
220 Portal User Guide
Verify that the email arrived.
How to Extract CA RCM Data
Workpoint Checkup
Workpoint checkup enables you to edit the TMS Wprkpoint adapter, view Workpoint
process list, and start a checkup ticket.
The Edit button enables you to edit the TMS Workpoint adapter that manages data
communications with the Workpoint server. You can edit the TMS property key value
and type in the Edit Property window. You can also remove the property key from the
database.
The Start button enables you to start checkup tickets active processes, displayed in the
Workpoint Process list displayed.
JMS Queue Checkup
The Java Message Service Checkup enables you to test JMS connectivity.
You can determine if to receive the message immediately, with a user-determined delay
in seconds, or manual mode.
Records and messages are displayed.
How to Extract CA RCM Data
You can extract CA RCM data to the CA RCM External Report Database. Third-party
reporting and data-mining applications can draw on this database to generate reports or
perform analysis. Each extracted data snapshot is a static copy of CA RCM objects. CA
RCM does not update the data snapshots after they are created.
You perform the following procedures when you work with data extraction:
■
Enable the External Report Database (see page 222)—Create the database and
enable the feature on the CA RCM server.
■
Create an extraction profile (see page 223)—Create a profile that defines the data
file types that are copied to the external report database.
■
Generate a data set, or snapshot (see page 223)—Based on an extraction profile.
You can schedule automatic generation of a data set at a fixed time or at recurrent
intervals. Each data set is labeled with the name of the profile used to generate it
and a time stamp.
■
Track data extraction jobs (see page 224)—Data extraction jobs appear in the Inbox
of the managing administrator.
■
Delete profiles and data snapshots (see page 226)—When they are no longer
needed. You can delete individual data sets, or schedule deletion at a future date.
Chapter 12: Using Administration Functions 221
How to Extract CA RCM Data
Extraction profiles are similar to data connectors, and you use the portal job scheduling
tools to initiate data snapshots like data connector jobs.
The data schema of the External Reporting Database is located in the
CA-RCM-rel#-Language-Files.zip file of the CA RCM installation package.
How to Enable the External Report Database
Extracted data is stored in a dedicated Microsoft SQL Server database. Follow the
following steps to enable the external report database:
1.
Create the database on a Microsoft SQL Server, as follows:
■
When a Microsoft SQL Server hosts CA RCM databases, select the External
Report Database option of the CA RCM installer to automatically create this
database.
■
When an Oracle database server hosts CA RCM databases, create the External
Report Database on a Microsoft SQL Server instance after you install CA RCM.
Note: For more information about creating the External report database, see the
Installation Guide.
2.
To enable data extraction, set the following CA RCM system parameter to True.
reportdb.enabled
Specifies whether CA RCM saves data snapshots to the external report
database.
Valid values: True, False
Note: CA RCM resets this property to False when it cannot export a scheduled data
snapshot to the database. If the connection to the database server is interrupted,
reset the property to True when the connection is restored.
222 Portal User Guide
How to Extract CA RCM Data
Create a Data Extraction Profile
Create a profile that specifies what data CA RCM copies to the external reporting
database.
Note: You need administrator-level rights in the CA RCM Portal to perform this
procedure.
To create a data extraction profile
1.
Click Administration, External Report DB in the main menu of the portal.
The External Report Database main screen appears.
2.
Click New Profile.
Note: To edit an existing export profile, click its name in the Profiles list.
The Basic Information screen appears.
3.
Enter a name and brief description for the profile, and click Next.
The Parameters screen appears. All the files and data objects in the CA RCM
databases are listed by type.
4.
Click each tab and select the data files to include in the extracted data.
5.
(Optional) Click the Tickets tab and select the All Tickets option to include the entire
ticket database.
Note: When you select a campaign, all its related tickets are included in the data
snapshot, even if you do not select the All Tickets option.
6.
Click Next.
The Overview screen appears.
7.
Review the profile definition.
8.
Click Finish.
The profile is created. The External Report Database main screen appears. The new
profile appears in the Profiles list.
Run or Schedule a Data Extraction Job
The data extraction job saves files to the External Report Database based on an
extraction profile. Define at least one extraction profile before you run a data extraction
job.
You can generate a single data snapshot, or schedule generation of data snapshots at
regular intervals.
Chapter 12: Using Administration Functions 223
How to Extract CA RCM Data
When you run a data extraction job, a tracking ticket appears in your Inbox.
Note: You need administrator-level rights in the CA RCM Portal to perform this
procedure.
To run or schedule a data extraction job
1.
Click Administration, External Report DB from the main menu of the portal.
The External Report Database main screen appears.
2.
Select one of the following options:
■
Click Run Now in the Profiles list row of the extraction profile you want the job
to use.
The job begins immediately.
■
To schedule future execution of a job, click Schedule in the Profiles list row of
the extraction profile you want the job to use.
The Schedule Extraction Task dialog appears.
Complete the following fields:
3.
–
First execution—Specifies the date and time at which the job is first run.
–
Additional repeats—The number of times you want to run the job. Enter
the value -1 to define an unending series.
–
Repeat interval—The time period between executions in the series.
Click OK.
The schedule is saved. CA RCM automatically initiates data snapshots according
to the schedule.
Track Data Extraction Jobs
When you initiate data extraction to the CA RCM external reporting database, a Report
DB Snapshot Extraction job ticket appears in your Inbox. Use this ticket to track
generation of a data snapshot.
If you initiate immediate data extraction, the ticket appears immediately in the queue.
224 Portal User Guide
How to Extract CA RCM Data
If you schedule a series of data snapshots, a new ticket appears for each snapshot when
the data extraction begins.
You can also review and delete scheduled data extraction jobs in the Job Scheduling
screen. Data extraction jobs are listed in the Job Scheduling screen with a Job Name as
follows:
EXTRACTION.extractionJobDetail
The Job Class label has the value ExtractionJob.
Note: You need administrator-level rights in the CA RCM Portal to perform this
procedure.
To track data extraction jobs
1.
Run or schedule a data extraction job in the CA RCM Portal.
2.
Click Inbox on the main menu.
The Inbox screen appears. When a data extraction job is active, a Report DB
Snapshot Extraction Ticket appears in the queue. The ticket title is the name of the
data export profile on which the job is based.
3.
Click the ticket title.
The ticket opens.
The Ticket contains the following standard sections:
4.
■
Standard ticket header, which displays identification and status information
■
More section, which contains priority, severity, and ticket history information.
■
Advanced section, which enables you to add attachments and notes.
Review the table in the Extraction Components section to track job progress.
Each row of the table lists a CA RCM data type, and the elapsed time taken to
export all the files of this type that you selected. When extraction is complete, the
Extraction State field has the value ENDED for all data types.
5.
Open the Extraction Parameters for Profile section to review the scope of the
extraction job.
The table lists the data types included in the data export profile used for this job,
and the number of data files of each type selected for export.
6.
Click Acknowledge when extraction of all data types is complete.
The ticket status changes to Completed and the ticket is removed from the active
tickets queue.
Chapter 12: Using Administration Functions 225
How to Extract CA RCM Data
Delete Data Extraction Profiles or Data Snapshots
Regularly scheduled data extractions can generate a large volume of data. Purge older
data sets to reduce the size of the CA RCM external reporting database. You can also
schedule automatic deletion at a future date and time.
Similarly, you may delete a data export profile if the data set it defines is no longer
useful.
Note: You need administrator-level rights in the CA RCM Portal to perform this
procedure.
To delete data extraction profiles or data snapshots
1.
Click Administration, External Report DB from the portal main menu.
The External Report Database main screen appears.
2.
(Optional) Delete an extraction profile, as follows:
a.
Locate an export profile you want to delete in the Profiles list.
b. Click Delete in the row of that export profile.
The extraction profile is deleted.
3.
(Optional) Delete a data snapshot, as follows:
a.
Locate a data set you want to delete in the Snapshots list.
b. Click Delete in the row of that data set.
The data set is deleted.
4.
(Optional) Schedule future deletion of a data snapshot, as follows:
a.
Locate a data set you want to delete in the Snapshots list.
b. Click Schedule Delete in the row of that data set.
The Schedule Delete Snapshot dialog appears.
c.
Specify the date and time at which to delete the snapshot, and click OK.
The snapshot is deleted at the scheduled date and time.
226 Portal User Guide
Chapter 13: Security and Permissions
Corporate security is critical, especially when you consider the potential harm that can
result from loss, alteration by unauthorized users, or misuse of data and resources.
The CA RCM Portal is accessible to both senior administrators and average business
users. These different types of users have different needs and use CA RCM in different
ways. Using the Portal, you can define role-based security and permissions to maintain
appropriate levels of security.
This section contains the following topics:
Security (see page 227)
Permissions (see page 229)
Assign a Resource to a Role (see page 234)
Use Case: Filter to Provide Self-Service Access to a User (see page 234)
Security
Software security is intended to prevent both unintentional and malicious harm. There
are various ways of achieving this goal. This section presents the CA RCM Portal
solutions for specific security issues.
More information:
Enabling Security (see page 227)
Authentication Settings (see page 228)
Encryption (see page 228)
Enabling Security
Software security can be configured to behave in one of the following ways:
Default Deny
Under these conditions, everything not explicitly permitted is forbidden. While this
method can improve security, it may negatively affect functionality.
Default Permit
Everything is permitted. The advantage of this security method is that it allows
greater functionality, and it can be adequate for the initial phases of setting up and
testing the system.
Chapter 13: Security and Permissions 227
Security
By default, security in the CA RCM Portal is disabled. When a user logs in, using a
recognized user name, the CA RCM Portal does not verify the user permissions and
there are no limits on what the user can see and do.
You configure the type of security used in the CA RCM Portal by setting a security
parameter in the eurekify.properties file.
The security parameter resembles the following:
sage.security.disable=true
When this property is set to false, CA RCM switches to the Default Deny security
method. Only functionality that is explicitly permitted is visible and enabled for the user.
More information:
Permissions (see page 229)
Authentication Settings
Authentication is the act of establishing that a user has sufficient security privileges to
access the CA RCM Portal. The following security parameter, located in the
eurekify.properties file, determines whether users need a password to access the CA
RCM Portal:
sage.security.disable.ADAuthentication=true
When this property is set to true, the user does not have to use their established
password to log in to the CA RCM Portal. Instead, any alphanumeric combination allows
them to gain entry.
When the property is set to false, users must provide a registered password to access
the CA RCM Portal.
Passwords are stored in a corporate Active Directory server. When a user attempts to
log in, CA RCM sends the user name and password to the Active Directory server for
authentication.
Encryption
When sending the user login and password data, we recommend that this data be
encrypted. The encryption security parameter located in the eurekify.properties file is as
follows:
sage.security.disable.ssl.ADAuthentication=true
When this is set to True, Secure Sockets Layer (SSL) authentication is disabled.
228 Portal User Guide
Permissions
When the parameter is set to False and SSL encryption is enabled, you have to supply
the keystore file in the following security parameter:
sage.security.eurekify.keyStore.file=
The keystore file is a database that stores the private and public keys necessary for SSL
encryption and decoding.
Permissions
When security is enabled in CA RCM, every action a user attempts is verified against
their permissions.
To enable security in CA RCM, edit the permissions configuration file (eurekify.cfg). Each
role in this configuration file represents a set of permissions. Each resource in the
configuration file is a rule or filter that defines the scope of access to Portal functions or
data. To give permissions to a user, associate the appropriate resources with a role and
be sure that the user is a member of that role.
No permission filters exist for Delegate or Escalate functionality.
Note: An approver can view the contents of an Approver ticket, even if an administrator
did not give the approver the appropriate permissions. CA RCM defines resources to
handle this issue in the background. These permissions are limited to that specific
campaign requirement.
More information:
The Permissions Configuration File (see page 229)
The Permissions Configuration File
To manage permissions for CA RCM, you first create resources in the permissions
configuration file (eurekify.cfg) using the DNA client tool. The following types of
resources are predefined in CA RCM:
■
Link type resources—determine which menu options are visible to each user.
■
Doc_Access type resources—determine access to CA RCM document files, such as
configurations, audit cards, universes, and so on.
■
Filter type resources—determine access to specific CA RCM entities.
To create resources in the permissions configuration file (eurekify.cfg)
1.
Verify that the database server and the CA RCM server are running.
2.
Run the DNA client tool.
Chapter 13: Security and Permissions 229
Permissions
3.
Click File, Review Database.
The Database Wizard appears.
4.
Select the Eurekify.cfg file, clear the Write Protected check box, and click Open.
The Eurekify.cfg file appears. Each role in this configuration file represents a set of
permissions. Each resource is a rule or filter that defines the scope of access to
Portal functions or data.
5.
Click the Resource Database icon or click View, Resource Database.
The resource database associated with the configuration appears in a new window.
6.
In the resource database window, right-click and select Add Resource.
The Resource Details screen appears.
7.
Fill in the fields appropriately, depending on the resource type you are adding (Link,
Doc_Access, or Filter.)
8.
Click OK.
9.
Repeat Steps 6 through 8 for every resource you want to add.
10. Add the new resources to the configuration file, as follows:
a.
Select a new resource and drag it to the resource section of the Eurekify.cfg
window.
The cursor changes into an ADD icon.
b. Release the cursor.
The new resources are added to the configuration file.
11. Save changes to the Eurekify.cfg file.
Link Type Resources
Link resources determine which menu options are visible to each user.
The general syntax is as follows:
[<Menu-Name>.<sub-menu>]
Enter the resource syntax in the Res Name 1 field.
230 Portal User Guide
Permissions
For example, [Self-Service.*] allows users linked to this resource permission to see and
use all the available Self-Service menus.
Adding [EX] after the square brackets excludes a specific menu or menu item from the
user's menu options.
For example, to exclude the Request New Role menu item, use the following syntax:
[SelfService.requestNewRole][EX]
Doc_Access Type Resources
Doc_Access resources determine access to CA RCM document files, such as
configurations, audit cards, universes, and so on.
The general syntax is as follows:
[<Document type>]
Enter the resource syntax in the Res Name 1 field.
For example, [AUDITCARD] allows users linked to this resource permission to access this
type of file.
Adding the modifier Read ([R]) or Read/Write ([RW]) sets the level of access to the files
that the user has access to.
The value entered in the Res Name 2 field influences the level of permissions. An
asterisk (*) indicates full permissions for all such files, or a specific entity, such as a
configuration name, universe name, and so on, can be listed.
Filter Type Resources
Filter resources determine access to specific CA RCM entities. Filters are based on the
standard LDAP filter format.
When you add a Filter resource to CA RCM, you can use the following filters:
■
[Filter_User]
■
[Filter_Role]
■
[Filter_Resource]
Chapter 13: Security and Permissions 231
Permissions
Populate the following additional fields when using a Filter resource:
Res Name 1
Specifies the filter to use: Filter_User, Filter_Role, or Filter_Resource.
Res Name 2
Specifies the universe name.
Res Name 3
Specifies the filter name or number.
Description
Specifies a description of the filter.
Type
Defines the resource type: Filter.
Filter1
Defines the filter. For example,
(>(type=role)(A(type=user)(sageUser=$$PersonID$$))).
Filter Format
Filters rely on the LDAP prefix filter format. The filter is constructed from an expression
which, in turn, can be constructed from sub-expressions.
Each filter expression is surrounded by parenthesis ("(",")") and represents a set of CA
RCM entities.
The simplest form of a filter is a field-value pair consisting of a CA RCM entity field name
and a desired value with an equal sign between them. For example,
"(Location=Cayman)" or "(PersonID=86.*)".
Another simple filter is (Name>Smith) which returns users whose Name field
alphabetically follows Smith. Thus, a filter such as the following:
(&(UserName>C)(UserName<F))
returns users whose Name field falls between the letters C and F, including C and F.
Another simple filter returns entity matches. This filter starts with a tilde (~), and is an
entity-value pair consisting of an CA RCM entity type (user/role/resource) and a related
entity name separated by an equal sign. For resources, three sets of parenthesis with
the three pairs appear after the ~. For example:
(~(role=Cayman)) or (~(resname1=email)(resname2=outlook)(resname3=WinNT))
232 Portal User Guide
Permissions
Filters can also have logical operations applied to them. The available operators are
AND, OR, and NOT. Operator symbols are as follows:
& - AND
| - OR
! – NOT
Operator symbols are prefixes and must be placed before the expression, for example:
"(&(Location=Cayman)(Organization=Finance))" - users in the Cayman Finance office
"(|(Country=US)(Country=UK))" – users in the US or the UK
"(!(Active=false))" – active users
Filters can be as complex as necessary, as long as they meet the previously listed rules.
For example:
"(&(|(Country=US)(Country=UK))(&(!(Active=false))(Organization=Finance)))"
This filter returns all the active users that are from the US or the UK and in the Finance
department.
Filter Extensions
These filter extensions are for use with campaigns only. The following additional filters
involve the RACI model:
A — approved entities
> — links to approved entities
For example:
■
All roles whose approver is “AD1\Admin”
(A(type=role)(sageUser=AD1\Admin))
■
All roles linked to users whose manager is “AD1\Admin”
(>(type=role)(A(type=user)(sageUser=AD1\Admin)))
Chapter 13: Security and Permissions 233
Assign a Resource to a Role
Assign a Resource to a Role
Assign resources to a role to give users of that role access to defined Portal permissions.
To assign resources to a role
1.
In the Eurekify.cfg window in the DNA client tool, select new resources and drag
them to a role listed under the Role section of the window.
The cursor changes into a LINK icon.
2.
Release the cursor.
The new resources are linked to the role specified in Step 1.
3.
Right-click the role specified in Step 1 and select Show All Linked Entities.
User and resource entities linked to the role are highlighted.
Note: If you need to add users to a role, select the user in the User section of the
Eurekify.cfg window and drag it to a role listed under the Role section of the
window.
4.
Verify that the new resources are linked to the role specified in Step 1.
5.
Save changes to the Eurekify.cfg file.
Use Case: Filter to Provide Self-Service Access to a User
To allow a user to access all of their own entities for self-service functionality, add the
following filter type resources to CA RCM using the DNA client tool.
1.
2.
234 Portal User Guide
Add a user filter by filling out the Resource Details screen as follows:
■
Res Name 1: [FILTER_USER]
■
Res Name 2: *
■
Description: Users can see themselves in universes that use the LoginID field.
■
Type: Filter
■
Filter1: (user.LoginID=$$PersonID$$)
Add a role filter by filling out the Resource Details screen as follows:
■
Res Name 1: [FILTER_ROLE]
■
Res Name 2: *
■
Description: Users can see their own roles in universes that use the LoginID
field.
■
Type: Filter
■
Filter1: (~(user.LoginID=$$PersonID$$))
Use Case: Filter to Provide Self-Service Access to a User
3.
Add a resource filter by filling out the Resource Details screen as follows:
■
Res Name 1: [FILTER_RES]
■
Res Name 2: *
■
Description: Users can see their own resources in universes that use the
LoginID field.
■
Type: Filter
■
Filter1: (~(user.LoginID=$$PersonID$$))
Note: To avoid truncating the filter string, expand the width of the Filter1 column in
the Edit Resource pop-up screen before you enter the string.
4.
Enter a value for the Filter ID (Res Name 3) field for each new resource filter
according to the numerical sequence.
5.
Associate the new resource filters with a role.
6.
Save changes to the Eurekify.cfg file.
Important! If you mapped the login ID attribute to an attribute other than LoginID in the
universe, change LoginID to the correct attribute in the filter. For example, if login IDs
are stored in the GUUID attribute, change the filter as follows:
(user.GUUID=$$PersonID$$)
Chapter 13: Security and Permissions 235
Chapter 14: Troubleshooting
This chapter provides a list of the CA RCM Portal Error Messages
This section contains the following topics:
Error Messages (see page 237)
Error Messages
CA RCM contains a system of messages that is intended to provide an alert when an
activity cannot be completed as defined or if further information is needed to complete
the activity: The following table displays typical messages and the type of action to
perform:
Field
Code
Description
settings.raci.create.missingmanagers.errcode
adm001
It is recommended that all universe
manager fields be filled before creating
RACI, so that Accountable links can be
automatically added.
settings.raci.create.alreadyexist.errcode
adm002
RACI configurations already exist for {0}
settings.raci.create.fail.errcode
adm003
failed to create RACI configurations for {0}
required.errcode
app001
field '${label}' is required.
iconverter.errcode
app002
'${input}' is not a valid ${type}.
numbervalidator.range.errcode
app003
${input} is not between ${minimum} and
${maximum}.
numbervalidator.minimum.errcode
app004
'${input}' is smaller than the minimum of
${minimum}.
numbervalidator.maximum.errcode
app005
'${input}' is larger than the maximum of
${maximum}.
numbervalidator.positive.errcode
app006
'${input}' must be positive.
numbervalidator.negative.errcode
app007
'${input}' must be negative.
stringvalidator.range.errcode
app008
'${input}' is not between ${minimum} and
${maximum} characters long.
stringvalidator.minimum.errcode
app009
'${input}' is shorter than the minimum of
${minimum} characters.
Chapter 14: Troubleshooting 237
Error Messages
Field
Code
Description
stringvalidator.maximum.errcode
app010
'${input}' is longer than the maximum of
${maximum} characters.
stringvalidator.exact.errcode
app011
'${input}' is not exactly ${exact} characters
long.
datevalidator.range.errcode
app012
'${input}' is not between ${minimum} and
${maximum}.
datevalidator.minimum.errcode
app013
'${input}' is less than the minimum of
${minimum}.
datevalidator.maximum.errcode
app014
'${input}' is larger than the maximum of
${maximum}.
patternvalidator.errcode
app015
'${input}' does not match pattern
'${pattern}'.
emailaddressvalidator.errcode
app016
'${input}' is not a valid email address.
creditcardvalidator.errcode
app017
the credit card number is invalid.
urlvalidator.errcode
app018
'${input}' is not a valid url.
equalinputvalidator.errcode
app019
'${input0}' from ${label0} and '${input1}'
from ${label1} must be equal.
equalpasswordinputvalidator.errcode
app020
${label0} and ${label1} must be equal.
user.count.roles.alert.description.errcode
apr001
user has {0} roles
user.count.resources.alert.description.errcode
apr002
user has {0} resources
role.count.users.alert.description.errcode
apr003
role has {0} users
role.count.children.alert.description.errcode
apr004
role has {0} children
role.count.resources.alert.description.errcode
apr005
role has {0} resources
resource.count.users.alert.description.errcode
apr006
resource has {0} users
resource.count.roles.alert.description.errcode
apr007
resource has {0} roles
campaignchoicesvalidator.errcode
arp001
please select at least one option for
${byfield} field.
configurationname.required.errcode
arp002
please select a configuration.
campaignname.required.errcode
arp003
please select a campaign.
byfield.required.errcode
arp004
please select the 'by field' parameter.
auditcard.required.errcode
arp005
please select audit card.
sort.required.errcode
arp006
please select sorting method.
campaignfilteroption.required.errcode
arp007
please choose filtering type.
238 Portal User Guide
Error Messages
Field
Code
Description
campaign.sendreminder.error.errcode
cmp001
send reminders was aborted, mail event is
not active. update mailing parameter
[tms.configuration.mail.events] in
eurekify.properties
campaign.text.campagin.errors.found.errcode
cmp002
errors found
campaign.error.nouniversesavilable.errcode
cmp003
no universes available
campaign.error.missingcampaigndescription.errcode
cmp004
missing campaign description
campaign.error.missingenddate.errcode
cmp005
missing end date
campaign.error.duedatemustbeinthefuture.errcode
cmp006
due date must be in the future
campaign.error.configurationmustbeselected.errcode
cmp007
configuration must be selected
campaign.error.racinotavailablefor.errcode
cmp008
raci not available for ({0})
campaign.error.campaignalreadyexists.errcode
cmp009
campaign [{0}] already exists
campaign.error.noaccess.errcode
cmp010
user {0} has no access to campaign {1}
settings.strings.ie.errors.missingname.errcode
cst001
missing name field.
settings.strings.ie.errors.missingdescription.errcode
cst002
missing description field.
settings.strings.ie.errors.namealreadyexist.errcode
cst003
duplicate name, name already in use.
settings.strings.ie.errors.missinguniverse.errcode
cst004
missing universe field.
settings.strings.ie.errors.missingsettings.errcode
cst005
was unable to find the settings xml file {0}.
settings.strings.ie.errors.missingmapping.errcode
cst006
was unable to find the mappings xml file
{0}.
settings.strings.ie.errors.missingenrichment.errcode
cst007
was unable to find the enrichment file {0}.
settings.strings.ie.errors.missingpassword.errcode
cst008
missing password field.
settings.strings.ie.errors.missingmaxduration.errcode
cst009
missing maxduration field.
settings.strings.ie.errors.errorparsingmaxduration.
errcode
cst010
error parsing maxduration field, please
use integer values.
settings.strings.ie.errors.missingconnectorclientclass.e cst011
rrcode
missing connector client class to use.
settings.strings.ie.errors.missingworkflowprocess.
errcode
cst012
missing work flow process.
settings.strings.ie.errors.missingtickettype.errcode
cst013
missing ticket type.
dashboard.compliance.error.noname.errcode
dbc001
please enter all auditcard names
dashboard.compliance.error.multiname.errcode
dbc002
name {0} appears more then once
Chapter 14: Troubleshooting 239
Error Messages
Field
Code
Description
dashboard.compliance.error.nocard.errcode
dbc003
please enter all audit cards
dashboard.compliance.error.multicard.errcode
dbc004
auditcard {0} appears more then once
dashboard.compliance.error.nobpralerts.errcode
dbc005
auditcard {0} has no bpr alerts
entity.emptylist.errcode
eml001
no match was found
mail.builder.createticket.sage.errticket.subject.errcod
e
mal001
new error ticket, title:{3}
mail.builder.createticket.sage.errticket.body.errcode
mal002
a error ticket (id
properties.errormsg.propertyalreadyexists.errcode
prp001
the property {0}" already exists
properties.errormsg.unencryptedpropertyalready
exists.errcode
prp002
an un-encrypted property [{0}] is already
exists, please remove it first.
properties.errormsg.contcreateemptyproperty.errcod prp003
e
can not create a property with a
null/empty key.
loginpage.userauthentication.failed.errcode
prt006
failed to authenticate user, invalid user
name/password
loginpage.connecttoauthenticationservice.failed.
errcode
prt007
failed to connect to authentication service,
please contact system administrator.
loginpage.userauthentication.failed.sageadmin.
errcode
prt008
incorrect password for admin user.
loginpage.userauthentication.failed.sagebatch.errcode prt009
incorrect password for batch user.
loginpage.userauthorization.failed.errcode
prt010
failed to authorize user: {0}, the user does
not exist in {1} configuration.
internalerrorpage.label.info1.errcode
prt011
an error has occurred. for more
information please view the log file.
internalerrorpage.label.info2.errcode
prt012
to relogin please click here
sagemaster.headers.foundconflicts.errcode
sgm001
error! conflicts in the master configuration
login field.
sagemaster.headers.countduplicates.errcode
sgm002
found {0} duplicate logins. please review:
selfservice.error.loading.bpr.errcode
sls001
could not load bpr file [{0}], proceeding
without
selfservice.error.finding.bpr.errcode
sls002
no bpr file defined, proceeding without
selfservice.error.finding.universe.errcode
sls003
no universes available
selfservice.error.starting.approval.errcode
sls004
error starting approval process
selfservice.validate.descriptionrequired.errcode
sls005
description field is required
240 Portal User Guide
Error Messages
Field
Code
Description
selfservice.validate.nouserisselected.errcode
sls006
no user is selected
selfservice.validate.norequestsmade.errcode
sls007
no requests made
selfservice.validate.missingraciconfigurations.errcode
sls008
missing raci configurations
selfservice.validate.errorgettingraciconfigurations.
errcode
sls009
error getting raci configurations
selfservice.validate.missingaccountablefor.errcode
sls010
missing accountable for: {0}
selfservice.validate.racierrorfor.errcode
sls011
raci error for: {0}
settings.headers.editimportexportpage.error.errcode
ste001
error fetching connector object: {0}
settings.headers.edituniversepage.error.errcode
ste002
error fetching connector object
changeapproval.child.remove.user.role.info.title.reject tkt001
ed.errcode
request to delete role {1} from user {1} rejected.
changeapproval.child.remove.user.role.info.title.failed tkt002
.errcode
request to delete role {0} from user {1} failed.
changeapproval.child.remove.user.role.notification
.title.errcode
tkt003
request to delete role {1} from user {0} is
already in process.
changeapproval.child.add.user.resource.info.title
.rejected.errcode
tkt005
request to add resource {1} to user {1} rejected.
changeapproval.child.add.user.resource.info.title
.failed.errcode
tkt006
request to add resource {0} to user {1} failed.
changeapproval.child.add.user.resource.info
.description.rejected.errcode
tkt007
the request to add resource {1} to user {0}
was rejected - request was submitted on
universe {2} from {3}
changeapproval.child.add.user.resource.info
.description.failed.errcode
tkt008
the request to add resource {1} to user {0}
failed - request was submitted on universe
{2} from {3}
changeapproval.child.remove.user.resource.info
.title.rejected.errcode
tkt009
request to delete resource {1} from user
{0} - rejected.
changeapproval.child.remove.user.resource.info
.title.failed.errcode
tkt010
request to delete resource {1} from user
{0} - failed.
changeapproval.child.remove.user.resource.info
.description.rejected.errcode
tkt011
the request to delete resource {1} from
user {0} was rejected - request was
submitted on universe {2} from {3}
changeapproval.child.remove.user.resource.info
.description.failed.errcode
tkt012
the request to delete resource {1} from
user {0} failed - request was submitted on
universe {2} from {3}
Chapter 14: Troubleshooting 241
Error Messages
Field
Code
Description
changeapproval.child.remove.user.resource
.notification.title.errcode
tkt013
request to delete resource {1} from user
{0} is already in process.
changeapproval.child.remove.user.resource
.notification.description.errcode
tkt014
the request to delete resource {1} from
user {0} is already in process - request was
submitted on universe {2} from {3}
changeapproval.child.add.role.role.info.title.rejected.e tkt015
rrcode
request to add role {0} to role {1} rejected.
changeapproval.child.add.role.role.info.title.failed
.errcode
tkt016
request to add role {0} to role {1} - failed.
changeapproval.child.add.role.role.info.description
.rejected.errcode
tkt017
the request to add role {0} to role {1} was
rejected - request was submitted on
universe {2} from {3}
changeapproval.child.add.role.role.info.description
.failed.errcode
tkt018
the request to add role {0} to role {1}
failed - request was submitted on universe
{2} from {3}
changeapproval.child.add.role.role.notification.tile
.errcode
tkt019
request to add role {0} to role {1} is
already in process.
changeapproval.child.add.role.role.notification
.description.errcode
tkt020
the request to add role {0} to role {1} is
already in process - request was submitted
on universe {2} from {3}
changeapproval.child.remove.role.role.info.title
.rejected.errcode
tkt021
request to delete role {0} from role {1} rejected.
changeapproval.child.remove.role.role.info.title.failed. tkt022
errcode
request to delete role {0} from role {1} failed.
changeapproval.child.remove.role.role.info
.description.rejected.errcode
tkt023
the request to delete role {0} from role {1}
was rejected - request was submitted on
universe {2} from {3}
changeapproval.child.remove.role.role.info
.description.failed.errcode
tkt024
the request to delete role {0} from role {1}
failed - request was submitted on universe
{2} from {3}
changeapproval.child.remove.role.role.notification.titl tkt025
e.errcode
request to delete role {0} from role {1} is
already in process.
changeapproval.child.remove.role.role.notification
.description.errcode
tkt026
the request to delete role {0} from role {1}
is already in process - request was
submitted on universe {2} from {3}
changeapproval.child.add.role.resource.info.title
.rejected.errcode
tkt027
request to add resource {1} to role {1} rejected.
242 Portal User Guide
Error Messages
Field
Code
Description
changeapproval.child.add.role.resource.info.title.faile
d.errcode
tkt028
request to add resource {0} to role {1} failed.
changeapproval.child.add.role.resource.info
.description.rejected.errcode
tkt029
the request to add resource {1} to role {0}
was rejected - request was submitted on
universe {2} from {3}
changeapproval.child.add.role.resource.info.descriptio tkt030
n.failed.errcode
the request to add resource {1} to role {0}
failed - request was submitted on universe
{2} from {3}
changeapproval.child.add.role.resource.notification
.title.errcode
tkt031
request to add resource {1} to role {0} is
already in process.
changeapproval.child.add.role.resource.notification
.description.errcode
tkt032
the request to add resource {1} to role {0}
is already in process - request was
submitted on universe {2} from {3}
changeapproval.child.remove.role.resource.info.title
.rejected.errcode
tkt033
request to delete resource {1} from role
{1} - rejected.
changeapproval.child.remove.role.resource.info.title
.failed.errcode
tkt034
request to delete resource {0} from role
{1} - failed.
changeapproval.child.remove.role.resource.info
.description.rejected.errcode
tkt035
the request to delete resource {1} from
role {0} was rejected - request was
submitted on universe {2} from {3}
changeapproval.child.remove.role.resource.info
.description.failed.errcode
tkt036
the request to delete resource {1} from
role {0} failed - request was submitted on
universe {2} from {3}
changeapproval.child.remove.role.resource
.notification.title.errcode
tkt037
request to delete resource {1} from role
{0} is already in process.
changeapproval.child.remove.role.resource
.notification.description.errcode
tkt038
the request to delete resource {1} from
role {0} is already in process - request was
submitted on universe {2} from {3}
changeapproval.child.role.task.addroletoraci
.description.errcode
tkt039
to continue please choose an accountable
user to {0} role
changeapproval.child.remove.user.role.notification
.description.errcode
tkt094
the request to delete role {1} from user {0}
is already in process - request was
submitted on universe {2} from {3}
login.errors.invalidcredentials.errcode
tms001
user/password not found.
login.errors.invalidcredentials.errcode
tms001
try wicket/wicket as the user
name/password combination
page.admin.failuremessage.errcode
tms002
{0} failed.
Chapter 14: Troubleshooting 243
Error Messages
Field
Code
Description
error.validate.optionvalue.errcode
tms003
the value {0} is not allowed in {1}.
error.validate.command.notfound.errcode
tms004
the command id {0} was not found.
error.validate.command.disabled.errcode
tms005
the command id {0} is not enabled.
error.addattachment.noname.errcode
tms006
fail to save attachment, please fill the field
name.
error.filter.errcode
tms007
the filter '{0}' has a syntax error. {1}
error.filter.resultempty.errcode
tms008
the user does not exist.
error.command.revokecmd.errcode
tms009
fail to revoke ticket {0}, missing job tickets
{1}.
error.command.revokecmd.msg2.errcode
tms010
fail to revoke ticket {0} with job tickets {1},
there are {2} activity tickets outside the
ticket tree.
error.command.linkcommands.errcode
tms011
fail to create commands:{0}, {1}
error.command.startjobcommand.errcode
tms012
fail to start job for ticket {0}, ticket has
already reference for job {1}
error.command.startjobcommand.checkjobticketexists tms013
.errcode
fail to commit activity
[checkjobticketexists] in job [{1}] of ticket
{0}, check tms port in workpoint wftms
web service.
error.workflow.connection.errcode
tms014
fail to connect to workpoint url:{0},
info:{1}
error.service.createconsulttickets.errcode
tms015
no ticket parent!
error.service.createconsulttickets2.errcode
tms016
fail to find consulting users, {0}
error.service.createconsulttickets3.errcode
tms017
fail to create consulting tickets. {0}
error.service.validatevalue.errcode
tms018
fail to update field {0} with value {1} in
ticket type {2}
error.command.saveticket.optimisticlockexception
.errcode
tms019
the ticket was updated by another user,
please reopen ticket.
error.validate.valuelength.errcode
tms020
validation fail for value:{0} cannot be
longer then {1}
error.validate.date.errcode
tms021
fail to parse date: {0}"
error.batchtask.errcode
tms022
[{6}] fail to run batch actionname
error.batchtask.startjob.errcode
tms023
action {0} of job {2} failed. retry count:{1}
error.update.ticket.errcode
tms024
cannot update the ticket [id
244 Portal User Guide
Error Messages
Field
Code
Description
error.campaignnamenotfound.errcode
tms025
campaign {0} not found.
page.recordnotfound.message.errcode
tms026
{0} was not found in {1}
page.internalerror.info1.errcode
tms027
an error has occurred. for more
information please view the log file.
page.internalerror.info2.errcode
tms028
null
page.expirederror.info1.errcode
tms029
your session has expired, please login
again.
page.expirederror.info2.errcode
tms030
null
error.workpoint.dbconnection.errcode
tms031
workpoint database connection is closed.
text.dialogs.runfailed.errcode
txd001
failed to run {0}, please watch log files.
text.dialogs.runfailed.errcode
txs002
failed to run {0}, please watch log files.
settings.strings.universe.masterequalmodel.errcode
ust001
warning!!! master and model
configurations are the same.
settings.strings.universes.errors.missingname .errcode ust002
missing name field.
settings.strings.universes.errors.missingdescription
.errcode
ust003
missing description field.
settings.strings.universes.errors.namealreadyexist
.errcode
ust004
duplicate name, name already in use.
settings.strings.universes.errors.missingmaster
.errcode
ust005
missing master configuration name field.
settings.strings.universes.errors.missingmodel
.errcode
ust006
missing model configuration name field.
settings.strings.universes.errors.missingauditsettingsfil ust007
e.errcode
was unable to find the audit settings file
{0}.
settings.strings.universes.errors.masterisnotreadonly
.errcode
ust008
the master configuration ({0}) is not read
only.
settings.strings.universes.errors.masterhasparent
.errcode
ust009
the master configuration ({0}) has a parent
configuration.
settings.strings.universes.errors.masternotlogged
.errcode
ust010
the model configuration ({0}) is not
logged.
settings.strings.universes.errors.modelisnotreadonly
.errcode
ust011
the model configuration ({0}) is not read
only.
settings.strings.universes.errors.modelhasparent.errco ust012
de
the model configuration ({0}) has a parent
configuration.
Chapter 14: Troubleshooting 245
Error Messages
Field
Code
Description
settings.strings.universes.errors.modelnotlogged
.errcode
ust013
the model configuration ({0}) is not
logged.
settings.strings.universes.errors.errorswasfound
.errcode
ust014
the following issues were found:
settings.strings.universes.errors.wouldliketoautofix
.errcode
ust015
would you like to auto-fix them?
error.workpoint.dbconnection.errcode
wp001
workpoint database connection is closed.
246 Portal User Guide
Appendix A: CA RCM Properties
This section contains the following topics:
tms.delegate.filter (see page 247)
tms.escalate.filter (see page 248)
tms.campaign.[campaign-type].reassign.filter (see page 248)
tms.delegate.filter
Used for filtering the delegate option user list. Comprises three options:
Description
Default delegate filter
Property
tms.delegate.filter
Example
tms.delegate.filter=GFilter=(Organization=$$owner.Organization$$)
Description
Ticket type filter
Property
tms.delegate.filter.TicketType.SAGE.ChangeApprovalParentTicket
Example
tms.delegate.filter.TicketType.SAGE.ChangeApprovalParentTicket=GFilter=
(Organization=cookingdept)
Description
Ticket name filter
Property
tms.delegate.filter.LinkUser-Role
Example
tms.delegate.filter.LinkUser-Role=GFilter=([email protected])
The “name” property (if defined) takes precedence over “type” which in turn takes
precedence over the default delegate property.
Appendix A: CA RCM Properties 247
tms.escalate.filter
tms.escalate.filter
Used for filtering the escalate option user list. Comprises three options:
Description
Default escalate filter
Property
tms.escalate.filter
Example
tms.escalate.filter=GFilter=(Organization=$$owner.Organization$$)
Description
Ticket type filter
Property
tms.escalate filter.TicketType.SAGE.ChangeApprovalParentTicket
Example
tms.escalate.filter.TicketType.SAGE.ChangeApprovalParentTicket=GFilter=(Organization=
cookingdept)
Description
Ticket name filter
Property
tms.escalate.filter.LinkUser-Role
Example
tms.escalate.filter.LinkUser-Role=GFilter=([email protected])
tms.campaign.[campaign-type].reassign.filter
Used for filtering the reassign option user list. Comprises three options:
Description
Reassign filter
Property
tms.campaign.[campaign-type].reassign.filter
Example
tms.campaign.userCertification.reassign.filter=GFilter=(Organization=
$$owner.Organization$$)
tms.campaign.roleCertification.reassign.filter=GFilter=(Organization=
$$owner.Organization$$)
tms.campaign.resourceCertification.reassign.filter=GFilter=(Organization=
$$owner.Organization$$)
248 Portal User Guide
Appendix B: Portal Structure (XML)
If you want to change the CA RCM Portal structure, for example, remove a section of the
Portal you never use, you can edit the portal-structure.xml file as needed. The
portal-structure.xml file is found in the following locations:
■
JBoss: Jboss_install_folder/conf
■
WebSphere: /eurekify.war/WEB-INF/classes/com/eurekify/web/portal/links
Appendix B: Portal Structure (XML) 249
Appendix C: CA RCM Data Files
CA RCM uses three separate but related files in a text-based, comma-separated format
to represent a configuration.
The user and resource database files contain the basic details of users and resources.
The configuration file contains the dynamic parts of a configuration; that is, the role and
relationship information.
This section contains the following topics:
User Database File (see page 251)
Resource Database File (see page 252)
Configuration File (see page 253)
User Database File
User database file names end with the .udb suffix. Each user is represented in this file by
one line, which includes comma-separated values for the following fields (in this order):
■
PersonID (the key)
■
User name
■
Organization name
■
Organization type
■
(Optional) an unlimited number of additional fields.
Although they are optional, CA RCM requires you to specify fields for the following types
of user information when you define a universe. Define these fields in .udb files that
form the basis for a configuration file in a universe.
■
LoginID
■
User email
■
ManagerID
Appendix C: CA RCM Data Files 251
Resource Database File
Example: User Database File
The following sample .udb file contains 3 user records.
PersonID,UserName,OrgName,OrgType,Country,Location,ManagerID,email,LoginID,
"52656727","Rodman Adam","System
Management","Corporate","US","Pennsylvania","54672910","[email protected]","IB
MR50\\Rodman Adam",
"54672910","Cooper Amos","IT
Security","Corporate","US","Pennsylvania","64646410","[email protected]","IBMR
50\\Cooper Amos",
"64646410","Herman Barbara","Operations","Corporate","US","New
Jersey","64646410","[email protected]","IBMR50\\Herman Barbara",
Resource Database File
Resource database file names end with the .rdb suffix. Each resource is represented in
this file by one line, which includes comma-separated values for the following fields (in
this order):
■
Resource Name 1 (ResName1)
■
Resource Name 2 (ResName1)
■
Resource Name 3 (ResName1)
■
(Optional) An unlimited number of additional fields
The ResName fields typically map to the endpoint or application group of the resource.
Although they are optional, CA RCM requires you to specify fields for the following types
of resource information when you define a universe. Define these fields in .rdb files that
form the basis for a configuration file in a universe.
■
Application
■
ManagerID
Example: Resource Database File
The following sample file contains 3 resource records.
ResName1,ResName2,ResName3,Description,ManagerID-Owner,Location,
"SYS1","RACFPROD","RACF22","Production RACF","77292450","Irvine,CA",
"Domain Users","NT5AVE","WinNT","Active Directory ","91236370","Houson,TX",
"DEVELOP","RACFPROD","RACF22","Production RACF","77292450","Irvine,CA",
252 Portal User Guide
Configuration File
Configuration File
Configuration file names end with the .cfg suffix. The configuration file refers to a user
database file and a resource database file. It contains role definitions and links between
users, roles, and resources.
Note: Multiple configurations may share the same user and resource database files.
The configuration file contains the following elements:
■
A header section lists the owner and modification history of the file. The first two
lines in the file specify the user and resource database files that the configuration
references. These lines have the following format:
UsersDB,udb_pathname
ResDB,rdb_pathname
Note: udb_pathname is the pathname of the referenced user database file, and
rdb_pathname is the pathname of the referenced resource database file.
■
User entity declarations define a subset of users from the referenced user database
file. Each line defines a single user, with the following format:
User, udb_record, PersonID
Note: udb_record is the index value of a record in the user database file. The first
user record in the .udb file has an index value of zero. PersonID is the value of the
PersonID field in the referenced user record.
■
Resource entity declarations define a subset of resources from the referenced
resource database file. Each line defines a single resource, with the following
format:
Res, rdb_record, ResName1, ResName2, ResName3
Note: rdb_record is the index value of a record in the resource database file. The
first user record in the .rdb file has an index value of zero. ResName1, ResName2,
ResName3 are the values of the corresponding mandatory fields in the referenced
resource record.
Appendix C: CA RCM Data Files 253
Configuration File
■
Role declarations define a role in terms of users, resources, or other roles in the
configuration. Each declaration defines a single role in one line, with the following
format:
Role,roleID,roleName,roleDescription,roleOrganization,roleOwner
Note: roleID is the numerical identifier CA RCM assigns to the role, roleName is the
unique name of the role, roleDescription is a text description of the role,
roleOrganization is the organization associated with the role, and roleOwner is the
user that owns the role.
■
Link declarations define role contents and user privileges as a set of links between
the declared user, role and resource entities. Each line defines a single link, with the
following format:
Link_type,Entity1,Entity2
Note: Link_type specifies the type of link. Entity1 and Entity2 specify the linked
entities, using the record index of a user or resource entity, or the roleID of a role
entity.
The Link_type string can have the following values:
■
User-Res: user-resource link
■
User-Role: user-role link
■
Role-Res: role-resource link
■
Role-Role: role-role link (parent-child link within the role hierarchy)
Entities must be listed in order. For example, in a User-Res declaration, the first
entity is a user record, and the second entity is a resource record. In a Role-Role
link, the first entity is the roleID of the parent role, and the second entity is the
roleID of the child role.
Example: Configuration File
Configuration files are typically much larger than this sample. In this example, role 1001
has only one resource, role 1014 has two resources, and role 1015 includes both role
1001 and role 1014 as children.
UsersDB,.\UsersDB.udb
ResDB,.\ResDB.rdb
CreateDate,03/09/2007 12:27
ModifyDate,03/09/2007 12:27
StatusDate,17/04/2007 15:36
Owner1,Ilan Sharoni
Organization1,Company
254 Portal User Guide
Configuration File
Owner2,
Organization2,
Operation1,
Operation2,
Operation3,
Status,
ParentConfigName,SQL://(local).sdb/ConfigWithRoles.cfg
User,0,"45489940"
User,1,"47868650"
User,2,"52656727"
Res,0,"APPLDEV","RACFTEST","RACF22"
Res,1,"BRLIMSYS","RACFPROD","RACF22"
Res,2,"DEVELOP","RACFPROD","RACF22"
Role,1001,"BASIC ROLE","Basic role - for all IT users","Enterprise","82922230","Org
Role","","45489940","Approved","09/05/2007 10:36","No
Rule","Enterprise","Corporate",""
Role,1014,"Title - Product Manager","Characteristic Role (50%)","Title - Product
Manager","99883135","Org Role","","45489940","Approved","09/05/2007
10:36","Title=Product Manager;","Title","Corporate",""
Role,1015,"Title - Operator","Characteristic Role (50%)","Title Operator","45489940","Org Role","","45489940","Approved","09/05/2007
10:36","Title=Operator;","Title","Corporate",""
User-Res,0,2
User-Res,0,1
User-Role,1,1001
User-Role,2,1014
Role-Res,1001,0
Role-Res,1014,1
Role-Res,1014,2
Role-Role,1015,1014
Role-Role,1015,1001
Appendix C: CA RCM Data Files 255
Glossary
Approved Audit Card
An Audit Card where all the listed violations have been approved. It can be used during
an audit to prevent repeated notices of violations that have already received approval.
Audit Card
A file with the extension .aud. It is generated by the DNA. It contains a list of violations
or out of pattern situations. Each entry is a violation connected to an entity or to a link.
It is possible to edit an Audit Card in the DNA module, adding instructions to either fix a
violation or approve one. For further information see the DNA User Manual.
Children
Ticket-type specific.
The number of children listed for any campaign ticket denotes the number of Approvers
assigned to the campaign.
The number of children listed for an Approver ticket is the number of [entities] the
specific approver has to audit, where [entities] refers to the campaign type: user, role or
resource certification.
Configuration
A CA RCM-proprietary data structure that holds a snapshot of the definitions of users,
resources and roles (if available), as well as the relevant relationships (privileges)
between them.
Connectors
Connectors use the converters to access the production computer for both download
and upload processes. There are separate connectors for import and export procedures.
defaultSettings.xml
A connection details XML file located in the CA RCM home directory under the converter
subdirectory. Use the CA RCM DM module to update.
Direct Link
An uninterrupted connection between two entities. For example: a user to resource link.
Dual Link
Refers to the case when both a direct link and an indirect link exist. For example: A user
is linked directly to a specific resource, and at the same time the user is linked to a role
that is linked to the same resource.
Entity
Refers to one of the following:
Glossary 257
■
User
■
Role
■
Resource
Indirect Link
A circuitous connection between two entities. For example: A user is linked to a specific
role and the role is linked to a specific resource. The link between the user and the
resource is an indirect link. Here are some further examples:
User—Role—Resource: Indirect link user to resource
User—Role—Role: Indirect link user to role (hierarchy)
User—Role—Role—Resource: Indirect link user to resource
Indirect links are not defined for the case of user to resource to role, where the user is
linked directly to a resource and a role is linked directly to the same resource. The user
in this case does not have any kind of link to the role in question.
Link or Entity Link
Refers to a connection between two entities. The possible links are:
■
user-role
■
user-resource
■
role-resource
■
role-role (hierarchy)
Links can be categorized as direct links, dual links or indirect links.
Mapping.xml
A mapping details XML file located in the <Eurekify home directory>\<Converter
directory>. Use the Eurekify DM module to update.
Master-configuration
The original configuration downloaded from the production computer. The
master-configuration presents the real-world definitions.
Model-configuration
A copy of the master-configuration. The audit process is run on the model-configuration
and the resulting, updated set of configuration files is compared by the Eurekify Sage
DNA system to the original, master-configuration files. The differences are then
uploaded to the production computer.
RACI
A RACI diagram, or RACI matrix, is used to describe the roles and responsibilities of
various teams or users It is especially useful in clarifying roles and responsibilities in
cross-functional/departmental projects and processes. Within the Eurekify Portal, this is
the source of the Approvers mentioned in this manual. They are listed in the
Accountable configuration file.
The RACI diagram divides tasks into four participatory responsibility types, which are
then assigned to different roles in the project or process.
258 Portal User Guide
The following responsibility types make up the acronym RACI:
Responsible
Those who do work to achieve the task. There can be multiple resources
responsible.
Accountable
(Also Approver) The resource ultimately answerable for the correct and thorough
completion of the task. There must be only one A resource specified for each task.
Consulted
Those whose opinions are sought. Two-way communication.
Informed
Those who are kept up-to-date on progress. One-way communication.
Very often the role specified as "accountable" is also specified "responsible." Outside of
this exception, it is generally recommended that each role in the project or process for
each task receive at most one of the participatory role types. Although some companies
and organizations do allow, for example, double participatory types, this generally
implies that the roles have not yet been truly resolved and so impedes the value of the
RACI approach in clarifying each role on each task. For further information on RACI see
http://www.pmforum.org/library/tips/pdf_files/RACI_R_Web3_1.pdf.
Role to Role Link
This type of link represents a hierarchal relationship. Users who are members of a
parent role are automatically members of the sub-role, and therefore provisioned with
all the sub-roles privileges.
Ticket
Tickets are work items that can be viewed in the Ticket Queue. They can be work related
or informational, and/or hierarchal, or provide a plain notification concerning a process.
Universe
A term used to denote a unique Master-configuration/Model-configuration pair.
Violations
A violation is a breach of corporate security policies, guidelines, BPRs and/or
regulations. CA RCM identifies such infractions and lists them in Audit Cards, where
relevant. While using the CA RCM Portal, you will come across Violations columns where
relevant. The number listed in such columns provides the number of violations
associated with the specific row in the table.
Workflow
Campaigns and approval processes are guided by a workflow, a collection of instructions
that guide the application logic. The workflow is generated by Workpoint™, which is a
Business Processes Management (BPM) workflow design engine.
Glossary 259
Index
A
Accountable • 217
Acknowledge • 177
Administration • 14, 18, 161, 170, 203, 206, 212,
214, 217, 218, 219, 249
Approval Process • 164, 203
Approval Process Ticket • 164
Approver • 18, 161, 164, 217, 229, 249
Approver Ticket • 161, 249
Approver Ticket • 161
Approver Ticket • 249
I
Import Connector • 19, 165, 170
M
Master • 19, 22, 161
Model • 19, 22
P
Permissions • 18, 162, 227
Properties • 161, 162, 164, 212, 214, 215, 249
C
R
Campaign Ticket • 161, 249
Campaign Ticket • 161
Campaign Ticket • 249
Connector • 20, 165, 170, 173, 249
Converter • 170, 173
Customize • 56
RACI • 22, 161, 217, 218, 233, 249
Reassign • 247
Reports • 18, 249
D
Delegate • 177, 229
DM client tool • 165, 170, 173
DNA client tool • 17, 20, 22, 95, 161, 165, 170, 173,
206, 217, 229
Due Date • 162
E
Email • 247
Entity Browser • 14, 249
Escalate • 177, 229
Eurekify.cfg • 229, 230, 231
Export Connector • 22, 165, 170, 173
F
S
Scheduler • 203, 249
Search • 56
Self-Service • 14, 18, 95, 230
Severity • 162, 170, 173
State • 162
Status • 162
T
Ticket Queue • 14, 18, 56, 161, 162, 165, 170, 173,
190
TMS Administration • 165
Transaction Log • 164, 203
U
Universe • 14, 19, 22, 170, 173, 205, 217, 218, 231,
249
Filter • 56, 203, 212, 215, 229, 231
G
Gfilter • 231
H
Home Page • 17, 18, 170, 173, 249
Index 261