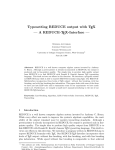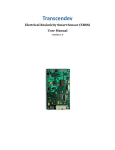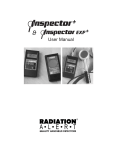
1
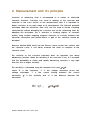
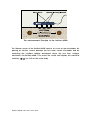
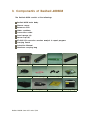
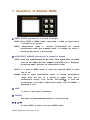
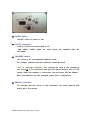
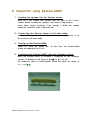
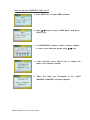
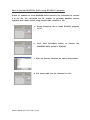
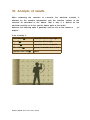
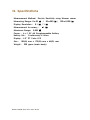
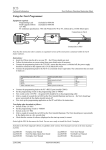
Resitest-400M Concrete Resistivity Tester Instruction Manual www.mkckorea.com Contents 1. Introduction.........................................................2 2. Measurement and it's principle......................3 3. Components of Resitest-400M kit....................5 4. Basic information on Resitest-400M................6 5. Preparation for use Resitest-400M...................8 6. How to maintain Resitest-400M......................10 7. Operation of Resitest-400M.............................11 8. Inspection using Resitest-400M.......................13 9. Operation according to each mode............14 10. Analysis of results..............................................24 11. Maintenance......................................................25 12. Specifications.....................................................26 Resitest 400M-June-2011-mkc-1/28 1. Introduction We thank you for your procurement of the Resitest-400M. Before using this instrument, We recommend you are to be fully aware of this instruction manual of the Resitest-400M. The Resitest-400M is a useful measuring equipment that can be used to measure the electrical resistivity of the surface of the concrete and detect corrosion state of reinforced concrete structures. The Resitest-400M mainly consists of the basic equipment and the Wenner array sensor. The measurement is to assess results when the Wenner sensor contacts the surface of reinforced concrete structures. In LCD battery status is displayed. It has "HOLD" key to hold present measurement display and other keys to store measurement display in memory Especially RT-400M has contour mapping function which enables easy analysis of concrete status in site by color mapping. Note: If Wenner materials sensor or high comes into conductive contact with materials such statically as metal charged as not concrete or standard block, the electronic circuitry in Resitest-400M will be damaged due to overflowing current. Resitest 400M-June-2011-mkc-2/28 2. Measurement and it's principle Corrosion of reinforcing steel is encountered in a variety of reinforced concrete structures. Corrosion can result in spalling of the concrete and reduction in the cross section of the reinforcement, thus it is important to detect corrosion at an early stage of its development. The Half-cell potential technique (Half-cell 200/Q-see man int'l) can be used to locate corroding reinforcement without disrupting the concrete over to the reinforcing steel. By adopting this technique, this is effective in locating regions of corrosion activity using contour mapping program. However, to connect between the electrical connection and reinforcement, a part of the concrete should be disrupted However Resitest-400M which has the Wenner sensor comes into contact with the concrete cover, it can easily measure the state of corrosion of the concrete cover. The resistivity of the concrete extremely does an important role about advancing corrosion. When the resistivity of the concrete is low, it is assumed that the probability of active and rapidly advancing corrosion is very high than the one of higher resistivity. The resistivity is calculated using the formulae R=v/I and ρ=2πaR where voltage 'R' is the resistance, electrodes, electrodes, ' ρ' is 'I' the is 'v' the resistivity is the current and 'a' voltage measured flowing between is distance the electrodes. R= v/I , Resitest 400M-June-2011-mkc-3/28 ρ=2πaR across the the current between the The measurement Principle of the Resitest-400M The Wenner sensor of the Resitest-400M consists of a row of four electrodes. By passing an electric current between the two outer current electrodes and by measuring the resultant voltage developed across the two liner 'voltage' electrodes, the Resitest-400M is to assess the results and display the electrical resistivity (㏀/㎝) on LCD of the main body. Resitest 400M-June-2011-mkc-4/28 3. Components of Resitest-400MM The Resitest-400M consists of the followings: Resitest-400M main body Wenner sensor Reference PCB Water container Connection cable Insert sponge (8) Sensor cap (6) RT-4040 CD concrete corrosion analysis & report program Carrying Pouch Instruction Manual Aluminum carrying bag main body Wenner sensor Reference PCB Water container Connection cable Insert sponge Sensor cap RT-4040 CD Pouch Adaptor manual Carrying Bag Resitest 400M-June-2011-mkc-5/28 4. Basic information on Resitest-400M From a long time ago, an inspection instrument which has the four point electrodes had been used to measure and assess in soil strata. When the Wenner sensor with four electrodes was used to measure the corrosion of the concrete, several problems had been found. To solve these problems, papers have been released in the early of 1980's. The Colebrand Ltd. in England has developed the Resistivity logger on the basis of "measurement of the Electrical Resistivity of Reinforced Concrete Structures for the assessment of Corrosion Risk by S.G. Millard, J.A. Harrison & A. J. Edwards) The CNS Ltd. in England also has developed the Resistivity meter on the basis of "Resistivity Measurements in Concrete" by A.J. Ewins, and Proceq SA in Switzerland has developed the Resi as a new Resistivity meter lately. The easy Resitest-400M operation was by designed solving to the make problems accurate and measurements inconveniences with of the using the existing equipments. Even though the measurement of corrosion of the concrete Resitest-400M is very effective, there are a few difficulties that must be overcome to obtain reliable results, owing to the character of the concrete. Because the concrete is an electrically non-homogeneous material, it is likely to be affected by the ambient temperature and the moisture content of the concrete. Measuring the same point by the Resitest-400M, the accuracy of the result should be within ± 1%. However, it must be remembered that can vary as the moisture content changes. the resistivity of Resitest 400M-June-2011-mkc-6/28 concrete Values of less than 1㏀.cm water-saturated concrete can increase to over 100㏀.cm for the concrete when oven-dried. the for same Therefore, affected be by sure the that the ambient electrical resistivity temperature and of the the concrete moisture is content change. Also an electrical current is affected by the reinforcement bar in the concrete. Therefore, if the measurement is to be conducted on the area of concrete with reinforcement bar, use the Covermeter-3000 (Q-see man int'l) or other concrete cover meters to locate precisely the position of the reinforcing bars. Thereafter, keep the Wenner sensor as far as possible from reinforcement bars. When the surface of the concrete is more narrower than the widthof the Wenner sensor (150 mm) or when all of the four electrodes could not contact with the surface of the concrete that is too rough, the measurements are impossible. The Resitest-400M consists of a row of electrodes arranged at 50 mm spacing in a straight line. If the spacing is too small, the presence or absence of the individual aggregate particles, usually having a very high resistivity, will lead to high degree of scatter in the measurements. Using larger spacing may lead to inaccuracies due to the current field being constricted by the spacing will also increase the error in the measurement of the concrete resistivity due to the increased influence of the conductive reinforcing steel embedded below the surface of the concrete. Therefore, in case that the surface of the concrete is more smaller the 150 mm, the measurements could be impossible. In case that the surface of the concrete is crooked or hollow, the measurement could be impossible as well. Because the Wenner sensor is paralleled, all of the four electrodes should be contacted on the surface of the concrete. The results may be affected by the contact condition between the electrodes and the concrete surface of the concrete. In case Resitest-400M, it is easy to get the most accurate results using special ring, should always pay attention to the contact condition. Resitest 400M-June-2011-mkc-7/28 5. Preparation for use of Resitest-400M a. How to insert the sponge into the Wenner sensor. The sponge condition of to measurement, the get the Wenner sensor accurate sponge should results. need to always Before be be and cleaned, kept clean after using every Bath Tub (water container), which is supplied with the instrument during measurement. Soak the sponges in water and insert them to the rings. After use, take out the sponges to wash in tap water or clean water. From time to time you should wash them, using bath tub. b. How to connect the Wenner sensor to the main body. After connecting the cable to the sensor, connect the cable to the socket in the main body. If the main body is turned before connecting the cable to the main body, the main body may be damaged during connecting the cable so that it is advisable to turn the instrument after connecting cables. c. Concrete Surface If the concrete surface is dry or wet, this can cause significant error. Also when the concrete surface is stained, it can not be measured and may cause significant error. If possible, therefore, it is advisable to keep the concrete surface as the best condition. In case of the concrete surface coated with oil paint, it is impossible to measure the electrical surface coated resistivity. with Likewise water paint, in the event measurement of the concrete may be incorrect. Should be drilled 2 - 3 mm hole into the concrete in order to get the best results. Resitest 400M-June-2011-mkc-8/28 d. Main body The Resitest-400M consumes the battery quite much so that you would better take the instruments with full charged. Before going on site, turn on the instrument and check whether the instrument is operated well. Check if the measurement is O.K with reference block. While there is no pre-defined minimum spacing between measurements on the surface of the concrete member, it is of little value to take Conversely, neither two measurements measurements detect corrosion taken activity from with that is virtually very the wide present nor same point, spacing result may in the appropriate accumulation of data for evaluation. The spacing shall therefore be consistent with the member being investigated and the intended end use of the measurements. Generally, a spacing of 50 cm has been used on site. But in case of the place where the probability of corrosion is high, smaller spacing is recommended. When measuring at a certain place, it is better to keep the Wenner sensor as far as possible from the reinforced bars. Resitest 400M-June-2011-mkc-9/28 6. How to maintain Resitest-400M a. How to maintain the Resitest-400M. If possible, it is advisable for the Resitest-400M to be kept in AL carrying case. By doing so, the Resitest-400M is prevented from moisture and dust. And in case of dropping that were caused by mistake, damage can be minimized as well. The Resitest-400M can be continuously used for about 5 hours. This is why before using it, the battery should always be recharged. b. How to maintain the Wenner sensor. In the event of the measurement of the electrical resistivity of concrete structures for the assessment of corrosion risk, 4 electrode Wenner sensor accuracy of between the is the used on instrument sponge and all is occasions affected the by concrete so far. the contact surface, Because the the condition sponge condition should be all the time. When the measurement is finished, after pulling out the sponges and get rid of the moisture and then keep them dry. The part of the Wenner sensor which is made of the metal should be got rid of the moisture and kept from rust. If the sponge is worn away, should be changed as new one. Resitest 400M-June-2011-mkc-10/28 7. Operation of Resitest-400M ① MENU (MODE: pressing for a second or longer) MENU: Select MENU. In MENU mode, stored data is called or erased and it is possible to set up time. MODE: Measurement mode is selected. Resitest-400M has normal measurement mode and mapping mode. To change the mode, it should be pressed for a second long. ② HOLD/SELECT (RANGE: pressing for a second or longer) HOLD: used the measurement to be hold. Then signal lines of probe icon on the upper left are stopped and HOLD icon is displayed. By pressing again, get back to measurement mode. SELECT: It is used in MENU mode to enter into selected MENU or enter into set up. RANGE: Used to select measurement range. To change measurement range, press this key for a second or longer. There are 3 measurement ranges, 0~20, 20~200, 200~2,000(kΩ). In case the measurement is not within measurement range, “OUT OF RANGE" is displayed in LCD. ③ SAVE To save or store what is measured. ④ CANCEL Get back to measurement mode or cancel set up. ⑤,⑥ ▲/▼ To select MENU or make a set up in MENU mode. Resitest 400M-June-2011-mkc-11/28 ⑦ POWER Switch ON/OFF switch to power or not. ⑧ RS-232 connector Used to transfer the stored data to PC. 3PIN SERIAL CABLE should be used which was supplied with the instrument. ⑨ CHARGER socket The socket is for rechargeable batteries inside. The charger supplied with the instrument should be used. How to recharge batteries: First connect the plug in the charger to the socket⑨ in the instrument and plug the power plug to 220 or 110V power. When the adaptor is connected, red and green LED are lighted. When the batteries are fully charged, green LED is extinguished. ⑩ SENSOR connector To connect Wenner sensor to the instrument. The point marked with black dot is the upside. Resitest 400M-June-2011-mkc-12/28 8. Inspection using Resitest-400M 1. Inserting the sponge into the Wenner sensor. Insert all of the soaked four sponges into the holes of the sensor's contact. Before inserting the sponges, wash them in tap water or clean water. During surveying, if the sponge is dried, the sponge should be soaked in water using bath tub. 2. Connecting the Wenner Sensor to the main body. After connecting the cable to the Wenner sensor, connect it to the socket of the main body. 3. Turning on the Resitest-400M. Power on, using the power key. At that time the Resitest-400M should be displayed 000 or 001. 4. Confirming the Resitest-400M using the reference block. When the Wenner sensor of RT-400M is contacted on the reference confirm if it displays in the range of 62.5㏀.cm ±1.5 or not. The displayed value in Resitest-400M should be within the range of 61.0 - 64.0㏀.㎝ Resitest 400M-June-2011-mkc-13/28 9. Operation according to each mode 1. Normal Measurement Mode In normal measurement mode, traditional measurement is performed. After measurements, Max value, minimum value, number of stored data are displayed. How to store data measured a. Contact Wenner sensor on concrete and ascertain the measurement. b. Press HOLD key to hold measurement. c. After ascertaining if the measured value is correct, press SAVE key and then SELECT key to store the measurement. When CANCEL key is pressed, the measurement is not stored and returns to normal measurement mode. d. When a datum was stored, SAVE COUNT: 1 is displayed on the bottom of LCD. Resitest 400M-June-2011-mkc-14/28 How to call stored data a. Press MENU key to open MENU window. b. Select “LOAD DATA” by pressing ▲/▼ key and press SELECT key. c. Data numbers, date and measurement value are displayed one after one. How to delete stored DATA a. Press MENU key to open window. b. By pressing ▲/▼ key, select “ALL DATA CLEAR” and press SELECT key. Resitest 400M-June-2011-mkc-15/28 c. If press SELECT key when “warning!" message appears, all dat stored are deleted. d. It can be ascertained by opening LOAD DATA window. Resitest 400M-June-2011-mkc-16/28 How to set up time a. Open MENU window by pressing MENU key. b. Press ▲/▼ keys to select “TIME SET” and press SELECT key. c. Press SELECT key in "CURRENT TIME" to change the year. d. Press ▲/▼ keys to set the year and then press SELECT to select the month which is changed in red color. Press ▲/▼ keys to set the month and press SELECT key. The others are set up in same manner. e. When set up is completed, press CANCEL key to close CURRENT TIME window. Resitest 400M-June-2011-mkc-17/28 2. Mapping Mode In MAPPING mode, the operator can edit any co-ordinates and store measurement values in the co-ordinates and finally generate contour mapping image. How to set any X,Y co-ordinates FORMAT a. Press MENU to open MENU window. b. Press ▲/▼ key to select “NEW FORMAT” and press SELECT key. c. When "WARNING!" message appears, press SELECT key. At this point, not stored data are deleted. d. After input x, y co-ordinates values in NEW FORMAT window, press SELECT. (The co-ordinate values are set up by 2 x 2 through 10 x 10.) e. After set up, press CANCEL key to return to measurement mode. \ Resitest 400M-June-2011-mkc-18/28 How to store measurement values in the FORMAT a. After set up, contact the Wenner sensor on the concrete surface and ascertain the measurement. b. Press HOLD key to hold the measurement value. c. Press SAVE key to ascertain the measurement value in MENU window, After ascertaining if the value is correct, press SELECT key to store the measurement. When CANCEL key is pressed, the measurement is not stored and return to measurement mode. d. Contact Wenner sensor on the second point. After ascertaining the measurement, repeat the b-c procedure to store the data. e. When all the blue colored cursors are gone and all the measurement points are mapping procedure is completed. Resitest 400M-June-2011-mkc-19/28 stored, then f. During measurement or after the completion of image mapping, it is possible to ascertain stored data using ▲/▼ keys by moving green cursor to any co-ordinates wanted. The stored data appears in blue color on the right side bottom. ※ In contour mapping, represented by blue high resistivity color and is low resistivity in red color. How to store completed image MAPPING FORMAT a. After ascertaining the completed contour mapping, press SAVE key. b. Using ▲/▼ keys select memory number from 1 to 5 to store the data. c. After selecting the number, press SELECT key to store the contour MAPPING. Resitest 400M-June-2011-mkc-20/28 How to delete MAPPING FORMAT during operation In order to store new data, formerly stored data should be deleted. a. Stop present operation. b. Press MENU key to open MENU window. c. Press ▲/▼ keys to delect “ALL DATA CLEAR” and press SELECT key. d. WARNING! message appears and press SELECT key. e. Press CANCEL key to return to measurement mode and store data from the first point. Resitest 400M-June-2011-mkc-21/28 How to transfer MAPPING DATA to PC a. Press MENU key to open MENU window. b. Press ▲/▼ keys to select “SEND DATA” and press SELECT key. c. In INFORMATION window, select memory number in which your data are stored using ▲/▼ key. d. After selection, press SELECT key to transfer the data in the memory number. e. When the data are transferred to TRANSFER COMPLETE!" message appears. Resitest 400M-June-2011-mkc-22/28 PC, "DATA How to transfer MAPPING DATA using RT-400 FC program RT-400 FC enables to send MAPPING DATA stored in the instrument to convert it to inp file. The converted inp file enables to generate detailed contour mapping and report format using Resitest-4040 software in CD. a. Excute Setup.exe file to install RT-400FC program in PC. b. Click Start Download button to transfer the MAPPING DATA stored in RT-400M. c. After the transfer, allocate file name and position. d. The stored data can be checked in LCD. Resitest 400M-June-2011-mkc-23/28 10. Analysis of results When measuring the corrosion of concrete, the electrical resistivity is affected by the ambient temperature and the moisture content of the concrete as described in the above. That is why it is difficult for the electrical resistivity to fix the specific datum point of the results. However, the following table is generally used on site as the reference analysis. If the resistivity is less than 5㏀ corrosion risk is very high 5 - 10㏀ corrosion risk is high 10 - 20㏀ corrosion risk is moderate 20 - 199.9㏀ good / corrosion risk is low greater than 200㏀ good Resitest 400M-June-2011-mkc-24/28 for 11. Maintenance a. Troubleshooting ■ Turning on the power key, but nothing appears. Battery is exhausted, battery should be recharged. ■ Even making a measurement, '0000' does not disappear. Check the contact status on the concrete. Confirm whether the cable is duly connected. ■ The sponge is not inserted into the sensor ring. After soaking the sponge, and then insert it. ■ Measured results are unstable in the same position. The state of contact is not good. Resitest 400M-June-2011-mkc-25/28 12. Specifications Measurement Method: Electric Resistivity using Wenner sensor Measuring Range: 0~20 ㏀ / 20~200 ㏀ / 200~2,000 ㏀ Display Resolution : 0.1 ㏀ / 1 ㏀ Measurement Accuracy : ±1 ㏀ Maximum Range: 2,000 ㏀ Power : 6 x 1.2V AA Recghargeable Battery Battery Life : Continuously 4 hours Display : 3.2" TFT Color LCD Size : 105(H) mm x 172(W) mm x 68(D) mm Weight : 990 gram (main body) Resitest 400M-June-2011-mkc-26/28 Concrete Corrosion Analysis & Report Program This application software is supplied with Half-Cell 200 (concrete rebar corrosion tester) or Resitest-400M (Concrete Resistivity Tester) made by MKC Korea. The software is protected by copyright and if any one who needs a copy of the software without purchasing M.K.C Korea's product should contact us and purchase the software. This software is supplied without any charge. We do not support the software and do not offer upgrade service. 1. Window98 User Read "Electronic User Manual". 2. Windows95 User ① Things to be checked: This software runs on Windows95 but some version of Windows95 could cause problem. Please check below: Check Windows version number. Go Start->Setting->Control panel->System->General-> "System: ?.??.??? ?" ?.??.??? ? is the version number. Check the number with below Windows 95 (initial version) - 4.00.950Windows 95 (OSR1) - 4.00.950 AWindows 95 (OSR2) - 4.00.950 B ? Windows95 initial version and OSR1 user can go ahead to install Half-Cell 2020 / Resitest 4040 application software. Insert the CD to CD-ROM drive and install Internet Explorer in Ie_401 folder. After installation is finished, read "Electronic User Manual". (If Internet Explorer is not installed, the software may not work properly ? For windows95 OSR2 users, read "② Checking Internet Explorer installation" Resitest 400M-June-2011-mkc-27/28 ② Checking Internet Explorer installation Check if Internet Explorer is installed in your PC, (In general Internet Explorer is installed in a PC) If Internet Explorer is installed, read "Electronic User Manual". If Internet Explorer is not installed, insert the Half-Cell 2020 / Resitest 4040 application installation CD to the CD drive then install Internet Explorer in Ie_401 folder (Ie4setup.exe). After the installation is finished, read "Electronic User Manual". 3. How to use Electronic User Manual; The User manual file is in the CD. Internet Explorer is needed to read the User Manual. Insert the Half-Cell 2020 / Resitest 4040 application installation CD to the CD drive and open Manual folder then open the manual file you want. The manual explains software installation, software usage and report printing. Resitest 400M-June-2011-mkc-28/28