1
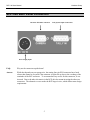
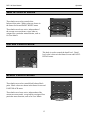
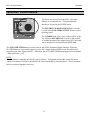
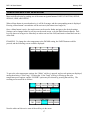
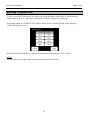
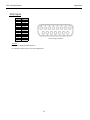
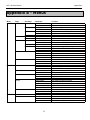
RC
RC
CP
P-1
16
60
0
P
O ERA
OPE
ERA
ATIO
ON MAN
MANUA
NUA
AL
OPE
O
ATIO
ON
M
AL
RCP-160 User Manual
Table of Contents
Table of Contents
Warnings/Safety Precautions ................................................................................................................. 2
Regulatory Compliance ........................................................................................................................... 3
Product Overview .................................................................................................................................... 4
RCP-160 Remote Control Panel - Top ................................................................................. 4
RCP-160 Rear Panel Connectors.......................................................................................... 5
Hardware Setup ....................................................................................................................................... 6
System Requirements ........................................................................................................... 6
Powering the RCP-160 ......................................................................................................... 6
RS-232 Connections ............................................................................................................. 7
EIA-485 Connections ........................................................................................................... 8
Tally Connections................................................................................................................. 9
Operation ................................................................................................................................................ 10
Panel Active Button............................................................................................................ 10
Camera Selection Buttons .................................................................................................. 10
Feature Buttons................................................................................................................... 11
Menu Navigation Buttons .................................................................................................. 12
Touch-screen LCD and Multi-Function Knobs .................................................................. 12
WHITE Control Knobs ...................................................................................................... 13
DETAIL Control Knob ...................................................................................................... 13
BLACK Control Knobs ...................................................................................................... 13
MASTER BLACK Control Block...................................................................................... 14
Lens Control Block ............................................................................................................ 14
IRIS/ELC Control Block .................................................................................................... 15
Using the Menus ..................................................................................................................................... 16
Status Screen ...................................................................................................................... 16
Touch-screen LCD Workflow ............................................................................................ 17
Feature Compatibility ......................................................................................................... 19
User Matrix Adjustment ..................................................................................................... 20
Memory Stick Interface ........................................................................................................................ 21
Using Memory Sticks ......................................................................................................... 21
Types of Memory Sticks .................................................................................................... 21
Memory Stick Insertion ...................................................................................................... 21
Formatting the Memory Stick ............................................................................................ 22
Loading a Scene File .......................................................................................................... 22
Storing a Scene File ............................................................................................................ 23
Appendix A - Connector Pin-Outs ....................................................................................................... 24
Appendix B - Menus .............................................................................................................................. 26
Appendix C - Specifications .................................................................................................................. 28
1
RCP-160 User Manual
Warnings
Warnings/Safety Precautions
The following must be read and followed before using the RCP-160.
•
Power supply:
• Nominal Voltage: 12V DC
• Absolute Minimum: 9V DC
• Absolute Maximum: 22V DC (peak)
• 500mA maximum current requirement
•
Use only the specified power source voltage and connection cord. The wrong source could result
in fire or electric shock.
•
Do not use this unit in situations that exceed the
( 5° to 40° C ). This may cause malfunction and/or damage the unit.
•
Do not touch the power cord or cables during a thunderstorm.
•
Operation near any appliance which generates strong magnetic fields may give rise to noise in the
communications or video signals.
•
Do not place unit into a confined space. Make sure adequate ventilation is available at all times
during use. Failure to do so may cause your unit to overheat and cause a fire hazard or electric
shock.
•
Electric shock warning: Do not remove cover. There are no user serviceable parts inside.
•
Use with recommended accessories only.
•
Do not use this unit in a place where it could come in contact with water, moisture, steam, dust, or
smoke. This could cause fire, electric shock, or camera failure.
•
To reduce the risks of fire, shock and damage, do not expose this unit to rain, snow, inclement
weather, moisture, or high humidity. Keep this unit away from all liquids. Do not place liquid
containers on the top of the unit.
2
temperature
specifications
RCP-160 User Manual
Warnings
Regulatory Compliance
USA:
WARNING: This equipment has been tested and found to comply with the limits for Class A digital
device pursuant to Part 15 of the FCC Rules. These limits are designed to provide reasonable protection
against harmful interference when the equipment is operated in a commercial environment. This
equipment generates, uses, and can radiate radio frequency energy and, if not installed and used in
accordance with the instruction's manual, may cause interference to radio communications. Operation of
this equipment in a residential area is likely to cause interference in which case the user will be required to
correct the interference at his/her own expense.
The user is cautioned that changes and modifications made to the equipment without approval of the
manufacturer could void the user's authority to operate this equipment.
CANADA:
This Class A digital apparatus meets all requirements of the Canadian Interference-Causing Equipment
Regulations.
Cet appareil numerique de la classe A respecte toutes les exigences du Reglement sur le materiel
brouilleur du Canada.
DISPOSAL:
This product contains some components with regulated disposal due to environmental considerations.
This symbol means that used electrical and electronic products should not be mixed
with general household waste.
For disposal or recycling information please contact your local authorities, or the
Electronics Industries Alliance.
If you wish to discard this product, please contact your local authorities or dealer and ask for the correct
method of disposal.
3
RCP-160 User Manual
Hardware Setup
Product Overview
The RCP-160 is a rack-mountable remote control panel designed for the remote control of up to six (6)
Iconix Video, HD-RH1 remote head camera systems.
RCP-160 Remote Control Panel - Top
Camera Selection Buttons
Feature Buttons
LCD Menu Function Buttons
Touch-screen LCD
Multi-Function Knobs
Detail Knob
WHITE Control
BLACK Control
Master Black Control Block
Lens Control Block
Memory Stick Slot
ELC/Iris Control Block
Panel Active Button
4
RCP-160 User Manual
Hardware Setup
RCP-160 Rear Panel Connectors
RS-232 & EIA-485 Connection
Tally System Input Connections
Power Supply Input
FAQ:
Why are the connectors upside down?
Answer:
While that depends on your perspective, the mating four-pin XLR connector has a latch
release that cannot be accessed if the connector is right-side up, due to the overhang of the
remainder of the RCP enclosure. To accommodate easy access for this connector, it was
inverted. Due to the other electronics in the RCP, this also meant inverting the other two
connectors. The alternative was to make the RCP larger in size, which did not meet design
requirements.
5
RCP-160 User Manual
Hardware Setup
Hardware Setup
System Requirements
Typical System Requirements for remote control operation:
•
•
•
•
RCP-160
DSUB-9 male-to-female serial cable
+12V DC power supply
Iconix video camera (and required accessories)
Powering the RCP-160
The RCP-160 may be powered by either an external power supply, or a camera that provides +12V DC
remote power via the serial port connector, such as the Iconix HD-RH1F**.
When using the RCP-160 a long distance from the camera, powering the RCP-160 with an external power
supply is recommended. In some cases, an external supply must be used, such as when using a media
converter (such as for fiber optic) or when communicating through a hub or other equipment.
Powering the RCP-160 via camera remote power is only recommended for reasonably short distances, and
when communicating to only one camera per RCP-160.
When an RCP-160 is connected to both an external power supply and a camera that provides remote
power, the RCP-160 will default to use the external supply as the primary source. Should the external
supply be removed, the RCP-160 will automatically switch to camera remote power. However, depending
on the nature of the removal or failure of the external supply, un-interrupted operation may not occur. In
some power failure cases, the RCP-160 will be forced to completely power down and restart under camera
remote power.
**Note: Older version HD-RH1 cameras do not typically supply +12V DC to the serial connector.
6
RCP-160 User Manual
Hardware Setup
RS-232 Connections
RS-232 communication is used for single-point camera control, at typical distances from 50-ft (15m), and
up to 500-ft (150m) with good-quality cable.
Iconix does not support multiple-camera operation with RS-232. RS-232, by nature, is not a multi-drop
system. If multiple-camera operation is required with RS-232, then a third-party RS-232 “hub” or similar
device is required.
The RCP-160 is configured as DTE for RS-232 connections. Iconix cameras are always configured as
DCE. Iconix RS-232 hardware uses only the RX, TX, and GND signals. Other signal lines (CTS, RTS,
DTR etc.) are “looped back” for proper operation with other devices that require them.
The pin-out of the “CAMERA” connector when in RS-232 mode is as follows:
Pin Number
1
2
3
4
5
6
7
8
9
RS-232 Signal
DCD
RXD
TXD
DTR
GND
DSR
RTS
CTS
+12V DC IN
(View facing rear panel )
7
RCP-160 User Manual
Hardware Setup
EIA-485 Connections
EIA-485 communication is implemented as a four-wire full-duplex system. This is to achieve full-duplex
multi-camera control with minimal overhead and bus contention. The EIA-485 interface can be used to
communicate over distances up to 4000-ft (1200m) with good quality twisted-pair cable.
Similar to the RS-232 convention of DCE and DTE, Iconix has implemented a “Master” and “Slave” pinout for the serial connectors. This is to allow the use of standard serial cables for short runs and
straightforward long-distance wiring, without the need for a NULL modem or other pair-swapping
methods.
The RCP-160 is wired as a “Master” device.
With this wiring convention, Pin 2 of the RCP-160 always goes to Pin 2 of the camera. Pin 3 to Pin 3, Pin
7 to Pin 7, Pin 8 to Pin 8, and so on.
It is recommended that good quality twisted-pair cabling be used for longer runs, such as Cat 3, Cat 5, Cat
5e, or Cat 6 cable.
The pin-out of the “CAMERA” connector when in EIA-485 mode is as follows:
Pin Number
1
2
3
4
5
6
7
8
9
EIA-485 Master"Signal
RXA (-)
TXA (-)
GND
TXB (+)
RXB (+)
+12V DC IN
(View facing rear panel)
This EIA-485 system may be wired multi-drop to accommodate up to six cameras, but the maximum
distance requirement must be met. Refer to the EIA-485 specification and published recommendations for
single drop and multi-drop wiring schemes, terminations, and hardware.
8
RCP-160 User Manual
Hardware Setup
Tally Connections
The RCP-160 provides a means for both red and green tally lights for all six possible cameras under its
control. The interface to the tally system is provided with a female DSUB-15 connector, which is wired
as follows:
Pin Number
1
2
3
4
5
6
7
8
9
10
11
12
13
14
15
Tally Signal
GND
CAM1 Red
CAM2 Red
CAM3 Red
CAM4 Red
CAM5 Red
CAM6 Red
GND
CAM1 Green
CAM2 Green
CAM3 Green
CAM4 Green
CAM5 Green
CAM6 Green
GND
(View facing rear panel)
The tally system can work in one of two standard tally configurations: contact closure, and open-drain.
For Contact Closure setup, wire the contacts between the desired tally pin (such as CAM1 Red), and one
of the GND pins.
For Open-Drain (or Open-Collector) configuration, connect the Drain (Collector) of the transistor to the
desired tally pin (such as CAM2 Green), and the Source (Emitter) of the transistor to one of the GND pins.
In both open-drain and contact closure configurations, the GND pins may be used common to multiple
tally lines. Multiple GND pins are provided for convenience, and not all need be connected externally for
proper operation.
9
RCP-160 User Manual
Operation
Operation
Panel Active Button
The Panel Active button must be activated (glowing
green) to control camera settings.
If the Panel Active button is not active, some menus may
still be navigated, but no adjustments can be made until it
is pressed and made active.
Camera Selection Buttons
Camera Selection
To select the active camera to be controlled, press the appropriate
CAM button. When selected, the CAM button will light up orange.
The RCP-160 will default to CAM 1, which has a factory default
address of zero (0). The unique serial protocol address of each
individual camera to be controlled must be assigned in the CONFIG
menu.
Tally indication
When a CAM button glows red, it indicates Red Tally condition.
When a CAM button glows green, it indicates a Green Tally condition.
If a camera is selected while tally is active, the CAM button will toggle between orange (selection color)
and the tally color (red or green).
10
RCP-160 User Manual
Operation
Feature Buttons
STANDARD Button
This button is used to set up the camera to a standard default
configuration. When pressed, this button will blink while this
operation is being performed, and turn off when complete.
FOCUS ASSIST Button
This button is used to activate the camera’s focus assist feature.
When pressed, this button will glow orange.
TEST Button
This button is used to activate the camera’s ramp test pattern output. When pressed, this button will glow orange.
BARS Button
This button is used to activate the camera’s color bar test pattern output. When pressed, this button will glow
orange.
CLOSE Button
This button is used to close and open the iris of a compatible lens when connected for control by the camera. When
active (iris closed), this button will glow orange.
5600K Button
This button is used to set the camera to 5600K color temperature settings. When in 5600K, this button will glow
green. Toggling this button to the inactive position will change the camera to 3200K settings. Note: This button
not being illuminated does not necessarily indicate 3200K settings, as other color temperature settings may be
selected in the menu. The STATUS screen will give an indication of the color temperature currently active.
AUTO KNEE Button
This button is used to activate the camera’s automatic knee circuit. When deactivated, the manual knee settings
will be enabled. When active, this button will glow green.
SKIN DETAIL Button
This button is used to turn on the skin detail feature. When active, this button will glow green.
BLACK GAMMA Button
This button is used to turn on the black gamma settings. When active, this button will glow green.
AWB Button
When pressed, this button will activate the Automatic White Balance function, and will blink orange until this
function is completed. This button will momentarily glow green if the AWB operation succeeds, and glow red if
the AWB operation fails.
ABB Button
When pressed, this button will activate the Automatic Black Balance function, and will blink orange until this
function is completed. This button will momentarily glow green if the ABB operation succeeds, and glow red if the
ABB operation fails.
11
RCP-160 User Manual
Operation
Menu Navigation Buttons
These buttons are used to access major menus
for touch-screen LCD navigation.
Pressing a Menu button will bring up a
corresponding menu for navigation, as described
below. Pressing it again will return to the
STATUS screen
PAINT Button
This button is used to access the PAINT menu, which control settings such as white balance and gamma.
FUNCTION Button
This button is used to access the FUNCTION menu, which control settings such as gain and shutter.
SCENE Button
This button is used to access the SCENE menu, which is used to change files settings, and access the memory stick.
SIGNAL Button
This button is used to access the SIGNAL menu, which controls settings such as format, frame rate, genlock.
LENS Button
This button is used to access the LENS menu, which accesses lens control settings, and configures the ELC/Iris
control block.
CONFIG Button
This button is used to access the CONFIG menu, which is used for RCP panel setup, and for camera
communications settings.
Touch-screen LCD and Multi-Function Knobs
The touch-screen LCD is used to display status
information, operation feedback, and to navigate
control menus. These menus are accessed via
the Menu Navigation Buttons described above.
The four multi-function knobs just below the
LCD are used to control parameters accessed via
the touch-screen menus. The function of each
knob will vary based upon which menu and
control parameter is being accessed.
12
RCP-160 User Manual
Operation
WHITE Control Knobs
These knobs are used to control white
balance/white paint. White values are shown in
the Status Screen and PAINT-WHITE menu.
These knobs are always active, independent of
the current on-screen menu, except when reassigned for a particular menu function, such as
for User Matrix.
DETAIL Control Knob
This knob is used to control the detail level. Detail
level value is shown in the Status Screen and PAINTDETAIL menu.
BLACK Control Knobs
These knobs are used to control black balance/black
paint. Black values are shown in the Status Screen and
PAINT-BLACK menu.
These knobs are always active, independent of the
current on-screen menu, except when re-assigned for a
particular menu function, such as for User Matrix.
13
RCP-160 User Manual
Operation
MASTER BLACK Control Block
The MASTER BLACK knob is used to raise and lower
the master black level. The master black value is shown
in the Status Screen and PAINT-BLACK menu.
This knob can only be used to adjust the master black
level when the MB ACTIVE button is active (glowing
green).
Lens Control Block
The ZOOM, FOCUS, and IRIS rocker switches are used
to control motorized lens functions. When the upper rocker
switch is pressed, the corresponding lens motor will be
driven forward. When the lower rocker switch is pressed,
the motor is driven in reverse.
The speed (PWM) and voltage for the motors controlled by
these rockers is set in the LENS menu.
These rocker switched can only be used to drive the lens motors when the LENS button is active (glowing
green).
NOTE:
This lens control block is meant to control operation of a lens with motorized zoom, focus, and iris. These
buttons control only the PWM DC motor outputs of a camera. A DC-style iris (as opposed to DC
motorized iris), must use the ELC/IRIS block. These functional blocks are not tied together in any way.
14
RCP-160 User Manual
Operation
IRIS/ELC Control Block
This block may be used to control ELC (electronic
shutter) or a compatible iris. This programmable
function is selected in the CONFIG menu.
The ELC/IRIS, COARSE and SENS knobs can only
be used when the ELC/IRIS ACTIVE button is active
(glowing green).
The COARSE knob is for coarse control of ELC or the
Iris, while the ELC/IRIS knob is used for fine control.
A variable amount of fine control for the ELC/Iris knob
can be increased or decreased by the SENS knob.
The AUTO SHUTTER button is used to turn on and off the Automatic shutter function. When the
ELC/IRIS button is active and the panel is set for ELC control in the CONFIG menu, this button will
toggle between Auto Shutter and ELC. Otherwise, the AUTO SHUTTER button toggles between shutter
= auto, and shutter = off
NOTE:
This Iris control is intended only for DC-style iris lenses. These knobs will not the control DC motor
outputs of a camera, which are controlled by the Lens Control Block, described above. These functional
blocks are not tied together in any way
15
RCP-160 User Manual
Memory Stick
Using the Menus
Status Screen
The Status Screen is shown on the LCD at panel start-up, and is shown when no menus are active (all
Menu Navigation buttons are OFF).
This screen shows current status information for a number of parameters, including Color Temperature,
Shutter, Gain, and current Scene file.
Additionally shown on the Status Screen are the values for all eight of the dedicated knobs for White,
Detail, Black, and Master Black.
The Color Temp, Shutter, Gain, File, and Detail parameters shown in this screen are also live soft-key
“short-cuts”. If pressed, they will jump to their corresponding menu screens for more information and
further adjustment. For example, pressing the Detail soft-key will bring up the Detail page of the PAINT
menu, which can be used to turn on or off Detail, and also adjust Skin Detail.
16
RCP-160 User Manual
Memory Stick
Touch-screen LCD Workflow
Menu workflow begins by pushing one of the menu navigation buttons: PAINT, FUNCTION, SCENE,
SIGNAL, LENS, and CONFIG.
When a Menu button is pressed and active, it will be lit orange, and the corresponding menu is displayed.
Pressing a Menu button a second time will de-activate it (the button is no longer lit)
Once a Menu button is active, the touch-screen can be used to further navigate to the desired settings.
Settings can be changed either by soft keys on the touch-screen, or by the Multi-Function Knobs. Softkeys are shown as being active when they are white text in a blue field, and inactive when black text in a
white field.
EXAMPLE: To change the color temperature to the D4300K setting, the PAINT button would be
pressed, and the following screen would be displayed:
To get to the color temperature settings, the “White” soft-key is pressed, and several options are displayed,
among them being “Color Temp”. Pressing the “Color Temp” soft-key will bring up the color
temperature preset options, and the “D4300K” option may be selected by pressing that soft-key. The
resulting screen would be as follows:
Note the white-on-blue active state of the soft-keys in the menu.
17
RCP-160 User Manual
Memory Stick
For some parameters, the Multi-Function Knobs are used for adjustment. For White Clip adjustment
(FUNCTION menu), the screen is as follows:
In this case, the left-most Multi-Function knob is used to adjust, as shown highlighted in white below:
Some screens will have as many as four parameters to be adjusted by the multi-function knobs. The
parameters will appear above each knob used to adjust, in order.
*A complete menu tree of all menus pages and parameters is provided in Appendix B.
18
RCP-160 User Manual
Memory Stick
Feature Compatibility
There are some features the RCP can control that are not supported by all cameras. When this is the case,
the RCP will simply not display the information for that feature, or will apparently not respond to a
command. An example would be when the “Skin Detail” button is pressed and the camera does not
support the skin detail feature. In this case, the button will not light up, as the command was not
acknowledged.
Additionally, in the menus, an unsupported parameter value will be shown only as a double-dash (- -)
instead of a number.
For example, some newer Iconix cameras, such as the HD-RH1F, will use the “Normal” white balance
mode on the RCP-160 to control white levels.
However, some older cameras will not support white level control while in “Normal” mode, due to a
different control structure. These cameras also do not support black level control. In this case, the white
and black values will be unavailable to the RCP, and will be shown as a double dash “- -" in the PAINT Æ
White and PAINT Æ Black menus, and the Status Screen, as shown:
To maintain compatibility, the RCP-160 has the ability to control the older style interface.
Black control for these cameras is only available via ABB, or pedestal control. Pedestal control is
available in the PAINT Æ Black Æ Pedestal menu.
White control for these cameras is achieved by AWB, or by switching the RCP-160 to “Manual” white
balance mode via the PAINT Æ White menu. When in this mode, Red and Blue may be controlled, but
not Green. The White knobs will then control the white for these cameras, and the Status Screen will
appear as follows for an older camera when in this mode:
19
RCP-160 User Manual
Memory Stick
User Matrix Adjustment
One of the advanced features of the RCP-160 is adjustment of the User Matrix using the knobs. In order
to accomplish this, some of the dedicated White and Black knobs are temporarily re-assigned when in this
screen. The User Matrix is accessed from the “PAINT Æ Matrix” menu page, as shown:
Pressing the “User Matrix Edit” soft-key from this screen will bring up the following User Matrix entry
screen:
The six adjustable fields correspond to the following six knobs below the screen as follows (highlighted
white):
Pressing the “Done” soft-key will exit the User Matrix entry, and return to the PAINT menu
It is often desirable to adjust White or Black during User Matrix adjustment, and this can easily be
accomplished by using the PAINT menu button to toggle between the User Matrix screen, and the Status
Screen (to adjust White or Black with the knobs).
20
RCP-160 User Manual
Memory Stick
Memory Stick Interface
Using Memory Sticks
A Memory Stick device may be used to store Scene File data, and to share Scene Files among multiple
RCPs.
Up to eight (8) scene files may be stored on a Memory Stick. The RCP may be used to both send a scene
file to a camera, and to store a Scene File from a camera.
Types of Memory Sticks
There are two types of Memory Sticks: general “Memory Sticks” and “Magic Gate” Memory Sticks,
which use copyright protection technology. Either type may be used with the RCP-160, but the RCP-160
does not support copyright protection. Data stored on the Memory Stick will not be subject to Magic Gate
encryption protection.
Memory Stick Insertion
Insert a Memory Stick with the label side (side with small arrow) on the left into the Memory Stick slot
until it clicks.
To eject the Memory Stick, press down on the Memory Stick in the slot with your finger until it stops.
When you remove your finger, the memory stick will “pop” up, and it may be grasped to be removed.
The Access Lamp near the Memory Stick slot shows the status of the Memory Stick:
Off: No Memory Stick is inserted
Lit Green: The Memory Stick in the slot is inactive, and may be safely removed.
Lit Red: Data is being read or written to the Memory Stick. Do NOT eject the Memory Stick
while in this condition or all data may be lost.
21
RCP-160 User Manual
Memory Stick
Formatting the Memory Stick
If a new Memory Stick is being used, or if erasing it is desired, then it may be formatted for use with the
RCP-160.
In the SCENE menu, navigate to the “SCENE Æ File Utilities Æ Format” menu page. The following
screen will appear, and to format, press “OK”:
Loading a Scene File
To load a scene file, first be sure to be in the active Scene File that it is desired to load it into, either A, B,
or C. This may be done in the “SCENE Æ Scene file” menu page.
Navigate the menus to “SCENE Æ File Utilities Æ Load Scene” which will bring up the following
“Choose Source” screen:
Select the desired File stored on the Memory Stick, and press “Load” to read into the currently selected
Scene File (A, B, or C).
22
RCP-160 User Manual
Memory Stick
Storing a Scene File
To store a scene file, first be sure to be in the active Scene File that it is desired to be stored from the
camera, either A, B, or C. This may be done in the “SCENE Æ Scene file” menu page.
Navigate the menus to “SCENE Æ File Utilities Æ Save Scene” which will bring up the following
“Choose Destination” screen:
Select the desired File number to write into on the Memory Stick, and press “Save” to store.
NOTE:
This will write over any previously stored information at the file location.
23
RC
CP-160 User Manual
M
Ap
ppendices
A
Appe
ndix A - Conn
C necto
or Pin
n-Ou
uts
Power: DC 12V
V In
Pin
n Number
1
2
3
4
Description
D
G
GND
N Connect
No
N Connect
No
+
+12V
DC
NOTES::
Connecttor is standard male
m XLR 4-pin.
Nominall Input Voltagee: 12V DC
Minnimum Input vo
oltage: 9V DC
C
Abssolute Maximum Input Voltagge: 22V DC (ppeak)
500m
mA maximum
m current requirrement
(View facinng rear panel)
Cameraa Comm
municatioon
Pin Number
N
1
2
3
4
5
6
7
8
9
RS-232 Signal
S
DCD
RXD
TXD
DTR
GND
DSR
RTS
CTS
+12V DC
C IN
RS-485 Sign
nal
RXA (-)
TXA (-)
GND
TXB (+)
RXB (+)
+12V DC IN
N
(
(View
facing rear
r panel)
NOTES::
Connecttor is standard male
m DSUB-9..
When inn RS-232 modee, the serial porrt is configuredd as DTE.
When inn RS-485 modee, the serial porrt operates as “full-duplex”
“
R
RS-485
(two paairs: one transm
mits, one receivves). Pinout is Icoonix “Master” pin-out; no need for null modem style cablling when connnected to equippment configurred as
“Slave”, such as Iconix
x cameras.
Pins 7 & 8 (CTS & RT
TS) are tied toggether, and are not used
Pins 1, 4,
4 & 6 (DCD, DTR,
D
& DSR) are tied together, and are not used
24
RCP-160 User Manual
Appendices
Tally Input
Pin Number
1
2
3
4
5
6
7
8
9
10
11
12
13
14
15
Tally Signal
GND
CAM1 Red
CAM2 Red
CAM3 Red
CAM4 Red
CAM5 Red
CAM6 Red
GND
CAM1 Green
CAM2 Green
CAM3 Green
CAM4 Green
CAM5 Green
CAM6 Green
GND
(View facing rear panel)
NOTES:
Connector is standard female DSUB-15.
See Hardware Setup section for use and configuration.
25
RCP-160 User Manual
Appendices
Appendix B - Menus
Menu
PAINT
Page
White
Black
Gamma
Detail
Matrix
FUNCTION Gain
White Clip
Knee
Shutter
Misc
SCENE
Scene File
File Utilities
Sub Page
Levels
Parameter
White Balance Mode
● R/G/B
Shading
Shading Mode
● R/G/B
AWB Area
Area Presets
Edit User Area
Color Temp
Color Temp Presets
Black Level
● R/G/B/Master
Pedestal
● R/G/B/Master
Table
Table Presets
Gamma: On/Off
User Power
User Presets
Black Gamma Range
● Level
Black Gamma: On/Off
● Detail
Detail: On/Off
● Level
Skin Detail: On/Off
Matrix presets
User Matrix Edit
User Matrix: On/Off
Gain Mode
● Fixed Gain
● Var Gain
● Level
White Clip: On/Off
Knee Mode
● Point
● Slope
Shutter Mode
● Exposure
● S-Scan
● ELC
● Auto Level
Digital NR: On/Off
Horizontal Flip: On/Off
Negative Image: On/Off
Scence File Presets
Save Scene
Load Scene
Format
26
Function
Sets Normal or Manual W/B mode
Adjusts levels for white
Selects shading correction mode
Adjusts manual shading correction
Sets picture area used for AWB
Programs user-defined AWB area
Sets color system for proper rendition
Adjusts the pre-gamma black level
Adjusts the pedestal level
Sets the gamma system table
Turns gamma on or off
Sets base power function for User Gamma
Adjusts curve range that black gamma affects
Adjusts amount of crush or stretch
Used to turn black gamma on or off
Adjusts detail enhancement
Turns detail on/off
Adjusts skin detail enhancement
Turns sking detail on/off
Sets the matrix color system
Adjusts user matrix
Turns the user matrix on/off
Sets mode for gain adjustment
Adjusts fixed gain
Adjusts variable (manual) gain
Adjusts white clip level
Turns white clip on/off
Sets mode for knee
Adjusts knee point
Adjusts knee slope
Sets mode for electronic shutter
Adjusts fixed exposure time
Adjusts Sync-Scan
Adjusts ELC level
Adjusts auto shutter level
Turns digital noise reduction on/off
Turns horizontal flip on/off
Turns negative image on/off
Selects active scene file
Saves a scene file to Memory Stick
Loads a scene file from Memory Stick
Formats Memory Stick
RCP-160 User Manual
Menu
SIGNAL
Page
Format
Rate
SDI Out
Genlock
Sync
LENS
Big Knob
Motor Set-up
CONFIG
Comm
Tally
Panel
Appendices
Sub Page
Source
Adjust
Parameter
Format
Rate
SDI Output Modes
Genlock Source
● Line
● Pixel
Genlock On/Off
Analog Sync
DVI Sync Polarity
Big Knob Control
● Zoom
● Focus
● Iris
● Voltage
Communication Mode
● CAM Addresses 1-6
Red Tally: On/Off
Green Tally: On/Off
● LCD
● LED
27
Function
Selects output format
Selects output frame rate
Selects SDI output mode
Selects genlock sync source
Adjusts genlock by line increments
Adjusts genlock by pixel increments
Turns genlock on/off
Selects analog channel for active sync output
Selects sync polarity for DVI outputs
Selects either ELC or Iris operation for Big Knob
Adjusts zoom PWM/speed
Adjusts focus PWM/speed
Adjusts iris PWM/speed
Adjusts motor drive DC voltage
Selects between RS-232 and EIA-485
Selects camera communications addresses
Turns red tally indicators on/off
Turns green tally indicators on/off
Adjusts LCD screen brightness
Adjusts button LED brightness
RCP-160 User Manual
Appendices
Appendix C - Specifications
General
Power Requirements
Power Consumption
Maximum Cable Length
Operating Temperature
Dimensions (w/h/d)
Mass
12.0VDC (9.0VDC min, 22.0 VDC max)
4W max.
500 ft (150 m) RS-232
4000 ft (1200 m) EIA-485
41ºF to 104ºF
5ºC to 40ºC
4.125 x 14.0 x 2.9 inches
102 x 354 x 74 mm
2.6 lb
1.2 kg
Inputs/Outputs
Camera control
CAMERA
TALLY
Up to six (6) with EIA-485
9-pin D-sub connector: RS-232, EIA-485
15-pin D-sub connector: contact closure, open-drain
28
RCP-160 User Manual
Appendices
ICONIX VIDEO INC.
Part Number:
7402 Hollister Ave.
Goleta, CA 93117
(800) 783-1080
Revision A
900004
http://www.iconixvideo.com
29
Printed in USA
©2007