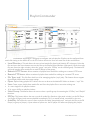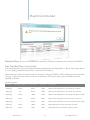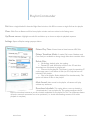
1
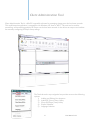
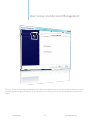
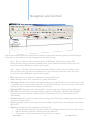
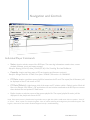
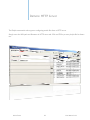
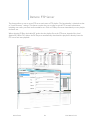
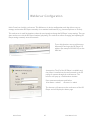
Mvix Ceeno LAN-based Networkable Digital Signage System User Manual Mvix Ceeno 1 User Manual v3.1 Federal Communication Commission Interference Statement This equipment has been tested and found to comply with the limits for a Class B digital device, pursuant to Part 15 of the FCC Rules. These limits are designed to provide reasonable protection against harmful interference in a residential installation. This equipment generates uses and can radiate radio frequency energy and, if not installed and used in accordance with the instructions, may cause harmful interference to radio communications. However, there is no guarantee that interference will not occur in a particular installation. If this equipment does cause harmful interference to radio or television reception, which can be determined by turning the equipment off and on, the user is encouraged to try to correct the interference by one of the following measures: Reorient or relocate the receiving antenna. Increase the separation between the equipment and receiver. Connect the equipment into an outlet on a circuit different from that to which the receiver is connected. Consult the dealer or an experienced radio/TV technician for help. FCC Caution: Any changes or modifications not expressly approved by the party responsible for compliance could void the user’s authority to operate this equipment. Country Code Statement For product available in the USA/Canada market, only channel 1~11 can be operated. Other channel Selections are not possible. To maintain compliance with FCC RF exposure requirements, use only belt-clips, holsters or similar accessories that do not contain metallic components in its assembly. The use of accessories that do not satisfy these requirements may not comply with FCC RF exposure requirements, and should be avoided. CAUTION: Any changes or modifications not expressly approved by the grantee of this device could void the user’s authority to operate the equipment. This transmitter must not be co-located or operating in conjunction with any other antenna or transmitter. Federal Communication Commission (FCC) Radiation Exposure Statement This EUT is compliance with SAR for general population/uncontrolled exposure limits in ANSI/IEEE C95.1-1999 and had been tested in accordance with the measurement methods and procedures specified in OET Bulletin 65 Supplement C. This equipment should be installed and operated with minimum distance 2.5cm between the radiator & your body. CE Statement: This device is in compliance with the essential requirement and other relevant provisions of the R&TTE Driective 1999/5/EC. Mvix Ceeno 2 User Manual v1.0 Table of Contents 1. Introduction 4 2. Playlist and Operation 5 3. Client Device Setup a. Mvix Ceeno Installation b. DS Player Main Menu c. Player Setup Screen 6 6 6 7 4. Remote Control 9 5. Scrolling Text 10 6. Client Administration Tool 11 7. User Group and Account Management 12 8. Server Setup 13 9. Client Setup 14 10. Playlist Scheduler 16 11. Navigation and Control 17 12. RSS Advantage Software 19 13. Playlist Commander 20 14. Remote HTTP Server 23 15. Remote FTP Server 24 16. WebServer Configuration 25 17. Independent Mode 27 18. Warranty 28 19. Trademark and Legal Attribution 29 Mvix Ceeno 3 User Manual v1.0 Introduction Mvix Ceeno is a low cost, digital signage media player with LAN and Internet connectivity targeted toward SMB installations. Ceeno is ideal for use in restaurants for menu boards, schools for directions and signage, real-estate locations as a property showcase, office locations for employee communications etc. Mvix Ceeno signage system can distribute media communication, videos and images over the internet via a web-URL or FTP protocol. It supports a wide variety of digital media files (JPEG, MP3, MPEG1/2/4, Divx) which can be downloaded from any location (web address, ftp location or LAN-based PC) and stored into a local CF card. The playback of this player can be controlled and coordinated via a PC-based Client Administration Tool (CAT), which manages content, coordinates schedules across all signage players on the network and ensures playback of media file sequence as per the pre-defined time schedule. Mvix Ceeno 4 User Manual v1.0 Playlist and Operation 1. Playlist: Playlist is a text file (.mpl) including commands, time schedule, filenames and content server IP address. This Playlist can be created by administrator using CAT (Client Administration Tool) software (included in the Mvix Ceeno bundle). 2. Basic Operation: One of the most basic operations of Mvix Ceeno is to download a playlist and media from a URL or FTP site and play it in loop. Content updates can be performed by simply uploading a new playlist/media on that URL / FTP. The process is simply: o Using your remote control, enter the SETUP MENU of the device and pre-configure network setup and save. Network setup includes username, password, server IP, client DHCP or static IP, and HTTP or FTP server’s URL address to download playlist. e.g. http://www.YOUR-URL-HERE.com/ad/filename.mpl o The administrator uploads playlist file into the specific URL path of HTTP or FTP server Connect AV cables to any TV / LCD display, and Ethernet cable to router or switch. Power up unit, Mvix Ceeno will load the network settings (as saved earlier), initialize LAN, connect to internet and download playlist from fixed URL and store into CF card. Mvix Ceeno is designed to perform this entire sequence by itself. After unpacking the downloaded content, Mvix Ceeno will Interpret playlist file and execute playback of files, time schedule …etc. Media File Playback is configured to loop repeatedly until stopped. Administrators can update new playlist (caution: keep the same file name as before) for network player to load. Mvix Ceeno will download the new playlist file when a reboot is performed. Mvix Ceeno can be configured for an automatic daily reboot, or set to a pre-defined schedule for the player to download content from the configured URL. 3. Monitoring and Management Tool – CAT (Client Administration Tool) CAT is a Windows application to manage multiple signage players / devices thru LAN. This tool should be installed on a Administrative PC – connected over the SAME local-area network (same router or switch). This CAT application allows an administrator to define playlists, create schedules, monitor status of each device on the network and also update content in real-time. CAT is equipped to transfer playlist and media content from the local administrative PC to the signage player, start and stop media playback, start and stop scrolling text and even reboot each device. The entire setup operation of each client can be setup from this application including IP addresses, time zones, scheduled Auto-Start and Stop settings etc. Note: This Manual will refer the Signage Player as Mvix Ceeno or Client interchangeably. In Digital Signage terminology, the signage player is the “client” and the administrative PC is referred as a “server” Mvix Ceeno 5 User Manual v1.0 Client Device Setup 1. Mvix Ceeno Installation Insert a High speed CF memory card (Sandisk Ultra II recommended) in Mvix Ceeno’s CF Card Slot. This Compact Flash card will store all playlist commands, media, schedules etc. (NOTE: Mvix Ceeno cannot be operated without a CF card). It is preferred that the CF Card is formatted via a PC (in FAT32 format structure) before inserting it Ceeno. This step is preferred but not required. CF can be formatted via the CAT application after it is inserted in Ceeno. Plug-in the LAN cable to connect Mvix Ceeno to your LAN or internet network Connect video cable (Component or VGA) to your LCD unit. (Remember to configure the correct TV Input Channel, if the TV does not have auto-sensing capabilities) Connect audio cable to TV unit’s audio connectors Connect AC power adapter to Mvix Ceeno Power-on the signage player (led light should be ON and screen displays show ‘Initializing’) 2. DS Player Main Menu LCD Display should show the following in sequence: o “IInitializing”, o “Initializing LAN”, o “Connecting DHCP Server..”, o “IP Address”, o “CF Card” …. then transitioning to the main menu Note: It may take some time to connect to the network depending on the IP assignment speed from network router. During this stage, the screen will continue to show: “Connecting to DHCP Server” Main Menu will display the following items on the screen Client Local IP: xxx.xxx.xxx.xxx Server IP: xxx.xxx.xxx.xxx or Host name Time: 2010/03/10 15:30 MAC Address: xx-xx-xx-xx-xx-xx Server Connection: ON or OFF or Error Storage: xxx MB Setup : Using the remote, navigate and select “Setup” and press ENTER to enter the Client Setup screen Storage: Using the remote, navigate and select “Storage” and press ENTER to go to file folder of the installed CF card. Mvix Ceeno 6 User Manual v1.0 3. Client Setup Screen Options available under the SETUP menu include: o ‘Network’, o ‘Time’, o ‘Device Schedule’, o ‘Auto Start’, o ‘Language’, o ‘Factory Default’, o ‘Save and Reboot’ and Use the remote, navigate and select any of the above options and press ENTER to configure options Network Setup Screen o User Name and Password: Use the keyboard button on the remote to open a virtual keyboard on o o o the screen. Using the remote, navigate to any alphabets and numbers, press ENTER to select, or use left arrow to erase a letter. After entering the username and password, press the keyboard button again to exit the virtual mode. Press ENTER key to go to next page. Follow on-screen commands. Server IP and Host Name: Use the remote, navigate and select ‘Server static IP’ or ‘Host Name’. Use numeric key pad on the remote to type digits for static IP or use virtual keyboard to type ‘Host Name’. Press ENTER to move to the next page. Clue: Server IP is the IP address of the Administrative PC. Refer to the Quick Start for information on how to locate the Server IP of the administrative PC. In most situations, you will not need to change the host name. Server Port: The default server port is 5021. Most situations do not require you to change this port. If this port is being used for some other purpose by the administrative PC, use the remote control to enter a different port no. e.g. ‘05021’. This port number must be the same as configured in the CAT application. (Refer to CAT Server Setup Utility to modify server’s port number. Upon modification, shut down the application and reboot. Client DHCP or Static IP: This option is to setup the IP address of Mvix Ceeno signage player. Using the remove, navigate to select ‘DHCP’ or ‘Static IP’ and press ENTER. In most situations, it is recommended to use DHCP IP allocation. Time Setup Screen o Time Server: Use the remote to navigate to select the timer server. Mvix Ceeno can acquire the correct time from ‘time.nist.gov’ or ‘windows.time.com’. o o o o o o Date: In most situations you can ignore this because Mvix Ceeno will acquire internet time automatically during the initialization stage. This option should be used only if there is no internet connection available to the system. Time: refer the “Date” option as above. Time Zone: Use the remote and navigate to select the local time zone. DST (Day Saving Time): Use remote and select On or OFF based on your location. Date Format: This date format is for the On-screen display of the scroll bar at the bottom of the screen. Select from mm/dd/yyyy or dd/mm/yyyy format options. Press ENTER on your remote control to go back to the Main Setup Menu. Mvix Ceeno 7 User Manual v1.0 Device Schedule Setup Screen o Reboot Time: This option allows configuration of auto-reboot time of Mvix Ceeno. Using the o Auto Start Screen o OFF: This option allows configuration of device status upon boot. If this option is set to OFF, the o o o remote, move the cursor to select ‘OFF’ or type TWO digits for daily reboot time. Upon schedule, the signage player will reboot itself. If Mvix Ceeno is pre-set for auto start to network mode, it will download a new playlist file as configured. At the same time, the signage player transmits reboot, update log / report data to the administrative PC. Device Schedule: Using remote, navigate to ‘OFF’ or ‘ON’. If set to ‘ON’, the schedule option will become editable to selecting the Auto-start and shutdown time (“HH MM to HH MM”). Using this option, Mvix Ceeno will power on at the scheduled time, and auto-start playback from the existing playlist file stored in the CF card. Device OFF time will stop the playback, and turn-off video display. signage player will wait for server’s (administrative PC) command upon boot. Local CF: If set to local CF, the client will playback according to playlist file stored in the Compact Flash card or playback all media files in an alphabetical order if no specific playlist file is found on the CF card. This is a standalone mode of the machine. HTTP URL: When this option is selected, the DS player will boot and fetch a playlist file directly bfrom a web-URL address. The web-URL path can be configured via the Admin-PC CAT application. The DS Player automatically downloads the playlist file and executes the scheduled playback of media files. iCAT: This is a web-based management software like the Client Administration Tool (CAT). This web-application can be accessed from a standard web-browser from any PC, anywhere. Contact your Mvix Representative for further details on this web-admin application. Factory Default: o Allows reverting back to factory-settings under Setup Menu. For example; Device Name: NDSP01 Password: 123 Server IP: 192.168.1.106 Server Port: 5021 Device IP: DHCP Save and Reboot: save all the changes and reboot the DS Player Return to menu: just return to main menu NOTE: All setup settings can also be modified via the CAT Application (Refer: “Tools” - “Client Setup Utility”). All the settings can be configured and saved as “autoconfig.mia” filename into the CF card. This CF card can be plugged into the DS Player and the unit will load its settings from the card. Use this technique to replicate settings across multiple clients. Mvix Ceeno 8 User Manual v1.0 Remote Control Label Remote Key Function Main Menu Switch to main menu screen via this button Video Mode Switch between Component Video and VGA output Keyboard Enter the virtual keyboard MUTE Mute/Un-mute sound VOL + Sound level control (Increase) VOL - Sound level control (Decrease) Position + Adjust scrolling text bar position (down) Position - Adjust scrolling text bar position (up) Background Color Select Background color for scrolling text bar (8 colors) Foreground Color Foreground color for scrolling text bar (white and black) Transparent Scrolling text transparency level (0%, 25%, 50%, 75%, 100%) Speed Scrolling text speed settings (fast, normal and slow) Scroll Bar Clock Turn On/off Clock display on the scrolling text bar EZ-Play Toggle between auto download/playback files in from CF card or execute “playlist.mpl” file in the CF card Mvix Ceeno 9 User Manual v1.0 Scrolling Text Mvix Ceeno is capable of displaying a scrolling text / marquee at the bottom of the screen. A regular .txt file can be used to store any text data. This text file can be built using the CAT application. The text content can be used as a scrolling ticker or news feed along with any full-screen photo or video file playback. The TXT file can be configured as per the following format: The 1st line of the text file, has the following syntax: osd_settings=[Background color], [Foreground color], [Transparency], [Speed], [Reserved], [Clock] e.g. “osd_settings=2,1,0,0,0,0 1. Background color: a number from 0 to 7 a. 0=blue, b. 1=grey, c. 2=red, d. 3=ligh blue, e. 4=green, f. 5=yellow, g. 6=magenta, h. 7=orange 2. Foreground color: a number from 0 to 1 a. 0=white b. 1=black 3. Transparency: a number from 0 to 4 a. 0=No transparency effect, b. 1=75%, c. 2=50% d. 3=25% e. 4=100% 4. Speed: a number from 1 to 4 a. 1=slow b. 2=normal c. 4=fast 5. Reserved: always 0 6. Clock/Date: a. 1=On b. 0=Off Note: Default settings are white text on a grey background. Mvix Ceeno 10 User Manual v1.0 Client Administration Tool Client Administration Tool is a Win PC-compatible software for managing signage over the local area network. This small-footprint application is compatible with Windows XP, Vista or Win-7. This tool can be used for controlling, and monitoring multiple DS Players on the local area network. It also allows an easy-to-use interface for remotely configuring DS Player Setup settings. The Tools tab on the top navigation bar provides access to the following options: 1) Adding and Editing User Accounts 2) Admin-PC (Server) Setup Utility 3) Client (DS Player) Setup Utility 4) Playlist Scheduler 5) Language Selection Mvix Ceeno 11 User Manual v1.0 User Group and Account Management The User Group and Account configuration tool allows the administrator to provide access to multiple users for controlling and managing DS Players on the network. Users can be given access to management of specific DS Players. Mvix Ceeno 12 User Manual v1.0 Server Setup The Server Setup Utility is for administrators to make changes to the Admin-PC (CAT Application) 1. Server port: Default = 5021. This is the port that the network router / switch uses to access the CAT application. This works exactly like the port-forwarding function of a router/switch. 2. PASV port: The default settings are from 5022 – 5031 (Range = 10). These can be changed to match network firewall setting. This setting is normally used to connect the CAT application via the network firewall. 3. RSS Ticker: Default is set to access RSS ticker from the RSS Advantage application. It can be changed to match the admin-PC’s path and filename. When RSS ICON is clicked, the application will push this file to the DS players. Note: The Client administration tool should be re-started (Exit the whole application and Start again) if any changes are made on this Server Setup Utility. Mvix Ceeno 13 User Manual v1.0 Client Setup Client Setup Utility is a simple editor to update a DS Player’s setup settings remotely (from the Admin-PC). IP or Hostname: Enter a static IP for the Admin-PC. This IP address provides the access path for each DS Player to communicate with the Admin-PC. This option also allows the user to enter a hostname (for example abc.blogdns.com) where the client administration tool is running. Port: Default Port is set at 5021. If 5021 is used for some other purpose on your network, then assign a different number (e.g. 05021). Remember to change the same port # in the Server Setup Settings as well Client Account Name and Password: Each DS Player can be protected via a Account Name and password. Enter a user name and password for each DS Player. This setting could be used for allowing individual users to have access to each DS Player via the CAT application. DHCP or Static IP: Select Dynamic IP by router or fixed static IP for the DS Player. Default is DHCP. Time Zone: Select the local time zone of the DS Player location Mvix Ceeno 14 User Manual v1.0 Client Setup Daylight Saving: Selecting this option will add one hour to the DS Player time, based on the Daylight Saving settings. Reboot / Restart time: Allows configuration of auto-boot timing for the DS Player. The DS Player will auto-boot itself at this time everyday. Device On: This is the global start time for the DS Player’s playback. This setting will configure the player to start media playback from the existing playlist file at the specified time. This setting can be used if the user requires a time-based auto-start of playback (e.g. 9:00am every morning) Device Off: This is the global stop time for the DS Player’s playback. This setting will configure the player to stop media playback. This setting can be used if the user requires a time-based auto-stop of playback (e.g. 6:00pm every evening) Video output: Select VGA or YPbPr output, depending on how the DS Player is connected to the LCD display AUTO-START PLAYLIST FILE LOCATION: OFF: This option allows configuration of device status upon boot. If this option is set to OFF, the signage player will wait for server’s (administrative PC) command upon boot. Local CF: If set to local CF, the client will playback according to playlist file stored in the Compact Flash card or playback all media files in an alphabetical order if no specific playlist file is found on the CF card. This is a standalone mode of the machine. HTTP URL: When this option is selected, the DS player will boot and fetch a playlist file directly bfrom a web-URL address. The web-URL path can be configured via the Admin-PC CAT application. The DS Player automatically downloads the playlist file and executes the scheduled playback of media files. Update Client is a remote command sent to Mvix Ceeno in real-time. It pushes all newly configured settings to Mvix Ceeno. The DS Players are configured to auto-boot upon receiving these settings. An auto-start takes approximately 15-20 seconds to boot and initialize. Mvix Ceeno 15 User Manual v1.0 Playlist Scheduler The Playlist scheduler allows a user to create advanced playback schedules for each playlist. This premium feature not only allows for scheduling on a daily basis but also for future time periods (e.g. 2 weeks from now etc.). Ideal for use in scheduling advertising and menu board content, this feature offers significant flexibility of configuring playback of multiple playlists simultaneously. When creating playlists in the playlist editor, save the .mpl file in the same group folder. Ex. If using the Home group, then save into “\..\Program Files \ CAT \ Home \” Browse over to the predefined playlist file, enter the start and end date and weekday for this playlist’s campaign schedule then click ‘Add’. Continue this process to add multiple playlists and corresponding schedules. The playlist scheduler allows for scheduling days and dates of playback. The Playlist Editor allows for playlist start and end times. Using this combination, a user can schedule each playlist to be played at a specific time, at a specific day and date. While scheduling multiple playlists, avoid scheduling conflicts – i.e. two or more playlist schedules for the same time/date campaign. Click File to SAVE the configured schedule into a “.sch” file into same group folder Ex. If using the Home group, then save into “\..\Program Files \ CAT \ Home \” Revert to the main interface of CAT Account-> Select Group -> Edit -> AutoPlay page and browse this .sch file, then click Finish Mvix Ceeno 16 User Manual v1.0 Navigation and Controls Client Administrative tool is also equipped with real-time control and monitoring options for the DS Players. These options are located on the top navigation bar (ref: colored icons) Icons - ‘Play’ to ‘Options’ allow control of groups of DS Players. Simply select a group of DS Players and these icons will become available for use. Any Command executed via these icons will be pushed to all the DS Players under this active group. Icons - ‘Status’ to ‘Playlist’ allow control of individual DS Players. Simply Select a DS Player via its name and these icons will become available for use. Any Command executed via these icons will be pushed to all the DS Players under this active group. Play: Manually send a ‘Playback’ command to a group of DS Players Stop: Manually send a ‘Stop’ command to a group of DS Players Message: Manually send an Instant message (scrolling text) to the DS Player. You can select any .txt file or manually type in a text message and push it to a group of DS Players. A news ticker type of on-screen scrolling text will be displayed on the bottom of the screen. Message Off: Manually send a “Message Off” command to group of clients to stop scrolling text. RSS: Manually send a RSS news ticker message to a group of DS players. (Bundled ‘RSS Advantage’ software must be pre-installed. And Microsoft .net Framework 1.1 or 2.0 is also required for this functionality) Volume: Manually increase / decrease volume settings on the DS Players. Setting ranges from “Mute” to 15 levels of volume control. Video: Manually control video output from the DS Player. Options allow for turning the video output ON or OFF. Options: Infrequently-used commands are located here: Format: Remotely format the CF card located in the DS Player. All files in CF card will be erased. Reboot: Remotely reboot the DS Player from the Admin-PC Group Status: Acquire real-time status of all clients in the group. Mvix Ceeno 17 User Manual v1.0 Navigation and Controls Individual Player Commands Status: Acquire real-time status of the DS Player. The status log information contains time, current playback filename, music and instant message. Example: Playing [01:54:30] slide6_1.DIVX(5/11,16) 0:0:6, Scrolling Text: IntoTheBlue.txt Capacity: Acquire real-time status of CF card capacity and firmware version #. Example: Storage Total Size: 977MB, Free Space: 762MB. F/W version: v2.2.86.0619U CF Data: Acquire a real-time report of all files located on the CF card. The report (list of filenames) will be displayed on the CF tab screen of CAT. CF Data [Delete]: A right-button click of the mouse on CF window yields a ‘Delete’ option. Check all files to be deleted, click ‘Delete’. CAT application will send a delete command to the DS Player to remove those checked files and update CF Data screen. Playlist: Acquire a real-time report of the current playlist file. The report (playlist file order) will be displayed on the playlist tab screen of CAT. Note- If the mouse cursor is placed on the log window area, a right click yields a small menu with two options: “Save As” or ”Clear”. “Clear” option is to clear the log data. “Save As” allows archiving of the log history for technical support. This log file / data can be sent to Mvix Technical Support for help / troubleshooting. Mvix Ceeno 18 User Manual v1.0 RSS Advantage Software Ask your Mvix Representative for the latest version of RSS Advantage Software. Install this application on the Admin-PC (same PC as the CAT application) This RSS Feed application allows the signage administrator to manage and push RSS links to DS Players for playback as a scrolling text at the bottom of the screen. The news tickers scrolling on the Admin-PC screen will be mirrored to the DS Player as long as RSS Icon button is pressed in CAT. The RSS Advantage software supplied by Mvix is a basic version. To purchase a full-features version, please click ‘Help->About’ to acquire the upgraded version (and receive a get 10% discount). Note: RSS feeds should be installed under C:\Program Files\RSS Advantage\Newsticker for CAT to fetch news ticker file. Note: Microsoft .net Framework 2.0 is required before the RSS Advantage application is operational. Search “Microsoft download framework” from any search engine or http://www.microsoft.com/downloads/details.aspx?FamilyID=0856EACB-4362-4B0D-8EDD-AAB15C5E04F5&displayl ang=en Mvix Ceeno 19 User Manual v1.0 Playlist Commander The main section of CAT Application is designed to configure and edit playlists. Playlists can be configured from media files sitting on the Admin-PC or the CF Card on the device. Here are some lists of tabs and features: Local Directory: This tab allows the user to load media files from local (Admin) PC’s directory. Select the files and press the arrow button to move the files to the Playlist Editor Window (right panel). Once the media files are moved to right window, select the “group” and press ‘EZ-Play’ on the selected group. The Admin-PC will push/ transfer these media files to each DS Player in that group. Remote HTTP Server: Allows creation of playlist from media files residing on a remote HTTP server Remote FTP Server: Allows creation of playlist from media files residing on a remote FTP server File Type: mpl : This file filter check box is for managing playlists (.mpl) only. This feature allows support for multiple playlist with time range settings. Open: Open existing playlist file. It allows the user to browse the Admin-PC folders to locate a “.mpl” file. Save: Create a new playlist from media files and Save the playlist file or overwrite existing one >: move single file to playlist window >>: move all files to playlist window Select Group: This button allows the user to select a specific group for executing the “EZ-Play” and “Playlist” functions. EZ-Play: This feature allows the user to push all media files (listed on right panel window) to the DS Player (or Group of Players) and execute playback immediately. This is a manual mode, controlled by the user. AutoPlay: CAT allows the user to create a playlist file called “Autoplaylist.mpl” and push this file to the DS Player (or group of players). Upon reboot or power on, the DS player will auto-start playing this playlist. Mvix Ceeno 20 User Manual v1.0 Playlist Commander Duration/Times: Allows users to enter loop counters for video file or duration time (seconds) for JPEG file. Start Time/End Time: (format:HHMM) This setting allows the user to configure time-based scheduling for each file/playlist. A “blank” time range refers to a “never ending” playback (always play no time limit for 24 hours). Each media file can have its own schedule. For example, “abc.jpg 30 0800 to 1200” indicates that the media file: “abc.jpg” will be active for 4 hours, each time its duration is 30 seconds. Start to play at 0800hrs and stop playback at 1200hrs. Similar Examples: Filename Duration/Counter From hhmm To hhmm Comments A000.jpg Blank Blank Blank A000 will be displayed for 3 seconds for 24 hours A001.jpg 30 Blank Blank A001 will be displayed for 30 seconds for 24 hours A002.jpg Blank 0800 1200 A002 will be displayed for 3 seconds from 8am to 12pm A003.mpg Blank Blank Blank A003 video will play 1 time each loop for 24 hours A004.mpg 3 0800 1200 A004 video will play 3 times each loop from 8am-12pm P001.mpl Blank 0800 1200 P001 playlist file will start from 8am to 12pm P002.mpl Blank 1200 1800 P002 playlist file will start from 12pm to 6pm Mvix Ceeno 21 User Manual v1.0 Playlist Commander Del: Select a single Media file from the Right Panel window, click DEL to remove a single file from the playlist Clear: Click Clear to Remove all files from playlist window and reset values in the Setting menu Up/Down arrows: Highlight a media file and Move up or down to adjust its playback sequence Settings: Opens a Playlist settings popup as below Picture Play Time: Control interval time between JEPG files Picture Transition Mode: 3 modes (Full screen, Random, and Cross Fade) are available to change image slide-show transition effect Delete Files: No Action: default value, do nothing. Format CF card: Will delete all files in the CF card then download new files based on playlist.mpl. Files not in the playlist: This feature is used for optmizing CF card storage space. It will delete all files (on CF Card) that are not included in the playlist. Files in the playlist: Delete Multiple Files simultaneously. This option will delete all files in the playlist. Mute Sound: Mute sound in the playlist, all content will play without any audio out. Download schedule: This setting allows a user to schedule a “download time” into a playlist file. This setting configures the DS Player to download content as per this schedule embedded in the playlist file This is an important feature where the network connection has to be optimized. (i.e. Avoid downloading content, till an older playback is complete) Mvix Ceeno 22 User Manual v1.0 Remote HTTP Server The Playlist commander also supports configuring media files from a HTTP server. Simply enter the URL path and filenames in HTTP server tab. Click on EZ-Play or save playlist file for future use. Mvix Ceeno 23 User Manual v1.0 Remote FTP Server The feature allows a user to access FTP server and create a FTP playlist. The functionality is identical to that of “Local Directory” settings. This feature requires the user to enter a typical FTP account information including user name, password and host address etc. Click on EZ-Play to execute immediately or save playlist for future use. When selecting EZ-Play, the Admin-PC pushes the the playlist file to the FTP server instead of the local (Admin-PC) folder. This allows the DS Player to automatically download the playlist file directly from the FTP server and start playback. Mvix Ceeno 24 User Manual v1.0 WebServer Configuration Mvix Ceeno has a built-in web-server. This Webserver is device configuration tool that allows users to manage and monitor DS Players remotely via a standard web-browser (e.g. Internet Explorer or Firefox). This web-server is useful in situations where the user intends to change the DS Player’s setup settings. The user does not have to visit the DS Player location (physically) The web-server allows changing and updating DS Player settings remotely over the network. To use this function, start a web-browser Microsoft IE and type the DS Player’s IP address (for example 192.168.1.16) on the URL line. Assumption: The IP of the DS Player is available and the player is installed on the same network as the PC trying to connect through the web-browser. The browser will pop up a confirmation window. Enter username and password below. User Name = admin Password = admin The browser will connect to the web-server of the DS Player and will display the home page. Mvix Ceeno 25 User Manual v1.0 WebServer Configuration WebServer Home Page Click Client Status on the left navigation section to view the status of DS Player. Click Client Account Setup on the the left navigation section to configure the DS Player’s network settings. The client Account setup page allows a user to enter a new IP address for the Server (Admin-PC) Users can also change DS Player’s account name and password to match CAT’s application’s client settings. This will allow the DS Player to login to the Admin-PC’s CAT program. Click “Apply and Reboot”. The browser will send a configuration file to the DS Player. The signage player will reboot and will attempt to connect to the new IP address of Admin-PC. Rebooting process can take about 30 seconds. Mvix Ceeno 26 User Manual v1.0 Independent Mode Mvix Ceeno can also be configured to play a playlist via the Independent Mode. During Independent mode operations, the media player does not require any network connectivity for operations and content updating. The independent mode allows the following functionalities: Auto-Power On: The DS Player is powered on as soon as the power cable is connected and switched on. Auto-Boot: The DS Player boots into a Playback mode automatically. Does not need any remote command and / or interactivity Auto-Playback: The DS Player starts playing media content as per the playlist and schedule. Mvix Ceeno can be configured to play a single file in looping mode (e.g. for Digital Menu Boards) or a mix of video and image files in a sequential mode (e.g. Product Showcase playlist). To configure the DS Player for Single File operation, Navigate to the setup menu via the Remote: a. Setup -> Preference -> File Repeat -> "Single" This setting will configure the DS Player to seamlessly play a single file continuously without gaps or refresh Updating Content in Independent Mode: The independent mode operation allows Mvix Ceeno to be updated by a simply USB drive. It does NOT require any network cables or connectivity to update media content and playlists / schedules. The following simply steps illustrate the process of updating content via a USB drive: 1. Connect the USB Drive on your PC and create a new folder on the USB Drive a. If you would like to update the DS Player content by simply COPYING the content from the USB drive, then label this folder "\COPY" b. If you would like to update the DS Player content by OVERWRITING the contents from the USB drive, then label this folder “\SYNC” 2. Turn OFF the DS Player 3. Insert USB drive in the front USB port and turn the device ON. 4. The DS player will auto-detect USB drive and copy or replace files on the CF card as follows: a. If the USB drive contains a folder named "\COPY" - all files in the \COPY folder will be copied to the "\MEDIA" folder on the DS Player’s CF card. b. If the USB drive contains a folder named "\SYNC" all files in the CF card's "\MEDIA" folder will be deleted and then all files in \SYNC folder (on the USB drive) will be copied to the "\MEDIA" folder on its DS Player’s CF Card. 5. If both \COPY and \SYNC folders exist on the USB drive, no files will be copied or deleted. 6. If neither \COPY or \SYNC folders exist on the USB drive, no files will be copied or deleted. Mvix Ceeno 27 User Manual v1.0 Warranty The Mvix Ceeno Digital Signage System comes with a full 1-yr manufacturer’s warranty on parts and labor. The Warranty coverage on this player begins the day you buy your product. This warranty covers defects in manufacturing only, and expressly excludes coverage for excessive wear and tear, physical or accidental abuse, loss and theft. Warranty service is available in all countries where the product is officially distributed. The warranty covers any service or exchange required for a defective unit during the coverage period. The service / exchange opportunity ends one year after the date of purchase. The replacement product is covered only for the warranty period of the original product. When the warranty on the original product expires, the warranty on all replaced products also expires. When it is necessary for you to ship the product to distributor / service center for service / exchange, you will pay the shipping costs for shipment to the distributor. The distributor will pay the shipping costs when returning the product to you. To receive warranty service, please be sure to have your proof of purchase. Warranty requests cannot be processed without proof of purchase. In no event shall MvixUSA’s (or its distributors’) liability exceed the price paid for the product from direct, indirect, special, incidental, or consequential damages resulting from the use of the product, its software, or its documentation. MvixUSA does not offer refunds for any product. As a part of our warranty service, we offer to repair or replace the product. We offer cross shipments, a faster process for processing and receiving your replacement. MvixUSA and its distributor pay for ground shipping only. Please contact MvixUSA’s Distributor in your country for more details. Specifically, your warranty does not cover the following: Shipping charges to return defective product. Labor charges for installation or setup of the product, adjustment of customer controls on the product, and installation or repair of systems outside of the product. Product repair and/or part replacement because of improper installation, connections to improper voltage supply, abuse, neglect, misuse, accident, unauthorized repair or other cause not within our control. Damage occurring to product during shipping when improperly packaged or cost associated with packaging. Incidental or consequential damages resulting from the product. Some states do not allow the exclusion of incidental or consequential damages, so the above exclusion may not apply to you. This includes, but is not limited to, prerecorded material, whether copyrighted or not.) Mvix(USA), Inc. and its other partners and distributors DO NOT assume any responsibility in any way for how you choose to use this product, associated firmware and this manual. By purchasing or receiving this product, you automatically agree to this disclaimer, and eliminate this company and any affiliates of any responsibility in this matter. MvixUSA or ITS DISTRIBUTORS ARE NOT LIABLE UNDER ANY CIRCUMSTANCES FOR ANY DIRECT, INDIRECT, SPECIAL, INCIDENTAL, OR CONSEQUENTIAL DAMAGES, HOWSOEVER INCURRED, EVEN IF NOTIFIED OF THE POSSIBILITY OF SUCH DAMAGES. TO THE EXTENT PERMITTED BY LOCAL LAW, THE REMEDIES PROVIDED IN THIS WARRANTY STATEMENT ARE YOUR SOLE AND EXCLUSIVE REMEDY. THIS LIMITED WARRANTY GIVES YOU SPECIFIC LEGAL RIGHTS AND YOU MAY ALSO HAVE OTHER RIGHTS WHICH VARY FROM STATE/PROVINCE TO STATE/PROVINCE. Please record below the model and serial numbers found on the product. MODEL # _______________________________ SERIAL # _______________________________ Mvix Ceeno 28 User Manual v1.0 Trademarks and Legal Attributions The trademarks of Mvix® and MvixUSA® are used in connection with products and services to signify the quality and excellence for which MvixUSA® is known. Mvix® and MvixUSA® are trademarks or registered trademarks of Mvix(USA), Inc. in the United States. You may use a Mvix® trademark or product name to refer specifically to such Mvix® product in marketing and promotional materials, books, conferences, applications, demonstrations, and so on. You are permitted to use a Mvix® trademark referentially provided that: * You adhere to these Mvix™ Trademark Usage Guidelines. * You do not disparage Mvix(USA), Inc. or its products and services. * You display your name or logo more prominently than any Mvix™ trademark. * You include a disclaimer that Mvix™ does not sponsor, affiliate, or endorse your product, and/or services. All other textual references, brands, logos or product names are the copyrights, trademarks or registered trademarks of their respective owners /holders. Use of these trademarks on our website, products, literature, communications, manuals, advertising material, press releases, etc. do not represent endorsements by the respective companies for Mvix(USA), Inc.'s products, services or brand, but merely reflect their possible compatibility with our products. Google is a trademark of Google Technology, Inc. HDMI is a trademark of HDMI Licensing LLC. iPod® is a registered trademark of Apple Computer, Inc. PSP™ (PlayStation Portable) is a trademark of Sony Computer Entertainment Inc. Java and all Java-based trademarks are trademarks of Sun Microsystems, Inc. in the United States, other countries, or both. Microsoft, Windows, Vista are trademarks of Microsoft Corporation. UNIX is a registered trademark of The Open Group in the United States and other countries. WI-FI, WPA, WPA2 and WMM are registered trademarks of Wi-Fi Alliance. REFERENCES TO CORPORATIONS, THEIR SERVICES, PRODUCTS and BRANDS WITHOUT WARRANTY OF ANY KIND, EITHER EXPRESSED OR IMPLIED. IN NO EVENT SHALL MVIX(USA), INC. BE LIABLE FOR ANY SPECIAL, INCIDENTAL, INDIRECT OR CONSEQUENTIAL DAMAGES OF ANY KIND, OR ANY DAMAGES WHATSOEVER, INCLUDING, WITHOUT LIMITATION, THOSE RESULTING FROM LOSS OF USE, DATA OR PROFITS, WHETHER OR NOT ADVISED OF THE POSSIBILITY OF DAMAGE, AND ON ANY THEORY OF LIABILITY, ARISING OUT OF OR IN CONNECTION WITH THE USE OR PERFORMANCE OF THIS INFORMATION. MVIX Products are not officially licensed or certified by DivX® Networks or Wifi Alliance. Any MvixUSA, Inc. publication may include technical inaccuracies or typographical errors. The information presented here is intended for general information only and is subject to change without notice. ALL INFORMATION IS PROVIDED "AS IS" WITHOUT WARRANTY OF ANY KIND, EITHER EXPRESSED OR IMPLIED, INCLUDING BUT NOT LIMITED TO THE IMPLIED WARRANTIES OR CONDITIONS OF MERCHANTABILITY OR FITNESS FOR A PARTICULAR PURPOSE, OR NON-INFRINGEMENT. SOME JURISDICTIONS DO NOT ALLOW THE EXCLUSION OF IMPLIED WARRANTIES, SO THE ABOVE EXCLUSION MAY NOT APPLY TO YOU. Mvix Ceeno 29 User Manual v1.0 Use of Copyright Media Federal law provides severe civil and criminal penalties for the unauthorized reproduction, distribution, rental or digital transmission of copyrighted video and audio files. (Title 17, United States Code, Sections 501 and 506). Mvix players are designed to assist you in backing up, storing and reproducing material which you own the copyright for or for which you have obtained permission from the copyright owner. UNLESS YOU OWN THE COPYRIGHT OR HOLD PERMISSION TO COPY FROM THE COPYRIGHT OWNER, YOU MAY BE VIOLATING COPYRIGHT LAW AND BE SUBJECT TO PAYMENT OF DAMAGES AND OTHER REMEDIES. Mvix Ceeno or any of its accessories must not be used for unauthorized duplication of DVDs/CDs or any other works protected by copyright. No license to infringe copyright is granted by the sale of this equipment. Recording and playback of material may require permission of the media owner. IF YOU ARE UNCERTAIN ABOUT YOUR RIGHTS, YOU SHOULD CONTACT YOUR LEGAL AHDMISOR. YOU ASSUME FULL RESPONSIBILITY FOR THE LEGAL AND RESPONSIBLE USE OF THE MVIX MULTIMEDIA PLAYER. Use of Mvix products, its accessories and software/firmware for illegal purposes is strictly prohibited. Mvix Ceeno 30 User Manual v1.0