1
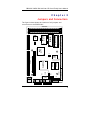
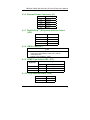
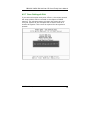
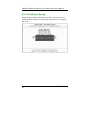
SBC8232 386SX ISA Half-size CPU Card Family User’s Manual Disclaimers ! " ! # !! ! Copyright 1999 by AXIOM Technology Co., Ltd. All rights reserved. April 1999, Version B1 Printed in Taiwan ii ESD Precautions Integrated circuits on computer boards are sensitive to static electricity. To avoid damaging chips from electrostatic discharge, observe the following precautions: ! Do not remove boards or integrated circuits from their anti-static packaging until you are ready to install them. ! Before handling a board or integrated circuit, touch an unpainted portion of the system unit chassis for a few seconds. This helps to discharge any static electricity on your body. ! Wear a wrist-grounding strap, available from most electronic component stores, when handling boards and components. Trademarks Acknowledgments AXIOM is a trademark of AXIOM Technology Co., Ltd. IBM is a trademark of International Business Machines Corporation. MS-DOS, MICROSOFT C and QuickBASIC are trademarks of Microsoft Corporation. TURBO C is a trademark of Borland Inc. BASIC is a trademark of Dartmouth College. Intel is a trademark of Intel Corporation. Other brand names and trademarks are the properties and registered brands of their respective owners. iii Unpacking After unpacking the CPU card, check and see if the following items are included and in good condition. If any of the items is missing or damaged, notify your dealer immediately. ! SBC8232V All-in-One 386SX CPU board x 1pc ! Driver & Utility diskette x 2 pcs. ! Keyboard adapter x 1pc ! FDD cable x 1 pc. ! HDD cable x 1 pc. ! COM, Printer extension cables with bracket x 1pc ! Screws (3mm) x 4 pcs. ! Bronze stick (6mm) x 4 pcs. ! User’s manual x 1pc ! Warranty card x 1pc Make sure that all of the items listed above are present. What To Do If There Is A Problem If there are damaged or missing parts, contact your supplier and/or dealer immediately. Do not attempt to apply power to the workstation if there is damage to any of its components. iv Table of Contents Chapter 1 1.1 Chapter 2 2.1 Introduction Specifications ............................................... ................................ ............... 2 Jumpers and Connectors Jumper Settings ............................................ ................................ ............ 6 2.1.1 CPU Speed Select (JP6) ...................................................... 6 2.1.2 Reset/HDD LED (J2, 11-18) .................................................. 6 2.1.3 Watchdog Function Select (JP4) ......................................... 6 2.1.4 External Keyboard (J3) ........................................................ 6 2.1.5 Speaker/Keylock/Power LED (J2, 1-10) ............................... 6 2.1.6 External Power Connector (J1) ........................................... 6 2.1.7 DiskOnChip TM (M-System) Address Select (JP5)................. 7 2.1.8 CMOS Clear(JP7) ................................................................. 7 2.1.9 COM2 Type Select (JP2, JP3) .............................................. 7 2.1.10 VGA Enable/Disable (JP8) ................................................... 7 2.1.11 AT Keyboard/PS2 Mouse Selection(JP1)............................. 8 2.2 Connectors ................................................... ................................ ................... 8 Chapter 3 3.1 3.2 Chapter 4 4.1 4.2 Installation Installing SIMMs S IMMs ........................................... ................................ ........... 9 Completing the Installation ........................ 10 AMI BIOS Setup System Initialization and Setup Verification 11 AMI BIOS Initial Setup ................................. ................................ . 12 4.2.1 Entering Setup ................................................................... 12 4.2.2 Standard CMOS Setup ...................................................... 13 4.2.3 Advanced CMOS Setup .................................................... 14 4.2.4 Advanced Chipset Setup .................................................. 15 4.2.5 Change Supervisor Password ............................................ 16 4.2.6 Auto Configuration with Optimal Settings Auto Configuration with Fail Safe Settings ........................ 17 4.2.7 Save Settings & Exit ........................................................... 19 4.2.8 Exit Without Saving ............................................................ 20 Table of Contents v Chapter 5 5.1 5.2 Appendix A Appendix B Appendix C Appendix D vi Display Drivers and Utilities Microsoft Windows 3.1 ................................ 21 DOS Driver Installation .............................. 22 Watchdog Timer Installing DiskOnChip Disk OnChip TM Connector Pin Assignment AMI BIOS Fatal Error Codes Table of Contents SBC8232 386SX ISA Half-size CPU Card Family User’s Manual Chapter 1 Introduction The SBC8232V is a half-size IBM TM PC AT 386SX all-in-one CPU card based on the ALI M6117 single chip with built-in 386SX CPU core. Its high performance Cirrus Logic 5429 VGA controller is an ISA bus compatible chip with GUI accelerator that supports display memory of up to 1MB resolution of up to 640x480 at 1.6million colors. The SBC8232V also offers several features such as a 16-level watchdog timer that can generate a system RESET with interval from 0 - 64 seconds. SBC8232V is a reliable product. Its highly compact form and numerous features make it an ideal cost/performance solution. SBC8232V also consolidates a PC/104 connector into its design that accommodates easy expansion to meet your application needs. Introduction 1 SBC8232 386SX ISA Half-size CPU Card Family User’s Manual The SBC8232V supports two 72-pin SIMM sockets, allowing DRAM expansion up to a maximum of 32MB. In addition, there are two serial ports, one-RS232 & one RS232/422/485 port (both with 16C550 UARTs). The standard Enhanced Bidirectional ECP/EPP parallel port on the SBC8232V supports up to two IDE hard disk drives and two FDDs. The IDE HDD interface function, supporting IDE interface for a maximum of 2 embedded drives, is also featured. 1.1 Specifications " Main Processor: " System Memory: 80386SX-33/40 ! supports two 72-pin SIMM sockets ! supports 1MB up to 32MB(1/4/16MB FPM or EDO) " Chipset: " Display: ALI M6117C ! Cirrus 5429 ISA bus with GUI accelerator 1MB display memory ! supports 640x480 16.7M color, 800x600 64K color, 1024x768 ! 256 color non-interlaced " DiskOnChip TM (M-system): ! supports M-system from 2MB to 72MB " Clock/Calendar: " IDE HDD Interface: Supports up to two IDE (AT bus) hard disk drives " FDD Interface: " PC/104 Connector: 104-pin connector, 16-bit ISA-bus compatible " Parallel port: 2 Dallas DS-12B887 battery-powered real-time clock Supports up to two floppy disk drivers, 3.5” and/or 5.25” Enhanced Bi-directional ECP/EPP parallel port Introduction SBC8232 386SX ISA Half-size CPU Card Family User’s Manual " Serial port: One RS-232 port and One RS232/RS 422/RS-485 port, both with 16C550 UARTs " Watchdog Timer: Generates a system RESET, 16-evel timer with time-out interval from 0 to 64 seconds " Keyboard: ! One 6 pin Mini-Din connector is located on the mounting bracket ! Support PC/AT, PS/2 Keyboard or PS/2 Mouse by jumper selection ! One 5 pin header connector for external keyboard connection " Power Supply Voltage: +5V dc / 1.5 Amp only " Operating Temperature: 32 to 140°F (0 to 60°C) " Board Size: 185mm(L) x 122mm(W) (7.3” x 4.8”) Introduction 3 SBC8232 386SX ISA Half-size CPU Card Family User’s Manual 4 SBC8232 386SX ISA Half-size CPU Card Family User’s Manual Chapter 2 Jumpers and Connectors The figure below shows the location of all jumpers and connectors on the SBC8232V. U3 FDC1 1 PRN1 DRAM DRAM SMC JP4 J2 2 1 JP2 1 2 1 Jumpers and Connectors COM1 J1 VGA 1 JP3 2 1 1 COM2 3 J4 J3 1 1 A B JP8 D C CL-GD5429 PC104 0 KB1 FDC37C669 1 2 1 ALI M6117 1 IDE1 DiskOnChipTM BIOS JP5 1 2 JP6 DS12B887 DALLAS 1 2 JP7 2 JP1 1 K/B Controller 1 2 SIMM1 SIMM2 SBC8232 5 SBC8232 386SX ISA Half-size CPU Card Family User’s Manual 2.1 Jumper Settings 2.1.1 CPU Speed Select (JP6) Options 16.7MHz 25MHz 33.3MHz 40MHz Settings Short 1-2, 3-4 Open Short 3-4 Short 1-2 2.1.2 Reset/HDD LED (J2, 11-18) Options System reset switch HDD LED, Pin18+, Pin17- Settings Short 11-12 Short 17-18 2.1.3 Watchdog Function Select (JP4) Options Settings Watchdog time out gen. system reset Short 1-2 2.1.4 External Keyboard (J3) Options Settings Keyboard clock Keyboard data No connect Keyboard Ground Keyboard Power 1 2 3 4 5 2.1.5 Speaker/Keylock/Power LED (J2, 1-10) Options Internal buzzer External speaker (remove 1-3) Power LED, Pin 2+, Pin6Keylock 6 Settings Short Short Short Short 1-3 1-7 2-6 8-10 Jumpers and Connectors SBC8232 386SX ISA Half-size CPU Card Family User’s Manual 2.1.6 External Power Connector (J1) Options +5V +12V -12V Ground -5V Settings Short Short Short Short Short 1,8 2,7 3 4,5 6 2.1.7 DiskOnChip TM (M-System) Address Select (JP5) Options E0000-E7FFF D8000-DFFFF D0000-D7FFF C8000-CFFFF Settings Short Short Short Short 7-8 5-6 3-4 1-2 2.1.8 CMOS Clear(JP7) JP7 SHORT THIS JUMPER, TURN ON SYSTEM POWER SYSTEM FOR 1 MINUTE, TURN POWER OFF, THEN SET THIS JUMPER to “OPEN” 2.1.9 COM2 Type Select (JP2, JP3) Settings Options JP3 RS232 RS422 RS485 Short 5-6 Short 3-4 Short 1-2 JP2 Short 3-5, 4-6, 9-11, 10-12 Short 1-3, 2-4, 7-9, 8-10 Short 1-3, 2-4, 7-9, 8-10 2.1.10 VGA Enable/Disable (JP8) Options VGA enable VGA disable Jumpers and Connectors Settings Short 1-2 Short 2-3 7 SBC8232 386SX ISA Half-size CPU Card Family User’s Manual 2.1.11 AT Keyboard/PS2 Mouse Selection(JP1) Options AT Keyboard PS/2 Mouse 2.2 JP1 Short 3-5, 4-6 Short 1-3, 2-4 Connectors The connectors allow the CPU card to connect with other parts of the system. Some problems encountered with your system may be caused by loose or improper connections. Ensure that all connectors are in place and firmly attached. Component HDD (IDE) connector FDD connector Parallel port PC/104 connector Keyboard connectors Reset switch connector External speaker connector HDD LED connector External power connector Serial port1 Serial port2 VGA connector CMOS RAM clear 8 Label IDE FDC PRN PC104 J4, J3 J2 (11-12) J2 (1-7) J2 (17-18) J1 COM1 COM2 VGA JP7 Jumpers and Connectors SBC8232 386SX ISA Half-size CPU Card Family User’s Manual Chapter3 Installation This chapter describes the procedures for installing the SBC8232V all-in-one CPU card into your system. The following is a list of typical peripherals required to build a minimum system: ! Power supply and passive backplane (optional) ! IBM PC/AT keyboard ! Display monitor ! Floppy or hard disk with MS-DOS or Flash Disk emulator 3.1 Installing SIMMs You can install from 1MB up to 32MB memory onboard using 1, 4 or 16MB 72-pin single-side fast-page or EDO SIMMs. 1. Ensure that all power supplies to the system are switched Off. 2. Insert the first SIMM edge connector at a slight angle into the socket of SIMM 1 close to the center of the board. Note that the SIMMs are keyed and will only go in one way. 3. Push the SIMM back into the connector carefully until it snaps into place. 4. Check to make sure the SIMM is inserted securely. 5. Repeat Steps 2-4 for remaining SIMM in SIMM 2. Or, you can install one SIMM only on the board. Installation 9 SBC8232 386SX ISA Half-size CPU Card Family User’s Manual 3.2 Completing the Installation To complete the installation, the following steps should be followed: 1. Make sure the power is off. 2. Set the configuration jumpers in accordance with Chapter 2. 3. Install the SBC8232V CPU card into one of the slots in a passive backplane. Or, just take the SBC8232V alone as a single board computer. 4. Connect the applicable I/O cables and peripherals, i.e. floppy disk, hard disk, monitor, keyboard, power supply and etc. NOTE: The color of pin one is usually red or blue, while others are gray. 5. Turn on the power. 10 Installation SBC8232 386SX ISA Half-size CPU Card Family User’s Manual Chapter4 AMI BIOS Setup 4.1 System Initialization and Setup Verification After turning the power on, the system will run routine testing and initialize board hardware. If there is any error during the tests, you will either hear a few short beeps or see an error message on the screen. The errors can either be fatal or nonfatal. The system usually continues the boot up sequence with not-fatal errors. Non-fatal error messages usually appear on the screen along with the following instructions: press <F1> to RESUME Write down the message and press the F1 key to continue the bootup sequence. The current systems configuration is different from the values stored in the boards CMOS memory. If they dont match, the program will produce error messages. Youll have to run the BIOS setup program again to set the correct configurations into memory. You will need to change the CMOS settings in following three situations: " during initial boot up of system, " after adding and/or removing hardware attached to your system, " when CMOS memory loses information on the saved configuration. The SBC8232Vs CMOS memory has an integrated lithium battery backup. The battery backup can last for ten years. Once it runs down, you will need to replace the RTC parts. Contact your system administrators for assistance. AMI BIOS Setup 11 SBC8232 386SX ISA Half-size CPU Card Family User’s Manual 4.2 AMI BIOS Initial Setup AMIs Flash BIOS has a built-in Setup program that allows users to modify the basic system configuration. This type of information is stored in battery-backed CMOS RAM. It retains the Setup information when the power is turned off. 4.2.1 Entering Setup Turn on the computer and press <Del> immediately. This will allow you to enter Setup. 12 AMI BIOS Setup SBC8232 386SX ISA Half-size CPU Card Family User’s Manual 4.2.2 Standard CMOS Setup When you choose the STANDARD CMOS SETUP option from the initial setup menu, the screen shown on the following page is displayed. The Standard Setup Menu allows users to configure system components such as date, time hard disk drive, and floppy drive. Once an option is highlighted, on-line help information is displayed at the left bottom of the Menu screen. AMI BIOS Setup 13 SBC8232 386SX ISA Half-size CPU Card Family User’s Manual 4.2.3 Advanced CMOS Setup By choosing the Advanced CMOS Setup option from the initial setup screen menu, the screen as below is displayed. This screen contains the manufacturers default values for the SBC8232V. 14 AMI BIOS Setup SBC8232 386SX ISA Half-size CPU Card Family User’s Manual 4.2.4 Advanced Chipset Setup By choosing the Advanced Chipset Setup option from the initial setup screen menu, the screen as below is displayed. This screen contains the manufacturers default values for the SBC8232V. AMI BIOS Setup 15 SBC8232 386SX ISA Half-size CPU Card Family User’s Manual 4.2.5 Change Supervisor Password This option allows you to setup your password. To enter a new user password, choose the Change Supervisor Password option from the Setup Main menu and press <Enter>. The screen will display the following message for you to enter your password. After you type the password, the screen will ask you to verify your password by displaying Retype new supervisor password. If you do not want to change the password, simply press <Enter>. 16 AMI BIOS Setup SBC8232 386SX ISA Half-size CPU Card Family User’s Manual 4.2.6 Auto Configuration with Optimal Settings Auto Configuration with Fail Safe Settings Each of these items allows the user to load optimal settings or fail safe settings respectfully. Both these items load the default system values directly from ROM. If the stored record created by the Setup program becomes corrupted (and therefore unusable), these defaults will load automatically when you turn on the SBC8232V. You can load optional default settings by choosing Y in the screen above. The high-performance settings are the most favorable values for optimum system performance. AMI BIOS Setup 17 SBC8232 386SX ISA Half-size CPU Card Family User’s Manual You can also load the fail safe settings by choosing Y in the screen above. Fail safe settings lets you select the most stable settings for your system. You may use this option as a diagnostic aid when the system is behaving erratically. 18 AMI BIOS Setup SBC8232 386SX ISA Half-size CPU Card Family User’s Manual 4.2.7 Save Settings & Exit If you select this option and press <Enter>, the values entered the setup utilities will be recorded in the chipsets CMOS memory. The microprocessor will check this every time you turn your system on and compare this to what it finds as it checks the system. This record is required for the system to operate. AMI BIOS Setup 19 SBC8232 386SX ISA Half-size CPU Card Family User’s Manual 4.2.8 Exit Without Saving Selecting this option and pressing <Enter> lets you exit the Setup program without recording any new values or changing old ones. 20 AMI BIOS Setup SBC8232 386SX ISA Half-size CPU Card Family User’s Manual Chapter 5 Display Drivers and Utilities The SBC8232V features SVGA interface onboard with the Cirrus Logic GD5429 that comes with a GUI accelerator. It support 640x480 16.7M color, 800x600 64K color, 1024x768 256 color non-interlaced. 5.1 Microsoft Windows 3.1 The graphic installation program (INSTALL.EXE) supports a simple installation procedure for the display driver setup program and the power management program. To use INSTALL, follow the steps as below: 1. Ensure that MS Windows 3.1 is up and running properly, using the standard VGA driver. 2. Select the MAIN group in Program Manager. 3. Click on FILE or press ALT+F. 4. Click on RUN or press R to select command line. 5. Type in A:INSTALL.EXE (if the display driver disk is in the B driver then type in B:INSTALL.EXE) and then press ENTER. An hourglass icon indicated the program is being loaded. Display Drivers and Utilities 21 SBC8232 386SX ISA Half-size CPU Card Family User’s Manual 5.2 DOS Driver Installation Insert DOS VGA Utility Diskette in Driver X: (X=A or B) Please key in install to start install program, following directive can to install ok. 3.To have to CHANGE Refresh you can to EXECUTE clmode 22 Display Drivers and Utilities SBC8232 386SX ISA Half-size CPU Card Family User’s Manual Appendix A Watchdog Timer Watchdog Timer Configuration The watchdog timer will reset the system automatically once the system program fails to refresh the watchdog timer during the watchdog time out interval. It is defined at I/O port 0443H and 043H to enable/disable watchdog time out function. To operate the watchdog function, user must have a program to set the watchdog time out value, and refresh the watchdog timer cycle. If the system program goes into a dead loop or operates at an abnormal cycle, the watchdog timer cannot be refreshed immediately. Meanwhile, the system will be reset by watchdog timer automatically. The watchdog timer will be refresh by disable watchdog output then enable watchdog output The following examples show the normal structure of system program. Watchdog Timer 23 SBC8232 386SX ISA Half-size CPU Card Family User’s Manual Watchdog Timer Examples Setup watchdog timer time out value: mov al,0ah mov dx,70h out dx,al jmp short $+2 mov dx,71h in al,dx jmp short $+2 and al,0f0h add ax,TimeValue ; TimeValue= 00h..0fh, reference as following watchdog time out table out dx,al jmp short $+2 mov al, 0bh mov dx, 70h out dx, al jmp short $+2 mov dx, 71h in al, dx jmp short $+2 or al, 08h out dx, al jmp short $+2 24 Watchdog Timer SBC8232 386SX ISA Half-size CPU Card Family User’s Manual Watchdog Time Out Table: Time Value 0 1 2 3 4 5 6 7 Time Out (sec.) None 0.5 1 0.015 0.03 0.06 0.125 0.25 Time Value 8 9 A B C D E F Time Out (sec.) 0.5 1 2 4 8 16 32 64 Enable watchdog output: mov dx, 443h in al, dx jmp short $+2 ; SET WATCH DOG ENABLE Disable watchdog output: mov dx,043h in al,dx jmp short $+2 Watchdog Timer ; SET WATCH DOG DISABLE 25 SBC8232 386SX ISA Half-size CPU Card Family User’s Manual 26 SBC8232 386SX ISA Half-size CPU Card Family User’s Manual Appendix B Installing DiskOnChipTM On the board of SBC8232V, you will find the socket, location U3, for DiskOnChip TM of M-systems. Please follow the procedures as below to install the DiskOnChip TM you bought: For 32-pin DiskOnChip TM 1. Align the notched edge of the chip with the notched end of the socket. 2. Align the chip’s pins with the socket holes. 3. Gently press the chip into the socket. For 28-pin DiskOnChip TM 1. Align the non-notched end of the chip with the nonnotched end of the socket. 2. Align the chip’s pins with the socket’s holes. (chip’s pin28 with the socket’s hole32) 3. Gently press the chip into the socket. For further technical information on DiskOnChip TM , please see the attached manual bundled in the DiskOnChip T M package or contact your M-systems agent. Installing DiskOnChipTM 27 SBC8232 386SX ISA Half-size CPU Card Family User’s Manual 28 SBC8232 386SX ISA Half-size CPU Card Family User’s Manual Appendix C Connector Pin Assignment Parallel/Printer Connector (PRN) Pin No. 1 2 3 4 5 6 7 8 9 10 11 12 13 14 15 16 17 18-25 Connector Pin Assignments Signal Strobe Data 0 Data 1 Data 2 Data 3 Data 4 Data 5 Data 6 Data 7 -Acknowledge Busy Paper Empty + Select - Auto Feed - Error - INIT Printer - Select Input Ground 29 SBC8232 386SX ISA Half-size CPU Card Family User’s Manual HDD Connector (IDE) Pin No. 1 3 5 7 9 11 13 15 17 19 21 23 25 27 29 31 33 35 37 39 30 Signal - RST D7 D6 D5 D4 D3 D2 D1 D0 GND N.C. IOW IOR IORDY N.C. IRQ A1 A0 CS0 -ACT Pin No. 2 4 6 8 10 12 14 16 18 20 22 24 26 28 30 32 34 36 38 40 Signal GND D8 D9 D10 D11 D12 D13 D14 D15 N.C. GND GND GND BALE GND -IO CS16 N.C. A2 CS1 GND Connector Pin Assignments SBC8232 386SX ISA Half-size CPU Card Family User’s Manual FDD Connector (FDD) Pin No. Signal GND High Density Unused Index Motor Enable A Driver Select B Driver Select A Motor Enable B Direction Step Pulse Write Data Write Enable Track 0 Write Protect Read Data Select Head Disk Change 1-33 (odd) 2 4, 6 8 10 12 14 16 18 20 22 24 26 28 30 32 34 CRT Display Connector (VGA) Pin No. 1 2 3 4 5 6 7 8 9 10 11 12 13 14 15 Connector Pin Assignments Signal RED GREEN BLUE N/C GND GND GND GND N/C GND N/C N/C H-SYNC V-SYNC N/C 31 SBC8232 386SX ISA Half-size CPU Card Family User’s Manual RS-232 Connector (COM1) Pin No. 1 2 3 4 5 6 7 8 9 Signal DCD RX TX DTR GND DSR RTS CTS RI RS-232/422/485 Connector (COM2) Pin No. 1 2 3 4 5 6 7 8 9 10 32 RS232 DCD DSR RX RTS TX CTS DTR RI GND N.C. RS422 RS485 TX- DATA- TX+ DATA+ RX+ RXGND N.C. Connector Pin Assignments SBC8232 386SX ISA Half-size CPU Card Family User’s Manual PC/104 Connector Pin No. A -IOCHCHK* 2 SD7 3 SD6 4 SD5 5 SD4 6 SD3 7 SD2 8 SD1 9 SD0 10 IOCHRDY* 11 AEN 12 SA19 13 SA18 14 SA17 15 SA16 16 SA15 17 SA14 18 SA13 19 SA12 20 SA11 21 SA10 22 SA9 23 SA8 24 SA7 25 SA6 26 SA5 27 SA4 28 SA3 29 SA2 30 SA1 31 SA0 32 GND ‘ *’’ means ‘ Low active single’ single ’ ‘ --'' means ‘ None’ None ’ 0 1 Connector Pin Assignments B C D -GND RESETDRV +5V IRQ9 -5V DRQ2 -12V OWS* +12V GND SMEMW* SMEMR* IOW* IOR* DACK3* DRQ3 DACK1* DRQ1 REFRESH* SYSCLK IRQ7 IRQ6 IRQ5 IRQ4 IRQ3 DACK2* TC BALE +5V OSC GND GND GND SBHE LA23 LA22 LA21 LA20 LA19 LA18 LA17* MEMR* MEMW* SD8 SD9 SD10 SD11 SD12 SD13 SD14 SD15 NC -------------- GND MEMCS16* IOSC16* IRQ10 IRQ11 IRQ12 IRQ15 IRQ14 DACK0* DRQ0* DACK5* DRQ5 DACK6* DRQ6 DACK7* DRQ7 +5V MASTER* GND GND -------------- 33 SBC8232 386SX ISA Half-size CPU Card Family User’s Manual 34 SBC8232 386SX ISA Half-size CPU Card Family User’s Manual Appendix D AMI BIOS Fatal Error Codes Beep Codes Fatal errors, which halt the boot process, are communicated through a series of audible beeps. If AMI BIOS POST can initialize the system video display, it displays the error message. Displayed error messages, in most cases, allow the system to continue to boot. Displayed error messages are described on the following table. Beeps Error Message 1 Refresh Failure 2 Parity Error 3 Base 64 KB Memory Failure 4 Timer Not Operational 5 Processor Error 8042 - Gate A20 Failure Processor Exception Interrupt Error 6 7 8 Display Memory Read/Write Error 9 ROM Checksum Error 10 CMOS Shutdown Register Read/Write Error 11 Cache Memory Bad — Do Not Enable Cache AMI BIOS Fatal Error Codes Description The memory refresh circuitry is faulty. Parity error in the base memory (the first 64 KB block) of memory. Memory failure in first 64 KB. A memory failure in the first 64-KB of memory, or Timer 1 is not functioning. The CPU generated an error. Cannot switch to protected mode. The CPU on the CPU Card generated an exception interrupt. The system video adapter is either missing or its memory is faulty. This is not a fatal error. The ROM checksum value does not match the value encoded in AMIBIOS. The shutdown register for CMOS RAM has failed. The cache memory test failed. Cache memory is disabled. Do not press <Ctrl> <Alt> <Shift> <+> to enable cache memory. 35 SBC8232 386SX ISA Half-size CPU Card Family User’s Manual Troubleshooting System Problems If the Computer Beeps If it beeps... 1, 2, or 3 times... 6 times... 8 times... 9 times... 11 times... 4, 5, 7, or 10 times... then... re-install the memory SIMMs or DIPs. If the system still beeps, replace the memory. re-install the keyboard controller chip. If it still beeps, replace the keyboard controller. If it still beeps, try a different keyboard, or replace the keyboard fuse (if the keyboard has one). there is a memory error on the video adapter. Replace the video adapter, or the RAM on the video adapter. the BIOS ROM chip is bad. The system probably needs a new BIOS ROM chip. re-install the cache memory on the motherboard. If it still beeps, replace the cache memory. the motherboard must be replaced. The following tables are the checkpoint lists generated by I/O 80h port in AMI runtime compressed BIOS in order of execution. Uncompressed Code Checkpoints Checkpoint C2 C5 C6 C7 C8 CA CB Description NMI is Disabled. Power on delay starting. Power-on delay complete. Going to enable ROM. (i.e., disable Cache if any) Calculating ROM BIOS checksum. ROM BIOS checksum passed. CMOS shutdown register test to be done next. CMOS shutdown register test done. CMOS checksum calculation to be done next. CMOS checksum calculation is done, CMOS Diag byte written. CMOS status register about to init for date and time. CMOS status register init done. Any initialization before keyboard BAT to be done next. Continued . . . . . 36 AMI BIOS Fatal Error Codes SBC8232 386SX ISA Half-size CPU Card Family User’s Manual Checkpoint Description CD BAT command to keyboard controller is to be issued. Keyboard controller BAT result verified. Any initialization after KB controller BAT to be done next. Initialization after KB controller BAT done. Keyboard command byte to be written next. Keyboard controller command byte is written. Going to check pressing of <INS> key during power-on. Checking for pressing of <INS> key during power-on done. Going to disable DMA and Interrupt controllers. CE CF D1 D2 Runtime Code is Uncompressed Checkpoint D3 D4 D5 DD 01 02 03 05 06 08 09 0A 0B Description DMA controller #1, #2, interrupt controller #1, #2 disabled. Video display is disabled and port-B is initialized. Chipset initialization/ auto memory detection over. To uncompress the RUNTIME code. RUNTIME code is uncompressed. Transfer control to uncompressed code in shadow ram at F000:FFF0. Processor’s register test about to start, and NMI to be disabled. NMI is Disabled. Power on delay starting. Power on delay complete. To check soft reset/power-on. Soft reset/power-on determined. Going to disable Cache if any. POST code to be uncompressed. POST code is uncompressed. CMOS checksum calculation to be done next. CMOS checksum calculation is done, CMOS Diag byte written. CMOS init to begin (If "INIT CMOS IN EVERY BOOT IS SET"). CMOS initialization done (if any). CMOS status register about to init for Date and Time. CMOS status register init done. Any initialization before keyboard BAT to be done next. Continued . . . . . AMI BIOS Fatal Error Codes 37 SBC8232 386SX ISA Half-size CPU Card Family User’s Manual Checkpoint 0C 0D 0E 0F 10 11 12 13 14 19 1A 20 23 24 25 26 27 Description KB controller I/B free. Going to issue the BAT command to keyboard controller. BAT command to keyboard controller is issued. Going to verify the BAT command. Keyboard controller BAT result verified. Any initialization after KB controller BAT to be done next. Initialization after KB controller BAT done. Keyboard command byte to be written next. Keyboard controller command byte is written. Going to issue Pin-23, 24 blocking/unblocking command. Pin-23, 24 of keyboard controller is blocked/unblocked. Going to check pressing of <INS> key during power-on. Checking for pressing of <INS> key during power-on done. Going to disable DMA and interrupt controllers. DMA controller #1, #2, interrupt controller #1, #2 disabled. Video display is disabled and port-B is initialized. Chipset init about to begin. Chipset initialization over. 8254 timer test about to start. 8254 timer test over. About to start memory refresh test. Memory Refresh line is toggling. Going to check 15 micro second ON/OFF time. Memory Refresh period 30 micro second test complete. Base 64K test about to start. Base 64K test passed. Going to set BIOS stack and to do any setup before Interrupt vector init. Setup required before vector initialization complete. Interrupt vector initialization about to begin. Interrupt Vector initialization done. Going to read input port of 9042 for turbo switch (if any) and to clear password if post diag switch is on. Input port of 8042 is read. Going to initialize global data for turbo switch. Global data initialization for turbo switch is over. Any initialization before setting Video mode to be done next. Continued . . . . . 38 AMI BIOS Fatal Error Codes SBC8232 386SX ISA Half-size CPU Card Family User’s Manual Checkpoint 28 2A 2B 2C 2D 2E 2F 30 Description Initialization before setting Video mode is complete. Going for monochrome mode and color mode setting. Different BUSes init (system, static, output devices) to start if present. (Please see Reference for details of different BUSes) About to give control for any setup required before optional Video ROM check. Processing before Video ROM control is done. About to look for optional Video ROM and give control. Optional Video ROM control is done. About to give control to do any processing after Video ROM returns control. Return from processing after the Video ROM control. If EGA/VGA not found then do display memory R/W test. EGA/VGA not found. Display memory R/W test about to begin. Display memory R/W test passed. About to look for the retrace checking. 31 Display memory R/W test or retrace checking failed. About to do alternate Display memory R/W test. 32 Alternate Display memory R/W test passed. About to look for the alternate display retrace checking. 34 Video display checking over. Display mode to be set next. 37 Display mode set. Going to display the power on message. 38 Different BUSes init (input, IPL, general devices) to start if present. (Please see Reference for details of different BUSes) 39 Display different BUSes initialization error messages. (Please see Reference for details of different BUSes) 3A New cursor position read and saved. Going to display the Hit <DEL> message. 3B Hit <DEL> message displayed. Virtual mode memory test about to start. 40 Going to prepare the descriptor tables. 42 Descriptor tables prepared. Going to enter in virtual mode for memory test. Continued . . . . . AMI BIOS Fatal Error Codes 39 SBC8232 386SX ISA Half-size CPU Card Family User’s Manual Checkpoint Description 43 Entered in the Virtual mode. Going to enable interrupts for diagnostics mode. 44 Interrupts enabled (if diagnostics switch is on). Going to initialize data to check memory wrap around at 0:0. 45 Data initialized. Going to check for memory wrap around at 0:0 and finding the total system memory size. 46 Memory wrap around test done. Memory size calculation over. About to go for writing patterns to test memory. 47 Pattern to be tested written in extended memory. Going to write patterns in base 640K memory. 48 Patterns written in base memory. Going to find out amount of memory below 1M memory. 49 Amount of memory below 1M found and verified. Going to find out amount of memory above 1M memory. 4B Amount of memory above 1M found and verified. Check for soft reset and going to clear memory below 1M for soft reset. (If power on, go to check point # 4Eh). 4C Memory below 1M cleared. (SOFT RESET) Going to clear memory above 1M 4D Memory above 1M cleared. (SOFT RESET) Going to save the memory size. (Go to check point # 52h). 4E Memory test started. (NOT SOFT RESET) About to display the first 64K memory size. 4F Memory size display started. This will be updated during memory test. Going for sequential and random memory test. 50 Memory testing/initialization below 1M complete. Going to adjust displayed memory size for relocation/shadow. 51 Memory size display adjusted due to relocation/shadow. Memory test above 1M to follow. 52 Memory testing/initialization above 1M complete. Going to save memory size information. 53 Memory size information is saved. CPU registers are saved. Going to enter in real mode. 54 Shutdown successful, CPU in real mode. Going to disable gate A20 line. 57 A20 address line disable successful. Going to adjust memory size depending on relocation/shadow. 58 Memory size adjusted for relocation/shadow. Going to clear Hit <DEL> message. Continued . . . . . 40 AMI BIOS Fatal Error Codes SBC8232 386SX ISA Half-size CPU Card Family User’s Manual Checkpoint Description 59 Hit <DEL> message cleared. <WAIT...> message displayed. About to start DMA and interrupt controller test. 60 DMA page register test passed. About to go for DMA #1 base register test. 62 DMA #1 base register test passed. About to go for DMA #2 base register test. 65 DMA #2 base register test passed. About to program DMA unit 1 and 2. 66 DMA unit 1 and 2 programming over. About to initialize 8259 interrupt controller. 67 8259 initialization over. About to start keyboard test. 7F Extended NMI sources enabling is in progress. 80 Keyboard test started. Clearing output buffer, checking for stuck key. About to issue keyboard reset command. 81 Keyboard reset error/stuck key found. About to issue keyboard controller interface test command. 82 Keyboard controller interface test over. About to write command byte and init circular buffer. 83 Command byte written, Global data init done. About to check for lock-key. 84 Lock-key checking over. About to check for memory size mismatch with CMOS. 85 Memory size check done. About to display soft error and check for password or by pass setup. 86 Password checked. About to do programming before setup. 87 Programming before setup complete. Going to uncompress SETUP code and execute CMOS setup. 88 Returned from CMOS setup program and screen is cleared. About to do programming after setup. 89 Programming after setup complete. Going to display power on screen message. 8B First screen message display. <WAIT...>message displayed. About to do Main and Video BIOS shadow. 8C Main and Video BIOS shadow successful. Setup options programming after CMOS setup about to start. Continued . . . . . AMI BIOS Fatal Error Codes 41 SBC8232 386SX ISA Half-size CPU Card Family User’s Manual Checkpoint Description 8D Set up options are programmed, mouse check and init to be done next. 8E Mouse check and initialization complete. Going for hard disk controller reset. 8F Hard disk controller reset done. Floppy setup to be done next. 91 Floppy setup complete. Hard disk setup to be done next. 94 Hard disk setup complete. Going to set base and extended memory size. 95 Memory size adjusted due to mouse support, hdisk type-47. Init of different BUSes optional ROMs from C800 to start. (Please see Reference for details of different BUSes) 96 Going to do any init before C800 optional ROM control. 97 Any init before C800 optional ROM control is over. Optional ROM check and control will be done next. 98 Optional ROM control is done. About to give control to do any required processing after optional ROM returns control. 99 Any initialization required after optional ROM test over. Going to setup timer data area and printer base address. 9A Return after setting timer and printer base address. Going to set the RS-232 base address. 9B Returned after RS-232 base address. Going to do any initialization before coprocessor test. 9C Required initialization before coprocessor is over. Going to initialize the coprocessor next. 9D Coprocessor initialized. Going to do any initialization after coprocessor test. 9E Initialization after co-processor test is complete. Going to check extd keyboard, keyboard ID and numlock. 9F Extd keyboard check is done, ID flag set, num-lock on/off, keyboard ID command to be issued. A0 Keyboard ID command issued. Keyboard ID flag to be reset. A1 Keyboard ID flag reset. Cache memory test to follow. A2 Cache memory test over. Going to set the keyboard typematic rate. A3 Soft error display complete. Going to set the keyboard typematic rate. Continued . . . . . 42 AMI BIOS Fatal Error Codes SBC8232 386SX ISA Half-size CPU Card Family User’s Manual Checkpoint Description A4 Keyboard typematic rate set. Going to program memory wait states. A5 Memory wait states programming over. Going to clear the screen and enable parity/NMI. A7 NMI and parity enabled. Going to do any initialization required before giving control to optional ROM at E000. A8 Initialization before E000 ROM control over. E000 ROM to get control next. A9 Returned from E000 ROM control. Going to do any initialization required after E000 optional ROM control. AA Initialization after E000 optional ROM control is over. Going to display the system configuration. B0 System configuration is displayed. Going to uncompress SETUP code for hot-key setup. B1 Uncompressing of SETUP code is complete. Going to copy any code to specific area. 00 Copying of code to specific area done. Going to give control to INT 19h boot loader. AMI BIOS Fatal Error Codes 43 SBC8232 386SX ISA Half-size CPU Card Family User’s Manual The following table contains all AMI BIOS beep codes. Except for Beep Code 8, they are always fatal. Beep Code Error Message Description 1 beep Refresh Failure The memory refresh circuitry the motherboard is faulty. 2 beeps Parity Error A parity error was detected in the first 64KB block of memory. 3 beeps Base 64KB Memory Failure Memory failure in first 64KB. 4 beeps Timer Not Operational A memory failure occurred within the first 64KB of memory, or Timer 1 on the motherboard is not functioning. 5 beeps Processor Error The CPU (Central Processing Unit) on the motherboard generated an error. 6 beeps 8042-Bate A20 Failure Gate A20 on the keyboard controller (8042) allows the CPU to operate in protected mode. The BIOS is not able to switch the CPU to protected mode. 7 beeps Processor Exception Interrupt Error The CPU generated an exception interrupt. 8 beeps Display Memory Read/ Write Error The system video adapter is either missing or its memory is faulty. This is not a fatal error. 9 beeps ROM Checksum Error The ROM checksum value does not match the value encoded in the BIOS. 10 beeps CMOS Shutdown Register Read/Write Error The shutdown register for CMOS RAM failed. 11 beeps Cache Error/External Cache Bad The external cache is faulty. 44 AMI BIOS Fatal Error Codes