1
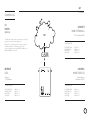
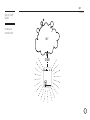
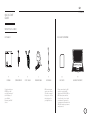
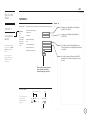
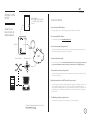
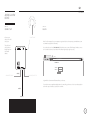
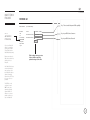
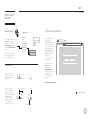
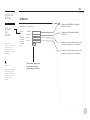
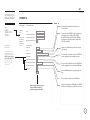
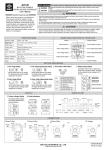
THE MANUAL
Creating quick, versatile &
robust connectivity using
cellular networks.
EDITION 01/ AUGUST 2013
DESIGNED IN AUSTRALIA. ASSEMBLED IN SINGAPORE.
G1
FATBOX
CONTENTS
0 1.
G1 ABILIT Y (COMMON USES)
03
0 2.
GET TING TO KNOW YOUR G1 ROUTER
04 - 05
0 3.
QUICK START GUIDE
06 - 12
0 4.
CONFIGURE FUNC TIONS
13 - 23
0 5.
SAFET Y
24
0 6.
CONTAC T AMPLIFIED ENGINEERING
25
2
G1
FATBOX
COMMON USES
G1
HSDPA
gateway
CONNECT
MOBILE TERMINALS
NET
POS Terminals & ATMs
The FATBOX G1 provides stable and robust data connectivity
gateway for remote and mobile applications.
Designed for succesful deployment of remote and mobile
networked applications in demanding internet data
connectivity applications requiring HSDPA (7.2Mbits/sec) or
EDGE and GPRS Class 12 speeds.
SET UP INSTRUCTION
GSM
QUICK START GUIDE
CONNECT DEVICES
LAN SET TINGS
3G SET TINGS
RETRIEVE
DATA
CONTROL
REMOTE DEVICES
Telemetry
CCTV Backhaul
Digital Signages
Unmanned Vehicles
SET UP INSTRUCTION
QUICK START GUIDE
CONNECT DEVICES
LAN SET TINGS
3G SET TINGS
PAGES: 6 - 12
PAGES 13 - 19
PAGES 20 - 21
PAGES 22 - 23
SET UP INSTRUCTION
PAGES: 6 - 12
PAGES 13 - 19
PAGES 20 - 21
PAGES 22 - 23
QUICK START GUIDE
CONNECT DEVICES
LAN SET TINGS
3G SET TINGS
PAGES: 6 - 12
PAGES 13 - 19
PAGES 20 - 21
PAGES 22 - 23
3
G1
FATBOX
ABOUT
top
THE HARDWARE
LED COLORS
GPS
INDICATOR
3G STRENGTH
INDICATOR
“NO’
INDICATOR*
‘YES’
INDICATOR*
POWER
INDICATOR
only for upcoming
GPS expansion
option
3G ANTENNAE
GPS
ANTENNAE
green
Device powered up
green
‘Yes’ Status
red
‘No’ Status
yellow
Connection poor
green
Connection good
N.A
N.A
POWER & OPERATING CONDITIONS
POWER
side
front
12-24VDC @ 0.3-0.15A
nominal
110-230VAC power
adaptor provided
bottom
OPERATING
TEMPERATURE
Frame Dimensions
L: 100mm
B: 76mm
H: 17.7mm
RESET PIN
ETH:0 PORT
ETH:1 PORT
-20°C to +55°C
POWER CONNECTOR
4
G1
FATBOX
ABOUT
UPGRADES
TECHNICAL
SPECIFICATION
G1 UPGRADE OPTIONS
ANTENNAE
Operating System
Base Station Antenna
-
Frequency
800/900/1800/1900/2100 MHz
Polarization
Vertical
Max Power
50W
Height
477mm +10
Wireless Cellular
Interface
-
Impedence
50Ohm
OTHER OPTIONS
Cable Length
1) 50cm or
2) 200cm
-
Mounting
1) Wall Mount or
2) Pole Mount
For industrail applications
that require the FATBOX
to be securely fixed,
the FATBOX can be ordered
with attached mounting
brackets.
HSDPA 7.2M downlink and
384K uplink
(850/1900/2100)
EDGE and GPRS Class 12
(850/900/1800/1900)
RX Diversity on
HSDPA/UMTS (850/2100)
LAN Interface
-
2 x 10/100BaseT (Bridged
with DHCP server)
Networking
Functions
-
Dynamic DDNS (using
DYNDNS.ORG) to map IP
addresses
Port forwarding of single
ports or range of ports to
your devices
Automatic PING on retries
failure to reboot router in
difficult networks
Site-to-Site IPSEC VPN using
aes-sha/md5
implementation
-
MOUNTING
BRACKETS
Linux 3.3.X running on
Qualcomm Atheros
400MHZ MIPS32 CPU
Firmware upgrade over
Ethernet TCP
-
5
G1
FATBOX
QUICK START
GUIDE
ESTABLISH A
CONNECTION
NET
GSM
6
G1
FATBOX
QUICK START
GUIDE
WHAT YOU’LL NEED
IN THE BOX
FATBOX
Together with your
FATBOX you will
need information of
the IP Address of
your Default
Gateway and DNS
Server.
YOU NEED TO PREPARE
SCREWDRIVER
CAT5 CABLE
POWER CABLE
ANTENNAE
Different antenna
options are offered.
The table on page 5
helps you to choose
the right type for
your application.
SIM CARD
ADMINISTRATOR PC
Please ensure that the SIM
card to be used has PIN
disable and HSUPA, EGPRS or
GPRS data plans enabled.
You will need to check with
your Network Operator for
configuration information like
APN, dial-number, username
and password.
7
G1
FATBOX
QUICK START
GUIDE
STEP 1 OF 7
Remove the screws on the bottom
of the casing.
Insert your SIM card into the mount provided.
4R7
FCC ID:
XXXXXX-EU850D
IMEI: XXXXXXXX-XXXXXX-X
WWAN
CE0976
IC: XXXXX-EU850D
4R7
EU850D
FCC ID:
XXXXXX-EU850D
IMEI: XXXXXXXX-XXXXXX-X
CE0976
IC: XXXXX-EU850D
EU850D
WWAN
INSERTING THE
SIM CARD
Firmly screw the casing back.
8
G1
FATBOX
QUICK START
GUIDE
STEP 2 OF 7
STEP 3 OF 7
CONNECT UP
3G ANTENNAE
Connect your FATBOX
to your devices in the
following manner.
LOG IN
Wait for a few moments for your computer to register the device then open up your web browser (we
recommend using Firefox or Chrome).
Key in “192.168.168.1” into your URL tab. ( We advise users to turn off their laptop’s wireless connection
to avoid the chance of any clashes in IP addressing during the log in process).
New Tab
192.168.168.1
You should see the following login page:
eth(0)
FATBOX CONSOLE
192.168.168.1/cgi-bin/FATBOX
POWER CONNECTOR
FATBOX G1
ADMINISTRATOR PC
Username admin
Password
12345
LOGIN
YOU SHOULD SEE
steady
The default user name is:
The default password is:
The ‘power indicator’
on and the ‘yes
indicator’ go from
flashing to steady.
admin
12345
Log in.
flashing to steady
9
QUICK START
GUIDE
G1
FATBOX
FATBOX G1
MENU OPTIONS
STEP 4 OF 7
Quick Start
LAN
CONFIGURE THE
ROUTER
You will automatically
be taken to the Quick
Start Page when you
log in.
3G
Basic settings to setup your FATBOX G1 router as a 3G/HSPA internet access gateway for the LAN port.
LAN (eth0 and eth1) Port Settings
LAN IP Address
192.168.168.1
LAN Netmask
255.255.255.0
Port Forwarding
Dynamic DNS
3G/HSPA Cellular Settings
Management
APN
System Status
Logout
Configure your LAN IP Address. By default the
address is 192.168.168.1
Configure your LAN Netmask. By default it is
255.255.255.0
your_apn
Username (PAP/CHAP only)
Key in the Access Point Name (APN) from your
Service Provider. It’s something like “telstra.internet”
or “tmobile”.
Password (PAP/CHAP only)
SIM PIN Code (if required only)
Update
The settings in this
page will enable your
FATBOX to create a
connection.
Key in the Username and Password and PIN (if
required) of your SIM card issued by your Service
Provider.
Click to update settings to router.
A reboot will be required for
updated settings to take effect.
YOU SHOULD SEE
signal indicatior on
steady
The ‘power indicator’
on and the ‘yes
indicator’ flashing
steadily.
steady
10
QUICK START
GUIDE
G1
FATBOX
FATBOX G1
MENU OPTIONS
STEP 5 OF 7
Quick Start
LAN
RESTART THE
NETWORK
3G
Port Forwarding
Key in your new
Username
System settings
Username admin
Password
12345
Update
Dynamic DNS
Key in your new
Password
Management
When you have finished
updating your quick
start settings, click onto
the Management tab.
You need to restart the
network In order for the
FATBOX to establish the
changes.
You can do it simply by
clicking the Reboot
Router tab here.
System Status
Logout
You can also customize
your own login profile
on the Management
Page.
Remember to keep a
record of your changes
where you can refer to
later.
Factory Reset
Reboot Router
YOU SHOULD SEE
Your connection will
drop and reset. You
should see your FATBOX
power down.
As your connection
resets The power LED
will come on and your
‘YES’ Indicator will blink
first and then flash
steadily. Your signal
indicators will also be
on to indicate the
strength of your signal.
signal indicatior on
steady
blink > steady
11
G1
FATBOX
QUICK START
GUIDE
STEP 6 OF 7
STEP 7 OF 7
REVIEW YOUR CHANGES
TEST THE CONNECTION
Your session may time out as your network resets. Hence to review your changes you
will need to access the web console again at “192.168.168.1”. Login with the
Username and Password that you have set.
You can test the speed of your connection on
http://www.speedtest.net/
FATBOX CONSOLE
SPEEDTEST.NET
192.168.168.1/cgi-bin/FATBOX
http://speedtest.net/
FATBOX G1
Username XXX
Password
PING
DOWNLOAD SPEED
UPLOAD SPEED
XXXX
LOGIN
TEST
Your new changes should be reflected in the Quick Start Menu.
Congratulations! Your FATBOX is now set up.
*The speed of the
connection is
dependant on the
telco.
QUICK START GUIDE END.
12
G1
FATBOX
CONFIGURING
THE FATBOX
ADDING A NEW
DEVICE
ISSUE DEVICE A
LOCATION
MAKE FATBOX
FINDABLE
UPDATE LAN
SETTINGS
ADVANCED 3G
MANAGEMENT
CONNECT UP
PORT FORWARDING
DYNAMIC DNS
CUSTOMIZE YOUR
NETWORK
MORE CONNECTION
OPTIONS
For users who need the
FATBOX to hook up to
remote terminals or
devices, this guides you
inthe connection and set
up of your devices.
Whenever you connect a
new device to your
FATBOX you want to tag
its applications to a
specific port so that
other devices can locate
it later.
Unless you have both a
static and public IP
address, your devices can
not be found from the
world wide web. Services
like Dynamic DNS (DDNS)
helps resolve the issue by
tracking public IP
addresses.
Do you need to configure
your network settings?
Customise settings such
as your default Gateway
and DNS server here.
The reliability of your
FATBOX connection can
be toggled up or down
to either increase the
robustiness of the
network or create more
economical settings.
14
16
18
20
22
15
17
19
21
23
13
G1
FATBOX
ADDING A NEW
DEVICE
MOBILE TERMINAL
(POS TERMINALS/ TELEMETRY DEVICES/
CCTV CAMERAS/ DIGITAL SIGNAGES/
VEHICLES)
YOU NEED TO PREPARE
Your router’s internal IP address
CONNECTING A
KIOSK, VEHICLE OR
MOBILE TERMINAL
This is typically the same as the “default gateway” from the above information.
Your router’s public IP address
You can find this by visiting www.whatismyip.com
FATBOX G1
Your router’s username and password
GSM
NETWORK SWITCH
FIREWALL ROUTER
If you do not know this information, you will need to look in your product manual or contact
your network administrator or internet service provider.
NET
Your network’s subnet mask
You can also find these under Control Panel>Network Connections>Local Area Connection
(or your network adapter’s name)>Properties>Internet Protocol (TCP/IP) Properties.
Your product’s username and password
You will need the administrative username and password for your product so that you can log
into it and make changes.
Existing forwarded ports or NAT entries from your router
DATA SERVER
WORKSTATIONS
You need know your existing port forward and/or NAT settings before adding new ones in order
to avoid conflicts. If you use point of sales software on your network you should call your
vendor and make CERTAIN you have the settings and know how to avoid creating conflicts with
them. Failing to do so could threaten your ability to create new transactions for a significant
period of time.
The default ports that your product uses.
You can find the default ports that you product uses in your usual manual.
MORE NETWORK DIAGRAMS CAN BE FOUND ON
http://amplified.com.au/
14
G1
FATBOX
ADDING A NEW
DEVICE
STEP 1 OF 2
STEP 2 OF 2
CONNECT UP
LOG IN
3G ANTENNAE
Connect your
device to the G1’s
eth(1) port.
Wait for a few moments for your computer to register the device then open up your web browser (we
recommend using Firefox or Chrome).
The eth(0) and
eth(1) ports are
bridged and own
the same IP
address.
Access the web console at “192.168.168.1”. ( We advise users to turn off their laptop’s wireless connection to avoid the chance of any clashes in IP addressing during the log in process).
FATBOX CONSOLE
192.168.168.1/cgi-bin/FATBOX
FATBOX G1
Username XXX
Password
XXXX
LOGIN
eth(0)
ADMINISTRATOR PC
POWER CONNECTOR
Login with the Username and Password that you have set.
If your device runs an application/applications, the next thing you have to do is to issue these applications with a specific address (or port) in the network.
eth(1)
device
15
G1
FATBOX
ISSUE DEVICE A
LOCATION
FATBOX G1
STEP 1 OF 3
PORT
FORWARDING
MENU OPTIONS
Port Forwarding
Quick Start
Add a new Port Forwarding Rule
Please consult with the device manufacturer for
details on what port(s) should be forwarded. Some
devices require more then one port to be
forwarded in order for you to obtain all the features
it has to offer.
LAN
3G
Whenever you connect a
new device to your
FATBOX you want to tag
its applications to a
specific port so that
other devices can locate
it later.
Source Port
Port Forwarding
Dynamic DNS
For users who want DMZ, you can key in ‘0-65535’ in
this option.
Single Port: XXX or Rang of Ports: XXX-XXX
Destination LAN IP Address
Management
Destination Port
System Status
Service
TCP and UDP
Logout
Add
Key in the IP address of your device connecting to
the FATBOX.
tcpudp
Could take up to 5 secs
Key in the port number of the application in your
connecting device. The range of ports here must be
the same as the source.
To set this go to the tab
titled Port Forwarding
on your left menu.
Select a Protocol to be used for your device.
Common options found are UDP, TCP or Both. In
most cases you will need to select the protocol
option "TCP and UDP". This will associate both
protocols to the port(s) being forwarded.
Click to update settings to router.
A reboot will be required for
updated settings to take effect.
In the Port Forwarding
menu you can also see a
list of the other devices
tagged to the FATBOX in
the given table.
For Example:
Current Port Forwarding Rules
Index
Source Port
Destination IP
Destination Port
Protocol
01
02
800
1000-1200
192.168.168.2
192.168.168.3
80
1300-1400
UDP and TCP
UDP
In the first example, if you access port 800 on the Fatbox [192.168.168.1:800],
it will be directed to port 80 at the device that holds the IP address of
192.168.168.2 [192.168.168.2:80].
The second example displays how a range of destination ports (1300-1400) on
a device with IP address 192.168.1.3 can be accessed with a range of ports
(1000-1200) on the FATBOX G1.
16
G1
FATBOX
ISSUE DEVICE A
LOCATION
STEP 2 OF 3
REBOOT ROUTER
STEP 3 OF 3
MENU OPTIONS
Quick Start
To save and implement your
Port Forwarding settings you
must restart the network. Go
to the Management tab and
click on the Reboot Router
button.
Your connection will drop
and reset again with your
new settings in place.
System settings
Username XXX
LAN
Password
3G
Port Forwarding
Update
Dynamic DNS
Management
System Status
Logout
Factory Reset
Reboot Router
Open your internet browser
and enter the IP address that
you assigned to your product.
You should be looking at the
login or default screen for
your product. Make sure to
include the web server port
(If something other than port
80) you have assigned to you
have your product.
DEVICE CONSOLE
For example, if your product
uses port 81 for its web server
and has an IP address of
192.168.168.50, you would
browse to
YOU SHOULD SEE
192.168.168.50:81
DEVICE CONSOLE ACCESS
http://192.168.168.50:81.
Your connection will
drop and reset. You
should see your FATBOX
power down.
As your connection
resets The power LED
will come on and your
‘YES’ Indicator will blink
first and then flash
steadily. Your signal
indicators will also be
on to indicate the
strength of your signal.
XXXX
TESTING FROM INTERNAL NETWORK (LAN)
signal indicatior on
steady
Now that your device can be located within your
network, the next thing to ensure is that it can
be found on the World Wide Web (www). Unless
you have a Public and Static IP address from your
service provider you will need to use a Dynamic
DNS service found in the next page.
PORT FORWARDING GUIDE END.
blink > steady
17
MAKE FATBOX
FINDABLE
G1
FATBOX
FATBOX G1
MENU OPTIONS
Quick Start
Key ‘1’ here to enable a dynamic DNS capability
Dynamic DNS Settings
1 0- Disabled 1- Enabled
Enable
STEP 1 OF 3
LAN
AUTOMATED
IP TRACKING
3G
DNS Service Username your_username
Port Forwarding
DNS Service Password
Dynamic DNS
Management
A Static and Public IP
address is essential to
getting your FATBOX
contactable from the
World Wide Web (www).
Please ensure that the
SIM card you obtain has
a Public and not a
Private IP.
your_password
Key in your DNS Service Username
Key in your DNS Service Password
Update
System Status
Logout
Click to update settings to router.
A reboot will be required for
updated settings to take effect.
Also, Public IP addresses
are severely limited so
most operators often
issue Public IPs that are
dynamic (changing)
rather than static. If that
is the case, it’s not a
problem.
The FATBOX can be
configured to run a
DDNS service that
automatically tracks
dynamic Public IP
addresses to create a
similar condition as a
Static and Public IP.
18
G1
FATBOX
MAKE FATBOX
FINDABLE
STEP 2 OF 3
REBOOT ROUTER
STEP 3 OF 3
MENU OPTIONS
Quick Start
To save and implement your
Dynamic DNS settings you
must reboot the router. Go to
the Management tab and
click on the Reboot Router
button.
Your connection will drop
and reset again with your
new settings in place.
System settings
Username XXX
LAN
Password
3G
Port Forwarding
XXXX
Update
Dynamic DNS
Management
System Status
Logout
Factory Reset
Reboot Router
TESTING FROM WAN (INTERNET)
You should be able to
substitute your
registered DNS address
for your internal one
(see your information
gathering checklist)
from a PC outside your
network ( Viewing a
product at your office
from home or
vice-versa) and achieve
the same result.
DEVICE CONSOLE
http://myrouter.dyndns.org:81
DEVICE CONSOLE ACCESS
For example, if your
DNS Service is
registered under
myrouter.dyndns.org
and your product uses
port 81 for its web
server, you would
browse to
YOU SHOULD SEE
Your connection will
drop and reset. You
should see your FATBOX
power down.
http://myrouter.dyndns.org:81.
As your connection
resets The power LED
will come on and your
‘YES’ Indicator will blink
first and then flash
steadily. Your signal
indicators will also be
on to indicate the
strength of your signal.
signal indicatior on
steady
DYNAMIC DNS GUIDE END.
blink > steady
19
UPDATE LAN
SETTINGS
STEP 1 OF 3
CUSTOMIZE
YOUR
NETWORK
G1
FATBOX
FATBOX G1
MENU OPTIONS
Quick Start
LAN IP Address
192.168.168.1
3G
LAN Netmask
255.255.255.0
Port Forwarding
eth0 MAC
1c:bd:0e:21:00:00
xx:xx:xx:xx:xx:xx
eth1 MAC
1c:bd:0e:21:00:01
xx:xx:xx:xx:xx:xx
LAN
Dynamic DNS
Management
Do you need to
configure your network
settings? Customise
settings such as your
LAN IP Address and LAN
Netmask here.
!
IMPORTANT:
Whilst you are configuring
the LAN settings, ensure
that your new settings do
not clash with any other
address set in your
network.
Configure your LAN IP Address. By default the
address is 192.168.168.1
LAN (eth0) Port Settings
System Status
Update
Logout
Configure your LAN Netmask. By default it is
255.255.255.0
The MAC of your eth0 port will be entered for you. If
you require to edit it you can do so in this menu.
The MAC of your eth1 port will be entered for you. If
you require to edit it you can do so in this menu.
Click to update settings to router.
A reboot will be required for
updated settings to take effect.
20
G1
FATBOX
UPDATE LAN
SETTINGS
STEP 2 OF 3
REBOOT ROUTER
STEP 3 OF 3
MENU OPTIONS
Quick Start
To save and implement your
Port Forwarding settings you
must restart the network. Go
to the Management tab and
click on the Reboot Router
button.
Your connection will drop
and reset again with your
new settings in place.
System settings
Username XXX
LAN
Password
3G
Port Forwarding
XXXX
Update
Dynamic DNS
Management
System Status
Logout
Factory Reset
Reboot Router
NEW LOGIN SETTINGS
To access the FATBOX web
console now, type in the
new LAN IP Address into
your browser.
For example, if you set
your new IP address as
192.168.2.1, you will now
access your login page via
the following address:
http://192.168.2.1
FATBOX CONSOLE
192.168.2.1
FATBOX G1
Username XXX
Password
XXXX
LOGIN
YOU SHOULD SEE
Your connection will
drop and reset. You
should see your FATBOX
power down.
As your connection
resets The power LED
will come on and your
‘YES’ Indicator will blink
first and then flash
steadily. Your signal
indicators will also be
on to indicate the
strength of your signal.
signal indicatior on
steady
UPDATE LAN GUIDE END.
blink > steady
21
ADVANCED 3G
MANAGEMENT
STEP 1 OF 2
MORE
CONNECTION
OPTIONS
G1
FATBOX
FATBOX G1
MENU OPTIONS
Quick Start
LAN
APN
your_apn
3G
Username (PAP/CHAP only)
Port Forwarding
Password (PAP/CHAP only)
Dynamic DNS
Management
Enter in the dial number provided for by your
Service Provider.
3G/HSPA Cellular Settings
You can choose the FATBOX to restrict operation on
only select protocol of either UMTS or GPRS.
The ‘UMTS Prefered’ option allows the FATBOX to
run both protocols however the box will go with
UMTS if it is available.
SIM PIN Code (if required only)
System Status
CONNECTION
ROBUSTNESS
For applications that
need greater fail-safe
reliability, functions like
PPP Keep alive, Enable
Reboot & PING retries
lets you toggle the
robustness of your
connections.
Logout
Advanced Settings
Dial Number
#99
Service
UMTS Prefered
Current: umts
Assigned DNS
PPP Keepalive
5
no. of connection failures before reconnection
Enable Reboot on Ping failure
0
Remote PING Host IP address
www.google.com
PING Retry Time Period (s)
15
PING retries
4
Assign your own DNS that overides the one set by
your network
For more robust or reliable connection the FATBOX
can be configured to automatically reconnect
1=enable 0=disable
Update
For more robust or reliable connection the FATBOX
can be configured to reboot itself upon PING failure
Enter in a PING destination (eg. www.google.com)
here
This sets the time in between each PING retry
Click to update settings to router.
A reboot will be required for
updated settings to take effect.
If there are this number of PING failures, the FATBOX
will reboot and attempt to re-establish a connection
22
G1
FATBOX
ADVANCED 3G
MANAGEMENT
STEP 2 OF 2
REBOOT ROUTER
MENU OPTIONS
Quick Start
To save and implement your
Dynamic DNS settings you
must reboot the router. Go to
the Management tab and
click on the Reboot Router
button.
Your connection will drop
and reset again with your
new settings in place.
System settings
Username XXX
LAN
Password
3G
Port Forwarding
Update
Management
System Status
Factory Reset
Reboot Router
YOU SHOULD SEE
Your connection will
drop and reset. You
should see your FATBOX
power down.
As your connection
resets The power LED
will come on and your
‘YES’ Indicator will blink
first and then flash
steadily. Your signal
indicators will also be
on to indicate the
strength of your signal.
XXXX
Dynamic DNS
Logout
signal indicatior on
A NOTE ON AUTOPING
steady
blink > steady
If you did not enable
AUTOPING, the green
yes and red no are
indication of your
connection. (Note that
having a green yes
shows a live connection
but this is different from
being able to PING
through).
signal indicatior on
If you enabled AUTOPING
the YES and NO indicators
will remain off and only
beep green or red upon a
send or a failure to PING.
signal indicatior on
steady
steady YES or NO indicates connection status
steady
YES or NO indicators will remain off and
only beeps Green or Red upon PING send or
failure.
3G SETTINGS GUIDE END.
23
G1
FATBOX
SAFETY
!
SAFETY
ALL CONDITIONS
All specialist electronic devices must be operated with due care to avoid damage or injuries and should
be installed and operated by a trained personnel.
DO NOT OPERATE THIS EQUIPMENT IN ENVIRONMENTS CONTAINING POTENTIALLY EXPLOSIVE GASES OR
LIQUIDS, EXAMPLE, GAS STATIONS AND CHEMICAL PLANTS AND EXPLOSIVE STORES.
POWER SET UP
Inadequate current or dips in voltage may cause the device to fail to connect to data services even if
the LEDs are lighted up.
Supply over 30 VDC will damage the device
SIM CARD
Never remove or insert SIM card when device has PWR switched in “ON” position. Damage caused to
device or SIM in such case will not be warranted.
CONFIGURING THE
ROUTER
Do not reboot/power-down the device until the writing process is acknowledged as completed.
24
THE CONTACT
Website:
amplified.com.au
Email:
[email protected]
Address:
Amplified Engineering Pty Ltd
No. 5 Turner Ave, Unit 1
Bentley Technology Park Bentley,
Western Australia 6102
AUSTRALIA
25