1
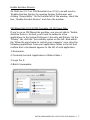
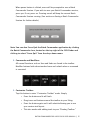
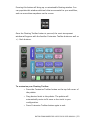
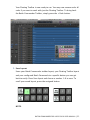
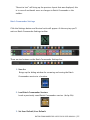
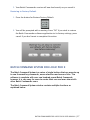
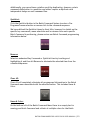
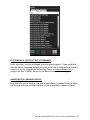
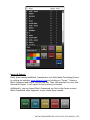
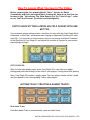
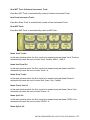
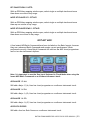
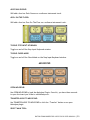
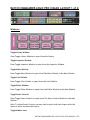
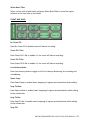
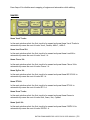
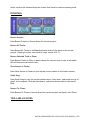
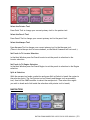
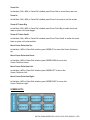
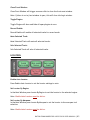
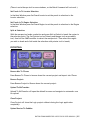
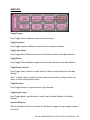
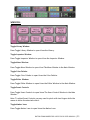
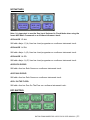
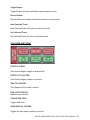
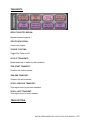
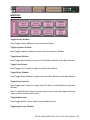
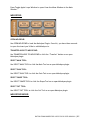
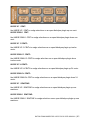
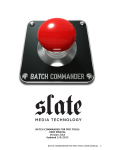
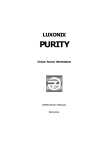
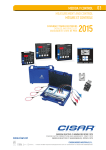
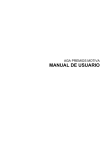
BATCH COMMANDER FOR LOGIC PRO X
USER MANUAL
Version 2.0.0
Updated 3/9/2015
BATCH COMMANDER FOR LOGIC PRO X USER MANUAL 1 Updated 3/9/2015
Contents SYSTEM REQUIREMENTS ......................................................................................................... 3 INSTALLING BATCH COMMANDER LOGIC PRO X ....................................................................... 4 BATCH COMMANDER LOGIC PRO X SOFTWARE FEATURES ....................................................... 6 Batch Commander Toolbar .................................................................................................................................................................. 6 Batch Commander Settings ................................................................................................................................................................ 12 Saving a Pro Tools Session ................................................................................................................................................................. 15 Saving a Batch Commander Session .............................................................................................................................................. 15 Restoring to Factory Default ............................................................................................................................................................. 17 BATCH COMMAND SYSTEM FOR LOGIC PRO X ...................................................................... 17 BATCH COMMANDER FOR LOGIC PRO X USER MANUAL 2 System Requirements
The Batch Commander is a Mac application, for optimal performance we
recommend the following specifications.
•
OSX 10.7 (Lion,) OSX 10.8 (Mountain Lion,) OSX 10.9 (Mavericks,) and
OSX 10.10 (Yosemite.)
•
Pro Tools 10, Pro Tools 11, Logic Pro X.
•
Slate Remote iOS Application (Optional.) Available on the App Store.
•
Intel i7 or Xeon processor with a clock speed of at least 2.4 GHz.
•
Minimum 4GB RAM (We recommend 8GB RAM.)
•
Graphics card with minimum 512MB memory, though 1GB graphics
memory is recommended.
•
Graphic & Batch Command response speed will vary depending on the
capabilities of the computer’s capacity.
•
Most display sizes supported. (Note: Default layouts may appear
differently on various displays, but all Batch Commands are available to
every user. Hit customize toolbar to view Batch Commands and relocate
to accommodate all display sizes.)
BATCH COMMANDER FOR LOGIC PRO X USER MANUAL 3 Installing Batch Commander Logic Pro X
Setting up Logic Pro X with Batch Commander is a one-time operation for
Logic Pro X sessions. On the Pro Tools menu bar;
1. First, navigate to your Apple on the OS Finder > Dock > Turn Hiding On.
Note: With the Slate Remote iOS application, you can hide the Batch
Commander application after launch and keep your dock visible if you’d
prefer.
2. Now, on a single monitor, navigate to the Edit Window and position the
Edit Window above the Batch Commander Toolbar. Note: If using more
than one monitor, make sure the main display is set to your Logic Pro X
Window.
BATCH COMMANDER FOR LOGIC PRO X USER MANUAL | 4
Enable Assistive Devices:
On OSX Lion (10.7) or OSX Mountain Lion (10.8,) you will need to
“Enable Assistive Devices by opening System Preferences and
clicking “Accessibility.” On the bottom left of the window, check the
box, “Enable Assistive Devices” and close the window.
OSX Mavericks (10.9) & OSX Yosemite (10.10) Users Only:
If you’re on an OSX Mavericks machine, you are not able to “Enable
Assistive Devices. Instead, you’ll need to authorize a few
applications in the System Preference’s Security and Privacy. On the
“Privacy” tab, click the “Accessibility option on the left. Now within
the “Allow the apps below to control your computer” area, drag the
following applications from your applications folder to the list and
confirm that a checkmark appears to the left of each application.
1) Automator.
2) Terminal (Located: Applications>Utilities folder.)
3) Logic Pro X.
4) Batch Commander.
BATCH COMMANDER FOR LOGIC PRO X USER MANUAL | 5
Batch Commander Logic Pro X Software Features
Batch Commander Toolbar
The Batch Commander Toolbar rests on the bottom of the screen and is the
control center for many essential features. It can be viewed with a single,
double, or triple rack space using the + and – rack buttons.
To Add or Remove Racks press the + to show more racks in your toolbar or – to
show less racks. Batch Commander Racks can be customized to show as many
or few tools as you would like.
BATCH COMMANDER FOR LOGIC PRO X USER MANUAL | 6
To interact with your OS while Batch Commander is open, we have provided
a quick an easy Hide Batch Commander button above the Batch Commander
Power button on the Batch Commander Toolbar.
Click with your mouse to hide your Batch Commander application almost
entirely except for the “Show” Batch Commander Icon on the bottom left
hand side. Click the Batch Commander Icon “Show” on the bottom left hand
side of the screen and the Batch Commander application will again appear.
Note: This can be very helpful when using an internet browser or something
that appears hidden behind the Batch Commander Toolbars.
Note: The Batch Commander can be hidden when using the Slate Remote iOS
application to advantage more screen real estate.
1. Power:
Exits the Batch Commander software application.
BATCH COMMANDER FOR LOGIC PRO X USER MANUAL | 7
When power button is clicked, users will be prompted to save a Batch
Commander Session. If you wish to save your Batch Commander session,
press yes. If not, press no. Pressing cancel will keep the current Batch
Commander Session running. (See section on Saving a Batch Commander
Session for further details.)
Note: You can also Force Quit the Batch Commander application by clicking
the Batch Commander Icon, located on the top right of the OSX Finder and
clicking to select “Force Quit” from the drop-down menu.
2. Commands and Modifiers:
All normal functions such as Save and Undo are found in the toolbar.
Modifier buttons latch when touched once and unlatch when a command
is executed.
3. Customize Toolbar:
Tap this button to enter “Customize Toolbar” mode. Simply:
•
Press the button and it will latch.
•
Drag icons and buttons around the toolbar to your liking.
•
Press the button again and it will unlatch allowing you to use
your custom tool layout.
•
This also works with adding tools to your “Floating Toolbar.”
BATCH COMMANDER FOR LOGIC PRO X USER MANUAL | 8
Note: When tools have been rearranged, you must have them to a
layout and save a Batch Commander Session (.bclay) for the changes
to take effect.
Drag any icon to your desired location in customize toolbar mode.
Note: To save changes, you must Save the Layout by clicking “Save
Layout” and then overwrite the number currently highlighted by hitting it
again. Then, save a BC Session by hitting the “Save BC Session” button,
name and locate it on your Hard Drive. Now, you will be able to Load this
from Settings at any time. Please refer to the Save Layout, Save BC
Session and Load BC Session items for more details.
4. Floating Toolbar:
BATCH COMMANDER FOR LOGIC PRO X USER MANUAL | 9
Pressing this button will bring up a customizable floating window. You
can populate this window with tools that are essential to your workflow,
and can move them anywhere on the screen.
Once the Floating Toolbar button is pressed, the semi-transparent
window will appear with the familiar Customize Toolbar button as well as
+/– Rack buttons.
To customize your Floating Toolbar:
•
Press the Customize Toolbar button on the top left corner of
the palette.
•
Drag desired tools to the palette. The palette will
automatically resize to fit more or less tools in your
configuration.
•
Press Customize Toolbar button again to exit.
BATCH COMMANDER FOR LOGIC PRO X USER MANUAL | 10
Your Floating Toolbar is now ready to use. You may now remove racks all
racks if you want to work with just the Floating Toolbar. To bring back
the Batch Commander Toolbar, simply press the + Rack button.
5. Save Layout:
Saves your Batch Commander toolbar layout, your Floating Toolbar layout
and your configured Batch Commands to a specific button you can get
back to easily. Press Save layout and choose a number 1-8 to save. To
recall your saved layout, press the assigned button.
NOTE:
BATCH COMMANDER FOR LOGIC PRO X USER MANUAL | 11
“Revert to Last” will bring up the previous layout that was displayed, this
is in case of accidental saves or changes to Batch Commands or the
toolbar.
Batch Commander Settings
Click the Settings button and the tool racks will appear. At the very top you’ll
notice a Batch Commander Settings toolbar.
There are ten buttons on the Batch Commander Settings bar.
1. Save As:
Brings up the dialog window for renaming and saving the Batch
Commander session to a location.
2. Load Batch Commander Session:
Loads a previously saved Batch Commander session. (.bclay file)
3. Set User Default/User Default:
BATCH COMMANDER FOR LOGIC PRO X USER MANUAL | 12
Batch Commander automatically launches in Batch Commander
Factory Default layout. However, once a user gets things to the way
they like them with saved layouts, etc. The user can set their current
layout to launch at default by touching the “Set User Default” button.
Once highlighted to “User Default,” the user knows that they are using
their layout as default.
4. Restore Factory Default/Factory Default:
Restores the Batch Commander software application to factory
settings which is based on the “Basic” Preset Default Layout.
5. VIDEO:
Direct link to our Batch Commander Videos on our SlateTV Channel.
6. USER MANUALS:
Open the Batch Commander User Manual directly from your software.
7. FORUM:
Access the User Forum for to join the Slate Media Technology
community to find answers and even exchange Batch Command ideas.
BATCH COMMANDER FOR LOGIC PRO X USER MANUAL | 13
8. CHECK FOR UPDATES:
Easily check to confirm your Batch Commander software is up-to-date.
Note: We have by default set your application to Check for updates at launch,
however this will require a connection to the internet to deliver an update
notification.
9. SWITCH BC:
Easily change between DAW Batch Commander support by hitting the Switch BC
button and then from the drop-down menus, changing the DAW selection and
hitting “Ok.” Note: You must close the previous DAW and open the DAW you’re
changing to before hitting “Ok”.
10.
PRESET DEFAULT LAYOUTS:
Easily change between preset default layouts we have included for various
workflows including: Basic, Advanced and Blank.
BATCH COMMANDER FOR LOGIC PRO X USER MANUAL | 14
Saving a Pro Tools Session
On the Batch Commander Toolbar, we have included a Save Pro Tools button
that allows you to easily save your Pro Tools progress. Remember, your Pro
Tools session is a different file than your Batch Commander Session so be sure
to save both frequently when changes have been made.
Saving a Batch Commander Session
The Batch Commander software application allows you to save your current
layouts, icons, and other customizations to a dedicated session folder. You can
save this file with your DAW sessions and instantly recall them at any point in
time.
BATCH COMMANDER FOR LOGIC PRO X USER MANUAL | 15
To Save A Batch Commander Session:
1. Hit the Save Batch Commander Session button.
2. Choose a folder you want to save the session to and give the file a name.
3. Press Save.
To Load a Batch Commander Session:
1. Press the Load Batch Commander Session button.
2. Locate your previously saved Batch Commander Session folder and press
open.
BATCH COMMANDER FOR LOGIC PRO X USER MANUAL | 16
3. Your Batch Commander session will now load exactly as you saved it.
Restoring to Factory Default
1. Press the button for Restore Factory Default.
2. You will be prompted with a warning. Press “OK” if you wish to restore
the Batch Commander software application to its factory settings, press
cancel if you don’t want to complete this action.
BATCH COMMAND SYSTEM FOR LOGIC PRO X
The Batch Command System is a series of single buttons that can execute up
to one thousand key commands, menu selections and mouse-clicks. The
software is complete with over one hundred preset Batch Commands,
however it is very easy for users to create their own and even share with
other Batch Commander users.
The Batch Command System window contains multiple functions as
explained below.
BATCH COMMANDER FOR LOGIC PRO X USER MANUAL | 17
Editing A Batch Command:
RIGHT-CLICK or CONTROL-CLICK one of the Batch Command buttons on the
Batch Commander Toolbar. The Batch Command Menu will launch and you can
use the various buttons explained below to accomplish your goal.
Key Command:
Click the Key Command button in the Batch Command System to enter a Key
Command into the command sequence.
Delay, Repeat & Duplicate:
Click the Delay space next to a command on the command line and add in an
amount of delay in milliseconds.
Note: If a Batch Command you created is not performing, you may need to add
some delay to the sequence.
Click the Repeat space to enter a number of times to repeat the command.
BATCH COMMANDER FOR LOGIC PRO X USER MANUAL | 18
Additionally, you can achieve a similar result by duplicating, however certain
commands take better to repetition and others require a duplicate with
independent delays on each command line.
QuickList:
Click the QuickList button in the Batch Command System to enter a PreProgramed menu selection or mouse-click to the command sequence.
We have defined the QuickList items by their title, however for details on the
specific key commands, menu selections and/or mouse-clicks each specific
Batch Command is performing, please review our Batch Command programming
information below.
Remove:
Select an undesired Key Command or QuickList item by touching and
highlighting it and then hit Remove to eliminate the selected item from the
command sequence.
Clear All:
Clear All will completely eliminate all programmed information in the Batch
Command menu associated with the selected button. This includes Name &
Color.
Name & Color:
On the bottom left of the Batch Command Menu there is an empty bar for
naming your Batch Command and a block of multiple colors for the Batch
BATCH COMMANDER FOR LOGIC PRO X USER MANUAL | 19
Command on the Batch Commander Toolbar. choose a color from the presets or
hit “MORE” for a choice from a provided color wheel.
SAVE:
Use the Save button to save a custom Batch Command. Be sure to give it a
name you will recognize in the “Users” tab of the QuickList.
USING THE QUICKLIST MENU:
Once the QuickList button has been clicked a menu will appear with multiple
tabs of preset Batch Commands labeled, “General,” “Music,” and “Post.”
Additionally, there is a “User” tab that will allow you to create and save your
own Batch Commands within your Batch Commander application.
Scroll through the lists on the various tabs and use the LOAD button to place a
QuickList item into the command line.
BATCH COMMANDER FOR LOGIC PRO X USER MANUAL | 20
CUSTOMIZING A QUICKLIST BATCH COMMAND:
Note: As a user, you are privileged to our on-going support. If you need help
with the Batch Command System or do not know how to program one yourself,
contact us on the Slate Media Technology Forum on www.slatemt.com or
simply click the “FORUM” button in the Batch Commander Settings.
NAMING BATCH COMMAND PANELS:
Push and hold on the label on the side of each Batch Command Panel to open
the Naming and color coding interface of the entire Batch Command Panel.
BATCH COMMANDER FOR LOGIC PRO X USER MANUAL | 21
CLEAR ENTIRE BATCH COMMAND PANEL:
Push and hold on the Batch Command Panel label and hit “Clear All” to
completely delete the contents of a Batch Command Panel quickly. Be careful
when using this function as it will delete the entire contents of a Batch
Command Panel including Names, Programmings and Colors.
PROGRAM YOUR OWN BATCH COMMAND:
To program your own Batch Command, enter a sequence of key commands
and/or mouse-click and menu selection QuickLIst items to create a powerful,
custom Batch Command. When finished, use the SAVE button and locate your
saved Batch Command within the USER tab of the QuickList menu.
BATCH COMMANDER FOR LOGIC PRO X USER MANUAL | 22
Import & Export:
Easily share customized Batch Commands on our Slate Media Technology Forum
by visiting our website: www.slatemt.com and clicking on “Forum.” Create a
Batch Command and Save it to your user tab. Then just selected it in your User
tab and hit Export. It will export to the location you choose.
Additionally, you can Import Batch Commands you find on the forum or even
Batch Commands other engineers in your studio have created.
BATCH COMMANDER FOR LOGIC PRO X USER MANUAL | 23
How To Access What You Saw In The Video:
Before covering the four preset default “Basic” layouts for Batch
Commander and their associated Batch Commands, here are a few that can
be seen in the “Introducing The Slate Remote For Pro Tools & Logic” video
on our YouTube Channel. (youtube.com/slatedigitaltv)
PASTE PLUGIN SETTINGS ACROSS MULTIPLE PLUGINS WITH ONE
BUTTON:
Copy and paste plugin settings across a variation of tracks with the Copy Plugin Batch
Commands. In the video, we demonstrated copying an adjusted EQ setting to 5 other
open EQ’s. It’s important to note however that you can change this Batch Command
in the QuickList to Copy Plugin X1 and adjust the variable of repeats for any number
pasted plugin settings.
COPY PLUGIN X5:
With 6 of the same plugins open, press Copy Plugin X5 to copy the front plugin
settings and paste the settings to the other 5 open plugins, closing them after pasting.
Note: Copy Plugin X5 requires 6 plugins open. The front plugin window will be copied
and then pasted to the corresponding 5 other open plugins.
AUTOMATICALLY CREATING & NAMING TRACKS:
New Audio Track:
Press New Audio Track to automatically create an Audio Track.
BATCH COMMANDER FOR LOGIC PRO X USER MANUAL | 24
New INST Track (Software Instrument) Track:
Press New INST Track to automatically create a Software Instrument Track.
New Drum Instrument Track:
Press New Drum Track to automatically create a Drum Instrument Track.
New MIDI Track:
Press New MIDI Track to automatically create a MIDI Track.
Name Vocal Tracks:
In the main window select the first track to be named and press Name Vocal Tracks to
automatically name the next 4 tracks Vocal, Double, Adlib 1, Adlib 2.
Name Lead Vocal X4:
In the main window select the first track to be named and press Name Lead X4 to
automatically name the next 4 tracks Vocal 1-4.
Name Drum Tracks:
In the main window select the first track to be named and press Name Drums to
automatically name the next 4 tracks Kick, Snare, Hat, Cymbal.
Name Chorus Vox X4:
In the main window select the first track to be named and press Name Chorus X4 to
automatically name the next 4 tracks Chorus 1-4.
Name Synth X4:
In the main window select the first track to be named and press Name SYNTH X4 to
automatically name the next 4 tracks SYNTH 1-4.
Name Bg Vox X4:
BATCH COMMANDER FOR LOGIC PRO X USER MANUAL | 25
In the main window select the first track to be named and press Name BG VOX X4 to
automatically name the next 4 tracks BG 1-4.
Name Pre Hook X4:
In the main window select the first track to be named and press Name Pre Hook X4 to
automatically name the next 4 tracks Pre Hook 1-4.
Name Guitars X4:
In the main window select the first track to be named and press Name Guitars X4 to
automatically name the next 4 tracks Guitars 1-4.
TOGGLING TRACK TYPES:
MIX WINDOW (TRACK) FOCUSING:
Toggle Track Focus:
With a Logic Mix window showing Press Toggle Track Focus to toggle the mixer track
selection to single, tracks or all.
Focus Audio Tracks:
With a Logic Mix window showing Press Focus Audio Tracks to toggle the mixer track
Show/Hide to Audio. (Must have RAVEN Key Commands imported.)
Focus Aux Tracks:
With a Logic Mix window showing Press Focus Aux Tracks to toggle the mixer track
Show/Hide to Aux. (Must have RAVEN Key Commands imported.)
Focus Instrument Tracks:
With a Logic Mix window showing Press Focus Inst Tracks to toggle the mixer track
Show/Hide to Instruments. (Must have RAVEN Key Commands imported.)
SHOW/HIDE GROUPS:
BATCH COMMANDER FOR LOGIC PRO X USER MANUAL | 26
First make all tracks in the session group 1 with (Show/Hide) as the only checked
option. All other types
Hide Group 1:
Add all tracks in the session to group 1, then in the Main window, press Hide Group 1
to toggle show/hide for the selected group.
Hide Group 2:
Add all selected tracks to group 2, then in the Main window, press Hide Group 2 to
toggle show/hide for the selected group. Hit Hide Group 2 again to view tracks.
Hide Group 3:
Add all selected tracks to group 3, then in the Main window, press Hide Group 3 to
toggle show/hide for the selected group. Hit Hide Group 3 again to view tracks.
Hide Group 4:
Add all selected tracks to group 4, then in the Main window, press Hide Group 3 to
toggle show/hide for the selected group. Hit Hide Group 4 again to view tracks.
Hide Group 5:
Add all selected tracks to group 5, then in the Main window, press Hide Group 4 to
toggle show/hide for the selected group. Hit Hide Group 5 again to view tracks.
Hide Group 6:
Add all selected tracks to group 6, then in the Main window, press Hide Group 5 to
toggle show/hide for the selected group. Hit Hide Group 6 again to view tracks.
Hide Group 7:
Add all selected tracks to group 7, then in the Main window, press Hide Group 6 to
toggle show/hide for the selected group. Hit Hide Group 7 again to view tracks.
Hide Group 8:
BATCH COMMANDER FOR LOGIC PRO X USER MANUAL | 27
Add all selected tracks to group 8, then in the Main window, press Hide Group 7 to
toggle show/hide for the selected group. Hit Hide Group 8 again to view tracks.
PASTE CHANNEL STRIP ACROSS MULTIPLE TRACKS WITH ONE
BUTTON:
PASTE CHANNEL STRIP X10:
With the channel strip selected on the Logic Mixer, Paste Channel Strip X10 will copy
the selected channel strip and paste the plugins and settings across ten tracks in the
right direction.
Note: This Batch Command can be customized by editing the number of repetitions in
the programming interface and can be selected in the programming interface to Paste
Channel Strip in a Left and/or Right direction across the Logic Mixer.
CUSTOMIZING KEY MAPPING:
First, open an ESX24 plugin on an appropriate track and assign an instrument to the
ESX24 track. Then, hit the “Edit” button on the ESX24 plugin window and a secondary
window will appear with your current Key Mappings. Simply hit to select, or hold shift
and select a range of notes. Then, use the Key Mapping Batch Commands to move up
and down the scale by single notes or by octave.
MOVE KEY RANGE UP 1 NOTE:
With an ESX24 key mapping window open, select single or multiple tracks and move
them up one note in key range.
BATCH COMMANDER FOR LOGIC PRO X USER MANUAL | 28
KEY RANGE DOWN 1 NOTE:
With an ESX24 key mapping window open, select single or multiple tracks and move
them down one note in key range.
MOVE KEY RANGE UP 1 OCTAVE:
With an ESX24 key mapping window open, select single or multiple tracks and move
them up one octave in key range.
MOVE KEY RANGE DOWN 1 OCTAVE:
With an ESX24 key mapping window open, select single or multiple tracks and move
them down one octave in key range.
INSTANT MIDI:
A few Instant MIDI Batch Commands have been included on the Basic layouts, however
they are a advanced Batch Commands and require correct performance. When
performed correctly, these Batch Commands will add two-bar MIDI chord progressions
and/or two-bar instrument rhythms.
Note: It is important to use the Step Input Keyboard in Chord Mode when using the
Insant MIDI Batch Commands on a software instrument track.
ADD MAJOR 1 5 6 4:
Will add a Major 1,5,6,4 two-bar chord progression on a software instrument track.
ADD MAJOR 1 4 5 4:
Will add a Major 1,4,5,4 two-bar chord progression on a software instrument track.
ADD MAJOR 1 6 2 5:
Will add a Major 1,6,2,5 two-bar chord progression on a software instrument track.
ADD ROCK GROOVE:
Will add a four-bar Rock Groove on a software instrument track.
BATCH COMMANDER FOR LOGIC PRO X USER MANUAL | 29
ADD FUNK GROOVE:
Will add a four-bar Funk Groove on a software instrument track.
ADD 4 ON THE FLOOR:
Will add a four-bar Four-On-The-Floor on a software instrument track.
TOGGLE STEP INPUT KEYBOARD:
Toggle on and off the Step Input Keyboard window.
TOGGLE CHORD MODE:
Toggle on and off the Chord Mode on the Step Input Keyboard window.
MELODYNE:
OPEN MELODYNE:
Use OPEN MELODYNE to load the Melodyne Plugin. Once hit, you have three seconds
to open the insert you’d like to add Melodyne to.
TRANSFER AUDIO TO MELODYNE:
Use TRANSFER AUDIO TO MELODYNE to click the “Transfer” button on an open
Melodyne plugin.
SELECT MAIN TOOL:
BATCH COMMANDER FOR LOGIC PRO X USER MANUAL | 30
Use SELECT MAIN TOOL to click the Main Tool on an open Melodyne plugin.
SELECT GAIN TOOL:
Use SELECT GAIN TOOL to click the Gain Tool on an open Melodyne plugin.
SELECT SHAPE TOOL:
Use SELECT SHAPE TOOL to click the Shape Tool on an open Melodyne plugin.
SELECT CUT TOOL:
Use SELECT CUT TOOL to click the Cut Tool on an open Melodyne plugin.
NUDGE UP 1 CENT:
Use NUDGE UP 1 CENT to nudge selections on an open Melodyne plugin up one cent.
NUDGE DOWN 1 CENT:
Use NUDGE DOWN 1 CENT to nudge selections on an open Melodyne plugin down one
cent.
NUDGE UP 12 CENTS:
Use NUDGE UP 12 CENTs to nudge selections on an open Melodyne plugin up twelve
cents.
NUDGE DOWN 12 CENTS:
Use NUDGE DOWN 12 CENTS to nudge selections on an open Melodyne plugin down
twelve cents.
NUDGE UP 24 CENTS:
Use NUDGE UP 24 CENTS to nudge selections on an open Melodyne plugin up 24 cents.
NUDGE DOWN 24 CENTS:
Use NUDGE DOWN 24 CENT to nudge selections on an open Melodyne plugin down 24
cents.
BATCH COMMANDER FOR LOGIC PRO X USER MANUAL | 31
NUDGE UP 1 SEMITONE:
Use NUDGE UP 1 SEMITONE to nudge selections on an open Melodyne plugin up one
semitone.
NUDGE DOWN 1 SEMITONE:
Use NUDGE DOWN 1 SEMITONE to nudge selections on an open Melodyne plugin up one
semitone.
AUTOMATIC SESSION UPLOAD TO GOBBLER:
Upload To Gobbler will copy the session name, open Gobbler, click send files, search
for the session name by pasting it into the search bar. Then, you just have to select
the session and type the email of whom you wish to send the session to.
Note: Must have Gobbler 1.0 downloaded and logged into a user account.
BATCH COMMANDER “BASIC” PRESET DEFAULT
The Batch Commander consists of 4 unique, preset layouts by default and
4 blank layouts. If you ever wish to get back to these preset default
layouts, simply go to Batch Commander SETTINGS and hit “PRESET
DEFAULT LAYOUTS” and choose from Blank, Basic or Advanced.
Hit the “RESTORE FACTORY DEFAULT” button in the Batch Commander
SETTINGS to restore the “Basic” layout that the software defaults to.
IMPORTANT:
Many of the Batch Commands require the Logic Key Commands included
in the installer to function correctly. Before using the Logic Batch
Commands, you need to install the Batch Commander Key Commands into
the Logic Key Commands Menu.
BATCH COMMANDER FOR LOGIC PRO X USER MANUAL | 32
BATCH COMMANDER LOGIC PRO X BASIC LAYOUT 1 of 4:
Windows:
Toggle Library Window
Press Toggle Library Window to open/close the Library.
Toggle Inspector Window:
Press Toggle Inspector Window to open/close the Inspector Window.
Toggle Mixer Window:
Press Toggle Mixer Window to open/close The Mixer Window in the Main Window.
Toggle Color Palette
Press Toggle Color Palette to open/close the Color Palette.
Toggle Editor Window:
Press Toggle Editor Window to open/close the Editor Window in the Main Window.
Toggle Smart Controls:
Press Toggle Smart Controls to open/close The Smart Control Window in the Main
Window.
Note: To adjust Smart Controls you may need to pinch with two fingers while the
mouse is above the selected control.
Toggle Marker Lane:
BATCH COMMANDER FOR LOGIC PRO X USER MANUAL | 33
Press Toggle Marker Lane to open/close the Marker Lane.
Toggle Apple Loops Window:
Press Toggle Apple Loops Window to open/close the Mixer Window in the Main
Window.
Comping:
Toggle Take Swiping Tool:
Select a track with a take folder and press Toggle Take Swipe to toggle between take
swiping and editing.
Toggle TakeView:
Select a track with a take folder and press Toggle Take View to toggle between
Packed and Unpacked take folder.
Create New Comp Region:
Select a track with a take folder and press Create New Comp to create a fresh comp
to edit.
Unpack Take To New Tracks:
Select a track with a take folder and press Unpack New unpack all the takes to new
tracks
Pack Selected Take:
Select a track with a take folder and press Pack Selected Take to convert all the takes
to a new region with fades.
Select Previous Take:
Select a track with a take folder and press Select Prev Take to move the region
selected to the previous take in the folder.
BATCH COMMANDER FOR LOGIC PRO X USER MANUAL | 34
Select Next Take:
Select a track with a take folder and press Select Next Take to move the region
selected to the next take in the folder.
COUNT AND SNAP:
No Count Off:
Press No Count Off to disable count off before recording.
Count Off 1 Bar:
Press Count Off 1 Bar to enable a 1 bar count off before recording.
Count Off 2 Bar:
Press Count Off 2 Bar to enable a 1 bar count off before recording.
Low Latency Mode:
Press Low Latency Mode to toggle on/off Low Latency Monitoring for recording and
overdubbing.
Smart Snap:
Press Smart Snap to enable Smart snapping of regions and automation while editing.
Snap To Beat:
Press Snap to Beat to enable Smart Snapping of regions and automation while editing
to the nearest bar.
Snap To Bar:
Press Snap To Bar to enable smart snapping of regions and automation while editing
to the nearest bar.
Snap Off:
BATCH COMMANDER FOR LOGIC PRO X USER MANUAL | 35
Press Snap off to disable smart snapping of regions and automation while editing.
NAMING:
Name Vocal Tracks:
In the main window select the first track to be named and press Name Vocal Tracks to
automatically name the next 4 tracks Vocal, Double, Adlib 1, Adlib 2.
Name Lead Vocal X4:
In the main window select the first track to be named and press Name Lead X4 to
automatically name the next 4 tracks Vocal 1-4.
Name Chorus X4:
In the main window select the first track to be named and press Name Chorus X4 to
automatically name the next 4 tracks Chorus 1-4.
Name Bg Vox X4:
In the main window select the first track to be named and press Name BG VOX X4 to
automatically name the next 4 tracks BG 1-4.
Name EFX X4:
In the main window select the first track to be named and press Name EFX X4 to
automatically name the next 4 tracks EFX 1-4.
Name Drum Tracks:
In the main window select the first track to be named and press Name Drums to
automatically name the next 4 tracks Kick, Snare, Hat, Cymbal.
Name Synth X4:
In the main window select the first track to be named and press Name SYNTH X4 to
automatically name the next 4 tracks SYNTH 1-4.
BATCH COMMANDER FOR LOGIC PRO X USER MANUAL | 36
Name Pre Hook X4:
In the main window select the first track to be named and press Name Pre Hook X4 to
automatically name the next 4 tracks Pre Hook 1-4.
CREATE TRACKS:
New Audio Track:
Press New Audio Track to automatically create an Audio Track.
New INST Track (Software Instrument) Track:
Press New INST Track to automatically create a Software Instrument Track.
New Drum Instrument Track:
Press New Drum Track to automatically create a Drum Instrument Track.
New MIDI Track:
Press New MIDI Track to automatically create a MIDI Track.
Create Track Stack:
Select tracks to be Stacked/Group and press Create Track Stack to create a new track
stack.
Flatten Track Stack:
Select track to be Flattened Unstacked/UnGrouped and press Flatten Track Stack to
create new tracks from the Stack.
Create Folder Stack:
Select tracks to be Stacked/Group and press Create Folder Stack to create a new
folder stack.
Create Summing Stack:
BATCH COMMANDER FOR LOGIC PRO X USER MANUAL | 37
Select tracks to be summed and press Create Sum Stack to create a summing stack.
EXPORTING:
Bounce Project:
Press Bounce Project to Bounce down the current project.
Bounce All Tracks:
Press Bounce All Tracks to individually bounce down all the track in the current
project. (Sends go to their own tracks in Logic version 10.0.7.)
Bounce Selected Track In Place:
Press Bounce Tracks In Place to bounce down the current track to new a new audio
file and overwrite the select track.
Show Session in Finder:
Press Show Session In Finder to open up the current session in the finder window.
Gmail Song:
Press Gmail Song to copy the current session name, close raven, open safari and go to
gmail, click compose, click add attachment, and paste session name in the search
field.
Bounce To iTunes:
Press Bounce To iTunes to bounce down the current project and import into iTunes.
TOOLS AND LOCATORS:
BATCH COMMANDER FOR LOGIC PRO X USER MANUAL | 38
Select the Pointer Tool:
Press Point Tool to change your current primary tool to the pointer tool.
Select the Pencil Tool:
Press Pencil Tool to change your current primary tool to the pencil tool.
Select the Marqee Tool:
Press Marquee Tool to change your current primary tool to the Marquee tool.
(There is not a Marqee tool in some windows, so the Batch Command will not work.)
Set Punch In To Locator Selection:
In the Main Window press Set Punch Locate to set the punch in selection to the
Locator selection.
Set Punch In To Region Selection:
In the Main Window press Set Punch Region to set the punch in selection to the Region
selection.
Split at Selection:
With the marqee tool make a selection and press Split at Select to break the region to
the selection point. Tip: Set Pointer tool as Primary and Marqee tool as secondary
tool, then hit the CMND modifier to select the marqee tool. Then select the region
you wish to break and click inside the selection with pointer tool to break)
NAVIGATION:
BATCH COMMANDER FOR LOGIC PRO X USER MANUAL | 39
Zoom Out:
In the Main, Edit, MIDI or Piano Roll window press Zoom Out to zoom the screen out.
Zoom In:
In the Main, Edit, MIDI or Piano Roll window press Zoom In to zoom in on the screen.
Zoom All Tracks Big:
In the Main, Edit, MIDI or Piano Roll window press Zoom Track Big to make the track
lanes or piano roll notes bigger.
Zoom All Tracks Small:
In the Main, Edit, MIDI or Piano Roll window press Zoom Track Small to make the track
lanes or piano roll notes smaller.
Move Cursor/Selection Up:
In the Main, MIDI or Piano Roll window press CURSR UP to move the Cursor/Selection
up.
Move Cursor/Selection Down:
In the Main, MIDI or Piano Roll window press CURSR DOWN to move the
Cursor/Selection down.
Move Cursor/Selection Left:
In the Main, MIDI or Piano Roll window press CURSR LEFT to move the
Cursor/Selection left.
Move Cursor/Selection Right:
In the Main, MIDI or Piano Roll window press CURSR RIGHT to move the
Cursor/Selection right.
SCREEN SETS:
BATCH COMMANDER FOR LOGIC PRO X USER MANUAL | 40
Screen Set 1-6:
Screen Set 1-6 will show the screen set associated with the number displayed.
TRACK COLORS:
Selected Track Blue:
Selected Track Blue will change the color of the entire selected track blue.
Selected Track Red:
Selected Track Red will change the color of the entire selected track red.
Selected Track Pink:
Selected Track Pink will change the color of the entire selected track pink.
Selected Track Orange:
Selected Track Orange will change the color of the entire selected track orange.
Selected Track Yellow:
Selected Track Yellow will change the color of the entire selected track yellow.
Selected Track Purple:
Selected Track Purple will change the color of the entire selected track purple.
WINDOWS:
BATCH COMMANDER FOR LOGIC PRO X USER MANUAL | 41
Show Main Window:
Show Main Window will show the arrange window.
Show Piano Roll:
Show Piano Roll will show the piano roll window.
Import BC Keys:
Import BC Keys will automatically import the Batch Commander Key Commands to
Logic Pro X.
Show Logic Mix Window:
Show Logic Mix Window will show the Logic Mix Window.
Open Smart Controls:
Open Smart Controls will open the smart controls in Logic.
Lock Screen Set:
Lock Screen Set will lock the screen set currently shown.
TRACK STATUS:
Fit All Tracks To Window:
Fit All Tracks To Window will shrink all of the tracks in the session to fit as many as
possible to the arrange window.
BATCH COMMANDER FOR LOGIC PRO X USER MANUAL | 42
Close Front Window:
Close Front Window will trigger a mouse-click to close the front-most window.
Note: If there is not a front window is open, this will close the Logic window.
Toggle Plugins:
Toggle Plugins will show and hide all open plugins at once.
Record Enable:
Record Enable will enable all selected tracks for record mode.
Mute Selected Track:
Mute Selected Track will mute all selected tracks.
Solo Selected Track:
Solo Selected Track will solo all selected tracks.
LOCATORS:
Enable Auto Locator:
Press Enable Auto Locator to set the locator settings to auto.
Set Locator By Region:
In the Main Window press Locate By Region to set the locator to the selected region.
Note: Enable Auto Locators must be Active.
Set Locator By Marquee:
In the Main Window press Locate By Marquee to set the locator to the marquee tool
selection.
Note: Enable Auto Locators must be Active.
BATCH COMMANDER FOR LOGIC PRO X USER MANUAL | 43
Scroll To Selection:
In the Main Window press Scroll To Select to snap the window view to the timeline
selection.
Go To Selection Start:
In the Main Window Press Go To Select Start to set the playhead to the start of the
current selection.
Go To Selection End:
In the Main Window Press Go To Select End to set the playhead to the end of the
current selection.
Go To Next Marker:
In the Main Window Press Go To Next Marker to set the playhead to the start of the
next marker.
Go To Previous Marker:
In the Main Window Press Go To Prev Marker to set the playhead to the start of the
previous marker.
BATCH COMMANDER LOGIC PRO X BASIC LAYOUT 2 of 4:
SHOW/HIDE GROUPS:
First make all tracks in the session group 1 with (Show/Hide) as the only checked
option. All other types
BATCH COMMANDER FOR LOGIC PRO X USER MANUAL | 44
Hide Group 1:
Add all tracks in the session to group 1, then in the Main window, press Hide Group 1
to toggle show/hide for the selected group.
Hide Group 2:
Add all selected tracks to group 2, then in the Main window, press Hide Group 2 to
toggle show/hide for the selected group. Hit Hide Group 2 again to view tracks.
Hide Group 3:
Add all selected tracks to group 3, then in the Main window, press Hide Group 3 to
toggle show/hide for the selected group. Hit Hide Group 3 again to view tracks.
Hide Group 4:
Add all selected tracks to group 4, then in the Main window, press Hide Group 3 to
toggle show/hide for the selected group. Hit Hide Group 4 again to view tracks.
Hide Group 5:
Add all selected tracks to group 5, then in the Main window, press Hide Group 4 to
toggle show/hide for the selected group. Hit Hide Group 5 again to view tracks.
Hide Group 6:
Add all selected tracks to group 6, then in the Main window, press Hide Group 5 to
toggle show/hide for the selected group. Hit Hide Group 6 again to view tracks.
Hide Group 7:
Add all selected tracks to group 7, then in the Main window, press Hide Group 6 to
toggle show/hide for the selected group. Hit Hide Group 7 again to view tracks.
Hide Group 8:
Add all selected tracks to group 8, then in the Main window, press Hide Group 7 to
toggle show/hide for the selected group. Hit Hide Group 8 again to view tracks.
MIX WINDOW TRACK FOCUSING:
BATCH COMMANDER FOR LOGIC PRO X USER MANUAL | 45
Toggle Track Focus:
With a mixer window showing Press Toggle Track Focus to toggle the mixer track
selection to single, tracks or all.
Focus Audio Tracks:
With a mixer window showing Press Focus Audio Tracks to toggle the mixer track
Show/Hide to Audio. (Must have RAVEN Key Commands imported.)
Focus Aux Tracks:
With a mixer window showing Press Focus Aux Tracks to toggle the mixer track
Show/Hide to Aux. (Must have RAVEN Key Commands imported.)
Focus Instrument Tracks:
With a mixer window showing Press Focus Inst Tracks to toggle the mixer track
Show/Hide to Instruments. (Must have RAVEN Key Commands imported.)
NUDGING:
Set Nudge Value To Beat:
In the Main Window press Set Nudge Beat to set the current Nudge value to Beats.
Set Nudge Value To Division:
In the Main Window press Set Nudge Div to set the current Nudge value to Division.
Set Nudge Value To Bar:
BATCH COMMANDER FOR LOGIC PRO X USER MANUAL | 46
In the Main Window press Set Nudge Bar to set the current Nudge value to Bar.
Set Nudge Value To Ticks:
In the Main Window press Set Nudge Tick to set the current Nudge value to Ticks.
Set Nudge Value to 10 MS:
In the Main, Edit, MIDI, Piano Roll Window press Set Nudge 10MS to change the current
nudge value to 10 milliseconds.
Set Nudge Value to 10 MS:
In the Main, Edit, MIDI, Piano Roll Window press Set Nudge 10MS to change the current
nudge value to 10 milliseconds.
Nudge Selection Left:
In the Main, Edit, MIDI, Piano Roll Window press Nudge Left to Nudge the selection
left by preset amount.
Nudge Selection Right:
In the Main, Edit, MIDI, Piano Roll Window press Nudge Right to Nudge the selection
right by preset amount.
TOOLS AND LOCATORS:
Select the Pointer Tool:
Press Point Tool to change your current primary tool to the pointer tool.
Select the Pencil Tool:
Press Pencil Tool to change your current primary tool to the pencil tool.
Select the Marqee Tool:
Press Marquee Tool to change your current primary tool to the Marquee tool.
BATCH COMMANDER FOR LOGIC PRO X USER MANUAL | 47
(There is not a Marqee tool in some windows, so the Batch Command will not work.)
Set Punch In To Locator Selection:
In the Main Window press Set Punch Locate to set the punch in selection to the
Locator selection.
Set Punch In To Region Selection:
In the Main Window press Set Punch Region to set the punch in selection to the Region
selection.
Split at Selection:
With the marqee tool make a selection and press Split at Select to break the region to
the selection point. Tip: Set Pointer tool as Primary and Marqee tool as secondary
tool, then hit the CMND modifier to select the marqee tool. Then select the region
you wish to break and click inside the selection with pointer tool to break)
EXPORTING:
Bounce Mix To iTunes:
Press Bounce To iTunes to bounce down the current project and import into iTunes.
Bounce Project:
Press Bounce Project to Bounce down the current project.
Upload To WeTransfer:
Upload To WeTransfer will open the default browser and navigate to wetransfer.com
for upload.
Close Project:
Close Project will close the Logic project without closing the Logic application
completely.
Upload Session To Gobbler:
BATCH COMMANDER FOR LOGIC PRO X USER MANUAL | 48
Upload Session To Gobbler will copy the Logic session name, hide Logic and Batch
Commander, open the Gobbler application and click Send Files. Then, it will
automatically paste the session name into the search bar. Select the session and type
the email address to whom you wish to send the session.
Note: Requires the Gobbler 1.0 application to be installed and signed in on the
computer used.
Bounce Mix To SoundCloud:
Bouce Mix To SoundCloud will bounce the session, open the default browser and
navigate to soundcloud.com for upload.
TRACK STATUS:
Fit All Tracks To Window:
Fit All Tracks To Window will shrink all of the tracks in the session to fit as many as
possible to the arrange window.
Close Front Window:
Close Front Window will trigger a mouse-click to close the front-most window.
Note: If there is not a front window is open, this will close the Logic window.
Toggle Plugins:
Toggle Plugins will show and hide all open plugins at once.
Record Enable:
Record Enable will enable all selected tracks for record mode.
Mute Selected Track:
Mute Selected Track will mute all selected tracks.
Solo Selected Track:
BATCH COMMANDER FOR LOGIC PRO X USER MANUAL | 49
Solo Selected Track will solo all selected tracks.
TRACK EDITING:
Fade In:
In the Audio Editor Window in track view press Fade In to fade in the current
selection.
Fade Out:
In the Audio Editor Window in track view press Fade Out to fade out the current
selection.
Move To Playhead:
In the Main Window or Editor File View window Press Move To Playhead to snap the
current selection start to the playhead.
Gain Up 1dB:
In the Audio Editor Window in track view press Gain Up 1dB to gain the current
selection 1dB.
Gain Down 1dB:
In the Audio Editor Window in track view press Gain Down 1dB to gain the current
selection down 1dB.
Reverse Region:
In the Main window press Reverse Region to reverse the selected region.
Mute Selected Region:
In the Main window press Mute Selected Region to mute the selected region.
Strip Silence
In the Main window press Strip Silence to open the Strip Silence window.
BATCH COMMANDER FOR LOGIC PRO X USER MANUAL | 50
WINDOWS:
Toggle Library:
Press Toggle Library Window to open/close the Library.
Toggle Inspector:
Press Toggle Inspector Window to open/close the Inspector Window.
Toggle Logic Mixer:
Press Toggle Mixer Window to open/close The Mixer Window in the Main Window.
Toggle Editor:
Press Toggle Editor Window to open/close the Editor Window in the Main Window.
Toggle Smart Controls:
Press Toggle Smart Controls to open/close The Smart Control Window in the Main
Window.
Note: To adjust Smart Controls you may need to pinch with two fingers while the
mouse is above the selected control.
Toggle Browser:
Press Toggle Browser to open/close the Logic Browser.
Toggle Apple Loops:
Press Toggle Apple Loops Window to open/close the Mixer Window in the Main
Window.
Open All Windows:
With all windows closed, hit the Open All Windows to toggle all Logic toggle windows
on and off.
BATCH COMMANDER FOR LOGIC PRO X USER MANUAL | 51
MARKERS AND LOCATE:
SET LOCATE BY REGION:
Sets locators by region.
SET LOCATE BY MARQUEE:
Sets locators by marquee.
SCROLL TO SELECT:
Scrolls to selection.
ENABLE AUTO LOCATORS:
Switches locators from following static to automatic.
GO TO THE START OF SELECTION:
Moves to the start of the selection.
GO TO THE END OF SELECTION:
Moves to the end of the selection.
GO TO PREVIOUS MARKER:
Moves to the previous marker.
GO TO NEXT MARKER:
Moves to the next marker.
BATCH COMMANDER LOGIC PRO X BASIC LAYOUT 3 of 4:
BATCH COMMANDER FOR LOGIC PRO X USER MANUAL | 52
WINDOWS:
Toggle Library Window
Press Toggle Library Window to open/close the Library.
Toggle Inspector Window:
Press Toggle Inspector Window to open/close the Inspector Window.
Toggle Mixer Window:
Press Toggle Mixer Window to open/close The Mixer Window in the Main Window.
Toggle Color Palette
Press Toggle Color Palette to open/close the Color Palette.
Toggle Editor Window:
Press Toggle Editor Window to open/close the Editor Window in the Main Window.
Toggle Smart Controls:
Press Toggle Smart Controls to open/close The Smart Control Window in the Main
Window.
Note: To adjust Smart Controls you may need to pinch with two fingers while the
mouse is above the selected control.
Toggle Marker Lane:
Press Toggle Marker Lane to open/close the Marker Lane.
BATCH COMMANDER FOR LOGIC PRO X USER MANUAL | 53
Toggle Apple Loops Window:
Press Toggle Apple Loops Window to open/close the Mixer Window in the Main
Window.
VIDEO FAVORITES:
COPY PLUGIN X5:
With 6 of the same plugins open, press Copy Plugin X5 to copy the front plugin
settings and paste the settings to the other 5 open plugins, closing them after pasting.
Note: Copy Plugin X5 requires 6 plugins open. The front plugin window will be copied
and then pasted to the corresponding 5 other open plugins.
PASTE CHANNEL STRIP X10:
With the channel strip selected on the Logic Mixer, Paste Channel Strip X10 will copy
the selected channel strip and paste the plugins and settings across ten tracks in the
right direction.
FLY HOOK CUSTOM:
Select a section of audio and press Fly Hook to copy the selection to specific markers.
Note: Fly Hook is designed for customization and will not work without delegating
markers in the command line.
TOGGLE STEP INPUT KEYBOARD:
Toggle on and off the Step Input Keyboard window.
TOGGLE CHORD MODE:
Toggle on and off the Chord Mode on the Step Input Keyboard window.
UPLOAD TO GOBBLER:
Upload To Gobbler will copy the session name.ok
Note: Must have Gobbler 1.0 downloaded and logged into a user.
BATCH COMMANDER FOR LOGIC PRO X USER MANUAL | 54
INSTANT MIDI:
Note: It is important to use the Step Input Keyboard in Chord Mode when using the
Insant MIDI Batch Commands on a software instrument track.
ADD MAJOR 1 5 6 4:
Will add a Major 1,5,6,4 two-bar chord progression on a software instrument track.
ADD MAJOR 1 4 5 4:
Will add a Major 1,4,5,4 two-bar chord progression on a software instrument track.
ADD MAJOR 1 6 2 5:
Will add a Major 1,6,2,5 two-bar chord progression on a software instrument track.
ADD ROCK GROOVE:
Will add a four-bar Rock Groove on a software instrument track.
ADD FUNK GROOVE:
Will add a four-bar Funk Groove on a software instrument track.
ADD 4 ON THE FLOOR:
Will add a four-bar Four-On-The-Floor on a software instrument track.
KEY MAPPING:
BATCH COMMANDER FOR LOGIC PRO X USER MANUAL | 55
MOVE KEY RANGE UP 1 NOTE:
With an ESX24 key mapping window open, select single or multiple tracks and move
them up one note in key range.
KEY RANGE DOWN 1 NOTE:
With an ESX24 key mapping window open, select single or multiple tracks and move
them down one note in key range.
MOVE KEY RANGE UP 1 OCTAVE:
With an ESX24 key mapping window open, select single or multiple tracks and move
them up one octave in key range.
MOVE KEY RANGE DOWN 1 OCTAVE:
With an ESX24 key mapping window open, select single or multiple tracks and move
them down one octave in key range.
SELECT LOW NOTE:
Selects the lowest MIDI note in the piano roll.
SELECT NEXT NOTE:
Toggle to the next MIDI note in the piano roll.
TRACK STATUS:
Fit All Tracks To Window:
Fit All Tracks To Window will shrink all of the tracks in the session to fit as many as
possible to the arrange window.
Close Front Window:
Close Front Window will trigger a mouse-click to close the front-most window.
Note: If there is not a front window is open, this will close the Logic window.
BATCH COMMANDER FOR LOGIC PRO X USER MANUAL | 56
Toggle Plugins:
Toggle Plugins will show and hide all open plugins at once.
Record Enable:
Record Enable will enable all selected tracks for record mode.
Mute Selected Track:
Mute Selected Track will mute all selected tracks.
Solo Selected Track:
Solo Selected Track will solo all selected tracks.
LOCATION AND VIEW:
STRETCH TO BAR:
Time Stretch Region Length to Nearest Bar.
STRETCH TO LOCATOR:
Time Stretch Region Length to Locators.
TRIM TO LOCATOR:
Trim Regions to Fill within Locators.
HIDE ACTIVE TRACKS:
Hides all active tracks.
TOGGLE HIDE VIEW:
Toggles hide view.
SHOW/HIDE ALL PLUGINS:
Toggles all open plugins visibly on and off.
BATCH COMMANDER FOR LOGIC PRO X USER MANUAL | 57
TRANSIENTS:
REPEAT SELECTED REGION:
Repeat selected region(s.)
CREATE NEW REGION:
Create new region.
TOGGLE FLEX TIME:
Toggle Flex Time on/off.
SLICE AT TRANSIENTS:
Break selections of audio by the transients.
TRIM START TRANSIENT:
Trims at the front transient.
TRIM END TRANSIENT:
Trims at the end transient.
SCROLL PREVIOUS TRANSIENT:
Trim region start to previous transient.
SCROLL NEXT TRANSIENT:
Trim region start to next transient.
TRACK EDITING:
BATCH COMMANDER FOR LOGIC PRO X USER MANUAL | 58
JOIN:
Join Regions per Tracks.
JOIN REGIONS:
Join Regions/Notes.
TRIM REGION:
Trim selected region.
SELECT ALL:
Select All.
TRANSIENT EDIT MODE:
Toggle Transient Editing Mode
DETECT TRANSIENTS:
Detect transients in selection.
SELECT ALL PREVIOUS:
Select all previous to selection.
SELECT ALL NEXT:
Select all after selection.
PRESET MARKERS:
BATCH COMMANDER FOR LOGIC PRO X USER MANUAL | 59
Add Session Markers:
In the Main Window press ADD SESSION MARKERS to instantly add song markers every
8bars in the session.
Fly Hook to Session Markers:
In the Main Window press Fly Hook to instantly copy the selected region to all the
chorus markers in the song.
Punch Selection to Verse 1 Marker:
In the Main Window press Punch Verse 1 to set the punch selection the verse 1.
Punch Selection to Verse 2 Marker:
In the Main Window press Punch Verse 2 to set the punch selection the verse 2.
Punch Selection to Bridge Marker:
In the Main Window press Punch Bridge to set the punch selection the Bridge.
Punch Selection to Chorus 1 Marker:
In the Main Window press Punch Chorus 1 to set the punch selection the chorus 1.
Punch Selection to Chorus 2 Marker:
In the Main Window press Punch Chorus 2 to set the punch selection the chorus 2.
Punch Selection to Chorus 3 Marker:
In the Main Window press Punch Chorus 3 to set the punch selection the chorus 3.
BATCH COMMANDER LOGIC PRO X BASIC LAYOUT 4 of 4:
BATCH COMMANDER FOR LOGIC PRO X USER MANUAL | 60
WINDOWS:
Toggle Library Window
Press Toggle Library Window to open/close the Library.
Toggle Inspector Window:
Press Toggle Inspector Window to open/close the Inspector Window.
Toggle Mixer Window:
Press Toggle Mixer Window to open/close The Mixer Window in the Main Window.
Toggle Color Palette
Press Toggle Color Palette to open/close the Color Palette.
Toggle Editor Window:
Press Toggle Editor Window to open/close the Editor Window in the Main Window.
Toggle Smart Controls:
Press Toggle Smart Controls to open/close The Smart Control Window in the Main
Window.
Note: To adjust Smart Controls you may need to pinch with two fingers while the
mouse is above the selected control.
Toggle Marker Lane:
Press Toggle Marker Lane to open/close the Marker Lane.
Toggle Apple Loops Window:
BATCH COMMANDER FOR LOGIC PRO X USER MANUAL | 61
Press Toggle Apple Loops Window to open/close the Mixer Window in the Main
Window.
MELODYNE:
OPEN MELODYNE:
Use OPEN MELODYNE to load the Melodyne Plugin. Once hit, you have three seconds
to open the insert you’d like to add Melodyne to.
TRANSFER AUDIO TO MELODYNE:
Use TRANSFER AUDIO TO MELODYNE to click the “Transfer” button on an open
Melodyne plugin.
SELECT MAIN TOOL:
Use SELECT MAIN TOOL to click the Main Tool on an open Melodyne plugin.
SELECT GAIN TOOL:
Use SELECT GAIN TOOL to click the Gain Tool on an open Melodyne plugin.
SELECT SHAPE TOOL:
Use SELECT SHAPE TOOL to click the Shape Tool on an open Melodyne plugin.
SELECT CUT TOOL:
Use SELECT CUT TOOL to click the Cut Tool on an open Melodyne plugin.
MELODYNE NUDGE:
BATCH COMMANDER FOR LOGIC PRO X USER MANUAL | 62
NUDGE UP 1 CENT:
Use NUDGE UP 1 CENT to nudge selections on an open Melodyne plugin up one cent.
NUDGE DOWN 1 CENT:
Use NUDGE DOWN 1 CENT to nudge selections on an open Melodyne plugin down one
cent.
NUDGE UP 12 CENTS:
Use NUDGE UP 12 CENTs to nudge selections on an open Melodyne plugin up twelve
cents.
NUDGE DOWN 12 CENTS:
Use NUDGE DOWN 12 CENTS to nudge selections on an open Melodyne plugin down
twelve cents.
NUDGE UP 24 CENTS:
Use NUDGE UP 24 CENTS to nudge selections on an open Melodyne plugin up 24 cents.
NUDGE DOWN 24 CENTS:
Use NUDGE DOWN 24 CENT to nudge selections on an open Melodyne plugin down 24
cents.
NUDGE UP 1 SEMITONE:
Use NUDGE UP 1 SEMITONE to nudge selections on an open Melodyne plugin up one
semitone.
NUDGE DOWN 1 SEMITONE:
Use NUDGE DOWN 1 SEMITONE to nudge selections on an open Melodyne plugin up one
semitone.
BATCH COMMANDER FOR LOGIC PRO X USER MANUAL | 63