1
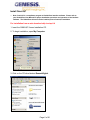
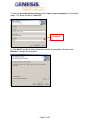
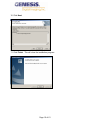
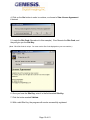
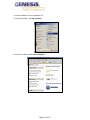
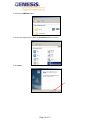
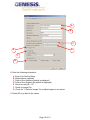
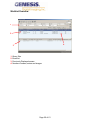
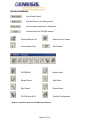
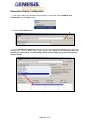
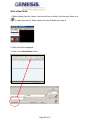
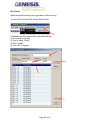
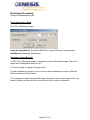
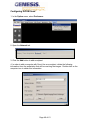
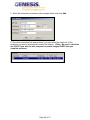
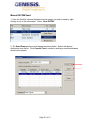
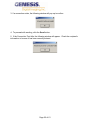
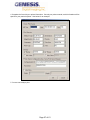
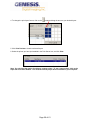
Omni-QC®
Installation & User Manual
Omni-QC®
Volume 2.5
Page 1 of 61
Copyrights
Omni-QC© is a trademark of Genesis Digital Imaging, Inc.
All products and company name mentioned herein should be considered
registered trademarks or trademarks of their respective companies.
© 2006 Genesis Digital Imaging. All rights reserved.
The information in this manual is subject to change without notice.
01/06/2006
Page 2 of 61
Table of Contents
Chapter 1
How to Install & Configure Omni-QC©
5
Introduction to Omni-QC©
Features
Hardware Requirements
Install Omni-QC©
Chapter 2
How to Use Omni-QC©
17
Logon
Configuration
Worklist Overview
Worklist Database
Exam Search and Open
Change Query Condition
Change Patient Information (Merge, Split)
Information Display
Start a New Scan
Display Window Overview
Function on Each Icons
Worklist Open
Exam Close
Close
Arrow
View Mode
No Split
Horizontal Split
Vertical Split
2 by 2 Spilt
Pixel View
DICOM Header View
Window Level, W/L All
Zoom, Magnifying Glass
Flip Horizontal, Flip Vertical
Rotate CW, Rotate CCW
Measure, Angle
Panning, Inverse
Page 3 of 61
Image Stitching
Save & Auto Send
Image File Open
DICOM File Open
Non-DICOM File Open
Image File Import/Export
Export
Import
Twain Driver Support
Image Processing
W/L Preset
Re-Arrange Image
Auto
Manual
Thumbnail Window
Configure DICOM Send
Manual DICOM Send
Display Preferences
Chapter 3
Applications
56
DICOM Print
Adding a DICOM Printer
Printing & Printing Options
Chapter 4
Appendix
Toolbar Icon Description
60
Page 4 of 61
Chapter One
Introduction to Omni-QC©
Omni-QC© is a DICOM acquisition software for Kodak/Orex CR Reader. Omni-QC© is
DICOM compatible including DICOM Send (SCU), DICOM Print for easy networking
with third party PACS or modalities.
Features
Local database
Display and convert DICOM versus non-DICOM images (JPEG, TIFF and BMP)
DICOM Send
DICOM Print DIR
Supports one or two (Worklist, View) up to 2K
Supports twain drives
Image processing and editing capabilities
Image stitching
Customize DICOM information overlay.
Logo of hospital can be displayed like a banner.
Hardware Requirements
1) CPU: Pentium IV, 1 GHz or higher.
2) Memory: 256M or higher.
3) HDD: 40G HDD or higher.
4) Ethernet network card: 10/100Mb NIC.
5) OS: Window NT/2000 Pro/XP Pro.
Page 5 of 61
Install Omni-QC
•
Note: Omni-QC is a compliment program to Kodak/Orex Interface software. Please refer to
your Kodak/Orex User Manual for proper installation procedure and operation of the interface
software. The Kodak/Orex drivers must be installed prior to Omni-QC installation.
For Installation from a web download skip to step # 4
1. Insert the OMNI-QC Viewer Installation CD.
2. To begin installation, open My Computer.
3. Click on the CD drive labeled GenesisDigital.
Page 6 of 61
4. Click on the OMNI-QC folder.
5. Click on the Setup icon to initiate the InstallShield Setup Launcher.
Page 7 of 61
6. Click Next.
7. Click Yes if you accept the terms of the license agreement.
Page 8 of 61
8. Enter the principal owner’s name and the name of your company in the indicated
areas. The serial number is “Omni-QC”
Omni-QC
9. Click Next if the default folder destination shown is acceptable, otherwise click
Browse to change the destination.
Page 9 of 61
10. Click Next.
11. Click Finish. This will close the installation program.
Page 10 of 61
HOW TO CONFIGURE THE LICENSE
1. Click on the OMNI-QC icon on the desktop to open the program.
2. When prompted by the dialogue box:
A. For 30 day Trial DO NOT press Enter and proceed to Step 2 on Page 9
B. To license the software press Enter and follow the instructions.
3. Click the Display Site Code button.
Page 11 of 61
4. Click on the Yes button in order to continue, or choose to View License Agreement
if desired.
5. Locate the Site Code (blurred out in this example). Give Genesis the Site Code, and
they will give you the Site Key.
(*Note: Each Site Code is unique. You must use the Site Code displayed on your own machine.)
6. Once you have the Site Key, enter it in the field marked Site Key.
7. Click the button marked Validate.
8. With a valid Site Key, the program will now be successfully registered.
Page 12 of 61
1. Insert the OMNI-QC Viewer Installation CD.
2. To begin installation, open My Computer.
3. Click on the CD drive labeled GenesisDigital.
Page 13 of 61
4. Click on the OMNI-QC folder.
5. Click on the Setup icon to initiate the InstallShield Setup Launcher.
6. Click Next.
Page 14 of 61
7. Click Yes if you accept the terms of the license agreement.
8. Enter the principal owner’s name and the name of your company in the indicated areas. The
serial number is “Omni-QC.”
9. Click Next.
Page 15 of 61
10. Click Finish. This will close the installation program.
Page 16 of 61
Chapter Two
How to Configure & Use QC
BEGIN & CONFIGURE OMNI-QC
1. Click on the OMNI-QC icon on the desktop to open the program.
2. Default User ID and Password are both "Genesis". To change the password, press
the Change PW button and follow the screen instructions.
Genesis
3. Omni-QC starts with the "Work List" display, shown in the following window.
Exit Button
4. Click on “Exit” Button
Page 17 of 61
5. Viewer is displayed with no image.
6. From the Tool Bar go to Option Preferences
7. Click on “Orex Acquisition” Tab
Page 18 of 61
A
B
C
E
D
F
G
8. Enter the following information
A. Enter Your Facility Name
B. Station Name (optional)
C. Path to Orex Interface (default is displayed)
D. Path to Orex Digident file (default is displayed)
E. Check for using S.I. V11
F. Check for Image Flip
G. Check for “1 Series n images” for multiple images in one series
9. Press OK to go back to the viewer.
Page 19 of 61
Worklist Overview
1
2
4
3
1. Query filter
2. Exam list
3. Previously Displayed exams
4. Number of exams, series and images
Page 20 of 61
Worklist Database
Add a New Patient
Add an Exam to an existing series
Save changes and send to destination
Launch Omni-Vue DICOM Viewer **
Search/Refresh List
Open Exam in Viewer
Clear Search Filter
Exit Worklist
DICOM Edit
Merge Exam
Merge Series
Split Exam
Split Series
Delete Exam
DICOM Send SCU
Worklist Configuration
** Requires installation Omni-Vue DICOM Viewer Software
Page 21 of 61
Change Patient Information
DICOM Edit: Change the patient information of the exam.
Merge Exam: The exam merges to another exam.
Merge Series: Merge the series to another series.
Split Exam: Split the series to another exam.
Split Series: Split the image to another series.
Merge Patient
Change the Patient ID, Name, Sex and date of birth of the exam.
Change DICOM information such as Patient ID, Name, Sex and date of birth.
Click ‘OK’
Click Refresh Button in the upper right hand corner to Display Changes
Page 22 of 61
Merge Exam
Merge the exam to another exam.
Right-click of the Merge Exam and click merge exam.
Display different exam lists of the same patient on the Destination Exam.
Click ‘Merge’ to be merged with exam.
Type [Patient ID] and click search.
If the patient information is in DB, list will be displayed on right portion of Destination Patient.
Click the patient and click Merge to change the patient information.
Merge with exam of another patient.
- Type in the [PID] of patient in Destination Exam and click search.
- Click the exam to be combined in list and click Merge.
Page 23 of 61
Merge Series
Merge the series to another series.
Right-click to apply Merge to one Series and click ‘Merge to one series’
Select key series to be seen as Series Title.
- Click the series on the Series List
- Click ‘>’ (Click ‘<’ to release)
Select the series to be merged to Key Series
- Click the series on the Series List
- Click ‘>’ (Click ‘<’ to release)
Click Merge.
Page 24 of 61
Split Exam
Split series on exam as separate exam.
Right-click on exam, which apply Split Exam and click ‘split Exam’
Select series to be split.
- Click the series to be split on current exam list.
- Click ‘>’ (Click ‘<’ to release)
(Click ‘Shift or CTRL’ for multiple selection)
(Click ‘>>/<<’ to appoint/release all)
Click Split Exam
Page 25 of 61
Split Series
Split image on series as separate series.
Right-click the exam, which applies Split Series, and click ‘Split Series’
Click the image to be split on Series List
Select image to be split
- Click the image to be split on Image list
- Click ‘>’ (Click ‘<’ to release)
(Click ‘Shift or CTRL’ for multiple selection)
(Click ‘>>/<<’ to appoint/release all)
Click ‘Split Exam’
Split image on series as separate series.
Page 26 of 61
Information Display Configuration
1. If you wish to change the information that is displayed on the image, select DICOM Overlay
Configuration from the Option menu.
2. Uncheck the Use Default box.
3. From the DICOM Information Item selection, click and drag the desired information to any of the four
locations (Left - Top, Left - Bottom, Right - Bottom, Right - Top). (*Note: Be sure to click on the title of
the item you wish to move. To select multiple items, click the empty space next to the item and
drag the mouse).
Page 27 of 61
4. When you have finished moving the desired items to the appropriate locations, the Location box
should appear as below. (*Note: Double click on an item to remove it from the list.)
Below the Location box will be a preview of your new layout. You may label this particular layout with a
title. To do so, type in the title and click Apply.
5. Click OK to save your changes
Page 28 of 61
Start a New Scan
1. When starting from the Viewer, from the tool bar on the left, click on open folder icon
to open the work list. When starting from the Worklist go to step 3.
2. Work List will be displayed
3. Click on the New Patient button.
Page 29 of 61
4. Enter the patient’s information. (*Note: All fields marked with an asterisk (*) are
required.)
5. Under the Referring Physician heading, enter the information of the referring
physician. After the first time this physician’s name is entered, it will continue to appear
as an option in the Select Referring Physician Name drop-down menu.
Page 30 of 61
6. Click on Acquire Image to launch scanner interface.
7. When prompted with “Ready for scanning,” choose your anatomical area and
proceed by properly inserting the cassette into the scanner. (For proper operation,
please refer to your Kodak/Orex user manual.)
8. Upon completion of scan procedure, click on the Exit door symbol to launch OmniQC Viewer.
9. Omni-QC Viewer is displayed
Page 31 of 61
Display Window
1
2
4
5
3
(1) Menu List (File, Edit, View, Image Process, Annotation, Tool, W/L Preset, Option)
(2) Menu Icons
(3) Exam List: Displays open exams and series
(4) Patient information
(5) The Image
Open Worklist
Or select File from Menu List and Click on Open WorkList (Ctrl+O)
Exam Close
Or select File from Menu List and Click on Close
This function closes the current displayed study. Or select File from Menu List and Click on Close All
(Ctrl+C) This function will close all open studies.
Page 32 of 61
Image Layout & Viewing Options
OMNI-QC supports four split view modes (Non, Horizon, Vertical, 2 by 2) and 8 view modes such as
Series Layout, Chest CT View, Compare View, Stack View, etc.
No Split
Horizon Split
Vertical Split
2 x 2 Split
In order to view multiple images at once, click the Tile button to change the layout.
When viewing images one at a time, click the arrow buttons in the upper right-hand corner to advance
images.
Page 33 of 61
Pixel View
Displays pixel value and coordinates of selected location. Click on the icon and move your mouse over
the image and Hounsfield Unit will be displayed.
DICOM Header View
Or click ViewDICOM Header
This function displays DICOM Header information.
Page 34 of 61
Window Level
Click Image Process Window Level and cursor will be changed to W/L. Click the image and drag to the
left and right, window level value will be changed. Short-cut key ‘W’ to select.
Contrast & Brightness
To change the contrast of the image, right click with the mouse and move the W/L icon left (high
contrast) and right (low contrast).
To change the brightness, right click with the mouse and move the W/L icon down (brighter) and up
(darker).
To apply any of these settings to ALL images, press the All Window Level button, and use left click
when moving the mouse.
Page 35 of 61
Window Level all
Click Image Process Window Level and cursor will be changed to W/L. Click the image and drag to the
left and right, window level value will be changed.
OMNI-QC supports window level all function by right-click drag.
Reset
Or click Process Display Original and click the icon on toolbar.
This function will return the selected image to its original setting prior to any modification
Reset All
Or click Image ‘Process Display All Original’ or click the icon on toolbar.
This function will return all the images to their original setting prior to any modification
Zoom
After click Zoom button, click and drag the image where you wish to see. If there are multiple images,
select all (Ctrl + A) and Zoom in/out all the images.
(Short-cut key: Z)
Page 36 of 61
Magnify Glass
Shift + Mouse Drag Adjustment of magnifying glass
Ctrl + Mouse Drag Magnify/Reduction magnified image
Alt + Mouse Drag Adjustment of W/L
To magnify part of an image, first click on the Magnify Glass button.
The magnifying glass will initially appear as shown below.
To change the size of the magnifying glass, hold Shift, click and drag the mouse to the desired size.
To change the zoom within the magnifying glass, hold Control, click and drag to the desired intensity.
Drag up (lower magnification) and down (higher magnification).
Page 37 of 61
Flip/Rotate Images
To rotate or flip images, use the corresponding buttons (Flip Horizontal, Flip Vertical,
Rotate CW, Rotate CCW).
Flip Horizontal (Image Process Flip Horizontal or click the icon)
Flip Vertical (Image Process Flip Vertical or click the icon)
Rotate CW (Click ‘Image Process Rotate CCW’
Rotate CCW (Image Process Rotate CW or click the icon)
Measure
Tool Measure or (Short-cut key: M)
1) Length measurement: Drag the mouse to measure the length of image.
2) Measurement between two lines: To draw the line, click the short-cut key ‘E’ and measure the length
between two points.
Page 38 of 61
Angle
To measure the angle, click Tool Angle or. (Short-cut key: A)
Drag the mouse on the image where you wish to measure.
Panning
Panning image moves to another part. After click the Panning button, click the image and drag to move
the image. (Short-cut key: P)
Inverse
Right-click on image. Click Inverse
Or click on the icon.
Page 39 of 61
Image Stitching
1) Open Series from Worklist
2) Change Display setting to show all images in series
3) Click Tool ---> Select Spine Image
4) Select image by order. Following message will be appeared on the each image
5) Click Tool->Image Stitching
Page 40 of 61
6) Adjust image using following menu
- Auto: Auto stitching.
- Reset: Recover to beginning.
- Move Up: Move the image upward
- Move Down: Move the image downward
- Move Lt: Move the image to the left
- Move Rt: Move the image to the right
- Crop: Crop the image
- Save: Save the image and close edit window
6) Click Save
7) Stitched image will be added to the series
Page 41 of 61
Save & Auto Send
To save the image with all the changes and send to a destination, click on this icon from
the tool bar.
Clicking Exam Done will automatically send the images to the specified recipient(s).
The progress bar shown below will appear, followed by a confirmation notice.
DICOM Send must be configured prior to this step. Refer to “Configuring DICOM
Send” at the end of this chapter.
Page 42 of 61
Image File Open (DICOM, Non-DICOM)
DICOM File Open
1) Click File->Open DICOM File
2) Select the file to be opened and click OK (Multiple selections with CTRL or SHIFT)
Non-DICOM File Open (JPG, BMP, TIFF)
Click File->Open Non-DICOM File
Select the file to be opened and click OK (Multiple selections with CTRL or SHIFT)
Page 43 of 61
Image File Export
Images can be saved as DICOM, JPEG, BMP or TIFF.
Select the whole image or part of image and click File->Export.
Export Window
3
1
2
1. Select format to be converted
2. Select compression mode in Sub Type.
3. Select the location and click Save.
Compression ratio value
A. Keep Original – Transmit the original image
B. Uncompress – Uncompress and transmit original image
C. Lossless JPEG – Transmit Lossless compression mode (½ ~ ¼ of original image)
D. Lossy (Minimal, Mild, Moderate, Severe, Very Severe) – Transmit lossy compression mode.
Image File Import
Open an image by DICOM File Open or Non-DICOM Open and click File->Import.
Type in the information
Database: Select Local or Conference Folder
Patient Information: Input patient information
Study Information: Input exam information
Series Information: Input series information
Applied Range: Select the image to be imported (Selected Images, All Images)
Window Level: After open it in OMNI-QC and select W/L (Current Value) or Image W/L (Original Value)
Click OK to finish
Page 44 of 61
Twain Driver Support
Using external twain drivers, you can control film digitizers and acquire film or paper
images.
How to Use
1) Click File Twain select source from top menu.
2) Select TWAIN driver.
3) Insert film at the digitizer.
4) Click File Twain Acquire Multi.
5) Run External Twain program.
6) Scanned image is display on image window of Omni-QC.
7) Click File Import from main menu.
8) Type patient, study and series, etc.
9) Click OK to store it to the local database of Omni-QC.
10) You can find imported image in Worklist window of Omni-QC.
Page 45 of 61
W/L Preset
Adjust window level easily with registration of short-cut key.
1) Adjust W/L and click ‘W/L PresetW/L Preset’
2) Modality and W/L value will be input automatically.
3) Click the short-cut key
4) Type in name “Chest”
5) Click “Update”
6) Click “OK” to register
Page 46 of 61
Re-Arrange Processing
Arrange the sequence as new.
Re-Arrange Image (Auto)
Click Tool->Rearrange Image
Image Arrange Method: Acquisition Date/Time, Image Date/Time, Image Number
Sort Method: Ascending, Descending
Rearrange Image (Manual)
1) Click Tool->Rearrange Image to change the mode of Rearrange Image. The rim of
image will be changed to the blue color.
2) Click the image to change with green color.
3) Insert between two images. If you move the cursor between two images, White bar
will be created and click to insert.
4) To change the location with another image. Move the cursor on the image, which you
wish to change, and the rim will be red color and click to switch the location.
Page 47 of 61
Thumbnail Window
Thumbnail window is not configured by default. If you want to use thumbnail window,
please configure Thumbnail window as described below.
How to Configure Thumbnail Window On/Off
1) Select Option -> Preference ->Display
2) To use Thumbnail window on image display window, check Show Thumbnail window
from Viewer tab or uncheck to not use the window.
How to Hide/Show Thumbnail Window
1) Open exams from Worklist window.
2) Thumbnail image window is displayed when you move the cursor to the bottom of
image display window and hides when you move the cursor away.
3) Thumbnail image window displays yellow opened mark on opened series or exams
4) Drag thumbnail image and drop into display window
Layout of Thumbnail Window may be modified by clicking on “<” or “>” button
Page 48 of 61
Configuring DICOM Send
1. In the Option menu, select Preference.
2. Open the Network tab.
3. Click the Add button to add a recipient.
4. In order to add a computer with Omni-Vue as a recipient, obtain the following
information from the workstation that will be receiving the images. Double-click on the
computer icon to obtain this information:
Page 49 of 61
5. Enter the information as shown in the example below, and click Add.
6. Once this information has been entered, you may select the check box of the
recipients you wish to automatically receive the images. (*Note: Be sure to check the
box ONLY if you wish for this computer to receive images EVERY time you
complete an exam.)
Page 50 of 61
Manual DICOM Send
1. From the Worklist, choose the patient whose images you wish to send by rightclicking on his or her information. Select Send DICOM.
2. The Send Exam window should appear as shown below. Select the desired
destination from the list. Click Connect Test to confirm a working connection between
sender and recipient.
Page 51 of 61
3. If a connection exists, the following window will pop up to confirm.
4. To proceed with sending, click the Send button.
5. If the Connection Test fails, the following window will appear. Check the recipient’s
information to be sure it has been correctly entered.
Page 52 of 61
Display Preferences
Display
Screen Font: Font used in Omni-QC.
.
Page 53 of 61
Display Type:
A. Landscape: The toolbar will be displayed on the left (Left image)
B. Portrait: The toolbar will be displayed on top (Right image)
Show thumbnail window: Activate Thumb Nail Window. Refer to Chapter 2: How To
Use Omni-QC– Thumbnail Window.
Worklist position save and restore: When checked, Omni-QC will save current
Worklist position.
Window/Level ROI Size
Set size of preview window when Window Level is adjusting. (Restart OMNI-QC to
apply)
Interpolation Method
To apply interpolation (anti-aliasing) functions to different modalities.
None: Do not apply interpolation on image.
Linear: Apply linear interpolation on image.
Bi-Cubic: Apply more linear interpolation on image.
DICOM Information
Change default font settings for DICOM information
Annotation
Appoint color, line thickness and font to be used in Annotation
Page 54 of 61
Dual Monitor Display Setting
Note: Multi Monitor setting must first be set in Windows prior to the following.
Click “Change Settings” to display Monitor Configuration window (below).
To designate monitor, you must select monitor and click on one of following buttons.
Worklist: Designate Worklist monitor
View: Designate view monitor
Unused: Disable selected monitor
Page 55 of 61
Chapter Three
Applications
Adding a DICOM Printer
Note: You must first have an image on file and selected before adding a printer.
1. Click the Print button to open the Print window.
2. Choose “DICOM” tab for DICOM Printer.
3. The first time you print an image, you will have to
Page 56 of 61
a printer.
4. Complete the form with your printer information. Consult your printer manual, as this information will be
specific to your particular printer. See below for an example.
5. You are now ready to print.
Page 57 of 61
Printing and Printing Options
1. Highlight an image and click the Print button.
2. The following box will open, allowing you to change your printing options.
3. To change the number of copies, click the up and down arrows next to “Copies.”
Page 58 of 61
4. To change the print layout format, click on the
button and drag the arrow to your desired layout.
5. Click Print Preview to view the selected layout.
6. Select the printer you have just installed in the Print Server box, and click Print.
Note: You also have the option of printing to a paper printer. To use a paper printer, click on the
Paper tab in the Print window. You must have all the proper drivers installed on your computer.
Page 59 of 61
Chapter Four
Appendix
Tool Bar Icons
File Management
Open Work List
Close Image
Arrow (Default Mouse pointer) [Esc]
Display Management
Single Image
Two Image Display - Horizontal
Two Image Display – Vertical
Four Image Display- 2 by 2
Display Original
Display All Original
Image Management
Window Level [Shift + W]
Window Level All
Flip Horizontal
Flip Vertical
Rotate CW
Rotate CCW
Zoom In/Out [Shift + Z]
Magnifying Glass [Shift + G]
Measure [Shift + M]
Angle
Page 60 of 61
Inverse
Pan [Shift + P]
Print Management
Printer Launch
More Icons
DICOM Header View
View Pixel Value
Page 61 of 61