1
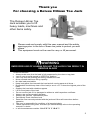
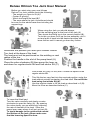
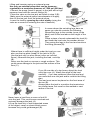
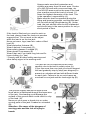
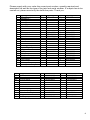
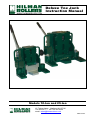
Deluxe Toe Jack Instruction Manual Models 10-ton and 25-ton 12 Timber Lane • Marlboro NJ 07746 732.462.6277 • fax:732.462.6355 email: [email protected] 06/27/2014 CONTENTS 3 INTRODUCTION 4 OPERATING INSTRUCTIONS 6 SAFETY WARNINGS 7 MAINTENANCE AND STORAGE 7 TROUBLESHOOTING 9-10 SPARE PARTS LIST 11 LIMITED WARRANTY 2 Thank you For choosing a Deluxe Hilman Toe Jack The Deluxe Hilman Toe Jack enables you to lift heavy loads, machines and other items safely. ! Please read and comply with this user manual and the safety warnings prior to the use of these toe jacks to protect you and others. This equipment must not be used to carry or lift personnel. WARNING IMPROPER USE OF HILMAN DELUXE TOE JACKS CAN RESULT IN SERIOUS INJURY TO AVOID INJURY: Always make sure that the load is fully supported by the claw or top plate Jack to rest on solid ground in VERTICAL position Jack only with the pivoting feet facing towards the load Never exceed maximum lifting capacity No side load permissible Keep body parts from beneath the load and all moving parts at all times Bystanders should keep clear of the load (to a min. of 1.5 times the highest point of the load) Support the load with suitable supports Lift on fixed parts of the load Do not use the jack if it is damaged or without a valid inspection certificate Always use recommended lubricants Always use genuine replacement parts Periodically check lubricant level Read the user manual provided with the jack and follow all instructions before operation The user is responsible for condition of all warning labels These instructions are guide- lines and you should always refer to the operating manual if in doubt. In all circumstances consider “S A F E T Y F I R S T “ 3 Deluxe Hilman Toe Jack User Manual Before you start using your new Hilman Deluxe Toe Jack, please check the following: - The weight you have to lift (A)? - Center of gravity? - Which toe height fits best (B)? - The area where the jack is positioned should be even for the whole base area including the support legs When using the Jack you should always: Put the swiveling legs to the front of the jack (A) Then locate the lifting toe in the correct position (B). To do this you have to lift up the toe assembly, pull it out and push it back into the desired position and lower the toe until it cannot go down any further. Determine the position you want your Hilman Deluxe 991004002 Toe Jack at the base of the load. The load must not be positioned on the welding or cast radius of the toe Position the handle in the slot of the pump head (A), Close the valve clockwise (B) then pump the lever up and down for regular stroke NH and fast stroke SH (C). Fast stroke SH (only 25 ton) with 3-times the speed of the regular stroke NH. This lifts the toe very fast into the required position under the load without actually contacting the load itself. Do not lift the load using fast stroke SH (A). Use the regular stroke to lift the load as described in 3 (B). Move the lever as described before (C). To lower the lifted load: Turn the valve carefully and slowly counterclockwise to open the valve (A). By opening the valve slowly you are effectively metering the rate of descent of the load. Store the pump lever away where it will not get lost (B). To avoid damage to the guides and extend the lifetime of the jack, please make sure that the lowering speed is slow. 4 Lifting and lowering using an external pump: Use only an external pump that can be pressureregulated to a maximum pressure of 7540 psi (520 bar) -Connect the pump (hand or power) to the jack with a high pressure hose with the correct fittings (A). -Close the valve on the toe jack as shown in step 3 (B). -Make sure the external pump has adequate oil supply, then lift the toe jack from the external pump. -Lower the load by opening the valve slowly (using the valve as a means of metering the rate of descent). In cases where the swiveling legs have no space you should consider the following: Spread the legs to the outside (never to the back) and lift the load above the height of the legs Place a piece of wood underneath the load (A). and lower the load onto the wooden blocks. Then swing the legs to the front and continue the lifting process (B). Where there is sufficient height under the load you can 991004002 also use the top plate (head) of the jack to lift (A). Use the jack only on even floors (never on inclined floors), otherwise the jack, including the load, could tip (B). Never use the jack on uneven or rough surfaces. This could cause damage to the jack and the surface of the floor (C). If you lift one side of a top-heavy object the load could top over (A). Watch the angle of the load carefully - if you see problems lower the load and use more than one toe jack and/or re-think the lifting plan. The load must never be placed on the front area of the toe (B). Always place the jack in a position that maximizes toe contact area, but never on the welded or cast radius of the toe. Never lower a load from a crane or fork lift onto the jack. This could cause overload and seriously damage the jack (A). Lift up the load only in well-supported areas of the object, never on sheet metal covers because they could get damaged (B). 5 991004002 Always make sure that bystanders and children are away from the work area. Cordon off a NO-GO area with cones and tape, etc. The NO-GO area must be the area of the load plus a radius around the load of at least 1.5 times the highest dimension of the load. This is the operators’ responsibility (A). Make sure the load is supported during the lifting and lowering process, and that the load will not shift during lifting/lowering (B). Under load, the jack should never be left unattended and should stay in the same position for only a short period of time. If the load is lifted and you need to work on the load, always lower the load onto wooden supports first. Do not work on the object while the load is on the toe jack. Never put arms, legs, head etc. under a lifted load (A). Wear protective footwear (B). Wear a helmet if necessary (C). Wear safety glasses if needed (D) Wear gloves if necessary (E) Wear a hair net if you have long hair and fix loose clothing (i.e. ties) ! Comply with all other safety warnings and other safety signs in the working area. The jack will not lift loads above the rated capacity due to the built in safety valve (A). If you use more than one jack you should support the load gradually step by step (see diagram) to prevent an unbalanced load with different loads on each jack. Failure to do so could cause an overload on one jack and the load might tip (B). The ground support should be equal to the force which is distributed through the base area of the jack. Overloading could damage the surface of the ground which could result in a tip of the load. (A). Never put your arms or hands into or under moving parts of the jack if loaded or unloaded (B). Attention - Be aware of the dangers of moving parts and the risk of injury to hands. 6 Before you start working you should fully understand that lifting and shifting heavy loads brings different risks and is dangerous. Therefore please follow this manual, ensuring that everyone who is using this equipment has fully read and understood this manual and the safety warnings. Nobody should use this equipment without first reading this manual. Always create a lifting plan so you know how you want to do the job prior to starting – and so that everybody involved knows what is going on. Do not operate this equipment if you are ill, feeling sick or tired, or under the influence of alcohol or drugs. When you work under such condition you might harm yourself and others or even cause life threatening injuries. An annual safety inspection of the jack should be carried out. Maintenance and Storage Grease all assigned areas at least once per year depending on the use of the jack. We recommend an annual oil change. This should be carried out as part of the yearly safety inspection. Procedure for oil change: Lift up the jack a little and release the retaining screw (B). Open the valve and push the lifting unit back to the lowest position. Take out the lifting unit. Release the four screws on the bottom of the jack (C) which loosens the cylinder and pump in order to fully extract. Open C-clip (D) and remove the legs (not necessary of you have grease nipples on legs). Open the oilscrew (E) incl. valve and if necessary take out valve (F). Recycle the old oil according to local environmental laws. Fill oil into the tank but not more than a maximum of 1 inch (20-30 mm) between the top and the oil level. Storage: always store in the upright position and in a dry area. Troubleshooting What if Load can be only partly lifted Load cannot be lifted at all Load lowers with valve closed Reason Too little oil in the Tank How to solve Refill oil (see above) Valve open Capacity not sufficient Safety valve loose Ball on valve does not seal Close Use additional or stronger jack Tighten Pumpscrew Press ball into bottom, close valve very tightly if necessary by using pliers Take out and clean or replace Take out and replace Take out and replace Take out and clean or replace Safety valve dirty Safety valve damaged Head seal pump damaged Safety valve dirty or damaged Seal damaged Take out and replace 7 8 Please supply with your order the correct part number, quantity required and description as well as the type of the jack and serial number. If a repair has to be carried out, please send only the defective parts. Thank you. Spare parts, universal Pos. Description Qty HTJ-10D Qty HTJ-25D 1 1 1 1 2 2 1 1 1 1 1 1 1 1 1 2 1 951057100 951057200 990061501 990193010 990193009 990198001 990112001 951059200 951057300 990114001 951059300 991005000 991059100 991004002 951059400 990176001 991200520 1 951058000 1 1 2 2 4 4 2 2 2 2 1 1 2 2 1 4 2 1 1 1 1 1 1 1 951057100 951057200 990061501 990193010 990193009 990198001 990112001 951059200 951057300 990114001 951059300 991005000 991059100 991004002 951059400 990176001 991200520 952559300 952559500 991001251 991003251 990147008 952559400 951058000 Diagram 1: 1 2 3 4 5 6 7 8 9 10 11 12 13 14 15 16 17 21 22 23 24 25 26 27 Pump joint 1 Pump joint 2 Spring pressure ball Nut for 3 Joint screw Joint nut Distance washer Nut M18x1 Jointbox Pin Pump Ram NH Ram seal Screwed socket ram O-Ring pump Cylinder pump NH Copper Seal Safety-valve SH-pump ram SH-piston SH-piston guide SH-U-seal SH-C-clip SH-Cylinder pump SH-Cylinder adapter Diagram 2: 30 31 32 33 34 35 36 37 38 Valve Stargrip O-ring valve Oil screw wheel Wheel washer Wheel screw Stud coupling S/G-FL Stud coupling XR Male hose coupler 1 1 1 1 951058000 990063100 991004001 990055001 991102007 991102006 080270001 1 1 1 1 2 4 2 1 1 1 951058000 990063100 991004001 990055001 110521101 990112001 990193011 991102007 991102006 080270001 1 1 1 1 951057400 1 951057400 Diagram 3: 48 Lever pump 9 Spare parts specific Pos. Description Qty HTJ-10D HTJ-25D 1 1 4 1 1 1 2 2 1 1 1 1 1 950620000 991103100 990179007 990191023 950610101 950610101 950610201 990147007 950630000 951130000 990179006 951040000 991057400 950620000 991103250 990179007 990191025 950610101 950610101 950610201 990147007 950630000 951130000 990179001 952540000 991057400 1 1 1 1 1 1 1 1 1 1 951050300 951050200 991001100 991003100 990147005 991050100 991002100 990147002 952550300 952550200 991001250 991003250 990147010 952550100 Diagram 3: 40 41 42 43 44 45 46 47 48 Pump /cylinder S/G-FLT Cylinder XR Screw cylinder S/G-FLT Cylinder XR Frame S/G-FLT Frame XR Swiveling leg C-Clip/Nut+washer leg Lifting unit S/G-FLT Lifting unit XR Screw lifing unit Toe Lever Diagram 4: 50 51 52 53 54 55 56 57 58 Piston rod Piston Piston guide U-Seal piston C-Clip piston Piston head Piston head guide C-Clip securing plate Screw securing plate Securing plate S/GFLT1 951050400 990179005 952550400 10 LIMITED WARRANTY We warrant each new Hilman Toe Jack sold by us to be free from manufacturing defects in normal service for a period of one (1) year commencing with delivery of the Toe Jack to the original user. Our obligation under this warranty is expressly limited at our option, to the replacement or repair at Hilman, Incorporated, Marlboro, New Jersey 07746 USA, or at a service facility designated by us, of such part or parts as inspection shall disclose to have been defective. This warranty does not apply to defects caused by damage or unreasonable use, including failure to provide reasonable and necessary maintenance while in the possession of the consumer. WE SHALL NOT BE LIABLE FOR CONSEQUENTIAL DAMAGES OF ANY KIND, including, but not limited to, consequential labor costs or transportation charges in connection with the replacement or repair of defective parts. We make no warranty with respect to trade accessories. They are subject to the warranties of their manufacturers. ANY IMPLIED OR STATUTORY WARRANTIES, INCLUDING ANY WARRANTY OF MERCHANTABILITY OR FITNESS FOR A PARTICULAR PURPOSE, ARE EXPRESSLY LIMITED TO THE DURATION OF THIS WRITTEN WARRANTY. We make no other express warranty, nor is anyone authorized to make any on our behalf. *In compliance with 1975 Consumer Product Warranties Law HILMAN, INCORPORATED, 12 Timber Lane, Marlboro, New Jersey 07746 11 Deluxe Toe Jack Warnings & Inspection Capacity / Model Number: ____________________ Serial Number: ___________ Manuf. Date: _________ Inspected by: ___________________________________ Inspection Date: ____________ Inspector’s Signature: ______________________ Approval Stamp: ! WARNING IMPROPER USE OF HILMAN DELUXE TOE JACKS CAN RESULT IN SERIOUS INJURY TO AVOID INJURY: Always make sure that the load is fully supported by the toe or top plate Jack to rest on solid ground in VERTICAL position Jack only with the pivoting feet facing towards the load Never exceed maximum lifting capacity No side load permissible Keep body parts from beneath the load and all moving parts at all times Bystanders should keep clear of the load (to a min. of 1.5 times the highest point of the load) Support the load with suitable supports Lift on fixed parts of the load Do not use the jack if it is damaged or without a valid inspection certificate Always use recommended lubricants Always use genuine replacement parts Periodically check lubricant level Read the user manual provided with the jack and follow all instructions before operation The user is responsible for condition of all warning labels These instructions are guide- lines and you should always refer to the operating manual if in doubt. In all circumstances consider “S A F E T Y F I R S T “ Models 10-ton and 25-ton 12 Timber Lane • Marlboro NJ 07746 tel: 732.462.6277 • fax:732.462.6355 email: [email protected]