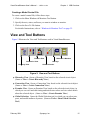
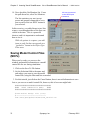
1
Visual SmartBrowser
User’s Manual
– UNIX version
To search the entire manual
set, press this toolbar button.
For help, refer to intro.pdf.
February 2001
Visual SmartBrowser User’s Manual – UNIX version
Copyright © 2001 Synopsys, Inc.
All rights reserved.
Printed in USA.
Information in this document is subject to change without notice.
SmartModel, ModelAccess, ModelTools, SourceModel Library, LM-1200, and
Synopsys Eaglei are registered trademarks; MemPro, MemSpec, MemScope,
FlexModel, LM-family, LM-1400, Logic Model, ModelSource, and SourceModel are
trademarks of Synopsys, Inc.
All company and product names are trademarks or registered trademarks of their
respective owners.
2
Synopsys, Inc.
February 2001
Visual SmartBrowser User’s Manual – UNIX version
Contents
Contents
Preface . . . . . . . . . . . . . . . . . . . . . . . . . . . . . . . . . . . . . . . . . . . . . . . . . . . . . . . . . . . . . .
About This Manual . . . . . . . . . . . . . . . . . . . . . . . . . . . . . . . . . . . . . . . . . . . . . . . . . .
Related Documents . . . . . . . . . . . . . . . . . . . . . . . . . . . . . . . . . . . . . . . . . . . . . . .
Manual Overview . . . . . . . . . . . . . . . . . . . . . . . . . . . . . . . . . . . . . . . . . . . . . . . .
Typographical and Symbol Conventions . . . . . . . . . . . . . . . . . . . . . . . . . . . . . . .
Getting Help . . . . . . . . . . . . . . . . . . . . . . . . . . . . . . . . . . . . . . . . . . . . . . . . . . . . . . .
The Synopsys Website . . . . . . . . . . . . . . . . . . . . . . . . . . . . . . . . . . . . . . . . . . . . .
Synopsys Common Licensing (SCL) Document Set . . . . . . . . . . . . . . . . . . . .
Comments? . . . . . . . . . . . . . . . . . . . . . . . . . . . . . . . . . . . . . . . . . . . . . . . . . . . . . . .
7
7
7
7
8
9
9
10
10
Chapter 1
VSB Overview . . . . . . . . . . . . . . . . . . . . . . . . . . . . . . . . . . . . . . . . . . . . . . . . . . . . . . .
Introduction . . . . . . . . . . . . . . . . . . . . . . . . . . . . . . . . . . . . . . . . . . . . . . . . . . . . . . .
Multiple Views . . . . . . . . . . . . . . . . . . . . . . . . . . . . . . . . . . . . . . . . . . . . . . . . . . . .
Main Window . . . . . . . . . . . . . . . . . . . . . . . . . . . . . . . . . . . . . . . . . . . . . . . . . . . . .
View and Tool Buttons . . . . . . . . . . . . . . . . . . . . . . . . . . . . . . . . . . . . . . . . . . . . . .
View Control Pane . . . . . . . . . . . . . . . . . . . . . . . . . . . . . . . . . . . . . . . . . . . . . . .
Status Pane . . . . . . . . . . . . . . . . . . . . . . . . . . . . . . . . . . . . . . . . . . . . . . . . . . . . .
Zoom Levels . . . . . . . . . . . . . . . . . . . . . . . . . . . . . . . . . . . . . . . . . . . . . . . . . . .
Hierarchy View . . . . . . . . . . . . . . . . . . . . . . . . . . . . . . . . . . . . . . . . . . . . . . . . .
Connection View . . . . . . . . . . . . . . . . . . . . . . . . . . . . . . . . . . . . . . . . . . . . . . . .
Views and Tools . . . . . . . . . . . . . . . . . . . . . . . . . . . . . . . . . . . . . . . . . . . . . . . . . . .
Hierarchy View . . . . . . . . . . . . . . . . . . . . . . . . . . . . . . . . . . . . . . . . . . . . . . . . .
Hierarchy View Pop-Up Menu . . . . . . . . . . . . . . . . . . . . . . . . . . . . . . . . . . . . .
Hierarchy View Tool Bar . . . . . . . . . . . . . . . . . . . . . . . . . . . . . . . . . . . . . . . . . .
Connection View . . . . . . . . . . . . . . . . . . . . . . . . . . . . . . . . . . . . . . . . . . . . . . . .
Connection View Pop-Up Menu . . . . . . . . . . . . . . . . . . . . . . . . . . . . . . . . . . . .
Connection View Tool Bar . . . . . . . . . . . . . . . . . . . . . . . . . . . . . . . . . . . . . . . .
Examine View . . . . . . . . . . . . . . . . . . . . . . . . . . . . . . . . . . . . . . . . . . . . . . . . . .
Examine View Pop-Up Menu . . . . . . . . . . . . . . . . . . . . . . . . . . . . . . . . . . . . . .
Global Selection Tool . . . . . . . . . . . . . . . . . . . . . . . . . . . . . . . . . . . . . . . . . . . .
Net Tags Tool . . . . . . . . . . . . . . . . . . . . . . . . . . . . . . . . . . . . . . . . . . . . . . . . . . .
Windows & Monitors Tool . . . . . . . . . . . . . . . . . . . . . . . . . . . . . . . . . . . . . . . .
Creating and Editing Buses . . . . . . . . . . . . . . . . . . . . . . . . . . . . . . . . . . . . . . . .
Specifying Illegal Characters . . . . . . . . . . . . . . . . . . . . . . . . . . . . . . . . . . . . . . .
11
11
12
13
15
16
16
17
17
17
19
19
21
22
23
24
26
27
28
28
31
32
35
37
February 2001
Synopsys, Inc.
3
Contents
Visual SmartBrowser User’s Manual – UNIX version
Visualizing a Setup or Hold Violation . . . . . . . . . . . . . . . . . . . . . . . . . . . . . . . .
Visualizing a Cause Report from a Simulation Run . . . . . . . . . . . . . . . . . . . . .
Visualizing an Effect Report from a Simulation Run . . . . . . . . . . . . . . . . . . . .
Viewing and Editing Instance Timing and Initial State Values . . . . . . . . . . . . .
Selecting Circuit Objects . . . . . . . . . . . . . . . . . . . . . . . . . . . . . . . . . . . . . . . . . .
Menu Commands . . . . . . . . . . . . . . . . . . . . . . . . . . . . . . . . . . . . . . . . . . . . . . . . . .
File Menu . . . . . . . . . . . . . . . . . . . . . . . . . . . . . . . . . . . . . . . . . . . . . . . . . . . . . .
Options Menu . . . . . . . . . . . . . . . . . . . . . . . . . . . . . . . . . . . . . . . . . . . . . . . . . .
View Menu . . . . . . . . . . . . . . . . . . . . . . . . . . . . . . . . . . . . . . . . . . . . . . . . . . . .
Tools Menu . . . . . . . . . . . . . . . . . . . . . . . . . . . . . . . . . . . . . . . . . . . . . . . . . . . .
Windows Menu . . . . . . . . . . . . . . . . . . . . . . . . . . . . . . . . . . . . . . . . . . . . . . . . .
Mouse and Keyboard Accelerators . . . . . . . . . . . . . . . . . . . . . . . . . . . . . . . . . . . . .
Left Mouse Button . . . . . . . . . . . . . . . . . . . . . . . . . . . . . . . . . . . . . . . . . . . . . . .
Right Mouse Button . . . . . . . . . . . . . . . . . . . . . . . . . . . . . . . . . . . . . . . . . . . . . .
Space Bar . . . . . . . . . . . . . . . . . . . . . . . . . . . . . . . . . . . . . . . . . . . . . . . . . . . . . .
Del, Delete . . . . . . . . . . . . . . . . . . . . . . . . . . . . . . . . . . . . . . . . . . . . . . . . . . . . .
M ............................................................
Arrow Key (right, left, up, down) . . . . . . . . . . . . . . . . . . . . . . . . . . . . . . . . . . .
Customizing Visual SmartBrowser . . . . . . . . . . . . . . . . . . . . . . . . . . . . . . . . . .
38
39
40
41
42
42
42
42
43
43
43
44
44
44
44
45
45
45
45
Chapter 2
Learning Visual SmartBrowser . . . . . . . . . . . . . . . . . . . . . . . . . . . . . . . . . . . . . . . . .
Introduction . . . . . . . . . . . . . . . . . . . . . . . . . . . . . . . . . . . . . . . . . . . . . . . . . . . . . . .
Setting Up the Tutorial . . . . . . . . . . . . . . . . . . . . . . . . . . . . . . . . . . . . . . . . . . . . . .
Using the VSB . . . . . . . . . . . . . . . . . . . . . . . . . . . . . . . . . . . . . . . . . . . . . . . . . . . . .
Identifying Hierarchical and SCV Instances . . . . . . . . . . . . . . . . . . . . . . . . . . .
Determining the Scope of an Instance . . . . . . . . . . . . . . . . . . . . . . . . . . . . . . . .
Creating a Sparse Hierarchy . . . . . . . . . . . . . . . . . . . . . . . . . . . . . . . . . . . . . . .
Using Global Selection . . . . . . . . . . . . . . . . . . . . . . . . . . . . . . . . . . . . . . . . . . .
Working with Circuit Object Tips . . . . . . . . . . . . . . . . . . . . . . . . . . . . . . . . . . .
Visually Identifying Nets with Net Tags . . . . . . . . . . . . . . . . . . . . . . . . . . . . . .
Defining Windows and Monitors . . . . . . . . . . . . . . . . . . . . . . . . . . . . . . . . . . .
Saving Model Control Files (MCFs) . . . . . . . . . . . . . . . . . . . . . . . . . . . . . . . . .
Changing Window Views . . . . . . . . . . . . . . . . . . . . . . . . . . . . . . . . . . . . . . . . .
53
53
53
54
60
62
63
64
66
67
69
72
74
Index . . . . . . . . . . . . . . . . . . . . . . . . . . . . . . . . . . . . . . . . . . . . . . . . . . . . . . . . . . . . . . . 77
4
Synopsys, Inc.
February 2001
Visual SmartBrowser User’s Manual – UNIX version
Figures
Figures
Figure 1:
Figure 2:
Figure 3:
Figure 4:
Figure 5:
Debugging Tools 12
View and Tool Buttons 15
Zoom Control Buttons 17
Hierarchy View Tool Bar Buttons 22
Connection View Tool Bar Buttons 26
February 2001
Synopsys, Inc.
5
Figures
6
Visual SmartBrowser User’s Manual – UNIX version
Synopsys, Inc.
February 2001
L
Visual SmartBrowser User’s Manual – UNIX version
Preface
Preface
About This Manual
This manual contains reference information for Visual SmartBrowser (VSB) users on
UNIX. If you are on NT, refer instead to the Visual SmartBrowser User’s Manual – NT
version. The UNIX version of VSB tool differs somewhat from the NT version.
This manual describes how to use the VSB tool to improve productivity when working
with SmartCircuit models of FPGA and CPLD devices. The manual does not contain
general information about SmartCircuit models or other types of SmartModel Library
models—that information is presented in the SmartModel Library User’s Manual.
Related Documents
For general information about SmartModel Library documentation, or to navigate to a
different online document, refer to the Guide to SmartModel Documentation. For the
latest information on supported platforms and simulators, refer to SmartModel Library
Supported Simulators and Platforms.
For detailed information about specific models in the SmartModel Library, use the
Browser tool (sl_browser) to access the online model datasheets.
Manual Overview
This manual contains the following chapters and appendixes:
Preface
Describes the manual and lists the typographical
conventions and symbols used in it; tells how to get
technical assistance.
Chapter 1:
VSB Overview
Procedures for using the VSB tool.
February 2001
Synopsys, Inc.
7
L
Preface
Visual SmartBrowser User’s Manual – UNIX version
Chapter 2:
Learning Visual
SmartBrowser
A short tutorial that enables new users to learn how
to use the VSB tool.
Typographical and Symbol Conventions
●
Default UNIX prompt
Represented by a percent sign (%).
●
User input (text entered by the user)
Shown in bold type, as in the following command line example:
% cd $LMC_HOME/hdl
●
System-generated text (prompts, messages, files, reports)
Shown as in the following system message:
No Mismatches: 66 Vectors processed: 66 Possible
●
Variables for which you supply a specific value
Shown in italic type, as in the following command line example:
% setenv LMC_HOME prod_dir
In this example, you substitute a specific name for prod_dir when you enter the
command.
●
Command syntax
Choice among alternatives is shown with a vertical bar ( | ) as in the following
syntax example:
-effort_level low | medium | high
In this example, you must choose one of the three possibilities: low, medium, or
high.
Optional parameters are enclosed in square brackets ( [ ] ) as in the following
syntax example:
pin1 [pin2 ... pinN]
In this example, you must enter at least one pin name (pin1), but others are optional
([pin2 ... pinN]).
8
Synopsys, Inc.
February 2001
L
Visual SmartBrowser User’s Manual – UNIX version
Preface
Getting Help
If you have a question while using Synopsys products, use the following resources:
1. Start with the available product documentation installed on your network or located
at the root level of your Synopsys CD-ROM. Every documentation set contains
overview information in the intro.pdf file.
Additional Synopsys documentation is available at this URL:
http://www.synopsys.com/products/lm/doc
Datasheets for models are available using the Model Directory:
http://www.synopsys.com/products/lm/modelDir.html
2. Visit the online Support Center at this URL:
http://www.synopsys.com/support/lm/support.html
This site gives you access to the following resources:
❍
SOLV-IT!, the Synopsys automated problem resolution system
❍
product-specific FAQs (frequently asked questions)
❍
lists of supported simulators and platforms
❍
the ability to open a support help call
❍
the ability to submit a delivery request for some product lines
3. If you still have questions, you can call the Support Center:
North American customers:
Call the Synopsys Eaglei and Logic Modeling Products Support Center hotline at
1-800-445-1888 (or 1-503-748-6920) from 6:30 AM to 5 PM Pacific Time, Monday
through Friday.
International customers:
Call your local sales office.
The Synopsys Website
General information about Synopsys and its products is available at this URL:
http://www.synopsys.com
February 2001
Synopsys, Inc.
9
Preface
L
Visual SmartBrowser User’s Manual – UNIX version
Synopsys Common Licensing (SCL) Document Set
Synopsys common licensing (SCL) software is delivered on a CD that is separate from
the tools that use this software to authorize their use. The SCL documentation set
includes the following publications, which are located in (root)/docs/scl on the SCL CD
and also available on the Synopsys FTP server (ftp://ftp.synopsys.com):
●
Licensing QuickStart—(142K PDF file)
This booklet provides instructions for obtaining an electronic copy of your license
key file and for installing and configuring SCL on UNIX and Windows NT.
●
Licensing Installation and Administration Guide—(2.08M PDF file)
This guide provides information about installation and configuration, key concepts,
examples of license key files, migration to SCL, maintenance, and troubleshooting.
You can find general SCL information on the Web at:
http://www.synopsys.com/keys
Comments?
To report errors or make suggestions, please send e-mail to:
[email protected]
To report an error that occurs on a specific page, select the entire page (including
headers and footers), and copy to the buffer. Then paste the buffer to the body of your
e-mail message. This will provide us with information to identify the source of the
problem.
10
Synopsys, Inc.
February 2001
L
Visual SmartBrowser User’s Manual – UNIX version
Chapter 1: VSB Overview
1
VSB Overview
Introduction
This manual presents information on how to use the VSB tool to improve productivity
when working with SmartCircuit models. This information is organized in the
following major sections:
●
Multiple Views
●
Main Window
●
View and Tool Buttons
●
Views and Tools
●
Menu Commands
●
Mouse and Keyboard Accelerators
Visual SmartBrowser (VSB) is a tool with a graphical user interface that you can use to
debug designs that incorporate SmartCircuit models of FPGA and CPLD devices. VSB
uses multiple different views of a device netlist to enable accurate diagnosis of design
problems.
VSB is part of a suite of SmartCircuit debugging tools that enable you to determine
relationships within your design, as illustrated in Figure 1 on page 12. The debugging
tools are:
●
SmartCircuit Monitor. Enables you to observe any element in your design and
receive reports of any changes that occur on that element.
●
Causal Tracing. Enables you to trace events in a simulation to see where a
problem is occurring or to trace the causes of a problem to their roots.
●
SmartBrowser interactive tool. Enables you to traverse a design and obtain
information about any element in the design; has a batch mode.
February 2001
Synopsys, Inc.
11
L
Chapter 1: VSB Overview
●
Visual SmartBrowser User’s Manual – UNIX version
Visual SmartBrowser. Graphically enables you to traverse a design for
information on the design elements; does not have a batch mode.
Debugging Tools
SmartCircuit
Monitor
Causal
Tracing
SmartBrowser
Interactive Tool
Visual
SmartBrowser
Figure 1: Debugging Tools
Both the SmartBrowser interactive tool and the VSB enable you to find information
about the elements in a design. The VSB gives a visual conceptualization of the design,
whereas the SmartBrowser gives no visual clues to the design. Whether you should use
the SmartBrowser or the Visual SmartBrowser is primarily a question of preference and
possibly circumstances, such as the size of your design.
For more information on SmartCircuit models, SmartCircuit monitors, causal tracing, or
the non-graphical SmartBrowser interactive tool, refer to the SmartModel Library
User’s Manual.
Multiple Views
Visual SmartBrowser reads a post-layout netlist (in the SmartCircuit .ccn format) and
represents the design in various graphical views.
12
●
Hierarchy view. View the design as a tree-like structure of hierarchical blocks.
●
Connection view. Expand and collapse circuit connections selectively. This
demand-driven approach has several benefits:
❍
Eliminates the need to display the entire schematic, reducing processing time
❍
Clears the designer’s view of unrelated nets and other circuit objects
❍
Shows how the semiconductor vendor (SCV) cells are actually connected
without the need to move up and down through the hierarchy
●
Examine view. View an instance in detail and edit any timing or state information.
●
Windows & Monitors tool. Create model control files for windowing and
monitoring internal nets and states during simulation.
Synopsys, Inc.
February 2001
L
Visual SmartBrowser User’s Manual – UNIX version
Chapter 1: VSB Overview
& Note
Throughout this manual and the rest of the SmartModel Library
documentation, the term “instance” may mean: 1) the device itself, 2) any
of the hierarchy blocks making up the device, or 3) the vendor’s library cell
(leaf node). The surrounding text determines which usage is intended.
Main Window
The Main window is the “command center” from which you control Visual
SmartBrowser. The main window contains the following elements:
●
Menu bar
●
Buttons to open the various views and tools
●
View control pane with icons for all open views
●
Optional status pane
Opening a Design
To open a design, include its file name on the command line when you start Visual
SmartBrowser, as shown in the following example:
% vsb design.ccn
There is also a menu command that you can use to open a design belonging to the same
model, or re-open the current design (to toss any changes you may have made).
1. Choose File > Open, or press Ctrl+O.
2. Select the netlist (.ccn) file you want to open.
3. Click on the OK button.
& Note
Tools like VSB are “model-centric.” This means that the model you are
using determines the correct version of the tool to use for that particular
model version. Since the model name (for example, a1425_84) has already
been embedded into the .ccn file by smartccn, we recommend that you
invoke VSB on the command line by specifying the design.ccn, as shown in
the preceding example.
February 2001
Synopsys, Inc.
13
Chapter 1: VSB Overview
L
Visual SmartBrowser User’s Manual – UNIX version
Displaying an Instance
To display the top-level (design) instance, click on the Create Hierarchy View button.
Viewing a Circuit Object
To view a circuit object in Hierarchy, Connection, or Examine View, follow these steps:
1. Select the net, port, or instance in an active view or tool.
2. In the main window, click on the corresponding view or tool button. You can also
choose the corresponding command from the View or Tools menu.
Toggling the Status Pane
To toggle display of the status pane in the main window, choose the following menu
entries:
Options > Show Status Pane
Toggling Tool or Circuit Object Tips
To toggle display of tool tips or circuit object tips, choose the following menu entries:
Options > Show Tool Tips or Options > Show Circuit Object Tips
Bringing a View to the Foreground
To bring a view to the foreground, click on the corresponding icon in the view control
pane. You can also choose the view by name from the Windows menu. If necessary,
you can click on the right and left arrow buttons to scroll more view icons into the view
control pane.
Raising and Iconifying Views
To raise or iconify all views, choose the following menu entries:
Windows > Raise All Views or Windows > Iconify All Views
Creating a Sparse Hierarchy View
To create a sparse hierarchy view, follow these steps:
1. In Connection View, use the Expand Selection, Collapse Selection, Hide Selected
Circuit Object, and Hide Unconnected Circuit Objects tools to display the instances
and ports of interest.
2. Click on the Create Sparse Hierarchy View button.
A new Hierarchy View displays just the portion of the design hierarchy that contains
the ports and instances in the active Connection View.
14
Synopsys, Inc.
February 2001
L
Visual SmartBrowser User’s Manual – UNIX version
Chapter 1: VSB Overview
Creating a Model Control File
To create a model control file, follow these steps:
1. Click on the Show Windows & Monitors Tool button.
2. Specify the nets, states, and buses you want to window or monitor.
3. Click on the Save To File button.
For detailed instructions, refer to “Windows & Monitors Tool” on page 32.
View and Tool Buttons
Figure 2 illustrates the View and Tool buttons used in Visual SmartBrowser.
Examine View
Connection View
Hierarchy View
Windows & Monitors
Net Tags
Global Selection
Figure 2: View and Tool Buttons
●
Hierarchy View. Opens a Hierarchy View based on the selected circuit object.
(Same as View > Create Hierarchy View.)
●
Connection View. Opens a Connection View based on the selected circuit object.
(Same as View > Create Connection View.)
●
Examine View. Opens an Examine View based on the selected circuit object, in
which you can view and edit timing and initial state values and view other details
about the selected object. (Same as View > Create Examine View.)
●
Global Selection. Opens the Global Selection tool, in which you can select nets,
ports, and model instances by name. (Same as Tools > Show Global Selection
Tool.)
February 2001
Synopsys, Inc.
15
Chapter 1: VSB Overview
L
Visual SmartBrowser User’s Manual – UNIX version
●
Net Tags. Opens the Net Tags tool, in which you can tag nets. Tags are represented
by different colors to make them easier to see. (Same as Tools > Show Net Tags
Tool.)
●
Show Windows & Monitors Tool. Opens the Windows & Monitors tool, which
you can use to set up windows and monitors for nets, states, and buses. (Same as
Tools > Show Windows & Monitors Tool.)
View Control Pane
Clicking on an icon in the view control pane brings the corresponding view to the
foreground. Click on the left and right arrow buttons to scroll through the view control
pane.
Status Pane
The status pane displays the name, type, and scope of the selected net, port, or instance.
It also shows the state of the VSB tool, the current zoom level, and whether the active
design has been modified.
The main window status pane also shows the string “MCF” if you have created windows
and monitors, but have not yet saved them in an MCF file.
Status panes also display a brief description of menu commands and tool buttons.
Toggling the Status Pane Display
To toggle the status pane display, follow these steps:
●
●
16
In the main window do one of the following:
❍
Choose Options > Show Status Pane.
❍
Press Ctrl+P.
In a Hierarchy View or Connection View, do one of the following:
❍
Click the right mouse button, and then choose View Controls > Show Status
Pane.
❍
Press Ctrl+P.
Synopsys, Inc.
February 2001
L
Visual SmartBrowser User’s Manual – UNIX version
Chapter 1: VSB Overview
Zoom Levels
You can use the zoom control buttons illustrated in Figure 3 from the hierarchy and
connections views to see four different levels of detail.
Lock Zoom Pane
Detail
High
Medium
Low
Figure 3: Zoom Control Buttons
Hierarchy View
In hierarchy view, each port is labeled with its name and direction (for example, I, O, or
I/O). For the root (design) instance, symbol pin names are shown in parentheses beside
the port names. The zoom buttons work as follows:
●
Detail Zoom. Each instance is labeled with its cell type, its name, and the number
of contained instances and semiconductor vendor (SCV) cells.
●
High Zoom. Each instance is labeled with its name and cell type.
●
Medium Zoom. Each instance is labeled with its name and cell type.
●
Low Zoom. Instances are not labeled, but circuit object tips show the name and cell
type of each instance. In this view, more of the hierarchy is visible, so it is easier to
see the overall topology and move about the instance tree.
Connection View
In connection view, the zoom buttons work as follows:
●
Detail Zoom.
❍
Each port of a hierarchical block is labeled with its name and direction (for
example, I, O, or I/O). For the root (design) instance, symbol pin names are
shown in parentheses beside the port names.
❍
Each SCV instance is labeled with its name and cell type. Input ports are shown
on the left side of the instance and output ports are shown on the right.
February 2001
Synopsys, Inc.
17
Chapter 1: VSB Overview
●
●
●
L
Visual SmartBrowser User’s Manual – UNIX version
❍
Each port on an SCV instance is labeled with its name.
❍
Circuit object tips show the names of net connections.
High Zoom.
❍
Each port of a hierarchical block is labeled with its name and direction (for
example, I, O, or I/O). For the root (design) instance, symbol pin names are
shown in parentheses beside the port names.
❍
Each SCV instance is labeled with its name and cell type.
❍
Ports on SCV instances are not labeled.
❍
Circuit object tips show the names of net connections.
Medium Zoom.
❍
Ports are not labeled, but circuit object tips show the names of ports on
hierarchical blocks.
❍
Each SCV instance is labeled with its cell type, and circuit object tips show the
names of instances.
❍
Circuit object tips show the names of net connections.
Low Zoom.
❍
Ports are not labeled, but circuit object tips show the names of ports on
hierarchical blocks.
❍
SCV instances are not labeled, but circuit object tips show the name and cell
type of each instance.
❍
Net connections are not displayed, but more of the Connection View is visible.
Setting the Zoom Level
To set the zoom level, do one of the following:
●
From the tool bar:
a. Click on the Change Zoom tool at the top of the Hierarchy View tool bar or the
Connection View tool bar.
b. Click on a zoom level icon.
●
With the right mouse button:
a. In Hierarchy View or Connection View, click the right mouse button and select
the Zoom command from the pop-up menu.
b. Choose a zoom level from the menu.
18
Synopsys, Inc.
February 2001
L
Visual SmartBrowser User’s Manual – UNIX version
Chapter 1: VSB Overview
Keeping the Zoom Pane in View
To keep the zoom pane in view, follow these steps:
1. Click on the Change Zoom tool at the top of the Hierarchy View tool bar or the
Connection View tool bar.
2. Click on the open padlock icon.
The zoom pane in the active Hierarchy View or Connection View stays open until
you click on the closed padlock icon.
Views and Tools
This section discusses the various VSB views and tools.
Hierarchy View
The Hierarchy View window displays the hierarchical location of the instances in a
design. The root instance is the design itself. The semiconductor vendor (SCV) cells
are located at the leaf nodes of a fully expanded branch. Thus, a flat netlist has two
levels: one for the design and one for all the SCV cells.
The Hierarchy View also contains a tool bar for common tasks and a list of ports
(I=input, O=output, I/O=bidirectional) for the selected instance. For the root (design)
instance, symbol pin names are shown in parentheses beside the port names. You can
use any port as a starting point for the generation of a new Connection View.
At the bottom of the Hierarchy View is an optional status pane.
Expanding a Hierarchical Block
To expand a hierarchical block, do one of the following:
●
By selection:
a. In the hierarchy pane, select a non-leaf instance.
b. Click on the Expand Selection tool.
●
By double-clicking:
a. Double-click on a non-leaf instance in the hierarchy pane.
February 2001
Synopsys, Inc.
19
Chapter 1: VSB Overview
L
Visual SmartBrowser User’s Manual – UNIX version
Collapsing a Hierarchical Block
To collapse a hierarchical block, do one of the following:
●
By selection:
a. In the hierarchy pane, select an expanded instance.
b. Click on the Collapse Selection tool.
●
By double-clicking:
a. Double-click on the expanded instance.
Exploring Connections from a Port
To explore connections from a port, do one of the following:
●
By selection:
a. From the list below the hierarchy pane, select the port.
b. Click on the Create Connection View button in the main window.
●
By double-clicking:
a. Double-click on the port in the list.
A new Connection View displays the selected port or SCV instance.
Displaying Instance Details
To display details on an instance, do one of the following:
●
By selection:
a. In the hierarchy pane, select the instance.
b. Click on the Create Examine View button in the main window.
●
By double-clicking:
a. Double-click on a leaf (SCV) instance in the hierarchy pane.
In Examine View, you can also modify timing and initial state values for circuit
objects that include timing and state information.
Displaying the Top-Level Instance
To display the top-level (design) instance, follow these steps:
1. In Hierarchy View or Connection View, click on the selected circuit object (or on
any unoccupied space) to cancel the current selection.
2. Click on the Create Hierarchy View button.
20
Synopsys, Inc.
February 2001
L
Visual SmartBrowser User’s Manual – UNIX version
Chapter 1: VSB Overview
Hierarchy View Pop-Up Menu
You can use the Hierarchy View pop-up menu to do any of the following:
●
Raise Application Shell Window (Ctrl+A). Brings the VSB main window to the
top.
●
Zoom. Displays a menu of zoom levels. (Similar to the Change Zoom tool on the
Hierarchy View tool bar.)
●
View Controls:
❍
Show Action Tool Bar (Ctrl+T). Toggles display of the tool bar in the active
Hierarchy View.
❍
Show Status Pane (Ctrl+P). Toggles display of status information in the active
Hierarchy View.
❍
Iconify this View. Reduces the active Hierarchy View to an icon.
❍
Close this View. Closes the active Hierarchy View. (Same as the Close View
tool on the Hierarchy View tool bar.)
●
Expand Tree. Shows the hierarchy under the selected instance. (Same as the
Expand Selection tool on the Hierarchy View tool bar.)
●
Collapse Tree. Hides the hierarchy under the selected instance. (Same as the
Collapse Selection tool on the Hierarchy View tool bar.)
●
Find Current Selection. Centers the selected circuit object in the active Hierarchy
View, if the view contains the object.
Use this command after you select an object in another view or tool. (Same as the
Find Selection tool on the Hierarchy View tool bar.)
●
Auto Find Current Selection. When possible, updates the active Hierarchy View
automatically to focus on the selected object.
February 2001
Synopsys, Inc.
21
L
Chapter 1: VSB Overview
Visual SmartBrowser User’s Manual – UNIX version
Hierarchy View Tool Bar
Figure 4 illustrates the tool bar buttons available in Hierarchy View.
Change Zoom
Collapse Selection
Expand Selection
Close View
Find Selection
Figure 4: Hierarchy View Tool Bar Buttons
22
●
Change Zoom. Displays a pane of zoom levels. Click on the open padlock icon to
keep the pane in view. (Similar to the Zoom command on the Hierarchy View
pop-up menu.)
●
Expand Selection. Shows the hierarchy under the selected instance. (Same as the
Expand Tree command on the Hierarchy View pop-up menu.)
●
Collapse Selection. Hides the hierarchy under the selected instance. (Same as the
Collapse Tree command on the Hierarchy View pop-up menu.)
●
Find Selection. Centers the selected object in the active Hierarchy View, if the
view contains the object. Use this command after you select an object in another
view or tool. (Same as the Find Current Selection command on the Hierarchy View
pop-up menu.)
●
Close View. Closes the active Hierarchy View. (Same as the Close this View
command on the Hierarchy View pop-up menu.)
Synopsys, Inc.
February 2001
L
Visual SmartBrowser User’s Manual – UNIX version
Chapter 1: VSB Overview
Connection View
In Connection View, you can trace connections through the design. Select a port or a
semiconductor vendor (SCV) instance, and then click on the Create Connection View
button to view input and output connections from the selected port.
In Connection View, ports on an instance include the following visual clues:
●
A circle in the port indicates inverted input or output.
●
Violet ports are connected to power and green ports are connected to ground.
The Connection View also contains a tool bar for common tasks and an optional status
pane.
Showing Port Drivers or Receivers
To show port drivers or receivers, do one of the following:
●
By selection:
a. In Connection View, select the port.
b. Click on the Expand Selection tool.
●
By double-clicking:
a. Double-click on the port in Connection View.
You can continue expanding connections until you reach an SCV device pin.
& Note
An unconnected port displays no net connections when expanded.
Hiding Expanded Port Connections
To hide an expanded port's connections, do one of the following:
●
By selection:
a. In Connection View, select the port.
b. Click on the Collapse Selection tool.
●
By double-clicking:
a. Double-click on the expanded port.
Note that the disconnected objects remain visible—to hide them, click on the Hide
Unconnected Circuit Objects tool.
February 2001
Synopsys, Inc.
23
Chapter 1: VSB Overview
L
Visual SmartBrowser User’s Manual – UNIX version
Hiding Individual Net Connections
To hide an individual net connection, select the net and click on the Hide Selected
Circuit Object tool (or press Delete).
Showing an Instance in the Connection View
To show an instance in the active Connection View, select the instance and choose Add
Current Selection from the Connection View pop-up menu.
Undoing a Wide Fan-In or Fan-Out
To undo a wide fan-in or fan-out, follow these steps:
1. Select the net into or out of the expanded port.
2. Click on the Hide Selected Circuit Object tool (or press Delete).
3. Click on the Hide Unconnected Circuit Objects tool.
Creating a Sparse Hierarchy View
To create a sparse Hierarchy View, follow these steps:
1. Use the Expand Selection, Collapse Selection, Hide Selected Circuit Object, and
Hide Unconnected Circuit Objects tools to display the instances and ports of
interest.
2. Click on the Create Sparse Hierarchy View button.
A new Hierarchy View displays just the portion of the design hierarchy that contains the
ports and instances in the active Connection View.
Connection View Pop-Up Menu
You can use the Connection View pop-up menu to do any of the following:
24
●
Raise Application Shell Window (Ctrl+A). Brings the VSB main window to the
top.
●
Zoom. Displays a menu of zoom levels. (Similar to the Change Zoom tool on the
Connection View tool bar.)
●
Change Display Using the View Controls:
❍
Show Action Tool Bar (Ctrl+T). Toggles display of the tool bar in the active
Connection View.
❍
Show Status Pane (Ctrl+P). Toggles display of status information in the active
Connection View.
Synopsys, Inc.
February 2001
L
Visual SmartBrowser User’s Manual – UNIX version
Chapter 1: VSB Overview
❍
Iconify this View. Reduces the active Connection View to an icon.
❍
Close this View. Closes the active Connection View. (Same as the Close View
tool on the Connection View tool bar.)
●
Expand Port. Shows the connections from the selected port. (Same as the Expand
Selection tool on the Connection View tool bar.)
●
Collapse Port. Hides the connections from the selected port. Note that the
disconnected objects remain visible—to hide them, click the Hide Unconnected
Circuit Objects tool. (Same as the Collapse Selection tool on the Connection View
tool bar.)
●
Find Current Selection. Centers the selected circuit object in the active
Connection View, if the view contains the object. Use this command after you
select an object in another view or tool. (Same as the Find Selection tool on the
Connection View tool bar.)
●
Add Current Selection. Adds an instance, selected in some other view, to the
active Connection View.
●
Auto Find Current Selection. When possible, updates the active Connection View
automatically to focus on the selected object.
●
Create Sparse Hierarchy View. Displays a portion of the design hierarchy
containing just the objects in the active Connection View.
●
Hide Unconnected Circuit Object. Hides objects in the active Connection View
that are not connected to any other object in the view. You can use this command to
prepare for creating a sparse hierarchy view.
●
Hide Selected Circuit Object. Hides the selected object in the active Connection
View. You can use this command to prepare for creating a sparse hierarchy view.
●
Show Scope Paths. Displays (below each instance) the path to the instance from
the root of the design.
February 2001
Synopsys, Inc.
25
L
Chapter 1: VSB Overview
Visual SmartBrowser User’s Manual – UNIX version
Connection View Tool Bar
Figure 5 illustrates the tool bar buttons available in Connection View.
Create Sparse
Hide Unconnected
Hierarchy
Circuit Object
Hide Selected
Close View
Circuit Object
Find Selection
Collapse Selection
Expand Selection
Change Zoom
Figure 5: Connection View Tool Bar Buttons
Change Zoom. Displays a pane of zoom levels. Click on the open padlock icon to keep
the pane in view. (Similar to the Zoom command on the Connection View pop-up
menu.)
Expand Selection. Shows the connections from the selected port. (Same as the Expand
Port command on the Connection View pop-up menu.)
Collapse Selection. Hides the connections from the selected port. Note that the
disconnected objects remain visible. (Same as the Collapse Port command on the
Connection View pop-up menu.)
Find Selection. Centers the selected object in the active Connection View, if the view
contains the object. Use this command after you select an object in another view or tool.
(Same as the Find Current Selection command on the Connection View pop-up menu.)
Create Sparse Hierarchy View. Displays (in a new Hierarchy View) just the portion of
the design hierarchy that contains objects visible in the active Connection View.
Hide Selected Circuit Object. Hides the selected circuit object in the active
Connection View.
Hide Unconnected Circuit Objects. Hides circuit objects in the active Connection
View that are not connected to any other object in the view.
Close View. Closes the active Connection View. (Same as the Close this View
command on the Connection View pop-up menu.)
26
Synopsys, Inc.
February 2001
L
Visual SmartBrowser User’s Manual – UNIX version
Chapter 1: VSB Overview
Examine View
In the Examine View window, you can view and modify detailed information about
model instances.
Graphical Pane
This area shows port names and the connected nets. Right- and left-pointing triangles
indicate signal direction. Grey circles indicate port inversion. Power and ground labels
are also visible.
If the instance has timing or state information, the corresponding down arrow button
(Timing Form or State Form, below the graphical pane) is enabled. Click on a down
arrow button to show the corresponding form.
When the Timing Form is visible, you can click on a port name in the graphical pane to
highlight the timing parameters associated with that port.
Timing Form
The Timing Form contains a list of timing parameters on the left. Select a parameter to
view the following information:
●
Name. The selected timing parameter.
●
Description. A description of the timing parameter.
●
Timing Value Units. Specifies whether to display values in picoseconds,
nanoseconds, microseconds, or milliseconds. Select one.
●
Values in .ccn File. The min, typ, and max values for the selected timing
parameter, as stored in the .ccn file.
●
Current Values. The min, typ, and max values for the selected timing parameter,
as modified but not yet saved to the .ccn file.
When the Timing Form is visible, you can click on a timing parameter in the parameter
list to highlight the associated ports in the graphical pane.
If you change the information on the Timing Form, click on the Accept Modification
button to record your changes.
February 2001
Synopsys, Inc.
27
Chapter 1: VSB Overview
L
Visual SmartBrowser User’s Manual – UNIX version
State Form
The State Form contains a list of states on the left. Select a state to view the following
information:
●
Name. The selected state.
●
Description. A description of the selected state parameter.
●
Value in .ccn File. The value of the selected state parameter, as stored in the .ccn
file.
●
Current Value. The value of the selected state parameter, as modified but not yet
saved to the .ccn file.
●
Bit Position. The offset of the last bit selected in the Value in .ccn File field.
If the state contains more than one bit, a slider appears below the Bit Position field.
Drag the slider, click on the right and left arrow buttons, or use the right and left
arrow keys to select a different bit.
To change a bit's value, select the bit and type the value you want it to have. Legal
characters are 0, 1, x (unknown), u (uninitialized), z (high-impedance), and
- (unspecified).
If you change the information on the State Form, click on the Accept Modification
button to record your changes.
Examine View Pop-Up Menu
You can use the Examine View pop-up menu to do any of the following:
●
Raise Application Shell Window (Ctrl+A). Brings the VSB main window to the
top.
●
View Controls, Close this View. Closes the active Examine View.
Global Selection Tool
Use this dialog box to select an instance, net, or port by name. You can also open this
dialog box to see which circuit object is the global selection.
If you know the name of the circuit object you want to select, type the name in the
Circuit Object field and, if necessary, type the path to the circuit object in the Scope
field. Make sure the Object Type selection is correct.
28
Synopsys, Inc.
February 2001
L
Visual SmartBrowser User’s Manual – UNIX version
Chapter 1: VSB Overview
If you know only a portion of the circuit object name or want to select from a list of
objects, you can browse the design.
Click on the Select Global button to select the specified instance, net, or port globally.
The Browse Filter field recognizes regular expressions and presents a list of all instances
that match the pattern you specify in the Browse Filter field.
Browsing for an Object
To browse for an object, follow these steps:
1. In the Scope field, type the path to the circuit object you want to select.
2. In the Browse Filter field, type part of the object name, or type a regular expression
to specify one or more objects.
3. Click on the Browse Given Scope button (or press Enter while the Browse Filter
field has the focus).
Traversing the Hierarchy
To traverse the hierarchy, follow these steps:
1. Set the Object Type to Instances.
2. Set the Browse Filter field as needed.
3. Click on the Browse Given Scope button.
4. Move up or down the design hierarchy:
❍
To move down, double-click on an instance in the list.
❍
To move up, double-click on the “double dots” (..) at the top of the list.
& Note
At the root of the design hierarchy, the list shows (Device: device-name),
rather than the double dots.
February 2001
Synopsys, Inc.
29
L
Chapter 1: VSB Overview
Visual SmartBrowser User’s Manual – UNIX version
Regular Expressions
Use the Browse Filter field of the Global Selection tool to specify a character or string
that appears anywhere in the found names. You can use standard regular expression
syntax in the Browse Filter field.
Matching a Character
To match a character, use the following syntax:
\specChar
Where specChar is one of the following:
\ [ ] ^ - . ? + * Matches the character literally; the backslash “escapes” the
special character.
char
Matches any other (non-special) character.
[chars]
Matches any of the characters in the brackets.
[^chars]
Matches any character except those in the brackets.
[char1-char2]
Matches any of the characters in the range char1 to char2.
Examples:
[a-z]
[0-9]
Matches any lowercase letter.
Matches any digit.
[^char1-char2]
Matches any character outside the range char1 to char2.
. (period)
Matches any single character.
? (question mark)
Matches an optional preceding element.
Examples:
ab?c
a[a-z]?c
30
Matches abc and ac.
Matches ac, aac, abc, . . . , azc.
Synopsys, Inc.
February 2001
L
Visual SmartBrowser User’s Manual – UNIX version
Chapter 1: VSB Overview
Matching a String
To match a string, use the following syntax:
+ (plus sign)
Matches one or more occurrences of the preceding element.
Examples:
ab+c
A[a-z]+
Matches abc, abbc, abbbc, and so on.
Matches A followed by one or more lowercase letters.
* (asterisk)
Matches zero or more occurrences of the preceding element.
Examples:
ab*c”
X[123]*
Matches ac, abc, abbc, abbbc, and so on.
Matches X, optionally followed by any combination of
1s, 2s, and 3s.
You can also concatenate regular expressions to create a string. For example,
“A[a-z]+_Bus[0-9]*” matches A followed by one or more lowercase letters, then _Bus,
then zero or more digits (such as Addr_Bus00 and Address_Bus).
Net Tags Tool
Use this dialog box to tag specific nets and to set the color of the nets in Connection
View. Displaying different nets in different colors can make it easier to identify
connection paths through a design.
Tagging a Net
To tag a net, follow these steps:
1. In the Net Tags tool, select a color.
2. In Connection View, select a net.
While the pointer is a hand, every net you select is added to the list under the current
color choice.
3. When you finish tagging nets, click on the current color choice again or close the
Net Tags tool.
February 2001
Synopsys, Inc.
31
Chapter 1: VSB Overview
L
Visual SmartBrowser User’s Manual – UNIX version
Removing Tags from Nets
To remove the tag from one or more nets, follow these steps:
1. In the Net Tags tool, select the nets to untag.
2. Click on the Clear Selected Net Tags button.
To remove the tag from all the nets of a given color, click on the Clear List button under
the corresponding color choice list.
Windows & Monitors Tool
Use this dialog box to do the following:
●
Designate nets, states, and buses for windowing or monitoring
●
Create and modify buses and aliases
●
Create model control files for simulation
The upper pane contains a pull-down list of window and monitor types:
Net Windows
Net Monitors
State Windows
State Monitors
Bus Windows
Bus Monitors
The list box below the menu shows all the items of the selected type. When a bus is
selected, the Bus Elements button below the list box is enabled. For more information,
refer to “Creating and Editing Buses” on page 35.
The buttons to the right of the list have the following functions:
●
Select Global. Makes the selected item (in the list) the global selection.
●
Clear Selection. Removes the selected item from the list.
●
Clear List. Removes all items from the list.
●
Save To File. Creates a model control file containing the current information on
windows, monitors, and bus definitions.
Click on the Object Adder button to expand the Windows & Monitors tool.
32
Synopsys, Inc.
February 2001
L
Visual SmartBrowser User’s Manual – UNIX version
Chapter 1: VSB Overview
Windowing or Monitoring a Net
To window or monitor a net, follow these steps:
1. Select the net you want to window or monitor.
2. Make sure the Net Monitor and Net Window buttons are set correctly in the Object
Type Filter area. A button that is “pushed in” (red) means the net will be added to
the corresponding list.
3. Click on the Add Object button.
Specifying Multiple Nets
To specify multiple nets, do one of the following:
●
You can add multiple nets by clicking on the Auto Add button. While the pointer is
a box, every net you select is added to the specified window and monitor lists. Click
on the button again to turn off automatic addition.
●
You can also select an instance to add all connected nets to the specified window
and monitor lists.
Windowing or Monitoring a State
To window or monitor a state, follow these steps:
1. Select an instance with state information you want to monitor.
2. Make sure the State Monitor and State Window buttons are set correctly in the
Object Type Filter area. A button that is “pushed in” (red) means the instance will
be added to the corresponding list.
3. Click on the Add Object button.
February 2001
Synopsys, Inc.
33
L
Chapter 1: VSB Overview
Visual SmartBrowser User’s Manual – UNIX version
Specifying Multiple States
To specify multiple states, click on the Auto Add button. While the pointer is a box,
every instance you select, if it has state information, is added to the specified window
and monitor lists. Click on the button again to turn off automatic addition.
Creating an Alias
To create an alias, follow these steps:
1. From the Net Windows, State Windows, Net Monitors, or State Monitors list, select
a net.
2. In the Alias text box, type one or more aliases for the net. Separate aliases with a
blank space.
3. Press Enter to record the aliases.
& Note
Visual SmartBrowser ignores any alias that contains illegal characters.
Editing or Removing Aliases
To edit or remove aliases, follow these steps:
1. From the Net Windows, State Windows, Net Monitors, or State Monitors list, select
a net.
2. In the Alias text box, add, modify, or delete aliases for the net as needed.
Remember to separate aliases with a blank space.
3. Press Enter to record your changes.
Creating a Model Control File
To create a model control file, follow these steps:
1. Click on the Save To File button.
2. Use the Filter field and the Directories and Files lists to fill the Selection field.
3. Fill out the Selection field as needed to specify the path and name for the model
control file.
Specifying Illegal Characters
To specify illegal characters for window and monitor names, follow these steps:
1. Click on the Illegal Chars button.
2. Clear the Illegal Chars and Substitute Chars fields.
34
Synopsys, Inc.
February 2001
L
Visual SmartBrowser User’s Manual – UNIX version
Chapter 1: VSB Overview
3. Click on the OK button
Creating and Editing Buses
Following are procedures for creating and editing buses.
Displaying Bus Elements
To display bus elements, follow these steps:
1. From the pull-down list at the top of the Windows & Monitors tool, select either Bus
Windows or Bus Monitors.
2. From the list box, select a bus.
3. Click on the Bus Elements button.
4. Click on the button again to display the list of monitored or windowed buses.
Defining a Bus Name
To define a bus name, do one of the following:
●
In a Bus Window or Bus Monitor:
a. From the pull-down list, select either Bus Windows or Bus Monitors.
b. In the Add Bus field, type the names of one of more buses you want to create,
and press Enter.
The bus names are added to the selected list (Bus Windows or Bus Monitors).
●
To define a bus name for other net or state options:
a. From the pull-down list, select one of the other (net or state) options.
b. From the list, select two or more nets to include in the bus.
c. In the Add Bus field, type the name of the bus, and press Enter.
The bus name is added to the Bus Windows or Bus Monitors list, depending on
whether the selected nets are designated for windowing or monitoring.
& Note
Visual SmartBrowser replaces any illegal characters in the bus name with
the specified substitute characters.
February 2001
Synopsys, Inc.
35
L
Chapter 1: VSB Overview
Visual SmartBrowser User’s Manual – UNIX version
Adding Elements to a Bus
To add elements to a bus, follow these steps:
1. From the list of Bus Windows or Bus Monitors, select the bus.
2. Click on the Bus Elements button.
3. Select the net (or instance with state information) you want to add.
4. Click on the Add Object button.
& Note
You can add multiple nets or states by selecting the Auto Add button. While
the pointer is a box, every net (or instance with state information) you select
is added to the selected bus list.
Reordering Elements in a Bus
To reorder the elements in a bus, follow these steps:
1. From the list of Bus Windows or Bus Monitors, select the bus.
2. Click on the Bus Elements button.
3. Select an element from the list.
4. Click on the up and down arrow buttons, beside the Bus Elements button, to move
the element to the desired position in the list.
Removing a Bus Element
To remove a bus element, follow these steps:
1. From the list of bus elements, select the element to remove.
2. Click on the Clear Selection button.
To remove all the elements of a bus, follow these steps:
1. From the list of Bus Windows or Bus Monitors, select the bus.
2. Click on the Bus Elements button.
3. Click on the Clear List button.
36
Synopsys, Inc.
February 2001
L
Visual SmartBrowser User’s Manual – UNIX version
Chapter 1: VSB Overview
Renaming a Bus
To rename a bus, follow these steps:
1. From the list of Bus Windows or Bus Monitors, select the bus.
2. Click on the Bus Elements button.
3. In the Edit Bus field, change the bus name, and press Enter.
Deleting a Bus Definition
To delete a bus definition, follow these steps:
1. From the list of Bus Windows or Bus Monitors, select the bus.
2. Click on the Clear Selection button.
Specifying Illegal Characters
For window and monitor names, VSB normally defines the slash (/) as an illegal
character and substitutes it with an underscore (_).
Disabling Illegal Character Substitutions
To disable illegal character substitution, follow these steps:
1. In the Windows & Monitors tool, click on the Illegal Chars button.
2. Clear the Illegal Chars and Substitute Chars fields.
3. Click on the OK button.
Until you specify an illegal character, VSB does not create automatic aliases or
validate bus names. Existing aliases, however they were created, are not affected.
Defining Illegal Characters
To define illegal characters, follow these steps:
1. In the Windows & Monitors tool, click on the Illegal Chars button.
2. In the Illegal Chars field, type any characters not accepted by the target simulator.
February 2001
Synopsys, Inc.
37
Chapter 1: VSB Overview
L
Visual SmartBrowser User’s Manual – UNIX version
3. In the Substitute Chars field, type the characters that will replace them.
Substitutions are position-dependent.
To illustrate position-dependency, say you type “abcde” in the Illegal Chars field
and ABCDE in the Substitute Chars field. VSB creates an alias of A_nEt for a_net
and renames a_bus as A_Bus.
& Note
If you specify fewer characters in the Substitute Chars field than in the
Illegal Chars field, VSB replaces unmatched characters in the Substitute
Chars field with the last character specified in the Illegal Chars field.
4. Click on the OK button.
VSB uses the information in this dialog box to validate all existing net and bus
names and net aliases:
❍
If a net name contains illegal characters, VSB creates an alias for it, using
substitute characters.
❍
If a bus name contains illegal characters, VSB renames it, using substitute
characters.
❍
If an alias contains illegal characters, VSB discards it entirely.
Visualizing a Setup or Hold Violation
Here is a sample setup violation error message generated by VSB:
Error: Violated setup constraint TSUD on D before CLK for cell /FA1A/df1
at time 27510.8 ns.
Actual setup time was 0.2 ns, specified minimum is 7.8 ns.
Model Id 0 Instance (A1010A_100-1) 27510.8 ns.
To find the point of violation noted in the error message, follow these steps:
1. Click on the Show Global Selection Tool button.
2. In the Circuit Object text field, enter the name of the object (df1) cited in the error
message. This is the string of characters following the last slash (/).
3. In the Scope text field, enter the path to the cited instance (/FA1A). This is the
string of characters preceding the last slash.
4. Make sure the Object Type is correct (Instances, in this example).
38
Synopsys, Inc.
February 2001
L
Visual SmartBrowser User’s Manual – UNIX version
Chapter 1: VSB Overview
5. Click on the Select Global button.
6. Click on the Create Connection View button.
7. Click on the Create Examine View button to check timing values.
Visualizing a Cause Report from a Simulation Run
Here is a sample cause report generated by VSB:
Trace: Triggering cause report from “FA1A_S”:
4028.5 ns 1->X on model port FA1A_S.
4028.5 ns 1->X on cell port /FA1A_S/U0/PAD, net FA1A_S.
4012.8 ns 1->X on cell port /I$4/U1/S, net N$8.
4002.7 ns 1->X on cell port /FA1A_CI/U0/Y, net N$6.
4000.0 ns 1->X on model port FA1A_CI.
Report completed.
Model Id 0 Instance (A1010A_100-1) 4028.5 ns.
To find out the underlying cause of the problem, open the cited port in Connection View
by either of these methods:
●
Using the Show Global Selection Tool button:
a. Click on the Show Global Selection Tool button.
b. In the Circuit Object text field, enter the name of the port (FA1A_S) cited in the
cause report.
c. In the Scope text field, enter the path to the cited port (/).
d. Make sure the Object Type is set to Ports.
e. Click on the Select Global button.
f. Click on the Create Connection View button.
●
From the Hierarchy View:
a. In Hierarchy View, select the root instance.
b. From the list of ports below the hierarchy pane, double-click on the port
(FA1A_S) cited in the cause report.
Next, trace the input signals following these steps:
1. In Connection View, double-click on the port to show the fan-in signals.
2. On the instance (/FA1A_S/U0) cited in the next line of the cause report,
double-click on the cited port (PAD).
3. On the instance (/I$4/U1) cited in the next line of the report, double-click on the
cited port (S).
February 2001
Synopsys, Inc.
39
Chapter 1: VSB Overview
L
Visual SmartBrowser User’s Manual – UNIX version
If necessary, use the scroll bar at the bottom of the connection pane to display
instances to the left.
4. On the instance /FA1A_CI/U0, double-click on port Y.
5. Follow net N$6 to input port FA1A_CI.
Visualizing an Effect Report from a Simulation Run
Here is a sample effect report generated by VSB:
Trace: Triggering effect report from ‘FA1A_A” at 4000.0 ns:
Model Id 0 Instance (A1010A_100-1) 4000.0 ns.
Trace: 4002.7 ns Effect 1->0 on cell port /FA1A_A/U0/Y, net N$2.
Model Id 0
Trace: 4013.1 ns Effect X->0 on cell port /I$4/U0/CO, net N$7.
Model Id 0
Trace: 4022.3 ns Effect X->0 on cell port /I$4/U1/S, net N$8.
Model Id 0
Trace: 4030.2 ns Effect X->0 on cell port /FA1A_CO/U0/PAD, net FA1A_CO.
Model Id 0
Trace: 4030.2 ns Effect X->0 on model port FA1A_CO.
Model Id 0
To find out the underlying cause of the problem, open the cited port in Connection View
using either of these methods:
●
Using the Show Global Selection Tool button:
a. Click on the Show Global Selection Tool button.
b. In the Circuit Object text field, enter the name of the port (FA1A_A) cited in the
cause report.
c. In the Scope text field, enter the path to the cited port (/).
d. Make sure the Object Type is set to Ports.
e. Click on the Select Global button.
f. Click on the Create Connection View button.
●
From the Hierarchy View:
a. In Hierarchy View, select the root instance.
b. From the list of ports below the hierarchy pane, double-click on the port
(FA1A_A) cited in the cause report.
40
Synopsys, Inc.
February 2001
L
Visual SmartBrowser User’s Manual – UNIX version
Chapter 1: VSB Overview
Next, trace the output signals:
1. In Connection View, double-click on the port to show the fan-out signals.
2. On the instance (/FA1A_A/U0) cited in the next line of the cause report,
double-click on the cited port (Y).
3. On the instance (/I$4/U0) cited in the next line of the report, double-click on the
cited port (CO).
If necessary, use the scroll bar at the bottom of the connection pane to display
instances to the right.
4. On the instance /I$4/U1, double-click on port S.
5. On the instance /FA1A_CO/U0, double-click on port PAD.
6. Follow net FA1A_CO to output port FA1A_CO.
Viewing and Editing Instance Timing and Initial State
Values
To view timing and state information, follow these steps:
1. Display the instance in Examine View using one of these methods:
❍
In Hierarchy View, double-click on the leaf instance.
❍
In Connection View, double-click on the instance.
❍
Select the instance; then click on the Create Examine View button.
2. Click on the Timing Form or State Form down arrow to display the related
information.
& Note
The down arrows are enabled only if the selected instance includes the
corresponding timing and state information.
3. If you change the timing or state information, the Accept Modification button is
enabled. Click the button to record your changes.
February 2001
Synopsys, Inc.
41
L
Chapter 1: VSB Overview
Visual SmartBrowser User’s Manual – UNIX version
Selecting Circuit Objects
This section provides information on how to select circuit objects under different
circumstances.
●
In Hierarchy View, click on an instance or port to make it the global selection.
●
In Connection View, click on a net, port, or instance to make it the global selection.
●
In the Global Selection tool, select a port, net, or instance, and click on the Select
Global button.
●
In the Net Tags tool, select a net, and click on the Select Global button.
●
In the Windows & Monitors tool, select a net or instance, and click on the Select
Global button.
Menu Commands
Some of the menus in the main window can be detached or “torn away” from the menu
bar. To detach a menu, click on the menu name and then choose the dashed line at the
top of the menu.
File Menu
The following commands are available from within the File menu:
●
Open (Ctrl+O). Displays a dialog box in which you select a netlist file to open.
●
Save (Ctrl+S). Saves the active netlist file. This option is available when you
change timing or initial state values. Changes do not affect the design from which
the netlist file was created.
●
Exit. Ends the active VSB session.
Options Menu
The following commands are available from within the Options menu:
42
●
Show Status Pane (Ctrl+P). Toggles display of status information in the main
window.
●
Show Tool Tips. Toggles display of tool descriptions.
●
Show Circuit Object Tips. Toggles display of circuit object descriptions.
Synopsys, Inc.
February 2001
L
Visual SmartBrowser User’s Manual – UNIX version
Chapter 1: VSB Overview
View Menu
The following commands are available from within the View menu:
●
“- - - - - - - - - -”. Detaches the View menu from the tool bar.
●
Create Hierarchy View. Opens a Hierarchy View based on the selected object.
●
Create Connection View. Opens a Connection View based on the selected object.
●
Create Examine View. Opens an Examine View based on the selected object. You
can use an Examine View to edit timing and initial state values and view other
details about the selected object.
Tools Menu
The following commands are available from within the Tools menu:
●
“- - - - - - - - - -”. Detaches the Tools menu from the tool bar.
●
Show Global Selection Tool. Opens the Global Selection tool, where you can
select nets, ports, and model instances by name.
●
Show Net Tags Tool. Opens the Net Tags tool, where you can set tags (colors) for
specific nets.
●
Show Windows & Monitors Tool. Opens the Windows & Monitors tool, where
you can set up windows and monitors for nets, states, and buses.
Windows Menu
The following commands are available from within the Windows menu:
●
“- - - - - - - - - -”. Detaches the Windows menu from the tool bar.
●
Iconify All Windows (Ctrl+I). Reduces the main window and all Hierarchy,
Connection, and Examine View windows to icons. Also closes all tool windows.
●
Iconify All Views. Reduces all Hierarchy, Connection, and Examine View
windows to icons.
●
Raise All Views. Restores all Hierarchy, Connection, and Examine View windows.
●
window-name. Brings the named window to the top. Each window name specifies
the view and the port or instance on which it is based.
February 2001
Synopsys, Inc.
43
Chapter 1: VSB Overview
L
Visual SmartBrowser User’s Manual – UNIX version
Mouse and Keyboard Accelerators
Accelerators are shortcuts to frequently used actions. VSB defines accelerators for
several menu commands and other actions. The menu accelerator keys are documented
on the menus. Following are instructions for how to work the VSB accelerators using
the mouse and keyboard.
Left Mouse Button
●
●
In Hierarchy View:
❍
Click on an instance or port to make it the global selection.
❍
Double-click on a non-leaf instance to expand or collapse its branch.
❍
Double-click on a leaf or semiconductor vendor (SCV) instance to show the
instance in a new Examine View.
❍
Double-click on a port of a non-leaf instance to show the port in a new
Connection View.
❍
Double-click on a port of a leaf (SCV) instance to show the SCV instance in a
new Connection View.
In Connection View:
❍
Click on a net, port, or instance to make it the global selection.
❍
Double-click on a port to expand or collapse its net connections.
❍
Double-click on an SCV instance to show the instance in a new Examine View.
Right Mouse Button
●
In Hierarchy, Connection, or Examine view, click to display a context-sensitive
pop-up menu.
Space Bar
●
●
44
In Hierarchy View:
❍
Expands or collapses the selected non-leaf instance.
❍
Creates a new Examine View based on the selected leaf instance.
In Connection View:
❍
Expands or collapses the selected port.
❍
Creates a new Examine View based on the selected instance.
Synopsys, Inc.
February 2001
L
Visual SmartBrowser User’s Manual – UNIX version
●
Chapter 1: VSB Overview
In a dialog box:
❍
Activates the current selection. You can use the space bar and the arrow keys as
an alternative to the left mouse button.
Del, Delete
●
In Connection View, hides the selected circuit object. You can use this as an
alternative to the Hide Selected Circuit Object tool.
●
In the main window, activates the menu bar.
●
In Hierarchy or Connection view, displays the pop-up menu.
M
Arrow Key (right, left, up, down)
●
In a dialog box, moves the selection focus. You can use this in conjunction with the
space bar as an alternative to the left mouse button.
Customizing Visual SmartBrowser
Visual SmartBrowser (VSB) is set up to display views and dialog boxes at an ideal size.
Similarly, it uses fonts and colors to provide clarity and contrast. On some monitors,
however, a given color may be unsatisfactory or a font difficult to read.
You can change several aspects of VSB's appearance by creating a custom version of the
X resource file, Vsb, that is created when you install the program.
To customize VSB, follow these steps:
1. Make a copy of the X resource file, Vsb.
2. Create an environment variable, XAPPLRESDIR.
3. Set XAPPLRESDIR to the directory (typically $HOME/apps_defaults) containing
your copy of Vsb.
4. Change the settings in your copy of the Vsb file for any of the following features:
❍
Changing Default Window Sizes
❍
Changing the View Control Pane Display
❍
Changing Default Tool Bar Display
❍
Changing Default Tool Tips Display
February 2001
Synopsys, Inc.
45
L
Chapter 1: VSB Overview
Visual SmartBrowser User’s Manual – UNIX version
❍
Changing Default Circuit Object Tips Display
❍
Changing Delay Times for Tips
❍
Changing Default Status Pane Display
❍
Changing Power and Ground Labels
❍
Changing Fonts for Labels
❍
Changing Fonts for Graphics
❍
Changing Colors
❍
Changing Menu Accelerator Keys
Changing Default Window Sizes
To change the default window size, follow these steps:
1. In the directory referenced by the XAPPLRESDIR environment variable, open your
copy of the X resource file, Vsb.
2. Find the string !! Geometry, near the top of the file.
3. Change the default values for the height and width of the following windows:
❍
*VC_ApplicationShellGUI*geometry: 800 Main window width, in pixels.
❍
*VC_HierarchyShellGUI*geometry: 420x700 Hierarchy View width and
height, in pixels.
❍
*VC_ConnectionShellGUI*geometry: 700x700 Connection View width and
height, in pixels.
4. Save your changes to your copy of Vsb.
Changing the View Control Pane Display
To show or hide the view control pane, follow these steps:
1. In the directory referenced by the XAPPLRESDIR environment variable, open your
copy of the X resource file, Vsb.
2. Find the string *toolAnimation near the top of the file.
3. To hide the view control pane, change TRUE to FALSE. To show the view control
pane, change FALSE to TRUE.
4. Save your changes to your copy of Vsb.
46
Synopsys, Inc.
February 2001
L
Visual SmartBrowser User’s Manual – UNIX version
Chapter 1: VSB Overview
Changing Default Tool Bar Display
To change the default tool bar display, follow these steps:
1. In the directory referenced by the XAPPLRESDIR environment variable, open your
copy of the X resource file, Vsb.
2. Find the string *showToolbar near the top of the file.
3. To hide the tool bar by default, change TRUE to FALSE. To show the tool bar by
default, change FALSE to TRUE.
4. Save your changes to your copy of Vsb.
Changing Default Tool Tips Display
To change the default tool tips display, follow these steps:
1. In the directory referenced by the XAPPLRESDIR environment variable, open your
copy of the X resource file, Vsb.
2. Find the string *showToolTips near the top of the file.
3. To hide tool tips by default, change TRUE to FALSE. To show tool tips by default,
change FALSE to TRUE.
4. Save your changes to your copy of Vsb.
Changing Default Circuit Object Tips Display
To change the default circuit object tips display, follow these steps:
1. In the directory referenced by the XAPPLRESDIR environment variable, open your
copy of the X resource file, Vsb.
2. Find the string *showCircuitObjectTips near the top of the file.
3. To hide circuit object tips by default, change TRUE to FALSE. To show circuit
object tips by default, change FALSE to TRUE.
4. Save your changes to your copy of Vsb.
February 2001
Synopsys, Inc.
47
Chapter 1: VSB Overview
L
Visual SmartBrowser User’s Manual – UNIX version
Changing Delay Times for Tips
VSB normally displays tool tips after 1.5 seconds and circuit object tips after 0.75
seconds. In certain network configurations, client/server communications may take
longer than the normal delays, resulting in a flickering effect. You can lengthen the
delays to allow for this, or shorten them to get tips faster.
To change the delay times for tips, follow these steps:
1. In the directory referenced by the XAPPLRESDIR environment variable, open your
copy of the X resource file, Vsb.
2. Find the string “!! Delay Popup Time of Tips (ms)”.
3. Change the delay times for a longer or shorter delay:
*delayTimeToolTips: 1500
Delay time for tool tips, in milliseconds.
*delayTimeCircuitObjectTips: 750
Delay time for circuit object tips, in milliseconds.
4. Save your changes to your copy of Vsb.
Changing Default Status Pane Display
To change the default status pane display, follow these steps:
●
For Hierarchy View and Connection View:
a. In the directory referenced by the XAPPLRESDIR environment variable, open
your copy of the X resource file, Vsb.
b. Find the string *showStatusPane near the top of the file.
c. To hide each view's status pane by default, change TRUE to FALSE. To show
each view's status pane by default, change FALSE to TRUE.
d. Save your changes to your copy of Vsb.
●
For the main window:
a. In the directory referenced by the XAPPLRESDIR environment variable, open
your copy of the X resource file, Vsb.
b. Find the string *CTL_ApplicationShellGUI*showStatusPane near the top of the
file.
c. To hide the main window's status pane by default, change TRUE to FALSE. To
show the main window's status pane by default, change FALSE to TRUE.
d. Save your changes to your copy of Vsb.
48
Synopsys, Inc.
February 2001
L
Visual SmartBrowser User’s Manual – UNIX version
Chapter 1: VSB Overview
Example
VSB normally displays a status pane at the bottom of each view. You can set up a single
status area in the main window that shows the status for any active view.
1. In the directory referenced by the XAPPLRESDIR environment variable, open your
copy of the X resource file, Vsb.
2. Find the string *showStatusPane near the top of the file.
3. To hide each view's status pane by default, set *showStatusPane to FALSE. To
show the main window's status pane by default, set
“*CTL_ApplicationShellGUI*showStatusPane” to TRUE.
4. Save your changes to your copy of Vsb.
Changing Power and Ground Labels
To change the power port label, follow these steps:
1. In the directory referenced by the XAPPLRESDIR environment variable, open your
copy of the X resource file, Vsb.
2. Find the string *voltageLabel near the top of the file.
3. Change Vcc to the string you prefer.
4. Save your changes to your copy of Vsb.
To change the ground port label, follow these steps:
1. In the directory referenced by the XAPPLRESDIR environment variable, open your
copy of the X resource file, Vsb.
2. Find the string *groundLabel near the top of the file.
3. Change Gnd to the string you prefer.
4. Save your changes to your copy of Vsb.
Changing Fonts for Labels
To change the fonts used for labels, follow these steps:
1. In the directory referenced by the XAPPLRESDIR environment variable, open your
copy of the X resource file, Vsb.
2. Find the string !! Font Settings a few lines down from the top of the file.
February 2001
Synopsys, Inc.
49
Chapter 1: VSB Overview
L
Visual SmartBrowser User’s Manual – UNIX version
3. Change the fonts used in the following places:
*statusPaneFrame*FontList
The font used in the status pane.
*viewControlPaneFrame*buttonFont
The font used on the icons in the view control frame.
Typically, you would change only the font family (from courier to times, for
example), weight (such as medium or bold), style (o for oblique, r for roman), or
size (such as 12 or 14).
& Note
Use the xlsfonts command to display a list of fonts available on your system.
4. Save your changes to your copy of Vsb.
Changing Fonts for Graphics
To change the fonts used in graphics, follow these steps:
1. In the directory referenced by the XAPPLRESDIR environment variable, open your
copy of the X resource file, Vsb.
2. Find the string !! Graphics Pane Fonts.
3. Change the fonts used at the following zoom levels:
*graphicsPaneFrame*smallFont
The font used in Medium Zoom. This must be a fixed-width font about half the
size of the font specified for largeFont.
*graphicsPaneFrame*mediumFont
The font used in High Zoom. This must be a fixed-width font about halfway
between the sizes specified for smallFont and largeFont.
*graphicsPaneFrame*largeFont
The font used in Detail Zoom. This must be a fixed-width font about twice the
size of the font specified for smallFont.
Typically, you would change only the font weight (such as medium or bold) or size
(such as 10 or 18).
4. Save your changes to your copy of Vsb.
50
Synopsys, Inc.
February 2001
L
Visual SmartBrowser User’s Manual – UNIX version
Chapter 1: VSB Overview
Changing Colors
Typically you would change a color in VSB to accommodate the needs of a particular
user or to compensate for a troublesome monitor or lighting environment. If you must
change a color, change it everywhere it is used in VSB to get consistent benefit from the
change.
Note that it is possible to specify an object's color so that it is no longer easy (or even
possible) to distinguish it from the background. Keep track of your changes to the X
resources file, and never edit the original. Follow the instructions in “Customizing
Visual SmartBrowser” on page 45 to create a custom copy.
To replace a color, follow these steps:
1. In the directory referenced by the XAPPLRESDIR environment variable, open your
copy of the X resource file, Vsb.
2. Find the string !! Color Settings.
The first few lines under “Colors Used” define custom colors used in VSB. Custom
colors are specified as RGB (red, green, blue) values of two hexadecimal digits
each. The next several lines in this section define the standard colors available.
3. Starting with the line after the color definitions, use your editor's search-and-replace
function to replace all occurrences of the color you want to change with the color
you prefer to use.
For example, if cyan doesn't show up well on your monitor, you can set up VSB to
use the custom light blue instead. Starting with the line after the color definitions,
replace every occurrence of the string cyan with the string #adbdc6.
4. Save your changes to your copy of Vsb.
Changing Menu Accelerator Keys
To change the menu accelerator keys, follow these steps:
1. In the directory referenced by the XAPPLRESDIR environment variable, open your
copy of the X resource file, Vsb.
2. Find the string !! Menu Accelerators near the end of the file.
3. Change the menu accelerator keys for the following commands:
*menuOpenFileButton*acceleratorText
File menu, Open command (text on menu).
*menuOpenFileButton*accelerator
File menu, Open command (keystroke definition).
February 2001
Synopsys, Inc.
51
Chapter 1: VSB Overview
L
Visual SmartBrowser User’s Manual – UNIX version
*menuSaveFileButton*acceleratorText
File menu, Save command (text on menu).
*menuSaveFileButton*accelerator
File menu, Save command (keystroke definition).
*menuToolbarToggle*acceleratorText
Options menu, Show Toolbar command (text on menu).
*menuToolbarToggle*accelerator
Options menu, Show Toolbar command (keystroke definition).
*menuStatusPaneToggle*acceleratorText
Options menu, Show Status Pane command (text on menu).
*menuStatusPaneToggle*accelerator:
Options menu, Show Status Pane command (keystroke definition).
*popupToolbarToggle*acceleratorText
Pop-up menu, View Controls menu, Show Action Toolbar command (text on
menu).
*popupToolbarToggle*accelerator
Pop-up menu, View Controls menu, Show Action Toolbar command (keystroke
definition.)
*popupStatusPaneToggle*acceleratorText
Pop-up menu, View Controls menu, Show Status Pane command (text on
menu).
*popupStatusPaneToggle*accelerator
Pop-up menu, View Controls menu, Show Status Pane command (keystroke
definition.)
*popupRaiseApplicationButton*acceleratorText
Pop-up menu, Raise Application Shell Window command (text on menu).
*popupRaiseApplicationButton*accelerator
Pop-up menu, Raise Application Shell Window command (keystroke
definition.)
4. Save your changes to your copy of Vsb.
52
Synopsys, Inc.
February 2001
L
Visual SmartBrowser User’s Manual – UNIX version Chapter 2: Learning Visual SmartBrowser
2
Learning Visual SmartBrowser
Introduction
The Visual SmartBrowser (VSB) tool enables you to improve your productivity when
working with SmartCircuit models of FPGA and CPLD devices. This chapter presents a
brief tutorial that you can use as the basis for learning how to use the VSB. You can use
the tutorial to learn how to:
●
Work with a post-layout netlist (in the SmartCircuit .ccn format)
●
Examine the design in various graphical views
●
Define buses
●
Specify circuit objects to window and monitor during simulation
●
Create a model control file for simulation
Setting Up the Tutorial
You open a compiled design netlist (.ccn) file by starting VSB with the netlist file name
on the command line; VSB will not invoke without a file name. In this section, you will
use a file prepared specially for the tutorial. The file is located at:
$LMC_HOME/lib/data/vsb_tutorial.ccn
1. To begin the tutorial, open the sample netlist included in your SmartModel Library
installation using this command:
%
vsb $LMC_HOME/lib/data/vsb_tutorial.ccn
If you already have the VSB running and your current design is not
vsb_tutorial.cnn, re-invoke the VSB using the previous command.
February 2001
Synopsys, Inc.
53
L
Chapter 2: Learning Visual SmartBrowser Visual SmartBrowser User’s Manual – UNIX version
After VSB reads the tutorial design netlist, it briefly shows the number of instances
in the design and then creates a VSB Main Window that looks like this:
& Note
Some illustrations of the windows in this tutorial have been slightly altered
in order to make them less awkward on the page. If a window in your VSB
session comes up slightly different than what you see in an illustration, don’t
worry; the graphic has probably been adjusted.
Before you actually get started with the tutorial, here are some suggestions for arranging
your screen so you have more room to work:
1. Move the main window to the upper right corner of your screen.
2. If you are using this tutorial online in PDF format, move the tutorial window to the
lower right corner, and make it as tall as possible without covering the main
window.
3. Press the page button in the Acrobat Reader to turn off the bookmarks and
maximize your reading space.
4. Make the tutorial window about a third to a fourth of the overall screen width,
depending on the size of your monitor.
You can always adjust the windows to your liking later.
Using the VSB
The main window is not only an entry point into your design when you invoke VSB, but
it provides you a means to display different windows that have specialized purposes. In
essence, the main window acts as a central control while you work in a VSB session.
When using the VSB, you will be able to use the main window to navigate back and
forth between these various windows.
Before bringing up any of these other windows, let’s look at the different functions
within the main window itself. First, you should know that the initial way in which the
VSB brings up the main window does not display all its functions. The main window is
capable of displaying the following information:
54
Synopsys, Inc.
February 2001
L
Visual SmartBrowser User’s Manual – UNIX version Chapter 2: Learning Visual SmartBrowser
●
Menu bar—displays by default
●
Buttons to open the various views and tools—display by default, although some are
greyed out by default until an appropriate time
●
View control pane with icons for all open views—displays icons only when a
specialized window is open
●
Status pane—displays only if you choose the Options > View Status Pane
pulldown menu item
Here is how the main window can look when you open different specialized windows
and display the Status Pane:
Connection View
Windows & Monitors Tool
Button
Button
Menu Bar
Global Selection Tool
Button
Hierarchy View
Button
Icons in View Control Pane
Net Tags Tool
Button
Examine View
Button
View Control Pane
Status Pane
Now that you are familiar with the different areas in the main window, let’s open a
Hierarchy View, which is a common first step when using VSB.
1. Click on the Create Hierarchy View button.
VSB displays the design in a new Hierarchy View.
February 2001
Synopsys, Inc.
55
L
Chapter 2: Learning Visual SmartBrowser Visual SmartBrowser User’s Manual – UNIX version
2. Drag the right boundary of the Hierarchy View out so you can see the entire
“instruction_register” instance.
Hierarchy Pane
Tool Bar
Design Instance
This is the “root” instance or “design” instance. It
represents the design described by the netlist, and in
VSB it is treated as a device. The instance is red,
because it is selected. Only one circuit object can be
selected at a time, so it’s called the global selection.
3.To deselect the instance, click on it (or on any
unoccupied space in the upper pane of the
Hierarchy View). Try it now. The instance isn’t red
any more, because it’s not selected. But something
else changed, too; the items in the port pane
disappeared.
4.Click on the instance now to select it.
When an instance is selected, the lower pane of the
Hierarchy View lists its ports. You can see each
port’s direction (I, O, or I/O, as defined in the
netlist), its name, and—for the design instance—the
corresponding symbol pin name in parentheses. For
example, CLOCK_IR is an input/output port that
corresponds to pin DP055 on the device symbol.
5.Click on the CLOCK_IR port now—the graphic
symbol, not the text.
It turns red, because it’s selected. But it’s part of the
instruction_register instance, so the instance is still
selected, too.
Status Pane
Port Pane
6.Click now on any unoccupied space in the lower
(port) pane to deselect the port.
Notice that the instance is still selected.
7. Click now on any unoccupied space in the upper (hierarchy) pane to deselect the
instance.
The instance is labeled with its cell type, its name, and the number of instances—
hierarchical blocks and semiconductor vendor (SCV) instances—at the next level
down.
8. Double-click on the instance now to expand the hierarchy beneath it.
The instance isn’t red, because it's still not selected. Double-clicking does not select
a circuit object.
56
Synopsys, Inc.
February 2001
L
Visual SmartBrowser User’s Manual – UNIX version Chapter 2: Learning Visual SmartBrowser
9. Drag the view divider down so more of the
hierarchy is visible.
View
Divider
10. Double-click on the instruction_cell instance
I$12 to expand it.
11. Scroll the Hierarchy View down and to the
right to see the expanded hierarchy.
Two visual clues distinguish an SCV instance
from a hierarchical instance: 1) the SCV
instance is outlined in black, and 2) its label
shows that it contains 0 instances. The
instruction_cell instance named I$12 contains four SCV instances.
12. Double-click on the DFPC named I$12.
When you double-click on an SCV instance, VSB displays it in a new Examine
View.
Graphical
Pane
State Form
Button
Timing Form
Button
You can resize or move the Examine View window if it covers the tutorial.
This instance includes timing information.
February 2001
Synopsys, Inc.
57
L
Chapter 2: Learning Visual SmartBrowser Visual SmartBrowser User’s Manual – UNIX version
13. Click on the Timing Form down-arrow button near the bottom of the Examine View.
Timing
Parameters
14. In the upper (graphical) pane of the Examine View, click on the text label for each
input port (D, CLK, CLR, and PRE).
The timing parameters associated with each port are highlighted in the Timing list
as you select the port in the graphical pane.
15. Click on the TS_D_CLKNL0 timing parameter at the top of the Timing list.
VSB displays information about the parameter to the right of the list.
As shown, TS_D_CLKNL0 is the setup time on D before CLK. In the .ccn file, the
min, typ, and max values for this instance are 1300, 3600, and 5200 ps, respectively
(as specified in the netlist). The current values show that the instance has not been
modified since the .ccn file was opened.
You can display these values in different units (ns, us, or ms), and you can change
the values.
16. Change the minimum value from 1300 ps to 1.35 ns.
Note that your changes affect only this VSB session, unless you save the modified
netlist (.ccn) file. Even then, the changes do not affect the original design, just the
netlist.
58
Synopsys, Inc.
February 2001
L
Visual SmartBrowser User’s Manual – UNIX version Chapter 2: Learning Visual SmartBrowser
As soon as you begin typing in the min entry box, the Accept Modification button
becomes available. This button changes the value for this instance.
For this exercise, we’ll leave the values unchanged. (So do not click on the Accept
Modification button.)
As you can see, the graphical pane above the Timing Form shows the association
between ports D and CLK.
17. Click on some of the other parameters in the Timing list.
When you select a parameter in the Timing list, VSB shows you the associated
ports, as specified in the compiled netlist. Note that some manufacturers define port
delays in which timing information is associated with only one pin.
This instance also includes state information.
18. Click on the State Form down-arrow button.
Any state parameters for the instance are listed on the State Form.
State
parameter
19. Click on the STATE parameter in the list.
As shown, this is the internal state of a DFPC instance. Its default value is “u,” but
you can change the initial value for this instance. Valid bit values include: 0, 1,
x (unknown), u (uninitialized), z (high-impedance), and - (unspecified).
February 2001
Synopsys, Inc.
59
L
Chapter 2: Learning Visual SmartBrowser Visual SmartBrowser User’s Manual – UNIX version
For a complex multiple-bit state value, as with a RAM device, you can find a
specific bit by dragging the Bit Position slider from right to left or clicking on the
arrow buttons beside the slider. VSB shows the current bit position above the slider.
20. Enter a new value in the Current Value field.
As soon as you begin typing, the Accept Modification button becomes available.
Remember, we’ll leave the values unchanged for this exercise.
21. When you’re ready, click on the Close button in the Examine View.
Identifying Hierarchical and SCV Instances
There’s another difference between hierarchical instances and SCV instances.
1. In the Hierarchy View, click on the instruction_cell instance named I$12.
If the Hierarchy View is concealed somewhere, you can use the “TOP” icon in the
View Control Pane of the main window to pop it forward.
2. In the port pane, double-click on port
CLOCK_IR.
VSB creates a new Connection View based on
port CLOCK_IR. From there you can explore
the receivers connected to the port.
3. In the Connection View, click the right mouse
button to display the popup menu.
4. Choose the Raise Application Shell Window
command to bring the main window to the
top.
5. In the View Control pane of the main window,
click on the icon labeled TOP.
6. Click on the DFPC SCV instance named I$12.
7. In the port pane of the TOP Hierarchy View,
double-click on port D.
Because D is a port on an SCV instance,
there’s no underlying hierarchy; so the new Connection View is based on the
instance rather than the port.
8. Now explore the receivers connected to the DFPC instance I$12:
a. For this exercise, deselect the DFPC instance in the top Hierarchy View.
b. In the Connection View, double-click on the Q port button to expand it.
60
Synopsys, Inc.
February 2001
L
Visual SmartBrowser User’s Manual – UNIX version Chapter 2: Learning Visual SmartBrowser
VSB shows another DFPC instance
(I$6) and an MX2 instance (I$4). The
net connection is shown in cyan,
because it’s the most recently
expanded.
9.Double-click on the same port (Q on
I$12) to collapse it.
The fan-out connection is hidden,
but the instances remain.
10.Click on the net connection between
I$6 and I$4. It turns red, because
it’s selected.
11.Click on the Hide Selected Circuit
Object tool.
12.Click on the Hide Unconnected
Circuit Objects tool.
That’s a fast way to undo a wide fan-in or fan-out; but we need to see those
components to go on with the tutorial.
13. Double-click on the Q port again to expand it.
The net connection is red, because it’s still selected. Hiding a net or instance does
not deselect it.
14. Expand the Q port on I$6.
15. Expand the PAD port on the OUTBUF_0 instance named U0.
The Connection View pans to the
right to show the last connection.
You have traced the net
connections all the way to I/O port
INST_BIT1, which corresponds to
symbol pin DP046 on the design
instance.
Change Zoom Tool
February 2001
Synopsys, Inc.
61
L
Chapter 2: Learning Visual SmartBrowser Visual SmartBrowser User’s Manual – UNIX version
16. To see the whole connection path at once, click on the Change Zoom tool and
choose High Zoom to zoom out from Detail Zoom to High Zoom.
Lock Zoom Pane
Detail
High
Medium
Low
Determining the Scope of an Instance
Remember that the last expanded net is shown in cyan unless it is also the current global
selection. That makes connections easier to follow as you expand ports across the
design.
Last
Expanded
Net
1. Reset the zoom level to Detail Zoom.
2. On the I$12 instance, expand the D port to show its drivers.
The Connection View pans to the left to bring the driver instance into view.
The new MX2 instance is named I$4, the same as another MX2 instance in this
Connection View.
3. Select the I$4 instance you just revealed.
In the status pane at the bottom of the Connection View, the scope of this instance is
shown as /I$12/.
62
Synopsys, Inc.
February 2001
L
Visual SmartBrowser User’s Manual – UNIX version Chapter 2: Learning Visual SmartBrowser
4. Select the other I$4 instance, to the right of I$12.
The status pane shows its scope as /I$13/. It is part of a different hierarchical block.
Ground
Port
Scope
Status
In Detail Zoom, you can also display the scope of each instance:
5. In the Connection View, click the right mouse button.
6. From the pop-up menu, choose the Show Scope Paths command.
As you can see, some of the ports are green, indicating connection to ground. Ports
connected to power are violet. These colors appear only after the port or instance
has been explored in Connection View, Hierarchy View, or Examine View.
Power and ground nets are not shown, even though the ports behave like other ports
on the instances. Unconnected ports, such as Y1 and Y2 on the OUTBUF_0
instance named U0, behave similarly.
Creating a Sparse Hierarchy
Once the Connection View contains all the instances you are interested in, you can
create a Hierarchy View that contains only those instances. This can help you see the
hierarchical nature of a portion of the design without the clutter of unrelated instances.
1. Click on the Create Sparse Hierarchy View tool.
February 2001
Synopsys, Inc.
63
L
Chapter 2: Learning Visual SmartBrowser Visual SmartBrowser User’s Manual – UNIX version
If you zoom out, you can see
that the new sparse Hierarchy
View shows the same five
SCV instances as the
Connection View. As you
select the various SCV
instances, they are selected in
the Connection View, too.
Remember, selection is
global.
SCV
Instances
2. In the Hierarchy View you
just created, click on the Close
View tool.
3. Click on open space in the
I$12 Connection View, so no
circuit object is selected.
Using Global Selection
So far, you’ve worked with Hierarchy View, Connection View, and Examine View.
There are also three dialogs, or tools, in VSB.
1. Bring the main window to the top.
2. Click on the Show Global Selection Tool button.
In the Global Selection tool, you can move up and down the design hierarchy to find
a specific port, net, or instance by name.
3. From the Object Type pull-down list, choose Instances.
4. Click on the Browse Given Scope button.
The list below the button shows all the instances in the current scope (as shown in
the Scope field, near the top of the Global Selection tool).
5. Scroll down the list and double-click on I$12 to move down that hierarchical
branch.
The Scope field shows /I$12/, and the list shows instances in that hierarchical block.
64
Synopsys, Inc.
February 2001
L
Visual SmartBrowser User’s Manual – UNIX version Chapter 2: Learning Visual SmartBrowser
Shows there are no
instances below;
indicates a leaf
6.In the list, double-click on I$12.
Scope with
I$12/I$12 instance
I$12/ is added to the scope, but it’s an
SCV instance, so the list doesn’t
show any instances. Instead, the list
shows double dots (..), representing
the parent hierarchical block.
7.Double-click on the double dots to
move back up the hierarchy a level.
8.In the list, click on I$4.
9.Click on the Select Global button next
to the Object Type pull-down list.
10.Click on the Close button.
SCV instance /I$12/I$4 is selected in
the connection view labeled I$12
Connection View.
& Note
Once you’ve set the scope in the Global Selection tool, you can change the
Object Type and select a port or net just as easily, but we’ll stick with
instances for this exercise.
You may have noticed the text boxes that pop up when the pointer rests for a moment
over a net; these are called circuit object tips.
Circuit Object Tip
February 2001
Synopsys, Inc.
65
L
Chapter 2: Learning Visual SmartBrowser Visual SmartBrowser User’s Manual – UNIX version
Working with Circuit Object Tips
Circuit object tips provide information, not displayed at the current zoom level, about
nets and instances in the active view.
1. From the view control pane of the main window, bring the CLOCK_IR Connection
View to the top.
2. Expand the CLOCK_IR port.
3. Expand the Q port on each of the three DFPC instances in the column you just
exposed.
4. In the next column, expand the top output port (Q, Y, or PAD) on all six instances.
5. Set the zoom level to High.
6. Make the Connection View large enough that you can see all the connection paths.
Now check some of the net connections by resetting the pointer briefly over the output
net connection from each of the six output ports you just expanded.
Rest pointer on
each of
these net
connections
66
Synopsys, Inc.
February 2001
L
Visual SmartBrowser User’s Manual – UNIX version Chapter 2: Learning Visual SmartBrowser
Three of the nets from those six output ports are named N$7. But the circuit object tips
include the scope of the net (if it differs from the scope of the active view), so you can
see that the nets are distinct.
This is especially useful at zoom levels where scope paths are not visible.
As mentioned earlier, the most recently expanded net connection is shown in cyan.
When you select a circuit object, it’s shown in red. These visual aids are transient; they
change each time you expand a port or select a different circuit object.
Visually Identifying Nets with Net Tags
In a complex display like the one you’ve created in the active Connection View, it can
be helpful to assign different colors to specific nets.
1. Bring the main window to the top, and click on the Show Net Tags Tool
button.
2. Arrange the Net Tags tool and the Connection View from CLOCK_IR so you can
see them both completely; if necessary, you can resize the Net Tags tool.
3. In the Net Tags tool, click on the button labeled Tag Net white.
The pointer changes to a pointing hand.
As long as the pointer is a hand, every net you select is tagged with the current color
choice, but you do not change the global selection.
4. In the Connection View from CLOCK_IR, use circuit object tips to find the
/I$12/N$7 net. (That's the output from one of the MX2 instances in the third
column from the left.)
5. Click on the /I$12/N$7 net to select it.
The net turns white.
6. In the Net Tags tool, click on Tag Net yellow.
7. In the Connection View from CLOCK_IR, find the /I$13/N$7 net, and select it.
(It’s the net from the other MX2 instance in the same column.)
Note that, if you tag a net that is selected, you will not see the tag color until you
change the global selection or deselect the net. Remember, the global selection is
always shown in red.
February 2001
Synopsys, Inc.
67
L
Chapter 2: Learning Visual SmartBrowser Visual SmartBrowser User’s Manual – UNIX version
Tag one more nets:
8. In the Net Tags tool, click on Tag Net green.
9. In the Connection View, select the N$7 net.
10. In the Net Tags tool, click on Tag Net green again.
The standard pointer returns.
As you can see, the net connections are much easier to follow now that they are
tagged. To learn a bit more about the Net Tags tool, continue with these steps:
11. Click on the Tag Net blue button.
12. In the Connection View, select four or five of the other net connections.
You can see the nets added to the “blue” list as you select them in the Connection
View.
Now clear some nets from the list:
13. In the Net Tags tool, select a couple of nets from the list under Tag Net blue.
14. Make sure the nets in the other three lists are not selected.
15. Click on the Clear Selected Net Tags button.
As you can see in the Connection View, the nets are no longer tagged.
You can also clear an entire list at once. In the Net Tags tool, click on the Clear List
button under the list of nets tagged blue.
As with the Global Selection tool, you can change the global selection from within
the Net Tags tool:
68
Synopsys, Inc.
February 2001
L
Visual SmartBrowser User’s Manual – UNIX version Chapter 2: Learning Visual SmartBrowser
16. Select the net from the list under Tag Net white.
17. Click on the Select Global button.
As you can see in the active Connection View, the white net is selected. (That’s why it’s
shown in red, for now.)
Net in new
global selection
As long as the pointer is a hand, this is the only way you can change the global selection.
You stop tagging, and get back the standard pointer by clicking again on the active Tag
Net button (so that no button is pushed in) or by closing the Net Tags tool. In the Net
Tags tool, click on the Close button.
Defining Windows and Monitors
There’s one more tool to learn about. With VSB, you can define windows and monitors
on nets, states, and buses and save them in a model control file for use during
simulation.
February 2001
Synopsys, Inc.
69
L
Chapter 2: Learning Visual SmartBrowser Visual SmartBrowser User’s Manual – UNIX version
1. Bring the main window to the top, and click on the Show Windows & Monitors
Tool button.
2. From the pull-down list at the top of the Windows & Monitors tool, choose Bus
Monitors.
3. In the Add Bus field, type N7_Bus, and press the Enter key (or Return).
4. In the list above the Add Bus field, select the bus you just created.
Bus Elements Button
5.Click on the Bus Elements button.
6.Click on the Object Adder down-arrow
button at the bottom of the Windows &
Monitors tool.
7.In the Object Type Filter area, click on the
Net Monitor button.
8.Click on the Auto Add button at the bottom
of the Windows & Monitors tool.
The pointer changes to a square. As long
as the pointer is a square, any net that you
select globally is added to the N7_Bus net.
(Use the center of the square pointer to
select circuit objects.)
9.Bring the Connection View from
CLOCK_IR to the top.
10.Click on each of the three tagged nets.
As you select each net, its name is added to
the list of bus elements. You can sort the
bus elements in the list. Try it now.
11.Select the element in the middle of the list.
12.Click on the up and down arrows (near the
Bus Elements button) to change the
element’s position in the list.
Square Pointer
70
You can use the Select Global button to the
right of the list to set the global selection to
an element in the list. Remember,
selection is global; only one circuit object
can be selected at a time.
Synopsys, Inc.
February 2001
L
Visual SmartBrowser User’s Manual – UNIX version Chapter 2: Learning Visual SmartBrowser
13. Try it now.
The Clear Selection button removes any selected elements from the list, and the
Clear List button removes all elements from the list.
14. When you’re ready, click on the Bus Elements button again.
You can also window or monitor the states of instances that include state
information.
15. In the Object Type Filter area, click on the State Window button. For this exercise,
make sure only the State Window and Net Monitor buttons are pushed in (red) in the
Object Type Filter area.
16. In the Connection View from CLOCK_IR, select each of the six DFPC instances
using the square pointer.
17. From the pull-down list in the Windows & Monitors tool, select State Windows.
State information for the six DFPC instances was added to the list as you selected
them, even though the State Windows list wasn’t displayed at the time.
& Note
If you had selected an instance without state information, nothing would
have been added to the State Windows list for that instance.
February 2001
Synopsys, Inc.
71
L
Chapter 2: Learning Visual SmartBrowser Visual SmartBrowser User’s Manual – UNIX version
18. Now check the Net Monitors list. From
the pull-down list, select Net Monitors.
All nets connected
to the DFPC port
instances
The list contains every net (except
power and ground) connected to every
port on each of the six DFPC instances
you selected.
In this exercise, you added items to two lists
at once, even though neither of the lists was
visible at the time. This is a powerful
shortcut, and it is important to understand
how to use it:
While the pointer is a square, you add
items to each list that corresponds to a
“pushed in” button in the Object Type
Filter area.
Saving Model Control Files
(MCFs)
When you’re ready, you can save the
window and monitor information to a model
control file for use during simulation.
1. Click on the Save To File button.
2. Set the Selection field to the name and
path where you want to save the model
control file, using the filter and lists as needed.
3. For this tutorial, just click on the Cancel button; there is no real information to save.
Just so you can see a model control file, however, this is how one might look:
#########################################
#####
Model Command File (MCF):
#####
#########################################
# Load netlist design file (.ccn):
# --------------------------------load /user/jdoe/hp700/lib/data/vsb_tutorial.ccn
72
Synopsys, Inc.
February 2001
L
Visual SmartBrowser User’s Manual – UNIX version Chapter 2: Learning Visual SmartBrowser
# Net Monitors List:
# -----------------bus _I$11_N$9 /I$11/N$9
monitor _I$11_N$9
bus _I$11_N$7 /I$11/N$7
monitor _I$11_N$7
bus _I$13_N$9 /I$13/N$9
monitor _I$13_N$9
bus _I$13_N$7 /I$13/N$7
monitor _I$13_N$7
bus _I$12_N$9 /I$12/N$9
monitor _I$12_N$9
bus _I$12_N$7 /I$12/N$7
monitor _I$12_N$7
bus _N$9 /N$9
monitor _N$9
bus _N$7 /N$7
monitor _N$7
bus _N$5 /N$5
monitor _N$5
bus _N$3 /N$3
monitor _N$3
bus _N$22 /N$22
monitor _N$22
bus _N$21 /N$21
monitor _N$21
bus _N$2 /N$2
monitor _N$2
bus _N$14 /N$14
monitor _N$14
bus _N$1 /N$1
monitor _N$1
February 2001
Synopsys, Inc.
73
L
Chapter 2: Learning Visual SmartBrowser Visual SmartBrowser User’s Manual – UNIX version
# State Windows List:
# ------------------bus _I$11_I$6_STATE /I$11/I$6/STATE
window _I$11_I$6_STATE
bus _I$11_I$12_STATE /I$11/I$12/STATE
window _I$11_I$12_STATE
bus _I$13_I$6_STATE /I$13/I$6/STATE
window _I$13_I$6_STATE
bus _I$13_I$12_STATE /I$13/I$12/STATE
window _I$13_I$12_STATE
bus _I$12_I$6_STATE /I$12/I$6/STATE
window _I$12_I$6_STATE
bus _I$12_I$12_STATE /I$12/I$12/STATE
window _I$12_I$12_STATE
# Bus Monitors List
:
# -------------------bus N7_Bus /I$13/N$7 /N$7 /I$12/N$7
monitor N7_Bus
Before you continue, turn off the Auto Add function by clicking on the Auto Add button
in the Windows & Monitors tool. The standard pointer returns.
In the Windows & Monitors tool, you can also create aliases and define substitutes for
characters your simulator does not accept. Refer to “Specifying Illegal Characters” on
page 37 for more information.
Changing Window Views
By now, you probably have a lot of open views and tools all over the screen, but that is
easy to fix.
1. Raise the main window.
2. From the Windows menu, choose the Iconify All Views command.
All open views are reduced to icons—the main window remains.
& Note
The Iconify All Windows command reduces the main window, too; and it
closes the Global Selection, Net Tags, and Windows & Monitors tools.
74
Synopsys, Inc.
February 2001
L
Visual SmartBrowser User’s Manual – UNIX version Chapter 2: Learning Visual SmartBrowser
This concludes your introduction to Visual SmartBrowser; close the VSB main window
without saving anything. You will discover more features as you use VSB to speed the
design and debug process. If you are using this tutorial online, click on the Close button
above to close the tutorial.
February 2001
Synopsys, Inc.
75
L
Chapter 2: Learning Visual SmartBrowser Visual SmartBrowser User’s Manual – UNIX version
76
Synopsys, Inc.
February 2001
Visual SmartBrowser User’s Manual – UNIX version
Index
Index
mouse, in Hierarchy view 44
Show Global Selection 64
Show Net Tags 67
Show Windows & Monitors 70
tool 15
view 15
zoom control, in tutorial 62
A
Accelerators
arrow key 45
delete 45
keyboard 44
left mouse button 44
M 45
menu keys, changing 51
mouse 44
right mouse button 44
space bar 44
Aliases
creating 34
editing 34
removing 34
C
B
Blocks
hierarchical, collapsing 20
hierarchical, expanding 19
Buses
creating 35
definitions, deleting 37
editing 35
elements, adding to 36
elements, displaying 35
elements, removing 36
elements, reordering 36
monitors 32
names, defining 35
renaming 37
windows 32
Buttons
Close View 64
Create Hierarchy View, in tutorial 55
Create Sparse Hierarchy 63
Hide Selected Circuit Object 61
Hide Unconnected Circuit Objects 61
in Main window 13
mouse, in Connection view 44
February 2001
Cause reports
from a simulation run 39
Characters
illegal substitutions, disabling 37
illegal, defining 37
illegal, specifying 34, 37
matching 30
Circuit object tips
default, changing display 47
toggling 14
Circuit objects
selected, hiding 25, 26
unconnected, hiding 25, 26
viewing 14
Circuits
object, selecting 42
Colors
changing 51
Commands
menu 42
vsb 13
Connection 26
Connection view 12, 15, 17, 23
closing, from tool bar 26
instance, showing in 24
pop-up menu 24
showing port drivers 23
showing receivers 23
tool bar 26
Connections
collapse port, from pop-up menu 25
Synopsys, Inc.
77
Index
Visual SmartBrowser User’s Manual – UNIX version
expand port, from pop-up menu 25
expanded port, hiding 23
exploring from a port 20
net, hiding 24
Control file
model, creating 15
Controls
view, from pop-up menu 21, 28
CPLD devices 11
Customization
of Visual SmartBrowser 45
bus, adding to a 36
bus, displaying 35
bus, removing 36
bus, reordering in a 36
Examine view 12, 15, 27
pop-up menu 28
Expressions
regular 30
F
D
Definitions
bus, deleting 37
Delay times
for tips, changing 48
Designs
opening 13
Detail zoom
in connection view 17
in hierarchy view 17
Details
instance, displaying 20
Devices
CPLD 11
FPGA 11
Displays
change from popup menu 24
circuit object tips, changing default 47
Status pane, changing default 48
tool bar, changing default 47
tool tips display, changing 47
view control pane 46
Divider
view, in tutorial 57
Drivers
port, showing in Connection view 23
E
Effect reports
from a simulation run 40
Elements
78
Fan-in
undoing 24
Fan-out
undoing 24
File menu 42
Files
model control, creating 15, 34
Fonts
changing for labels 49
Forms
State 28
Timing 27
FPGA devices 11
G
Global selection tool 15, 28
Graphical pane 27
Graphical user interface
SmartBrowser 11
Ground labels
changing 49
H
Hierarchy
blocks, collapsing 20
blocks, expanding 19
collapse tree, from pop-up menu 21
expand tree, from pop-up menu 21
traversing 29
Hierarchy view 12, 15, 17, 19
closing, from tool bar 22
pop-up menu 21
Synopsys, Inc.
February 2001
Visual SmartBrowser User’s Manual – UNIX version
sparse, creating 24, 25, 26
tool bar 22
High zoom
in connection view 18
in hierarchy view 17
Hold violations
visualizing 38
I
Illegal characters
defining 37
specifying 34, 37
substitutions, disabling 37
Instances
details, displaying 20
displaying 14
showing in connection view 24
timing, editing 41
timing, viewing 41
top-level, displaying 20
Interfaces
graphical user, SmartBrowser 11
K
Keyboard
shortcuts 44
Keys
menu accelerator, changing 51
M
Main window 13
elements 13
Medium zoom
in connection view 18
in hierarchy view 17
Menu bar
in Main window 13
Menus
accelerator keys, changing 51
commands 42
File 42
Options 42
pop-up menu, connection view 24
pop-up menu, examine view 28
pop-up menu, hierarchy view 21
Tools 43
View 43
Windows 43
Model control file
creating 15, 34
Models
SmartCircuit 11
Monitors
bus 32
net 32, 33
state 32, 33
Mouse
shortcuts 44
L
Labels
changing fonts for 49
ground, changing 49
power, changing 49
Levels
zoom 17
zoom, setting 18
Low zoom
in connection view 18
in hierarchy view 17
February 2001
Index
N
Names
bus, defining 35
Net Tags tool 16
Nets
connections, hiding individual 24
monitoring 33
monitors 32
multiple, specifying 33
removing tags 32
tagging 31
tagging tool 31
windowing 33
windows 32
Synopsys, Inc.
79
Index
Visual SmartBrowser User’s Manual – UNIX version
O
Objects
browsing for 29
circuit, selecting 42
circuit, viewing 14
selected circuit, hiding 25, 26
unconnected circuit, hiding 25, 26
Options menu 42
P
Panes
graphical 27
status 13, 16
Status, changing default 48
status, toggling 14
status, toggling display 16
view control 13, 16
view control display, changing 46
zoom, keeping in view 19
Paths
scope, showing 25
Ports
connections, hiding expanded 23
drivers, showing in Connection view 23
exploring connections from 20
Power labels
changing 49
R
Receivers
showing in Connection view 23
Reports
cause 39
effect 40
S
Scope path
showing 25
Selection
adding, from pop-up menu 25
collapsing, from tool bar 22, 26
expanding, from tool bar 22, 26
80
finding, from pop-up menu 21, 25
finding, from tool bar 22, 26
global, tool 28
Setup violations
visualizing 38
Shortcuts
keyboard 44
mouse 44
see also accelerators 44
Show Windows & Monitors tool 16
Simulations
cause reports, visualizing 39
effect reports, visualizing 40
SmartBrowser
customizing 45
SmartCircuit models
in VSB 11
Space bar
in Connection view 44
in dialog box 45
in Hierarchy view 44
Sparse hierarchy view
creating 14
State form 28
States
initial, editing 41
monitoring 33
monitors 32
multiple, specifying 34
windowing 33
windows 32
Status pane 13, 16
default display, changing 48
toggling 14
toggling display 16
Strings
matching 31
Substitutions
illegal characters, disabling 37
T
Tags
net 31
removing from nets 32
Synopsys, Inc.
February 2001
Visual SmartBrowser User’s Manual – UNIX version
Timing
instance, editing 41
instance, viewing 41
Timing form 27
Tips
circuit object, toggling 14
delay times for, changing 48
tool, toggling 14
To 49
Tool bar
display, changing default 47
Tool bars
connection view 26
hierarchy view 22
Tool tips
default display, changing 47
toggling 14
Tools 19
buttons 15
Change Zoom, in tutorial 62
Close View 64
Create Sparse Hierarchy View 63
Global Selection 15, 28
Hide Selected Circuit Object, in tutorial
61
Hide Unconnected Circuit Objects, in
tutorial 61
Net Tags 16, 31
Show Global Selection 64
Show Net Tags 67
Show Windows & Monitors 16, 70
vsb 13
Windows & Monitors 32
Windows & Monitors view 12
Tools menu 43
V
Values
initial state, editing 41
initial state, viewing 41
instance timing, editing 41
instance timing, viewing 41
View control pane 13, 16
View menu 43
February 2001
Index
Views 19
bringing to foreground 14
buttons 15
Connection 12, 15, 17, 23
Connection, pop-up menu 24
Connection, tool bar 26
controls, from pop-up menu 21, 28
divider, in tutorial 57
Examine 12, 15, 27
Examine, pop-up menu 28
Hierarchy 12, 15, 17, 19
Hierarchy, pop-up menu 21
Hierarchy, tool bar 22
iconifying 14
multiple 12
raising 14
sparse hierarchy, creating 14, 24, 25, 26
Windows & Monitors 12
zoom pane, keeping in 19
Violations
hold, visualizing 38
setup, visualizing 38
Visual SmartBrowser (VSB)
customization 45
graphical user interface 11
VSB
customization 45
vsb command 13
W
Windows
bus 32
default, changing size 46
main 13
net 32, 33
shell, from pop-up menu 21, 24, 28
state 32, 33
Windows & Monitors
tool 32
view 12
Windows menu 43
Z
Zoom
Synopsys, Inc.
81
Index
Visual SmartBrowser User’s Manual – UNIX version
change, from tool bar 22, 26
levels, from pop-up menu 21, 24
Zoom level 17
setting 18
Zoom pane
keeping in view 19
Zooms
Change Zoom tool, in tutorial 62
detail, in connection view 17
detail, in hierarchy view 17
high, in connection view 18
high, in hierarchy view 17
low, in connection view 18
low, in hierarchy view 17
medium, in connection view 18
medium, in hierarchy view 17
82
Synopsys, Inc.
February 2001