1
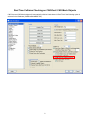
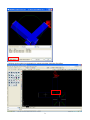
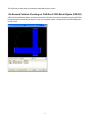
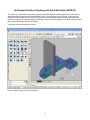
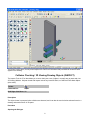
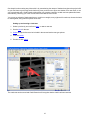
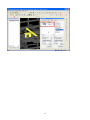
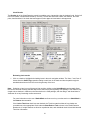
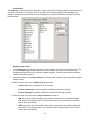
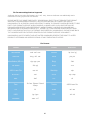
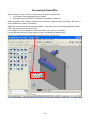
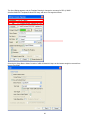
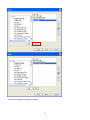
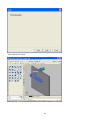
Collision Checking
Real Time Collision Checking on CAD-Duct/ CAD-Mech Objects ............................................................................ 2
On Demand Collision Checking on CAD-Duct/ CAD-Mech Objects (CHECK) ......................................................... 4
On Demand Collision Checking with AutoCAD Solids (DETECT) ............................................................................ 5
Collision Checking / 3D Viewing Drawing Objects (INSPECT) ................................................................................. 6
Collision Checking / 3D Viewing XRef Drawing Objects (INSPECT2) ...................................................................... 8
Navisworks Collision Checking.................................................................................................................................. 9
JetStream Clash Detective .................................................................................................................................... 9
Overview of Clash Detective.................................................................................................................................. 9
Setting up and running a clash test...................................................................................................................... 10
Clash Batches ...................................................................................................................................................... 12
Managing batches of clash tests.......................................................................................................................... 12
Merging clash tests from multiple files ................................................................................................................. 13
Importing clash tests ............................................................................................................................................ 13
Exporting clash tests ............................................................................................................................................ 13
Creating custom clash tests................................................................................................................................. 14
Clash Rules.......................................................................................................................................................... 15
Setting clash rules................................................................................................................................................ 15
Adding custom clash rules ................................................................................................................................... 16
Editing clash rules ................................................................................................................................................ 18
Deleting clash rules.............................................................................................................................................. 18
Selecting Items for Clash Testing ........................................................................................................................ 18
Selecting items for a clash test ............................................................................................................................ 19
Setting the clash test type and tolerance options ................................................................................................ 19
Time-based Clashing ........................................................................................................................................... 20
Running the clash test ......................................................................................................................................... 20
Clash Results ....................................................................................................................................................... 21
Reviewing clash results ....................................................................................................................................... 21
Clash Reports ...................................................................................................................................................... 23
Reporting clash results ........................................................................................................................................ 23
Glossary ............................................................................................................................................................... 24
File Formats and Applications Supported ............................................................................................................ 26
File Formats...................................................................................................................................................... 26
Applications Supported ........................................................................................................................................ 27
Project Scheduling Software Supported .............................................................................................................. 28
Processing Collision RFIs........................................................................................................................................ 29
Real Time Collision Checking on CAD-Duct/ CAD-Mech Objects
CAD-Duct and CAD-Mech objects will automatically collision/ clash detect in Real-Time if the following option is
selected in the Database (CADDuctSolidsBSS Tab):
2
Collisions can be marked on the drawing by selecting the Mark Collisions Check Box.
3
The Collisions are then visible on the drawing marked with Green Circles.
On Demand Collision Checking on CAD-Duct/ CAD-Mech Objects (CHECK)
CAD-Duct and CAD-Mech objects can also be checked for collisions at any time on demand, by typing CHECK at
the command line and selecting all objects, or any set of required objects. Clashes will be found and displayed in
the 3D Viewer.
4
On Demand Collision Checking with AutoCAD Solids (DETECT)
The Inspect is a command line command to perform on-demand Collision checking against AutoCAD Solids, or
AutoDesk Building Systems (ABS)/ AutoCAD MEP Solids. This command must be invoked, as the objects in
ABS will not auto-collision check in real time, however it does then display all items that clash with other items.
Instead of showing a 3D Viewing Window, the drawing is just parsed down displaying only those CAD-Duct/ CADMech objects that collide with AutoCAD Solids.
Type Detect at the command line as below:
Select all objects, using an AutoCAD Selection.
5
The Result is seen above, as only those objects from CAD-Duct/ CAD-Mech that penetrated an AutoCAD Solid
appear in the drawing.
Collision Checking / 3D Viewing Drawing Objects (INSPECT)
The Inspect Tools is a Tool that allows you to more clearly see a set of object in a small, easy to rotate and view
3D Viewing Window. Objects viewed with Inspect include any AutoCAD Solid, or CAD-Duct/ CAD-Mech Object
(also solids).
Toolbar
Command line:
inspect
Shift Right Click Menu: NA
Description
The object viewer is prompted when collisions are detected, and it can also be used to isolate selected Items in a
drawing and examine them in 3D space.
Procedure
Opening the Dialogue
6
1.
2.
3.
4.
Open an existing CAD-Duct/CAD-Mech drawing
Type INSPECT at the command line
Select the Item or Items to be “Inspected”, often all item sin the drawing.
The Object Viewer dialogue appears, as shown below:
The Viewer is broken down into 3 main sections:
Top Section
The top section allows the user to examine the Item/s selected as the command was invoked. Using the mouse
the following options are available:
•
Left Mouse Button - Holding down the left mouse button and moving the mouse allows the used to
rotate the view
•
Middle Mouse Button (Wheel pressed) - Holding down the Middle mouse button or wheel and moving
the mouse allows the user to pan the view. This option is dependent on the mouse and if the
MBUTTONPAN variable is set to <1>
•
Mouse Scroll Wheel - Using the scroll wheel allows the user to zoom in and out
7
Middle Section
•
Insert view as Section - Selecting this option can be used to insert the current Object Viewer view into
the drawing as a section
•
Shade Modes - Allows the user to change between Shaded, Hidden & Wireframe modes
•
Views drop-down menu - Allows the user to select Top, Bottom, Left, Right, Front, Back views
Bottom Section
The bottom section contains following options:
•
Item information window - This section provides additional information about the displayed Items. This
information takes the form of the Item Number, the Size and connection method (if appropriate) and the
Elevation to both the top and the bottom of the Items.
•
Mark Collisions - This option is used to mark detected collisions on the drawing when the viewer is
closed. The collisions are marked with a green circle indicating the affected areas. The option is only
enabled when the viewer is being used with the collision detection system. The Enable Run Time
Collision Detection option and information can be found in the CAD-Duct Solids Settings.
•
Hide All Except Selection - This option allows the user to isolate the Items displayed in the viewer when
the viewer is closed. All other Items will be hidden and can be restored using the SHOWALL command or
Icon.
•
Set View - This options is used to re-orientate the main drawing to match the rotation / position and zoom
parameters of the Object Viewer window.
•
OK - Closes the Dialogue
Collision Checking / 3D Viewing XRef Drawing Objects (INSPECT2)
The Inspect2 Command, when chosen from the command line, works just as the Inspect Command Does, except
it looks for items within Externally Referenced Documents (XRef Objects).
8
Navisworks Collision Checking
Roamer + Clash Detective allows the user to process collision detection tests within a single model or model
against model for project coordination.
JetStream Clash Detective
User Manual
Copyright © 2007 Autodesk, Inc.
Autodesk, Inc.
Revision 5.5.38796
Autodesk, Inc. reserves the right to make changes in specification at any time and without notice. The information
furnished by Autodesk, Inc. in this publication is believed to be accurate; however, no responsibility is assumed
for its use, nor for any infringement of patents or other rights of third parties resulting from its use.
JetStream and the JetStream logo are registered trademarks of Autodesk, Inc. All other trademarks and
copyrights are property of their respective owners. All rights reserved.
Contains Autodesk(R) RealDWG by Autodesk, Inc., Copyright (C) 1998-2007
Autodesk, Inc. All rights reserved.
This software is based in part on the work of the Independent JPEG Group.
Contains a modified version of Open CASCADE libraries. See the license file "OpenCascadeLicense.txt" in the
JetStream installation directory. Source code is available from www.navisworks.com/files/OpenCascade.zip.
LightWorks and the LightWorks logo are registered trademarks of LightWork Design Ltd. LWA, LWA-Enabled and
the LWA-Enabled logo, Interactive Image Regeneration, IIR, A-cubed, Feature-Following Anti-Aliasing and FFAA
are all trademarks of LightWork Design Ltd. All other trademarks, images and logos remain the property of their
respective owners. Copyright of LightWork Design Ltd. 1990-2005, 2006.
Overview of Clash Detective
The Clash Detective plugin checks your model and shows you any areas where items interfere or "clash" with
each other. Like all plugins, the Clash Detective is a dockable tabbed control bar accessed through the Tools
menu (Hint: hold down the Control key to prevent the control bar from docking if necessary). From the Clash
Detective control bar you can set up the rules and options for your clash tests, view the results, sort them and
produce a report as a text file or in HTML or XML formats. A clash test is a configuration of options, rules and
selections used in checking for clashes in a model. These are useful if you have set tests for your model and
need to run them as a batch. You can create a number of different clash tests for a model and save them in a
JetStream .nwf file for checking with updated models at a later date.
General clash tests that you are required to run on all projects can be set up once, exported and then re-used on
subsequent projects. Such tests may be specific to your industry or company; for example, you may always use a
particular diameter piping which requires insulating. You could therefore set up a test, which selects all of this
piping in the scene and clash test it against the rest of the model to ensure a specific clearance around it is
maintained.
Managing a series of clash tests can get complicated, especially if you have a whole set of different layers you
want to clash separately. Clash Detective is designed to help you control these clash tests and leave an audit trail
of clashes throughout the life of the project.
9
One simple but time-saving way it does this is by remembering the names of clashes throughout the project's life
so you don't have to go through each clash every time you do a test to figure out whether it's a new clash, or one
you have already seen. Clash Detective also allows you to assign a status to a clash and can update this status
automatically, informing you of the current state of the clashes in the model.
You can set up a batch of clash tests that you could run overnight, every night and for each test, choose the items
to clash against, along with the options for the test.
Setting up and running a clash test
1. Select a previously run test from a batch, or start a new test
2. Set the rules for the test.
3. Select the required items to be included in the test and set the test type options.
4. View the results
5. Produce a clash report
The crash test can be saved and Clash Detective will recognize that the crash has been resolved.
10
11
Clash Batches
The Batch tab of the Clash Detective control bar is used to manage your clash tests and results. You can set up
as many tests as you like in a batch and save them into the JetStream .nwf file so that on opening it up again the
tests can be re-run with the new model revision.
To run a clash test, either:
Click on Update to run all of the tests in the batch.
or
Select an existing test to run on its own, switch to the Select tab and click Start
Managing batches of clash tests
Click Add to append a new test to the current batch.
Click Delete to delete the currently selected test from the batch.
Click Compact to delete all clash results with a
status of resolved from the test in order to create a smaller file.
Click Clean to reset all tests so that they are as if you had not yet run them. In other words, this will make their
test status new.
Click Clear All to remove all tests from the batch in order to start from scratch.
Note
You can rename a test by selecting it and either pressing F2 , or by clicking again on the highlighted text. You can
also sort the Batch columns alphanumerically by simply clicking on the column heads. Clicking again toggles
between ascending and descending.
12
Merging clash tests from multiple files
Merge the files using File, Merge . See the File Management, Merging Files section of the JetStream Roamer
user guide for more information.
All of the clash test data will be combined, whilst any duplicate geometry from the files will not be loaded.
Importing clash tests
Clash tests can be imported into JetStream Clash Detective to set up pre-defined, generic clash tests. (see
>Exporting clash tests for information on exporting clash tests).
Note
If the clash test to be imported contains a search set as one of the clash selections, then the search set will also
be imported along with all other test rules, options and selection information.
To import a clash test:
From the File menu, choose Import, Clash Test XML...
The Import dialog is displayed:
Locate and Open the .xml file to import the clash test information, or click Cancel to return to JetStream.
Exporting clash tests
Tests can be set up to clash items based on generic properties, including direct property selection in the left and
right clash selection trees, or using pre-defined search sets.
For example, you may have saved a search set that finds all pipes of a specific size, named "100mm Pipes". Your
test then clashes all 100mm Pipes against the entire model (see ). Exporting this clash test will enable you to
import it into another model, which will automatically set up a clash test between 100mm Pipes and the entire
model.
Note
Any clash tests that are based on explicit selections will not be exported. For example, clashing one layer against
another is not a valid test for exporting. To achieve this you will need to use the Find Items dialog to search for
each layer based on a specific property (e.g. Item, Name). These searches can then be saved as Search Sets
and finally selected in the Left and Right selection trees in Clash Detective.
You may also select all loaded files in the Left or Right selection tree and Clash Detective will treat this as
selecting the entire model.
Multiple gereric tests can be set up as a batch and exported for use by other Clash Detective users or by yourself
on other projects.
13
To export a clash test:
Having set up your implicit clash tests, from the File menu, choose Export, Clash Test XML...
The Export dialog is displayed:
Enter a new file name and location, if you wish to change from those suggested.
Click Save to export the .xml file, or click Cancel to return to JetStream.
Creating custom clash tests
Exported clash tests can be used as a basis to define custom clash tests. If you have a common set of clash tests
that you reuse on multiple projects, you can turn them into a custom clash test. Once installed as a custom clash
test, the entire batch of tests can be selected and run directly from the Select tab. The results from all tests in the
batch are combined and presented as the results of the custom clash test. The name of each test in the batch is
displayed in the Description field of the results.
Custom clash tests are an excellent way to roll out a standardized set of tests across an organization. They allow
the expertise of "power" users to be reused by everyone. Finally, they can be seen as a way of implementing
object intelligence. For example, a custom clash test could be written that checked for compliance with a local
building code based on object information and properties defined in a particular CAD system.
To define a custom clash test:
1. >Export your clash tests to an XML file. The name of the file is used as the default name of the custom
test.
2. If desired, change the name of the custom test by editing the XML file directly. The top level element in
the XML file is called "batchtest". The name of the custom test as displayed to the user is defined by the
"name" attribute. The name of the custom test as saved in a file is defined by the "internal name"
attribute.
3. To install the custom test, copy the exported XML file to the custom_clash_tests subdirectory of one of
the JetStream search directories. Clash Detective searches these directories on startup looking for
custom tests. See the section called "Search Directories" in the chapter called "Interface" in the Roamer
book for more information.
4. To use the custom test select it from the Test Type drop down on the Select tab. And press Start. All
other options and rules are specified by the custom test.
14
Clash Rules
The Rules tab of the Clash Detective control bar allows you to define and customize ignore rules to be applied to
the clash test.
Setting clash rules
1. The Ignore Clashes Between box enables you to select "rules" that reduce the number of clash results
by ignoring certain combinations of clashing items. The following rules are built-in:
•
•
•
•
•
•
•
•
If Items in same layer is checked, any items found clashing that are in the same layer are not
reported in the results.
If Items in same group/block/cell is checked, any items found clashing that are in the same group
(or inserted block) are not reported in the results.
If Items in same file is checked, any items found clashing that are in the same file (either externally
referenced or appended) are not reported in the results.
If Items in same composite object is checked, any items found clashing that are part of the same
composite object (an item composed of multiple parts of geometry) are not reported in the results.
If Items in previously found pair of composite objects is checked, any items found clashing that
are part of composite objects (items composed of multiple parts of geometry) that have previously
been reported in the test are not reported in the results.
If Items with coincident snap points is checked, any items found clashing that have snap points
that coincide are not reported in the results. This can be particularly useful for pipe runs made from
cylinders.
If Items in the same AutoPlant Component is checked, any items found clashing that are contained
within the same AutoPlant component are not reported in the results.
If Connected AutoPlant Components is checked, any items found clashing that are in connected
AutoPlant components are not reported in the results.
15
Adding custom clash rules
JetStream Clash Detective provides a number of templates which you can customize to create your own ignore
rules.
To add a new ignore rule:
Click the New button.
The Rules Editor dialog is displayed:
1. Enter a new name for your rule.
2. From the Rule Templates list, choose a template to customize. The following templates are built in:
o
Insulation Thickness . This rule is to be used with a Clearance test and will ignore any items
found clashing where the clearance is greater than the insulation thickness.
If you have a pipe requiring a specific thickness of insulation, then you may want to carry out a
clearance test on that pipe, setting the clearance tolerance to the required insulation thickness.
This would identify any areas where there is not enough clearance around the pipe to install the
insulation.
If you have various pipes, all requiring different thicknesses of insulation then rather than setting
up a seperate clearance test for each thickness, you can set up one test with the greatest
necessary tolerance, i.e. assume all pipes require the maximum thickness of insulation. This rule
can then be applied to ignore any clashes that are falsely identified, as their actual insulation
thickness is less than the maximum clearance used.
See the diagram below for an example of where this ignore rule would be applied:
16
Pipe 1 has insulation thickness t and C is the maximum clearance (thickest insulation) required
anywhere in the current model. Any items (2 ) that come within the range of t to C will not be
reported in the results.
o
Same Property Value . This rule will ignore clashing items that share a specific property.
o
Same Selection Set . This rule will ignore clashing items that are in the same specified Selection
Set.
o
Specified Selection Sets . This rule will ignore clashing items where each item is in a specified
Selection Set
3. In the Rule Description box, click on each of the underlined values to define your custom rule. The
customizable values available with the built in templates are:
o
Name . Use the name of the category or property as it is displayed in the interface
(recommended). You can also choose Internal Name which is that accessed via the API (for
advanced use only).
o
'' . Choose from the available list, which category the property you wish to define is in. Only the
categories that are contained in the scene are available in the drop down.
o
'' . Choose from the available list, which property you wish to define. Again, only the properties in
the scene within the chosen category will be available.
o
the Last Object . Search for the defined property on the specified selection. The Last Object is
the default, though you can also choose from Any Parent, a Model, a Layer , or the Geometry
o
'' . Choose from the available list, which Selection Set you require to define the rule. Only the predefined Selection and Search Sets are available in the drop down.
4. Click OK to add the new ignore rule, or Cancel to return to JetStream.
17
Editing clash rules
1. Choose the ignore rule you wish to edit.
2. Click the Edit button.
3. Rename the rule if you wish to change it from its current name.
4. Choose another Rule Template if you wish to change it from the current template.
5. In the Rule Description box, click on each of the underlined values to redefine your custom rule.
6. Click OK to save the changes you've made to the rule, or click Cancel to return to JetStream.
Deleting clash rules
2. Choose the ignore rule you wish to delete.
3. Click the Delete button to delete the clash rule.
Selecting Items for Clash Testing
The Select tab of the Clash Detective control bar allows you to refine your clash test by only testing sets of items
at a time, rather than the whole model against itself. This will produce faster and more sensible results. You
choose two sets of items to test against each other using selection trees, which are exactly the same tabs as
those in Roamer's selection tree control bar.
The Select tab is also where you set the test type and tolerance and where you run a single test from.
18
Selecting items for a clash test
1. There are two identical boxes in this tab called Left and Right . These boxes represent two sets of items
that will be tested against each other during the clash test and you need to select items in each. You can
select the items by choosing a tab from the selection tree and manually selecting items from the tree
hierarchies. Any selection sets in the scene are also included on a tab, which is a quick and useful
method of setting up items across sessions (see the chapter called "Selecting Items" in the Roamer book
for more details).
2. You can also transfer the current selection to one of the boxes by selecting items in the usual way in the
main navigation window and/or selection tree and clicking the appropriate Select Current button.
3. Check the appropriate Self Intersect check box if you want that set to test for self-intersection, as well as
intersection against the other set.
4. Clash tests can also include the clashing of points, lines and surfaces depending on which of the three
buttons underneath each window are selected. These three buttons correspond to surfaces, lines and
points, and each can be toggled on and off by clicking on them.
If it was required to do a clash test, for example, between some surface geometry and a point cloud, then it might
be done by setting up the geometry in the left hand window, and the point cloud in the right. At that point the
Surface button would be set under the left window, with the other two unset. The Points button would be set
under the right-hand window with the other two unset, and the Type perhaps set to Clearance with a Tolerance
of 1 meter.
Note: If the Type is set to Hard , lines and surfaces will actually need to intersect with any points to register a
clash.
Setting the clash test type and tolerance options
There are four default clash test types for you to choose from:
• Hard . Choose this option if you wish the clash test to detect actual intersections between geometry.
• Hard (Conservative) . This option performs the same clash test as Hard , however it additionally applies
a conservative intersection method. See for more information on this.
Note: This clash test type is only available when in Developer profile. See the Interface, Profiles section of the
Roamer book for more information on user profiles.
•
Clearance . Choose this option if you wish the clash test to detect for geometry within a set distance from
other geometry (see for information on how to set this distance). You might use this type of clash when
pipes need to have space for insulation around them, for example.
Note: Clearance clashes are not the same as "soft" clashes. Clearance clashes detect for static geometry coming
within a distance of other geometry, whereas soft clashes detect potential clashes between moving components.
JetStream Clash Detective does not currently support soft clash checking.
•
Duplicates . Choose this option if you wish the clash test to detect for duplicate geometry. You might use
this type of clash test to check a model against itself to ensure the same part has not been drawn, or
referenced twice, for example.
To select the clash test options:
1. From the Run, Type drop down, choose the clash test type you wish to run. Any custom clash tests that
have been defined (see ) appear at the end of the list.
2. Enter the Tolerance required, which will be in scene units. See for more information on this.
19
Time-based Clashing
If a JetStream TimeLiner license is available, the Link To TimeLiner check box will be available for
selection.
Linking to TimeLiner integrates the features of Clash Detective and TimeLiner, allowing the automation of
interference checking throughout the lifecycle of a TimeLiner project.
1. On clicking the Start button, if the Link To TimeLiner check box is checked, Clash Detective will
combine with TimeLiner to produce a clash report based on the Clash Detective settings, TimeLiner
simulation settings, and the project data contained in TimeLiner.
2. As the TimeLiner project simulation progresses forward in time, Clash Detective will check at each
interval in the project to see if there are any clashes present. Once the simulation is complete, any
clashes found in this manner will be shown in the Results tab alongside TimeLiner project information.
See the following chapter on Results for more information.
Note: If the TimeLiner project is large in size, running this type of clash test will invariably take more time to
complete than a normal clash run.
Running the clash test
1. Once the left and right sets are selected and the clash type and tolerance defined, click on Start to start
the test running. The Found box shows how many clashes have been found so far during this test.
Note: The progress bar shows how far through the test Clash Detective has got. If you wish to stop the test at
any time, press the Cancel button and all clashes found up until the interrupt will be reported and the test will be
saved with a Partial status.
20
Clash Results
The Results tab of the Clash Detective control bar enables you to interactively view the clashes found. On the left
is a list of clashes, numbered and sorted by >severity. The list also shows the >status, the distance, the clash
point, date found and, if the clash has been approved, who approved it and when it was approved.
Reviewing clash results
1. Click on a clash to highlight both clashing items in the main navigation window. The "Item 1" and "Item 2"
boxes show the Smart Tag properties relating to each item in the clash and also the path through the
standard selection tree from the root to the geometry of the item.
Note: Selecting an item in one of these tree lists and then clicking on the SwitchBack button beneath allows
the current view and currently selected object to be sent back to the originating CAD package. This makes it very
simple to show clashes in JetStream, take them back to the CAD package, alter the design, and reload them in
JetStream for a very fast design review turnaround.
For more information on the use of SwitchBack and how to set it up, see the section on SwitchBack in
the Roamer documentation.
If the Link to TimeLiner check box was checked, the TimeLiner start time/date of any clashes are
recorded next to the appropriate Clash under the Start End and Task columns in the Clash Detective
Results tab. If multiple clashes are found on a particular date, each individual clash is listed with identical
TimeLiner information.
21
Clicking on a clash in the Clash Detective Results tab highlights the clash in the main 3D view (with object
visibility based on TimeLiner activities), and highlights the appropriate point in the TimeLiner project if
available and visible on screen. TimeLiner visibility and colour settings in the 3D view will be overlaid by
the appropriate Clash Detective highlight colours.
2. To rename a clash, click on the clashes name, press F2 or right click on the clash and choose Rename .
This name will be saved and remembered for future tests.
3. To manually change the >Status of clashes, select the new clashes requiring the change, and select a
new status from the drop down list. Multiple clashes can be changed by either holding down the Ctrl key
whilst selecting individual clashes (the last selected being shown in the main view), or by holding down
the Shift key and selecting another clash, thereby selecting all clashes between the two including the first
and last (again, the last selected being shown in the main view). Once the required clashes have been
selected, changing the Status of the currently selected clash updates all those highlighted to the same
status.
4. To enter notes about the clash for others to review, right click on the clash and choose Add Comment
from the context menu. The Add Comment dialog will appear to allow you to enter your comment.
5. Select the display options you wish to apply:
o
Check Select Filter if you want to select an item in the main navigation window and show only
those clashes that involve that selected item.
o
Check Auto Reveal if you want JetStream to attempt to temporarily hide anything obstructing the
clashing items so that you can see the clash when zooming in on it, without having to move
location.
o
Check Auto Zoom if you want to automatically zoom in on the selected clash. Unchecking this
box allows you to keep the main viewpoint static while flicking through the clashes one by one.
o
Check Save Viewpoint if you want to store the current viewpoint with the result. This allows you
to tailor the viewpoint for a clash result. It also enables redlining to be stored with a clash result.
Note: Once redlining has been added, subsequent changes to the viewpoint due to navigation will not be saved.
In order to save a different viewpoint, the redlining must first be removed using the redline Erase tool.
o
Check Highlight All if you want to highlight all the clashes found in the main navigation window,
in the color of their status.
o
Check Dim Other if you want to turn all items not involved in a clash to gray.
o
Check Hide Other if you want to hide all items not involved in a clash in order to focus better on
the clashing items.
o
Check TimeLiner if you want to see the state of the TimeLiner sequence at the time of the clash
(for use with Time-based Clashing - see the TimeLiner documentation for more information).
6. Check the Highlight check box to override the color of the item in the main navigation window with the
color of the status of the selected clash.
7. Click Select to select a clashing item in the main navigation window. If a selection color is set (by default
blue), this overrides the Highlight option, which allows you to highlight the item, in the color of its status.
8. Click on any of the column headings to sort the table using that column's data. This sorting can be
alphabetical, numerical, date-related, or, in the case of the Results->Status column, in workflow order
New>Active>Approved>Resolved . Clicking the column heading repeatedly toggles the sorting between
ascending and descending.
22
Clash Reports
The Report tab of the Clash Detective control bar is used to write reports containing details of all the clash results
found in the current test. You can write a text file, an html or xml file containing jpegs of the viewpoints of the
clashes or simply save the clash results as a list of viewpoints for review by a JetStream user without the Clash
Detective plugin.
Reporting clash results
1. In the Contents box select all the information you want to appear in the report for each clash result. This
can include Smart Tag properties relating to the items involved in the clash, how to find them in the
standard selection tree from root to geometry, whether images or TimeLiner task information should be
included, clash status and so on.
2. Check those clashes in the Include Clashes box to select which clashes you want to include in the report
based on status.
3. Select the type of report from the Report Type drop down list:
o
Current Test creates a single file for the current test.
o
All Tests (combined) will create a single file containing all results from all tests
o
All Tests (separate) will create a separate file for each test containing all results.
4. Select the format of the report from the Report Format drop down list:
o
XML will create an .xml file containing all the clashes and a jpeg of their viewpoints alongside
their details. On choosing this option, you will need to select or create a folder for the files and
enter a name for the xml file.
o
HTML will create an .html file containing all the clashes and a jpeg of their viewpoints alongside
their details. On choosing this option, you will need to select or create a folder for the files and
enter a name for the html file.
23
Note: To customize the appearance or layout of the html file, you will need to edit the
clash_report_html_lang.xsl file, where lang is a code representing your language. The installed file is located in
the stylesheets subdirectory of the JetStream install directory. You can copy the edited file to the stylesheets
subdirectory of any of the JetStream search directories. See the section called "Search Directories" in the chapter
called "Interface" in the Roamer book for more information.
o
Text will create a .txt file containing all the clash details and the location of a jpeg of each
clash.On choosing this option, you will need to select or create a folder for the files and enter a
name for the txt file.
o
As viewpoints will create a folder in the saved Viewpoints control bar, called the name of the
test. Each clash is saved as a viewpoint in this folder, with a comment attached containing the
clash result details.
5. Click the Write Report button to write the report.
Glossary
Glossary of technical terms relating to JetStream Clash Detective.
Clash Status
Each clash has a current status associated with it and each status has a colored icon to identify them.
This status is updated automatically by Clash Detective or can be manually overridden if desired. The
statuses are as follows:
•
New : a clash found for the first time in the current run of the test.
•
Active : a clash found in a previous run of the test and not resolved.
•
Approved : a clash previously found and approved by someone.
•
Resolved : a clash found in a previous run of the test and not in the current run of the test. It is
therefore assumed to be resolved.
•
Old : any clash in an "old" test. The icons still have the code of the status from the previous run,
but this is a reminder to say that the current test is old. See for a description of old tests.
If the status is changed to Approved , Clash Detective takes the user currently logged on as the person
who approved it.
Enabling hyperlinks will show clash results using the relevant status icon
Clash Test Status
A clash test can have one of 4 statuses:
•
New indicates a clash test that has not yet been run with the current model.
•
Done indicates a clash test that has been successfully run with the latest version of the model.
•
Old indicates a clash test that has been altered in some way since being set up. This might
include changing an option, or having loaded the latest revision of the model.
•
Partial indicates a clash test that has been interrupted during execution. Results are available up
to the point of interruption.
Clearance Clash
A clash in which the geometry of item 1 may or may not intersect that of item 2, but comes within a
distance of less than the set >tolerance
24
Hard Clash
A clash in which the geometry of item 1 intersects that of item 2 by a distance of more than the set
>tolerance
Duplicate Clash
A clash in which the geometry of item 1 is the same as that of item 2, located within a distance of
between zero and the set >tolerance. A tolerance of zero would therefore only detect duplicate geometry
in exactly the same location.
Intersection Method
A standard Hard clash test type applies a Normal Intersection Method , which sets the clash test to
check for intersections between any of the triangles defining the two items being tested (remember all
JetStream geometry is composed of triangles). This may miss clashes between items where none of the
triangles intersect. For example, two pipes that are exactly parallel and overlap each other slightly at their
ends. The pipes intersect, yet none of the triangles that define their geometry do and so this clash would
be missed using the standard Hard clash test type. However, choosing Hard (Conservative) reports all
pairs of items, which might clash. This may give false positives in the results, but it is a more thorough
and safer clash detection method.
Severity
For hard clashes, the severity of a clash depends on the intersection of the two items intersecting. Hard
clashes are recorded as a negative distance. The more negative the distance, the more severe the clash.
Hard clash severity depends on whether the Conservative or Normal Intersection Method has been
applied (see for more details on this). If Normal , the greatest penetration between a pair of triangles is
measured. If Conservative , the greatest penetration of space around one item into the space around
another is measured.
For clearance clashes, the severity depends on how close one item invades the distance required around
the second. For example, an item coming within 3mm is more severe than an item coming within 5mm of
the other.
For duplicate clashes, the severity depends on how close one item is to the other. When the distance
between them is zero, it is more likely that this is duplicate geometry, where as items that are further apart
are more likely to be different objects and therefore have a lesser severity.
Tolerance
The Tolerance controls the severity of the clashes reported and the ability to filter out negligible clashes,
which can be assumed to be worked around on site. Tolerance is used for >Hard>Clearance and
>Duplicate types of clash test. Any clash found that is within this tolerance will be reported, whereas
clashes outside of this tolerance will be ignored. So for Hard clashes, a clash with a >severity of between
zero and the tolerance value will be ignored, whereas for Clearance clashes, a clash with a >severity of
more than the tolerance value will be ignored as it is further away than the distance required. Similarly, a
Duplicate clash with a >severity of more than the tolerance value will be ignored as it is likely to be a
seperate, yet identical piece of geometry.
25
File Formats and Applications Supported
JetStream has its own native file formats (.nwd, .nwf, .nwc), however JetStream can additionally read a
combination of many popular 3D CAD formats.
PLEASE NOTE THAT SOME THIRD PARTY VENDORS MAY ELECT TO NOT PROVIDE FILE FORMAT
SUPPORT FOR NAVISWORKS PRODUCTS AS OUTLINED BELOW FOLLOWING THE SALE OF
NAVISWORKS TO AUTODESK. WHILE WE INTEND TO WORK TO PROVIDE CONTINUED DIRECT THIRD
PARTY FILE FORMAT SUPPORT WHEN POSSIBLE, IN SOME CASES, SUCH SUPPORT MAY BE
DISCONTINUED DESPITE OUR PREFERENCE. WHEN FEASIBLE, A WORKFLOW CHANGE MAY
ADDRESS SOME CUSTOMER’S NEEDS (E.G., EXPORT OF FILES FROM AN UNSUPPORTED THIRD
PARTY CAD PRODUCTS INTO A FILE FORMAT SUPPORTED BY NAVISWORKS). PLEASE COME BACK
TO THIS WEB PAGE FOR FURTHER UPDATES ON FILE FORMAT SUPPORT AVAILABILITY.
NAVISWORKS, AND ITS PARENT AND AFFILIATED COMPANIES RESERVE THE RIGHT TO ALTER
PRODUCT OFFERINGS AND SPECIFICATIONS AT ANY TIME WITHOUT NOTICE.
File Formats
Format
Extension
Format
Extension
NavisWorks
.nwd .nwf .nwc
Inventor
.ipt .iam. ipj
AutoCAD
.dwg, .dxf, .sat
Leica
.pts .ptx
MicroStation (SE & J)
.dgn .prp .prw
Riegl
.3dd
3D Studio
.3ds .prj
RVM
.rvm
ASCII Laser File
.asc .txt
SketchUp
.skp
ACIS SAT
.sat
STEP
.stp .step
DWF
.dwf
STL
.stl
Faro
.fls .fws .iQscan .iQmod
.iQwsp
Trimble
ASCII laser file
IFC
.ifc
VRML
.wrl .wrz
IGES
.igs .iges
Z+F
.zfc .zfs
Informatix
.man .cv7
26
Applications Supported
The following table is a non-exhaustive list of CAD applications and properties currently supported by JetStream
, along with any additional information that may be necessary to review your files in JetStream.
ALL BRAND NAMES, PRODUCT NAMES, OR TRADEMARKS BELONG TO THEIR RESPECTIVE HOLDERS.
NAVISWORKS AND ITS PARENT AND AFFILIATED COMPANIES RESERVE THE RIGHT TO ALTER
PRODUCT OFFERINGS AND SPECIFICATIONS AT ANY TIME WITHOUT NOTICE, AND ARE NOT
RESPONSIBLE FOR TYPOGRAPHICAL ERRORS THAT MAY APPEAR IN THIS DOCUMENT.
For a complete List, go to:
http://www.navisworks.com/en/support/formats
Exporter
Native
Other
Format
Properties
M.A.P.
CAD-Duct/ CAD-Mech
CAD-Duct / CAD-Mech Details
Other Formats
DWG, DXF, 3DS
In order to read a CAD-Duct / CAD-Mech file into JetStream, you either need CAD-Duct/ CAD-Mech
installed on the same machine as JetStream, or have the CAD-Duct / CAD-Mech Object Enabler
installed. The Object Enabler can be downloaded from the MAP Customer Care Website, in the
Utilities Area of: http://www.map-cc.com/updates_and_installers.htm
If CAD-Duct / CAD-Mech is installed, the Object Enabler is not necessary. Simply export to .nwd or
.nwc depending on whether you have a JetStream Roamer, or JetStream Roamer + JetStream
Publisher license respectively, Using the Command Line Command nwdout, or nwcout.
In JetStream, object properties can be viewed in the 'CAD-Duct' tab in the 'Properties' window. To
open the Properties window, go to View > Control Bars > Properties.
27
Project Scheduling Software Supported
This table contains a list of the project scheduling software and formats supported by JetStream
TimeLiner.
Developer
Product
File
Format
Notes
Asta
PowerProject
.pp
Requires Asta PowerProject to be installed on same
machine, to make link.
Microsoft Project 2000 to 2007 .mpp
Requires Microsoft Project to be installed on same
machine, to make link.
n/a
Requires P3 to be installed on same machine. The file
format is not read directly. Instead, TimeLiner logs into P3
and retrieves project information.
Primavera
Primavera
Engineering and
Construction
n/a
Requires Primavera v4.1 or 5 Engineering and
Construction to be installed on same machine, along with
the Primavera SDK. TimeLiner connects to the Primavera
database via an ODBC data source link.
Microsoft
Microsoft Project
Exchange Format
.mpx
Does not require any project software to be installed. This
is the common project exchange format which can be
exported to from a number of scheduling packages.
Primavera ProjectPlanner (P3)
28
Processing Collision RFIs
When a collision or clash is found, two things (other than ignoring it) can be done:
• The Collision is fixed straight right away if possible
• A Request for Information (RFI) is submitted to the engineer/ consultancy
When processing an RFI, normally a submission form is filled out, as provided by the consultancy, the owner, or
as is a standard form used by the contractor.
Additionally, an attachment is sent with drawing details. There are 2 options for creating this attachment within
CAD-Duct/ CAD-Mech that may prove useful.
Use a viewport, set up the viewport with the desired objects, set up all plot requirements.
Use Spooling which allows for quicker selection of items, and already has plotting setup.
Spooling is accessed from the SPOOLDWG Command, or spool Toolbar Flyout:
29
The Spool Dialog appears, and the Template Drawing is changed to one setup for RFIs (C:\MAPSoftware\CAD\CAD Templates\Collision RFI.dwt), and name is changed as follows:
Selecting the Setup Button Allows Creation of a Bill Of Materials Unique to this instance weight is removed from
the previous BOM.
30
And Finish is selected to complete the drawing.
31
Select Objects to Proceed:
32
The RFI Detail Printout is now ready
33