1
ChipworkX Development System
Rev.1.10
July 21, 2010
G H I
Getting Started
E l e c t r o n i c s
GHI Electronics,LLC
ChipworkX Development System
Table of Contents
Table of Contents
1.Introduction...................................................................................................................................................................................................3
The objective of this guide..................................................................................................................................................................4
2.Getting Started.............................................................................................................................................................................................5
2.1.System Setup.....................................................................................................................................................................................5
2.2.The Emulator......................................................................................................................................................................................6
Create a Project..................................................................................................................................................................................6
Selecting Transport Interface.............................................................................................................................................................8
Executing (Deploying) the project......................................................................................................................................................9
Debugging Breakpoints....................................................................................................................................................................10
2.3.Running on Hardware.......................................................................................................................................................................11
MFDeploy can Ping!.........................................................................................................................................................................12
Deploying to Hardware.....................................................................................................................................................................12
Connect MFDeploy to show debugging messages..........................................................................................................................13
Checking ChipworkX firmware and TinyBooter Version..................................................................................................................14
2.4.Deleting The Deployed Project.........................................................................................................................................................15
Emergency user application code deletion......................................................................................................................................15
3.Assemblies with ChipworkX Project...........................................................................................................................................................16
3.1.What are Assemblies?......................................................................................................................................................................16
Standard Assemblies........................................................................................................................................................................16
GHI NETMF assemblies...................................................................................................................................................................16
Adding Assemblies to Visual C# Project..........................................................................................................................................17
4.TinyBooter and Firmware Update..............................................................................................................................................................18
4.1.Checking the Firmware Version........................................................................................................................................................18
4.2.TinyBooter Update using bootstrap loader.......................................................................................................................................20
Erasing Process:..............................................................................................................................................................................20
Emergency Bootstrap access...........................................................................................................................................................20
Installing TinyBooter Updater USB Driver:.......................................................................................................................................21
Updating TinyBooter:........................................................................................................................................................................21
4.3.ChipworkX Firmware Update Through TinyBooter...........................................................................................................................22
5.What is next?..............................................................................................................................................................................................25
Legal Notice..................................................................................................................................................................................................26
Licensing.................................................................................................................................................................................................26
Disclaimer...............................................................................................................................................................................................26
Rev.1.10
Page 2 of 26
www.ghielectronics.com
GHI Electronics,LLC
ChipworkX Development System
Introduction
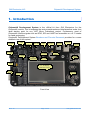
1. Introduction
ChipworkX Development System is the official kit from GHI Electronics for the
ChipworkX module. This kit exposes the various peripherals and interfaces that make it an
ideal starting point for any .NET Micro Framework project. Furthermore, most of
ChipworkX module signals such as GPIO, SPI and UART are accessible on a 0.1" header
for rapid prototyping.
ChipworkX Development System Brochure and Pin-outs Document provides for a more
detailed view of this system.
L-Speaker
2 LED
XBee
connector
XBee LEDs
Pow er
Connector
JTAG
USB Client
SV5 header
SV1 header
3D
Accelerometer
UEXT header
Dual Port
USB Host
RJ45
Ethernet
R-Speaker
RTC
Battery
SD/MMC
connector
Pow er
LEDs
4.3” TFT Display
With touch screen
RS232
D-SUB
Buttons Pad
SV2 header
Front View
Rev.1.10
Page 3 of 26
www.ghielectronics.com
GHI Electronics,LLC
ChipworkX Development System
Introduction
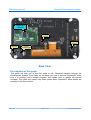
ChipworkX
Module
Touch
Controller
RS232 level
converter
Stereo Audio
Connector
VS1053
MP3/MIDI decoder
Back View
The objective of this guide
This guide will help you in the first steps to use ChipworkX Module through the
Development System. From here, we will show you how to connect ChipworkX, make
sure it is running, load a simple program, and explain how to update the internal
firmware. This guide only covers very basic points about ChipworkX. More details are
provided in the user manual.
Rev.1.10
Page 4 of 26
www.ghielectronics.com
GHI Electronics,LLC
ChipworkX Development System
Getting Started
2. Getting Started
2.1. System Setup
Before we try anything, we want to make sure the PC is setup with needed software. First
download and install Visual C# express 2010 with SP1. If you have Visual Studio 2010
installed then you can skip this step.
Now, download and install .NET Micro Framework 4.1 SDK (not the porting kit).
if link above didn't work, search for “.NET Micro Framework 4.1 SDK”.
Finally, install the GHI NETMF SDK (Software Development Kit) available on GHI
Electronics website.
The SDK comes in a zip file, extract it and then run setup.exe to install the SDK.
Rev.1.10
Page 5 of 26
www.ghielectronics.com
GHI Electronics,LLC
ChipworkX Development System
Getting Started
2.2. The Emulator
NETMF includes an emulator that allows running application right on the PC. For our first
project, we will use the emulator to run a very simple application.
Create a Project
Open Visual C# express and, from the menu, select file -> New Project. The wizard now
should have “Micro Framework” option in the left menu. Click on it, and from the
templates, select “Console Application”
Rev.1.10
Page 6 of 26
www.ghielectronics.com
GHI Electronics,LLC
ChipworkX Development System
Getting Started
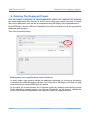
Click the “OK” button and you will have a new project that is ready to run. The project
has only one C# file, called Program.cs, which contains a few lines of code. The file is
shown in “Solution Explorer” window. If this window is not showing then you can open it
by clicking “View->Solution Explorer” from the menu.
using System;
using Microsoft.SPOT;
namespace MFConsoleApplication1
{
public class Program
{
public static void Main()
{
Debug.Print(
Resources.GetString(Resources.StringResources.String1));
}
}
}
For simplicity change the code to make it look like the listing below.
Rev.1.10
Page 7 of 26
www.ghielectronics.com
GHI Electronics,LLC
ChipworkX Development System
Getting Started
using System;
using Microsoft.SPOT;
public class Program
{
public static void Main()
{
Debug.Print("Amazing!");
}
}
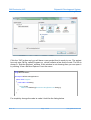
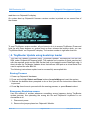
Selecting Transport Interface
Do not worry if you do not understand the code. We will explain it later. For now, we
want to run it on the emulator. Let us make sure you have everything setup properly.
Click on “Project->Properties” from the menu. In the new showing window, we want to
make sure we select the emulator. On the left side tabs, select “.NET Micro Framework”
and make sure the window looks like the image below.
Transport: Emulator
Device: Microsoft Emulator
Rev.1.10
Page 8 of 26
www.ghielectronics.com
GHI Electronics,LLC
ChipworkX Development System
Getting Started
Make sure the output window is visible, click on “View->Output”
Executing (Deploying) the project
Finally, we are ready to run our first application. Press F5 key on the computer. This is a
very useful shortcut and you will be using it a lot to run your applications. After you
press F5, the application will be compiled and loaded on the emulator, and in couple
seconds everything will stop! That is because our program had finished execution so
fast that we didn't see much.
We want to “debug” the code now. Debugging means that you are able to step in the
code and see what it is doing. This is one of the greatest values of NETMF.
This time use F11 instead of F5, this will “step” in the application instead of just running
it. This will deploy the application on the emulator and stop at the very first line of the
code. This is indicated by the yellow arrow.
Rev.1.10
Page 9 of 26
www.ghielectronics.com
GHI Electronics,LLC
ChipworkX Development System
Getting Started
C# applications always start from a method called Main, and this is where the arrow had
stopped. Press F11 again and the debugger will run the next line of code, which is the
line you changed before. You probably have guessed it right, this line will print
“Amazing!” to the debug window. The debug window is the output window on Visual C#
express. Make sure Output window is visible like explained earlier and press F11 one
more time. Once you step on that line, you will see the word Amazing! Showing in the
output window.
The Program that you've just deployed is called "Managed Code" in .NET Micro
Framework Terminology.
Debugging Breakpoints
Breakpoints are another useful feature when debugging code. While the application is
running, the debugger checks if execution has reached a breakpoint. If so, the
execution will pause. Click the bar right to the left of the line that prints “Amazing!”. This
will show a red dot which is the breakpoint.
Rev.1.10
Page 10 of 26
www.ghielectronics.com
GHI Electronics,LLC
ChipworkX Development System
Getting Started
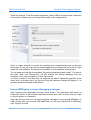
Now press F5 to run the software and when the application reaches the breakpoint the
debugger will pause it as showing in the image below.
Now, you can step in the code using F11 or continue execution using F5.
2.3. Running on Hardware
We are now ready to connect ChipworkX Development System to the PC. Connect The
development system using the USB cable. No power is needed as ChipworkX
Development System uses USB for power. If this is the first time you plug the system to
your PC then windows will ask for drivers. Direct windows to the GHI NETMF interface
driver available in GHI NETMF SDK under USB Drivers Folder.
Important Note: The development system with the many peripherals, such as the TFT
display, requires relatively high power. So make sure that you connect to a direct USB port
Rev.1.10
Page 11 of 26
www.ghielectronics.com
GHI Electronics,LLC
ChipworkX Development System
Getting Started
at your PC or to a powered USB hub, or the board might not function correctly due to the
insufficient supplied power. If you can not provide a USB port with good power or you are
not sure, you can connect external power directly to the development system.
MFDeploy can Ping!
Before we use the hardware, let us make sure it is properly connected. The NETMF
(.NET Micro Framework) SDK comes with a software from Microsoft called MFDeploy.
There are many good uses for MFDeploy but for now we only need it to “ping” the
device. Basically, “ping” means MFDeploy will say “Hi” to the device and then checks if
the device will respond with “Hi”. This is to make sure the device is connected properly
and communication has no issues.
Open MFDeploy and connect ChipworkX using the included USB cable to your PC. If
this is the first time you plug in ChipworkX, Windows will ask for drivers. Supply the
driver from the SDK folder and wait until windows is finished.
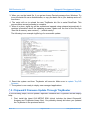
Deploying to Hardware
Now that we checked the hardware is working using MFDeploy, we need to go back to
Rev.1.10
Page 12 of 26
www.ghielectronics.com
GHI Electronics,LLC
ChipworkX Development System
Getting Started
Visual C# express. From the project properties, select USB for transport and ChipworkX
for the device. Make sure your setup looks similar to the image below.
Allow a couple seconds to ensure the hardware has completed the boot up process
then press F5, we will now send our simple application to ChipworkX and it will run right
inside the real hardware. Switching from emulator to real hardware is that simple!
Try the steps we tried with the emulator, like setting breakpoints and using F11 to step in
the code. Note that “Debug.Print” will still forward the debug messages from the
hardware to the output window on Visual C# express.
You have to keep in mind that only one software can talk to ChipworkX interface at the
same time. In another word, you can not Ping the hardware through MFDeploy if it is
already connected through Visual Studio.
Connect MFDeploy to show debugging messages
After Deploying the application through Visual Studio. The application still works on
ChipworkX even if is Visual Studio was disconnected and it will run every time you reset
or recycle power on ChipworkX.
User can still view the boot up and debugging messages by connecting MFDeploy to
USB. Simply after you connect USB cable and you can ping ChipworkX in MFDeploy,
click Target->Connect.
Rev.1.10
Page 13 of 26
www.ghielectronics.com
GHI Electronics,LLC
ChipworkX Development System
Getting Started
After this you can even reset the board and see all the boot up sequence messages and
any debugging messages including the strings printed out in the code using
Debug.Print(). In our previous example,"Amazing!". When done, you can disconnect
using Target->Disconnect.
Important Note: If you did not see the debugging messages, press the Ping button and
the debug messages will be displayed after.
Checking ChipworkX firmware and TinyBooter Version
At this point and before proceeding, it is important to check if you need to update your
ChipworkX firmware. When you download a new SDK, it comes with new firmware that
needs to be sent to ChipworkX. Please see system update section at the end.
Rev.1.10
Page 14 of 26
www.ghielectronics.com
GHI Electronics,LLC
ChipworkX Development System
Getting Started
2.4. Deleting The Deployed Project
User can always over-deploy the current application (project) on ChipworkX by deploying
the newer application from Visual C#. but in some cases user might need only to delete
the current application. this can be accomplished using MFDeploy tool explained before:
Open MFDeploy, choose USB and ChipworkX from device list and ensure you get positive
response when pinging
Then click the erase button:
Emergency user application code deletion
In some cases, user needs to delete the application because it is locking up the device
or blocking the USB debugging interface. but Visual C# or MFDeploy tool does not help
here and can not communicate with the device.
In this case you should access The Tinybooter mode (by pressing and holding Up and
Down buttons on system bootup, you will see "Tinybooter on the screen", release the
buttons the Erase the application code using MFDeploy as explained earlier.
Rev.1.10
Page 15 of 26
www.ghielectronics.com
GHI Electronics,LLC
ChipworkX Development System
Assemblies with ChipworkX Project
3. Assemblies With ChipworkX Project
3.1. What are Assemblies?
Hardware/Software features are accessed through Managed code using C# Classes with
their members such as methods, properties and variables. On ChipworkX you may neeed
assemblies from 2 sources:
Standard Assemblies
.NET Micro Framework SDK includes pre-compiled assemblies that contain the
managed code of various classes for hardware features such as Debug Class that
you've just used in the example to print the string "Amazing!" using the Print Method.
Users do not see the source code of these classes but can use these classes by simply
adding the relevant assemblies to the Visual C# project.
.NET Micro Framework library examples:
●
Microsoft.SPOT.Hardware
●
Microsoft.SPOT.Native
●
System.IO
Classes are described is in .NET Micro Framework SDK documentation which also
includes information about the required assemblies.
GHI NETMF assemblies
ChipworkX hardware adds more functionality on top of the .NET Micro Framework. For
example, hardware peripherals such as CAN, Analog converters, PWM,...etc are not
directly supported in .NET Micro Framework. However, they can be easily used with
ChipworkX.
The assembly provides access to hardware peripherals, storage solutions, USB
connectivity, and many other features. The assembly files and their documentation are
included with GHI NETMF SDK. These assembly files must be added to your Visual
Studio project in order to be able to use the extra features.
ChipworkX uses the same assemblies available for EMX and USBizi. This also means,
you can switch from ChipworkX to USBizi to EMX without the need to change any line
of code!
GHI NETMF library examples:
●
GHIElectronics.NETMF.Hardware
●
GHIElectronics.NETMF.System
●
GHIElectronics.NETMF.Net
Rev.1.10
Page 16 of 26
www.ghielectronics.com
GHI Electronics,LLC
ChipworkX Development System
Assemblies with ChipworkX Project
Adding Assemblies to Visual C# Project
Adding a library is pretty simple.
1. Go to the Menu and select “project --> Add Reference...“
2. Choose the library that you need then click OK.
3. We can now see the new Assembly reference with the References in the solution
explorer.
Rev.1.10
Page 17 of 26
www.ghielectronics.com
GHI Electronics,LLC
ChipworkX Development System
Assemblies with ChipworkX Project
4. TinyBooter And Firmware Update
ChipworkX includes three pieces of embedded software, bootstrap loader, TinyBooter and
ChipworkX firmware.
Important note: Always make sure the firmware and TinyBooter loaded on the device
match the firmware and TinyBooter versions associated with the GHI NETMF SDK
ChipworkX firmware. Ideally, whenever you install a new SDK on your PC, you will also
update the firmware on your device and update the assemblies you have added to your
application.
the next sections explains how to check the firmware version number and how to updating
the firmware is explained here.
4.1. Checking the Firmware Version
Before updating the firmware, you can check the version number and make sure it needs
to be updated or if you have the latest installed. Make sure you have the latest SDK and
firmware installed.
Then go to wwww.ghielectronics.com (ChipworkX downloads), the current GHI NETMF
SDK version is shown in the download link. You can download and install the SDK. When
done, the version release notes and changes are shown automatically. These are also
available in the SDK installation folder.
Rev.1.10
Page 18 of 26
www.ghielectronics.com
GHI Electronics,LLC
ChipworkX Development System
TinyBooter and Firmware Update
After you have the SDK installed, you can see the Release Notes file, for example
ChipworkX firmware version number is 4.0.1.0 and Tinybooter version number is 4.0.1.0 in
this SDK.
The easiest way to verify the version numbers on ChipworkX Development System is to
Rev.1.10
Page 19 of 26
www.ghielectronics.com
GHI Electronics,LLC
ChipworkX Development System
TinyBooter and Firmware Update
read them on ChipworkX's display.
On system boot up ChipworkX firmware version number is printed out on second line of
the screen.
To read TinyBooter version number, all you have to do is to access TinyBooter (Press and
hold Up and Down buttons on system boot up then release the buttons when you see
"TinyBooter Mode" on ChipworkX's display. The version number is right after that line.
4.2. TinyBooter Update using bootstrap loader
The user can update Tinybooter using “Tinybooter Updater” included with GHI NETMF
SDK under ChipworkX\Firmware folder. This updater tool consists of Atmel sam-ba tool
with the required script and the BIN file that has to be loaded to serial DataFlash chip. It
also includes the Tinybooter Updater driver that defines USB port as a virtual Serial Port
used to upload the new BIN file.
The following instructions explain how to successfully accomplish this:
Erasing Process:
1. Power up ChipworkX hardware.
2. Press and hold Up, Select and Down buttons, keep holding and reset the system.
3. Release the buttons when prompted to do so then you will see instructions about how
to proceed.
4. Press Up three times to proceed with the erasing process, or press Down to abort.
Emergency Bootstrap access
Use this method of access whenever something wrong happens during TinyBooter
update process, like uploading the wrong bin file and ChipworkX tinybooter is not
accessible at all.
1. Disconnect power.
2. Remove the jumper placed on ChipworkX Module.
Rev.1.10
Page 20 of 26
www.ghielectronics.com
GHI Electronics,LLC
ChipworkX Development System
TinyBooter and Firmware Update
3. Connect power.
4. Place the jumper back.
5. Connect USB cable.
6. Follow the same next steps for updating the TinyBooter.
Installing TinyBooter Updater USB Driver:
1. After erasing serial DataFlash and NOR Flash successfully following the previous
steps.
2. Power up ChipworkX hardware.
3. Connect USB cable to your PC, then Windows will ask for driver INF file.
4. The driver file is located in the following path:
%GHI NETMF SDK%\ChipworkX\Firmware\TinyBooter Updater\USB Tinybooter Updater Driver\
5. Important Note (for Windows 7 users only): Windows 7 installs the driver
automatically but it mistakenly considers it a GPS camera device. Although the name is
wrong the driver is OK and you may proceed with the steps.
6. After Windows is done installing the driver, you will see a new serial port (COM port) in
your system. It will take the first available COM port number, e.g. COM5.
7. This port is used by TinyBooter Updater script to upload the new tinybooter.bin file to
serial DataFlash, or it can be used to access the processor using Atmel tool SAM-BA
(sam-ba_cdc_2.9.xp_vista.exe) to manually upload bin files to serial DataFlash.
Updating TinyBooter:
1. After installing TinyBooter Updater USB Driver and recognizing the new COM port
number, open command prompt and go to the following folder
%GHI NETMF SDK%\ChipworkX\Firmware\TinyBooter Updater\
2. Run the following command to run the script:
ChipworkX_TinyBooter_Updater.bat COMx
where x is the number of newly created Serial Port. See example below:
Rev.1.10
Page 21 of 26
www.ghielectronics.com
GHI Electronics,LLC
ChipworkX Development System
TinyBooter and Firmware Update
3. When you run the batch file, if you get an Access Denied message from Windows. Try
to run the batch file as an Administrator, or copy the batch file to your desktop and run it
from there.
4. The script will run to upload the new TinyBooter bin file to serial DataFlash. This
process takes several seconds to complete.
5. When it is done, logfile.log will be created and opened using notepad automatically. It
contains information about the updating process. Make sure the end of the file says
“Sent file & memory area content (....) match exactly!”
The following is an example logfile.log of a successful update:
6. Reset the system and then Tinybooter will execute. Make sure to update TinyCLR
firmware.
7. The system is now ready to deploy new managed applications.
4.3. ChipworkX Firmware Update Through TinyBooter
In the following steps, we will update ChipworkX firmware with Tinybooter and MFDeploy
help:
1. First, install the latest GHI NETMF SDK (which includes the latest ChipworkX
firmware and TinyBooter binary files). You probably already did when you updated
the TinyBooter in the previous section.
Rev.1.10
Page 22 of 26
www.ghielectronics.com
GHI Electronics,LLC
ChipworkX Development System
TinyBooter and Firmware Update
2. Insure there is no need to update the TinyBooter or you already did.
3. Press and hold the Up and Down buttons then press and release reset to access
TinyBooter mode. You will see on the ChipworkX's TFT display.
4. Run MFDeploy and select USB from the Device list, you should see
ChipworkX_ChipworkX in the dropdown.
5. Check the communication between MFDeploy and TinyBooter by pinging the
device. Press Ping and you should see this message:
6. Now we can lead MFDeploy to the new ChipworkX firmware files. Click Browse and
direct MFDeploy to the firmware HEX files. These can be found under
ChipworkX\firmware folder in the SDK. The other files with “sig” extension must
exist in the same folder as the HEX files. Select ALL of the HEX files at once and
start deploying the firmware by pressing Deploy.
Rev.1.10
Page 23 of 26
www.ghielectronics.com
GHI Electronics,LLC
ChipworkX Development System
TinyBooter and Firmware Update
7. Loading the files takes about a minute. On completion the firmware will execute.
Double check the version number to make sure the correct firmware is loaded.
8. Loading new firmware will not erase the deployed managed application. If you need
to erase the managed application click Erase.
Rev.1.10
Page 24 of 26
www.ghielectronics.com
GHI Electronics,LLC
ChipworkX Development System
What is next?
5. What Is Next?
There are many documents and resources that helps you out with ChipworkX and .NET
Micro Framework:
•
ChipworkX User Manual
•
ChipworkX downloads page on www.ghielectronics.com
•
GHI blog is always a good place to visit
http://tinyclr.blogspot.com/
The Micro Framework Project website is an excellent resource
http://www.microframeworkprojects.com/
A good and free eBook to continue learning about C# is available at
http://www.programmersheaven.com/2/CSharpBook
Jens Kuhner excellent book on .NET Micro Framework
http://www.apress.com/book/view/9781430223870
•
•
•
•
USB complete is an excellent book on USB
http://www.lvr.com/usbc.htm
•
.NET Micro Framework's main page on Microsoft's website
http://www.microsoft.com/netmf
•
.NET Micro Framework Community
http://www.netmf.com/
Rev.1.10
Page 25 of 26
www.ghielectronics.com
GHI Electronics,LLC
ChipworkX Development System
Legal Notice
Legal Notice
Licensing
ChipworkX Module is fully licensed for commercial use. The Module price covers the
commercial use of ChipworkX Module with .NET Micro Framework.
Disclaimer
IN NO EVENT SHALL GHI ELECTRONICS, LLC. OR ITS CONTRIBUTORS BE LIABLE FOR ANY
DIRECT, INDIRECT, INCIDENTAL, SPECIAL, EXEMPLARY, OR CONSEQUENTIAL DAMAGES
(INCLUDING, BUT NOT LIMITED TO, PROCUREMENT OF SUBSTITUTE GOODS OR SERVICES; LOSS
OF USE, DATA, OR PROFITS; OR BUSINESS INTERRUPTION) HOWEVER CAUSED AND ON ANY
THEORY OF LIABILITY, WHETHER IN CONTRACT, STRICT LIABILITY, OR TORT (INCLUDING
NEGLIGENCE OR OTHERWISE) ARISING IN ANY WAY OUT OF THE USE OF THIS PRODUCT, EVEN
IF ADVISED OF THE POSSIBILITY OF SUCH DAMAGE. SPECIFICATIONS ARE SUBJECT TO CHANGE
WITHOUT ANY NOTICE. GHI ELECTRONICS, LLC LINE OF PRODUCTS ARE NOT DESIGNED FOR
LIFE SUPPORT APPLICATIONS.
ChipworkX is a Trademark of GHI Electronics, LLC
.NET Micro Framework, Visual Studio, MFDeploy, Windows Vista, Windows SideShow are registered or
unregistered trademarks of Microsoft Corporation.
Other Trademarks and Registered Trademarks are Owned by their Respective Companies.
Rev.1.10
Page 26 of 26
www.ghielectronics.com