1
Multi Edition
User Manual
INDEX
1. INTRODUCTION
2. INSTALLATION PROCESS
3. INITIAL STEPS
4. USAGE GUIDE
4.1.
SURVEYS
4.2.
NEW SURVEY
4.3.
SEO
4.4.
SPLIT TESTING
4.5.
SETTINGS
5. SURVEY SELECTION
6. TROUBLESHOOTING
7. SUPPORT
1
1. INTRODUCTION
This plugin allows you to engage your audience on your website using intelligent surveys &
quizzes. Includes advanced list-segmentation, Webinar support, full SEO integration, splittesting functionality and full reporting.
You can create unlimited surveys, get stats, and segment visitors according to their answers
provided.
2
2. INSTALLATION PROCESS
This plugin is installed like any other Premium plugins. You should go to Plugins >> Add New
and then choose “Upload”.
The next step is to select the .zip file that you downloaded, and click on “Install Now”.
Finally, click on “Activate Plugin” to activate it in the WordPress interface.
3
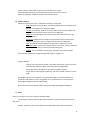
Now, you will need to activate the plugin. To do so, go to the Survey Snatcher menu in the
sidebar, and enter the e-mail you used to purchase Survey Snatcher.
4
3. INITIAL STEPS
The first thing you need to do is to download the bonus image pack (50 backgrounds you can
use in any survey).
To do so, go to Survey Snatcher >> Settings and scroll to the bottom, where you will see
“Install Image Pack”. Click on download and wait until the process finishes (please note that in
slow connections, the download might take up to 4 minutes).
Once this previous step is done, if you want to integrate Survey Snatcher with one of the
supported Autoresponder systems, you can do so from the same Settings screen.
Currently, these autoresponders are supported:
- Aweber
- Getresponse
- Mailchimp
- Icontact
- Constant Contact
For Aweber, you will only need to authorize Survey Snatcher to access your autoresponder
information. For the others, you will need to enter your API information.
You can also integrate the plugin with Gotowebinar (you will need to create an Api Key here)
and any of those plugins: Webinar Express and Hangouts Plugin. To use those last two, they
need to be installed and activated in the same WordPress site as Survey Snatcher.
If you want to use the Facebook connect button to get the email address from visitors, you will
first need to create an app (here) and enter the App Id and App Secret in the same settings
screen.
5
4. USAGE GUIDE
The plugin is divided into 5 different sections:
1) Surveys
Survey list
2) New survey
Create a new survey
3) SEO
SEO settings and reports
4) Split-testing
Create split-testing cases and see stats
5) Settings
Configure plugin settings
6
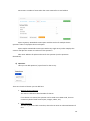
4.1. Survey list
From this screen, you can:
- create a new survey
- activate/deactivate an existing survey
- edit an existing survey
- export survey results (summary or full)
- duplicate a survey (the new one will be identical to the old one, except for
the already existing stats)
- delete a survey
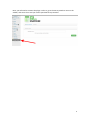
4.2. Creating a new survey
From the survey list, click on the button “Add New Survey”
7
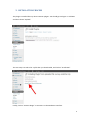
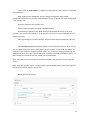
You will be redirected to the “New Survey” Screen:
There are 4 different tabs under this screen:
General Settings: Configure all common aspects for the survey (give it a name, status,
autoresponder system, etc)
Display Options: How and where to display
Stats: View real-time stats about conversions, etc.
Questions: Enter all the questions and optin forms
a) General Settings
Name: Survey name (for internal use)
Type:
Survey: Questions are presented one by one. Next question depends on
previous answer (non-linear path). Can have multiple end-points.
Quiz: All questions are presented in a row. Single end-point
Description (optional): Short text to describe the survey
8
Active: On/off; if the survey is Off, won’t be shown to the visitor
Autoresponder (optional): Autoresponder system to use for this survey
Webinar (optional): Webinar system to use for this survey
b) Display Options
Method: Currently there are 7 methods to display a survey/quiz:
- Popup: displays an html popup, with the background semi-transparent (so
the rest of the page is still partially visible)
- Top Bar: A colour bar appears at the top, with a Call to Action. When the
user clicks on the call to action, the survey is displayed
- Side Bar: An image appears on the left; when the visitor clicks on it, the
survey appears
- Exit Popup: When the user drags the mouse near the top of the screen
(about to click back / close), a popup with the survey is displayed.
- Chat: A facebook-like chat appears at the bottom right of the screen
- Full page splash: similar to the popup, but the rest of the screen is covered,
so the visitor will only see the survey and nothing else
- Embed: you can embed in a post/page, using the shortcode provided
Each method can be fully configured regarding colours, images, etc.
Trigger settings:
-
Cookie: if you activate this option, the visitor will see the survey only once,
and won’t be presented again until x days later (configurable)
Delay: The survey will appear x secs after the page is loaded
Scroll: The survey will appear after the user has scrolled a certain % of the
page
Post/pages: the survey can appear only on specific pages. If “show everywhere” is
checked, it will appear on every single page. If it is unchecked, you can choose the
post/pages/categories where it will appear.
Note: keep Control key pressed while selecting multiple post/pages/categories
c) Stats
Here you can get survey stats, with the following fields:
Times shown: number of times that the survey/call to action has been presented to
the visitor
Started: number of times when the user has submitted at least the first question
9
Conversions: number of times when the visitor entered his e-mail address
Export summary: Downloads a CSV report with the results for multiple choice
questions: what % of people chose each option.
Export replies: Downloads a CSV report with every single survey taken. Displays the
visitor e-mail plus the answer to each one of the questions.
Clear stats: Deletes all replies and stats for the question (not the questions
themselves).
d) Questions
Here you can add questions / optin forms for the survey.
There are 3 kinds of choices you can add here:
1. Multiple choice questions
The visitor is offered a closed number of choices.
If no choices are created, the question can be used as an HTML node, that can
contain any kind of html content (text, images, videos, etc.)
2. Open questions
The user is presented with a text box, where he can enter an unlimited amount of
text.
10
3. End-point
This is the optin form, where the user is asked for his/her details, and the
corresponding action is triggered (moved into a new autoresponder list, subscribed
to a webinar, etc.)
MULTIPLE CHOICE QUESTIONS:
After adding a new multiple choice question, a new question element appears on the screen,
where you can configure all settings:
Question title: a reminder for you, not visible to visitors
Question text: this is the actual question text that will be presented to the visitor.
Next question: the question where the user will be led to after answering this one (can
be overriden by the different choices).
11
Then comes the Style editor to configure the appearance of the question. It is divided
into 4 elements.
Body: applies to the whole box. You can configure things like width, height,
background image (you can use one of the predefined ones, or upload your own), background
color, margins, etc.
Question: applies to the question text
Choices: applies to each one of the individual choices
Submit button: applies to the “Next” button that will lead the visitor to the next
question. You can use a text button or an image (you can use one of the predefined ones, or
upload your own)
After you change any of these settings, the preview box will be updated in real time.
The Introductory text (optional) will appear on top of the question text. Here you can
put any HTML content you desire, using either the visual editor, or the HTML text editor. For
example, if you wanted to embed a youtube video, you can do it by copying and pasting the
embed code. If you want just a plain HTML node, leave the title blank, and add no choices, so
the introductory text will be the only visible part of the question.
Note: the content for the introductory text will be visible in the preview once you save the
survey.
Note: when the question is first created, you get a limited HTML editor. If you want to get the
full WordPress editor, save the survey first.
Below that are the choices
12
Each choice corresponds to one of the options that are presented to the user to choose from
when replying to the question. If you select a “next question”, the visitor will be led to that
question.
You can also edit the settings under “Advanced list segmentation metadata” (only for
advanced users). If you edit the settings here, and the user picks this answer, at the end of the
survey, after he enters his e-mail address, he’ll be put into this particular list/webinar (this can
be overriden by upcoming questions, and also by the end point).
Note: this is done on a “the last one wins” basis. Let’s see it with an example:
Q1. What’s your favourite pet?
The user answers “dogs”, associated with the autoresponder list “dogs”. If the
survey ends here, he’ll be put in the list “dogs”.
If there is a new question, like this:
Q2: Do you like big or small dogs?
If the user answers “small”, and that answer is associated with the list “smalldogs”, then at the end the visitor will only be subscribed to “small-dogs”, but not to dogs.
Same thing applies to autoresponder tags and webinars (last one wins)
Note: it is important to make sure that the next question is set either for the question, or the
answers; otherwise, if there is no next question, the survey will close.
13
OPEN QUESTIONS:
In this kind of questions there are no choices; instead there is a text box for the user to enter
an unlimited text. The size of the box can be configured under “Reply Box” settings.
Like in the multiple choice questions, you can enter any kind of HTML content, and configure
the question elements like size, colors, fonts, submit button, etc.
14
END POINT:
This is where the survey ends, and where the visitor will be presented with an opt-in box.
All the options here are classified in tabs:
Tab1 : Style
Like in the previous question types, you can configure thinks like background, color,
fonts, etc.
Tab2: Content
15
If you decide to use your own autoresponder code, you will only be presented with an HTML
text box, where you can enter anything you want.
If, on the other hand, you use the Survey Snatcher API integrations with any of the supported
autoresponders, the generation of the optin form is managed for you. Here you can choose if
you want to ask for the visitor’s name (as well as for the email), and if you want to show any
spam notice (ex: we will never sell your e-mail address, etc.).
If you choose “Use your own autoresponder”, the content of the end-point will be just the
content of the “Body” HTML box. If you use one of the presets, the body text will be shown
above the optin form (so you could have anything like text, image, videos, etc).
Tab3: Settings
Here you can configure what will happen to the user after finishing the survey (either stay on
the same page or be redirected to a new one).
Facebook connect: If you check this option, a button will appear in the optin form so that the
user can log in using facebook (make sure to create a Facebook app first and enter the API
details under the plugin settings).
Display social share buttons: If checked, below the optin box, 3 social share buttons will appear
(Facebook, Twitter and Google+). You can also edit the predefined text that will appear after
they click on the share button.
16
Tab4: Autoresponder automation
Here you can override any previous settings about list, tags, or webinar. If you select a value
here, any previous ones will be ignored. If you leave them blank, the visitor will be subscribed
to the last selected option in the previous questions (on a “last one wins” basis).
Tab5: AR Magic
Hey, we have a big warning sign here, and it’s for a reason ;-)
Now, this is what this thing does: let’s say you have people who are already in your list (in any
of the supported autoresponder systems), and want to move/copy them to a new list
depending on their answers to a survey, without them entering their e-mail address again.
With this “Autoresponder magic” you can do very easily!
17
Instead of redirecting them to the normal survey page (let’s say www.my-page.com/survey),
you append some extra parameters at the end of the url, and send a message to your list using
this special url (ex: www.my-page.com/survey?sid=231&e={email}. If they click the link, their
e-mail address will be embedded in the link, so they won’t need to enter their e-mail address.
When they get to the end point, instead of the optin box, they will get the content of the
“Thank you page content” box, and will be moved or copied (depending on the option you
select) to the new list. How cool is that? ;-)
They are also cookied, so the next time they visit the page and take the survey again, even if
they come from a normal link, the plugin will remember all the settings.
Note: if you select “move” instead of copy, you will also need to enter a “list from” option.
To get this option up and running, when you are mailing to your list using one of the
autoresponder e-mail editors, append the extra url parameters that you get after clicking “get
url” to the link, and replace {email} by the autoresponder e-mail placeholder. Just remember
not to use any click tracking from the autoresponder, as this messes with the system, and
leave the plain url in the e-mail.
Note: the character ? is used to separate a normal url from the parameters, and can only
appear once. If your url already has one (ex: http://www.site.com?p=99), then replace the ? in
the extra parameters by &.
For example, if the url of your survey is the one above, and the extra parameters are like this:
?sid=231&e={email} , the final url will be: http://www.site.com?p=99& sid=231&e={email}
If, on the other hand, the original url does not contain ?, you will append the normal string at
the end (ex, for http://www.site.com/post1, the final url would be
http://www.site.com/post1? sid=231&e={email}
Final note: double check your settings here before mailing your list, as if it is improperly
configure, might have undesired effects and move people among your lists!
18
4.3. SEO
SEO Rules work like this: if the visitor just arrived from a Search Engine (Google / Bing /
Yahoo), using a particular keyword, he can be presented with a specific survey.
When you add a SEO rule, you can select a survey (must be active) and as many SEO
keywords as you desire. If the searched keyword matches any of those in the list, the survey
will be shown.
For the keywords, you can use the wildcard *, which will replace any kind of content. If
no wildcard entered, there will be only exact matches.
This is better explained with an example:
User search in SE
black car
black cars
a black car
black cars for sale
a black car in the garage
i want a black car
black cars for sale
the best black car in the world
a black and white car
Text for keyword
black car
black car
black car
black car*
black car*
*black car
*black car
*black car*
*black car*
Is there a match?
YES
NO
NO
YES
NO
YES
NO
YES
NO
19
The plugin also creates a shortcode to display the searched keyword. So, if you enter
the following:
[incoming-keyword default=”default kw”]
If the user just came from a Search Engine, it will show the searched keyword;
otherwise, it will show the default keyword.
You can use the shortcode in any post/page, or in any of the surveys.
In a real life example, you could enter this string:
Hello, you came here looking for [incoming-keyword default=”blue widgets”], have a
look around!
If the visitor just came from a SE using the keyword “yellow widgets”, he will see:
Hello, you came here looking for yellow widgets, have a look around!
In any other case, he would see:
Hello, you came here looking for blue widgets, have a look around!
If the option “Store SEO keywords in database” is checked, then all incoming queries
will be recorded in the database, and you can sport all stats using the button “Export data”.
Warning: this might make the database grow pretty big if you receive a lot of SEO
traffic!
If you want to delete all previous stats, click on the button “Reset SEO stats”.
Warning: If the visitor is logged in to his Google account (using https:// address instead
of http://) at the moment of the search, the keyword is then not transferred, so you won’t be
able to get the incoming keyword.
20
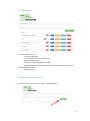
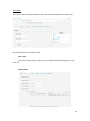
4.4. Split testing
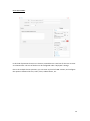
In case you want to split test different elements in a survey, you can create split-tests.
A split-test is a collection of two or more surveys, that will be displayed randomly, and the
results (views and conversions) is then recorded and displayed:
21
To create a split-test you just need to enter a name (not visible to the visitor, just for internal
use), and two or more surveys. Then, instead of showing a fixed surveys, they are displayed on
a random basis.
As always, we provide a “Reset stats” button to clear the database.
The recommended way to do a split-test is the following: create a survey, add the questions
and edit all settings. Once the survey is finished, duplicate it and modify all settings you would
like to alter. After that, create a new split-test and select both surveys.
22
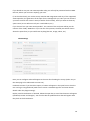
4.5. Settings
This screen has several parts:
Autoresponders
Api integration with autoresponders
Webinars
Api / plugin integration with webinar systems
Others
Facebook API details
Image Pack
Click on “Download” after installing the plugin to download the image pack, consisting
on 50 images that can be used as image background, popup background, etc.
Activation details
Your activation details (the e-mail you used when you purchased the plugin)
23
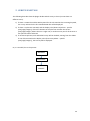
5. SURVEY SELECTION
The following describes how the plugin decides which survey to show (in case there are
different ones):
1) If there is a SEO rule and the SEO keyword for the rule matches the incoming keyword,
the survey selected in the first matched SEO rule will be displayed
2) If there is a split-test activated, and the display rule (show everywhere - specific
post/page/category) of the first element in the split-test matches the current
post/page/category where the user is right now, a random survey out of all the ones in
the split-test will be selected.
3) If no SEO or Split-test, each individual survey will be checked, starting from the oldest.
If one of them matches the display rules (show everywhere – specific
post/page/category), that survey will be displayed.
So, in a nutshell, this is the process:
SEO RULE?
SPLIT-TEST?
INDIVIDUAL
SURVEY?
24
6. TROUBLESHOOTING
¡Help! My survey is not displaying, what could be happening?
If you have created a survey, but you cannot see it displayed in the user area, check the
following:
1. The survey is active
2. Go into the survey, and check the “display options” tab:
Check that the cookie – do not show again until after x days is disabled
Make sure the delay is set to 0
Make sure the page scroll trigger is disabled
Make sure that either “show everywhere” is checked, or the specific post/page/category is
selected.
Test with another display method, and see if it still does not appear.
If none of this seems to work, then open a support ticket and we’ll be happy to help!
25
7. SUPPORT
If you have any questions, comments, etc., please open a support ticket at:
http://imtoolshq.com/support/
26