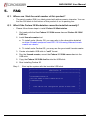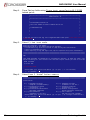
1
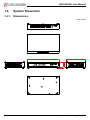
AND-G420N1 User Manual AND-G420N1 Networking Microbox powered by AMD GX-420MC with 6 x GbE LAN (2-pair Bypass) User Manual Acrosser Technology Co., Ltd. www.acrosser.com AND-G420N1 User Manual Disclaimer For the purpose of improving reliability, design and function, the information in this document is subject to change without prior notice and does not represent a commitment on the part of Acrosser Technology Co., Ltd. In no event will Acrosser Technology Co., Ltd. be liable for direct, indirect, special, incidental, or consequential damages arising out of the use or inability to use the product or documentation, even if advised of the possibility of such damages. Copyright This document contains proprietary information protected by copyright. All rights are reserved. No part of this manual may be reproduced by any mechanical, electronic, or other means in any form without prior written permission of Acrosser Technology Co., Ltd. Trademarks The product names appear in this manual are for identification purpose only. The trademarks and product names or brand names appear in this manual are the property of their respective owners. Purpose This document is intended to provide the information about the features and use of the product. Audience The intended audiences are technical personnel, not for general audiences. To read this User Manual on your smart phone, you will have to install an APP that can read PDF file format first. Please find the APP you prefer from the APP Market. 2 Acrosser Technology Co., Ltd. AND-G420N1 User Manual Table of Contents 1. System Introduction....................................................................... 5 1.1. Specifications.............................................................................................................. 5 1.3. Packing List................................................................................................................. 7 1.4. System Dissection....................................................................................................... 8 1.4.1.Dimensions...................................................................................................... 8 1.4.2. Front I/O Panel................................................................................................. 9 1.4.3. Rear I/O Panel................................................................................................. 9 2. Assembly/Disassembly Procedures............................................11 2.1. Open the Chassis Cover............................................................................................11 2.2. SATA HDD Installation............................................................................................... 12 2.3. CF Card Installation................................................................................................... 13 2.4. Memory Module Installation...................................................................................... 16 3. BIOS Settings................................................................................ 17 3.1. Main Setup................................................................................................................ 17 3.2. Advanced Setup........................................................................................................ 18 3.2.1. W83627DHG Super IO Configuration............................................................ 19 3.2.2. W83627DHG HW Monitor.............................................................................. 19 3.2.3. SATA Configuration........................................................................................ 20 3.2.4. Serial Port Console Redirection..................................................................... 21 3.3. Chipset Setup............................................................................................................ 22 3.4. Boot Setup................................................................................................................. 23 3.5. Save & Exit Setup..................................................................................................... 24 4. Software Installation and Programming Guide......................... 25 4.1.Introduction................................................................................................................ 25 4.1.1.GPIO.............................................................................................................. 25 4.1.2.Watchdog....................................................................................................... 25 4.1.3. LAN Bypass................................................................................................... 25 4.2. File Descriptions........................................................................................................ 25 4.2.1. GPIO/Watchdog/LAN Bypass........................................................................ 25 4.3. API List and Descriptions.......................................................................................... 26 4.3.1.GPIO.............................................................................................................. 26 4.3.2.Watchdog....................................................................................................... 26 4.3.3. LAN Bypass................................................................................................... 27 www.acrosser.com 3 AND-G420N1 User Manual 5. FAQ................................................................................................ 29 Q 1. Where can I find the serial number of this product?.................................................. 29 Q 2. What if the Fedora 20 Workstation cannot be installed normally?............................ 29 4 Acrosser Technology Co., Ltd. AND-G420N1 User Manual 1. System Introduction Acrosser's Microbox Networking device AND-G420N1 is powered by AMD® G-Series GX-420MC, [email protected], 2MB L2 cache, DDR3-1600 memory (up to16GB). The CPU supports AES (Advanced Encryption Standard) technology, making it an ideal choice for network security vendors, encryption faster and more secured. With a remarkable 6x Intel® GbE LAN Controller, AND-G420N1 offers the utmost compatibility & connectivity with a mini form factor. Besides, the model can handle 2-pair LAN bypass configured via software APIs or hardware jumpers. AND-G420N1 also provides luxurious sets of I/O, including 2x USB3.0 ports, 1x SATA-II port, 1x Console port and pin headers for 2x USB2.0 & GPIOs (4-In, 4-Out) internally. 1.1. Specifications System CPU • AMD GX-420MC, [email protected], 2MB L2 Cache Memory • Support DDR3 Only, (Max. capacity: 16GB) • 2x 204-pin SO-DIMM sockets (non-ECC) • 2G x1, 2G x2, 4G x1 (option) Storage SATA • 1x SATA II connector CF • 1x CF card, support UDMA Type-II socket HDD • 1x Swappable 2.5” HDD Bay on top cover Communication and I/O Ethernet • 6x PCIe x1 Intel GbE chip via RJ-45 Connector • 10/100/1000Mbps LAN Bypass • 2-pair LAN Bypass (LAN1/LAN2, LAN3/LAN4) • No wake-up feature USB • 2x USB 3.0 (external) • 2x USB 2.0 (internal) pin header Serial Ports • 1x RS-232 GPIO • 4x GPI • 4x GPO www.acrosser.com 5 AND-G420N1 User Manual Other Features Watchdog Timer • Software Programmable: 0~255 seconds. (0=Disable Timer) Battery • Lithium Battery, 3V 220mAH (CR2032) Hardware Monitoring • • • • • CPU Voltage CPU Temperature System Temperature RTC Battery Voltage Fan Speed Power Requirement Power Supply • DC in 12V / 60W adapter Software OS Support • Ubuntu 14.04 (32/64-bit), Linux Kernel 3.13 (32/64-bit) • Fedora 20 (32/64-bit), Linux Kernel 3.11 (32/64-bit) • Text Mode Only Mechanical & Environment Thermal • CPU: Fanless • System Fan Dimension • 242 x 149.5 x 44 mm (W x D x H) Operating Temperature • 0 ~ 40°C Storage Temperature • -20 ~ 80°C Relative Humidity • 0 to 90% @ 40°C, non-condensing EMC & Safety EMC 6 • CE, FCC Class A Acrosser Technology Co., Ltd. AND-G420N1 User Manual 1.3. Packing List Check if the following items are included in the package. 1x AND-G420N1 System 1x Quick Manual 1x Driver CD 1x Console Cable 1x Power Adapter 1x Power Cord 1x Screw Pack 1x Pull-tab Opener www.acrosser.com 7 AND-G420N1 User Manual 1.4. System Dissection 1.4.1. Dimensions (Unit: mm) 44 149.5 8 48.5 242 Acrosser Technology Co., Ltd. AND-G420N1 User Manual 1.4.2. Front I/O Panel • LED Indicators LED Light Status Bypass 1 Green Bypass 1 function enabled Bypass 2 Green Bypass 2 function enabled HDD Yellow HDD active Green LAN1 ~ LAN6 Green Yellow On: 1000Mbps Off: No link On: 100Mbps Off: 10Mbps Blinking: LAN active On: LAN not active 1.4.3. Rear I/O Panel • DC12V DC 12V power inlet. • Reset System reset button. Use a stick of less than 4mm in diameter to push this button. • LED Indicators LED Light Status POWER Green Power turned on HDD Green HDD active Bypass2 Yellow LAN 3 & LAN 4 bypass function enabled Bypass1 Yellow LAN 1 & LAN 2 bypass function enabled www.acrosser.com 9 AND-G420N1 User Manual • USB External USB 3.0 connectors. • Console Pin # Signal Pin # Signal 1 RTS 5 GND 2 DTR 6 SIN 3 SOUT 7 DSR 4 GND 8 CTS • LAN1 ~ LAN6 RJ-45 Ethernet Connectors. LED LED1 LED2 10 Light Status Off 10Mbps Green 100Mbps Orange 1000Mbps Yellow Link/Active Off LAN Off Acrosser Technology Co., Ltd. AND-G420N1 User Manual 2. Assembly/Disassembly Procedures 2.1. Open the Chassis Cover Step 1: Unscrew the three screws that fixed the chassis top cover. Step 2: Open up the top cover. www.acrosser.com 11 AND-G420N1 User Manual 2.2. SATA HDD Installation Step 1: Use the four screws provided in the package to install your SATA hard disk into the bracket located at the inner side of the top cover. Step 2: Firmly connect the SATA power and signal cable. 12 Acrosser Technology Co., Ltd. AND-G420N1 User Manual 2.3. CF Card Installation Step 1: Before inserting your CF card, you will have to stick a customized pull-tab opener to help detaching the CF card from its card holder. Step 2: Peel off the protective sheet on the pull-tab opener, and stick it on your CF card as shown below. www.acrosser.com 13 AND-G420N1 User Manual Step 3: Press the pull-tab opener to make it stick firmly onto the CF card. Step 4: Unscrew and remove the card stopper. Insert the CF card into the card holder. 14 Acrosser Technology Co., Ltd. AND-G420N1 User Manual Step 5: Push the CF card all the way into the card holder. Step 6: Lock the card stopper into position. www.acrosser.com 15 AND-G420N1 User Manual 2.4. Memory Module Installation Step 1: Align the notch key on the memory module with the one on the socket. Insert the first memory module into the socket. Step 2: Align the notch key on the memory module with the one on the socket. Insert the second memory module into the socket. 16 Acrosser Technology Co., Ltd. AND-G420N1 User Manual 3. BIOS Settings This chapter describes the BIOS menu displays and explains how to perform common tasks needed to get the system up and running. It also gives detailed explanation of the elements found in each of the BIOS menus. The following topics are covered: • Main Setup • Advanced Setup • Chipset Setup • Boot Setup • Save & Exit Setup Once you enter the AMI BIOS™ CMOS Setup Utility, the Main Menu will appear on the screen. Use the arrow keys to highlight the item and then use the <Pg Up> <Pg Dn> keys to select the value you want in each item. 3.1. Main Setup The BIOS setup main menu includes some options. Use the [Up/Down] arrow key to highlight the option that you wish to modify, and then press the [Enter] key to select the item and configure the functions. Main Aptio Setup Utility - Copyright (C) 2015 American Megatrends, Inc. Advanced Chipset Boot Save & Exit BIOS Information BIOS Vendor Core Version Compliancy Project Version Build Date and Time American Megatrends 4.6.5.4 UEFI 2.3.1; PI 1.2 Set the Date. Use Tab to switch between Date elements. AMB-G420N1 V100-001 08/31/2015 11:22:33 CPU Information Socket0: AMD GX-420MC SOC Quad Core Running @ 2022 MHz 1262 mV Max Speed: 2000 MHz Intended Speed: 2000 MHz Min Speed: 1000 MHz Memory Information 4080 MB (DDR3) Total Memory Memory Frequency Dimm0: Not Present Dimm1: Size=4096MB, Speed=667 MHz System Date System Time [Mon 08/31/2015] [11:22:33] →←: Select Screen ↑↓: Select Item Enter: Select +/-: Change Opt. F1: General Help F2: Previous Values F3: Optimized Defaults F4: Save & Exit ESC: Exit Version 2.17.1246. Copyright (C) 2015 American Megatrends, Inc. Note: Listed at the bottom of the menu are the control keys. If you need any help with the item fields, you can press <F1> key, and it will display the relevant information. www.acrosser.com 17 AND-G420N1 User Manual • System Date This option allows user to set the date on the system real-time clock RTC. Use your keyboard to navigate to the month, day, or year and type in the correct numeric value. Note: The Day option automatically changes when you set the Date option. • System Time This option allows user to set the time on the RTC. Use your keyboard to navigate to the hour, minute, or second and type in the correct numeric value. Note: The time is in 24-hour format. For example, 5:30 A.M. appears as 05:30:00, and 5:30 P.M. as 17:30:00. 3.2. Advanced Setup Select the Advanced menu item from the Aptio Setup Utility to enter the Advanced BIOS Setup screen. You can select any item in the left frame of the screen and press <Enter> key to enter its sub-menu and access its parameters. Main Aptio Setup Utility - Copyright (C) 2015 American Megatrends, Inc. Advanced Chipset Boot Save & Exit Lan Bypass Function [Disabled] Enable or disable Lan by pass function W83627DHG Super IO Configuration W83627DHG HW Monitor SATA Configuration Serial Port Console Redirection →←: Select Screen ↑↓: Select Item Enter: Select +/-: Change Opt. F1: General Help F2: Previous Values F3: Optimized Defaults F4: Save & Exit ESC: Exit Version 2.17.1246. Copyright (C) 2015 American Megatrends, Inc. 18 Acrosser Technology Co., Ltd. AND-G420N1 User Manual 3.2.1. W83627DHG Super IO Configuration Aptio Setup Utility - Copyright (C) 2015 American Megatrends, Inc. Advanced W83627DHG Super IO Configuration W83627DHG Super IO Chip Serial Port 0 Configuration Set Parameters of Serial Port 0 (COMA) W83627DHG →←: Select Screen ↑↓: Select Item Enter: Select +/-: Change Opt. F1: General Help F2: Previous Values F3: Optimized Defaults F4: Save & Exit ESC: Exit Version 2.17.1246. Copyright (C) 2015 American Megatrends, Inc. • Serial Port 0 Configuration Enable or disable serial port 0 (COMA). 3.2.2. W83627DHG HW Monitor Aptio Setup Utility - Copyright (C) 2015 American Megatrends, Inc. Advanced Pc Health Status System Temperature CPU Temperature SYSFAN Speed CPU Core Voltage RTC Battery Voltage : : : : : +33'C +52'C 6308 RPM +1.261 V +3.351 V →←: Select Screen ↑↓: Select Item Enter: Select +/-: Change Opt. F1: General Help F2: Previous Values F3: Optimized Defaults F4: Save & Exit ESC: Exit Version 2.17.1246. Copyright (C) 2015 American Megatrends, Inc. www.acrosser.com 19 AND-G420N1 User Manual • System Temperature This item displays the system temperature. • CPU Temperature This item displays the CPU temperature. • SYSFAN Speed This item displays the system fan speed. • CPU Core Voltage This item displays the VCORE voltage level. • RTC Battery Voltage This item displays the battery voltage level. 3.2.3. SATA Configuration This option allows you to view and configure the SATA settings. Aptio Setup Utility - Copyright (C) 2015 American Megatrends, Inc. Advanced SATA SATA SATA SATA SATA Configuration Controller(s) Mode Selection Port0 Port1 [Enabled] [AHCI] Not Present Not Present Determines how SATA controller(s) operate. →←: Select Screen ↑↓: Select Item Enter: Select +/-: Change Opt. F1: General Help F2: Previous Values F3: Optimized Defaults F4: Save & Exit ESC: Exit Version 2.17.1246. Copyright (C) 2015 American Megatrends, Inc. • SATA Controller(s) Enable or disable SATA device. • SATA Mode Selection Determines how SATA controller(s) operate. • SATA Port0 ~ SATA Port1 Enable or disable serial port. 20 Acrosser Technology Co., Ltd. AND-G420N1 User Manual 3.2.4. Serial Port Console Redirection Aptio Setup Utility - Copyright (C) 2015 American Megatrends, Inc. Advanced COM0 Console Redirection Console Redirection Settings [Enabled] Console Redirection Enable or Disable. →←: Select Screen ↑↓: Select Item Enter: Select +/-: Change Opt. F1: General Help F2: Previous Values F3: Optimized Defaults F4: Save & Exit ESC: Exit Version 2.17.1246. Copyright (C) 2015 American Megatrends, Inc. • Console Redirection Enable or disable Console Redirection. • Console Redirection Settings This settings specify how the host computer and the remote computer will exchange data. Both computers should have the same or compatible settings. www.acrosser.com 21 AND-G420N1 User Manual 3.3. Chipset Setup Select the Chipset menu item from the Aptio Setup Utility to enter the Chipset Configuration Setup screen. You can select any item in the left frame of the screen and press <Enter> key to enter its sub-menu and access its parameters. Main Lan Lan Lan Lan Lan 1 2 3 4 5 Aptio Setup Utility - Copyright (C) 2015 American Megatrends, Inc. Advanced Chipset Boot Save & Exit Enable Enable Enable Enable and 6 Enable XHCI Enable EHCI Enable [Enabled] [Enabled] [Enabled] [Enabled] [Enabled] Lan 1 On/Off Control [Enabled] [Enabled] →←: Select Screen ↑↓: Select Item Enter: Select +/-: Change Opt. F1: General Help F2: Previous Values F3: Optimized Defaults F4: Save & Exit ESC: Exit Version 2.17.1246. Copyright (C) 2015 American Megatrends, Inc. • Lan 1 Enable Enable or disable system LAN1 port. • Lan 2 Enable Enable or disable system LAN2 port. • Lan 3 Enable Enable or disable system LAN3 port. • Lan 4 Enable Enable or disable system LAN4 port. • Lan 5 and 6 Enable Enable or disable system LAN5 and LAN6 ports. • XHCI Enable Control the USB XHCI (USB 3.0) function. • EHCI Enable Control the USB EHCI (USB 2.0) function. 22 Acrosser Technology Co., Ltd. AND-G420N1 User Manual 3.4. Boot Setup Choose boot priority. Aptio Setup Utility - Copyright (C) 2015 American Megatrends, Inc. Advanced Chipset Boot Save & Exit Main Boot Boot Boot Boot Option Option Option Option Priorities #1 #2 #3 Sets the system boot order →←: Select Screen ↑↓: Select Item Enter: Select +/-: Change Opt. F1: General Help F2: Previous Values F3: Optimized Defaults F4: Save & Exit ESC: Exit Version 2.17.1246. Copyright (C) 2015 American Megatrends, Inc. • Boot Option #1 ~ #3 Sets the system boot order. www.acrosser.com 23 AND-G420N1 User Manual 3.5. Save & Exit Setup Main Aptio Setup Utility - Copyright (C) 2015 American Megatrends, Inc. Advanced Chipset Boot Save & Exit Save Changes and Reset Discard Changes and Reset Reset the system after saving the changes. Restore Defaults →←: Select Screen ↑↓: Select Item Enter: Select +/-: Change Opt. F1: General Help F2: Previous Values F3: Optimized Defaults F4: Save & Exit ESC: Exit Version 2.17.1246. Copyright (C) 2015 American Megatrends, Inc. • Save Changes and Reset Reset the system setup after saving the changes. • Discard Changes and Reset Reset the system setup without saving any changes. • Restore Defaults Restore/Load default values for all the setup options. 24 Acrosser Technology Co., Ltd. AND-G420N1 User Manual 4. Software Installation and Programming Guide 4.1. Introduction Acrosser provides AND-G420N1 APIs for GPIO, Watchdog, and LAN Bypass. All APIs are provided in ‘Libw83627.a and Libw83627.so. Users can use these files to program its application lib_init() API before using any other APIs. And, users need to call lib_close() to finish APIs, or to use maintest execution file to control GPIO, Watchdog, and LAN Bypass. 4.1.1. GPIO This model provides a GPIO interface. Users can use the GPIO APIs to configure and to access the GPIO interface. 4.1.2. Watchdog This model provides a Watchdog timer. Users can use the Watchdog APIs to configure and to access the Watchdog timer. The Watchdog timer can be set to 1~255 seconds. Setting the timer to zero disables the timer. The remaining seconds of the timer to reboot can be read from the timer. 4.1.3. LAN Bypass This model provides two pairs of LAN ports to implement the bypass function. Users can invoke the LAN Bypass APIs to control the bypass states of the LAN ports. 4.2. File Descriptions 4.2.1. GPIO/Watchdog/LAN Bypass 1. Libw83627.a The static library of the GPIO, Watchdog, and LAN Bypass APIs for accessing the SuperIO. 2. Libw83627.h This file includes the declarations of the APIs and macro definitions. 3. maintest The execution file of the utility. www.acrosser.com 25 AND-G420N1 User Manual 4. Libw83627.so The dynmic library of the GPIO, Watchdog, and LAN Bypass APIs for accessing the SuperIO. 4.3. API List and Descriptions 4.3.1. GPIO Syntax: Get_gpi_status(int pin) Description: Get the status of GPIO input pins. Parameters: This function takes an Integer variable as the parameter. The pin0 ~ pin3 is the status of the input pins. Return Value: 1: HIGH, 0: LOW. Syntax: Get_gpo_status(int pin) Description: Get the status of GPIO output pins. Parameters: This function takes an integer variable as the parameter. The pin0 ~ pin3 is the status of the output pins. Return Value: 1: HIGH, 0: LOW. Syntax: Set_gpo(int pin, int value) Description: Set the status of GPIO Output value. Parameters: Set value 0 is Low, 1 is High Return Value: If the function sets the values successfully, it returns 0 or -1, any other returned value stands for error. 4.3.2. Watchdog 26 Syntax: Void wdt_start(int _timevalue) Description: This function reads the value of the watchdog time counter. Parameters: The parameter ‘_timevalue’ is the value to set to watchdog timer register. The range is 1 ~ 255. Return Value: None. Syntax: Int get_wdt_count(void) Description: This function get the watchdog timer register. Parameters: None. Return Value: This function returns the value of the time counter. Acrosser Technology Co., Ltd. AND-G420N1 User Manual Syntax: Void wdt_stop(void) Description: This function sets the watchdog timer stop Parameters: None. Return Value: None. 4.3.3. LAN Bypass Syntax: void enableWtd(void) Description: Enable Watchdog Timer. (This timer is different from the System Watchdog timer). Parameters: None. Return Value: None. Syntax: void disableWtd(void) Description: Disable Watchdog Timer. Parameters: None. Return Value: None. Syntax: void reloadWtd(void) Description: Reload Watchdog Timer. Parameters: None. Return Value: None. Syntax: void forceNormal(void) Description: Force the port to become normal state. Parameters: None. Return Value: None. Syntax: void forceBypass(void) Description: Force the port to become bypass state. Parameters: None. Return Value: None. Syntax: void setWtd4(void) Description: Set the watchdog timer to 4 seconds. Parameters: None. Return Value: None. www.acrosser.com 27 AND-G420N1 User Manual 28 Syntax: void setWtd8(void) Description: Set the watchdog timer to 8 seconds. Parameters: None. Return Value: None. Syntax: void setWtd16(void) Description: Set the watchdog timer to 16 seconds. Parameters: None. Return Value: None. Syntax: void setWdt32(void) Description: Set the watchdog timer to 32 seconds. Parameters: None. Return Value: None. Acrosser Technology Co., Ltd. AND-G420N1 User Manual 5. FAQ Q 1. Where can I find the serial number of this product? • The serial number (S/N) is a label printed with alpha-numeric character. You can find the S/N label on the bottom of this product or on its packing box. Q 2. What if the Fedora 20 Workstation cannot be installed normally? • Please follow these steps to install Fedora 20 Workstation. 1. Get ready with the files Fedora 21 32/64 server iso and Fedora 20 32/64 DVD iso. 2. Install liveusb-creator tool. a. To install under Ubuntu OS, you may refer to the description detailed on https://ifireball.wordpress.com/2011/10/14/running-fedoras-liveusbcreator-on-ubuntu/ b. To install under Fedora OS, you may use the yum install liveusb-creator. 3. Create a bootable USB stick in "ext3" format. 4. Run the liveusb-creator, exract the Fedora 21 32/64 server iso into the USB stick. 5. Copy the Fedora 20 32/64 dvd iso into the USB stick. 6. Start installing Fedora 20. Step 1: Boot up the system with the bootable USB stick. ******************************************************************* * Fedora-Server 21 * ******************************************************************* * * * * * InstallFedora-Server 21 * * Test this media & install Fedora-Server 21 * * * * Troubleshooting * * * * * * * * Press Tab for full configuration options on menu items. * * * ******************************************************************* www.acrosser.com 29 AND-G420N1 User Manual Step 2: Press Tab key. Add a string linux text console=ttyS0,115200 behind quiet. ******************************************************************* * Fedora-Server 21 * ******************************************************************* * * * * * InstallFedora-Server 21 * * Test this media & install Fedora-Server 21 * * * * Troubleshooting * * * * * * * * * > vmlinuz initrd=initrd.img inst.stage2=hd:LABEL=LIVE quiet linux text console= ttyS0,115200 Step 3: Select 2) Use text mode. Starting installer, one moment... anaconda 21.48.21-1 for Fedora-Server 21 started. * installation log files are stored in /tmp during the installation * shell is available on TTY2 * when reporting a bug add logs from /tmp as separate text/plain attachments ================================================================================ ================================================================================ VNC Text mode provides a limited set of installation options. It does not offer cust om partitioning for full control over the disk layout. Would you like to use VNC mode instead? 1) Start VNC 2) Use text mode Please make your choice from above [’q’ to quit | ‘c’ to continue | ‘r’ to refresh]: 2 Step 4: Select Item 3 Installation source. ================================================================================ ================================================================================ Installation 1) [ ] Language settings 2) [!] (English (United States)) 3) [!] Installation source 4) [!] (Processing...) 5) [!] Installation Destination 6) [x] (No disks selected) 7) [!] Root password 8) [!] (Password is not set.) Please make your choice from above [’q’ to quit ‘r’ to refresh]: 3 30 Timezone settings (Timezone is not set.) Software selection (Processing...) Network configuration (Wired (enp3so0) connected) User creation (No user will be created) | ‘b’ to begin installation | Acrosser Technology Co., Ltd. AND-G420N1 User Manual Step 5: Select Item 2 local ISO file. ================================================================================ ================================================================================ Installation source Choose an installation source type: 1) CD/DVD 2) local ISO file 3) Network Please make your choice from above [’q’ to quit | ‘c’ to continue | ‘r’ to refresh]: 2 Step 6: Select Item 1 USB flash drive. ================================================================================ ================================================================================ Select device containing the ISO file 1) USB 3.0 FLASH DRIVE /dev/sdb1 (14.44 GiB MB) ext3 LIVE 2) ATA ST320LT012-9WS14 /dev/sda1 (500 MiB MB) ext4 ffd4b141-1102-4a3f-b136a5a27194a69d 3) ATA ST320LT012-9WS14 /dev/sda3 (50 GiB MB) ext4 987962af-61af-4740-aa22-3 cd86f4858b5 4) ATA ST320LT012-9WS14 /dev/sda5 (244.1 GiB MB) ext4 7c9e5844-03c7-4d53-aac 8-9eb1a0efe9d5 Please make your choice from above [’q’ to quit | ‘c’ to continue | ‘r’ to refresh]: 1 Step 7: Select Item 1 Fedora-20-i386-DVD.iso. ================================================================================ ================================================================================ Select an ISO to use as install source 1) Fedora-20-i386-DVD.iso Please make your choice from above [’q’ to quit | ‘c’ to continue | ‘r’ to refresh]: 1 Step 8: Select Item 2 Timezone settings. ================================================================================ ================================================================================ Installation 1) [ ] Language settings 2) [!] (English (United States)) 3) [!] Installation source 4) [!] (Processing...) 5) [!] Installation Destination 6) [x] (No disks selected) 7) [!] Root password 8) [!] (Password is not set.) Please make your choice from above [’q’ to quit ‘r’ to refresh]: 2 www.acrosser.com Timezone settings (Timezone is not set.) Software selection (Processing...) Network configuration (Wired (enp3so0) connected) User creation (No user will be created) | ‘b’ to begin installation | 31 AND-G420N1 User Manual Step 9: Select the timezone of your region. ================================================================================ ================================================================================ Timezone setting Available regions 1) Africa 6) Atlantic 2) America 7) Aystralia 3) Antarcatica 8) Europe 4) Artic 9) Indian 5) Asia Please select the timezone. Use numbers or type names directly [b to region list, 10) Pacific 11) US 12) Etc q to quit]: 5 Step 10: Select the city your region. 1) 2) 3) 4) 5) 6) 7) Aden Almaty Amman Anadyr Aqatau Aqtobe Ashgabat 28) 29) 30) 31) 32) 33) 34) Irkutsk Jakarta Jayapura Jerusalem Kabul Kamchatka Karachi 54) 55) 56) 57) 58) 59) 60) Pyongyang Qatar Qyzylorda Rangoon Riyadh Sakhalin Samarakand 25) Ho_Chi_Minh 52) Phnom_Penh 78) Yerevan 26) Hong_Kong 53) Pontianak 27) Hovd Please select the timezone. Use numbers or type names directly [b to region list, q to quit]: 65 Step 11: Select Item 4 Software selection. ================================================================================ ================================================================================ Installation 1) [ ] Language settings 2) [x] (English (United States)) 3) [x] Installation source 4) [!] (Fedora-20-i386-DVD.iso) 5) [!] Installation Destination 6) [x] (No disks selected) 7) [!] Root password 8) [!] (Password is not set.) Please make your choice from above [’q’ to quit ‘r’ to refresh]: 4 Timezone settings (Asia/Taipei timezone) Software selection (GNOME Desktop) Network configuration (Wired (enp3so0) connected) User creation (No user will be created) | ‘b’ to begin installation | Step 12: Select Item 8 Development and Creative workstation. ================================================================================ ================================================================================ Base environment Software selection Base environment 1) [ ] GNOME Desktop 2) [ ] KDE Plasma Workspaces 3) [ ] Xfce Desktop 4) [ ] LXDE Desktop 5) [ ] Cinnamon Desktop 6) [ ] MATE Desktop 7) [ ] Sugar Desktop Environment Please make your choice from above [’q’ ‘r’ to refresh]: 8 32 8) [x] Development and Creative Work station 9) [ ] Web Server 10) [ ] Infrastructure Server 11) [ ] Basic Desktop 12) [ ] Minimal Install to quit | ‘c’ to continue | Acrosser Technology Co., Ltd. AND-G420N1 User Manual Step 13: Select the rest of the items, press b to begin installation. ================================================================================ ================================================================================ Installation 1) [ ] Language settings 2) [x] (English (United States)) 3) [x] Installation source 4) [x] (Fedora-20-i386-DVD.iso) 5) [x] Installation Destination (Automatic partitioning selecte 6) [x] d) 7) [x] Root password 8) [x] (Password is not set.) Please make your choice from above [’q’ to quit ‘r’ to refresh]: b www.acrosser.com Timezone settings (Asia/Taipei timezone) Software selection (Development and CReative Works tation) Network configuration (Wired (enp3so0) connected) User creation (User test will be created) | ‘b’ to begin installation | 33 AND-G420N1 User Manual Technical Support Form We deeply appreciate your purchase of Acrosser products. Please find the “tech_form. doc” file in our utility CD. If you have any questions or problems about Acrosser products, please fill in the following information. We will answer your questions in the shortest time possible. Describe Your Info and Acrosser System Info • Your Company Name: • Your Contact Info: Phone Number: • Your E-Mail Address: • Your Company Address: • Acrosser Model Name: • Acrosser Serial Number: Describe System Configuration • CPU Type: • Memory Size: • Storage Device (e.g. HDD, CF, or SSD): • Additional Peripherals (e.g. Graphic Card): • Operating System & Version (e.g. Windows 7 Embedded): • Special API or Driver: (If yes, please provide it for debug.) • Running Applications: • Others: Describe Your Problems or Questions: Send the above information to one of the following Acrosser contacts: • • • • Acrosser Local Sales Representative Acrosser Authorized Sales Channels Acrosser Inquiry --- http://www.acrosser.com/inquiry.html Acrosser FAX Number --- 886-2-29992887 www.acrosser.com 34 Acrosser Headquarters 241新北市三重區光復路一段61巷26號10樓 10F., No.26, Ln. 61, Sec. 1, Guangfu Rd., Sanchong Dist., New Taipei City 241, Taiwan, R.O.C. TEL: +886-2-29999000 FAX: +886-2-29992887 Acrosser Taichung Office 408台中市南屯區河南路四段162號12樓之6 12F.-6, No.162, Sec. 4, Henan Rd., Nantun Dist., Taichung City 408, Taiwan, R.O.C. TEL: +886-4-22510659 FAX: +886-4-22546079 Acrosser China Subsidiary 深圳市欣扬通电子有限公司 深圳市福田区车公庙泰然九路21号 皇冠科技园3栋2楼 (邮编: 518040) 2F., 3rd Building, Crown Science Park, No. 21, Tai-Ran 9th Rd., Che Gong Miao, Futian Dist., Shenzhen, China (Postal:518040) TEL: +86-755-83542210 FAX :+86-755-83700087 Acrosser Shanghai Office 欣扬通电子有限公司 上海分公司 上海市徐汇区零陵路631号爱乐大厦12E (邮编: 200085) 12E, Aile Building, No.631, Ling-ling Road, Xu-Hui Dist., Shanghai, China (Postal:200085) TEL: +86-21-64288853 FAX: +86-21-64288854 Acrosser Beijing Office 欣扬通电子有限公司 北京分公司 北京市海淀区安宁庄西三条9号 宜品上层2-703 (邮编: 100085) Room 2-703, Yipinshangceng, No.9, Xisantiao, Anning Zhuang, Haidian Dist., Beijing, China (Postal:100085) TEL: +86-10-82359009 FAX: +86-10-82359003 Acrosser USA Inc. 11235 Knott Ave. Suite A, Cypress, CA 90630, USA Toll Free: +1-866-401-9463 TEL: +1-714-903-1760 FAX: +1-714-903-5629