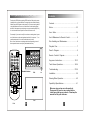
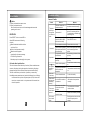
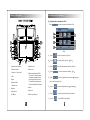
1
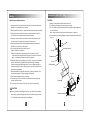
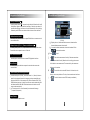
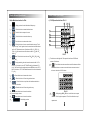
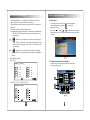
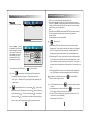
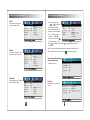
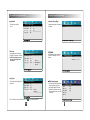
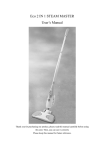
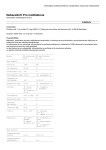
MIC
NO.:088-MTK6200-000-00A
IR
BLUETOOTH/TV/DISC
Some functions in the user manual are optional.
Please refer to the real model in actual use.
Capability
Capability &
& Specifications
Specifications
Capability
FM
Frequency Range .................................................... 87.5-108.0MHz
Intermediate Frequency.................................................... 10.7MHz
AM
Frequency Range .................................................... 522-1620KHz
ntermediate Frequency..................................................... 450KHz
TFT LCD Monitor
LCD Monitor ........................................................ 6.2 inch Diagonal
Screen Size .................................................154.4(W)¡ 92.6(H)Á 5.90(D) MM
LCD Dimension ........................................................ 480X(R,G,B)X234 dot
Display Area ....................................................137.52(W) ˆ 77.22(V) MM
NOTICE: The specification and design of this product
are subject to changes without prior notice.
41
Steering Wheel Operation(626
627
Contents
628)
Touch a point(Pic B)before entering DVD interface. When touch screen
interface show up, press 8888 on the numeric buttons. When Steering
Wheel Setup & Quit shows on the screen(Pic C) shows, steering wheel
setup will beentered. Press one of the buttons on the steering wheel
and hold it, then press any setup button on remote control/panel(Pic A)
A toot shows that the setup isdone. Press Quit button to exit.
Contents ............ ................................... ..... ..... ..... 1
Notice ............ .................. .......... ........... ..... ..... .. 2-3
User Guide ............ .................. .......... .............. .. 3-4
For example: If you want to modify the volume on steering wheel, press
one of the buttons on the steering wheel and hold it, then press + on
panel/remotecontrol. A toot shows that the setup is done.
Note: One of the buttons on steering wheel is corresponding to one of
those onpanel/remote control(only the alterable buttons)
Use & Maitenance for Remote Control ................ .....5
Disc Handling and Maintenance ............ ............ .....6
Playable Disc ............ .................. ............ ........ .....7
Panel's Diagram ............ ................... ......... ...... ..8
Remote Control's Diagram ............ .................... ....9
a
Key-press Instructions ............ ..................... ....10 -13
Touch Screen Operations ............ ................. .....14 -36
RETURN
Troubleshooting ............ ................... ...... ..... .....37-38
alterable buttons
PicB
In stallation ............ ................... ............ .. ..... ..... .....39
Steering Wheel Operation ............ ..................... .....40
Capability & Specifications ............ .................... .....41
VYW VMWdegh
EXIT
E
Welcome using series car audio products.
Pleasecarefully read our user manual before
installing and using our products. Plesekeep the
manual well for your reference.
PicC
PicA
40
1
Installation 626
Notice
627
628
CAUTION:
Important prevention measure
Please read the entire instruction Manual about your monitor and preserve
properly it, by win prepare later to consult.
1. Before operating this monitor , please read this instruction manual carefully.
2. Please preserve the instruction manual in convenient place, in order to
consult sequence of operation and security information.
3. Please pay more attention to the instruction manual each warning, and
1. Always use an experienced installation technician.
2. The location of the player must not obstruct the driver .
3. Do not install the player in excessive dusty, shakable, high-temperature
or humid condition.
,
Note : these conditions will adversely affect the player s operation.
4. Follow the player connecting diagram, using the appendixes provided with
the unit.
strictly carries on the operation according to the instruction.
4. Other people except have read and grasped the operation explanation,
otherwise, do not let him use this system.
5. Do not install the monitor in which may cause:
A. Block off the driver ' s sightline.
B. Affects the vehicles any operating system or the security function
performance ( including the button of the security aerocyst and caution
light), or interrupts the driver safe driving the position.
6. If operates this monitor to disperse your attention. Causes you are unable
to drive vehicles safely. Please observe the safe driving rule and pay
attention to all present traffic regulations, if you are operating system or
reading the display in trouble. Please park your car safely, then make with
the necessary ajudgement.
7. Please remember to tie the safety belt when you driving, otherwise, if the
accident has happened. The injured degree will intensify.
8. Do not wear the earphone when you driving.
9. To ensure safety. Do not use some function when the brake is pulled up
and the vehicle is driving.
10. Do not turn up the volume too high. You can ' t hear the outer activity.
Body
Mounting metal bar
Hex. nut
Flat washer
Screw
Flexible washer
Hex. Bolt
Car panel
Unit
CAUTION
Don ' t try installing or repairing your monitor . If you have no training about
electronic setup and car fittings, and who have no relational experiences.
Install the screw
Install the bracket
You will be injured by electric shock or other danger.
2
39
Troubleshooting
Notice
The troubles in DVD playing
Reason
Trouble
Measure
Fails to
dialogue
language and
subtitle
language
If the disc does not record
The playing DVD has not
multi-lingual record content. muti-lingual, you will not switch it.
If the disc has not record
You have to switch in the
subtitle. The subtitle can't
item of the disc menu.
display.
Do not display
the subtitle
The playing DVD has no
subtitle.
If the disc has not record
subtitle. The subtitle can'tdisplay.
You only switch in display
items of the disc menu.
Use the disc menu to switch.
If the disc has not record the
The playing DVD has not
multi-lingual record content. selecting language in DVD
SETUP. It can't switch to
selecting language.
Fails to accord
to D/K mode in
DVD SETUP
to carry out
playing.
Fails to switch
angle
The picture
unclear /
Distortion &
Dark.
The playing DVD has not
shoot scene which from
multi-angle.
If the DVD has not record the
scent from multi-angle, you will
not switch in multi-angle.
You are trying to multi-angle Watch the record scene from
watch scene which has not multi-angle shoot to switch in
shoot from milti-angle.
multi-angle.
Because of the unit compatible
duplication system.
The disc has signal which
Therefore, when play the disc
which has forbid copying signal,
forbid copy.
the image can watch when
(Some may have this
certain display monitors appear
signal.)
the horizontal stripe or oder
flaws.
The troubles in VCD playing
Trouble
PBC (play control)
menu display will
not be searched
out.
Fails to repeat &
track and time
searching.
Reason
Measure
CAUTION
In order to avoid the accident and break the relational law. Do not use the
display monitor which the driver can be watching with this unit.
In order to avoid the accident has happened, and break the relational law.
Do not use the front DVD or TV function when driving, and the back monitor
should not install it in which separate the driver ' s attention.
In some country or states, even if the driver or others, watching image from
the monitor will break the law. In similar area, must keep the rules and do
not use the DVD function.
CAUTION
Do not install the vehicles which have no ACC function.
User Guide
About unit
Notice
A. This unit is used at the 13.8V DC ground. In the condition of the negative
ground connect with the metal body of car, so it is safe to operate.
B. Fix the unit in the steady parts. If you parked your car to direct the sunlight
wait until the temperature in the car becomes normally before operating
the unit.
C. If this unit is out of order. Please shut off the power sources immediately
and contact with authorized repairman in time. Do not disassemble it by
yourself.
D. Please forgive us that we are irresponsible for the damages by your own
defect.
Protect LCD monitor
When this unit does not use in long time. Do not expose the LCD monitor to
The playing VCD has
no PBC.
The playing VCD has
PBC.
38
The VCD without PBC can not
carry out this operation.
The VCD with PBC can not
carry out this operation.
direct sunlight. Otherwise, it will cause the function out of gear.When use
the mobile phone, please keep away from the monitor, so that video sign
al was interrupted decause of spot, color stripe, etc.
3
Troubleshooting
User Guide
Common Trouble
Notice
A. When your hands have sweat, water.
B. When your hands have dirt.
Do not touch the monitor to avoid it was damaged and cause the
operating can ' t control.
RESET MPU
Press ' RESET ' button to reset MPU to
default MPU must reset as following
situation:
When finished the installation before
use this unit first.
If this unit can ' t operate normally.
When the monitor appears
exceptionally or the error message.
1. Turn off the Ignition switch.
Trouble
The power
fails to put
through the
unit does not
work
Note:Maybe some camera lens can 't match with this monitor,so it will app
ear horizontal line on picture.Only need press 9P/N button over 2
seconds on remote control to set system match in 3 seconds,then
solve this question.
No sound
Press 'RESET' button.
The unit enforcing the play
with repose, slow motion or
per frame to play.
Enforce the repose, slow motion
or per frame to play has no
sound.
The grip brake wire has
disconnected.
Connect the grip brak wrie, then
pull it up.
The grip brake has not
pulled up.
Connect the grip brak wrie, then
pull it up.
Icon display, The disc forbid operating.
the operation
This operation's structure
is unable to
with the disc do not
carry on
compatible.
Audio and
video leap
The operation is unable to cany
on.
The operation is unable to cany
on.
The unit installed loose.
Fix the unit steadily.
Touch screen
can ' t operate
normally by
tiuching
Built-in MPU is unable to
normal work.
After launder the operations
normally.
The remote
control does
not work
The remote control does
not aim at its receiver
window.
The battery of remote
control die down.
Fail to reset
tune in radio
mode.
4
Measure
Please check whether the power
has been connected correctly.
Removes reason which the fuse
broke off, then chang the fuse.
For god's sake to install the right
same tating fuse.
The wire has discconnected. Connect the wire correctly.
2. Use the pen point or other edgily tools to press.
This unit includes car back video input function. (When car back camera
connects this player), during the operation of car backing, this player
changes from play mode to car back video input mode automatically.
Then the screen shows you back view, it protects you more safely.
Fuse broke off.
The noise and other factor
caused the Built-in MPU
fails to work normally.
No picture
Car back video input function
Reason
The down-lead and tie-in
has dis connected.
33
37
The remote control aimed its
receive window.
Please use new battery instead.
Radio signal too low to store the
correct frequenly into the
storage.
Touch Screen Operations
1 In audio balance interface,touch
Use & Maitenance for Remote Control
/
to adjust the balance of LF
, RF, LR,RR rangingfrom 0 to 20 .
2 Touch
L
to quit and back to setup interface.
Install battery
Slide out the battery seat from the back of remote control, then according to
anode and negative direction to insert the battery.
When use it first. Please pull out film which the battery protrudes.
Press this button to enter GPS interface.(See details inNavig
To prize the battery tray with the tip tool.
ation & map user manual. The GPS function has been built in the model.
Press
MENU
to exit or change
Pull out the battery tray and insert the battery +
towards up.
to other modes.
Touch Screen Adjustment
3V
To set this button when touch screen working has warp, in order to setup
accurately, you can choose pointed tools(but do not damage the screen
surface) to operate.Touch
in Pic 9 and four
will be shown
as Pic 9. According to the sequence of the pictures, touch
until
the forth has been touched. Theadjustment has been finished.
Note: While making the adjustment for the touch screen, point at the
centre of
and do not touch other position. Otherwise,
it will not be effective or incline.
3
1
+
3V
+
After installed the battery to push back the tray.
CAUTION
Please keep the battery away from the children. If the battery was pushed back
by him. Please see a doctor at once.
CAUTION
Only use a 3V lithium battery.
The remote control does not use in one month at least, please take out the
battery.
Do not electricize to the battery, tears down, heats up or abandons it in the fire.
Do not operate the battery with metal tool.
Do not store the battery with metal material.
If the battery leak liquid, please wipe it off and install the new battery.
Deal with the used battery. To obey the local government laws and regulations
of your country or the environment public organization ' s rules.
Use remote control
2
*
4
(Pic 9)
The product can not be adjusted any more after leaving factory
because of all of products were adjusted in production.
36
The remote control operation aimed the front panel. The remote control can ' t
work normally to direct the sunlight.
CAUTION
Do not keep the remote control to direct the high temperature or sunlight.
Do not keep the remote control falling the floor. So that it was clipped in below of
the brake or gun.
5
Disc Handling And Maintenance
Touch Screen Operations
Note:The brightness, contrast, colour can not be changed in Standard
To keep the disc clean, please hold the disc edge only, do not touch its
surface.
Mode, Soft Mode, and Bright Mode. They can only be change in
Do not stick the label or adhere things on the disc.
Customised Mode.
3 Touch
C
to exit and back to setup interface.
Touch
to enter audio setup interface. Pic8-3
Inc o rre c t
Co rre c t
ROCK
OFF
Do not expose the disc into direct sunshine or near the hot sources.
After playing, please store it into the disc box.
Pic8-3
Before playing, wipe the disc with a clean cloth, from the centre hole
towards the outer edge .
1
2
There are 4 kinds of modes in audio modes: Rock, Jazz, Standard, Classic.
Press
/
to adjust loudness, treble, dediant, and bass ranging
from 0 to 16. Karaoke mode can not be adjusted.
3
D
Touch
Touch
to quit and back to setup interface.
enter audio banlance interface.Pic8-4
Never use alcohol, thinner, cleaning fluid, static electricity prevention
liquids or any other solvent to clean discs.
After playing, please store the disc into the disc box and keep them in room
temperature. It can help to extend the using life of the disc effectively.
(Pic8-4)
6
35
Touch Screen Operations
Playable Disc
This unit can play DVD, S-VCD, VCD, CD, MP3, MP4 etc. format discs.
A
Touch
to enter system setup interface
Pic8-1
OFF
ON
OFF
ON
CDC
Disc
types
Disc
symbols
Recorded
Contents
Audio+Video
(Motion Picture)
DVD
Disc Sizes
Playing time
About 2 hours
(single side disc)
12cm
About 4 hours
(double sides disc)
Audio+Video
12cm
About 45 minutes
Audio+Video
(Motion Picture)
12cm
About 74 minutes
Audio
12cm
About 74 minutes
MP3
Audio
12cm
About 600 minutes
MP4
Audio+Video
compressed format
12cm
S-VCD
SVCD
(Motion Picture)
Pic8-1
1 Touch
and then
/
to adjust the clock. Touch
C OMPAC T
to see the data in column
VCD
DIGITAL VIDEO
2
Touc h
3 Touch
B
Touch
/
/
To t ur n on/ of f t he buzz er / car r ev er s e.
to quit system setup and back to setup interface.
C OMPACT
CD
DIGITAL AUDIO
to enter display setup interface. Pic8-2
STAND
22
16
30
1
(Pic8-2)
In display mode, there are 4 kinds of modes: Standard, Soft, Bright,
Customised
2
Touch one of the modes and Brightness, Contrast, Colour will be
shown in the column.
34
NOTICE:
Some DVD, S-VCD, VCD discs playing operation may be limited by the soft
ware designer s special regulation, please refer to the instruction manual
of disc. This unit can play recorded discs (CD-R,CD-RW) too, but it depends
on the quality and recorded situation, some kinds of discs can not play in
this unit.
PAY ATTENTION :
This player cannot playback diameter 8cm disc. To avoid damage of it,
please do not insert and play the above mentioned disc in this player.
7
Panel
s Diagram
Touch Screen Operations
K Setup Interface Introduction Pic8
Touch
6
to enter setup operation interface. Pic8
1
MIC
IR
13 5
3
4
2
15
12
(Pic8)
11
14
7
10
16
9
8
1.Remote control receiver
11. Monitor on/off
2. Disc eject button
12. Bluetooth
3. Volume +/-;Power on/off
13.Radio searching down/DVD
/last track /TV channel search
forward/fast-backward;Radio
searching up/DVD/next track/
TV channel search backward/
fast-forward:Menu/Enter/Power
4. Disc
5.Menu
6.Bluetooth MIC
7. Reset button
8. Monitor
14. Mute
9.SD card slot
15. Disc slot
10.USB port
16.Audio input/AV Input
A
Touch
to enter system setup.(Pic8-1)
B
Touch
to display setup interface.
C
Touch
to enter audio balance interface.
D
Touch
E Touch
Pic8-3
to enter main menu interface. Pic1
back to playback/radio interface default goes
back to radio interface. P4
F Touch
to enter background setup.
G Touch
to enter touch screen adjusting interface.
H Touch
8
Pic8-2
not available
to enter DSP audio interface.
33
Touch Screen Operations
J
7010
6208
Remote Contorl s Diagram
Touch this button to enter Changer Mode interface as Pic 7 shows:
1
20
2
3
4
19
RETURN
18
17
Pic 7
1.
Touch this button for the previous disc.
16
15
5
6
7
8
14
2.
Touch this button for the next disc.
3.
Pause button. Press this button for pause.
4.
Press this button for the next track.
5.
Press this button for the previous track.
13
12
9
10
11
6
7
8
9
10
/
Press this button to adjust the volume.
Press this button for mute.
Press this button to quit the system setup and back to the main menu
interface.
Disc playing time display
Disc playing order display
32
1 Power on/off
11 Volume down
2 Numeric button
12 Title/subtitle
3 Number 10+/# button
13 Mute
4 GPS&Audio/Video synchro;
14 Volume up
DUAL ZONE=listen music
15 Radio searching down/previous
or radio while using GPS
track/backward&TV channel
5 Bluetooth (The optional function operation)
searching up/bluetooth answer
6 Radio
calls
7 Enter
16 Direction
8 Radio searching up/next track
17 Pause
/fastforward&TV channel
searching back/bluetooth hangup 18 Zoom out
9 Menu
19 Setup/location(GPS)/*button
10 Auto-memory&search&storage
20 Disc eject button
/tracksearching/title/audio channel
/program
9
Key-press Instructions
Disc Eject Button(
Touch Screen Operations
)
In playing mode, press
on panel to eject the disc. When the disc is still
inside,press it again to make the disc in and play. If the disc stays about 10
seconds after ejecting,it will return to the slot automatically, but not playing.
Otherwise, press DVD shortcut button or Menu button to enter the menu.
Radio shortcut button
In standby state, press this button on panel/'Radio'button on remote control
to enter radio mode.
(1)
Volume button
VOL+/-
Power on/off button (
)
chosen dialed,answered, missed calls.
In standby state, press +/- on panel/remote control to adjust the volume.
Press this button on panel to turn on/off the unit.
(2)
In working state, touch this button to enter DVD playback interface.
It records the dialed, answered, missed calls numbers.Touch
/
6
DVD Shortcut Button
(Pic6-4)
Display column. It shows the dialed, answered, missed calls or
F
Touch
to choose the number.
to quit .
This unit has rear camera function.(If the rear camera has
been connected with this unit) When the unit is working, push reverse.
Menu Button
It will switch to rear camera mode. The scene shot by the camera can
In standby state, press this button on panel to enter the touch screen main
menu interface.
be shown on the monitor.
H
Auto-memory&Scan Storage Button
1 In radio mode, press SCAN on remote control or Search button on
panel for the player will search six strongest stations automatically and
and stored from NO.1-6 into memory stick. FM has 3 bands as FM1, Fm2,
FM3Each band can store 6 stations and 18 ones can be stored totally. AM
has 3bands as AM1, AM2,AM3 .Each band can store 6 stations and 18
ones can be stored totally.
2 In TV mode, press it for over 2 secretary for auto search & storage.
(The optional function operation)
Press this button to enter AV IN mode. In this mode, touch
Setup to enter setup interface. Touch quit to enter main menu interface.
I
Touch this button to enter IPOD mode.(not available)
Reset Button
Press this button on panel to reset.
10
31
Key-press Instructions
Touch Screen Operations
(1)
Dial numbers through the cellphone or the numeric buttons on panel.
(2)
Touch numeric buttons on panel to dial the number. The number will be
shown in the column. Touch
to deleate one by one or deleate
(3)
all by long-press.
Touch
to make the call after dialing the number. Touch
to hang up.
(4) During calling, touch
to switch between the car
s speaker and
the phone.
(5)
/
Touch this button to adjust the volume.
USB Function
1. Insert the USB into the USB port, the player will automatically playback the
contents of USB. Press 'MENU' button on panel to enter main menu and
touch USB/SD to enter. Touch the tracks on screen to playback.
2. Press 'MENU' button on panel to enter main menu and choose other
playback modes.
Note: USB supports to play MP3 DVD CD AVI WMA JPG, 1.1 2.0
full speed 2G 4G 8G, with not more than 300 grates for the folder,
each grate not exceeding 500 documents.
Monitor off
4 Answering Pic6-3
Touch Monitor on/offbutton panel to turn on/off the monitor.
TV Shortcut Button
In working state, press this button on panel to enter TV interface.
Bluetooth Shortcut Button
In working state, press this button to enter bluetooth interface.
(The optional function operation)
Pic6-3
(1)
When there is a call incoming, it will switch to bluetooth hand-free interface
from any mode. The original playback voice will switch to the cellphone ring.
(2)
Touch
set
ANSWER
or
1
to answer or refuse. If the model has been
, the calls will be connected automatically after ringing
3 times.The incoming Tel number will be shown in the column.
(3)
Radio searching down/DVD/last track/TV channel search
)
forward/fast-backward (
During calling, touch
2
3
to switch between the car s speaker and
4
the phone.
5
5 Touch
to enter calling record interface. Pic6-4
30
In radio mode, Press
on panel/remote control to adjust the
receiver frequency down. Press and hold it for over 2 seconds to
search down automatically.
In disc playing mode, Press
to select the last track.
In TV mode, press
button once to skip previous a channel, press
this button over 2 seconds to search up automatically and play the
searching stations. (The optional function operation)
In disc playing mode, press this button over 2 seconds to select fastbackward as following: fast backward X2, X4, X8 ,X16 playing.
In bluetooth mode ,press this button on remote control to answer the call.
(The optional function operation)
11
Key-press Instructions
Touch Screen Operations
Radio Searching up/DVD/Next Track/TV Channel Search
Backward/ Fast-forward(
)
1
In radio mode, Press
on panel/remote control to adjust the
receiver frequency up. Press and hold it for over 2 seconds to search
up automatically.
2
In disc playing mode, Press
to select the next track.
3 In TV mode, press
button once to skip previous a channel, press
this button over 2 seconds to search up automatically and play the
searching stations. (The optional function operation)
4 In disc playing mode, press this button over 2 seconds to select fastforward as following: fast forward X2, X4, X8 ,X16 playing.
5 In bluetooth mode ,press this button on remote control to hangup.
(The optional function operation)
(Pic6-1)
Matching & Connecting
1
the system attains the signal, the name of the device will be shown on
the cellphone. When
1.In working state, press this button to enter GPS&audio/vedio synchro
1 GPS&audio: In audio/radio/TV mode, press GPS button on panel/
remote control to enter GPS interface with the above mentioned mode.
When there is voice coming from the GPS, the current voice will be
covered by it. After the GPS finishing guiding, it will come back to the
previous mode. The GPS interface stays.
GPS&video: In audio/radio/TV mode, press GPS button twice on panel
/remote control to enter GPS mode. When the GPS finishes voice
guiding,it come back to the previous mode.
Note: If the above mentioned modes are not needed, turn it off in the
GPS mode.
0000
CXN1450
is connected,press password
to match with the device. When 'CONNECTED' is shown on the
cellphone, the unit has been connected with the cellphone successfully.
2
In
CONNECT
touch
or
3
ANSWER Auto-answer. In connected state, the calls will be
connected automaticallyafter ringing 3 times.
4
BT Press
5
A2DP
button, then
is unavailable.
button is available only when BT is conected.
Not available.
3 Touch
to enter bluetooth calling interface. Pic6-2
or MUTE on remote control to turn on/off the
Disc Slot
When the disc is inserted into the slot, in DVD mode, the disc will be played
automatically.
The disc will not play if not in DVD mode.
Pic6-2
12
button to connect. If out
of connection, pressthis button to connect again.
Mute Button
In standby state, press
mute mode.
and turn
on the bluetooth function in the cellphone to search for device. When
GPS&Audio/Video Synchro
2
Please build up bluetooth connection between the unit and the cell
phone before using the bluetooth function. Touch
29
Touch Screen Operations
E
1
Bluetooth Operation Interface (The optional function operation)
Touch
Key-press Instructions
Num e ric Butto n
to enter bluetooth interface Pic6
In p la yb a c k m od e, p re ss this b utton o n re m o te c o ntro l to c ho o se the tra c k.
In b lue too th m o d e, p re ss this b utto n o n re m o te c o ntro l to d ia l the num b e r.
Title Button
1 In DVD playback mode, press Title/Subtitle
Menu button on panel for title display.
2
(Pic6)
( )
Touch this button to show the dialing interface.
( 2)
Touch this button to show the calls record.
( 3)
Touch this button to show the bluetooth setup interface.
on remote control or
Some VCD and SVCD (especially KARAOKAY) have the menu which
allows to select the content. This kind of menu is called PBC.
While playing this kind of disc:
* Press Title to setup the PBC.
* Press the numeric buttons to choose the track.
When PBC is off, choose the track on remote control through the
numeric buttons.
When PBC is on, you can not choose the track through remote control.
Warning
If it shows PBC MENU is chosen within 10 secretary, the unit will
begin to play from the first track.
Pause Button
(4)
Touch this button to mute.
(5)
/
Touch this button to adjust the volume.
(6)
Touch this button to quit bluetooth interface.
(7)
Touch this button to switch between speaker and cellphone.
(8)
Touch this button to hang up/refuse the call.
(9)
(10)
(11)
(12)
2 Touch
Touch this button to deleate the number.
Touch this button to answer/make a call.
Shows the incoming/dialed out numbers
clock diaplay column
Pause. Press
continue.
on remote control to pause. Press it again to
Zoom Button
This button on remote control is for view zooming in function. While
playing DVD/VCD, press it to zoom in the view by times according
to the pressing times as: X2,X3,X4.
Se tup Butto n
Press this b utton o n rem o te c o ntro l fo r DVD se tup.(Ple a se se e d e ta ils in To uc h
Sc re e n Op e ra tio ns inte rfa c e 12 DVD
Direction/Enter Button
Press the direction button to move the cursor to the needed item and press
ENTER to choose.
to enter bluetooth setup interface. Pic6-1
28
13
Touch Screen Operations
Touch
MENU
Touch Screen Operations
D.TV Operation Interface Pic5
button to enter main menu interface as Pic 1 shows:
(The optional function operation)
A
DISC
Pic 1
A
B
DISC
Press this button to enter DVD playback mode.
Touch
SD to enter SD playback mode. Touch
Pic5
USB
to enter USB playback mode.
1
Frequency Column
2
C
Touch this button to enter radio mode.
D
Touch this button to enter TV mode.
E
Touch this button to enter bluetooth connecting mode.
F
Touch this button to enter rear camera mode.
Storage Button Touch
or
button on remote control, or
to choose the frequency. Press
SAVE buttonor SCAN button on remote control to save the stations.
3 Direction button Touch
the channel. Touch
the channel.Press
or
or
on remote control to adjust
on remote control to adjust
on remote control for over 2 seconds for auto
searching.
G
Touch this button to quit main menu interface and
4
enter radio interface.
H
Touch this button to enter IPOD mode.(Not available)
J
Touch this button to enter changer mode.
5
6
K
Touch this button to enter setup interface.
L
Touch this button to enter GPS interface.(See details
in GPS & map user manual)
14
Search
or press
SCAN button on remote control for over 2 seconds to search for
channels from 44.25MHZ-863.25MHZ automatically. Stations will be
saved as No.00-49.(At most50 stations)
Touch this button to enter AV in mode.
I
Searching button. In TV mode, touch
7
Setup button
Touch this button to enter setup interface.
Quit button. Touch this button to quit TV interface and back
to main menu interface.
PAL/NTSC not available
27
Touch Screen Operations
Radio Mode Introduction for Pic4:
1
Display column for station Number & frequency.
2
Touch this button to search stations down.
3
Touch this button on panel to mute.
4
Touch this button to search stations up.
5
6
Touch this button for auto-search & station storage. Touch
it again to stop. Touch it again to back to search and save the stations
as No.1-6.FM is saved at most 18 stations as FM1:1-6 FM 2:1-6
FM3 :1-6 AM is saved at most 18 stations as AM1: 1-6 AM2:1-6
AM3:1-6
Band. Touch this button to choose FM1 FM2 FM3 AM1
AM2
9
10
11
12
AM3
During searching, the stations can be saved as No.1-6. For
example, If you want to save 107.70MHZ in the fourth channel in F1
1-6 , click on the fourth number and press SEEK to save 107.70
MHZ. At this time, 107.70 MHZ has been saved in the fourth channel in
F1 1-6 .
16
Pic2-1
1 Touch A area on the right side. The operation interface of DVD touch
screen will be shown.
1
Touch this button and numeric buttons will be shown as follow.
Touch these buttons on screen or numeric buttons on remote control
to choose the track as Pic2-2 shows.
Press this button to increase the volume.
Press this button for fine tuning stations down.
Press this button to quit the radio interface and back to
main menu interface.
Press this button for fine tuning stations up.
13
Press this button to choose the stations.
14 Channel display column
15
A DVD Operation Interface Pic2-1
Touch this button to reduce the volume.
7
8
Touch Screen Operations
Press this button to choose the stations.
Clock display column
26
Pic2-2
2
While playing VCD CD disc, touch this button to repeat
the track. Touch it again to repeat all. Touch it the third time to quit
repeat mode.
15
Touch Screen Operations
Touch Screen Operations
While playing DVD disc touch this button to repeat chapter. Touch it
again to repeat title. Touch it the third time to repeat all.
While playing Mp3, touch this button to repeat one track. Touch it again to
repeat title.
Touch it the third time to close the repeating mode.
Note: While playing VDC disc, the above functions can only available when
PBC is off. Touch MENU button and the note will be shown on the to
p right cornner.
3
B USBPlayback
Insert USB to the unit. It will play the contents automatically.
Click in the main menu and touch
to enter USB
playback interface.3
Now touch
/
/
/
on remote control to choose
the previous/next track. The track can be chosen directly by touching
it on panel.
Stop button. Touch this button once, the unit will stop playing.
Touch PLAY
twice to return to the previous playing memory. Touch
STOP twice to stop playing. Touch PLAY
twice to play from the
right beginning.
4
Program button. Touch this button on panel to use program
playback function. You can designate at most 20 tracks to the playing list
in order.
Pic3
* The interface is as follow:
DVD JPEG :
Program
1
2
3
4
5
Super VCD
Tt
Tt
Tt
Tt
Tt
VCD
07
C Introduction to Radio Touch Interface
/CH
When the unit is on, the monitor will enter the radio default
interface as Pic 4 shows.
--
ct:
ct:
ct:
ct:
ct:
CD HD-CD
6
7
8
9
10
Tt
Tt
Tt
Tt
Tt
ct:
ct:
ct:
ct:
ct:
M
DTS-CD
Program:Track 01-07
1
2
3
4
5
6
7
8
9
10
16
Pic4
25
Touch Screen Operations
Touch Screen Operations
ˆ If PBC is on, it will be off when program playback is on.
* Press the number following the cursor. Then press Play button or move
the cursor to START for program playback. Please remember that each
number should be at least a 2-digit one. For example, if you want to press
in the third song, you should press 03.
* Note:
ˆ Move the cursor to ' STOP ' and then press ENTER to clear all the numbers.
ˆ To modify the playback list:Move the cursor to the item and press
the new number.
Program playback is not suitable for MP3.
- - Passwor d Set up Page- Pass wor d
c hange
Password menu is as follow
5
Display button
1. While playing DVD, press this button once to show the title, chapter,
Choose change to modify
thepassword. Press in the old
one andthen press in the new
one for twice.The cursor will
stay on OK button once you
finish pressing. (A 4-digit
number is effective.) The
originalpassword is 0000
playback time. Touch it again to show the title, chapter, rest of playback
time. Touch it again to show the title, chapter, chapter playback time.
Ol d passwor d
New passwor d
Conf i r m pwd
Touch it again to show the title, chapter, rest of chapter playback time.
2. While playing VCD, touch it once to show the track, track playback time.
Touch it again to show the track, rest of the track playback time. Touch it
again to show the track, playback time of the whole disc. Touch it again to
show the track, rest playback time of the whole disc. Touch it again to turn
* Touch
setup
button in DVD menu or
(13) Touch
on panel and waitl capture logo
left topcorner.Press"setup" on panel-->
it off.
to quit setup menu.
3. While playing MP3,CD, touch it once to show the single track playback
time. Touch it again to show the rest playback time of the single track.
will be shown on
Gonoral Setup Page
-->
Logo Type --> Captured .The opening view will be replaced by the
6
Left channel. In playback mode, press
button on remote control to switch.
or AMS/AUDIO
screen capture.
(14)
Repeat playback button. Fix point repeat A-B
between any 2 points. While playing, starting from
set the starting point
the setting of point B
A
A . Then set the ending point
allows to play
(7)1 In DVD playback mode, touch
on panel for title menu display
function.
2 While reading doc of picture format, press
to view the picture.
touch A-B button to
B . After finishing
, touch A-B button and the unit will repeat playing
3
Press it again to enter the main content of the doc.
Some VCD has the menu which allows to choose the content. This
kind of menu is also called PBC
While playing this kind of disc:
frompoint A to point B. Press A-B button again to cancel this function.
24
17
Touch Screen Operations
Touch Screen Operations
* Press title button to setup PBC
* Press the numeric button to open the segment of the track.
When PBC is off, press numeric button no remote control to select the track.
When PBC is on, press numeric button on remote control to select the track.
Warning:
If no operation is executed within 10 secretary after the PBC MENU
is displayed, the unit will continue to play from the first track.
8
Parental
While playing locked disc, you
can choose the parental control
rating according to the disc or
your need.
Touch this button to quit DVD interface and back to main
- - Pr ef er ence Page- 1 Ki d Saf
Eng
Audi o
2 G
Eng
Subt i t l e
3 pg
Eng
Di s c Menu
4 pg13
Par ent al
5 pgr
6 R
Def aul t
7 Nc17
8 Adul t
menu interface.
9
In playback mode, press this button on panel or press
on remotecontrol for over 2 seconds for fast-forward by, X2
X4
X8
X16 X32. Touch it again after X32 to normal mode. In normal mode,
touch
on panel or press
for back forward by X2
X4
on remote for over 2 seconds
X8 X16 X32.Touch it again after X32 to
normal mode.
10
Touch
on panel or
on remote control for the previous track.
Touch
on panel or
on remote control for the next track.
(11)
Pause. Touch this button on panel or
pause. Touch it again to back to playback mode.
(12) Touch
on panel to enter DVD setup interface.
on remote control to
Note:
You can choose the rating only when it is unlocked. The limitation can
only make effects in locked state.
1
2
3
4
5
6
7
8
KID SAFE Allows to play some titles
G Allows to play titles with at least 2 parental control setting.
PG Allows to play titles with at least 3 parental control setting.
PG-13 Allows to play titles with at least 4 parental control setting.
PG-R Allows to play titles with at least 5 parental control setting.
R Allows to play titles with at least 6 parental control setting.
NC-17 Allows to play titles with at least 7 parental control setting.
Adult Allows to play titles with at least 1 parental control setting.
Default
Each setting will be back to the
original one if have chosen this
item..
Main process for DVD setup
Press Setup button.
The main menu will
be shown as follow:
- - Pr ef er ence Page- Audi o
Eng
Subt i t l e
Eng
Di sc Menu
Eng
Par ent al
Reset
Def aul t
- - Gonor al Set up Page - Tv Di s pl ay
Angl e Mar k
Os d Lang
Logo Type
18
PS
Of f
Eng
DEF
* Touch Setup
button in DVD menu or
23
to quit the setup menu.
Touch Screen Operations
Touch Screen Operations
Audio
For sound options: English,
French, Spanish, Italian
- - Pr ef er ence PageEng
Audi o
Eng
Subt i t l e
Eng
Di sc Menu
Par ent al
Def aul t
Engl i sh
Fr ench
Spani sh
Lt al i an
Por t uguese
* Note: Preference page can be enterd only when there is no disc in the unit.
Subtitle
Title options: English, French,
Spanish, Italian, Portuguese
Touch the setting gtoup or
- - Pr ef er enc e Page- / /
/
on remote
Eng
Audi o
control and prress Enter
Engl i sh
Eng
Subt i t l e
button to select the item. For
Fr ench
Eng
Di sc Menu
example,if to set the Spanish,
Spani sh
Par ent al
touch
Preference page -->
Lt al i an
Def aul t
Subtitle --> Spanish .
Por t uguese
For remote control, press
to Preference page , then
press
to Subtitle , then press
to Spanish to choose the
needed item.
* Touch
- - Pr ef er ence PageEng
Audi o
Subt i t l e
Eng
Eng
Di sc Menu
Par ent al
Def aul t
Setup button in DVD menu or
to quit the setup menu.
Engl i sh
Fr enc h
Spani sh
Lt al i an
Por t uguese
Introduction to Each Setting
* Gonoral Setup Page
Setting structure is
- - Gonor al Set up Page - Tv Di spl ay
Angl e Mar k
Osd Lang
Logo Ty pe
PS
Of f
Eng
DEF
Disc Menu
Disc language options: English,
French, Spanish, Italian
- - Pr ef er ence PageEng
Audi o
Eng
Subt i t l e
Eng
Di sc Menu
Par ent al
Def aul t
22
-
TV Display
3 modes Normal/Ps Normal/Lb
Wide
Engl i sh
Fr ench
Spani sh
Lt al i an
- - Gonor al Set up Page - Tv Di spl ay
Angl e Mar k
Osd Lang
Logo Type
19
PS
Of f
Eng
DEF
Nor mal / Ps
Nor mal / Lb
wi de
Touch Screen Operations
Touch Screen Operations
Angle Mark
There are two options:
on /off
Speaker Setup Page
speaker setup page interface is
as follow:
- - Gonor al Set up Page - Tv Di spl ay
Angl e Mar k
Osd Lang
Logo Type
PS
Of f
Eng
DEF
On
Of f
Osd Lang
3 languages can be chosen:
English, Portuguese, Chinese
In OSD lang display, please
operate according to the
actual unit.
- - Speaker Set up Page - Downmi x
DOWNMIX
- - Gonor al Set up Page - Tv Di spl ay
Angl e Mar k
Osd Lang
Logo Type
PS
Of f
Eng
DEF
In DOWNMIX mode, there are
2 kinds of channels: Lt/Rt &
Stereo
Engl i sh
Por t uguese
Chi nese
- - Speaker Set up Page - Downmi x
Lt / RT
st er eo
Logo Type
Two kinds of opening:Default
Captured
* Touch
- - Gonor al Set up Page - Tv Di spl ay
Angl e Mar k
Osd Lang
Logo Type
Setup button in DVD menu or
20
PS
Of f
Eng
DEF
Def aul t
Capt ur ed
Preference page
Interface forPreference pageis
as follow:Items are:Audio
SubtitleDisc Menu Parental
Default(The interface can only
be shown when there is no disc
in the unit.)
- - Pr ef er ence
Audi o
Subt i t l e
Di sc Menu
Par ent al
Def aul t
to quit the setup menu.
21
Page- Eng
Eng
Eng
This document was created with Win2PDF available at http://www.daneprairie.com.
The unregistered version of Win2PDF is for evaluation or non-commercial use only.