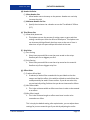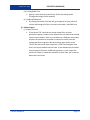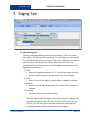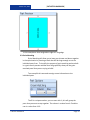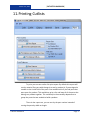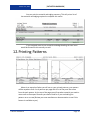
1
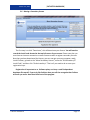
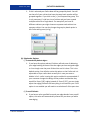
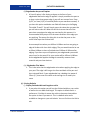
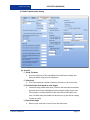
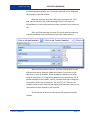
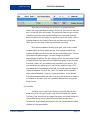
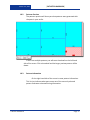
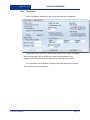
Cutlister Handbook
CUTLISTER SOFTWARE LTD.
Copyright 2011
March 1st, 2011
[CUTLISTER HANDBOOK]
Table of Contents
1. Introduction ............................................................................................................................................ 5
2. Registration ............................................................................................................................................. 6
2.1
User Data ...................................................................................................................................... 6
2.2
Starting your trial ......................................................................................................................... 7
2.3
Registering a Primary License ...................................................................................................... 7
2.4
Moving a Primary License ............................................................................................................ 8
2.5
Registering a Secondary License .................................................................................................. 9
2.6
Moving a Secondary License ...................................................................................................... 10
3. Program Updates .................................................................................................................................. 11
4. Preferences ........................................................................................................................................... 12
4.1
General Options ......................................................................................................................... 12
(a)
Cutlist Options ........................................................................................................................ 12
(b)
Edgebander Options ............................................................................................................... 13
(c)
Printing Defaults..................................................................................................................... 14
(d)
Program Updates.................................................................................................................... 15
(e)
Grid Colors .............................................................................................................................. 15
4.2
(a)
4.3
Database Options ....................................................................................................................... 15
Database Location .................................................................................................................. 15
Default Optimization Setting ..................................................................................................... 16
(b)
Grain Matching ....................................................................................................................... 17
(c)
Saw Timing.............................................................................................................................. 17
Cutlister Handbook
Page 2
March 1st, 2011
[CUTLISTER HANDBOOK]
(d)
Header Cut Rules .................................................................................................................... 18
(e)
Third Phase Cuts ..................................................................................................................... 18
(f)
Strip Rules ................................................................................................................................... 18
(g)
Offcut Rules ............................................................................................................................ 18
(h)
Pattern Rules .......................................................................................................................... 19
(i)
Material Trim Cuts...................................................................................................................... 19
(j)
Pattern Export ............................................................................................................................ 20
5. Job Tab .................................................................................................................................................. 21
5.1
Job Entry ..................................................................................................................................... 21
5.2
Global Variable ........................................................................................................................... 21
6. Cutlist Tab ............................................................................................................................................. 22
6.1
Cutlist Entry ................................................................................................................................ 22
6.2
Cutlist Options ............................................................................................................................ 22
6.3
Cutlist Notes ............................................................................................................................... 22
7. Edging Tab ............................................................................................................................................. 23
7.1
Edge Banding Entry .................................................................................................................... 23
8. Material Tab .......................................................................................................................................... 25
8.1
Material Entry............................................................................................................................. 25
8.2
Material Options ........................................................................................................................ 26
9. Parts Tab ............................................................................................................................................... 27
9.1
Part Entry .................................................................................................................................... 27
9.2
Part Preview ............................................................................................................................... 27
9.3
Grain Matching ........................................................................................................................... 28
9.4
Using Formulas ........................................................................................................................... 30
10. Optimization Tab .................................................................................................................................. 34
Cutlister Handbook
Page 3
March 1st, 2011
[CUTLISTER HANDBOOK]
10.1
Material Bar ................................................................................................................................ 34
10.2
Patterns Preview ........................................................................................................................ 35
10.3
Pattern Information ................................................................................................................... 35
10.4
Cutlist Rules ................................................................................................................................ 36
11. Printing Cutlists ..................................................................................................................................... 37
12. Printing Patterns ................................................................................................................................... 38
13. Import Cutlists(File->Import) ................................................................................................................ 39
14. Software License Agreement ................................................................................................................ 41
Cutlister Handbook
Page 4
March 1st, 2011
[CUTLISTER HANDBOOK]
1. Introduction
I developed Cutlister to increase productivity. I have been a project manager for a
millwork company for 10 years and developing applications for nearly 20 years. I found a
need to have a more standard way to give the cutlist data to the production staff so that
they could easily and efficiently cut and edge the parts required. Cutlister allows you to
organize your cultists by Job. You can create multiple cultists per job, create edge bandings
and materials for each cultist. Simply enter the parts to the finished size (edging thickness
will be automatically deducted for you), assign a material and which edges of the part will
receive an edge. You can then optimize the parts and patterns will be created for you to
reduce the time consuming task of figuring out how to organize the parts on each material.
Print out your cutlist and patterns and your ready to get your product into the shop.
I developed the optimizer logic on my own. I have seen many optimizers, some good,
some not so good. Let us be honest about this, I know there will be at some point, a better
way to create a pattern, an optimizer is only as good as the logic it was given. To account for
all of the different sizes and quantities of parts is one of the most challenging pieces of logic
to come up with. But you have to start somewhere. You as an individual could sit down for
weeks and not work it all out. On a half decent computer, Cutlister can optimize 10,000
parts of varying sizes and materials in less than 10 seconds.
Cutlister is a continuing effort. If you have a pattern that you think should come out a
different way that what the optimizer is presenting, SEND ME THE DETAILS. I will see what I
can do to improve the system.
Cutlister Handbook
Page 5
March 1st, 2011
[CUTLISTER HANDBOOK]
2. Registration
When you start Cutlister for the first time, you will see a registration window, If
you click next you will go to the next screen where you will enter your user data.
2.1 User Data
After you have completed entering your user data, you can continue to click next to get
to the registration option that you would like or you can simply look on the right of the
screen. To begin your free 30 day trail, go to the trial screen.
Cutlister Handbook
Page 6
March 1st, 2011
[CUTLISTER HANDBOOK]
2.2 Starting your trial
And click start trial.
If you have already registered Cutlister, then goto the “Register Primary License” screen.
2.3 Registering a Primary License
Enter the registration key. If you also have a update subscription key, enter your
registration key first, then click register. After you have successfully registered your key,
enter your subscription key and click register again. If you have multiple licenses and this is
Cutlister Handbook
Page 7
March 1st, 2011
[CUTLISTER HANDBOOK]
your first computer that you are registering, this computer will be the “Primary” Computer.
To register additional licenses go to the "Register Secondary License" screen.
If you have already registered your license, but would like to upgrade this computer to a
new one, you need to move your primary key. To do this, go to the screen “Move Primary
License”.
2.4 Moving a Primary License
The first step is to click “Deactivate”, this will deactivate your license. You will need to
record the install code located at the top left corner of your screen. Please note that you
must have an internet connection to move licenses as well as register secondary licenses.
Now that you have deactivated the license, you can now get your new computer ready,
install Cutlister, go back to the “Move Primary License”, enter the “Old Primary PC Install
Code” and then click “Re-Activate Keys”. That is all you need to do to move your registration
keys.
If you would like to register a secondary license, you need to do the following :
Cutlister Handbook
Page 8
March 1st, 2011
[CUTLISTER HANDBOOK]
2.5 Registering a Secondary License
On the “Primary” Computer (The first computer your registered) You will need to
record the Install Code located at the top left of the registration screen. You will simply
enter this install code in the secondary computer and this computer will be registered. You
must have a multi-user license and must have an active internet connection to register
secondary computers.
If you have already registered your license, but would like to upgrade this computer to a
new one, you need to move your secondary key. To do this, go to the screen “Move
Secondary License”.
Cutlister Handbook
Page 9
March 1st, 2011
[CUTLISTER HANDBOOK]
2.6 Moving a Secondary License
The first step is to click “Deactivate”, this will deactivate your license. You will need to
record the install code located at the top left corner of your screen. Please note that you
must have an internet connection to move licenses as well as register secondary licenses.
Now that you have deactivated the license, you can now get your new computer ready,
install Cutlister, go back to the “Move Secondary License”, enter the “Old Secondary PC
Install Code” and then click “Re-Activate Keys”. That is all you need to do to move your
registration keys.
Registration is important to us. Software piracy can bury a small independent
developer like myself. If you truly like Cutlister then you will also recognize that Cutlister
will save you more than then initial cost of the program.
Cutlister Handbook
Page 10
March 1st, 2011
[CUTLISTER HANDBOOK]
3. Program Updates
Cutlister will check for updates each time the program is started. This setting can
be disabled by clicking the file menu->Preferences, Go to the general options tab and at the
bottom of the screen you can turn off automatic updates. If you have chosen to disable the
automatic updates, you can go to the help menu and click check for updates. If your update
subscription has run out, you must purchase the software investment plan in order to
receive the latest updates.
Subscription prices are based on the ending of your last subscription status. For more
details visit our website at http://www.cutlister.com
Cutlister Handbook
Page 11
March 1st, 2011
[CUTLISTER HANDBOOK]
4. Preferences
4.1 General Options
(a) Cutlist Options
(i) Use Formulas :
1. If this is selected you will have access to developing simple formulas,
It will enable the Global Variables located on the Job tab and will
enable Variables, Product Variables and Formulas on the Parts tab. To
find out more about developing formulas refer to the appropriate
section.
(ii) Group by batch
Cutlister Handbook
Page 12
March 1st, 2011
[CUTLISTER HANDBOOK]
1. If this is selected your Cutlist data will be grouped by batch. You will
see that all of your cultists that have the same batch number will be
grouped together. If you click on the [+] it will expand the group. This
is only necessary if a job has a lot of cultists and you have created
multiple cultists for a single batch. For example if you have 10
different cabinets you might choose to separate each cabinet into
separate cultists. You can also change the group by batch option in
the Cutlist tab by press [ctrl-g].
(b) Edgebander Options
(i) Automatically deduct edges :
1. If you have this option selected, Cutlister will take care of deducting
your edge banding thickness from the edges you have assigned edges
to. You simply enter the parts finished size and it is done. This is the
default setting. You will also notice this option on the Cutlist tab. It is
adjustable on a per cutlist basis as well just in case you want to
disable it for 1 cutlist. Leaving this option enabled is recommended. If
your customer changes the design of the product and decides they
would like 3mm (1/8”) edging instead of .5mm (1/32”) you can simply
adjust the edging thickness and everything is corrected for you. If this
option is not enabled you will need to re-calculate all of the part sizes.
(ii) Pre-mill Default :
1. If you have a value specified here and your edge bander has a premill
option, this value will automatically entered for you when you add a
new edging.
Cutlister Handbook
Page 13
March 1st, 2011
[CUTLISTER HANDBOOK]
(iii) Edge bander has pre-mill option
1. A Pre-mill option is like having a shaper at the front of your
edgebander before the edge is applied. It simply machines the part to
to have a nice clean square edge. A pre-mill can remove from .5mm
(1/32”) to 3mm (1/8”) of material (Refer to your machines manual). If
you have this option enabled a new field will show up in the Edging
Tab called “Premill”. You will simply enter the value that you want the
pre-mill unit to take off. What this will do is ensure that all of the
parts that are assigned an edge are oversized by this amount. It is
recommended that you pre-mill the exact thickness of the edge you
are applying, The reason for doing this is so that the parts on the
cutlist show up at the finished size.
As an example lets take a part 100mm X 100mm and we are going to
edge all 4 sides with 1mm thick edging. The part would need to be cut
at 98mm X 98mm to have a finished size of 100mm X 100mm after
edging. If you have a pre-mill option on your edgebander you would
enter 1mm for the premill. So your cutsize will be 100mm X 100mm.
As the edgebander applies the edge it essentially removes 1mm
material and puts 1mm back on.
(iv) Edgebander Trim Waste
1. This is the value that the edgebander trims when applying the edge to
your part. The edge is left long at the front and back of the part and
then trimmed flush. If your edgebander has a leading trim waste of
25mm (1”) then enter this value as the trailing trim is usually the
same.
(c) Printing Defaults
(i) Display finished width and length on cutlist
1. If you select this option you will see the finished width on your cutlist
as well as the cut width and length. This option is default and is a
preference. I find that it causes the cutlist to become cluttered but
the option is there if you want it. This is a default value and is
available to change on a per cutlist basis. You can find it on the Cutlist
tab.
Cutlister Handbook
Page 14
March 1st, 2011
[CUTLISTER HANDBOOK]
(ii) Save cutlist and material summaries on print
This option will save a copy of the cutlist and material summary to the job
folder set on the job tab. This is handy since it will create a hard copy of
the cutlist and material summary that is not in a database. After you have
printed a dialog will pop up and ask you if you want to save a copy or not.
(d) Program Updates
(i) Automatically check for updates
1. If this option is selected Cutlister will check for updates when the
program is started. Review the program updates section for more
information.
(e) Grid Colors
1. This will allow you change the Odd, Even and New Item row colors to
suite your liking.
4.2 Database Options
(a) Database Location
(i) This is the location where your database is located. It is defaulted to the
installation directory. If your company has a server that is backed up
nightly it is recommended that you create a database directory on the
server and change the location to point to that directory.
Cutlister Handbook
Page 15
March 1st, 2011
[CUTLISTER HANDBOOK]
4.3 Default Optimization Setting
(a) Saw info
(i) Blade Thickness
1. Enter the thickness of the saw blade of the table saw or beam saw
that you will be using to cut the patterns.
(ii) Max Stack
1. This is the maximum number of panels you want to cut at one time.
(iii) Auto Calculate stack based on stack height
1. Instead of using a Max stack value, Cutlister will calculate the number
of panels that can be stacked based on the beam height of your saw.
This number is usually available in the manual that came with your
saw. For table saws you should not have this on as you will be cutting
1 sheet at a time.
(iv) Max Stack Height
1. Refer to your saws user manual. Enter the value here.
Cutlister Handbook
Page 16
March 1st, 2011
[CUTLISTER HANDBOOK]
(v) Minimum Part
1. This is the minimum part size that your saw can cut, when you have
these parts on your cutlist, you will un-check the optimize checkbox
on the parts list. This will ensure that these parts don’t end up on the
pattern. This is more for CNC saws that will be cutting multiple sheets
and due to the clamps cannot clamp onto small parts.
(b) Grain Matching
(i) Re-cut Blade Thickness
1. This is the blade thickness of the saw that you will be re-cutting the
grain matched blanks on. While you can technically re-cut this on a
beam saw, the blade thickness is usually 5mm(3/16”) and will cause
grain shift on a 1 drawer and 2 door combination. It is better to cut it
on a table saw that typically has a 3mm (1/8”) blade thickness. This
value is adjustable on a per material basis, after you optimize you will
see the optimization settings that can be changed for just this one
type of material. The re-cut blade thickness is one of those options.
(ii) Oversize Width
1. This is the value that you want to add to the grain matched blank in
width. This value is adjustable on a per material basis, after you
optimize you will see the optimization settings that can be changed
for just this one type of material. The oversize width is one of those
options.
(iii) Oversize Length
1. This is the value that you want to add to the grain matched blank in
length. This value is adjustable on a per material basis, after you
optimize you will see the optimization settings that can be changed
for just this one type of material. The oversize length is one of those
options.
(c) Saw Timing
(i) The saw timing is used for determining how much time it takes to load
the saw, enter patterns if it’s a CNC, how long does a long rip take, how
long does a short rip (cross cut) take based on the hourly rate of the saw
can determine whether it is more cost effective to start cutting a new
sheet or keep turning the offcut (Multiple phased cuts).
Cutlister Handbook
Page 17
March 1st, 2011
[CUTLISTER HANDBOOK]
(d) Header Cut Rules
(i) Allow Header Cuts
1. Allow header cuts to show up on the pattern. Header cuts can help
increase the yield.
(ii) Minimum Header Cut Size
1. Specify the minimum size a header cut can be. The default it 305mm
(12”).
(e) Third Phase Cuts
(i) Allow third phase cuts
1. Third phase cuts are the process of cutting a part or parts and then
cutting a smaller part from the offcut of those parts. Third phase cuts
can increase yield significantly but they come at the cost of time. It
takes time to spin the parts and put them back in the saw.
(f) Strip Rules
(i) Part Sorting
1. Select how you would like to see the parts sorted on the strips.
Smallest part first or biggest part first.
(ii) Strip Sorting
1. Select how you would like to see the strips sorted on the material.
Smallest strip first or biggest strip first.
(g) Offcut Rules
(i) Produce offcut label
1. If selected, a label will be created with the part labels so that the
sawyer can label the offcut, this could be utilized to track offcuts that
could potentially be used in future cutlists. If you do not select this,
you are basically telling Cutlister that you do not interested in offcuts.
(ii) Min offcut width
1. This is the minimum width an offcut must have in order to be counted
as an offcut.
(iii) Min offcut Length
1. This is the minimum length an offcut must have in order to be
counted as an offcut.
This is simply the default setting, after optimization, you can adjust these
settings for just one material type if you wish by adjusting the cutlist
Cutlister Handbook
Page 18
March 1st, 2011
[CUTLISTER HANDBOOK]
rules. This will allow you the flexibility to review the patterns and decide
if there are some larger offcuts that you would like to make labels for.
(h) Pattern Rules
(i) Analyze Sheet Costs
1. Check this option to change the way the optimizer computes
patterns. This will compare the material value to the cost of the saw
and the time it will take to cut certain patterns and determine if it is
more cost effective to cut an extra sheet or to spin the offcuts and do
third phase and header cuts.
(ii) Best Yield
1. Check this option to change the way the optimizer computes
patterns. This will check a series of computed patterns and select the
one that yielded the best.
(iii) Least Patterns
1. Check this option to change the way the optimizer computes
patterns. This will look for the most repeated patterns and select
them over yield since it will generate less patterns.
(iv) Long/Short Rip Penalty
1. This option will affect the outcome of the pattern generation. If you
move the slider all the way to the right, you have applied a penalty to
short rips meaning that you do not want patterns with short rips. If
you move the slider all the way to the left you have applied a penalty
to long rips and the generated patterns will not have long rips.
(i) Material Trim Cuts
(i) Leading Length Trim
1. Specify a value that the saw will trim off for the leading length
(Changes the width of the material)
(ii) Trailing Length Trim
1. Specify a value that the saw will trim off for the trailing length
(Changes the width of the material)
(iii) Leading Width Trim
1. Specify a value that the saw will trim off for the leading width
(Changes the length of the material)
Cutlister Handbook
Page 19
March 1st, 2011
[CUTLISTER HANDBOOK]
(iv) Trailing Width Trim
1. Specify a value that the saw will trim off for the trailing width
(Changes the length of the material)
(v) Update All Materials
1. By clicking the button, Cutlister will go through all of your jobs and
cultists and change all of the trim cuts to the value’s specified here.
(j) Pattern Export
(i) Export Directory
1. If you have a CNC saw that can accept output files, we have
generated a pattern output so the patterns do not need to be entered
into the saw manually. Each cnc manufacturer is different and usually
requires the purchase of a module to import the cutlist from the
various optimizer programs. We have written ours similar to the
.CPOUT file that comes from Cutplanner (2020 Technologies) Since
that is the import module that we have. If you already have a module
that you import files from a different optimizer, try our output file
and see if it loads, if it does we would like to hear from you so we can
add to the list of saws.
Cutlister Handbook
Page 20
March 1st, 2011
[CUTLISTER HANDBOOK]
5. Job Tab
5.1 Job Entry
To enter a new job, click on the row that says “Click here to add new job”. You
can go to the next field by pressing the [tab] key, you can go to the previous
field by pressing [shift-tab]. When you have finished entering the data into the
fields, simply [tab] through past the last field, this will automatically save the
job and start the entry for another job. Select the job you just entered and
click the cutlist tab.
(i) Job #
1. Enter your unique job number in this field.
(ii) Job name
1. Enter the job name into this field.
(iii) Project Manager
1. Enter the project managers name into this field. This will be the
person who is in charge of looking after the project.
(iv) Job Directory
1. Click on the button and locate the directory for this job. This will be
the location to which the cultists are saved to after printing.
(v) Completion Date
1. This will be the date the the project is to be completed.
5.2 Global Variable
Global variables are located on the Job tab, if it is not, you need to go to
preferences->general options and enable “Use Formulas”. Any
variables set in the global variable area will override and variables with
the same name in your individual cultists.
Cutlister Handbook
Page 21
March 1st, 2011
[CUTLISTER HANDBOOK]
6. Cutlist Tab
6.1 Cutlist Entry
To enter a new cutlist, click on the row that says “Click here to add a new
cutlist”. Fill in the fields, tabbing to the next field, when you get to the last
field press [tab] again to save the record. Select the cutlist you just entered
and select the edging tab.
(i) Cutlist #
1. This number is automatically set and is a unique number, meaning
there will only be 1 cutlist with this number in this job.
(ii) Batch #
1. This is the batch number and can be any number you want.
(iii) Cutlist by
1. Enter the name of the person that will be doing the cutlist.
(iv) Description
1. Enter a description for the cutlist
6.2 Cutlist Options
(i) Deduct edges
1. Select whether or not this cutlist should automatically deduct edges
for you. For more information review the Perferences Section
(ii) Display finished width and length on cutlist
1. Select whether or not this cutlist should display the finished width
and length on the cutlist. For more information review the
Perferences Section
6.3 Cutlist Notes
If there are any special notes or some information you need on the cutlist
simply enter it here and it will appear at the bottom of the cutlist report.
Cutlister Handbook
Page 22
March 1st, 2011
[CUTLISTER HANDBOOK]
7. Edging Tab
7.1 Edge Banding Entry
To enter a new edge banding, click on the row that says “Click here to add
new edging”. This will start the new record, The name column is actually used
if you use the formula feature of cutlister. The name is defaulted so its best to
leave this alone. Start in the Color column. Remember when you have
completed all of the fields you can just [tab] through to save that record and
begin entering a new one.
(i) Name
1. Automatically generated name, E1..E2.. etc You can change this but it
should not be the same as one that exists in the cutlist already.
(ii) Color
1. Enter the color of the edging, could be White or Maple for example.
(iii) Material
1. Enter the type of edge banding material, could be PVC or Veneer for
example.
(iv) Thickness
1. Enter the thickness of the edge banding.
After you have entered the edging, you can select any of the edgings that
you have entered and either click the [+] to the left of the row, or press
[CTRL-D]. This will allow you to enter the widths that are available for
that edging and the specific lineal foot cost of that edging.
Cutlister Handbook
Page 23
March 1st, 2011
[CUTLISTER HANDBOOK]
If you do not choose to enter any widths that will be fine as well since
cutlister will automatically figure out the widths of edging required based
on the material thickness. Assigning available widths will simply group
more thicknesses together for example if you have one material at 19mm
thick, and have another at 19.5mm you will see 2 line items on the
material summary. if you entered an available width of 22mm they would
both be grouped together under the 22mm.
If you add the 22mm width and you have a part that requires a wider
edging but forgot about it, don't worry, it will still add it to the material
summary so you don't forget about it.
(v) Width
1. Enter the available widths for the edging.
(vi) Cost
1. Enter the cost per lineal ft. This is used to estimate a cost for the
material summaries.
Additionally if your edgebander also has a pre-mill unit, there will be an
additional “Premill” field. For additional information review the preferences
section.
You can copy one or multiple edge bandings, Select the ones you want to
copy, right click and select “copy selected edge banding(s)” You can then right
click again and select paste, OR you can go to a new cutlist within the same job
go to the edge banding tab, right click and select “paste edgebanding(s)”.
Cutlister Handbook
Page 24
March 1st, 2011
[CUTLISTER HANDBOOK]
8. Material Tab
8.1 Material Entry
To enter a new material, click on the row that says “Click here to add new
material” Whichever field you click first will be where you start typing, if you
need to go to the previous field, simply press [shift-tab]. If you would like to
go to the next field press the [tab] key. The name field is automatically
generated for you. It will start with “M1” then “M2” and so on. You can
change this value, but different materials should have a unique name. If you
start typing on the Side 1 Material field a popup screen will appear with
additional fields to fill out.
This will also happen for the Core Material and Side 2 Material fields. If you
notice, each of the pop ups have a check box for grained. If any one of these 3
are checked the material is set to grained. There is an additional Grained field
on the main grid, this is not editable, it will simply indicate whether or not
that material is grained.
Cutlister Handbook
Page 25
March 1st, 2011
[CUTLISTER HANDBOOK]
Enter a material size, and then press tab, you will see the cost field, this
field is not editable, it is a computed value based on the Side 1, Core and Side
2 Cost and will give you a total sq ft cost of the material.
If your material is a lineal material, such as solid lumber or metal you
simply click the lineal check box and it will set the material to lineal.
Alternately you can press the [space bar] to check and uncheck.
Fill out the fields, tabbing to the next field, when you have completed all of
the fields, when you have completed simply tab through and the popup will
close.
When you have completed the material entry, you will still need to assign
available sheet sizes to the material. To do this, simply select the material you
would like to add sheet sizes to and click the [+] to the left of the row,
Alternatively you can press [CTRL-D] and it will expand the detail.
You can enter all of the sheet sizes available as well as any offcuts you may
have. When you get to the qty field you can enter the exact qty of the
material or you can enter * which means unlimited. If this size is an offcut be
sure to check offcut if you want to use up the offcuts first no matter how
much yield you get from it. If you don’t necessarily want to use the offcut
don’t check the offcut check box. The the optimizer will only look at the offcut
and will use it only if it yields well. You can check and un-check the offcuts box
by pressing the [SPACE BAR].
You can copy one or multiple materials, Select the ones you want to
copy, right click and select “copy selected Material(s)” You can then right click
again and select paste, OR you can go to a new cutlist within the same job go
to the Materials tab, right click and select “Paste Materials(s)”.
8.2 Material Options
(i) Leading Length Trim
1. Specify a value that the saw will trim off for the leading length
(Changes the width of the material)
(ii) Trailing Length Trim
1. Specify a value that the saw will trim off for the trailing length
(Changes the width of the material)
(iii) Leading Width Trim
Cutlister Handbook
Page 26
March 1st, 2011
[CUTLISTER HANDBOOK]
1. Specify a value that the saw will trim off for the leading width
(Changes the length of the material)
(iv) Trailing Width Trim
1. Specify a value that the saw will trim off for the trailing width
(Changes the length of the material)
9. Parts Tab
9.1 Part Entry
To enter a new part, click the row that says “Click here to add new part”.
Whichever field you click on that row will be your starting position, so if you
need to go to the previous field press [shift-tab], if you want to go to the next
field press [tab]. When you have completed entering your part, simply tab
through and the new part will be added and you will be ready to enter your
next part. If you started adding a new part but would like to cancel that
record, press esc and you should see the row display “Click here to add new
part”.
Each part has an individual notes section, if you have specific notes
pertaining to that part, type it there and on the cutlist it will show below the
part on the cutlist.
You can copy one or multiple parts, Select the ones you want to copy,
right click and select “copy selected parts(s)” You can then right click again
and select paste, OR you can go to a new cutlist within the same job go to the
parts tab, right click and select “paste parts(s)”. When you copy parts from
one cutlist to another the assigned material and edge bandings will also be
copied to the new cutlist.
9.2 Part Preview
The part preview shows you a quick representation of the part and as you
assign the edges will visually show you which edges you have assigned edges
to.
Cutlister Handbook
Page 27
March 1st, 2011
[CUTLISTER HANDBOOK]
In this example we have assigned an edge to 1 long edge.
9.3 Grain Matching
Grain Matching will allow you to keep your drawer and doors together
in the optimization by creating a blank that will be large enough to cut the
individual parts from. To simplify the process of grain matching we have built
in a grain match preview window that will graphically show you the grain
matched panel that you are trying to build.
To accomplish this we need to assign some information to the
individual parts.
The ID is a unique number, you can start with 1, this will group the
parts that you want to stay together. The column is a value from A-Z and the
row is a value from 1-10.
Cutlister Handbook
Page 28
March 1st, 2011
[CUTLISTER HANDBOOK]
For an easier understanding, lets do an example. Create a cutlist and
add a maple melamine material to the material list, Create 3 parts.
-
Drawer Front 600 X 150
Left Door 298.5 X 600
Right Door 298.5 X 600
Be sure to assign each parts grain matching id to 1. For the drawer front,
enter a Column of “A”, and a Row of “1”. For the left door enter a column of
“A”, and a Row of “2”. For the right door enter a column of “B”, and a Row of
“2”. You should see the following in the grain match preview window, I have
marked this one up to look like an spread sheet so you can better understand
the process of grain matching :
As you can see it is pretty simple. If you were going to add an
additional full height door to the right, it would not be “B1” because the
drawer front crosses the B1, therefore you should use the next column “C1”.
I felt it was necessary to build in the preview so that users could see what
they were doing. Play with it and try some different scenarios.
Cutlister Handbook
Page 29
March 1st, 2011
[CUTLISTER HANDBOOK]
9.4 Using Formulas
Formulas are only available in the Gold version of cutlister. The formulas built
into cutlister are very simple mathematical calculations utilizing variables. If
you have many products that are virtually identical, but they may vary in
width or length, then you could use formulas so that you could simply copy
the last cutlist that you did, change the length variable, and all of the parts will
adjust to the new size. It’s a time saving feature but it will take a bit of
practice to understand just how valuable the formula feature is.
Click on the parts tab, if you do not see the formulas, product variables
and variables boxes then you either don’t have the gold version of Cutlister
or you simply do not have formulas enabled. To enable formulas you need to
go to file->preferences and then under the general options tab under the
group cutlist options, check the “use formulas” checkbox. This will enable the
use of formulas.
Now that we have that taken care of let me explain the different
variables that we have to work with within our formulas.
(i) Product Variables
These variables are for products, let take a box for example, click on the
product variables box.
Enter a box as I have done above, 100mm X 100mm X 100mm, If you
begin typing in the “Product Description” field, the “Name” will be
Cutlister Handbook
Page 30
March 1st, 2011
[CUTLISTER HANDBOOK]
automatically generated for you. Fill out the remainder of the fields and
tab through to save the product.
Now that you have done that, add a part to the parts list, call it
side, you can leave the qty, width and length blank. If you have not
already done so, ensure that you have at least 1 material in the materials
tab.
After you finish entering your part click on the part formulas box,
you will not be able to click this box until you have a part selected.
When the formula box comes up, you have 3 fields which can be
affected by formulas, Quantity, Width and Length. If you notice to the
right there is a list of variables. These variables are based on the name
value of the product. P1_Q equals the quantity of the product qty, P1_D
equals the depth of the product, and P1_H equals the length or height of
the product. Notice the variables M1_THK and E1_THK. These are the
variables linked to your materials and edging, and represent a way to use
the thickness of that material in your formula.
Fill out the box as shown, to exit simply click anywhere outside
the box.
Cutlister Handbook
Page 31
March 1st, 2011
[CUTLISTER HANDBOOK]
Since the part is the only one in the list, its selected and you
cannot see the grayed boxes as above. Click in the “Click here to add new
part” so that the focus will change. The grayed out fields are just a visual
indication that these have formulas behind them. You could manually
adjust the dimension, but when you optimize or print the cutlist it will recalculate based on the formula. Now that you have seen the grayed
fields, press the [esc] key so that you don’t add a new part.
Since we have added a formula to the part, click on the product
variables again, and only change the qty. Click anywhere outside the
product variable box and notice that the part also changed qty’s. Click on
the product variable box again, this time change the product
height/length to 200mm. The part changes with it. You have now created
a simple formula. You can use any mathematical symbol in the formulas.
A box has 2 sides, so if you made the qty equation for the part P1_Q*2
you would have a product qty of 1, but the part would be a qty of 2. If
you added the top and bottom of the box, you could make the length of
the top and bottom P1_W-(2*M1_THK). This would take the product
width value and deduct 2 times the material thickness. So the bottom
and top would go between the sides. You can make formulas as simple or
as complex as you want, they are a powerful feature when you get the
hang of them.
(ii) Variables
Variables can be used in your formulas, basically they can be a
value, but you are using the name in the formula instead of a number.
That way if you should need to change that value, you simply change it in
the variable section and any parts that utilize that variable in the
formulas will automatically be adjusted. Click the variable box and add a
variable as I have done below.
Cutlister Handbook
Page 32
March 1st, 2011
[CUTLISTER HANDBOOK]
Once you add the variable, click anywhere outside the box to
close it. If you go back to the formula box, you will now see this variable
in the list and you can use it in your formulas. If you wanted to put doors
on the box, you would simply add a part for the doors, then for the
formulas, make the following :
Quantity : P1_Q*2
Width : (P1_W-G_DOOR)/2
Length/Height : P1_H
The doors will now adjust with the width of your product. If you made a
mistake and the gap between the doors is supposed to be 5mm, then simply go
to the variable box and change the value of G_Door to 5mm, click outside of the
box and the parts will adjust automatically.
Cutlister Handbook
Page 33
March 1st, 2011
[CUTLISTER HANDBOOK]
10.Optimization Tab
Before optimizing, make sure you have a cutlist with at least 1 material and 1
part. Click the optimize tab.
10.1
Material Bar
At the top of the screen you will see the material “Names”, if you drag
the mouse over the material name, you will see the description of the
material. To select this material, simply click the material name. This will
draw the pattern previews for that material.
if your material has a red circle with a number on it, it means there is an
error with that material. The 1 represents the number of errors found. Click on
that material and review the “Parts that were not optimized”
As you can see the part length was larger than the material and the parts
cannot be optimized. You will also get an error if there are parts smaller than
the “saw width rule” or if you have specified a qty of sheets and you simply
run out of material before all of the parts are optimized. As a rule of thumb,
you should correct all errors before continuing.
Cutlister Handbook
Page 34
March 1st, 2011
10.2
[CUTLISTER HANDBOOK]
Patterns Preview
The patterns preview will show you what patterns were generated with
the parts in your cutlist.
If there are multiple patterns you will see a thumbnail on the left hand
side of the screen. Click a thumbnail and the larger preview pattern will be
drawn.
10.3
Pattern Information
On the right hand side of the screen is some pattern information.
This list just indicates what parts come out of the currently selected
pattern and some estimated timing information.
Cutlister Handbook
Page 35
March 1st, 2011
10.4
[CUTLISTER HANDBOOK]
Cutlist Rules
Above the pattern preview are the cutlist rules that can be adjusted.
These cutlist rules will ONLY affect the current material. So you can adjust
these settings and it will not affect your other material patterns. Any
adjustments will also be saved, but only for this material in this cutlist.
For information on the different settings review the preferences section.
This is where you set the defaults.
Cutlister Handbook
Page 36
March 1st, 2011
[CUTLISTER HANDBOOK]
11.Printing Cutlists
To print your current cutlist click print report. By default this report will
sort by material. But you could change it to sort by product id, if you assigned a
number to the Unit # field of the parts. You would use this if you had parts that
were part of a product. This would then print a list and keep all of the parts that
belong to a product together. This could help in the assembly department to
group the parts that are needed to build a product.
There is also a part sort, you can sort by the part number instead of
sorting the parts by width an length.
Cutlister Handbook
Page 37
March 1st, 2011
[CUTLISTER HANDBOOK]
You can print the material and edging summary. This will print a list of
the materials and edging required to complete this cutlist.
If you assigned costs to your materials and edge banding the total costs
would be shown on this summary as well.
12.Printing Patterns
Above is an example of what you will see on your printed patterns, your pattern
will be anywhere from 1 to 4 patterns per page with a list of the parts that come
from the each pattern. At the top of the page you will see what material you need to
use as well as the export filename you need to look for if you are loading the
patterns on a cnc saw (Review your saw manufacturer documentation to see if this
feature is available to you).
Cutlister Handbook
Page 38
March 1st, 2011
[CUTLISTER HANDBOOK]
13.Import Cutlists(File->Import)
Importing cultists gives you the ability to “copy” a cutlist or bring in a cutlist from
another database all together.
You simply select the job, and then select the cutlist(s) that you want to import
and click import selected. If you are importing multiple cutlist and want an easy way
to identify the different cultists you imported, try setting the import color. This will
color the parts that you imported. You also have the ability to select what you want
to copy from that cutlist, you may only want the material and edge banding so you
would uncheck the others.
When you print a cutlist, notice that the part number is changed. If your part
number is 1 and your cutlist number is 1 when you print your part number is
changed to 1-1. This makes it so you have a unique part because there could be
other cultists going through the production process with the part number 1. This
helps to uniquely identify the part. If you have multiple cultists for the same batch,
for example 3 different cabinets and instead of putting all of the parts in one cutlist
you decide to have 3 cutlists. When you optimize you will make a new cutlist and call
it combined cutlist 1,2,3 this is simply for optimization purposes. The problem that
presents itself is that your combined cutlist is cutlist 4, so all of your imported parts
become “Part # + Cutlist #” so now your part numbers don’t match the cutlist 1,2,3
parts. To keep the part numbers for cutlist 1,2,3 select the option “Merge part num
+ Cutlist #” this will keep the original part number. You will not see this reflected in
Cutlister Handbook
Page 39
March 1st, 2011
[CUTLISTER HANDBOOK]
the parts list, but when you optimize, the part numbers will reflect the original part
number.
If you use Product Planner™ from 2020 technologies™, You can import the parts
from there into cutlister. The process is as follows :
Go to Manufacturing
Go to Reports -> Export to database
Then from within cutlister, file->import cutlist, select the import pattern systems
tab find the Jobrpt.mdb file and select import. This can take a while depending on
the number of parts being imported. Cutlister will also generate material and edging
based on what was used. The only thing you will need to do after is make sure if you
were using grained material that you set the material to grained and also set the
sheet size.
It is important to note that the way product planner works with part #'s allows
many parts to have the same part number. When importing from pattern systems,
The part number is imported as such : "Part Number"-"Unique ID in job" so the part
number becomes unique. The part would look like 100-10, 100 being the part
number, 10 being the unique id in the job.
Cutlister Software Ltd is in no way associated with Pattern Systems International,
Product Planner, Cutplanner, 2020 Technologies, All copyrights and trademarks are
property of their respective owners.
Cutlister Handbook
Page 40
March 1st, 2011
[CUTLISTER HANDBOOK]
14.Software License Agreement
CUTLISTER SOFTWARE LTD. LICENSE AGREEMENT:
PLEASE READ: BY DOWNLOADING, USING OUR SOFTWARE, OR PURCHASING SERVICES RELATED TO THE SOFTWARE,
YOU ACCEPT THE TERMS AND CONDITIONS STATED BELOW IN A LEGALLY BINDING MANNER.
If you are obtaining the software as defined below on behalf of a company, you represent that you are duly authorized to
represent the company and accept the terms and conditions of the agreement on behalf of the company. A binding
contract is then formed between CUTLISTER SOFTWARE LTD. and the company in accordance with the terms of this
agreement. You personally agree not to commit or encourage any violation of our agreement with the company.
If the company you represent or you (collectively "you") do not agree to the terms and conditions of this agreement, do
not download, install or use this software.
PROPRIETARY RIGHTS AND CONDITIONS:
All right, title and interest including, but not limited to, copyright and other intellectual property rights in and to the
software (including but not limited to all html, asp, aspx, dll, graphic/image, source files and text files) are owned by
CUTLISTER SOFTWARE LTD.. Such rights are protected by Canadian copyright laws, other applicable copyright laws, and
international treaty provisions. CUTLISTER SOFTWARE LTD. retains all rights not expressly granted herein.
You may not redistribute, sell, decompile, reverse engineer, or disassemble the software.
LICENSES:
Each copy of the software must have it's own (separate) license and be registered with CUTLISTER SOFTWARE LTD. You
are not permitted to make copies of the software without first purchasing the appropriate additional licenses. Individual
software licenses are only valid when registered with CUTLISTER SOFTWARE LTD. A primary license is the first license that
you purchase, A valid internet connection is required when you register your primary license. Additional licenses are
secondary licenses. Computers with secondary licenses must have a valid internet connection to move or activate
secondary licenses. CUTLISTER SOFTWARE LTD. Will not issue a new registration key. If you lose your registration key,
CUTLISTER SOFTWARE LTD will re-issue the original registration key. You are responsible to protect your registration key
and any secondary computers registered from a multi-user license. If a new key is required, the purchase of a new
license will be necessary.
DISCLAIMER OF WARRANTIES:
To the extent allowed by local law, this software is provided to you "as is" without warranties or conditions of any kind,
whether oral or written, express or implied. CUTLISTER SOFTWARE LTD specifically disclaims any implied warranties or
conditions of merchantability, satisfactory quality, non-infringement and fitness for a particular purpose.
LIMITATION OF LIABILITY:
Except to the extent prohibited by local law, in no event will CUTLISTER SOFTWARE LTD, or it’s employees or officers be
liable for direct, special, incidental, consequential or other damages (including lost profit, lost data, or downtime costs),
arising out of the use, inability to use, or the results of use of the software, whether based in warranty, contract, tort or
other legal theory, and whether or not advised of the possibility of such damages. Your use of the software is entirely at
your own risk. Should the software prove defective, you assume the entire cost of all service, repair, or correction.
RETURN POLICY:
Software (including but not limited to all html, asp, aspx, graphic/image, and text files) that is not specifically referred to
as "trial software", or that includes the "source code", cannot be returned for a refund. Should you experience a problem
with any purchased software, CUTLISTER SOFTWARE LTD offers support services to assist with any technical issues. There
are no refunds on installation services or any software that has been installed, registered, downloaded, or emailed to you.
SUPPORT SERVICES:
Some software and services purchased from CUTLISTER SOFTWARE LTD may include limited free support (technical
support, re-downloads, and free updates may be limited to 1 year from date of original qualifying purchase). Unless stated
otherwise, the free support is only available through our website/email. If you require more advanced technical support or
require telephone assistance, additional consulting services or a support plan may be required. We reserve the right to
change our support policy at anytime. To contact our support dept. for assistance, click on "Contact Us" and follow the
links to "Technical Support".
INSTALLATION:
You must make every attempt to safeguard your data and other files during installation, when upgrading, or when
installing an update. CUTLISTER SOFTWARE LTD does not assume responsibility for loss of data or any other losses that
result from installation, upgrading, or updating of the software. Hard disks should be backed up on a regular basis and
should always be backed up before you begin any installation tasks.
Cutlister Handbook
Page 41
March 1st, 2011
[CUTLISTER HANDBOOK]
OPTIONAL TRAINING SERVICE:
If you have purchased the optional installation service, CUTLISTER SOFTWARE LTD will install the software onto your
computers. CUTLISTER SOFTWARE LTD will provide training for the agreed length of time. Installation includes basic
configuration only, unless stated in writing prior to installation. After we determine that the installation and training was
successful, technical support is provided at the current technical support department hourly rate, unless a software
investment plan has been purchased. By accepting our services, you acknowledge that CUTLISTER SOFTWARE LTD is not
responsible for lost data. While we will make every attempt to safeguard data during installation or service, we do not
assume responsibility for loss of data. Hard disks and all data on your server should be backed up on a regular basis and
should always be backed up before CUTLISTER SOFTWARE LTD is called for service or installation. We are not responsible
for any loss of data.
GENERAL DISCLAIMER:
CUTLISTER SOFTWARE LTD. neither assumes nor accepts any liability for any loss, damage, theft, misuse, malfunction,
etc. of your hardware or data or anything else that you may own regardless of the cause or reason for any such
misfortune. CUTLISTER SOFTWARE LTD, it’s officers, and employees will not be liable for lost profits, loss of business or
other consequential, special, indirect or punitive damages, even if advised of the possibility of such damages, or for any
claim by any third party . These policies, terms, and conditions may be subject to change without notice.
Cutlister Handbook
Page 42