1
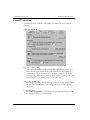
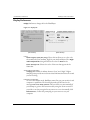
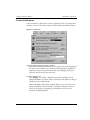
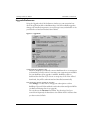
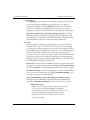
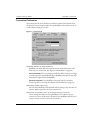
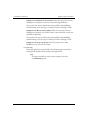
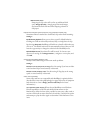
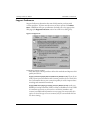
Chapter 7: PREFERENCES 7 One of the most important tools you have in your RealPlayer is your Preferences. Preferences are settings that allow you to finely adjust the way RealPlayer works and looks to better match your own system and desires. You can customize RealPlayer by changing the settings in the Preferences dialog box (opened from the View/Options menu). These settings control various aspects of RealPlayers functions. RealPlayer Preference settings apply to all applications using RealPlayer technology, including RealPlayer Web page plug-ins (music and video that appears as part of a Web page rather than playing in your RealPlayer). How to open your Preferences Preferences are just a click (or two) away. 1. Select the View/Preferences menu to open Preferences. 2. Click OK or Cancel at the bottom of the Preferences window to exit. Windows Control Panel [Windows only] On Windows based machines, several of your Preferences are also available from your Windows Control Panel. Most of these Preferences deal with network and Internet connectivity and support issues. All of these Preferences will appear on the same tabs as they do within your RealPlayer and are described in the following pages. Due to differences in the operating systems, this function is not available on the Macintosh. 57 CHAPTER 7: Preferences RealPlayer 8 Plus User Manual General Preferences General Preferences is the first tab shown. It contains the most common options. Figure 7-1: General tab Home Clip: (Default is Off) When selected, RealPlayer will automatically begin playing the clip you select whenever you launch the program similar to the Home page for your browser. You can choose to use a Channel or a specific clip in the Settings dialog. If the clip or channel you are currently playing is the one you would like to use, simply select Use Current Clip. Recent Clips: (Default is 8) You can quickly replay clips by selecting your most recently played clips at the bottom of the File menu. This setting controls how many clips are displayed. Location Bar history Click Clear Location Bar to clear the list of previously played clips; similar to clearing the history in your browser. 58 RealPlayer 8 Plus User Manual CHAPTER 7: Preferences StartCenter [Windows only]: (Default is On) RealPlayer can be launched when you start Windows and stay active in your System Tray so that it responds more quickly when you want to play a clip. The System Tray is opposite your Windows Start button in the same area that you see the Time and Date. The StartCenter icon also gives you quick access to RealPlayer functions and content. While you are connected to the Internet, StartCenter will also keep your Channel Headlines and Live Stations updated as well as check for Real.com Message Flashes and RealPlayer updates while you are connected to the Internet even when you dont have RealPlayer open. To change your StartCenter behavior, click Settings... Check or uncheck Enable StartCenter and then select the behavior that is most convenient, whether to always display the StartCenter icon or to only display it when you receive a Flash (see Real.com Message Service on page 29). Scan time: (Default is 20 seconds) This setting affects all Scan options (Favorites, Playlist, and Stations). Each clip in the selection will be played from its beginning for the specified amount of time. 59 CHAPTER 7: Preferences RealPlayer 8 Plus User Manual Display Preferences Display Preferences change the look of RealPlayer. Figure 7-2: Display tab (PC version) (Mac version) Colors: Audio Analyzer levels (Mac only): These choices allow you to color code the sound levels (low, medium, high) in your Audio Analyzer. The High Audio Analyzer level setting will also be the color for Wave mode. Status message text: Status bar. Choose the color of the text that appears in the Audio Analyzer (Mac only): Sampling rate: Default is midway between Low and High. Higher sampling rates provide more accurate visual information about the sound you are receiving. Full Screen test (PC only): To run in Full Screen mode, RealPlayer must first test your monitors and computer's capabilities. The best display mode will be listed or the message: Full screen mode untested . The test will be run automatically if you attempt to get into Full screen mode by using the Zoom control. If you wish to run the test again for any reason or to run it manually, click Full screen test... Follow the prompting on your screen to test your computer. 60 RealPlayer 8 Plus User Manual CHAPTER 7: Preferences Content Preferences Content Preferences affect how content is displayed, when it is updated and whether or not you subscribe to Real.com News and Entertainment Flashes. Figure 7-3: Content tab Language: (Default is Language initially installed) By default, RealPlayer will display any text components in the language of the version you installed. If you prefer another language be displayed or played by content that provides more than one language, specify your preference here from the drop down list. Channels: (Default is On) Click Settings... to enable or disable the automatic updating of your Channel Headlines, as well as enable or disable the automatic scrolling of Headlines in your Channels tab. Channel Headlines will only be updated while you are connected to the Internet. RealPlayer will not attempt to establish a dial-up connection solely for the purpose of updating your headlines even if you have automatic updating enabled. 61 CHAPTER 7: Preferences RealPlayer 8 Plus User Manual Real.com News and Entertainment Flashes: (Default for all is Off) Click Settings to subscribe or change your subscription to either Real.com Take 5 and Real.com New Flashes (see Real.com Message Service on page 29). You can also set the Alert level for Flashes. By choosing a level, you control how frequently the StartCenter icon blinks when it indicates that you have received a Flash. Web browser: (Default is On) Some clips contain synchronized multimedia events that display Web pages or images in your browser while you are playing a clip. This setting controls whether RealPlayer applications enable these events. If you have more than one browser installed, you can select which will be used by default when there is a synchronized event. Preferred Web browser: Accessibility Content providers can use RealPlayers abilities to offer accessibility features (such as Closed Captioning). Click Settings... to turn on specific options. Select Use accessibility features when available to activate either the Show captions or Display descriptive audio track options. When selected, RealPlayer will either display closed captioning or use a descriptive audio track. If the clip has been authored without captioning or a descriptive track, this setting will have no effect. 62 RealPlayer 8 Plus User Manual CHAPTER 7: Preferences Upgrade Preferences Using the Upgrade tab of the Preferences window, you can customize how often the application talks to RealNetworks to check for available upgrades, change your installed components, correct file-type issues, and whether or not you subscribe to Real.com Product News flashes. Figure 7-4: Upgrade tab Update notification: (Default is On) While on, RealPlayer periodically contacts RealNetworks in the background to determine if a newer version or necessary new components are available for your RealPlayer. If an upgrade is available, RealPlayer offers to download the new files. If you choose to accept any or all of the offered downloads, they will be authenticated and installed automatically. Real.com Product Flashes: (Default for all is Off) Click Settings... to subscribe or change your subscription to either RealPlayer Tips and Tricks and Real.com Product News and Special Offers (see Real.com Message Service on page 29). You can also set the Alert level for Flashes. By choosing a level, you control how frequently the StartCenter icon blinks when it indicates that you have received a Flash. 63 CHAPTER 7: Preferences RealPlayer 8 Plus User Manual RealPlayer Plug-ins Click Settings... to see a listing of the different components and the files you can use with your RealPlayer (e.g. AVI, WAV, etc.). To remove a component highlight it and click Remove. You will not be allowed to remove core components of RealPlayer. Core components are those components that are considered essential for the operation of RealPlayer. While checked, RealPlayer will alert you before continuing with the installation of any new components or updates. If unchecked, RealPlayer will automatically begin installation of any new components that it downloads. Warn before installing new components: (Default is On) Media Types When programs are installed, certain file-types are associated with that program. A files type is described at the front of every file and alerts your computer to what programs can use the file (see What types of files can RealPlayer play? on page 85). Some programs can use other programs file-types (for example, word processors can often read other word processor documents). When you click on a link or a file, Windows checks to see what program is associated with that file-type and automatically launches that program (for example, double-clicking on a .ram file should launch RealPlayer and begin to play a clip). Re-associate: Occasionally the installation of a new program causes these file-types to no longer be associated with RealPlayer. Clicking Re-associate will allows RealPlayer to automatically use RealNetworks file-types again. If there are file-types you always want RealPlayer to use, you can select those types by clicking Auto-Restore Settings... and selecting the file-types you wish manually. Auto-Restore Settings...: By selecting this option RealPlayer automatically selects RealNetworks media in the Auto-Restore Settings list. You can alter what is selected. Always play RealNetworks Media with RealPlayer: (Default is On) Additional Information Often, the terms file-type and file extension (such as. ram or .doc) can be used interchangeably. In actuality, extensions are not always an indication of file-type. Filetype is determined by code in the file header, that portion of the file that is read first when the file is opened or accessed. 64 RealPlayer 8 Plus User Manual CHAPTER 7: Preferences Connection Preferences The Connection tab in the Preferences window contains information about the speed of your connection and how long RealPlayer will continue to try to connect before telling you it cant. Figure 7-5: Connection tab Bandwidth: (Default is set during installation) RealPlayer automatically selects which content can be delivered in realtime over your connection. (See Figure 6-4: Bandwidth on page 45.) This is set during installation. If this setting is too high you will experience extended buffering as RealPlayer attempts to play clips intended for higher (faster) bandwidths. Normal bandwidth: Gives RealPlayer the upper limit for streams it should upshift to through SureStream (see SureStream on page 51). Maximum bandwidth: Buffered Play: (Default is Entire Clip) Set how much RealPlayer should buffer before playing a clip. Increase for a better quality experience on slower connections. Network time-out: (Default is 20 sec. for Connection and 90 sec. for Server) These settings determine how long RealPlayer will continue to try to connect to a server. If this time is exceeded, your RealPlayer will tell you it cannot connect or that it has lost its connection. 65 CHAPTER 7: Preferences RealPlayer 8 Plus User Manual Transport Preferences The Transport tab in the Preferences window allows you to customize your network connection for RealPlayer. Most likely, if you are connecting to the Internet through a commercial Internet Service Provider (ISP), you will not have to set any of the items on this tab. Warning Unless you have specific transport problems, do not change these values. The description of these preferences assumes a basic knowledge of Internet protocols and firewalls. For more information about firewalls, refer to our Web site at: http://service.real.com/firewall/ Figure 7-6: Transport tab Network transport Auto-Configure... : (Default) Use this setting if you are not aware of any problems that require you to specify a transport method. RealPlayer will automatically configure itself to use the most efficient mode of transport for your connection. Do not change this setting unless you are aware of specific transport problems. 66 RealPlayer 8 Plus User Manual CHAPTER 7: Preferences RTSP, PNA. Use this setting if your computer has problems using some network transports. (Consult your network administrator for the appropriate settings.) Use specified Transports: Select Use specified transport... and then click either PNA or RTSP to access the Specify Transports dialog (described on next page) for each protocol. UDP port: (Default is Off) Some networks have limited ports available for Internet applications. This setting controls which port RealPlayer applications use for receiving data. (Consult your network administrator for the appropriate settings.) Additional Information The UDP port setting does not affect TCP packets, which can only be received through Port 7070. Specify Transports dialog Figure 7-7: RTSP Transport Settings The Transport Settings dialog allows you to select the different modes of network transport that you can receive. You can have different settings for PNA and RTSP. (Since these settings are network specific there are no meaningful defaults. Consult your network administrator for the appropriate settings.) Use TCP to Connect to Server Select this option if you want RealPlayer to use TCP for the initial connection to RealServer. 67 CHAPTER 7: Preferences RealPlayer 8 Plus User Manual Select this option if you want RealPlayer to attempt to receive live content through Multicast. Attempt to use Multicast for live content: If you select this option, indicate how many milliseconds RealPlayer should attempt to use this type of transport before switching to UDP. Select this option if you want RealPlayer to attempt to use UDP for static content and live content not available via Multicast. Attempt to use UDP for static content: If you select this option, indicate how many milliseconds RealPlayer should attempt to use this type of transport before switching to TCP. Select this option if you want RealPlayer to use TCP for all content. Attempt to use TCP for all content: Use HTTP Only Select this option if you are behind a firewall and cannot receive data through TCP. All data will be streamed through HTTP. Note You may not be able to receive some content if you select the HTTP Only option. 68 RealPlayer 8 Plus User Manual CHAPTER 7: Preferences Proxy Preferences A proxy is a server that acts as an intermediary between a companys protected LAN (local area network) and the Internet (see Firewalls and Security on page 54). RealPlayer can be configured to work with different proxy servers. (Because these settings are network specific, there are no meaningful defaults. Consult your network administrator for the appropriate settings.) Warning Unless you have specific proxy problems, do not change these values. For more about proxies and firewalls see: http://service.real.com/firewall/ Figure 7-8: Proxy tab PNA and RTSP Options Click to select either or both of these proxies if RealPlayer should use them to connect to the server. For each applicable proxy enter the appropriate domain name or IP address of the server and the port number that RealPlayer should use to communicate with the proxy server. HTTP Options: (Default is Use my web browsers HTTP proxy) Select appropriate HTTP proxy. You can have different proxy information for HTTP than you have for PNA or RTSP. 69 CHAPTER 7: Preferences RealPlayer 8 Plus User Manual Exceptions: Do Not Use Proxy for: (host1, host2, host3...) You can exclude certain local hosts (domain names or IP addresses) with which you do not need to communicate using the proxy server. Enter these hosts in this field. This field is only available if you have enabled one of the Use proxy options. 70 RealPlayer 8 Plus User Manual CHAPTER 7: Preferences Performance Preferences Settings on the Performance tab tailor system compatibility. In most cases you should not change them. However, you may find them helpful if you have an older system or if you are experiencing specific video problems (see Video/Display Problems on page 75). Figure 7-9: Performance tab Playback performance RealPlayer uses this setting to optimize the performance of clip playback. Change this performance setting only if your computer seems sluggish or has problems while playing content. Clip Cache: (Default is On) Some content is created so that frequently used media can be cached, or temporarily saved, so you dont have to stream the information again only a short time later. The next time you play the clip or other clips that use the cached information they will begin playing sooner than if you had to stream that information again. From this dialog you can Enable cache, select the cache file size (by using the slider) and clear the cache, by clicking Empty clip cache... Settings... 71 Additional Information Emptying the clip cache will not free up additional disk space. Empty clip cache... simply purges the saved images and sound from the file much like emptying a drawer of old papers. Playback from Web links [Internet Explorer only]: (Default is Enabled, Play) Sometimes links are authored to download a clip rather than streaming. Settings... Enable instant playback allows you to select a specific default behavior. Clicking on a link can either Play and save, Play, or simply Save the clip. By selecting Always Ask, RealPlayer will ask how to handle a link when you click on it. The default action will be automatically selected, but you will have the opportunity to change the selection before RealPlayer acts. Default folder for save lists where files will be saved. To choose a new directory for saving, click Change Location..., navigate to a new place, and click OK. Sound card compatibility [Windows only] Modify sound card settings to overcome audio problems. Settings... Use this setting if you have an older sound card and clips sound scratchy or distorted. Disable 16-bit sound (use 8-bit only): Use this setting if clips play at the wrong speed or sound scratchy or distorted. Disable custom sampling rates: Video card compatibility Some video cards are not compatible with RealPlayers optimized video. (See also Why is my video playback ugly? on page 76 for a list of symptoms and solutions or come to http://service.real.com/for the latest information.) Use optimized video display : When selected, RealPlayer uses Windows DirectX capabilities on the PC and similar enhancements on the Macintosh to deliver the best video possible. In some cases, older cards or versions of DirectX can cause distorted or bad video. Uncheck this option and attempt to play the video again to determine if this Preference is the issue. RealPlayer 8 Plus User Manual CHAPTER 7: Preferences Support Preferences Support Preferences determine how much information you share with content providers. To learn more about any of these options click Tell Me More... RealPlayer will open your Browser and take you to the appropriate Web page (the Registration location section has a link in its dialog box). Figure 7-10:Support tab Supply info to content providers This data helps content providers refine their methods and improve their quality and service. Supply connection-quality data to RealServers (Default is On) If you do not wish to share your information with content providers, do not check this box. Information about your connection quality is used to improve data encoding and transmission methods. sends your RealPlayers unique identifier (GUID, see below) to RealServers. Your GUID is sometimes your ticket to view secure or otherwise members only content (see additional information on next page). You must select this option to view this type of secure content, but you can uncheck this box for other viewing. Supply GUID when playing streaming content (Default is Off) 73 CHAPTER 7: Preferences RealPlayer 8 Plus User Manual Additional Information A Globally Unique Identifier (GUID) is an alphanumeric identifier in RealPlayer that is disabled by default and is only enabled if you turn on the feature in Preferences. A GUID is randomly generated by RealPlayer during installation. RealNetworks uses publicly documented standards to create a GUID. A GUID is used to indicate a unique installation of a product, and is found in many popular software applications. RealPlayer has GUIDs disabled by default (set to all zeroes so that it is not unique). Some content providers require that you enable your GUID in order to play their content. (You will receive an error from the RealServer if a GUID is required to access the content.) This is typically because their content is limited-access, such as pay-per-view, or for registered members only. If you enable the GUID, it will be sent to all streaming media servers when you play a clip or broadcast. Send support info If selected, RealPlayer will send information about your computer to our support database when you have a connection or program error in order to provide better information and possible solutions to any problems that may arise. If you do not check the box, you may only receive general error messages. Cookies: (Default is Enabled) By storing information about previous media sessions, content providers can better customize your experience and provide better connectivity. Registered location Use this setting to change your physical location in our registration database. By having accurate information, RealNetworks can connect you to the nearest possible server for updates (see Figure 7-4: Upgrade tab on page 63) and other connections. 74