1
REALPRODUCER 11 USER’S GUIDE
RealProducer 11 Powered by Helix™ DNA
Revision Date: 19 August 2005
RealNetworks, Inc.
P.O. Box 91123
Seattle, WA 98111-9223
U.S.A.
http://www.real.com
http://www.realnetworks.com
Copyright ©2004, 2005 RealNetworks, Inc. All rights reserved.
Information in this document is subject to change without notice. All rights reserved. No part of this book may
be reproduced, in any form or by any means, without permission in writing from RealNetworks, Inc.
Helix, the Helix logo, the Real "bubble" (logo), RealProducer, Helix Producer, RealSystem Server, Helix Universal
Server, RealAudio, RealVideo, RealMedia, RealPlayer, and RealOne Player are all trademarks or registered
trademarks of RealNetworks, Inc.
Other product and corporate names may be trademarks or registered trademarks of their respective owners.
-------------------------------
Copyright © 1995-2005 RealNetworks, Inc. This product may incorporate one or more of the following: U.S.
Patent # 5,917,835; U.S. Patent # 5,854,858; U.S. Patent # 5,917,954; U.S. Patent # 6,597,961; U.S. Patent
#6,314,466. Other U.S. patents pending. All rights reserved.
ACELP®.net codec by VoiceAge Corporation Copyright© 2000-2002. All rights reserved.
RealNetworks Lossless audio codec Copyright © 1999-2003 RealNetworks, Inc. All rights reserved.
RealNetworks RealAudio Multichannel Codec Copyright © 2003 RealNetworks, Inc. All rights reserved.
AAC implementation developed by Coding Technologies.
RealNetworks RealVideo 8 video codec Copyright © 1995-2003 RealNetworks, Inc. Portions Copyright © 19992000 Intel Corporation. All rights reserved.
RealNetworks RealVideo 9 video codec Copyright © 1995-2003 RealNetworks, Inc. Portions Copyright © 19992003 Intel Corporation. All rights reserved.
RealNetworks RealVideo 10 video codec Copyright © 1995-2003 RealNetworks, Inc. Portions Copyright ©
1999-2003 Intel Corporation. All rights reserved.
-------------------------------
STLport included under license from Boris Fomitchev. The following text pertains only to STLport:
Copyright © 1999,2000 Boris Fomitchev
This material is provided "as is", with absolutely no warranty expressed or implied. Any use is at your own risk. Permission to use
or copy this software for any purpose is hereby granted without fee, provided the above notices are retained on all copies.
Permission to modify the code and to distribute modified code is granted, provided the above notices are retained, and a notice
that the code was modified is included with the above copyright notice.
Copyright © 1994 Hewlett-Packard Company
Permission to use, copy, modify, distribute and sell this software and its documentation for any purpose is hereby granted without
fee, provided that the above copyright notice appear in all copies and that both that copyright notice and this permission notice
appear in supporting documentation. Hewlett-Packard Company makes no representations about the suitability of this software
for any purpose. It is provided "as is" without express or implied warranty.
Copyright © 1996,97 Silicon Graphics Computer Systems, Inc.
Permission to use, copy, modify, distribute and sell this software and its documentation for any purpose is hereby granted without
fee, provided that the above copyright notice appear in all copies and that both that copyright notice and this permission notice
appear in supporting documentation. Silicon Graphics makes no representations about the suitability of this software for any
purpose. It is provided "as is" without express or implied warranty.
Copyright © 1997 Moscow Center for SPARC Technology.
Permission to use, copy, modify, distribute and sell this software and its documentation for any purpose is hereby granted without
fee, provided that the above copyright notice appear in all copies and that both that copyright notice and this permission notice
appear in supporting documentation. Moscow Center for SPARC Technology makes no representations about the suitability of
this software for any purpose. It is provided "as is" without express or implied warranty.
SUMMARY OF CONTENTS
INTRODUCTION ..................................................................................................................... 1
PART I: GETTING STARTED
NEW FEATURES ........................................................................................................... 7
1
2
MEDIA BASICS ........................................................................................................... 15
3
INSTALLATION........................................................................................................... 27
PART II: ENCODING BASICS
PRODUCING AUDIO .................................................................................................. 35
4
5
PRODUCING VIDEO .................................................................................................. 55
6
ENCODING CLIPS ...................................................................................................... 85
7
CHOOSING AUDIENCES .......................................................................................... 103
8
MONITORING A JOB ............................................................................................... 141
9
MODIFYING DEFAULT SETTINGS............................................................................. 151
PART III: BROADCASTING LIVE EVENTS
10
PLANNING A BROADCAST....................................................................................... 165
11
RUNNING A BROADCAST ........................................................................................ 189
PART IV: MEDIA TOOLS
12
EDITING REALMEDIA FILES ..................................................................................... 223
13
DEFINING EVENTS AND IMAGE MAPS .................................................................... 235
14
USING THE COMMAND-LINE APPLICATION ........................................................... 251
PART V: FILE FORMATS
XML FILE BASICS ...................................................................................................... 295
A
B
JOB FILE SYNTAX ...................................................................................................... 301
C
AUDIENCE FILE SYNTAX........................................................................................... 343
D
SERVER FILE SYNTAX ................................................................................................ 361
E
PREFERENCE FILE SYNTAX ....................................................................................... 371
GLOSSARY........................................................................................................................... 377
INDEX ................................................................................................................................. 383
v
RealProducer 11 User’s Guide
vi
CONTENTS
INTRODUCTION
1
How This Guide Is Organized ............................................................................ 1
Conventions Used in this Guide......................................................................... 3
Additional Documentation Resources ............................................................... 4
Technical Support ............................................................................................ 4
PART I: GETTING STARTED
1
NEW FEATURES
7
New Features in RealProducer 11 ...................................................................... 7
Low-Latency Broadcasts ............................................................................... 7
IP Version 6 Support..................................................................................... 7
Listen Address Default for Push Broadcasts ................................................... 8
RealAudio and RealVideo File Extensions ....................................................... 8
RealMedia Editor for RealProducer Basic....................................................... 8
Change to Default Audience ......................................................................... 8
Features Removed from RealProducer 11........................................................... 8
Legacy Broadcast Support ............................................................................ 9
RealVideo G2 with SVT ................................................................................. 9
ATRAC3-Based Music Codecs....................................................................... 9
Features Introduced with RealProducer 10........................................................10
RealVideo 10...............................................................................................10
RealAudio 10 Stereo Music Codecs ..............................................................10
RealAudio 5.1 Multichannel Codecs.............................................................11
RealAudio Lossless Codec............................................................................11
Audio Delay Compensation Prefilter .............................................................12
Video Resize Prefilter....................................................................................12
Encoding Complexity...................................................................................12
File Rolling for Large Clips............................................................................12
Multiple Outputs for a Single Encoding Job ..................................................13
Enhanced Load Management Capabilities ....................................................13
New Job File Format ....................................................................................14
Upgrade Issues ................................................................................................14
New Installation Directory ...........................................................................14
vii
RealProducer 11 User’s Guide
Job File Versions ..........................................................................................14
2
MEDIA BASICS
15
Inputs and Sources..........................................................................................15
Audio and Video Editing Programs...............................................................16
RealProducer Features .....................................................................................16
Encoding Methods ......................................................................................16
Jobs and Job Files ........................................................................................17
Audiences ...................................................................................................18
Destinations and Outputs ...........................................................................19
Additional Encoding Settings .......................................................................21
Clip Modification ............................................................................................22
RealMedia Editor ........................................................................................22
Events Files .................................................................................................22
Digital Rights Management .........................................................................22
Presentations ..................................................................................................23
Ram File .....................................................................................................23
SMIL Presentations .....................................................................................23
Javascript Methods......................................................................................24
Media Delivery ................................................................................................24
On-Demand Clip Streaming.........................................................................24
Live Broadcasts ...........................................................................................24
3
INSTALLATION
27
Audio and Video Input Formats .......................................................................27
Uncompressed Input Formats ......................................................................27
Formats Requiring DirectX...........................................................................27
Formats Requiring QuickTime......................................................................28
Input Color Formats....................................................................................28
System Requirements.......................................................................................29
Chipset Optimizations.................................................................................30
Additional Basic Requirements ....................................................................30
Installing RealProducer on Windows ................................................................31
Installing RealProducer on Linux ......................................................................32
PART II: ENCODING BASICS
4
PRODUCING AUDIO
35
Understanding RealAudio................................................................................35
Bandwidth and Audio Quality......................................................................35
RealAudio Bandwidth Characteristics...........................................................36
RealAudio Codecs ...........................................................................................37
Understanding the RealAudio Codec Tables .................................................38
viii
Contents
Voice Codecs ..............................................................................................39
Mono Music Codecs....................................................................................40
Stereo Music Codecs ...................................................................................41
Stereo Surround Codecs ..............................................................................43
5.1 Multichannel Audio Codecs ...................................................................45
Lossless Audio Codec ..................................................................................47
Audio Capture ................................................................................................50
Source Media..............................................................................................50
Recording Equipment ..................................................................................50
Shielded Cables...........................................................................................51
Input Levels.................................................................................................51
Volume Levels for Live Broadcasts ................................................................51
Sampling Rates ...........................................................................................51
Audio Optimization.........................................................................................52
DC Offset ...................................................................................................52
Normalization.............................................................................................52
Dynamics Compression ...............................................................................53
Equalization................................................................................................53
5
PRODUCING VIDEO
55
Understanding RealVideo.................................................................................55
Factors for Creating a Good Streaming Video ...............................................55
Soundtrack Bandwidth ................................................................................57
Encoded Frame Rates ..................................................................................59
Visual Clarity...............................................................................................60
RealVideo Codecs........................................................................................61
Constant Bit Rate Video...................................................................................63
SureStream CBR Clips .................................................................................63
Downshifting and Upshifting .......................................................................64
SureStream Substreams ...............................................................................65
Variable Bit Rate Video ....................................................................................66
VBR Clips for Download ..............................................................................67
VBR Clips for Streaming and Broadcasting ...................................................67
VBR Encoding Settings.................................................................................68
Video Recording Tips.......................................................................................70
Video Staging ..............................................................................................70
Scene Changes and Movement.....................................................................70
Colors and Lighting .....................................................................................71
Video Output ..............................................................................................71
Color Depth................................................................................................71
Source Media Quality ..................................................................................71
Video Capture .................................................................................................71
ix
RealProducer 11 User’s Guide
Video Capture Dimensions ..........................................................................72
Video Capture Frame Rates..........................................................................72
Computer Speed and Disk Space .................................................................72
Video Encoding Dimensions ........................................................................73
High-Bandwidth and Low-Bandwidth Streaming Audiences ..........................75
RealMedia File Size......................................................................................76
RealVideo Filters..............................................................................................76
Noise Filters ................................................................................................77
Resize Filter.................................................................................................77
Inverse-Telecine Filter ..................................................................................78
De-interlace Filter........................................................................................79
Black-Level Correction Filter.........................................................................80
RealVideo Options ..........................................................................................80
Two-Pass Encoding .....................................................................................80
Encoding Complexity Modes........................................................................81
Video Startup Latency .................................................................................82
Maximum Time Between Keyframes .............................................................82
Loss Protection ...........................................................................................84
6
ENCODING CLIPS
85
Using Jobs.......................................................................................................85
Creating a New Job File ...............................................................................85
Using and Modifying Existing Jobs................................................................86
Changing the Overall Default Settings ..........................................................87
Running Multiple Jobs .................................................................................88
Using the Job Manager ................................................................................88
Selecting Inputs and Destinations ....................................................................89
Using a File as the Input...............................................................................89
Using Live Audio or Video as the Input .........................................................90
Creating a Destination Clip..........................................................................92
Adding Clip Information..................................................................................94
How Clip Information Displays in RealPlayer ................................................95
Filtering Video Input ........................................................................................95
Cropping ....................................................................................................96
Black-Level Correction .................................................................................97
De-Interlace and Inverse-Telecine .................................................................97
Video Noise ................................................................................................97
Setting Basic Encoding Parameters ...................................................................97
Setting Audio Parameters ............................................................................98
Choosing Video Options..............................................................................99
Choosing Audiences ......................................................................................100
Default Audience and Options...................................................................101
x
Contents
Adding an Audience to a Job......................................................................101
7
CHOOSING AUDIENCES
103
Understanding Audiences ..............................................................................103
Audio Encoding for Audiences ...................................................................103
Video Encoding for Audiences ....................................................................104
Which Audiences Should I Use? .................................................................105
Low-Bandwidth Streaming Audiences.............................................................106
12k Substream for 28k Dial-up ..................................................................107
16k Substream for 28k Dial-up ..................................................................108
26k Substream for 56k Dial-up ..................................................................108
28k Dial-up...............................................................................................109
56k Dial-up...............................................................................................110
64k Single ISDN ........................................................................................111
128k Dual ISDN ........................................................................................112
150k LAN .................................................................................................113
High-Bandwidth Streaming Audiences............................................................113
256k DSL or Cable ....................................................................................114
384k DSL or Cable ....................................................................................115
512k DSL or Cable ....................................................................................116
768k DSL or Cable ....................................................................................116
Mobile Device Audiences ...............................................................................117
General Mobile Streaming Audience ...........................................................118
General Mobile Local Playback Audience ....................................................119
Pocket PC Local Playback Audience............................................................119
Variable Bit Rate Download Audiences ...........................................................120
350k Download (VBR) ..............................................................................121
450k Download (VBR) ..............................................................................122
750k Download (VBR) ..............................................................................123
1M Download (VBR).................................................................................123
2M Download (VBR).................................................................................124
5M Download (VBR).................................................................................125
Quality Download Audiences .........................................................................125
70% Quality Download (VBR) ....................................................................126
80% Quality Download (VBR) ....................................................................127
90% Quality Download (VBR) ....................................................................128
100% Quality Download (VBR) ..................................................................128
Stereo Surround Audiences ............................................................................129
350k Surround Stereo (VBR) ......................................................................130
450k Surround Stereo (VBR) ......................................................................130
750k Surround Stereo (VBR) ......................................................................131
1M Surround Stereo (VBR) ........................................................................132
xi
RealProducer 11 User’s Guide
2M Surround Stereo (VBR) ........................................................................133
Multichannel Audio Audiences.......................................................................133
350k Multichannel (VBR) ..........................................................................134
450k Multichannel (VBR) ..........................................................................134
750k Multichannel (VBR) ..........................................................................135
1M Multichannel (VBR).............................................................................136
2M Multichannel (VBR).............................................................................137
5M Multichannel (VBR).............................................................................137
Lossless Audio...............................................................................................138
8
MONITORING A JOB
141
Starting an Encoding Job ...............................................................................141
Stopping an Encoding Job .........................................................................141
Playing a Media Clip..................................................................................142
Monitoring Audio .........................................................................................142
Disabling the Audio Meters........................................................................142
Adjusting Audio Gain ................................................................................143
Preventing Clipped Audio Input .................................................................143
Monitoring Video Output ..............................................................................144
Monitoring Statistics .....................................................................................144
Encoding Statistics Phases .........................................................................145
Encoding Statistics Values .........................................................................145
Video Quality Index ...................................................................................146
Viewing Log Messages ...................................................................................147
Using the Log Viewer .................................................................................147
Filtering Messages by Functional Area ........................................................148
9
MODIFYING DEFAULT SETTINGS
151
Adjusting RealProducer Preferences................................................................151
Changing the File Location Preferences.......................................................151
Changing Log File and Log Viewer Preferences.............................................153
Creating and Editing Audiences......................................................................155
Changing Audience Values for the Active Job ..............................................156
Editing, Creating, or Deleting an Audience Template...................................156
Choosing a Template Name.......................................................................158
Setting CBR or VBR Encoding ....................................................................158
Video Settings ...........................................................................................159
Adjusting Audio Stream Settings ................................................................160
PART III: BROADCASTING LIVE EVENTS
10
PLANNING A BROADCAST
165
Broadcasting Basics.......................................................................................165
xii
Contents
The Role of Helix Server .............................................................................166
Broadcasting Methods ..............................................................................166
CBR Broadcasts ........................................................................................167
VBR Broadcasts.........................................................................................168
Broadcast Transport Protocols...................................................................168
Version 6 IP Addresses ...............................................................................169
Video Startup Latency................................................................................169
SMIL in Broadcasts....................................................................................170
Broadcast Trial Runs .................................................................................171
Simulated Live Broadcasts .........................................................................171
Broadcast Distribution ..................................................................................172
Multiple Destinations ................................................................................172
Parallel Outputs ........................................................................................172
Server Splitting ..........................................................................................173
Optional Broadcasting Features .....................................................................174
Encoder Redundancy.................................................................................174
Archiving...................................................................................................175
Virtual Paths .............................................................................................176
Broadcast Load Management ........................................................................177
Broadcast Load Testing .............................................................................177
Video Codecs and Encoding Complexity .....................................................178
Automatic Frame Rate Reduction...............................................................179
Video Filters, Resizing, and Cropping..........................................................179
Audio Resampling .....................................................................................179
Visual Monitoring......................................................................................180
End-to-End Broadcast Latency .......................................................................180
Latency Modes ..........................................................................................180
Encoding Latency ......................................................................................181
Helix Server Latency ...................................................................................183
RealPlayer Latency.....................................................................................184
Network Latency .......................................................................................185
Tips For Creating Presentations with Lowered Latency.................................186
Setting the Latency Mode...........................................................................187
11
RUNNING A BROADCAST
189
Running an Account-Based Broadcast ............................................................189
Advantages of Account-Based Broadcasting ...............................................189
Account-Based Broadcast Steps .................................................................190
Preparing Helix Server for an Account-Based Broadcast ...............................190
Defining the Account-Based Server Destination...........................................192
Starting and Stopping an Account-Based Broadcast....................................194
Setting Up a Password-Only Broadcast...........................................................194
xiii
RealProducer 11 User’s Guide
Advantages of Password-Only Broadcasting ...............................................195
Disadvantages of Password-Only Broadcasting...........................................195
Password-Only Broadcast Steps .................................................................195
Preparing Helix Server for Password-Only Broadcasting ...............................196
Defining a Password-Only Server Destination..............................................198
Starting and Stopping a Password-Only Broadcast......................................200
Multicasting a Live Stream .............................................................................200
Preparing Helix Server for a Multicast .........................................................201
Defining a Multicast Server Destination ......................................................203
Starting and Stopping a Multicast..............................................................205
Changing Advanced Push Broadcast Parameters .............................................205
TCP Reconnect .........................................................................................205
Metadata Resend Interval ..........................................................................206
Statistics Update Interval ...........................................................................206
Packet Resend Requests and Listen Address................................................206
Forward Error Correction...........................................................................207
Multicast Time to Live ...............................................................................209
Running a Pull Broadcast...............................................................................210
Advantages of Pull Broadcasting ................................................................210
Disadvantages of Pull Broadcasting............................................................211
Pull Broadcast Steps..................................................................................211
Preparing Helix Server for Pull Broadcasting................................................212
Defining a Pull Broadcast Server Destination ..............................................213
Starting and Stopping a Pull Broadcast ......................................................215
Reducing Broadcast Latency ..........................................................................216
Setting the RealProducer Latency Mode......................................................216
Changing the Maximum Packet Size ...........................................................217
Working with Server Templates ......................................................................217
Using a Server Template ............................................................................217
Editing or Deleting a Server Template .........................................................217
Broadcast URLs ............................................................................................218
Standard URL for a Push Broadcast ...........................................................219
Standard URL for a Pull Broadcast .............................................................220
PART IV: MEDIA TOOLS
12
EDITING REALMEDIA FILES
223
Using the Graphical Editor.............................................................................223
Opening a RealMedia Clip .........................................................................224
Navigating Through a Clip .........................................................................224
Editing with the RealMedia Editor ..................................................................225
Editing a Clip’s Beginning or End ...............................................................225
xiv
Contents
Changing Clip Information ........................................................................226
Merging Image Maps or Events ..................................................................227
Appending Clips........................................................................................228
Using Advanced Editing Features....................................................................229
Viewing Stream Information.......................................................................229
Changing Editor Preferences ......................................................................230
Running the Command Line Editor ................................................................230
Getting Information from a RealMedia Clip ................................................231
Editing Metadata ......................................................................................231
Cutting and Pasting Files ...........................................................................231
Common RealMedia Editor Command Line Operations ..............................232
13
DEFINING EVENTS AND IMAGE MAPS
235
Understanding Events and Maps ....................................................................235
Writing an Events File ....................................................................................236
Specifying URL Events................................................................................236
Adding a Title, Author, and Copyright ........................................................238
Adding Extended Clip Information .............................................................239
Creating Image Maps.....................................................................................241
Setting a Duration .....................................................................................242
Creating the Overall Map...........................................................................242
Defining Hot Spot Areas ............................................................................243
Setting the Action......................................................................................247
Defining Alternate Text ..............................................................................247
Map File Example ......................................................................................247
Running the RMEvents Utility.........................................................................248
Using RMEvents Option Flags ....................................................................248
Merging an Event or Map File with the Clip.................................................248
Extracting Map and Events Information......................................................249
14
USING THE COMMAND-LINE APPLICATION
251
Encoding From the Command Line ................................................................251
Using Job Files or Command Options.........................................................251
Running the Command-Line Application ....................................................252
Stopping the Command-Line Application ...................................................253
Monitoring the Return Value......................................................................255
Command-Line Functional Areas ...................................................................256
Job File Options ............................................................................................259
Job File Name (-j) ......................................................................................259
Create Job File (-cj)....................................................................................259
Disable Codec Updates (-duc) ...................................................................261
Input Options ...............................................................................................262
Input File or Directory (-i) ..........................................................................262
xv
RealProducer 11 User’s Guide
Audio Capture Device ID (-ac) ...................................................................263
Audio Capture Device Port (-ap) ................................................................263
Capture Mono Audio (-cm) .......................................................................264
Video Capture Device ID (-vc) ....................................................................264
Video Device Port (-vp)..............................................................................265
Video Format (-vf).....................................................................................265
Capture Frame Size (-cs)............................................................................266
Capture Duration (-d) ...............................................................................266
Clip Information Options ..............................................................................266
Title (-t)....................................................................................................267
Author (-a) ...............................................................................................267
Copyright (-c) ...........................................................................................267
Keywords (-k)............................................................................................267
Description (-de).......................................................................................267
Content Rating (-r) ...................................................................................268
Prefilter Options............................................................................................268
Audio Gain Filter (-ag)...............................................................................268
Disable Audio Watchdogs (-daw) ..............................................................269
Black Level Filter (-bl) ................................................................................269
Inverse-Telecine and De-interlace Filters (-di) ..............................................269
Crop Video Input (-cr) ...............................................................................270
Video Noise Filter (-nf) ..............................................................................271
Output and Destination Options ...................................................................271
Output File or Directory (-o)......................................................................271
Destination File Roll Size (-drs) ..................................................................272
Destination File Roll Time (-drt).................................................................272
Push Server Destination (-sp) .....................................................................272
Pull Server Destination (-si)........................................................................275
Server Template or Server File (-sd).............................................................277
Latency Mode (-lm)...................................................................................279
Maximum Packet Size (-mtu) .....................................................................279
Encoding Options .........................................................................................280
Audience Definitions or Audience Files (-ad)...............................................280
Disable Two-Pass Encoding (-dt) ...............................................................281
Audio Mode (-am) ....................................................................................281
Disable Audio (-da)...................................................................................282
Audio Resampling Quality (-arq) ...............................................................282
Video Mode (-vm) .....................................................................................282
Disable Video (-dv)....................................................................................283
Resize Video (-rs) ......................................................................................283
Resize Quality (-rq) ...................................................................................284
Video Codec Override (-vco) ......................................................................284
xvi
Contents
Encoding Complexity Override (-eco) .........................................................284
Logging Options............................................................................................285
Logging Category (-lc) ...............................................................................285
Disable Logging to File (-dlf) ......................................................................285
Disable Logging to Screen (-dls) .................................................................286
Quiet Mode (-q)........................................................................................286
Process ID File (-pid) .................................................................................286
Help Options ................................................................................................286
Display Help (-h).......................................................................................286
Display Detailed Help (-m) ........................................................................287
Print Device Information (-pd) ...................................................................287
Print Audiences (-pa).................................................................................287
Print Servers (-ps) ......................................................................................287
Print Version (-v) .......................................................................................287
Command Line Usage Examples.....................................................................288
Basic Encoding Examples...........................................................................288
Job File Examples.......................................................................................289
Audio Encoding ........................................................................................290
Live Capture Examples ...............................................................................290
Input Modification Examples .....................................................................291
PART V: FILE FORMATS
A
XML FILE BASICS
295
XML File Rules...............................................................................................295
The XML Tag and Namespaces ..................................................................295
Tags, Attributes, and Values.......................................................................296
XML Recommendations.................................................................................298
B
JOB FILE SYNTAX
301
Understanding Job Files .................................................................................301
Features Exclusive to the Job File ................................................................301
Tips for Creating Job Files ..........................................................................302
Job Section....................................................................................................304
Job Properties ...........................................................................................304
Job File Example ........................................................................................305
Clip Information............................................................................................305
Clip Information Values .............................................................................306
Metadata Values for RealPlayer ..................................................................306
Separate Clip Information for Outputs .......................................................307
Clip Information Examples.........................................................................307
Audio and Video Inputs .................................................................................309
Single and Multiple Inputs .........................................................................309
xvii
RealProducer 11 User’s Guide
Input Tag..................................................................................................310
Digitized File Input ....................................................................................311
Capture Input ...........................................................................................313
Input File and Capture Examples................................................................315
Prefilters .......................................................................................................317
Prefilter Order ...........................................................................................318
Video Resizing Methods.............................................................................319
Input Cropping Prefilter.............................................................................320
De-Interlace and Inverse-Telecine Prefilter...................................................322
Video Noise Reduction Prefilter..................................................................323
Black-Level Prefilter ...................................................................................324
Video Resizing Prefilter ..............................................................................324
Audio Gain Prefilter...................................................................................326
Audio Delay Compensation Prefilter...........................................................327
File and Server Outputs..................................................................................329
Destinations Section......................................................................................330
Destination Tag ........................................................................................330
File Destinations .......................................................................................330
Server Destinations....................................................................................333
Media Profile ................................................................................................334
Media Profile Properties ............................................................................335
Media Profile Audience References .............................................................337
Latency Reduction.....................................................................................338
Media Profile Example ...............................................................................339
Audiences Section .........................................................................................340
Working with Audiences ............................................................................341
Incorporating an Audience File into a Job File .............................................341
C
AUDIENCE FILE SYNTAX
343
Understanding Audiences ..............................................................................343
Audience Files ...........................................................................................343
Audiences in Job Files ................................................................................344
Audience Section...........................................................................................345
Audience Properties...................................................................................345
Audience Properties Example .....................................................................346
Streams Section ............................................................................................346
Audio Stream Properties ................................................................................347
Audio Stream Context ...............................................................................348
Using Fewer than Four Audio Stream Contexts............................................350
Audio Context Examples............................................................................351
Video Stream Properties.................................................................................353
Stream Encoding Types .............................................................................354
xviii
Contents
Video Stream Bit Rate................................................................................356
Video Stream Example ...............................................................................356
Stream Packetization .....................................................................................357
Packetizer Tag ...........................................................................................357
Packetizer Properties..................................................................................358
Maximum Packet Size and Duration ...........................................................358
Maximum Superblock Size .........................................................................359
D
SERVER FILE SYNTAX
361
Understanding Server Destination Files ...........................................................361
Push Server Syntax .........................................................................................362
Push Server Properties................................................................................362
Push Server Examples.................................................................................365
Pull Server Syntax...........................................................................................367
Pull Server Properties .................................................................................368
Pull Server Example....................................................................................369
E
PREFERENCE FILE SYNTAX
371
Editing RealProducer Preferences....................................................................371
File Path Preferences ......................................................................................372
Temporary Directory..................................................................................372
File Path Example ......................................................................................373
Log File Preferences .......................................................................................373
Log File Example........................................................................................374
Log Viewing Properties...................................................................................375
Log File Example........................................................................................375
GLOSSARY
377
INDEX
383
xix
RealProducer 11 User’s Guide
xx
INTRODUCTION
Welcome. This guide explains how to convert audio and video into
streaming or downloadable media using RealProducer 11 Powered
by Helix™ DNA. It teaches you how to create clips, or send a live
stream to Helix Server for broadcast to RealPlayer viewers.
How This Guide Is Organized
The guide contains the following chapters and appendixes.
Chapter 1: New Features
This chapter explains new and removed features in RealProducer 11.
Chapter 2: Media Basics
If you are new to media production, refer to this chapter for explanations of
media encoding options and the major features of RealProducer 11.
Chapter 3: Installation
This chapter explains RealProducer requirements and describes how to install
the product.
Chapter 4: Producing Audio
For tips about producing high-quality audio content, refer to this chapter.
This chapter also explains the properties of the various RealAudio codecs.
Chapter 5: Producing Video
The information in this chapter will help you to create high-quality video
content. This chapter also explains the RealVideo codecs and filtering options.
Chapter 6: Encoding Clips
This chapter describes how to use the RealProducer graphical application to
set up an encoding job.
1
RealProducer 11 User’s Guide
Chapter 7: Choosing Audiences
This chapter describes the settings of the predefined audiences that you use to
set clip and broadcast streaming speeds.
Chapter 8: Monitoring a Job
When you are ready to start encoding, refer to this chapter for information
about kicking off and monitoring the encoding process.
Chapter 9: Modifying Default Settings
For information about changing the RealProducer preferences and audience
settings, see this chapter.
Chapter 10: Planning a Broadcast
This chapter explains the basic issues around broadcasting live audio or video.
Chapter 11: Running a Broadcast
When you are ready to set up a live broadcast, refer to this chapter for
explanations of how to perform a push or pull broadcast.
Chapter 12: Editing RealMedia Files
This chapter explains how to use the RealMedia Editor to edit RealAudio and
RealVideo clips.
Chapter 13: Defining Events and Image Maps
The RMEvents utility allows you to encode clip information, create clickable
image maps, and open Web pages automatically as a clip plays.
Chapter 14: Using the Command-Line Application
Refer to this chapter if you plan to encode clips or broadcasts using the
RealProducer command-line application.
Appendix A: XML File Basics
This appendix describes the basic rules for editing the RealProducer XMLbased files.
Appendix B: Job File Syntax
Job files can define the encoding settings used by the graphical application
and the command-line application. This appendix describes the job file
syntax.
2
Introduction
Appendix C: Audience File Syntax
This appendix explains the syntax of audience files, which define the
streaming speeds at which clips and broadcasts are encoded.
Appendix D: Server File Syntax
Server files define server destinations used in live broadcasts. This appendix
describes the server file syntax.
Appendix E: Preference File Syntax
This appendix explains how to edit the RealProducer preferences file manually
to set overall encoding preferences.
Conventions Used in this Guide
The following table explains the typographical conventions used in this guide.
Notational Conventions
Convention
Meaning
emphasis
Bold text is used for in-line headings, user-interface
elements, URLs, and e-mail addresses.
terminology
Italic text is used for technical terms being introduced,
and to lend emphasis to generic English words or
phrases.
syntax
This font is used for fragments or complete lines of
programming syntax (markup).
syntax emphasis Bold syntax character formatting is used for program
names, and to emphasize specific syntax elements.
variables
Italic syntax character formatting denotes variables
within fragments or complete lines of syntax.
[options]
Square brackets indicate values that you may or may not
need to use. As a rule, when you use these optional values,
you do not include the brackets themselves.
choice 1|choice 2 Vertical lines, or “pipes,” separate values that you can
choose between.
...
Ellipses indicate nonessential information omitted from
examples.
3
RealProducer 11 User’s Guide
Additional Documentation Resources
In addition to this introductory guide, you may need the following resources,
which are available for download at http://service.real.com/help/library/
encoders.html:
• Introduction
to Streaming Media
Start with this guide if you are new to streaming media or RealNetworks
products. Written for the beginning user, it explains how to put together a
basic presentation using different production techniques.
• RealNetworks
Production Guide
This guide is the main reference manual for streaming media production.
It expands on most of the topics presented in this introductory guide.
Refer to it for instructions and tips on media production, as well as for
complete information about using SMIL.
• RealPlayer
Scripting Guide
If you are a Web programmer, refer to this guide for instructions about
using Javascript or VBScript with RealPlayer. Using these scripting
languages, you can customize RealPlayer to turn it into your own Internet
jukebox, for example.
• Helix
Server Administration Guide
The basic reference for the Helix Server administrator, this guide explains
how to set up, configure, and run Helix Server to stream multimedia. You
need this guide only if you are running Helix Server yourself. It is available
at http://service.real.com/help/library/servers.html.
Technical Support
To reach RealNetworks’ Technical Support, you can contact their Web site by
choosing Help>Technical Support from the RealProducer main menu. The
information you provide in this form will help Technical Support personnel
respond promptly. For general information about RealNetworks' Technical
Support, visit http://service.real.com.
4
PART
Part I:
GETTING STARTED
The following chapters introduce you to features new in
RealProducer 11, as well as explain the basic issues for encoding
a clip or broadcast. The installation chapter explains computer
requirements, and walks you through the installation process.
I
CHAPTER
Chapter 1:
1
NEW FEATURES
This chapter describes new and removed features in RealProducer
11. It also discusses upgrade issues if you have used an earlier
version of RealProducer or Helix Producer.
New Features in RealProducer 11
RealProducer 11 introduces the following new features.
Low-Latency Broadcasts
RealProducer 11 provides three latency modes that can help you to reduce the
end-to-end latency of a live broadcast. It also provides the ability to configure
packet sizes and audio superblock sizes to optimize broadcast packets for
your network.
Note: Low latency broadcasts function only when sending the
live stream to Helix Server version 11 or later.
For More Information: Refer to “End-to-End Broadcast Latency”
on page 180.
IP Version 6 Support
You can install and run RealProducer 11 on computers and operating systems
that support version 4 IP addresses (IPv4), version 6 IP addresses (IPv6), or
both. RealProducer 11 supports broadcasts to Helix Servers that use either
IPv4 or IPv6 addresses.
For More Information: See “Version 6 IP Addresses” on page 169.
7
RealProducer 11 User’s Guide
Listen Address Default for Push Broadcasts
RealProducer 11 uses a new default method for sending its listen address to
Helix Server in a push broadcast. In earlier versions of RealProducer, the listen
address was automatically set to the default IP address on the RealProducer
machine. Broadcasting successfully through a NAT firewall required changing
the listen address manually. The new default causes Helix Server to determine
the listen address from the IP packets it receives, providing easier traversal
through a network address translation (NAT) firewall.
For More Information: See “Listen Address” on page 207.
RealAudio and RealVideo File Extensions
RealProducer 11 can encode RealAudio clips with the file extension .ra or .rm .
It can encode RealVideo clips with the file extension .rv, .rm , or .rmvb . In most
cases, it chooses the file extension automatically based on the input media and
your encoding choices.
For More Information: For more on these file extensions, refer to
“Single and Multiple Destinations” on page 19.
RealMedia Editor for RealProducer Basic
The RealMedia Editor described in Chapter 12 is now available with both
RealProducer Basic and RealProducer Plus.
Change to Default Audience
By default, RealProducer 11 encodes clips and live broadcasts using just the
256k DSL or Cable audience. In previous versions, RealProducer Plus included
the 56k Dial-up and 28k Dial-up audiences by default. RealProducer Basic
used just the 56k Dial-up and 28k Dial-up audiences by default. Using either
RealProducer Plus or RealProducer Basic, you can change which audiences are
used for any job, however.
For More Information: See “Choosing Audiences” on page 100.
Features Removed from RealProducer 11
The following features, included with previous versions of RealProducer and
Helix Producer, have been removed from RealProducer 11.
8
CHAPTER 1: New Features
Legacy Broadcast Support
Using RealProducer 11, you can broadcast only to Helix Server version 9 and
higher. Support for legacy broadcasts to RealServer 8 and earlier has been
dropped in the graphical application and command-line application (-sg
option).
If a job file specifies a live broadcast using legacy broadcast mode, the
RealProducer 11 graphical application automatically updates the job file to
use account-based broadcasting instead. If you intend to broadcast using the
RealProducer 11 command-line application, however, you need to update the
job file manually to use account-based mode. Or, you can open the job file in
the graphical application, save it, and then run the saved job file with the
command-line application.
The following sections provide more information about specifying accountbased broadcasts in job files:
• The
section “Server Destinations” on page 333 explains how the job file
defines live broadcast servers.
• See
“Push Server Syntax” on page 362 for an explanation of how to create
an account-based server destination.
• The
section “Running an Account-Based Broadcast” on page 189 explains
the basics of account-based broadcasting, describing the Helix Server
requirements for receiving the broadcast stream.
RealVideo G2 with SVT
The RealVideo G2 codec has been removed from RealProducer 10 and later.
The RealVideo 8 codec is the oldest codec currently available in RealProducer,
providing playback compatible with RealPlayer 8 and later.
ATRAC3-Based Music Codecs
As described in “RealAudio 10 Stereo Music Codecs” on page 10, AAC-based
codecs have replaced ATRAC3-based codecs for streaming bit rates above 64
Kbps for stereo and stereo surround music.
9
RealProducer 11 User’s Guide
Features Introduced with RealProducer 10
In 2004, RealProducer 10 succeeded Helix Producer as the primary tool for
encoding RealMedia clips and live broadcasts. The following sections describe
the features introduced with RealProducer 10 and included with RealProducer
11.
RealVideo 10
RealVideo 10 provides significant quality advances over its predecessors,
RealVideo 9 and RealVideo 8. Clips encoded with RealVideo 10 exhibit greater
clarity and increased smoothness of motion, particularly in fast-action scenes.
You can stream the RealVideo 10 format with RealServers version G2 through
8, as well as Helix Server. These servers do not require any plug-in updates to
stream the new content.
Tip: The RealProducer Plus command-line application
includes a -vco option that allows you to override the video
codec selected in the audience file. For details, refer to “Video
Codec Override (-vco)” on page 284.
For More Information: See “RealVideo 10 Codec” on page 62.
RealAudio 10 Stereo Music Codecs
RealProducer 10 introduced new codecs for stereo music and stereo surround
based on AAC encoding technology. These codecs replaced older codecs based
on ATRAC3 technology. Within the RealProducer graphical user interface,
these codecs are designated as “RealAudio 10”.
• 96
10
Kbps Stereo Music - RealAudio 10
• 128
Kbps Stereo Music - RealAudio 10
• 160
Kbps Stereo Music - RealAudio 10
• 192
Kbps Stereo Music - RealAudio 10
• 256
Kbps Stereo Music - RealAudio 10
• 320
Kbps Stereo Music - RealAudio 10
• 128
Kbps Stereo Surround - RealAudio 10
• 160
Kbps Stereo Surround - RealAudio 10
• 192
Kbps Stereo Surround - RealAudio 10
CHAPTER 1: New Features
• 256
Kbps Stereo Surround - RealAudio 10
• 320
Kbps Stereo Surround - RealAudio 10
Many audience templates that formerly used the ATRAC3 codecs use the new
RealAudio 10 stereo codecs at the same bit rates. The new codecs can encode
any input acceptable to RealProducer, and can use any audio prefilter. You can
use the encoded output for clips or live broadcasts. Note, however, that the
RealAudio 10 codecs are compatible only with RealOne Player (an automatic
codec update is required) and later. Listeners using older players are prompted
to upgrade when they attempt to play the content.
Note: Stereo music codecs that encode at rates below 96 Kbps
are not based on AAC technology. They are backwardscompatible to RealPlayer G2 or RealPlayer 8, depending on the
precise codec used. For more information, refer to “Stereo
Music Codecs” on page 41.
RealAudio 5.1 Multichannel Codecs
RealProducer 10 added multichannel RealAudio codecs that preserve the
discrete, multichannel sound data of input files as 5- or 6-channel audio. As
found on DVDs, multichannel sound typically includes six discrete channels,
commonly referred to as 5.1 channels. RealProducer includes the following
predefined audience templates that use multichannel RealAudio:
• 5.1
Multichannel 450 Kbps VBR Download
• 5.1
Multichannel 700 Kbps VBR Download
• 5.1
Multichannel 1 Mbps VBR Download
• 5.1
Multichannel 1.5 Mbps VBR Download
For More Information: See “5.1 Multichannel Audio Codecs” on
page 45 for details about multichannel encoding.
RealAudio Lossless Codec
RealProducer 10 added a lossless RealAudio codec that faithfully reproduces
the full dynamic frequency of the input audio file while compressing the
output. The encoded clip, which is saved in the RealMedia variable bit rate
format (.rmvb ), is typically around half the size of the input file, though the
compression rate varies with different types of input.
11
RealProducer 11 User’s Guide
For More Information: See “Lossless Audio Codec” on page 47
for complete information.
Audio Delay Compensation Prefilter
The audio delay compensation prefilter corrects audio shift when audio input
is out of synchronization with a video’s visual track. You must specify the use
of this filter manually through a job file.
For More Information: See “Audio Delay Compensation
Prefilter” on page 327.
Video Resize Prefilter
Using a job file, you can resize a video before or after other video filters are
applied. This gives you the flexibility to resize the video at any point during
the prefiltering process.
For More Information: See “Video Resizing Methods” on page
319.
Encoding Complexity
RealProducer 10 introduced encoding complexity modes of low, medium , and
high that affect the RealVideo 9 and RealVideo 10 codecs, as well as the
RealAudio lossless codec. The default value of high produces the best possible
results, but also requires the most processing time. Lowering the complexity
level to medium or low results in faster encoding times, but reduced quality (for
video) or a larger file size (for lossless audio).
For More Information: See “Encoding Complexity Modes” on
page 81.
File Rolling for Large Clips
Through the RealProducer command-line application or job file, you can
create multiple RealMedia files for a single output clip. This allows you to
overcome limitations on the size of a single file, which is typically 2 to 4
Gigabytes, depending on the operating system. You can create a new output
file based on the length of the encoding time, such as every 15 minutes, or on
the size of the encoded file.
12
CHAPTER 1: New Features
For More Information: See “File Destinations” on page 330 for
information about adding file rolling to a job file. The section
“Output and Destination Options” on page 271 explains how
to set up file rolling through the command-line application.
Multiple Outputs for a Single Encoding Job
Helix Producer 9 introduced the use of multiple destinations, which is the ability
to write the same stream to more than one destination. This allows you to
write to two separate files, for example, or to broadcast a stream to a server
while simultaneously writing it to an archive file.
RealProducer 10 introduced multiple outputs, which builds on the multiple
destinations feature. Using multiple outputs, you can vary the encoding
properties of the various destinations during a single encoding session. There
are many uses for multiple outputs, such as the following:
• You
can encode clips with different properties for different bandwidths.
For example, from the same input you can encode a clip for lowbandwidth connections using a small frame size, and a separate clip for
high-bandwidth connections using a large frame size.
• You
might broadcast a live stream at a relatively low bit rate to conserve
bandwidth on your server. At the same time, you can archive the stream at
a high bit rate to provide higher-quality, on-demand access to the event at
a later point.
For More Information: You can define multiple outputs through
the job file. For more information, refer to “File and Server
Outputs” on page 329.
Enhanced Load Management Capabilities
RealProducer 10 added enhanced load management capabilities that help to
ensure that encoding processes for live streams do not lag behind the live
input due to CPU constraints. This provides detailed feedback about how
RealProducer changes the broadcast stream quality to manage the encoding
load.
For More Information: See “Broadcast Load Management” on
page 177.
13
RealProducer 11 User’s Guide
New Job File Format
With RealProducer 10, the syntax of the job file changed to make the file more
extensible and robust. The new job file format uses generic XML tag names for
inputs, prefilters, outputs, postfilters, and streams. For example, in an older
job file, the black-level prefilter section looked like the following:
<blackLevelPrefilter>
...prefilter information...
</blackLevelPrefilter>
In the new job file, the black level prefilter section looks like the following:
<prefilter xsi:type="blackLevelPrefilter">
...prefilter information...
</prefilter>
For More Information: See also “Job File Versions” on page 14.
Upgrade Issues
The following sections explain issues with upgrading to RealProducer 11 from
an earlier version of RealProducer or Helix Producer.
New Installation Directory
On Windows, RealProducer 11 installs by default in a new directory:
c:\\Program Files\Real\RealProducer Plus 11
—OR—
c:\\Program Files\Real\RealProducer Basic 11
RealProducer 11 does not overwrite previous installations of RealProducer or
Helix Producer, and you can continue to use the older versions along with
RealProducer 11.
Job File Versions
RealProducer 11 uses the same job file format as RealProducer 10. This format
differs from that introduced with Helix Producer 9, however. When it
encounters an older job file, RealProducer 11 reads the file and saves it to the
new format automatically. You can also update older job files as described in
the section “Job File Syntax Update” on page 289.
14
CHAPTER
Chapter 2:
MEDIA BASICS
2
This chapter introduces you to the steps for creating streaming or
downloadable media. It describes the major features of
RealProducer, and explains the procedures for encoding and
delivering static clips or live broadcasts.
Inputs and Sources
RealProducer encodes RealAudio and RealVideo clips and broadcasts from
audio and video input. This input can be a file in a format such as WAVE, AVI,
or MPEG. Or, the input may be live material that you have captured with a
microphone or camera attached to an audio or video capture card on the
RealProducer computer.
Files or Live Sources Used as Inputs
15
RealProducer 11 User’s Guide
For More Information: For a list of acceptable input formats,
refer to “Audio and Video Input Formats” on page 27.
Audio and Video Editing Programs
Before you encode a clip with RealProducer, you can use the audio or video
editing program of your choice to edit a digitized input file. Using this
program, you can set a video’s length, for example, cropping out any
unnecessary parts. Although RealProducer provides some editing functions
such as cropping, it does not provide all of the advanced features found in
audio and video editing programs.
Tip: The quality of a streaming audio or video clip starts with
the source file. The more you know about audio and video
editing, the better you’ll be able to produce a great streaming
clip. For some pointers about preparing files for encoding, see
Chapter 4 and Chapter 5.
RealProducer Features
Once you have your audio or video input ready, you can encode the input as a
RealVideo or RealAudio clip. Taken together, these clip types are called
RealMedia. This section explains the aspects of RealProducer you use to encode
a RealMedia clip or broadcast.
Encoding Methods
On Windows, there are two ways to run RealProducer. You can use the
RealProducer graphical application, or run the RealProducer command-line
application. On Linux, you can use the command-line application.
Graphical Application
The RealProducer graphical application provides an easy-to-use interface for
encoding RealMedia clips and broadcasts. Using the graphical application,
you can drag-and-drop input files, select your encoding options, and save the
encoded output to a clip or send it to a server for broadcast. Chapter 6
explains the basic procedures for using the graphical application.
16
CHAPTER 2: Media Basics
Command-Line Application
You can run the command-line application from the command prompt on
Windows or Linux. It provides all of the features of the graphical application,
as well as a few advanced features not available through the graphical
application. See Chapter 14 for information about running the command-line
application.
Jobs and Job Files
A job file is a central aspect of encoding RealMedia with RealProducer. The job
defines how to encode your clip or broadcast. It selects the media inputs, sets
the encoding properties, and defines the destinations, such as whether to save
the encoded stream to a clip, forward it to a server for broadcast, or both.
The Structure of a Job
Whether you use the graphical application or the command-line application,
you can save your job settings in a job file for later use. You can also modify a
job file’s settings, either through RealProducer or by hand, to create a new job
quickly. The job file uses an XML-based format to define all of the job’s
encoding settings.
For More Information: The section “Using Jobs” on page 85
explains how to define jobs through the graphical application.
See “Job File Options” on page 259 for information about
specifying jobs on the command line. Appendix B explains the
job file syntax.
17
RealProducer 11 User’s Guide
Audiences
When you set up a job, you choose one or more audiences. An audience defines
several aspects of the encoding job. Most importantly, it defines the bit rate at
which a clip or broadcast streams. For a downloadable clip, the audience
selection affects the clip’s quality and file size. Selecting an audience is
therefore one of the most important decisions you make when encoding a
clip. RealProducer predefines a number of audiences designed for lowbandwidth streaming to modems and smartphones, high-quality download
files, and many other uses.
For More Information: Chapter 7 describes the predefined
audiences. “Choosing Audiences” on page 100 explains how to
select audiences through the graphical application. The section
“Audience Definitions or Audience Files (-ad)” on page 280
does the same for the command-line application. You can also
create your own audiences, as explained in “Creating and
Editing Audiences” on page 155.
Constant Bit Rate and Variable Bit Rate Audiences
Each audience is either constant bit rate (CBR) or variable bit rate (VBR). The
CBR audiences are designed for streaming. When you use them, you can
encode multiple audiences into a clip or broadcast. For example, a single clip
can stream to 56 Kbps modems and faster broadband connections when you
use CBR encoding.
The VBR audiences are designed for downloadable clips, but can also be used
for streaming in some instances. When you encode a downloadable clip, you
select a VBR template according to how highly you want to compress the
input, or how well you want to preserve the input’s quality. Unlike CBR clips
that can have multiple audiences, VBR clips can include just one audience.
For More Information: For background about CBR and VBR,
refer to “Constant Bit Rate Video” on page 63 and “Variable Bit
Rate Video” on page 66.
Audience Files
RealProducer stores audience information in an XML-formatted audience file
that you can edit by hand. You can also copy and modify an existing file to
create your own audience definition. Appendix C explains the audience file
18
CHAPTER 2: Media Basics
syntax. Refer to the section “Audiences Section” on page 340 for information
about how to copy audience file information into a job file.
Destinations and Outputs
Each job defines an output, which is the encoded media data and all of its
properties. To define where RealProducer sends its output, you specify one or
more destinations.
Single and Multiple Destinations
A destination may be an encoded RealMedia clip, which is a file that uses one
of the following file extensions:
• .ra
– RealAudio
RealProducer automatically selects the .ra file extension if the input is
audio-only. You can also select the .rm file extension for audio-only
content.
Tip: Using the .ra file extension helps search engines identify
the file as an audio-only clip.
• .rv
– RealVideo
RealProducer uses the .rv file extension if the input is video-only or videowith-audio. You can also select the .rm file extension for video content.
Tip: Using the .rv file extension helps search engines identify
the file as a RealVideo clip.
• .rm
– RealAudio or RealVideo
RealProducer chooses the .rm file extension if it cannot determine the
content of the input clip. You can use .rm file extension for any RealAudio
or RealVideo clip, except for variable bit-rate clips.
• .rmvb
– variable bit-rate
RealProducer uses the .rmvb file extension if you choose a variable bit rate
audience. You cannot use the .ra , .rv, or .rm extension when encoding a
variable bit-rate clip.
For More Information: See “Variable Bit Rate Video” on page 66.
19
RealProducer 11 User’s Guide
In addition to encoding a clip, you can define server destinations that send the
encoded output to one or more Helix Servers for broadcast. All destinations
receive the same output data. If network problems prevent encoded data from
reaching a server destination, for example, a clip destination still records the
data.
Multiple Destinations for Job Output
For More Information: You can encode multiple destinations for
a single output through the graphical application as described
in “Selecting Inputs and Destinations” on page 89. “File and
Server Outputs” on page 329 explains how to define
destinations within a job file.
Multiple Outputs
RealProducer also lets you define multiple outputs that have different
properties. From the same video input, for example, you might encode a large
video clip for fast, broadband connections, and a smaller video clip for slow
modem connections. Because each video has a different size, it is a separate
output. Each of these outputs can have one or more destinations, whether
saved as a clip or sent to a server. Encoding multiple outputs is possible when
you define the outputs in a job file and run the job file through the
command-line application.
20
CHAPTER 2: Media Basics
Multiple Outputs with Multiple Destinations
For More Information: For information about defining multiple
outputs in a job file, see “File and Server Outputs” on page
329.
Additional Encoding Settings
In addition to the audience selection, your job can define many additional
encoding parameters.
Clip Information
Clips or broadcasts standardly encode information such as the presentation’s
title, author, and copyright. The section “Adding Clip Information” on page
94 explains how to add clip information through the graphical application.
Refer to the section “Clip Information Options” on page 266 for instructions
about doing this through the command-line application. You can also add
clip information directly to a job file, as described in “Clip Information” on
page 305.
Video Filters
Video filters allow you to alter and improve the video input before encoding it.
You can use these filters to remove artifacts such as video noise, as well as to
crop and resize the video. The section “RealVideo Filters” on page 76 explains
the filters. See the section “Filtering Video Input” on page 95 for information
about applying filters through the graphical application. “Prefilter Options”
21
RealProducer 11 User’s Guide
on page 268 explains how to specify filters on the command line, and
“Prefilters” on page 317 covers the filter syntax used in the job file.
Clip Modification
After you have encoded a RealMedia clip using RealProducer, you can move
the clip to Helix Server for streaming, or place it on a download server.
However, you may first want to use another application to edit or modify the
encoded clip.
RealMedia Editor
The RealMedia Editor allows you edit an encoded RealVideo or RealAudio clip.
For example, you can use this application to change the clip information,
remove a scene from a video, or combine several clips into a single clip. The
RealMedia Editor is included with RealProducer Plus. You can run it as a
graphical application on Windows, or a command-line application on
Windows or Linux. Chapter 12 explains how to run the RealMedia Editor.
Events Files
Using the RealMedia Events utility, you can encode clip information into an
existing RealAudio or RealVideo clip. You can also add image maps or timed
URLs to the clip. This allows viewers to click a video clip to open related Web
pages in their browser. Or, an audio or video clip can open Web pages
automatically when the clip reaches certain positions in its timeline. See
Chapter 13 for information about defining clip events.
Digital Rights Management
If you need to protect media assets, you can use RealNetworks’ digital rights
management technology. Using Helix DRM Packager, you can encrypt the
contents of a RealMedia clip, then assign rights to that clip on an individual
basis using Helix DRM License Server. Digital rights management is an
optional and separate part of the media encoding process.
Note: For more about RealNetworks’ DRM technology, visit
http://www.realnetworks.com/products/drm/index.html.
22
CHAPTER 2: Media Basics
Presentations
Once you encode a clip, it is ready for streaming or downloading. Additionally,
you can use various scripting or markup languages to combine multiple clips
and Web pages into a media presentation. Other guides available from
RealNetworks explain scripting and markup languages you can use with clips
and broadcasts encoded by RealProducer.
For More Information: You can download RealNetworks’
content creation guides in PDF or HMTL format from
http://service.real.com/help/library/encoders.html.
Ram File
When your presentation is ready to stream, you may want to write a Ram file,
which is so-named because it uses the file extension .ram , as in movie.ram . Also
known as a metafile, the Ram file links your Web page to your media. Although
a Ram file is not necessary when you stream a clip or broadcast using Helix
Server, it is useful for passing simple parameters to RealPlayer. It might
instruct RealPlayer to open the clip in full-screen mode, for example, or
provide the URL to a Web page that displays as the clip plays.
For More Information: For information about writing a Ram
file, refer to the Ram file chapter in Introduction to Streaming
Media. The Ram file is also covered in the presentation delivery
chapter of RealNetworks Production Guide.
SMIL Presentations
You can also create a Synchronized Multimedia Integration Language (SMIL) file to
integrate several clips into a single presentation. SMIL is the standard markup
language for timing and controlling streaming media clips. Using a SMIL file,
you can coordinate the layout and playback of multiple media clips in parallel
(simultaneously) or in sequence. SMIL can also open HTML pages as a clip
plays and provide interactive options, such as playing one of three different
videos depending on which button the viewer clicks.
Note: For the basics of SMIL, see Introduction to Streaming Media.
For a comprehensive look at SMIL, refer to RealNetworks
Production Guide.
23
RealProducer 11 User’s Guide
Javascript Methods
RealPlayer supports Javascript and VBScript methods that you can use to play
clips based on viewer interaction with forms or elements displayed in a Web
page. If you are familiar with Web-based scripting, refer to RealPlayer Scripting
Guide for more information.
Media Delivery
Just as a Web server delivers Web pages to browsers, Helix Server serves
streaming media to RealPlayer. Using Helix Server, you can stream clips that
you have encoded using RealProducer. You can also set up live broadcasts in
which RealProducer encodes live content in real-time, sending it to Helix
Server for distribution to RealPlayer viewers.
RealProducer, Helix Server, and RealPlayer
For More Information: For information about Helix Server
features, refer to Helix Server Administration Guide, which you
can browse or download from
http://service.real.com/help/library/servers.html.
On-Demand Clip Streaming
To deliver a streaming presentation, you need to have access to Helix Server. If
you are not running Helix Server yourself, the Helix Server administrator can
set up a method for you to deliver content. To stream a clip on-demand, you
simply transfer the clip to a Helix Server content directory and add a link to
the clip in a Web page.
Live Broadcasts
Broadcasting a live event requires a closer coordination between RealProducer
and Helix Server. The Helix Server administrator must set up certain server
features to allow the broadcast stream. On RealProducer, you define certain
server parameters that allow RealProducer to deliver the live stream. Chapter
24
CHAPTER 2: Media Basics
10 explains the issues involved with broadcast. Refer to Chapter 11 for
instructions about delivering a broadcast stream to Helix Server.
25
RealProducer 11 User’s Guide
26
CHAPTER
Chapter 3:
3
INSTALLATION
This chapter describes the hardware and software requirements for
RealProducer, and explains how to install the product. Instructions
are given for Windows and Linux operating systems.
Audio and Video Input Formats
It is better to work with uncompressed formats. Otherwise, you compress the
source once when you digitize it and again when you encode it as RealVideo.
This double compression can decrease the image quality. Use a compressed
source format only if RealProducer supports the file as input.
Tip: Always keep copies of the video source files. You cannot
convert RealVideo clips back to their original source formats
or any other streaming formats.
Uncompressed Input Formats
You can use the following file formats as input sources on any operating
system that runs RealProducer. Using these formats does not require
installing other audio and video software:
• Uncompressed
• WAV
QuickTime 3, 4, and 5 (.mov )
audio files (.wav )
• Uncompressed
AVI (.avi )
Formats Requiring DirectX
You can use the following file formats as inputs on Windows if you have
DirectX 6 or higher installed. Some formats require DirectX 8:
• Compressed
AVI (.avi )
• AIFF (.aif, .aifc, .aiff )
27
RealProducer 11 User’s Guide
• MPEG (.mpg, .mpeg, .m1v, .mp3, .mpa, .mpe, .mpv2, .m3u )
• QuickTime
2 (.mov, .qt )
For More Information: For the latest version of DirectX, go to
http://www.microsoft.com.
Formats Requiring QuickTime
The following file formats can be used as sources on Windows if the latest
version of QuickTime is installed:
• AU (.au, .snd, .ulw )
• Sound
Designer II (.sd2 )
• DV (.dif, .dv )
• QuickTime
Flattened Movie (.mov, .qt )
• MPEG (.mpg, .mpeg, .m1v, .mp3, .mpa, .mpe, .mpv2, .m3u )
Input Color Formats
The following color formats are supported for video captures:
• YUV12.
This format is also known as I420. It is the native color format
used by RealVideo codecs. Using I420 as input improves performance by
removing the need to convert the color format before encoding.
• RGB
15, 16, 24, 32.
• BGR
15, 16, 24, 32. This is the Macintosh version of RGB.
• The
following Windows YUV Formats: YUY2, YV12, YVU9, YVYU, CYUV,
IYUV, UYNV, UYVY, V422, YUNV.
• The
following Macintosh YUV Formats: 2VUY, YUVS, YVYU, YUVU,
YVU9, YUV2, V210.
28
CHAPTER 3: Installation
System Requirements
The following table lists the minimum and the recommended requirements
for using RealProducer 11.
System Requirements
Requirement
Minimum
Recommended
Windows Version
Windows XP
Windows 2000
Windows XP with the latest
service pack
Linux Version
Linux 2.4 with glibc 2.1 or
greater
Linux 2.6 (Red Hat 9 and
SUSE 9 tested)
CPU
500 MHz
2.4 GHz or faster Pentium IV
RAM
128 MB
512 MB or more
Hard Disk Space
500 MB
1 GB
Color Display
16-bit
24-bit (TrueColor)
Sound Card
16-bit sound card or better
• The
minimum system configuration shown in the preceding table can
encode the following job:
• command-line
• RealVideo
• 240x180
• 15
encoding of live data
10 in high-complexity mode
pixel frame size
frames per second
• SureStream
clip with the 28k Dial-up and 56k Dial-up audiences
Encoding through the graphical application, or encoding for additional,
higher-bandwidth audiences results in a reduction of encoding complexity
or frame rate.
For More Information: For information about frame rates and
complexity modes, refer to “Encoded Frame Rates” on page 59
and “Encoding Complexity Modes” on page 81, respectively.
• The
system configuration recommended in the preceding table can
encode the following job without any degradation in encoding complexity
or frame rate:
• command-line
• RealVideo
encoding of live data
10 in high-complexity mode
29
RealProducer 11 User’s Guide
• 320x240
• 30
pixel frame size
frames per second
• 768k
DSL or Cable audience
Chipset Optimizations
The following are CPU optimizations supported by RealProducer, along with
the approximate performance increase each chipset provides:
• MMX—400
• SSE1—No
percent performance increase over non-MMX systems.
performance increase.
• SSE2—20 percent performance increase in addition to MMX performance
improvements.
• SSE3—6
to 7 percent performance above SSE2.
• Hyperthreading—Up
to 20 percent performance improvement on top of
other chipset improvements.
Note: On Windows, use of hyperthreading is recommended
only with Windows XP. To be effective, hyperthreading
requires a Level 2 CPU cache of at least 1 MB.
For More Information: Consult your hardware vendor's
documentation to determine if your hardware supports these
optimization instruction sets.
Additional Basic Requirements
In addition to normal hardware and software requirements, RealNetworks
recommends that you have the following products:
• latest
version of RealPlayer
• speakers
or headphones connected to your sound card
For recording from a media device, you should have any of the following
connected to your computer:
• video
capture card, if encoding live video
• S-VHS,
• video
30
Digi-Beta, or Beta-SP video player
camera
CHAPTER 3: Installation
• microphone
To send audio and video directly to your computer, you will need the
following:
•A
media device such as a VCR, video camera, or microphone.
• For
capturing live audio, a sound card.
• For
capturing live video, a video capture card, unless you can connect a
video device directly to your computer by IEEE -1394 (Firewire, iLink), or
a USB port.
Installing RealProducer on Windows
The following procedure explains how to install RealProducer onto a
computer running Windows. See “System Requirements” on page 29 for
computer and operating system requirements.
➤
To install RealProducer onto Windows:
1. Download the installation program or insert the CD-ROM into your
drive.
2. Close any other applications that may be open and double-click on the
installation program icon. The installer unpacks the required files and
opens the License Agreement.
3. Read the terms and conditions carefully, and select I accept the terms in the
licence agreement if you agree. You can click Cancel at any time to abort
the installation.
4. Click Next to continue. The Serialization page opens.
5. Enter your name, company name, and serial number you received when
you purchased RealProducer.
6. Click Next to continue. The Install Options page opens.
7. The default install directory that RealProducer will install to your
computer is listed. You can change this default install directory by clicking
the Browse button and selecting the new path.
8. You also have the options to select whether a shortcut to RealProducer
will be created on the desktop and/or on the Quick Launch toolbar, and
whether command line tools will be added to your PATH.
31
RealProducer 11 User’s Guide
Warning! You must have enough disk space and write access to
the location where you intend to install RealProducer. If not,
you will not be able to continue the installation.
9. Click Next to continue. The install program installs all necessary files and
opens the Finishing Up page.
10. Choose whether you want to launch RealProducer and/or the Readme file
when you exit the install program.
11. Click Finish to exit.
Installing RealProducer on Linux
The following procedure explains how to install RealProducer onto a
computer running Linux. See “System Requirements” on page 29 for
computer and operating system requirements.
➤
To install RealProducer onto Linux:
1. Download the installation program, or insert the CD-ROM into your
drive.
2. Make sure your CD drive is mounted properly, if installing from a CD.
3. Copy the installer to your hard drive if you are getting it from a CD.
4. Start RealProducer installer by entering one of the following, depending
on whether you have RealProducer Plus or RealProducer Basic:
./realproducer_plus_11_linux_setup.bin
./realproducer_basic_11_linux_setup.bin
The installer extracts the necessary files to the directory where the installer
is located. It then installs all necessary programs and files. When
complete, the installer shows the Software License agreement.
5. With RealProducer Plus, enter the serial number when prompted.
32
PART
Part II:
ENCODING BASICS
The following chapters explain how to set up, start, and
monitor an encoding job using the RealProducer graphical
application. Chapter 7 describes audiences, which you can use
with the graphical or command-line application.
II
CHAPTER
Chapter 4:
PRODUCING AUDIO
4
RealNetworks pioneered streaming audio with RealAudio, the first
streaming media product for the Internet. Since its debut in 1995,
RealAudio has become the standard for network audio, delivering
stereo sound over 28.8 Kbps modems and CD-quality sound at high
connection speeds. This chapter provides a reference for the
RealAudio codecs, and gives pointers on how to prepare and encode
your sound files for streaming or downloading.
For More Information: See also “Adjusting Audio Gain” on page
143 and “Audio Delay Compensation Prefilter” on page 327 for
information about audio filters that you can use with
RealProducer.
Understanding RealAudio
Because RealAudio clips are compressed, you typically start with a sound file
in an uncompressed format such as WAV or AIFF. Using RealProducer, you
create a RealAudio clip from the source file. RealAudio clips typically use the
file extension .ra or .rm , although clips may also end with .rmvb (variable bitrate clip). The following sections explain how RealAudio encodes an audio file
for streaming. This information will help you to produce high-quality
streaming clips.
Bandwidth and Audio Quality
One way that RealAudio codecs squeeze an audio file’s size down is by
throwing out nonessential data. This makes it a lossy compression format.
RealAudio doesn’t delete data indiscriminately, though. It first jettisons
portions you cannot hear, such as very high and very low frequencies. Next, it
removes as much data as needed while keeping certain frequencies intact.
35
RealProducer 11 User’s Guide
Voice encoding favors frequencies in the normal human speaking range.
Music encoding retains a broader frequency range.
Although RealAudio is savvy about what audio data it throws out, be aware
that the lower the target streaming speed, the more data gets ejected, and the
cruder the sound quality becomes. At low bandwidths, you get roughly the
quality of an AM radio broadcast. With faster connections, you can encode
music with FM-quality sound. And at the high speeds of DSL, cable modems,
and LANs, RealAudio sound quality rivals that of CD or multichannel DVD
playback. When creating RealAudio clips for any bandwidth, it’s important to
start with high-quality input, as described in “Audio Capture” on page 50, to
attain good sound quality.
RealAudio Bandwidth Characteristics
You create a RealAudio clip by using one or more RealAudio codecs. A codec is a
coder/decoder. It tells RealProducer how to turn audio source files into
RealAudio clips. On the receiving end, RealPlayer uses codecs to expand clips
into audio data the computer can play. RealAudio employs a series of codecs,
each of which creates an audio stream for a precise bandwidth. One codec
compresses mono music for a 28.8 Kbps modem. Another one compresses
stereo music for that same modem speed. This set of codecs is different from
the set used to compress music for, say, DSL and cable modem connections.
A RealAudio clip consumes bandwidth at a relatively constant rate determined
by the codec used to encode the clip. A RealAudio clip encoded with a 20 Kbps
codec, for example, steadily consumes 20 Kbps of bandwidth as it plays. The
following table lists the standard bit rates for RealAudio clips encoded for
specific target audiences by RealProducer. Encoding a voice-only audio file for
a 28.8 Kbps modem, for example, creates a 16 Kbps streaming clip. With mono
music input, though, you get a 20 Kbps clip.
RealAudio Standard Bit Rates
Target Audience
28.8 Kbps modem
56 Kbps modem
64 Kbps single ISDN
Voice Only
16 Kbps
32 Kbps
Voice and Mono
Music
Music
Stereo
Music
20 Kbps
20 Kbps
20 Kbps
32 Kbps
32 Kbps
32 Kbps
44 Kbps
44 Kbps
44 Kbps
(Table Page 1 of 2)
36
CHAPTER 4: Producing Audio
RealAudio Standard Bit Rates (continued)
Target Audience
Voice Only
112 Kbps dual ISDN
Corporate LAN
512 Kbps DSL/cable modem
Stereo
Music
64 Kbps
64 Kbps
64 Kbps
256 Kbps DSL/cable modem
384 Kbps DSL/cable modem
Voice and Mono
Music
Music
132 Kbps
96 Kbps
96 Kbps
64 Kbps
176 Kbps
264 Kbps
352 Kbps
(Table Page 2 of 2)
Tip: In terms of bandwidth use, RealAudio is inflexible. The
RealAudio codecs set streaming bit rates in a stairstep model:
20 Kbps, 36 Kbps, 44 Kbps, and so on, with no inbetween
choices. Because RealAudio clips always stream at specific bit
rates, consider their bandwidth needs first when you use them
in multiclip presentations. Then create your other clips to
stream within the remaining bandwidth.
For More Information: With SureStream technology, a single
RealAudio clip can stream at many different speed. For the
basics of SureStream, see “SureStream CBR Clips” on page 63.
RealAudio Codecs
When you encode a RealAudio or RealVideo clip using RealProducer, you do
not select the RealAudio codec directly. Instead, you choose your audience
settings, as described in the section “Choosing Audiences” on page 100. You
might select one audience, such as 256 Kbps DSL users, or encode multiple
audiences into a single SureStream clip that can stream at different bit rates.
Unless you wish to change the audience defaults, you just need to select the
right audience settings when you encode a clip to have RealProducer use the
appropriate RealAudio codec. The audience templates presented in the
RealProducer graphical user interface always indicate the target streaming
speed, such as with the “384k DSL or Cable Modem” audience.
Note, though, that the type of audio input you use can affect your choice of
audience. If you are using stereo surround audio as your source, you may want
to encode using the “350k Surround Stereo” audience template instead of a
template that encodes just standard, two-channel stereo audio. Or, if the input
37
RealProducer 11 User’s Guide
is multichannel, you may want to choose the “350k Multichannel” audience
setting. The following sections explain more about these audio types.
Additionally, you should note RealPlayer compatibility with the RealAudio
codecs you use. Old versions of RealPlayer can play audio encoded with voice
codecs, for example, but only RealOne Player and later can play audio encoded
with certain stereo, stereo surround, and multichannel codecs. The sections
that list the available codecs explain compatibility issues. Note, too, that all
RealPlayers since 1998 have the ability to upgrade automatically to new audio
codecs or a new player version if the user attempts to play an unsupported
RealAudio format.
Tip: Chapter 9 explains how to determine, and change if
necessary, the codec settings used with each audience setting. If
you wish to change a default setting, be sure that you
understand the codec properties described in the following
sections.
Understanding the RealAudio Codec Tables
The following sections describe the RealAudio codecs available through
RealProducer. The codecs are listed in separate tables for voice, mono music,
stereo music, stereo surround, multichannel, and lossless audio. Each table
provides the following information.
Codec
The Codec column describes the codec as it appears in the RealProducer
interface. The name lists the streaming bit rate for the encoded audio, and
indicates the type of audio input the codec is suited for.
Type and Flavor
The Type and Flavor columns identify the codec for use with the command-line
application. This information is not shown in the RealProducer graphical user
interface.
Sampling Rate
The sampling rate column lists the codec’s optimum sample rate. If the input
does not have the expected rate, RealProducer resamples the input without
causing pitch shifting. For best results, the audio input should have the same
or higher sampling rate than the codec’s rate. For SureStream clips, the input
38
CHAPTER 4: Producing Audio
sampling rate should be equal to or greater than the largest sample rate of all
codecs used. Although RealProducer accepts audio input at any sampling rate,
it is optimized for the following rates:
•4
kHz
•8
kHz
• 11.025
• 16
kHz
kHz
• 22.05
kHz
• 24
kHz
• 32
kHz
• 44.1
kHz
• 48
kHz
• 96
kHz
Tip: After you load a clip as input, a process described in
“Using a File as the Input” on page 89, you can click the Source
Properties button to display the audio properties, including
the sampling rate.
For More Information: RealProducer allows you to choose high-
quality resampling (recommended) or fast resampling. The
section “Setting Audio Parameters” on page 98 explains how to
set this option in the graphical application. See “Audio
Resampling Quality (-arq)” on page 282 and “Media Profile
Properties” on page 335 for information about setting this
option through the command-line application or job file,
respectively.
Voice Codecs
Voice codecs produce the best results for voice-only audio input. The lowestspeed voice codec normally used to encode a RealAudio clip streams data at 16
Kbps. The lower-speed codecs (5, 6.5, and 8.5 Kbps) are used as SureStream
duress streams when the connection bandwidth drops. They’re also used to
encode soundtracks for low-bandwidth RealVideo clips. The following table
39
RealProducer 11 User’s Guide
lists the available voice codecs, which are compatible with RealPlayer G2 and
later.
RealAudio Voice Codecs
Codec
Type
Flavor
Sampling Rate
5 Kbps voice
sipr
2
8 kHz
6.5 Kbps voice
sipr
0
8 kHz
8.5 Kbps voice
sipr
1
8 kHz
16 Kbps voice
sipr
3
16 kHz
32 Kbps voice
cook
7
22.05 kHz
64 Kbps voice
cook
14
44.1 kHz
Mono Music Codecs
Music codecs are designed to encode audio with a larger frequency range than
voice. You will capture a broader, fuller sound with codecs designed for higher
bit rates. As with the voice codecs, the lowest-speed mono music codec
normally used with RealAudio streams data at 16 Kbps. The lower-speed
codecs (6, 8, and 11 Kbps) are used as duress streams in SureStream clips, and
to encode soundtracks for low-bandwidth RealVideo clips. When there are two
versions of a codec, RealProducer uses the higher-response version by default.
About High-Response Codecs
The 20 kbps, 32 kbps, and 44 kbps music codecs come in two varieties. By
default, RealProducer uses the “high response” versions, which are the better
codecs for most situations. But you can also use the “normal response”
versions by changing your audience templates, as described in Chapter 9.
The high response codecs cover a larger frequency range than the normal
response versions. Sometimes, the high response version has twice the range as
the normal codec. This means it provides crisper sound and is better at
capturing high frequencies. With symphonic music, for example, the high
response codec gets more of the flute and piccolo. It can produce more
distortion than the normal response codec with voices and loud sounds such
as drums, though.
If you are encoding music with a diverse range of frequencies, stick with the
high response codecs. If you notice distortion, compare your results with a clip
that uses the normal response codecs. The best tool for determining which
40
CHAPTER 4: Producing Audio
codec to use is your ear. Listen carefully for minute differences in how the clip
sounds. It also helps to have other people listen. Our own ears have different
frequency responses, too.
Available Mono Music Codecs
You can use the following codecs to encode audio files as mono music. All
mono music codecs are compatible with RealPlayer G2 and later.
Mono Music Codecs
Codec
Type
Flavor
Sampling Rate
6 Kbps Music - RealAudio
cook
8
8 kHz
8 Kbps Music - RealAudio
cook
0
8 kHz
11 Kbps Music - RealAudio
cook
1
8 kHz
16 Kbps Music - RealAudio
cook
2
8 kHz
20 Kbps Music - RealAudio
cook
3
11.025 kHz
20 Kbps Music High Response - RealAudio
cook
15
22.05 kHz
32 Kbps Music - RealAudio
cook
4
22.05 kHz
32 Kbps Music High Response - RealAudio
cook
16
44.1 kHz
44 Kbps Music - RealAudio
cook
5
44.1 kHz
64 Kbps Music - RealAudio
cook
6
44.1 kHz
Stereo Music Codecs
Use stereo music codecs for encoding traditional, two-channel stereo music.
RealProducer also uses these codecs when you encode voice-with-music clips.
Types of Stereo Music Codecs
You can encode many different bandwidths of stereo music, using three
different stereo codecs:
• The
oldest stereo music codecs produce lower quality sound than newer
codecs, but are compatible with RealPlayer G2 and later.
• Stereo
music codecs listed as “RealAudio” in the following table provide
high quality stereo sound compatible with RealPlayer 8 and later.
Note: At several bandwidths, you can choose between normal
and high response versions of the stereo codecs. RealProducer
uses the higher-response version by default. But you can
41
RealProducer 11 User’s Guide
change to a normal response version as described in “Creating
and Editing Audiences” on page 155.
For More Information: The section “About High-Response
Codecs” on page 40 explains the difference between normal
and high-response audio encoding.
• The
codecs listed as “RealAudio 10” in the following table and the
RealProducer interface are based on AAC technology. They are compatible
with RealOne Player (a codec autoupdate is required) and later.
Available Stereo Music Codecs
The following stereo music codecs are available in RealProducer 11.
Stereo Music Codecs
Codec
Type
Flavor
Sampling Rate
12 Kbps Stereo Music - RealAudio
cook
26
11.025 kHz
16 Kbps Stereo Music - RealAudio
cook
17
22.05 kHz
20 Kbps Stereo Music
cook
9
11.025 kHz
20 Kbps Stereo Music - RealAudio
cook
18
22.05 kHz
20 Kbps Stereo Music High Response - RealAudio
cook
19
22.05 kHz
32 Kbps Stereo Music
cook
10
22.05 kHz
32 Kbps Stereo Music - RealAudio
cook
20
22.05 kHz
32 Kbps Stereo Music High Response - RealAudio
cook
21
44.1 kHz
44 Kbps Stereo Music
cook
11
22.05 kHz
44 Kbps Stereo Music - RealAudio
cook
22
44.1 kHz
44 Kbps Stereo Music High Response - RealAudio
cook
23
44.1 kHz
64 Kbps Stereo Music
cook
12
44.1 kHz
64 Kbps Stereo Music - RealAudio
cook
24
44.1 kHz
64 Kbps Stereo Music - RealAudio 10
raac
0
44.1 kHz
96 Kbps Stereo Music
cook
13
44.1 kHz
96 Kbps Stereo Music - RealAudio
cook
25
44.1 kHz
96 Kbps Stereo Music - RealAudio 10
raac
1
44.1 kHz
128 Kbps Stereo Music - RealAudio 10
raac
2
44.1 kHz
160 Kbps Stereo Music - RealAudio 10
raac
3
44.1 kHz
192 Kbps Stereo Music - RealAudio 10
raac
4
44.1 kHz
(Table Page 1 of 2)
42
CHAPTER 4: Producing Audio
Stereo Music Codecs (continued)
Codec
Type
Flavor
Sampling Rate
256 Kbps Stereo Music - RealAudio 10
raac
5
44.1 kHz
320 Kbps Stereo Music - RealAudio 10
raac
6
44.1 kHz
(Table Page 2 of 2)
Stereo Surround Codecs
Encode your audio using a stereo surround codec if you know that the source
audio is matrixed, multiple-channel sound, and you wish to preserve the
multiple channels for your listeners. Because stereo surround is compatible
with conventional stereo systems, listeners who do not have stereo surroundenabled equipment will still be able to hear the two main channels. Stereo
surround audio and video clips are suitable for streaming or download.
What is Stereo Surround?
Stereo surround audio includes more channels than traditional stereo, which
uses just the left and right channels. These additional channels are mixed (or
matrixed) using the conventional left and right stereo channels. This allows
older receivers to play just the left and right channels, while newer receivers
enabled for stereo surround can extract from the left and right channels the
audio data for the additional speakers.
For More Information: You can find background about
producing stereo surround input at the Dolby Laboratories
Web site at http://www.dolby.com/tech/. See also
http://www.realnetworks.com/resources/index.html for
additional information.
Channel Support for Stereo Surround Audio
The RealAudio stereo surround codecs preserve the matrixed, multichannel
surround audio in the audio input. RealProducer supports any number of
matrixed channels. Because the audio input is standard stereo input, the
computer running RealProducer does not require a special sound card or
43
RealProducer 11 User’s Guide
cabling. The following table explains the common channel arrangements
found in matrixed, stereo surround audio.
Common Channel Arrangements in Matrixed, Stereo Surround Audio
Channels
Description
4
To the standard left and right channels, this arrangment adds a front
center and a rear center channel.
5.1
This type of matrixing uses five main channels: left, center, right, left
surround, and right surround. The “.1” refers to a sixth, low-frequency
effects (LFE) bass channel that covers a fraction of the frequency range of
the main channels.
6.1
Building on the 5.1 arrangement, this type of matrixing adds two
additional channels for playback on two additional speakers.
7.1
Also building on the 5.1 arrangement, this type of matrixing adds four
additional channels for playback on two additional speakers.
Sources of Stereo Surround Audio
It is important to note that RealProducer does not mix the multichannel
stereo surround into the left and right stereo channels itself. The source you
are encoding, whether a static clip or live input, must be matrixed already.
This type of audio content is typically created using encoders by Dolby
(http://www.dolby.com), CRS Labs, or Digital Theater Systems
(http://www.dtsonline.com/). These sources are prevalent on DVDs and
television broadcasts. Although you can use non-digital surround sources,
digital sources provide the best results.
Playback of Stereo Surround Audio
To hear the matrixed, surround sound, RealPlayer users can play the audio on
an A/V receiver, such as a home theater system, that is equipped with stereo
surround decoding, and that is connected to the surround channels and
optional subwoofer. As well, some computer speakers will play stereo
surround audio directly. Audio systems not enabled for stereo surround play
just the standard left and right stereo channels.
Standard Stereo Codecs for Stereo Surround Audio
If you do not want to preserve the stereo surround information, you can
encode your audio with an audience template that uses the conventional
stereo codecs described in “Stereo Music Codecs” on page 41. The primary
44
CHAPTER 4: Producing Audio
reason to do this is to stream at bandwidths lower than those available for
stereo surround. By using a SureStream clip, you can encode low-bandwidth
streams in conventional stereo, and high-bandwidth streams that use stereo
surround audio.
Standard Stereo Input for Stereo Surround
If your audio source is traditional, two-channel stereo, do not encode the
input using stereo surround audio codecs. Although traditional stereo
encodes OK as stereo surround audio, RealProducer does not create the extra
channels (it only preserves existing channels), so using stereo surround audio
codecs does not enhance the listening experience. Additionally, the standard
stereo codecs are more efficient at encoding two-channel stereo than the
stereo surround audio codecs.
Available Stereo Surround Codecs
RealProducer can encode stereo surround audio with any of the following
codecs. The three “RealAudio” codecs are compatible with RealPlayer 8 and
later. The “RealAudio 10” codecs, which are based on AAC technology, are
compatible with RealOne Player (a codec autoupdate is required) and later.
Stereo Surround Audio Codecs
Codec
Type
Flavor
Sampling Rate
44 Kbps Stereo Surround Audio - RealAudio
cook
29
22.05 kHz
64 Kbps Stereo Surround Audio - RealAudio
cook
27
44.1 kHz
96 Kbps Stereo Surround Audio - RealAudio
cook
28
44.1 kHz
128 Kbps Stereo Surround - RealAudio 10
raac
7
44.1 kHz
160 Kbps Stereo Surround - RealAudio 10
raac
8
44.1 kHz
192 Kbps Stereo Surround - RealAudio 10
raac
9
44.1 kHz
256 Kbps Stereo Surround - RealAudio 10
raac
10
44.1 kHz
320 Kbps Stereo Surround - RealAudio 10
raac
11
44.1 kHz
5.1 Multichannel Audio Codecs
The multichannel RealAudio codecs preserve the discrete, multiple channels
in the audio source. Use them if you know that the source audio includes
multichannel sound, and your intended listeners have home theater systems
45
RealProducer 11 User’s Guide
or other equipment able play all of the channels. Multichannel audio and
video clips are suitable for streaming or download.
What is Multichannel Audio?
Like stereo surround audio, multichannel audio includes channels in addition
to the left and right stereo channels. Unlike stereo surround, however,
multichannel audio encodes the additional channels separately, rather than
mixing all channels into the signals for the left and right speakers. For this
reason, multichannel audio is often called discrete multichannel, rather than
the matrixed multichannel of stereo surround audio.
Using multichannel audio preserves the optimum sound quality of
multichannel audio. With stereo surround, the matrixing process may
replicate some audio data meant for one channel on another channel. (This is
an artifact of the stereo surround mixing in the audio source, rather than the
RealAudio encoding.)
Sound System Requirements for Multichannel Audio Encoding
To use discrete, multichannel audio, your sound system must capture and
preserve each channel. If you start with a prerecorded file, for example, that
digitized file format must preserve the additional channels. A common audio
format to use with multichannel audio is AC-3, which is also called Dolby
Digital. For live capture, the sound card used with the RealProducer computer
must support the multiple input channels. A standard sound card supporting
only two-channel stereo input will not work for discrete, multichannel audio.
Channel Support for Multichannel Encoding
RealProducer encodes all multichannel output as 5.1 channels (left, center,
right, left surround, right surround, LFE bass) or 6 channels. It can accept
fewer than six channels as input, upmixing as necessary to create the
additional channels. The obsolete quadraphonic multichannel format, which
uses two front and two back channels, is not supported.
Multichannel Input Formats
RealProducer can encode multichannel input from a file but not from a live
capture. You can use the following audio source formats as input for the
RealAudio multichannel codecs:
• DirectShow
46
(Windows Only)
CHAPTER 4: Producing Audio
• Uncompressed
Wave (.wav )
• Uncompressed
AVI (.avi )
• Uncompressed
QuickTime (.mov )
• Compressed
QuickTime (Windows Only)
Playback of Multichannel Audio
To hear the different channels in discrete, multichannel audio, RealPlayer
users on Windows can direct the audio to a multichannel-enabled sound card
or home theater system. With traditional speaker systems, and on operating
systems other than Windows, RealPlayer converts the audio signal to the
standard stereo channels.
Standard Stereo Codecs for Multichannel Audio
As with stereo surround audio, you can encode multichannel audio with
standard stereo codecs. This does not preserve the multiple channels, however.
For example, you might create a SureStream RealAudio clip that streams
multichannel audio at high bandwidths and standard stereo at low bit rates.
You should not encode standard stereo input with the multichannel codecs,
however, as the quality will not be as high as when you use standard stereo
codecs.
Available Multichannel Codecs
The following codecs are available for high-bandwidth, multichannel
recordings. All multichannel codecs are compatible with RealOne Player (a
codec autoupdate is required) and later.
Multichannel Audio Codecs
Codec
Type
Flavor
Sampling Rate
96 Kbps 5.1 Multichannel - RealAudio 10
cook
30
44.1 kHz
132 Kbps 5.1 Multichannel - RealAudio 10
cook
31
44.1 kHz
184 Kbps 5.1 Multichannel - RealAudio 10
cook
32
44.1 kHz
268 Kbps 5.1 Multichannel - RealAudio 10
cook
33
44.1 kHz
Lossless Audio Codec
RealProducer 11 includes a lossless RealAudio codec that faithfully
reproduces the full dynamic frequency of the input audio file while
47
RealProducer 11 User’s Guide
compressing the output. The encoded clip, which is saved in the RealMedia
variable bit rate format (.rmvb ), is typically around half the size of the input
file, though the compression rate varies with different types of input.
What is Lossless Encoding?
The RealAudio lossless codec is designed primarily for high-quality music
downloads in mono or two-channel stereo format (multichannel output is not
supported). It replicates CD-quality sound in a format that takes less time for
the user to download.
The RealAudio lossless codec preserves the exact sound of the input audio
while compressing the file size to about half the original size. Although the
lossless audio codec is designed for high-fidelity music downloads, you can
also use it with with streaming clips and broadcasts in high-bandwidth
environments.
Note: The lossless codec is not accessible through the graphical
user interface. Use the command-line application as described
in Chapter 14 to encode your files as lossless streams.
Input Formats for Lossless Encoding
You can encode any audio or video format acceptable to RealProducer 11 with
the RealAudio Lossless codec. The codec is optimized for 16-bit, 44.1 kHz
audio used in audio CDs, but other sampling rates and bit depths are accepted
as well. During encoding, you can apply the audio delay, audio gain, or audio
meter prefilter.
Output Formats for Lossless Encoding
The primary, intended output for lossless encoding is a single audio stream
saved as a downloadable clip. However, you can also use lossless audio when
encoding constant bit rate or variable bit rate video clips. You can also use
lossless audio encoding for streaming clips or broadcasts.
Player and Server Compatibility for Lossless Audio
Lossless audio clips can be streamed and downloaded for playback by RealOne
Player (an automatic codec update is required) and later. You can stream or
broadcast using lossless audio with Helix Server version 9 and later servers.
48
CHAPTER 4: Producing Audio
Streaming Rates for Lossless Audio Clips
Although a lossless audio stream is intended for downloading, it can also be
streamed. However, unlike audio streams encoded with other codecs, a lossless
stream does not have a single target stream rate. Instead, the streaming rate is
approximately the size of the audio data in Kilobits divided by the audio
duration in seconds. For example, a lossless audio clip that is 6 Megabytes
(49,152 Kilobits) and plays for 2 minutes (120 seconds) streams at a rate of 410
Kilobits per second. Use of lossless audio for streaming media is therefore
recommended only for high-bandwidth situations.
Tip: If you use lossless audio in a streaming video clip, keep in
mind that the visual track is compressed to fit within the
remaining bandwidth of the overall target rate. If the audio
uses up most of the streaming bandwidth, the video’s visual
quality will suffer.
Lossless Audio Encoding Modes
RealProducer 11 provides three encoding modes—low, medium , and high —that
affect video and lossless audio. All modes faithfully reproduce the full audio
range of the input file. The higher compression modes perform more complex
analysis on the input, however, resulting in longer encoding times but smaller
file sizes. Because of the reduced file sizes, the higher compression modes
create lossless audio clips that stream at lower bit rates.
Limitations on Editing Lossless Clips
With one exception, a lossless audio clip cannot be modified:
• Using RealPlayer, users can convert a lossless audio clip to a .wav
file, or to
a lower-fidelity format (such as MP3) for transfer to portable devices.
• RealProducer
cannot convert a lossless audio clip back to its original
source format.
• RealProducer
cannot re-encode a lossless clip using another audio codec.
You should therefore always keep your source file if you plan to encode
additional clips.
• You
cannot edit a lossless audio clip using the RealMedia editor.
49
RealProducer 11 User’s Guide
Available Lossless Codec
Use the following lossless codec to encode perfect quality sound. The
RealAudio lossless codec is compatible with RealOne Player (a codec
autoupdate is required) and later.
RealAudio Lossless Codec
Codec
Type
Flavor
Sampling Rate
RealAudio Lossless Audio
ralf
0
same as source
material
Audio Capture
A streaming clip reflects the quality of its audio source. Any quality problems
within the source will affect the streaming clip as well. Because you cannot
edit a broadcast, live Webcasting introduces several issues beyond those
involved with delivering on-demand clips. This section will help you capture
high-quality audio source files, or set up your sound equipment to deliver
good broadcasts.
For More Information: For information about broadcasting live
content, refer to Chapter 10.
Source Media
If you plan to stream existing material, start with the best source possible. Use
the cleanest recording with the least amount of unwanted noise. Compact
discs (CDs) and digital audio tapes (DATs) are good source media, although
well-recorded analog sources such as records, reel-to-reel tapes, and chrome
(type II) cassettes can sound just as good. Try to avoid consumer-grade
recording media such as Type I cassettes and VHS tapes.
Recording Equipment
Every piece of equipment in the audio chain—microphone, mixer, sound card,
and so on—affects sound quality. If you intend to provide professional-quality
audio content, invest in professional-quality audio equipment and software.
Lesser equipment can add hiss and distortion, degrading sound clarity.
50
CHAPTER 4: Producing Audio
Shielded Cables
It is important to use high-quality, shielded cables. Using unshielded cables
increases the likelihood of introducing line noise and radio frequency
interference into recordings. Keep audio cables physically separated from
power cords to minimize the introduction of noise. Also be sure to ground all
equipment properly.
Input Levels
Setting correct input levels is crucial. All audio equipment has a dynamic
range, the ratio between the loudest possible sound the equipment can
reproduce without distortion and its inherent “noise floor.” Also called
“clipping,” distortion of this type is audible as a high-frequency crackling
noise.
To get the best dynamic range, set the input level on each audio device in the
signal chain so that it uses its full range of available amplitude without
distortion during the program’s loudest sections. The signal chain typically
includes a microphone, a mixing desk, a compressor, and a sound card. For
each piece of equipment, set levels as close as possible to 0 decibels without
going over that level.
Check for signal distortion at each point in the signal chain. Perform several
test runs, and make sure that there are no peaks above maximum amplitude.
Adjust the levels on your sound card mixer so that the input approaches but
does not exceed the maximum. Be conservative, though. Levels might
suddenly increase if, for instance, an interviewee suddenly speaks loudly or a
crowd at a sports event roars.
Volume Levels for Live Broadcasts
When broadcasting live audio streams, it is useful to have a dynamics
compressor for gain compression (not data compression). This piece of audio
equipment automatically adjusts the volume level. By providing a consistent
volume level, it allows you to “set and forget” the input levels to RealProducer.
Sampling Rates
Try to capture sound with a sampling width of 16 bits. RealAudio codecs have
different sampling rates that produce the best sound, however. If your sound
card allows it, capture audio content at the optimum sampling rate for the
51
RealProducer 11 User’s Guide
codec you intend to use. RealProducer will convert the file to the optimum
rate if necessary, but this is recommended only for static files. For live
broadcasts, use a sound card that supports the optimum rate. This avoids the
overhead entailed in converting the rate while encoding sound in real time.
For More Information: “RealAudio Codecs” on page 37 lists the
optimum sampling rates for each codec.
Tip: You do not need to capture stereo sound if you plan to use
a mono codec. However, many sound cards simply discard the
right input channel in mono mode. If you have a mixing desk,
pan all inputs to the center so that nothing is lost during the
conversion to mono.
Audio Optimization
If you are not broadcasting audio live, you work with digitized audio source
files in supported formats such as WAV or AIFF. You then edit the audio files
to optimize them. To do this, you need to be familiar with the features your
editing program offers. This section gives you some optimization tips you can
try with your editing software before encoding your clips with RealProducer.
Tip: Always keep copies of your audio source files. You cannot
convert RealAudio clips back to their original source formats.
DC Offset
DC offset is low-frequency, inaudible noise that results from equipment
grounding problems. If you don’t remove it, it can skew the results of
subsequent sound editing. Use your sound editor’s DC Offset function
immediately after recording a digital audio file.
Tip: If your editing program has this option, remove DC offset
during recording. This eliminates an editing step.
Normalization
Set sensible input levels when recording, and then use normalization to
maximize the levels after recording. Your streaming files sound best when
your digitized source has the highest possible gain without clipping. Digital
audio files that do not use their full amplitude range produce low-quality
52
CHAPTER 4: Producing Audio
streaming clips. If the amplitude range is too low, use your sound editor to
adjust the range and increase the amplitude.
Tip: Most sound editors have a Normalize function that
maximizes levels automatically. Because some systems have
trouble with files normalized to 100 percent, normalize to 95
percent of maximum, or to -0.5dB.
Dynamics Compression
Normalization maximizes the volume level of the audio file’s loudest sections.
Consequently, quiet sections may not encode as well. Dynamics compression
evens out input levels by attenuating (turning down) the input when it rises
above a specified threshold. Check your audio software for a Compression or
Dynamics feature. You can control attenuation by specifying a compression
ratio. This turns down the loudest sections, and you can readjust input levels
accordingly.
Tip: For multipurpose dynamics compression, set the
threshold to -10dB, the ratio to 4:1, and the attack and release
times to 100ms. Adjust the input level to get approximately
3dB of compression and an output level of about 0dB.
Equalization
Equalization (EQ) changes the tone of the incoming signal by “boosting”
(turning up) or “cutting” (turning down) certain frequencies. Using EQ, you
can emphasize certain frequencies and cut others that contain noise or
unwanted sound. EQ can compensate for RealAudio codecs that do not have
flat frequency responses (that is, codecs for which certain frequencies are not
as loud after encoding). You can therefore use EQ to make a RealAudio clip
sound as close as possible to the source recording.
Tip: For voice-only content, you can make the file more
intelligible by cutting frequencies below 100 Hz and carefully
boosting frequencies in the 1 to 4 kHz range.
53
RealProducer 11 User’s Guide
54
CHAPTER
Chapter 5:
PRODUCING VIDEO
5
RealVideo provides the highest quality compressed video available,
whether for streaming or downloading. This chapter explains how
RealProducer encodes a source video. It covers video production
techniques, providing tips for capturing high-quality input and
working with digitized video source files. This information will help
you to produce high-quality clips.
Understanding RealVideo
A video consists of two parts: the visual track and the soundtrack. In a
RealVideo clip, the soundtrack is encoded with RealAudio codecs, and the
visual track is encoded with a RealVideo codec. RealProducer packages both
tracks in a RealVideo clip that, like a RealAudio clip, uses the file extension
.rm , .rv, or .rmvb (variable bit-rate clip). The following sections explain the basic
aspects of creating a RealVideo clip.
Factors for Creating a Good Streaming Video
The most important factor for creating a good streaming video is to start with
good source material. The RealVideo encoding process does not improve the
quality of the input, although filters can increase the visual contrast or remove
certain imperfections. The more you compress video, the more its quality
tends to degrade. So it’s important to understand how the encoding choices
you make affect the clip’s final quality, and to follow good practices that keep
the quality as high as possible throughout the video production cycle.
Data Budgets
As RealProducer converts a source video into a RealVideo clip, it compresses
the video information so that the clip can stream at a certain bandwidth.
Think of targeting a certain streaming audience as having a fixed data budget
to spend. For low-bandwidth audiences such as users on 56 Kbps modems,
55
RealProducer 11 User’s Guide
you have a smaller data budget (about 34 Kilobits a second) than when you
target broadband audiences such as DSL and cable modem users (225 Kilobits
or more per second). The following table lists some common target audiences,
along with the maximum, recommended streaming speed (that is, your total
data budget) for each.
Maximum Streaming Rates
Target Audience
Maximum Streaming Rate
14.4 Kbps modem
10 Kbps
28.8 Kbps modem
20 Kbps
56 Kbps modem
34 Kbps
64 Kbps ISDN
45 Kbps
112 Kbps dual ISDN
80 Kbps
Corporate LAN
150 Kbps
256 Kbps DSL/cable modem 225 Kbps
384 Kbps DSL/cable modem 350 Kbps
512 Kbps DSL/cable modem 450 Kbps
786 Kbps DSL/cable modem 700 Kbps
Video Quality Factors You Control Directly
For a given data budget, you have to spend data on the following things,
which are in your control:
• constant
bit rate (CBR) or variable bit rate (VBR) encoding
CBR clips, which are described in “Constant Bit Rate Video” on page 63,
are the safer choice for streaming video to any bandwidth. Explained in
“Variable Bit Rate Video” on page 66, VBR clips produce higher-quality
results, but are suited only for video downloads and certain highbandwidth streaming environments.
• audio
soundtrack
Most videos include a soundtrack that requires a fixed amount of
bandwidth. If you give too much data to the soundtrack, the video’s visual
quality suffers. Chapter 4 explains the RealAudio codecs used for
RealVideo soundtracks. The section “Soundtrack Bandwidth” on page 57
provides details about the bandwidth division between a video’s
soundtrack and visual track.
56
CHAPTER 5: Producing Video
• video
dimensions
You want to use the largest width and height for the video that you can.
However, choosing too large of a video size takes too much data away
from the other quality factors. The section “Video Capture” on page 71
provides recommended dimensions.
• video
codec
The RealVideo codec choice, and its encoding complexity level, also affect
the clip quality. By default, RealProducer produces the best results by
using the highest-quality codec set to the highest complexity level.
However, you may want to choose different settings to speed encoding or
reach older versions of RealPlayer. See “RealVideo Codecs” on page 61.
Video Quality Factors You Affect Indirectly
You do not set the following quality factors directly. Instead, other choices
you make affect their outcomes in the encoded clip. In general, following good
production practices and making smart choices with the factors that you can
control result in good quality in these areas:
• frame
rate
The frame rate affects how smoothly the motion flows in the video. If the
frame rate encodes too low, the video will look jerky. For more on this, see
“Encoded Frame Rates” on page 59.
• visual
clarity
If the visual quality comes out too low, the video will look fuzzy. For more
information, see “Visual Clarity” on page 60.
Soundtrack Bandwidth
Because RealVideo uses RealAudio to encode a video’s soundtrack, a chunk of
the clip’s bandwidth first goes toward the audio. The visual track is then
squeezed into the bandwidth that’s left. For 56 Kbps modems, for example,
RealVideo clips stream at 34 Kbps, leaving 22 Kbps of modem bandwidth for
overhead. How much bandwidth the visual track gets depends on how the
audio is encoded. With an 8 Kbps RealAudio voice codec for the soundtrack,
the visual track gets 26 Kbps. With a 16 Kbps music codec, though, the visual
track gets just 18 Kbps.
57
RealProducer 11 User’s Guide
Possible Audio and Visual Tracks in a 56 Kbps RealVideo Clip
At low bandwidths, how you encode the soundtrack greatly affects how the
visual track looks. Music codecs typically consume more bandwidth than do
voice codecs. Music’s greater frequency range requires more data than does
speech, so a music soundtrack consumes more bandwidth than a spoken one.
A video with an audio narration might therefore look better than one
accompanied by music, as there would be more bandwidth available for the
visual track.
At higher bandwidths, the soundtrack consumes proportionally less of the
available clip data, so differences in soundtrack encoding affect visual quality
less. At speeds above 100 Kbps, you get high-quality sound that uses no more
than a quarter of the clip’s bandwidth. The following table lists the standard
target audiences for constant bit rate RealVideo streams, giving the clip
streaming speeds and the RealAudio codecs used for the soundtracks, broken
out by audio type.
Audio Codecs for Streaming RealVideo Clips
Target Audience
Clip Speed
28.8 Kbps modem
20 Kbps
56 Kbps modem
34 Kbps
Voice Codec
Music Codec
6.5 Kbps voice 8 Kbps Music - RealAudio
64 Kbps single ISDN
50 Kbps
8.5 Kbps voice 11 Kbps Music - RealAudio
128 Kbps dual ISDN
100 Kbps
16 Kbps voice
20 Kbps Music - RealAudio
(Table Page 1 of 2)
58
CHAPTER 5: Producing Video
Audio Codecs for Streaming RealVideo Clips (continued)
Target Audience
Clip Speed
Corporate LAN
150 Kbps
256 Kbps DSL/cable
225 Kbps
384 Kbps DSL/cable
350 Kbps
512 Kbps DSL/cable
450 Kbps
768 Kbps DSL/cable
700 Kbps
Voice Codec
32 Kbps voice
Music Codec
32 Kbps Stereo Music High
Response - RealAudio
44 Kbps Stereo Music High
Response - RealAudio
64 Kbps Stereo Music RealAudio
64 Kbps voice
96 Kbps Stereo Music RealAudio
(Table Page 2 of 2)
Encoded Frame Rates
One way that RealProducer compresses clips is by reducing the input video’s
frame rate. Each RealProducer audience has a frame rate target, typically 15 or
30 frames per second (fps). Clips encoded at broadband rates usually meet
their frame rate targets. At slower streaming speeds, RealProducer attempts to
encode the target rate, but will scale the rate down as necessary depending on
other factors such as video dimensions and audience bandwidth. So although
you cannot control the frame rate precisely in these instances, using good
production practices results in higher frame rates.
Frame Rate and Motion
The higher the frame rate, the smoother the motion will appear in the video:
• The
standard frame rate for full-motion video is 24 to 30 fps. At this
speed, the human eye perceives movement as continuous—a phenomenon
known as persistence of vision.
•A
common rate for lower-speed streaming video that approximates fullmotion video is 15 fps. To most people, a 15 fps video flows smoothly,
though not quite as fluidly as one at a higher rate.
• Below
15 fps, a video looks jerky.
• Below
7 fps, a video looks very jerky.
• Below
3 fps, a video essentially becomes a slideshow.
59
RealProducer 11 User’s Guide
Factors that Affect Frame Rate
Most source videos start out at 15 to 30 fps. During encoding, RealVideo
adjusts this frame rate downward as necessary. Thus, your encoded clip will
not have just one frame rate, but a mix of frame rates that varies with its
content. If you follow good production practices, your clips will typically
stream over slow- to medium-speed connections at 7 to 15 fps. At higher
speeds, you’ll get the 15 to 30 fps maximum set in the audience. Other factors
besides bandwidth, though, affect a RealVideo clip’s frame rate:
• The video’s dimensions greatly affect frame rate. If the dimensions are too
large for your target bandwidth, you will not get a high frame rate. For
more information, see “Video Capture” on page 71.
• RealVideo
10 provides video quality superior to that produced by older
RealVideo codecs. Using an older codec may result in a lower frame rate.
• Visually
complex videos that show many objects moving across the screen
simultaneously are hard to encode and may lower the frame rate.
• RealProducer
gives you an option for smoother motion. Choosing this
option raises the clip’s overall frame rate but reduces visual quality. This
has the most effect on clips that stream at low bandwidths.
• In a video that has a mix of fast and slow scenes, variable bit-rate encoding
(VBR) and two-pass encoding generally help the fast scenes achieve a
higher frame rate. See “Variable Bit Rate Video” on page 66 and “Two-Pass
Encoding” on page 80 for more information.
• During
a live broadcast, RealProducer may lower the frame rate if the
computer’s processing power is too low to encode the input in real-time.
Visual Clarity
In addition to lowering the frame rate, RealVideo compresses clips by
throwing out pixel data. A video stores information about each pixel in the
frame. RealVideo, on the other hand, stores data for pixel groups. When
bandwidth is tight, RealVideo shoehorns pixels with slightly different RGB
values into the same group. These pixels then look identical rather than nearly
identical. This may result in a loss of detail if compression is too high. The
following illustration compares a smooth video with one that has lost detail
through too much compression.
60
CHAPTER 5: Producing Video
Smooth and Distorted Video
Bandwidth is the primary factor that affects a clip’s visual clarity. By using
good production practices as described in this chapter, you can help keep the
video’s clarity intact during encoding. Also note the following points:
• The
video’s dimensions affect visual clarity. Using dimensions too large
for target bandwidth can make the video blurry. For more information,
see “Video Capture” on page 71.
• RealVideo 10 produces better visual
clarity than RealVideo 9 or RealVideo
8.
• When
you encode with RealProducer, you can choose an option for better
image quality. The video may be jerkier, though, because increasing the
pixel data reduces the frame rate. This option has the most effect on clips
that stream at low bandwidths.
• Video
with relatively low motion (“talking heads”) will have better visual
quality than a video with rapid scene changes and a lot of movement.
• VBR
clips using two-pass encoding generally provide superior visual
quality to CBR clips. See “Variable Bit Rate Video” on page 66 and “TwoPass Encoding” on page 80 for more information.
Tip: If you plan to launch a video in double- or full-screen
mode, boost video clarity as much as possible during
production and encoding. RealPlayer enlarges the clip by
duplicating its pixels, which magnifies any defects.
RealVideo Codecs
RealVideo 10 is the default RealVideo codec used with RealProducer 11. If you
use RealProducer Plus, you can also encode with older RealVideo codecs.
RealNetworks recommends using RealVideo 10 unless you need faster
61
RealProducer 11 User’s Guide
encoding performance during broadcasts, or you need to stream video to
RealPlayer 8.
For More Information: See also “Encoding Complexity Modes”
on page 81 for information about how a video codec’s
complexity mode affects video quality.
RealVideo 10 Codec
The RealVideo 10 codec creates the highest quality compressed video possible.
It offers improved visual quality over RealVideo 9 and RealVideo 8, especially
with fast-action scenes and on-screen text. Because RealVideo 10 performs
more complex analysis of video data than earlier codecs, encoding may take
more than twice the time required with RealVideo 9. To help shorten the
encoding time and improve the quality of live broadcasts, RealProducer
provides the following features:
• RealVideo
10 is optimized for multiprocessor machines. RealProducer
uses a second processor when the video height is greater than 180 pixels.
When you encode a SureStream CBR clip for multiple audiences,
RealProducer uses up to two processors for each audience. For example,
encoding a RealVideo clip for a 56 Kbps modem audience and a 256 Kbps
broadband audience can utilize up to four processors.
• When
encoding pre-recorded clips, you can lower the codec complexity
level. This reduces the clip’s visual quality, but decreases the encoding
time. For more information, refer to “Encoding Complexity Modes” on
page 81.
• For
live broadcasts, RealProducer uses automatic load management
features to compensate for the increased encoding demands of RealVideo
10. This helps to ensure that RealProducer does not fall behind the video
input rate. See “Broadcast Load Management” on page 177.
RealVideo 10 is compatible with RealOne Player and later. Users of older
RealPlayers are prompted to update to RealPlayer 11 when they attempt to
play RealVideo 10 content. Playback of RealVideo 10 content consumes the
same amount of system resources on the viewer’s computer as playback of
RealVideo 9. Viewers, therefore, will not notice any performance slowdown
when playing a RealVideo 10 clip compared to a RealVideo 9 clip.
62
CHAPTER 5: Producing Video
RealVideo 9 Codec
RealVideo 9 improves on RealVideo 8 with higher compression and improved
visual quality. RealOne Player and later can play RealVideo 9 clips. Users who
have older versions of RealPlayer are prompted to autoupdate to RealPlayer 11
when the viewer attempts to play a RealVideo 9 clip. RealVideo 9 is not
available with RealProducer Basic.
RealVideo 8 Codec
The RealVideo 8 codec is backwards-compatible to RealPlayer 8. The video
quality is not as high as with RealVideo 9 and 10, but encoding is faster.
Additionally, RealVideo 8 requires fewer resources on the RealPlayer machine
to decompress. This makes it suitable for the slower processors of mobile,
handheld devices. RealVideo 8 is not available with RealProducer Basic.
Constant Bit Rate Video
When you create a RealVideo clip, you can choose constant bit rate (CBR) or
variable bit rate (VBR) encoding. In RealProducer, each audience template is
either CBR or VBR. CBR encoding is the more traditional method of encoding
streaming video. It maintains a consistent bit rate for the stream, such as a
constant 34 Kbps when streaming to 56 Kbps modems. You should generally
use CBR video when streaming at bandwidths below 350 Kbps, and anytime
you want to use SureStream to encode multiple bandwidths into the same clip
or broadcast. At high bandwidths, however, you can use CBR or VBR video.
SureStream CBR Clips
Using SureStream technology, you can encode a constant bit rate RealAudio
or RealVideo clip for multiple bandwidths. For example, you can encode a
single RealVideo clip for 56 Kbps modems, 112 Kbps dual ISDN, 256 Kbps
DSL, and so on. The clip’s playback quality improves with each faster speed.
When a viewer clicks a link to a SureStream clip, RealPlayer and Helix Server
determine which stream to use based on the available bandwidth, as shown in
the following illustration.
63
RealProducer 11 User’s Guide
SureStream Clip Encoded for Multiple Bandwidths
Each stream that you add to SureStream clip increases the clip’s file size, as
well as the encoding time. Streams for higher bandwidths increase the file size
more than streams for lower bandwidth because high-bandwidth encodings
include more data. As explained in “Broadcast Load Management” on page
177, the encoding time can become a critical issue during live broadcasts, so
you need to choose the audiences you use carefully.
Note: The RealVideo codec you choose encodes all of a clip’s
SureStream streams. You cannot encode half the streams with
the RealVideo 10 codec, for example, and the other half with
the RealVideo 8 codec.
Downshifting and Upshifting
Helix Server and RealPlayer can switch streams to compensate for network
conditions. If a fast connection becomes bogged down because of high
network traffic, Helix Server switches to a lower-bandwidth stream to prevent
the presentation from stalling. When the congestion clears, Helix Server
switches back to the higher-bandwidth stream. RealPlayer doesn’t need to
rebuffer data during this shifting.
64
CHAPTER 5: Producing Video
Switching Bandwidths During Network Congestion
Note: With the exception of the RealAudio lossless codec, all
RealAudio codecs use constant bit rate encoding. Any audio
stream other than a lossless stream can therefore be included
in a SureStream clip, whether as a soundtrack to a video, or as
audio-only voice or music.
SureStream Substreams
Because SureStream can downshift during network congestion, it’s a good
idea always to include one or more substreams in a CBR clip. A substream is
simply a stream encoded at a lower bandwidth than your target audience
speed. RealProducer predefines three substream audiences, two for 28 Kbps
modems and one for 56 Kbps modems:
• 12k
Substream for 28k Dial-up
• 16k
Substream for 28k Dial-up
• 26k
Substream for 56k Dial-up
Substreams are particularly important for modem users because modem
bandwidth can fluctuate widely. For a 56 Kbps modem audience, the 56 Kbps
modem template encodes video at 34 Kbps. If the SureStream clip includes
the 26 Kbps substream, the video downshifts to that stream if the user’s
available bandwidth falls below 34 Kbps. The clip can continue to downshift
to slower substreams if needed. This ensures that the presentation can still
stream during network congestion.
65
RealProducer 11 User’s Guide
RealProducer labels certain audience templates as “substreams” because they
are not intended to be the clip’s primary stream. Any CBR audience can act as
a substream for a higher-bandwidth audience, however. You can include the
64k Single ISDN audience as a substream for your 150k LAN users, for
example, even if you do not intend to stream the clip over ISDN. To be
effective, however, a substream should be no more than 100 Kbps slower than
the primary audience.
Variable Bit Rate Video
Variable bit rate (VBR) encoding generally provides superior video quality to
constant bit rate (CBR) encoding. It gives more bandwidth to scenes that are
hard to compress, making the most visible difference in videos that have fastmoving, high-action scenes. Clips encoded with VBR use the file extension
.rmvb . VBR is not compatible with SureStream technology, however, so you
can encode a VBR clip only for a single bandwidth. VBR encoding is suited for
bandwidths of 350 Kbps or higher.
Single Bit Rate for a VBR Clip
Unlike a CBR clip, a VBR clip does not maintain a constant streaming rate.
Instead, it has a target average bit rate (or quality) and a maximum bit rate.
For example, RealProducer’s 450 Kbps VBR download audience averages 450
Kilobits of data per second. However, the audience has a maximum of 900
Kbps, meaning that the stream can, if necessary, consume up to 900 Kilobits
of data a second. These data spikes typically occur during high-action
sequences, resulting in greater video clarity and higher frame rates than CBR
encoding.
Tip: In RealProducer, audience templates that use VBR
encoding include “VBR” in the audience name. If the template
does not say “VBR,” it is a CBR template.
For More Information: Two-pass encoding is an important
component for creating a high-quality VBR file. For more
information, refer to “Two-Pass Encoding” on page 80.
66
CHAPTER 5: Producing Video
VBR Clips for Download
VBR clips are better suited for downloading than are CBR clips. Because a
viewer downloads the entire clip before playing it, the bandwidth spikes
inherent in a VBR clip will not cause playback problems. As you encode clips
for download, you can consider the VBR encoding speeds as a guide to quality
and file size. For example, a 450 Kbps VBR download will generally have lower
quality and a smaller file size than a 750 Kbps VBR download.
Tip: Quality depends on the source content. For a video that
has relatively little action and small dimensions, for example,
750 Kbps VBR encoding may offer little improvement over 450
Kbps VBR encoding.
VBR Clips for Streaming and Broadcasting
Although VBR audience templates are geared for video downloads, you can
also use VBR encoding for streaming clips and broadcasting live events. The
primary reason to do this is that VBR offers better quality than CBR. For
example, depending on the content, a 350 Kbps VBR stream may have roughly
the same visual quality as a CBR stream encoded at 450 Kbps.
To benefit from VBR, the streaming network must be able to accommodate
bandwidth spikes. Local area networks (LANs) and cable modem users are
good candidates for VBR streaming. Because all viewers in these networks
share a large pool of bandwidth, a VBR clip’s intermittent bandwidth spikes
tend not to overload a single viewer’s connection bandwidth. Connections in
which bandwidth is not shared, such as DSL, can prove problematic. A 450
Kbps VBR clip has a maximum bandwidth of 900 Kbps, for instance. If a DSL
connection has a maximum throughput of 500 Kbps, the VBR clip may stall.
When you stream a prerecorded VBR clip on demand, each viewer generally
starts playback at a different time. This means that the bandwidth spikes
inherent in the clip are spread out over time for all viewers. When you
broadcast a VBR stream, however, bandwidth spikes occur for each viewer at
the same time. When broadcasting, therefore, your network needs to handle
higher cumulative spikes than when you stream prerecorded clips.
Note: Streaming a VBR clip requires that you use Helix Server
version 9 or higher.
67
RealProducer 11 User’s Guide
Tip: Multicasting, which is available on some intranets, helps
to overcome the bandwidth spikes of standard unicasting by
delivering one stream to all viewers, rather than a separate
stream to each viewer. For more information, refer to the
multicasting chapter of Helix Server Administration Guide.
VBR Encoding Settings
For each VBR audience template, three settings affect how the clip or
broadcast is encoded: maximum bit rate, average bit rate, and quality. Each
VBR clip uses two of these three settings to determine how it encodes its data.
To create a VBR clip appropriate for your needs, it’s important to understand
how these settings interact.
For More Information: The section “Creating and Editing
Audiences” on page 155 explains how to change the VBR
encoding settings through the graphical application.
Tip: In an audience file, you can define two additional
variations of VBR encoding, vbrUnconstrainedQuality and
vbrUnconstrainedBitrate . For information about setting VBR
properties through an audience file, refer to “Video Stream
Properties” on page 353.
Average Bit Rate
A VBR clip’s average bit rate value reflects the average bandwidth of the clip
measured as the total number of Kilobits consumed divided by the timeline in
seconds. The actual bandwidth at any point during clip playback may be lower
or higher than this value. Through most of the video, however, the second-bysecond bandwidth use will be close to this value.
Maximum Bit Rate
A VBR clip’s maximum bit rate caps the bandwidth that the clip can consume.
It is typically set by default to twice the average bit rate. A 450 Kbps VBR clip
has a maximum bandwidth of 900 Kbps, for example. So during a high-action
scene, for example, a video encoded with this audience may have a bandwidth
spike of up to 900 Kbps. These spikes are only occasional, however, and the
overall clip playback rate stays close to the average bit rate.
68
CHAPTER 5: Producing Video
Although you can set the maximum bit rate value higher or lower, a higher
setting is unlikely to result in significantly greater quality. You can lower the
setting if you want to reduce the bandwidth spikes on your network. Keep in
mind, however, that lowering this maximum decreases the benefit of VBR
encoding. The closer the maximum bit rate value approaches the average bit
rate value, the more the clip behaves like a CBR clip.
Tip: Keep the maximum bit rate value between 50 percent to
100 percent greater than the average bit rate setting. For a 450
Kbps template, for example, the maximum rate should be 675
to 900 Kbps.
Quality
The quality setting gears the encoding process to achieve a certain level of
visual quality. With a quality of 100 percent, for example, RealProducer
attempts to reproduce the visual quality of the input nearly perfectly. A lower
quality, such as 90 or 80 percent, allows for more visual imperfections, but
results in a smaller clip that uses less bandwidth. Keep in mind, however, that
the quality setting does not guarantee a faithful reproduction of content. It
only attempts to achieve the quality level within the input constraints, such as
the video dimensions, target frame rate, content type, and maximum bit rate.
Because encoding for quality can vary the average bit rate greatly, the average
bit rate setting is ignored. (That is, the average bit rate and quality settings are
mutually exclusive, and you can define only one of the values.) If you set a
maximum bit rate of 900 Kbps and a quality of 100 percent, for example, the
average bit rate may turn out to be close to 900 Kbps. At a lower quality target,
such as 80 percent, the average bit rate will probably be lower. The actual,
average bit rate depends greatly on content, though, and will vary for each
clip.
Because the average bit rate can vary greatly, quality-based encoding is better
suited for downloaded clips. However, you can stream or broadcast a qualityencoded stream as long as your network has the capacity to provide to each
user the bandwidth indicated by the maximum bandwidth target. Typically,
each stream will use less bandwidth than this, and you can compute the
average bandwidth of a clip by dividing the file size in Kilobits by the number
of seconds in the timeline. For a live broadcast, though, it is impossible to
know the average bandwidth of a quality-encoded stream in advance.
69
RealProducer 11 User’s Guide
Tip: By editing an VBR audience file, you can vary the
relationships between bit rate and quality. See “Stream
Encoding Types” on page 354.
Video Recording Tips
If you intend to shoot a new video rather than use existing video content, this
section provides tips for capturing high-quality input. Because video loses
image quality if it’s highly compressed, always start with the best video source
available.
For More Information: For pointers on recording audio, see
“Audio Capture” on page 50.
Video Staging
Consider the video’s final frame size before you shoot the first frame.
Streaming over 56 Kbps modems requires a small video window, so you need
to frame important visual elements well. For recommended clip dimensions,
see “Video Encoding Dimensions” on page 73.
Scene Changes and Movement
The fewer things that change from frame to frame, the sharper the image will
appear in a low-bandwidth video. You can do the following to cut down on
unnecessary movement:
• Use
a mounted camera rather than hand-held one. This greatly reduces
the movement you inadvertently introduce into the scene when recording.
• Don’t
have a rapidly moving object fill the entire frame. But you don’t
want to pull the camera back too far either. You need to find a happy
medium between close-ups and panoramic shots.
Of course, you don’t want to eliminate all dynamic elements. When you do
include rapid movement, allow enough time for objects to resolve. Because of
low frame rates and high compression, objects coming to rest may appear
blurry at first. If you have a dialog box popping up on a computer screen, for
example, have the box remain stationary for a few seconds so that the image
resolves.
70
CHAPTER 5: Producing Video
Colors and Lighting
Bright lighting at a constant exposure keeps the foreground detail crisp. Use
uniformly dark colors for backgrounds, and uniformly light colors (but not
whites) for clothing. Complex textures such as paisley and stripes degrade the
final image quality with unwanted visual effects.
Video Output
Video playback devices commonly have at least two common output types—
S-video and composite. Use S-video, as it produces better results.
Professional-grade devices typically have other, high-quality output modes
that can connect to a video capture card.
Color Depth
Always use 24-bit or 32-bit color. Lower color resolution results in poor clips.
Source Media Quality
Whether you shoot a video yourself or digitize existing material, start with
high-quality video media. The following are common video formats, listed in
order of descending quality:
1. HDV
2. Betacam SP, also known simply as Beta. This format is common among
video production professionals.
3. DV, miniDV, DVCam, or DVCPro.
4. Super-VHS (S-VHS) or HI-8mm.
5. VHS, 8mm.
Video Capture
The following sections provide recommendations on frame rates and video
dimensions when capturing video input into a digitized file, and encoding the
video into a streaming or downloadable clip. When you encode directly from a
capture source, you do not create an input file first. However, it is still
important to choose your encoded output dimensions correctly to produce a
high-quality clip or broadcast.
71
RealProducer 11 User’s Guide
For More Information: See “Factors for Creating a Good
Streaming Video” on page 55 for background on the
relationship between dimensions, bandwidth, frame rate, and
visual clarity.
Video Capture Dimensions
If you capture video to a digitized file format, such as AVI or MPEG, you can
edit the video using video editing software before encoding it with
RealProducer. In this case, digitize the video at 320 pixels wide by 240 pixels
high unless you are short on disk space or your video capture card
recommends different dimensions.
Full-Screen Capture
You may want to capture full-motion video at the full-screen size of 640 by
480 pixels if all of the following are true:
• Your
clips will stream at broadband speeds of 256 Kbps or higher.
• Your
encoded clips will be larger than 320 pixels by 240 pixels.
• You have a video workstation capable of digitizing full-motion, full-screen
video. Standard PCs typically cannot handle this large of a load.
Video Capture Frame Rates
When you capture content to a source file first, digitize the video at 15 frames
per second (fps) if you plan to stream the clip at less than 150 Kbps. For these
low speeds, 15 fps is the maximum rate that the standard RealProducer
audiences encode. Above speeds of 150 Kbps, RealProducer can encode up to
30 fps, so it is better to capture the source input at 30 fps.
For More Information: For more information about the frame
rate for encoded clips, see “Encoded Frame Rates” on page 59.
Computer Speed and Disk Space
Because video capture places a large burden on a computer’s CPU and hard
drive, use the fastest computer you have available. On Windows computers,
you can use any video capture card that supports Video for Windows or
DirectShow.
72
CHAPTER 5: Producing Video
Disk Space Requirements for Video Capture
Use the following formula to calculate the approximate size in megabytes of a
digitized video file:
(pixel width) x (pixel height) x (color bit depth) x (fps) x (duration in seconds)
8,000,000
Suppose you want to capture a three-minute video at 15 frames per second,
with 24-bit color, in a window that is 320 by 240 pixels. As you can see from
the following equation, your digitized source file would be approximately 622
MB:
(320) x (240) x (24) x (15) x (180) / 8,000,000 = 622 Megabytes
If necessary, you can conserve disk space by decreasing the clip dimensions or
lowering the frame rate, or both.
Video Source File Size Limit
Some computer file systems limit a single file to 2 GB (2048 MB) in size. At a
320-by-240 size and 15 fps, this translates to about 9.5 minutes of video.
Certain video production programs support the OpenDML (AVI 2.0)
standard, which allows the creation of files larger than 2 GB. RealProducer
may be able to accept a video source file larger than 2 GB as input, depending
on the production software used to create the file.
If you plan to produce long videos or videos with large dimensions, check
whether or not your video production software is limited to a 2 GB output file
size. If it is not limited to 2 GB, create a video file larger than 2 GB and test to
determine if RealProducer can accept the file as input.
Tip: If you are limited to 2 GB for the video source file and you
need to produce a larger video, you can create separate video
source files (each 2 GB or smaller) and encode them as separate
RealVideo clips. Then, merge the clips using the RealMedia
editor described in Chapter 12.
Video Encoding Dimensions
When you capture video to a digitized input clip, you want to capture the
largest size possible to preserve as much quality as you can. When you encode
the file as RealVideo, however, you may need to reduce the video dimensions.
Choosing dimensions too large for a given target bandwidth can result in a
73
RealProducer 11 User’s Guide
low frame rate or a large number of visual artifacts, rendering the video jerky
or fuzzy.
There are no specific rules for which video dimensions to use, other than to
maintain the aspect ratio of the digitized source. The primary consideration
for selecting encoding dimensions is bandwidth, though other factors can
affect the quality. For example, to keep its frame rate higher, a fast-action clip
may require smaller dimensions than a low-action clip.
For More Information: To resize a video, you can scale the source
file with your video editing software. Or, you can crop or resize
the RealVideo clip as you encode it. For more on resizing, see
“Resize Filter” on page 77.
Desktop Video Dimension Recommendations
Most videos encoded for streaming to a desktop media player use a 4:3 aspect
ratio to fit the dimensions of standard computer monitors. The following are
general recommendations for encoded video dimensions based on your target
audience’s bandwidth:
• For
desktop audiences with bandwidth less than 256 Kbps, use a smaller
size, such as 240 pixels wide by 180 pixels highor 176 pixels wide by 132
pixels high.
Tip: RealVideo 10 provides higher quality at high compression
rates than older RealVideo codecs. When developing video for
low-bandwidth audiences, using RealVideo 10 provides higher
quality at larger dimensions.
• For
desktop broadband connections of 256 Kbps or higher, encode your
clip at 320 pixels wide by 240 pixels high.
• At
very high bandwidths, you can choose larger dimensions, such as 640
by 480. To use these dimensions, however, the input should be of very
high quality.
Mobile Device Video Dimension Recommendations
Mobile devices such as personal digital assistants and smartphones may have
different screen sizes, so it’s useful to know the specifications for the devices
you are targeting. A common screen resolution of most smartphones is 176
pixels by 144 pixels. This size does not have the 4:3 aspect ratio common to
74
CHAPTER 5: Producing Video
television and desktop video. If you are starting with a larger, 4:3 source such
as 320 by 240, you can do two things:
• Reduce
the video to 176 pixels wide by 132 pixels high. This leaves 12
pixels of screen height unused.
• If
the input video width is 320 pixels, crop out portions from one or both
sides to create a width of 292 pixels. Then scale the video smaller to
approximately 176 pixels by 144 pixels.
For More Information: For more about RealPlayer for mobile
devices, visit http://www.realnetworks.com/industries/
mobile/index.html.
High-Bandwidth and Low-Bandwidth Streaming Audiences
If you want to encode a video clip or broadcast for both low-bandwidth and
high-bandwidth audiences, you can adopt two different strategies:
• Use
the same clip or broadcast for all audiences.
Using SureStream technology, you can create a single RealVideo clip that
streams at many bandwidths. However, if you create the video at a large
size such as 320-by-240, the clip will not stream well to slow connections.
Using a smaller size benefits modem users, but does not take full
advantage of the greater bandwidth of faster connections.
• Create
separate clips for low-bandwidth and high-bandwidth viewers.
Creating separate clips allows you to encode a larger clip for highbandwidth audiences, and a smaller clip for low-bandwidth audiences.
You can make the clips available through separate links, or use a SMIL
<switch> tag to let RealPlayer choose which version to play.
Note: Using a job file, you can encode two separate clips at
once, sizing each clip separately. This allows you to create a
larger clip for high-bandwidth audiences, and a smaller clip for
low-bandwidth audiences in a single encoding pass. For more
information, see “Media Profile” on page 334.
For More Information: For information about using SMIL to
select clips, refer to the switching chapter of RealNetworks
Production Guide.
75
RealProducer 11 User’s Guide
RealMedia File Size
As noted in “Video Source File Size Limit” on page 73, file size limits imposed
by an operating system’s file system are generally more of a problem when
capturing video than when encoding it. A compressed RealVideo clip is often
smaller than the input clip. However, there are some cases in which a
RealVideo clip may exceed the operating system’s maximum:
•A
SureStream clip, described in “SureStream CBR Clips” on page 63, can
encode multiple streams for different audiences. If you include several
high-bandwidth audiences, the encoded clip may exceed the source clip in
size, even though each stream contains less data than the original input.
• If
you encode a long video clip directly from a live source or capture
device, the encoded clip may grow larger than the allowable file system
limit.
When a clip reaches the operating system’s file size limit, RealProducer
automatically creates, or rolls, a new clip. The new clip will have the same name
as the original clip, but with a number added to the file name. For example,
movie.rm rolls to movie1.rm when movie.rm reaches the operating system limit.
The clip movie1.rm rolls to movie2.rm if it grows too large, and so on.
For More Information: By using the command-line application
or editing a job file, you can set lower limits on file rolling, and
roll files by time, such as every 15 minutes. For job file
information, refer to “File Destinations” on page 330. The
command-line options are explained in “Output and
Destination Options” on page 271.
Tip: You can combine rolled files into a single sequence using a
Ram file or a SMIL file. Transitions may not be seamless, and
may contain audio and video gaps, however. For information
about creating clip sequences, refer to Introduction to Streaming
Media or RealNetworks Production Guide.
RealVideo Filters
RealProducer includes video filters that can improve the appearance of the
encoded clip. However, you should understand when to use each type of filter.
Some filters can degrade the video quality when used incorrectly. As well, the
use of some filters can significantly increase the encoding time.
76
CHAPTER 5: Producing Video
For More Information: For information about using filters with
the command-line application, refer to “Prefilter Options” on
page 268. See “Prefilters” on page 317 for information about
defining filters in the job file.
Noise Filters
A by-product of poor quality in one or more links in the video production
chain, video noise (which has nothing to do with the audio quality) can
distort the encoded clip. These distortions are similar to the “snow” that often
shows up in TV signals received over an antenna. The source of the noise is
typically hardware, such as the video tape, capture card, or camera. Using
professional-quality equipment and media helps eliminate video noise at the
source. If your source video is high quality to start with, you won’t need the
noise filters.
For More Information: The section “Video Noise” on page 97
explains how to apply this filter using the graphical
application.
Low Noise Filter
If your video input has a small amount of noise, turn on the low-noise filter.
Because it has a small impact on processing power and won’t degrade a video’s
appearance, the low noise filter is safe to leave on at all times. It’s better
practice, though, to use it only when necessary.
High Noise Filter
If noise greatly distorts the source video, try the high noise filter. Use it only if
necessary, though, because it can add 30% or more to the encoding time. The
high noise filter can also remove slight details, making highly textured
surfaces look more smooth, which may not be desirable in all cases.
Resize Filter
RealProducer’s resizing filter allows you to crop or resize the video as you
encode it. You can select whether to do this as a fast resize or a high-quality
resize. These resize options affect the video only when you make it smaller.
The minimum size for a resized or cropped video is 32-by-32 pixels. The width
and height of a resized or cropped video must be a multiple of 4, such as 160
pixels, 240 pixels, and so on.
77
RealProducer 11 User’s Guide
RealProducer can resize content using a quick method (fast resize), or through
a complex analysis (high-quality resize). A fast resize has a small impact on
encoding time, but the resulting image may have some distortion. A highquality resize results in a superior image, but it may double or triple the
encoding time because it carefully analyzes the video source before resizing.
Because of its impact on speed, the high-quality resize filter is not
recommended for broadcasts.
Tip: If you are encoding a letterbox clip for display on
computer screens that use a traditional 4:3 aspect ratio, crop
out the black bars at the top and bottom of the video image.
This helps to improve the video quality.
For More Information: The sections “Cropping” on page 96 and
“Resizing the Video” on page 100 explains how to crop and
resize a video using the graphical application.
Inverse-Telecine Filter
The Inverse-Telecine filter is for cinematic film that was transferred to NTSC
video. Film is usually shot at 24 frames per second (fps), whereas the NTSC
standard is 30 fps. The film-to-video conversion (called “telecine”) duplicates
some fields to bring the film input up to the NTSC frame rate. American
theatre-release films transferred to video, for example, undergo the telecine
process.
Use the inverse-telecine filter when encoding NTSC video that was transferred
from film and has a frame rate of 30 fps. The filter strips out redundant fields,
letting RealProducer focus on image quality. This improves the clip’s overall
look. Although the inverse-telecine filter is safe to use on all input, it slows
performance marginally and should be used only when the source is NTSC
video that originated from film.
Note: PAL video, which is widely used in Europe, does not
require the inverse-telecine filter because the conversion from
24 fps film to 25 fps PAL does not use the telecine process.
For More Information: The section “De-Interlace and Inverse-
Telecine” on page 97 explains how to apply this filter using the
graphical application.
78
CHAPTER 5: Producing Video
De-interlace Filter
The de-interlace filter removes jaggedness in interlaced NTSC or PAL video. A
video camera running at 30 frames per second captures the odd-numbered
lines of a field in 1/60th of a second, and the even-numbered lines in the next
1/60th of a second. It then interlaces the two to create the frame. Because half
the field’s lines are captured a fraction of a second later than the other half,
fast-moving objects may appear jagged, the result of the object advancing
slightly within 1/60th of a second. The following figure illustrates this
jaggedness in a detail of an interlaced video.
Jaggedness in an Interlaced Video (detail)
The next figure shows the jaggedness removed with the de-interlace filter.
Jaggedness Removed with the De-interlace Filter (detail)
The de-interlace filter has a modest impact on encoding speed, but is useful
only for interlaced source video that is 240 lines or higher. Typical source
video used for television is 480 lines high. If you digitize the video with a video
capture card that captures at 240 lines high or less, the card throws out either
the odd or the even lines, de-interlacing the video itself. The de-interlace filter
is safe to leave on, though, because RealProducer never applies it to a video less
than 240 lines high.
79
RealProducer 11 User’s Guide
For More Information: The section “De-Interlace and Inverse-
Telecine” on page 97 explains how to apply this filter using the
graphical application.
Black-Level Correction Filter
The black-level correction filter improves a video’s contrast by making nearblack pixels pure black and near-white pixels pure white. This improves the
video’s appearance if it looks “washed out” because of a lack of contrast. Using
this filter improves the RealVideo codec efficiency by increasing the number of
pixels that have the same color value. Applying this filter has only a modest
impact on encoding speed.
For More Information: The section “Black-Level Correction” on
page 97 explains how to apply this filter using the graphical
application.
RealVideo Options
The RealVideo options allow you to modify how RealProducer encodes
RealVideo clips. You can generally change these options separate for each
audience template. As with the RealVideo filters, you should understand how
each options works before changing the default values. Setting an option
incorrectly can degrade the video quality.
Two-Pass Encoding
With two-pass encoding, which is used only when encoding from a digitized
source file, RealProducer runs through the entire source video once to gather
information about how best to encode the streaming clip. It then makes a
second pass to encode the streams. Two-pass encoding can substantially
increase clip quality, but it requires more encoding time. The first pass takes
about as long as it would to encode the source file for one target audience.
Although two-pass encoding helps when you use constant bit rate encoding, it
provides greater benefit for variable bit rate (VBR) encoding, described in
“Variable Bit Rate Video” on page 66. With two pass encoding, RealProducer
can analyze the entire video file to determine how best to vary the playback bit
rate through the length of the clip. Without two-pass encoding, RealProducer
sequentially analyzes small sections of the source file during encoding,
creating a string of VBR sections within the clip.
80
CHAPTER 5: Producing Video
Tip: Use two-pass encoding whenever you encode from a
digitized file. Turn it off only if you must decrease the
encoding time. When you use live input, RealProducer
deactivates two-pass encoding automatically.
For More Information: The section “Using Two-Pass Encoding”
on page 99 explains how to disable two-pass encoding through
the graphical application. See “Job Properties” on page 304 for
information about setting this feature directly in the job file.
The section “Disable Two-Pass Encoding (-dt)” on page 281
explains how to override this feature using the command-line
application.
Encoding Complexity Modes
RealProducer uses encoding complexity modes of low, medium , and high that
affect the RealVideo 9 and RealVideo 10 codecs, as well as the RealAudio
lossless codec. The default value of high produces the best possible results, but
also requires the most processing, resulting in the longest encoding times.
Lowering the complexity level to medium or low results in faster encoding
times, but reduced visual quality (for video) or a larger file size (for lossless
audio).
With RealProducer Plus, the complexity mode for video encoding is userdefinable for each audience template through the template’s advanced video
options. You can also set the complexity for video or lossless audio through
the command line, and capture the complexity setting to a job file. Note the
following about the encoding complexity settings:
• RealVideo
10 set to the low encoding complexity is generally equivalent in
quality and encoding time to RealVideo 9 set to the high encoding
complexity.
• For
live broadcasts, the load management feature reduces the encoding
complexity automatically as needed, so you can keep the encoding
complexity set to the default value of high . See “Broadcast Load
Management” on page 177.
• The
RealProducer 11 command-line application includes an -eco option
that allows you to override the video or lossless audio encoding
complexity mode selected in the audience file. See “Encoding Complexity
Override (-eco)” on page 284.
81
RealProducer 11 User’s Guide
• The
encoding complexity mode affects the file size and streaming rate of
lossless audio clips. For details, refer to “Streaming Rates for Lossless
Audio Clips” on page 49.
For More Information: The section “Creating and Editing
Audiences” on page 155 explains how to edit audience
templates to change the RealVideo complexity mode. See
“Video Stream Properties” on page 353 for information about
setting this feature directly in the audience file.
Video Startup Latency
Each RealVideo clip has a maximum startup latency that determines how long
video requires to display after RealPlayer begins to receive the stream. The
default value of 4 ensures that the video requires no more than four seconds of
buffering once the stream begins. This four-second latency does not include
the time it takes to launch RealPlayer, find the host Helix Server, send the
request, and receive the server’s response, however.
If necessary, you can increase the startup latency in whole values up to 60
seconds. This may be particularly useful for videos that stream at low bit rates
and start out with high action sequences. The longer latency creates a larger
data buffer for the starting sequence, and generally improves the video’s
appearance. Bear in mind, however, that a long latency time may cause restless
viewers to stop the presentation before it begins playback.
Note: The startup latency does not affect how quickly a
downloaded clip begins to play. Increasing the latency value,
however, can improve the visual quality in downloaded clips
that begin with fast-action sequences.
For More Information: The section “Creating and Editing
Audiences” on page 155 explains how to edit audience
templates to change this RealVideo option. See “Video Stream
Properties” on page 353 for information about setting this
feature directly in the audience file.
Maximum Time Between Keyframes
An uncompressed video records all data for each frame of the video. At 15 to
30 frames per second, the amount of data quickly escalates to a very large file
size. When creating a RealVideo clip, RealProducer encodes the full frame data
82
CHAPTER 5: Producing Video
for only certain frames, called keyframes. The frames that follow a keyframe
encode just the data that describes how that frame varies from the preceding
frame. How often keyframes occur depend on the video contents. The first
frame of a new scene typically requires a new keyframe. A fast-action video
typically requires more keyframes than a slow-moving video.
For More Information: The section “Creating and Editing
Audiences” on page 155 explains how to edit audience
templates to change this RealVideo option. See “Video Stream
Properties” on page 353 for information about setting this
feature directly in the audience file.
Benefits of Lowering the Maximum Keyframe Time
As an option for each audience template, you can set the maximum time
between keyframes, which is 10 seconds by default for every audience
template. This means that RealProducer adds a keyframe at least every 10
seconds. Most videos will have more frequent keyframes than this anyway,
depending on the video contents. Under most circumstances, you should not
change this default value. You may want to lower it, though, to provide certain
benefits. Adding more frequent keyframes does the following:
• Reduces
distortion when streaming in a lossy environment. Distortion
results when a frame packet is lost. Using more frequent keyframes helps
to shorten the stretch of video that may be distorted.
• Reduces
the video startup latency during a live broadcast when
broadcasting with Helix Server version 10 or earlier. For more
information, refer to “Video Startup Latency” on page 169.
• Improves
RealPlayer’s ability to seek to specific points in the RealVideo
timeline.
• Adds
flexibility for editing RealVideo clips through the RealMedia editor.
You can cut a RealVideo clip only at a keyframe, for example. Adding
keyframes means more precise control over where the cut occurs.
Costs of Lowering the Maximum Keyframe Time
Because keyframes encode much more data than other frames, lowering the
maximum time between keyframes can either increase the clip file size, or
lower the clip’s image quality. In short, lowering the maximum keyframe rates
provides more resilience against data loss, but degrades the overall
compression efficiency. You should therefore change the keyframe rate only
83
RealProducer 11 User’s Guide
after careful consideration and testing to determine if the change produces
the desired results.
Loss Protection
RealProducer’s loss-protection feature adds error-correction data to RealVideo
packets, helping them maintain quality when they are streamed in lossy
environments. You’ll get more benefit from loss protection when streaming
across the Internet than over an intranet. The feature is turned off by default,
but is safe to turn on for all encoded content because RealProducer adds only
as much error-correction data as it can without lessening the video quality.
Note: For most types of live broadcasts, RealProducer can also
generate error correction packets to protect the stream as it is
delivered to Helix Server. For more information, see “Forward
Error Correction” on page 207.
For More Information: The section “Creating and Editing
Audiences” on page 155 explains how to edit audience
templates to change this RealVideo option. See “Video Stream
Properties” on page 353 for information about setting this
feature directly in the audience file.
84
CHAPTER
Chapter 6:
6
ENCODING CLIPS
This chapter describes how to use the RealProducer graphical
application to encode media clips. It explains how to define a job,
choose audio and video inputs, set encoding options, and select
encoding audiences. Chapter 7 provides details about each audience,
and Chapter 8 explains how to start and monitor the encoding
process.
For More Information: You can also encode clips using the
command-line application, which Chapter 14 describes. For
instructions on sending an encoded stream to a server for
broadcast, refer to Chapter 11.
Using Jobs
Each time you encode a clip or broadcast, RealProducer creates a job that
records the encoding settings. The bottom portion of the RealProducer
graphical application is a job manager that shows the current jobs, and allows
you to perform actions with these jobs, such as running them in sequence.
Optionally, you can save each job to a separate job file, which is an XMLformatted text file that you can manually edit as described in Appendix B.
Once you have saved a job file, you can reload it to apply the same settings to
another clip or broadcast. Although using a job file is optional, you’ll find job
files highly effective if you encode a lot of clips or broadcasts.
Creating a New Job File
Whenever you encode a clip or broadcast, RealProducer creates a job
automatically, letting you choose whether or not to save the job settings to a
file. You can also create a job file without actually encoding any streams. This
allows you to define job profiles to use later. The following steps describe the
basic procedure for creating, editing, and saving a job file.
85
RealProducer 11 User’s Guide
➤
To create a new job:
1. Start a new job file by choosing File>New Job or selecting an audio or
video input to encode, as described in “Selecting Inputs and Destinations”
on page 89. A new, untitled job appears in the job manager, which is
described in “Using the Job Manager” on page 88.
2. Define your encoding settings as described in this chapter. You can set up
your audiences, define clip information, turn on video filters, create input
and output file names, and so forth.
3. If you use RealProducer Plus, you can save your job by choosing File>Save
Job or pressing Ctrl+s. Or, close RealProducer Plus and click Save when
prompted to save the job file.
Note: RealProducer Basic does not allow you to save job files.
4. Using the Save dialog, save your job file anywhere on your computer or
network. The job file is automatically saved with the file extension .rpjf .
Tip: Give the job file a descriptive title that will help you to
remember the purpose of the job. For example, you might
name a job file GeneralVideoForDialUpModems.rpjf .
Note: You can share a saved job by giving the job file to
another RealProducer user. If you defined inputs and outputs,
the user needs access to those same sources and destinations to
run the job.
Using and Modifying Existing Jobs
Once you have saved a job file using RealProducer Plus, you can use it as the
basis for additional encoding jobs. When you load a saved job file, you can
override the job settings on a case-by-case basis. Suppose that a certain job file
has all the basic settings you want, but for a certain clip you also want to turn
on the video noise reduction filter. You just load the job file, turn on the noise
reduction filter through the graphical application, and encode the clip. When
you’re done, you can discard the changes, save them, or write the job to a new
job file.
Tip: RealProducer supplies a number of predefined job files
that are stored in the samples/jobs subdirectory under the
RealProducer main directory. You can use these files as
86
CHAPTER 6: Encoding Clips
templates for your own jobs, or create your own jobs from
scratch using the graphical user interface.
➤
To open and modify an existing job file:
1. If you have recently used the job you want to reuse, choose File>Recent
Jobs>... and select from the list of jobs. Otherwise, give the File>Open Job
command and select the job file.
2. Make any necessary changes, which may include the following:
• If
you defined inputs and outputs in the job file, RealProducer uses
these same inputs and outputs. You can easily change this by deleting
the input and output names and defining new ones, as described in
“Selecting Inputs and Destinations” on page 89.
• It’s
a good idea to double-check the audience settings for the job to
ensure that you are encoding the output properly. For more
information, see “Choosing Audiences” on page 100.
• A job file can record specific clip information, as described in “Setting
Basic Encoding Parameters” on page 97. You may need to add or
change this information each time you encode with an existing job
file.
3. When you finish making necessary changes, choose File>Save Job (Ctrl+s)
to save the changes to the existing job file. If you want to create a new job
file, choose File>Save Job As... (Ctrl+Shift+s) and save the file under a new
file name.
Note: RealProducer Basic does not allow you to save job files.
Changing the Overall Default Settings
RealProducer predefines many default settings, such as the audience used. You
can change the overall defaults to those set in the current job by choosing
Settings>Default Settings>Save Current as Default. This is useful if you encode a
lot of clips the same way. By saving your job settings as the default, you do not
have to open a job file to use those settings. To restore the original, default
settings, select Settings>Default Settings>Restore Original Default.
For More Information: The section “Default Audience and
Options” on page 101 lists the audiences and encoding options
used with the standard, default settings.
87
RealProducer 11 User’s Guide
Running Multiple Jobs
RealProducer Plus can run multiple jobs in batch mode, processing one
output after another. Batch encoding is useful when you have a number of
clips that you want to encode with similar settings. RealProducer Basic can
open just one job file at a time, however.
➤
To encode a batch of jobs:
1. Open or create multiple jobs. Each job appears in the Job Manager, which
is described in “Using the Job Manager” on page 88.
Tip: To create a number of jobs with the same settings, open a
job, then drag-and-drop media files into RealProducer. For
each input file, RealProducer creates a new job with the same
settings as the open job. You can also duplicate a job’s settings
by right-clicking on a job title in the job manager and selecting
Duplicate from the context menu. In this case, you may need to
change the input and output clips.
2. In the job manager, select the jobs that you want to encode. To do this,
click each job while holding down the Ctrl key. You can also select a group
of contiguous jobs by clicking the first job, then clicking the last job while
you hold down the Shift key.
Tip: To remove a job from the batch encoding run, highlight
the job in the job manager and choose Edit>Delete.
3. Encode the batch of jobs by clicking the Encode button. Each job runs in
order.
For More Information: For more about encoding and
monitoring a job, refer to Chapter 8.
Tip: You don’t have to wait for a job to finish encoding to
perform other tasks with RealProducer. While one job runs,
you can add a job or create a new job.
Using the Job Manager
The job manager, which appears at the bottom of the RealProducer main
window, keeps track of the encoding jobs you are using in the current session.
88
CHAPTER 6: Encoding Clips
Through this manager, you can quickly control more than one job at a time.
The job manager display four information fields for each job:
Job
This is the job file name. Until you save the job file, the job name is
Untitled . To change settings for a job, click its job name, then make your
changes.
Status
This field provides a description of the job status, such as Ready, Not
Ready, Analyzing , Encoding , and Done .
Start
This field indicates the time that the job began encoding.
End
This field records the time the job stopped encoding.
Job Manager (detail)
Tip: When you right-click a selected job in the job manager,
RealProducer displays a context menu that allows you to
perform basic functions with the job, such as starting the
encoding, saving the job, and so on.
Selecting Inputs and Destinations
For the media input, you can use digitized files or data from an audio or video
capture device. For outputs, you can specify an encoded clip, a live broadcast
to a server, or both. Chapter 11 explains how to choose a server as a
destination to create a live broadcast.
For More Information: For information about acceptable audio
and video input formats, refer to “Audio and Video Input
Formats” on page 27.
Using a File as the Input
Source files are digitized media files on your hard disk, network, or input
medium such as CD or DVD. If you have video editing software, you can use
that software to edit and optimize the file before encoding it.
89
RealProducer 11 User’s Guide
Tip: For tips about producing high quality input files, refer to
“Audio Optimization” on page 52 and “Video Recording Tips”
on page 70.
➤
To use a digitized file as the encoding input:
1. If you have multiple jobs open, click the appropriate job file name in the
job manager.
2. In the RealProducer main window, click the Input File radio button. Then
click the Browse button to display a standard browsing dialog in which
you can find the file you want to add as the input. You can also display the
browsing dialog by giving the menu command File>Open Input File or the
keyboard shortcut Ctrl+i. By default, the browse dialog shows only the
media files that have acceptable input formats.
Note: You cannot re-encode a RealMedia clip. If you need to
encode a clip for a different audience, for example, you must
use as input the original, digitized file.
3. When you have located the input file through the browsing dialog, click
Open. The field next to the Input File button displays the path and file
name. If you have not already loaded a job file, an untitled job opens in
the job manager.
4. Once you have selected a source, you can click Source Properties to display
information about the input, including the file size and duration, audio
sampling rate and bit depth, and video dimensions and frame rate.
Using Live Audio or Video as the Input
Another source for media input is live or prerecorded audio or video sent to
your computer’s audio or video capture card. You can encode these media
inputs as clips, or send the encoded stream to a server for broadcast.
➤
To capture from an audio device:
1. If you have multiple jobs open, click the appropriate job file name in the
job manager.
2. In the RealProducer main window, click the Devices radio button.
3. Select the audio capture device from the pull-down list. This list provides
the names of all audio captures devices, such as “SoundBlaster,” that
RealProducer has detected.
90
CHAPTER 6: Encoding Clips
4. If you want to adjust the sound recording capabilities of your audio
device, click the Settings button next to the listed audio device. A
submenu lists the available settings dialogs, which may include vendorspecific controls that differ for each audio capture device. For instructions
about using vendor-specific controls, consult the device’s user manual.
5. Select the Recording Mixer menu option. This opens the recording control
window in which you can specify how audio is mixed from different audio
sources.
6. Select which recording inputs to use by checking the Select box for each
input.
7. Adjust the sound level by moving the sliders up or down. When you have
finished setting the values, close the recording control window.
Tip: If the volume is too high, the recorded sound may be
clipped and appear distorted. If the volume is too low, it will be
difficult to hear. Use the audio meter described in “Monitoring
Audio” on page 142 to monitor the level during encoding.
8. If you want to encode the input for a specific amount of time, click the
Duration box and enter the number of hours, minutes, and seconds in the
timing fields. The timer begins when you start the encoding process, and
automatically stops the process when the specified time elapses.
Otherwise, encoding stops when you click the Stop button.
9. Once you have selected a source, you can click Source Properties to display
information about audio properties that will be captured.
➤
To capture from a video device:
1. If you have multiple jobs open, click the appropriate job file name in the
job manager.
2. In the RealProducer main window, select the Devices radio button.
3. Select the video device for your computer from the pull-down list. This list
provides the names of all video captures devices that RealProducer has
detected.
4. If you want to adjust the video recording capabilities, click the Settings
button next video device name. This displays a submenu of available
settings dialogs, which can vary with each capture device. For information
about vendor-specific controls, consult the device’s user manual.
91
RealProducer 11 User’s Guide
5. For most video capture devices, you can select the video dimensions in
pixels. This will determine how large your input video will be. Select the
same size you want for your encoded output clip. For more information,
refer to “Video Encoding Dimensions” on page 73.
6. Select the video format to determine how the capture card converts the
video into digital video. Some common formats include RGB, YUY2,
BTYUV, YUV9, and YUV12.
Tip: Use YUV12 if it is available. This is the native color format
for RealVideo codecs. Choosing this option improves
performance by removing the need to convert the color format
before encoding.
7. Select the video source. Some video capture devices allow you to plug in
various sources, such as an S-video input from a video camera, a cable
television cable, or a Web camera. When you have finished setting the
options, close the window.
8. If you want to encode the input for a specific amount of time, click the
Duration box and enter the number of hours, minutes, and seconds in the
timing fields. The timer begins when you start the encoding process, and
automatically stops the process when the specified time elapses.
Otherwise, encoding stops when you click the Stop button.
9. Once you have selected a source, you can click Source Properties to display
information about video properties that will be captured.
Creating a Destination Clip
You can save your encoded output to a clip, as the following sections describe.
Or, you can send the output to a server for broadcast as described in Chapter
11. A clip or server output is called a destination, and you can save your encoded
input to multiple destinations. For example, you send live input to a server for
broadcast, and simultaneously write it to a clip for archive purposes. The
encoded data sent to each destination is identical.
Note: When you use RealProducer Plus, you can encode any
number of clip and server destinations for the output. With
RealProducer Basic, you can define one clip destination and
one server destination in each job.
92
CHAPTER 6: Encoding Clips
Tip: When you use a job file with the command-line
application, you can specify multiple outputs, which can have
different encoding settings. For example, one output might be
a clip with large dimensions for broadband connections, while
the second output is a clip with smaller dimensions for dial-up
connections. See “Media Profile” on page 334 for more
information.
Modifying a Clip Destination
By default, RealProducer automatically defines an output clip when you select
an input file. The output clip uses the input’s base file name and the
appropriate extension. For example, if you choose movie.mpeg as your input,
RealProducer sets up movie.rv, movie.rm , or movie.rmvb (depending on your
encoding choices) as the output destination, creating the clip in the same
directory as the input.
To modify a clip’s properties, such as its name or output location, double-click
the clip icon in the destinations area. You can also highlight the clip name,
and click the pencil icon below the destinations window. Either action displays
a browse dialog in which you can navigate to the directory where you want to
save the clip. If you rename the clip, you can enter just the base file name.
RealProducer appends the appropriate file extension (.ra , .rv, or .rm for CBR
clips; .rmvb for VBR clips), based on your encoding choices.
For More Information: Through the RealProducer preferences,
you can change the directory where the clip is created, or turn
off the automatic destination feature. See “Changing the File
Location Preferences” on page 151.
Creating a New Destination Clip
The following procedure describes how to create a new RealAudio or
RealVideo clip as a destination for an encoded input file or live capture. It is
generally necessary to encode just one destination clip. All destinations for a
job have identical encoding settings. You can therefore create a second clip by
duplicating the output clip through your operating system.
➤
To define a clip as a destination:
1. If you have multiple jobs open, click the appropriate job file name in the
job manager.
93
RealProducer 11 User’s Guide
2. Select File>Add File Destination. You can also click the RealPlayer icon in
the destinations area. This opens a save dialog.
3. Browse to the directory where you want to save the output clip.
4. Enter the base file name. RealProducer automatically adds the correct file
extension (.ra , .rv, or .rm for CBR clips; or .rmvb for VBR clips), based on
your encoding choices.
For More Information: For background on the possible file
extensions, see “Single and Multiple Destinations” on page 19.
5. Click Save. Your new destination appears in the destinations area. If a
destination already exists for the job, the new destination appear below it.
Deleting a Destination Clip
To delete a destination clip, select the job in the job manager if multiple jobs
are open. Next, click the clip name in the destination window to highlight it.
Then, either press Delete on your keyboard or click the trash can icon below
the destination window.
Adding Clip Information
RealProducer can encode clip information directly into a clip or broadcast.
This is highly recommended for all jobs because the clip information tells the
viewer about the stream and can help search engines categorize clip. If you are
running multiple jobs, first choose the job you want by clicking the job name
in the job manager. Then, either choose Settings>Show Clip Information or
click the Clip Information button. You can then enter the following
information:
94
Title
In this field, enter the title of the clip or broadcast. Because this title
appears in the RealPlayer interface, it is best to use a short title.
Author
This field holds the name of the person or organization that created
the clip.
Copyright
Here, enter the copyright string, such as (c) 2004 ABC Corporation .
Keywords
The keywords field holds words that certain audio and video search
engines can read to categorize the clip. Add a few words that will help
your audience search for your clip. Separate each term with spaces.
Unless you are adding a proper name, use lowercase for each term.
Avoid overly generic terms such as video or music .
CHAPTER 6: Encoding Clips
Description
This field holds a description of the clip that appears when the viewer
displays extended clip information. This allows you to describe the
clip in detail without creating a long title.
Rating
Selecting a rating in the pull-down list is highly recommended for any
content not intended for all age groups. You can choose one of the
following. No Rating is the default:
–No Rating
–All Ages
–Older Children
–Younger Teens
–Older Teens (15 and up)
–Adult Supervision Recommended
–Adults Only
Tip: Using the RMEvents utility described in Chapter 13, you
can add information to a clip that has already been encoded.
You can also specify clip information through a Ram file, as
described in Introduction to Streaming Media.
How Clip Information Displays in RealPlayer
RealNetworks highly recommends that you always include a title. If a title is
not encoded in the clip or specified through other means (such as a Ram file),
RealPlayer displays the clip’s file name, which is of less use to the viewer than
the title. The clip information appears in the following areas of RealPlayer:
• The
title appears in the title bar above the RealPlayer playback controls.
• Title
and author information appears in the “Now Playing” list, which is
part of the RealPlayer media browser pane. Viewers can double-click a clip
title to play that clip.
• Title
information appears in the recent clips list at the bottom of the
RealPlayer File menu.
• Extended
clip information appears when the viewer chooses File>Clip
Properties>View Clip Info (Ctrl+i).
Filtering Video Input
When you encode video input, you can use a number of filters that can
improve the quality of the video that comes from your source. All video filters
are optional. If you are working with multiple jobs, select the appropriate job
95
RealProducer 11 User’s Guide
in the job manager. Then, display the video filters palette by clicking the Video
Filters button or selecting Settings>Show Video Filters (Ctrl+f).
Video Filters
Tip: Changes to the video filters are recorded immediately. You
do not need to close the palette to save your changes for the
job. You can leave the palette open as you continue to set up a
job or switch to another job.
Cropping
The cropping feature, available only on RealProducer Plus, allows you to crop
out portions along the edge of a video. Cropping removes any unwanted areas,
and can reduce the amount of data encoded, boosting clip quality.
To crop a video, check the Cropping box. You can then set the cropping
borders by clicking and dragging the yellow lines on the source video image.
Or, enter cropping pixel values directly into the following boxes:
96
Left
Represents the number of pixels from the left edge of the video to start the
cropping. You can specify up to 32 pixels less than the total width.
Width
Defines the total width of the cropped video, measured from the point set
by the Left property. If the width value is not a multiple of 4, the next lower
multiple is used. For example, a value of 162 results in a video 160 pixels
wide.
Top
Sets the number of pixels from the top edge of the video to start the
cropping. You can specify up to 32 pixels less than the total height.
Height
Indicates the total height of the video, measured from the point set by the
Top property. If the value is not a multiple of 4, the next lower multiple is
used. For example, a value of 127 results in a video 124 pixels high.
CHAPTER 6: Encoding Clips
For More Information: You can scale a cropped or non-cropped
video smaller or larger as described in “Resizing the Video” on
page 100. Refer to “Video Encoding Dimensions” on page 73
for recommended video sizes.
Black-Level Correction
Check the Black level correction box to increase the video contrast by making
black areas darker. This filter is useful if the source video appears washed out.
De-Interlace and Inverse-Telecine
The de-interlace and inverse-telecine filters remove artifacts that may occur in
videos larger than 320-by-240, and NTSC-format video transferred from film,
respectively. If you need to use them, click the Automatic radio button to have
RealProducer apply the filters only if needed. To use just one of the filters,
check the Manual button and select the filter you want.
For More Information: The sections “De-interlace Filter” on page
79 and “Inverse-Telecine Filter” on page 78 explain these filters.
Video Noise
Video noise appears as static (“snow”) in your input video. The noise filter
removes these artifacts prior to encoding. Do not apply this filter if the input
does not contain noise because the filter can degrade the quality of
undistorted video. You can choose the Low setting if the static is light, or the
High setting if it is more pronounced.
For More Information: For more on the difference between low
and high noise settings, refer to “Noise Filters” on page 77.
Setting Basic Encoding Parameters
When you create a new job, you should set a few basic parameters that affect
the overall encoding. If you have multiple jobs open, select the appropriate job
in the job manager as described in “Using the Job Manager” on page 88. After
you set your input, click the Audiences button or choose Settings>Show
Audiences (Ctrl+e). This opens the Audiences palette. You set the basic
parameters in the top half of the palette. In the bottom half, you select your
audiences as described in “Choosing Audiences” on page 100.
97
RealProducer 11 User’s Guide
Encoding Settings on Upper Half of Audiences Palette
Tip: Changes to the basic settings are recorded immediately.
You do not need to close the palette to save your changes for
the job. You can leave the palette open as you continue to set
up a job or switch to another job.
Setting Audio Parameters
The Audio Mode setting indicates the type of audio being encoded: Voice ,
Music , or No Audio . You should ensure that this is set correctly for each job. For
example, using the Voice setting for a musical soundtrack can degrade the
music quality because a voice codec does not capture the wider frequency
range found in music.
In general, you should leave the Use high quality resampler for audio box
checked. This provides the best results if the audio input does not have the
correct sampling rate for the codec, as described in “Sampling Rate” on page
38. Unchecking this box speeds processing time, which may be necessary
during a live broadcast. Doing so may lower the quality of the audio, though.
Tip: If your audio content is mixed, use the Music setting to
capture the greatest frequency range. If you are encoding at a
bit rate of 256 Kbps or higher, you may want to choose Music
even for voice-only content. This generally provides more
bandwidth for the soundtrack, improving the quality. It takes
away bandwidth from the visual track, however.
98
CHAPTER 6: Encoding Clips
Choosing Video Options
The Video Mode pull-down list on the Audiences palette affects how video is
encoded. The default value of Normal Motion Video produces the best results for
most audiences. You can leave this value set even when you encode an audioonly clip because RealProducer automatically detects that no visual track is
present. You should select the No Video option only if you want to encode just
the audio portion from the video input.
At slow streaming rates for modem audiences, you can choose one of the
following options when encoding a video. These options primarily affect fastaction videos:
• Choose Sharpest Image
if you want to encode the crispest image. The frame
rate will be lower, though, making the video jerkier. For more
information, see “Visual Clarity” on page 60.
• Choose Smoothest Motion
if you want to keep the frame rate as high as
possible. The image may become more blurry, however. For details, refer
to “Encoded Frame Rates” on page 59.
• If
you have a large video (320-by-240 or larger), you can resize the video
smaller when streaming at low bandwidths. Or, you can choose Slide Show
to encode a frame every few seconds. This creates a slide show with no
motion, but the highest possible image quality.
Selecting a RealVideo Codec
In the Video codec pull-down list, you select the RealVideo codec to use. The
section “RealVideo Codecs” on page 61 explains the codec differences. The
default is RealVideo 10, which provides the highest possible video quality and
is compatible with RealOne Player and later. RealVideo 10 is the only option
on RealProducer Basic. With RealProducer Plus, you can choose RealVideo 9
or RealVideo 8.
Tip: Use RealVideo 8 to create videos that are compatible with
RealPlayer 8 and later on desktop machines, as well as with
RealPlayer for mobile devices such as smartphones and
personal digital assistants.
Using Two-Pass Encoding
In the Audiences palette, you can turn off two-pass encoding, which the
section “Two-Pass Encoding” on page 80 describes. RealNetworks
99
RealProducer 11 User’s Guide
recommends that you keep two-pass encoding enabled, turning it off only if
you need to decrease your encoding time. Video quality will decline, however.
Tip: Two-pass encoding cannot be used with live broadcasts
and is automatically disabled. You therefore do not need to
uncheck this option when broadcasting.
Resizing the Video
Normally, the encoded video uses the same height and width dimensions as
the video input. If you use RealProducer Plus and you want to change the size
of the encoded video, check the Resize video to box and enter a pixel value for
the new height and width. You can scale the video smaller, which may be
necessary when streaming to slow bandwidths, as described in “Video
Capture” on page 71. Note that if you scale the output video much larger than
the input size, it may appear blurry.
If you keep the Maintain aspect ratio box checked, you can enter just the height
or width value for the resize. RealProducer automatically calculates the other
value to maintain the ratio between the two dimensions. By unchecking this
box, you can enter width and height values independently. If you do not
maintain the aspect ratio, however, the output will be distorted.
RealNetworks recommends that you keep the High quality resize box checked.
This produces superior results, but significantly increases the encoding time.
Uncheck the box only if you need to decrease the encoding time. Note that the
video quality will decline, however. The section “Resize Filter” on page 77
provides background information about resizing.
Note: You can also crop out portions of the video input before
resizing the video. See “Filtering Video Input” on page 95 for
more information. Refer to “Video Encoding Dimensions” on
page 73 for recommended video sizes.
Choosing Audiences
Before you encode a clip or broadcast, you choose the audience or audiences
to use. For each audience, RealProducer encodes a separate stream based on
the speed of the network connection or a certain level of quality that you want
to preserve. For example, RealProducer encodes video at 34 Kbps for 56 Kbps
dial-up modem users, and at 225 Kbps for 256 Kbps DSL or Cable Modem
100
CHAPTER 6: Encoding Clips
users. RealProducer predefines a variety of audience templates. The following
sections explain how to add audiences to encoding jobs.
For More Information: Chapter 7 provides details about each
audience that you can choose. See “Creating and Editing
Audiences” on page 155 for information about creating your
own audience templates.
Default Audience and Options
If you do not choose your own audiences for an encoding job, RealProducer
uses a set of default encoding values designed for broadband connections. The
clip or broadcast will be compatible with RealOne Player and later. The
following are the default values:
General settings:
SureStream CBR clip for multiple audiences
Two-pass encoding
No predefined clip information
Audience:
256k DSL or Cable
Audio encoding:
Music codecs (codec used depends on the audience)
High-quality audio resampling
Video encoding:
RealVideo 10
Normal motion video
No video resizing
No video prefilters
High encoding complexity
Maximum start-up latency of 4 seconds
Tip: The section “Changing the Overall Default Settings” on
page 87 explains how to change these default settings.
Adding an Audience to a Job
If you have multiple jobs open, select the appropriate job in the job manager
as described in “Using the Job Manager” on page 88. Then click the Audiences
button or choose Settings>Show Audiences (Ctrl+e). This opens the Audiences
palette. In the top half of this palette, you choose basic encoding settings as
described in “Setting Basic Encoding Parameters” on page 97. In the bottom
half, you select your audiences.
101
RealProducer 11 User’s Guide
Audience Selection on Lower Half of Audiences Palette
The left-hand section of the Audiences palette lists the available audience
templates. Each template has a name that describes the audience, such as 56k
Dial-up, and lists the template’s average bandwidth usage. The right-hand
section of the palette lists the audiences chosen for the job. By default,
RealProducer uses the audience described in the section “Default Audience
and Options” on page 101 to create a SureStream clip.
To add an audience to the job, click the audience name in the left-hand
windows and click the right arrow button. To add multiple audiences to the
same job, you can choose only the audiences not listed as variable bit rate
(VBR) audiences. To delete an audience from the job, highlight the template
name in the right-hand section, and click the trash can icon or press your
keyboard’s Delete key.
Note: Using RealProducer Plus, you can add any number of
CBR audiences to a SureStream clip. With RealProducer Basic,
you are limited to three audiences.
Tip: To view the properties for an audience added to the job,
double-click the audience name. Or, highlight the name and
click the pencil icon. Chapter 7 lists the properties for each
audience.
102
CHAPTER
Chapter 7:
CHOOSING AUDIENCES
7
This chapter lists the properties of the predefined audiences. This
information will help you to choose which audiences to use when
encoding a clip or broadcast with the graphical application, as
described in “Choosing Audiences” on page 100. You can also use
audience files when encoding with the command-line application,
which Chapter 14 explains. Appendix C describes the syntax of the
audience files, which you can edit manually.
Understanding Audiences
A single audience defines a range of parameters used to encode a clip or
broadcast. It defines the audio codecs, the video codec, the maximum frame
rate, and the maximum streaming bandwidth, for example. You can use the
same audience to encode a video clip or an audio-only clip.
Audio Encoding for Audiences
Each audience setting defines four possible audio codecs. RealProducer uses
one of those codecs depending on the type of audio used as the input:
• For
a voice-only audio clip, an audience uses a voice codec. If the input is
stereo surround or 5.1 multichannel audio, however, it uses a stereo
surround or multichannel music codec to preserve audio data in the extra
channels. RealProducer uses this codec when the clip is audio-only and
you select Voice as the audio mode.
• For
a video with voice-only narration, an audience uses a voice, stereo
surround, or multichannel codec as appropriate. Because a video clip uses
the majority of its bandwidth for its visual track, RealProducer generally
uses a lower-bandwidth audio codec than when it encodes an audio-only
clip. RealProducer uses this codec with a video clip when you select Voice
as the audio mode.
103
RealProducer 11 User’s Guide
• For
a music audio clip, an audience uses a mono music, stereo music,
stereo surround, or 5.1 multichannel codec depending on the input and
the streaming bandwidth. RealProducer uses this codec when the clip is
audio-only and you select Music as the audio mode.
• For
a video with music, an audience uses a mono music, stereo music,
stereo surround, or 5.1 multichannel codec depending on the input. The
chosen codec is generally geared for a lower streaming speed than with a
music-only clip, though, to preserve bandwidth for the visual track.
RealProducer uses this codec with a video clip when you select Music as the
audio mode.
For More Information: The section “Setting Audio Parameters”
on page 98 explains how to set the Voice or Music audio mode
through the graphical application. For the command-line
application, you use the -am option, described in the section
“Audio Mode (-am)” on page 281. See “Media Profile” on page
334 for information about how the stream context is set in a
job file.
Note: The audio codecs partially determine which versions of
RealPlayer can play your clip or broadcast. The tables in this
chapter summarize player compatibility. For specific
information on a codec-by-codec basis, refer to “RealAudio
Codecs” on page 37.
Video Encoding for Audiences
The audience defines a default video codec, which is RealVideo 10 for desktop
streaming and download audiences, and RealVideo 8 for mobile device
audiences. However, you can use RealVideo 8, 9, or 10 with any audience. To
change the video codec choice, you can do one of the following:
• Edit
the audience file manually as described in Appendix C.
• Override the codec default when encoding with the graphical-application,
as described in “Selecting a RealVideo Codec” on page 99.
• Override
the codec default when encoding with the command-line
application, as described in “Video Codec Override (-vco)” on page 284.
Note: The video codec partially determines which versions of
RealPlayer can play your clip or broadcast. The tables in this
104
CHAPTER 7: Choosing Audiences
chapter summarize player compatibility. For specific
information on a codec-by-codec basis, refer to “RealVideo
Codecs” on page 61.
Which Audiences Should I Use?
RealProducer provides a number of predefined audiences designed to fit a
variety of streaming and downloading requirements. The following sections
guide you to the appropriate set of audiences to use. As you explore the
audience choices, keep two important points in mind:
• With
variable bit rate (VBR) audiences, you can choose only one audience
for each job. All audiences not marked as “VBR” are constant bit rate
(CBR) templates. You can use multiple CBR audiences in a job.
• As
described in “Creating and Editing Audiences” on page 155, you can
modify existing audiences or define your own audiences. Before doing
this, however, verify that the predefined audiences do not meet your
needs. You should also be familiar with the audio and video issues
described in Chapter 4 and Chapter 5, respectively.
Streaming to Low Bandwidth (Modem) Audiences
The audiences described in “Low-Bandwidth Streaming Audiences” on page
106 are designed to stream to low-bandwidth viewers, such as RealPlayer users
connecting to the Internet through modems. Because these audiences are
SureStream-compatible, you can encode several of them into a single clip. You
can also add audiences from the set listed in “High-Bandwidth Streaming
Audiences” on page 113.
Creating Streaming or Downloadable Clips for Broadband Audiences
The audiences described in “High-Bandwidth Streaming Audiences” on page
113 are designed for broadband streaming connections such as digital
subscriber line (DSL) and cable modems. Like the audiences described in
“Low-Bandwidth Streaming Audiences” on page 106, these audiences are
SureStream-compatible, so you can encode several of them into a single clip.
For a downloadable clip, a VBR audience is the best choice. You can use VBR
audiences for high-bandwidth streaming clips, too. However, you can choose
only a single audience for each clip or broadcast when you use an audience
listed in one of the following sections:
105
RealProducer 11 User’s Guide
• The
audiences described in the section “Variable Bit Rate Download
Audiences” on page 120 create the most general-purpose clips. The audio
will be encoded as mono or stereo, depending on the input.
• You can encode downloadable clips based on a quality metric by using the
audiences listed in the section “Quality Download Audiences” on page
125. These audiences also produce mono or stereo audio output.
• The
audiences described in “Stereo Surround Audiences” on page 129
encode high-quality downloadable clips that preserve stereo surround
information in the audio input.
• Use
the audiences listed in the section “Multichannel Audio Audiences”
on page 133 to create downloadable clips from input that includes
discrete, multichannel audio.
• For
faithful encoding of standard mono or stereo input in audio-only
clips, use the lossless codec described in “Lossless Audio” on page 138.
Streaming or Downloading to Mobile Devices
The audiences described in “Mobile Device Audiences” on page 117 are
tailored to the needs of mobile devices such as smartphones and personal
digital assistants.
Low-Bandwidth Streaming Audiences
This set of audiences encodes audio or video for streaming to RealPlayer
across low-bandwidth Internet and intranet connections. Because these
audiences are SureStream-compatible, you can encode multiple audiences into
a clip, as explained in “SureStream CBR Clips” on page 63. That same clip can
also contain one or more high-bandwidth audiences listed in the section
“High-Bandwidth Streaming Audiences” on page 113.
Substream Audiences
The low-bandwidth streaming audiences include three substreams. These
substreams are specifically intended as backups for dial-up modem audiences
in cases where available bandwidth declines:
106
• 12k
Substream for 28k Dial-up
• 16k
Substream for 28k Dial-up
• 26k
Substream for 56k Dial-up
CHAPTER 7: Choosing Audiences
Primary Audiences
You can choose any of the following audiences for your primary streams, or as
backup streams for other higher-bandwidth, primary audiences:
• 28k
Dial-up
• 56k
Dial-up
• 64k
Single ISDN
• 128k
Dual ISDN
• 150k
LAN
12k Substream for 28k Dial-up
This audience is used as a substream for the 28k Dial-up audience. You can
include it, along with the 16k Substream for 28k Dial-up, when encoding a
SureStream clip for modem users.
12k Substream Audience
Setting or Property
Value
Player compatibility
RealOne Player and later with RealVideo 9 or 10,
RealPlayer 8 and later with RealVideo 8,
RealPlayer G2 and later for audio-only voice or music
Total bandwidth
12 Kbps
Target video frame rate
15 fps
Average video bandwidth
6 or 7 Kbps depending on audio choice
Recommended video sizes
176-by-132
RealVideo codec
RealVideo 10
SureStream compatible
yes
Recommended substreams
none
Audio input
mono or stereo voice or music
Audio output
mono voice, mono music
Voice codec for video
5 Kbps voice
Music codec for video
6 Kbps Music - RealAudio
Voice codec for audio-only
8.5 Kbps voice
Music codec for audio-only
11 Kbps Music - RealAudio
107
RealProducer 11 User’s Guide
16k Substream for 28k Dial-up
This audience is a substream for the 28k Dial-up audience. You can include it,
along with the 12k Substream for 28k Dial-up, when encoding a SureStream
clip for modem users.
16k Substream Audience
Setting or Property
Value
Player compatibility
RealOne Player and later with RealVideo 9 or 10,
RealPlayer 8 and later with RealVideo 8,
RealPlayer G2 and later for audio-only voice or music
Total bandwidth
16 Kbps
Target video frame rate
15 fps
Average video bandwidth
10 or 11 Kbps depending on audio choice
Recommended video sizes
176-by-132
RealVideo codec
RealVideo 10
SureStream compatible
yes
Recommended substreams
12k Substream for 28k Dial-up
Audio input
mono or stereo voice or music
Audio output
mono voice, mono music
Voice codec for video
5 Kbps voice
Music codec for video
6 Kbps Music - RealAudio
Voice codec for audio-only
16 Kbps voice
Music codec for audio-only
16 Kbps Music - RealAudio
26k Substream for 56k Dial-up
This is a substream for the 56k Dial-up audience.
26k Substream Audience
Setting or Property
Value
Player compatibility
RealOne Player and later with RealVideo 9 or 10,
RealPlayer 8 and later with RealVideo 8,
RealPlayer G2 and later for audio-only voice or music
Total bandwidth
26 Kbps
Target video frame rate
15 fps
Average video bandwidth
18 or 19 Kbps depending on audio choice
(Table Page 1 of 2)
108
CHAPTER 7: Choosing Audiences
26k Substream Audience (continued)
Setting or Property
Value
Recommended video sizes
176-by-132 to 240-by-180
RealVideo codec
RealVideo 10
SureStream compatible
yes
Recommended substreams
16k Substream for 28k Dial-up
Audio input
mono or stereo voice or music
Audio output
mono voice, mono music
Voice codec for video
6.5 Kbps voice
Music codec for video
8 Kbps Music - RealAudio
Voice codec for audio-only
16 Kbps voice
Music codec for audio-only
20 Kbps Music - RealAudio
(Table Page 2 of 2)
28k Dial-up
The 28 Kbps dial-up audience is the primary audience for users connecting to
the Internet on 28.8 Kbps modems.
28k Dial-up Audience
Setting or Property
Value
Player compatibility
RealOne Player and later with RealVideo 9 or 10,
RealPlayer 8 and later with RealVideo 8,
RealPlayer G2 and later for audio-only voice or music
Total bandwidth
20 Kbps
Target video frame rate
15 fps
Average video bandwidth
12 or 13 Kbps depending on audio choice
Recommended video sizes
176-by-132
RealVideo codec
RealVideo 10
SureStream compatible
yes
Recommended substreams
12k Substream for 28k Dial-up, 16k Substream for
28k Dial-up
Audio input
mono or stereo voice or music
Audio output
mono voice, mono music
Voice codec for video
6.5 Kbps voice
Music codec for video
8 Kbps Music - RealAudio
(Table Page 1 of 2)
109
RealProducer 11 User’s Guide
28k Dial-up Audience (continued)
Setting or Property
Value
Voice codec for audio-only
16 Kbps voice
Music codec for audio-only
20 Kbps Music - RealAudio
(Table Page 2 of 2)
56k Dial-up
The 56 Kbps dial-up audience is the primary audience for users connecting to
the Internet on 56 Kbps modems. This audience setting encodes stereo music
for an audio-only clip. Lower-bandwidth substreams, such as the 26k
Substream for 56k Dial-up, encode all audio output as mono. So if a 56 Kbps
modem user is listening to a stereo music clip, a drop in bandwidth causes a
shift to mono music.
56k Dial-up Audience
110
Setting or Property
Value
Player compatibility
RealOne Player and later with RealVideo 9 or 10,
RealPlayer 8 and later with RealVideo 8,
RealPlayer G2 and later for audio-only voice or music
Total bandwidth
34 Kbps
Target video frame rate
15 fps
Average video bandwidth
26 or 27 Kbps depending on audio choice
Recommended video sizes
176-by-132 to 240-by-180
RealVideo codec
RealVideo 10
SureStream compatible
yes
Recommended substreams
26k Substream for 56k Dial-up, 16k Substream for
28k Dial-up
Audio input
mono or stereo voice or music
Audio output
mono voice, mono music with video, stereo music for
audio-only
Voice codec for video
6.5 Kbps voice
Music codec for video
8 Kbps Music - RealAudio
Voice codec for audio-only
32 Kbps voice
Music codec for audio-only
32 Kbps Stereo Music High Response - RealAudio
CHAPTER 7: Choosing Audiences
64k Single ISDN
This is the primary audience for single-line ISDN. Although DSL lines and
cable modems are replacing ISDN use in many countries, this audience can act
as a substream for higher-bandwidth encodings.
64k Single ISDN Audience
Setting or Property
Value
Player compatibility
RealOne Player and later with RealVideo 9 or 10,
RealPlayer 8 and later with RealVideo 8,
RealPlayer G2 and later for audio-only voice or music
Total bandwidth
50 Kbps
Target video frame rate
15 fps
Average video bandwidth
39 or 41 Kbps depending on audio choice
Recommended video sizes
176-by-132 to 240-by-180
RealVideo codec
RealVideo 10
SureStream compatible
yes
Recommended substreams
56k Dial-up, 26k Substream for 56k Dial-up
Audio input
mono or stereo voice or music
Audio output
mono voice, mono music with video, stereo music for
audio-only
Voice codec for video
8.5 Kbps voice
Music codec for video
11 Kbps Music - RealAudio
Voice codec for audio-only
32 Kbps voice
Music codec for audio-only
44 Kbps Stereo Music High Response - RealAudio
111
RealProducer 11 User’s Guide
128k Dual ISDN
This is the primary audience for dual-line ISDN. Although DSL lines and
cable modems are replacing ISDN use in many countries, this audience can act
as a substream for higher-bandwidth encodings.
128k Dual ISDN Audience
112
Setting or Property
Value
Player compatibility
RealOne Player and later with RealVideo 9 or 10,
RealPlayer 8 and later with RealVideo 8,
RealPlayer 8 and later for audio-only music,
RealPlayer G2 and later for audio-only voice
Total bandwidth
100 Kbps
Target video frame rate
15 fps
Average video bandwidth
79 or 84 Kbps depending on audio choice
Recommended video sizes
176-by-132 to 240-by-180
RealVideo codec
RealVideo 10
SureStream compatible
yes
Recommended substreams
64k Single ISDN, 56k Dial-up
Audio input
mono or stereo voice or music
Audio output
mono voice, mono music with video, stereo music for
audio-only
Voice codec for video
16 Kbps voice
Music codec for video
20 Kbps Music - RealAudio
Voice codec for audio-only
64 Kbps voice
Music codec for audio-only
96 Kbps Stereo Music - RealAudio
CHAPTER 7: Choosing Audiences
150k LAN
This audience is designed for a local area network (LAN) such as a corporate
intranet. This is the lowest-speed audience that uses stereo music for video
soundtracks, and that can encode more than 15 frames of video per second.
150k LAN Audience
Setting or Property
Value
Player compatibility
RealOne Player and later with RealVideo 9 or 10,
RealPlayer 8 and later with RealVideo 8,
RealOne Player and later for audio-only music,
RealPlayer G2 and later for audio-only voice
Total bandwidth
150 Kbps
Target video frame rate
30 fps
Average video bandwidth
118 Kbps
Recommended video sizes
176-by-132 to 240-by-180
RealVideo codec
RealVideo 10
SureStream compatible
yes
Recommended substreams
128k Dual ISDN, 64k Single ISDN
Audio input
mono or stereo voice or music
Audio output
mono voice, stereo music
Voice codec for video
32 Kbps voice
Music codec for video
32 Kbps Stereo Music High Response - RealAudio
Voice codec for audio-only
64 Kbps voice
Music codec for audio-only
128 Kbps Stereo Music - RealAudio 10
High-Bandwidth Streaming Audiences
This set of audiences encodes audio or video for streaming to RealPlayer
across broadband Internet connections. Use any of the following audiences, or
a combination of several audiences, to create general-purpose clips that
stream at high bandwidths:
• 256k
DSL or Cable
• 384k
DSL or Cable
• 512k
DSL or Cable
• 768k
DSL or Cable
113
RealProducer 11 User’s Guide
Note: Because these audiences are SureStream-compatible, you
can also encode in the same clip the audiences listed under
“Low-Bandwidth Streaming Audiences” on page 106. A single
clip for narrowband and broadband streams works well for
audio-only clips. With video, however, you may want to use
different width and height dimensions for low-speed and highspeed audiences. For more information, refer to “Video
Capture” on page 71.
Tip: Although you can also use these audiences when creating
clips intended for download, the audiences described in the
section “Variable Bit Rate Download Audiences” on page 120
are better suited for this purpose.
256k DSL or Cable
This audience targets 256 Kbps DSL and cable modem users. This is typically
the lowest speed at which these services are offered.
256k DSL or Cable Audience
Setting or Property
Value
Player compatibility
RealOne Player and later with RealVideo 9 or 10,
RealPlayer 8 and later with RealVideo 8,
RealOne Player and later for audio-only music,
RealPlayer G2 and later for audio-only voice
Total bandwidth
225 Kbps
Target video frame rate
30 fps
Average video bandwidth
180 or 193 Kbps depending on audio choice
Recommended video sizes
320-by-240
RealVideo codec
RealVideo 10
SureStream compatible
yes
Recommended substreams
150k LAN, 128k Dual ISDN
Audio input
mono or stereo voice or music
Audio output
mono voice, stereo music
Voice codec for video
32 Kbps voice
Music codec for video
44 Kbps Stereo Music High Response - RealAudio
(Table Page 1 of 2)
114
CHAPTER 7: Choosing Audiences
256k DSL or Cable Audience (continued)
Setting or Property
Value
Voice codec for audio-only
64 Kbps voice
Music codec for audio-only
256 Kbps Stereo Music - RealAudio 10
(Table Page 2 of 2)
384k DSL or Cable
This audience targets 384 Kbps DSL and cable modem users. It provides the
highest-quality, audio-only encoding for a general streaming audience.
Higher-speed audiences improve the video and audio-with-video quality, but
will have the same audio-only quality.
384k DSL or Cable Audience
Setting or Property
Value
Player compatibility
RealOne Player and later with RealVideo 9 or 10,
RealPlayer 8 and later with RealVideo 8,
RealOne Player and later for audio-only music,
RealPlayer G2 and later for audio-only voice
Total bandwidth
350 Kbps
Target video frame rate
30 fps
Average video bandwidth
286 Kbps
Recommended video sizes
320-by-240
RealVideo codec
RealVideo 10
SureStream compatible
yes
Recommended substreams
256k DSL or Cable, 150k LAN
Audio input
mono or stereo voice or music
Audio output
mono or stereo voice, stereo music
Voice codec for video
64 Kbps voice
Music codec for video
64 Kbps Stereo Music - RealAudio
Voice codec for audio-only
96 Kbps Stereo Music - RealAudio
Music codec for audio-only
320 Kbps Stereo Music - RealAudio 10
115
RealProducer 11 User’s Guide
512k DSL or Cable
This audience targets 512 Kbps (one-half Megabit) DSL and cable modem
users. The music-with-video quality is better than the 384k DSL or Cable
audience, but the audio-only quality is the same.
512k DSL or Cable Audience
Setting or Property
Value
Player compatibility
RealOne Player and later with RealVideo 9 or 10,
RealPlayer 8 and later with RealVideo 8,
RealOne Player and later for audio-only music,
RealPlayer G2 and later for audio-only voice
Total bandwidth
450 Kbps
Target video frame rate
30 fps
Average video bandwidth
353 or 386 Kbps depending on audio choice
Recommended video sizes
320-by-240 or larger
RealVideo codec
RealVideo 10
SureStream compatible
yes
Recommended substreams
384k DSL or Cable, 256k DSL or Cable
Audio input
mono or stereo voice or music
Audio output
mono or stereo voice, stereo music
Voice codec for video
64 Kbps voice
Music codec for video
96 Kbps Stereo Music - RealAudio
Voice codec for audio-only
96 Kbps Stereo Music - RealAudio
Music codec for audio-only
320 Kbps Stereo Music - RealAudio 10
768k DSL or Cable
This audience targets 768 Kbps (three-quarters Megabit) DSL and cable users.
For audio-only encoding, the audio quality is the same as the 384k DSL or
116
CHAPTER 7: Choosing Audiences
Cable audience. With video, the audio quality is the same as the 512k DSL or
Cable audience.
768k DSL or Cable Audience
Setting or Property
Value
Player compatibility
RealOne Player and later with RealVideo 9 or 10,
RealPlayer 8 and later with RealVideo 8,
RealOne Player and later for audio-only music,
RealPlayer G2 and later for audio-only voice
Total bandwidth
700 Kbps
Target video frame rate
30 fps
Average video bandwidth
603 or 646 Kbps depending on audio choice
Recommended video sizes
320-by-240 or larger
RealVideo codec
RealVideo 10
SureStream compatible
yes
Recommended substreams
512k DSL or Cable, 384k DSL or Cable
Audio input
mono or stereo voice or music
Audio output
mono or stereo voice, stereo music
Voice codec for video
64 Kbps voice
Music codec for video
96 Kbps Stereo Music - RealAudio
Voice codec for audio-only
96 Kbps Stereo Music - RealAudio
Music codec for audio-only
320 Kbps Stereo Music - RealAudio 10
Mobile Device Audiences
The mobile device audiences are designed for streaming media to
smartphones that include RealOne Player (or later) for mobile devices, as well
as for creating download clips for personal digital assistants such as Palm
devices and Pocket PC. These audiences have two features meant to
accommodate the slower processors on these devices:
• The
maximum frame rate for these audiences is lower than the frame rate
for other streaming and download audiences. Decoding a high frame rate
is processor-intensive. A lower frame rate is therefore recommended for
mobile devices.
• RealVideo
8 is the preferred codec. It requires less processor power for
decompressing video than RealVideo 9 and RealVideo 10.
117
RealProducer 11 User’s Guide
Warning! When you encode with the graphical application, you
will override the RealVideo 8 codec selection if you do not
change the job’s default setting from RealVideo 10. See
“Selecting a RealVideo Codec” on page 99.
When encoding a destination, you can choose one of the following mobile
device audiences:
• General
Mobile Streaming Audience
• General
Mobile Local Playback Audience
• Pocket
PC Local Playback Audience
General Mobile Streaming Audience
This audience is designed for streaming audio or video to smartphones.
General Mobile Streaming Audience
118
Setting or Property
Value
Player compatibility
RealOne Player and later for mobile devices
Total bandwidth
20 Kbps
Target video frame rate
5 fps
Average video bandwidth
12 or 14 Kbps depending on audio choice
Recommended video sizes
176-by-144
RealVideo codec
RealVideo 8
SureStream compatible
yes
Recommended substreams
n/a
Audio input
mono or stereo voice or music
Audio output
mono voice or music
Voice codec for video
6.5 Kbps voice
Music codec for video
8 Kbps Music - RealAudio
Voice codec for audio-only
16 Kbps voice
Music codec for audio-only
16 Kbps Music - RealAudio
CHAPTER 7: Choosing Audiences
General Mobile Local Playback Audience
This general-purpose audience produces audio or video clips suitable for
download to most mobile devices.
General Mobile Local Playback Audience
Setting or Property
Value
Player compatibility
RealOne Player and later for mobile devices
Total bandwidth
80 Kbps
Target video frame rate
7.5 fps
Average video bandwidth
64 to 72 Kbps depending on audio choice
Recommended video sizes
176-by-144
RealVideo codec
RealVideo 8
SureStream compatible
yes
Recommended substreams
n/a
Audio input
mono or stereo voice or music
Audio output
mono voice, mono music with video, stereo music for
audio-only
Voice codec for video
16 Kbps voice
Music codec for video
16 Kbps Music - RealAudio
Voice codec for audio-only
32 Kbps voice
Music codec for audio-only
44 Kbps Stereo Music
Pocket PC Local Playback Audience
This audience is suitable for audio or video clips downloaded to Pocket PC
devices or any other mobile device with a higher-speed processor.
Pocket PC Local Playback Audience
Setting or Property
Value
Player compatibility
RealOne Player and later for mobile devices
Total bandwidth
200 Kbps
Target video frame rate
15 fps
Average video bandwidth
168 Kbps
Recommended video sizes
176-by-144
RealVideo codec
RealVideo 8
(Table Page 1 of 2)
119
RealProducer 11 User’s Guide
Pocket PC Local Playback Audience (continued)
Setting or Property
Value
SureStream compatible
yes
Recommended substreams
n/a
Audio input
mono or stereo voice or music
Audio output
mono voice, mono music with video, stereo music for
audio-only
Voice codec for video
32 Kbps voice
Music codec for video
32 Kbps Music High Response - RealAudio
Voice codec for audio-only
32 Kbps voice
Music codec for audio-only
64 Kbps Stereo Music
(Table Page 2 of 2)
Variable Bit Rate Download Audiences
This set of audiences encodes downloadable clips. You can also encode
streaming clips or broadcasts using these audiences, as long as you
understand the streaming characteristics described in “Variable Bit Rate
Video” on page 66. For each job, you can choose one of the following VBR
download templates:
• 350k
Download (VBR)
• 450k
Download (VBR)
• 750k
Download (VBR)
• 1M
Download (VBR)
• 2M
Download (VBR)
• 5M
Download (VBR)
Tip: If you are unsure about your network characteristics, stick
with the audiences described in “High-Bandwidth Streaming
Audiences” on page 113. Those audiences encode video at a
lower quality, but make more conservative assumptions about
available bandwidth.
For More Information: You can also create downloadable clips
according to a quality metric. The section “Quality Download
Audiences” on page 125 lists the audiences that you use for
120
CHAPTER 7: Choosing Audiences
this type of encoding. If your audio input is not mono or
stereo, you may want to use a stereo surround or multichannel
audience as described in “Stereo Surround Audiences” on page
129 and “Multichannel Audio Audiences” on page 133.
350k Download (VBR)
This is the lowest-speed VBR download audience.
350k Download (VBR) Audience
Setting or Property
Value
Player compatibility
RealOne Player and later with RealVideo 9 or 10,
RealPlayer 8 and later with RealVideo 8,
RealOne Player and later for audio-only music,
RealPlayer G2 and later for audio-only voice
Average bandwidth
350 Kbps
Maximum bandwidth
700 Kbps
Target video frame rate
30 fps
Average video bandwidth
286 Kbps
Recommended video sizes
320-by-240 or larger
RealVideo codec
RealVideo 10
SureStream compatible
no
Audio input
mono or stereo voice or music
Audio output
mono or stereo voice, stereo music
Voice codec for video
64 Kbps voice
Music codec for video
64 Kbps Stereo Music - RealAudio
Voice codec for audio-only
96 Kbps Stereo Music - RealAudio
Music codec for audio-only
320 Kbps Stereo Music - RealAudio 10
121
RealProducer 11 User’s Guide
450k Download (VBR)
This audience offers improved music-with-video quality from the 350k
Download (VBR) audience. Higher-speed audiences improve the video quality
but not the audio quality.
450k Download (VBR) Audience
122
Setting or Property
Value
Player compatibility
RealOne Player and later with RealVideo 9 or 10,
RealPlayer 8 and later with RealVideo 8,
RealOne Player and later for audio-only music,
RealPlayer G2 and later for audio-only voice
Average bandwidth
450 Kbps
Maximum bandwidth
900 Kbps
Target video frame rate
30 fps
Average video bandwidth
353 to 386 Kbps depending on audio choice
Recommended video sizes
320-by-240 or larger
RealVideo codec
RealVideo 10
SureStream compatible
no
Audio input
mono or stereo voice or music
Audio output
mono or stereo voice, stereo music
Voice codec for video
64 Kbps voice
Music codec for video
96 Kbps Stereo Music - RealAudio
Voice codec for audio-only
96 Kbps Stereo Music - RealAudio
Music codec for audio-only
320 Kbps Stereo Music - RealAudio 10
CHAPTER 7: Choosing Audiences
750k Download (VBR)
This audience provides the same audio quality as the 450k Download (VBR)
audience.
750k Download (VBR) Audience
Setting or Property
Value
Player compatibility
RealOne Player and later with RealVideo 9 or 10,
RealPlayer 8 and later with RealVideo 8,
RealOne Player and later for audio-only music,
RealPlayer G2 and later for audio-only voice
Average bandwidth
750 Kbps
Maximum bandwidth
1500 Kbps
Target video frame rate
30 fps
Average video bandwidth
654 to 686 Kbps depending on audio choice
Recommended video sizes
320-by-240 or larger
RealVideo codec
RealVideo 10
SureStream compatible
no
Audio input
mono or stereo voice or music
Audio output
mono or stereo voice, stereo music
Voice codec for video
64 Kbps voice
Music codec for video
96 Kbps Stereo Music - RealAudio
Voice codec for audio-only
96 Kbps Stereo Music - RealAudio
Music codec for audio-only
320 Kbps Stereo Music - RealAudio 10
1M Download (VBR)
With this audience, audio quality is the same as with the 450k Download
(VBR) and 750k Download (VBR) audiences.
1M Download (VBR) Audience
Setting or Property
Value
Player compatibility
RealOne Player and later with RealVideo 9 or 10,
RealPlayer 8 and later with RealVideo 8,
RealOne Player and later for audio-only music,
RealPlayer G2 and later for audio-only voice
Average bandwidth
1 Mbps
(Table Page 1 of 2)
123
RealProducer 11 User’s Guide
1M Download (VBR) Audience (continued)
Setting or Property
Value
Maximum bandwidth
2 Mbps
Target video frame rate
30 fps
Average video bandwidth
904 to 936 Kbps depending on audio choice
Recommended video sizes
320-by-240 or larger
RealVideo codec
RealVideo 10
SureStream compatible
no
Audio input
mono or stereo voice or music
Audio output
mono or stereo voice, stereo music
Voice codec for video
64 Kbps voice
Music codec for video
96 Kbps Stereo Music - RealAudio
Voice codec for audio-only
96 Kbps Stereo Music - RealAudio
Music codec for audio-only
320 Kbps Stereo Music - RealAudio 10
(Table Page 2 of 2)
2M Download (VBR)
This audience offers very high download quality for large video clips.
2M Download (VBR) Audience
Setting or Property
Value
Player compatibility
RealOne Player and later with RealVideo 9 or 10,
RealPlayer 8 and later with RealVideo 8,
RealOne Player and later for audio-only music,
RealPlayer G2 and later for audio-only voice
Average bandwidth
2 Mbps
Maximum bandwidth
4 Mbps
Target video frame rate
30 fps
Average video bandwidth
1936 Kbps
Recommended video sizes
320-by-240 or larger
RealVideo codec
RealVideo 10
SureStream compatible
no
Audio input
mono or stereo voice or music
Audio output
mono or stereo voice, stereo music
Voice codec for video
64 Kbps voice
(Table Page 1 of 2)
124
CHAPTER 7: Choosing Audiences
2M Download (VBR) Audience (continued)
Setting or Property
Value
Music codec for video
96 Kbps Stereo Music - RealAudio
Voice codec for audio-only
96 Kbps Stereo Music - RealAudio
Music codec for audio-only
320 Kbps Stereo Music - RealAudio 10
(Table Page 2 of 2)
5M Download (VBR)
This audience provides very high-quality playback for large video clips.
5M Download (VBR) Audience
Setting or Property
Value
Player compatibility
RealOne Player and later with RealVideo 9 or 10,
RealPlayer 8 and later with RealVideo 8,
RealOne Player and later for audio-only music,
RealPlayer G2 and later for audio-only voice
Average bandwidth
5 Mbps
Maximum bandwidth
10 Mbps
Target video frame rate
30 fps
Average video bandwidth
4904 to 4936 Kbps depending on audio choice
Recommended video sizes
320-by-240 or larger
RealVideo codec
RealVideo 10
SureStream compatible
no
Audio input
mono or stereo voice or music
Audio output
mono or stereo voice, stereo music
Voice codec for video
64 Kbps voice
Music codec for video
96 Kbps Stereo Music - RealAudio
Voice codec for audio-only
96 Kbps Stereo Music - RealAudio
Music codec for audio-only
320 Kbps Stereo Music - RealAudio 10
Quality Download Audiences
The quality download audiences are similar to the VBR audiences described in
“Variable Bit Rate Download Audiences” on page 120. You can use them if you
wish to maintain a certain visual quality level in large, downloadable video
clips. Because these audiences do not define an average bit rate, they are not
125
RealProducer 11 User’s Guide
good choices for streaming. When encoding a destination, you can choose one
of these VBR quality download templates:
• 70%
Quality Download (VBR)
• 80%
Quality Download (VBR)
• 90%
Quality Download (VBR)
• 100%
Quality Download (VBR)
For More Information: For background on the difference
between VBR clips encoded for quality or bit rate, refer to “VBR
Encoding Settings” on page 68.
Note: All quality-based download audiences provide the same
audio quality, so you will notice quality improvements among
the templates only with video clips.
70% Quality Download (VBR)
This audience template attempts to maintain a 70% quality level compared to
the input video. You may notice a small number of imperfections added by the
encoding process.
70% Quality Download (VBR) Audience
Setting or Property
Value
Player compatibility
RealOne Player and later with RealVideo 9 or 10,
RealPlayer 8 and later with RealVideo 8,
RealOne Player and later for audio-only music,
RealPlayer G2 and later for audio-only voice
Quality target
70%
Maximum bandwidth
1400 Kbps
Target video frame rate
30 fps
Recommended video sizes
320-by-240 or larger
RealVideo codec
RealVideo 10
SureStream compatible
no
Audio input
mono or stereo voice or music
Audio output
mono or stereo voice, stereo music
Voice codec for video
64 Kbps voice
Music codec for video
96 Kbps Stereo Music - RealAudio
(Table Page 1 of 2)
126
CHAPTER 7: Choosing Audiences
70% Quality Download (VBR) Audience (continued)
Setting or Property
Value
Voice codec for audio-only
96 Kbps Stereo Music - RealAudio
Music codec for audio-only
320 Kbps Stereo Music - RealAudio 10
(Table Page 2 of 2)
80% Quality Download (VBR)
This audience improves on the 70% Quality Download (VBR) audience
settings.
80% Quality Download (VBR) Audience
Setting or Property
Value
Player compatibility
RealOne Player and later with RealVideo 9 or 10,
RealPlayer 8 and later with RealVideo 8,
RealOne Player and later for audio-only music,
RealPlayer G2 and later for audio-only voice
Quality target
80%
Maximum bandwidth
2000 Kbps
Target video frame rate
30 fps
Recommended video sizes
320-by-240 or larger
RealVideo codec
RealVideo 10
SureStream compatible
no
Audio input
mono or stereo voice or music
Audio output
mono or stereo voice, stereo music
Voice codec for video
64 Kbps voice
Music codec for video
96 Kbps Stereo Music - RealAudio
Voice codec for audio-only
96 Kbps Stereo Music - RealAudio
Music codec for audio-only
320 Kbps Stereo Music - RealAudio 10
127
RealProducer 11 User’s Guide
90% Quality Download (VBR)
This audience attempts to replicate the input video nearly perfectly, within the
constraints set by the maximum bandwidth and the video dimensions.
90% Quality Download (VBR) Audience
Setting or Property
Value
Player compatibility
RealOne Player and later with RealVideo 9 or 10,
RealPlayer 8 and later with RealVideo 8,
RealOne Player and later for audio-only music,
RealPlayer G2 and later for audio-only voice
Quality target
90%
Maximum bandwidth
4000 Kbps
Target video frame rate
30 fps
Recommended video sizes
320-by-240 or larger
RealVideo codec
RealVideo 10
SureStream compatible
no
Audio input
mono or stereo voice or music
Audio output
mono or stereo voice, stereo music
Voice codec for video
64 Kbps voice
Music codec for video
96 Kbps Stereo Music - RealAudio
Voice codec for audio-only
96 Kbps Stereo Music - RealAudio
Music codec for audio-only
320 Kbps Stereo Music - RealAudio 10
100% Quality Download (VBR)
Choose this audience to replicate the input video as perfectly as possible, given
the constraints set by the maximum bandwidth and the video dimensions.
100% Quality Download (VBR) Audience
Setting or Property
Value
Player compatibility
RealOne Player and later with RealVideo 9 or 10,
RealPlayer 8 and later with RealVideo 8,
RealOne Player and later for audio-only music,
RealPlayer G2 and later for audio-only voice
Quality target
100%
Maximum bandwidth
10,000 Kbps
(Table Page 1 of 2)
128
CHAPTER 7: Choosing Audiences
100% Quality Download (VBR) Audience (continued)
Setting or Property
Value
Target video frame rate
30 fps
Recommended video sizes
320-by-240 or larger
RealVideo codec
RealVideo 10
SureStream compatible
no
Audio input
mono or stereo voice or music
Audio output
mono or stereo voice, stereo music
Voice codec for video
64 Kbps voice
Music codec for video
96 Kbps Stereo Music - RealAudio
Voice codec for audio-only
96 Kbps Stereo Music - RealAudio
Music codec for audio-only
320 Kbps Stereo Music - RealAudio 10
(Table Page 2 of 2)
Stereo Surround Audiences
The stereo surround audiences are similar to the VBR audiences described in
“Variable Bit Rate Download Audiences” on page 120. You can use them for
downloadable or streaming clips. However, you should select one of the
following stereo surround audiences only if your audio input is stereo
surround:
• 350k
Surround Stereo (VBR)
• 450k
Surround Stereo (VBR)
• 750k
Surround Stereo (VBR)
• 1M
Surround Stereo (VBR)
• 2M
Surround Stereo (VBR)
For More Information: For background, refer to “What is Stereo
Surround?” on page 43. If you plan to stream a clip encoded
with one of these audiences, see “VBR Clips for Streaming and
Broadcasting” on page 67.
129
RealProducer 11 User’s Guide
350k Surround Stereo (VBR)
This is the lowest-speed audience offering stereo surround encoding.
350k Surround Stereo (VBR) Audience
Setting or Property
Value
Player compatibility
RealOne Player and later with RealVideo 9 or 10,
RealPlayer 8 and later with RealVideo 8,
RealOne Player and later for audio-only clips
Average bandwidth
350 Kbps
Maximum bandwidth
700 Kbps
Target video frame rate
30 fps
Average video bandwidth
306 Kbps
Recommended video sizes
320-by-240 or larger
RealVideo codec
RealVideo 10
SureStream compatible
no
Audio input
stereo surround voice or music
Audio output
stereo surround voice or music
Voice codec for video
44 Kbps Stereo Surround Audio - RealAudio
Music codec for video
44 Kbps Stereo Surround Audio - RealAudio
Voice codec for audio-only
192 Kbps Stereo Surround - RealAudio 10
Music codec for audio-only
320 Kbps Stereo Surround - RealAudio 10
450k Surround Stereo (VBR)
This audience offers the same audio quality as the 350k Surround Stereo
(VBR) audience.
450k Surround Stereo (VBR) Audience
Setting or Property
Value
Player compatibility
RealOne Player and later with RealVideo 9 or 10,
RealPlayer 8 and later with RealVideo 8,
RealOne Player and later for audio-only clips
Average bandwidth
450 Kbps
Maximum bandwidth
900 Kbps
Target video frame rate
30 fps
Average video bandwidth
406 Kbps
(Table Page 1 of 2)
130
CHAPTER 7: Choosing Audiences
450k Surround Stereo (VBR) Audience (continued)
Setting or Property
Value
Recommended video sizes
320-by-240 or larger
RealVideo codec
RealVideo 10
SureStream compatible
no
Audio input
stereo surround voice or music
Audio output
stereo surround voice or music
Voice codec for video
44 Kbps Stereo Surround Audio - RealAudio
Music codec for video
44 Kbps Stereo Surround Audio - RealAudio
Voice codec for audio-only
192 Kbps Stereo Surround - RealAudio 10
Music codec for audio-only
320 Kbps Stereo Surround - RealAudio 10
(Table Page 2 of 2)
750k Surround Stereo (VBR)
For audio-only clips, this audience provides the same sound quality as the
350k Surround Stereo (VBR) and 450k Surround Stereo (VBR) audiences. The
audio quality for video clips is higher, however.
750k Surround Stereo (VBR) Audience
Setting or Property
Value
Player compatibility
RealOne Player and later with RealVideo 9 or 10,
RealPlayer 8 and later with RealVideo 8,
RealOne Player and later for audio-only clips
Average bandwidth
700 Kbps
Maximum bandwidth
1400 Kbps
Target video frame rate
30 fps
Average video bandwidth
604 or 636 Kbps depending on audio choice
Recommended video sizes
320-by-240 or larger
RealVideo codec
RealVideo 10
SureStream compatible
no
Audio input
stereo surround voice or music
Audio output
stereo surround voice or music
Voice codec for video
64 Kbps Stereo Surround Audio - RealAudio
Music codec for video
96 Kbps Stereo Surround Audio - RealAudio
(Table Page 1 of 2)
131
RealProducer 11 User’s Guide
750k Surround Stereo (VBR) Audience (continued)
Setting or Property
Value
Voice codec for audio-only
192 Kbps Stereo Surround - RealAudio 10
Music codec for audio-only
320 Kbps Stereo Surround - RealAudio 10
(Table Page 2 of 2)
1M Surround Stereo (VBR)
This audience offers high fidelity downloads, with improved audio quality
over the 750k Surround Stereo (VBR) audience.
1M Surround Stereo (VBR) Audience
132
Setting or Property
Value
Player compatibility
RealOne Player and later
Average bandwidth
1 Mbps
Maximum bandwidth
2 Mbps
Target video frame rate
30 fps
Average video bandwidth
872 or 936 Kbps depending on audio choice
Recommended video sizes
320-by-240 or larger
RealVideo codec
RealVideo 10
SureStream compatible
no
Audio input
stereo surround voice or music
Audio output
stereo surround voice or music
Voice codec for video
64 Kbps Stereo Surround Audio - RealAudio
Music codec for video
128 Kbps Stereo Surround - RealAudio 10
Voice codec for audio-only
256 Kbps Stereo Surround - RealAudio 10
Music codec for audio-only
320 Kbps Stereo Surround - RealAudio 10
CHAPTER 7: Choosing Audiences
2M Surround Stereo (VBR)
This audience offers very high fidelity downloads, with improved audio
quality over the 1M Surround Stereo (VBR) audience.
2M Surround Stereo (VBR) Audience
Setting or Property
Value
Player compatibility
RealOne Player and later
Average bandwidth
2 Mbps
Maximum bandwidth
4 Mbps
Target video frame rate
30 fps
Average video bandwidth
1840 or 1903 Kbps depending on audio choice
Recommended video sizes
320-by-240 or larger
RealVideo codec
RealVideo 10
SureStream compatible
no
Audio input
stereo surround voice or music
Audio output
stereo surround voice or music
Voice codec for video
96 Kbps Stereo Surround Audio - RealAudio
Music codec for video
160 Kbps Stereo Surround - RealAudio 10
Voice codec for audio-only
320 Kbps Stereo Surround - RealAudio 10
Music codec for audio-only
320 Kbps Stereo Surround - RealAudio 10
Multichannel Audio Audiences
The multichannel audiences are similar to the VBR audiences described in
“Variable Bit Rate Download Audiences” on page 120. You can use them for
downloadable or streaming clips. However, you should select one of the
following multichannel audiences only if your audio input has discrete,
multichannel audio that you wish to preserve:
• 350k
Multichannel (VBR)
• 450k
Multichannel (VBR)
• 750k
Multichannel (VBR)
• 1M
Multichannel (VBR)
• 2M
Multichannel (VBR)
• 5M
Multichannel (VBR)
133
RealProducer 11 User’s Guide
For More Information: For background, refer to “What is
Multichannel Audio?” on page 46. If you plan to stream a clip
encoded with a multichannel audience, refer to “VBR Clips for
Streaming and Broadcasting” on page 67.
350k Multichannel (VBR)
This is the lowest-speed audience that preserves multichannel audio data.
350k Multichannel (VBR) Audience
Setting or Property
Value
Player compatibility
RealOne Player and later
Average bandwidth
350 Kbps
Maximum bandwidth
700 Kbps
Target video frame rate
30 fps
Average video bandwidth
254 Kbps
Recommended video sizes
320-by-240 or larger
RealVideo codec
RealVideo 10
SureStream compatible
no
Audio input
discrete multichannel voice or audio
Audio output
discrete multichannel voice or audio
Voice codec for video
96 Kbps 5.1 Multichannel - RealAudio 10
Music codec for video
96 Kbps 5.1 Multichannel - RealAudio 10
Voice codec for audio-only
184 Kbps 5.1 Multichannel - RealAudio 10
Music codec for audio-only
268 Kbps 5.1 Multichannel - RealAudio 10
450k Multichannel (VBR)
The audio encoding rates for this audience are the same as the 350k
Multichannel (VBR) audience. Its higher bandwidth improves video quality
only.
450k Multichannel (VBR) Audience
Setting or Property
Value
Player compatibility
RealOne Player and later
Average bandwidth
450 Kbps
(Table Page 1 of 2)
134
CHAPTER 7: Choosing Audiences
450k Multichannel (VBR) Audience (continued)
Setting or Property
Value
Maximum bandwidth
900 Kbps
Target video frame rate
30 fps
Average video bandwidth
354 Kbps
Recommended video sizes
320-by-240 or larger
RealVideo codec
RealVideo 10
SureStream compatible
no
Audio input
discrete multichannel voice or audio
Audio output
discrete multichannel voice or audio
Voice codec for video
96 Kbps 5.1 Multichannel - RealAudio 10
Music codec for video
96 Kbps 5.1 Multichannel - RealAudio 10
Voice codec for audio-only
184 Kbps 5.1 Multichannel - RealAudio 10
Music codec for audio-only
268 Kbps 5.1 Multichannel - RealAudio 10
(Table Page 2 of 2)
750k Multichannel (VBR)
This audience offers improved audio and video quality over the 450k
Multichannel (VBR) audience.
750k Multichannel (VBR) Audience
Setting or Property
Value
Player compatibility
RealOne Player and later
Average bandwidth
700 Kbps
Maximum bandwidth
1400 Kbps
Target video frame rate
30 fps
Average video bandwidth
569 Kbps
Recommended video sizes
320-by-240 or larger
RealVideo codec
RealVideo 10
SureStream compatible
no
Audio input
discrete multichannel voice or audio
Audio output
discrete multichannel voice or audio
Voice codec for video
132 Kbps 5.1 Multichannel - RealAudio 10
Music codec for video
132 Kbps 5.1 Multichannel - RealAudio 10
(Table Page 1 of 2)
135
RealProducer 11 User’s Guide
750k Multichannel (VBR) Audience (continued)
Setting or Property
Value
Voice codec for audio-only
268 Kbps 5.1 Multichannel - RealAudio 10
Music codec for audio-only
268 Kbps 5.1 Multichannel - RealAudio 10
(Table Page 2 of 2)
1M Multichannel (VBR)
The audience offers improved video quality over the 750k Multichannel (VBR)
audience. For audio-only clips, however, the audio quality is the same.
1M Multichannel (VBR) Audience
136
Setting or Property
Value
Player compatibility
RealOne Player and later
Average bandwidth
1 Mbps
Maximum bandwidth
2 Mbps
Target video frame rate
30 fps
Average video bandwidth
817 Kbps
Recommended video sizes
320-by-240 or larger
RealVideo codec
RealVideo 10
SureStream compatible
no
Audio input
discrete multichannel voice or audio
Audio output
discrete multichannel voice or audio
Voice codec for video
184 Kbps 5.1 Multichannel - RealAudio 10
Music codec for video
184 Kbps 5.1 Multichannel - RealAudio 10
Voice codec for audio-only
268 Kbps 5.1 Multichannel - RealAudio 10
Music codec for audio-only
268 Kbps 5.1 Multichannel - RealAudio 10
CHAPTER 7: Choosing Audiences
2M Multichannel (VBR)
This audience provides the highest overall audio quality of the multichannel
audiences.
2M Multichannel (VBR) Audience
Setting or Property
Value
Player compatibility
RealOne Player and later
Average bandwidth
2 Mbps
Maximum bandwidth
4 Mbps
Target video frame rate
30 fps
Average video bandwidth
1732 Kbps
Recommended video sizes
320-by-240 or larger
RealVideo codec
RealVideo 10
SureStream compatible
no
Audio input
discrete multichannel voice or audio
Audio output
discrete multichannel voice or audio
Voice codec for video
268 Kbps 5.1 Multichannel - RealAudio 10
Music codec for video
268 Kbps 5.1 Multichannel - RealAudio 10
Voice codec for audio-only
268 Kbps 5.1 Multichannel - RealAudio 10
Music codec for audio-only
268 Kbps 5.1 Multichannel - RealAudio 10
5M Multichannel (VBR)
This audience offers very high fidelity downloads. The audio encoding quality
is the same as the 2M Multichannel (VBR) audience. You will notice
improvements in the visual quality only.
5M Multichannel (VBR) Audience
Setting or Property
Value
Player compatibility
RealOne Player and later
Average bandwidth
5 Mbps
Maximum bandwidth
10 Mbps
Target video frame rate
30 fps
Average video bandwidth
4732 Kbps
Recommended video sizes
320-by-240 or larger
(Table Page 1 of 2)
137
RealProducer 11 User’s Guide
5M Multichannel (VBR) Audience (continued)
Setting or Property
Value
RealVideo codec
RealVideo 10
SureStream compatible
no
Audio input
discrete multichannel voice or audio
Audio output
discrete multichannel voice or audio
Voice codec for video
268 Kbps 5.1 Multichannel - RealAudio 10
Music codec for video
268 Kbps 5.1 Multichannel - RealAudio 10
Voice codec for audio-only
268 Kbps 5.1 Multichannel - RealAudio 10
Music codec for audio-only
268 Kbps 5.1 Multichannel - RealAudio 10
(Table Page 2 of 2)
Lossless Audio
The lossless audio audience is intended primarily to encode audio-only clips
in a lossless format, which the section “Lossless Audio Codec” on page 47
describes. You can use it to encode lossless audio with a video clip as well.
However, the amount of bandwidth given to the video’s visual track can vary
greatly depending on how much bandwidth is required to encode the audio
losslessly.
Lossless Audio Audience
Setting or Property
Value
Player compatibility
RealOne Player and later
Average bandwidth
2 Mbps
Maximum bandwidth
4 Mbps
Target video frame rate
30 fps
Average video bandwidth
n/a
Recommended video sizes
320-by-240 or larger
RealVideo codec
RealVideo 10
SureStream compatible
no
Audio input
high-fidelity mono or stereo voice or audio
Audio output
high-fidelity mono or stereo voice or audio
Voice codec for video
RealAudio Lossless Audio
Music codec for video
RealAudio Lossless Audio
(Table Page 1 of 2)
138
CHAPTER 7: Choosing Audiences
Lossless Audio Audience (continued)
Setting or Property
Value
Voice codec for audio-only
RealAudio Lossless Audio
Music codec for audio-only
RealAudio Lossless Audio
(Table Page 2 of 2)
Note: Encoding with the lossless audio codec is supported only
through the command-line application, which Chapter 14
covers. This audience is not available through the graphical
application.
For More Information: The encoding complexity mode affects
both the lossless audio codec and the video codec. For
background, refer to “Encoding Complexity Modes” on page
81.
139
RealProducer 11 User’s Guide
140
CHAPTER
Chapter 8:
MONITORING A JOB
8
This chapter shows you how to start an encoding job, and describes
the different methods for monitoring a job. You will learn about
encoding statistics, as well as the logging tool that displays errors
and warnings about a job as it runs.
Starting an Encoding Job
Once you have set up an encoding job, you can start and monitor the
encoding process. The following procedure explains how to start and stop an
encoding job.
➤
To start encoding a job:
1. If you are encoding from a live source, make sure that the capture
equipment is functioning properly and is connected to the computer’s
capture card.
2. If you have multiple jobs open, select the job you want to encode in the
job manager list.
3. Ensure that you have set the correct encoding parameters, such as clip
information, Music or Voice audio choice, and audiences, as described in
Chapter 6.
4. Click the Encode button. During encoding, you can use any of the
monitoring tools described in this chapter.
Stopping an Encoding Job
When you are finished encoding, click the Stop button. Or, if you have set a
duration for the encode, you can wait until the duration is complete. Note
that if you have defined multiple destinations, clicking Stop halts the
encoding process for all destinations. You cannot stop the encoding process
141
RealProducer 11 User’s Guide
for one destination (such as writing to a clip) while continuing the process for
another destination (such as broadcast to a server).
Playing a Media Clip
After the encoding process has finished, you can play a destination clip as long
as you have RealPlayer installed on the RealProducer machine. To do this,
choose File>Play RealMedia File (Ctrl+p), or click the RealPlayer play button
below the destination window. Do not use this feature when encoding a live
broadcast, however.
Monitoring Audio
As you encode clips, you can monitor the audio levels for both the input audio
and the encoded output audio. This helps to ensure that the audio levels are
encoded in the optimal dynamic range. On an input or output audio meter,
green for the left or right channel indicates a normal reading. Red warns that
the audio is close to being over-modulated. If the audio registers above the
possible dynamic range, the clipping indicator above the meter lights up to
indicate that the audio has become distorted.
Audio Meter
Disabling the Audio Meters
Optionally, you can disable the audio monitors. This helps to speed the
encoding process, and is useful in live broadcasts in which you want to
142
CHAPTER 8: Monitoring a Job
conserve as much processing power as possible. To turn off a meter, select
View>Input Audio Meter, View>Output Audio Meter, or both. Selecting these
options again reinstates the audio meters.
Adjusting Audio Gain
With RealProducer Plus, you can adjust the audio output using the Gain
palette, which you can display with the Settings>Show Audio Gain Control
(Ctrl+r) command. In this palette, you set a decibel gain from +12 (amplify the
audio) to -12 (attenuate the audio). RealProducer saves the gain setting when
you close the palette. The gain settings apply only to the current job.
Audio Gain Palette
When you amplify the audio signal, RealProducer dynamically compresses the
audio range if the output signal becomes overmodulated. Thus, the output
audio is never clipped, even at the maximum gain level. A value of 6 doubles
the audio level while a value of 12 quadruples it. A value of -6 reduces the level
to half, while -12 reduces it to a quarter.
For More Information: Using a job file, you can specify a wider
range. See “Audio Gain Prefilter” on page 326.
Preventing Clipped Audio Input
When the input audio has an audio gain that causes distortion, the clipping
indicators above the input audio meter light up. In this case, RealProducer’s
gain control cannot eliminate the distortion. To eliminate the distortion, you
may need to adjust the settings in your audio hardware or software that
provides the audio input to RealProducer.
143
RealProducer 11 User’s Guide
For example, the sound capture card may have its mixer levels set too high. In
this case, adjust the analog gains leading to your sound card input so that the
input audio meter on RealProducer never rises to the 0 dB level. If needed,
modify audio gain through an external mixer board if the sound card's audio
mixer does not provide adequate control.
With certain material and input sources, however, the external mixing may
lead to sound levels that are too low on average. In this case, you can use the
RealProducer gain control tool to bring the signal back up to acceptable levels.
This is safe to do because the gain tool will not introduce clipping.
Monitoring Video Output
When your encoding job contains video, you will see the source video play in
the input preview window. The output displays in the output preview window.
Optionally, you can disable the input or output video windows. This helps to
speed the encoding process by eliminating the need for RealProducer to
display the video onscreen. This is useful in live broadcasts in which you want
to conserve as much processing power as possible. To turn off a window, select
View>Input Video, View>Output Video, or both. Selecting these options again
reinstates the video display.
Monitoring Statistics
RealProducer displays a number of encoding statistics that you can monitor
as you encode a clip or broadcast. These statistics provide an overview of the
encoded output, showing you how well the encoding process meets your
target settings. You can open the statistics window at any point before or
during encoding by selecting View>Show Statistics (Ctrl+y). The job title
appears at the top of the window.
Statistics Window
144
CHAPTER 8: Monitoring a Job
Encoding Statistics Phases
RealProducer displays three different sets of statistics during three phases of
the encoding process.
Job Configured but not Running
If you have configured an encoding job but not yet started it, the statistics
window shows how the streams are configured. For a variable bit rate
encoding (VBR), you’ll see one audience. For a constant bit rate encoding
(CBR), you’ll see a separate line for each audience you’ve added. The statistics
show the total bit rate for each stream, as well as the bit rates for the video and
audio. They also show the maximum frames per second (FPS) for the video.
Job Running
As you run an encoding job, the statistics window updates in real time to show
how each stream is being encoded. Statistics do not display during the first
pass of two-pass encoding, however.
Job Finished
When the encoding completes, the statistics window shows you the actual
statistics for the entire encoding job. Some statistics, such as frames per
second (FPS), are listed as averages.
Encoding Statistics Values
The following table summarizes the encoding statistics that RealProducer
displays. During the encoding, some statistics update in real-time. After the
encoding, some fields display average values.
Statistics Summary
Statistic
Description
Audience
Lists the audience template used to encode the stream.
Total Bit Rate
Indicates the total bit rate of the encoded audience stream, in the
form of Kilobits per second (Kbps) with single decimal precision.
If the rate is over 1 Megabit per second, the value is in Mbps with
two decimal precision.
Video Bit Rate
Gives the bit rate of the video portion of the stream. If there is no
video in the output, this displays as n/a .
(Table Page 1 of 2)
145
RealProducer 11 User’s Guide
Statistics Summary (continued)
Statistic
Description
Audio Bit Rate
Lists the bit rate of the audio portion of the stream. If there is no
audio in the output, this displays as n/a .
FPS
Lists the video’s frames per second. If encoding has not started,
the value is the maximum target. During an encoding. the value is
the actual fps being encoded. After the encoding, this field gives
the average frame rate. For an audio-only clip, the value is n/a .
Min. FPS
Gives the minimum frame rate, in frames per second, encoded
into the stream. For an audio-only clip, or before video encoding
has started, the value is n/a .
Quality
Lists the quality level of the output compared to the input after all
video filters have been applied. A value of 100 percent represents
equivalent quality to the input. For an audio-only clip, or before
video encoding has started, the value is n/a . See “Video Quality
Index” on page 146.
Min. Quality
Indicates the minimum quality level of the clip during encoding.
For an audio-only clip, or before video encoding has started, the
value is n/a .
Pre-roll
Lists the number of seconds of preroll (buffering) that the viewer
will experience when beginning to play the encoded stream.
(Table Page 2 of 2)
Video Quality Index
The quality index indicates how well each RealVideo stream will play back:
•A
value of 94 to 100 means that the clip will play back with excellent
quality. You could even increase the video frame rate or window size and
achieve high quality.
• A value
of 60 to 93 represents the efficiency range of the RealVideo codec.
Streams with these values will have good visual clarity and a high frame
rate.
•A
value of 40 to 59 indicates fair quality. These stream may have some
visual artifacts and slow frame rates in some if not all sections. You’ll
achieve higher quality by shrinking the source video’s window size.
•A
value from 0 to 40 indicates poor quality playback with a slow frame
rate and a high number of artifacts. You should shrink the video’s window
size if you intend to stream at this speed.
146
CHAPTER 8: Monitoring a Job
Tip: The purpose of SureStream substreams is to keep the
presentation running during adverse network conditions. A
poor quality level is therefore acceptable for these streams.
Viewing Log Messages
RealProducer records messages about encoding tasks as they occur. Whereas
the monitoring window provides statistics about the encoding job, the log file
informs you about RealProducer performance, such as its CPU use. After a job
has run, you can view the log files to find encoding errors or diagnostic
messages. You can also use the log viewer to display encoding information on
the screen in real-time, or after the job has finished.
For More Information: The RealProducer preferences set the log
file location and features, and determine how many messages
display in the log viewer. See “Changing Log File and Log
Viewer Preferences” on page 153 for more information.
Using the Log Viewer
The log viewer gives you a real-time view of the log messages as RealProducer
generates them. It also provides the ability to filter the log to display just one
type of message. Displaying the log viewer during encoding is particularly
useful when you encode a live broadcast because the viewer can warn you
about problems such as excess CPU consumption and lowered frame rates.
➤
To open the log viewer:
1. Select View>Show Log Viewer (Ctrl+L) to display the log viewer. The most
recent messages display at the top of the window.
2. You can filter the types of information (errors, warnings, information,
and diagnostic) that the log viewer lists by selecting the appropriate check
boxes. The log viewer preferences determine which message types are
actually recorded to the log.
Tip: You can select and deselect the message types during
encoding to update the log viewer output in real-time.
3. You can also display messages according to the functional area, such as
only the messages related to audio codecs. The default value of Show all
147
RealProducer 11 User’s Guide
displays all functional area messages. “Filtering Messages by Functional
Area” on page 148 describes these areas.
4. After a job runs, you can save the messages to a separate text file by
clicking the Save Messages button and choosing a file name and location.
5. Click Clear Messages if you want to reset the log viewer before or after
running a job.
Filtering Messages by Functional Area
Choosing one or more functional areas allows you to display only certain
types of messages, such as those related to RealAudio and RealVideo codecs.
Each functional area may include errors, warnings, informational messages,
and diagnostic messages. The following table describes these areas.
Log Viewer Functional Areas
148
Functional Area
Events Logged
ActiveX
Events specific to the ActiveX control used by Windows-based
programs to encode media using RealProducer.
Audio Codec
Events involving one of the audio codecs used for the job.
Audio Prefilters
Events concerning the use of an audio prefilter. The section
“Prefilters” on page 317 describes the prefilters.
Broadcast
Events that occur when transmitting a live stream to Helix
Server. For an introduction to broadcast-related issues, refer
to Chapter 10.
Capture
Events around the capture of input media. See “Using Live
Audio or Video as the Input” on page 90 for capture set-up
instructions.
Command Line
Events that occur when running the command-line
application, which Chapter 14 describes.
File Output
Events involed with writing encoded media streams to a file.
The section “Creating a Destination Clip” on page 92 explains
how to set up a file as the output.
File Reader
Events related to reading an audio file or the audio
component of a video file.
GUI
Events related to the use of the graphical application.
Job File
Events related to the use of a job file, which Appendix B
describes.
CHAPTER 8: Monitoring a Job
Log Viewer Functional Areas
Functional Area
Events Logged
License
Events involving the license key for RealProducer Plus, such as
an expired license.
Postfilters
Events related to post-filters added by the RealProducer SDK.
Remote Agent
Events related to the remote agent.
SDK Configuration
Events concernig the set up of jobs.
SDK Encoding
Events related to encoding activities.
SDK Core
Events specific to the core SDK.
SDK Generic Filter
General events about prefilters or postfilters.
Statistics
Events that affect statistics processing.
Video Codec
Events related to the RealVideo codec.
Video Pre-filters
Events concerning the use of a video prefilter. The section
“Prefilters” on page 317 describes the prefilters.
Video Rendering
Events related to video preview, described in “Monitoring
Video Output” on page 144.
149
RealProducer 11 User’s Guide
150
CHAPTER
Chapter 9:
MODIFYING DEFAULT SETTINGS
9
In this chapter, you learn how to modify the RealProducer
preferences, which determine where RealProducer stores files, and
how it logs error and informational messages. This chapter also
explains how to change the default audience settings, or create new
audiences, to customize how RealProducer encodes streams.
Adjusting RealProducer Preferences
You can adjust the RealProducer preferences to determine how and where
RealProducer stores support files. These preferences affect all jobs.
For More Information: You can modify the RealProducer
preferences manually as described in Appendix E.
Changing the File Location Preferences
You can change the default setting for where RealProducer creates the output
files, as well as where it stores temporary files and its audience and server
templates.
151
RealProducer 11 User’s Guide
File Location Preferences
➤
To change the default file locations:
1. Select Edit>Preferences to open the preferences dialog.
2. Choose the File Locations category.
3. The default selection of Automatically create a file for each job causes
RealProducer to define an output clip that uses the same base file name as
the input clip you select. When you use this feature, you can automatically
save the output in one of the following locations:
• Same Location as Source File—Save the encoded output clip in the same
directory as the input media file.
• Other—Save all encoded clips in the directory you specify. Either enter
the full path to the directory, or click Browse and navigate to the
directory you want to use.
Note: If you choose not to define an output clip automatically,
you must always set up the output clip destination. When you
use this automatic output feature, you can always change the
name or location of the clip destination manually. For
instructions, refer to “Modifying a Clip Destination” on page
93.
4. Under User Directories, you can choose where RealProducer stores its
audience and server templates:
152
CHAPTER 9: Modifying Default Settings
• In
the Audience Template field, enter the full path name of the
directory that stores audience files. Or, click the Browse button and
navigate to the directory you want to use. Appendix C explains
audience files.
• In
the Server Template field, enter the full path name of the directory
that stores server files. Or, click the Browse button and navigate to the
directory you want to use. Appendix D explains server files.
Note: If you change the storage location of audience or server
files, manually move any existing files that you want to
continue using to the new location.
5. RealProducer uses a temporary directory to save data that it uses during
encoding. To change this preference, select one of the following options in
the Temporary Storage Directory section:
• Same Location as File Destination—Saves
the temporary data in the
same directory as the destination clip.
• Other—Saves temporary data
in the directory you specify. Either enter
the full path to the directory, or click Browse and navigate to the
directory you want to use.
Note: If you use %TEMP% in this field, RealProducer uses the
same directory specified by the Windows TEMP variable. After
you close and restart RealProducer, this field lists the full path
to the %TEMP% directory.
Tip: RealProducer operates faster if the temporary directory
resides on the local RealProducer machine, rather than a
network drive.
6. Click OK to save the preferences.
Changing Log File and Log Viewer Preferences
RealProducer automatically logs information about encoding jobs in a text
file. Through the preferences, you can turn off logging or modify the log file
settings. You can display and filter log messages on-screen with the log viewer,
which the section “Viewing Log Messages” on page 147 describes.
153
RealProducer 11 User’s Guide
Log File Preferences
➤
To modify log file settings:
1. Select Edit>Preferences to open the preferences dialog.
2. Choose the Log File category.
3. To disable logging, uncheck the Enable logging to file box. You can set the
remaining preferences only if logging is enabled.
4. In the Log Location field, enter the full path name of the directory that
stores the log file. Or, click the Browse button and navigate to the
directory you want to use. Along with the path, choose a name for the log
file, using .log as the file extension. The default location is the main
RealProducer installation directory.
5. For Log Contents, you can specify the events that you want to log:
• For the log format, you can choose Short to log only the job name and
message. The Detailed format logs more information, such as the
message category, functional area, time, and message number.
• Under
Messages, you can choose any combination of the following
message types:
154
Errors
Error messages are severe problems that typically cause the
encoding operation to fail.
Warnings
Warning messages indicate possible problems that did not
cause the encoding to fail.
CHAPTER 9: Modifying Default Settings
Information
Informational messages convey important messages about
the encoding operation.
Diagnostic
Diagnostic messages convey non-critical messages about the
encoding operation. An encoding operation may generate
many diagnostic messages, so including this message type
may cause your log file to grow quickly.
• Under
Functional Areas, the default is Show all, meaning that
RealProducer logs messages from all areas of operation. If you want to
log messages for just some areas, such as broadcasting or video codec
operations, click Show selected and choose the appropriate functional
areas.
6. By default, RealProducer logs all messages to the specified file, allowing
the file to grow indefinitely. If you encode clips or broadcasts frequently,
or you include diagnostic messages in the log, you should check Enable log
file rolling. Then, choose a maximum log file size in Megabytes, or a time
limit:
month
Create a new log file at midnight of the last day of each month.
week
Set up a new log file at midnight of Sunday of each week.
day
Write a new log file at midnight of each day.
hour
Roll the log file at the top of each hour.
RealProducer creates a new log file under a new name when the current
log file reaches the size or time limit. The file extension includes a
numeric designation to indicate the order of the log files. For example, if
your log file is named producer.log , the first rolled file is named
producer.log1, the second is producer.log2 , and so on.
7. Click Log Viewer to change the number of messages from the log file that
the log viewer displays. The default is 1000. The section “Viewing Log
Messages” on page 147 explains how to use this viewer.
8. Click OK to save the preferences.
Creating and Editing Audiences
You can fine-tune the audience templates installed with RealProducer. This
section explains how to change audience settings for a single job, or all jobs. It
also provides instructions and tips for creating your own audience templates.
155
RealProducer 11 User’s Guide
Changing Audience Values for the Active Job
Using RealProducer Plus, you can change the audience properties for an active
job. First, add the audience to your job as described in “Choosing Audiences”
on page 100. Then, click the audience name in the Audiences palette to display
the Audience Properties dialog. You can then change the audience settings as
described in the following sections. Optionally, you can click Save as Template
to save the audience modifications permanently.
Change Audience Properties for a Job
Editing, Creating, or Deleting an Audience Template
When you use RealProducer Plus, you can edit an audience template to change
it permanently. You can also create new templates from existing ones to define
your own audiences. Changes are recorded in the template and the active job,
but not in any previous jobs that also used the audience template. To update
an older job, edit the job file manually. Or, open the job in the graphical
application, delete the existing audience or audiences, then add the new
audiences.
156
CHAPTER 9: Modifying Default Settings
Note: When you use RealProducer Basic, you cannot edit the
existing audience templates. You are limited to creating one
new template.
For More Information: The section “Choosing Audiences” on
page 100 explains how to add and remove audiences from a job
using the graphical application. See “Audiences Section” on
page 340 for details about how a job file stores audience
information.
Edit Audience Templates
➤
To edit or create an audience template:
1. Select Edit>Audience Templates to list all available templates.
2. Select a template from the list. This displays the template’s settings in the
right-hand side of the dialog.
Tip: Within the list, templates are ordered according to the
audience’s average streaming speed or quality setting.
3. You can then perform any of the following actions:
157
RealProducer 11 User’s Guide
a. Edit the settings for the template as described in the following
sections.
b. Click the “duplicate” icon at the bottom of the template list to copy
the selected template. Then, edit the settings fields. This allows you to
create a similar template quickly.
c. Click the trash icon to delete the selected template.
4. Click Apply to save changes to the template. Click OK to exit the dialog
and save any changes.
Tip: If you have altered and saved an original, default template,
you can restore the default values to the template by selecting
the template clicking Restore Selected Template. Click Restore
All Templates to reset default values to all predefined templates.
These buttons have no effect on templates you have created.
Choosing a Template Name
When you edit a template or create a new one, you specify a name in the
Template name field. The graphical application uses this name to identify the
template. You can also use this name to specify the audience with the
command-line application, as described in “Audience Definitions or Audience
Files (-ad)” on page 280. RealProducer uses the template name as the file name
for the audience file, appending the .rpad extension automatically.
Setting CBR or VBR Encoding
In an audience template, you can specify that the audience uses constant bit
rate (CBR) or variable bit rate (VBR) encoding. For background on these
choices, refer to “Constant Bit Rate Video” on page 63 and “Variable Bit Rate
Video” on page 66. With the exception of the RealAudio Lossless codec, which
you cannot select in the graphical application, you can use any RealAudio
codec in a CBR or VBR template.
CBR Maximum Bandwidth
For a CBR audience, you specify the total, maximum streaming speed. This
should be less than the raw bandwidth of the connection type. For example,
you should not set an audience template for 56 Kbps modems to stream at 56
Kbps. These modems do not actually provide that much usable bandwidth.
158
CHAPTER 9: Modifying Default Settings
The following table lists maximum streaming rates for common Internet
connections.
Maximum Streaming Rates
Target Audience
Maximum Streaming Rate
14.4 Kbps modem
10 Kbps
28.8 Kbps modem
20 Kbps
56 Kbps modem
34 Kbps
64 Kbps ISDN
45 Kbps
112 Kbps dual ISDN
80 Kbps
Corporate LAN
150 Kbps
256 Kbps DSL/cable modem 225 Kbps
384 Kbps DSL/cable modem 350 Kbps
512 Kbps DSL/cable modem 450 Kbps
786 Kbps DSL/cable modem 700 Kbps
For any other connection speed, calculate the maximum streaming speed as:
• Approximately
75 percent of the connection bandwidth for analog
connections such as dial-up modems.
–Or–
• Approximately
90 percent of the connection bandwidth for high-speed
digital connections such as DSL or cable modems.
VBR Settings
For a variable bit rate audience, you set a maximum bit rate along with an
average bit rate or a quality target. The maximum bit rate should be 50 to 100
percent higher than an average bit rate. A VBR clip with an average bit rate of
300 Kbps should have a maximum bit rate of 450 to 600 Kbps, for example.
For More Information: The section “VBR Encoding Settings” on
page 68 explains the relationship between maximum bit rate,
average bit rate, and quality.
Video Settings
The Target frame rate field sets the ideal maximum video frame rate for the
audience, measured in frames per second (fps). A higher frame rate creates
159
RealProducer 11 User’s Guide
smoother motion. Cinematic film uses 24 fps, for example, while NTSC video
uses 30 fps. The section “Encoded Frame Rates” on page 59 explains frame
rates and their relationship to visual clarity.
For bandwidths under 150 Kbps, RealNetworks recommends a maximum
frame rate of 15 fps. This provides acceptably smooth motion without
sacrificing too much visual clarity. At higher bit rates, you can select up to 30
fps. For mobile devices that have slower processors than desktop machines,
you may want to choose a slower maximum rate, such as 5 to 7.5 fps.
Note: The frame rate setting specifies an ideal maximum only.
Other factors, such as available bandwidth and video size affect
the final frame rate. The monitoring utility, described in
“Monitoring Statistics” on page 144, shows actual frame rate
encoded into a stream.
Advanced Video Stream Options
Click Advanced Video Options to change specific parameters about how
RealProducer encodes video clips. In general, the default values work well for
most audiences, and you should not change these settings unless you have
specific reasons to do so and understand the possible, negative effects of your
choices. For information about these options, refer to the following sections:
• “Encoding
• “Video
Complexity Modes” on page 81
Startup Latency” on page 82
• “Maximum
• “Loss
Time Between Keyframes” on page 82
Protection” on page 84
Adjusting Audio Stream Settings
For audio encoding, you select four RealAudio codecs from the pull-down
lists. For each clip that includes audio, RealProducer selects one of these
codecs depending on the clip type, such as whether it is audio-only or video,
and whether the audio track is voice or music. The section “Audio Encoding
for Audiences” on page 103 explains these choices. For explanations of all
RealAudio codecs, refer to “RealAudio Codecs” on page 37. Keep the following
points in mind:
• When
you set the RealAudio codecs used with a video clip, you must leave
appropriate bandwidth for the visual track. For tips on balancing audio
and video bandwidth use, refer to “Soundtrack Bandwidth” on page 57.
160
CHAPTER 9: Modifying Default Settings
• When
encoding a clip that uses voice, you typically use one of the voice
codecs described in “Voice Codecs” on page 39. At higher bandwidths,
however, you can use a music or stereo music codec to provide greater
fidelity.
• Never
use a voice codec for music.
• The
audio codec should match the expected audio input. Do not use a
multichannel codec for traditional stereo input, for example.
• Your
choice of audio codec (as well as video codec) determines which
versions of RealPlayer can play the clip. The codec descriptions in
“RealAudio Codecs” on page 37 describe RealPlayer compatibility.
161
RealProducer 11 User’s Guide
162
PART
Part III:
BROADCASTING LIVE EVENTS
The following chapters cover the basic issues with delivering a
live broadcast, and explain how to set up a live broadcast on
both RealProducer and Helix Server.
III
CHAPTER
Chapter 10:
PLANNING A BROADCAST
10
This chapter explains the issues and methods for broadcasting live
content on a network, whether an intranet or the Internet. It
introduces you to the types of broadcasts, explains broadcast
options, and covers advanced broadcast features. When you are
ready to broadcast, refer to Chapter 11 for instructions about using
your chosen type of broadcast method.
Tip: If you are new to streaming media, familiarize yourself
with the process for encoding static clips, which Chapter 6
describes. You should also review the audio and video issues
described in Chapter 4 and Chapter 5. Broadcasting requires
many of the same choices you make when encoding a clip, and
introduces new issues of broadcast bandwidth and processor
load.
Broadcasting Basics
In a live broadcast, RealProducer takes live input from a capture card as
described in “Using Live Audio or Video as the Input” on page 90, encodes it
as RealAudio or RealVideo, and sends the stream to Helix Server for
replication and distribution to RealPlayer viewers. You encode a broadcast
stream using the same audiences you use when creating a static clip, as
described in Chapter 7.
165
RealProducer 11 User’s Guide
Live Broadcasting
The Role of Helix Server
Helix Server is required for a broadcast because RealProducer cannot
broadcast directly to RealPlayers. Nor you can deliver a broadcast using a Web
server. The Helix Server license, or practical considerations such as its
outgoing bandwidth, determine how many RealPlayer viewers you can reach
with a broadcast. Helix Server must be configured to accept the broadcast, and
the server setup determines how the broadcast is distributed to RealPlayer
viewers:
• unicasting—a
separate stream to each RealPlayer
• multicasting—a
common stream for all RealPlayers
To send a broadcast stream from RealProducer to Helix Server, you define a
server destination in RealProducer. The destination records information such
as the server’s address and the password required for access. By saving a
destination as a template, you can easily repeat a broadcasts using the same
parameters. When you run a broadcast, you can send the same stream to
multiple servers by defining multiple server destinations in your job. You can
also archive the broadcast as a clip by adding a clip destination to your job.
Broadcasting Methods
RealProducer offers several broadcast methods. The method you choose with
RealProducer affects only the delivery of the broadcast stream to Helix Server.
The server, in turn, determines the method for broadcasting the live stream to
individual RealPlayers. RealProducer-to-Helix Server broadcasting methods
break down into the two general areas of push and pull:
166
CHAPTER 10: Planning a Broadcast
• push
broadcasting
In push broadcasting, RealProducer initiates the broadcast stream and
delivers the stream to Helix Server when the broadcast begins. There are
several methods of push broadcasting:
• account-based,
push broadcast—This is the simplest broadcasting
method to set up, requiring no configuration on Helix Server.
RealProducer also receives statistical feedback from Helix Server. See
“Running an Account-Based Broadcast” on page 189 for more
information.
• password-only,
push broadcast—This is similar to account-based
broadcasting, but it is more efficient with bandwidth. It requires
server set-up, but does not provide server feedback. The section
“Setting Up a Password-Only Broadcast” on page 194 explains this
broadcast method.
• multicast
push—This method is available if you have a multicastenabled network and you want to deliver the broadcast stream to
several servers. See “Multicasting a Live Stream” on page 200.
• Pull
In pull broadcasting, RealProducer does not deliver the broadcast stream
as soon as you start encoding. Rather, it waits for Helix Server to request
the stream, which occurs when the first RealPlayer user requests the
broadcast from Helix Server. For more information, refer to “Running a
Pull Broadcast” on page 210.
CBR Broadcasts
Broadcasting constant bit rate (CBR) audio or video allows you to reach the
widest audience on the Internet. As described in “SureStream CBR Clips” on
page 63, you can use SureStream to encode the broadcast stream for multiple
audiences. Each primary stream or substream you choose increases the
processor load during encoding, however, and adds to the outgoing
bandwidth requirements.
If you choose the 56k Dial-up audience and the 128k Dual ISDN audience, for
example, the encoding may require twice as much processing power. As well,
the outgoing bandwidth available to RealProducer must be over 185 Kilobits
per second.
167
RealProducer 11 User’s Guide
Note: Except for those encoded with the lossless codec, all
audio-only RealAudio streams are CBR and support the use of
SureStream.
VBR Broadcasts
If you broadcast variable bit rate (VBR) video, you can choose one VBR
audience for each output. Your outgoing RealProducer bandwidth, as well as
your RealPlayer viewers’ network connections, should be able to handle the
maximum bandwidth requirement for your selected audience, as listed in
Chapter 7. For example, the 350k Download (VBR) audience has a maximum
possible bandwidth of 700 Kilobits a second.
Note: If you plan to broadcast a VBR stream, be sure that you
understand VBR characteristics. See “VBR Clips for Streaming
and Broadcasting” on page 67 for background.
Broadcast Transport Protocols
When you use a non-multicast, push broadcast method, you specify whether
to use TCP or UDP when delivering the broadcast stream to Helix Server. UDP
is the preferred protocol because of the lower network overhead. But you may
want to use TCP when delivering the broadcast over a lossy environment.
Note: The monitoring connection of an account-based
broadcast always uses TCP whether the data transport stream
is UDP or TCP.
UDP
When RealProducer uses the connectionless UDP protocol, it does not receive
notice that broadcast packets have arrived or are missing. This generally
reduces the network communications overhead and improves the quality of
the broadcast. Helix Server notifies RealProducer if it requires data to be
resent. Thus, using UDP enhances the performance of your broadcast.
A firewall between RealProducer and Helix Server may block UDP packets.
The best solution is to configure the firewall to allow UDP packets through
the ports that RealProducer and Helix Server use the broadcast transmission.
These ports, which vary depending on the broadcast method, are described in
the sections about setting up each type of broadcast in Chapter 11.
168
CHAPTER 10: Planning a Broadcast
TCP
If you select the TCP protocol when broadcasting, RealProducer and Helix
Server establish a two-way connection. If a broadcast packet is lost in
transmission, the network itself requests the packet to be resent. This makes
TCP a highly reliable protocol for broadcast on a network prone to high
packet loss. It is also more likely to pass through firewalls that you cannot
configure to accept UDP communications.
Using TCP incurs a higher network and machine overhead, however, and can
lead to inefficiencies. Helix Server does not need all stream packets to keep a
broadcast flowing to RealPlayer. If a packet is lost, the network requests the
packet again from RealProducer. That packet may no longer be available,
however. Or, if it is available, it may arrive at Helix Server too late to be useful.
Hence, both RealProducer and Helix Server must handle some network
requests that do not benefit the broadcast.
Version 6 IP Addresses
RealProducer supports DNS names, version 4 IP addresses (IPv4), and the
newer version 6 IP addresses (IPv6) for delivering a broadcast stream to Helix
Server. Note the following about using IPv6 addresses:
• The
use of an IPv6 address as the server destination or as the
RealProducer listen address requires the use of Helix Server version 11 or
higher.
• Whenever
possible, use a domain name instead of an IPv6 address.
• RealProducer
supports full IPv6 syntax, such as the following:
• 1080:0:0:0:8:800:200C:417A
It also supports the use of a double colon (“::”) to compress leading or
trailing fields containing only zeroes, as in the following:
• 1080::8:800:200C:417A
• RealProducer
will not broadcast to a reserved multicast address. However,
it will multicast to permanent or nonpermanent addresses, which always
begin with FF, as in FF15:0:0:0:0:0:0:101.
Video Startup Latency
Startup latency, also called stream acquisition latency, is the amount of time
required for RealPlayer to display a live stream after the viewer clicks a link to
169
RealProducer 11 User’s Guide
the broadcast. For a video, RealPlayer must receive a video key frame before it
displays the visual image. With the standard RealProducer encoding settings,
key frames can be up to 10 seconds apart, meaning that a RealPlayer user may
need to wait up to 10 seconds for playback to begin. In this case, the user hears
the soundtrack for several seconds until the video’s visual track displays.
Automatic Startup Latency Reduction
Broadcasting with Helix Server version 11 or later greatly reduces startup
latency. Helix Server automatically buffers each new keyframe, sending it
immediately to RealPlayer instead of waiting for RealProducer to transmit the
next keyframe. This reduction in startup latency occurs whether or not you
use the end-to-end latency reduction features described in “End-to-End
Broadcast Latency” on page 180.
Manual Startup Latency Reduction
Helix Servers earlier than version 11 do not reduce broadcast startup latency
automatically. When you broadcast using these servers, RealPlayer viewers may
have to wait several seconds for video images to display. As described in
“Maximum Time Between Keyframes” on page 82, you can lower the
maximum time between key frames to shorten this delay. However, this can
reduce the compression gains of the RealVideo codec, resulting in lower visual
quality.
SMIL in Broadcasts
You can use SMIL 1.0 or SMIL 2.0 to add prerecorded content to a live
broadcast. Within a SMIL file, you treat a broadcast like any other clip,
furnishing a URL that points RealPlayer to the live stream instead of an ondemand clip. You can assign broadcast streams to SMIL regions to lay out the
presentation, and play a broadcast sequentially or in parallel with on-demand
clips.
SMIL can deliver an on-demand RealPix slide show along with live RealAudio,
for example. It cannot synchronize the on-demand clip with the live stream,
however. This is because the on-demand clip’s timeline starts when the viewer
requests the presentation, whereas the broadcast stream’s timeline starts when
the broadcast begins.
To illustrate this, suppose that viewer A requests the presentation 2 minutes
after the broadcast begins, and viewer B requests it 4 minutes after the
broadcast begins. At 10 minutes into the broadcast, both viewers hear the
170
CHAPTER 10: Planning a Broadcast
same audio, but viewer A’s RealPix clip is at its 8-minute mark, whereas viewer
B’s clip is at its 6-minute mark. Hence the relationship between the two
timelines varies for each viewer.
For More Information: For more on SMIL, see RealNetworks
Production Guide.
Broadcast Trial Runs
When you broadcast live content, you don’t get a second chance. It’s good
practice to perform a trial run to ensure that the equipment works properly
and that the broadcast results are what you expect. Because you can’t edit a
live broadcast the way you can a prerecorded file, it’s important to set your
audio levels and plan your video shots carefully in advance.
During both the trial run and the live broadcast, view the broadcast with
RealPlayer and confirm that the quality is good. When RealPlayer connects,
check that the content begins to play in a reasonable time, such as less than 15
seconds for a push broadcast or 30 seconds for the first request of a pull
broadcast. Display RealPlayer’s playback statistics to verify that the frame rate
is adequate, and that packet loss is not excessive.
When you broadcast using SureStream, you can change the RealPlayer
bandwidth preferences to display different SureStream streams. If you
experience problems during your trial run, you may need to reduce the
number of streams. Or, you may need to run the encoder on a more powerful
computer.
For More Information: See “Broadcast Load Management” on
page 177 for additional points about managing processor load
during a broadcast. Refer to Chapter 4 and Chapter 5 for tips
about encoding audio and video in a live broadcast.
Simulated Live Broadcasts
The broadcasting techniques described in this chapter apply only to the
broadcasting of live content. Using the Simulated Live Transfer Agent (SLTA)
of Helix Server, you can broadcast prerecorded clips as if they were live events.
The effect is that of a radio station that broadcasts the same prerecorded song
to every listener at the same time. SLTA even allows you to define playlists that
you can update during the broadcast.
171
RealProducer 11 User’s Guide
To use SLTA, you encode clips as described in Chapter 6. All clips used in an
SLTA broadcast must be encoded for the same audience or audiences. You
then transfer the clips to Helix Server, set up an SLTA playlist, and run the
SLTA utility from the Windows or UNIX command line. The chapter on
simulated live broadcasts in Helix Server Administration Guide explains how to
do this.
Broadcast Distribution
In the simplest method of broadcasting, you send a single stream to a single
server through a push or pull broadcasting method. Or, you send a single
stream to multiple computers through multicasting. RealProducer allows you
to send multiple streams to multiple destinations, however. As well, Helix
Server offers several features for forwarding streams to additional servers. The
following sections describe methods for distributing broadcast streams to
multiple points.
Multiple Destinations
Using RealProducer, you can define multiple server destinations for a single
encoded output. This allows you to forward the same broadcast to more than
one Helix Server. In push broadcasting, you define each destination explicitly.
In pull broadcasting, a new destination is created each time a Helix Server
pulls the broadcast from RealProducer.
Each additional server destination that you define for an output adds to your
outgoing bandwidth requirement. If your broadcast stream is 350 Kilobits, for
example, sending it to a second destination increases the total bandwidth to at
least 700 Kilobits. Because the same stream is sent to each destination, using
multiple destinations does not increase the processor load for live encoding.
Parallel Outputs
Using parallel outputs, you can encode two or more streams with different
properties. For example, you might want to encode live audio as a lowbandwidth, SureStream CBR stream for dial-up modem users, and as a highbandwidth VBR stream for cable modem users. Because the same encoded
stream cannot be both CBR and VBR, you create two separate outputs.
As shown in “Destinations and Outputs” on page 19, you can send each
encoded output to the same server destination, or to different server
172
CHAPTER 10: Planning a Broadcast
destinations. If the same Helix Server broadcasts both streams, the streams
must have different names. Your Web page then gives viewers the choice of a
low-speed broadcast or a high-speed broadcast.
Each output that you add increases the amount of processing power that
RealProducer requires, so you need to ensure that your computer is fast
enough to handle the load. The processing power required for each output
depends on the audiences selected. A multi-rate SureStream encoding requires
more processing than encoding for a single audience. As well, encoding video
requires much more processing power than encoding audio-only input.
For More Information: To set up parallel outputs, you create a
job file as described in Appendix B. You then run the broadcast
through the command-line application, which Chapter 14
covers.
Server Splitting
Each Helix Server is limited in the number of viewers who can receiver the
broadcast. These limits are based on the server license, as well as practical
constraints such as the amount of outgoing bandwidth. For a large broadcast,
you may need to use multiple Helix Servers to reach your anticipated
audience. Although RealProducer can send a broadcast stream to multiple
server destinations, it is often more efficient to have the servers forward (or
split) the broadcast stream themselves.
One-to-Many Splitting
The preceding illustration shows a simple splitting arrangement in which
RealProducer sends a broadcast stream to one Helix Server acting as a
transmitter. This server then splits the stream to three additional Helix Servers
173
RealProducer 11 User’s Guide
acting as receivers. The transmitter and receivers can each stream the broadcast
to multiple viewers.
The method by which RealProducer delivers the stream to a transmitter is
entirely independent of the manner in which the transmitter splits the stream.
For example, RealProducer may use an account-based push to contact the
transmitter, whereas the transmitter splits the stream by multicasting to the
various receivers. As well, the receivers may be set up to pull the stream from
the transmitter, even though RealProducer pushes the broadcast stream to the
transmitter.
For More Information: Setting up a splitting arrangement
requires the services of an experienced Helix Server
administrator. For more information on available options,
refer to the chapter on transmitters and receivers in Helix Server
Administration Guide.
Optional Broadcasting Features
The following sections describe optional features that you can use when
broadcasting to Helix Server. In some instances, the Helix Server
administrator must enable or configure the feature on the server.
Encoder Redundancy
When broadcasting through account-based or password-only push methods,
you can provide encoder redundancy through two or more RealProducers
encoding the same live event. When you start each broadcast stream, you
specify the same stream name, but add a unique, numbered delimiter, such as
.1 or .2 . When the RealProducers connect to Helix Server, they form a queue
based on connection order. Consider this example:
live.rm.2 connects first
live.rm.3 connects second
live.rm.1 connects third
Under normal circumstances all viewers receive the stream live.rm , and have no
knowledge of which RealProducer encoded the stream. In the preceding
example, live.rm originates as live.rm.2 . If the RealProducer delivering live.rm.2
fails, RealPlayers connect to the next live.rm stream in the queue, which is
live.rm.3 . If live.rm.2 returns, it goes to the bottom of the queue. A subsequent
failure of live.rm.3 causes media players to connect to live.rm.1, and so on.
174
CHAPTER 10: Planning a Broadcast
RealProducer Redundancy
Note: Encoder redundancy is enabled automatically on Helix
Server. Its use changes the broadcast URL, though. The Helix
Server administrator may also require the use of a different
delimiter, such as a tilde (~), in the stream identifier. Confer
with the administrator on these issues before using encoder
redundancy.
Tip: To provide optimal redundancy, each encoder should be as
independent as possible. For example, use multiple video
cameras connected to separate RealProducer computers that
use different power supplies and network connections.
For More Information: Refer to the unicasting chapter of Helix
Server Administration Guide for information about encoder
redundancy configuration options.
Archiving
When you broadcast a live event, you can also record the event to a clip for
later, on-demand streaming. You can archive the clip through RealProducer,
Helix Server, or both. A primary consideration is disk space. Writing a long
broadcast to a clip can consume considerable disk space depending on the
broadcast bandwidth. The server may have more available space than your
RealProducer computer. As well, creating the archive on the server eliminates
the need to upload the archive clip later if you want to stream it on demand.
175
RealProducer 11 User’s Guide
RealProducer Archiving
To archive a broadcast on RealProducer, you define a clip destination along
with the server destination. RealProducer automatically creates a new clip if
the existing archive reaches the operating system limit (typically 2 or 4
Gigabytes). If you run the broadcast from the command-line, or manually
create a job file for the broadcast, you can specify a different file rolling limit
based on broadcast time or file size.
For More Information: The section “Creating a Destination Clip”
on page 92 explains how to create an archive clip. For
information on file rolling through the command line, see
“Output and Destination Options” on page 271. The section
“File Destinations” on page 330 explains how to define file
rolling through a job file.
Helix Server Archiving
The Helix Server administrator can turn on archiving for RealMedia
broadcasts. Like RealProducer, Helix Server can create multiple archive files
based on the broadcast time (such as a new file every 15 minutes), or file size
(20 Megabytes per file, for example). The administrator can also set up
selective archiving rules that archive only certain broadcast streams based on
the presence of a virtual path in the stream name.
For More Information: See the unicasting chapter of Helix Server
Administration Guide for information about archiving.
Virtual Paths
When you encode a broadcast, you define a stream name such as live.rm .
Optionally, you can precede the stream name with a a virtual path, as in
news/live.rm . The virtual path does not correspond to any physical directory or
mount point. Rather, it serves as a flag to Helix Server to apply certain rules
for archiving or splitting.
The Helix Server administrator can set up archiving rules based on the
presence of virtual paths. For instance, the administrator may archive all
broadcasts that include the news/ path in a certain directory, and all
broadcasts that use the sports/ path in a different directory. A second use is
with splitting, which the section “Server Splitting” on page 173 describes. The
virtual path can define which broadcast streams are split to which receivers.
176
CHAPTER 10: Planning a Broadcast
Note: Confer with the Helix Server administrator about the
path name to use. When you include the virtual path with the
broadcast stream name, URLs to the broadcast must include
the virtual path as well.
For More Information: For information about server-side
archiving rules, refer to the unicasting chapter in Helix Server
Administration Guide. That manual’s chapter on transmitters
and receivers explains splitting rules.
Broadcast Load Management
When you broadcast live content, it is crucial that your RealProducer machine
encode the input audio or video in real-time. Otherwise, the encoding process
falls behind the input media and the broadcast stalls. RealProducer provides
several features that automatically lowers the processing load as necessary.
The following sections explain these load management features, and discuss
the encoding options that you may want to avoid because of the processing
power they require.
Note: The number of SureStream audiences you choose for a
constant bit broadcast greatly affects the processing
requirements. See “CBR Broadcasts” on page 167 for more
information.
Tip: You will get superior encoding results using a machine
with two or more processors. The section “RealVideo Codecs”
on page 61 explains how RealProducer manages multiple
processors. No matter how fast of a machine you use, though,
you should not run other, unnecessary applications or services
on the RealProducer machine during a live broadcast.
Broadcast Load Testing
Before running a broadcast, you can test your RealProducer computer to
determine if it can handle the processing load.
Testing Load Levels with a Trial Broadcast
The best way to do this is to run a test broadcast, as advised in the section
“Broadcast Trial Runs” on page 171. During the broadcast, look for messages
177
RealProducer 11 User’s Guide
about load reduction and frame dropping printed to the command-line
application screen or displayed in the log viewer. After the broadcast trial has
completed, check the statistics to ensure that the average video frame rate was
acceptable.
For More Information: Refer to the sections “Viewing Log
Messages” on page 147 and “Monitoring Statistics” on page
144.
Testing Load Levels through Clip Encoding
If you do not have a Helix Server available for a broadcast load test, capture
live input to a RealMedia clip as described in Chapter 6. Select the same
options and audiences you plan to use in the broadcast. If RealProducer can
encode the clip in less time than it takes the clip to play (for example, 45
seconds to encode a 60-second video file), it can typically handle the broadcast
load.
Tip: When testing with a video clip, turn off two-pass encoding
as described in “Choosing Video Options” on page 99.
Video Codecs and Encoding Complexity
As noted in the section “Encoding Complexity Modes” on page 81, you can set
a video complexity level of low, medium , and high . If you use the default setting
of high , RealProducer automatically lowers the level if the encoding process
cannot keep up with the video input. This scales down the video quality, but
keeps the broadcast flowing. You therefore do not need to change the level
manually when broadcasting unless you specifically want to reserve processing
power for other applications on the RealProducer computer.
By default, RealProducer uses RealVideo 10, which provides the highest video
quality, but also requires the most processing power. For best results, stick
with RealVideo 10 and let RealProducer reduce the encoding complexity
automatically. If you use RealProducer Plus and still lack processing power,
you can switch to RealVideo 9, which requires less processing power.
RealVideo 8, in turn, requires less processing power than RealVideo 9.
Tip: YUV12, also known as I420, is the native color format used
by RealVideo codecs. Capturing video input as I420 improves
performance by removing the need to convert the color format
before encoding.
178
CHAPTER 10: Planning a Broadcast
Automatic Frame Rate Reduction
If necessary, RealProducer scales down the encoded frame rate to keep up with
the media input stream. Most audience settings specify a preferred frame rate
of 15 or 30 frames per second. RealProducer attempts to provide the preferred
rate, but encodes at a slower rate if necessary if the encoding process begins to
maximize the CPU usage. Check the log viewer for reductions in frame rates.
To keep the frame rate encoding adequate, you may need to eliminate other,
CPU-intensive features, or broadcast using a faster computer.
Note: RealProducer may also lower the encoded frame rate
because of the bandwidth constraints of the chosen broadcast
audience. The RealProducer log does not report these rate
reductions because they do not result from CPU bottlenecks.
The RealPlayer playback statistics panel lists the broadcast
stream’s frame rates, however.
Video Filters, Resizing, and Cropping
The section “RealVideo Filters” on page 76 explains the video prefilters that
you can use during a broadcast. The black-level, de-interlace, and low noise
filters are relatively safe to use because of their low processing needs. Resizing
a video is highly processor intensive and should not be used when
broadcasting. However, cropping a video can speed the encoding process
because it decreases the amount of video data that must be encoded.
Tip: When possible, use the video capture card to set the video
input to the appropriate size. Resizing through hardware is
generally faster than resizing through software. See “Video
Encoding Dimensions” on page 73 for tips about selecting the
video height and width.
Audio Resampling
RealAudio codecs require audio input to have a certain sampling rate. If
necessary, RealProducer resamples the audio to the necessary rate before
encoding. It is helpful to avoid resampling by ensuring that your audio input
uses a preferred sampling rate. See “Sampling Rate” on page 38 for details.
179
RealProducer 11 User’s Guide
Visual Monitoring
If you use the RealProducer graphical application to run the broadcast,
RealNetworks highly recommends that you turn off the visual display of the
input video and encoded output to lessen the processor load. Refer to the
section “Monitoring Video Output” on page 144 for instructions.
End-to-End Broadcast Latency
During a live broadcast, a viewer experiences a latency of approximately 10
seconds between the time events occur and when they display in RealPlayer.
Although this amount of latency is acceptable in most circumstances, it may
be too long in certain cases, such as video-conferencing or a Web broadcast
synchronized to a television event. In these cases, you can lower the end-to-end
broadcast latency to as low as two seconds. But if data packets are lost on the
network, the broadcast is more likely to stutter.
Note: Latency in this context refers to the difference in time
between when live events occur and when they appear in
RealPlayer. There is also a separate, startup latency that occurs
when a viewer clicks a link to a broadcast, as described in
“Video Startup Latency” on page 169.
Latency Modes
You cannot precisely control the amount of broadcast latency because
network conditions are variable and unpredictable. However, RealProducer,
Helix Server, and RealPlayer provide features that allow you to reduce
broadcast latency significantly under stable network conditions. These
180
CHAPTER 10: Planning a Broadcast
products support three separate latency modes, summarized in the following
table.
Summary of End-to-End Latency Modes
Latency
Mode
Expected
End-to-End
Latency
Preroll for
CBR Video
Preroll for
VBR Video
Preroll for
Audio-Only Clips
Error
Resiliency
high
0–normal
10 or more
seconds
4 seconds
4 seconds
23 milliseconds
to 2.3 seconds
depending on
the codec
1–reduced
4 or more
seconds
2 seconds
2 seconds
500 milliseconds moderate
1 second
0.5 seconds
23 to 480
milliseconds
depending on
the codec
2–minimal 2 or more
seconds
low
Note: You can change the default video preroll from 4 seconds
as described in “Video Startup Latency” on page 82. The new
default then applies to a broadcast when latency reduction is
not used (mode 0). The video prerolls of 2, 1, or 0.5 seconds
remain effective for latency modes 1 and 2 regardless of the
default video preroll, however.
Encoding Latency
Encoding latency is the time that elapses from when RealProducer receives the
raw audio and video input to when it transmits packets of encoded RealAudio
or RealVideo data to Helix Server. When you choose a reduced latency mode,
RealProducer does three things:
• RealProducer
encodes a latency mode setting into the live stream. This
allows Helix Server 11 and later, as well as RealPlayer 11 and later, to
change their stream handling characteristics based on the desired latency.
The following sections explain how Helix Server and RealPlayer respond
to the latency setting.
• RealProducer
lowers the streaming preroll for RealVideo. This buffers
video data for a smaller amount of time and keeps the data displayed in
RealPlayer more closely synchronized with the live input. The table
181
RealProducer 11 User’s Guide
“Summary of End-to-End Latency Modes” on page 181 describes the
preroll reduction.
• RealProducer
reduces the size of, or completely eliminates, superblocks
for RealAudio streams. This allows it to transmit the RealAudio data to
Helix Server faster. The following section explains superblocking and the
effects of reducing it.
RealAudio Superblocks and Latency Reduction
When RealProducer encodes a live audio stream, whether for an audio-only or
a video broadcast, it does not create and transmit audio packets until it has
enough packets to create a superblock. The use of audio superblocks reduces
the effect of lost packets, but increases end-to-end latency in audio broadcasts.
Therefore, low-latency broadcasts reduce the size of audio superblocks or
eliminate them entirely.
Audio With Superblocks
Consider the simplified example depicted in the following illustration. When
a listener tunes to an audio broadcast, the first superblock of data the listener
receives consists of five data packets constituting the first ten seconds of the
audio. (In reality, superblocks are smaller, ranging from about 20 milliseconds
to a few seconds.) The audio does not play until RealPlayer has received all of
the packets that constitute the superblock.
Broadcast Audio in Superblocks
In the preceding figure, the first data packet contains the audio for the third
and sixth seconds of the audio, while the second block contains the fourth
and seventh seconds of the audio. Suppose that the second packet is lost.
Instead of a continuous, two-second gap in the audio, the listener hears a onesecond gap at the fourth second, and a one-second gap at the seventh second.
This is less disruptive to the listening experience. The superblock thereby
minimizes broadcast disruption if packet loss occurs.
Because the superblock in the preceding figure contains 10 seconds of audio,
RealProducer must encode the audio for 10 seconds before distributing the
182
CHAPTER 10: Planning a Broadcast
audio in the superblock’s five distinct data packets. This introduces a latency
of 10 seconds before RealProducer sends the data packets to Helix Server. So
although the listening experience is enhanced if a packet is lost, the use of
superblocks increases end-to-end latency.
For More Information: Choosing a latency mode setting
automatically sets the superblock size. However, you can also
use the maxPacketInterleavingDuration property to set a
superblock size manually for a job file output as described in
“Media Profile Properties” on page 335. Defined in the
packetizers section of an audience file, this property sets the
superblock size on a stream-by-stream basis, as described in
“Maximum Superblock Size” on page 359.
Audio Without Superblocks
When superblocks are not used, RealProducer creates and transmits a packet
of audio media to Helix Server as soon as it has encoded enough data to form
the packet. The following figure illustrates RealProducer transmitting packets,
each of which contains two seconds of audio data, to Helix Server as soon as it
creates the packets. Because superblocks are not used, a lost packet results in a
continuous, two-second gap of audio.
Broadcast Audio without Superblocks
Note: In an actual broadcast, packets are typically smaller than
those illustrated in the preceding figure. Therefore, the
encoding latency is generally much lower than two seconds,
and a lost packet results in a significantly smaller audio gap.
Helix Server Latency
When Helix Server version 11 or later receives a broadcast stream from
RealProducer, it buffers the stream for a certain time before delivering the
stream to RealPlayer. If you broadcast through a splitting arrangement in
which the broadcast stream passes through a series of Helix Servers before
183
RealProducer 11 User’s Guide
being viewed, each server in the chain buffers the stream before forwarding it
to the next server, increasing the end-to-end latency at each server.
Helix Server 11 and later automatically adjust buffering times based on the
latency mode set in the broadcast stream. This ensures that the server uses less
buffering when reduced end-to-end latency is desired. The following table lists
the default receiver buffering used with each latency mode.
Receiver Buffering Based on Latency Mode
Latency Mode
Receiver Buffering (Helix Server 11 and later)
0 – normal latency
1 second
1 – reduced latency
0.05 seconds
2 – minimal latency
none
Note: End-to-end latency reduction requires that all servers are
Helix Server 11 or later. For more about using Helix Server in a
low-latency broadcast, refer to the chapter on transmitters and
receivers in Helix Server Administration Guide.
Tip: The amount of forward error correction (FEC) used by
RealProducer also affects how much receiver buffering should
be used. For low latency, you may want to reduce or turn off
error correction. Although adding error correcting packets to a
low-latency stream does not cause problems with latency
reduction, the packets may arrive too late to be of use. For
more information, see “Forward Error Correction” on page
207.
RealPlayer Latency
Low latency broadcasts are recommended only when most viewers are using
RealPlayer 11 or later. Based on the latency mode flag, these players do not
pause a presentation momentarily to wait for resend requests or out-of-order
packets. They also request fewer or no resends for lost packets. Earlier versions
of RealPlayer may request resends of dropped packets, introducing
unnecessary traffic into the network.
184
CHAPTER 10: Planning a Broadcast
Network Latency
In a live broadcast, each network router through which a media packet passes
adds a small amount of latency, around 25 milliseconds per router. Hence,
there is incremental, end-to-end latency the further a broadcast travels and the
more routers it traverses. Additionally, a satellite uplink can add up to one
second of latency. This latency is not configurable when broadcasting through
the Internet. However, configuring the packet size optimally helps to make the
network routing as efficient as possible.
Every packet-based network has a packet size limit known as a maximum
transfer unit (MTU). If a data packet is larger than the MTU, a network router
splits the packet. You therefore incur more network overhead if packets are so
large that routers must split them. Conversely, a network runs less efficiently
if packets are too small because routers must read the destination information
in each packet before forwarding the packet. Smaller packets mean more
packets, which results in more router reads.
Common MTU Sizes
Although network MTUs are configurable, the following values are common:
• Most
local area networks use an MTU of 1500 bytes.
• Mobile
networks typically have an MTU of 1400 to 1500 bytes.
The following table lists the default, maximum packet size for video encoded
by RealProducer. At high bit rates, the maximum packet size is close to the
standard MTU for most networks. At lower streaming speeds, however, the
default packet size is smaller. You may therefore raise the maximum packet
size to gain some efficiency on the network.
Default Maximum Packet Sizes for Video
Target Bit Rate
Packet Size
Greater than 256 Kilobits
1352 bytes
Between 128 and 256 Kilobits
1000 bytes
Below 128 Kilobits
600 bytes
Tip: Because each router hop adds data to a packet, configure
packet size to be lower than the MTU.
185
RealProducer 11 User’s Guide
Setting the Packet Size
For information about setting the maximum packet size through
RealProducer, refer to the following sections:
• See
“Changing the Maximum Packet Size” on page 217 for information
about setting the broadcast packet size in RealProducer.
• The -mtu
option sets the packet size for the command-line application, as
described in “Maximum Packet Size (-mtu)” on page 279.
• In
the job file media profile section, the maxPacketSize property sets the
maximum packet size for an output. See “Media Profile Properties” on
page 335.
• Defined
in the packetizers section of an audience file, the maxPacketSize
property sets the packet size on a stream-by-stream basis, as described in
“Maximum Packet Size and Duration” on page 358.
Tips For Creating Presentations with Lowered Latency
If your low-latency broadcast is part of a multimedia presentation that uses
SMIL 2.0, you should reduce the latency caused by static clips. For example, if
live audio streams along with a Flash presentation, tune the Flash
presentation to use a low preroll.
You can also use the SMIL attribute and value syncBehavior=”independent” with
a static clip. This prevents RealPlayer from keeping the clip synchronized to
the broadcast. A long clip preroll or rebuffering does not then affect the
broadcast. The following is a sample SMIL 2.0 file that plays live audio in
parallel with a RealPix slideshow:
<smil xmlns=”http://www.w3.org/2001/SMIL20/Language”>
<body>
<par>
<audio src=”rtsp://helixserver.example.com/broadcast/live.rm”/>
<ref src=”rtsp://helixserver.example.com/media/images.rp”
syncBehavior=”independent”/>
</par>
</body>
</smil>
For More Information: For more information, refer to the Flash
chapter and SMIL groups chapter of RealNetworks Production
Guide.
186
CHAPTER 10: Planning a Broadcast
Setting the Latency Mode
For information about setting the latency mode in RealProducer, see the
following sections:
• The
section “Reducing Broadcast Latency” on page 216 explains how to
set the latency mode in the RealProducer graphical application.
• The -lm
option defines the latency mode for the command-line
application, as described in “Latency Mode (-lm)” on page 279.
• You
can set the latency mode through the latencyMode property in the
media profile section of the job file. See “Latency Reduction” on page 338.
187
RealProducer 11 User’s Guide
188
CHAPTER
Chapter 11:
RUNNING A BROADCAST
11
This chapter explains how to set up a broadcast by defining server
destinations and templates. The procedure differs depending on the
type of broadcast you are performing. Refer to Chapter 10 for
background about broadcasting options.
Tip: You can also encode the output as an archive clip during
the broadcast. The section “Creating a Destination Clip” on
page 92 explains how to do this.
Running an Account-Based Broadcast
Account-based, push broadcasting provides easy set-up and reliable delivery of
the broadcast stream. It allows you to send a stream to Helix Server version 9
or later. In this method, RealProducer maintains a monitoring connection to
Helix Server. This connection allows it to pass a user name and password to
authenticate access to the server. Helix Server uses this connection to send
statistics about the broadcast stream back to RealProducer.
For More Information: Refer to the section “Running an
Account-Based Broadcast” on page 189 for set-up instructions.
Advantages of Account-Based Broadcasting
Because of its monitoring connection, account-based broadcasting is a good
method to use if you do not have access to the monitoring pages on Helix
Server. The feedback from the monitoring connection informs you if the
access attempt failed because of an invalid password, for instance. It also
informs you if the connection between RealProducer and the server was
dropped and automatically restarted.
Setting up an account-based broadcast requires a minimal amount of
knowledge about how Helix Server is configured. You need to know the server
IP address, and have a valid user name and password for an encoder login
189
RealProducer 11 User’s Guide
defined by the Helix Server administrator in the server’s authentication
database.
Account-Based Broadcast Steps
The following figure illustrates the interaction between RealProducer, Helix
Server, and RealPlayer in an account-based broadcast.
Account-Based, Push Broadcast
1. RealProducer establishes its monitoring connection with Helix Server.
Using this connection, RealProducer sends a user name and password
that authenticates its attempt to access the server.
2. After Helix Server authenticates the broadcast, it informs RealProducer
how to make the broadcast connection, telling it which server ports to use,
for example.
3. RealProducer establishes the broadcast stream connection to Helix Server.
It begins to send the encoded packets, whether or not any RealPlayer users
have requested the broadcast yet.
4. A viewer typically requests the broadcast by clicking a link in a Web page.
This launches RealPlayer, which requests a broadcast stream from Helix
Server.
5. Helix Server streams the broadcast to RealPlayer.
Preparing Helix Server for an Account-Based Broadcast
Helix Server requires minimal configuration to receive and distribute an
account-based broadcast. Confer with the server administrator on the
following issues, which are covered in the unicasting chapter of Helix Server
Administration Guide:
190
CHAPTER 11: Running a Broadcast
• RealProducer
requires a valid user name and password. These values are
defined in the Helix Server authentication database under the
SecureRBSEncoder realm. If you previously broadcasted using RealProducer
8.5 or earlier, your user name and password were defined under a different
authentication realm and will not work with RealProducer 11.
Tip: If you are the Helix Server administrator, you can connect
using the user name and password for Helix Administrator.
For greater security, however, define a different user name and
password for RealProducer.
• The
broadcast requires at least two ports on Helix Server for the stream
data, whether you use TCP or UDP. RealProducer and Helix Server
negotiate which ports to use. Possible ports are in the range 50001 to
50050 unless the Helix Server administrator changes the range.
Tip: If you select UDP transport, ensure that any firewalls
between RealProducer and Helix Server allow UDP data sent to
Helix Server on the ports in the defined range. If you are
broadcasting through a firewall performing network address
translation (NAT), see “Listen Address” on page 207.
• If you want to archive or split the broadcast on Helix Server, you may need
to apply archiving or splitting rules. This requires that the Helix Server
administrator define the rules for a specific virtual path that precedes the
stream name, as in news/live.rm . For background, refer to “Virtual Paths”
on page 176.
• If
you plan to use redundant encoders, verify the stream delimiter
expected by Helix Server. This is typically a period, as in live.rm.1 and
live.rm.2 . For more on this topic, see “Encoder Redundancy” on page 174.
• Confer
with the Helix Server administrator if you plan to lower the
broadcast latency as described in “End-to-End Broadcast Latency” on page
180. Lowering the latency automatically reduces the receiver buffering on
Helix Server version 11 and later, which may not be desirable. The Helix
Server administrator can override the buffering value, however.
• The
URL for the broadcast varies depending on the Helix Server features,
such as viewer authentication, that you use. The section “Standard URL
for a Push Broadcast” on page 219 explains the basic URL format.
191
RealProducer 11 User’s Guide
• Although
RealProducer receives statistics about the broadcast stream, it
does not receive statistics about the actual broadcast, such as how many
RealPlayer viewers connected and how long they watched. Depending on
the method Helix Server uses to broadcast the stream to the players, as
well as the server logging parameters, the server log files may record these
statistics.
Defining the Account-Based Server Destination
This section explains how to define the account-based broadcast on
RealProducer. You can create the server destination anytime before the
broadcast, and can save the settings to a template for future use. You’ll need
the following information about Helix Server:
• Helix
Server IP address or DNS name
• Helix
Server HTTP port number
• valid
user name defined in the SecureRBSEncoder realm of the Helix Server
authentication database
• valid
➤
password for the user name
To set up an account-based server destination:
1. If you have multiple jobs open, click the appropriate job file name in the
job manager.
2. Select File>Add Server Destination to display the server destination dialog.
Or, click the server icon in the destinations area.
3. Enter a description of the server in the Destination Name field. This is for
your reference only and does not affect the broadcast. If you save the
destination as a template, this entry becomes the name of the template in
the graphical application, as well as the file name of the server destination
file.
4. In the Stream Name field, enter a name for the broadcast stream. This
name resembles a clip name and should use the appropriate extension,
either .ra , .rv, or .rm for a constant bit rate stream. It should be .rmvb for a
variable bit rate stream. This name appears in the broadcast URL.
The stream name can include uppercase or lowercase letters, numbers, an
underscore (_), and a dash (-). Spaces are not allowed. If you are using
encoder redundancy, include the appropriate stream delimiter and a
unique number for this encoder:
192
CHAPTER 11: Running a Broadcast
live.rm.2
5. From the Broadcast Method pull-down list, select Push, Account-Based
Login (Helix Server) .
6. For Server Address, enter a version 4 IP address, version 6 IP address, or
DNS name of the Helix Server used for the broadcast. The following are
examples of each type of address:
• 207.188.7.176
• FEDC:BA98:7654:3210:FEDC:BA98:7654:3210
• helixserver.example.com .
7. The optional Path field specifies a virtual path that can be used for
archiving or splitting on Helix Server. Use a simple name followed by a
forward slash, such as news/ .
8. For Port, specify the HTTP port on Helix Server. The default value is port
80, which is the server’s default HTTP port. For account-based
broadcasting, RealProducer uses its monitoring connection to contact
Helix Server on this port and deliver the broadcast stream information.
RealProducer and Helix Server then negotiate which UDP or TCP ports to
use for the broadcast data.
9. In the Username and Password fields, enter a valid encoder user name and
password defined in Helix Server’s authentication database. The
broadcast connection fails if either value is incorrect. If you are saving the
destination as a template, you can click Remember password to store the
user name and password in the template file.
Warning! The password is saved as plain text in the job file or
the server template. If you save the password, be sure that you
maintain appropriate security on these files.
10. Under Transport, click the radio button for UDP or TCP to select the type of
protocol to use for the broadcast stream. UDP is preferred, but may be
blocked by firewalls. See “Broadcast Transport Protocols” on page 168 for
descriptions of TCP and UDP.
11. You may want to set the advanced broadcast options by clicking the
Advanced Options button. See “Changing Advanced Push Broadcast
Parameters” on page 205 for more information.
193
RealProducer 11 User’s Guide
12. To save the server destination as a template, click the Templates button
and select Save as Template. You can then use this server destination for
future broadcasts, as described in “Working with Server Templates” on
page 217.
13. Click OK to save the server destination. The destination appears in the
destinations section of the RealProducer main window. You can rightclick the destination name to edit or delete the destination.
14. To lower the broadcast latency, follow the instructions in “Reducing
Broadcast Latency” on page 216. Be sure that you first understand the
issues and ramifications of latency reduction, which the section “End-toEnd Broadcast Latency” on page 180 describes.
Starting and Stopping an Account-Based Broadcast
When you have completed the server destination and have defined the live
input as described in “Using Live Audio or Video as the Input” on page 90, you
can start the broadcast by clicking the Encode button. RealProducer
immediately begins to encode the live input, sending the broadcast stream to
Helix Server.
If configured to do so, the account-based broadcast method automatically
reconnects a dropped broadcast stream. Because of its monitoring connection,
RealProducer receives broadcast statistics and notification if Helix Server has
stopped the broadcast. If the server stops the broadcast, RealProducer
terminates the stream and stops the encoding process. You can also terminate
the broadcast by clicking the Stop button.
For More Information: See “Monitoring Statistics” on page 144
for information about monitoring a broadcast in progress.
Setting Up a Password-Only Broadcast
Unlike account-based broadcasting, password-only broadcasting does not
establish a monitoring connection. It therefore incurs less network overhead,
but it receives no feedback from Helix Server. This broadcast method allows
you to send a live stream to Helix Server version 9 or later. You must set up the
server as a receiver in a splitting arrangement, however.
194
CHAPTER 11: Running a Broadcast
Advantages of Password-Only Broadcasting
Because it sets up no monitoring connection between RealProducer and Helix
Server, password-only broadcasting requires less bandwidth and processor
power on the RealProducer machine. This makes the broadcast more efficient,
especially if you have multiple server destinations. Password-only broadcasting
also lightens the load on Helix Server because the server does not need to
generate broadcast statistics for RealProducer.
A password-only broadcast re-establishes its connection automatically. If the
broadcast connection fails for some reason, RealProducer continues to send
the stream to Helix Server. It automatically encodes the broadcast metadata
(such as the stream name) and password into the stream at regular intervals.
This allows Helix Server to re-establish the broadcast once it begins to receive
the stream data again.
For More Information: The section “Metadata Resend Interval”
on page 206 explains the advanced parameter that affects how
long it takes Helix Server to re-establish a dropped broadcast
stream.
Disadvantages of Password-Only Broadcasting
Password-only broadcasting is recommended only when you operate both
RealProducer and Helix Server. Each broadcast stream protected by a unique
password requires a separate receiver definition on Helix Server. This
broadcasting method therefore requires more Helix Server configuration than
does account-based broadcasting. Because the server provides no feedback, it
is impossible to verify from RealProducer if the log-in attempt failed. You can
use Helix Server’s monitor, however, to determine if the broadcast connection
has been established.
Password-Only Broadcast Steps
The following figure shows the interaction between RealProducer, Helix
Server, and RealPlayer in a password-only broadcast.
195
RealProducer 11 User’s Guide
Password-Only, Push Broadcast
1. As soon as it starts encoding the broadcast stream, RealProducer sends
the stream packets to the Helix Server address. It receives no feedback that
the broadcast packets have been received, encoding the stream metadata
and server login password into the stream at regular intervals.
2. A viewer typically requests the broadcast by clicking a link in a Web page.
This launches RealPlayer, which requests a broadcast stream from Helix
Server.
3. Helix Server delivers the broadcast to RealPlayer.
Preparing Helix Server for Password-Only Broadcasting
In a password-only broadcast, RealProducer acts as a transmitter and Helix
Server functions as a receiver in a splitting arrangement. This highly robust
configuration requires coordinated set-up on both ends. The chapter on
transmitters and receivers in Helix Server Administration Guide explains
splitting, and shows how to set up the server as a receiver. Before running a
password-only broadcast, confer with the server administrator on the
following issues:
• To
be configured as a receiver, Helix Server must be licensed for broadcast
distribution. Clicking the About link in Helix Administrator displays the
Helix Server licensing information.
• To
connect to the Helix Server receiver, RealProducer transmits a
password. Unlike with account-based broadcasts, this password is not
defined in the Helix Server authentication database. Rather, the receiver
configuration defines an authentication type of Basic and sets the
password. The Helix Server administrator will need to supply you with the
password to use.
Note: Optionally, the receiver can require no authentication. In
this case, you leave the password field in RealProducer blank.
Unsecured transmission should be used only if RealProducer
196
CHAPTER 11: Running a Broadcast
and Helix Server are on the same local network and a firewall
blocks attempts by encoders outside the firewall to reach Helix
Server.
• Both RealProducer and the receiver need to define the same range of ports
on Helix Server used for stream data. Default ports for both machines are
30001 to 30020, but you may need to change this range depending on the
receiver definition. When the broadcast begins, RealProducer and Helix
Server negotiate which ports in this range to use.
Tip: If you use the UDP transport, ensure that any firewalls
between RealProducer and Helix Server allow UDP data sent to
Helix Server on the ports in the defined range. If you are
broadcasting through a firewall performing network address
translation (NAT), see “Listen Address” on page 207.
• The
Helix Server receiver definition must specify the RealProducer IP
address as the transmitter source, and indicate whether TCP or UDP is
used. RealProducer must specify the same protocol in its server
destination.
• Because
this broadcast method does not provide feedback from Helix
Server, there is no way to verify from RealProducer that the server has
received the stream. Helix Server has a monitor that indicates encoder
connections, however.
• If you want to archive or split the broadcast on Helix Server, you may need
to apply archiving or splitting rules. This requires that the Helix Server
administrator define the rules for a specific virtual path that precedes the
stream name, as in news/live.rm . For background, refer to “Virtual Paths”
on page 176.
• If
you plan to use redundant encoders, verify the stream delimiter
expected by Helix Server. This is typically a period, as in live.rm.1 and
live.rm.2 . For more on this topic, see “Encoder Redundancy” on page 174.
• Confer
with the Helix Server administrator if you plan to lower the
broadcast latency as described in “End-to-End Broadcast Latency” on page
180. Lowering the latency automatically reduces the receiver buffering on
Helix Server version 11 and later, which may not be desirable. The Helix
Server administrator can override the buffering value, however.
197
RealProducer 11 User’s Guide
• The
URL for the broadcast varies depending on the Helix Server features,
such as viewer authentication, that you use. The section “Standard URL
for a Push Broadcast” on page 219 explains the basic URL format.
• Depending on the Helix Server logging parameters and the method it uses
to broadcast the stream to RealPlayer viewers, broadcast statistics (such as
the total number of viewers and how long each viewer watched) may be
recorded in the server log files.
Defining a Password-Only Server Destination
This section explains how to define a password-only broadcast on
RealProducer. You can create the server destination anytime before the
broadcast, and can save the settings to a template for future use. You’ll need
information about the Helix Server receiver configuration:
• Helix
Server IP address or DNS name
• receiver
• UDP
or TCP transport
• server
➤
port range
log-in password defined in the receiver configuration
To define a password-only server destination:
1. If you have multiple jobs open, click the appropriate job file name in the
job manager.
2. Select File>Add Server Destination to display the server destination dialog.
Or, click the server icon in the destinations area.
3. Enter a description of the server in the Destination Name field. This is for
your reference only and does not affect the broadcast. If you save the
destination as a template, this entry becomes the name of the template in
the graphical application, as well as the file name of the server destination
file.
4. In the Stream Name field, enter a name for the broadcast stream. This
name resembles a clip name and should use the appropriate extension,
either .ra , .rv, or .rm for a constant bit rate stream. It should be .rmvb for a
variable bit rate stream. This name appears in the broadcast URL.
The stream name can include uppercase or lowercase letters, numbers, an
underscore (_), and a dash (-). Spaces are not allowed. If you are using
198
CHAPTER 11: Running a Broadcast
encoder redundancy, include the appropriate stream delimiter and a
unique number for this encoder:
live.rm.2
5. From the Broadcast Method pull-down list, select Push, Password-Only
Login (Helix Server) .
6. For Server Address, enter a version 4 IP address, version 6 IP address, or
DNS name of the Helix Server used for the broadcast. The following are
examples of each type of address:
• 207.188.7.176
• FEDC:BA98:7654:3210:FEDC:BA98:7654:3210
• helixserver.example.com .
7. The optional Path field specifies a virtual path that can be used for
archiving or splitting on Helix Server. Use a simple name followed by a
forward slash, such as news/ .
8. For Port Range, indicate the range of ports on Helix Server where
RealProducer sends the broadcast packets (either TCP or UDP).
RealProducer and Helix Server negotiate the actual ports to use once the
broadcast begins. The default range is 30001 to 30020.
9. In the Password field, enter the password set in the Helix Server receiver
definition. The broadcast connection fails if the value is incorrect. If you
are saving the destination as a template, you can click Remember password
to store the password in the job file or server template file.
Warning! The password is saved as plain text in the job file or
the server template. If you save the password, be sure that you
maintain appropriate security on these files.
10. Under Transport, click the radio button for UDP or TCP to select the
protocol used for the broadcast stream. UDP is preferred, but may be
blocked by firewalls. See “Broadcast Transport Protocols” on page 168 for
descriptions of TCP and UDP.
11. You may want to set the advanced broadcast options by clicking the
Advanced Options button. See “Changing Advanced Push Broadcast
Parameters” on page 205 for more information.
12. If you want to save the server destination as a template, click the
Templates button and select Save as Template. You can then use this server
199
RealProducer 11 User’s Guide
destination for future broadcasts, as described in “Working with Server
Templates” on page 217.
13. Click OK to save the server destination. The destination appears in the
destinations section of the RealProducer main window. You can rightclick the destination name to edit or delete the destination.
14. To lower the broadcast latency, follow the instructions in “Reducing
Broadcast Latency” on page 216. Be sure that you first understand the
issues and ramifications of latency reduction, which the section “End-toEnd Broadcast Latency” on page 180 describes.
Starting and Stopping a Password-Only Broadcast
When you have completed the server destination and have defined the live
input as described in “Using Live Audio or Video as the Input” on page 90, you
can start the broadcast by clicking the Encode button. RealProducer
immediately begins to encode the live input, sending the broadcast stream to
Helix Server.
The password-based broadcast method automatically reconnects a dropped
broadcast stream. Because it maintains no monitoring connection with Helix
Server, however, RealProducer does not receive notice if Helix Server stops the
broadcast. You can terminate the broadcast from RealProducer by clicking the
Stop button.
Multicasting a Live Stream
In a multicast, RealProducer Plus can deliver the same broadcast stream to any
number of Helix Servers without increasing its outgoing bandwidth. In nonmulticast delivery (multiple server destinations with password-only
broadcasting, for example), each server receives a separate stream, adding to
RealProducer’s bandwidth requirement. The following figure illustrates
multicasting, which is available with Helix Server version 9 and later.
Multicasting is not available through RealProducer Basic.
200
CHAPTER 11: Running a Broadcast
Multicast Push
Multicasting requires that your RealProducer, Helix Servers, and all network
equipment such as routers be multicast-enabled, which is often possible on a
local area network (LAN). Multicasting may not be possible if RealProducer or
any of the Helix Servers needs to communicate to another broadcast
component across the Internet. Confer with your network administrator and
Helix Server administrator to determine if multicasting is available.
Tip: Multicast broadcasting can also be used for broadcasting
across a one-way satellite network where two-way connections
are not possible.
Preparing Helix Server for a Multicast
In a multicast, RealProducer acts as a transmitter and the Helix Servers
function as receivers in a splitting arrangement. This configuration requires
coordinated set-up on both ends. The chapter on transmitters and receivers in
Helix Server Administration Guide explains splitting, and shows how to set up
each server as a receiver. Before configuring a multicast, confer with the server
administrator on the following issues:
• To be configured as a multicast receiver, each Helix Server receiver must be
licensed for broadcast distribution. Clicking the About link in Helix
Administrator displays the Helix Server licensing information.
•A
multicast requires the use of a continuous range of multicast addresses
on your network. These addresses are in the range 224.0.0.0 to
239.255.255.255 .
• To
connect to the Helix Server receivers, RealProducer transmits a
password. Unlike with account-based broadcasts, this password is not
defined in the Helix Server authentication database. Rather, the receiver
configurations define an authentication type of Basic and set the
201
RealProducer 11 User’s Guide
password. The Helix Server administrator will need to supply you with the
password to use.
Note: Optionally, the receivers can require no authentication.
In this case, you leave the password field on RealProducer
blank. Unsecured transmission should be used only if
RealProducer and the Helix Servers are on the same local
network and a firewall blocks attempts by encoders outside the
firewall to reach the Helix Server receivers.
• Both
RealProducer and the Helix Servers define the same range of ports
on the receivers used for stream data. Default ports are 30001 to 30020,
but you may need to change this range depending on the receiver
definitions. When the broadcast begins, RealProducer and the Helix
Server receivers negotiate which ports to use.
Note: Ensure that any firewalls between RealProducer and
Helix Server allow multicast, UDP data sent to the Helix
Servers on the ports in the defined range.
• The
receiver definition on each Helix Server defines the RealProducer IP
address as the transmitter source, and must specify that udp/multicast is
used as the transport.
• If you want to archive or split the broadcast on Helix Server, you may need
to apply archiving or splitting rules. This requires that the Helix Server
administrator define the rules for a specific virtual path that precedes the
stream name, as in news/live.rm . For background, refer to “Virtual Paths”
on page 176.
• If
you plan to use redundant encoders, verify the stream delimiter
expected by Helix Server. This is typically a period, as in live.rm.1 and
live.rm.2 . For more on this topic, see “Encoder Redundancy” on page 174.
• Confer
with the Helix Server administrator if you plan to lower the
broadcast latency as described in “End-to-End Broadcast Latency” on page
180. Lowering the latency automatically reduces the receiver buffering on
Helix Server version 11 and later, which may not be desirable. The Helix
Server administrator can override the buffering value, however.
• The
URL for the multicast varies depending on the Helix Server features,
such as viewer authentication, that you use. The section “Standard URL
for a Push Broadcast” on page 219 explains the basic URL format.
202
CHAPTER 11: Running a Broadcast
• Depending on the Helix Server logging parameters and the method it uses
to broadcast the stream to RealPlayer viewers, broadcast statistics (such as
the total number of viewers and how long each viewer watched) may be
recorded in the server log files.
Defining a Multicast Server Destination
This section explains how to define a multicast server destination on
RealProducer. You can create the server destination anytime before the
multicast, and can save the settings to a template for future use. You’ll need
the following information about the Helix Server receivers and network
multicast configuration:
• multicast
• port
ranges on the receivers
• password
➤
address
on the receivers
To define a multicast server destination:
1. If you have multiple jobs open, click the appropriate job file name in the
job manager.
2. Select File>Add Server Destination to display the server destination dialog.
Or, click the server icon in the destinations area.
3. Enter a description of the server in the Destination Name field. This is for
your reference only and does not affect the broadcast. If you save the
destination as a template, this entry becomes the name of the template in
the graphical application, as well as the file name of the server destination
file.
4. In the Stream Name field, enter a name for the broadcast stream. This
name resembles a clip name and should use the appropriate extension,
either .ra , .rv, or .rm for a constant bit rate stream. It should be .rmvb for a
variable bit rate stream. This name appears in the broadcast URL.
The stream name can include uppercase or lowercase letters, numbers, an
underscore (_), and a dash (-). Spaces are not allowed. If you are using
encoder redundancy, include the appropriate stream delimiter and a
unique number for this encoder:
live.rm.2
203
RealProducer 11 User’s Guide
5. From the Broadcast Method pull-down list, select Push, Multicast (Helix
Server) .
6. For Multicast Address, enter the multicast address for the broadcast
stream. It must be in the range 224.0.0.0 to 239.255.255.255 .
7. The optional Path field specifies a virtual path that can be used for
archiving or splitting on Helix Server. Use a simple name followed by a
forward slash, such as news/ .
8. For Port Range, indicate the range of ports on the Helix Server receivers
where the broadcast packets will be sent. RealProducer and Helix Server
negotiate the actual ports to use once the broadcast begins. The default
range is 30001 to 30020.
9. In the Password field, enter the password defined in each Helix Server
receiver definition. The broadcast connection fails if the value is incorrect.
If you are saving the destination as a template, you can click Remember
password to store the password in the job file or server template file.
Warning! The password is saved as plain text in the job file or
the server template. If you save the password, be sure that you
maintain appropriate security on these files.
10. You may want to set the advanced broadcast options by clicking the
Advanced Options button. See “Changing Advanced Push Broadcast
Parameters” on page 205 for more information.
11. If you want to save the destination as a template, click the Templates
button and select Save as Template. You can then use this destination for
future multicasts, as described in “Working with Server Templates” on
page 217.
12. Click OK to save the server destination. The destination appears in the
destinations section of the RealProducer main window. You can rightclick the destination name to edit or delete the destination.
13. To lower the broadcast latency, follow the instructions in “Reducing
Broadcast Latency” on page 216. Be sure that you first understand the
issues and ramifications of latency reduction, which the section “End-toEnd Broadcast Latency” on page 180 describes.
204
CHAPTER 11: Running a Broadcast
Starting and Stopping a Multicast
When you have completed the server destination and have defined the live
input as described in “Using Live Audio or Video as the Input” on page 90, you
can start the multicast by clicking the Encode button. RealProducer
immediately begins to encode the live input, sending the broadcast stream to
Helix Server.
A multicast automatically reconnects a dropped broadcast stream based on
the metadata resend interval. Because it maintains no monitoring connection
with the Helix Server receivers, however, RealProducer does not receive notice
if the receivers stop the broadcast. You can terminate the broadcast from
RealProducer by clicking the Stop button.
Changing Advanced Push Broadcast Parameters
In the Server Destination dialog, clicking the Advanced Options button displays
a dialog in which you can configure the advanced settings for an accountbased, password-only, or multicast push broadcast. These settings primarily
affect how RealProducer attempts to reconnect to Helix Server if the broadcast
stream is dropped, and how it protects the broadcast stream against lost data.
You may want to leave these options set to their default values at first,
modifying them only if you experience disconnects or lost data between
RealProducer and Helix Server.
Note: For pull broadcasting, Helix Server defines the error
correction and metadata rates. You can set a single advanced
pull broadcasting parameter as described in “Defining a Pull
Broadcast Server Destination” on page 213.
TCP Reconnect
The TCP reconnection option is on by default. It affects the reconnection
method for account-based broadcasts, which use a TCP monitoring channel.
It also controls the reconnection method for password-only broadcasting if
you have chosen TCP rather than UDP as the broadcast protocol. In the server
definition file, the enableTCPReconnect property enables TCP reconnection.
The TCP reconnection interval sets the number of seconds that RealProducer
waits before attempting to reconnect to Helix Server. The interval period
begins when the operating system terminates the TCP connection because it
has received no response from Helix Server. In the graphical application, you
205
RealProducer 11 User’s Guide
set this value in the Time between attempts field. In the server destination file,
the TCPReconnectInterval property sets the value. Choose a value in seconds of 1
second or higher. A value of 0 is not valid. The default value is 10 .
Metadata Resend Interval
The metadata resend interval affects how RealProducer and Helix Server reestablish a dropped broadcast stream in password-only and multicast
broadcasts that use UDP as the transport. When RealProducer communicates
to Helix Server solely through UDP, it does not receive feedback from the
server and therefore cannot know if a broadcast stream has been dropped.
To protect against stream loss, RealProducer periodically encodes metadata
into the broadcast stream. This provides the information that Helix Server
needs to restart the stream, such as the stream name and the receiver
password. Through the graphical application’s Metadata resend interval field,
or the server destination file’s metadataResendInterval property, you specify
how frequently RealProducer encodes metadata into the stream. This value
determines the approximate, maximum time that viewers may need to wait for
RealPlayer to reconnect to a dropped broadcast. The default is 30 seconds.
Note: The metadata resend interval has no effect on password-
only broadcasts that use TCP transport. For these broadcasts,
as well as for account-based broadcasts, the TCP reconnection
values described in “TCP Reconnect” on page 205 control the
reconnection characteristics.
Statistics Update Interval
The statistics update interval determines how frequently Helix Server sends
statistics reports to RealProducer during an account-based broadcast. It is not
used with any other broadcast method. Set a value in seconds in the graphical
application’s Server statistics update... field or through the server destination
file’s statisticsUpdateInterval property. The default value is 10 seconds.
Packet Resend Requests and Listen Address
If Helix Server does not receive broadcast packets, it first attempts to
reconstruct the broadcast data using the forward error correction packets, as
described in “Forward Error Correction” on page 207. If that fails, it can
request RealProducer to resend the packets. There is no guarantee, however,
206
CHAPTER 11: Running a Broadcast
that RealProducer will still have the packets buffered or that they will arrive in
time to be useful for the broadcast. The resend feature functions with
account-based and password-only broadcasts that use the UDP transport. It is
ignored for broadcasts that use a TCP transport, as well as multicasts.
Packet Resends
The packet resend feature is turned on by default. Because the resend requests
increase network overhead slightly, you may want to turn the resend feature
off to keep tight control over network bandwidth use. To do so, uncheck the
packet resend option in the graphical application, or set a value of False for the
allowResends property in the server destination file.
Note: The Helix Server receiver configuration can turn off the
feature for making resend requests. In this case, the
RealProducer setting has no effect because the server will never
make these requests.
Listen Address
The listen address sets the version 4 or version 6 IP address that RealProducer
uses to listen for packet resend requests from Helix Server. The default value
of Automatic (you can also specify the value of 0 ) causes all versions of Helix
Server to gather the listen address from the IP packet headers. This works in
most cases, including broadcasts that traverse a network address translation
(NAT) firewall that masks the actual IP address of the RealProducer machine.
If RealProducer cannot reach Helix Server using the default setting, you can
specify the IP address explicitly using the graphical application’s Listen
address drop-down list. Or, enter the IP address manually. If you are working
directly with server destination files, which Appendix D describes, add the IP
address as the value of the listenAddress property.
Tip: Using an explicit IP address from the RealProducer
machine typically does not work when you broadcast through
a NAT firewall. If the default value of Automatic does not work
with your NAT firewall, set the listen address to 0.0.0.0 instead.
Forward Error Correction
When forward error correction (FEC) is used, RealProducer adds error
correction packets to the broadcast stream. If packets containing broadcast
data are lost, Helix Server can often reconstruct the data using the error
207
RealProducer 11 User’s Guide
correction packets. You can include forward error correction with broadcasts
that use the UDP transport. The setting is ignored for any broadcast that uses
TCP for data transport.
If you use forward error correction, the value set in the graphical application’s
Partial stream redundancy field or through the server destination file’s
fecPercent field indicates the percentage of the broadcast stream dedicated to
forward error correction. The greater the value, the higher the packet loss
protection and the greater the bandwidth needed for the stream. A standard
value of 20 percent means that one in five packets is for error correction. The
stream also uses 20 percent more bandwidth than if error correction were
turned off.
Note: Using FEC increases the bandwidth only for the stream
between RealProducer and Helix Server. It does not affect the
bandwidth of the broadcast streams delivered to RealPlayer
viewers by Helix Server.
Tip: Forward error correction is most useful when sending a
broadcast stream over a lossy network such as the Internet. If
your RealProducer and Helix Server are on the same local area
network, you may not need to use any error correction.
For More Information: If the packet reconstruction fails, Helix
Server may request the lost packets to be sent again, as
described in “Packet Resend Requests and Listen Address” on
page 206.
Redundant Stream Protection
You can turn FEC protection all the way up to 100%, effectively creating a
redundant stream that provides maximum protection against packet loss.
This doubles the outgoing bandwidth required for the broadcast stream,
however. To do this through the graphical application, click the Full stream
redundancy radio button. If you are editing the server destination file
manually, set the value of the fecPercent property to 100 .
When you use full stream redundancy, you can set an offset in seconds
between each packet and its redundant packet. This reduces the chance that
both packets will be lost. For example, an offset value of 2 means that after it
transmits a certain packet to Helix Server, RealProducer waits two seconds
before transmitting the redundant packet. To set this offset, enter a value in
208
CHAPTER 11: Running a Broadcast
seconds in the graphical application’s Redundant packet latency field. In the
server destination file, the fecOffset property controls this setting.
Note: Implementing packet redundancy is not the same as
using redundant RealProducers, which is described in
“Encoder Redundancy” on page 174. Packet redundancy
protects against losses due to network conditions, but it does
not protect against the failure of the encoding process as does
encoder redundancy.
FEC Rates and Receiver Buffering
When you use forward error correction, the Helix Server administrator may
need to increase the amount of time that the receiver buffers the broadcast
stream. If an FEC packet arrives after the server broadcasts the portion of the
stream that the FEC packet corrects, the packet is useless. The administrator
may need to change the buffering whether you use partial or full stream
redundancy:
• If
you use full stream redundancy, Helix Server must buffer the stream at
least as long as the redundant packet offset value. For example, if
RealProducer transmits redundant stream packets five seconds after the
initial stream packets, the Helix Server receiver needs to buffer the stream
for a minimum of five seconds.
• When
you use partial stream redundancy, broadcasting low-bandwidth
RealVideo streams with an error correction rate lower than 20 percent
may require raising the receiver buffering time. The chapter on
transmitters and receivers in Helix Server Administration Guide explains how
to set the receiver buffering based on the transmitter FEC rate.
Multicast Time to Live
All multicast broadcasts include a “time to live” feature. As a multicast data
packet passes through a multicast-enabled router, its time to live decreases by
1. When the value reaches 0, the router discards the data packet. When you set
up a multicast, you specify a time to live of 0 to 255 in the Multicast time to live
field or the server destination file’s multicastTTL property. The larger the value,
the greater the distance a packet can travel. The default value of 16 typically
209
RealProducer 11 User’s Guide
keeps multicast packets within an internal network. The following table
summarizes possible values.
Time to Live (TTL) Values
TTL Value
Packet Range
0
local host
1
local network (subnet)
16
intranet
32
site
64
region
128
continent
255
world
Running a Pull Broadcast
In pull broadcasting, RealProducer begins to generate broadcast packets as
soon as you start the encoding. However, it does not deliver the broadcast
stream until Helix Server requests the stream, which occurs when the first
RealPlayer user requests the broadcast. Pull broadcasting thereby saves
bandwidth between RealProducer and Helix Server when no one is viewing the
broadcast. This broadcast method allows you to send a stream to Helix Server
version 9 or later.
For More Information: See “Running a Pull Broadcast” on page
210 for set-up instructions.
Advantages of Pull Broadcasting
Pull broadcasting conserves bandwidth between RealProducer and Helix
Server when a broadcast stream is not needed. This is useful in many cases,
such as the following:
• online
radio stations
You might use multiple instances of RealProducer to encode multiple
streams for different online radio stations. Using pull broadcasting, you
send to Helix Server only the streams for the stations that listeners have
requested.
210
CHAPTER 11: Running a Broadcast
• server
redundancy
Helix Server can provide server redundancy by sending each RealPlayer a
list of alternate servers to contact in case their connection to the primary
server fails. If you use pull broadcasting, a backup server receives the
broadcast stream only if a connection between a RealPlayer and a primary
server is lost.
For More Information: See the chapter on multiple servers in
Helix Server Administration Guide for more about redundancy
servers.
Disadvantages of Pull Broadcasting
Because a pull broadcast does not begin until the first RealPlayer user requests
the broadcast, the first viewer may experience a longer than normal delay as
Helix Server contacts RealProducer to acquire the broadcast stream. After the
server acquires the stream, however, the broadcast is queued on Helix Server
and subsequent viewers experience no additional delay.
When you use pull splitting, you do not have control over how many Helix
Servers pull the stream. Any server that knows the RealProducer address,
stream name, and access password can request the stream. You therefore have
less control over your outgoing RealProducer bandwidth than you do with
push splitting, in which you define exactly which servers receive the stream.
Note: Each Helix Server that requests the broadcast receives a
separate stream. Multicasting is not available with pull
splitting.
Pull Broadcast Steps
The following figure illustrates the interaction between RealProducer, Helix
Server, and RealPlayer in a pull broadcast.
211
RealProducer 11 User’s Guide
Pull Broadcasting
1. RealProducer begins encoding live streaming media, but the output is not
sent to Helix Server.
2. The first audience member requests the broadcast, typically by clicking a
link in a Web page. This launches RealPlayer, which requests the broadcast
stream from Helix Server.
3. Helix Server requests the broadcast stream from RealProducer, sending it
information about the server address and ports to use. Once the
connection is established, Helix Server sends “keep alive” requests as long
as viewers are receiving the broadcast.
4. RealProducer sends the broadcast stream to Helix Server, terminating the
stream when it receives no more keep alive messages.
5. Helix Server streams the broadcast to RealPlayer users.
Preparing Helix Server for Pull Broadcasting
In a pull broadcast, RealProducer acts as a transmitter and Helix Server
functions as a pull-enabled receiver in a splitting arrangement. This requires
coordinated set-up on both ends. The chapter on transmitters and receivers in
Helix Server Administration Guide explains splitting, and shows how to set up
the server as a pull-enabled receiver. Before running a pull broadcast, confer
with the server administrator on the following issues:
• To
be configured as a receiver, Helix Server must be licensed for broadcast
distribution and pull-splitting. Clicking the About link in Helix
Administrator displays the Helix Server licensing information.
• RealProducer
requires that Helix Server transmit a valid password to pull
the stream. This password is defined in the RealProducer server
destination and the server receiver configuration.
212
CHAPTER 11: Running a Broadcast
• The
Helix Server receiver defines a range of ports it uses to receive the
stream data. Default ports are 30001 to 30020. When the broadcast
begins, RealProducer and Helix Server negotiate which ports to use. For
best results, ensure that any firewalls between RealProducer and Helix
Server allow UDP data sent to Helix Server on the ports in the defined
range.
• The
Helix Server receiver definition specifies RealProducer as a
transmitter source through its IP address, and indicates whether TCP or
UDP is used.
• In
a pull broadcast, the Helix Server receiver defines the error correction
parameters used for the broadcast stream. These parameters should be set
in the pull-enabling section of the receiver configuration.
• If you want to archive or split the broadcast on Helix Server, you may need
to apply archiving or splitting rules. This requires that the Helix Server
administrator define the rules for a specific virtual path that precedes the
stream name, as in news/live.rm . For background, refer to “Virtual Paths”
on page 176.
• Confer
with the Helix Server administrator if you plan to lower the
broadcast latency as described in “End-to-End Broadcast Latency” on page
180. Lowering the latency automatically reduces the receiver buffering on
Helix Server version 11 and later, which may not be desirable. The Helix
Server administrator can override the buffering value, however.
• The
URL for the broadcast varies depending on the Helix Server features,
such as viewer authentication, that you use. The section “Standard URL
for a Pull Broadcast” on page 220 explains the basic URL format.
• Depending on the Helix Server logging parameters and the method it uses
to broadcast the stream to RealPlayer viewers, broadcast statistics (such as
the total number of viewers and how long each viewer watched) may be
recorded in the server log files.
Defining a Pull Broadcast Server Destination
This section explains how to define a password-only broadcast on
RealProducer. You can create the server destination anytime before the
broadcast, and can save the settings to a template for future use.
213
RealProducer 11 User’s Guide
➤
To define a pull server destination:
1. If you have multiple jobs open, click the appropriate job file name in the
job manager.
2. Select File>Add Server Destination to display the server destination dialog.
Or, click the server icon in the destinations area.
3. Enter a description of the server in the Destination Name field. This is for
your reference only and does not affect the broadcast. If you save the
destination as a template, this entry becomes the name of the template in
the graphical application, as well as the file name of the server destination
file.
4. In the Stream Name field, enter a name for the broadcast stream. This
name resembles a clip name and should use the appropriate extension,
either .ra , .rv, or .rm for a constant bit rate stream. It should be .rmvb for a
variable bit rate stream. The stream name can include uppercase or
lowercase letters, numbers, an underscore (_), and a dash (-). Spaces are
not allowed.
5. From the Broadcast Method pull-down list, select Pull (Helix Server) .
6. For Local IP Address, select the IP address used by RealProducer to listen
for pull requests. If your computer has just one IP address, that address is
selected by default in the pull-down list. The Helix Server receive must
specify this address as the transmitter address.
7. The optional Path field specifies a virtual path that can be used for
archiving or splitting on Helix Server. Use a simple name followed by a
forward slash, such as news/ .
8. For Producer Listening Port, indicate the port on RealProducer that it uses
to listen for pull requests from Helix Server. By default, this port is 3031,
but you can use any available port up to 65535. Firewalls should allow
TCP communications through the chosen port. RealProducer and Helix
Server then negotiate the ports to use for the data transfer.
9. In the Password field, enter the password that the receiver must transmit
to pull the broadcast. The broadcast connection fails if the receiver
supplies the wrong value. If you are saving the destination as a template,
you can click Remember password to store the password in the job file or
server template file.
214
CHAPTER 11: Running a Broadcast
Warning! The password is saved as plain text in the job file or
the server template. If you save the password, be sure that you
maintain appropriate security on these files.
10. You may want to change the server timeout, which is the amount of time
that RealProducer waits for a response from Helix Server before assuming
that Helix Server has finished broadcasting. At this point, RealProducer
shuts down the broadcast stream. It does not discontinue the broadcast
stream, however. This allows other servers to pull the stream.
The timeout value is 30 seconds by default. You can raise the value if
previous pull broadcasts have timed out while RealPlayer viewers were still
receiving the broadcast. RealNetworks does not recommend that you
lower the value. Do the following to set the value:
a. Click the Advanced Options button.
b. In the Server connection timeout field, set a new value in seconds.
c. Click OK.
11. If you want to save the server destination as a template, click the
Templates button and select Save as Template. You can then use this server
destination for future broadcasts, as described in “Working with Server
Templates” on page 217.
12. Click OK to save the server destination. The destination appears in the
destinations section of the RealProducer main window. You can rightclick the destination name to edit or delete the destination.
13. To lower the broadcast latency, follow the instructions in “Reducing
Broadcast Latency” on page 216. Be sure that you first understand the
issues and ramifications of latency reduction, which the section “End-toEnd Broadcast Latency” on page 180 describes.
Starting and Stopping a Pull Broadcast
When you have completed the server destination and have defined the live
input as described in “Using Live Audio or Video as the Input” on page 90, you
can start the encoding process by clicking the Encode button. RealProducer
begins to encode the live input, but does not send the broadcast stream to a
Helix Server until the stream is requested.
Helix Server typically re-requests a broadcast stream if it is inadvertently lost.
During the broadcast, it periodically sends “keep alive” messages to
215
RealProducer 11 User’s Guide
RealProducer to indicate that it continues to need the stream. If the server
notifies RealProducer that it no longer needs the stream, or the server
connection times out, RealProducer stops transmitting the stream but does
not stop the encoding process. This allows additional servers to pull the
stream if necessary. You can terminate a broadcast stream and the encoding
process by clicking the RealProducer Stop button.
Reducing Broadcast Latency
For any live, push or pull broadcast, you can reduce the end-to-end broadcast
latency, displaying events in RealPlayer as little as two seconds after they occur.
Reducing latency is not desirable in all circumstances, however, because it
provides RealPlayer with fewer means to recover from packet loss and other
errors. A low-latency broadcast can therefore create a more erratic user
experience when network errors occur.
For More Information: Before choosing latency reduction in a
broadcast, be sure to read the background information in the
section “End-to-End Broadcast Latency” on page 180.
Setting the RealProducer Latency Mode
To set the RealProducer latency mode, create a new job or open an existing job
and click Settings>Network Settings. Using the radio buttons, you can choose
one of three latency modes: Normal , Moderate , or Low. The default value is
Normal , which creates the highest end-to-end latency, but offers the best error
correction. The value of Low provides the lowest end-to-end latency, but
network errors are propagated to the viewer. The latency mode is saved when
you save the job file.
Warning! Use the Moderate or Low latency setting only when
delivering a live stream to Helix Server version 11 or later.
Earlier versions of Helix Server do not handle the stream
properly.
For More Information: The table “Summary of End-to-End
Latency Modes” on page 181 lists the expected latency
reduction for each mode.
216
CHAPTER 11: Running a Broadcast
Changing the Maximum Packet Size
RealProducer’s packet sizing feature allows you to set the maximum packet
size for live broadcasts. Packets may still be smaller than this size, however.
You should change these values only if you are familiar with the maximum
transfer unit (MTU) for the network you use. To set a packet size, choose
Settings>Network Settings, click the Custom radio button, and enter a size in
bytes.
For More Information: For more about MTU sizes, refer to
“Network Latency” on page 185.
Working with Server Templates
When you create a server destination, the server information is written to the
job file if you save the job. Optionally, you can save the server definition as a
separate server template. This allows you to share the server definition or add
it quickly to any other broadcast job. RealProducer stores the server template
as an XML-based text file in the servers directory under its main installation
directory. Using RealProducer Plus, you can save any number of server
templates. With RealProducer Basic, you can save one server template.
For More Information: Appendix D explains how to edit a server
file manually.
Using a Server Template
To save a server template, create a server destination as described in one of the
broadcast set-up sections in this chapter. Then save the server definition as a
template by clicking the Templates button and choosing Save as Template. To
use that template in another job, select File>Add Server Destination, click
Templates, and choose the template from the list. If you make changes to the
template, you can change the destination name and save the changes as a new
template by clicking Templates and choosing Add to List.
Editing or Deleting a Server Template
You can edit any server template if you need to change it. These changes are
recorded in the template and the active job, but not in any previous jobs that
also used the server template. To update an older job, edit the job file
217
RealProducer 11 User’s Guide
manually. Or, open the job in the graphical application, and replace the server
destination in the output with the revised server destination.
Server Templates
➤
To edit a server template:
1. Select Edit>Server Templates to list all available templates.
2. Select a template from the list. This displays the template’s settings in the
right-hand side of the dialog.
3. You can then perform any of the following actions:
a. Edit the settings for the template as described in the various sections
of this chapter.
b. Click the “duplicate” icon at the bottom of the template list to copy
the selected template. Then, edit the settings fields. This allows you to
create a similar template quickly.
c. Click the trash icon to delete the selected template.
4. Click Apply to save changes to the template. Click OK to exit the dialog
and save any changes.
Broadcast URLs
The following sections provide a general guide to URLs used by RealPlayer
viewers to play a broadcast. Confer with the Helix Server administrator about
218
CHAPTER 11: Running a Broadcast
the actual URL to use, as URLs can vary from the standard forms described
below for many reasons:
• An
HTTP URL in a Web page includes a /ramgen/ mount point, whereas
an RTSP URL in a Ram or SMIL file does not.
• The
Helix Server administrator can change the mount point (typically
/broadcast/ , /encoder/ , or /redundant/ ) used with any broadcast method.
• Using
the splitting feature, the Helix Server administrator can route the
broadcast stream to multiple receivers. This lengthens the broadcast URL,
and the URL to the stream on each receiver will differ.
• Including
features such as user name and password authentication for
viewers adds additional mount points to the URL.
• The
Helix Server administrator may shorten long broadcast URLs by
substituting an alias for parts of the URL.
Standard URL for a Push Broadcast
For a basic push broadcast that the viewer accesses by clicking a link in a Web
page, the URL looks like the following:
http://helixserver.example.com/ramgen/broadcast/news/live.rm
• The /ramgen/
mount point launches RealPlayer when the viewer clicks the
link in a Web page. If the URL is in a Ram file (.ram or .rpm ) or SMIL file
(.smil ), the /ramgen/ mount point is omitted and the protocol is rtsp:// .
• The /broadcast/
mount point is the default mount point used by Helix
Server for an account-based or password-only broadcast. If redundant
encoders are used with any broadcast method, the mount point is
/redundant/ .
•A
virtual path such as news/ is optional. It is included in the URL only if
RealProducer specifies this path along with the stream name.
• You
define the stream name, shown as live.rm above, through the
RealProducer server destination.
Note: If you use encoder redundancy, RealProducer defines
delimiters in the stream name, such as .1 and .2 . These
delimiters are not included in the URL.
219
RealProducer 11 User’s Guide
Standard URL for a Pull Broadcast
The URL to a pull broadcast is longer than a URL to a push broadcast because
it includes information about both the Helix Server receiver and the
RealProducer transmitter. The following example shows the general format
for a basic pull broadcast that the viewer accesses by clicking a link in a Web
page. For convenience, the example is displayed on two lines. The first line
gives the receiver information. The second line supplies the transmitter
parameters:
http://receiver.example.com/ramgen/broadcast/pull/
realproducer.example.com:3031/news/live.rm
• The /ramgen/
mount point launches RealPlayer when the viewer clicks the
link in a Web page. If the URL is in a Ram file (.ram or .rpm ) or SMIL file
(.smil ), the /ramgen/ mount point is omitted and the protocol is rtsp:// .
• The /broadcast/
mount point is the default mount point used by Helix
Server for a pull broadcast. Following the broadcast mount point is a path
that indicates pull splitting is used, as in /pull/ . The Helix Server receiver
defines this path.
• The
link’s transmitter portion lists the RealProducer IP address or host
name, along with its listen port, as in realproducer.example.com:3031.
•A
virtual path such as news/ is optional. It is included in the URL only if
RealProducer specifies this path along with the stream name.
• You
define the stream name, shown as live.rm above, through the
RealProducer server destination.
220
PART
Part IV:
MEDIA TOOLS
In addition to the RealProducer grapical application, you can
use the command-line application, media editor, and event
encoding tool described in the next set of chapters.
IV
CHAPTER
Chapter 12:
EDITING REALMEDIA FILES
12
RealMedia Editor allows you edit RealAudio and RealVideo clips.
You can shorten a clip, for example, but cutting it at its beginning
or end. You can change the title, author, and other clip information.
You can also can merge image maps or interactive events into a
RealMedia file. You can use a command-line editor on Windows and
Linux, and a graphical editor on Windows.
Using the Graphical Editor
RealMedia Editor is installed automatically in the RealMediaEditor directory
under the main RealProducer installation directory. On Windows, you can use
the rmeditgui graphical editor program. To open the graphical editor, give the
File>Edit RealMedia File command on RealProducer. The menu items at the
top of the window allow you to access different functions of the editor:
• Use
File to open, save or append to a RealMedia clip.
• Use
Navigate to jump to key frames and edit points.
• Use
Tools to access clip and stream information, merge image maps and
events, and edit your preferences.
• Use
Help to locate information about running the editor.
The editor also has these functional areas:
• The clip viewer is a video window that shows the video portion of the clip.
• The timeline provides a graphical representation of the input file. You can
move the slider to any keyframe or edit point. The current time position is
also shown here.
• The
zoom tool zooms in or out of the timeline.
223
RealProducer 11 User’s Guide
• The
clip info area allows you to change the title, author, copyright,
keywords, and description of a clip. You can also view the clip’s stream
information this area.
Opening a RealMedia Clip
Once you have opened a RealMedia clip, you can play it, navigate through it,
and edit it.
➤
To open a clip:
1. In the main window, choose File>Open RealMedia File.
2. Navigate to the directory where the RealMedia file (extension .ra , .rv, .rm ,
or .rmvb ) is located and select it. You can edit RealMedia clips that are
under 2 Gigabytes in file size.
3. Click Open to display the clip in the main window. If it is a RealVideo clip,
the first frame appears in the viewer.
Tip: You can also drag a clip into the RealMedia Editor main
window to open that clip instantly.
Navigating Through a Clip
RealMedia Editor gives you different methods to navigate through a clip to
find the points to edit. You can use the slider on the timeline, click the Play
and Stop buttons, use edit points, or use keyframes.
Using the Timeline
Using the timeline is the easiest way to navigate along your clip. The red line
marks the current position in the clip. To move the line, either click on it and
drag it to a new position, or click with the mouse button at a desired point in
the timeline. This displays the video frame at that point.
Using Buttons
Using the navigation buttons is another way to find part of a clip. Click the
Play button to start playback. Click Stop when you reach the desired point in
the clip.
224
CHAPTER 12: Editing RealMedia Files
Using Keyframes for Video Clips
Keyframes are video frames that are encoded pixel-for-pixel. A RealVideo clip
consists of a number of keyframes. The frames between keyframes are based
on the keyframes, and a video clip must have at least one keyframe. Navigating
with keyframes allows you to jump to a main section of a clip, such as the start
of a new scene. Click the >> button to go to the next keyframe in the clip.
Click << to go to the previous keyframe.
Using Edit Points for Audio Clips
Edit points are possible points at which you can edit a clip. These points are
designated by the smallest block of audio data that a clip can be split into.
There are no edit points in a video-only clip, so you can edit the clip at any
point. Click the > button to go to the next edit point in the clip. Click the <
button to go to the previous edit point in the clip.
Editing with the RealMedia Editor
This section shows you how use the RealMedia Editor to edit a RealMedia
clip. You will learn how to edit out the beginning or end of a clip, how to
change clip information, how to merge either an image map or an interactive
event to a clip, and how to append another clip to the current clip.
Editing a Clip’s Beginning or End
Using RealMedia Editor, you can remove portions from the beginning or end
of a clip. This section shows you how to mark the points for editing, and gives
you tips on editing a clip.
➤
To edit the beginning or end of a clip:
1. Open the clip and navigate to the point that will be the clip’s new
beginning.
2. Click the In button. On the timeline, the beginning of this section is
marked by a bracket ( [ ). The following parts on the timeline display in a
darker grey color.
Tip: You can also modify the beginning of your clip by
changing the current time within the In field.
3. Navigate to the point that will be the end of the new clip.
225
RealProducer 11 User’s Guide
4. Click the Out button. On the timeline, the end of the clip is marked by a
bracket ( ] ). The portion of the timeline between the two brackets shows
in a darker grey color. The new ending time of the clip is also shown.
Note: You can modify the end of your clip by changing the
current time within the Out field.
5. Click Play Selection to play the marked section of the clip and verify that
you have selected the appropriate parts.
Note: You cannot change the beginning and end marks until
the clip has stopped playing.
6. When you are satisfied with the new clip, select File>Save RealMedia File As
and choose a new name for the edited clip.
Editing Tips
The following tips will help edit clips:
• If
you set a selection point between keyframes, the cutting may not be
precisely accurate. The resulting video may have a black or frozen image,
or it may simply begin at the next keyframe.
•A
video clip must contain at least one keyframe. If you create a clip
without a keyframe, you will be unable to save it.
• You
can type time values directly for current clip position using the
format days:hours:minutes:seconds.milliseconds .
Changing Clip Information
Clip information tells the audience about a clip and allows the audience to
find a clip more easily. With RealMedia Editor, you can add clip information if
none exists or you can change clip information that is attached to a file.
➤
To change clip information:
1. Open a RealMedia file.
226
CHAPTER 12: Editing RealMedia Files
2. In the Clip Info area, enter new information for the clip:
Title
In this field, enter the title of the clip or broadcast. Because this
title appears in the RealPlayer interface, it is best to use a short
title.
Author
This field holds the name of the person or organization that
created the clip.
Copyright
Here, enter the copyright string, such as (c) 2004 ABC
Corporation .
Keywords
The keywords field holds words that certain audio and video
search engines can read to categorize the clip. Add a few words
that will help your audience search for your clip. Separate each
term with spaces. Unless you are adding a proper name, use
lowercase for each term. Avoid overly generic terms such as
video or music .
Description
This field holds a description of the clip that appears when the
viewer displays extended clip information. This allows you to
describe the clip in detail without creating a long title.
3. To enter rating information, click the Clip Info button. In the dialog, you
can enter any clip information described previously, and also set a rating:
• No
Rating
• All
Ages
• Older
Children
• Younger
Teens
• Older
Teens (15 and up)
• Adult
Supervision Recommended
• Adults
Only
4. Click OK to return to the main window.
5. To save the new clip, select File>Save RealMedia File As and save the clip
under a new file name.
Merging Image Maps or Events
Image maps are text files that create clickable fields within a RealVideo clip.
When clicked by a viewer, the image map causes a specific action, such as
opening a Web page in the viewer’s browser. Events are similar to image maps,
227
RealProducer 11 User’s Guide
except that actions happen automatically without audience interaction. Using
RealMedia Editor, you can merge these files into a RealMedia clip.
For More Information: Chapter 13 explains how to write an
image or event file.
➤
To merge an image or event file into a RealMedia clip:
1. Open the RealMedia clip.
2. Select Tools>Merge Image Maps or Tools>Merge Events. This opens a file
dialog.
3. Locate the image map or event file that you want to merge and click Open.
RealMedia Editor merges the file information with the clip, creating a
new, untitled clip and closing the original clip.
4. To save the new clip, select File>Save RealMedia File As and save the clip
under a new file name.
Appending Clips
RealMedia Editor allows you to combine one RealMedia clip with another.
Appending works only when the number and type of streams in each file are
identical. Therefore, this feature works best when the source files are all
encoded with RealProducer using the same settings.
Note: The total size of the appended clips cannot exceed the
editor’s 2 Gigabyte file size limit.
➤
To append one clip to another:
1. Open the first RealMedia clip.
2. Select File>Append RealMedia File.
3. Locate the clip you want to append and click Open. RealMedia Editor the
appends the selected clip to the open clip. This process can take some
time, depending on the size of the second clip.
4. When the appending process completes, you can edit the combined files
and save it as a new clip. The editor closed the original clips.
228
CHAPTER 12: Editing RealMedia Files
Using Advanced Editing Features
RealMedia Editor provides advanced features that can help you with the
editing process. You can view information about all streams within a clip. Plus,
you can decide how fast RealMedia Editor previews a clip.
Viewing Stream Information
Every RealMedia clip contains a number of streams. Single rate VBR files
contain only one stream, whereas SureStream CBR files can contain multiple
streams depending on the number of target audiences. RealMedia Editor
allows you to view information about each encoded stream. However, if your
file does not contain any recording information, the corresponding field will
be blank.
➤
To view stream information:
1. Open a RealMedia file.
2. Select Tools>Stream Info. This opens a dialog that provides the following
information:
• Audio Mode—the type of audio for the encoded clip (such as music or
voice)
• Video Mode—the
quality of the encoded video (such as normal or
smooth motion)
• Video Size—the
size and width, in pixels, of the encoded video
• File Type—either
• Audiences--the
single rate or SureStream
audience bandwidth you have selected.
This dialog also gives you the following information about each stream
within the clip:
• Bit Rate—the
• Preroll—the
amount of bandwidth necessary to view the stream
amount of bits needed to download before the stream
can play
• Frequency—the
frequency response of the encoded audio for the
stream
• Codec—the
compression/decompression algorithm used to encode
the stream.
3. Click Close to return to the main window.
229
RealProducer 11 User’s Guide
Changing Editor Preferences
RealMedia Editor allows you to change how it previews a clip you open. You
view a clip quickly, or more accurately. The accurate view takes more time to
render if the clip is large.
➤
To change RealProducer preferences:
1. Select Tools>Preferences to open the preferences dialog.
2. Select a method for opening clips:
• Quick—Plays
back the selection without delay. However, audio and
video may not play exactly as they do in the saved clip. For example,
frames of video at the beginning of a clip may appear different. And
audio may not stop precisely at the end of a clip.
• Accurate—saves
the selection to a temporary file. This can take a
significant time for long clip. The preview, however, will look and
sound exactly like the saved clip.
3. Click OK to return to the main window.
Running the Command Line Editor
The rmeditor executable program in the RealMediaEditor directory runs
RealMedia Editor from the command line on Windows and Linux. There are
three main functions that this program performs:
• It
extracts information about a RealMedia clip (also called a “dump”).
• It
changes metadata, such as title, author, keywords, and copyright
information in a clip.
• It
cuts clips and can paste clips together.
The following table summarizes the rmeditor options, which have both long
and short option flags.
RealMedia Command-Line Editor Options
Flag (long and short) Value
Function
-input
-i
filename.ext
Indicates path to the input file.
-output
-o
filename.ext
Specifies path to the output file.
-title
-t
text
Gives the title text.
-author
-a
text
Specifies the author name.
(Table Page 1 of 2)
230
CHAPTER 12: Editing RealMedia Files
RealMedia Command-Line Editor Options (continued)
Flag (long and short) Value
Function
-copyright
-c
text
Provides the copyright text.
-comment
-C
text
Any comments about the clip.
-startTime
-s
dd:hh:mm:ss.xyz
Sets clip start time.
-endTime
-e
dd:hh:mm:ss.xyz
Sets clip end time.
-logFile
-l
filename.log
Gives path to the log file.
-dumpFile
-d
filename.txt
Sets the path to the dump file.
-description
-q
text
Describes the file contents.
-keywords
-n
text
Provides a list of keywords.
-rating
-R
0=No rating
Allows you to rate the content.
1=All ages
2=Older children
3=Younger teens
4=Older teens
5=Adult
supervision
recommended
6=Adults only
(Table Page 2 of 2)
Getting Information from a RealMedia Clip
Use the following syntax to create a text-based dump file that contains
information about an encoded RealMedia clip:
rmeditor -inputFile filename.rm -dumpFile filename.txt
Editing Metadata
The following syntax shows how to edit clip information:
rmeditor {-inputFile filename} {-outputFile filename}
[-t | -title title] [-a | -author author] [-c | -copyright copyright]
[-q | -description description] [-n | -keyword keywords] [-r | -rating rating
Cutting and Pasting Files
Use the following syntax to cut files and paste two files together:
231
RealProducer 11 User’s Guide
rmeditor {-i | -input | -inputFile input [-s | -startTime dd:hh:mm:ss.xyz] [-e |
-endTime dd:hh:mm:ss.xyz] }
[-i | -input | -inputFile input [-s | -startTime dd:hh:mm:ss.xyz] [-e |
-endTime dd:hh:mm:ss.xyz] ]
...
{-o | -output | -outputFile filename} [-t | -title title] [-a | -author author]
[-c | -copyright copyright] [-q | -description description]
[-n | -keyword keywords]
Common RealMedia Editor Command Line Operations
The following are frequently used operations.
• View
the current title, author, copyright, comments, mobile playback and
selective record setting:
rmeditor -i input.rm
• Change
the current title of a .rm file:
rmeditor -i input.rm -t "new title text" -o output.rm
• Enable
the allow recording flag:
rmeditor -i input.rm -r 1 -o output.rm
• Disable
the allow recording flag:
rmeditor -i input.rm -r 0 -o output.rm
• Trim
the duration of a file:
rmeditor -i input.rm -s 0:0:3:2.20 -e 0:0:4:2.20 -o output.rm
Note: The start and end times will be adjusted so the clip starts
and ends on keyframe boundaries. Use 0 as the end time to
specify the end of the file.
• Paste
multiple RealMedia files together:
rmeditor -i input.rm -i input2.rm -i input3.rm -o output.rm
Note: If more than one input file is specified, any start and end
time arguments are ignored.
• Add
a description to the file:
rmeditor -i input.rm -q "This file contains audio and video of the 1/1/99
meeting" -o output.rm
• Add
232
keywords to the file:
CHAPTER 12: Editing RealMedia Files
rmeditor -i input.rm -n "travel Fiji resorts" -o output.rm
• Enable
the allowing indexing flag:
rmeditor -i input.rm -IN 1 -o output.rm
• Disable
the allowing indexing flag:
rmeditor -i input.rm -IN 1 -o output.rm
233
RealProducer 11 User’s Guide
234
CHAPTER
Chapter 13:
DEFINING EVENTS AND IMAGE MAPS
13
When you produce RealAudio or RealVideo clips using
RealProducer, you can use a utility that embeds clip information
and HTML URLs directly in the clip. For RealVideo clips, you can
also create clickable image maps. This chapter explains how to write
markup that creates these features, and how to run the utility that
merges the markup with the encoded clips.
Understanding Events and Maps
Event files and map files are text files that use a simple markup language. An
event file defines URLs that open automatically in a the viewer’s browser as
the audio or video clip plays. This allows you to create a presentation in which
HTML pages are timed to display at certain points as the clip plays. The events
file can also encode extended clip information beyond the standard title,
author, and copyright.
The map file can define image maps that overlay a RealVideo clip and open
when the viewer clicks a predefined hot spot. These hot spots can be the entire
video, or a smaller area in the shape of a circle, rectangle, or irregular polygon.
So whereas the event file URLs open automatically, the map file URLs open
only on user interaction.
Once you define your event file or map file, you merge the file with your
encoded clip using the RMEvents utility. This creates a copy of your clip that
has the event or map information permanently encoded into it. To change the
events or maps, you must create a new version of the clip by merging the
original clip with a new event file or map file.
Tip: Using a map file or event file is just one way to open URLs
and add extended clip information. Ram files and SMIL files
also provide these capabilities. Because these latter techniques
do not encode information directly into the clip, they allow
235
RealProducer 11 User’s Guide
you to change the information more readily. For a comparison
of all available production techniques, refer to the first chapter
of Introduction to Streaming Media.
Writing an Events File
The events file is a plain text file that uses the standard extension of .txt .
Within this file, you describe events that will occur as the clip plays. You write
each event on a separate line, and you can use a pound sign (# ) to start a
comment line. Each event line follows this format:
flag start_time end_time event_syntax
The flag indicates the type of event, which can be either to display clip
information, or to open a URL in an HTML pane automatically. The following
table summarizes the possible flags.
Events File Flags
Flag
Action
Reference
a
Add author information to the clip.
page 238
c
Include copyright information in the clip.
page 238
i
Add title information or include extended clip information.
page 238
page 239
u
Open a URL automatically as the clip plays.
page 236
The starting time and ending time are relative to the start of clip playback.
You indicate the time value with the following format, in which only the
seconds field is required:
dd:hh:mm:ss.xyz
After you create your event file, you encode it into the clip as described in
“Running the RMEvents Utility” on page 248.
Note: Define each event on a single line within the events text
file. Do not press Enter to wrap long lines manually.
Specifying URL Events
When opening a URL automatically in an HTML pane, you use the u event
flag. The event syntax looks like this:
u start_time end_time &&target&&URL?parameters
236
CHAPTER 13: Defining Events and Image Maps
Browser Target
The URL must be a fully qualified HTTP URL. For target , you specify one of
the HTML panes found in RealOne Player and later. Earlier versions of
RealPlayer, which do not handle HTML pages natively, display the URL in the
viewer’s default browser. If you plan to embed the clip in a Web page, you can
specify an HTML frame name. You can use one of the following values.
frame_name
Display the URL in the designated browser frame.
_rpcontextwin
Display the URL in the RealPlayer related info pane.
_rpbrowser
Display the URL in the RealPlayer media browser pane.
_rpexternal
Display the URL in a secondary RealPlayer browsing window.
For More Information: If you are unfamiliar with the RealPlayer
HTML windows, refer to the first chapter of Introduction to
Streaming Media.For information about playing a clip in a Web
page, refer to the web page embedding chapter of RealNetworks
Production Guide.
Related Info Pane Sizing
If you use _rpcontextwin to open the URL in the related info pane, you can use
either of the following parameters to set the size of the pane:
rpcontextheight=pixels
Sets the pixel height of the related info pane. If no height is
specified, RealPlayer uses the height of the media clip.
rpcontextwidth=pixels
Sets the pixel width of the related info pane. If no width is
specified, a default of 330 pixels is used.
Events File URL Examples
The following is a sample events file that opens two URLs in the related info
pane at different times, and two URLs in the media browser pane at different
times:
# Open a URL in the related info pane when the clip starts, and size the pane.
u 00:00:00.0 00:01:59.9 &&_rpcontextwin&&
http://www.example.com/info1.html?rpcontextheight=250&rpcontextwidth=280
#
# Open a URL in the media browser pane at the 1-minute mark.
u 00:01:00.0 00:01:59.9 &&_rpbrowser&&http://www.example.com/index.html
#
# Open a second URL in the related info pane at the 2-minute mark.
237
RealProducer 11 User’s Guide
u 00:02:00.0 00:04:00.0 &&_rpcontextwin&&http://www.example.com/info2.html
#
# Open a second URL in the media browser pane at the 3-minute mark.
u 00:03:00.0 00:04:00.0 &&_rpbrowser&&http://www.example.com/index2.html
Note the following about this sample:
• When
you open multiple URLs, list the events in ascending order
according to the start times.
• The
related info pane size is set for the duration of the clip by the first
URL that opens in that pane. Any subsequent URLs that target the related
info pane therefore do not require sizing information.
• The
end times indicate a point past which the URL should not open. In
the second event defined above, the URL is scheduled to open at 1:00
minutes, but no later than 1:59.9 minutes. If a viewer starts the clip and
immediately seeks to its 3-minute mark, for example, the URL doesn’t
display because the clip never plays at any point between the URL’s start
and end times.
Adding a Title, Author, and Copyright
When you encode a clip, you have the option of including clip information
values as described in “Adding Clip Information” on page 94. Using the events
file, you can override the existing title, author, and copyright values, or add
them if you did not include them during the encoding process. The events file
does not allow you to add other values such as keywords and a description,
however.
To add the title, author, or copyright, you include the i , a , or c event flag in the
events file, respectively. The format is the same for specifying URLs:
flag start_time end_time value
Values do not need to be quoted. The following are examples:
i 00:00:00.0 00:00:10.0 2004 Music Awards
a 00:00:00.0 00:00:10.0 Brilliant Media Limited
c 00:00:00.0 00:00:10.0 2004 Brilliant Media Limited
For clip information flags, you can specify the start time as the clip’s starting
time (00:00:00.0 ). Specifying an end time is required, but the actual end time
doesn’t matter because the clip information will display throughout the
length of the clip playback. In the example above, the end times are set to 10
seconds after the clip starts.
238
CHAPTER 13: Defining Events and Image Maps
Adding Extended Clip Information
Using an events file, you can also encode several clipinfo parameters. Geared
for online music, these parameters allow you to add information such as the
artist name, album, genre, and so on, which displays when the viewer chooses
the File>Clip Properties>View Clip Info command, or presses Ctrl+i. This
information displays in RealOne Player or later, and is ignored by earlier
RealPlayers. It can include the title, author, and copyright, so you do not need
to include those separately, as described in “Adding a Title, Author, and
Copyright” on page 238.
The clipinfo parameter uses the i event flag and one long value surrounded by
double quotation marks. Within the quotes, you separate the subvalues with
vertical lines, or “pipes,” as shown here:
i 00:00:00.0 00:00:10.0 clipinfo:title=My Presentation|artist name=Pat Morales|...
For clip information, you can specify the start time as the clip’s starting time
(00:00:00.0 ). Specifying an end time is required, but the actual end time
doesn’t matter because the clip information will display throughout the
length of the clip playback. In the example above, the end time is set to 10
seconds after the clip starts.
Clip Information Parameters
The following table describes the name and value pairs that you can use with
clipinfo . You can use any set of values, and list them in any order. Most text
values can be over 100 characters long.
clipinfo Parameter Values
Name and Value
Function
title=text
Gives the clip title.
artist name=text
Indicates the artist name.
album name=text
Gives the album name. If you specify an album name and do
not also display an HTML page in the related info pane,
RealPlayer displays in that pane a standard page that lists the
artist, album, year, and genre values. The viewer can hide this
information, though, with View>Album Info>Hide.
genre=text
Indicates the clip genre, such as Rock or Jazz.
copyright=text
Gives the copyright notice.
year=text
Indicates the year the content was released.
(Table Page 1 of 2)
239
RealProducer 11 User’s Guide
clipinfo Parameter Values (continued)
Name and Value
Function
cdnum=number
Supplies the CD track number.
comments=text
Provides any additional comments.
(Table Page 2 of 2)
Text Escape Characters
To use certain text characters in a value for the clipinfo parameter, you must
use the character’s corresponding escape code. This is because certain
characters represent syntax components. A pipe (|) represents the start of a
new value, for example, so to use a pipe within a value, you must use the
escape code %7C . The following table lists some common text characters that
you can add through escape codes.
Text Character Escape Codes
Name
Character
Escape Code
ampersand
&
%26
apostrophe
‘
%27
backslash
\
%5C
carat
^
%5E
double quote
“
%22
greater than sign
>
%3E
left bracket
[
%5B
less than sign
<
%3C
percent sign
%
%25
pipe
|
%7C
pound sign
#
%23
right bracket
]
%5D
You can enter other common text characters, such as commas, periods, and
colons directly into clipinfo parameter. Conversely, you can display any text
character, including letters and numbers, by using an escape code that starts
with % followed by the character’s ASCII hexadecimal value. You can create an
asterisk (*) with the escape code %2A , for example.
For More Information: Visit http://www.asciitable.com for a
full list of ASCII codes.
240
CHAPTER 13: Defining Events and Image Maps
Clip Information Example
This example sets the clipinfo parameter for an audio clip:
i 00:00:00.0 00:00:10.0 clipinfo:title=Artist of the Year|
artist name=Your Name Here|album name=My Debut|genre=Rock|
copyright=2001|year=2001|comments=This one really knows how to rock!
The following figure illustrates how this information appears in the clip
information panel (Ctrl+i).
Clip Information
Creating Image Maps
For a RealVideo clip, you can write a map file to create image maps that open
a URL or issue a RealPlayer command when clicked. The image map can
provide one or more clickable hot spots that are active for the entire duration
of the clip, or only during certain periods. You can create these hot spots in
the shapes of rectangles, circles, or polygons. Clicking the left half of a video
might take the viewer to one Web page, for example, while clicking the right
half opens a different page.
You can create a map file using any text editor that can save output as plain
text. The map file uses a simple markup similar to HTML that defines the hot
spot locations, durations, and actions. Once you define your map file, you
merge the map coordinates into the RealVideo clip using the RMevents utility,
as described in “Running the RMEvents Utility” on page 248.
Tip: You can also use SMIL to create clickable image maps that
overlay a video or multiclip presentation. The advantage to
using SMIL is that the map coordinates are not merged into
241
RealProducer 11 User’s Guide
the clip, and are therefore easier to change. However, you must
always stream the clip through the SMIL file to make the hot
spots available. For more information, see the hyperlinking
chapter of RealNetworks Production Guide.
Setting a Duration
The map file begins with a mandatory DURATION parameter that defines the
total amount of time that the hot spots are active, using a time value in the
following format:
dd:hh:mm:ss:xxx
In this time format, you must specify all fields. The last field, which indicates
milliseconds, is separated from the seconds field by a colon, not a period as in
other time formats. The following example sets the entire duration of the hot
spots to five minutes, 30 seconds:
DURATION=0:0:5:30:0
Creating the Overall Map
Following the DURATION parameter, you define the overall area that can
contain a hot spot between <MAP> and </MAP> tags. The <MAP> tag uses START
and END parameters that define when the map area is active, relative to the
start of clip playback. Like DURATION , the START and END parameters have
values in the following format:
dd:hh:mm:ss:xxx
The following map area becomes active 30 seconds after the start of the clip,
and stays active for one minute:
<MAP START=0:0:0:30:0 END=0:0:1:30:0 ...>...</MAP>
The COORDS parameter, which must follow the START and END parameters,
defines a rectangle for the map. It uses four values, separated by commas, that
set the map’s size and placement, measured from the upper-left corner of the
clip in the following order:
1. distance of the map’s left edge from the clip’s left edge (left-x)
2. distance of the map’s top edge from the clip’s top edge (top-y)
3. distance of the map’s right edge from the clip’s left edge (right-x)
4. distance of the map’s bottom edge from the clip’s top edge (bottom-y)
242
CHAPTER 13: Defining Events and Image Maps
The COORDS parameters allows you to create a map area from any rectangular
portion of the clip area. The simplest way to define the map is to create it at
the same size as the clip. If the clip is 360 pixels wide by 240 pixels high, for
example, you use a map tag such as the following:
<MAP START=0:0:0:30:0 END=0:0:1:30:0 COORDS=0,0,360,240>...</MAP>
Tip: You can define more than one map area. Typically, each
map area is active at a different point during the clip timeline.
If map areas are active at the same time, the map areas or the
hot spots that each map defines should not overlap.
Defining Hot Spot Areas
To create a hot spot, you use an <AREA> tag with a SHAPE attribute that defines
the hot spot’s shape, and a COORDS attribute to define the hot spot’s size and
placement. You define the SHAPE and COORDS attributes just as you do in
HTML 4.0. The following example defines a rectangular hot spot:
<AREA SHAPE=RECTANGLE COORDS=20,40,80,120 ...>
How you specify the coordinate values depends on what shape—rectangle,
circle, or polygon—you want, as explained in the following sections. In all hot
spots, the coordinates are measured from the upper-left corner of the area
defined by the <MAP> tag.
Creating a Rectangular Hot Spot
Use SHAPE=RECTANGLE to create a rectangular hot spot. You then specify four
COORDS pixel values to set the hot spot’s size and placement, measured from
the upper-left corner of the map in the following order:
1. distance of the hot spot rectangle’s left edge from the map’s left edge
(left-x)
2. distance of the hot spot rectangle’s top edge from the map’s top edge
(top-y)
3. distance of the hot spot rectangle’s right edge from the map’s left edge
(right-x)
4. distance of the hot spot rectangle’s bottom edge from the map’s top edge
(bottom-y)
Coordinate values are separated by commas, as shown in the following
example:
243
RealProducer 11 User’s Guide
<AREA SHAPE=RECTANGLE COORDS=20,40,80,120 ...>
The preceding example defines a hot spot 60 pixels wide (80 pixels minus 20
pixels) and 80 pixels high (120 pixels minus 40 pixels). It creates a hot spot like
that shown in the following illustration.
Rectangular Hot Spot
Tip: Think of the first pair of values as defining the x and y
coordinates of the hot spot’s upper-left corner, and the second
pair of values as defining the x and y coordinates of the hot
spot’s lower-right corner.
Defining a Circular Hot Spot
You can use SHAPE=CIRCLE to create a circular hot spot. Three COORDS pixel
values specify the circle’s center placement and radius in the following order:
1. distance of the hot spot circle’s center from map’s left edge (center-x)
2. distance of the hot spot circle’s center from the map’s top edge (center-y)
3. the hot spot circle’s radius
The coordinate values are separated by commas, as shown in the following
example:
<AREA SHAPE=CIRCLE COORDS=100,120,50 ...>
The preceding example places the circular hot spot’s center 100 pixels in from
the clip’s left edge, and 120 pixels down from the clip’s top edge. The hot spot
has a radius of 50 pixels. The following figure illustrates this example.
244
CHAPTER 13: Defining Events and Image Maps
Circular Hot Spot
Tip: The last value, which sets the circle’s radius, should not be
more than the smaller of the other two values. If the first two
values are 40 and 20 , for example, the third value should not be
more than 20 . Otherwise, part of the circle extends beyond the
clip boundaries and is cut off.
Making a Polygonal Hot Spot
Use SHAPE=POLYGON to make a polygonal hot spot with any number of sides.
You might create a triangle or an octagon, for example. For every n sides of the
polygon you want to create, you must specify 2n values in the COORDS attribute.
To create a triangle, for example, you need to specify six COORDS values. Each
pair of coordinate values indicates the placement of a corner of the polygon in
this order:
1. distance of the polygon corner from the map’s left edge (corner-x)
2. distance of the polygon corner from the map’s top edge (corner-y)
The following example defines a triangular hot spot:
<AREA SHAPE=POLYGON COORDS=40,150,120,30,200,150 ...>
The following figure illustrates the preceding example. The first value pair for
the COORDS attribute defines the triangle’s lower-left corner. The COORDS value
pairs then proceed clockwise, defining the top corner, followed by the lowerright corner.
245
RealProducer 11 User’s Guide
Polygonal Hot Spot
Tip: When defining a polygon, you can start with any corner,
specifying the placement of additional corners by going
around the polygon either clockwise or counter-clockwise.
Tips for Defining Hot Spots
•A
viewer may resize a presentation manually by, for example, clicking and
dragging a RealPlayer corner. In these cases, hot spots scale with clips.
• Values
such as COORDS=30,30,10,10 for a rectangular hot spot are ignored,
and the hot spot will not function. Here, the hot spot’s left side is defined
as being farther to the right than its right side. As well, the top is defined
to be below the bottom.
• A hot spot defined to extend beyond the source clip is cropped at the clip’s
edge. For example, if a rectangular hot spot uses COORDS=50,50,300,300 but
the source clip is 200 by 200 pixels, the hot spot’s effective coordinates are
50,50,200,200 .
• If
multiple hot spots overlap on a clip, the link for the hot spot defined
first in the file is used when the viewer clicks the overlapping area.
• Many
programs, including shareware and freeware, can generate HTML
image maps. You can use one of these programs to define the coordinates
for a hot spot. Simply create an HTML image map over an image that is
the same size as your clip, view the HTML source, and copy the image map
coordinates into your <AREA> tag.
246
CHAPTER 13: Defining Events and Image Maps
Setting the Action
The <AREA> tag for a hot spot can define one of three actions that occur when
the viewer clicks the hot spot. The action parameter should follow the COORDS
parameter in the <AREA> tag:
PLAYER
Play a different clip. The URL should be a quoted, fully-qualified streaming
media URL.
SEEK
Seek to a different part of the timeline. The time value uses the same format
as the DURATION element, as described in “Setting a Duration” on page 242.
URL
Open the HTML page in the viewer’s browser. The value should be a quoted,
fully-qualified HTTP URL. In RealOne Player and later, this URL opens in a
secondary browsing window rather than one of the main player panes.
The following are examples:
<AREA ... PLAYER=”rtsp://helixserver.example.com/movie2.rm” ...>
<AREA ... SEEK=0:0:2:15:0 ...>
<AREA ... URL=”http://www.example.com/page2.html” ...>
Defining Alternate Text
The last parameter in the <AREA> tag must be an ALT attribute that uses short,
descriptive text as its value. When the viewer moves the screen pointer over the
hot spot, the alt text displays in the status line above the RealPlayer media
playback pane, indicating what action clicking the hot spot will perform. In
the following example, the text “Visit RealNetworks” is used for the ALT value:
<AREA ... URL=”http://www.realnetworks.com” ALT=”Visit RealNetworks”>
Map File Example
The following example defines an image map that is active for five minutes.
The map creates two clickable map areas, each of which covers the entire, 360pixel-by-240-pixel video. The first map area is active for the first half of the
clip. Clicking it fast-forwards to the second half of the clip’s timeline. As the
second half of the timeline plays, clicking the image map displays a Web page
in the viewer’s browser.
DURATION=0:0:5:0:0
<MAP START=0:0:0:0:0 END=0:0:2:30:0 COORDS=0,0,360,240>
<AREA SHAPE=RECTANGLE COORDS=0,0,360,240 SEEK=0:0:2:30:0
ALT="Click to fast-forward to part 2.">
</MAP>
247
RealProducer 11 User’s Guide
<MAP START=0:0:2:30:1 END=0:0:5:0:0 COORDS=0,0,360,240>
<AREA SHAPE=RECTANGLE COORDS=0,0,360,240 URL="http://www.example.com"
ALT="Visit our Web site.">
</MAP>
Running the RMEvents Utility
After you write your event or image file, you use the RMEvents utility to merge
the file with your clip. This creates a new clip that includes the events or maps.
The utility is named rmevents.exe on Windows and rmevents on Linux. You can
find it in the RealMediaEditor subdirectory of the RealProducer installation
directory.
Tip: The utility needs access to the libraries in its directory, so
you should run it from this directory, or add its directory to
your PATH environment variable.
For More Information: You can also use the graphical RealMedia
editor to merge event and image files with your clip. See
“Merging Image Maps or Events” on page 227.
Using RMEvents Option Flags
The following table describes the options that you use on the command line
when running RMEvents.
RMEvents Options
Option
Value
Function
-?
(none)
Displays help. Do not use this with any other options.
-d
name
Dumps events or image map information into text files.
-e
file name
Provides the path and file name of the event file.
-i
file name
Gives the path and file name of the input clip.
-m
file name
Indicates the path and file name of the map file.
-o
file name
Specifies the path and file name of the output clip.
Merging an Event or Map File with the Clip
When your event and map files are complete, you use RMEvents to merge
them with your encoded RealAudio or RealVideo clip. Open a command-line
248
CHAPTER 13: Defining Events and Image Maps
prompt and navigate to the directory that holds the RMEvents utility. Then
give the following command, which uses four flags to indicate the input clip,
output clip, events file, and map file. If you are not encoding a map file, for
instance, leave out the -m command and value:
rmevents -i input.ext -o output.ext -e events.txt -m maps.txt
where:
• input.ext
is the path and name of the input clip
• output.ext
is the path and name of the output clip
• events.txt
is the path and name of the events file
• maps.txt
is the path and name of the map file
Tip: Always choose a new output name so that you can save
your original clip without any encoded events or maps. You
cannot delete image map or events information once you have
encoded it into a clip. You can override the information with
new information, however.
Extracting Map and Events Information
Using the -d flag, you can extract map and event file information encoded into
a clip, writing it to text files. This action does not remove the information
from the clip, however. You specify the input clip with the -i option and a
dump file base name along with the -d option:
rmevents -i movie.rm -d movie
In this example, event information is written to the file movie_evt.txt . Map
information is written to the file movie_imap.txt .
249
RealProducer 11 User’s Guide
250
CHAPTER
Chapter 14:
USING THE COMMAND-LINE APPLICATION
14
This chapter explains how to run the RealProducer command-line
application, which can encode media as both clips and live
broadcasts. The command-line application can perform the same
encoding functions as the RealProducer graphical application, and
provides additional features not found in the graphical application.
Encoding From the Command Line
The command-line application is an executable file named producer.exe on
Windows and producer on Linux. It provides the same encoding capabilities as
the RealProducer graphical application, and allows you to perform batch
encoding on any number of media files. You can run the application from the
command line manually, or tie the application into any production or
scripting system that can use your operating system’s command line.
Using Job Files or Command Options
There are two basic ways to use the command-line application. You can enter
all of the encoding information on the command line when you run the
application. Or, when you use RealProducer Plus, you can define the encoding
options in a job file, as described in Appendix B, and process the job file
through the command line. Both methods allow you to specify the same
general encoding options, but each method provides its own advantages:
• When
you use a job file, you can define multiple inputs and outputs that
are encoded in parallel. Without a job file, you can define a single input
and single output for each encoding session. A single output can have
multiple destinations, however. For example, you can send an encoded
output to a broadcast server as well as save it to a local file.
• If you do not use a job file, you can use batch encoding. This allows you to
process multiple clips one after the other, all with the same encoding
251
RealProducer 11 User’s Guide
settings. This is useful if you need to encode a lot of clips using the same
settings.
Running the Command-Line Application
The command-line application uses the command name producer. This
executable file is located in the main RealProducer installation directory. On
Windows, the RealProducer installer adds this directory to your Path
environment variable, so you can run the application from any directory. On
Linux, you can add this directory to your path through your login shell. The
RealProducer installer can also create a symbolic link to the command-line
application.
File Locations and Temporary Directory
RealNetworks recommends that you run the command-line application from
a directory other than the RealProducer installation directory. Your media
files can be located anywhere on your network, but it is easiest to encode them
from the directory in which you run the command-line application. For
fastest operation, encode output on the same disk that holds input files,
preferably the local RealProducer disk. Also, set the temporary directory to a
directory on the same disk used for output.
For More Information: The section “Changing the File Location
Preferences” on page 151 explains how to set the temporary
directory through the graphical application. You can also
define the temporary directory in the preferences file, which
Appendix E describes.
Command Line Syntax
To run the application, open a command line prompt and navigate to your
content directory. Then enter the producer executable name along with your
options, as shown in the following example:
producer -i movie.avi -o movie_streaming.rm ...additional options...
Notes About the Command-Line Syntax
Note the following about the command syntax:
• Each
option is preceded by a dash, as in -i . Options are from one to three
characters long.
252
CHAPTER 14: Using the Command-Line Application
• Some
options, such as -i and -o require values, as shown above. Other
options do not take values.
• An option’s value immediately follows the option. Separate the two with a
space.
• If
an option value uses multiple words separated by spaces, enclose the
entire option string in double or single quotation marks. Do not include
the option flag itself with in the marks.
• If you do not include an option on the command line, the option’s default
value applies to the encoding job.
• The
order of options on the command line does not matter.
• The
command-line application supports cross-platform file naming, as
described in “File and Directory Paths” on page 312.
Stopping the Command-Line Application
You can stop an encoding session and save the resulting clip by pressing
Ctrl+c. With SureStream clips, however, some merging time is required before
the final output is written. To cancel encoding and delete the output and
temporary files, press Ctrl+\ on Linux or Ctrl+Break on Windows (Break is on
the upper-right row of the keyboard).
Sending Signals to the Linux Command-Line Application
On Linux, the command-line application listens to and responds to signals
that notify it of important events. The kill command can use signal names or
numbers as arguments to send the application a signal. The kill command
takes two arguments: the signal name or number and the process ID:
kill signal process_id
Signals and Actions
The following table defines the signals to which the command-line
application responds.
Linux Signals and Actions
Signal Name
Signal Number
Action
SIGINT
2
Stop
SIGTERM
15
Stop
(Table Page 1 of 2)
253
RealProducer 11 User’s Guide
Linux Signals and Actions (continued)
Signal Name
Signal Number
Action
SIGQUIT
3
Cancel
SIGABRT
6
Cancel
(Table Page 2 of 2)
Note: No action results from sending a SIGHUP signal to the
command-line application.
Process IDs
The kill command’s second argument is the process ID. A single instance of
RealProducer runs under several process IDs, but only one ID will accept a
signal. To identify the correct ID, use the Process ID File (-pid) option (see
page 286) to get the process ID. The following is an example:
producer -ac 0 -o out.rm -pid /tmp/producer.pid
Stop and Cancel Signals
To stop encoding but save the encoded output, use the kill command with a
SIGINT signal as shown in the following example:
kill -SIGINT $(cat /tmp/producer.pid)
To cancel encoding and delete the output, use the kill command with a
SIGQUIT signal as follows:
kill -SIGQUIT $(cat /tmp/producer.pid)
Tip: RealProducer includes a sample command-line utility,
signalproducer, that sends signals to a running command-line
application. This utility is available in source and binary
formats in the samples/utilities/producer_signal_generator
directory.
Sending Signals to the Windows Command-Line Application
On Windows, the RealProducer command-line application listens for window
messages sent to its window handle. When the application starts, it registers a
window handle based on the process ID (PID). You can obtain the PID from
the Windows Task Manager. Or, you can record the PID using the Process ID
File (-pid) option (see page 286), as shown in the following example:
producer -ac 0 -o out.rm -pid "c:\pid.txt"
254
CHAPTER 14: Using the Command-Line Application
With the PID, you can send a stop or cancel request to the application by
using a utility available as source and in binary form (signalproducer.exe ) in the
following directory under the main RealProducer installation directory:
samples\utilities\producer_signal_generator
The signalproducer.exe utility uses the following syntax, in which the stop
option saves the output and cancel option discards it:
signalproducer.exe {-p PID|-P PIDFILE} [-a stop|cancel] [-q]
The following example shows how to send a cancel signal to the commandline application using a PID file:
signalproducer.exe -P c:\pid.txt -a cancel
You can also pass the PID directly using a lowercase -p option, as shown in the
following example:
signalproducer.exe -p 2096 -a cancel
Monitoring the Return Value
You can use the command-line application’s return value to detect if an error
occurred if you run the application from a script. The application returns a
value of 0 if no errors occurred during encoding. If errors occurred, the
application returns a value of 1.
Getting the Return Value on Linux
On Linux, you can access the return code by assigning the function call to a
variable, then testing that variable's value. The return value is stored in a
special shell variable ($? ). The following sample script checks the contents of
the ? variable for an error. If the variable has a value of 1 or higher, the script
prints an error string:
producer -i movie.mpeg
if [ $? -ge 1 ]; then echo "Encoding error occurred."
Getting the Return Value on Windows
DOS stores the return value of a command-line program in an environment
variable called ERRORLEVEL . This following example checks the contents of
ERRORLEVEL and prints an error string if ERRORLEVEL has a value of 1 or more:
producer -i movie.avi
IF ERRORLEVEL 1 echo Encoding error occurred.
255
RealProducer 11 User’s Guide
Command-Line Functional Areas
The following tables summarize the major functional areas and options for
using the RealProducer command-line application.
Job File Options
Option
Value
Default
Function
Reference
-j
job file
(none)
Indicates the job file to use.
page 259
-cj
new job file
input file
name
Creates a new job file.
page 259
-duc
(none)
(none)
Disables codec updating.
page 261
Option
Value
Default
Function
Reference
-ac
integer|string|
device name
(none)
Specifies the audio capture
input device ID.
page 263
-ap
integer|string|
device name
capture
Indicates the port of the audio
card default capture input.
page 263
-cm
(none)
stereo
capture
page 264
-cs
WidthxHeight
capture
Defines the input video
card default dimensions.
page 266
-i
file name
(none)
Sets the input file name.
page 262
-vc
integer|string|
device name
(none)
Specifies the video capture
input device ID.
page 264
-vf
NTSC|NTSC-JP|
PAL|PAL-M|
PAL-N|PAL-NC|
SECAM| integer
NTSC
Specifies the video format of
the video capture device. Linux
only.
page 265
-vp
integer|string|
device name
capture
Indicates the port of the video
card default capture input.
page 265
Input Options
Forces mono audio capture.
Linux only.
Clip Information Options
Option
Value
Default
Function
Reference
-a
-c
string
(none)
Encodes an author name.
page 267
string
(none)
Sets the encoded copyright.
page 267
-de
string
(none)
Adds a clip description.
page 267
(Table Page 1 of 2)
256
CHAPTER 14: Using the Command-Line Application
Clip Information Options (continued)
Option
Value
Default
Function
Reference
-k
string
(none)
Adds keywords.
page 267
-r
0 to 6
0
Rates the content of the output.
page 268
-t
string
(none)
Adds a title.
page 267
(Table Page 2 of 2)
Prefilter Options
Option
Value
Default
Function
Reference
-ag
-48 to 48
0
Adjusts the audio gain.
page 268
-bl
(none)
(none)
Increases video contrast.
page 269
-cr
Left,Top,Width,
Height
(none)
Sets cropping parameters in
pixels.
page 270
-daw
(none)
(none)
Disables audio tests.
page 269
-di
auto|both|d|i
(none)
Applies de-interlace or inverse- page 269
telecine filters.
-nf
low|high
(none)
Removes video noise.
page 271
Output and Destination Options
Option
Value
Function
Reference
-drs
Megabytes
Starts a new output file by size.
page 272
-drt
dd:hh:mm:ss
Starts a new output file by encoding time.
page 272
-lm
0|1|2
Sets the broadcast latency mode.
page 279
-mtu
bytes
Sets a broadcast’s maximum packet size.
page 279
-o
file name
Specifies the output file name and path.
page 271
-sd
broadcast string
Creates any type of broadcast using a server
destination template or file.
page 277
-si
broadcast string
Starts encoding a broadcast stream in pull
mode.
page 275
-sp
broadcast string
Creates an account-based, password-only, or page 272
multicast push broadcast.
257
RealProducer 11 User’s Guide
Encoding Options
Option
Value
Default
Function
-ad
audience name|
file name
system Specifies the encoding audiences. page 280
defaults
-am
voice|music
music
-arq
fast|high
high
Sets the audio resampling quality. page 282
-da
(none)
(none)
Disables audio from the input.
page 282
-dt
(none)
(none)
Disables two-pass encoding
page 281
-dv
(none)
(none)
Disables video from the input.
page 283
-eco
low|medium|high
high
Sets the video or lossless audio
encoding complexity.
page 284
-rq
fast|high
high
Determines the resize quality.
page 284
-rs
WidthxHeight
0x0
Sets the resizing dimensions.
page 283
-vco
rv8|rv9|rv10
rv10
Chooses the RealVideo codec.
page 284
-vm
normal|sharp|
normal
smooth|slideshow
Affects the video’s visual quality,
primarily at lower bandwidths.
page 282
Sets the audio mode.
Reference
page 281
Logging Options
Option
Value
Function
Reference
-dlf
(none)
Disable logging to the standard log file.
page 285
-dls
(none)
Disable logging to the screen.
page 286
-lc
e|w|i|d
Determine the types of messages logged.
page 285
-pid
file name
Create a process ID file.
page 286
-q
(none)
Display no information on the screen.
page 286
Help Options
258
Option
Function
Reference
-h
Displays a list of available commands.
page 286
-m
Provides full help for command line operation.
page 287
-pa
Prints audience definitions for use with the -ad option.
page 287
-pd
Prints device information for use with live capture.
page 287
-ps
Prints server definitions for use with the -sd option.
page 287
-v
Displays the RealProducer version number.
page 287
CHAPTER 14: Using the Command-Line Application
Job File Options
Job files, which use the file extension .rpjf , are XML-formatted files that
specify the inputs, outputs, and encoding operations to perform. Appendix B
explains the job file syntax. This section explains the options for using and
creating job files with the command-line application of RealProducer Plus.
Note: Job file processing is not available with the command-
line application of RealProducer Basic.
Job File Name (-j)
Use the -j option to specify the path and file name of the job file to use. You
can use either a relative path from the current directory, or an absolute path.
For example:
-j MyJob.rpjf
When you encode with a job file, the job file defines the input and output, as
well as the encoding options. You therefore cannot use most other options on
the command line. The following options are allowable, however, along with
the -j option:
• Create
Job File (-cj) option (see page 259)
• Disable
Codec Updates (-duc) option (see page 261)
• Disable
Audio Watchdogs (-daw) option (see page 269)
• Logging
• Process
• Video
Category (-lc) option (see page 285)
ID File (-pid) option (see page 286)
Codec Override (-vco) option (see page 284)
• Encoding
Complexity Override (-eco) option (see page 284)
For More Information: See “Job File Examples” on page 289 for
samples of command-line syntax for encoding clips or
broadcasts with job files. “Job File Syntax Update” on page 289
shows how to update earlier job files to the RealProducer 11
format.
Create Job File (-cj)
If you have RealProducer Plus, you can use the -cj option to generate a job file
from the command line options you provide. This allows you to capture
259
RealProducer 11 User’s Guide
command-line settings into a job file without encoding any content. You can
later run the job file you created and perform the encoding by using the -j
option. For instance, you may want to create a basic job file using the -cj
option, then modify it manually as described in Appendix B before running it
on the command line.
The value for the -cj option is a file name and path, which can be absolute or
relative to your current directory. For example:
-cj NewJob.rpjf
-cj c:\Jobs\NewJob.rpjf
-cj /usr/realproducer/jobs/NewJob.rpjf
Warning! Job file properties are not validated until the job
runs. You can create an invalid job file by specifying a nonexistent audience, for example. In this case, you do not receive
an error until you encode a job using the file.
Input and Output Options
The simplest way to create a job file is to specify an input file, a job file name,
and the other encoding options on the command line. The following example
creates the job file movie.rpjf . This file specifies movie.avi as the job input. It
automatically sets the job output to movie.ra , movie.rv, movie.rm , or movie.rmvb
depending on the audiences chosen as part of the encoding options:
-i movie.avi -cj movie.rpjf ...encoding options...
To set the output clip to a different name, you include the -o option on the
command-line:
-i movie.avi -o streaming_movie.rm -cj movie.rpjf ...encoding options...
For More Information: For more on defining inputs, refer to
“Input File or Directory (-i)” on page 262. The section “Output
File or Directory (-o)” on page 271 describes outputs.
Batch Job File Creation
You can create job files in batch mode by specifying an existing directory as
the value of the -cj option. For example, you can create a job file for every AVI
clip in a directory. In the following example, an input named movie.avi results
in a job file named movie.rpjf in the jobfiles directory:
-i c:\media\videos\*.avi -cj c:\media\jobfiles
260
CHAPTER 14: Using the Command-Line Application
You can also specify just the input directory, as shown in the following
example. RealProducer creates a job file for every media file in an acceptable
input format, such as AVI, WAVE, or MPEG, that it finds in the input
directory. It ignores files in other formats, such as .rm and .txt files:
-i /usr/producer/media/videos -cj /usr/producer/media/jobfiles
Disable Codec Updates (-duc)
When you have job or audience files created with the older Helix Producer,
RealProducer 11 automatically updates the audience settings to use new audio
and video codecs. This is the recommended action. Job or audience files that
formerly specified the RealVideo G2 with SVT codec are updated to use
RealVideo 8. The following table lists the RealAudio codecs substituted for
older audio codecs.
Automatic RealAudio Codec Updating
Previous RealAudio Codec
New RealAudio Codec
66 Kbps Stereo Music - RA8
64 Kbps Stereo Music
94 Kbps Stereo Music - RA8
96 Kbps Stereo Music
105 Kbps Stereo Music - RA8
96 Kbps Stereo Music
132 Kbps Stereo Music - RA8
128 Kbps Stereo Music - RealAudio 10
146 Kbps Stereo Music - RA8
128 Kbps Stereo Music - RealAudio 10
176 Kbps Stereo Music - RA8
160 Kbps Stereo Music - RealAudio 10
264 Kbps Stereo Music - RA8
256 Kbps Stereo Music - RealAudio 10
352 Kbps Stereo Music - RA8
320 Kbps Stereo Music - RealAudio 10
132 Kbps Surround Audio
128 Kbps Stereo Surround - RealAudio 10
146 Kbps Surround Audio
128 Kbps Stereo Surround - RealAudio 10
176 Kbps Surround Audio
160 Kbps Stereo Surround - RealAudio 10
264 Kbps Surround Audio
256 Kbps Stereo Surround - RealAudio 10
352 Kbps Surround Audio
320 Kbps Stereo Surround - RealAudio 10
If you want your audience or job files to retain the older codec information,
however, you can include the -duc option on the command line:
-duc
Warning! RealProducer 11 no longer includes the RealVideo G2
codec, or RealAudio codecs based on ATRAC3 technology. If
your existing audience or job files specify these codecs and you
261
RealProducer 11 User’s Guide
include the -duc option, RealProducer 11 will not be able to
encode the job.
Tip: You can modify how RealProducer updates older codecs by
modifying the settings of the codecmapping.txt file located in
the resources directory under the RealProducer installation
directory. You will need to know the codec names and flavors,
which are listed in the codec tables in the section “RealAudio
Codecs” on page 37.
Input Options
This section describes the input options that allow you to specify a file or live
capture as the input to be encoded. Note that you can specify just one input
through the command line. In a job file, however, you can specify multiple
inputs that are run in parallel, as described in “Audio and Video Inputs” on
page 309.
Input File or Directory (-i)
Use the -i option to indicate a digitized file on the network or local drive to be
encoded. For the file path, you can specify either a relative path from the
current directory, or an absolute path. The input file name is ignored if the
Audio Capture Device ID (-ac) option (see page 263) or Video Capture Device
ID (-vc) option (see page 264) is specified.
For More Information: For a list of supported input file types,
refer to “Audio and Video Input Formats” on page 27. For
information about specifying output file locations and names,
see “Output File or Directory (-o)” on page 271.
Single File Input Examples
-i
-i
-i
-i
movie1.mpg
../media/movie1.mpg
c:\files\media\movie1.avi
/home/encoder/media/movie1.mpg
Batch File Encoding
With RealProducer Plus, you can specify multiple files that are encoded
serially. You can specify the directory that contains the source files, or use one
262
CHAPTER 14: Using the Command-Line Application
or more asterisks (* ) as wildcards in file names. You cannot use a wildcard in a
directory path, however. If you do not specify output paths and names, the
encoded clips are written to the input directory, using each input’s base file
name and the .ra , .rv, .rm , or .rmvb extension, depending on the encoding type.
Batch File Input Examples
-i
-i
-i
-i
-i
-i
*.mpg
../media/
c:\files\media\
c:\files\media\trailer*.avi
/home/encoder/media/*.mpg
/home/encoder/media/
Audio Capture Device ID (-ac)
The -ac option specifies the audio device ID for the input audio device. Using
this option overrides the -i option for a file input. You can use one of the
following values:
• Integer
of value 0 or higher identifying a specific device number, such as:
-ac o
• String
matching an existing device name:
-ac “Sound Blaster Live!”
• String
with a wildcard (* ) matching an existing device name, such as:
-ac “Sound Blaster *”
• UNIX
device name or symbolic link to a device name, such as:
-ac /dev/audio
For More Information: Use the Print Device Information (-pd)
option (see page 287) to list values for your system.
Audio Capture Device Port (-ap)
Use -ap to specify the port for the audio device used for audio capture. You
must specify the audio device ID as well. Using the -ap option overrides the -i
option for a file input. If you omit the audio port, the current mixer settings
are used. You can use one of the following values:
• Integer
of value 0 or higher identifying a specific port number, such as:
-ap o
263
RealProducer 11 User’s Guide
• String
matching an existing port name:
-ap “Line In”
• String
with a wildcard (* ) matching an existing port name, such as:
-ap “Mic*”
Note: This option is not available on Windows or on Linux
distributions that use the free OSS audio drivers. Instead, set
the audio capture port using the Windows Recording Control
Panel. On Linux, use mixer software specific to your Linux
distribution.
For More Information: Use the Print Device Information (-pd)
option (see page 287) to list values for your system.
Capture Mono Audio (-cm)
The Linux-only -cm option forces the audio card to record a single, mono
audio channel. Omitting the option enables stereo capture. The option does
not require any values:
-cm
Tip: When capturing mono-only, you’ll get best results when
using one of the mono codecs listed in “Voice Codecs” on page
39 or “Mono Music Codecs” on page 40.
Video Capture Device ID (-vc)
Use -vc to set the device ID for the input video device. Using this option
overrides the -i option for a file input. You can use one of the following values:
• Integer
of value 0 or higher identifying a specific device number:
-vc 1
• String
matching an existing device name:
-vc “Osprey Capture Card 1”
• String
with a wildcard (* ) matching an existing device name, such as:
-vc “Osprey*”
• UNIX
device name or symbolic link to a device name, such as:
-vc /dev/video3
264
CHAPTER 14: Using the Command-Line Application
For More Information: Use the Print Device Information (-pd)
option (see page 287) to list values for your system.
Video Device Port (-vp)
The -vp option sets the port for the video capture device. If you use -vp , you
must specify the video device ID as well. Using the -vp option overrides the -i
option for a file input. If you omit the port, the current mixer settings are
used. You can use one of the following values:
• Integer
of value 0 or higher identifying a port number, such as:
-vp 1
• String
matching an existing port name:
-vp “S-Video”
• String
with a wildcard (* ) matching an existing port name, such as:
-vp “Composite*”
Note: This option is not available with Video for Windows
(VFW) devices. Instead, use the graphical application to set the
port through the capture card dialog. See “Using Live Audio or
Video as the Input” on page 90 for instructions.
For More Information: Use the Print Device Information (-pd)
option (see page 287) to list values for your system.
Video Format (-vf)
The -vf option defines the video format on Linux only. It specifies the video
format of the video capture device. On Windows, use the driver dialog to set
the video format. This option is ignored if you do not also use the Video
Capture Device ID (-vc) option. The default is NTSC. The following are the
possible values:
• NTSC
• NTSC-JP
• PAL
• PAL-M
• PAL-N
• PAL-NC
265
RealProducer 11 User’s Guide
• SECAM
• integer
(specifies a format understood by your video driver)
Here are some examples:
-vf SECAM
-vf 8
Capture Frame Size (-cs)
The -cs option sets the size of the video capture when you use the Video
Capture Device ID (-vc) option (see page 264). It is ignored for audio-only and
file-to-file encoding. If you do not specify this size, the dimensions set in the
video capture card are used. The value specifies pixel dimensions in the form
WidthxHeight , as shown in the following example:
-cs 320x240
Note: The RealVideo codec rounds each dimension down to
the nearest 4 pixels. If you specify a height of 183 pixels, for
example, the output clip has a height of 180 pixels.
For More Information: You can resize any video output, whether
from a capture or with file-to-file encoding. See “Resize Video
(-rs)” on page 283.
Capture Duration (-d)
The -d option sets the duration that the audio or video capture lasts. This is
not used when encoding from a file. The duration timer begins when you start
the encoding. If you omit this option, encoding lasts until you stop it
manually. The section “Duration Syntax” on page 298 explains how to specify
time values. Here are some examples:
-d 90
Encode for 90 seconds.
-d 10:30
Encode for ten hours and 30 seconds.
-d 1:00:00
Encode for one hour.
Clip Information Options
The following clip information options are available through the commandline application. Adding clip information is highly recommended. For
266
CHAPTER 14: Using the Command-Line Application
background on the information values, refer to “Adding Clip Information” on
page 94.
Title (-t)
The -t option defines a title for the clip or broadcast. The value can be any
string up to 255 characters. For example:
-t “2004 Music Awards”
Author (-a)
Use the -a option to define the author of the clip or broadcast. The value can
be any string up to 255 characters. For example:
-a “Brilliant Media Limited”
Copyright (-c)
The -c option defines the copyright owner and date for the recorded clip. The
value can be any string up to 255 characters. For example:
-c “2004 Brilliant Media Limited”
Keywords (-k)
Using the -k option, you can define keywords that help search engines index
your clip. The value can be any string up to 255 characters. For example:
-k “awards 2004 music”
Description (-de)
Using the -de option, you can set a description of the clip that is longer and
more informative than the title. The value can be any string up to 64 Kilobytes
in size. For example:
-de “An encore presentation of the 2004 music awards.“
267
RealProducer 11 User’s Guide
Content Rating (-r)
The -r option defines the age range for which the content is applicable. Use
one of the following integer values (0 is the default):
0
No rating
1
All ages
2
Older children
3
Younger teens
4
Older teens
5
Adult supervision recommended
6
Adults only
For example:
-r 1
Prefilter Options
The following prefilter options are available through the command-line
application. A prefilter modifies the audio or video input before it is encoded.
Because all prefiltering is optional, no prefilters are applied by default.
Note: You cannot apply the audio compensation prefilter,
which adjusts audio that is out of synchronization with video,
through the command line. You can specify this prefilter in a
job file, however. See “Audio Delay Compensation Prefilter” on
page 327.
Audio Gain Filter (-ag)
Available with RealProducer Plus, the -ag option applies the audio gain filter
to amplify or attenuate the input audio. This can boost the audio signal or
decrease it to prevent it from clipping. The value is a number from -12.0
(attenuation) to 12.0 (amplification). For example:
-ag -5.0
For More Information: For background on audio gain, refer to
“Monitoring Audio” on page 142.
268
CHAPTER 14: Using the Command-Line Application
Disable Audio Watchdogs (-daw)
The -daw option disables the audio watchdogs, which are a set of tests that
RealProducer runs on the audio input to detect audio problems. You can use
them when encoding from a file or a live capture, but they are most useful
when capturing live media because you may be able to correct the problem
through the capture equipment. Any audio problems discovered are logged
periodically (typically every five seconds) while the problem persists. After
logging 20 messages for the same problem, RealProducer suspends logging of
that message for 16 hours. The following table describes the watchdog tests.
Audio Watchdog Tests
Test
Test Condition
Out-of-Phase
Indicates that the audio signal has been out of phase for more
than 10 seconds.
Clipping
Warns that the audio is being clipped heavily, moderately, or
lightly.
Silence
Detects if the audio input signal has been below -60dB for
longer than 10 seconds.
Channel Imbalance
For stereo input, indicates that one channel has been 6dB lower
than the other channel for more than 10 seconds.
The option does not require a value, as shown here:
-daw
Black Level Filter (-bl)
This filter increases contrast in videos by making dark colors pure black and
off-white colors pure white. The option does not require a value:
-bl
For More Information: The section “Black-Level Correction
Filter” on page 80 describes this filter.
Inverse-Telecine and De-interlace Filters (-di)
The -di option specifies the use of the inverse-telecine or de-interlace filter on
the video input. The de-interlace filter is generally needed only on videos
269
RealProducer 11 User’s Guide
larger than 320 by 240. The inverse-telecine filter is for videos that were
transferred from film. The following are the values that you can specify.
auto
Autodetect and apply both filters only if needed. This is recommended.
d
Apply the de-interlace filter only.
i
Apply the inverse-telecine filter only.
both
Apply both the de-interlace and inverse-telecine filters.
Here is an example:
-di auto
For More Information: The sections “Inverse-Telecine Filter” on
page 78 and “De-interlace Filter” on page 79 explain how these
filters operate.
Crop Video Input (-cr)
Available with RealProducer Plus, the -cr option applies the cropping prefilter,
which crops out areas from the sides of the input video. The option uses four
pixel values, separated by commas and no spaces. In order, these values
indicate the values for Left , Top , Width , and Height .
Left
Represents the number of pixels from the left edge of the video to start the
cropping. You can specify up to 32 pixels less than the total width.
Top
Sets the number of pixels from the top edge of the video to start the
cropping. You can specify up to 32 pixels less than the total height.
Width
Defines the total width of the cropped video, measured from the point set
by the Left property. If the width value is not a multiple of 4, the next lower
multiple is used. For example, a value of 162 results in a video 160 pixels
wide.
Height
Indicates the total height of the video, measured from the point set by the
Top property. If the value is not a multiple of 4, the next lower multiple is
used. For example, a value of 127 results in a video 124 pixels high.
In the following example, the cropping starts 10 pixels to the right of the
video’s left edge and 20 pixels down from the top edge. The resulting video is
then 320 pixels wide by 240 pixels high.
-cr 10,20,320,240
Tip: As described in “Resize Video (-rs)” on page 283, you can
also resize a video. Because cropping occurs first, the final two
270
CHAPTER 14: Using the Command-Line Application
numbers of the -cr value indicate the input size for the resizing
operation.
Video Noise Filter (-nf)
As described in “Noise Filters” on page 77, the noise filters can remove small
distortions in the video image. Use a value of low for small distortions, a value
of high if the noise is more pronounced. You should not apply these filters to
video input that is free of distortion. Here is an example:
-nf high
Output and Destination Options
This section describes the output and destination options. Using the
RealProducer Plus command-line application, you can encode a single output,
but can send that output to any number of destinations, whether files or
servers. With RealProducer Basic you can define one file destination and one
server destination for each encoding session.
For More Information: If you create a job file, you can specify
multiple outputs, each of which may have different encoding
options and destinations. See “File and Server Outputs” on
page 329.
Output File or Directory (-o)
The -o option sets the output clip’s file name and path to an existing
directory. The path can be absolute or relative to the current directory. You
must supply a file name for captured input. With file-to-file encoding, you can
omit the -o option to encode the clip using the input file’s base file name and
the appropriate extension, either .ra , .rv, or .rm for constant bit rate clips, or
.rmvb for variable bit rate clips. In this case, the output clip is saved to the
directory that holds the input file. The following examples specify output
paths and file names:
-o C:\Movies\movie1.rm
-o /usr/producer/output/movie2.rmvb
Batch Output Encoding
As described in “Batch File Encoding” on page 262, you can encode multiple
input files using wildcards. In this case, you do not need to specify the outputs
271
RealProducer 11 User’s Guide
to save the encoded clips in the directory that holds the input files. The
outputs will use the input files’ base file names along with the .ra , .rv, .rm , or
.rmvb extension. You can use the -o option to specify an output directory,
however, if you want to save the clips in a different directory:
-o C:\Movies
-o /usr/producer/output/
Archive Clips
If you specify the name of clip that exists already in the output directory,
RealProducer does not overwrite the existing clip. Instead, it archives the
existing clip by appending _archNNN to the base file name. Hence, movie.rm
becomes movie_arch001.rm before the new movie.rm clip is saved. If you encode
the output again, the existing movie.rm becomes movie_arch002.rm . Higher
numbers therefore represent newer archives.
Destination File Roll Size (-drs)
Use the -drs option to set an file size limit in Megabytes that causes
RealProducer to create a new output file. The section “File Rolling” on page
332 explains how file rolling works. The following example sets a roll size of
20 Megabytes:
-drs 20
Destination File Roll Time (-drt)
The -drt option sets an encoding duration after which RealProducer creates a
new output file. The section “File Rolling” on page 332 explains how file
rolling works. See “Duration Syntax” on page 298 for information about
timing values you can use. The following example creates a new file archive
after RealProducer has encoded the output for 15 minutes:
-drt 15:00
Push Server Destination (-sp)
The -sp option defines a push broadcast with Helix Server version 9 or later as
the destination. You can perform an account-based push, password-only push,
or multicast (RealProducer Plus only). Before running a push broadcast,
review the broadcast issues described in Chapter 10 and be sure that you
272
CHAPTER 14: Using the Command-Line Application
understand the broadcast features and server set-up requirements for your
chosen type of broadcast, as described in one of the following sections:
• “Running
• “Setting
an Account-Based Broadcast” on page 189
Up a Password-Only Broadcast” on page 194
• “Multicasting
a Live Stream” on page 200
Push Server Syntax
This broadcasting method uses the following syntax:
-sp username:password@address:port/path/stream
–or–
-sp :password@address:port/path/stream
As the following table explains, you may not need to define every component
in the broadcast stream, depending on the broadcast type and the server
settings.
Push Destination Components
Component Value
username
User name defined in the Helix Server authentication database. Used
only with account-based broadcasts. If no server authentication is
required for account-based push, omit both the user name and the
password. Note that a colon must precede and follow the user name.
password
Password defined in the Helix Server authentication database (accountbased) or the receiver definition (password-only, multicast). If you
supply only the password preceded by a colon, RealProducer assumes a
password-only broadcast or multicast. The Helix Server receiver must
be set to use the Basic authentication method.
address
Valid IPv4 address, IPv6 address, or domain name for the Helix Server
destination. For multicasts, the value must be a class-D multicast
address.
port
Server port that receives the stream. For account-based broadcasts, the
default is 80, which is typically the server’s HTTP port. Use a different
value if the server uses a different HTTP port. For password-only and
multicasts, the receiver typically accepts connections on ports 30001
through 30020. The default value for these broadcast types is 30001.
(Table Page 1 of 2)
273
RealProducer 11 User’s Guide
Push Destination Components
Component Value
path
Optional, virtual path used to define server-side archiving or stream
splitting. For background, refer to “Virtual Paths” on page 176.
stream
The name of the broadcast stream. Include the .ra , .rv, .rm , or .rmvb
file extension, as in live.rm . The name can not contain the following
characters: @ : /
(Table Page 2 of 2)
Default Broadcast Values
The -sp broadcasting option does not allow you to set advanced broadcast
parameters such as the transport type and error correction features, which the
section “Changing Advanced Push Broadcast Parameters” on page 205
describes. Nor can you set the listen address if you are broadcasting through a
firewall performing network address translation (NAT). Instead, this
broadcasting option uses the default values for these features.
For More Information: If you need to change default values for
advanced broadcast features, use the Server Template or Server
File (-sd) option (see page 277), or define the broadcasting
options in a job file.
Push Broadcast Examples
The following examples show how to perform one of the three possible
broadcast types using the -sp option.
Account-Based Broadcast Example
The presence of a user name and password causes RealProducer to start an
account-based broadcast. In the following example, the port value is included
because the server does not use port 80 for HTTP requests. No virtual path is
given, and the stream name is news.rm .
-sp remote_encoder:[email protected]:8080/news.rm
If authentication is not required on the server, you can omit the user name,
password, and @ sign:
-sp helixserver.example.com:8080/news.rm
Password-Only Broadcast Example
The presence of just a password preceded by a colon, along with a nonmulticast IP address or DNS name, starts a password-only broadcast. In the
274
CHAPTER 14: Using the Command-Line Application
following example, the port value is not given, so RealProducer delivers the
stream to the default port 30001. A virtual path used by the server is provided,
along with the stream name live.rm .
-sp :[email protected]/sports/live.rm
Multicast Example
The presence of a password but no user name, along with a multicast IP
address, starts a password-only multicast. In the following example, the port
value of 30011 is supplied. No virtual path is used with the stream name.
-sp :[email protected]:30011/playoffs.rm
Pull Server Destination (-si)
The -si option defines a pull broadcast accessible by Helix Server version 9 or
later. Before running a pull broadcast, review the broadcast issues described in
Chapter 10 and be sure that you understand the broadcast features and server
set-up requirements described in “Running a Pull Broadcast” on page 210.
Pull Server Syntax
This broadcasting method uses the following syntax:
-si password@listenAddress:listenPort/path/stream
As the following table explains, you may not need to define every component
in the broadcast stream, depending on the server settings.
Pull Destination Components
Component
Value
password
Password used by RealProducer to authenticate server pull requests.
The Helix Server receiver must supply this password. If you omit
this, any pull-enabled server can connect to the stream.
listenAddress
Valid version 4 or version 6 IP address to which RealProducer binds.
The default of 0 uses the default IP address on the default network
interface card. See “IP Address Values” on page 276 for information
about displaying the IP addresses.
listenPort
Port that RealProducer uses to listen for pull requests. The default is
3031,
(Table Page 1 of 2)
275
RealProducer 11 User’s Guide
Pull Destination Components
Component
Value
path
Optional, virtual path used to define server-side archiving or stream
splitting. For background, refer to “Virtual Paths” on page 176.
stream
The name of the broadcast stream. Include the .ra , .rv, .rm , or .rmvb
file extension, as in live.rm . The name can not contain the following
characters: @ : /
(Table Page 2 of 2)
Default Broadcast Values
With pull broadcasting, the server that pulls the stream defines most of the
advanced stream features, such as error correction. RealProducer defines a few
advanced parameters, however, which the section “Defining a Pull Broadcast
Server Destination” on page 213 describes. When you use the -si option, the
command-line application uses the default settings.
For More Information: If you need to change default values for
advanced broadcast features, use the Server Template or Server
File (-sd) option (see page 277), or define the broadcasting
options in a job file.
IP Address Values
RealProducer can reside on machines that use either version 4 or version 6 IP
addresses. To find the listen address of the RealProducer machine on which
the command-line application is running, do the following:
• On
the Linux command line, type the following to display the IP address
on the screen:
ifconfig
• On
Windows NT/2000/XP, open a command prompt and type the
following to display the IP address on the screen:
ipconfig
• On
Windows ME/98SE, open a command prompt and type the following
to open a dialog that allows you to select different network cards and view
their IP addresses:
winipcfg
276
CHAPTER 14: Using the Command-Line Application
Pull Broadcast Examples
The following example shows how to start a pull broadcast using the -si
option and specifying all possible values, including a virtual path name:
-si [email protected]:3031/rock/radio.rm
To use the RealProducer default IP address and listen port, you would use a
value such as the following. This example does not include a virtual path with
the stream name:
-si dkgy435ty@0/radio.rm
Server Template or Server File (-sd)
Available with RealProducer Plus, the -sd option allows you to broadcast in
pull or push mode using a predefined server destination. When you use this
option, a server destination template or file sets the necessary broadcast
parameters, such as the server’s IP address, transport method, and advanced
parameters like error correction. This is the most flexible means of
broadcasting, but requires the use of a separate, server destination template or
file.
For More Information: Chapter 11 covers the different
broadcasting methods and explains how to create a server
destination using the graphical application. Appendix D
explains the server file syntax.
Server Destination Syntax
This broadcasting method uses the following syntax:
-sd username:password@definition,path/stream
As the following table explains, you may not need to define every component
in the -sd option’s value, depending on the broadcast type.
Server Definition Broadcast Components
Component Value
username
User name required by the broadcasting method. If no user name is
required, as with password-only broadcasting, omit this value.
password
Password required by the broadcasting method. If no password is
required, omit this value.
(Table Page 1 of 2)
277
RealProducer 11 User’s Guide
Server Definition Broadcast Components
Component Value
definition
Name of a server definition stored in the default server destination
directory. Or, the path and file name of a server definition file stored
anywhere on your network. See “Locating Server Definitions” on page
278
path
Optional, virtual path used to define server-side archiving or stream
splitting. For background, refer to “Virtual Paths” on page 176.
stream
The name of the broadcast stream. Include the .ra , .rv, .rm , or .rmvb
file extension, as in live.rm . The name can not contain the following
characters: @ : /
(Table Page 2 of 2)
Locating Server Definitions
As explained in Appendix D, a server destination file is an XML-formatted file
that uses the extension .rpsd . To use a destination file, provide the full file
name and extension, along with a relative or absolute path as the definition
component. Relative paths are relative to the directory from which you run
the command-line application.
You can also specify a server template, which is a server destination file stored
in the servers directory under the main RealProducer installation directory. To
use a template, you provide the template name, which is the value of the
destination’s name property. You can abbreviate the template name down to a
unique set of letters.
Tip: Use the Print Servers (-ps) option (see page 287) to display
a list of available server templates.
For More Information: You can change the location of the server
templates by editing the preferences file as described in
Appendix E.
Server Definition Examples
The following example specifies the absolute path to a server destination file
that sets up an account-based broadcast. Both a user name and password are
supplied, as required by the account-based, push broadcast method:
-sd remote_encoder:as45er897@/usr/encoder/pushbroadcast.rpsd,football.rm
The next example provides the relative path to a server destination file that
defines a password-only push broadcast. Accordingly, the -sd option value
278
CHAPTER 14: Using the Command-Line Application
supplies just a password. A virtual path of hourly/ is included with the stream
name:
-sd yop563sdf@../definitions/SydneyReceiver.rpsd,hourly/news.rm
The following example indicates a server destination template named Rock
Radio Pull Broadcast stored in the default template directory. When you specify
a template, you can abbreviate the name down to a unique set of characters,
such as Rock in the following example:
-sd 567dlopf212@Rock,livefeed.rm
Latency Mode (-lm)
The -lm option affects the latency mode of a live broadcast. Omitting it, or
using a value of 0 , produces a broadcast that is resilient against packet loss,
but introduces the most latency. You can use a value of 1 to reduce latency, or
2 to broadcast with the smallest possible latency. These values make packet
loss more noticeable to the viewer, however. For example:
-lm 1
Warning! Use a low latency setting only when delivering a live
stream to Helix Server version 11 or later. Earlier versions of
Helix Server will not handle the stream properly.
For More Information: For background on broadcast latency,
refer to “End-to-End Broadcast Latency” on page 180.
Maximum Packet Size (-mtu)
The -mtu option allows you to set the maximum packet size in bytes for live
broadcast streams. This helps you optimize the broadcast if you are familiar
with your network’s maximum transfer unit (MTU). For example:
-mtu 1275
For More Information: The section “Network Latency” on page
185 provides more information about setting a maximum
packet size.
279
RealProducer 11 User’s Guide
Encoding Options
This section lists the general encoding options that affect the output, whether
a clip or a broadcast stream. Use these options to select the video codec, for
example, or specify the encoding audiences.
Audience Definitions or Audience Files (-ad)
The -ad option defines the audiences for which the output is encoded. You can
use the Print Audiences (-pa) option (see page 287) to display the available
audience definitions. You can abbreviate an audience name to a unique set of
characters. For example, you can specify the 28k Dial-up audience by using
28k . When you use just the audience name, RealProducer looks for the
audience file in the location specified by the RealProducer preferences.
If an audience file does not reside in the default location, you can provide the
location of the audience file, using a full or relative path along with the file
name, including the extension (.rpad ). Using either the audience name or file
name, you can specify multiple, constant bit rate (CBR) audiences using a
quoted, comma-separated list. With variable bit rate (VBR) video or RealAudio
lossless encoding, you can specify only one audience. Here are examples:
-ad
-ad
-ad
-ad
-ad
150k
"28k,56k"
"28k Dial-up,56k Dial-up,256k DSL/Cable Modem"
"C:\settings\ModemGeneralAudience.rpad"
"/files/28k.rpad,/files/56k.rpad"
Tips for Using Audience Definitions
Note the following about selecting audiences:
• Using
RealProducer Plus, you can add any number of CBR audiences to a
SureStream clip. With RealProducer Basic, you are limited to three
audiences.
• If
you specify no audiences with the -ad option and you do not use a job
file that defines audiences, RealProducer encodes the output for the
default audience, which is described in the section “Default Audience and
Options” on page 101.
• Chapter
280
7 describes the encoding settings of the predefined audiences.
CHAPTER 14: Using the Command-Line Application
• If
you create your own audience definitions, you set the audience name
through the name property, as described in “Audience Properties” on page
345.
• RealProducer
11 automatically updates older audience files to use the
latest codecs. You can disable this, however, with the Disable Codec
Updates (-duc) option (see page 261).
• The
section “Adjusting RealProducer Preferences” on page 151 explains
how to find the default location of audience files.
Disable Two-Pass Encoding (-dt)
By default, RealProducer reads an input file in two passes. The first pass
analyzes the data, the second pass encodes it. The -dt option disables two-pass
encoding so that all actions occur in a single pass. This speeds encoding time,
but lowers the encoded quality. Use the option without any values:
-dt
Automatic Disabling of Two-Pass Encoding
Two-pass encoding is automatically disabled when you specify the following
options for live capture:
• Audio
Capture Device ID (-ac)
• Video
Capture Device ID (-vc)
It is also disabled if you send output to a server using any of the following
options:
• Push
• Pull
Server Destination (-sp)
Server Destination (-si)
• Server
Template or Server File (-sd)
Audio Mode (-am)
Use the -am option to describe the basic audio content of the input, either
voice or music . This determines whether a voice or audio codec is used to
encode the audio. Values are voice or music . Because the default is music , you
need to include this option only if encoding voice-only audio:
-am voice
281
RealProducer 11 User’s Guide
For More Information: The actual codecs used are defined in the
audience template. Each codec expects a certain type of input,
such as mono, stereo, or discrete multichannel. For
information about how an audience defines codecs, refer to
“Audio Stream Context” on page 348.
Disable Audio (-da)
The -da option strips the audio from the input source. Typically, you use this
when encoding file-to-file or capturing video input for which you do not want
to encode audio. The option does not require a value. For example:
-da
Tip: Do not use the -da option when capturing audio with the
Audio Capture Device ID (-ac) option (see page 263). Instead,
omit the -ac option.
Audio Resampling Quality (-arq)
As explained in “Sampling Rate” on page 38, RealProducer resamples audio if
the input does not match the sampling rate expected by the chosen RealAudio
codec. The -arq option determines the resampling quality. The default value of
high produces the best results, but uses more processing power than the fast
value, shown here:
-arq fast
Note: Neither the fast nor the high value causes pitch shifting.
Video Mode (-vm)
The -vm option influences the visual quality of the encoded video. It helps you
to balance visual clarity against frame rate, and generally has more effect on
videos encoded for low bandwidths. You can use it to help heighten the visual
clarity or increase the encoded frame rate. You can use one of the following
values:
282
normal
The default value of normal attempts to balance frame rate and visual
clarity. This is the best choice for most content.
sharp
The sharp value creates the sharpest image possible. Consequently, the
encoded frame rate may be lower and the video may appear jerkier.
CHAPTER 14: Using the Command-Line Application
smooth
The smooth value produces the smoothest motion possible by
increasing the frame rate. As a result, the video may be blurrier due to
decreased visual clarity.
slideshow
The slideshow value encodes a frame every few seconds to create a
slideshow. The video will have very little motion, but a high degree of
visual clarity. You may want to use this value if you are encoding a video
with large dimensions at a low bandwidth.
For example:
-vm sharp
Disable Video (-dv)
The -dv option strips the video out of the input source. Typically, you use this
when encoding file-to-file and want to capture only the audio portion of a
video clip. The option does not require a value. For example:
-dv
Tip: Do not use the -dv option with the Video Capture Device
ID (-vc) option (see page 264). Instead, omit the -vc option.
Resize Video (-rs)
If you have RealProducer Plus, you can use the -rs option to set the output
video’s width and height in pixels. This option uses a value WidthxHeight , in
which each component is an integer from 0 to 2048. The default value of 0x0
performs no resizing. If you set a single value to 0, that dimension scales in
proportion to the other dimension, maintaining the input clip’s aspect ratio.
The following are examples:
-rs 320x240
Resize the video to 320 pixels wide by 240 pixels high.
-rs 180x0
Resize the width to 180 pixels and scale the height proportionally,
maintaining the input video’s aspect ratio.
-rs 0x160
Resize the height to 160 pixels and scale the width proportionally,
maintaining the input video’s aspect ratio.
Note: The RealVideo codec rounds each dimension down to
the nearest 4 pixels. If you specify a height of 183 pixels, for
example, the output clip has a height of 180 pixels.
283
RealProducer 11 User’s Guide
For More Information: The Capture Frame Size (-cs) option (see
page 266) can resize video capture input. This allows you to
resize the encoded output by overriding the default video
capture dimensions.
Resize Quality (-rq)
When you resize the encoded video using the -rs option, the -rq option affects
the resulting quality. Using the default high value results in a higher-quality
output, but requires considerably more processing power during encoding.
The fast value uses less processor power, but results in lower quality:
-rq fast
Video Codec Override (-vco)
Using RealProducer Plus, you can choose a video codec other than the default
RealVideo 10. This allows you to use RealVideo 9 or RealVideo 10 for faster
encoding, or backwards-compatibility with RealPlayer 8. The selected codec
encodes all video streams for the output. Acceptable values are rv10 , rv9 , and
rv8 , as shown here:
-vco rv8
Encoding Complexity Override (-eco)
With RealProducer Plus, you can set a complexity mode, which the section
“Encoding Complexity Modes” on page 81 explains. This mode affects
RealVideo 9 or 10 clips, as well as RealAudio lossless clips. The default value of
high produces the best results, but requires the most processing power. A value
of medium or low speeds processing time, but results in lower quality for video
clips or a larger file size for lossless audio clips. Here is an example:
-eco medium
Note: When you use a server as a destination, RealProducer
automatically scales down the encoding complexity as needed.
You therefore do not need to use this option when producing a
broadcast. See “Broadcast Load Management” on page 177 for
more information.
284
CHAPTER 14: Using the Command-Line Application
Logging Options
The following options affect the messages that RealProducer creates as it
encodes a job. The log file location is set through the RealProducer
preferences, as described in “Adjusting RealProducer Preferences” on page 151.
Logging Category (-lc)
The -lc option determines the level of logging messages used, overriding the
logging category set in the preferences. These messages are written to the log
file or printed to the screen, depending on the other logging options you use.
For the value, use a comma-separated string that includes any of the
following:
error
Error messages are severe problems that typically cause the encoding
operation to fail.
warning
Warning messages indicate possible problems that did not cause the
encoding to fail.
info
Informational messages convey important messages about the
encoding operation.
diagnostic
Diagnostic messages convey non-critical messages about the encoding
operation. Because an encoding operation may generate many
diagnostic messages, the log file can grow rapidly when you include
this category.
You can abbreviate each value down to the first letter, as shown in the
following examples:
-lc "error,warning,info"
-lc "err,warn,info,diag"
-lc "e,w,i,d"
For More Information: The section “Changing Log File and Log
Viewer Preferences” on page 153 explains how to set logging
preferences through the graphical application. You can also set
these preferences manually, as described in Appendix E.
Disable Logging to File (-dlf)
The -dlf option disables logging to the log file. Messages may still display on
the screen. The option takes no value:
-dlf
285
RealProducer 11 User’s Guide
Disable Logging to Screen (-dls)
The -dls option disables logging to the screen. Log messages may still be
written to the log file, however. The option takes no value:
-dls
Quiet Mode (-q)
The -q option prevents any information, including log messages, from being
printed to the screen. Use this option if you are running the command-line
application from another application that will fail if output is written to the
standard output device. The option takes no value:
-q
Process ID File (-pid)
The -pid option writes a file that holds the process ID of the current encoding
section. This ID is useful for shutting down the command-line application
remotely, as described in “Stopping the Command-Line Application” on page
253. The option uses as a value a file name and path, which can be absolute or
relative to the current directory. Here are some examples:
-pid ..\Jobs\job18.pid
-pid /usr/log/job34.pid
Help Options
The following sections explain the help options that you can display through
the RealProducer command-line application.
Display Help (-h)
Use the -h option without any other options to display a list of commands
that you can use with the command-line application. The option does not
require a value, as shown here:
-h
286
CHAPTER 14: Using the Command-Line Application
Display Detailed Help (-m)
Use the -m option without any other options to display full information about
the commands that you can use with the command-line application. The
option does not require a value, as shown here:
-m
Print Device Information (-pd)
The -pd option extracts audio and video capture device information. Use only
this option without a value on the command line:
-pd
You can use the returned device information with the following options:
• Audio
Capture Device ID (-ac) option (see page 263)
• Audio
Capture Device Port (-ap) option (see page 263)
• Video
Capture Device ID (-vc) option (see page 264)
• Video
Device Port (-vp) option (see page 265)
Tip: If the -pd option does not return audio port information
on Linux, use mixer software to adjust the input audio port.
Print Audiences (-pa)
This option prints a list of acceptable audiences that you can use with the
Audience Definitions or Audience Files (-ad) option (see page 280). Use only
this option on the command line. It does not require a value:
-pa
Print Servers (-ps)
Use the -ps option alone on the command line to list the accepted server
definitions for use with the Server Template or Server File (-sd) option (see
page 277). No value is required. Example:
-ps
Print Version (-v)
The -v option displays version and copyright information for RealProducer.
No value is required:
287
RealProducer 11 User’s Guide
-v
Command Line Usage Examples
The following sections provide examples of how to run the RealProducer
command-line application.
Basic Encoding Examples
The following examples illustrate the most basic uses of the command-line
application.
Simple Encode
The following example is the simplest possible encoding of a media clip.
Because no audiences are specified, RealProducer encodes using the default
audience described in “Default Audience and Options” on page 101. Because
no output is specified, the encoded clip is named movie.rm . The .rm extension
is used because the default audience is a constant bit rate audience:
producer -i movie.avi
To save the clip to a different directory or file name, you can include the -o
option:
producer -i movie.avi -o c:\videos\movie_streaming.rm
Variable Bit Rate Encoding
To encode for any audience other than the default ones, you need to include
the -ad option. When using a variable bit rate audience, the output uses the
.rmvb file extension. You can select only one VBR audience per encoding:
producer -i movie.avi -o movie.rmvb -ad “450k Download“
Batch Encoding with a Wildcard
The following example encodes a batch of files using a wildcard to designate
all MPEG clips in the specified input directory. The output clips are placed in
the movies directory:
producer -i C:\source\*.mpeg -o C:\movies\
Clip Information
The following example encodes clip information into the clip:
288
CHAPTER 14: Using the Command-Line Application
producer -i myfile.mov -o output.rm -t "Summer Vacation" -a "John Doe"
-k "Cape Cod Summer Vacation 2004"
-de "Video from summer vacation in Cape Cod."
Job File Examples
The next set of examples demonstrate how to create and encode with job files.
Job File Encoding
The following example shows how to run a job file from the command line.
The job file specifies the inputs, outputs, and general encoding options. It
may specify one input and output, parallel inputs, or multiple outputs:
producer -j GenericStreamingSettings.rpjf
Job File Creation
Using the -cj option, you can capture the command line settings to a job file:
producer -cj ModemSettings.rpjf -i movie.avi -o movie.rmvb ...additional options...
Next, you can edit the job file as described in Appendix B if necessary, and run
it on the command line:
producer -j ModemSettings.rpjf
Batch Job File Creation
If you specify multiple file inputs, as described in “Batch File Encoding” on
page 262, you can specify an output directory with -cj to create multiple job
files. For example, you might use the following command:
producer -cj c:\Jobs\ -i *.avi ...additional options...
In this case, RealProducer creates a new job file for each AVI file in the current
directory. The job file for movie1.avi is c:\Jobs\movie1.rpjf , the job file for
movie2.avi is c:\Jobs\movie2.rpjf , and so on.
Job File Syntax Update
RealProducer 11 uses a different job file syntax than Helix Producer. The
RealProducer 11 graphical user interface and command-line application read
the older file syntax, but save job files using the new syntax. This new job file
syntax is not compatible with Helix Producer, so you cannot use a job saved by
RealProducer 11 with the older Helix Producer.
289
RealProducer 11 User’s Guide
You can update existing job files to the new syntax by processing them
through the command-line application, reading the job with the -j option and
writing a new job file with the -cj option, as shown in the following example.
The inputs and outputs specified in the job do not need to be available when
you run the update:
producer -j oldjob.rpjf -cj newjob.rpjf
Note: The command-line application supports the updating of
a single job file at a time. Batch mode is not currently available.
Audio Encoding
The following examples show how to encode audio-only clips.
RealAudio Lossless
You can encode an audio or video clip with the RealAudio lossless codec using
the command-line application only. Use the -ad option to specify the lossless
audience:
producer -i music.wav music.rmvb -ad Lossless
Voice-Only Clip
Audio encoding selects music encoding by default. If an audio clip or video
soundtrack is voice-only, use the -am option to specify voice:
producer -i lecture.mpeg -am voice ...additional options...
Audio From a Video
If you want to encode just the audio portion of a video file, you can use the -dv
option to disable video:
producer -i movie1.avi -dv ...additional options...
Live Capture Examples
The following examples demonstrate how to capture live input and encode it
to a file or send it to a server for broadcast.
Live Input Capture to File
The following example captures input from the video card and the sound card,
writing the output to a clip named capturefile.rm:
producer -vc 0 -ac “Sound Blaster *” -o c:\capturefile.rm
290
CHAPTER 14: Using the Command-Line Application
Live Input Capture for Broadcast
The following example captures audio and video, delivering the encoded
stream to Helix Server using the account-based, push method of broadcasting.
This broadcast method requires a user name (encoder in this example) and
password:
producer -v 0 -ac 0 -sp encoder:[email protected]/news.rm
Capture with Audience Targets
The following example captures audio and video and streams, sending the
output to both a server and a file destination. The server broadcast uses the
password-only push method. The encoding targets the 56k and 150k
audiences:
producer -vc 0 -ac 0 -sp :[email protected]/sports/live.rm
-o archive.rm -ad "56k,150k"
Input Modification Examples
The next set of examples shows how to modify the input by applying prefilters
and resizing.
Prefiltering
This example applies the audio gain prefilter with a value of 4, applies blacklevel correction and performs auto-detection of de-interlace and inversetelecine:
producer -i vacation.mov -o vacation.rm -ag 4 -bl -di auto
Cropping and Resizing
The next example assumes an input in wide screen format (2.35:1 ratio), with a
width of 564 pixels and a height of 240 pixels. First, 102 pixels are cropped
from both the left and right sides to create an input that is 360 by 240 (4:3
ratio). Then, the video is resized down to approximately 240 by 180 pixels:
producer -i widescreen.avi -o normal.rm -cr 102,0,320,240 -rs 240x0
291
RealProducer 11 User’s Guide
292
PART
Part V:
FILE FORMATS
RealProducer uses a set of XML-formatted files to define
encoding options, audiences, and destinations. The following
appendixes explain the file syntax so that you can edit the files
by hand.
V
APPENDIX
Appendix A:
A
XML FILE BASICS
The text files that RealProducer uses when encoding streams—job
file, audience file, and server file—use XML (eXtensible Markup
Language) syntax. This appendix covers the basics of editing these
files, explaining tags, lists, and namespaces. Subsequent appendixes
cover the specific syntax for each file type in detail.
XML File Rules
This section explains the basics of XML markup, introducing you to the rules
you need to follow when editing an XML file. If you are familiar with other
Web-based markup languages, such as HTML, you will pick up XML quickly.
You need to be careful, though, because XML is less forgiving than HTML.
Lapses that may not matter in HTML markup, such as missing quotation
marks or end tags, will prevent an XML file from working properly.
Tip: You can edit an XML file with any text, HTML, or XML
editor that can save the file as plain text with the proper
extension. On Windows, some text editors may automatically
include .txt as the extension. Disable this feature when saving
by choosing All Files for Save as type, or change the saved file’s
.txt extension through the operating system.
The XML Tag and Namespaces
XML files begin with an <?xml> version tag:
<?xml version="1.0" encoding="UTF-8"?>
Following the version tag, markup consists of one or more elements. An
audience file, for example, uses an <audience> element that contains all
additional markup:
295
RealProducer 11 User’s Guide
<?xml version="1.0" encoding="UTF-8"?>
<audience xmlns="http://ns.real.com/tools/audience.2.0"
xmlns:xsi="http://www.w3.org/2001/XMLSchema-instance"
xsi:schemaLocation="http://ns.real.com/tools/audience.2.0
http://ns.real.com/tools/audience.2.0.xsd">
...audience information...
</audience>
Each xmlns attribute shown above defines an XML namespace. This namespace
tells RealProducer how to handle the markup contained within the file. The
namespace identifier is in the form of a URL only to ensure uniqueness.
RealProducer does not contact the URL.
Note: If you edit an XML file, do not change the namespaces.
When creating a new XML file, be sure to use the appropriate
namespaces for the file type.
Tags, Attributes, and Values
Elements within an XML file take the following form:
<tag type=”type”>value</tag>
The following are the basic parts to an XML element:
tag
The tag name comes just after a left angle bracket. Some tags may
consist of just the name, as in the <stream> tag. Other tags may have
attributes. Except for the XML version tag and the comment tag, all tags
in an XML file have a corresponding end tag. For example, the
<audience> tag has the end tag </audience> .
type
The type attributes defines the type of data that the element provides.
For more information, see “Data Type Values” on page 297.
value
The value is a character string, integer, time value, or so on that defines
the feature.
Lowercase or Camel Case for Tags and Attributes
In RealProducer markup, single-word tags and attributes are lowercase. When
a tag, attribute, or predefined value consists of a compound word, the first
letter of all words after the first word is generally capitalized, as in
encodingComplexity. This is referred to as “camel case.”
296
APPENDIX A: XML File Basics
Attribute Values Enclosed in Double Quotation Marks
Attribute values, such as string in type=”string” , must be enclosed in double
quotation marks. Do not add any blank spaces between the quotation marks
and the value they enclose.
Data Type Values
Most XML elements within the RealProducer files must include a type
attribute that indicates the type of value.
Value Types
Type
Value
Notes
type=”bag”
group
Indicates a group of properties.
type=”bool”
true|false
True or false values use this type, which stands for
“Boolean.” You can also use 1 for true and 0 for
false .
type=”double”
decimal
values
A double type is used for very large values, values
that include a decimal point, and values that may
be negative.
type=”duration”
time value
A duration type indicates a time value in the format
[d:][h:][m:]s[.xyz] .
type=”string”
text string
A string can include letters and numbers. Do not
use double quotation marks within the value string.
Maximum lengths may vary, but are typically at
least 256 characters
type=”uint”
unsigned
integer
Values that are positive integers, including 0 , use
this type.
xsi:type=”value”
customized
value
An xsi: prefix allows for customized value types.
Value Type Examples
The following examples illustrate the use of the type attribute in RealProducer
XML files:
<outputWidth type="uint">360</outputWidth>
<maxFrameRate type="double">15.000000</maxFrameRate>
<streamContext type="bag">
...stream context elements...
</streamContext>
297
RealProducer 11 User’s Guide
<stream xsi:type="audioStream">
...audio stream elements...
</stream>
<deinterlace type="bool">true</deinterlace>
<pluginName type="string">rn-prefilter-deinterlace</pluginName>
Duration Syntax
The format for the value of a parameter that specifies a duration is the
following:
[d:][h:][m:]s[.xyz]
Only the seconds value is required. If a value is omitted, it is assumed to be
zero. You must specify intermediate values. To indicate hours, for example,
you must include the minutes and seconds field. Here are some sample values:
30
30 seconds
45.5
45-1/2 seconds
5:35
5 minutes, 35 seconds
1:0:0
1 hour
1:22:30:0
1 day, 22 hours, 30 minutes
File Names and Paths Observe Letter Cases
In tags that specify files or other input, paths and file names can be uppercase,
lowercase, or mixed case, corresponding to their actual names on the
operating system. All of the following path and file name examples are
allowable, for example:
<filename type="string">C:\media\video\video1.rm</filename>
<filename type="string">C:\media\video\Video1.rm</filename>
<filename type="string">C:\media\video\VIDEO1.rm</filename>
Note: On operating systems that are not case-sensitive, such as
Windows, these tags all specify the same file. On a casesensitive operating system such as Linux, these tags indicate
different files.
XML Recommendations
Although not strict rules, the following recommendations will help you keep
your XML markup organized and understandable.
298
APPENDIX A: XML File Basics
XML Comments
As in HTML, XML has a comment tag that starts with these characters:
<!--
and ends with these characters:
-->
There is no corresponding end tag:
<!-- This is a comment -->
A comment can be any number of lines long. It can start and end anywhere in
a XML file. Multiple comments cannot be nested, though. Use comments to
describe what various sections of your XML file are meant to do. This helps
other people understand your file more easily.
Indentation Between Elements
Although indenting XML markup is not required, it helps you to keep track of
the XML file’s structure. You typically indent markup by pressing the Tab key
once for each level of indentation. In a stream section, for example, the
element tags are indented one level from the <stream> tag. The two tags that
make up the stream context are indented one level from the <streamContext>
tag:
<stream xsi:type="audioStream">
<codecFlavor type="uint">25</codecFlavor>
<codecName type="string">cook</codecName>
<encodingComplexity type="string">high</encodingComplexity>
<pluginName type="string">rn-audiocodec-realaudio</pluginName>
<streamContext type="bag">
<audioMode type="string">voice</audioMode>
<presentationType type="string">audio-only</presentationType>
</streamContext>
</stream>
299
RealProducer 11 User’s Guide
300
APPENDIX
Appendix B:
B
JOB FILE SYNTAX
A RealProducer job file records a range of encoding settings so that
you can quickly re-encode clips or broadcasts using the same
properties. This appendix describes the job file syntax. Using this
information, you can edit a job file without relying on the
RealProducer graphical application.
Note: If you are not familiar with XML syntax, refer to
Appendix A for information about XML namespaces, tags,
attributes, and values.
Understanding Job Files
A job file records the full range of RealProducer settings used to encode a clip
or broadcast. It defines the audio and video codecs used, for example, and
specifies the use of filters and other options. When you save a job through the
graphical application—a process described in Chapter 6—RealProducer
updates the file automatically to record your encoding changes. You can also
create job files, which use the file extension .rpjf , through the command-line
application and edit them manually. This allows you to change job
information using a text editor or any automated process that can modify
XML files.
For More Information: The section “Job File Options” on page
259 explains how to create a job file through the commandline application.
Features Exclusive to the Job File
You can set up a few RealProducer encoding features only through a job file or
command line. The following features are not available through the graphical
user interface. If your job file includes them, you must encode the jobs using
the command-line application:
301
RealProducer 11 User’s Guide
• RealAudio
Lossless Codec
To encode audio using the lossless codec, you need to specify the lossless
codec in an audience definition. The section “Audiences Section” on page
340 illustrates the audience section in the job file. Appendix C covers the
audience syntax.
• Multiple
Outputs
A job file can define multiple outputs that are encoded in parallel.
Multiple outputs might be two separate clips, one of which is encoded for
a lower bandwidth and resized smaller. For more information, see “File
and Server Outputs” on page 329.
• Parallel
Inputs
Using a job file, you can merge parallel inputs into a single output. For
example, you might merge a video stream from a digitized file with audio
that you capture live. For more information, see “Single and Multiple
Inputs” on page 309.
• Audio
Delay Compensation Prefilter
This prefilter allows you to resynchronize an audio soundtrack with
video. This is useful if you are capturing audio and video separately as
parallel inputs. Refer to “Audio Delay Compensation Prefilter” on page
327.
• Prefilter
Resizing
Through the job file, you can resize the video input before or during the
encoding. See “Video Resizing Methods” on page 319 for an explanation
of the available resizing options.
• File
Rolling
File rolling normally occurs when an encoded clip reaches the file size
limit set by the operating system. With the file rolling parameters, you can
specify other sizes or time limits for file rolling. See “File Rolling” on page
332.
Tips for Creating Job Files
The following are some tips to keep in mind when using job files:
• When
creating a new job file, RealNetworks recommends that you start
with an existing job file that you have renamed. RealProducer provides a
302
APPENDIX B: Job File Syntax
number of predefined job files that are stored in the samples/jobs
subdirectory under the RealProducer main directory. You can use these
files as templates for your own jobs.
• You
can override most job file settings through the RealProducer
graphical application, then save or discard your changes after encoding. If
a certain clip could benefit from noise filtering, for instance, you can
apply that filter during the encoding, even though the job file does not
specify the use of that filter. This gives you the ability to create job files
with general settings that you change on a case-by-case basis.
• When
encoding through the command-line application, you cannot
override or add to the settings in the job file, except in the specific cases
described in “Job File Options” on page 259.
• Prefilters, which are described in “Prefilters” on page 317, have parameters
that enable or disable them. This allows you to define a prefilter within a
job without activating it. If you think that you may want to use a certain
prefilter with a job, it’s a good idea to add the prefilter syntax to the job
file and leave the filter disabled until you need to use it.
• A job can define specific input and output files. You can override a specific
input and output during encoding. Or, you can create a job file that has
blank input and output values. If you do this, include the appropriate
syntax, but leave the value blank, as in the following example:
<filename type="string"></filename>
•A
job file defines encoding audiences, as described in “Audiences Section”
on page 340. An output’s media profile, described in “Media Profile” on
page 334, determines which audiences the output uses, though. This
allows you to define all the audiences you think that you might use within
the audiences section, then apply those audiences to various outputs
through their the media profiles.
• RealProducer
Plus supports the full range of job file capabilities. If you
use RealProducer Basic, however, you are limited by the following
restrictions:
• no
cropping, resize, or audio gain filter
• RealVideo
10 codec only
• maximum
of three audiences in a SureStream CBR clip
• one
customized audience
303
RealProducer 11 User’s Guide
• one
• no
file and one server destination
multicast broadcasting
Job Section
The <job> and </job> tags encapsulate all job information within a job file.
The <job> tag follows directly after the XML declaration tag. Be sure to include
the namespaces shown in the following example, and add any namespaces
required by customized RealProducer components:
<?xml version="1.0" encoding="UTF-8"?>
<job xmlns="http://ns.real.com/tools/job.2.0"
xmlns:xsi="http://www.w3.org/2001/XMLSchema-instance"
xsi:schemaLocation="http://ns.real.com/tools/job.2.0
http://ns.real.com/tools/job.2.0.xsd">
...all job parameters...
</job>
Job Properties
The following table describes the main properties within the <job> list.
Job Properties
Property
Value
Function
enableTwoPass
type=”bool”
true|false
Enables two-pass encoding, as described in
“Two-Pass Encoding” on page 80. The default
is true . This property is ignored for live
broadcasts.
disableLoadManagement
type=”bool”
true|false
Disables RealProducer’s ability to reduce
encoding complexity during live encodes to
keep up with the input stream. The default
value of false should generally not be
changed. For background, refer to “Broadcast
Load Management” on page 177.
clipInfo
list
Defines clip information, as described in
“Clip Information” on page 305.
inputs
list
Sets the inputs used for encoding the clip or
broadcast, as described in “Audio and Video
Inputs” on page 309.
(Table Page 1 of 2)
304
APPENDIX B: Job File Syntax
Job Properties (continued)
Property
Value
Function
parOutputs
list
Determines the encoding outputs, as
described in “File and Server Outputs” on
page 329.
audiences
list
Selects the encoding audiences, as described
in “Audiences Section” on page 340.
(Table Page 2 of 2)
Job File Example
The following abstract example shows the major structure of a job file. The
order of the lists within the <job> section does not matter. For example, the
<audiences> list can precede the <clipInfo> list. The hierarchy does matter,
however. The <audiences> list cannot fall within the <clipInfo> list, for instance:
<?xml version="1.0" encoding="UTF-8"?>
<job xmlns="http://ns.real.com/tools/job.2.0"
xmlns:xsi="http://www.w3.org/2001/XMLSchema-instance"
xsi:schemaLocation="http://ns.real.com/tools/job.2.0
http://ns.real.com/tools/job.2.0.xsd">
<enableTwoPass type="bool">true</enableTwoPass>
<clipInfo>
...clip information such as title, author, and copyright...
</clipInfo>
<inputs>
...inputs used to encode the clip or broadcast contents...
</inputs>
<parOutputs>
...outputs for the encoded content, such as a clip or broadcast server...
</parOutputs>
<audiences>
...audiences for the content, defining bandwidths and the codecs used...
</audiences>
</job>
Clip Information
The optional clip information section defines metadata properties that are
encoded into static clips and live broadcasts. The values are typically provided
for the benefit of the viewer, and do not affect the encoded content. For
example, a metadata value can provide a clip title that displays in the media
305
RealProducer 11 User’s Guide
player’s title bar. The following abstract example demonstrates clip
information within the job file structure:
<clipInfo>
<entry>
<name>Metadata Name</name>
<value type=”type”>Metadata Value</value>
</entry>
...additional metadata entries...
</clipInfo>
Clip Information Values
Each metadata entry falls between <entry> and </entry> tags. A <name> element
and <value> element define each metadata property.
Clip Information Tags
Tag
Value
Function
name
string up to 255
characters
Defines the type of metadata. A media player must
recognize the name to handle the metadata value
properly. The value cannot be left blank.
value
integer or string up Supplies the value for the metadata field. The value can
to 64 Kilobits
be blank. The default is an empty string.
Metadata Values for RealPlayer
RealPlayer supports a number of metadata values. If you do not specifically
add metadata values, no metadata is encoded into the stream.
Standard Metadata Properties for RealPlayer
Property
Value
Author
type=”string”
string up to 255 Indicates the clip author.
bytes
Content Rating integer from 0
type=”uint”
to 6
Function
Defines an age range for ratings systems:
0 –No Rating (this is the default)
1 –All Ages
2 –Older Children
3 –Younger Teens
4 –Older Teens (15 and up)
5 –Adult Supervision Recommended
6 –Adults Only
(Table Page 1 of 2)
306
APPENDIX B: Job File Syntax
Standard Metadata Properties for RealPlayer (continued)
Property
Value
Copyright
type=”string”
string up to 255 Provides the clip copyright.
bytes
Function
Description
type=”string”
string up to
1023 bytes
Keywords
type=”string”
string up to 255 Adds keywords for search engines that can read
bytes
RealMedia clips.
Title
type=”string”
string up to 255 Adds a clip title.
bytes
Gives a clip description that is generally longer
and more informative than the title.
(Table Page 2 of 2)
For More Information: The section “Adding Clip Information”
on page 94 explains the values you should use for the clip
metadata properties.
Separate Clip Information for Outputs
If you define information within a single <clipInfo> list at the start of the job
file, that information is used for all clips or broadcasts created with the job
file. As described in the section “File and Server Outputs” on page 329, you
can also define clip information within each output section. This allows you
to define separate information for each output when encoding multiple
outputs. You can also mix the two methods. In this case, clip information
defined for an output overrides the corresponding information defined for
the job.
Tip: You can define the same basic information, such and title,
author, and copyright for all outputs by setting these values
for the job. You can then add specific information, such as
unique descriptions, for each output.
Clip Information Examples
The following example defines several metadata properties used for all
outputs created through the job file:
<job...>
<clipInfo>
<entry>
<name>Title</name>
<value type=”string”>2003 Football Highlights</value>
307
RealProducer 11 User’s Guide
</entry>
<entry>
<name>Copyright</name>
<value type="string">(C) 2004</value>
</entry>
<entry>
<name>Keywords</name>
<value type="string">sports, football</value>
</entry>
<entry>
<name>Description</name>
<value type="string">A year-end review of the highlights in the 2003
fall football season.</value>
</entry>
<entry>
<name>Content Rating</name>
<value type="uint">1</value>
</entry>
</clipInfo>
...all other job file information...
</job>
The next example defines basic clip information such as title, author, and
copyright for all outputs, but a separate description for each output. In this
example, one output is a live broadcast and another output is an archive clip
that will be available on-demand after the broadcast ends:
<job...>
<clipInfo>
<entry>
<name>Title</name>
<value type=”string”>2003 Football Highlights</value>
</entry>
...other clip info such as author and copyright...
</clipInfo>
...other job file information...
<parOutputs>
<output>
...output information for the live broadcast...
<clipInfo>
<entry>
<name>Description</name>
<value type="string">A live, year-end review of the highlights in
the 2003 fall football season.</value>
</entry>
308
APPENDIX B: Job File Syntax
</clipInfo>
</output>
<output>
...output information for the archive clip...
<clipInfo>
<entry>
<name>Description</name>
<value type="string">Archived highlights of the 2003 fall
football season.</value>
</entry>
</clipInfo>
</output>
</parOutputs>
...additional job file information...
</job>
Audio and Video Inputs
The inputs section defines the audio or video input for the job. Inputs can be
either digitized files or output from capture devices such as cameras attached
to a video capture card. The <inputs> and </inputs> tags encapsulate the inputs
section. Within this list, you can define a single input or multiple inputs.
For More Information: The section “Audio and Video Input
Formats” on page 27 lists acceptable file and color formats for
encoding.
Single and Multiple Inputs
To define a single input, you add <input> and </input> tags within the <inputs>
element:
<inputs>
<input ...>
...single input defined here...
</input>
</inputs>
To define multiple inputs, you add <parInputs> and </parInputs> tags within
the <inputs> element. Then, you define each input between <input> and
</input> tags:
309
RealProducer 11 User’s Guide
<inputs>
<parInputs>
<input ...>
...audio input defined here...
</input>
<input ...>
...video input defined here...
</input>
</parInputs>
</inputs>
Using parallel inputs, you can encode one audio and one video stream
simultaneously, using any combination of sources. For example, you might
encode into a single clip the audio from one file and the video from a different
file. Or, you might combine the audio from a file with video images captured
live.
Tip: To encode audio and video from the same live event, you
capture the audio and video as a single input. You use parallel
inputs only when the audio and video come from different
sources.
Note: When a job includes parallel inputs, you must encode
the job through the command-line application rather than the
graphical application.
For More Information: With parallel inputs, you can use the
audio delay compensation prefilter to synchronize the audio
and video inputs. See “Audio Delay Compensation Prefilter”
on page 327.
Input Tag
The <input> tag defines each input. It uses an xsi:type attribute with a value of
avFileInput or captureInput , respectively, to indicate whether the input comes
from a digitized file or a capture device. The following example shows a single
input for a digitized file:
<inputs>
<input xsi:type="avFileInput">
...input values for the digitized file...
</input>
</inputs>
310
APPENDIX B: Job File Syntax
The next example defines the single input as live or prerecorded material
coming from an audio or video capture device:
<inputs>
<input xsi:type="captureInput">
...input values for the capture...
</input>
</inputs>
Digitized File Input
When the input is a digitized file, the input type is avFileInput . You can then
specify the following properties. You can leave the file name value blank if you
want to specify the file name through the graphical application, as described
in “Using a File as the Input” on page 89. The file name value is required when
you process the job file through the command-line application, however.
File Input Properties
Property
Value
Function
disableAudio
type=”bool”
true|false
Disables the audio for all outputs that
use this input when set to true . This
enables you to capture video only. The
default is false . You can also disable
audio output-by-output. See “Media
Profile Properties” on page 335.
disableVideo
type=”bool”
true|false
Disables the video for all outputs that
use this input when set to true . This
enables you to capture audio only. The
default is false . You can also disable
video output-by-output. See “Media
Profile Properties” on page 335.
filename
file name and path
type=”string”
Indicates the path and name of the
input file. You cannot use wildcards.
See “File and Directory Paths” on page
312.
name
string
type=”string”
Assigns a name to the source, such as
source1, source2 , and so on. This is
optional, but strongly recommended
when using parallel inputs.
(Table Page 1 of 2)
311
RealProducer 11 User’s Guide
File Input Properties (continued)
Property
Value
Function
rn-avfile-aviuncompressed
pluginName
type=”string” rn-avfile-directshow
rn-avfile-movuncompressed
rn-avfile-qt
rn-avfile-wavuncompressed
Provides the name of the file system
plug-in used to read the input file. If
you omit this property, RealProducer
scans available plug-ins and uses the
first one it finds that can read the
input format.
prefilters
Indicates one or more prefilters to use
with the input. For more information,
refer to “Prefilters” on page 317.
list of filters
(Table Page 2 of 2)
File and Directory Paths
For an input’s filename value, you list the path and file name when encoding
through the command-line interface. When using the graphical application,
you can specify the name, or leave the value blank and provide the file name
when encoding. The file name and path should use the standard conventions
for your operating system. However, RealProducer observes the following
conventions to help keep the job file portable across platforms:
• You
can specify a relative or absolute path to a file. Relative paths are
relative to the current working directory, which is the directory from
which the command-line application is run or the graphical application
was started. If you start RealProducer by double-clicking a job file, the
working directory is the directory that holds the job file.
• On
Windows, forward slashes in paths are interpreted as backslashes, so
“/ ” is read as “\ ”.
• On
Linux, backslashes are interpreted as forward slashes, so “\ ” is read as
“/ ”.
• If
an absolute path starts with a single slash, RealProducer on Windows
assumes that the path occurs on the system’s default drive. For example, if
C:\ is the default drive, the path /home/media/video.mpeg is interpreted as
C:\home\media\video.mpeg .
• On Linux, absolute paths that start with a drive letter such as C:\
error because no logical translation is possible.
312
cause an
APPENDIX B: Job File Syntax
Capture Input
When the input comes from a capture device, such as a camera, microphone,
or CD player, the input type is captureInput . You can then specify the following
properties. Only the capture device ID is required.
Capture Input Properties
Property
Value
Function
audioCaptureMono
type=”bool”
true|false
Linux only. If set to true , forces capture of
a single, mono audio channel. Required
for Linux audio devices not configured as
stereo pairs. The default value of false
enables stereo capture.
audioDeviceID
type=”string”
integer|string|
device name
Sets the audio device used for recording.
See “Devices and Ports” on page 314
audioDevicePort
type=”string”
integer|string|
device name
Specifies the audio port used for
recording. You must also provide the
device ID. See “Devices and Ports” on
page 314
duration
type=”duration”
[d:][h:][m:]s[.xyz] The length of time to capture from the
|infinite
device. If no value is used, the default is
infinite . You can specify down to a
fraction of a second, but the timing is
accurate only to the packet size of the
stream. For audio this is about 200
milliseconds. For video the size varies
with the bit rate. For information about
duration values, see “Duration Syntax” on
page 298.
name
type=”string”
string
Assigns a name to the source, such as
source1, source2 , and so on. This is
necessary only if you have multiple inputs
and multiple outputs. Unique names are
recommended.
pluginName
type=”string”
rn-capture-av
Provides the name of the plug-in used to
read the input. If you omit this property,
RealProducer scans available plug-ins and
uses the first one it finds that can read
the input format.
prefilters
list of filters
Indicates one or more prefilters to use.
For more information, refer to “Prefilters”
on page 317.
(Table Page 1 of 2)
313
RealProducer 11 User’s Guide
Capture Input Properties (continued)
Property
Value
Function
videoDeviceID
type=”string”
integer|string|
device name
Sets the video device used for the input.
See “Devices and Ports” on page 314
videoDevicePort
type=”string”
integer|string|
device name
Specifies the video port used for the
input. You must also provide the device
ID. See “Devices and Ports” on page 314
videoFormat
type=”string”
NTSC|NTSC-JP|
PAL|PAL-M|
PAL-N|PAL-NC|
SECAM| integer
Linux only. Indicates the video format.
Use one of the predefined strings or an
integer representing a format understood
by your driver. On Windows, use the
video driver dialog to set the video
format. The default is NTSC .
videoFrameHeight
type=”uint”
integer
Sets an optional video height in pixels.
Use any positive integer divisible by 4, and
not greater than 2048. The default value
of 0 uses the capture device’s default size.
videoFrameWidth
type=”uint”
integer
Sets an optional video width in pixels. Use
any positive integer divisible by 4, and not
greater than 2048. The default value of 0
uses the capture device’s default size.
(Table Page 2 of 2)
Devices and Ports
The required audioDeviceID and videoDeviceID parameters select the capture
card or cards used for the input. The optional audioDevicePort and
videoDevicePort parameters set the ports used for audio and video capture,
respectively. You can use any of the following values:
• Integer of value 0
or higher identifying a specific device or port number. A
value of 0 always selects the first device or port. Here is an example:
<audioDeviceID type=”uint”>1</audioDeviceID>
• String
matching an existing device or port name. The following are
examples:
<audioDeviceID type=”string”>Sound Blaster Live!</audioDeviceID>
<audioDevicePort type=”string”>Line In</audioDevicePort>
<videoDeviceID type=”string”>Osprey Capture Card 1</videoDeviceID>
<videoDevicePort type=”string”>S-Video</videoDevicePort>
• String
as:
314
with a wildcard (* ) matching an existing device or port name, such
APPENDIX B: Job File Syntax
<audioDeviceID type=”string”>Sound Blaster *</audioDeviceID>
<audioDevicePort type=”string”>Mic*</audioDevicePort>
<videoDeviceID type=”string”>Osprey Capture Card *</videoDeviceID>
<videoDevicePort type=”string”>Composite*</videoDevicePort>
• UNIX
device name, such as one of the following:
/dev/audio
/dev/video
The following are tips for setting the audio and video device IDs and ports:
• If
you use a single video card to capture both video and audio, you must
specify both the audioDeviceID and videoDeviceID parameters.
• Using numbers for the device IDs maximizes the portability of the job file
so that you can transfer it to another machine.
• The
pull-down lists in the Devices section of the graphical application
supply the names of audio and video devices on your RealProducer
computer. For more information, see “Using Live Audio or Video as the
Input” on page 90.
• The
command-line application’s -pd option displays audio and video
device information. See “Print Device Information (-pd)” on page 287.
• The video card’s settings define the captured frame rate. During encoding,
RealProducer uses the largest frame rate among all selected audiences as
the maximum frame rate target. See “Video Stream Properties” on page
353.
Input File and Capture Examples
The following examples illustrate the syntax for encoding input from files and
live captures.
Single Input File
The following example defines a single input for a digitized file. A single
prefilter is used with the input. For more on prefilters, refer to “Prefilters” on
page 317.
<inputs>
<input xsi:type="avFileInput">
<filename type="string">C:\media\videos\video1.avi</filename>
<prefilters>
<prefilter xsi:type="audioGainPrefilter">
315
RealProducer 11 User’s Guide
<enabled type="bool">true</enabled>
<gain type="double">-5</gain>
<pluginName type="string">rn-prefilter-audiogain</pluginName>
</prefilter>
</prefilters>
</input>
</inputs>
Single Capture Input
The following example captures audio and video input for 15 minutes. A
single prefilter is used to attenuate the audio input. For more on prefilters,
refer to “Prefilters” on page 317.
<inputs>
<input xsi:type="captureInput">
<audioDeviceID type=”string”>Sound Blaster *1</videoDeviceID>
<audioDevicePort type=”string”>Mic*</videoDevicePort>
<videoDeviceID type=”string”>Osprey Capture Card 1</videoDeviceID>
<videoDevicePort type=”string”>S-Video</videoDevicePort>
<pluginName type=”string”>rn-capture-av</pluginName>
<duration type="duration">15:00.000</duration>
<prefilters>
<prefilter xsi:type="audioGainPrefilter">
<enabled type="bool">true</enabled>
<gain type="double">-5</gain>
<pluginName type="string">rn-prefilter-audiogain</pluginName>
</prefilter>
</prefilters>
</input>
</inputs>
Parallel Inputs
Using parallel inputs, you can encode one audio stream and one video stream
from separate sources. The following example captures the visual track from a
digitized video file. It combines this stream with five minutes of audio from
the audio capture device. The black-level filter increases the video contrast.
The audio delay compensation prefilter advances the audio one-half second to
synchronize it with the video. For more on prefilters, refer to “Prefilters” on
page 317.
316
APPENDIX B: Job File Syntax
<inputs>
<parInputs>
<input xsi:type="avFileInput">
<name type="string">VideoInput</name>
<filename type="string">c:\media\promo.avi</filename>
<disableAudio type="bool">true</disableAudio>
<prefilters>
<prefilter xsi:type="blackLevelPrefilter">
<pluginName type="string">rn-prefilter-blacklevel</pluginName>
<enabled type="bool">true</enabled>
</prefilter>
</prefilters>
</input>
<input xsi:type="captureInput">
<name type="string">AudioInput</name>
<audioDeviceID type=”string”>Sound Blaster *1</videoDeviceID>
<audioDevicePort type=”string”>Mic*</videoDevicePort>
<pluginName type=”string”>rn-capture-av</pluginName>
<duration type="duration">5:00.000</duration>
<prefilters>
<prefilter xsi:type="audioDelayCompPrefilter">
<pluginName type="string">
rn-prefilter-audiodelaycomp</pluginName>
<enabled type="bool">true</enabled>
<advance type="double">0.5</advance>
</prefilter>
</prefilters>
</input>
</parInputs>
</inputs>
Prefilters
An optional prefilters section can appear within each <input> list to define the
audio and video filters that are applied to the input before it is encoded. The
prefilters appear within a list defined by <prefilters> and </prefilters> tags (note
the plural “prefilters”). Each prefilter uses <prefilter.../> and </prefilter> tags
(note the singular “prefilter”) to enclose the prefilter properties. An xsi:type
attribute within a <prefilter > tag determines the type of prefilter used. The
following example shows the audio gain prefilter defined within an input
section:
317
RealProducer 11 User’s Guide
<input xsi:type="avFileInput">
...additional input information...
<prefilters>
<prefilter xsi:type="audioGainPrefilter">
<enabled type="bool">true</enabled>
<gain type="double">0.000000</gain>
<pluginName type="string">rn-prefilter-audiogain</pluginName>
</prefilter>
</prefilters>
</input>
The following table summarizes the available prefilters.
Available Prefilters
Prefilter
Function
Reference
Cropping
Crops out portions of the input video.
page 320
De-interlace and Removes unnecessary frames from NTSC videos and
Inverse-Telecine corrects line shifting in videos more than 240 pixels
high.
page 322
Video Noise
Reduction
Reduces artifacts in the input video.
page 323
Black Level
Correction
Improves contrast by making black areas darker and
light areas whiter. This increases the encoding
efficiency.
page 324
Resize
Resizes the input video and corrects pixel aspect ratios. page 324
Audio Gain
Amplifies or attenuates the audio signal.
Audio Delay
Compensation
Corrects audio that is not synchronized with the video. page 327
page 326
Note: You can also define prefilters within the media profile
section, which is described in “Media Profile” on page 334.
This is recommended if you are defining multiple outputs and
want to use different filters for each output.
Prefilter Order
RealProducer applies prefilters in the order they are specified within the job
file. Because a prefilter alters video data before the data is passed to the next
filter, specifying prefilters in the wrong order can degrade the output. For
example, reducing noise can make a video impossible to de-interlace. The
following is the recommended order for using prefilters on video input:
318
APPENDIX B: Job File Syntax
1. Cropping
2. Inverse-Telecine
3. De-interlace
4. Video Noise Reduction
5. Black Level Correction
6. Resize
Note: You can apply audio prefilters at any point in the
filtering chain.
Video Resizing Methods
The following sections describe the two methods for resizing a video. In either
case, video resizing during encoding is processor-intensive and should be
avoided for a live broadcast. If you need to resize a live broadcast, the best
method is to perform resizing in hardware on the video capture device before
sending the input to RealProducer.
Tip: You can also crop an input video to remove unnecessary
portions. This is done through the cropping prefilter, as
described in “Input Cropping Prefilter” on page 320.
Prefilter Resizing
The video resize prefilter, which is described in “Video Resizing Prefilter” on
page 324, alters the size of the video before it is encoded. This prefilter is
useful for correcting non-square pixel aspect ratios. If the input video has a
non-square pixel aspect ratio (such as DV), you can shorten the video
horizontally to convert non-square pixels to square pixels. Resizing the video
before the actual encoding may also speed the rest of the encoding process
because less source material needs to be encoded. All outputs use the resized
input.
Codec Resizing
Through an output’s media profile, which is described in “Media Profile” on
page 334, you can also specify a new video height and width. In this resizing
method, the RealVideo codec resizes the content during the encoding. Because
codec resizing is more efficient, it is generally preferable to prefilter resizing
unless you need to correct for non-square pixels. This is the mode used when
319
RealProducer 11 User’s Guide
you resize content through the graphical application or command-line
application.
Tip: Always use codec resizing when making a video larger.
Expanding the video through the resizing prefilter adds extra
pixels, which makes the clip larger and harder to compress. In
contrast, resizing the output larger through the codec encodes
instructions that tell RealPlayer how to increase the video
dimensions during playback. This keeps the clip size smaller.
Width and Height Values for Resizing
For the video resize prefilter, the videoResizeWidth and videoResizeHeight
properties set the video’s new size. When you resize through the codec, the
media profile’s outputWidth and outputHeight properties resize the video. Both
sets of properties work the same way.
For any resize property, the value must be at least 32, and be a multiple of 4,
such as 120, 240, 360, and so on. Values not divisible by 4 are rounded down.
For example, a value of 123 is rounded down to 120. If both height and width
are set to 0, no resizing occurs. The maximum height or width is 2048 pixels.
To preserve an input video’s aspect ratio, set the height or width to the desired
size, then set the other value to 0. If the input video is 640 pixels wide by 480
high, for example, you can set the width to 320 and the height to 0. This
automatically scales the height to 240. If you do not preserve the input video’s
height-to-width ratio when resizing, the output video will appear distorted.
Input Cropping Prefilter
The input cropping filter contains several settings for cropping the video
source. You can use it to cut out unnecessary parts of a video, such as the
black bars at the top and bottom of a letterboxed, widescreen clip. The
prefilter uses the type value of xsi:type=”inputCroppingPrefilter” .
Note: The cropping prefilter does not scale the video larger or
smaller. For information about resizing, see “Video Resizing
Methods” on page 319.
320
APPENDIX B: Job File Syntax
Input Cropping Properties
The following table describes the cropping properties.
Input Cropping Prefilter Properties
Property
Value
Function
rn-prefilterpluginName
Optionally sets the plug-in to use. If omitted,
type=”string” inputcropping RealProducer selects the plug-in based on the
xsi:type value.
enabled
type=”bool”
true|false
Enables the filter when set to the default value of
true .
left
type=”uint”
integer
An integer representing the number of pixels from
the left of the video to start the cropping. You can
specify up to 32 pixels less than the total width. The
default is 0 .
width
type=”uint”
integer
An integer indicating the total width of the cropped
video, measured from the value set by the left
property. The default is the input video width minus
the pixels cropped by the left property. If the value is
not a multiple of 4, the next lower multiple is used.
For example, a value of 162 results in a video 160
pixels wide.
top
type=”uint”
integer
An integer representing the number of pixels from
the top of the video to start the cropping. You can
specify up to 32 pixels less than the total height. The
default is 0 .
height
type=”uint”
integer
An integer indicating the total height of the cropped
video, measured from the value set by the top
property. The default is the input video height
minus the pixels cropped by the top property. If the
value is not a multiple of 4, the next lower multiple is
used. For example, a value of 127 results in a video
124 pixels high.
Tip: If you perform a horizontal or vertical resizing on the
video first, the cropping offsets are measured from the video’s
new size, not its original size.
Input Cropping Example
The following example demonstrates the cropping prefilter syntax. Applying
this prefilter creates a video that is 320 pixels wide by 240 pixels high. The
output video’s top border begins 12 pixels down from the top border of the
321
RealProducer 11 User’s Guide
input video. As well, its left border begins 24 pixels in from the left border of
the input video.
<prefilter xsi:type="inputCroppingPrefilter">
<pluginName type="string">rn-prefilter-inputcropping</pluginName>
<enabled type="bool">true</enabled>
<left type="uint">24</top>
<width type="uint">320</top>
<top type="uint">12</top>
<height type="uint">240</top>
</prefilter>
De-Interlace and Inverse-Telecine Prefilter
The optional de-interlace filter is useful for videos larger than 240 pixels high.
The inverse-telecine filter is for NTSC videos that have been transferred from
film. For an explanation of these filters, refer to “Inverse-Telecine Filter” on
page 78 and “De-interlace Filter” on page 79. The prefilter uses the type value
of xsi:type=”deinterlacePrefilter” .
De-Interlace and Inverse-Telecine Properties
The following table describes the de-interlace and inverse-telecine properties.
De-Interlace and Inverse-Telecine Prefilter Properties
Property
pluginName
type=”string”
Value
rn-prefilterdeinterlace
Function
Optionally sets the plug-in to use. If omitted,
RealProducer selects the plug-in based on the
xsi:type value.
enabled
type=”bool”
true|false
Enables the filter when set to the default value of
true .
manual
type=”bool”
true|false
If this property is set to the default of false ,
RealProducer applies the de-interlace and inversetelecine filters only if it determines they are needed.
This allows you to leave the filter enabled for all
content and have RealProducer use it only if
necessary.
(Table Page 1 of 2)
322
APPENDIX B: Job File Syntax
De-Interlace and Inverse-Telecine Prefilter Properties (continued)
Property
Value
Function
deinterlace
type=”bool”
true|false
Applies the de-interlace filter when its value is set to
the default of true . Used only if manual is also set to
true .
inverseTelecine
type=”bool”
true|false
Applies the inverse-telecine filter when its value is
set to the default of true . Used only if manual is also
set to true .
(Table Page 2 of 2)
De-Interlace and Inverse-Telecine Example
The following syntax provides an example of the de-interlace and inverse
telecine filters:
<prefilter xsi:type="deinterlacePrefilter">
<pluginName type="string">rn-prefilter-deinterlace</pluginName>
<enabled type="bool">true</enabled>
<manual type="bool">false</manual>
<deinterlace type="bool">true</deinterlace>
<inverseTelecine type="bool">true</inverseTelecine>
</prefilter>
Video Noise Reduction Prefilter
This filter can reduce video noise. It has high and low settings, which are
described in the section “Noise Filters” on page 77. The prefilter uses the type
value of xsi:type=”videoNoiseReductionPrefilter” .
Noise Reduction Properties
The following table describes the noise reduction filter properties.
Noise Reduction Prefilter Properties
Property
pluginName
type=”string”
Value
rn-prefilter-video
noisereduction
Function
Optionally sets the plug-in to use. If omitted,
RealProducer selects the plug-in based on the
xsi:type value.
enabled
type=”bool”
true|false
Enables the filter when set to the default value
of true .
level
type=”string”
low|high
Indicates whether to use low or high noise
filtering.
323
RealProducer 11 User’s Guide
Noise Reduction Example
The following is sample syntax for the low noise reduction prefilter:
<prefilter xsi:type="videoNoiseReductionPrefilter">
<pluginName type="string">rn-prefilter-videonoisereduction</pluginName>
<enabled type="bool">true</enabled>
<level type="string">low</level>
</prefilter>
Black-Level Prefilter
This filter increases the video contrast and improves the RealVideo codec
efficiency. For more information, refer to “Black-Level Correction Filter” on
page 80. The prefilter uses the type value of xsi:type=blackLevelPrefilter” .
Black-Level Properties
The following table describes the black level properties.
Black-Level Correction Prefilter Properties
Property
pluginName
type=”string”
enabled
type=”bool”
Value
rn-prefilter-blacklevel
Function
true|false
Enables the filter when set to true .
Optionally sets the plug-in to use. If
omitted, RealProducer selects the plug-in
based on the xsi:type value.
Black-Level Example
The following is sample syntax for the low noise reduction prefilter:
<prefilter xsi:type="blackLevelPrefilter">
<pluginName type="string">rn-prefilter-blacklevel</pluginName>
<enabled type="bool">true</enabled>
</prefilter>
Video Resizing Prefilter
The video resize prefilter resizes the video input before encoding. You should
generally run it last, as noted in “Prefilter Order” on page 318, because vertical
resizing can adversely affect the use of other prefilters. The prefilter uses the
type value of xsi:type=”videoResizePrefilter” .
324
APPENDIX B: Job File Syntax
Tip: Refer to “Video Resizing Methods” on page 319 to
determine if the resize prefilter or codec resizing is the better
method to use for your content.
Video Resizing Properties
The following table describes the video resizing filter properties.
Video Resizing Prefilter Properties
Property
Value
rn-prefiltervideoresize
Function
enabled
type=”bool”
true|false
Enables the filter when set to the default
value of true .
videoResizeWidth
type=”uint”
integer in
multiples of 4,
from 32 to 2048
Sets the video width in pixels. See “Width
and Height Values for Resizing” on page
320.
videoResizeHeight
type=”uint”
integer in
multiples of 4,
from 32 to 2048
Sets the video height in pixels. See “Width
and Height Values for Resizing” on page
320.
videoResizeQuality
type=”string”
fast|high
Determines the type of resizing to perform
if the video is resized. The default high
value results in better quality, but uses
more CPU.
pluginName
type=”string”
Optionally sets the plug-in to use. If
omitted, RealProducer selects the plug-in
based on the xsi:type value.
Video Resizing Examples
The following example demonstrates the video resize filter syntax reducing
the video size to 176 pixels wide by 132 pixels high:
<prefilter xsi:type="videoResizePrefilter">
<pluginName type="string">rn-prefilter-videoresize</pluginName>
<enabled type="bool">true</enabled>
<videoResizeWidth type="uint">176</videoResizeWidth>
<videoResizeHeight type="uint">132</videoResizeHeight>
<videoResizeQuality type="string">high</videoResizeQuality>
</prefilter>
If you are running the de-interlace filter on a large video, you may be able to
decrease the encoding time by first resizing the video’s width, running the
other prefilters, then resizing the video’s height. The initial, horizontal resize
decreases the amount of video data that other prefilters must process. Only
325
RealProducer 11 User’s Guide
vertical resizing needs to be performed after other prefilter operations because
it can affect de-interlacing.
The following example resizes a video from 320-by-240 pixels to 176-by-132
pixels in two steps. Note that in the first resizing, the height is reduced. Here,
the original width is specified because leaving the videoResizeHeight set to its
default value automatically reduces the height to keep it in the same aspect
ratio with the video. In the second resizing, the height is reduced:
<prefilters>
<prefilter xsi:type="videoResizePrefilter">
<pluginName type="string">rn-prefilter-videoresize</pluginName>
<enabled type="bool">true</enabled>
<videoResizeWidth type="uint">176</videoResizeWidth>
<videoResizeHeight type="uint">240</videoResizeHeight>
<videoResizeQuality type="string">high</videoResizeQuality>
</prefilter>
...other prefilters, such as de-interlacing...
<prefilter xsi:type="videoResizePrefilter">
<pluginName type="string">rn-prefilter-videoresize</pluginName>
<enabled type="bool">true</enabled>
<videoResizeWidth type="uint">176</videoResizeWidth>
<videoResizeHeight type="uint">132</videoResizeHeight>
<videoResizeQuality type="string">high</videoResizeQuality>
</prefilter>
</prefilters>
Audio Gain Prefilter
The audio gain prefilter amplifies or attenuates audio. When the prefilter is
enabled in the job file, it applies to all audio inputs. The audio gain prefilter
does not support multichannel audio and should not be used when encoding
multichannel input. This prefilter uses the type value of
xsi:type=”audioGainPrefilter” .
326
APPENDIX B: Job File Syntax
Audio Gain Properties
The following table describes the audio gain filter properties.
Audio Gain Prefilter Properties
Property
pluginName
type=”string”
Value
Function
rn-prefilter-audiogain Optionally sets the plug-in to use. If
omitted, RealProducer selects the plug-in
based on the xsi:type value.
enabled
type=”bool”
true|false
Enables the filter when set to the default
value of true .
gain
type=”double”
Number from -12 to
Sets the audio gain level in dB. Use a minus
sign to indicate negative values. A low value
effectively mutes the video. High values do
not introduce clipping. For background,
refer to “Monitoring Audio” on page 142.
12
Audio Gain Example
The following example demonstrates the audio gain filter syntax:
<prefilter xsi:type="audioGainPrefilter">
<pluginName type="string">rn-prefilter-audiogain</pluginName>
<enabled type="bool">true</enabled>
<gain type="double">5.000000</gain>
</prefilter>
Audio Delay Compensation Prefilter
The audio delay compensation prefilter corrects audio shift when audio input
is out of synchronization with a video’s visual track. It shifts the audio by the
number of specified seconds, eliminating the need to correct the delay
through video preprocessing. This is useful when you encode audio and video
from separate, parallel inputs.
You can specify this filter only through the job file. It is not available through
the graphical user interface or command-line application.When the prefilter is
included in the job file, it applies to all audio inputs. Using this filter, which
has a type value of xsi:type=”audioDelayCompPrefilter” , does not increase the
encoding time.
Tip: Some video editing tools, such as DVD ripping software,
provide information about how much delay exists between
audio and video.
327
RealProducer 11 User’s Guide
For More Information: For more on separate, parallel inputs
used to encode audio and video, refer to “Single and Multiple
Inputs” on page 309.
Audio Delay Compensation Properties
The following table describes the audio delay compensation filter properties.
Audio Delay Compensation Prefilter Properties
Property
Value
rn-prefilteraudiodelaycomp
Function
true|false
Enables the filter when set to the default value
of true .
advance
time value
type=”duration”
The time by which to advance the audio
stream if it runs behind the video. For
information about time values, see “Duration
Syntax” on page 298.
delay
time value
type=”duration”
The time by which to delay the audio stream if
it runs ahead of the video. For information
about time values, see “Duration Syntax” on
page 298.
pluginName
type=”string”
enabled
type=”bool”
Optionally sets the plug-in to use. If omitted,
RealProducer selects the plug-in based on the
xsi:type value.
Note: You typically specify either advance or delay. If you specify
both, the applied delay value is the difference between the two
values. For example, if you set advance to 0.2 seconds and delay
to 0.5 seconds, the applied audio compensation is a delay of 0.3
seconds.
Audio Delay Compensation Example
The following example demonstrates the audio gain filter syntax:
<prefilter xsi:type="audioDelayCompPrefilter">
<pluginName type="string">rn-prefilter-audiodelaycomp</pluginName>
<enabled type="bool">true</enabled>
<delay type="duration">0.1</delay>
</prefilter>
328
APPENDIX B: Job File Syntax
File and Server Outputs
The outputs section defines the output for the job, which is either an encoded
clip or a broadcast stream sent to Helix Server. The <parOutputs> and
</parOutputs> tags encapsulate the outputs section. Within this list you can
define one or more outputs between <output> and </output> tags. All outputs
defined in this section are encoded simultaneously when the job file runs.
The <output> tag defines each output within the <parOutputs> list. An <output>
section is itself a container for separate sublists that define the output’s
destination, media profile, and optional clip information. The following
example shows the structure for defining a single output for a digitized file:
<parOutputs>
<output>
<destinations>
...output destinations for the clip or broadcast...
</destinations>
<mediaProfile>
...profile for the output, such as the audiences it uses...
</mediaProfile>
<clipInfo>
...optional clip information for the output...
</clipInfo>
</output>
...additional outputs...
</parOutputs>
Note: When you define more than one output, the output
streams are encoded simultaneously. You must use the
command-line application to process a job file that includes
multiple outputs, however. For live captures, it is important
that your RealProducer machine has sufficient processing
power for parallel outputs.
For More Information: For instructions about defining clip
information for each output, refer to “Clip Information” on
page 305. For background on broadcast requirements, refer to
Chapter 10.
329
RealProducer 11 User’s Guide
Destinations Section
The destinations section defines the destination for each output, which can
either be a clip or a broadcast stream sent to a server. The <destinations> and
</destinations> tags encapsulate the destinations section within an <output>
list. Within this list you can define one or more destinations between
<destination> and </destination> tags. All destinations defined for the output
are encoded simultaneously when the job file runs.
Destination Tag
A <destination> tag defines each destination within the <destinations> list. It
uses a type attribute with one of the following values to encode the output as a
file or a broadcast stream:
xsi:type=“fileDestination”
Encode as a file.
xsi:type=“pushServer”
Encode a broadcast stream that is pushed to a server.
xsi:type=“pullServer”
Encode a broadcast stream that is pulled by a server.
File Destinations
When the output destination is a digitized file, the destination type is
xsi:type=”fileDestination” . You can then specify the properties described in the
following table. A file name parameter is required, but you can leave the value
blank if you want to specify the name through the graphical application, as
described in “Creating a Destination Clip” on page 92. When you use the
command-line application, you must include the file name. If you specify
more than one output file, you must run the job through the command-line
application.
File Output Properties
Property
Value
Function
destinationRollSize
type=”uint”
integer
Sets the size in Megabytes at which to
create a new output clip. See “File
Rolling” on page 332.
destinationRollTime
type=”duration”
time value
Sets the time at which to create a new
output clip. See “File Rolling” on page
332.
(Table Page 1 of 2)
330
APPENDIX B: Job File Syntax
File Output Properties (continued)
Property
Value
Function
filename
type=”string”
file name and path
Indicates the path and name of the out
file. You cannot use wildcards. See
“Output File Names” on page 331.
name
type=”string”
string
Assigns a handle to the output. This is
not related to the file name and is
typically used only by graphical
applications to identify the output.
pluginName
type=”string”
rn-file-realmedia
Provides the name of the file system
plug-in that writes the file. Required
only if you are not created a RealMedia
clip.
(Table Page 2 of 2)
File Destination Example
The following example shows a single input for a digitized file:
<destination xsi:type="fileDestination">
<filename type="string">C:\media\movie.rm</filename>
</destination>
Output File Names
An output file name is required when encoding through the command-line
application. It is optional when using the graphical application, however, and
you can add the name through the graphical application before you encode, as
described in “Creating a Destination Clip” on page 92.
Whether you use the command-line application or graphical application, you
can omit the file name value as long as you encode from an input file. The
output then uses the same base file name as the input, along with the
appropriate extension (.ra , .rv, .rm , or .rmvb ). For example, a constant bit rate
clip encoded from movie.avi becomes movie.rv or movie.rm . A variable bit rate
version becomes movie.rmvb .
If you specify the name of clip that exists already in the output directory,
RealProducer archives the existing clip by appending _archNNN to the base file
name. Hence, movie.rm becomes movie_arch001.rm before the new movie.rm clip
is saved. If you encode the output again, the existing movie.rm becomes
movie_arch002.rm . Higher numbers therefore represent newer archives.
331
RealProducer 11 User’s Guide
File Rolling
File rolling allows you to create multiple RealMedia files for a single output
clip. Each new file is appended with a number. The output clip movie.rm might
be saved as movie.rm , movie1.rm , movie2.rm , and so on. Rolling happens
automatically when the clip reaches the RealMedia file format limit (4 GB), or
the maximum size allowed by the operating system:
•2
or 4 Gigabytes on Windows
•2
Gigabytes on Linux
You can also specify limits to the file size using the destinationRollSize
property. A value of 30 , for example, creates a new output clip from the file or
live input when the current clip reaches 30 Megabytes in size.
Rolling Files By Time
The destinationRollTime property rolls new files based on the amount of time
that RealProducer has encoded the output. For example, if you set a file
destination time of 15 minutes when encoding a broadcast named live.rm , the
first 15 minutes is encoded as live.rm , the second 15 minutes is saved as
live1.rm , and so on.
Because this time-rolling method is based on encoding time rather than the
input media’s timeline, it can produce clips of various lengths when you
encode an input file. With a roll time of 15 minutes, each rolled clip may play
for 20 minutes, for example, if RealProducer was able to encode the input
faster than real-time.
Time values are accurate to the minute, but should include a seconds
designation using the syntax described in “Duration Syntax” on page 298. For
example, the following sets a roll time of 10 minutes:
<destinationRollTime type=”duration”>10:00</destinationRollTime>
Tip: You can specify both a file rolling time and a file rolling
size. In this case, the new file is created when the first specified
limit is reached.
Combining Archives
Using the RealMedia Editor described in Chapter 12, you can combine rolled
files into a single output, up to the file size limit of your operating system.
You can also play the individual clips in sequence through a Ram file or a
SMIL file. With either method, though, that file transitions may not be
seamless, and may contain audio and video gaps. If you stream the clips in
332
APPENDIX B: Job File Syntax
sequence, each new clip may require buffering that temporary pauses playback
on RealPlayer.
Tip: Refer to Introduction to Streaming Media or RealNetworks
Production Guide for information about combining rolled clips
into a single sequence using a Ram file or a SMIL file.
Server Destinations
When the output destination is a server, the destination type is one of the
following, depending on the server type and the broadcast method:
xsi:type=“pushServer”
Encodes a broadcast stream that is pushed to a server.
For background, refer to the push broadcasting sections
of Chapter 11. The section “Push Server Syntax” on
page 362 explains the markup for this broadcast type.
xsi:type=“pullServer”
Creates a broadcast stream that is pulled by a server. For
background, refer to “Running a Pull Broadcast” on
page 210. The section “Pull Server Syntax” on page 367
explains the markup for this broadcast type.
If you plan to encode using the graphical application, you can include the
server destinations in the job file. Or, you can leave the server destination
section empty, and define server destinations through the graphical
application as described in Chapter 11. When you broadcast using the
command-line application and a job file, your job file must define the server
destination.
Tip: The easiest way to define a server destination is to create a
a server file as described in Appendix D. Then, incorporate the
server file syntax into the job file.
Incorporating a Server File into a Job File
You can add server destination information from a server file into a job file
manually, as described in the following procedure.
➤
To create a job file server destination from a server file:
1. Create a <destinations>...</destinations> section for the output if one does
not exist already.
2. Copy everything from the selected server file between its <destination> and
</destination> tags, and paste this markup into the <destinations> element.
333
RealProducer 11 User’s Guide
This is everything in the server file, except for the XML declaration tag on
the first line.
3. Delete the namespaces from the <destination> tag. The job file requires
only the namespaces defined in the <job> tag.
4. If you wish to use the job file in the graphical application, include the
server’s name property.
5. If you set up multiple broadcast outputs sent to the same server, ensure
that each stream name, as defined by the streamname property, is unique.
Media Profile
Within an output section, a media profile section defines the output settings,
such as which audiences are used. Because you define the media profile
separately for each output, you can create multiple outputs that have different
properties, such as two clips encoded at different dimensions. A list created by
the <mediaProfile> and </mediaProfile> tags defines these settings between each
output’s <output> and </output> tags, as shown in the following example:
<parOutputs>
<output>
...output information...
<mediaProfile>
...media profile settings for this output...
</mediaProfile>
</outputs>
<parOutputs>
334
APPENDIX B: Job File Syntax
Media Profile Properties
The following table describes the properties defined in an output’s media
profile section. The audience references section is required. All other elements
are optional.
Media Profile Properties
Property
Value
Function
audienceRefs
list
Indicates the audiences to use when
encoding the output. See “Media
Profile Audience References” on page
337.
audioMode
type=”string”
voice|music
Describes the type of audio content.
The default is music . The chosen
audiences should have an audio
stream that corresponds to this
setting, whether the clip is audio-only
or audio-video. See “Audio Stream
Context” on page 348.
audioResamplingQuality
type=”string”
fast|high
Affects the quality of audio
resampling, which must be done if the
codec sample rate differs from the
input sample rate. The default high
resampling results in better quality,
but uses more CPU. With either value,
there is no pitch shift. For
background, refer to “Sampling Rate”
on page 38.
disableAudio
type=”bool”
true|false
Disables the audio output if set to
true . The default is false . You can also
disable the audio for each input, as
described in “Digitized File Input” on
page 311.
disableVideo
type=”bool”
true|false
Disables the video output if set to
true . The default is false . You can also
disable the video for each input, as
described in “Digitized File Input” on
page 311.
latencyMode
type=”uint”
0|1|2
Reduces latency for live broadcasts.
The default is 0 , which is the highest
latency but also the highest error
resiliency. See “Latency Reduction” on
page 338.
(Table Page 1 of 2)
335
RealProducer 11 User’s Guide
Media Profile Properties (continued)
Property
Value
Function
maxPacketDuration
type=”duration”
any duration
Defines the maximum time that
RealProducer can encode a stream
before writing a packet. This can also
be defined in the stream properties as
described in “Maximum Packet Size
and Duration” on page 358.
maxPacketInterleaving
Duration
type=”duration”
duration from 0
to 60.000
Sets the superblock size for audio
packetization. This can also be
defined in the stream properties as
described in “Maximum Superblock
Size” on page 359.
maxPacketSize
type=”uint”
value in bytes
from 0 to 15000
Sets the maximum size for an audio
or video packet. This can also be
defined in the stream properties as
described in “Maximum Packet Size
and Duration” on page 358.
outputHeight
type=”uint”
integer in
multiples of 4,
from 32 to 2048
Sets the video height in pixels. See
“Width and Height Values for
Resizing” on page 320.
outputWidth
type=”uint”
integer in
multiples of 4,
from 32 to 2048
Sets the video width in pixels. See
“Width and Height Values for
Resizing” on page 320.
prefilters
list of filters
Indicates one or more prefilters to use
with the input. You can also define
prefilters in the inputs section to
apply the same filters to all outputs.
For more information, refer to
“Prefilters” on page 317.
resizeQuality
type=”string”
fast|high
Determines the type of resizing to
perform if the video is resized. The
default high value results in better
quality, but uses more CPU.
videoMode
type=”string”
sharp|normal|
Sets the video mode. This setting is
smooth|slideshow ignored for quality-based VBR
encoding. The default is normal . For
background, refer to “Choosing Video
Options” on page 99.
(Table Page 2 of 2)
336
APPENDIX B: Job File Syntax
Media Profile Audience References
The <audienceRefs> list contains one or more <audienceRef> elements that
select which audiences are used with the output. The audience defines the
audio and video codecs used, and sets the output’s streaming bandwidth. The
audiences are defined elsewhere in the job file, as described in “Audiences
Section” on page 340. The value enclosed by the <audienceRef> element must
correspond to an audience name, which is described in “Audience Properties”
on page 345.
Multiple Audience References Example
The following example shows four audiences used when encoding an output:
<parOutputs>
<output>
...output information...
<mediaProfile>
...media profile information...
<audienceRefs>
<audienceRef>16k Substream for 28k Dial-up</audienceRef>
<audienceRef>28k Dial-up</audienceRef>
<audienceRef>56k Dial-up</audienceRef>
<audienceRef>256k DSL or Cable</audienceRef>
</audienceRefs>
</mediaProfile>
</output>
</parOutputs>
Combining Multiple Audiences
As shown in the preceding example, you can encode multiple streams into a
single output using SureStream. When you do this, you must choose
audiences appropriately for the encoding to work:
• Using more than one audience requires that all audiences use constant bit
rate encoding. Attempting to include a variable bit rate stream in the
output causes the encoding to fail. In each audience definition, the
encodingType value should be cbr. For more information, refer to “Video
Stream Properties” on page 353.
• All video streams must use the same video codec. You cannot encode some
streams as RealVideo 10 and some streams as RealVideo 8, for example. If
audiences specify different RealVideo codecs, the newer codec is used. For
337
RealProducer 11 User’s Guide
information on selecting the video codec, see “Video Stream Properties”
on page 353.
• To
make good use of SureStream, streams should use significantly
different bandwidths, as determined by the audience’s avgBitrate element:
• If
two video streams have average bit rates within five percent of each
other, RealProducer encodes both streams but logs a warning.
• If
two or more audio streams use different audio codecs that differ in
bit rate by 1 Kbps or less, RealProducer logs an error and stops the
encoding. Difference audiences can specify the same audio codec,
however. To conserve file size and processing time, RealProducer
encodes the audio stream only once.
For More Information: For more on avgBitrate , see “Audience
Properties” on page 345.
Latency Reduction
The latencyMode property can decrease the end-to-end latency for live
broadcasts, as described in the section “End-to-End Broadcast Latency” on
page 180. The default value of 0 sets the default system latency mode. Setting a
value of 1 decreases latency. A value of 2 provides the lowest possible latency,
but also creates more noticeable errors if broadcast packets are lost.
Setting a value for latencyMode automatically sets the maxPacketDuration and
the maxPacketInterleavingDuration values for the stream. (If you also define the
maxPacketDuration and maxPacketInterleavingDuration values in the media
profile section of the job file or the stream packetizer section of the audience
file, their values override the latencyMode setting.) The following table lists the
values set for the packet properties based on the latency mode setting. The
mode has no effect on maxPacketSize .
Effect of Latency Mode on Packets and Superblocks
Latency
Mode
338
maxPacketDuration
maxPacketInterleaving
Duration
0
Default packet size of 23 to 480
milliseconds, depending on the codec.
Default superblock duration.
Varies with each codec.
1
50 milliseconds (8 packets per superblock) 400 milliseconds
2
100 milliseconds
0 (no superblocks)
APPENDIX B: Job File Syntax
Warning! Use a low latency setting only when delivering a live
stream to Helix Server version 11 or later. Earlier versions of
Helix Server will not handle the stream properly.
For More Information: See “Maximum Packet Size and
Duration” on page 358 and “Maximum Superblock Size” on
page 359 for explanations of the maxPacketDuration and the
maxPacketInterleavingDuration properties, respectively.
Media Profile Example
The following example shows media profile settings defined for two output
clips. The first clip is meant for dial-up modem connections, so it specifies
dial-up modem audiences, and resizes the input to make it smaller. This helps
to increase the frame rate and clarity when streaming over slow connections.
The second output is for broadband connections. It specifies several DSL and
cable modem audiences, keeping the encoded video the same size as the input:
<parOutputs>
<output>
...output information for the first file...
<mediaProfile>
<audioMode type="string">voice</audioMode>
<disableAudio type="bool">false</disableAudio>
<disableVideo type="bool">false</disableVideo>
<outputHeight type="uint">132</outputHeight>
<outputWidth type="uint">176</outputWidth>
<resizeQuality type="string">high</resizeQuality>
<audienceRefs>
<audienceRef>16k Substream for 28k Dial-up</audienceRef>
<audienceRef>28k Dial-up</audienceRef>
<audienceRef>56k Dial-up</audienceRef>
</audienceRefs>
</mediaProfile>
</output>
<output>
...output information for the second file...
<mediaProfile>
<audioMode type="string">voice</audioMode>
<disableAudio type="bool">false</disableAudio>
<disableVideo type="bool">false</disableVideo>
<outputHeight type="uint">0</outputHeight>
<outputWidth type="uint">0</outputWidth>
339
RealProducer 11 User’s Guide
<resizeQuality type="string">high</resizeQuality>
<audienceRefs>
<audienceRef>256k DSL or Cable</audienceRef>
<audienceRef>512k DSL or Cable</audienceRef>
<audienceRef>768k DSL or Cable</audienceRef>
</audienceRefs>
</mediaProfile>
</output>
</parOutput>
For More Information: For information about the relationship
between video dimensions, bandwidth, and output quality, see
“Factors for Creating a Good Streaming Video” on page 55.
Audiences Section
The audiences section defines one or more audiences that are used within the
job file. Because a job file can define multiple audiences, the audience section
starts and ends with <audiences> and </audiences> tags (note the plural
“audiences”). Within this section, one or more sublists defined between
<audience> and </audience> tags (note the singular “audience”) create each
audience setting. The following example shows the structure of the audience
section within a job file:
<job...>
...additional job file information...
<audiences>
<audience>
...first audience definition...
</audience>
<audience>
...second audience definition...
</audience>
...additional audience definitions...
</audiences>
</job>
For More Information: Refer to Appendix C for an explanation of
the audience syntax.
340
APPENDIX B: Job File Syntax
Working with Audiences
Each job file should have an audiences section defined between <audiences>
and </audiences> tags. If you plan to encode using the graphical application,
you can include the audiences in the job file. Or, you can leave the audiences
section empty, and select your audiences through the graphical application as
described in “Choosing Audiences” on page 100.
When you use a job file with the command-line application, your job file must
define the audiences. The easiest way to create the audience definitions is to
import the syntax from an audience file, as described in “Incorporating an
Audience File into a Job File” on page 341.
It’s important to keep in mind that not every audience listed in the job file
must be used when encoding. The audience definitions within the <audiences>
list provide the reference information necessary to encode for a particular
audience. An output’s media profile section determines which audiences are
used for that output, however, as described in “Media Profile” on page 334.
Incorporating an Audience File into a Job File
You can add audience information from an audience file into a job file
manually, as described in the following procedure.
➤
To create a job file audience section from an audience file:
1. Create an <audiences>...</audiences> section within the job file if one does
not exist already. This list falls within the <job> ...</job> list, and typically
appears at the end of the job file. Note the plural “audiences” in the tag
names.
2. Copy everything from the selected audience file between the <audience>
and </audience> tags. This is everything in the file, except for the XML
declaration tag on the first line.
3. Delete the namespaces from the <audience> tag. The job file requires only
the namespaces defined in the <job> tag.
4. Ensure that the audience definition includes a name attribute, which is
described in “Audience Properties” on page 345.
5. For each output in the job file that uses these audience settings, modify
the output’s media profile to refer to the audience by way of the audience
name value. For more information, refer to “Media Profile Audience
References” on page 337.
341
RealProducer 11 User’s Guide
342
APPENDIX
Appendix C:
AUDIENCE FILE SYNTAX
C
This appendix describes the RealProducer audience syntax. Each
audience file or job file records settings about how clips and
broadcasts are encoded. The information in this appendix allows
you to edit audience information to modify encoding settings
without using the RealProducer graphical application.
Note: If you are not familiar with XML syntax, refer to
Appendix A for information about XML namespaces, tags,
attributes, and values.
Understanding Audiences
Each audience section within an audience file or job file defines a single
audience for which a clip or broadcast is encoded. RealProducer predefines a
number of audiences that appear within the graphical user interface when you
click the Audiences button. For example, one audience is for 56 Kbps dial-up
modems while another is for 256 Kbps DSL and cable modem users. Each
audience specifies the streaming rates at which audio and video clips are
encoded, along with other settings.
Audience Files
The audience files are stored in the audiences subdirectory under the main
RealProducer installation directory, although you can change this location
through the RealProducer preferences. Audience files use the file extension
.rpad , and their file names correspond directly to the audience name in the
graphical application. For example, the 56k Dial-up audience in the graphical
user interface stores its information in the file named 56k Dial-up.rpad .
If you edit an audience through the graphical application—a process described
in “Creating and Editing Audiences” on page 155—RealProducer updates the
corresponding audience file to record the changes. You can also edit audience
343
RealProducer 11 User’s Guide
files manually. This allows you to change audience information used by the
graphical application or command-line application using a text editor or any
automated process that can modify text files.
Tip: When creating a new audience file, RealNetworks
recommends that you start with an existing audience file that
you have renamed.
Audiences in Job Files
A job file, which Appendix B explains, can also hold information about
audiences. For example, if you use the RealProducer graphical application to
create a new job and add the 56k Dial-up audience to this job, RealProducer
copies the audience information from the 56k Dial-up.rpad audience file into
the job file. Unlike an audience file, which defines just a single audience, a job
file can define multiple audiences. This is necessary for using SureStream
technology, which encodes a single clip with multiple streams targeting
different audiences.
When you encode a clip using a job file, RealProducer gathers the audience
information from the job file, rather than the original audience file. This
allows you to change the audience settings for the job without affecting the
audience default settings. For instance, you might change an audio codec used
for your 56 Kbps dial-up audience within a job. That change affects only the
clips encoded using that job file.
The syntax for defining an audience within an audience file and a job file is
the same, except for the following differences:
• The main <audience>
tag in an audience file requires a namespace, whereas
an <audience> tag within a job file does not use a namespace.
• Within
a job file, an audience definition requires a name value. A job
allows multiple outputs, such as encoding to two separate files. Using the
name values, you can specify which audiences each output uses. One
output might use a high-bandwidth audience, for example, while another
output encodes for a low-bandwidth audience.
• Because
a job file supports multiple audiences, each <audience> section
falls within a list that begins with an <audiences> tag and ends with
</audiences> . The audience file, which defines only one audience, does not
use the <audiences> container list.
344
APPENDIX C: Audience File Syntax
For More Information: Refer to “Audiences Section” on page 340
for an explanation of how audiences appear within a job file.
Audience Section
The <audience> and </audience> tags encapsulate an audience section within
an audience file or job file. The audience section then uses separate <streams>
sections to define the video stream, the audio stream, and so on. For a
standalone audience file that defines a single audience, the <audience> tag
follows directly after the XML declaration tag. Be sure to include the
namespaces shown in the following example, and add any namespaces
required by customized RealProducer components:
<?xml version="1.0" encoding="UTF-8"?>
<audience xmlns="http://ns.real.com/tools/audience.2.0"
xmlns:xsi="http://www.w3.org/2001/XMLSchema-instance"
xsi:schemaLocation="http://ns.real.com/tools/audience.2.0
http://ns.real.com/tools/audience.2.0.xsd">
...all audience parameters...
</audience>
For More Information: For information about defining an
audience within a job file, refer to “Audiences Section” on page
340.
Audience Properties
The following table describes the properties of an <audience> element.
Audience Properties
Property
Value
Function
avgBitrate
type=”uint”
positive integer
from 1 to 999999
Defines the average bit rate for this audience in
bits per second (bps). This is ignored if the
encoding type is set to vbrQuality, or you are
encoding audio without video. For more on
encoding types, refer to “Stream Encoding
Types” on page 354.
(Table Page 1 of 2)
345
RealProducer 11 User’s Guide
Audience Properties (continued)
Property
Value
Function
maxBitrate
type=”uint”
positive integer
from 1 to 999999
Limits the total bit rate for this audience to a
maximum number in bits per second (bps). The
value, which must be more than the value for
avgBitrate , applies only if the encoding type is
vbrBitrate or vbrQuality, as described in “Stream
Encoding Types” on page 354.
name
string
type=”string”
Creates a user-defined name that identifies the
audience template. This name appears in the
graphical user interface. The job file uses the
name to determine which audiences each
output uses.
streams
Defines each stream in the audience, as
described in “Streams Section” on page 346.
list
(Table Page 2 of 2)
Audience Properties Example
The following example shows a template for an audience using 256 Kbps DSL
or cable modem connections. The average bit rate is set to 225 Kbps, which
allows approximately 10 percent of the total bandwidth for network overhead.
If variable bit rate encoding is used, bandwidth spikes can reach 450 Kbps:
<audience>
<avgBitrate type="uint">225000</avgBitrate>
<maxBitrate type="uint">450000</maxBitrate>
<name type="string">256k DSL or cable</name>
<streams>
...streams defined here...
</streams>
</audience>
Streams Section
Each audience template has a streams section that defines the encoded
streams. This section starts and ends with <streams> and </streams> tags (note
the plural “streams”). Within this list, one or more sublists defined between
<stream> and </stream> tags (note the singular “stream”) define each stream
setting.
Each <stream> section can define an audio or video stream. All stream types are
optional. You can omit the video stream from audio-only encodings, for
346
APPENDIX C: Audience File Syntax
example. You define each video stream once within the audience section. For
audio, however, you can define up to four streams for four separate audio
contexts:
• music
• voice
in an audio-only clip
• music
• voice
in an audio-only clip
in a video clip
in a video clip
The various <stream> sections use an xsi:type attribute to indicate the type of
the stream. The following example shows the five possible streams defined
within an audience section:
<audience>
...other audience properties...
<streams>
<stream xsi:type="audioStream">
...audio stream for music in an audio-only clip...
</stream>
<stream xsi:type="audioStream">
...audio stream for voice in an audio-only clip...
</stream>
<stream xsi:type="audioStream">
...audio stream for music in a video clip...
</stream>
<stream xsi:type="audioStream">
...audio stream for voice in a video clip...
</stream>
<stream xsi:type="videoStream">
...video stream...
</stream>
</streams>
</audience>
Audio Stream Properties
The following table describes the properties that the various audio streams
can contain. Each audio stream section begins with a <stream
347
RealProducer 11 User’s Guide
xsi:type="audioStream"> tag and ends with a </stream> tag. The codecName and
codecFlavor properties are required.
Audio Stream Properties
Property
Value
Function
codecFlavor
type=”uint”
number
Sets the encoding speed used with the
chosen codec. For a list of the flavor
numbers, refer to the tables in the
section “RealAudio Codecs” on page 37.
codecName
type=”string”
sipr|cook|ralf|raac
Defines the type of codec used to encode
the stream. For a list of the codec names,
refer to the tables in the section
“RealAudio Codecs” on page 37.
encodingComplexity low|medium|high
type=”string”
Sets the complexity for the lossless codec,
as described in “Encoding Complexity
Modes” on page 81. This value is ignored
for all other codecs. The default is high .
encodingType
type=”string”
cbr|
vbrUnconstrained
Quality
Determines the encoding type. The
default is vbrUnconstrainedQuality for
the RealAudio lossless codec, cbr for all
other codecs. Omit this to choose the
encoding type automatically. For
background, refer to “Stream Encoding
Types” on page 354.
pluginName
type=”string”
rn-audiocodecrealaudio|
rn-audiocodeclossles s
Optionally sets the plug-in to use. If
omitted, RealProducer selects the plug-in
based on the xsi:type value.
streamContext
type=”bag”
list
Determines the audio context for which
the codec is used. Refer to “Audio Stream
Context” on page 348.
Audio Stream Context
Each audience can have up to four audio streams that define which audio
codec is used based on the presentation type (audio-only or audio-video) and
audio mode (voice or music). This creates four possible audio stream contexts:
• voice
in an audio-only clip
• music
• voice
348
in an audio-only clip
in a video clip
APPENDIX C: Audience File Syntax
• music
in a video clip
These contexts exist because you should use different codecs when encoding
music or voice. As well, the audio typically receives more bandwidth in an
audio-only clip than in a video clip. When RealProducer encodes a clip using
the audience information, it selects just one of the audio contexts, based on
other audio settings you have defined in the job file, graphical application, or
command line.
For More Information: For background on audio contexts, refer
to the section “Audio Encoding for Audiences” on page 103.
Stream Context Element
Each audio stream uses the streamContext sublist to define one of the four
possible audio contexts. For example, the following markup instructs
RealProducer to use this audio stream when encoding voice audio for a video
clip or broadcast:
<stream xsi:type="audioStream">
...audio codec information...
<streamContext type="bag">
<audioMode type="string">voice</audioMode>
<presentationType type="string">audio-video</presentationType>
</streamContext>
</stream>
Stream Context Properties
The following table describes the stream context properties.
Stream Context Properties
Property
Value
Function
audioMode
type=”string”
music|voice
Indicates that the audio is music or voice, causing
RealProducer to encode with a music or voice
codec. The default is music .
presentationType audio-video|
type=”string”
audio-onl y
Specifies if the stream is audio and video, or
audio-only. If audio-only is selected, RealProducer
generally uses a higher bit-rate codec for the
audio. The default is audio-video .
For More Information: The section “Setting Audio Parameters”
on page 98 explains how to set the audio mode through the
graphical application. For the command line, see the section
349
RealProducer 11 User’s Guide
“Audio Mode (-am)” on page 281. See “Media Profile” on page
334 for information about how the stream context is set in a
job file.
Using Fewer than Four Audio Stream Contexts
Unless you are an advanced user, RealNetworks recommends that you always
define four separate audio streams for the four possible stream contexts. This
ensures that the audience information is valid for all possible audio contexts.
However, you can define fewer than four audience contexts depending on your
encoding needs. Improperly defining these audio contexts, however, may cause
errors.
If you encode only music videos, for example, you can define just one audio
stream that uses the appropriate music codec for your audience streaming
speed. In this case, you do not need to include a <streamContext> list.
RealProducer uses the single, defined stream for any audio encoded for the
audience.
If you define a single audio stream, though, you may inadvertently create
unstreamable clips, or clips that do not use available bandwidth effectively.
Suppose that you create a 56 Kbps modem audience and use a 32 Kbps music
codec as the only audio stream. The total streaming speed for this audience is
approximately 34 Kbps. As long as you encode audio-only files, you are using
bandwidth effectively. But if you encode a video with this audience setting, the
visual track gets only 2 Kbps of bandwidth, rendering the video useless.
Conversely, you might define a 6 Kbps music clip for your 56 Kbps modem
audience. This leaves about 28 Kbps of usable bandwidth for a video’s visual
track, which is a good division. However, if you encode an audio-only clip with
this audience, it still uses just 6 Kbps of the bandwidth for the audio, letting
the other 28 Kbps of bandwidth go unused. For an audio-only clip, you want
to select a higher-bandwidth codec that uses bandwidth more effectively and
improves the sound quality.
When you define multiple audio streams for different stream contexts, you
need to ensure that a context fits your audio encoding settings. Suppose that
you set RealProducer to encode a video sound track with music, and your
audience file specifies just two streams:
350
•a
stream for audio-only music
•a
stream for audio-only voice
APPENDIX C: Audience File Syntax
In this case, RealProducer does not encode the clip because no context for
audio-video with music exists.
Audio Context Examples
The following sections explain the codec choices and show the markup used
for defining audio streams for a 56 Kbps dial-up modem audience. Because
this type of modem connection rarely achieves a sustained throughput of 56
Kbps, the avgBitrate value for the audience is set at 34 Kbps. The audio (or
audio and video together) cannot use more than this amount of bandwidth.
For More Information: The section “RealAudio Codecs” on page
37 lists the audio codecs along with the values you use for
codecName and codecFlavor.
Voice for Audio-Only Clips
For audio-only with voice, choose a voice codec that uses as much of the
available bandwidth as possible. For a 34 Kbps target speed, for example, the
best choice is 32 Kbps voice, which has a codec name of cook and a flavor of 7:
<stream xsi:type="audioStream">
<pluginName type="string">rn-audiocodec-realaudio</pluginName>
<codecName type="string">cook</codecName>
<codecFlavor type="uint">7</codecFlavor>
<encodingComplexity type="string">high</encodingComplexity>
<streamContext type="bag">
<presentationType type="string">audio-only</presentationType>
<audioMode type="string">voice</audioMode>
</streamContext>
</stream>
Music for Audio-Only Clips
For audio-only music, choose a music codec that has a bit rate as close to the
available bit rate without going over. For a 34 Kbps target speed, for example, a
good choice is 32 Kbps Stereo Music High Response - RealAudio. This codec
has a name of cook and a flavor of 21 :
<stream xsi:type="audioStream">
<pluginName type="string">rn-audiocodec-realaudio</pluginName>
<codecName type="string">cook</codecName>
<codecFlavor type="uint">21</codecFlavor>
<encodingComplexity type="string">high</encodingComplexity>
<streamContext type="bag">
351
RealProducer 11 User’s Guide
<presentationType type="string">audio-only</presentationType>
<audioMode type="string">music</audioMode>
</streamContext>
</stream>
Voice Audio for Video Clips
For audio with video, it’s generally advisable to allocate only 20 percent of a
video’s bandwidth for audio. A good choice when streaming at 34 Kbps is 6.5
Kbps voice. This codec has a name of sipr and a flavor of 0 :
<stream xsi:type="audioStream">
<pluginName type="string">rn-audiocodec-realaudio</pluginName>
<codecName type="string">sipr</codecName>
<codecFlavor type="uint">0</codecFlavor>
<encodingComplexity type="string">high</encodingComplexity>
<streamContext type="bag">
<presentationType type="string">audio-video</presentationType>
<audioMode type="string">voice</audioMode>
</streamContext>
</stream>
Music Audio for Video Clips
As with voice, a music codec for a video stream should consume only about 20
percent of the total bit rate. A good choice is either 6 Kbps Music - RealAudio,
or 8 Kbps Music - RealAudio if you want better sound quality. The following
illustrates the 8 Kbps codec, which has a name of cook and a flavor of 0 :
<stream xsi:type="audioStream">
<pluginName type="string">rn-audiocodec-realaudio</pluginName>
<codecName type="string">cook</codecName>
<codecFlavor type="uint">0</codecFlavor>
<encodingComplexity type="string">high</encodingComplexity>
<streamContext type="bag">
<presentationType type="string">audio-video</presentationType>
<audioMode type="string">music</audioMode>
</streamContext>
</stream>
352
APPENDIX C: Audience File Syntax
Video Stream Properties
The following table describes the properties that a video stream can contain.
Each video stream section begins with a <stream xsi:type="videoStream"> tag
and ends with a </stream> tag.
Video Stream Properties
Property
Value
Function
codecName
type=”string”
rv8|rv9|rv10
Defines the specific video codec
used. The default is rv10 for
RealVideo 10. See “RealVideo
Codecs” on page 61 for more
information.
enableLossProtection true|false
type=”bool”
Determines if error correction
packets are added. The default is
false . See “Loss Protection” on
page 84.
encodingComplexity
type=”string”
low|medium|high
Sets the encoding complexity, as
described in “Encoding
Complexity Modes” on page 81.
The default is high .
encodingType
type=”string”
cbr|
vbrBitrate|
vbrQuality|
vbrUnconstrainedQuality|
vbrUnconstrainedBitrate
Sets constant bit rate encoding
or a type of variable bit rate
encoding. The default is cbr.
Refer to “Stream Encoding
Types” on page 354.
maxFrameRate
type=”double”
positive number from 060.000
Sets the maximum target frame
rate. The default is 30 . See
“Encoded Frame Rates” on page
59.
maxKeyFrameInterval positive number from 0 to Sets the maximum number of
type=”double”
60.000
seconds between video key
frames. The default is 10 . See
“Maximum Time Between
Keyframes” on page 82.
maxStartupLatency
type=”double”
number of seconds
between 4.0 and 60.0
Determines how long the clip
buffers. The default is 4.0 . See
“Video Startup Latency” on
page 82.
(Table Page 1 of 2)
353
RealProducer 11 User’s Guide
Video Stream Properties (continued)
Property
Value
Function
pluginName
type=”string”
rn-videocodec-realvideo
Optionally defines the plug-in
that encodes the stream. You use
the same value for RealVideo 8,
9, or 10. If omitted,
RealProducer selects the plug-in
based on the xsi:type value.
quality
type=”uint”
positive integer from 1 to
Sets a quality target for VBR
clips. A value of 100 represents
the highest possible quality. For
background, refer to “VBR
Encoding Settings” on page 68.
See also “Stream Encoding
Types” on page 354.
100
(Table Page 2 of 2)
Stream Encoding Types
The encodingType attribute for an audio or video stream uses one of the values
described in the following table. The value you select determines whether
RealProducer ignores or adheres to other audience settings. This attribute
primarily affects video streams, but can be used with audio as well. If you do
not define it for an audio stream, RealProducer uses vbrUnconstrainedQuality
for the RealAudio lossless codec and cbr for all other audio codecs.
Audio and Video Encoding Type Values
encodingType Value
Output
cbr
Constant bit rate stream based on the audience’s
avgBitrate . The audience maxBitrate and the video
stream quality values are ignored. Use this setting for all
audio codecs other than the RealAudio lossless codec,
which uses vbrUnconstrainedQuality . This is the only
setting you can use for a video stream when packaging
multiple streams into a single clip using SureStream
technology.
(Table Page 1 of 2)
354
APPENDIX C: Audience File Syntax
Audio and Video Encoding Type Values (continued)
encodingType Value
Output
vbrBitrate
Variable bit rate stream based on the audience’s
avgBitrate and maxBitrate settings. The video stream
quality value is ignored. This is the standard setting for
most variable bit rate clips. RealProducer may encode
certain sections at speeds up to the maxBitrate setting,
but attempts to encode an overall bit rate consistent with
the avgBitrate value. The resulting average rate may be
somewhat higher than the avgBitrate value, however. The
vbrUnconstrainedBitrate encoding type generally encodes
very close to the specified average bit rate, but has an
unconstrained maximum bit rate.
vbrQuality
Variable bit rate stream based on the audience’s
maxBitrate setting and the video stream’s quality setting.
The audience’s avgBitrate setting is ignored. Use this
value if you want to try to maintain the encoding quality
at a certain level and it is not necessary to maintain a
consistent, average bit rate. The quality level may be
constrained by the maximum bit rate, however,
particularly during fast-action scenes.
vbrUnconstrainedQuality
Variable bit rate stream based on the video stream’s
quality setting. The audience’s avgBitrate and maxBitrate
values are ignored. Use this value to maintain the
encoding quality at a certain level when it is not necessary
to maintain a consistent, average bit rate or adhere to a
maximum bit rate. This is the only setting allowed for the
RealAudio lossless codec.
vbrUnconstrainedBitrate
Variable bit rate stream based on the audience’s
avgBitrate setting. The audience maxBitrate property and
video stream quality setting are ignored. The resulting file
may therefore have large bandwidth spikes, but the
average bit rate will be close to the avgBitrate value. This
is a better choice than vbrBitrate for creating a download
clip at a specific file size. The final size will be the
avgBitrate setting multiplied by the clip timeline. For
example, a 60-second clip with an average bit rate of 450
Kbps is approximately 27,000 Kbits, or 3.3 Megabytes.
(Table Page 2 of 2)
For More Information: For background on variable bit rate
encoding, see “Variable Bit Rate Video” on page 66.
355
RealProducer 11 User’s Guide
Video Stream Bit Rate
When you define a video stream, you do not set its bit rate directly. To
determine the rate, take the audience’s avgBitrate value and subtract the rates
for the selected audio stream.
For a 256 Kbps audience, for example, the average bit rate may be 225 Kbps. If
a 44 Kbps music audio codec is used for the sound track, the video’s visual
track has an average bit rate of 181 Kbps (225 minus 44). If the video uses a
voice sound track that consumes 32 Kbps, the visual track has an average bit
rate of 193 Kbps (225 minus 32).
For a variable bit rate clip, the same calculation using the audience’s
maxBitrate value reveals the video’s maximum rate. If the maximum rate is 450
Kbps, for instance, the video’s visual track can use a maximum bandwidth of
406 Kbps (450 minus 44) when a music codec is used, or a maximum
bandwidth of 418 Kbps (450 minus 32) if a voice codec is used.
For More Information: The section “Audience Properties” on
page 345 describes the audience values. For background on the
division between the sound track and the visual track in a
video clip, refer to “Soundtrack Bandwidth” on page 57.
Video Stream Example
The following example shows a video stream defined for a relatively low
bandwidth, such as a dial-up modem. Because of the slow streaming speed,
constant bit rate encoding is used with a maximum frame rate of 15 frames
per second:
<stream xsi:type="videoStream">
<codecName type="string">rv10</codecName>
<enableLossProtection type="bool">false</enableLossProtection>
<encodingComplexity type="string">high</encodingComplexity>
<encodingType type="string">cbr</encodingType>
<maxFrameRate type="double">15.000000</maxFrameRate>
<maxKeyFrameInterval type="double">10.000000</maxKeyFrameInterval>
<maxStartupLatency type="double">4.000000</maxStartupLatency>
<pluginName type="string">rn-videocodec-realvideo</pluginName>
<quality type="uint">30</quality>
</stream>
356
APPENDIX C: Audience File Syntax
Stream Packetization
The optional packetizers section defines how RealProducer writes network
packets for audio and video output. You can change the default packetizing
settings to reduce the latency of live broadcasts and to optimize the packet size
for your network. The <packetizers> and </packetizers> tags encapsulate the
packetizers section. Within this list, you can define a single packetizer.
Tip: The latencyMode property in the media profile section of a
job file provides a simpler means of reducing broadcast latency
without explicitly setting packet durations and superblock
sizes. For details, refer to “Latency Reduction” on page 338.
Packetizer Tag
To define a packetizer, you add <packetizer> and </packetizer> tags within the
<packetizers> element. The <packetizer> tag uses an xsi:type attribute with a
value of audioPacketizer or videoPacketizer, respectively, to indicate whether the
packetization is for an audio or video stream, respectively. The following
example shows the syntax for defining an audio stream packetizer:
<stream xsi:type="audioStream">
...stream information...
<packetizers>
<packetizer xsi:type=”audioPacketizer”...>
...audio stream packetizer defined here...
</packetizer>
</packetizers>
</stream>
357
RealProducer 11 User’s Guide
Packetizer Properties
The following table describes the properties that you can define for an audio
or video packetizer.
Packetizer Properties
Property
Value
Function
maxPacketDuration
type=”duration”
any duration
Defines the maximum time that
RealProducer can encode a stream
before writing a packet. See “Maximum
Packet Size and Duration” on page 358.
maxPacketInterleaving
Duration
type=”duration”
duration from 0
to 60.000
Sets the superblock size for audio
stream packetization. This value does
not apply to video. See “Maximum
Superblock Size” on page 359.
maxPacketSize
type=”uint”
value in bytes
from 0 to 15000
Sets the maximum size for an audio or
video packet. See “Maximum Packet Size
and Duration” on page 358.
Maximum Packet Size and Duration
The maxPacketDuration and maxPacketSize properties set the maximum time in
milliseconds or size in bytes, respectively, that RealProducer encodes an audio
or video stream before creating a packet. You can use maxPacketDuration along
with maxPacketInterleavingDuration described in “Maximum Superblock Size”
on page 359 to lower audio broadcast latency. The maxPacketSize property
helps to optimize packets for transmission across a network.
When you use these properties together, the first limit reached determines the
packet size. For example, you might specify the following:
<maxPacketSize type="uint">1450</maxPacketSize>
<maxPacketDuration type="duration">0.500</maxPacketDuration>
These properties instruct RealProducer to create a packet for the stream when
one of the following critiera is met:
• The
encoded stream data reaches 1,450 bytes (approximately 1.4
Kilobytes) in size.
• RealProducer
has encoded the stream for 500 milliseconds since creating
the last packet.
358
APPENDIX C: Audience File Syntax
Notes about Setting the Packet Size
Note the following about setting the audio or video packet size:
• You
should not set maxPacketSize higher than the maximum transfer unit
(MTU) for your network. If you omit maxPacketSize from the packetizers
section, a default value applies. For more information, see “Network
Latency” on page 185.
• If maxPacketSize
is larger than half of the stream preroll, RealProducer logs
a warning and sets the size to half of the preroll.
• Setting the maxPacketDuration
value higher than the video preroll results in
an increased latency.
• If
the value of maxPacketDuration for an audio stream is larger than
maxPacketInterleavingDuration , the maximum packet duration is set to the
same value as the interleaving duration.
• Setting
a value for maxPacketDuration overrides the packet duration
specified in the latencyMode attribute of the job file. Therefore, do not
specify maxPacketDuration if you want to use latencyMode . For more
information, see “Latency Reduction” on page 338.
• You
can also include these attributes in the media profile section of a job
file. This defines the values for all streams in the output. If you define the
properties in both the packetizers section and the job file’s media profile
section, the values from the packetizers section are used. For information
about using these values in a job file, refer to “Media Profile” on page 334.
Maximum Superblock Size
The maxPacketInterleavingDuration property, which functions only for audio
streams, sets the maximum superblock size. Although setting a small
superblock size lowers the latency for a live audio broadcast, it makes packet
loss in the stream more noticeable to the listener. For an explanation of this
issue, refer to “RealAudio Superblocks and Latency Reduction” on page 182.
Omitting maxPacketInterleavingDuration from the packetizer section varies the
superblock size with the codec used to encode the stream. If you add
maxPacketInterleavingDuration to the packetizer section, you can set any
duration value from 0 to 60.000 seconds. Choosing 0 or a value lower than the
video frame duration disables audio interleaving, creating no superblocks.
359
RealProducer 11 User’s Guide
The following example sets a packet duration of one-quarter second and an
interleaving (superblock) duration of two seconds. This means that a
superblock contains eight packets and causes approximately two seconds of
latency before RealProducer transmits the superblock packets to Helix Server:
<maxPacketDuration type="duration">0.250</maxPacketDuration>
<maxPacketInterleavingDuration type="duration">2.00</maxPacketInterleavingDuration>
The next example sets a packet size of 250 milliseconds and turns off
superblocking. This creates a lower latency than the preceding example, but
creates more noticeable audio gaps if packets are lost:
<maxPacketDuration type="duration">0.250</maxPacketDuration>
<maxPacketInterleavingDuration type="duration">0</maxPacketInterleavingDuration>
360
APPENDIX
Appendix D:
SERVER FILE SYNTAX
D
This appendix explains how to create and edit a server destination
file, which records settings used to transmit a live stream to Helix
Server for broadcast to RealPlayers.
Note: If you are not familiar with XML syntax, refer to
Appendix A for information about XML namespaces, tags,
attributes, and values.
Understanding Server Destination Files
A server destination file specifies the IP address or DNS name of a Helix
Server used to broadcast a live stream. For a multicast, the server destination
file indicates the multicast address. The destination file also defines
properties required by the server, such as error correction parameters and
authentication passwords. These properties can vary by broadcast type. For
example, error correction parameters are set in the server destination file for
push broadcasts but not for pull broadcasts.
After you create a server destination file, copy it to the servers directory under
the main RealProducer installation directory. You then use the destination
with the graphical application, as described in “Working with Server
Templates” on page 217, or when running the command-line application, as
explained in “Output and Destination Options” on page 271. Server
destination files use the file extension .rpsd .
For More Information: Before you create or modify a server
destination file, be sure that you understand the broadcasting
issues described in Chapter 10.
Tip: RealProducer includes sample server destination files for
all broadcast types in the samples/servers directory under the
main RealProducer installation directory. You can use one of
these files as the basis for creating your own server destination
361
RealProducer 11 User’s Guide
file. Or, you can create files through the graphical application,
as described in Chapter 11.
Push Server Syntax
A push server file can set up an account-based broadcast, a password-only
broadcast, or a multicast. Following the XML declaration tag, you define all
properties within a single list starting with a <destination> tag and ending with
a </destination> tag. The pushServer value for the xsi:type property identifies
the server destination as a push broadcast:
<?xml version="1.0" encoding="UTF-8"?>
<destination xsi:type="pushServer" xmlns="http://ns.real.com/tools/server.2.0"
xmlns:xsi="http://www.w3.org/2001/XMLSchema-instance"
xsi:schemaLocation="http://ns.real.com/tools/server.2.0
http://ns.real.com/tools/server.2.0.xsd">
...all push server properties...
</destination>
The following sections in Chapter 11 provide background about how the
broadcast properties function for the various types of push broadcasts:
• “Running
• “Setting
an Account-Based Broadcast” on page 189
Up a Password-Only Broadcast” on page 194
• “Multicasting
• “Changing
a Live Stream” on page 200
Advanced Push Broadcast Parameters” on page 205
Push Server Properties
The following table lists the possible push server properties. You define each
property as a separate tag within the <destination> list.
Push Server Properties
Property
Value
Function
address
type=”string”
IP address or
DNS name
Provides the server’s version 4 IP
address, version 6 IP address, or DNS
name. Ignored for multicasts.
allowResends
type=”bool”
true|false
Accepts the server’s packet resend
requests when set to the default value
of true . This is ignored if transport is
tcp or udp/multicast .
(Table Page 1 of 4)
362
APPENDIX D: Server File Syntax
Push Server Properties (continued)
Property
Value
Function
authType
type=”string”
account-based|
single-password
Sets the authentication type used. The
default is account-based , which
requires a user name and password.
The single-password type requires
only a valid password. Use singlepassword for password-only
broadcasts and multicasts.
enableTCPReconnect
type=”bool”
true|false
Re-establishes a dropped broadcast
stream when set to the default value of
true. Used only if transport is tcp .
endPort
type=”uint”
port number
Defines the last port in the port range
the server uses to receive broadcast
data. The value can be 1 to 65535 . The
default is 30020 . This property is
ignored for account-based broadcasts.
fecOffset
type=”uint”
seconds
Offsets redundant packets by the
specified number of seconds if
fecPercent is 100 . The default is 0 .
fecPercent
type=”uint”
0-50|100
Allocates a percentage of the stream
for error correction packets. The value
can be any integer from 0-50 or 100 .
Values from 51 to 99 are assumed to
be 100 . The default is 0 .
listenAddress
type=”string”
IP address
Sets the version 4 or version 6 IP
address that RealProducer uses to
listen for packet resend requests. The
default value of 0 causes Helix Server
to gather the listen address from the
IP headers, which works for most
broadcasts. This property is ignored
for multicasts.
metadataResendInterval
type=”uint”
seconds
Defines the number of seconds
between metadata resends when
transport is udp . Ignored if transport
is tcp . The default is 30 .
multicastAddress
type=”string”
multicast IP
address
Indicates the version 4 or version 6
multicast address to use. Ignored if
transport is not udp/multicast .
(Table Page 2 of 4)
363
RealProducer 11 User’s Guide
Push Server Properties (continued)
Property
Value
Function
multicastTTL
type=”uint”
router hops
Sets the number of router hops
allowed for a multicast. Valid values
are 1 to 255 . The default is 16 . Ignored
for other types of broadcasts.
name
type=”string”
name
Names the server destination for use
by the graphical application. Used
only in a job file. With a server
destination file, the file name is used
as the destination name.
password
type=”string”
string
Validates the server connection. For
account-based broadcasts, the server’s
authentication database defines the
password. For password-only
broadcasts or multicasts, the receiver
definition sets the password.
path
type=”string”
path name
Defines an optional, virtual path used
for server features such as archiving or
splitting. Include a trailing forward
slash, as in news/ . The value appears
in the URL ahead of the stream name,
as in news/live.rm .
pluginName
type=”string”
rn-server-rbs
Identifies the plug-in that handles the
stream connection.
port
type=”uint”
port number
For an account-based broadcast, this
defines the HTTP port on the server,
which is typically 80 . For a passwordonly broadcast or multicast, this
defines the first port in the port range
the server uses to receive broadcast
data. The value can be 1 to 65535 . The
default is 30001 .
savePassword
type=”bool”
true|false
Saves the password as plain text in the
server destination file when set to
true . The password is used only with
the graphical application. With the
command-line application, you must
enter the password on the command
line. The default is false .
(Table Page 3 of 4)
364
APPENDIX D: Server File Syntax
Push Server Properties (continued)
Property
Value
Function
statisticsUpdateInterval
type=”uint”
1 to 604800
Sets the number of seconds between
statistics updates from the server in
account-based broadcasts only. The
default is 10 .
streamname
type=”string”
stream name
Defines the stream name used in the
broadcast URL. This should use the
appropriate extension: .ra , .rv, .rm , or
.rmvb .
TCPReconnectInterval
type=”uint”
1 to 3600
Indicates the number of seconds to
wait before attempting to re-establish
an account-based broadcast or a
password-only broadcast that uses
TCP transport. The default is 10 .
transport
type=”string”
udp/unicast|
udp/multicast|
tcp
Defines the broadcast transport and
mode. The default is udp/unicast . For
password-only broadcasts and
multicasts, this value must match the
setting on the receiver.
username
type=”string”
name
Validates the broadcast. The server
defines the user name and password
in its authentication database. Used
only with account-based broadcasts.
(Table Page 4 of 4)
Push Server Examples
The following sections provide examples of the three standard types of push
broadcasting: account-based, password-only, and multicast.
Account-Based Example
The following example defines an account-based broadcast. The authType
property sets the broadcast type. The username and password properties supply
log-in credentials for the Helix Server authentication database.
<?xml version="1.0" encoding="UTF-8"?>
<destination xsi:type="pushServer" xmlns="http://ns.real.com/tools/server.2.0"
xmlns:xsi="http://www.w3.org/2001/XMLSchema-instance"
xsi:schemaLocation="http://ns.real.com/tools/server.2.0
http://ns.real.com/tools/server.2.0.xsd">
<pluginName type="string">rn-server-rbs</pluginName>
365
RealProducer 11 User’s Guide
<authType type="string">account-based</authType>
<address type="string">helixserver.example.com</address>
<port type="uint">80</port>
<endPort type="uint">0</endPort>
<username type="string">realmedia-encoder</username>
<password type="string">453ERP098zu</password>
<savePassword type="bool">true</savePassword>
<transport type="string">udp/unicast</transport>
<listenAddress type="string">0</listenAddress>
<fecPercent type="uint">20</fecPercent>
<fecOffset type="uint">10</fecOffset>
<metadataResendInterval type="uint">30</metadataResendInterval>
<allowResends type="bool">true</allowResends>
<statisticsUpdateInterval type="uint">2</statisticsUpdateInterval>
</destination>
Password-Only Example
The following example defines a password-only broadcast, as shown in the
authType property value. There is no user name, and the log-in password is
defined in the Helix Server receiver configuration. The metadataResendInterval
property defines how long it may take Helix Server to re-establish a dropped
broadcast stream.
<?xml version="1.0" encoding="UTF-8"?>
<destination xsi:type="pushServer" xmlns="http://ns.real.com/tools/server.2.0"
xmlns:xsi="http://www.w3.org/2001/XMLSchema-instance"
xsi:schemaLocation="http://ns.real.com/tools/server.2.0
http://ns.real.com/tools/server.2.0.xsd">
<pluginName type="string">rn-server-rbs</pluginName>
<authType type="string">single-password</authType>
<address type="string">helixserver.example.com</address>
<port type="uint">30001</port>
<endPort type="uint">30020</endPort>
<savePassword type="bool">true</savePassword>
<password type="string">546zRGW23</password>
<transport type="string">udp/unicast</transport>
<listenAddress type="string">172.23.104.188</listenAddress>
<fecPercent type="uint">20</fecPercent>
<fecOffset type="uint">10</fecOffset>
<metadataResendInterval type="uint">30</metadataResendInterval>
<allowResends type="bool">true</allowResends>
366
APPENDIX D: Server File Syntax
<enableTCPReconnect type="bool">true</enableTCPReconnect>
<TCPReconnectInterval type="uint">10</TCPReconnectInterval>
<statisticsUpdateInterval type="uint">2</statisticsUpdateInterval>
</destination>
Multicast Example
The next example illustrates a server destination file for a multicast. The
authType property is set to single-password because the password defined in the
Helix Server receiver configurations is required. The transport property creates
the multicast through its udp/multicast value. The multicastAddress property
defines the multicast address monitored by all Helix Server receivers.
<?xml version="1.0" encoding="UTF-8"?>
<destination xsi:type="pushServer" xmlns="http://ns.real.com/tools/server.2.0"
xmlns:xsi="http://www.w3.org/2001/XMLSchema-instance"
xsi:schemaLocation="http://ns.real.com/tools/server.2.0
http://ns.real.com/tools/server.2.0.xsd">
<pluginName type="string">rn-server-rbs</pluginName>
<authType type="string">single-password</authType>
<port type="uint">30001</port>
<endPort type="uint">30020</endPort>
<savePassword type="bool">true</savePassword>
<password type="string">3542zdf22</password>
<transport type="string">udp/multicast</transport>
<multicastAddress type="string">225.229.1.1</multicastAddress>
<multicastTTL type="uint">16</multicastTTL>
<fecPercent type="uint">20</fecPercent>
<fecOffset type="uint">10</fecOffset>
<metadataResendInterval type="uint">30</metadataResendInterval>
<statisticsUpdateInterval type="uint">2</statisticsUpdateInterval>
</destination>
Pull Server Syntax
A pull server file defines a broadcast in which Helix Server requests the
broadcast stream from RealProducer. Following the XML declaration tag, you
define all properties within a single list starting with the <destination> tag and
ending with the </destination> tag. The pullServer value for the xsi:type
property identifies this server definition as a pull broadcast:
367
RealProducer 11 User’s Guide
<?xml version="1.0" encoding="UTF-8"?>
<destination xsi:type="pullServer"
xmlns="http://ns.real.com/tools/server.2.0"
xmlns:xsi="http://www.w3.org/2001/XMLSchema-instance"
xsi:schemaLocation="http://ns.real.com/tools/server.2.0
http://ns.real.com/tools/server.2.0.xsd">
...all pull server properties...
</destination>
For More Information: Refer to “Running a Pull Broadcast” on
page 210 for background information about pull broadcast
properties.
Pull Server Properties
The following table lists the possible pull broadcast properties. You define
each property as a separate tag within the <destination> list.
Pull Server Properties
Property
Value
Function
listenAddress
type=”string”
IP address
Defines the version 4 or version 6 IP address that
RealProducer uses to listen for pull requests. Do
not use a DNS name. A value of 0 indicates the
default address on the RealProducer computer’s
network interface card.
listenPort
type=”uint”
port number
Sets the port that RealProducer monitors for pull
requests. The value can be 1 to 65535 . The default
is 3031. You can use the same port for multiple
broadcasts running on the same machine.
name
type=”string”
name
Names the server destination for use by the
graphical application. Used only in a job file.
With a server destination file, the file name is
used as the destination name.
password
type=”string”
string
Validates the broadcast. The serve password in the
receiver configuration must match this value.
path
type=”string”
path name
Sets an optional, virtual path used for server
features such as archiving or splitting. Include a
trailing forward slash, as in news/ . The value
appears in the URL ahead of the stream name, as
in news/live.rm .
pluginName
type=”string”
rn-server-rbs
Identifies the plug-in that handles the stream
connection.
(Table Page 1 of 2)
368
APPENDIX D: Server File Syntax
Pull Server Properties (continued)
Property
Value
Function
savePassword
type=”bool”
true|false
Saves the password as plain text in the server
destination file when set to true . The default is
false .
serverTimeout
type=”uint”
0 to 86400
Sets the number of seconds that RealProducer
waits before stopping the broadcast packets after
it receives no more “keep alive” messages from the
server. The default is 30 .
streamname
type=”string”
stream name
Defines the stream name used in the broadcast
URL. This should use the appropriate extension:
.ra , .rv, .rm , or .rmvb .
(Table Page 2 of 2)
Pull Server Example
The following example defines a pull broadcast. RealProducer listens on the IP
address and port defined by listenAddress and listenPort , respectively, for
broadcast requests by Helix Server. The password property verifies access to the
stream. In a pull broadcast, the initiating receiver specifies many of the
broadcast parameters, such as whether forward error correction is used.
<?xml version="1.0" encoding="UTF-8"?>
<destination xsi:type="pullServer" xmlns="http://ns.real.com/tools/server.2.0"
xmlns:xsi="http://www.w3.org/2001/XMLSchema-instance"
xsi:schemaLocation="http://ns.real.com/tools/server.2.0
http://ns.real.com/tools/server.2.0.xsd">
<pluginName type="string">rn-server-rbs</pluginName>
<listenAddress type="string">172.23.104.188</listenAddress>
<listenPort type="uint">3031</listenPort>
<savePassword type="bool">true</savePassword>
<password type="string">WEPO342zqd</password>
<serverTimeout type="uint">30</serverTimeout>
</destination>
369
RealProducer 11 User’s Guide
370
APPENDIX
Appendix E:
PREFERENCE FILE SYNTAX
E
This appendix describes the properties of the RealProducer
preferences file, which affect the operation of both the graphical
application and the command-line application. You can edit this file
manually if you need to change the preferences settings.
Note: If you are not familiar with XML syntax, refer to
Appendix A for information about XML namespaces, tags,
attributes, and values.
Editing RealProducer Preferences
RealProducer records application preferences in the file producer.pref , located
in the main installation directory. This XML-formatted text file specifies
values such as the path to audience and server files. It also sets the location of
the temporary directory used when encoding clips. You can change most
preference properties using the graphical application, as described in
“Adjusting RealProducer Preferences” on page 151. If you are using the
command-line application, edit the preferences using any text or XML editor.
Note: This appendix does not describe how to change the
applicationState properties, which record the graphical
application’s display state. Under normal circumstances, you
should not need to edit these properties.
371
RealProducer 11 User’s Guide
File Path Preferences
The <paths/> tag contains three properties that set the paths to files used by
RealProducer.
Path Preferences
Property
Value
Function
audiences
path
Provides the full path to the directory that stores
audience files, which are described in Appendix C.
Relative paths are not allowed. The default is the
audiences directory under the main installation
directory.
servers
path
Specifies the full path to the directory that stores
server files, which are described in Appendix D.
Relative paths are not allowed. The default is the
servers directory under the main installation
directory.
tempDir
path|%TEMP%|
Indicates the directory used to store temporary files
during encoding. See “Temporary Directory” on page
372.
%OUTPUTDIR%
Temporary Directory
For tempDir, you can enter the full path name of the directory to use as the
temporary directory. Or, you can use one of the following variables:
• If
you use %TEMP% as the value, RealProducer uses the same directory
specified by the Windows TEMP or Linux TEMPDIR variable. If the Linux
TEMPDIR variable is not set, RealProducer uses the /tmp directory.
• Use
a value of %OUTPUTDIR% to set the temporary directory for each job to
the same directory used to store the job’s output clip.
Tip: RealProducer operates faster if the temporary directory
resides on the local RealProducer machine, rather than a
network drive.
Note: After you restart the RealProducer graphical application,
the graphical preferences dialog lists the full path to the
directory specified by the %TEMP% or %OUTPUTDIR% variable.
372
APPENDIX E: Preference File Syntax
File Path Example
The following example illustrates the <paths/> tag:
<paths audiences="C:\Program Files\Real\RealProducer Plus 10\audiences\"
servers="C:\Program Files\Real\RealProducer Plus 10\servers\"
tempDir="%TEMP%"/>
Log File Preferences
The <fileLogging/> tag uses the properties described in the following table to
set the RealProducer logging preferences.
Log File Preferences
Property
Value
Function
category
error|warning|
info|diagnostic
Sets the logging category. Choose any
combination of categories, separating them
with commas. For more information on
categories, refer to “Logging Category (-lc)”
on page 285.
disable
true|false
Turns off logging when set to true . The
default is false .
enableRolling
true|false
Enables the creation of multiple log files
(log rolling) when set to true . The default is
false .
filename
file name
Sets the log file name. You can use a full
path or a path relative to the installation
directory.
filterFunctionalArea
true|false
Filters the log according to functional area
when set to true . The default is false , which
captures all logging areas.
format
detailed|short
Determines the log format. You can choose
short to log only the job name and message.
The default detailed format logs more
information, such as the message category,
functional area, time, and message number.
formatSeparator
character
Defines the character used to separate
entries on a line within the log. The default
is \t for a tab.
(Table Page 1 of 2)
373
RealProducer 11 User’s Guide
Log File Preferences (continued)
Property
Value
Function
functionalArea
all|list
Defines which functional areas are logged.
The default value all logs all areas.
Otherwise, enter a comma-separated list of
specific areas.
previousFilename
file name
Indicates the file name of the last log
created if log rolling is used. The file
extension includes a numeric designation
to indicate the order of the logs. For
example, for a log named producer.log , the
first rolled file is named producer.log1, the
second is producer.log2 , and so on.
rollTimeIntervalType hourly|daily|
Determines how frequently the log file is
weekly|monthly rolled if time-based rolling is turned on.
The default is monthly.
rollType
size|time
Determines if log files are rolled according
to size or preset time if log rolling is
enabled. The default is time .
sizeRollSize
1-99999
Sets the size of the log file in Megabytes
when log files are rolled according to size.
Use any integer up to 99999 .
(Table Page 2 of 2)
Log File Example
The following example illustrates the <fileLogging/> tag:
<fileLogging format="detailed"
formatSeparator="\t"
disable="false"
filename="producer.log"
previousFilename="C:\Program Files\Real\RealProducer Plus 10\producer.log"
enableRolling="false"
rollType="time"
sizeRollSize="5"
rollTimeIntervalType="monthly"
filterFunctionalArea="false"
functionalArea="all"
category="error,warning,informational"/>
374
APPENDIX E: Preference File Syntax
Log Viewing Properties
The log viewer is available through the graphical application, as described in
“Viewing Log Messages” on page 147. The <screenLogging/> tag uses the
properties described in the following table to set the log viewer preferences.
Log Viewing Preferences
Property
Value
Function
disable
true|false
Turns off log viewing when set to true . The
default is false .
filterFunctionalArea
true|false
Filters log viewing according to functional
area when set to true . The default is false ,
which displays all logging areas.
functionalArea
all|list
Defines which functional areas are
displayed. The default value all displays all
areas. You can also create a commaseparated list of specific areas.
category
error|warning|
info|diagnostic
Sets the logging category. Choose any
combination of categories, separating them
with commas. For more information on
categories, refer to “Logging Category (-lc)”
on page 285.
Log File Example
The following example illustrates the <screenLogging/> tag:
<screenLogging disable="false"
filterFunctionalArea="false"
functionalArea="all"
category="error,warning,info"/>
375
RealProducer 11 User’s Guide
376
GLOSSARY
A
artifact
B
bandwidth
A visual imperfection in an encoded video clip. Too many artifacts can
make the video look blocky.
The upper limit on the amount of data, typically expressed as Kilobits per
second (Kbps), that can pass through a network connection.
binary tag
An XML tag that comprises opening and closing tags, such as <List> and
</List> .
bit
The smallest unit of measure of data in a computer. A bit has a binary
value, either 0 or 1.
bit rate
A measure of bandwidth, expressed as the number of bits transmitted per
second. A 28.8 Kbps modem, for example, can transmit or receive around
29,000 bits per second.
broadcast
To deliver a presentation, whether live or prerecorded, in which all viewers
join the presentation in progress. Contrast to on-demand.
buffering
The receiving and storing of data before it is played back. A clip’s initial
buffering is called preroll. After this preroll, excessive buffering may stall
the presentation.
byte
A common measurement of data. One byte consists of 8 bits.
377
RealProducer 11 User’s Guide
C
cable modems
Devices that allow rapid transmission and reception of data over
television cable. They are digital devices, unlike dial-up modems, which
transmit analog data.
CBR
Constant Bit Rate. A type of RealVideo encoding in which all parts of the
video play back at the same bit rate. Contrast to VBR.
client
A software application that receives data from a server. A Web browser is a
client of a Web server. RealPlayer is a client of Helix Server.
clip
A media file within a presentation. Clips typically have an internal
timeline, as with RealAudio and RealVideo.
codec
Coder/decoder. Codecs convert data between uncompressed and
compressed formats, reducing the bandwidth a clip consumes.
D
download
To send a file over a network with a nonstreaming protocol such as HTTP.
Contrast to stream.
DSL
Digital Subscriber Line. A technology for transmitting digital data over a
regular telephone line much faster than through dial-up modems.
duress stream
A low-bandwidth SureStream audio or video stream that Helix Server uses
if a connection’s available bandwidth drops greatly.
E
encoding
F
fps
Converting a file into a compressed, streaming format. For example, you
can encode WAV files as RealAudio clips.
Frames Per Second. The number of video frames that displays each second
in a streaming video clip.
frequency response
A measure of audio clip quality. The higher a clip’s frequency response,
the more frequencies it can faithfully reproduce.
378
Glossary
H
Helix Server
RealNetworks server software used to stream multimedia presentations to
RealPlayer.
Helix Server administrator
The person in charge of setting up and running Helix Server.
HTTP
Hypertext Transport Protocol. The protocol used by Web servers to
communicate with Web browsers. In contrast, Helix Server streams clips
to RealPlayer with RTSP.
I
ISDN
Integrated Services Digital Network. Technology that makes digital data
connections at 64 or 112 Kbps possible over telephone lines.
ISP
Internet Service Provider. A company that provides access to the Internet.
Many ISPs have Helix Server available to stream media clips.
K
kilobit (Kb)
A common unit of data measurement equal to 1024 bits. A kilobit is
usually referred to in the context of bit rate per unit of time, such as
Kilobits per second (Kbps).
kilobyte (KB)
A common unit of data measurement equal to 1024 bytes or 8 Kilobits.
L
LAN
Local Area Network. A computer network confined to a local area, such as
a single building. LANs vary in speed, with bandwidth shared among all
networked devices.
lossy
A compression scheme that lowers clip size by discarding nonessential
data from the source file. Both RealAudio and RealVideo are lossy.
M
metafile
Another name for a Ram file.
mouseover
The action of moving a computer screen pointer over an interactive area.
An animated button may change appearance on a mouseover, for example.
379
RealProducer 11 User’s Guide
N
namespace
O
on-demand
P
PNA
An XML declaration that identifies the features used in a SMIL
presentation. For SMIL 2.0 and higher, the <smil> tag must declare a
namespace.
A type of streaming in which a clip plays from start to finish when a user
clicks a link. Most clips are streamed this way. Contrast to broadcast.
A proprietary protocol Helix Server uses for backward compatibility with
RealPlayer 3 through 5. URLs using PNA start with pnm:// .
port
A connection to a server, designated by a number such as 8080. Helix
Server uses different ports for the RTSP, HTTP, and PNA protocols.
preroll
Buffering that occurs just before a clip plays back. Preroll should be no
more than 15 seconds.
presentation
A group of clips coordinated through SMIL and streamed from Helix
Server to RealPlayer.
R
Ram file
A text file that uses the file extension .ram or .rpm . It launches RealPlayer
and gives it the URL to a streaming clip or presentation.
RDT
RealNetworks Data Transport. The proprietary data package Helix Server
uses (along with RTSP) when communicating with RealPlayer. Contrast
to RTP.
RealAudio
A clip type for streaming audio over a network. RealAudio clips use the .ra
or .rm extension.
RealPix
A clip type (file extension .rp ) for streaming still images over a network.
RealPix uses a markup language for creating special effects such as fades
and zooms.
380
Glossary
RealPlayer
The RealNetworks desktop software for playing RealAudio and
RealVideo. RealPlayer combines streaming and digital download
technologies.
RealProducer
A RealNetworks tool for encoding RealAudio and RealVideo clips.
RealText
A clip type (file extension .rt ) for streaming text over a network. It uses a
markup language for formatting text.
real-time
Delivered as it occurs. For example, a live event is streamed across a
network in a real-time broadcast.
RealVideo
A clip type for streaming video over a network. RealVideo clips use the
extension .rm , .rv, or .rmvb .
rebuffering
An undesirable state in which RealPlayer must pause a presentation to
wait for streaming data to arrive. Rebuffering can result from network
conditions, or a poorly produced presentation.
RTP
Real-Time Transport Protocol. The open, standards-based data package
Helix Server uses (along with RTSP) to communicate with RTP-based
clients. Contrast to RDT.
RTSP
Real-Time Streaming Protocol. An open, standards-based control protocol
that Helix Server uses to stream clips to RealPlayer or any RTP-based
client. Contrast to HTTP.
S
server
1. A software application, such as a Web server or Helix Server, that sends
requested data over a network.
2. A computer that runs server software.
SMIL
Synchronized Multimedia Integration Language. A markup language for
specifying how and when each clip plays within a presentation. SMIL files
use the extension .smil .
381
RealProducer 11 User’s Guide
stream
1. To send a media clip over a network so that it begins playing back as
quickly as possible.
2. A flow of a single type of data, measured in Kilobits per second (Kbps).
A RealVideo clip’s soundtrack is one stream, for example.
SureStream
A RealNetworks technology that enables a RealAudio or RealVideo clip to
stream at multiple bit rates.
U
unary tag
An XML tag that includes a closing slash, as in <ref/> .
URL
Uniform Resource Locator. A location description that enables a Web
browser or RealPlayer to receive a clip stored on a Web server or Helix
Server.
382
V
VBR
X
XML
Variable Bit Rate. A type of RealVideo encoding that enables RealPlayer to
play different parts of the video at different bit rates, even though the
video is streamed at a constant rate. Contrast to CBR.
Extensible Markup Language. The parent language for SMIL. XML allows
one to develop flexible, standardized languages for any purpose.
INDEX
A
account-based broadcast
advanced settings, 205
advantages of, 189
archiving, 191
broadcast steps, 190
command-line option, 272
overview, 189
redundant encoders, 191
server
authentication, 191
destination syntax, 362
destinations, 192
ports used, 191
preparation, 190
starting and stopping, 194
statistics, 192
statistics update interval, 206
stream name, 192
URLs, 219
archiving broadcasts, 175
audience file
audience section, 345
audio stream
contexts
defining, 348
examples, 351
less than four, 350
properties, 347
compared to job file, 344
overview, 343
packetizer, 357
interleaving duration, 359
packet size and duration, 358
properties, 358
superblocks, 359
properties
audioMode , 349
avgBitrate , 345
codecFlavor , 348
codecName
for audio, 348
for video, 353
enableLossProtection , 353
encodingComplexity
for audio, 348
for video, 353
encodingType
for audio, 348
for video, 353
maxBitrate , 346
maxFrameRate , 353
maxKeyFrameInterval , 353
maxPacketDuration , 358
maxPacketInterleavingDuration , 358
maxPacketSize , 358
maxStartupLatency , 353
name , 346
presentationType , 349
quality , 354
streamContext , 348
streams section, 346
template location, 153
video stream
bit rate, 356
example, 356
properties, 353
stream encoding types
cbr , 354
overview, 354
vbrBitrate , 355
vbrQuality , 355
vbrUnconstrainedBitrate , 355
vbrUnconstrainedQuality , 355
audiences
383
RealProducer 11 User’s Guide
audio codec selection, 103
categories
discrete multichannel audio, 133
high-bandwidth streaming, 113
lossless audio, 138
low-bandwidth streaming, 106
mobile devices, 117
quality-based downloads, 125
stereo surround audio, 129
variable bit rate downloads, 120
CBR or VBR selection, 158
changing audio codecs, 160
choosing between, 105
constant vs. variable rates, 18
default settings, 101
editing
for active job, 156
for all jobs, 156
in graphical application, 100
job file references, 337
on command line, 280
overview, 18, 103
statistics, 144
template name, 158
video codec selection, 104
video settings, 159
audio
audience file stream properties, 347
cables, 51
DC offset, 52
delay compensation prefilter, 327
digitizing, 52
disabling
in job file, 335
on capture, 282
discrete multichannel audio, 45
dynamics compression, 53
editing programs, 16
equipment quality, 50
frequency equalization, 53
gain
compression, 51
in graphical application, 143
in job file, 326
on command line, 268
input formats, 27
384
input levels, 51
live capture, 90
lossless, 47
monitoring levels, 142
normalization, 52
optimizing, 52
recording tips, 50
resampling quality
in graphical application, 98
in job file, 335
on command line, 282
resampling while broadcasting, 179
sampling width, 51
signal-to-noise ratio, 51
source media, 50
stereo surround, 43
see also RealAudio
audio delay compensation filter, 327
audio gain filter
in graphical application, 143
in job file, 326
on command line, 268
audio mode
in graphical application, 98
in job file, 335
on command line, 281
B
bandwidth
clip characteristics
RealAudio, 36
RealVideo, 57
negotiation, 63
SureStream clips, 63
bandwidth targets, 159
batch encoding
in graphical application, 88
on command line, 262
Betacam video, 71
black-level correction
in graphical application, 97
in job file, 324
on command line, 269
overview, 80
broadcasting
advanced push options, 205
Index
archiving the broadcast stream
on RealProducer, 176
on the server, 176
audio resampling, 179
audio volumes, 51
broadcast quality, 171
encoder redundancy, 174
encoding complexity reduction, 178
forward error correction, 207
frame rate reduction, 179
IP version 6, 169
latency
audio superblocks, 182
configuring
in graphical application, 216
in job file, 338
on command line, 279
encoding latency, 181
expected latency, 180
network latency, 185
overview, 180
presentation tips, 186
RealPlayer latency, 184
server latency, 183
load management, 177
load testing, 177
maximum packet size
in audience file, 358
in command line, 279
in graphical application, 217
metadata resend interval, 206
multiple destinations, 172
network address translation issues, 206
packet resends, 206
reconnection attempts, 205
redundant stream protection, 208
resend listen address, 206
server destination templates, 217
simulated live broadcasts, 171
SMIL files, 170
splitting streams among servers, 173
TCP transport, 169
trial run, 171
UDP transport, 168
URLs, 218
video features to avoid, 179
video startup latency, 169
virtual paths, 176
see also account-based broadcast
see also multicasting
see also password-only broadcast
see also pull broadcast
C
cable shielding, 51
camel case, 296
chipset performance improvements, 30
clip information
editing with RealMedia Editor, 226
in graphical application, 94
in job file, 305
on command line, 266
overriding in events file, 238
RealPlayer display of, 95
codecs
see RealAudio
see RealVideo
command-line application
batch encoding, 262
clip information options, 266
encoding options, 280
filter options, 268
help options, 286
input options, 262
job file
advantages of using, 251
options, 259
logging options, 285
options
-a author, 267
-ac audio capture device ID, 263
-ad audience definitions or files, 280
-ag audio gain filter, 268
-am audio mode, 281
-ap audio capture device port, 263
-arq audio resampling quality, 282
-bl black-level filter, 269
-c copyright, 267
-cj create job file, 259
-cm capture mono audio, 264
-cr rcrop video, 270
-cs capture frame size, 266
385
RealProducer 11 User’s Guide
-d capture duration, 266
-da disable audio, 282
-daw disable audio watchdogs, 269
-de description, 267
-di inverse-telecine and de-interlace fil-
signal trapping, 253
stopping, 253
syntax, 252
temporary directory, 252
usage examples, 288
ters, 269
-dlf disable logging to file, 285
-dls disable logging to screen, 286
-drs destination file roll size, 272
-drt destination file roll time, 272
-dt disable two-pass encoding, 281
-duc disable codec update, 261
-dv disable video, 283
-eco encoding complexity, 284
-h display help, 286
-i input file or directory, 262
-j job file name, 259
-k keywords, 267
-lc logging category, 285
-lm latency mode, 279
-m display detailed help, 287
-mtu maximum packet size, 279
-nf video noise filter, 271
-o output file or directory, 271
-pa print audiences, 287
-pd print device information, 287
-pid process ID file, 286
-ps print servers, 287
-q quiet mode, 286
-r content rating, 268
-rq video resize quality, 284
-rs resize video, 283
-sd server template or file, 277
-si pull server destination, 275
-sp push server destination, 272
-t title, 267
-v print version, 287
-vc video capture device ID, 264
-vco video codec override, 284
-vf video format, 265
-vm video mode, 282
-vp video device port, 265
output and destination options, 271
overview, 251
process IDs, 253
return value, 255
386
D
de-interlace filter, 79
in graphical application, 97
in job file, 322
on command line, 269
overview, 79
destinations
compared to outputs, 19
in graphical application, 89
in job file, 329
multiple servers, 172
on command line, 271
overview, 19
digital rights management, 22
digital video formats, 71
DirectX requirements, 27
discrete multichannel audio
audiences, 133
description, 46
encoding with stereo codecs, 47
file formats available, 46
playback requirements, 47
sound system requirements, 46
supported number of channels, 46
documentation library, 4
duration element syntax, 298
dynamics compression, 53
E
encoding complexity
automatic reduction in broadcasts, 178
in audience file, 348, 353
overriding on command line, 284
overview, 81
error correction, 84
events file
creating, 236
extended clip information, 239
extracting events information, 249
merging through RealMedia Editor, 227
merging with clip, 248
Index
overview, 235
title, author, and copyright, 238
URLs, 236
F
file rolling
in job file, 332
on command line, 272
film-to-video transfer, 78
firewall problems during broadcasts, 207
forward error correction, 207
frame rates
RealVideo, 59
video capture, 72
H
hardware requirements, 29
chipset support, 30
Helix Server, 24
administration guide, 4
Helix Server Administration Guide, 4
HTML pages
opening automatically, 236
opening on mouse click, 241
hyperhreading support, 30
I
image maps
alternate text, 247
creating, 241
duration, 242
extracting map information, 249
hot spots
circular, 244
cropping, 246
image map programs, 246
overlapping, 246
polygonal, 245
rectangular, 243
tips, 246
merging through RealMedia Editor, 227
merging with clip, 248
player actions, 247
URLs, 243
inputs
audio formats accepted, 27
color formats, 28
file
in graphical application, 89
in job file, 311
on command line, 262
live capture
audio on command line, 263
in graphical application, 90
in job file, 313
video on command line, 264
overview, 15
video formats accepted, 27
installation
Linux, 32
Windows, 29, 31
interlaced video, 79
Introduction to Streaming Media, 4
inverse-telecine filter, 78
in grapical application, 97
in job file, 322
on command line, 269
overview, 78
IP addresses
discovery, 276
version 6, 169
J
Javascript, 24
job file
archive files, 331
audience definitions, 344
audiences
combining multiple audiences, 337
importing from audience file, 341
references, 337
section for defining, 340
tips for defining, 341
audio
device ID and port, 314
disabling, 335
filters
delay compensation, 327
gain, 326
overview, 317
broadcast latency, 338
clip information, 305
command line use, 259
creating
387
RealProducer 11 User’s Guide
in graphical application, 85
manually, 302
default settings, 87
destinations, 330
file, 330
server, 333
example, 305
exclusive features, 301
features not in RealProducer Basic, 303
file and path conventions, 312
file rolling, 332
input tag, 310
inputs, 309
capture, 313
examples, 315
file, 311
multiple, 309
single, 309
job manager, 88
job section, 304
media profile, 334
audience references, 337
example, 339
opening in graphical application, 86
outputs
file name conventions, 331
output section, 329
see also job file destinations
overview, 301
parallel inputs
defining, 309
example, 316
properties
audienceRefs , 335
audioCaptureMono , 313
audioDeviceID , 313
audioDevicePort , 313
audioMode , 335
audioResamplingQuality , 335
destinationRollSize , 330
destinationRollTime , 330
disableAudio , 311, 335
disableLoadManagement , 304
disableVideo , 335
duration , 313
enableTwoPass , 304
388
filename , 311, 331
latencyMode , 335
maxPacketDuratin , 336
maxPacketInterleavingDuration , 336
maxPacketSize , 336
name , 331
for captures, 313
for clip information, 306
for inputs, 311
outputHeight , 336
outputWidth , 336
resizeQuality , 336
value , 306
videoDeviceID , 314
videoDevicePort , 314
videoFormat , 314
videoFrameHeight , 314
videoFrameWidth , 314
videoMode , 336
tips for writing, 302
updating syntax from earlier version, 289
video
cropping, 320
device ID and port, 314
disabling, 335
filters
black-level, 324
de-interlace, 322
inverse-telecine, 322
noise reduction, 323
order for using, 318
overview, 317
resizing, 324
mode, 336
resizing
quality, 336
width and height, 320
resizing methods, 319
job manager, 88
jobs
encoding, 141
input for, 89
manager, 88
opening, 86
overview, 17
Index
L
M
latency, see broadcasting
legacy broadcast, 9
Linux installation, 32
logging
category
in graphical application, 154
on command line, 285
disabling on command line, 285
log viewer, 147
preferences, 153
loss protection, 84
lossless audio
audience, 138
codec list, 50
editing restrictions, 49
encoding complexity, 81
encoding modes, 49
input formats, 48
output formats, 48
overview, 47, 48
player and server compatibility, 48
streaming rates, 49
media profile in job file, 334
metafile, 23
monitors, 144
MTU, 185
multicasting
advanced settings, 205
archiving on server, 202
command-line option, 272
multicast addresses, 201
overview, 200
packet time to live (TTL), 209
redundant encoders, 202
server
destination syntax, 362
destinations, 203
password requirement, 201
ports used, 202
preparation, 201
starting and stopping, 205
stream name, 203
URLs, 219
multichannel audio, see discrete multichan-
nel audio
N
namespaces, 295
NAT firewall traversal, 207
O
OpenDML, 73
outputs
compared to destinations, 19
editing, 223
file location preferences, 151
in graphical application, 89
in job file, 329
multiple, 20
multiple broadcast outputs, 172
on command line, 271
overview, 19
P
packet size for broadcasts, 185
packet time to live, 209
password-only broadcast
advanced settings, 205
advantages of, 195
archiving on server, 197
broadcast steps, 195
command-line option, 272
disadvantages of, 195
overview, 194
password requirement, 196
redundant encoders, 197
server
destination, 198
destination syntax, 362
ports used, 197
preparation, 196
starting and stopping, 200
stream name, 198
URLs, 219
preferences
file locations, 151
temporary directory, 153
process ID, 286
pull broadcast
advantages of, 210
broadcasting steps, 211
command-line option, 275
389
RealProducer 11 User’s Guide
disadvantages of, 211
overview, 210
server
destination, 213
destination syntax, 367
preparation, 212
starting and stopping, 215
stream name, 214
URLs, 220
Q
QuickTime input sources, 28
R
.ra extension, 19
.ram extension, 23
Ram file, 23
RealAudio
audio quality and bandwidth, 35
bandwidth characteristics, 36
codec selection in audiences, 160
codecs, 50
codec flavor, 38
discrete multichannel
codec list, 47
overview, 45
high response, 40
lossless, 47
lossy nature, 35
mono music, 40
sampling rates, 38
stereo music, 41
stereo surround
codec list, 45
overview, 43
voice, 39
converting to other formats, 52
editing, 223
file extension, 19
merging clips, 228
RealVideo soundtracks, 57
sound quality, 35
superblocks, 182
with other clips, 37
RealMedia Editor
command-line editor, 230
graphical application, 223
390
preferences, 230
RealNetworks Production Guide, 4
RealPlayer
broadcast video latency, 169
clip information display, 95
extended clip information, 239
RealVideo codec support, 63
related info pane sizing, 237
seeking through image map, 247
RealPlayer Scripting Guide, 4
RealVideo
artifacts
causes of, 60
reducing, 77
bandwidth characteristics, 57
clip dimensions, 73
desktop media, 74
codecs
in graphical application, 99
lossy nature, 59
overriding on command line, 284
RealVideo 10, 62
RealVideo 8, 63
RealVideo 9, 63
color formats for inputs, 28
compressed input, 27
converting to other formats, 27
dimensions
different sizes for different bit rates, 75
portable devices, 74
recommended sizes, 71
editing, 223
encoding complexity, 81
overriding on command line, 284
error correction, 84
file extension, 19
file rolling, 76
filters
black-level correction, 80
de-interlace, 79
inverse-telecine, 78
noise, 77
resize, 77
frame rates
factors that affect, 60
overview, 59
Index
variable nature, 60
keyframe maximum time
benefits of lowering, 83
costs of lowering, 83
overview, 82
merging clips, 228
multiprocessor optimizations, 62
quality factors, 55
quality guide, 71
soundtracks, 57
startup latency, 82
two-pass encoding, 80
variable bit rate encoding, 66
average bit rate, 68
encoding settings, 68
for downloads, 67
for streaming, 67
maximum bit rate, 68
quality, 69
visual clarity
factors that affect, 61
overview, 60
see also video
resize filters, 77
.rm extension, 19
RMEvents utility, 248
extracting map or file information, 249
options, 248
see also events file
see also image maps
.rmvb extension, 19, 66
.rpad extension, 343
.rpjf extension, 301
.rpsd extension, 361
.rv extension, 19
S
multicasts, 203
password-only broadcast, 198
specifying on command line, 277
templates, 217
shielded cables, 51
SLTA, 171
SMIL
broadcasting, 170
overview, 23
statistics, 144
audio bit rate, 146
frames per second, 146
preroll, 146
quality, 146
total bit rate, 145
video bit rate, 145
stereo surround
audiences, 129
codecs, 45
encoding as standard stereo, 44
overview, 43
playback requirements, 44
sources for, 44
supported number of channels, 43
substreams, 65
SureStream
broadcasts
processor load, 167
stream number reduction, 171
downshifting and upshifting, 64
overview, 63
RealAudio codecs, 37
substreams, 65
s-video, 71
T
sampling rates, 38
server destination file
overview, 361
pull broadcast, 367
push server, 362
template location, 153
server destinations
account-based broadcast, 192
editing, 217
TCP transport protocol, 169
Technical support, 4
temporary directory, 153
two-pass encoding
disabling
in graphical application, 99
in job file, 304
on command line, 281
overview, 80
391
RealProducer 11 User’s Guide
U
UDP transport protocol, 168
URLs
broadcasting, 218
events file, 236
in image maps, 243
see also hot spots
V
variable bit rate encoding, 66
VBScript, 24
VHS format, 71
video
audience file stream properties, 353
capture
disk space, 72
file size limit, 73
formats, 27
frame rates, 72
requirements, 72
screen size, 71
color formats, 28
cropping
effect on broadcasts, 179
in graphical application, 96
in job file, 320
on command line, 270
overview, 77
disabling
in graphical application, 99
in job file, 335
on capture, 283
disabling monitors, 144
editing programs, 16
filters
effect on broadcasts, 179
in graphical application, 95
in job file, 317
on command line, 268
frame rate
reduction during broadcasts, 179
setting the maximum, 159
input formats, 27
interlaced, 79
lighting, 71
live capture, 90
minimizing movement, 70
392
mode
in graphical application, 99
in job file, 336
on command line, 282
motion resolution, 70
noise reduction, 77
in graphical application, 97
in job file, 323
on command line, 271
quality factors, 55
recording tips, 70
resize quality
in graphical application, 100
in job file, 336
on command line, 284
resizing
effect on broadcasts, 179
in graphical application, 100
in job file, 319, 324
on command line, 283
overview, 77
source formats, 71
staging shots, 70
s-video, 71
24-bit depth, 71
see also RealVideo
Video for Windows, 27
volume for live broadcasts, 51
W
Windows installation, 29, 31
X
XML
attribute format, 296
camel case values, 296
case-sensitivity, 296, 298
comments, 299
indentation, 299
namespace, 295
quotation marks for values, 297
recommendations, 298
tag format, 296


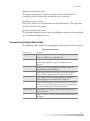


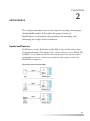
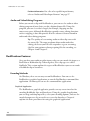
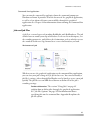
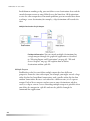
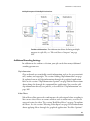


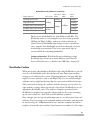
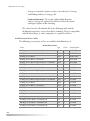

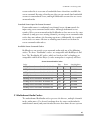


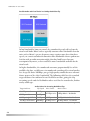
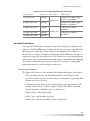


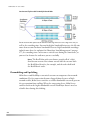
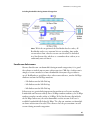
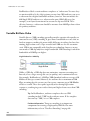
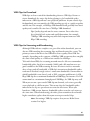


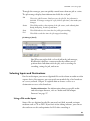
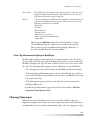
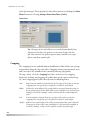


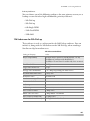
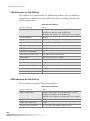

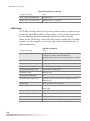
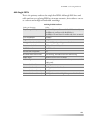
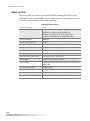

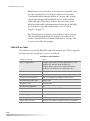
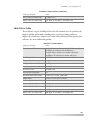
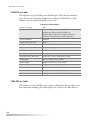
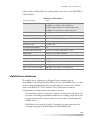
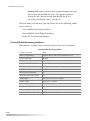

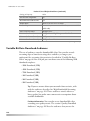
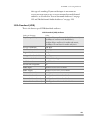
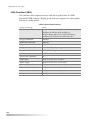
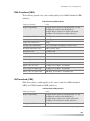

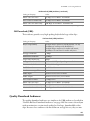
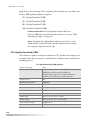
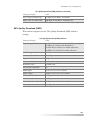
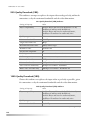

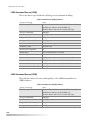

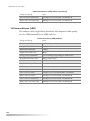
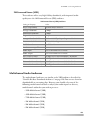
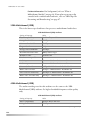
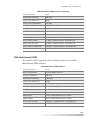
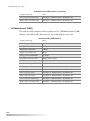


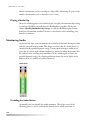
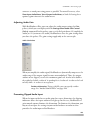
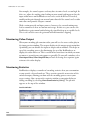


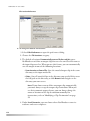

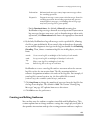

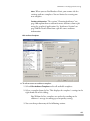
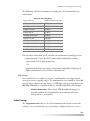


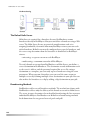


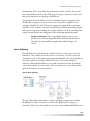
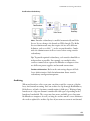
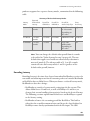
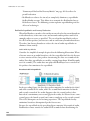


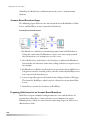


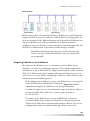

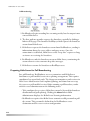

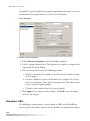


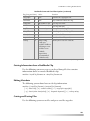


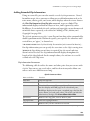
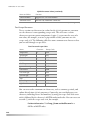
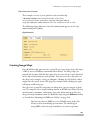
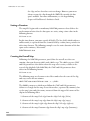

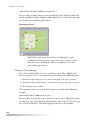
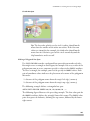
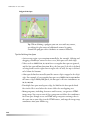


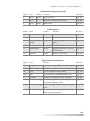
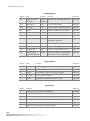


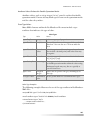


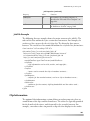
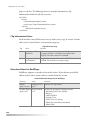

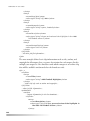
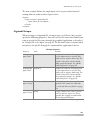
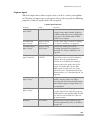
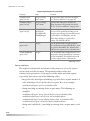

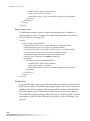


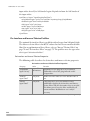
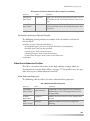
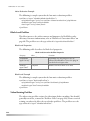
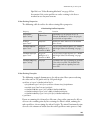
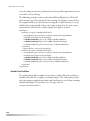
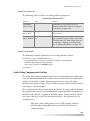
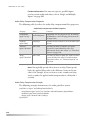
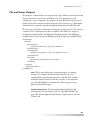

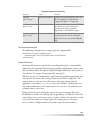

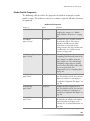
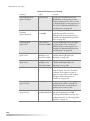
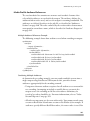


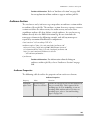
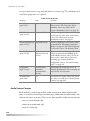

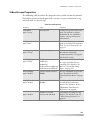

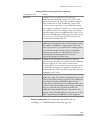
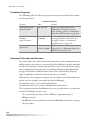

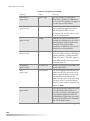
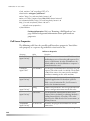

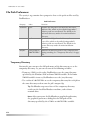
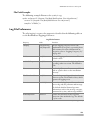
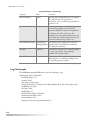
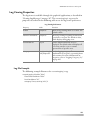


![How to open your Preferences Windows Control Panel [Windows only]](http://vs1.manualzilla.com/store/data/005787188_1-657759d9a2a48c6bde523f6baebed157-150x150.png)