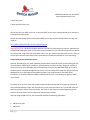
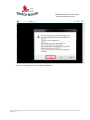
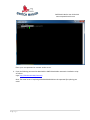
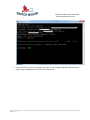
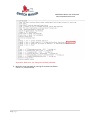
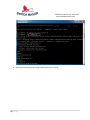
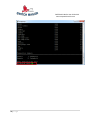
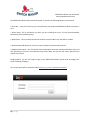
1
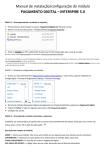
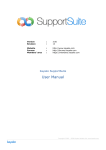
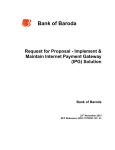
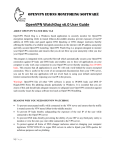
SMTPSwitch Mailer User Guide V4.0
www.smtpswitchmailer.com
How to Install SMTPSwith Mailer on Centos Server/VPS
SMTPSwitch Mailer is a web based email marketing software that runs on a web server or online server.
An online server is either a dedicated server or a virtual server which can be obtained from hosting
providers easily from the internet. SMTPSwitch Mailer performs very well in a Linux VPS or dedicated
servers and since Virtual Private Servers are usually very easy to manage and affordable, we recommend
running the software on a VPS. You can obtain very affordable VPS from various hosting providers as low
as $5 per month. The VPS normally is provisioned with root access which allows you to install any
software on the VPS and port 25 which is required by SMTPSwitch Mailer is usually opened.
Please note that SMTPSwitch Mailer cannot be run on a shared hosting environment because the
required PHP functions are normally disabled in shared hosting platforms and cannot be executed by
the application. Hence, the application will not function properly when run in a shared hosting
environment. You must run the application on a VPS or a dedicated server.
One of the great benefits with a Virtual Private Server (VPS) is that the server is very easy to manage via
a web based user interface. The hosting provider will give you SSH root credentials which you can use to
connect and manage the server. You can for example restart the server MySQL and Apache services
using the SSH root access should you experience any issues with them while the software is running. You
can also reboot the server via the web based interface the hosting provider will provide in case the
server is not responding or down.
You do not need any technical experience to install and use SMTPSwitch Mailer software. If you already
have some basic Linux operating system experience, then you will be able to setup the mailer on your
Linux web server in less than 5 minutes. However, if you do not have any Linux operating system
experience, you can still use SMTPSwitch Mailer software. We do offer free installation service after you
place your order and we also offer some tutorials and guides on how to perform basic Linux operations
related to connecting to the server via an SSH client such as Putty and how to issue some
troubleshooting commands to resolve any issues you might encounter while using the software.
The mailer includes an automatic system check which will attempt to check if your server or VPS meets
all the requirements needed to run SMTP Switch Mailer. This system check script is included in the
installation wizard.
1|Page
SMTPSwitch Mailer User Guide V4.0
www.smtpswitchmailer.com
Selecting a Hosting Provider:
SMTPSwitch Mailer can be installed on any low end dedicated or Virtual private server. If you do not
already have a server to install the mailer, you can visit the following VPS hosting provider’s websites to
check out their offers:
•
•
•
•
•
www.burstnet.net
www.dmehosting.com
www.fortatrust.com
www.shinjiru.com
www.serverpronto.com
Important: We offer a free installation of the mailer after placing your order. However, we only support
Centos operating systems. Hence if you want to install the software on your server free of charge, you
must ensure that you select Centos Operating system when placing the VPS order from the provider
website!
Getting SMTP Servers:
You will need one or more external SMTP servers in order to run SMTPSwitch Mailer for sending your
email campaigns. SMTPSwitch Mailer only supports SMTP relay servers. This means that the SMTP
servers must allow the sending of emails through the SMTP server via the mailer. Hence the mailer
server must be granted access or permission to relay emails to the appropriate destination mail server
using the configured SMTP server. You can add unlimited SMTP servers to SMTPSwitch Mailer which will
be rotated or switched depending on the maximum mailing limit you will configure for each of the SMTP
servers in the application.
For professional and efficient email marketing, we would recommend that you get a SMTP account from
SMTP providers since these SMTP servers are usually fine tuned professionally and efficiently for email
marketing. After you get your SMTP account from one of these SMTP relay service providers, then you
simply add the SMTP account to the mailer.
You can visit the following websites to obtain a SMTP server account:
1. www.socketlabs.com
2. www.smtp2go.com
2|Page
SMTPSwitch Mailer User Guide V4.0
www.smtpswitchmailer.com
3. www.smtp.com
4. www.interspire.smtp.com
You can also use free SMTP servers or a free email SMTP servers such as gmail/hotmail etc if you have a
low subscribers mailing lists.
You will find the settings for these free email SMTP servers that has been tested to work fine with the
mailer at:
http://www.smtpswitchmailer.cc/smtp-popsettings.pdf
Warning/Disclaimer: We do not support spammers and strictly forbid anyone to use this application for
sending unsolicited spam email via free email service providers such as Yahoo/Gmail/Hotmail etc. We do
not recommend using these free email SMTP servers for your email marketing needs as there are a lot
of restrictions and anti-spam policies put in place which will make it unsuitable for email marketing!
Private SMTP Server Installation Service
However, depending on your email marketing needs and the volume of emails you are sending out, the
use of third party SMTP server providers may be expensive since they normally charge per number of
emails sent out. A more affordable alternative will be to have your own dedicated SMTP server which
will allow you to unlimited and high volume emails. Thus, we would recommend that you get a private
dedicated server or VPS and then have SMTP installed. If you need assistance with SMTP server
installation, we do offer professional SMTP installation services for a reasonable price ($29 per SMTP
server install).
Our SMTP server services come with Forward Confirmed Reverse DNS and SPF support to ensure that
your email deliverability is high. You can order for a server from the internet or if you already have one
and then provide us with the SSH root details. The server or VPS must have Centos Operating system
and must be a raw server with no software or control panel installed.
After we setup the SMTP server, we will provide you with the following information:
•
•
SMTP server Host
SMTP Port
3|Page
SMTPSwitch Mailer User Guide V4.0
www.smtpswitchmailer.com
•
SMTP Username and Password for authentication
The price for the SMTP server setup is $29 per server.
To learn more about our SMTP server installation services, please go to:
http://www.bulkmailer.cc/smtp.htm
Automatic Setup Script for SMTPSwitch Mailer
If you do not want us to install the software on your server, or you are experienced with Linux operating
system and want to install the software yourself, you can simply download the mailer software and
install on your server. However, to make the installation process as easy and convenient as possible we
have developed an automatic installation script which automates the setup process. The script is
designed for Centos 5 and above (32 or 64 bits).
System Requirements for Automatic Setup Using the Setup Script
In order to use the automatic setup script, please ensure your web host meets the application
requirements:
• Centos 5 or above (32 or 64 bits)
• Fresh Centos VPS/Server without any installed applications or control panel
Procedures:
1. Sign up for a VPS or dedicated server using any hosting provider. You can see a list of
recommended VPS hosting providers above.
2. Obtain the SSH root credentials from the hosting provider. This will normally be provided in your
welcome email or in the server activation email.
3. Login to the server using a SSH client such as Putty. Connect by using the IP address provided by
the hosting provider and then enter the password provided by the hosting provider.
4|Page
SMTPSwitch Mailer User Guide V4.0
www.smtpswitchmailer.com
Click “Yes” to accept the server hostkey fingerprint.
5|Page
SMTPSwitch Mailer User Guide V4.0
www.smtpswitchmailer.com
Login as “root”
6|Page
SMTPSwitch Mailer User Guide V4.0
www.smtpswitchmailer.com
Enter your root password to connect to the server
4. Enter the following command to download the SMTPSwitch Mailer automatic installation script
as follows:
wget http://XXX.XXX.XXX.XXX/ssmsetup
Note: The actual server IP replacing XXX.XXX.XXX.XXX.XXX can be requested after placing your
order!
7|Page
SMTPSwitch Mailer User Guide V4.0
www.smtpswitchmailer.com
5. Using a text editor, open the ssmsetup script and at line 16, change the MYSQL password for the
mailer setup as highlighted in red in the screenshot below:
8|Page
SMTPSwitch Mailer User Guide V4.0
www.smtpswitchmailer.com
Important: Make sure you change this default password!
6. Make the script executable by running the command as follows:
chmod +x /root/ssmsetup
9|Page
SMTPSwitch Mailer User Guide V4.0
www.smtpswitchmailer.com
7. Run the script as follows:
./ssmsetup
10 | P a g e
SMTPSwitch Mailer User Guide V4.0
www.smtpswitchmailer.com
8. Answer Yes to all prompts by typing y while the script is running:
11 | P a g e
SMTPSwitch Mailer User Guide V4.0
www.smtpswitchmailer.com
12 | P a g e
SMTPSwitch Mailer User Guide V4.0
www.smtpswitchmailer.com
9. Wait for the script to finish. At the end of the installation, you should see output similar to the
one shown below:
13 | P a g e
SMTPSwitch Mailer User Guide V4.0
www.smtpswitchmailer.com
If you encounter any error while the script is running, you can send us screenshots of the error
in order to assist you.
10. Now that the setup is complete, navigate to your server's IP address by using a browser. This will
normally be :
http://your_server_IP/smtpswitchmailer/
11. After some seconds, you should see the system check results as shown below:
14 | P a g e
SMTPSwitch Mailer User Guide V4.0
www.smtpswitchmailer.com
Before the script installation, the system check script will automatically run and check if your server or
VPS meets all the requirements. The system check script will check the following:
1. Checks necessary ports required to be open. The following ports must be opened on the server to
enable the mailer perform the email verification and automated bounced email processing
functions:
•
•
•
•
15 | P a g e
25
465
995
110
SMTPSwitch Mailer User Guide V4.0
www.smtpswitchmailer.com
2. Check ALL required PHP functions to run all features of the mailer (mail sending, SMTP verification,
Automated bounced email processing/auto unsubscribe, Email verification etc)
3. Check for Forward Confirmed Reverse DNS
16 | P a g e
SMTPSwitch Mailer User Guide V4.0
www.smtpswitchmailer.com
The SMTPSwitch Mailer setup wizard will appear. It contains the following fields as shown below:
• Serial No. - Copy the license key you received when you purchased SMTPSwitch Mailer and paste it
here.
• Server Name- This is the domain on which you are installing the script. This will be automatically
detected by the script during setup.
• Admin Email - This is the email that will be used for the super admin user that will be created.
• Admin Password & Password – Here you enter the admin username and password.
• Database Information - You will need to enter the database username, password, database name and
host (localhost) as found in the automatic setup script. Make sure you use the correct password you
used in step 5 above.
Congratulations, you are now ready to login to the SMTPSwitch Mailer control panel and begin your
email marketing campaign!
Your control panel will be accessible under: http://your_server_IP/smtpswitchmailer/
17 | P a g e
SMTPSwitch Mailer User Guide V4.0
www.smtpswitchmailer.com
Setup Video Tour on Centos Based VPS
Alternatively if you prefer to setup the application manually on Centos based VPS, we have prepared a
guided video tour which illustrates how this is done. The video is accessible under:
http://smtpswitchmailer.com/setup/setup.htm
Using a Domain Name for Your SMTPSwitch Mailer Instance:
A typical SMTPSwitch Mailer instance URL setup using this installation guide looks like:
http://XXX.XXX.XXX.XXX.XXX/smtpswitchmailer
Where; XXX.XXX.XXX.XXX is the server/VPS main IP
Using this IP based URL may cause your email campaigns to look suspicious and can cause many email
filters or anti-SPAM filters to block your emails since the unsubscribe links that are inserted
automatically by the application in the emails sent out will contain this IP. A better approach is to map
the IP to a fully qualified domain name such as http://www.domain.com/smtpswitchmailer/
To do this, you need to take the following steps:
1. Ask your VPS/Server provider to create a reverse DNS (rDNS) that will translate the domain you wish
to access the SMTPSwitch Mailer instance to the server IP. Simply provide the server/VPS provider
the domain name and the rDNS will be setup usually within minutes.
2. After the rDNS has been setup, go to your DNS hosting interface to create a “A” record (Address
Record) that will map the domain name to the IP address of the server/VPS. If you do not have your
own DNS hosting, you can signup for a free DNS hosting from any free DNS hosting provider such
as Zonomi
3. Once the above steps has been completed and the DNS has fully propagated, the SMTPSwitch
Mailer instance can now be accessed using the domain name as follows:
http://domain.com/smtpswitchmailer/
18 | P a g e
SMTPSwitch Mailer User Guide V4.0
www.smtpswitchmailer.com
Optimizing Your Server or VPS for SMTPSwitch Mailer:
Modify PHP.ini Settings
In order to optimize SMTPSwitch Mailer, you will need to change the php.ini settings of PHP on your
web server. The php.ini can be accessed on a Centos based Linux server on the path below:
•
/etc/php.ini
We have provided below the recommended high performance settings values for the mailer that should
be used.
•
•
•
•
•
max_execution_time = 3600
max_input_time = 3600
memory_limit = 500M
post_max_size = 20000M
upload_max_filesize = 20000M
Modify my.cnf Settings
•
Increase the Amount of Memory Allocated to MYSQL: In order to increase the amount of memory
available to MySQL, the “Key Buffer” parameter in the MySQL must be set and increased. This is
done by adding a “key_buffer” parameter into your MySQL configuration file (my.cnf). The key
buffer holds the indexes of tables in memory and a bigger key buffer results in faster row lookups.
We usually recommend that you allocate half of your server’s total RAM to MySQL for optimal
performance. For example, if your server has 4GB of RAM total, set the “key_buffer” variable to
“2G” in your MySQL configuration file and restart your MySQL server for the change to take effect.
Example: key_buffer = 2G
•
Increase MySQL Connection Limit: MySQL default configuration sets the maximum simultaneous
connections to 100. However, to improve the software sending speed and performance, it is
recommended to increase this value to a higher value. Please note that setting the value too high
will result in the MySQL server crashing. We recommend using a value of 400-500 depending on
your server available RAM. To set the value, open your MySQL configuration file and set the
“max_connections” variable to the value you need. Once that’s done, restart your MySQL service for
the change to take effect.
Example: max_connections= 400
19 | P a g e
SMTPSwitch Mailer User Guide V4.0
www.smtpswitchmailer.com
•
Increase MySQL Allowed Packets: The MySQL Allowed Packet (max_allowed_packet) settings must
be increased in order for the MySQL server to handle big queries such as when using very large
mailing lists. The default MySQL max_allowed_packet value is 1MB. This value must be increased to
a higher value in order to improve the performance of the software. We recommend a value of
2000MB depending on the size of your mailing lists. Once that’s done, restart your MySQL service
for the change to take effect.
Example: max_allowed_packet = 2000MB
The appropriate parameters have to be added to the my.cnf file in the server. The my.cnf file can
be found on most Linux servers at: /etc/my.cnf. Open this file and append the parameter lines and
values to the file under the [mysqld] section. A sample is shown below:
max_allowed_packet=2000M
key_buffer = 2G
max_connections= 400
Automatic Email Campaign Monitoring
The automatic installation script for SMTPSwitch Mailer will also install a free and open source
automatic process monitoring or scheduling script known as secrond which will be used for proactively
monitoring all email campigns started in the mailer. Note that during the campaign sends, issues such as
Apache/PHP/MySQL service being down, SMTP servers being down or server outrage will cause the
sending to die and this will be logged on the Queue Status with the option to re-try the email campaign.
SMTPSwitch Mailer has the intelligent capability to re-start the campaign from where it stopped initially
before the script died.
The email campaigns status monitoring script will be installed on your server along with the mailer
software which will monitor all the active campaigns every second and will automatically restart any
failed campaign without you having to bother manually clicking the RETRY button in the Queue Status
page. You just need to make sure that the server is up and running and that MYSQL and APACHE are
running and the monitoring software takes care of everything.
You can view the monitoring script logs in the location below in your server:
/var/log/secrond/exec.log
20 | P a g e
SMTPSwitch Mailer User Guide V4.0
www.smtpswitchmailer.com
This script runs every second and you can view all the status of the active campaign processes in the log
file.
However, for this process monitoring script to work, your server must be active and MYSQL/Apache/PHP
must be running. If these have problems or stopped on the server, then the monitoring script cannot do
anything. There is no solution for the problem since no server is 100% uptime. When the server times
out, or Apache goes down or MySQL goes down and an active email campaign is running on the mailer,
it will DIE because the email relays is dependent on these server processes. (Apache, server outrage,
MySQL )
Now you must understand that when the monitoring script detects a failed email campaign and restarts
it, it will take few minutes (1-5) for this information to be refreshed in the Queue Status page. So do not
click the Retry button or delete the failed queue. Everything is being done automatically!
Software Disclaimer:
SMTPSWITCHMAILER IS NOT A TOOL FOR SPAMMING. We do not support spammers and strictly forbid
anyone to use this application for sending unsolicited spam email. By purchasing and using the program,
you agree to use it legally. When using our software, make sure your e-mails are compliant with all
applicable email marketing laws and the CAN-SPAM Act
Getting Support:
Support Center/Tickets: http://www.smtpswitchmailer.com/supportsuite/
Email: [email protected]
You can download the mailer user manual at the following link:
http://www.smtpswitchmailer.com/smtpswitchmailermanual.pdf
21 | P a g e