1
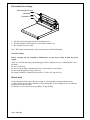
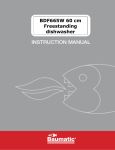
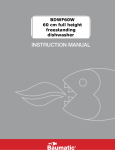
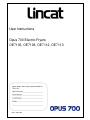
User Instructions
Opus 700 Electric Fryers
OE7105, OE7108, OE7112, OE7113
IS272 ECN3209
Please read the following carefully before using this appliance.
Warnings and Precautions
Please ensure that all commissioning checks and initial start-up procedures have taken place.
This manual should be kept in a safe and accessible place for future reference.
This appliance is designed for professional use and must only be operated by qualified
personnel.
It is mandatory that all appliances are installed, commissioned and serviced by a qualified
and competent person as defined by the regulations in force in the country of installation.
Failure to comply will invalidate the warranty.
Please ensure that the appliance is serviced regularly by a competent catering equipment
engineer.
WARNING
!
!
!
!
!
!
!
!
!
!
!
!
!
!
Do not move this appliance when the tank contains oil.
Hot oil can cause severe burns. Avoid direct physical contact.
Always drain food before frying.
Never put water into the oil, as this will cause splashing and possible overflow of the tank.
Never put anything other than food into the oil.
Disconnect the unit from the electricity supply before servicing or undertaking any
electrical maintenance.
Parts of this unit may become hot in normal use, therefore suitable precautions must be
taken to avoid accidental contact.
Never leave the unit unsupervised whilst frying.
If the unit should begin to smoke, switch off immediately.
In the event of a fire occurring, water should not be used to extinguish it. It is advisable to
install a fire extinguisher and have a fire blanket within reach of the fryer.
Do not overfill the tank with oil.
Maintain the oil level above the minimum mark to avoid fire risk.
Before switching on the appliance please ensure that the tank is filled with oil to the
specified capacity as indicated in the table overleaf.
Model No. Capacity
OE7112
16 Litres
OE7113 2 x 16 Litres
OE7105 2 x 8 Litres
OE7108
35 Litres
IS272 ECN3209
Filling with oil
1. Remove the dust cover and locate it behind the wire basket support at the rear of the tanks.
2. Check that the drain taps are closed in the safe locked position (see “Cleaning the tanks”).
3. Fill the tank of the fryer to the higher of the two level marks on the rear tank wall. See chart
above for capacity of oil to reach midway between the minimum and maximum level marks.
Orange element On indicator
Green power On indicator
Tank thermostat control
RH/LH Tank Green power on indicator
RH/LH Tank Orange element On indicator
RH/LH Tank thermostat control
OE7112 CONTROL PANEL
OE7113 CONTROL PANEL
Green power On indicator
Tank thermostat control
Green power On indicator
RH/LH Tank Orange element On indicator
RH/LH Tank thermostat control
OE7105 CONTROL PANEL
RH/LH Element Orange element On indicator
OE7108 CONTROL PANEL
Control Panel Layouts
IS272 ECN3209
Operation
Warning
Always check that there is oil in the tank before switching on the appliance.
1. Turn on the power supply at the isolating switch and turn the thermostat control knobs to the
required temperature setting.
2. The green neon will light indicating that mains power is on, and amber neons will light
indicating that the heating elements are energised.
3. When the oil in a tank reaches the selected temperature, its associated amber neon will go out.
Should a tank fail to heat when its neon is illuminated, the high temperature cut-out may require
resetting. These cut-outs are located in the rear panel of the unit, accessed through the door under
the fyer tank.
Press the exposed button to reset the cut-out.
Should the appliance still fail to operate, consult a qualified electrical engineer.
Cleaning
Before carrying out any cleaning of your fryer, disconnect it from the power supply.
Oil condition
To maintain the condition of the oil it is recommended that it is filtered after every service period.
Do not allow the oil to fall below the low level mark to avoid the risk of fire. Oil should be replaced
when it becomes dark brown in colour and should be disposed of according to local authority
regulations.
Old oil has a reduced flash point and is more prone to surge boiling.
Warning
Always allow oil to cool to a maximum 55ºC before draining. Always drain the unit before
cleaning or servicing.
Draining the Oil
1. Turn the unit off and isolate from the power supply.
2. Allow the oil to cool to a maximum of 55°C.
3. Screw the drain elbow onto the drain tap and place a suitable container under the outlet of the
drain elbow.
4. Open the tap and allow the oil to drain.
5. Close the tap to the safe locked position (see diagram below)
6. Unscrew the drain elbow.
IS272 ECN3209
Using the drain tap
Drain tap
Drain elbow attachment
Depress
Align squares,
press to engage,
turn to open and close.
Turn to Open
Turn to Open
IS272 ECN3209
Cleaning the tanks
Food debris can be a health risk, ensure that food debris is cleaned from the fryer after use.
Element latch release button
DETAIL A
A
The elements can be raised out of the tank to allow easy access for debris removal and cleaning.
Both elements lift simultaneously using the lifting hook provided. As the elements are raised to the
parked position, a safety switch fitted to the element mounting plate at the rear of the fryer
disconnects the power supply. The elements are reconnected to the power supply as they are
returned to the operating position. This is an additional safeguard and the unit must still be turned
off and isolated from the power supply.
1. Turn the unit off and isolate from the power supply, then remove the wire basket support and
element cover in that order. See section “Disassembly for cleaning” instructions.
2. Raise both elements out of the tank by lifting upward; using the element lifting hook located
onto the element support wires.
3. When fully raised, the elements will automatically latch in the upright parked position.
4. Remove any debris from the bottom of the tank.
5. Wash the tanks, top surface of the fryer body, basket support and cover plate with a warm
detergent solution.
6. Clean through the drain taps using a suitable brush.
7. Rinse out the tanks and drain taps, drying all areas thoroughly and flush through with a small
quantity of cooking oil to remove any traces of water.
8. Remove and wash the drain elbow.
9. Close the drain taps into the safe locked position (see “Draining the oil”).
10. To lower the elements back into the tanks; Lift the element slightly using the element lifting
hook located onto the element support wire, and then depress the latch button located on the
hobtop. Carefully lower the elements into the tank.
11. Replace the element cover, basket support in that order.
12. If it is not intended to refill the unit immediately, apply a thin layer of cooking oil to the inside
of the tanks for protection against corrosion.
IS272 ECN3209
Disassembly for cleaning
WIRE BASKET SUPPORT
FASTENER
ELEMENT COVER
1. Lift the wire basket support from the mounting bosses.
2. Turn the fasteners anti-clockwise to release the element cover.
3. Re-assemble in reverse order.
Note: The baskets and drain tube can be cleaned using a suitable dishwasher.
General cleaning
Before carrying out any cleaning or maintenance on your fryer, isolate it from the power
supply.
After use, clean the unit using a warm detergent solution, taking care not to contaminate the oil in
the tanks.
Do not use abrasives.
Do not use any products containing chlorine to clean stainless steel surfaces.
Do not clean the appliance using a water jet.
In extreme conditions a branded cleaner such as “Carbon off” may be used.
Basket loads
Overloading the basket reduces the fryer output of cooked product and will result in uneven
cooking. It also increases the possibility of surge boiling (the oil may suddenly boil over when the
basket is placed into the tank).
Food that is over-wet increases the possibility of surge boiling.
IS272 ECN3209