1
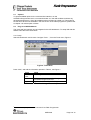
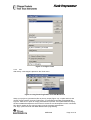
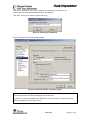
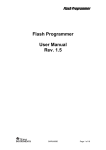
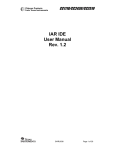
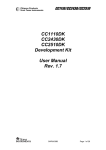
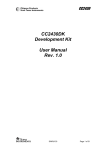
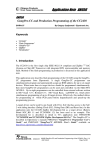
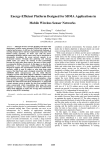
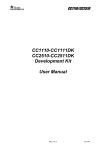
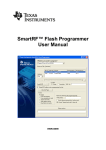
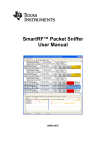
Flash Programmer
Flash Programmer
User Manual
Rev. 1.1
SWRU069
Page 1 of 12
Flash Programmer
Table of contents
1
2
3
4
4.1
INTRODUCTION ......................................................................................................................3
ABOUT THIS MANUAL ..........................................................................................................3
DEFINITIONS............................................................................................................................3
PROGRAMMING USING THE GUI VERSION ...................................................................4
SYSTEM ON CHIP. ..........................................................................................................................5
4.1.1
4.1.2
4.1.3
4.1.4
4.2.1
4.2.2
Device list: ............................................................................................................................................................................ 5
Actions: ................................................................................................................................................................................. 5
Flash lock:............................................................................................................................................................................. 6
IEEE address / general change field:................................................................................................................................... 6
USB MCU FIRMWARE UPDATE. ....................................................................................................8
Updating SmartRF04EB USB MCU firmware..................................................................................................................... 8
Updating CC2430DB USB MCU firmware.......................................................................................................................... 8
5
5.1
5.2
COMMAND LINE INTERFACE.............................................................................................9
OPTIONS ........................................................................................................................................9
PLUG-IN TO IAR WORKBENCH ......................................................................................................9
5.2.1
5.2.2
Setup ...................................................................................................................................................................................... 9
Use....................................................................................................................................................................................... 10
6
DOCUMENT HISTORY .........................................................................................................12
4.2
SWRU069
Page 2 of 12
Flash Programmer
1
Introduction
This is the user manual for the Chipcon Flash Programmer.
The Flash Programmer is used to program the flash memory in Chipcon’s system on chip
MCU’s.
It is also used for upgrading the firmware in the USB MCU found on the SmartRF04EB and
CC2430DB.
When connecting a CC2430 the Flash Programmer also support reading/writing the IEEE
address.
2
About this manual
This manual covers the use of the Flash programmer, both the GUI version and the command
line interface.
The intended use of the Flash Programmer is to provide a quick and easy way to download
.hex files into Chipcon’s system on chip products. As well as the possibility to update the USB
MCU firmware through the USB cable.
The manual describes the most common functions and options available.
How to access the flash programmer from IAR workbench is also described.
Only programming through the USB cable is described. The Flash Programmer also has
functionality to program the USB MCU found on SmartRF04EB and CC2430DB through the
Silicon Laboratories serial adapter EC2, however this is not covered in this manual.
3
Definitions
SmartRF®04DK
USB MCU
Factory firmware
GUI
A collective term used for all development kits for the
SmartRF®04 platform, i.e. CC2510DK and CC2430ZDK Pro
The Silicon Labs C8051F320 MCU used to provide a USB
interface on the SmartRF®04EB and CC2430DB
The firmware that is supplied programmed into the USB MCU
from the factory. This firmware supports SmartRF® Studio
operation as well as a stand-alone PER tester.
Graphical User Interface
SWRU069
Page 3 of 12
Flash Programmer
4
Programming using the GUI version
System on Chip
tab. Used to
program
Chipcon’s SoC
Chapter 4.1
EB application
(USB)
Used to update the
USB MCU firmware
Chapter 4.2
Program USB MCU using
Silicon Laboratories serial
adapter EC2.
Not covered in this
manual
Figure 1: GUI interface
Figure 1 show the GUI interface of the Flash Programmer. There is four different tab’s to
choose from.
“System on Chip” is used to program Chipcons SOC’s e.g. CC2430, CC2510. The use of this
tab is described in chapter 4.1.
“EB application (USB)” is used when updating the USB MCU found on SmartRF04EB and
CC2430DB. The use of this tab is described in chapter 4.2.
SWRU069
Page 4 of 12
Flash Programmer
4.1
System on Chip.
Device list
Chapter 4.1.1
IEEE address
(only CC2430)
Chapter 4.1.4
Actions
Chapter 4.1.2
Flash lock
Chapter 4.1.3
Figure 2: System on Chip window
4.1.1
Device list:
The device list is a list over all currently connected System on Chip devices. Note that when
the System on Chip tab is selected, a SmartRF04EB’s without a System on Chip EM
connected will not be displayed.
If more than one chip is connected the one selected (marked blue) in this window is the one
that will be programmed.
4.1.2
Actions:
There are five different actions that can be performed on the Chipcon SoC’s. To perform an
action, select one and then press the “Perform actions” button.
The progress bar and output window at the bottom will output the progress and result of the
action.
The five actions are:
Erase and program
Will erase the flash memory of the selected SoC and then program it with the .hex file
selected in the “Flash image” field.
Erase, program and verify
Same as “Erase and program”, but after the programming the content of the flash will be
read back and compared with the .hex file. This will detect errors during programming or
errors caused by damaged flash. It is therefore recommended to always verify after
programming.
SWRU069
Page 5 of 12
Flash Programmer
Append and verify
This action will write the contents of the hex file given in the “Flash image” field, to the
selected SoC without erasing the Flash first. Note that all the Flash written to must read
0xFF (be erased) before programming starts. Feature is useful when a program is
divided into more that one hex file.
This action uses debug commands to read from the Flash, which means that if the
debug commands are blocked on the chip, it is impossible to perform this action.
Verify against hex-file
This action will compare the contents of the Flash with a .hex file given in the “Flash
image” field.
Note that the function only verifies that the contents of the .hex file is present in the
Flash, it does not check if there is anything additional written in the Flash.
This action uses debug commands to read from the Flash, which means that if the
debug commands are blocked on the chip, it is impossible to perform this action.
Read into hex-file
This action will read the entire content of the Flash and then write it to the hex-file given
in the “Flash image” field.
Note that the hex-file given in the “Flash image” field will be overwritten.
This action uses debug commands to read from the Flash, which means that if the
debug commands are blocked on the chip, it is impossible to perform this action.
4.1.3
Flash lock:
When programming a chip it is possible to apply the different Flash lock and debug command
lock that is supported by the chip. These fields will change depending on the chip type
selected in the Device list. Please refer to the datasheet for the different chip types for a
description of these locks.
Note that if the debug command lock is set, it is impossible to use most of the debug
commands on the chip. E.g. the Flash may no longer be read out.
4.1.4
IEEE address / general change field:
Depending of the chip connected these fields will change.
Figure 3: IEEE address for Zigbee SoC
Figure 4: Change field for non Zigbee SoC
If a ZigBee SoC is connected e.g. CC2430, the window will look like Figure 3
If a non ZigBee SoC is connected e.g. CC2510, the window will look like Figure 4
IEEE address on ZigBee devices
On a CC2430 the IEEE address is stored in the last 8 bytes of the flash. E.g. the
placement is different depending on the size of the Flash. See Table 1 below.
SWRU069
Page 6 of 12
Flash Programmer
Chip type
CC2430 F-128
CC2430 F-64
CC2430 F-32
IEEE address
start
0x1FFF8
0xFFF8
0x7FF8
IEEE address
end
0x1FFFF
0xFFFF
0x7FFF
Table 1: Placement of IEEE address
To read the IEEE address from a chip select the appropriate Chip type (e.g. F-128) and
push the “Read IEEE” button.
To write the IEEE address to a chip, manually write the address into the IEEE field
(hexadecimal, with a space between each byte) and then push the “Write IEEE
address” button.
Note that the address can only be written if the address area is erased e.g. all eight
bytes in the flash that are to be written to are either 0xFF or already has the correct
value.
If not a flash erase must first be done, e.g. via the “Erase, program and verify” action.
Writing the IEEE address will also fail if the flash is write-protected, or the debug
command lock is set.
If the “Retain IEEE address when reprogramming the chip” is checked the IEEE
address is preserved when a new program is written to the chip with the “Erase and
program” or “Erase, program and verify” action. This is however not possible if the
debug command lock is set on the chip before the programming starts.
Change Field on non ZigBee devices
The intention of this field is to provide an easy and quick way to give a unique address
to the chip when programming it. It gives the user the possibility to change any number
of bytes at any location in the program read from the hex file, before it is written to the
chip.
When “Change” is checked, input the start address, e.g. the first byte that should be
changed into the first field.
Then the new values are written into the rightmost field (hexadecimal, with a space
between each byte)
When “Erase and program” or “Erase, program and verify” action is performed, the
bytes at the given address from the hex file are replaced with those written by the user
before the chip is programmed. The hex file itself is not changed.
SWRU069
Page 7 of 12
Flash Programmer
4.2
USB MCU firmware update.
Firmware
revision
number
Figure 5: USB MCU update
Figure 5 show the “EB application (USB)” tab. It provides the possibility to update the USB
MCU firmware using only a USB cable, no additional programmer is necessary. When a
SmartRF04EB or CC2430DB is connected it will appear in the device list. In the rightmost
column the revision number of the current firmware can be read.
Note that the update procedure is different for SmartRF04EB and CC2430DB. However the
hex file used, (fw400.hex), is identical for the two products.
4.2.1
Updating SmartRF04EB USB MCU firmware
1. Remove any CCxxxxEM module and all external equipment connected to the
SmartRF04EB.
2. Connect the USB cable to the SmartRF04EB and turn it on, it should appear in the
Device list with “Chip type” N/A.
3. Browse to the correct flash image (fw400.hex)
4. Choose the “Erase, program and verify”
5. Push “Perform actions”.
6. The status indicator at the bottom will show the progress and when completed the
text “EB firmware update OK” will appear.
4.2.2
Updating CC2430DB USB MCU firmware
1. Connect pin 4 and 20 on P6 (I/O A) together.
2. Connect pin 9 and 10 on P4 (USB deb) together.
3. Connect the USB cable to the SmartRF04EB and turn it on, it should appear in the
Device list with “Chip type”, “EB type” and “EB firmware ID” set to N/A.
4. Browse to the correct flash image (fw400.hex)
5. Choose the “Erase, program and verify”
6. Push “Perform actions”.
7. The status indicator at the bottom will show the progress and when completed the
text “EB firmware update OK” will appear.
SWRU069
Page 8 of 12
Flash Programmer
5
5.1
Command Line Interface
Options
To get all available options in the command line interface, run the
SmartRF04ProgConsole.exe in a command window or in the IAR workbench without any
parameters/arguments. A list of all available options will then be printed out. These options
are the same as the ones available in the GUI version of the Flash programmer, please refer
to chapter 4 for a description of these.
5.2
Plug-in to IAR Workbench
The command line interface can be integrated in the IAR Workbench. To setup IAR with this
feature follow the instructions below.
5.2.1 Setup
Start IAR Workbench and choose “Configure Tools…”, from the Tools menu, Figure 6.
Figure 6: Tools Menu
Press “New”, and add the information present in Table 2, see Figure 7.
Field
Menu
Text:
Command:
Argument:
Value
FlashProgram
C:\Program Files\Chipcon\FlashProg\
SmartRF04ProgConsole.exe1
S() EPV F=$TARGET_PATH$ K(0)
Table 2: Flash Programmer Setup
1
Insert the complete path to the Command Line Flash Programmer
SWRU069
Page 9 of 12
Flash Programmer
Figure 7: Configure Tools
5.2.2
Use
After setup, a new target is placed on the Tools menu.
Figure 8: Using Flash Programmer from IAR Workbench
Setup your project to generate hex file as primary output (Figure 10), compile and link, and
choose “Flash Program” from the Tools menu. A command line window will be displayed,
Figure 9. After the “S” option an empty parenthesize is present. If this parenthesize is empty,
the first available development card is used. If more than one development card is connected,
fill in the ID number for the card you want to use in the empty parenthesize.
The “K(0)” option will retain the IEEE address while programming.
SWRU069
Page 10 of 12
Flash Programmer
Use K(0) on CC2430 F-128, K(1) on CC2430 F-64 and K(2) on CC2430 F-32
If the K option is removed the IEEE address is not retained.
The “EPV” option is for “Erase, program and verify”
Figure 9: Command Line Window
Press OK and the hex file will be downloaded.
Figure 10: Generate HEX file as primary output
Note:
If the output format is hex file the debugger can not be used.
To produce a hex file for banked code, please see the manual named “Chipcon IAR User
Manual” available from www.chipcon.com.
SWRU069
Page 11 of 12
Flash Programmer
6
Document history
Revision
1.1
1.0
Date
2006-02-16
2005-12-21
Description/Changes
Changed layout
Initial release
SWRU069
Page 12 of 12