1
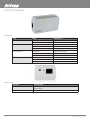
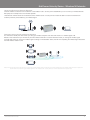
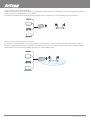
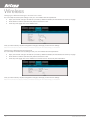
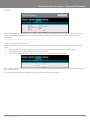
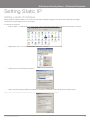
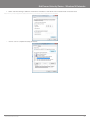
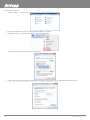
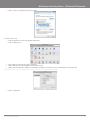
NETCOMM VELOCITY™ SERIES Wireless N Extender USER GUIDE Table of Contents About the NP124........................................................................................................................................................................................4 Minimum System Requirements........................................................................................................................................................................................5 Package Contents............................................................................................................................................................................................................5 Safety Precautions............................................................................................................................................................................................................5 Device Overview................................................................................................................................................................................................................6 Front Panel........................................................................................................................................................................................ 6 Bottom Panel.................................................................................................................................................................................... 6 Setting up the NP124���������������������������������������������������������������������������������������������������������������������������������������������������������������������������������8 Using the NP124 as a Wireless Access Point.................................................................................................................................... 8 To setup the NP124 as a Wireless Access Point................................................................................................................................ 8 Placement when used as a Wireless Access Point ...........................................................................................................................9 Configuring the NP124....................................................................................................................................................................................................10 Using the NP124 as a Wireless Repeater........................................................................................................................................ 11 Placement when used as a Wireless Repeater.................................................................................................................................11 Using the NP124 as a Wireless Bridge............................................................................................................................................ 12 Placement when used as a Wireless Bridge....................................................................................................................................12 Wireless����������������������������������������������������������������������������������������������������������������������������������������������������������������������������������������������������14 Changing the Wireless Settings in Access Point mode.................................................................................................................... 14 Changing the Wireless Security Settings......................................................................................................................................... 14 WPS...............................................................................................................................................................................................................................15 Configuring Wireless MAC Filtering.................................................................................................................................................. 15 Home Page�����������������������������������������������������������������������������������������������������������������������������������������������������������������������������������������������17 The NP124 Home Page...................................................................................................................................................................17 To view the NP124 Home Page....................................................................................................................................................... 17 System management�������������������������������������������������������������������������������������������������������������������������������������������������������������������������������19 Information......................................................................................................................................................................................................................19 Local...............................................................................................................................................................................................................................20 Firmware.........................................................................................................................................................................................................................20 Settings...........................................................................................................................................................................................................................21 Reboot............................................................................................................................................................................................................................21 Password........................................................................................................................................................................................................................21 Setting Static IP����������������������������������������������������������������������������������������������������������������������������������������������������������������������������������������23 Setting a static IP Address..............................................................................................................................................................................................23 For Windows 2000/XP....................................................................................................................................................................................................23 For Windows Vista-32/64................................................................................................................................................................................................24 For Windows 7-32/64.....................................................................................................................................................................................................26 For Mac OSX 10.6..........................................................................................................................................................................................................27 Product Warranty............................................................................................................................................................................................................29 Technical Support...........................................................................................................................................................................................................29 Wireless N Extender User Guide 2 YML124 www.netcomm.com.au About the NP124 About the NP124 The NP124 Wireless N Extender supports the wireless 802.11b/g/n standards with one 10/100Base-T Ethernet port. The Wireless N Extender is the perfect product to combat weak wireless signals in the home or office. With its triple functionality, the NP124 is the perfect product to give users a massive wireless boost. The NP124 can be used as a Wireless Access Point, Wireless Repeater or a Wireless Bridge. If you have an existing Internet connection but no wireless or older Wireless G, then the NP124 can connect directly into your modem/ router and act as a wireless N access point. When in access point mode the NP124 connects into your modem/router by Ethernet cable and makes available a high speed wireless signal that multiple users can connect to. If you have an existing wireless network that cannot service all areas, the NP124 will work as a wireless repeater. Simply plug the device into a convenient location, it will pick up the existing weak wireless signal and redistribute a strong wireless signal for users to connect to. No more non-existent, unstable or inconsistent wireless signals in the upstairs bedrooms, living rooms at the end of the house or the far corner office. If you have a specific product, like an Internet enabled TV or gaming console that you want a wired connection to, then use the NP124 in wireless bridge mode. The NP124 is designed to connect directly into the wall and its tidy housing makes it an unobtrusive fixture in any home or office. Also featuring a WPS button and advanced wireless security options, the NP124 is an ideal solution for enabling wireless connectivity throughout your entire home or office. The NP124 supports 64/128-bit WEP, WIFI Protected Access (WPA), and the latest WPA2 encryption via the TKIP and AES algorithm to protect your wireless network from unauthorized access. MAC Address Filtering for wireless clients also provides an additional layer of security for your wireless network. The NP124 comes with 1 x 10/100M Auto MDI/MDIx Ethernet port that can be used to connect to an existing wired network to serve as a wireless access point or wireless bridge. It can also be used to upgrade the firmware or configure the device via its web-based configuration page when connected to a computer. Wireless N Extender User Guide 4 YML124 www.netcomm.com.au NetComm Velocity Series - Wireless N Extender Minimum System Requirements Your computer must meet the following minimum requirements: • Any operating system can be used • Web Browser • 233MHz processor • Ethernet (or Wireless) network adapter Package Contents The package contents are listed below: • NP124 • Ethernet cable • Printed QSG If there are any items missing, please contact NetComm immediately. Safety Precautions • Do not open, service, or change any component. • Only qualified technical specialists are allowed to service the equipment. • Observe safety precautions to avoid electric shock YML124 www.netcomm.com.au Wireless N Extender User Guide 5 Device Overview Front Panel LED STATE DESCRIPTION POWER LED Solid Green Device is powered ON Off Device is powered OFF Solid Green Ethernet device is connected Blinking Green Indicates LAN activity Off No Ethernet device connected Solid Green Wireless interface is UP Blinking Green Indicates wireless activity Off Wireless interface is DOWN Solid Green WPS association is successful Blinking Green WPS authentication is on going Off WPS disabled ETHERNET LED WIRELESS LED WPS LED and BUTTON Bottom Panel FEATURE DESCRIPTION RESET Press the Reset button for 5 seconds to restore the NP124 to factory default settings ETHERNET PORT Connect to computers/Ethernet devices Wireless N Extender User Guide 6 YML124 www.netcomm.com.au How to configure WEP/WPA-PSK/WPA2-PSK Set up Wireless Security Setting up the NP124 Setting up the NP124 is easy. Follow the steps below to connect the device to your existing modem-router / wireless router or access point. Using the NP124 as a Wireless Access Point You can use the NP124 as a wireless access point to turn a regular modem-router into a wireless capable networking device. Connect an Ethernet cable from any available Ethernet LAN port on the modem-router to the NP124. The NP124 will then serve as a wireless interface for your wireless-enabled devices such as computers and smartphones to enable them to connect to the Internet via your existing modem-router. To setup the NP124 as a Wireless Access Point Connect an Ethernet cable from an available port in your modem-router and connect the other end of the Ethernet cable to the Ethernet port of the NP124. Please note: B y default, no extra configuration is needed for the NP124 to be used as a wireless access point. Connect an Ethernet cable from your existing modem-router to the NP124 and you should be able to access the Internet wirelessly. For a Wireless Connection • You can find the default SSID and wireless security information on the sticker located on the back of the NP124. Once a connection to the NP124 is established, your computer will receive an IP address and you can then start configuring the NP124 using the web based configuration pages. If you have already made configuration changes on the NP124, you can clear these settings by holding the reset button beside the Ethernet port in for 5 seconds to restore the device to its factory default configuration. You will then need to refer to the sticker on the back of the NP124 for the default SSID and password in order to connect your wireless devices. Alternatively, you can manually configure the access point settings as required for your wireless network. Wireless N Extender User Guide 8 YML124 www.netcomm.com.au NetComm Velocity Series - Wireless N Extender Placement when used as a Wireless Access Point You will need to connect the NP124 directly to the modem that is supplying your Internet. For this reason, the placement of the NP124 will be bound by the position of your modem YML124 www.netcomm.com.au Wireless N Extender User Guide 9 Configuring the NP124 NOTE: For use as a wireless repeater or wireless bridge, you will have to enter the web user interface and enter a small amount of information about your existing wireless network. Before you access the web user interface, connect the NP124 to your computer • Connect the NP124 to a power outlet. • Connect the Ethernet cable from your computer to the NP124 To access the web based configuration, complete the following steps: • Open your browser and type 192.168.20.1 (the factory default IP address) into the address bar at the top of page. • Enter admin for both the username and password and click on OK. • Click on Quick Setup at the top of the web page. Please note: If you are connecting the NP124 to a hidden wireless network, you will need to enter the information from your existing wireless router / access point manually. • Choose the applicable operation mode from the drop-down box (Steps for each mode are listed below). • If you selected either Repeater or Wireless Bridge mode, click the Site Survey button to show the list of available wireless networks. • Click the Connect button located on the right side of the Wireless network you want to connect to. • Enter the wireless network key / passphrase. • Click the Apply button to save the settings. Wireless N Extender User Guide 10 YML124 www.netcomm.com.au NetComm Velocity Series - Wireless N Extender Using the NP124 as a Wireless Repeater Once the wireless connection from the NP124 to the wireless router / access point is established you can connect your wireless devices like laptops and smartphones to the wireless repeater. These devices will then obtain an IP address from the wireless router / access point and should be able to access the Internet from locations previously unreachable by your wireless signal. Placement when used as a Wireless Repeater You will need to identify the areas where you have good wireless reception and areas with weak or no wireless signal at all. Based on this assessment you will need to place the wireless extender in a location between where you have good wireless signal coverage and where you have poor wireless signal coverage. In the illustration below, the NP124 is repeating the wireless signal broadcast from the wireless modem-router. Please note: C orrect placement of the NP124 is crucial to get the best possible results for extending your existing wireless signal. The wireless extender should be placed in a location where it can receive a good wireless signal from the wireless router / access point so as to avoid disconnection and packet loss. YML124 www.netcomm.com.au Wireless N Extender User Guide 11 Using the NP124 as a Wireless Bridge Connect wired devices to your wireless network by connecting an Ethernet cable from a wired device, such as a computer, game console or Internet-ready TV, to the Ethernet port of the NP124. These devices will then obtain an IP address from the wireless router / access point and should be able to access the Internet. Placement when used as a Wireless Bridge You will need to connect the NP124 into a power outlet near the device that you want to connect to the Internet by Ethernet cable. For this reason, the placement is bound by the position of the device you want to connect. Note however, that the NP124 will need to be in a position where it can receive a strong wireless signal from your current wireless router. Wireless N Extender User Guide 12 YML124 www.netcomm.com.au Wireless Wireless Changing the Wireless Settings in Access Point mode You can modify the access point settings to suit your own wireless network requirements. • Open your browser and type 192.168.20.1 (the factory default IP address) into the address bar at the top of page. • Enter admin for both the username and password and click on OK. • At the top of the page, click on the Wireless icon. Once you have made any required configuration changes, click Apply to save the new settings. Please note: You will need to re-setup any wirelessly connected devices using the new wireless settings you have selected. Changing the Wireless Security Settings You can modify the wireless security settings to suit your own wireless network requirements. • Open your browser and type 192.168.20.1 (the factory default IP address) into the address bar at the top of page. • Enter admin for both the username and password and click on OK. • At the top of the page, click on the wireless icon and then click on the security link underneath it. Once you have made any required configuration changes, click Apply to save the new settings. Please note: You will need to re-setup any wirelessly connected devices using the new wireless settings you have selected. Wireless N Extender User Guide 14 YML124 www.netcomm.com.au NetComm Velocity Series - Wireless N Extender WPS WPS (or Wifi Protected Setup) makes it easy for wireless clients to connect to the wireless access point. Press the WPS button on the NP124 and then press the WPS button on the wireless client within 2 minutes, and the wireless security authentication will be done automatically. NOTE: The WPS button can only be used when in wireless access point mode Configuring Wireless MAC Filtering Wireless MAC Filtering allows you to select which wireless clients can or cannot have access to the wireless network broadcast by the NP124. • Open your browser and type 192.168.20.1 (the factory default IP address) into the address bar at the top of page. • Enter admin for both the username and password and click on OK • At the top of the page, click on the wireless icon and then click on the MAC filter link underneath it. You can select to Allow or Deny access from the Policy pull down menu and then enter the MAC address of the wireless client you wish to allow or deny access to. Once you have made any required configuration changes, click Apply to save the new settings. YML124 www.netcomm.com.au Wireless N Extender User Guide 15 Home Page NetComm Velocity Series - Wireless N Extender Home Page The NP124 Home Page The Home Page displays current network information about your NP124. To view the NP124 Home Page • Open your browser and type 192.168.20.1 (the factory default IP address) into the address bar at the top of page. • Enter admin for both the username and password and click on OK The AP Client Connection Status displays the Connection status and SSID of the wireless router / access point being extended while the Wireless Client List displays the wireless clients currently connected to the NP124. YML124 www.netcomm.com.au Wireless N Extender User Guide 17 System management NetComm Velocity Series - Wireless N Extender System management The System Management menu is used for administering the device settings and firmware. • Open your browser and type 192.168.20.1 (the factory default IP address) into the address bar at the top of page. • Enter admin for both the username and password and click on OK • At the top of the page, click on the System link. The system management page contains the following items: • Information • Local • Firmware • Settings • Reboot • Password Information The Information page shows the current device information. Below is a list of information shown on this page. LABEL DESCRIPTION Firmware Version Shows the current firmware version running on the NP124. Build Date Shows the current firmware release date. Serial Number Shows the serial number of the NP124. ETH MAC Address Shows the Ethernet interface MAC address. Bridge MAC Address Shows the Wireless Bridge interface MAC address. Wireless MAC Address Shows the wireless interface MAC address. Wireless Status Shows the status of the wireless interface. YML124 www.netcomm.com.au Wireless N Extender User Guide 19 Local This page enables you to change the LAN settings for the NP124. LABEL DESCRIPTION Router IP Address Set the LAN IP address of the NP124. Router Subnet Mask Set the subnet mask for the network the NP124 is connected to. This is usually set to: 255.255.255.0 Please note: T he NP124 will only provide an IP address to your computer / device upon initial setup. Once the NP124 is associated with another wireless router or Access Point, you will be unable to access the web based configuration pages at the IP address specified above without setting a static IP address on your computer or device first. Please see the instructions at the end of this guide for the steps required to do this. Firmware The firmware page allows you to see the current firmware version and build date as well as upgrade the firmware running on the NP124. LABEL DESCRIPTION Firmware Information Shows the current firmware version and build date. Firmware Upgrade Upload a firmware upgrade file to the NP124. Please note: Make sure you connect to the NP124 via an Ethernet cable when upgrading the firmware to avoid corruption during the firmware upgrade procedure. Wireless N Extender User Guide 20 YML124 www.netcomm.com.au NetComm Velocity Series - Wireless N Extender Settings The settings page enables you to backup, restore or reset the current configuration of the NP124. LABEL DESCRIPTION Backup Click the Backup button to save a copy of the current NP124 configuration to your hard drive. Restore Click the browse button and navigate to a previously saved configuration backup. Click the restore button to load these settings into the NP124. Reset Click the Reset button to restore the factory default configuration of the NP124. All previously stored settings are lost. Reboot Reboot enables you to reboot the NP124 to ensure any new settings take effect. LABEL DESCRIPTION Reboot Reboots the device Password The password page enables you to change the password required to access the web based configuration pages. LABEL DESCRIPTION Password Enables you to change the password YML124 www.netcomm.com.au Wireless N Extender User Guide 21 Setting Static IP NetComm Velocity Series - Wireless N Extender Setting Static IP Setting a static IP Address Setting a static IP address enables you to access the web based configuration pages for the NP124 after it has been successfully connected to another wireless router or access point. For Windows 2000/XP 1. Click on “Start” -> “Control Panel” (in Classic View). In the Control Panel; double click on “Network Connections” to continue. 2. Single RIGHT click on “Local Area connection”, then click “Properties”. 3. Double click on “Internet Protocol (TCP/IP)”. 4. Select “Use the following IP address” and enter the IP address 192.168.20.2 and a subnet mask of 255.255.255.0. Please note: If you have changed the IP address of the NP124, you will need to select an appropriate static IP address. YML124 www.netcomm.com.au Wireless N Extender User Guide 23 5. Click on “OK” to complete the setup procedures. For Windows Vista-32/64 1. Click on “Start” -> “Control Panel” -> “Network and Sharing Center”. 2. In the Manage network connections, click on “Manage network connections” to continue. 3. Single RIGHT click on “Local Area connection”, then click “Properties”. 4. The screen will display the information “User Account Control”, click “Continue”. 5. Double click on “Internet Protocol Version 4 (TCP/IPv4)”. Wireless N Extender User Guide 24 YML124 www.netcomm.com.au NetComm Velocity Series - Wireless N Extender 6. Select “Use the following IP address” and enter the IP address of 192.168.20.2 and a subnet mask of 255.255.255.0. Please note: If you have changed the IP address of the NP124, you will need to enter an appropriate static IP address. 7. Click on “OK” to complete the setup procedures. YML124 www.netcomm.com.au Wireless N Extender User Guide 25 For Windows 7-32/64 1. Click on “Start” -> “Control Panel” (in Category View) -> “View network status and tasks”. 2. In the Control Panel Home, click on “Change adapter settings” to continue. 3. Single RIGHT click on “Local Area Connection”, then click “Properties”. 4. Double click on “Internet Protocol Version 4 (TCP/IPv4)”. 5. Select “Use the following IP address” and enter the IP address of 192.168.20.2 and a subnet mask of 255.255.255.0. Please note: If you have changed the IP address of the NP124, you will need to enter an appropriate static IP address. Wireless N Extender User Guide 26 YML124 www.netcomm.com.au NetComm Velocity Series - Wireless N Extender 6. Click on “OK” to complete the setup procedures. For Mac OSX 10.6 1. Click the Apple icon and choose System Preferences. 2. Click on Network icon. 3. Set Location to Automatic and click on Ethernet. 4. Select “Manually” from the Configure IPv4 dropdown menu. 5. Select “Use the following IP address” and enter the IP address of 192.168.20.2 and a subnet mask of 255.255.255.0. Please note: If you have changed the IP address of the NP124, you will need to enter an appropriate static IP address. 6. Click on Apply Now. YML124 www.netcomm.com.au Wireless N Extender User Guide 27 Legal & Regulatory Information This manual is copyright. Apart from any fair dealing for the purposes of private study, research, criticism or review, as permitted under the Copyright Act, no part may be reproduced, stored in a retrieval system or transmitted in any form, by any means, be it electronic, mechanical, recording or otherwise, without the prior written permission of NetComm Limited. NetComm Limited accepts no liability or responsibility, for consequences arising from the use of this product. NetComm Limited reserves the right to change the specifications and operating details of this product without notice. NetComm is a registered trademark of NetComm Limited. All other trademarks are acknowledged the property of their respective owners. Product Warranty The warranty is granted on the following conditions: 1. This warranty extends to the original purchaser (you) and is not transferable; 2. This warranty shall not apply to software programs, batteries, power supplies, cables or other accessories supplied in or with the product; 3. The customer complies with all of the terms of any relevant agreement with NetComm and any other reasonable requirements of NetComm including producing such evidence of purchase as NetComm may require; 4. The cost of transporting product to and from NetComm’s nominated premises is your responsibility; and, 5. NetComm does not have any liability or responsibility under this warranty where any cost, loss, injury or damage of any kind, whether direct, indirect, consequential, incidental or otherwise arises out of events beyond NetComm’s reasonable control. This includes but is not limited to: acts of God, war, riot, embargoes, acts of civil or military authorities, fire, floods, electricity outages, lightning, power surges, or shortages of materials or labour. 6. The customer is responsible for the security of their computer and network at all times. Security features may be disabled within the factory default settings. NetComm recommends that you enable these features to enhance your security. The warranty is automatically voided if: 1. You, or someone else, use the product, or attempts to use it, other than as specified by NetComm; 2. The fault or defect in your product is the result of a voltage surge subjected to the product either by the way of power supply or communication line, whether caused by thunderstorm activity or any other cause(s); 3. The fault is the result of accidental damage or damage in transit, including but not limited to liquid spillage; 4. Your product has been used for any purposes other than that for which it is sold, or in any way other than in strict accordance with the user manual supplied; 5. Your product has been repaired or modified or attempted to be repaired or modified, other than by a qualified person at a service centre authorised by NetComm; and, 6. The serial number has been defaced or altered in any way or if the serial number plate has been removed. Limitations of Warranty The Trade Practices Act 1974 and corresponding State and Territory Fair Trading Acts or legalisation of another Government (“the relevant acts”) in certain circumstances imply mandatory conditions and warranties which cannot be excluded. This warranty is in addition to and not in replacement for such conditions and warranties. To the extent permitted by the Relevant Acts, in relation to your product and any other materials provided with the product (“the Goods”) the liability of NetComm under the Relevant Acts is limited at the option of NetComm to: • Replacement of the Goods; or • Repair of the Goods; or • Payment of the cost of replacing the Goods; or • Payment of the cost of having the Goods repaired. All NetComm ACN 002 490 486 products have a standard 12 months warranty from date of purchase. However some products have an extended warranty option (refer to packaging). To be eligible for the extended warranty you must supply the requested warranty information to NetComm within 30 days of the original purchase by registering on-line via the NetComm web site at www.netcomm.com.au Wireless N Extender User Guide 28 YML124 www.netcomm.com.au NetComm Velocity Series - Wireless N Extender NETCOMM LIMITED Head Office PO Box 1200, Lane Cove NSW 2066 Australia P: 02 9424 2070 F: 02 9424 2010 E: [email protected] W: www.netcommlimited.com. DYNALINK NZ 12c Tea Kea Place, Albany, Auckland, New Zealand P: 09 448 5548 F: 09 448 5549 E: [email protected] W: www.dynalink.co.nz Product Warranty NetComm products have a standard 12 months warranty from date of purchase. However some products have an extended warranty option, via registering your product online at the NetComm website www.netcommlimited.com. Technical Support If you have any technical difficulties with your product, please refer to the support section of our website. www.netcomm.com.au/support Note:NetComm Technical Support for this product only covers the basic installation and features outlined in the Quick Start Guide. For further information regarding the advanced features of this product, please refer to the configuring sections in the User Guide or contact a Network Specialist. Trademarks and registered trademarks are the property of NetComm Limited or their respective owners. Specifications are subject to change without notice. Images shown may vary slightly from the actual product. YML124 www.netcomm.com.au Wireless N Extender User Guide 29