1
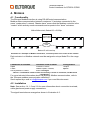
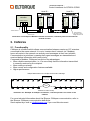
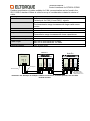
Technical Manual Control interfaces for Eltorque QT250 & QT800 Valve actuators Revision Date: 2013-01-14 Author: Tor Erik Næbb Technical Manual Control interfaces for QT250 & QT800 Revision history Revision date 04.03.2009 02.09.2009 Done by TEN TEN TEN Approved by Changes BB - 14.01.2013 BN AEA First version Various changes Changed Logo, added QT2500 and MT actuators, various other changes. Corrected characteristic values for digital interface outputs Referenced documentation User Manual QT250 and QT800 User Manual QT2500 User Manual MT50 and MT150 Eltorque Manager 2 Manual Eltorque Manager 3 Manual Technical Manual Control interfaces for QT250 & QT800 Table of Contents 1. General information ...................................................................................................... 4 1.1 Introduction ............................................................................................................. 4 1.2 Terminology ............................................................................................................ 4 1.3 The Eltorque control interfaces ............................................................................... 6 1.4 Connection Terminals ............................................................................................. 7 1.5 Cable Glands .......................................................................................................... 9 1.6 Power supply connections ...................................................................................... 9 2. Digital ........................................................................................................................... 10 2.1 Functionality .......................................................................................................... 10 2.2 Installation ............................................................................................................. 10 3. Analogue ...................................................................................................................... 13 3.1 Functionality .......................................................................................................... 13 3.2 Installation ............................................................................................................. 13 4. Modbus......................................................................................................................... 15 4.1 Functionality .......................................................................................................... 15 4.2 Installation ............................................................................................................. 15 5. CANopen ...................................................................................................................... 17 5.1 Functionality .......................................................................................................... 17 5.2 Installation ............................................................................................................. 17 6. Configuration using Eltorque Manager ..................................................................... 20 7. Troubleshooting .......................................................................................................... 21 7.1 General ................................................................................................................. 21 7.2 Digital .................................................................................................................... 21 7.3 Analogue............................................................................................................... 21 7.4 Modbus and CANopen.......................................................................................... 22 Contact information: ELTORQUE AS Lyng Industrial Park 7125 Vanvikan Norway Tel: +47 748 55 520 Fax: +47 74 85 55 12 Web: http://www.eltorque.com/ Technical Manual Control interfaces for QT250 & QT800 1. GENERAL INFORMATION 1.1 Introduction Eltorque is a range of quarter-turn electric valve actuators suitable for use in a wide variety of industrial environments. The Eltorque actuators are characterized by: Compact size and good torque to size/ weight ratio Flexible control interfaces for easy integration with a wide range of control systems Low power consumption Electronic configuration of speed, torque and other parameters Easy and cost effective installation Maintenance free There are various actuator models available: QT250: Part turn, 250 Nm max torque QT800: Part turn, 800 Nm max torque QT2500: Part turn, 2500 Nm max torque MT50: Multi-turn, 50 Nm max torque MT150: Multi turn, 150 Nm max torque This Technical Manual covers the functionality of the control interfaces for the QT250 and QT800 Valve actuators. The actuators themselves including valve interfacing, spare parts etc. are described in separate User manuals. QT2500 and MT actuators are covered in separate User Manuals. 1.2 Terminology Term Valve actuator Control Interface Configuration Hazardous area PLC Digital Control Analogue Control Description An electric device for operation of valves in various process control systems. Electronic device controlling the valve actuator according to signals from an overall control system. e.g. PLC or other type of electronic controller. The set-up of parameters, which affects the actuator’s performance and behaviour. Area in which the permanent or periodical presence of explosive substances causes a risk of explosion. A Programmable Logic Controller is a digital computer used for automation of industrial processes, such as control of machinery on factory assembly lines, measurement and control of process plants etc. Simple control utilizing relays, on/ off switches and indicators. Allows only Open or Closed functionality for a valve actuator. Step-less control utilizing analogue current or voltage signals, e.g. 4-20 mA, 0-10 V etc. Allows positioning of the valve actuator between Open and Closed. Technical Manual Control interfaces for QT250 & QT800 Term Fieldbus Control Modbus CANopen Description A fieldbus is an industrial computer network for real-time distributed control of various devices, including valve actuators. When Eltorque valve actuators are controlled by Fieldbus, the functionality is extended in terms of positioning, commands, feedback and configuration. The Eltorque Modbus interface is using RS-485 serial communication utilizing the Modbus protocol. Modbus is a fieldbus which allows communication with max 31 actuators connected to the same “master-slave” network. “Master-slave” means that the Modbus controller is a master which actively sends commands and requests to the “slave actuators”. The Eltorque CANopen interface is using the CAN (Controller Area Network) communications standard. CANopen is a fieldbus which allows communication between max 127 actuators connected to the same network. It is not a “masterslave” network (ref. Modbus), hence all nodes in the network can actively send messages at its their own initiative. The communication is prioritized, meaning that urgent messages are transmitted and received before information with lower priority. Compared to Modbus, CANopen has the following advantages: More reliable communication, i.e. it is more likely that the information transmitted is received correctly by the recipient. More nodes pr network, max 127. More control and configuration features available. Technical Manual Control interfaces for QT250 & QT800 1.3 The Eltorque control interfaces There are 4 different Eltorque control interfaces available: 1. Digital: Open - Closed 2. Analogue: 4-20 mA positioning 3. Modbus: Fieldbus, max 31 actuators pr. network. 4. Canopen: Fieldbus, max 127 actuators pr. network. The interface incl. connection terminals are located inside the actuator’s control box. During installation and configuration, this box must be removed by unscrewing the six M4 HEX 3 mm fastening screws. Illustration 1-1: Actuator and control box separated. NOTE: When re-assembling the control box with the actuator, make sure no wires are jammed between the surfaces and that the screws are cross-tightened. It is also recommended to apply some seal lubrication on the gasket to ensure the actuator remains water proof. Control Interface Control signal and Configuration Connectors FI Interface 110-240 V AC/ DC L N G Valve position sensor DC Power supply Motor Control M Motor Illustration 1-2: Control interface schematics The Eltorque control interface consists of 3 main modules: 1. Power supply. 2. Motor Control. 3. Interface. Technical Manual Control interfaces for QT250 & QT800 1.4 Connection Terminals Note: Electrical installation can only be designed and made by personnel with the appropriate skills and competence. Ensure all such work is done according to applicable laws and regulations. Special requirements apply for installation in hazardous locations. The connection terminals are located inside the Eltorque Control box. Configuration DIP-switch Control signals Voltage Supply Configuratio n connector Illustration 1-3: Connection terminals location. The Voltage Supply and Configuration connectors are common for all interfaces, while the DIP-switch and Control Signals will vary depending on the interface version. All terminals can accommodate wires of cross section 0,5 - 2,5 mm2. Technical Manual Control interfaces for QT250 & QT800 Connection terminals for 1.0 and 2.0 versions Illustration 1-4: Pluggable screw-type terminal. 0,6 x 3,5 mm Flathead screwdriver recommended. Operating instructions: 1: Check that terminal is open. 2: Insert wire. 3: Tighten screw firmly. 4: Pull wire to check that it is fastened properly. Illustration 1-5: Spring-loaded terminal. 0,4 x 2,5 mm Flathead screwdriver recommended. Operating instructions: 1: Insert screwdriver to open terminal. 2: Insert wire. 3: Remove screwdriver. 4: Pull wire to check that it is fastened properly. Connection terminals for 2.1 EX version Illustration 1-6: EX E screw-type terminal. 0,6 x 3,5 mm Flathead screwdriver recommended. Illustration 1-7: EX E spring loaded terminal. 0,6 x 3,5 mm Flathead screwdriver recommended, strip length 5-6 mm. Operating instructions: 1: Check that terminal is open. 2: Insert wire, strip length 10 mm. 3: Tighten screw firmly, torque 0.4-0,5 Nm. 4: Pull wire to check that it is fastened properly. Operating instructions: 1: Press and hold down lever with the screwdriver. 2: Insert wire, strip length 5-6 mm. 3: Release lever. 4: Pull wire to check that it is fastened properly. Note: On screw type terminals, it is recommended to use appropriate ferrules for multi-conductor wires. On spring-loaded terminals, ferrules are not recommended regardless of wire type. Technical Manual Control interfaces for QT250 & QT800 1.5 Cable Glands Cable glands must be selected according to cable diameter. In order to maintain the Eltorque Actuator’s IP68 encapsulation, it is important to use IP68 rated cable glands. When installing 2.1 EX versions in hazardous environments, use only EX E certified cable glands. It is recommended to use EMC rated cable glands and shielded cables in environments with high levels of electro magnetic noise and disturbances. Typical examples of such environments are in the vicinity to generators, large electrical motors, 1-8: Cable glands. frequency converters etc. The Eltorque control box has 5 threaded holes for cable glands, and there are two different versions of hole configurations available: 2x M16 + 3 x M20. (Use M16 for signal cables) 5x M20. 1.6 Power supply connections Note: Electrical installation can only be designed and made by personnel with the appropriate skills and competence. Ensure all such work is done according to applicable laws and regulations. Special requirements apply for installation in hazardous locations. The supply voltage must be 230 V AC with an acceptable tolerance of 180-264 V AC. The power consumption varies between 30 W and 120 W depending on whether the actuator is in standby mode or is running. Start-up current after loss of power will be max 5x1A/ 230V. Each actuator has two power supply connectors enabling serial power connection of multiple actuators. But keep the following aspects in mind when designing the circuit: Fuses must have a current rating according to max power consumption of all actuators combined. Fuses with slow C-characteristic is recommended to avoid undesired tripping during start-up Wiring must have appropriate cross-section according to max current consumption. In case of power loss in the circuit, none of these actuators and valves can be operated. Fuse cabinet Fuses C-Characteristics Actuator 1 L NG L NG Actuator 2 L NG L NG Actuator 3 L NG L NG Illustration 1-9: Multiple actuators with serial power connection. Actuator n L NG L NG Technical Manual Control interfaces for QT250 & QT800 2. DIGITAL 2.1 Functionality The QT Digital Interface allows simple Open & Close operation of valves, i.e. you can command the actuator to Close or Open the valve. The actuator provides feedback when the valve is Closed, Open or a failure is triggering the Alarm function. Valve No: X Open M Close Closed Pr. Actuator: 2 Digital Inputs 3 Digital Outputs Open Alarm M DI PLC DO Illustration 2-1: Digital Control using buttons and lamps, or control via PLC. As shown on the illustration above, actuators with digital interface can be controlled directly from a conventional panel with buttons/ switches and indicator lamps. Alternatively, it can be controlled from a PLC with Digital inputs and outputs. This allows extended functionality in terms of automatic control, visual user interface on display etc. 2.2 Installation Note: See section 1.4, 1.5 and 1.6 for more information about connection terminals, cable glands and power supply connections. The QT Digital interface has 2 inputs and 3 outputs as shown below: ”Old” interface, 10 terminals ”New” interface, 8 terminals Digital Control Interface Digital Control Interface Closed + Closed - Open + Open Alarm + Alarm GND Common Close Open Common Closed Open Alarm GND Output Open Input Close Output Common Input 1 2 3 4 5 6 1 2 3 4 5 6 7 8 9 10 7 8 Illustration 2-2: Terminal overview of “new and old” type of digital interface. Technical Manual Control interfaces for QT250 & QT800 Note: On the 8-pole version, the output + terminals are merged into one Common terminal. The functionality of the outputs is identical for both versions; the relays are voltage-free and normally open. Max switching voltage to the output terminals are 277 VAC or 125 VDC. Maximum switching rating 1250 VA / 150 W. 5 A is the maximum carrying current. Input signals are given by bridging terminal 1+2 or 1+3, and the signal can be constant or pulses of minimum 100 ms length. In case both the Close and Open signals are active simultaneously; the actuator will respond to the Open signal. Note: The Common input terminal (#1) is active and has an internal power supply of 15 V/ 50 mA. Do not attempt to connect an external supply to this terminal as it can damage the control interface. Cable requirements and recommendations Cable parameter Required/ Recommended Number of conductors 7 Cross section 0,5-1,5 mm2 Shield Not mandatory, but is recommended in case the actuator is placed in conjunction with equipment emitting high levels of disturbances. Length related resistance Max 100 m/m Cable length Max. 1000 m Table 2-1: Cable requirements and recommendations. The outputs provide feedback of the actuator’s status, i.e. Closed, Open and/ or Alarm. An alarm is triggered by the following failure scenarios: Manual emergency operation. Valve position out of defined operation area. Valve blocked. High temperature. The digital interface can be used in various control circuits as shown below: Technical Manual Control interfaces for QT250 & QT800 Open Alarm GND Common Close Open Common Closed Open Alarm GND 2 3 4 5 6 1 2 3 4 5 6 PLC 8 Illustration 2-3: Digital interface control circuit examples. Alarm X0 X1 X2 Digital In 7 Open 8 Max. 150V AC/ DC Supply + - Y0 Y1 Digital Out 7 Open Closed 1 Close Common Output Open Input Close Output Common Input Digital Control Interface Closed Digital Control Interface Technical Manual Control interfaces for QT250 & QT800 3. ANALOGUE 3.1 Functionality The QT Analogue interface allows control of regulation valves where positioning of the valve is needed. The actuator provides continuous feedback of its actual position, for comparison between desired and actual position. Both positioning and feedback signals are analogue 4-20 mA. The control interface also has a digital Alarm output, which is triggered by various failure scenarios. Illustration 3-1: Analogue level and flow control. 3.2 Installation Note: See section 1.4, 1.5 and 1.6 for more information about connection terminals, cable glands and power supply connections. The signal terminals are arranged as shown below: Analogue In + Analogue In - Analogue Out + Analogue Out - Alarm + Alarm - +15 VDC GND Analogue Control Interface 1 2 3 4 5 6 7 8 Illustration 3-2: Analogue Control interface terminal overview. Recommended cable cross-section is 0,5-1,5 mm2. Analogue control signals can be sensitive to electro magnetic noise, and Lyng Motor strongly recommends shielded cables and appropriate cable glands in case the actuator is placed near to or connected in the same network as equipment emitting high levels of disturbances. control circuit. Technical Manual Control interfaces for QT250 & QT800 Analogue In + Analogue In - Analogue Out + Analogue Out - Alarm + Alarm - +15 VDC GND Analogue Control Interface 1 2 3 4 5 6 7 8 - - + Out In Active Analogue IO + + X0 Digital In The analogue input and output are both passive, and need to be powered from the PLC or other type of controller, supply voltage 12-24 VDC. Note: The accuracy of an actuator with analogue interface is +/- 5%, i.e. if control signal is 12 mA/ 50%, the valve position will be in the range of 45-55%. If a higher accuracy is needed, please consider a Fieldbus interface with accuracy of +/- 0,5% instead See section 4 and 5 for more information. The Alarm output is triggered by the following scenarios: Manual emergency operation. Valve position out of defined operation area. Valve blocked. High temperature. Power failure. (Only if alarm output is inverted) 4-20 mA control signal is lost. By using the Eltorque Manager, you can configure the following parameters in the Analogue control interface: Analogue input and output calibration, this is necessary to ensure accurate control. Invert inputs and outputs Note: It is recommended to invert the Alarm output, as this also will trigger the alarm in case the actuator is subjected to a Illustration 3-4: Example of 4-20 mA power failure. Analogue Controller control circuit. In case 4-20 mA control signal is lost, the actuator has a configurable fail safe function: Close valve, Open valve or Idle, i.e. position remains unchanged. See section 6 for more information about the Eltorque Manager. Cable requirements and recommendations Cable parameter Required/ Recommended Number of conductors 6 Cross section 0,5-1,5 mm2 Shield Not mandatory, but is recommended in case the actuator is placed in conjunction with equipment emitting high levels of disturbances. Length related resistance Max 100 m/m Cable length Max. 1000 m Table 3-1: Cable requirements and recommendations. Technical Manual Control interfaces for QT250 & QT800 4. MODBUS 4.1 Functionality The Eltorque Modbus interface is using RS-485 serial communication. Modbus allows communication between maximum 31 actuators connected to the same “master-slave” network. “Master-slave” means that the Modbus controller is the “master” which actively sends commands and requests to the “slave” actuators. Modbus fieldbus network, Baudrate 19,2 or 38,4 kBps PC or PLC based Modbus controller Terminal resistor Terminal resistor Maximum 31 units in one loop Illustration 4-1: Example of Modbus schematics, controller placed in the center of the network. Each actuator in a Modbus network must be assigned a unique Node ID in the range 1-31. Commands to actuator Open Close Go to position 0-100%. Feedback from actuator Position 0-100% Status: Open, Closed, Error messages Configuration Torque Speed Table 4-1: The Modbus interface offers functionality in terms of commands, feedback and configuration. For more technical information about the Eltorque Modbus communication, refer to the “Eltorque modbus communication definitions”. Send request by e-mail to [email protected] if you need this document. 4.2 Installation Note: See section 1.4, 1.5 and 1.6 for more information about connection terminals, cable glands and power supply connections. The signal terminals are arranged as shown in Illustration 4-2. Modbus Control Interface Modbus Control Interface Incoming Outgoing Incoming A (TxD+/ RxD+) B (TxD-/ RxD-) GND A (TxD+/ RxD+) B (TxD-/ RxD-) GND A (TxD+/ RxD+) B (TxD-/ RxD-) GND Bridge for terminal resistor Technical Manual Control interfaces for QT250 & QT800 1 2 3 6 7 8 1 2 3 4 B (TxD-/ RxD-) GND 5 A (TxD+/ RxD+) Outgoing 6 7 8 Illustration 4-2: Left: Terminals on interface with DIP-switch. Right: Terminals on interface without DIP-switch. Node ID= 0 Node ID= 16 Node ID= 0 Node ID= 8 Node ID= 0 Node ID= 4 Node ID= 0 Node ID= 2 Node ID= 0 Node ID= 1 Spare - not in use Time delay 0 ms Baudrate 38,4 Kbit/s On 4 5 6 7 8 9 10 On Off On Off On Off On Off On Off On Off On Off Time delay 20 ms Off 3 Off Baudrate 19,2 Kbit/s 2 On Terminal resistor active 1 On Off Terminal resistor not active On Modbus interfaces with DIP-switch, terminal resistor, baudrate and Node ID can be configured as shown below: DIP switch configuration Modbus Illustration 4-3: Modbus DIP switch configuration. On Modbus interfaces without DIP-switch, baudrate and Node ID are configured using the Eltorque Manager, see section 6 for more information. Terminal resistor is set by bridging terminal 4 and 5. Cable requirements and recommendations Cable parameter Required/ Recommended Number of conductors 1+2 Twisted pair for TxD and RxD signals Cross section 0,5-1,5 mm2 The transmission range increases with larger cable crosssection and lower capacitance. Shield Yes Requires use of EMC cable glands Nominal impedance Max 100 Ω Capacitance Max 42 pF/ m Transmission range increases with lower capacitance Length related resistance Max 70mΩ/m. Cable length 500 m Terminal resistor Yes, at both ends Table 4-2: Cable requirements and recommendations. Terminal resistor Incoming Outgoing GND A (TxD+/ RxD+) B (TxD-/ RxD-) GND A (TxD+/ RxD+) B (TxD-/ RxD-) GND GND Outgoing B (TxD-/ RxD-) B Modbus Control Interface Incoming A (TxD+/ RxD+) A Modbus Control Interface GND Modbus terminals Node ID n B (TxD-/ RxD-) Modbus controller Node ID 1 A (TxD+/ RxD+) Technical Manual Control interfaces for QT250 & QT800 1 2 3 6 7 8 1 2 3 6 7 8 Shielded cable Shielded cable Terminal resistor DIP switch 1 ON or Bridge terminal 4 & 5 Twisted pair Illustration 4-4: Example of Modbus network connections, controller placed in the end with terminal resistor. 5. CANOPEN 5.1 Functionality CANopen is a fieldbus which allows communication between maximum 127 actuators connected to the same network. It is not a “master-slave” network (ref. Modbus), hence all nodes in the network can actively send messages at their own initiative. Communication is prioritized, meaning that urgent messages are transmitted and received before information with lower priority. Compared to Modbus, CANopen has quite a few advantages: More reliable communication, i.e. it is more likely that the information transmitted is correctly received by the recipient. More nodes pr network. More control and configuration features available. Higher performance. CANopen fieldbus network, 50 or 125 kBps, max 500 or 250 m cable length PC or PLC based CAN controller Terminal resistor Terminal resistor Maximum 127 units in one loop Illustration 5-1: Example of CANopen schematics, controller placed in the center of the network. For more technical information about the Eltorque CANopen communication, refer to the Eltorque CANopen communication definitions. Send request by e-mail to [email protected] if you need this document. Technical Manual Control interfaces for QT250 & QT800 5.2 Installation Note: See section 1.4, 1.5 and 1.6 for more information about connection terminals, cable glands and power supply connections. The signal terminals are arranged as shown in Illustration 5-2. CANopen Control Interface CAN_H CAN_L GND CAN_H CAN_L Bridge for terminal resistor 2 3 6 7 8 1 2 3 4 5 CAN_L GND 1 Outgoing CAN_H CAN_L Incoming CAN_H Outgoing GND Incoming GND CANopen Control Interface 6 7 8 Illustration 5-2: Left: Terminals on interface with DIP-switch. Right: Terminals on interface without DIP-switch. On CANopen interfaces with DIP-switch, terminal resistor and Node ID can be configured as shown below: DIP switch configuration CANopen Node ID= 0 Node ID= 64 Node ID= 0 Node ID= 32 Node ID= 0 Node ID= 16 Node ID= 0 Node ID= 8 Node ID= 0 Node ID= 4 Node ID= 0 Node ID= 2 Node ID= 0 Node ID= 1 Not in use Terminal resistor not active Terminal resistor active 1 2 3 4 5 6 7 8 9 10 On Off On Off On Off On Off On Off On Off On Off On Off On Off On Off Illustration 5-3: CANopen DIP switch configuration. On CANopen interfaces without DIP-switch, Node ID are configured using the Eltorque Manager, see section 6 for more information. Terminal resistor is set by bridging terminal 4 and 5. Baud rate 50 or 125 Kbit/s can only be set using Eltorque Manager regardless of DIP-switch presence. Important: 50 Kbit/s Baud rate is recommended as this makes the CANopen network less sensitive to signal disturbances and issues of cable type or length. The network response time is normally nearly the same for both baud-rates. Technical Manual Control interfaces for QT250 & QT800 Detailed specification of cables suitable for CAN communication can be found in the ISO 11898-2 standard. Below is a brief sum-up of considerations related to choice of cable. Cable parameter Required/ Recommended Number of conductors 1+2 Twisted pair for CAN_H and CAN_L signals Cross section 0,5-1,5 mm2 The transmission range increases with larger cable crosssection. Shield Yes - Requires use of EMC cable glands Nominal impedance 120 Ω Capacitance Max 42 pF/m Transmission range increases with lower capacitance. Length related resistance Max 70mΩ/m Specific Line Delay 5 ms/m Cable length Max 500 m with baudrate 50 kbit/s Max 250 m with baudrate 125 kbit/s Terminal resistor Yes, at both ends. Table 5-1: Cable requirements and recommendations. 1 2 3 4 5 CAN_L 8 CAN_H 7 Outgoing GND 6 Bridge for terminal resistor 5 CAN_L 4 CAN_H 3 Incoming GND 2 CAN_L 1 Outgoing CAN_H Bridge for terminal resistor Twisted pair CAN_L 3 CANopen Control Interface Incoming CAN_H CAN_L 2 CANopen Control Interface GND GND CAN_H 1 Node ID n GND CANopen controller Node ID 1 6 7 8 Terminal resistor Shielded cable Shielded cable Terminal resistor DIP switch 1 ON or Bridge terminal 4 & 5 Illustration 5-4: Example of CANopen network connections, controller placed in the end with terminal resistor. Technical Manual Control interfaces for QT250 & QT800 6. CONFIGURATION USING ELTORQUE MANAGER The Eltorque actuators are configured using a standard PC with the Eltorque Manager 2 SW installed and a special configuration cable connected via USB. 1. The Eltorque Manager can be downloaded from www.eltorque.com\downloads. To install it on your computer, double-click the Manager Setup.msi file. 2. Follow instructions on screen to complete the installation. The USB cable drivers will also be installed automatically. 3. Connect the configuration cable to a USB-port on your PC 4. Double click the Eltorque Manager icon to start program. Illustration 6-1: Eltorque Manager Screenshot without actuator connection. Note: The Eltorque Actuator image will be shaded and values under Actuator type set to dummy until you establish connection with the Actuator and its Control Interface. For more information about the use of the Eltorque Manager, please refer to its builtin user guide found under Help – Help Content. Technical Manual Control interfaces for QT250 & QT800 7. TROUBLESHOOTING 7.1 General Problem description The actuator does neither respond to control signal nor give any feedback and there is little resistance if you try to turn the emergency operation hand wheel. It is not possible to establish connection with Eltorque manager. Actuator is not able to turn valve with the desired speed or does not move to correct open or closed position. Cause & solution 1. No input power supply, check wiring and fuses. 2. Control interface electronics has stopped running, disconnect input power supply, wait 3 seconds and reconnect to reset the electronics. 1. Check that configuration cable is properly connected. 2. Check configuration cable switch, it must be set to 0. 1. Use Eltorque Manger to re-configure the actuator’s speed, torque and/ or open closed positions. 7.2 Digital Problem description Cause & solution The actuator does not respond to input control signals. 1. Bad connection, check wiring. 2. A supply voltage is connected to the Common terminal, must be disconnected immediately. The actuator does not give Open, Closed or Alarm feedback. 1. Bad connection, check wiring. 2. No power supply in the feedback circuits, check PLC or power supply. 7.3 Analogue Problem description Cause & solution The actuator does not respond to analogue input control signals. 1. Bad connection, check wiring. 2. No power supply from the 4-20 mA PLC/ controller outputs. Check that supply voltage is 12-24 VDC. 3. Incorrect type of PLC/ Controller analogue output, verify that it is 4-20 mA. Technical Manual Control interfaces for QT250 & QT800 Problem description The actuator does not give analogue output feedback signal. Analogue input or output signal is inaccurate. The actuator does not give digital alarm signal. Cause & solution 1. Bad connection, check wiring. 2. No power supply from the 4-20 mA PLC/ controller inputs. Check that supply voltage is 12-24 VDC. 3. Incorrect type of PLC/ Controller analogue input, verify that it is 4-20 mA. 1. Use Eltorque Manager to calibrate the input and output, see section 6 for more information. 2. Input and output is inverted 4. Bad connection, check wiring. 1. No power supply in the feedback circuits, check PLC or power supply. 7.4 Modbus and CANopen Problem description The actuator does neither respond to control commands nor provide feedback. Unstable Fieldbus communication. Cause & solution 1. Bad connection, check wiring. 2. Terminal resistor not present. 3. Baud rate not set correctly; must be the same for all actuators and PLC. 4. Incorrect Node ID. 1. Cable is outside specifications given in sections 4.2 and 0 respectively. Pay special attention to shield and length. 2. Terminal resistor not present. Technical Manual Control interfaces for QT250 & QT800 ELTORQUE AS Lyng Industrial Park 7125 Vanvikan, Norway Tel: +47 748 55 520 Fax: +47 74 85 55 12 Web: http://www.eltorque.com/