1
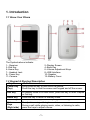
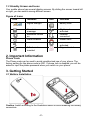
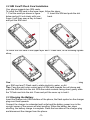
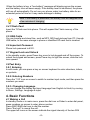
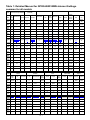
I © 2012. All rights are reserved. No part of this document may be reproduced without permission. While all efforts have been made to ensure the accuracy of all contents in this manual, we assume no liability for errors or omissions or statements of any kind in this manual, whether such errors or omissions or statements resulting from negligence, accidents, or any other cause. The contents of this manual are subject to change without notice. Protect our environment! We strive to produce products in compliance with global environmental standards. Please consult your local authorities for proper disposal. Note: User’s Manual is Just to guide the user about the functionality of the phone. This does not substantiateany certificate of technology. Some functions may very due to modifications and up-gradation of software or due to printing mistake. II Welcome Congratulations on your purchase of the LAVA mobile phone. Your phone provides many functions which are practical for daily use, such as a hands-free loudspeaker, camera, MP3 player, video recorder, LED Torch, Super Loud Speaker, Hindi Language Input & Display and more. Your phone can also connect to a PC, laptop, or other device using a USB data cable. You can read the manual for complete knowledge about the use of the Discover137mobile phone and experiencing the well-established functions and simple operation method. Please use the original accessories in order to achieve best results.Use of non-original components may cause damage to machinery, for which the company shall not be held responsible. LAVA support and contact Information Check www.Lavamobiles.com web site for additional information, downloads, and services related to your LAVA product. To check for the nearest LAVA service center location for maintenance services, you may like to visit www.lavamobiles.com/support-services For Your Safety Before using your phone, please read the following important information to eliminate or reduce any possibility of causing damage and personal injury. III Precautions Safe power on Do not use your mobile phone where it is forbidden to use or it might cause disturbance or danger. Safe transportation first Please observe all local laws and regulations. Do not use your mobile phone while driving. Safe transportation should be considered first when driving. Disturbance Mobile phone’s performances may fluctuate during a disturbance. Turn off when in the hospital Please follow location-specific applicable limitations. Please switch your mobile phone off when near a medical instrument. Turn off on an airplane Please follow location-specific applicable limitations. Do not use your mobile phone on an airplane. Turn off when at a gasoline station Do not use your mobile phone at a filling station or around fuels or chemicals. Turn off around exposure Area Please observe location-specific applicable limitations Do not use your mobile phone near an area where explosions can occur. Proper use As described in this manual, your mobile phone can be used only in the locations free from mobile phone usage restrictions. Please do not touch the antenna area of your phone. IV Use qualified after sales service Only a qualified technician can install or repair your mobile phone. Please contact LAVA authorized service center in case of phone failure. Accessories and batteries Only use the authorized accessories and batteries. Waterproof Your mobile phone as well as battery is not waterproof. Please keep it away from water. Backup Remember to make a backup or keep a written record of all important information saved in your mobile phone. Connect to other devices Please read the user manual of the device to get more detailed security instructions before connecting to other devices and do not connect to an incompatible product. SOS emergency calls Make sure your mobile phone is switched on and in a service area. In idle mode, input the SOS number; then press the Dial Key. Advise where you are and do not hang up without permission. Improper use will invalidate the warranty! These safety instructions also apply to original accessories. Backup Copies Remember to make back-up copies or keep a written record of all important information stored in your phone. V TABLE OF CONTENT PRECAUTIONS ................................................................................................ IV 1. INTRODUCTION ........................................................................................ - 1 1.1 KNOW YOUR PHONE ............................................................................ - 1 1.2 KEYPAD & SHORTCUT DESCRIPTION ...................................................... - 1 1.3 STANDBY SCREEN AND ICONS ............................................................... - 2 2. IMPORTANT INFORMATION ..................................................................... - 2 3. GETTING STARTED .................................................................................. - 2 3.1 BATTERY INSTALLATION ......................................................................... - 2 3.2 SIM CARD/T-FLASH CARD INSTALLATION ................................................ - 3 3.3 CHARGING THE BATTERY ...................................................................... - 3 3.4 T-FLASH CARD ..................................................................................... - 4 3.5 USB CABLE ........................................................................................ - 4 3.6 IMPORTANT PASSWORD ........................................................................ - 4 3.7 KEYPAD LOCK AND UNLOCK .................................................................. - 4 3.8TEXT ENTRY ........................................................................................ - 4 4. BASIC FUNCTIONS ................................................................................... - 4 4.1 MAKING A CALL .................................................................................... - 4 4.2 ANSWERING A CALL .............................................................................. - 5 4.3 REJECTING A CALL ............................................................................... - 5 5. FUNCTION MENU...................................................................................... - 5 5.1ALARM................................................................................................. - 5 5.2 BROWSER ........................................................................................... - 5 5.3 CALCULATOR ....................................................................................... - 9 5.4 CALENDAR .......................................................................................... - 9 5.5 CALL LOG ........................................................................................... - 9 5.6 CAMERA ............................................................................................. - 9 5.7 CLOCK ................................................................................................ - 9 5.8 CONTACTS .......................................................................................... - 9 5.9 NETWORK APPLICATIONS .................................................................... - 10 5.10 DIALER ........................................................................................... - 10 5.11 DOWNLOADS ................................................................................... - 10 5.12 FM RADIO ....................................................................................... - 10 5.13 FILE MANAGER ................................................................................ - 10 5.14 GALLERY ......................................................................................... - 10 5.15 GAME ZONE .................................................................................... - 10 5.16 HOME FX ........................................................................................ - 10 5.17 LAVA SPACE .................................................................................... - 10 5.18 MESSAGES ...................................................................................... - 10 5.19 MOVIE ............................................................................................ - 11 5.20 MUSIC ............................................................................................ - 11 5.21 NOTES ............................................................................................ - 11 5.22 RECORDER ..................................................................................... - 11 5.23 SIM TOOLKIT ................................................................................... - 11 - VI 5.24 SETTINGS ....................................................................................... - 11 5.25 TASKS............................................................................................. - 13 5.26 WSTORE......................................................................................... - 13 5.27 GAME ............................................................................................. - 13 5.28 OPEAR MINI .................................................................................... - 13 6. CARE AND MAINTENANCE .................................................................... - 13 7. TECHNICAL INFORMATION.................................................................... - 15 SAR INFORMATION .................................................................................... - 15 TROUBLESHOOTING ................................................................................. - 17 - VII 1. Introduction 1.1 Know Your Phone The Symbols above indicate: 1− Receiver 3−Dial Key 5−Home Key 7− Headset Jack 9− Power Key 11−Camera 2−Display Screen 4−Back Key 6−Volume Adjustment Keys 8−USB Interface 10−Speaker 12−Battery Cover 1.2 Keypad & Shortcut Description Key Power Key (Top) Definitions Long press the key to turn on/off the phone. Press the key to lock the screen and keypad and off the screen. Dial Key In standby mode or in main menu, press this key to enter Dialpad or Call log. Press the key to return to standby mode. In the menu mode, press the key to go back to upper menu. To adjust incoming call ringtone volume. During a call, while playing music, video, or listening to radio, press the keys to adjust volume. Home Key Back Key Volume Keys (Right side) -1- 1.3 Standby Screen and Icons Your mobile phone has several display screens. By sliding the screen toward left or right, you can switch among different screen. Figure of Icons Icon Indicates Icon Indicates Signal strength Battery level New text message Bluetooth turned on Alarm enabled Flight mode activated Headset connected Missed calls Silent activated Vibration activated Edge activated T-flash card inserted 2. Important Information Phone Code The Phone code can be used to avoid unauthorized use of your phone. The factory setting for the phone code is 4321. If phone lock is enabled, you will be asked to input the phone password when you switch on your phone. 3. Getting Started 3.1 Battery Installation Caution: Install according to the illustration above to avoid breaking the battery connectors. -2- 3.2 SIM Card/T-Flash Card Installation Your phone supports two SIM cards. To install the SIM card in the lower layer, follow the steps: 1. Find the small pin shown in figure 2. Insert the SIM and push the slot below and pull it out slowly with your back. finger. It will then open a tray to insert and pull the SIM card. To install the SIM card in the upper layer and T-Flash card, do as following figures show: Caution: Do not bend or scratch your SIM card and T-Flash card. Avoid exposing your SIM card and T-Flash card to static electricity, water, or dirt. Tips: Face the gold color contact point of SIM card towards the cell phone and push the SIM card into the slot. With the metal contacts facing down, gently slide the T-Flash card into the slot. Press and pull the cover up to lock it. 3.3 Charging the Battery Insert the charger into USB interface of the phone; the flash symbol on the charger plug must face upwards. Connect the charger to a standard wall outlet and the battery power icon in the up-right corner of the screen will start scrolling. When the battery bar stops scrolling, the battery charge is complete. Press the two sides of the charger plug and disconnect the charger from the phone. -3- ·When the battery is low, a "low battery" message will display across the screen and the battery icon will seem empty. If the battery level is insufficient, the phone will turn off automatically. Do not use your phone under low battery state for an extended period of time or it may cause damage to battery. Note: If the battery is powerless, the battery icon will reappear after a few minutes of charging. 3.4 T-flash Card Insert the T-Flash card into phone. This will expand the Flash memory of the phone. 3.5 USB Cable You can transfer and store files, such as MP3, MP4 and pictures from PC, through USB cable, to the mass storage in phone or identified SD card that is inserted. 3.6 Important Password Phone lock password is 4321. 3.7 Keypad Lock and Unlock In the standby mode, press Power key once to lock keypad and off the screen. To unlock the keypad and screen, press Power key to light the screen, slide the lock icon upward. 3.8Text Entry 3.8.1 Entering In edit mode, you can press a key on screen keyboard to enter charcters, letters, or symbols. 3.8.2. Entering Numbers Press the “123” icon on screen to switch to number input mode, and then press the numbers you want. 3.8.3. Changing Language You can change the display and input language from English to Hindi, by moving to Menu, Settings, Language & input. 4. Basic Functions 4.1 Making a Call In standby mode or in main menu, press the dial icon or Dialer to enter dial panel, press numbers on screen to enter phone number. Press SIM1/SIM2 dial icon to dial the number. Press “End call” to cancel the call. The upper left icons on the screen indicate the signal intensity of the two SIM -4- cards (strongest when full). The call quality is easily impaired by stumbling blocks. To improve signal intensity, keep clear of blocks by moving about. To make phone calls, you may dial the number either from the keypad or use the numbers saved in the phonebook. 4.1.1 Emergency Calls This phone, like any wireless phones, operates using radio signals, wireless and landline networks which cannot guarantee connection in all conditions. Therefore, you should never rely solely upon any wireless phone for essential communications (e.g. medical emergencies) To make an emergency call: Switch your phone on. Some networks may require that a valid SIM card is properly inserted in the phone Dial the official emergency number. Emergency numbers vary by location. While making an emergency call, please remember to give all information as particularly as possible. Never hand off the call please until you are given permission to do so. 4.2 Answering a Call When you receive a call, the phone will ring or vibrate and will display an incoming call notification. Press Accept on screen or Dial key to answer. During the calling, press the icons on screen to operate.The name and phone number of the caller is shown on the screen if the network supports the service. You may answer or reject the call. If call waiting is ON when you are on the phone and there is another incoming call, your phone will notify you with a short tone. You may answer or reject that second call. If you choose to answer the second call, the current call will be on hold. 4.3 Rejecting a Call You can press “Reject” on screen to reject a call. 5. Function Menu 5.1Alarm After setting the alarm clock, ring or vibration to remind you when the phone will arrive the time you set, in order to achieve the role of the alarm clock. 5.2 Browser You can use your phone to access Wireless Application Protocol (WAP) sites and use WAP-based services. To browse WAP pages, you must subscribe to the data service from your service provider and configureyour phone's relevant settings. Select the website list on screen or input URL in address bar to visit. For WAP Settings ― ― Step 1: MenuSettingsNetwork & connectivityData accounts Step 2: Select operator and required settings -5- Example: Vodafone GPRS for Vodafone operator and GPRS settings In case operator or required settings are not there use empty at the bottom of profiles and new profile will be created ― Step 3: After that enter the data settings as given on page 6-8 in detailed manual taking care of following: Account Name: Enter any name for connection APN: Check from detailed menu according to operator Username: Check from detailed menu according to operator Password: Check from detailed menu according to operator Authentication Type: Normal (in case of NA in detailed manual) DNS: Primary DNS as mentioned in detail menu NA or Null – No need to enter any data Profile Name: Enter any name for connection Homepage: Check from detailed menu according to operator Connection Type: Check from detailed menu according to operator Proxy: Check from detailed menu according to operator Port: Check from detailed menu according to operator Data accounts: Enter same connection name for which you are making settings (Name should be same as Operator’s WAP profile name) Example: Vodafone GPRS for Vodafone operator and GPRS settings In case NA or Null in detailed menu– No need to enter any data EXAMPLE Changing Settings for Airtel Live ― ― ― Step 1: MenuSettingsNetwork &connectivityData accounts Step 2: Select Airtel Live or in case Airtel Live doesn’t exist use empty Step 3: Enter the details Account Name: Airtel Live (Enter any name) APN: airtelfun.com Username: Leave Blank Password: Leave Blank Authentication Type: Normal DNS: 000.000.000.000 Profile Name: Airtel Live Homepage: http://live.airtelworld.com Connection Type: HTTP Proxy: 100.001.200.099 Port: 8080 Data accounts: Airtel Live (Name should be same as Operator’s WAP profile account name) IMPORTANT NOTE: By default there are WAP settings, change to internet profile settings for accessing internet plans of operator. -6- Table 1: Detailed Manual for GPRS-WAP-MMS-Internet Settings common for all models Operator AIRCEL details (Rest of India except Karnataka) Application AIRC EL WAP AIRTEL IDEA Aircel Aircel MMS Internet Karnataka Aircel WAP Karnataka AIRTEL MMS MMS-GPRS Internet GPRS MMS-GPR S WAP-GPRS MMS-GPRS aircel mms aircel gprs aircel mms aircel wap airtelmms.com NONE NONE NONE NONE NONE NONE NA NA NA NA NA NA NA NA NA NA NA NA NA NA NA NA Applicati WAPon GPR type S aircel wap Authenti NON cation E User NA name Passwor NA d APN Line Type Speed AIRCEL (Karnataka) AIRCEL MMS NA AIRTEL LIVE Mobile Office Internet IDEA WAP WAP-GPR WAP-GP WAP-GPR S RS S airtelfun.co airtel m gprs.com Reliance IDEA MMS RELIANC E MOBILE WORLD RELIANCE MMS Reliance Net Internet-GP WAP-GP RS RS MMS-GPRS Internet GPRS-G PRS Idea Internet MMS-GP RS Imis mmsc internet rcomwap rcommms rcomnet NONE NONE NONE NONE NONE NONE NA NA NA NA NA NA NA NA NA NA NA NA NA NA NA NA NA NA NA NA NA NA NA NA NA NA NA NA NA NA NA NA NA NA NA NA NA NA http:// Homepa http://10.50.1.1 http://my http://mmsc http://www.p http://100.1.201 http://live.ai http://Airt http://wap.i http://10.4. http://www.i http://wap. http://mmsc.r http://wap myair ge/MMS 66/servlets/m aircel.co /mmrelay.a ocketinternet .171:10021/mm rtelworld.co elLive.co deafresh.co 42.21:800 deafresh.co rworld.co.i com.co.in/m .google.c cel.co C ms m pp .in sc m m m 2/ m n ms/ om m Connecti HTTP HTTP HTTP WAP WAP HTTP HTTP HTTP HTTP HTTP HTTP HTTP HTTP HTTP on type Proxy Yes Yes No na Yes Yes Yes No Yes Yes No Yes Yes enable 172.0 Proxy 172.017.083.0 00000.0. 192.168.03 192.168.035. 100.001.201.17 100.001.20 000.000. 010.004.04 010.004.0 000.000.00 010.239.2 010.239.221. 17.08 address 69 000.000 5.196 201 2 0.099 000.000 2.015 42.015 0.000 21.005 005 3.069 Proxy 8080 8080 Off Off 8799 8080 0 8080 8080 0 8080 8080 port NA NA NA User name NA NA NA NA NA NA NA NA NA NA NA NA NA Pass-wo rd NA NA NA NA NA NA NA NA NA NA NA NA NA NA null null Null null Null null null null null null null 000.000.0 00.000 null null null null Null null Null null null null null null null 000.000.0 00.000 null null null null Null null Null null null null null null null null null null null null null Null null null null null null null Primary DNS Secondary DNS IP Address Subnet Operator details Reliance Internet AppliRTL GSM GPRS-G cation WAP PRS Applicati RTL WAP-GPR on GSM Net S type APN smartnet smartwap MTNL_ Delhi Vodafone Smart MMS VODAFON VODAFONE MMS E LIVE Vodafone MTNL GPRS MTNL MMS Mobile - Prepaid Prepaid Connect WAP-GPRS WAP-GPR S MMS-GPRS INTERNE WAP-GPRS T-GPRS MMS portal nmms portal nmms www gprs ppsdel MMS-GPRS gprs ppsdel 000.000.0 00.000 000.000.0 00.000 Dolphin Delhi MTNL Delhi Internet MTNL MMS - MTNL GPRS Postpaid - Postpaid INTERNE MMS-GPRS T-GPRS gprsp psdel gprsmtnldel NA null null Dolphin MTNL 3G MTNL 3G WAP-GPRS WAPGPRS WAPGPRS gprsmtnldel mtnl3g mtnl3g Authenti NA PAP NONE NONE NONE NONE NONE NONE NONE NONE NONE NONE NONE cation User NA NA NA NA NA NA mtnl mtnl NA mtnl mtnl mtnl mtnl name Passwor mtnl mtnl mtnl mtnl mtnl mtnl NA NA NA NA NA NA NA d 123 123 123 123 123 123 Line NA NA NA NA NA NA NA NA NA NA NA NA NA Type Speed NA NA NA NA NA NA NA NA NA NA NA NA NA Homepa http://go http://wap.r http://10.239. http://live.v http://mms1.live.v http://goo http://localho http://172.16. Http://goo http://172.16. http://localho http://wap.g http://wap.g ge/MMSC ogle.com world.co.in 221.47/mms/ odafone.in/ odafone.in/mms/ gle.com st/home.wml 31.136/mms/ gle.com 31.136/mms/ st/home.wml oogle.com oogle.com ConnectHTTP HTTP HTTP HTTP HTTP HTTP HTTP HTTP HTTP HTTP HTTP HTTP HTTP ion type Proxy NA Yes Yes Yes Yes No Yes Yes No Yes Yes No No enable Proxy 010.239.22 010.239.221. 010.010.00 000.000. 172.016.031. 172.016.031. 000.000. 172.016.031. 172.016.031. 000.000.00 000.000..00 NA 010.010.001.100 address 1.007 007 1.100 000.000 010 010 000.000 010 010 0.000 0.000 Proxy NA 8080 8080 9401 9401 0 9401 9401 0 9401 9401 0 0 port User NA NA NA NA NA NA NA NA NA NA NA NA NA name Pass-wor NA NA NA NA NA NA NA NA NA NA NA NA NA d -7- Primary DNS Secondary DNS IP Address Subnet null null null null Null null null null null null null null null null null null null Null null null null null null null null null null null null null Null null null null null null null null null null null null null Null null null null null null null null null Operat or details Dolphin_Mumbai TATA DOCOMO Application MTNL MMS Postpaid MTNL GPRS -Postpaid MTNL Prepaid MTNL MMS Prepaid TATA DOCOMO DIVE-IN Applica tion type MMS-GPRS WAP-GPR WAP-GPR S S WAP-GPRS WAP-GPRS TATA DOCOMO MMS Uninor TATA DOCOMO INTERNE MMS-GPR INTERNET-GP S RS Uninor WAP WAP-GPR S Uninor MMS Loop Mobile UNINOR Internet Loop MMS mumbai Loop WAP mumbai Loop Internet INTERN MMS-GP ET-GPR RS S MMS-GPRS WAP-GPRS Internet-GP RS gprsmtnlm gprsppsm TATA.DOCOM TATA.DOC TATA.DOCOM APN gprsmtnlmum gprsppsmum uninor uninor uninor mizone mizone www um um O.DIVE.IN OMO.MMS O.INTERNET Authen NONE NONE NONE NONE NONE NONE NONE NONE NONE NONE PAP PAP None tication User MDN ( Leave MDN ( Leave mtnl mtnl mtnl mtnl NA NA NA NA NA NA None name blank) blank) Passwo mtnl mtnl mtnl mtnl NA NA NA NA NA NA mmsc mmsc None rd 123 123 123 123 Line NA NA NA NA NA NA NA NA NA NA NA NA NA Type Speed NA NA NA NA NA NA NA NA NA NA NA NA NA Homep http://172.16. http://mtnl http://mtnl http://172.16. http://divein.tat http://mmsc http://divein.tat Http://wap. Http://10. Http://goo http://mms.loop http://atcafe.l http://wap.g age 39.140/mms/ mumbai.in mumbai.in 39.140/mms/ adocomo.com / adocomo.com myuninor.in 58.2.120 gle.com mobile.in:8080 oopmobile.in oogle.com Connec tHTTP HTTP HTTP HTTP HTTP HTTP HTTP HTTP HTTP HTTP WSP WSP HTTP ion type Proxy No No No No Yes Yes Yes Yes Yes No Yes Yes no enable Proxy 172.16.3009. 172.16.30 172.16.30 172.16.3009. 010.124.094.0 010.124.02 000.000.000.0 010.058.01 010.058. 000.000. 010.000.000.01 010.000.000. 000.000.00 addres 010 09.010 09.010 010 07 6.094 00. 0.058 010.059 000.000. 0 010 0.000 s Proxy 9401 9401 9401 9401 8080 8799 0 8080 8080 0 9401 9401 0 port User NA NA NA NA NA NA NA NA NA NA NA NA NA name Pass-w NA NA NA NA NA NA NA NA NA NA NA NA NA ord Primary null null null null Null null null null null null null null null DNS Secondary null null null null Null null null null null null null null null DNS IP Addres null null null null Null null null null null null null null null s Subnet null null null null Null null null null null null null null null Operat CELL-O or CELL-ONE NE details CELL-O CELL-O CELL-ONE NE NE CELL-O NE CELL-ON E CELL-O NE CELL-O CELL-O CELL-O NE NE NE BSNL WAP Prepaid BSNL MMS BSNL UP(W) BSNL UP(W) BSNL KOLKATA MMS Application type MMS-GPR WAP-GP WAP-GP MMS-GPR WAP-GP WAP-GP MMS-GPR WAP-GP S RS RS S RS RS S RS APN Authe nticati on User name Passw ord Line Type Speed BSNL KOLKAT A WAP BSNL KARNAT AKA WAP Application BSNL KARNATA KA MMS bsnlmms BSNL WAP Postpaid bsnlmms bsnllive bsnlwap www.e.po www.e.pr None None None PAP None None NA NA NA ppp NA NA NA NA NA ppp123 NA NA NA NA NA NA NA NA NA NA NA NA NA NA BSNL HARYAN A Videocon BSNL Video-c Video-con MMS UP (W) on WAP Virgin Video-c INTER-N WAP-G on ET-GPR PRS Internet S VMI VMI Internet GSM GSM - GPRS WAP inter-net vinterne m.vbyte vinternet. t.com s.in in MMS-G WAP-GP Inter-net PRS RS GPRS MMS-GPRS WAP-G PRS bsnlmms bsnllive bsnlmm bsnlportal bsnlnet s vgprs.com vgprs.c om PAP NONE NONE NONE NONE NA NA NA None None ppp NA NA NA NA NA NA NA NA NA ppp123 NA NA NA NA NA NA NA NA NA NA NA NA NA NA NA NA NA NA NA NA NA NA NA NA NA NA NA http://bsnlm http://wap http://wap http://bsnlm http://wap http://wap http://10.31 http://wap http://bs http://wap http://go http://10.202.4. http://w http://go http://m. Homemsc.in:851 .cellone.i .cellone.i msc.in:851 .cellone.i .cellone.i .53.18/mm .cellone.i nlmmsc.i .cellone.i ogle.co 119:10021/mms ap.vlive. ogle.co vbytes.i page 4 n n 4 n n s n n n m c/ in m n Conne ctHTTP HTTP HTTP HTTP HTTP HTTP HTTP HTTP HTTP HTTP HTTP HTTP HTTP HTTP WSP ion type -8- NA NA blank HTTP Proxy Yes Yes enable Proxy 010.210.01 010.220. addres 0.011 067.131 s Proxy 8080 8080 port User NA NA name PassNA NA word Primar null null y DNS Secondary null null DNS IP Addre null null ss Yes Yes Yes Yes Yes Yes Yes Yes 010.220. 010.210.01 192.0168 192.168. 010.031.54 010.220. 010.210. 010.220. 067.131 0.011 .081.163 081.163 .2 067.131 010.011 067.131 No Yes Yes Yes No No 000.000 010.202 000.000 010.124 010.202.005.14 000.000. .000.00 .005.14 .000.00 .094.00 5 000.000 0 5 0. 8 8080 8080 9401 9401 9401 8080 8080 8080 0 8799 8799 8080 9201 0 NA NA NA NA NA NA NA NA NA NA NA NA NA NA NA NA NA NA NA NA NA NA NA NA NA NA NA NA null null null null null null null null null null null null 0.0.0.0 0.0.0.0 null null null null null null null null null null null null 0.0.0.0 0.0.0.0 null null null null null null null null null null null null 0.0.0.0 0.0.0.0 5.3 Calculator The calculator can execute simple calculations. Press the numbers or icons on screen to input numbers and calculate. 5.4 Calendar In the calendar, you can check schedules for current month. There has an alarm for the date with schedule. Select one date to check all schedules for that day, or you can edit or delete the schedules. 5.5 Call Log You can check call logs such as received calls, dialled calls in Call log. Press one record, you can call the number, send message, etc. 5.6 Camera By using the camera application, you can take photos for around people or events anytime. Press the Camera icon in main menu to enter. Press the shoot icon to take photo. Press the icons on screen to operate the camera. After taking a photo, the thumbnail of the photo will be displayed at the corner. Click the thumbnail to view the photo. You can select Rotate, Delete, Set as or Shart when view the photo. Slide the icon between camera and video recorder to change shoot mode. 5.7 Clock You can check the time on the screen of the city you select and set. Press “Add” to add other cities, press “List” to check city time. 5.8 Contacts In the Contacts, press the icons on screen to enter: ― Add contact Select save the contact on phone or SIM cards, enter detailed information and select Save to save new contact. ― Groups -9- Select to add contact to group or create new group. ― Share Select to share one or more contacts via Bluetooth. ― More You can select to delete the contact, send message, edit my card, and do settings in the Contacts. 5.9 Network Applications Your phone has several built-in network applications such as Cricket Next, Lava Zone, etc. By clicking the icons in menu, it will link to the WAP pages. 5.10 Dialer Press the icons on screen to input numbers in sequence. After inputting numbers, press dial icon and select SIM card to dial. Press the icons at the top of screen, you can enter Call log and Contacts. 5.11 Downloads To check all downloads applications and to manage. 5.12 FM Radio Select FM Radio in the main menu and plug earphone to enter. Press the icons on screen to operate the FM radio. 5.13 File Manager In the main menu, select File mgr. to enter and manage files and folders. 5.14 Gallery You can use Gallery to view or manage photos. 5.15 Game Zone You can enter game zone to play games. 5.16 Home Fx To select Classic, Cylinder, Windmill, or Pageflow. 5.17 Lava Space Select SIM1 or SIM2 to enter Lava Space. 5.18 Messages 1. Select Messages in the main menu to enter. Select New msg. to create new SMS or MMS and send. 2. Enter receiver’s number or add number from Contacts. 3. Press “Tap to compose” to input message content. 4. If you want to send picture or video file, press More, Insert, to add images, - 10 - videos and audio. The message will shift to multimedia message automatically. 5. Press Send and the message will be sent via default SIM card. 5.19 Movie You can use Movie to view or manage videos. 5.20 Music Select Music in main menu. Press Songs, Artists, Albums, and Playlists at the top of screen to change category. Select one audio file to play the music. Press the icons on screen to operate the audio player. Note: The phone supports background play. 5.21 Notes The stick notes function can let you record the information you need anytime, anywhere. Press Notes in the main menu, Press “Add” to add new note content. Press the existing note content for viewing and editing. 5.22 Recorder The phone support sound record function, recorded files will be saved in standard or high quality. 5.23 SIM Toolkit Go to Menu, SIM Toolkit. If your SIM card supports STK function, the phone can display different first level menu according to different STK card. This function needs the network provider support. If user finds STK function can't operate normally, please contact the network provider. If the network provider does not support this function, we do not claim any responsibility whatsoever. 5.24 Settings 5.24.1 Nwtwork & Connectivity You can select Flight mode, Bluetooth, Bluetooth settings, Data connection SIM, GPRS transfer preference, Mobile network settings, and Data accounts. Bluetooth The phone supports Bluetooth. It can exchange information between devices including mobile phones wirelessly. Through Bluetooth, you can sync phone and computer, exchange data with other Bluetooth devices, and can connect to Bluetooth earphone. Go to Menu, Settings, Netword & connectivity, press Bluetooth to turn on Bluetooth and set. Before transmit data, you may need to match with other Bluetooth devices. 5.24.2 Personalization ― Theme settings: To set wallpaper for the phone. ― Sound settings: To set Silent, Vibration, Ring volume, etc. - 11 - ― Notification settings: To turn on/off notifaction service, and select applications. ― Security settings Use of Passwords Your mobile phone and SIM card have various passwords. Those passwords avoid unauthorized use of your phone and SIM card. You can change PIN, PIN2 and phone password in the “Settings > Security settings”. Go to Menu, Settings, Security settings Phone and SIM Phone Lock If turn on the phone lock, you need to input password everytime when power on the phone. Select Change password to change phone code. Change Password Input old password, then input new password and confirm new password to change. PIN Lock The PIN (Personal Identification Number) code protects your SIM card from unauthorized use. The PIN code is usually supplied with the SIM card. When the PIN code request is enabled, the password is asked every time the phone is turned on. Typing the Pin incorrectly for three times, shall lock the SIM card and you will need to use the PUK to unlock it. PUK is usually set by the network operator. Enter the correct PUK to unlock the SIM card, and then enter the new PIN and press OK key or left soft key. If the PUK is correct, the SIM card will be unlocked and the PIN will be reset. Change PIN Input old password, then new code, press new code again to confirm. Change PIN2 You can modify the PIN2 number here. PUK (8 digits) The PUK (Personal Unblocking Key) code is required to change a blocked PIN code. Please contact your network operator for the code. Note: Ten times wrong input of PUK in succession, the SIM card will be invalid and you need to consult network operator for a new SIM card. PUK2 (8 digits) The PUK2 code, supplied with some SIM card, is required to change a blocked PIN2 code. It may be supplied with the SIM card. If not, contact your network operator. Mobile Tracker Enter password to activate mobile tracker function. When user activated this function and lost the mobile, if someone pick-up the mobile and insert new SIM, the anti steal will send SMS to predetermined numbers to show detail of the lost mobile. 5.24.3 System ― Display settings: Set brightness and screen auto-lcok - 12 - ― Date & time settings: Set network time auto-update, home city, time settings, and date settings. ― Language & input: Set system language and international keyboards. ― Multi-SIM settings: Select whether to display boot up menu, and select SIM1/2. ― Advanced settings: Check SIM usage, and input default password to restore factory settings. 5.24.4 Applications ― Call settings: Set parameters related to call, such as black list, white list, auto redial, etc. ― Contacts settings: Set contacts storage, set speed dial, backup contacts, etc. ― Messaging settings: Check memory status, set text message and multimedia message, etc. 5.25 Tasks To check saved tasks or press “Add” to add new task. 5.26 WStore Enter Wstore to check installed applications or download new ones. 5.27 Game The phone has buily-in game Asphalt6. You can select to play. 5.28 Opear Mini With the Opera Mini, you can browse the WAP pages conveniently. 6. Care and Maintenance Battery care • Your device is powered by a rechargeable battery. When the power is weak, please charge the battery. In order to extend the lifespan of the battery, use all the battery's power before recharging. • Unplug the charger from the electrical plug and the device when not in use. Overcharging may shorten its lifespan. • Extreme temperatures can affect the ability of your battery to charge. Battery needs the fit temperature. If the surrounding temperature is over 40°C, the battery cannot be charged. • Use the battery only for its intended purpose. Never use any charger or battery that is damaged. Do not short-circuit the battery. Accidental short-circuiting can occur when a metallic object such as a coin, clip, or pen causes direct connection of the positive (+) and negative (-) terminals of the battery. (These look like metal strips on the battery.) Short-circuiting the terminals may damage the battery or the - 13 - connecting object. • Leaving the battery in hot or cold places, such as in a closed car in summer or a freezer in winter conditions, will reduce the capacity and lifetime of the battery. Always try to keep the battery between 59°F and 77°F (15°C and 25°C). A hot or cold battery may not function temporarily, even when the battery is fully charged. • Battery performance is particularly limited in temperatures below freezing. • Do not dispose of batteries in a fire! Dispose of batteries according to local regulations. Please recycle when possible. Cellphones are not considered household waste. Mobile phone maintenance • Keep the device dry. Precipitation, humidity, and all types of liquids or moisture can contain minerals that will corrode electronic circuits. If your device does get wet, remove the battery and allow the device to dry completely before replacing it. • Do not use or store the device in dusty, dirty areas. Its moving parts and electronic components can be damaged. • Do not store the device in hot areas. High temperatures can shorten the life of electronic devices, damage batteries, and warp or melt certain plastics. • Do not store the device in cold areas. When the device returns to its normal temperature, moisture can form inside the device and damage electronic circuit boards. • Do not attempt to open the device other than as instructed in this guide. • Do not drop, knock, or shake the device. Rough handling can break internal circuit boards and fine mechanics. • Do not use harsh chemicals, cleaning solvents, or strong detergents to clean the device. • Do not paint the device Paint can clog the moving parts and prevent proper operation. • Use only the supplied or an approved replacement antenna. Unauthorized antennas, modifications, or attachments could damage the device and may violate regulations governing radio devices. • Do not store your mobile phone near or with a credit card, disk or other magnetic materials. This may affect information stored on your phone. • Keep your phone away from pins. Pins can be absorbed by the phone’s receiver magnet which may cause harm. • If you intend not to use your mobile phone for a long period of time, please remove the battery from the phone. Leaving the battery inside the mobile phone for a long period of time may cause moisture to the battery, and it can damage the mobile phone or the battery. All of the above suggestions apply to your device, battery, charger, or any enhancement. If any device is not working properly, take it to the nearest authorized service facility for service. Using the Charger - 14 - Danger: • Only use the lava charger that came with the phone. Using a different charger may cause the phone to breakdown or explode. • If the charger short circuits, a fire may occur. • Do not use a damaged, worn or broken charger. This may cause a fire. • Clean dust away from the power socket to avoid the possibility of a fire. • Do not store the charger near any liquids. If liquids spill onto the charger and may cause it to overheat or breakdown. • If liquid does spill onto the charger, immediately unplug the power cable to prevent overheating, fire or another type of break down. • Do not use the charger in places with high humidity like a bathroom. This may cause a fire or other breakdowns. • Do not touch the charger, power cable or socket with wet hands. This may cause an electric shock. 7. Technical Information Weight: 103.6g (with battery) Size: 117 ×62 ×11.8 mm Battery: 1100mAh Networks: GSM Battery work times refer to the list below (Will not announce if the capacity is changed): The operation time of the battery depends on conditions such as: • Transmitting power level • Signal (distance between the phone and the base station) • Network parameters defined by the operator • Phone use (games, SMS) • Charging procedure used Exclusions: Subject to the exclusions contained below: 1. Damage due to the improper use. 2. User does not follow the manual. Explanation: LAVA has the final right of the explanation for this document. Software upgrades will not be announced. All the configurations mentioned in this user manual is only for reference; please refer to the actual phone. SAR Information The highest SAR value for this mobile phone is <0.951 W/Kg, in accordance with the requirements of the ICNIRP. The recommended s limit for exposure to radio waves is 1.6 watts/kilogram (W/kg) averagedover1 gramoftissue. For more information, please visit Lava’s website www.lavamobiles.comto read about - 15 - Safetyprecautions: a. Use a wireless hands-free system ( Headphone, headset) with a low power Bluetooth emitter b. Make sure the cell phone has a low SAR c. Keep your calls short or send a text message (SMS) instead. This advice applies especially to children, adolescents and pregnant women d. Use cell phone when the signal quality is good e. People having active medical implants should preferably keep the cell phone at least 15cm away from the implant E-waste Disposal Mechanism 'E-waste' means waste electrical and electronic equipment (WEEE). In other words E-waste is a popular, informal name for electronic products nearing the end of their "useful life". For more details about e-waste please refer e-waste rules, 2011 www.moef.nic.in Do’s and Don’ts for disposal e-waste Do’s: a. b. c. d. e. Ensure that an Authorised Person repairs your Lava products Call Our Local Authorised Collection Centers to Dispose Lava products Always drop your used electronic products, batteries or any accessories thereof after the end of their life at nearest Authorised Collection Point or Collection Center. Separate the packaging material according to responsible waste disposal options and sorting for recycling. Always remove the battery from the product, when you do not intend to use the product anymore it in future. Don’ts: a. b. c. d. e. f. g. h. i. j. Do not Dismantle your Lava Product on your own Do not give your e-waste to Kabbadi Wala / Scrap Dealer/ Rag Pickers. Do not dispose-off the e-waste in landfills. Never dump E-waste in garbage bins. Do not dispose of your product at municipal waste bins or rooms. Do not throw used batteries into household waste. Consequences of improper handling and disposal of E-Waste Improper disposal of waste prevents natural resources from being re-used. Some waste contains hazardous chemicals and if not disposed of properly may release toxins into the soil and water, and also releases greenhouse gases into the environment If e-waste is not properly disposed of, it can threat to the health and well-being of humans and animals and it also has adverse effect on the environment. - 16 - k. l. m. Placing of batteries or devices on or in heating devices, such as microwave, ovens, stoves, or radiators and improper disposal of batteries may lead to explosion. If the battery terminals are in contact with metal objects, it may cause a fire. For more details on how to dispose of your Lava products at the end of life, Please refer the list of our Services Centers on Pan India basis on our website www.lavamobiles.com or please view this link for the details of Service Centers http://www.lavamobiles.com/support-services. Troubleshooting Service Center number No.:+919560394002 Kindly note please send area code of place through SMS to this No. and in return you will get address of service center nearest to you by SMS - 17 - Frequently Asked Questions Frequently Asked Questions Cause and Solution Fail to turn on Press the power key for over 1 second. Check if the battery is properly connected. Please remove and install it again and retry; Check if battery is appropriately charged. Fail to connect network Display information while turning on Poor quality calling of Standby duration shortened SIM Card Error In case of Weak signal, please try and move to a location with strong signal and try connecting to the network again; Please ensure that you are not beyond the network coverage of service providers; Please ensure you have a valid SIM card. Please contact your network provider for further information. Check if the SIM card is installed correctly Handset lock password: If the handset lock is activated, you have to input handset password. Input PIN: if Inputting PIN while turning the phone on each time is activated, you have to input the PIN code. Input PUK code: When you’ve input wrong PIN code for 3 times will lock the SIM card. You need to input the PUK code provided by your network provider. Please check if the sound volume is tuned properly In an area with poor network conditions, example: basement, the signal might be weak. Try searching a location with stronger signal reception and call again. While using the mobile phone in the peak period of communication, like commute time, you may not be able to call because of line congestion. The standby duration is relative to the network systems. While the mobile phone is in an area with poor signal strength and cannot receive the signal, the handset will continuously search for a base station. This will significantly reduce battery charge. It is recommended that you turn off your mobile in area with no signal reception to save battery. Need replacing the battery: Please change to a new battery as battery performance may decrease after prolonged usage. Dirt on the metal surface of an SIM card: Use clean cloth to wipe the metal touch point on an SIM card. The SIM card is not installed. The SIM card is damaged. Please contact your network service provider. - 18 - Fail to dial out Callers can not contact you Fail charge to Please check if you press the dial key after typing the number. Please check if calling is forbidden because of default settings. Please check if the SIM is valid. Please check if the call barring is set. Please check if the fixed dial function is set. Please check if the mobile phone is on and connected with the network. Please check if the Call barring or call divert is activated. Please check if the SIM card is valid. May be due to poor contact. Please check if the plug is connected well. Please confirm if the environment temperature is within the range of 0ºC ~40ºC while charging. The battery or charger is damaged in which case you need to replace it. - 19 - Lava warranty certificate Limited warranty: LAVA international Ltd. (LAVA) provides limited warranty for your mobile phone and original accessories delivered with your mobile phone (hereinafter referred to as “product”) The warranty period for the transceiver is one (1) year and for battery, charger and headset is six (6) months from the date of purchase. LAVA Warranty Subject to the conditions of this Limited Warranty, LAVA warrants a product to be free from defects in design, material and workmanship at the time of its original purchase by you, and for a subsequent period of one (1) year for transceiver and six (6) months for battery & charger. You shall have to coverage or benefits under this warranty in the event that any of the following conditions are applicable: The product has been subjected to abnormal use or conditions, improper storage, exposure to 1.excessive moisture or dampness, exposure to excessive temperature, unauthorized modification, unauthorized repair (including but not limited to use of unauthorized spare parts in repairs),abuse, accidents, Acts of God, spills of food or liquids, improper installation You have not notified Lava of the defect in the product during the applicable warranty period. The product serial no. code or the accessories date code has been removed, defaced or altered. The product has been used with or connected to an accessory (i) Not supplied by Lava or its affiliates, (ii) Not fit for use with the product or (iii) Used otherwise than in manner intended. The seals of the product’s battery enclosure have been broken or shown evidence of tempering or the product’s battery has been used in equipment other than that for which it has been specified usable by LAVA. All plastic surfaces and all other externally exposed part that is scratched or damaged due to normal use. To get maximum of your new product, we recommend you to: Read the guidelines for safe and efficient use as mentioned in the manual. Read the terms and conditions of your Lava warranty in the manual. Keep your original receipt; you will need it for warranty services if asked to produce. - 20 - Present this Lava Warranty Certificate along with original proof of purchase whenever you require any warranty services. In case Lava product needs service, please visit the nearest Lava service centers given in the service guide. Please visit our Website www.lavamobiles.com for updated list of Authorized Service Centers near to your location. Important note: for your warranty to be valid, all information on the warranty certificate has to be completed including the stamp from the authorized distributor/retailer. All warranty information, product features and specifications are subject to change without notice. IMEI No. ………………………… Dealers Stamp ………….……… Date of purchase ……………… Model No. ……………………… - 21 -