1
ALL TOPO MAPS
Viewing Software
GPS Tool
BIGTOPO Seaming Tool
User Manual
The fast and convenient way to view, annotate
and print the highest accuracy topographic maps.
Copy your 16-character ALL TOPO MAP Serial Number to this box for safekeeping:
iGage
For Windows 95/98/NT
Contents
System Requirements ................................................................................................................ 4
Installation ................................................................................................................................... 4
Adding Additional State Sets ...................................................................................................... 5
Thank You for Purchasing All Topo Maps! ............................................................................... 5
What Are All Topo Maps? ......................................................................................................... 6
Returns, Technical Support and Upgrades ............................................................................. 6
Starting and Using All Topo Maps ............................................................................................ 7
The All Topo Map Viewing Screen ........................................................................................................ 7
All Topo Map Viewer Main Menu ............................................................................................... 9
All Topo Map Viewer Buttons and Controls ............................................................................. 11
How Do I? Common All Topo Map Examples ...................................................................... 13
Example 1: Finding a Place If You Know Its Name: A ‘Simple Search’ ................................... 13
Example 2: Determine Distance Between Two Points ............................................................. 15
Example 3: Quickly Determine Traced Distance and Area ...................................................... 16
Example 4: Annotate the Map With a Distance and Area ...................................................... 17
Example 5: Mark Property Boundaries, Compute Enclosed Area .......................................... 18
Example 6: Printing Maps ......................................................................................................... 21
Example 7: Export Maps to Another Application ................................................................... 23
All Topo Map Viewer Operation ............................................................................................. 23
Setting System and Coordinate Options ............................................................................................. 23
Measuring Straight Line Distance with the {Measurement Spike} ...................................................... 26
Tracing Paths to Measure Distance and Area ...................................................................................... 26
‘Control-X’ Marks the Spot - Cursor Location to Window’s Clipboard ............................................ 29
Export Maps to Other Programs with the ‘Map Export Wizard’ ...................................................... 29
File Type Details ......................................................................................................................... 31
Exported Image Resolution ....................................................................................................... 32
Export Map to GIS/CAD ..........................................................................................................32
Printing a Map ..................................................................................................................................... 33
Printing Maps on Large Format Printers ................................................................................... 36
2
ALL TOPO MAPS
Waypoints / Coordinate Annotations .................................................................................... 36
Saving the Cursor Position as a New Waypoint .................................................................................. 36
Using the Advanced Edit Waypoint Tabs ............................................................................................. 37
The ‘Coordinate Details’ Tab - Waypoint Text Attributes ........................................................ 38
The ‘Symbol’ Tab - Waypoint Symbol Attributes ...................................................................... 41
The ‘Line’ Tab - Waypoint Line Attributes ................................................................................ 45
The ‘Links’ Tab - Waypoint Hyperlink and Slide Attributes ..................................................... 46
Annotation Files ........................................................................................................................ 47
Using the Find Map Tool ..................................................................................................................... 48
Using the Find Location Tool ............................................................................................................... 49
Using the ‘Search For a Waypoint’ Tool ............................................................................................. 50
All Topo Maps: GPS Tool ........................................................................................................ 51
GPS Example 1: Moving Waypoints From Map to GPS ........................................................... 53
GPS Example 2: Moving a GPS Track from GPS to Map ......................................................... 55
Real Time Position Tracking ................................................................................................................. 57
BigTopo Map Seaming Tool ..................................................................................................... 59
Tour: Building A BigTopo Map ........................................................................................................... 60
Tour 1: Defining BigTopo Coverage ........................................................................................ 60
Tour 2: Select Annotation Options .......................................................................................... 61
Tour 3: Choosing Output Files and Paths ................................................................................. 63
Tour 4: Making the BigTopo .................................................................................................... 64
Tour 5: Previewing a BigTopo ................................................................................................... 65
Tour 6: Opening a BigTopo in the All Topo Maps Viewer ....................................................... 66
Index ........................................................................................................................................... 68
Legal Notices ............................................................................................................................. 71
All Topo Maps Quick User Tips .............................................................................................. 72
User Guide
3
System Requirements
Adding Additional State Sets
Minimum Computer
If you purchase additional state map sets you must run the setup program on each additional set.
For each additional map set:
1. Exit AllTopo and its help resources, place data disk #1 in the CD drive.
2. Click Start (on the Start menu bar), and then click Run.
3. Type d:\Setup, where d is the letter representing your CD-ROM drive, and then click
OK.
Hard Disk Drive
Monitor Setting
Printer
Optional GPS Receiver
60 MHz 486, 8 Meg Ram, Win95™, Win98™ or WinNT™
Run under Virtual PC on a Mac.
100 megabytes of free space + 15 Meg per additional state set
True Color / High Color / 256 Color Mode
(will not run in 16-color mode)
Any graphics capable windows printer. (Laser printers:
1.5MBytes printer memory for 300 DPI printouts,
4+MBytes for 600 dpi.)
Garmin™, Magellan™, Lowrance™ with serial cable.
Tracking supported for all NMEA output devices.
Installation
Each ALL TOPO MAPS set should be installed using the installation program which is found on the
#1 data CD or the dedicated installation disk if one is provided. Only the first disk needs
to be installed. To run the installation program:
1. Start (turn on) your computer.
2. After your computer completes starting, place CD #1 into the CD-ROM drive.
3. Click Start (on the Start menu bar), and then click Run.
4. Type d:\Setup, where d is the letter representing your CD-ROM drive, and then click
OK.
The installation program will automatically add an icon to start ALL TOPO MAPS, both on your
desktop and on the Start Menu under ‘Start, Programs, ALL TOPO MAPS’.
The first time you run ALL TOPO MAPS you will need to enter your unique Serial Number which
may be found on the ‘ALL TOPO MAPS Serial Number Certificate’ attached to the ‘Warranty and
Software Update Registration’ card. DO NOT loose your Serial Number, it is your proof of
purchase and your key to product updates and support.
4
ALL TOPO MAPS
Thank You for Purchasing ALL TOPO MAPS!
Thank you very much for purchasing and using ALL TOPO MAPS! We are always excited to hear
from ALL TOPO MAP users and invite you to send stories, enhancement requests, and general
comments to:
email: [email protected]
The latest updated version of the ALL TOPO MAP viewer and any new tools may be downloaded
(at no cost) from the iGage web site:
www.igage.com
Please take a moment to fill in the registration card and return it, or use the web based
registration form at www.igage.com/regweb/ We want our upgrade information to be
welcome at your address and promise to keep our customer lists (your name and address)
private.
Store your Certif icate of Serial Number in a safe place; you will need it if you upgrade your
system’s ALL TOPO MAP components. Your certificate lists toll free numbers for All Topo Map
support.
Don’t divulge your serial number to others. Program updates, special promotions and support
are offered only once per customer as metered by your serial number. Other individuals using
your serial number will prevent you from obtaining the updated tools and support that you
deserve.
User Guide
5
What Are ALL TOPO MAPS?
Starting and Using ALL TOPO MAPS
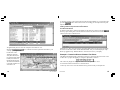
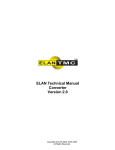
ALL TOPO MAPS are a collection of 7½ minute (1:24,000),
1:100,000 scale and 1:250,000 topographical maps, with easy to
use viewing software (AllTopo.exe) for your Win95/98/NT
based computer. Each collection includes every map for an entire
state. The viewing software allows quick access to every map by
location or place/feature name. Export to the clipboard and
printing is supported. Straight line, traced distances and areas
may be measured.
7½ minute topographical maps represent the smallest scale
(most detailed resolution) available for general coverage of rural
lands. The base, paper maps are prepared by the USGS in 7
minute 30 second (7½ minute) longitude and latitude increments
which project the curved surface of the earth onto the flat
A 7½ Minute, 1:24,000 Scale
surface of the paper.
Quadrangle Topo Map
These paper maps are scanned, georeferenced to 2½-minute grid ticks, then digitally rubbersheet reprojected to flat Universal Transverse Mercator (UTM) space. Finally the digital map
images are highly compressed and prepared for use with the ALL TOPO MAPS program.
Double click on the ALL TOPO MAPS icon that was placed on your desktop, or find ALL
TOPO MAPS under the Windows Task Bar: ‘Start Menu: Programs: ALL TOPO MAPS’.
ALL TOPO MAPS will begin loading its components and databases; shortly you will arrive at the
map location and scale that you last viewed.
and enter a place name to quickly find the place you are looking
Press the Find Place key
for. For a quick overview of ALL TOPO MAPS operation, check out the Quick User Tips on the
rear cover of this User’s Guide.
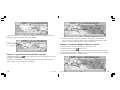
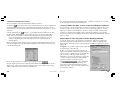
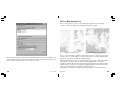
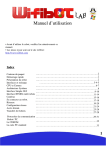
The ALL TOPO MAP Viewing Screen
Switch between 1:24K,
100K and 1:250K maps
The Main Menu Bar
Map Name
Select Cursor
{Spike} distance box: distance from the {Spike}
to cursor. F4 cycles through formats, F6 drops
the {Spike} at the current cursor location.
Search for a place Search by
by it’s name
Map Name
Search by
Coordinates
Zoom Control
Returns, Technical Support and Upgrades
If within 30 days you decide that ALL TOPO MAPS is not the product that you expected, please
return the disks and the Certificate of Serial Number to the retailer where you purchased the
product for a refund.
iGage will gladly exchange disks that are unusable or damaged. Call to request a ‘free’ disk
exchange within 30 days of purchase. After 30 days, your data disks may be replaced or
upgraded at any time for a nominal fee.
iGage hopes to provide a useful product and great product support. Our technical support
address and telephone numbers can be found on the ‘Certificate of Serial Number’ card which
is included with the data disks.
6
ALL TOPO MAPS
View list of
Waypoints
Cursor
Coordinates Box.
F3 cycels through
formats.
Displayed Map
Scale
User Guide
Current Annotation
File. Double-click to
edit source.
Move the map using
these scroll bars.
7
Press F1 in any screen for targeted Help.
Use the menu option ‘View: Reset All Window Sizes’ or press Ctrl-W to force every ALL
TOPO MAPS window onto your screen at a reasonable size and position.
Use
or F9 to switch between the 1:24,000, 1:100,000 and 1:250,000 maps.
Center the location you are interested in by double-clicking on it with the Bombsight or
Draghand cursors, the center map location is preserved when map scales are switched.
Viewing and Moving Around ALL TOPO MAPS
Method 1: Use the Arrow Keys to move the map around the screen.
(shortcut = ‘D’) then use the left-mouse-button to
Method 2: Select the ‘Drag Hand’
drag the map image on the screen.
Method 3: Double click the left mouse button at the map location that you want centered
on your display.
Method 4: Use the scroll bars at screen bottom and right to move the map on your
screen.
Method 5: You can quickly jump to any waypoint with the ‘Find Wpt’
tool.
Method 6: If you have a coordinate from a GPS or other source, press the ‘Find Loc’
button to display the Find by Location tool.
Moving to an Adjacent Map
Method 1: Double-click in the currently displayed map’s collar (the white border at the
edge) to move to an adjacent map.
Method 2: Press the ‘Find Map’
button, single click the map you want to view, then
click the ‘Show Center Map’
button.
Zoom In and Out
Method 1: Press the Page Up key to Zoom out 10% (move away from map).
Press the Page Down key to Zoom in 10% (move closer to map).
Hint: Also press and hold the Shift key to change the Zoom in 1% increments.
8
ALL TOPO MAPS
Method 2: Select the Zoom (shortcut = Z) tool
then use the left mouse button to
drag a new window area. Alt-0 will quickly display the entire image so you can
resize the view to another area.
Method 3: Press ‘Alt-V’ to access the View menu, then select one of the preset Zoom
values.
Method 4: Press the drop button on the Zoom box
, then select one of the
preset Zoom values.
Method 5: Type the desired zoom scale into the zoom box.
Method 6: Right-click, select zoom, then select a preset zoom value.
Method 7: If your mouse has a roller wheel, moving the wheel away zooms in; rolling
back zooms out.
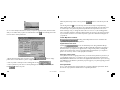
All Topo Map Viewer Main Menu
You can access the menu bar items by holding the Alt key while pressing the underlined
character. The main menu has these selections:
File: Open
Open BigTopo
Export Map to GIS/CAD
Setup Printer/Map Scale
Print Viewed Map
Print Entire Map
Exit
Edit: Export Map to Clipboard
Copy Cursor Position to Clipboard
Add Waypoint
Edit Nearest Waypoint
Quick Add Waypoint
{Measrurement Spike}
Select Tool
User Guide
Ctrl+B
Ctrl+R
Ctrl+P
Alt+F4
Ctrl+C
Ctrl+X
F2
F7
F6
B,Z,D,P
open other state sets
open seamed maps (see BigTopo below)
writes full or partial images to files
prepares images for printing
sends the viewed map to the printer
sends the entire map to the printer
close ALL TOPO MAPS
partial or entire map to clipboard or file
sends current cursor position to the clipboard
adds the cursor position to the annotation list
edit annotation attributes
adds a waypoint just like the last one
sets the spike at the cursor position
chooses Bombsight, Zoom, Drag Hand
9
Search:
Search by Place or Feature
Search by Map Name
Search by Coordinate Location
Search by Annotation Wpt
Jump to {Measurement Spike}
Annotations:
Display Map Annotations
Waypoint Name
Waypoint Description
Waypoint Notes
Clear System Annotations
Pencil Attributes
New Annotation File
Open Annotation File
Save Annotations
Save Annotations As…
Edit Annotation Source
Options:
Coordinate System Options
Display UTM 1K/10K Grid
High Quality Display
View: Detailed Map Information
System Information Logger
Switch Map Scales
Print Preview
Refresh Display
Reset All Window Sizes
Fit On Page
Page Width
Zoom 400, 200, 100, 75, 50, 25%
10
or Draw Pencil tools
Tools: GPS Tool
BigTopo
Alt+P
Alt+M
Alt+C
Alt+W
Alt+K
quickly find any named location on maps
quickly find a map by its name
quickly find a Lat/Lon or UTM position on map
quickly find an annotation
center the measurement {Spike} on the viewer
Help: Help on ALL TOPO MAPS
Ctrl+Alt+A
Alt+N
Alt+D
Alt+T
Alt+C
toggles display of all annotations ON/OFF
toggles display of waypoint Names ON/OFF
toggles display of waypoint Descriptions ON/OFF
toggles display of waypoint Notes ON/OFF
removes Spike, clicks, and finds from display
set the Pencil Tool’s width and color
work with a new, empty annotation file
open another annotation file
save the current annotation file
save the current annotations to a new file
edit the text source for the current annotations
Ctrl+N
Ctrl+O
Ctrl+S
Ctrl+A
F8
Alt+Y
Alt+G
Alt+Q
F9
Alt+R
Alt+W
Alt+0
About ALL TOPO MAPS
ALL TOPO MAPS
display the table of contents for ALL TOPO MAP’S
online help
display All Topo program version and legal info
All Topo Map Viewer Buttons and Controls
Zoom Box: shows and changes current image magnification.
1:250,000 scale map selector. Switches to large coverage map.
1:100,000 scale map selector. Switches to medium coverage map. (Not
available in every All Topo Map set.
1:24,000 scale map selector. Switches to high detail map.
Bombsight cursor selector. Shortcut = B. Use the Bombsight to accurately set
waypoints, make {Spike} measurements and trace distances. When selected
Shift -> Draghand, Ctrl -> Zoom.
Draghand cursor selector. Shortcut = D. Use the Draghand cursor to position
the map. When selected the Shift -> Zoom, Ctrl -> Zoom.
choose coordinate display style, cache size
toggle UTM grid overlay
disable high quality rendering engine
for faster display updates
information on the current map
log of system information, events and errors
toggle through 24, 100 and 250K scale maps
resizes annotations to match printouts
repaints map and annotations
sets All Topo Map window sizes to defaults
sets zoom so entire map fits on screen
sets zoom so map’s width fits on screen
forces zoom
Shift+Ctrl+G display the All Topo Map GPS Tool
Shift+Ctrl+B display the All Topo Map BigTopo map seamer
Zoom cursor selector. Zooms in map image. Shortcut = Z. When selected Shift
-> Bombsight, Ctrl -> Draghand.
Pencil cursor selector. Shortcut = P. Draws freehand traces. When selected
both Shift and Control -> Draghand.
&
User Guide
Annotations ON/OFF. Toggles display of all annotations and grids ON/OFF.
Shortcut = Ctrl+Alt+A.
Print Preview. When depressed, line widths and annotation sizes are adjusted
to match printouts generated with ‘Print Viewed Map’. Before printing, setup
the print scale and paper orientation using the ‘File: Setup Printer / Map Scale’
menu option. Shortcut = Alt V, P.
11
Quickly display a location by its place name. Shortcut = Alt+P. See Ex. 1.
Quickly find and display a map by its mapname. Shortcut = Alt+M.
Quickly find a Location by its Lat/Lon or UTM coordinates. Shortcut = Alt+L
Display waypoint list. Center, edit and reorder waypoints. Shortcut = Alt+W.
Current cursor coordinate display. Shows the geographic coordinates of the
mouse cursor. Press the F3 key to cycle through coordinate formats, or use the
drop button to choose from the available formats. Press Cntl-X to copy these
contents to the Window’s clipboard.
Select the ‘Open’ item to evaluate the hyperlink associated with the nearest waypoint.
Select ‘Edit Waypoint’ to change the nearest waypoint.
‘Delete Waypoint’ removes the nearest waypoint from the annotation list.
‘What’s this?’ describes the source of the nearest waypoint on the Status Bar at the bottom of
the viewer’s window.
‘Add to Waypoint List’ adds a new coordinate annotation at the current cursor position.
‘[Zero Traced Distance]’ clears the Bombsight’s accumulated distance and area.
{Set Measurement Spike}’ places the {Spike} at the current cursor position.
Select ‘Pencil Attributes’ to change the drawing pencil’s width and color.
‘Zoom’ allows quick zooming to preset magnifications.
Distance from the {Measurement Spike} to the cursor. Both X,Y and Distance
and Bearing are shown. Press F4 to cycle through Feet, Yards, Meters and Miles;
or use the drop button to choose format options.
Window controls to Minimize, Maximize (fill entire screen) and Close (X) the
ALL TOPO MAPS viewer.
How Do I? Common ALL TOPO MAP Examples
Current map annotation file. Double-click on its name to edit the annotation
source file, use the main menu ‘Annotations’ to open, save and create files.
Viewing status. Distances traced with the Bombsight tool, scale information and
to resize the map
errors are displayed in this area. You can use the drag box
viewing window.
Viewing maps, making simple measurements and printing maps should be easy! These
examples show how to perform common tasks in ALL TOPO MAPS:
1. Finding a map by a placename.
2. Measuring the distance between two points.
3. Quickly measure a traced distance and area.
4. Annotate the map with a traced distance and area.
5. Accurately mark property boundaries, compute enclosed area.
6. Print a map.
7. Export a map to the Window’s clipboard, a file, CAD or GIS.
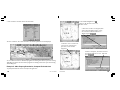
Example 1: Finding a Place If You Know Its Name: A ‘Simple Search’
Right-mouse-click on the map to display this pop-up menu.
12
ALL TOPO MAPS
To find the ‘Flaming Gorge Dam’ using the ALL TOPO MAPS: Utah collection. Press the Find Place
button (or press ‘Alt-P’), then enter the first few characters of the place name:
User Guide
13
To add every location on the current map from the placename database to your annotation list,
button. After a few moments of searching, the currently viewed map will
press the
fully annotated.
Finding a Place If You ‘Kind-Of Know’ Its Name:
An ‘Advanced Search’
A ‘Simple Search’ finds no match for ‘Box Butte’ in the Utah map collection. Press the
button (or press ‘Alt-P’), then select the ‘Advanced Search’ tab, and enter ‘box butte’ in the
search box, then press ‘Submit Search’.
The grid instantly moves to show all of the place names that are close.
Check the
box to make the annotation permanent and add it to your
currently open waypoint list.
Double click on the
‘Flaming Gorge Dam’
entry. The ‘Dutch John’
topographical map will be
loaded, and centered at
the Flaming Gorge Dam.
The dam location will be
noted with a marker and
annotation note.
14
ALL TOPO MAPS
It takes ALL TOPO MAPS a few moments to search through thousands of place names and display
the search results. Now double click the ‘Band Box Butte’ entry to load and display the ‘Clay
Basin’ topographical map. ‘Band Box Butte’ is centered and noted on your display.
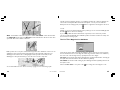
Example 2: Determine Distance Between Two Points
The {Measurement Spike} is like a steel stake, press F6 to pound it into the ground at the cursor
location. Once you place the {Spike} on a map, the spike distance window:
will continuously display the straight line distance from the Spike to the cursor.
To measure the distance between two road intersections:
1. Place any of the cursors over the first intersection, press the F6 key on the keyboard.
User Guide
15
2. Move the cursor to the second intersection, read the distance from the display window. Use
the F4 key to cycle between Meters, Feet, Yards and Miles.
Move cursor,
read distance from
cursor to {Spike}
3. Read the traced distance at the bottom of the map viewing screen on the status bar.
If you can’t see the status bar, it might be under your Window’s Start/Task bar. Press
Ctrl-W to resize and position the ALL TOPO MAPS viewing window.
Example 4: Annotate the Map With a Distance and Area
To quickly annotate a map with an irregular area’s perimeter and area:
1. Select the Pencil Trace cursor
(shortcut = P).
2. Position the pencil at the start of the area, hold the left-mouse-button down, then carefully
trace clockwise around the area; end the trace close to where you started. Remove your finger
from the mouse button when you complete the trace.
Example 3: Quickly Determine Traced Distance and Area
1. Select the Bombsight cursor
(shortcut = B), press the F5 key on the keyboard to zero the
Bombsight’s accumulated distance.
2. Position the cursor at the base measurement point, press and hold the left-mouse-button
while moving the cursor clockwaise around the feature.
16
ALL TOPO MAPS
User Guide
17
3. Choose distance and area units for the annotation.
1. Select the Bombsight Cursor
(shortcut = B), place the cursor over
the first corner.
2. Press F2 to create a new waypoint, then
enter a short description for the corner;
set ‘Connect Coordinates with Line’ to
.
‘Begin’ and press
The trace is added to the current annotation set with the perimeter and area displayed:
3. Place the cursor over the next
corner (move clockwise) and
press F2 to create another
waypoint.
4. Enter a description, insure that ‘Connect
Coordinates with Line’ is set to ‘ON’ and
press
You can edit the annotation’s attributes by right-mouse-clicking near the base point and selecting
‘Edit Waypoint’. Delete the annotation by right-mouse-clicking near the base point and selecting
‘Delete Waypoint’.
Example 5: Mark Property Boundaries, Compute Enclosed Area
To quickly determine the area enclosed by an irregular area:
18
ALL TOPO MAPS
User Guide
19
5. Repeat steps 3 and 4 until all
corners have waypoints. Position the
cursor over the starting waypoint and
press F2.
8. Change the text position to
SouthEast so that it does not
overwrite the first corner’s
description. Press
.
6. Select the ‘Coordinate Details’ tab, then
button to
press the Description’s
display the %token% helper tool.
9. All Topo Maps display
both the perimeter in
miles and the enclosed
area in acres.
Example 6: Printing Maps
ALL TOPO MAPS makes printing maps at any scale easy. When you are ready to print a map,
select the ‘File: Setup Printer, Map Scale’ menu item (shortcut = Ctrl+R):
7. Click on %MILES%, then on
%ACRES% to include the connecting
line’s total length and enclosed area.
Press
.
ALL TOPO MAPS will adjust its window size to match your printer’s page aspect ratio, this insures
20
ALL TOPO MAPS
User Guide
21
that what you see on the display will be what you print. The ‘Print Preview’ button
is
automatically pressed and the displayed text is rescaled to match the printed text’s size. The ‘Set
Printed Scale’ dialog is shown:
Example 7: Export Maps to Another Application
1. Use the Draghand cursor, arrow keys and the PageUp and PageDn keys to compose the
desired image to export. Select ‘Edit: Export Map to Clipboard, File or GIS’.
2. Select ‘Export: just the viewed map’ and
‘To: the Windows Clipboard’.
3. Choose any desired image options.
3. Unclick ‘Resample Output Image’ to export
the map with full resolution.
4. Press the ‘Export’ button to transfer the
image to the Windows Clipboard.
5. Use the ‘Edit: Paste’ option in the
destination application to paste the exported
image.
CAD/GIS Notes
1. Check the listed printer and its resolution. Use the
printers and access Window’s print driver configuration tool.
button to change
2. Choose portrait or landscape for the resulting printout:
3. Select a printed map scale. The 7½ minute quadrangles are normally printed at 1:24,000.
Press
, or one of the other ‘Force Printed Maps Scale To’ buttons to set the map scale.
button to view the map as it will print.
Press the
4. Use the drag hand tool
to move the map on the screen and compose the printed map.
When satisfied with scale and composition, select ‘File: Print Viewed Map’ from the main menu
(shortcut = Ctrl+P) to send the map to the printer. The printed map will match the map viewed
on the screen.
22
ALL TOPO MAPS
When exporting images for CAD or GIS
applications, select ‘To an Image File’ and
supply an output path and filename.
Check
to write a text
file detailing the exported image’s contents.
to write a world file.
Check
The world file may help your CAD/GIS
application georeference the exported image.
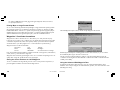
All Topo Map Viewer Operation
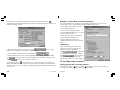
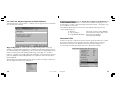
Setting System and Coordinate Options
The main menu selection ‘Options: Coordinate, System Options’ (shortcut = Alt+Y) allows you
to configure the default coordinate format shown on the display.
User Guide
23
NSEW Before or After Coordinate
If ‘NSEW’ is checked, you may choose to display the Compass direction
(NSEW) before or after the coordinate value:
Before Coordinate:
N 40° 54" 52', W 109° 25" 16'
After Coordinate:
40° 54" 52' N, 109° 25" 16' W
Lat & Lon Order
If Lat/Lon coordinates are selected, you can choose to place the
Latitude (North/South) coordinates first or last.
‘North/South First’ Checked:
N 40° 54" 52', W 109° 25" 16'
‘East/West First’ Checked:
W 109° 25" 16', N 40° 54" 52'
Area Tracing Units
By default, area measurement is disabled. You can choose from the following area units:
Square Feet, Acres, Square Miles, Square Meters or Hectares
Read about using area measurements in the ‘Tracing Paths to Measure Distance’ and examples
section of this manual.
{Measurement Spike} Base Location
In addition to choosing the ‘Coordinate Display Method’, you can configure these additional
display options from this menu:
Map Cache Size
The map cache greatly speeds up moving between maps. Its default size is 40 Megabytes which
holds about 6 maps. Setting a larger cache size will allow more maps to remain available for
quick display.
Use ‘N S E W’ or ‘+ -’
Select Compass (NSEW) or Signed (±) Values for Lat/Lon displayed values:
Compass:
N 40° 54.862", W 109° 25.270"
Signed:
40° 54.862", -109° 25.270"
24
The current measurement spike location is shown in the ‘Base Location’ box. You can manually
enter any legal coordinate to precisely set the {Measurement Spike} location.
Press the
the map cache.
ALL TOPO MAPS
User Guide
button to remove all cached files and regain the file space allocated to
25
Measuring Straight Line Distance with the {Measurement Spike}
1. Quick / Temporary Measurements
Also see ‘Example 2: Determine Distance Between Two Points’ for {Spike} example.
The {Measurement Spike} allows you to make straight line (as the crow flies) distance
measurements from the {Measurement Spike} to the cursor.
You can place the {Measurement Spike} at any map location by positioning the cursor over the
map and pressing F6 (or mouse right-click and select ‘Set {Measurement Spike}’.) As the cursor
is moved away from the {Spike} location, the straight line distance is displayed in the {Spike
Distance} box:
The ‘Spike Distance’ is displayed both in planer Cartesian coordinates: “(0.034, 0.77)” showing
the (East-West Distance, North-South Distance) and as a Distance and Compass heading:
(0.085 Miles @ 24.0°).
You may select the displayed units from Meters, Feet, Yards or Miles by pressing the drop arrow
at the {Spike Distance} box’s right-hand side or pressing F4 to cycle through the options. The
distance units you choose will be the default units for all distance measurements.
Quickly center the {Measurement Spike} on the viewing screen with the main menu option
‘Search: Jump to {Measurement Spike}’ (shortcut = Alt-K). The {Spike}, like a steel spike is
always somewhere and can not be deleted. To move it out of your way, just place it (with the F6
shortcut) on another map or in a map’s corner.
Use the menu option ‘Annotations: Clear System Annotations’ (shortcut = Alt+C) to clear the
{Spike} from the current map.
Tracing Paths to Measure Distance and Area
See ‘Example 3: Quickly Determine Distance and Area’ for an example.
Tracing a path allows you to measure the length of a road, river, trail or feature that is not
straight. ALL TOPO MAPS has two methods for tracing measurement:
26
ALL TOPO MAPS
generates >
Area measurement is turned off by default. To enable area computations, select the
‘Coordinate, System Options’ menu option (shortcut = Alt-Y) and conf igure ‘Area Tracing
Units’. Choose ‘Area Tracing Units’ from Square Feet, Acres, Square Miles, Square Meters and
Hectares.
Tracing clockwise accumulates area; tracing counterclockwise subtracts area from the displayed
total. Unclosed areas are automatically completed with a straight line back to the starting point.
(shortcut = ‘B’) to the start of
To determine the length of a trail, move the bombsight cursor
the trail and press F5 (or right-click the mouse and select ‘[Zero Traced Distance]’).
Press and hold the left-mouse-button, while dragging the cursor along the path. When you reach
the end of the trail release the left-mouse-button.
The status line on the screen bottom continuously displays the traced distance and area.
When you release the Left Mouse button, you may reposition the map and continue to
accumulate traced distance and area. Press the Shift key while tracing to move the map without
accumulating distance. Press the Alt key while tracing to subtract distance from the traced total.
A common traced distance/area measurement problem occurs when the Windows Task Bar
obstructs your view of the bottom of the ALL TOPO MAPS viewer’s window: you cannot see the
status line. Press Control-W to automatically adjust window sizes or manually re-size your display
window.
User Guide
27
2. Permanent Traced Distance and Area
You can delete the Pencil trace by deleting the anchor coordinate: position the cursor over the
anchor then right-click and select ‘Delete Waypoint’.
Also see ‘Example 4: Annotate the Map With a Distance and Area’
can be used to draw a traced outline along a trail or around an irregular area.
The Pencil tool
A waypoint will be appended to the current annotations, along with the traced line. You can
annotate the trace’s anchor waypoint with the traced distance and the enclosed area. To use the
Pencil tool:
(shortcut = ‘P’). Configure the Pencil’s width and color from
Select the Pencil Tracing tool
the ‘Annotations: Pencil Attributes’ menu. Position the mouse over the start of the path or
outline. Press and hold the left mouse button, then drag the Pencil along the desired path.
If you reach the edge of the screen, press and hold the keyboard’s shift key (the cursor will
change to a Drag-Hand) then pull the map’s edge to the screen’s center and release the
keyboard shift key.
When you complete tracing, release the left mouse button and the ‘Display Distance and Area’
menu will be displayed. If you are interested in displaying the enclosed area, end the trace close
to its starting anchor point.
Choose the desired distance and optional area for display, then press
.
The trace will be appended to the current annotations with the anchoring coordinate. You can
edit the anchor’s text, symbol and links by moving the cursor over the anchor then pressing
Shift-F2 or right-click the mouse and select ‘Edit Waypoint’.
28
ALL TOPO MAPS
‘Control-X’ Marks the Spot - Cursor Location to Window’s Clipboard
Press Control-X to copy the current cursor coordinates to the Windows clipboard. The cursor
position is copied in the same format selected for cursor position display (press F3 or use the
‘Options: Coordinates and System Options’ selection to change the default coordinate units).
Control-X is convenient when including location coordinates in a publication or report. Most
programs will insert the saved coordinate from the Window’s clipboard using the ‘Edit: Paste’ command
(shortcut = Ctrl-V).
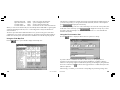
Export Maps to Other Programs with the ‘Map Export Wizard’
To copy the viewed portion or the entire map to the Window’s clipboard or a graphics file,
select ‘Edit: Export Map to Clipboard, File or GIS’ (shortcut = ‘Ctrl-C’) to display the ‘Map
Export Wizard’. Follow these steps to export an image to the Window’s clipboard or a generic
graphics file:
‘1. Export’: choose what to export. You can export just
the viewed image or the entire map.
‘2. To’: choose where to export the image. You can
export to the Window’s clipboard or a graphics file. If you
choose to write to a graphics file, you can select the file’s
path and name. See ‘File Type Details’ for file type
information. If you export an entire map or a large area,
consider exporting to a file instead of the Window’s
clipboard to save time and system resources.
to write a text file that
Check
contains information about the exported map. The
exported file contains detailed information about the
image’s scale, name, source and corner locations in Lat/
Lon and UTM coordinates.
User Guide
29
Check
to write a text file that contains the northwest corner location and
scaling information needed by GIS application to import the image. The extension of the
worldfile is file type dependant: .BMP-> .BPW, .TIF->.TFW, .PNG->.PGW.
Checking ‘Compress File’ may enable image compression for some file types, see ‘File Type
Details’ below.
‘3. Image Options’: The exported image can be annotated with additional text, grid and
scale information. The annotation information is controlled by these options:
‘Include Source Map name’ adds the map name to the lower left corner of the exported
map.
‘Include Coordinate Annotations’ adds any user defined annotations (waypoints, icons,
lines, text) to the exported image.
‘Overlay UTM Grid Lines’ includes 1,000 meter (10,000 meter if the base map is
1:100,000 or 1:250,000 scale) grid lines and edge markers.
‘Overlay Lat/Lon Grid Lines’ adds 1° Latitude and Longitude grid lines in blue with edge
markers.
‘Include Coordinate Names’ includes coordinate (waypoint) Names with map annotations.
‘Include Coordinate Descriptions’ includes coordinate (waypoint) Descriptions with map
annotations.
‘Include Coordinate Notes’ adds coordinate (waypoint) Notes to map annotations.
‘Resample Output Image’ when checked allows sub-sampling to reduce the size of the
exported image. If unchecked, the exported image will have the full resolution of the ALL TOPO
MAPS map image.
When checked, you can change the Output image width and height or the final scale. Selecting
50% scale reduces the height and width by a factor of two, and reduces the exported image size
by a factor of four. Reduced images are intelligently resampled for the best exported image
quality.
After configuring the exported map’s settings, press the
file or fill the Window’s clipboard.
30
button to write the output
ALL TOPO MAPS
File Type Details
Exported image files can be stored as .BMP, .EPS, .GIF, .PCX, .PNG, .PGA and .TIF files. Details
on each of these graphics formats follow. If you don’t know which format you want to use,
consider:
.BMP
Generates big files that work with almost any application.
.PNG
A good choice for use on web pages. High compression, universal acceptance.
.TIF
GIS applications may be able to use the companion .TFW file to georeference
the image.
NOTE: the .JPG format is not supported by BigTopo as this ‘lossy’ format is unsuitable for map storage.
Windows Bitmap (.BMP) Format
The Windows bitmap .BMP format is the simplest and most widely supported output format. If
compression is selected and the scale is set to 100% and no annotations are enabled, then the
image is stored with RLE8 compression.
Encapsulated Postscript (.EPS) Format
The exported map image is saved as a Version 3 Encapsulated Postscript file. This format is not
widely supported by engineering/GIS applications and should be used with caution.
Compression has no effect for EPS files.
Graphics Interchange File (.GIF) Format
The exported map image is saved as a GIF file with palette information. “LZW compression” is
not supported. Compression has no effect.
PCX (.PCX) Format
The image is saved as an 8-bit PCX. Compression has no effect.
Portable Network Graphics (.PNG) Format
The PNG format, with compression is an excellent choice for storing generated maps! If
compression is checked then PNG ‘maximum compression using the best filter for each row’ is
used. The BigTopo PNG code is based upon the source code for the ZLIB compression library
User Guide
31
by Jean-Loup Gailly and Mark Adler. This format is intended to be a patent-free replacement for
GIF. It uses the LZ77 compression rather than LZW.
TGA (.TGA) Format
The image is saved as a TGA file. If compression is checked, Run Length Encoding (RLE) is
enabled.
TIF (.TIF) Format
The image is saved as a TIF file. Checking compression enables packbits compression, which may
not be well supported by your viewer. LZW compression is not supported (try the compressed
PNG format as an alternative.)
Some applications are known to have problematic TIFF format readers. Disabling packbits
compression on TIF files greatly increases file portability.
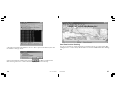
Exported Image Resolution
Image exports are made at full resolution unless you check the ‘Resample Output Image’ button.
When ALL TOPO MAPS annotates your exported image, it assumes that you will be printing the
image at its nominal scale:
1:24,000
160 DPI (Dots Per Inch)
3.81 meters / inch
1:100,000
250 DPI
10.16 meters / inch
1:250,000
250 DPI
25.4 meters / inch
Text size and line widths are adjusted to generate correct sizes for these resolutions. The Print
Preview function may not accurately reflect the exported image annotation’s appearance.
Export Map to GIS/CAD
Use the ‘File: Export Map to GIS/CAD’ menu option to export the entire base map. The ‘Map
Export Wizard’ is invoked with these options:
.TIF file with standard USGS filename
.TFW worldfile enabled
.TXT information file enabled
32
ALL TOPO MAPS
The ALL TOPO MAPS companion tool ‘BIGTOPO’ also generates seamed and re-collared maps in a
variety of formats suitable for export. See the BIGTOPO section at the end of this manual for
more information.
The Worldfile (.TFW)
You can enable the generation of a companion world file for an image written to a graphics file.
The WorldFile contains the UTM coordinates for the upper-left corner of the image, the image
rotation and the image scale factors. The UTM zone is not enumerated in the world file. The
worldfile when found in the same directory as the image file, enables other GIS applications to
automatically georeference the exported image. Worldfile extensions are generated by taking
the first and third characters of the image filename’s extension and appending a ‘W’. The
worldfile for an image contained in ‘TestMap.TIF’ would be named ‘TestMap.TFW’
The format of the .TFW file is:
item
item
item
item
item
item
1:
2:
3:
4:
5:
6:
x-dimension of a pixel
rotation (typically 0)
rotation (typically 0)
y-dimension of a pixel
x-coordinate of center
y-coordinate of center
in map units
in map units (negative if north of equator)
of upper left pixel
of upper left pixel
Printing a Map
You may print the entire map or the viewed section of a map.
Unless you have a large format raster printer, printing the entire map will typically yield a waytoo-small map. When you print the entire map the resulting scale is adjusted to allow the map to
print on one printer page.
Printing the viewed map allows you to control the scale and the content of the resulting printout.
Before printing choose the ‘File: Setup Printer, Map Scale’ menu selection:
User Guide
33
When the printed map’s scale is correct, press the
print.
Use the drag hand tool
ALL TOPO MAPS will adjust its window to match your printer’s page aspect ratio, this insures that
what you see will be what you print. The ‘Print Preview’ button
is automatically pressed and
text is rescaled to match printed text.
button to view the map as it will
to move the map on the screen and compose the printed map.
When satisfied with scale and composition, select ‘File: Print Viewed Map’ from the main menu
to send the map to the printer. The printed map will match the map viewed on the screen.
If after selecting a scale, you change the window size or zoom in or out, the resulting printed
map’s scale will be adjusted to match the altered window size and zoom scale. If the aspect ratio
of your window selection does not match the printer’s paper then a blank band will appear on
your printout.
Include Map Name and Scale
Checking ‘Include Map Name and Scale’ will include the
map’s name and printed scale on the printout.
High Definition Print Driver
Checking
on the ‘Set Printer Map Scale’ dialog will enable All Topo
Map’s internal Raster Image Processor (RIP). The All Topo RIP will resample the map image to
the full resolution of your printer. For high resolution or large format printers, resulting print
jobs may be excessively large, uncheck ‘Use High Definition Printer Driver’ if you experience
printer ‘out of memory’ errors or if the print job never finishes.
Printing To Laser Printers
1. Check the listed printer and its resolution. Use the
printers and access the Window’s printer configuration tool.
button to change
2. Choose portrait or landscape for the resulting printout using
3. Select a printed map scale. The 7½ minute quadrangles are normally printed at 1:24,000.
Press
to set the map scale.
34
ALL TOPO MAPS
Laser printers must have enough physical memory to hold the entire printed map in memory. If
you get half-page printouts or out of memory errors, try lowering the printer resolution from
600/1200 DPI to 300 DPI and uncheck the ‘Use High Definition Print Driver’ option. Choosing
‘Fine Dithering’ in the Window’s print driver properties page for your printer typically generates
better looking maps.
Printing Problems
ALL TOPO MAPS generates huge print jobs that tax your printer’s Windows print drivers. Check
the web site of your printer’s manufacturer for an updated print driver.
User Guide
35
Pre ‘February 2000’ HP Large Format (bigger than legal sized) printer drivers are known to
be especially troublesome!
Printing Maps on Large Format Printers
ALL TOPO MAPS will directly print full sized quadrangles on large format raster printer/plotters.
Choosing high resolutions in your Windows print driver’s properties or checking ‘Use High
Definition Print Driver’ in the ALL TOPO printer setup menu may generate huge print jobs (>4
Gigabytes) that may not be usable with your plotter or computer. Setting the Windows print
driver for 300 DPI resolution generates print jobs 1/4 the size of 600 DPI selections.
The ‘Edit Waypoint’ helper is shown, with the ‘Simple Waypoint’ tab selected:
Waypoints / Coordinate Annotations
Waypoints are locations of interest. ALL TOPO MAPS allows you to easily annotate any map
location by cursor position or its coordinates. You can organize these waypoints and associated
comments in simple text files, which can be printed, edited, copied to the windows clipboard
and downloaded to your GPS (using the ALL TOPO MAPS: GPS Tool or by manual entry).
Waypoint locations can be annotated with:
Traced lines
Lines
Triangles
Circles
Ellipses
Rectangles
Crosses
Wind Barbs
Stock and Custom Icon Images
Lines can be drawn between individual coordinates and media content (pictures, web addresses,
sounds, movies...) can be attached to waypoints.
Waypoints can be entered by positioning the cursor over a coordinate and pressing F2. You can
quickly enter a waypoint ‘just like the last one’ by pressing F7.
Saving the Cursor Position as a New Waypoint
To save a coordinate in the waypoint file, place the cursor at a map location and press F2; or
press the right-mouse-button and select ‘Add To Waypoint List’.
36
ALL TOPO MAPS
Default waypoint descriptions containing just the location can be selected, or you can override
the ‘Default Map Note Types’ and enter a custom note.
Use the ‘Connect Coordinates with Line’ setting to control line drawing between waypoint
coordinates. Connecting lines are drawn between coordinates when both coordinates have lines
set ON (or Line After).
Using the Advanced Edit Waypoint Tabs
Coordinate text annotations have many text, color, size, symbol and link attributes. These
attributes can be easily set using the ‘Coordinate Details’, ‘Symbol’, ‘Line’ and ‘Links’ tabs of the
‘Edit Waypoint’ dialog.
User Guide
37
The ‘Edit Waypoint’ dialog is shown when you press F2 to add a new waypoint or right-mouseclick near an existing waypoint and select ‘Edit Waypoint’.
and Y offset from the previous coordinate:
The
button sets the attributes of the currently selected waypoint to those of the last
button sets the attributes of the currently selected waypoint to
edited waypoint. The
the standard ‘Factory Defaults’.
or enter a length and compass bearing to the new point:
The ‘Coordinate Details’ Tab - Waypoint Text Attributes
The ‘Coordinate Details’ tab sets the text attributes of a waypoint:
Location: Sets the coordinate location for the annotation. You may enter a new coordinate in
any reasonable Lat/Lon or UTM format.
Move a waypoint to a new location by manually changing the coordinate location: the easiest
method is to first use Ctrl-X to copy the new location to the Window’s Clipboard, then use the
button to the right of the location to load the coordinate from the clipboard.
You may also enter coordinates that are relative to the previous coordinate’s location. After
entering a fully qualified coordinate, put the cursor anywhere on the map and press F2 to enter
a new waypoint. In the Location box enter an ‘@’ to indicate a relative coordinate then the X
38
ALL TOPO MAPS
ALL TOPO MAPS re-evaluates relative locations each time annotations are re-drawn on the map.
GPSName: The GPS name is a short one to six character description that is transferred to the
GPS for an ID. You can check the ‘Auto Name’ box to have ALL TOPO MAPS automatically
generate a GPSName from the Description. If you’re not using a GPS then you can leave the
GPS Name blank. The ALL TOPO MAPS: GPS Tool will automatically make the GPS Names unique
when it prepares coordinates for transfer to the GPS.
You can toggle the display of GPSName display on and off using the menu option ‘Annotations:
Waypoint Name’ (shortcut = Alt-N).
Description, Note: the Description and Note can be displayed next to coordinate
annotations. You can toggle the Description display using the menu option ‘Annotations:
Waypoint Description’ (shortcut = Alt-D). Note is toggled with ‘Annotations: Waypoint Note’
(shortcut = Alt-T).
Press Ctrl-Enter to enter multiple lines in the Description and Note edit box.
buttons. The
Special %tokens% can be inserted into Descriptions and Notes using the
%tokens% automate the display of position, distance, and some system parameters. When text
annotations are applied to the map’s surface, these commands are reevaluated each time the
coordinate is drawn. For example this Description:
“Location = %DMS%”
will be displayed as
Location = N 46 33 9.859 W 112 4 6.159
Using the pencil trace tool, or by connecting coordinates with lines (see example 4), it is possible
to display accurate accumulated distances and areas in coordinate Descriptions and Notes.
Auto Name, Auto Inc & Auto Dec: ALL TOPO MAPS can help you name and describe
User Guide
39
coordinates by automatically incrementing or decrementing the last number in a description.
With ‘Auto Inc’ checked the coordinate description:
‘Point 127’
will change to
‘Point 128’
when the next waypoint is entered.
Checking ‘Auto Name’ will generate a suitable GPSName from the current description:
‘Point 127’
is named
‘PNT128’
Font Color: control both the foreground color and background color for text
annotations. Click the color boxes or the ‘F’ (text) and ‘B’ (background) to change text
annotation colors.
button to change the
Font Name and Size: click on the font’s name or the
annotation’s text font. You can choose any available screen/printer font, set Bold and Italic text,
and choose a text size. Text and line sizes are set in points and are resized
so that they are the same size when printed or displayed. You can use the
‘View: Print Preview’ option to display text and lines as they will appear
when printed.
Rotation: adjust the text rotation around the location’s base point with Position and Rotation.
Rotation of 0 degrees generates left to right text; rotation of 180 degrees results in bottom-up
text.
Offset: moves the text away from the coordinate. Offset units are 1/72 of an inch, negative
offsets move text closer to the coordinate location.
Text Background: controls text background. ‘Fill’ creates a rectangular solid background in
the selected font background color. ‘Clear’ just outlines text with the background color.
The ‘Symbol’ Tab - Waypoint Symbol Attributes
The ‘Symbol’ tab sets the waypoint symbol type, size, color and fill.
Position: controls the position of text about the coordinate. North, NorthEast, East,
SouthEast, South, SouthWest, West, NorthWest and Centered positions are supported:
40
ALL TOPO MAPS
User Guide
41
Triangle: an unfilled triangle with base length = Width(X), rotated Rotation degrees.
Circle: a circle of Width(X) diameter. Circles can be filled with clear, solid or hatched
patterns.
Ring: a circle of Width(X) diameter. Rings are unfilled.
Ellipse: an ellipse with Width(X) and Height(Y), rotated Rotation degrees. Ellipses can be
filled with clear, solid or hatched patterns.
Square: a square box with Width(X), rotated Rotation degrees. Squares are not filled.
Rect Centered: an unfilled rectangle centered at the coordinate, Width(X) wide by
Height(Y) high, rotated Rotation degrees.
There are four rectangle symbols:
Each waypoint coordinate is annotated with a symbol. You can control the symbol type and its
color with the attributes listed on the Symbol tab. Width(X) and Height(Y) entries default to the
system’s default units: add ‘meters’, ‘feet’, ‘yards’, or ‘miles’ after the measurement to override
the system defaults.
Symbol Type selects the type of symbol to place at the coordinate:
Plain Marker Line
Triangle
Circle
Ring
Ellipse
Square
Rectangles
Cross
WindBarbs
Stock and Custom Icons
Plain Marker: a square dot Marker Width in size with the selected foreground and
background colors. Line Width sets the outside ring thickness and symbol Fill controls the
marker’s fill.
Line: a line extending from the coordinate location the distance specified by Width(X) and
Height(Y) and rotated (clockwise) by Rotation degrees.
42
ALL TOPO MAPS
Rect SW: an unfilled rectangle with its Southwest corner based at the waypoint coordinate.
Width(X) wide by Height(Y) high, rotated Rotation degrees.
Rect SE: an unfilled rectangle with its Southeast corner based at the waypoint coordinate.
Width(X) wide by Height(Y) high, rotated Rotation degrees.
Rect S: an unfilled rectangle with its South edge centered at the waypoint coordinate.
Width(X) wide by Height(Y) high, rotated Rotation degrees.
Cross: Two lines crossed at the waypoint coordinate, covering an area Width(X) by Height(Y),
rotated Rotation degrees.
User Guide
43
(typically located ‘C:\AllTopo\Images\’). Icon bitmaps should be 16 or 256-color bitmaps, the
color of the lower left pixel will be used as the ‘transparent’ color. If you move additional
bitmaps into the Stock Images path, use the button to register the new images into the stock
icon list.
Clicking on a stock icon will automatically set the symbol type to Icon and select Width(X)=0.0.
button to browse for a bitmap.
Press the
Wind: A wind barb located at the waypoint coordinate. Line Width controls the wind stave
size, Width(X) sets the wind speed, Rotation sets the wind direction. Be sure to enter wind
speed with ‘Knot’ units: Wdith = ‘135 Knots’.
Icon: specifies an icon to place centered at the waypoint location. Hundreds of stock icons are
available and can be selected from the right hand side of the Symbol tab. Setting the icon’s
Width(X) to 0.0 results in the icon being displayed at the pixel size it was drawn; set the
Width(X) to a value (like ‘0.25 miles’) to force the icon to rescale to map units.
If you exchange HWP annotation files between computers, be sure to include any needed
custom icons with the HWP file. The .HWP file’s path is searched for needed icons if they can’t
be found in the stock images path.
The ‘Line’ Tab - Waypoint Line Attributes
Select the Line tab to enable and change the attributes of lines connecting successive waypoints.
Lines are drawn between successive waypoints if both waypoints have ‘Connect Coordinates w/
Line’ set to ‘On’. The first waypoint may optionally have Line set to ‘Begin’.
Line Style selects Solid, Dotted, Dashed, Dash-Dotted, or Dash-Dot-Dotted lines. Selecting any
Line Style other than Solid will force the Line Width to 0 (hairline).
Line Width sets the line’s width. Setting any Line Width greater than 0 (hairline) will force the
Line Style to Solid.
Click on the Line Color’s color patch or the
key to change the connecting line’s color.
You can add additional icons to the stock icons by copying new icons to the Images path
44
ALL TOPO MAPS
User Guide
45
The ‘Links’ Tab - Waypoint Hyperlink and Slide Attributes
Select the Links tab to connect media to a coordinate, control a waypoint’s inclusion in the slide
show and add system meta tags.
Check the ‘Include this coordinate in the Slide Show’ box
to add a coordinate as a slide in the ALL TOPO MAPS slide show. When viewing maps, you can
press the keypad ‘*’ button to view the first slide, then press the keypad ‘+’ and keypad ‘-‘ keys
to move between successive slides.
The ‘Additional <Meta> Tags’ box can be used to enter additional system tags. The most
common additional tags are:
<I “filename”>
includes the contents of another HWP file
<T “Title To Display”>
sets the title for the All Topo Map’s viewer
<A “N 40 00 00 W 119 00 00”> AutoJump location displayed
when opening the HWP file
Annotation Files
Collections of waypoint coordinates are stored in text files. Typically these files have a ‘.HWP’
file extension. Annotation files are typically stored in the ‘\AllTopo\Users\’ folder. The
Annotation file currently in use is displayed at the bottom of the map viewing screen.
You can manage annotation files using the main menu’s ‘Annotations’ selections:
Waypoint Hyperlink may contain a path to any media content (pictures, sounds, web
addresses or a program launch) registered on your Windows system. After setting the link, you
can evaluate the link by mouse-right-clicking on the coordinate, then selecting the ‘Open’ option.
To link to a web site enter a fully qualified path like “http://www.igage.com”. To attach a
picture to a coordinate, enter a fully qualified path and filename or place the picture in the same
path as the .HWP file. A fully quailifed pathname is not required for a file in the same path as
the base HWP file.
When viewing maps with hyperlinked waypoints right-mouse-click near a linked coordinate and
select the ‘Open’ menu item to execute the link:
46
ALL TOPO MAPS
User Guide
47
New Annotation File
Ctrl-N make a new empty annotation file.
Open Annotation File
Ctrl-O open an existing annotation file.
Save Annotations
Ctrl-S
save the current annotation file.
Save Annotations As... Ctrl-A
rename then save the current annotation file.
When you create a new annotation file, it is automatically named ‘WP1.HWP’. To guard against
accidental overwriting and data loss, ALL TOPO MAPS will generate a unique new filename for
saved annotations.
The menu option ‘Annotations: Edit Annotation Source’ (shortcut = F8) opens a text editor
containing the source for the current annotation set. The format of annotation files is similar to
HTML code. The full syntax of annotation files is available in the online All Topo Map help file.
The find map tool displays the currently viewed map, and its eight adjacent neighboring maps. If
you know a map’s name, you can type in the first few characters, select the correct map then
press
to display the selected map.
To move to adjacent maps, click once on the outside map to move it to the center position, then
double click on the center map or press
to display the new map. As you move
from map to map, the Find Map tool’s status line will show the ALL TOPO MAP data disk that
holds the selected map.
Using the Find Location Tool
Press the
button to display the Find Location tool (shortcut = Alt+L):
Using the Find Map Tool
Press the
button or press Alt+M to display the Find Map Tool:
If you have a known coordinate from a GPS or other source, you can quickly place an
annotation on the map and jump to the spot. Tabs are available for coordinates in Degrees
Minutes Seconds (D M S), Degrees decimal Minutes (D M.m), decimal Degrees (D.d), UTM and
Free Form coordinates. The
on the Free Form page will load a coordinate directly from the
Window’s clipboard.
After entering a coordinate, you can view the corresponding map location by pressing ‘Show
48
ALL TOPO MAPS
User Guide
49
Location’. To place an annotated waypoint at the location, enter a coordinate Description in the
‘Location Comments’ box and press the ‘Add as Waypoint and Show Location’ button.
Using the ‘Search For a Waypoint’ Tool
Press the
button (shortcut = Alt+W) to display the Search For a Waypoint tool.
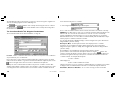
ALL TOPO MAPS: GPS Tool
ALL TOPO MAPS: GPS is the tool that links the ALL TOPO MAPS viewer and your GPS receiver.
Waypoints and Routepoints and Tracks may be moved between the ALL TOPO MAPS viewer and
your GPS,
Real Time Tracking also automatically plots and centers your current position on the map
viewer’s window.
You can quickly start the GPS tool by selecting ‘Tools: GPS Tool’ from the ALL TOPO MAPS
viewer window:
The GPS Tool will be displayed, wait a moment while it loads all available ALL TOPO MAP data
sets:
You can use the Search Wpt tool to quickly find, display and edit annotations. Use the mouse to
select a coordinate or group of coordinates. You can change the coordinate order using the
Move Up and Move Dn buttons, center the map over a location using the ‘Center Waypoint’
button or directly edit a waypoint by pressing the ‘Edit Waypoint’ button.
50
ALL TOPO MAPS
User Guide
51
Connect your GPS to the COM port on your computer with the GPS manufacturer’s serial
cable (available separately).
The first time you run the ALL TOPO MAPS: GPS tool select the ‘GPS Setup’ tab to choose the
correct GPS device brand and communications port settings.
releases the communication port.
The ‘Baud Rate’, ‘Data Bits’, and ‘Parity’ must match the settings in your GPS. Pressing the
button will select the Baud, Data, and Parity which best match the selected GPS’s
typical factory defaults, however you must manually set the ‘COM Port’ number.
After successfully configuring the GPS hardware, press the
to verify that your GPS
is talking to ALL TOPO MAPS: GPS. If the test fails, a list of possible causes will be presented.
After verifying the connection, press
to return to the ‘Coordinate List’ tab.
Use the ‘Coordinate List’ tab to move coordinates between your PC and GPS:
1. Get coordinates from a source: ‘ALL TOPO MAPS’ active waypoint list, a ‘Waypoint File’ or
from the ‘GPS Receiver’.
2. In the coordinate list box, highlight coordinates to send/receive.
3. Save the highlighted coordinates to a destination: ‘ALL TOPO MAPS’ active waypoint list, a
‘Waypoint File’ or to the ‘GPS Receiver’.
GPS Example 1: Moving Waypoints From Map to GPS
1. Create a new empty waypoint file in ALL TOPO MAPS. In the ALL TOPO MAPS viewer, select
‘Annotations: New Annotation File’.
2. Mark several coordinate annotations using the F2 Key:
Select the GPS Brand that matches your receiver. Detailed hints and suggestions for use with
your GPS brand may be displayed. After reading the hints on your GPS Brand, press the
button.
The ‘COM Port’ must be set to the COM port that is physically connected to your GPS.
COM1 and COM2 are the most common selections.
If you have ever had a PDA (Personal Digital Assistant) cradle attached to the COM port, it’s
data synchronizing tool may still have the COM port open! The GPS tool will report an ‘Error
Opening Communication Port’ and refuse to select the COM port until the PDA’s tool
52
ALL TOPO MAPS
3. Switch to the GPS Tool using the Windows task bar, or by pressing Alt+Tab. If the GPS tool
is not already running, start it with the ALL TOPO MAPS menu selection “Tools: GPS Tool”.
4. Select ‘Load Coordinates From ALL TOPO MAPS’ from the ‘Coordinate List’ tab of the GPS
Tool. The GPS tool will retrieve the coordinates from ALL TOPO MAP’s annotation base, insure
that the GPS Waypoint Names are unique and display the waypoints in the ‘Edit and Select
User Guide
53
Coordinates to Save’ box:
select ‘Waypoint List’ and press
.
The GPS Tool will quickly append the waypoints to the GPS receiver’s waypoint list and display
them on the map.
GPS Example 2: Moving a GPS Track from GPS to Map
1. Consult your GPS’s manual for the sequence to clear the track buffer, then configure the
track buffer to accumulate points in Auto mode (or once every 15 seconds). After the GPS
establishes it’s position, take it on a short trip to accumulate a track history.
2. Select the ‘Load Coordinates From GPS Receiver’ option on the GPS Tool:
the ‘Get Coordinates From’ dialog is displayed:
5. Save the coordinates to the GPS by pressing ‘Save Selected Coordinates To GPS Receiver’:
choose ‘Track List’ and press
. The GPS Tool will retrieve all of the track points from
your GPS Receiver and place them in the coordinate list:
the ‘Save Coordinates To’ dialog is displayed:
54
ALL TOPO MAPS
User Guide
55
Real Time Position Tracking
3. Press the ‘Save Selected Coordinates to ALL TOPO MAPS’ option on the GPS Tool; the ‘Save
Coordinates as’ dialog is shown:
You can use your GPS to continuously track your location in the ALL TOPO MAPS viewer. After
starting the ALL TOPO MAPS viewer, start the GPS tool. Select the ‘NMEA & Real Time Tracking’
tab:
Select ‘Connected Route of Waypoints’ and press
. The GPS Tool will move the
GPS’s track log to the ALL TOPO MAPS viewer and display your track on the map.
56
ALL TOPO MAPS
User Guide
57
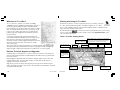
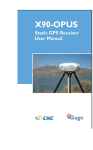
BIGTOPO Map Seaming Tool
BIGTOPO extracts portions of one or more quadrangles, merges the user selected map
contents, re-collars and re-grids the resulting georeferenced map image:
=>
BigTopo takes multiple maps
Check both the ‘Display current position’ and ‘Automatically center map’ options. When your
GPS receiver gets a position lock, the viewer will automatically center the correct map on your
screen and place a blue X at your current location on the map.
58
ALL TOPO MAPS
and makes arbitrary coverage quadrangles!
BIGTOPO accepts bounding coordinates and then quickly produces a seamed topo map, at full
resolution. BIGTOPOS can be written to a variety of file formats for exchange with GIS/CAD
applications, and may be used without copyright limitations.
The maximum dimension of a BIGTOPO map is 124,500 meters (about 77.4 miles) in height or
width. Windows 95/98 machines are limited to quarter gigabyte BIGTOPO files (250
megabytes), Windows NT machines can generate larger images if they have sufficient virtual
memory allocations; however, most programs (including the All Topo Map viewer) won’t be
able to open image files that cover more than 1,400 square miles.
Detailed BIGTOPO information is available by pressing F1-Help on your keyboard from the
User Guide
59
BIGTOPO application.
The BIGTOPO tool can be started from the ALL TOPO MAPS viewer ‘Tools: BIGTOPO’ menu option.
the Control key, then press and release the X key, finally release the Control key.) You don’t
need to select a specific cursor tool; the Bombsight, Drag Hand, Pencil Tracer and Zoom tools
all work with Ctrl-X.
Select ‘Tools: BIGTOPO’ to start BIGTOPO, or use the Windows task bar to re-focus the BIGTOPO
tool. Paste the map’s corner location into the BIGTOPO’s center using the
button:
Tour: Building A BIGTOPO Map
Building a BIGTOPO map is easy to do. This tour will take you through these steps:
1. Define the BIGTOPO coverage.
2. Select annotation options.
3. Choose an output file name and path.
4. Make the BIGTOPO.
5. Preview the seamed map in BIGTOPO.
6. Opening the BIGTOPO from within ALL TOPO MAPS
Tour 1: Defining BIGTOPO Coverage
Start the ALL TOPO MAPS viewer and find the center location of the BIGTOPO map you want to
make. For this example we will use the corner of a quadrangle as the BIGTOPO’s center. Four
maps will be seamed:
Change the BIGTOPO’s Height to 8 miles and the Width to 20 miles to control the resulting
map’s coverage area.
You can specify the resulting image by it’s Northwest corner, it’s Southwest corner or it’s
Center corner.
Tour 2: Select Annotation Options
Press Control-X to copy the current cursor location to the windows clipboard. (Press and hold
60
ALL TOPO MAPS
The ‘Annotations’ tab controls map recollaring (adding a new border) grids, scales and titles.
Select the ‘Annotations’ tab:
User Guide
61
Tour 3: Choosing Output Files and Paths
Select the ‘Output File’ tab:
Check ‘Recollar (add borders to) BIGTOPO, enter a map title, check ‘Overlay UTM Grid on
BIGTOPO’ and ‘Include a Map Scale’.
The ‘Corner Title’ is placed on the resulting map’s lower right corner. Black UTM Grids are
placed at 1,000 meter intervals with values in the collar, blue Lat/Lon grids are placed on 1°
intervals.
Choose: ‘Output BIGTOPO to ALL TOPO MAPS’ to make a map that the ALL TOPO MAPS viewer
can open and display. Set ‘File Compression’ to ‘Low (fast)’ to speed up the map generation.
Press the
62
ALL TOPO MAPS
User Guide
button:
63
Enter a filename in the ‘Object Name’ box, keep the default path, finally press
.
Output Notes
BIGTOPO maps are always written at full resolution.
To directly export a map to CAD or GIS applications select ‘Export BIGTOPO as generic graphic
picture’ and choose a destination path, filename and file type. If a .TIF output file is selected a
.TFW worldfile is also generated. GIS and CAD applications may be able to use the worldfile
to georeference BIGTOPO maps.
A .TXT file with detailed image information is also written when BigTopos are exported to
generic graphics formats.
Tour 4: Making the BIGTOPO
Use your mouse pointer to select the ‘Build BigTopo’ tab:
Information about the resulting BIGTOPO map is displayed, press the ‘Make BigTopo’ button to
start building the requested BIGTOPO map. The ‘Activity Log’ is automatically displayed while
the map is generated.
Tour 5: Previewing a BIGTOPO
Press the button found on the ‘Build BIGTOPO’ tab to view the map just generated:
64
ALL TOPO MAPS
User Guide
65
PageUp and PageDown keys zoom in and out, press the shift key to use the magnifying glass to
closely inspect the seamed map. After previewing the BIGTOPO, use the menu option ‘File:
Close Preview’ to return to the main BIGTOPO screen.
Tour 6: Opening a BIGTOPO in the ALL TOPO MAPS Viewer
Select the BIGTOPO with your mouse, then press
:
Use the Window’s ‘Change Task’ shortcut keys: Alt+Tab or the task bar at screen bottom to
return to the ALL TOPO MAPS viewer, then select the menu option ‘File: Open BigTopo Map’:
The ‘Open BIGTOPO Map’ dialog is shown:
66
ALL TOPO MAPS
User Guide
67
Index
Symbols
%ACRES% 20
%commands% 39
%DMS% 39
%MILES% 20
<A 47
<I 47
<Meta> 47
<T 47
@ 38
{Measrurement Spike} 9
{Measurement Spike}
12, 15, 25, 26
{Spike} 7, 26
16-Color 45
24 button 8
256 Color 4
256-Color 45
Alt+W 10, 12, 50
Alt+Y 10
Alt-D 39
Alt-K 26
Alt-N 39
Alt-P 13
Alt-T 39
Annotation 18, 47, 61
Annotation File 7
Annotation Source 48
Annotations 10, 11, 30, 36
Area 17, 18, 26, 28
Area Tracing Units 27
Area Units 25
Arrow Keys 8
Aspect ratio 34
Auto 55
Auto Dec 39
Auto Inc 39
Auto Name 39
AutoJump 47
Automatically 58
A
About 11
Acres 27
Activity Log 65
Add to Waypoint List 13
Add Waypoint 9
Adjacent Map 8
Alt+0 10
Alt+C 10
Alt+D 10
Alt+F4 9
Alt+G 10
Alt+K 10
Alt+L 49
Alt+M 10, 48
Alt+N 10
Alt+P 10
Alt+Q 10
Alt+R 10
Alt+T 10
Alt+Tab 66
68
B
Barb 44
Base 16
Baud Rate 53
Bearing 12, 39
Begin 45
BigTopo 11, 33, 59
Blue X 58
BMP 31
Bombsight 11, 16
Border 61
Boundaries 18
Build 64
Build BigTopo 64
C
Cache 25
CAD 23, 32, 59
CD-ROM drive 4
Center map 58
Center Waypoint 50
Circles 36
Clear 26, 41
Clear System Annotations 10
Clipboard 9, 23, 29, 49, 60
Clockwise 27
Collar 62
Color 28, 45
COM 52
Compass 24, 39
Compression 31, 32, 63
Configuring 53
Connect Coordinates 45
Control-W 27
Control-X 29
Coordinate 23
Coordinate Details 37, 38
Coordinate List 53
Coordinate Location 10
Coordinate System Options 10
Coordinates 7
Copy Cursor Position to
Clipboard 9
Copyright 59
Corner 61
Corner Title 62
Counterclockwise 27
Coverage 60
Cross 43
Crosses 36
Ctrl+A 10
Ctrl+Alt+A 10
Ctrl+B 9
Ctrl+C 9
Ctrl+N 10
Ctrl+O 10
Ctrl+P 9
Ctrl+R 9
Ctrl+S 10
Ctrl+X 9
Ctrl-A 48
Ctrl-Enter 39
Ctrl-N 48
Ctrl-O 48
Ctrl-S 48
Ctrl-V 29
Ctrl-W 17
Ctrl-X 38
Cursor 7
Cursor coordinate 12
D
Dash-Dot-Dotted 45
Dash-Dotted 45
Dashed 45
Data Bits 53
Data disk 49
Databases 7
Defaults 53
Degrees 49
Delete Waypoint 13, 18, 29
Description 10, 39
Descriptions 30
Detailed Map Information 10
Display current 58
Display current position 58
Display Distance and Area 28
Display Map Annotations 10
Distance 7, 18, 26, 28
Dot 42
Dotted 45
Double click 8
DPI 32, 35
Draghand 11
Draw 10
Draw Pencil 10
Driver 35
E
Edit 9
Edit Annotation Source 10, 48
Edit Nearest Waypoint 9
Edit Waypoint
13, 18, 28, 37, 50
ALL TOPO MAPS
Ellipse 43
Ellipses 36
Encapsulated Postscript 31
EPS 31
Error 53
Examples 13
Exchange 6
Exit 9
Export 23, 29
Export Map 9
F
F1 8
F2 9
F3 7, 12
F4 7, 12, 26
F5 16, 27
F6 7, 9, 15, 26
F7 9
F8 10, 48
F9 8, 10
Feature 10
Feet 26, 42
File 9, 48
File formats 59
File space 25
File Type 31
Filled Marker 42
Find 13
Find Location 49
Find Map 48
Find Place 7
Fit On Page 10
Font Color 40
Font Name 40
Force Printed Maps Scale 22
Free Form 49
GPS Receiver 4, 51, 58
GPS Setup 52
GPS Tool 11, 51–58
GPS Track 55
GPSName 39
Graphics Interchange File 31
Grid 10, 14, 30, 62
Grids 61
H
Hard Disk 4
Hectares 27
Height 42
Help 8, 11
High Color 4
High Definition 35
High Quality Display 10
How Do I 13
HP 36
HTML 48
HWP 45
Hyperlink 46
I
Icon 36, 44
Image Options 30
Images 36, 45
Includes 47
Installation 4
Intersection 15
J
Jump to {Measurement Spike}
10
K
Knots 44
G
Georeference 64
GIF 31
GIS 23, 30, 32, 59
User Guide
L
Laser Printers 35
Lat/Lon 12, 38
Lat/Lon Order 25
Legal 71
Line 37, 45
Line After 37
Line On 37
Line Width 45
Lines 36
Links 37, 46
Location 12, 38, 49
LZ77 32
LZW 32
M
Magnifying glass 66
Main Menu 7, 9
Map Cache 25
Map Name 7, 10, 35
Map Scale 7, 10, 21, 33, 34
Mapname 12
Measurement Spike 10
Meta 47
Meta tags 46
Meter 62
Meters 26, 32
Meters / inch 32
Microsoft 71
Miles 26, 42
Minutes 49
Monitor 4
Move 7
Move Dn 50
Move Up 50
N
Name 10
Names 30
New Annotation 10, 48
NMEA 57
Note 39
Notes 10, 30
NSEW 25
O
Object Name 64
Offset 39
ON/OFF 10
Open 9
Open Annotation 10, 48
Open BigTopo 9, 66
Options 10, 23, 24
Output Files 63
P
Page aspect 34
Page Width 10
Parity 53
Paste 29
PCX 31
PDA 53
PEGASUSIMAGING 71
Pencil 11, 17, 28
Pencil Attributes 10, 28
Perimeter 17, 18, 21
Personal Digital Assistant 53
Pictures 46
Place 10
Place Name 10
Plain Marker 42
Plotters 36
PNG 31
Port 53
Portable Network Graphics 31
Position 40
Preview 32, 66
Previewing 65
Print 32
Print drivers 35
Print Entire Map 9
Print jobs 35
Print Preview 10, 11, 22, 34
Print Viewed Map 9, 22
Printer 4, 9, 36
Printing 33
Printing Problems 35
69
Program launch 46
Property Boundaries 18
Q
Quick Add Waypoint 9
R
Ram 4
Raster printer 33
Real Time 57
Real Time Tracking 51
Recollar 62
Rect Centered 43
Rect S 43
Rect SE 43
Rect SW 43
Rectangle 36, 43
Refresh Display 10
Register 45
Registration card 5
Relative coordinate 38
Reprojected 6
Resample 23, 30, 32
Reset All Window Sizes 10
Resolution 32, 34, 36
Ring 43
Rotation 40
Routepoints 51
Rubbersheet 6
S
Save 48, 54
Save Annotations 10, 48
Scale 12, 22, 30, 61
Scroll 7
Scroll bars 8
Seaming 59
Search 10, 13, 15
Search by Annotation Wpt 10
Search by Coordinate Location
10
Search by Coordinates 7
70
Search by Map Name 7, 10
Search by Place or Feature 10
Search Wpt 50
Seconds 49
Select Cursor 7
Select Tool 9
Serial Number 4
Setup 4
Setup Printer 21
Shift+Ctrl+B 11
Shift+Ctrl+G 11
Shortcut 11
Show Coordinate 49
Signed 24
Simple Search 15
Simple Waypoint 37
Size 40
Slide 46
Solid 45
Sounds 46
Source Map 30
Spike 7
Square 43
Square Feet 27
Square Meters 27
Square Miles 27
Stake 15
Start Menu 4
Starting 7
Status 12, 17, 27, 49
Stock icons 44
Stock images 45
Straight Line 26
Style 45
Support 5
Switch Map Scales 10
Symbol 37, 41
System 23
System Information Logger 10
System Requirements 4
T
Tab 41
Task bar 61
Technical support 6
Test GPS 53
Text attributes 38
Text Background 41
Text Position
Text Orientation 40
TFW 30, 33
TIF 33
Title 47
Titles 61
Toggles 10
Tool 9
Tools 11
Topographical maps 6
Traced 28
Traced Distance 16
Traced distance 17
Traced lines 36
Tracing Paths 26
Track 55
Tracking 57
Tracks 51
Transparent 45
Triangle 43
True Color 4
U
Unique 54
Unisys 71
Universal Transverse Mercator 6
Updated version 5
Use Last
Use Factory 38
User Defined Icons 42
USGS 6
UTM
6, 12, 29, 30, 33, 38, 62
Legal Notices
W
Waypoint 50
Waypoint Description 10
Waypoint Hyperlink 46
Waypoint Name 10
Waypoint Notes 10
Web 46
Web based registration 5
What’s this? 13
Width 28, 42, 45
Wind 36, 44
Window 21
Window Sizes 8
Windows 95/98 59
Windows Bitmap 31
Windows NT 59
World file
TFW 23
Worldfile 33, 64
Wpt 10, 50
More legal notices can be found in the online help under ‘Legal Notices’.
ALL TOPO MAPS is licensed for use on a single computer. You may not install ALL TOPO
MAPS on two computers.
ALL TOPO MAPS can not be leased, loaned or rented.
The product ALL TOPO MAPS contains portions of imaging code owned by Pegasus Software
LLC, Inc., and Pegasus Imaging Corporation, Tampa, FL, (WWW.PEGASUSIMAGING.COM).
If this product is distributed with the library file ‘.\AllTopo\Bin\ATMDeCmp.DLL’; 203,776
bytes in length, then the product contains code “Licensed under U.S.A. Patent No. 4,558,302
and foreign counterparts” by Unisys Corporation, Blue Bell, Pennsylvania. See the menu
option ‘Help: About’ for additional information.
The map images contained in this product are derived from Digital Raster Graphic (DRG)
Images produced by the USGS and The Land Information Technology Company, Ltd., of
Aurora, CO.
X
X Offset 38
Y
Y offset 39
Yards 26, 42
Z
Zero 16
Zero Traced Distance 13, 27
ZLIB 31
Zoom 7, 9, 11
Zoom In 8
Zoom Out 8
V
View 10
Viewing Screen 7
All Topo Maps, Version 6._._._ for Windows 95/98/NT, User’s Guide
iGage; 1545 South 1100 East; Salt Lake City Utah 84105
© 1999, 2000 by iGage (www.igage.com)
All rights reserved; Eigth Edition published 2000 Printed in the United States of America
2000 2001 2002
13 12 11 10 9 8
No ISBN number assigned, no Library of Congress Cataloging-in-Publication (CIP) data assigned.
Windows 95/98 & NT are trademarks of Microsoft Corporation. (www.microsoft.com)
Garmin is a trademark of Garmin International. (www.garmin.com)
Lowrance is a tradmark of Lowrance Electronics, Inc. (www.lowrance.com)
ALL TOPO MAPS
User Guide
71
ALL TOPO MAPS Quick User Tips
Panning the Map, Moving the Map on Your Screen:
Use the Drag Hand to move the map.
click-click
Use the Arrow Keys to move the map around the screen.
Double-click within the map to center the clicked location on the screen, or double-click in a
map margin (border) to show the adjacent map.
Finds a specific map or move to adjacent maps.
Zooming In and Out: Changing the Map Scale
Zoom tool, drag area to zoom into.
PageUp
PageDown
Home
Press the Page Up key to zoom out 10% (move away from the map). Hold the Shift key and
press Page Up to zoom out 1%.
Press the Page Down key to zoom in 10% (move closer to the map). Hold the Shift key and
press Page Down to zoom in 1%.
Set the Zoom to 100%.
Switch between 1:250,000, 1:100,000 and 1:24,000 scale maps.
Other Shortcuts and Tips:
Quickly finds a place by its name. Find a Location By Place or Feature Name.
Show/Hide All Waypoints .
F1
F2
F3
F4
F5
F6
F7
Online help.
Add a Waypoint at the current cursor location.
Change the Cursor Coordinate display: D M S, D M.m, D M S.s, UTM or MGRS.
Change the units for the Measurement Spike distance: Meters/Feet/Miles.
Zero the 'Traced Distance' then press left mouse button and drag cursor to trace a path and
measure its length.
Place the 'Measurement Spike' at the current Cursor position.
Quick, add a waypoint , just like the last one.
View the Waypoint list.