1
Page 1
SOLIDYNE AUDICOM
SOLIDYNE AUDICOM
Page 2
SOLIDYNE AUDICOM
Contents
Table of contents
SECTION 1 Install and setup .................................................................... 13
1.1
Computer and sound card setup ......................................................... 13
1.1.1
General settings ...................................................................................... 13
1.1.2
Audio devices .......................................................................................... 13
1.1.3
Assign outputs devices in AUDICOM ........................................................... 13
1.2
Dongle (licenses) .............................................................................13
1.3
'Full' installation ...............................................................................13
1.3.1
1.4
A-Start (settings for the WEB-tools services) ............................................... 14
AUDICOM Configuration Panel (aConfig) ..............................................17
1.4.1
AUDIO .................................................................................................... 17
1.4.2
FOLDERS ................................................................................................ 19
1.4.3
PREFERENCES ......................................................................................... 20
1.4.4
AUDIO LINKS .......................................................................................... 23
1.4.5
PLAYED TITLES COLORS ........................................................................... 23
1.4.6
WEATHER REPORTS and TIME ................................................................... 24
1.4.2.1
1.4.2.2
1.4.2.3
1.4.3.1
1.4.3.2
1.4.3.3
1.4.3.4
1.4.3.5
1.4.3.6
1.4.3.7
1.4.4.1
1.4.4.2
1.4.6.1
1.4.7
1.4.8
1.5
1.5.1
AUDIO FILE STORAGE ................................................................................................................................... 19
DATA BASE ................................................................................................................................................... 20
NEWS SOURCE ............................................................................................................................................. 20
RADIO STATION ............................................................................................................................................ 20
START UP OPTIONS ...................................................................................................................................... 20
MUSICALIZATION OPTIONS .......................................................................................................................... 20
CYBERPLAY OPTIONS .................................................................................................................................... 21
“LIVE ASSIST” INSTANT PLAYER .................................................................................................................... 22
AUDIO/VIDEO EXTERNAL EDITORS ............................................................................................................... 22
MEDIA LIBRARY DISCOVERY ......................................................................................................................... 22
IP for iLink (AUDICOM-to-AUDICOM) ........................................................................................................... 23
SATELLITE LINK ............................................................................................................................................. 23
O’CLOCK audio clip ....................................................................................................................................... 25
FONTS .......................................................................................................................................................... 25
VIDEO ........................................................................................................................................................... 25
Update / Reinstall .............................................................................25
Migración de versiones 7.0 / 10.0 a 10.1 .................................................... 26
1.6
Advanced customization of data base fields............................................26
1.7
Migration from another on-air software ...............................................26
1.7.1
Supported codecs .................................................................................... 26
1.7.2
Folders for media files .............................................................................. 27
1.7.3
Data Base ............................................................................................... 27
1.7.4
Schedule logs .......................................................................................... 27
1.8
USB GPIO ........................................................................................ 27
WARNING ........................................................................................................... 28
1.9 Remote links ........................................................................................ 28
SOLIDYNE AUDICOM
Page 3
SOLIDYNE AUDICOM
1.9.1
Internet link ............................................................................................ 28
1.9.2
Satellites ................................................................................................ 28
1.9.3
SatFill ..................................................................................................... 29
1.9.4
Master-Slave Satellite (SatSlave) .............................................................. 29
1.9.5
Repeat external signals - switching by time ................................................. 29
1.9.6
Streaming repeater using "Satfill" .............................................................. 30
1.9.7
Controlling remote terminals from a Master Terminal ................................... 30
a) Controlling the console via USB ..................................................................................................................................... 29
b) Controlling the input of the sound card ......................................................................................................................... 29
1.9.7.1
1.9.7.2
1.9.7.3
1.10
MASTER TERMINAL (satellite upload) .......................................................................................................... 30
REMOTE TERMINAL (Satellite header) ......................................................................................................... 31
INPUT DEVICE............................................................................................................................................... 31
Power outage ...................................................................................31
1.10.1 Protection against lighting ......................................................................... 31
1.11
Auto-starting at the morning ............................................................. 32
1.12
RDS setup ....................................................................................... 32
1.12.1 Software setup ........................................................................................ 32
1.12.2 Use ........................................................................................................ 33
1.12.3 Settings .................................................................................................. 33
SECTION 2 On-air studio .......................................................................... 35
2.1
Starting AUDICOM ............................................................................35
2.1.1 Login to AUDICOM....................................................................................... 35
2.1.2 Change user ............................................................................................... 35
2.1.3 User names and passwords .......................................................................... 36
2.1.3.1
2.1.3.2
Default users ................................................................................................................................................ 36
New Users .................................................................................................................................................... 36
2.1.4 Close Session ............................................................................................. 36
2.1.5
2.2
Shutdown AUDICOM ................................................................................ 36
The AUDICOM desktop ......................................................................37
2.2.1 Tools bar.................................................................................................... 37
2.2.2 Customize desktop ...................................................................................... 37
2.2.2.1
2.2.2.2
Appearance .................................................................................................................................................. 37
Customize toolbar ........................................................................................................................................ 37
2.2.3 Time and weather reports ............................................................................ 38
2.2.3.1
2.2.3.2
2.3
Display.......................................................................................................................................................... 38
Update values .............................................................................................................................................. 38
CyberPlay - Main schedule .................................................................38
2.3.1
OVERVIEW .............................................................................................. 39
2.3.2
Transport controls ................................................................................... 42
2.3.1.1
2.3.1.2
2.3.1.3
2.3.1.4
2.3.1.5
2.3.1.6
COMMERCIAL blocks .................................................................................................................................... 40
PROGRAM blocks (radio shows) .................................................................................................................. 40
VU-METERS and COUNTERS ......................................................................................................................... 41
Maximized view ........................................................................................................................................... 41
Commentary ................................................................................................................................................ 42
Popup messages........................................................................................................................................... 42
2.3.2.1
Space bar [spacebar / home] ..................................................................................................................... 42
2.3.2.2 Pause / Stop [end].................................................................................................................................................. 43
2. 3.2.3
Fade & Stop [ctrl + end] ............................................................................................................................... 43
Page 4
SOLIDYNE AUDICOM
Contents
2.3.2.4
Fade & Play [ctrl + home] ............................................................................................................................. 43
2.3.2.5
Schedule stop point [page up] ..................................................................................................................... 43
2.3.2.6
Cue [Suprimir] .............................................................................................................................................. 43
2.3.2.7 Select a title [cursor arrows Up / Down] ................................................................................................................ 43
2.3.2.8
How to remove an item from schedule [Backspace] .................................................................................... 44
2.3.2.9
How to insert a title [Ins].............................................................................................................................. 44
2.3.2.10 Change the position of an item in the schedule ................................................................................................... 44
2.3.3
CYBERPLAY TOOLS ................................................................................... 44
2.3.3.1
Mode AUTO / MANUAL................................................................................................................................ 44
2.3.3.2
Reload the schedule (adds and blocks) ........................................................................................................ 44
2.3.3.3
Save changes to LOG files............................................................................................................................. 45
2.3.3.4
Next Title [Enter] .......................................................................................................................................... 45
2.3.3.5
Insert AutoDJ................................................................................................................................................ 45
2.3.3.6
Mix [Asterisk] ............................................................................................................................................... 46
2.3.3.7 Right-click menu .................................................................................................................................................... 46
2.4
PlayList Manager ..............................................................................46
2.5
Live Assist ....................................................................................... 48
2.5.1
Overview ................................................................................................ 48
2.5.2
Set the output devices .............................................................................. 49
2.5.3
USING LIVE ASSIST ................................................................................. 49
2.5.4
Live Assist sets ........................................................................................ 50
2.5.5
SETTINGS ............................................................................................... 50
2.5.3.1
2.5.3.2
2.5.3.3
2.5.3.4
2.5.3.5
2.5.4.1
2.5.4.2
2.5.5.1
2.5.5.2
2.5.5.3
2.6
Maximized view ........................................................................................................................................... 49
Pause/Stop & Fade-stop............................................................................................................................... 49
Cueing .......................................................................................................................................................... 49
Play mode .................................................................................................................................................... 49
Mark in/out .................................................................................................................................................. 49
Export / import Tab contents ....................................................................................................................... 50
Creating new sets ......................................................................................................................................... 50
SIZE OF BUTTONS ......................................................................................................................................... 50
DATA FILE ..................................................................................................................................................... 50
ICONS ........................................................................................................................................................... 51
InfoMusic ON-AIR ...............................................................................51
2.6.1
Overview ................................................................................................ 51
2.6.2 How to use on-air InfoMusic ......................................................................... 52
2.6.2.1 Current's title viewing ............................................................................................................................................ 52
2.6.2.2 Search and access the database............................................................................................................................. 52
2.6.2.3
Keyboard shortcuts ...................................................................................................................................... 52
2.6.3.4 Cross Fade Editor .................................................................................................................................................. 53
2.6.3.5
Intro ............................................................................................................................................................. 53
2.6.3.6
Start Time..................................................................................................................................................... 53
2.6.3.7
End Time ...................................................................................................................................................... 53
2.7
I REC: Instant recorder .....................................................................54
2.7.1
OPERATION ............................................................................................. 54
2.7.2
SETTINGS ............................................................................................... 54
2.7.1.1
2.7.2.1
2.7.2.2
2.7.2.3
2.7.2.4
2.7.2.5
2.8
File names .................................................................................................................................................... 54
Audio input .................................................................................................................................................. 54
Sample Rate (Hz) .......................................................................................................................................... 54
Channels....................................................................................................................................................... 55
Directory (folder) ......................................................................................................................................... 55
"Loop" Recorder ........................................................................................................................................... 55
Media Ingest – AUDICOM File Manager................................................55
SOLIDYNE AUDICOM
Page 5
SOLIDYNE AUDICOM
2.8.1
Overview ............................................................................................... 55
2.8.2
Using AUDICOM File Manager .................................................................... 55
2.8.3
autoDB (automatic file indexing) ................................................................ 64
2.8.4
AVANCED INFORMATION .......................................................................... 64
2.8.2.1
TITLES COLORS ............................................................................................................................................. 56
2.8.2.2
FOLDER COLORS ........................................................................................................................................... 56
2.8.2.3
REFRESH FOLDER CONTENTS [ / Num pad ] ................................................................................................. 57
2.8.2.4
INSERT [ Enter ] ........................................................................................................................................... 57
2.8.2.5
CUE START/STOP [ Delete ] .......................................................................................................................... 57
2.8.2.6
PLAY ............................................................................................................................................................. 57
2.8.2.7
STOP / PAUSE ............................................................................................................................................... 57
2.8.2.8
AUDIO EDIT .................................................................................................................................................. 58
2.8.2.9
SYNCRO ........................................................................................................................................................ 58
2.8.2.10 FULL VIEW ............................................................................................................................................................ 58
2.8.2.11 MOVE AND COPY ................................................................................................................................................. 58
2.8.2.12 RENAME .............................................................................................................................................................. 59
2.8.2.13 DELETE ................................................................................................................................................................. 59
2.8.2.14 SEARCH [F3] ......................................................................................................................................................... 59
2.8.2.15 NEW FOLDERS ...................................................................................................................................................... 61
2.8.2.18 IMPORT FOLDER................................................................................................................................................... 62
2.8.2.19 DELETE A FOLDER................................................................................................................................................. 62
2.8.2.20 FOLDER INFO (properties) .................................................................................................................................... 62
2.8.2.21 EXPLORE THE NETWORK ...................................................................................................................................... 63
2.8.2.22 RIGHT-CLICK MENU.............................................................................................................................................. 63
SECTION 3 SCHEDULING .......................................................................... 67
3.1
Cyber Play Editor ..............................................................................67
3.1.1
Overview ................................................................................................ 67
3.1.2
LOG & PGM scheduling files ....................................................................... 68
3.1.3
Load and save files................................................................................... 69
3.1.4
Creating Musical contents ......................................................................... 70
3.1.5
COMMERCIAL BREAKS (/batch).................................................................. 76
3.1.2.1
3.1.3.1
3.1.3.2
3.1.3.3
3.1.3.4
Creating the daily schedule .......................................................................................................................... 69
Loading a file ................................................................................................................................................ 69
Loading LOG and PGM for a date ................................................................................................................. 69
Save LOG / PGM ........................................................................................................................................... 70
Play Lists ....................................................................................................................................................... 70
3.1.4.1
Magic Programming ..................................................................................................................................... 70
3.1.4.2 Direct sequence of titles ........................................................................................................................................ 73
3.1.4.3
WORKING WITH PLAY LISTS ......................................................................................................................... 73
3.1.4.4
DIRECT INCLUSION ....................................................................................................................................... 76
3.1.5.1
3.1.5.2
3.1.5.3
3.1.5.4
EasyLog ........................................................................................................................................................ 77
Add a SPOT to schedule ............................................................................................................................... 78
Remove a spot occurrence ........................................................................................................................... 78
Print ............................................................................................................................................................. 78
3.1.6 How to add titles into LOG & PGM fields ......................................................... 78
3.1.7
Previewing the schedule (F9) ..................................................................... 79
3.1.8
Multiple terminals .................................................................................... 80
3.1.9
Commands for commercial breaks.............................................................. 80
3.1.7.1
3.1.7.2
3.1.7.3
Test-CyberPlay ............................................................................................................................................. 79
Edit the schedule from TEST windows ......................................................................................................... 79
Changing the order of the titles ................................................................................................................... 80
3.1.9.1
BATCH OF ADS.............................................................................................................................................. 80
3.1.9.2
RANDOM ...................................................................................................................................................... 81
3.1.9.3
TIME ............................................................................................................................................................. 82
3.1.9.4
TEMP ............................................................................................................................................................ 82
3.1.9.5 HUMIDITY .............................................................................................................................................................. 82
3.1.9.6 PRESURE ................................................................................................................................................................ 82
Page 6
SOLIDYNE AUDICOM
Contents
3.1.9.7
RAIN ............................................................................................................................................................. 83
3.1.9.8 WEATHER REPORT ................................................................................................................................................ 83
3.1.9.9
COMMENTARY ............................................................................................................................................. 83
3.1.9.10 PAUSES (Stop point) ............................................................................................................................................. 83
3.1.9.11 PAUSES WITH TEXT .............................................................................................................................................. 84
3.1.9.12 CHAINED EVENTS ................................................................................................................................................. 84
3.1.9.13 REGIONAL ............................................................................................................................................................ 85
3.1.10 COMMANDS FOR ARTISTIC SCHEDULING .................................................... 85
3.1.10.1
LIVE SHOWS ................................................................................................................................................. 85
3.1.10.2
META-NAMES: including canning stuff......................................................................................................... 86
3.1.10.3
AUDICOM Auto-DJ and third party music schedulers .................................................................................. 87
AUTO-DJ
87
EXTERNAL-DJ ..................................................................................................................................................................... 87
DIRECT INCLUSION ............................................................................................................................................................ 88
3.1.10.4
Special inclusion: EXACTTIME....................................................................................................................... 89
MIX a file
90
3.1.10.5
Blocks with Sponsors .................................................................................................................................... 91
3.1.10.6
INTERNET LINK - ILink (only for Multicast and higher) ................................................................................. 92
Link with others AUDICOM terminals ................................................................................................................................ 92
Link with public streaming ................................................................................................................................................. 92
3.1.10.7
Satellite FILL ................................................................................................................................................. 92
3.1.10.8
Master - Slave satellite ................................................................................................................................. 93
3.2
Automated scheduling: Auto-DJ EDITOR .............................................93
3.2.1
Overview ................................................................................................ 93
3.2.2
AutoDJ criteria ......................................................................................... 94
3.2.3
How to create an AutoDJ template ............................................................. 97
3.2.2.1
3.2.2.2
3.2.2.3
3.2.2.4
3.2.2.5
3.2.2.6
3.2.2.7
3.2.2.8
3.2.2.9
3.3
Styles ............................................................................................................................................................ 94
Performers ................................................................................................................................................... 95
Authors ........................................................................................................................................................ 95
Include Top Hits ........................................................................................................................................... 95
Genders ........................................................................................................................................................ 95
Tempo / Mode ............................................................................................................................................. 95
Promotional cuts .......................................................................................................................................... 96
Partners files ................................................................................................................................................ 96
Insert Meteor ............................................................................................................................................... 96
Manejo de Noticias ...........................................................................98
3.3.1
Overview ................................................................................................ 98
3.3.2
News Suite .............................................................................................. 98
3.3.3
NEWS (breaking news) ............................................................................100
3.3.2.1
Estimation of reading's time ........................................................................................................................ 99
3.3.2.2
Text files with attached audio ...................................................................................................................... 99
3.3.2.3 Text files location ................................................................................................................................................. 100
3.3.3.1
3.3.3.2
News Management - The application NEWS .............................................................................................. 100
How it works .............................................................................................................................................. 101
SECTION 4 INGEST MEDIA ..................................................................... 103
4.1
Overview ....................................................................................... 103
4.2
Data Base of media files (InfoMusic-Production) ................................. 103
4.2.1
Overview ...............................................................................................103
4.2.2
Users fields ............................................................................................103
4.2.2.1
4.2.2.2
4.2.2.3
4.2.2.4
FILE NAME .................................................................................................................................................. 104
TITLE ........................................................................................................................................................... 104
COMMENTARY ........................................................................................................................................... 105
STYLE [ F7 ] ................................................................................................................................................ 105
SOLIDYNE AUDICOM
Page 7
SOLIDYNE AUDICOM
4.2.2.5
PERFORMER [ F10 ] ................................................................................................................................... 105
4.2.2.6
AUTHOR [ F9 ] ........................................................................................................................................... 105
4.2.2.7
POSITION.................................................................................................................................................... 105
4.2.2.8
TEMPO ....................................................................................................................................................... 105
4.2.2.9 MOOD .................................................................................................................................................................. 106
4.2.2.10 GENDER [ F8 ] .................................................................................................................................................... 106
4.2.2.11 RECORDING COMPANY ...................................................................................................................................... 106
4.2.2.12 TOP HIT [ F11 ] .................................................................................................................................................. 106
4.2.2.13 CLASS ................................................................................................................................................................. 106
4.2.2.14 PROCESSING....................................................................................................................................................... 107
4.2.2.15 MEDIA ................................................................................................................................................................ 107
4.2.2.16 ALBUM ID / CD # / Track .................................................................................................................................... 107
4.2.2.17 FADE IN / OUT ................................................................................................................................................... 107
4.2.3
INTRO TIME (and transport controls) .........................................................108
4.2.4
System fields..........................................................................................108
4.2.5
Using InfoMusic-Prod ...............................................................................109
4.2.6
Data base structure .................................................................................112
4.2.4.1
LENGTH ...................................................................................................................................................... 108
4.2.4.2
Fs / BITRATE ............................................................................................................................................... 108
4.2.4.3
REC MODE .................................................................................................................................................. 108
4.2.4.4
RECORDING DATE ...................................................................................................................................... 108
4.2.4.5 LAST TIME ON-AIR................................................................................................................................................ 109
4.2.4.6 LAST WEEK PLAYED .............................................................................................................................................. 109
4.2.4.7
BEST WEEK ................................................................................................................................................. 109
4.2.5.1
SCAN - Checking registered files / Ingest several files simultaneously ....................................................... 109
4.2.5.2
SEARCH [ F5 ]............................................................................................................................................. 110
4.2.5.3 FOUND RECORDS ................................................................................................................................................. 111
4.2.5.4
RIGHT-CLIC MENU ...................................................................................................................................... 111
4.2.5.5
SCROLL BUTTONS [ Up/Down arrows ] ...................................................................................................... 111
4.2.5.6
SAVE [F2] .................................................................................................................................................... 112
4.2.5.7 DELETE ................................................................................................................................................................. 112
4.2.5.8
EMPTY FIELDS [ F6 ].................................................................................................................................... 112
4.2.5.9
PRINT ......................................................................................................................................................... 112
4.2.5.10 EXIT 112
4.2.6.1 Transfer - Transferring files between different workstations .............................................................................. 113
4.3
AutoEdit: Automatic trim of silences ................................................. 114
4.3.1
Using AutoEdit ........................................................................................114
4.3.2
AutoEdit & Data Base ..............................................................................116
4.3.1.1
4.3.1.2
4.3.1.3
4.3.1.4
4.3.1.5
4.3.1.6
SOURCE FOLDER......................................................................................................................................... 115
FILE ............................................................................................................................................................. 115
DESTINATION FOLDER ................................................................................................................................ 116
PROCEED .................................................................................................................................................... 116
CONFIGURE ................................................................................................................................................ 116
PLAY ........................................................................................................................................................... 116
SECTION 5 NETWORK SETTINGS ............................................................ 117
5.1
Example of an installation on Windows network ................................. 117
5.1.1
Settings .................................................................................................117
5.1.2
AUDICOM settings...................................................................................117
5.1.3
Location of data base ..............................................................................117
5.1.4
Scheduling files ......................................................................................118
5.1.5
Audio files ..............................................................................................118
5.1.6
AUDICOM system files .............................................................................119
5.1.7
AutoDj Editor..........................................................................................119
5.2
Page 8
Users and permissions .................................................................... 120
SOLIDYNE AUDICOM
Contents
5.2.1
Users and access level .............................................................................120
5.2.2
Administrator .........................................................................................120
5.2.3
New users ..............................................................................................120
5.2.4
Permits description..................................................................................121
5.2.5
Air ........................................................................................................121
5.2.6
File Manager...........................................................................................121
5.2.7
Live Assist ..............................................................................................122
5.2.8
Admicom ...............................................................................................122
5.2.9
InfoMusic ...............................................................................................122
5.2.10 Starting application ..................................................................................122
5.2.11 Skin ........................................................................................................122
5.2.12 Presets....................................................................................................122
5.2.13 Pop-up messages .....................................................................................122
5.3
Using AUDICOM on networks ........................................................... 123
5.3.1
Prod)
Access between AUDICOM terminals (CyberPlay Editor; AutoDj Editor; InfoMusic123
5.3.2
Audio files and database ..........................................................................123
5.3.3
Making the program logs .........................................................................124
5.3.4
Files ......................................................................................................125
5.3.5
A single on-air terminal ...........................................................................125
5.3.6
Several on-air terminals...........................................................................125
5.3.2.1
How to register files ................................................................................................................................... 124
SECTION 6 INTERNET TOOLS ................................................................. 127
6.1
iRDS streaming coder ..................................................................... 127
6.1.1
Overview ...............................................................................................127
6.1.2
Public streaming .....................................................................................128
6.1.3
Using a streaming to link radio stations .....................................................130
6.1.4
iRDS WEB player.....................................................................................132
6.1.5
FTP Update ............................................................................................133
6.1.6
TCP Metadata .........................................................................................134
6.1.2.1
6.1.2.2
6.1.3.1
6.1.3.2
6.1.4.1
6.2
Streaming using AAC PLUS over Icecast server .......................................................................................... 129
How to listen the streaming ....................................................................................................................... 130
xLink: realtime link ..................................................................................................................................... 132
How to receive the audio the remote station ............................................................................................ 132
Publish the iRDS web player ....................................................................................................................... 133
iLink - transporting audio and linking remote stations ......................... 136
6.2.1
iLink output device ..................................................................................136
6.2.2
Using iLink in CyberPlay Editor..................................................................136
6.2.3
Replacement of ads .................................................................................139
6.2.4
Replacement of promotional cuts ..............................................................139
6.2.2.1
6.2.3.1
6.2.4.1
6.2.4.2
6.3
Using iLink with xLink protocol ................................................................................................................... 138
Using iLink with standard streaming .......................................................................................................... 139
Media files for replacement ....................................................................................................................... 140
Replace commands .................................................................................................................................... 140
AUDICOM WEB Tools ...................................................................... 140
6.3.1
Access ...................................................................................................141
6.3.2
Live Panel ..............................................................................................141
6.3.3
CyberPlay ..............................................................................................142
SOLIDYNE AUDICOM
Page 9
SOLIDYNE AUDICOM
6.3.4
Weather.................................................................................................142
6.3.5
RSS contents ..........................................................................................143
6.3.6
Live reads ..............................................................................................144
6.3.7
Chat room..............................................................................................145
6.3.8
Remove items from panel ........................................................................145
6.3.9
File Manager...........................................................................................145
6.3.10 Mail-link, remote news ..............................................................................146
6.3.10.1 Mail-Link ............................................................................................................................................................ 146
6.3.10.2 Files and Folders ................................................................................................................................................ 146
6.3.10.3 How to automate the emission.......................................................................................................................... 146
6.3.11 WebTools administration ...........................................................................147
6.3.11.1 Media settings ................................................................................................................................................... 148
6.3.11.2 Stations .............................................................................................................................................................. 148
6.3.11.3 Terminals ........................................................................................................................................................... 149
6.3.11.4 Users .................................................................................................................................................................. 149
6.4
AudiCast ....................................................................................... 150
6.4.1
Overview ...............................................................................................150
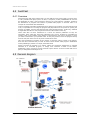
6.5 General diagram ................................................................................ 150
SECTION 7 ADMICOM: Traffic and ads .................................................... 151
7.1
Station settings .............................................................................. 151
7.1.1
Station ..................................................................................................151
7.1.2
Schedules ..............................................................................................152
7.1.3
Announcer .............................................................................................153
7.1.4
Shows ...................................................................................................154
7.1.1.1
7.1.1.2
7.1.2.1
7.1.2.2
7.2
Station information .................................................................................................................................... 151
Basic controls ............................................................................................................................................. 152
Schedules ................................................................................................................................................... 152
Shows ......................................................................................................................................................... 153
Commercial settings ....................................................................... 154
7.2.1
Customer categories................................................................................154
7.2.2
Ad agencies............................................................................................155
7.2.3
Commercial item.....................................................................................156
7.2.4
Central de Medios ...................................................................................156
7.2.5
Ejecutivo de cuenta .................................................................................157
7.2.6
Medio de pago ........................................................................................157
7.2.7
Origen ...................................................................................................157
7.3
Ad campaigns ................................................................................ 158
7.3.1
Customers records ..................................................................................158
7.3.2
Ad .........................................................................................................158
7.3.3
Specials commands .................................................................................163
7.3.4
Generate the commercial breaks ...............................................................164
7.3.2.1
7.3.2.2
7.3.3.1
7.3.3.2
7.3.3.3
7.3.4.1
Page 10
Windows controls ...................................................................................................................................... 160
Ad campaign .............................................................................................................................................. 160
Alternated ads ............................................................................................................................................ 163
Chained ads ................................................................................................................................................ 163
AUDICOM sentences .................................................................................................................................. 163
Rejected ads ............................................................................................................................................... 164
SOLIDYNE AUDICOM
Contents
7.4
Reports ......................................................................................... 164
7.4.1
Solds report ...........................................................................................164
7.4.2
Agency billing .........................................................................................164
7.4.3
Live reads ..............................................................................................165
7.4.4
Schedule profile ......................................................................................165
7.4.5
Ad campaign ..........................................................................................165
8.5
Aaudit ........................................................................................... 166
8.5.1
Overview ...............................................................................................166
7.5.2
Playign a title .........................................................................................167
7.5.3
Open file ................................................................................................167
7.5.4
Multiple workstations ...............................................................................167
7.5.6
Save as TXT ...........................................................................................167
7.5.7
Print ......................................................................................................167
7.5.8
Reports..................................................................................................167
7.5.9
Graphics Reports ....................................................................................168
Music or ads? ................................................................................................................................................................... 166
User's events log .............................................................................................................................................................. 167
SECTION 8 MANTEINANCE ..................................................................... 171
8.1
8.1.1
dbReindex ..................................................................................... 171
Self-diagnostics ......................................................................................172
8.2
Backups ........................................................................................ 172
8.3
Support and updates ...................................................................... 173
8.3.1
Updates .................................................................................................173
8.3.2 Contact us ................................................................................................173
SOLIDYNE AUDICOM
Page 11
SECTION 1
Install and setup
1.1 Computer and sound card setup
1.1.1 General settings
To improve the performance of AUDICOM, check that the configurations of the computer and
Windows complete the following requirements:
1)
OS: Windows 7/8.1
2)
ANTIVIRUS: set it to exclude from the analysis the C:/Audicom and C:/Admicom in all
network terminals. Make sure the antivirus respect 100% the exceptions defined,
otherwise change the antivirus.
3)
We recommend not activate the APM (Advanced Administrator of Energy). This must be
disabled in the BIOS of the computer.
4)
The “on-board” audio can be used as channel monitoring (cue). DO NOT USE AUDIO "ON
BOARD" to output program; because it does not meet the minimum quality requirements
for use with AUDICOM for professional audio systems.
5)
Disable the Screen Saver. You can turn off the monitor when AUDICOM works in automatic
mode.
6)
It is recommended NOT activate scheduled maintenance on Windows
7)
Set the font size to 100%. If you change it to 125% or 150% viewing windows
AUDICOM may be affected.
8)
Disable the Window's sounds. To disable it, go to Windows Control Panel and look for
"Sound Devices".
9)
As far as possible, not use keyboards with power-off or "sleep" keys, since they are a
factor of permanent risk. If by mistake the operator presses that key, the air machine is
power-down. If You have this kind of keyboards, tries to disable this feature.
1.1.2 Audio devices
Today many consoles provide channels with USB connection, which
of sound cards in your computer. AUDICOM supports all audio
Windows DIRECT-X technology. If your computer has a sound card
a playback channel for previous monitoring (CUE). The use
recommended to send on-air. Require DirectX 9 or newer.
makes unnecessary the use
interfaces compatible with
on-board, you can use it as
of these devices is not
1.1.3 Assign outputs devices in AUDICOM
When there are more than one sound device, you must assign the output devices to the system
AUDICOM. This settings are made from AUDICOM Configuration Panel (aStart).
1.2 Dongle (licenses)
AUDICOM requires a license dongle to run, which is connected to a USB port. For safety, fix the
dongle to the chassis with a band or cable lock. Another option is to place the dongle inside the
computer case. On installation the drivers for the dongle "Hardkey" are installed. You needs
Administrator rights for install this drivers.
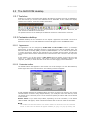
1.3 'Full' installation
There are two general ways of installation, Full (first time) and Modular (re-install), that
allow you to install the components separately.
FULL INSTALLATION installs all AUDICOM modules, demos and accessories. This option is
recommended for the first installation, when previous versions don't exist. The components
installed are:
Page 13
SOLIDYNE AUDICOM
SOLIDYNE AUDICOM
•
Licenses: Hardkey drivers.
•
AUDICOM and all basic modules: ‘On-air’ main program - File Manager - InfoMusicproduction - CyberPlay Editor - AutoDj Editor - News Virtual Office - Aaudit - HDCorder DBreindex – Documentation files.
•
Admicom - Management of ads and billing.- (only Multicast y HD)
•
Audio demo cuts (optional).
•
Demo scheduling files (optional).
•
AutoRec 202: 24Hs MP3 Recording. This product is sold separately but AUDICOM includes
the a version for 2 channels, that works over on-air terminal.
•
CDex: transfers audio CDs to the hard disk. It compresses files WAV in MP3 using the
LAME codec.
Once the installation completes, reboot the system.
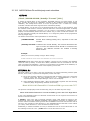
The setup will create an AUDICOM icon's group on Windows Start Up menu. All AUDICOM files
are located at C:\AUDICOM; with the following sub-folders:
\AUDICOM
AIR
AUDIO
DB
LA-ICONS
LOG
METEOR
PGM
On-Air scheduling logs.
Contains all audio folders used by AUDICOM. ALL audio files are
stored in folders located in \AUDICOM\Audio.
Files of musical database
Live Assist icons
Commercial program logs
Weather Station files
Artistic contents logs
TEXT
Contents the folders with TXT files
This folders structure is fixed. The location of these folders is set in 'AUDICOM Configuration
Panel', and must be modified when you customizes an AUDICOM's network (see AUDICOM’s
network > Software settings).
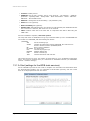
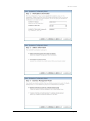
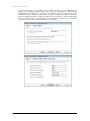
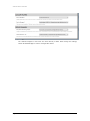
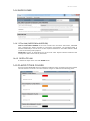
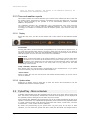
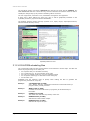
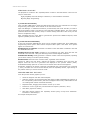
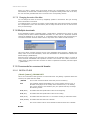
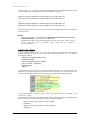
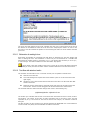
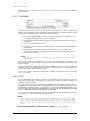
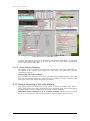
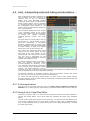
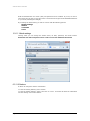
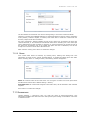
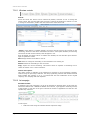
1.3.1 A-Start (settings for the WEB-tools services)
On the installation process the user need to complete user information and information about
the terminal being installed. It is very important to fill this data rigorously, and even record
them to not forget passwords and user names.
Page 14
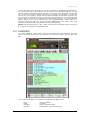
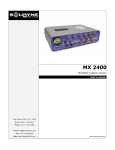
SOLIDYNE AUDICOM
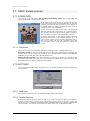
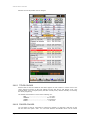
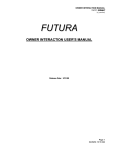
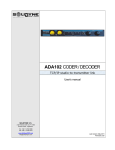
On-air screen
SOLIDYNE AUDICOM
Page 15
SOLIDYNE AUDICOM
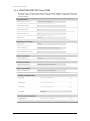
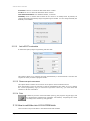
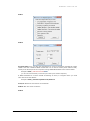
A multi media groups a set of stations, each of which have their own users WebTools. For
example, the multimedia "National Radio" may contain the "AM National", "National Rock",
"National Folkloric" stations etc. The name of the multimedia will be necessary to access the
administration panel of WebTools, which allows, for example, create new users for each station.
When an independent station is defined, the alias of the radio station (with the suffix-admin)
will be the default name for administration. This information is detailed in the confirmation
email sent by the server to confirm WebTools account creation.
Page 16
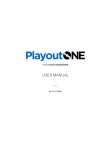
SOLIDYNE AUDICOM
On-air screen
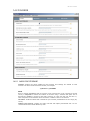
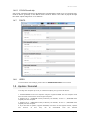
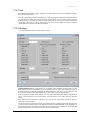
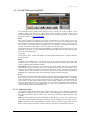
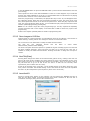
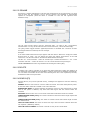
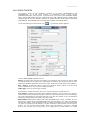
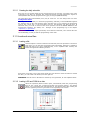
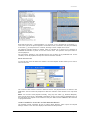
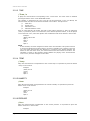
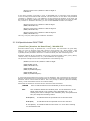
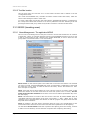
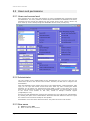
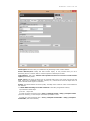
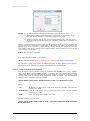
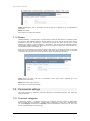
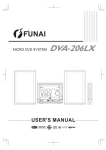
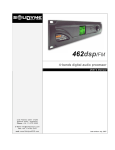
1.4 AUDICOM Configuration Panel (aConfig)
The configuration must be done for each terminal.
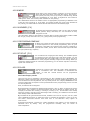
1.4.1 AUDIO
Define an audio device for each AUDICOM output channel. The modules 'CyberPlay', 'Live Assist
1', 'Live Assit 2' and 'Play List Manager' can be assigned to different output devices. In addition,
you can define an output channel for CUE.
SOLIDYNE AUDICOM
Page 17
SOLIDYNE AUDICOM
The channels assigned in mix-mode are mixed directly to PGM. When change the settings,
reboot all AUDICOM apps in order to changes take effects.
Page 18
SOLIDYNE AUDICOM
On-air screen
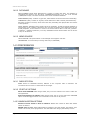
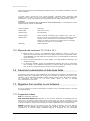
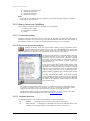
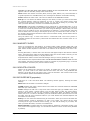
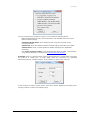
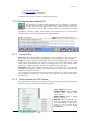
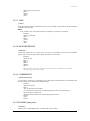
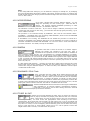
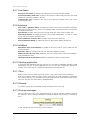
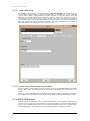
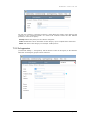
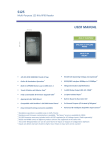
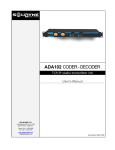
1.4.2 FOLDERS
1.4.2.1 AUDIO FILE STORAGE
SERVERS: Defines the drives enabled for this terminal. This settings are defined on each
terminal. The drives must be declared as UNC, for example:
\\Server or \\PC-AIRE
NOTE
Even in network installations that do not have server (because the on-air computer is the file
server) is REQUIRED to define the location of the files using a network UNC path. This is
because the database is unique for the entire network, so if the user sets only the drive 'C',
other computers on the network cannot access the contents of the on-air terminal.
PARTNERS: locations: Folder that contents the pre-recorded presentations for the songs (dry
voices).
PROMOS FOR REPLACE: Location for audio cuts that will replace promotional and cut of a
content linked with a Master Station by iLink.
SOLIDYNE AUDICOM
Page 19
SOLIDYNE AUDICOM
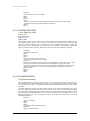
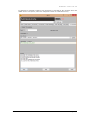
1.4.2.2 DATA BASE
MAM DATABASE (Media Asset Management): Location of media data base. The database is
centralized and locates in the file server (\\SERVER\Audicom\db) or at the on-air terminal
(\\AIRE\Audicom\db). The other terminals access to the centralized database.
PROGRAMMING (PGM): Location of .pgm files, which defines the shows and musical scheduling.
COMERCIALS (LOG): Location of .log files, which defines the Traffic contents (advertisements).
AIR LOG: Location of .air files, which stores the daily scheduling with played titles and actions
of the operators.
MUSIC FORMAT: Database where AutoDJ stores the templates. Usually the AutoDJ database is
stored at the on-air computer. When there are more tan one station; each station have its own
AutoDj templates, so the reference in each on-air terminal will be UNC to local disk (\\Station1\Audicom ; \\Station-2\Audicom). From any AUDICOM terminal AutoDJ Editor will can Access
to any on-air terminal.
1.4.2.3 NEWS SOURCE
TEXT LOCATION: This special folder in "File Manager" that supports TXT files .
TELEPROMTER: Is not necessary to change this field (C:\AUDICOM)
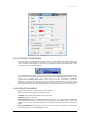
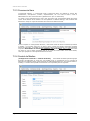
1.4.3 PREFERENCES
1.4.3.1 RADIO STATION
NAME: Name for AUDICOM terminal, different to the computer name in Windows. We
recommend do not exceed 17 characters for the length.
1.4.3.2 START UP OPTIONS
Never start AUDICOM: When ILogon starts, stay on screen until the user enters a valid user
name/password.
Start auto-playing in 3 minutes: When Ilogon starts, stay on screen and launch AUDICOM
lapsed 3 minutes logged with the user "automatico" if the user is not present.
1.4.3.3 MUSICALIZATION OPTIONS
Amount of music tracks to show in advance: Defines the number of titles that AutoDJ
selects in advance.
PROMO class to use: Allows differentiate promotional cuts that identify the Station; from
artistic cuts used by music programmers. This field define the category that AutoDj will use.
Page 20
SOLIDYNE AUDICOM
On-air screen
1.4.3.4 CYBERPLAY OPTIONS
Include a pause after each live block: If the insertion of "Pauses" is enabled; CyberPlay
include a stop point (or pause), preceding each "live" block on the scheduling.
Automatically load next day programming at: Schedule in which AUDICOM will load the
scheduling files (LOG and PGM).
Automatic height of comment text-box: If the space in the commentary window is not
enough, the window's height duplicates.
Deactivate independent channel CUE: When the independent channel for CUE is
deactivates, the cueing plays using the same playback audio device, but with the difference
that cueing do not generates RDS data.
CUE end time: When selecting CUE to an audio track already been cueing, AUDICOM will
playback the last seconds of the track.
SOLIDYNE AUDICOM
Page 21
SOLIDYNE AUDICOM
1.4.3.5 “LIVE ASSIST” INSTANT PLAYER
AMOUNT OF COLUMNS: Number of columns of Live Assist panel when is maximized
(default=4).
AMOUNT OF ROWS Number of rows of Live Assist panel when is maximized (default=10).
HIDE ID NUMBER FROM BUTTONS: Each Live Assist button has a unique number to trigger the
audio using a keyboard shortcut. If this feature is not used, then the ID’s can be hidden from
the button.
KEEP PLAYING ON EMPTY BUTTON: make any ampty button work like a STOP button, so that if
another button is playing, it will stop as soon as the empty button is pressed.
NOVATION LAUNCHPAD: Settings for a MIDI controller used for remote control of Live Assist 1
and Live Assist 2. For each Live Assist 2 MIDI channels must be settled: one for INPUT and one
for OUTPUT. The input channel is used to launch audio, and the output channel is used to
control the lights of the LaunchPad.
1.4.3.6 AUDIO/VIDEO EXTERNAL EDITORS
AUDIO EDITOR: Select the executable file of your audio editor of choice.
VIDEO EDITOR: Select the executable file of your video editor of choice.
1.4.3.7 MEDIA LIBRARY DISCOVERY
File discovery in workstation is: Enables this option ONLY for the files server workstations.
Page 22
SOLIDYNE AUDICOM
On-air screen
1.4.4 AUDIO LINKS
1.4.4.1 IP for iLink (AUDICOM-to-AUDICOM)
Time to wait before fallback: If the iLink module loses connection with header, AUDICOM
wait a defined time before launching to emergency programming. The playback buffer in
Windows Media Player must be set to a value equal to half timeout. The buffer defined in WMP
is used for streaming audio playback.
Headroom: Produce an attenuation level of the local audio. Adjusts with the headroom that
manages the audio stream sent by the header.
1.4.4.2 SATELLITE LINK
It defines the input device used with SatFill blocks.
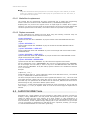
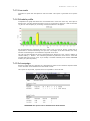
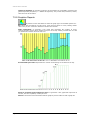
1.4.5 PLAYED TITLES COLORS
Several windows AUDICOM, titles are displayed in different colors according to the time elapsed
since its last issue on the air. The colors and time ranges are defined in the following panel.
SOLIDYNE AUDICOM
Page 23
SOLIDYNE AUDICOM
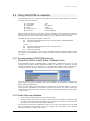
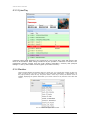
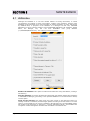
1.4.6 WEATHER REPORTS and TIME
Defines the way in which announcements will be generated. Weather and time announcements
are built based on prerecorded voices, detailed in the chapter "Customized voices for
announcements".
Page 24
SOLIDYNE AUDICOM
On-air screen
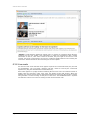
1.4.6.1 O’CLOCK audio clip
Set a beep sound file that will be broadcast five seconds before each hour. For the beep airs,
must be active (pressed) on the Meteor Zone "O'clock" button. The audio is played through
the audio output assigned to "Live Assist 2".
1.4.7
FONTS
1.4.8
VIDEO
To known about video settings, please refers to AUDICOM HDV Mixer user’s manual.
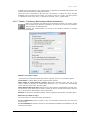
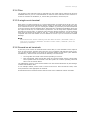
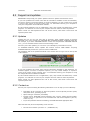
1.5 Update / Reinstall
To change the computer up-to-Air (or reinstall everything on it) proceed as follows:
1. Install AUDICOM on the new computer using the original CD-ROM. The new computer must
have the same network name as the original computer.
2. Replace the C: \ AUDICOM recently created by the installer; for the C: \ AUDICOM which
originally had the computer.
3. Replace the C: \ ADMICOM recently created by the installer; for the C: \ ADMICOM which
originally had the computer.
4. If you also wish to update / upgrade AUDICOM, must have current support contract, updates
and
services.
In
this
case,
can
be
downloaded
from
the
Internet
SOLIDYNE AUDICOM
Page 25
SOLIDYNE AUDICOM
(http://www.solidynepro.com/indexahtmlp_UpGrade,t.htm) last updated AUDICOM, and now
may be installed.
To install a newer version from a CD, choose "Modular - Reinstall" option. Install the same
modules as how "full", but can be chosen individually from a menu. Usually updates are
distributed in a single executable file and downloaded from the WEB (www.audicom.com.ar).
WARNING:
ALTHOUGH THE INSTALLER NOT OVERRWRITE USER INFORMATION, is recommended to have
updated backup of folder C:\AUDICOM
\Audicom\AUDIO
Audio files
\Audicom\DB
Data base of music
\Audicom\Log\
Ads scheduling
\Audicom\Pgm\
Artistic contents scheduling (.pgm). Playlists (.pls, .m3u, .txt)
\Audicom\Air\
On-air log. Sólo es necesario tener copias de seguridad de estos
archivos si es de interés para la radio mantener un registro
histórico de todos los archivos que salieron al aire. El tamaño
promedio de un archivo .air es de 80 KB.
\Admicom\
Traffic data base
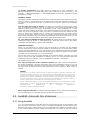
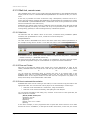
1.5.1 Migración de versiones 7.0 / 10.0 a 10.1
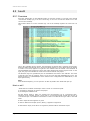
a) Before moving to version 10.1 AUDICOM requires updating to version 9.x Then run
dbreindex and select 'With Syncronize info in DB info files'. Once checked that option,
press PROCEED. This will embed the information in the Current Database in media files
(audio and video).
b) Run the upgrade AUDICOM 10.1, which installs a new SQL database technology. The
database is empty.
c)
To rebuild the database, simply open AUDICOM File Manager and click on each folder
tabs "autoDB". As the database information is protected within the ID3Tag of media
files, all of the original data will be imported into the new database.
1.6 Advanced customization of data base fields
If necessary, some aspects of the database can be modified before starting to load media files.
Manually editing the configuration file audicom.ini is possible to redefine some fields of the
database, such as definitions CATEGORY, TEMPO, MODE; among others. While this is possible,
we recommend not modify it. For more details check via mail or through
www.audicompower.net forum.
1.7 Migration from another on-air software
If you are replacing a system of automation of another mark, is important that she considers
the following thing:
1.7.1 Supported codecs
PCM: Uncompressed audio files.
MP3/WAV-MP3 (MPEG Layer 3): Mp3 or wav can have extension, but internally they are
equal. If its old system worked with archives of this type, any type of reconversion is not
necessary. It will not either be necessary to concern the archives to be able to use them. Single
it will be necessary to copy them to the folders of work of AUDICOM, as it is explained later.
ADPCM: Typically they are of extension wav. This format is obsolete. There are different
variants from the ADPCM, some are supported by Windows and others can require the
installation of an external CODEC. AUDICOM supports to Ms-adpcm and any compatible
Page 26
SOLIDYNE AUDICOM
On-air screen
variation with standard ACM if it is had codec corresponding. Some manufacturers "red-baptize"
to this format like "Cd-4 Quality".
MP2/WAV-MP2 (MPEG Layer 2): Like the MP3, can have extension mp2 or wav. These
archives are used by systems that work with plates ANTEX (Sx-34/36, etc.); Digigram or
similars. They can be used directly without reconverting them, installing the CODEC for Layer 2
(not incluído with AUDICOM). We recommended to acquire the CODEC developed by the
QDesign company. Contáctese with www.qdesign.com or consults with its Solidyne
representative for more information.
Dolby AC2: The typical extension is wav or atx. Not supported by AUDICOM in direct form, but
it is possible to obtain a codec. Contact with its Solidyne distributor for more information.
1.7.2 Folders for media files
AUDICOM works with a rigid structure of folders. The management of files and folders is
explained in chapter AUDICOM File Manager.
At this point is important to know that all media files that AUDICOM manages must be
organized in this folder structure:
\Audicom\AUDIO
JAZZ
TANGO
BOLEROS
POP 80's
POP 90's
SALSA
ROCK&ROLL
EFECTOS
PROMOS
CORTINAS
....
The folders contained in \Audicom\Audio are called media folders. These folders cannot have
sub-folders. If sub-folders exists, AUDICOM will ignore them.
Use File Manager to create new folders within AUDICOM, this way the structure of folders will
be always the proper. The user only choose the disc and a name for the folder. Please refers to
the chapter File Manager for more information.
1.7.3 Data Base
For automated modes (AutoDj's) AUDICOM requires media files registered in the database. File
Manager allows to the user ingest files to the database in automatic way (using 'AutoDB'
folders). In addition, 'InfoMusic Production' is the tool to manage the database. See the chapter
"InfoMusic-Production" and see SCAN.
1.7.4 Schedule logs
AUDICOM offers several forms to generate the main schedule. ADMICOM is in charge of the
commercial scheduling, and have its own customers Data Base, independent of the musical
data base.
In order to know the format and how to generate the schedule, please refers the following
chapters:
CyberPlay Editor
Tráfico, Administración y Estadísticas
1.8 USB GPIO
This interface is an accessory that is sold independently (see your dealer Solidyne). The I / O
USB has 2 inputs and 2 outputs for control. Using an input / output USB can externally control
the transport functions 'AUDICOM' software. It is also possible that 'AUDICOM' control external
devices. This is the case of the line consoles Solidyne, whose modules will transmit control
signals to command AUDICOM playing: with this control, opening the fader and enable the 'Air'
button AUDICOM starts playing. Turning off the channel (or closing the fader), AUDICOM stops.
SOLIDYNE AUDICOM
Page 27
SOLIDYNE AUDICOM
Then the control signals input / output are described, and the satellite control signals, which
are detailed in the chapter "Remote Control and Satellites".
Remember: Sending and receiving commands must be enabled from the Configuration Panel
AUDICOM.
WARNING
The ground terminals of the I/O USB interface share the ground with the USB. Because they
are not isolated internally, these terminals may expose the USB ground potential of the PC to
which they are connected. Make sure all circuits to be connected to the interface before
connecting. If a inverse voltage or high peak voltage is applied to the input or output terminals
may cause damage to the USB interface or even the computer.
The outputs gives 5 volts and have an internal resistance (250 Ohms) to limit the current.
Tickets are "dry contact". Are switched to ground by connecting them directly.
The inputs are "dry contact"; it connects directly to ground.
1.9 Remote links
1.9.1 Internet link
A work mode widely used today, is the transmission of audio over the Internet. AUDICOM is
designed and optimized to work with audio over the Internet. The head station has control over
the repeater station. In the chapter "Internet Tools" these facilities are detailed.
1.9.2 Satellites
The satellite blocks are used to automate switching between local audio and an external source,
such as a satellite, or to remotely control a repeater terminal. For switching possible, it is
necessary to have a console that can be remotely controlled by logic signals. The consoles
Solidyne the 2300/2600 series support it.
There are two modes of operation Satellite: Satellite-fill "SatFill" and Satellite Master-Slave
"SatSlave". The use of one or another depends on the satellite link that you want to manage,
since they are designed for different requirements and each has a specific function in the
system.
Page 28
SOLIDYNE AUDICOM
On-air screen
'Multicast AUDICOM' also allows transmission to remote stations using the Internet. This
method is detailed in "Internet Tools"
1.9.3 SatFill
This mode is used in terminals requiring alternate the local programming with external audio
sources, such as satellite, links, etc.. In this mode, the 'AUDICOM' software enables an external
source during Satellite block (Event SatFill). Switching between satellite and local programming
is produced according to a time schedule.
On the 'OnAir' screen, these blocks appears as a control bar called 'SYNC'. Each 'SYNC' event
has a fixed duration, and while active, the external signal (Satellite) will remain on the air.
When SYNC ends, switching takes place and AUDICOM continues with local programming, as
scheduled.
1.9.4 Master-Slave Satellite (SatSlave)
Allows to establish connections between AUDICOM workstations. In this configuration, a
workstation will behave Master, controlling the programming of one or several remote
workstations, denominated "Slaves." workstations. Master workstation uses an special
instruction known as /REGIONAL. When this instructions is interpreted by the On Air module,
sends a start pulse via parallel port that is transmitted via satellite to the remote (Slaves)
workstations (repeaters), where the AUDICOM interprets it commuting the Remote workstation
to the local programming.
The last block of a SatSlave program doesn't require of start pulse. On screen will appear
programmed as Syncro, because of not arriving the corresponding pulse, commutation will be
made according to the programming schedule, so that the next program begins at the defined
hour.
1.9.5 Repeat external signals - switching by time
For explain this. the case of an AIR workstation is supposed, which requires to commute
between local programming and satellite programming. The workstation is programmed in
SatFill mode. As was said, in this mode the commutation is controlled by the the schedule.
During the SatFill event, the input of the corresponding satellite will be enabled.
The commutation can be made in two ways:
a) Controlling the console via USB
In this case the satellite audio signal is sent to a console's channel remotelly managed by
AUDICOM. (obviously, the console must allow the remote control). AUDICOM controls the
console's module sending commands through the USB port to switch the channel status,
depending on how the SatFill instruction was programmed in CyberPlay Editor.
With respect to the connections, you have two classes: data and audio.
==>
Data connections: The connection of data is made between the USB I/O module and
the console. The data transmitted by the port are subject to the configuration of the
system, and is descripted later
==>
Audio connections: They take the satellite signal and local program (from PC) to the
console inputs. In some cases the audio connection between the computer and the
console can be USB.
b) Controlling the input of the sound card
The external signal is connected to the line input of the sound card. AUDICOM will switch
between the incoming signal from line input, and the local audio from AUDICOM playlist.
Only one sound card can be controlled. If you have more that one sound card, you can define
the sound card in the SatFill command, as is explained later.
At the mixing console you have the a unique output, PGM-1, with the audio from AUDICOM,
and the satellite signal which incomes by sound card line input.
SOLIDYNE AUDICOM
Page 29
SOLIDYNE AUDICOM
1.9.6 Streaming repeater using "Satfill"
To repeat streaming audio; 'AUDICOM' has a block type called "iLink" which played directly
streaming audio. Click here to use iLink.
1.9.7 Controlling remote terminals from a Master Terminal
This configuration involves to the blocks SatSlave (Master-slave). Suppose you for this case
that you have two workstations:
a) Local Workstation, which behaves as Master. It sends the program signal to the satellite.
b) Remote Workstation, which behaves as Slave. It receives control signals and audio from the
satellite.
The remote workstation (Slave) will be programmed with SatSlave's. When the Master
workstation finds a /REGIONAL command (typically into an advertising batch), toggle an output
in the parallel port. The satellite codifier receive this status change through a relay, and
transmits it to the Slave workstation closing a contact in the satellite header. This interface is
shown next.
1.9.7.1 MASTER TERMINAL (satellite upload)
See USB I/O pinout at USB GPIO
The slave workstation detects the signal sent by the Master workstation like a status change in
the USB interface, which is connected to the corresponding contact in the satellite header.
When detecting a status change, the audio program is commuted fading the line input of the
sound card (by where the audio via satellite enters); and plays the local audio that will be onair until taking place a new status change in the satellite header (when the /regional
commercial break concludes at the Master workstation).
Likewise, the /Regional will change the PIN 10 status on the USB interface, to commute the
audio console, in case it is necessary. Next the diagram of connections of the SLAVE
workstation. In this example audio console is not used, the signal enters directly to the line
input of the sound card.
Page 30
SOLIDYNE AUDICOM
On-air screen
1.9.7.2 REMOTE TERMINAL (Satellite header)
The connections (pin-out) are detailed at USB GPIO
1.9.7.3 INPUT DEVICE
The input used in this mode is defined in AUDICOM Configuration Panel. If not defined, the
default audio device is used. To check the Windows default device, go to Control Panel ->
"Sounds and Multimedia" section.
1.10 Power outage
It should never be allowed that an power failure affects the computer. Remember that Windows
have a progressive method to shutdown the system and that it doesn't accept an abrupt cut of
feeding. The hard disks can damage if the computer don’t shutdowns properly. Therefore
always it should be provided to the computer of a Source of Non Off Feeding (denominated
"UPS" for their initials in English). This source UPS is a system fed from a battery that
transforms the direct current of this into AC of 220 volts. They will always be used the
denominated UPS "On-line" or of Double Conversion that you/they are a little more expensive
than the common ones, but they guarantee the absolute continuity of the feeding. The power
will be of 500 W for each computer PC.
The AUDICOM can be settled to automatic restart and play in case con power failure.
a) Use an UPS with capability to feed the console and the transmitter. This way the
transmission will never be interrupted. As alternative, can be installed an UPS for the computer
and a emergency generating group for the transmitter (of modern type with automatic
starting).
b) A more economic solution is to suspend the transmission during the blackout, but restarting
it automatically when the energy returns. In this case is convenient to turn off the PC so that it
doesn't continue generating commercial spots that don't come out to the air to be out the
transmitter. To achieve this an "intelligent" UPS must be used. This UPS notifies to Windows
when the energy cuts, closing Windows and shut downing the computer. When the energy
returns, Windows are restarted and the AUDICOM starts PLAYING at the more next hour. This
way the spots are canceled during the blackout appears in the audit schedules like "not played
on the air". Also the program of billing of the AUDICOM, cancels the billing of the spots that you
didn't come out to the air during the energy cut.
To operate in this mode (b) you must create a AUDICOM shortcut (aire.exe) in the start up
folder of Windows Start Up menu, so that AUDICOM be started when power on the PC. The
option Autorun of the AUDICOM must be enable. The feature Autorun must be defined in the
1.10.1 Protection against lighting
It is important to keep in mind that most of the cases of stations of Radio damaged by rays
happen when the ray enters for the electric power lines. Neither the UPS neither the stabilizers
of tension can protect it against this event, because the surges generated by a ray overcome
SOLIDYNE AUDICOM
Page 31
SOLIDYNE AUDICOM
the dozens of thousands of volts. Very distant electric storms can even travel many kilometers
for the electric power airlines and to cause big damages. To avoid this circumstance seeks
advice the employment of Unloaders of Rays for lines of 220 volts. These units are connected
poles of 220v and a javelin of 2 meters buried in the floor between both. They are located in
the main board, before the UPS. We request to consult to the Technical Department of Solidyne
for marks and models of Unloaders.
1.11 Auto-starting at the morning
The following explanations are not, in fact, an installation subject; but a way of programming of
the AUDICOM, but there are including this information in the chapter Installation to facilitate its
location, since it is a case of frequent application.
Suppose you that your radio lets transmit to the 00:00 Hs and begin the transmission at the
07:00 Hs. Each morning, the operator of the transmitting plant power-on the equipment, or the
same one activates using an automatic device of ignition (clock to timer). Then, AUDICOM must
exactly start to play at the 7:00 Hs., in automatic form.
The solution is very simple: consite in programming a SatFill block while the radio is off-air. The
AUDICOM computer will remain working, reproducing the Satfill block. At the 7:00 Hs the
satelite block ends to take place to the commercial break (or another block) that start the
programmingschedule.
The programming command in PGM file will be similar to the following one:
/Block /00:00-07:00 /Satfill
/Block /07:00-09:00 /AutoDJ="Music at the morning"
In this way, the computer remains playing the satelite block all night long, and at 7:00
(according to the PC clock) starts to play the next block, in the previous example an automatic
musical block (AutoDj).
Notes: if the radio let to transmit at 23:00 Hs, the Satfill block would be separated in two
parts. The complete block will be armed when they join the end of the PGM of one day with the
beginning of the PGM of the following day. That is to say; the programming logs (PGM) begin
with a Satfill block from 00:00 to 07:00Hs and finalizes with a SatFill block from 23:00 to
00:00Hs. This particular way of programming is totally independent of the state of the
AUDICOM´s autorun, explained in the previous item. In order to know more about the
programming of AUDICOM, please consults CyberPlay Editor chapter
1.12 RDS setup
1.12.1 Software setup
The RDS module (RDS.EXE included in the folder C:\AUDICOM) manages the hardware
'Solidyne RDS-100' and other compatible brands (see www.solidynePro.com). This application
must be running for the RDS hardware keeps the updated information. The program runs
automatically when you declare a serial port (start when you start AUDICOM). The 'iLogon'
module monitors the RDS application, and relaunched if it was closed. By maximizing the
application you will see this window:
Page 32
SOLIDYNE AUDICOM
On-air screen
1.12.2 Use
As AUDICOM played titles, notifies the RDS. The RDS software accesses the database to obtain
the necessary information.
You can send messages in real time filling the "Flash Msg" field and pressing the [Flash] button.
The field 'Send as traffic announce' in the main window allows you to use the 'Traffic announce'
of RDS receivers. 'Ad Traffic' is a field for extra information. Some receivers have two fields and
can display both texts at a time, while others only have one line RDS and switches between
'Traffic announce' and the main RDS information.
1.12.3 Settings
To configure the RDS soft press the button "Config".
Communication port: By default the port is disabled. After installing a device RDS, run the
RDS software from the 'AUDICOM' menu on Windows Star Up. Enter the COMM port used on
the RDS software configuration. Restart the RDS application (the comm value is stored in the
file serial.ini, located in the \AUDICOM folder, in the [comm] section variable 'port').
In the configuration panel can be defined in a way that differentiated information using RDS for
music, commercial blocks and other blocks. Also the name of the radio and the message
format.
Since RDS viewers only show 8 characters, you may choose to alternate the text in order to
show more long messages.
The "Export info to" dumps information generated by RDS in a text file defined in this field. This
is used to link a hardware RDS is not supported directly by AUDICOM RDS. If the application of
the hardware can lift the data from an external file, the data dump permitra link AUDICOM RDS
with that application. The location of the file format supports UNC.
SOLIDYNE AUDICOM
Page 33
SOLIDYNE AUDICOM
Page 34
SOLIDYNE AUDICOM
On-air screen
SECTION 2
On-air studio
2.1 Starting AUDICOM
2.1.1 Login to AUDICOM
After the installation, the AUDICOM icon appears on Windows desktop. Double-clic on icon
launch the logon window:
Here the user enters username and password. The user profile loads customized settings
and rights, which was assigned by the AUDICOM Administrator (see Access Levels and
passwords). If the users settings was not defined yet; you can enter the AUDICOM default
names, as detailed below.
When AUDICOM desktop is already running logged with another user, close the current session
and login with your user name. For this, launch I-logon by double-clicking the AUDICOM
desktop at upper angle, where the current OPERATOR name shown.
Double-clicking on OPERATOR name opens I-Logon.
Note: I-Logon and toolbar reports the expiration date for the updates.
2.1.2 Change user
Once you enter the user name and password, press the button "Change User" to enter to the
system. The combination of uppercase/lowercase are allowed for user's name but NOT for the
password. User's changes are registered into the emission log files (.air).
SOLIDYNE AUDICOM
Page 35
SOLIDYNE AUDICOM
2.1.3 User names and passwords
2.1.3.1 Default users
AUDICOM default users allows to operate the system, but these examples can be deleted when
the radio defines their own users. Each users have a different configuration, so that the
different possibilities of the system can be tested. Default users names are (in spanish):
Administrador
Automatico
Aire-1
Aire-2
Produccion
Programacion
Comercial
Mantenimiento
Default users do not have password. The user called 'Automatico' is a SYSTEM user and
cannot be deleted. It's used when you leaves AUDICOM in autoplay (AutoDj or Satellites) with
none user logged. In this case, login as 'Automatico' so that the use of AUDICOM is restricted
(e.g.: titles cannot be added neither deleted on the programming schedule).
NOTE: "Automatico" is also used when the system recovers from a power failure. If I-logon
window remains inactive last one minute, AUDICOM will run automatically. One minute later
playing is started (Please see "Power failures - autoarun")
2.1.3.2 New Users
User's name and password will be assigned by the network administrator (or staff in charge of
system AUDICOM). Once defined, user name cannot be changed; but the user will be able to
change his password when he wants. To change the password:
•
Press "Change Password"
•
Enter the current password and the new password twice. It can be alphanumeric.
Press OK.
Next time that you enters to the system, you will have to use the new password.
2.1.4 Close Session
When you ends your job, you must log out from AUDICOM to avoid that somebody uses it in
your absence and modify your settings, or be able to carry out any operations while you
continues logged as the operator.
In order to leave the system working in AUTOMATIC mode, you can log in as automatico (don't
need password). This way, you abandon the system but AUDICOM will be working without
operator. Obviously, the programming will be prepared so that AUDICOM continues operating
with AutoDj or Satellites.
'Close Session' allows you to log out and leave AUDICOM operative, so that the next operator
logging and begin to use it. The main program will remain open without operator logged. This
way, only the basic functions will remain enabled (Play / Stop) and modifications in the desktop
settings will not be saved.
2.1.5 Shutdown AUDICOM
If you wants to close all AUDICOM applications, press 'ShutDown AUDICOM'
Page 36
SOLIDYNE AUDICOM
On-air screen
2.2 The AUDICOM desktop
2.2.1 Tools bar
Desktop is a graphic environment that displays the different modules and tools of AUDICOM 8.
From the tool bar you access to the different tools of AUDICOM. It also contains the display
with the time counters, clocks and weather information.
AIR tools are only available if the user has permissions to "On-Air Operator". Otherwise, the
tools will not be available for transmission.
The position and size on the desktop of the different modules is customized for each user.
2.2.2 Customize desktop
AUDICOM desktop can be customized in two aspects: appearance and toolbar. The first 15
buttons are fixed. You can add additional icons that will appear next to 'ACONGFIG' button
2.2.2.1 Appearance
The appearance can be changed by double-click on the ToolBar texture (or desktop's
background). A window will appear showing a drop-down menu with all available skins. The
Skins are based on bitmaps (BMP), located at \AUDICOM\Skins. You can edit the original skins
or create new designs, based on the originals for size, resolution and file names. This files are
stored in folders whose names define the name with which the skin is shown in the drop-down
menu.
In this window, you can also enters a radio name which will appear an the right top of the
screen (e.g.: "Radio Buenos Aires"). This name is valid for that workstation, stored in the
computer, therefore, it will be the same for all the users that logging in that workstation.
2.2.2.2 Customize toolbar
The default buttons that appears in the tool bar can not be changed. You can add buttons by
double-right-click on the tool bar texture. The following window will appear:
At left (Available buttons) the available buttons are shown. At right (User tool bar), the current
showed buttons are listed. Using add/quit buttons, you modify the 'User tools bar' list, which
can include up to 9 elements, since it is the maximum quantity of buttons that can be showed
on the tool bar.
Button 'menu': If you adds many buttons, depending on screen resolution, a new button
labeled "MENU "will appear, which contents the buttons that not are not visible in the toolbar.
NOTE
The ToolBar and the Menu button can contain modules to which the user has restricted
access. In that case the button will appear disabled (in gray) or a pop-up warning will
SOLIDYNE AUDICOM
Page 37
SOLIDYNE AUDICOM
notice you about the restriction. This depends on the attributions defined by the
administrator in the AUDICOM users settings.
2.2.3 Time and weather reports
This module contains the controls that allow you to inform to the audience the time o’clock and
the weather report: temperature; humidity; atmospheric pressure and fallen rain. This values
can be entered manually by the operator or it can automatically updated by AUDICOM
WEBTols, using Internet.
The AUDICOM generates the corresponding voice announcements using files previously
recorded (a demo set is included with the AUDICOM software). You can make you own
recordings, as is detailed in "Customized voices for weather reports". Up to 4 sets of voices can
be done.
2.2.3.1 Display
Shows the date, time, and the current weather info. It also include an old fashioned needle
clock.
Current time
Pressing this button, the announcement corresponding to the current time is played on-air, in
mix mode through PGM audio channel. The time is taken from the PC clock. If you wants to
adjust the computer clock, make sure that AUDICOM is stopped, since changes on the PC clock
while the program is on-air can cause errors in the time calculations.
Time O'clock
When you press this button, it will remains retained. To release it, press it again. When
this button is on, the time will be announced every time o’clock (16:00, 17:00, etc.).
The button 'voice' defines the voice set used for the announcement. Take in mind that
the time announcement will be aired in mix mode, that is to say, played over the audio
broadcasting at this moment.
Temp - Humidity - Pressure - Rain
Each button plays the announcement corresponding to the requested item. If you pulses
several successively, they will be aired one after another one.
"Voice" button
Allows to define the voice set used for time and weather announcements. Up to four sets of
voices are allowed.
2.2.3.2 Update values
Double-clic on display opens a dialog box to enter the values. We recommend to use the
AUDICOM Web Tools for automatic update.
2.3 CyberPlay - Main schedule
CyberPlay automatically shows the scheduling with all events to be aired, with its exact airing
time. Live shows, news programs, satellite links, automatic music program, etc are displayed in
the CyberPlay window, although some of these may be live events.
When starting with AUDICOM, this programming log can be created dynamically by the on-air
operator. In advanced use, sophisticated programming can be achieved using CyberPlay Editor
to create comercial breaks (LOG file)and prerecorded radio shows, remote links, real time
musical blocks , o'clock events and more (PGM file)
By defaul, the programming log are generic files (.log and .pgm) for all days. In basic
operation, you can insert files, pauses and other events into the blocks. All changes made to
Page 38
SOLIDYNE AUDICOM
On-air screen
commercial breaks (green zone) are saved into the LOG file (C:\AUDICOM\Log\Month00.log).
As you become familiar with AUDICOM, you can create advanced programming logs. You can
create a different programming log for each day. You can have seven .PGM files (one for each
day). If some day requires a special programming (for example for Christmas), a custom file
for that day can be created. The file name will be 091225.PGM (for December 25 2009). This
file is merged by CyberPlay with the correspondent LOG file that has the commercial spots
shedule. This .LOG file can be created by an external traffic software, or by using Admicom
traffic software. It can also be manually done using CyberPlay Editor. Usually there are a
different .LOG file for each day, using the format: AAMMDD.LOG (Year, Month, Day). Then
CyberPlay combines both files to generate the complete program log.
Advise! The programming logs (.LOG y .PGM) are loaded by aire module all days at 18:05 Hs
p.m. This can be changed from AUDICOM.ini file.
2.3.1 OVERVIEW
The module CyberPlay shows under a graphical environment the programming log for today,
and also yesterday and tomorrow logs. The user can scroll the schedule using the right scroll
bars.
For an easy visualization, the each block are displayed with different color:
Green
Yellow
Light Blue
Light Red
SOLIDYNE AUDICOM
Commercial Block
Live Block
AutoDj (automatic) Block
Satellite Block; streaming link (iLink)
Page 39
SOLIDYNE AUDICOM
Violet
Black
Exacttime
Pauses
To the left of each event you can see the scheduled time. This times updates when the item is
aired. Odd and even hours have a slightly different gray background color. Different days are
indicated by different font color of time numbers (red for yesterday, back for today, blue for
tomorrow). The file that AUDICOM is now playing is displayed with a background red bar (called
cursor). The audio files that were played appears grayed.
As the red cursor advances, the programing log is automatically scrolled by AUDICOM so that
the red cursor remains in the middle 1/3 of the window, so that the red cursor remains always
visible.. If you scrolls the log too far above or below the red cursor, AUDICOM will automatically
center the red cursor when the current file ends. To avoid this, select a title (by clicking on it).
A yellow CUE bar appears on that title. This will disable the auto-scrolling feature. If during one
minute the user doesn't make any operation, auto-scrolling activates again.
A red arrow above the vertical scroll bar will appear when the file been reproduced (red cursor)
is outside the visible area of the program log. This indicates if the cursor bar is above (arrow
pointing up) or below (arrow pointing down) the visible section of the program log; pressing the
arrow scrolls the log to make the red cursor (file been reproduced) appear.
2.3.1.1 COMMERCIAL blocks
The information found in a commercial breaks (with commercial spots) will be similar to the one
of the following example:
where:
00:00
SF5
Spot1; Spot2
Meteor: Time
Commercial block time stamp when should be aired (in hours and minutes).
Parameters that determine the time error margin of the block (in minutes).
Title of the Commercial files, spots, or station jingles
Description of the extended command selected. In this case say the time.
2.3.1.2 PROGRAM blocks (radio shows)
During
the
program
blocks
the
contents
of
the
radio
develop.
these
segments may correspond to live shows, musical automatic programming (AutoDJ), satellite
links or over the Internet (explained below).
The information found in all other blocks will be similar to that of the following example:
[Live]
18:00-18:00
<no title>
block type
Time of Beginning and Ending of block. They always indicate the interval
between the beginning of the block and the beginning of the following
commercial block. In this example, the commercial block and the block they
both begin at 18:00 o'clock
Name of block. In this example the block doesn't have a name so the <no
title> legend is displayed.
Program Lenght: It indicates the beginning and ending time of the current show (which is
made up of several blocks). In this case it is a talk show (because the show
is made up of ‘Live’ blocks), starts at 18:00 (6:00PM), and ends at 21:00
(9:00PM). Note that this talk show is made up of several shorter ‘Live’
blocks, separated by commercial blocks.
If need information on how to create or modify blocks or entire shows in the program log,
please refer to CyberPlay Editor.
Page 40
SOLIDYNE AUDICOM
On-air screen
2.3.1.3 VU-METERS and COUNTERS
The information screen displays artist, title and style of playing file. It also contains a level
indicator (dBFS) and indicator of elapsed time (hours: minutes: seconds), which also is
represented graphically by a progress bar that fills as the playback progresses. It contents the
Transport Controls (see Use of CyberPlay).
Intro
This counter displays a countdown of the time of introduction of a song, that is to say, the
remaining time before the soloist/singer begins to sing. It is used for the speaker/DJ to stop
talking before the singing begins (to not overlapping over the singer voice). The Intro time is
set from the on-air screen, with the InfoMusic, or from InfoMuisc- Production. The audio file
must be indexed in the data base in order to be able to set the Intro time.
When Partner files (pre-recorded song presentations) are enabled, then the Intro time is a very
important value, since you can can define that presentations files ends just with when the Intro
time ends (see partners files).
Cross fades
At the right of "Intro" counter will appears a circular display that fills when a crossfade between
files takes place.
Block
It displays the remaining time (minutes:seconds) of the current program block. When the
remaining time is smaller than one minute, a little progress bar will start to fill above the
counter, indicating that the block is ending.
Live shows: During a live show (or live blocks), the block counter will show the estimated
remaining time for the beginning of the next commercial break. When the remaining time is
smaller than one minute a progress bar will appear above the counter, indicating that the block
is ending. This is just information for the DJ, to he know how much time left. Nevertheless,
AUDICOM do not start playing the commercial break until the operator press Play.
Error
It keeps track of the time discrepancy between the original program log ending time for playing
block, and the current ending time (minutes:seconds). When AUDICOM works in automatic
mode, minimizes this errors, trying to make them zero if possible (if not, it does fulfill with the
error tolerance of each blocks). When works in manual mode (default), this counter is used to
know how much time you need to compensate. The error can be compensated by canceling or
to adding Music, Promos, etc. If a block has error -05:00, this means that the next block will
start five minutes before the established time.
2.3.1.4 Maximized view
The Expanded Mode widens Cyber Play's window. When this is done, additional (advanced)
information is displayed, showing the file names used by AUDICOM to create the program log.
There are two necessary files to create the log. The files are classified by their extension (.LOG
or .PGM):
LOG: This field specifies the file that AUDICOM is actually using to load the commercial log
from. When "double-clicking" this field a window will pop-up prompting to load another .log file.
PGM: It specifies the file that AUDICOM is actually using to load the programming log from.
When "double-clicking" this field a window will pop-up prompting to load another .pgm file.
SOLIDYNE AUDICOM
Page 41
SOLIDYNE AUDICOM
2.3.1.5 Commentary
The Commentary Window shows information on the performer and author of the current file
under reproduction, together with annotations or comments that have been added to this file
when it has been uploaded into the Music Database. All these data is retrieved from this
database. When just 15 seconds remain to the current file under reproduction, the Comment
Window will start displaying the information of the following file.
This window also shows additional information, for instance, if the audio file has a partner file.
Status information is also displayed in this window. The user messages of AUDICOM, such as
warning messages, or suggestions will show up here.
2.3.1.6 Popup messages
When a user tries to make a prohibited operation, a pop-up message will appear notifying the
restriction. This messages disappear automatically passed seconds, clicking on them or
pressing Escape in the keyboard.
In this example the user tried to Play from File Manager
2.3.2 Transport controls
Next, all the controls and buttons of the On-Air Module are described. The functions that have a
keyboard shortcut are indicated in [brackets].
2.3.2.1
Space bar [spacebar / home]
Starts the play of the programming schedule, beginning from the title marked as
"next" (green cursor). If "Play" is pressed during the reproduction, skips to the
next title; if the titles have assigned crossfade values, they are ignored. The jump
will be done always by "cut".
AUTO-PLAY
This feature makes AUDICOM start to play lapsed one minute after iLogon opens and the user
is not present. If the user make an action (I.E: click on play list item) auto-play is aborted. The
playing will start from the item of the scheduling nearest to the current time.
The Auto-play mode is set in the Configuration Panel, sections 'Preferences'.
This feature is very useful in case of power failure, when the radio works automatically and
there is no operating staff. A shortcut must be placed in the "Start Up" folder of Windows
menu, so that AUDICOM executes when Windows starts.
Page 42
SOLIDYNE AUDICOM
On-air screen
There is another way to generate a boot, which is not related to the above explanation. Used in
radios left to transmit the night, and basically is to schedule a block satellite (Satfill) during the
night while the radio is off the air. This procedure described in "Autostarting at the morning".
2.3.2.2 Pause / Stop [end]
Pressing this button the playing is paused and the "Pause" button becomes
"Stop". Being paused, you can press Play to continues the playing, or you can
press "Stop" to stop the playing completely. Once stopped, pressing "Play" the
file plays from the beginning.
2. 3.2.3 Fade & Stop [ctrl + end]
Pressing this button while a title is on the air, the level gradually decreases until
the playback stops. The slope of attenuation is 20 dB per second.
2.3.2.4 Fade & Play [ctrl + home]
Pressing this button the present title ends with a fade out and the next title starts
to play. If the titles have defined times for crossfades, pressing this button the
crossfade will take place.
2.3.2.5 Schedule stop point [page up]
It inserts a pause event in the schedule. Pauses appears as a black bar with
the legend "PAUSE". When the play (red) cursor arrives at this point, the playing
STOPS, and the title below the pause is marked as "next title" (green cursor).
In order to insert a pause in the programming schedule, select with a click (yellow cursor) the
position in where you wants that the playing stops and press SCHEDULING PAUSE button. A
PAUSE event will be inserted BEFORE the selected title. If there is no selected title and PAUSE
is pressed while a file is playing, the PAUSE event will appears below the current playing file
(red cursor).
In order to remove a PAUSE event, select it and presses "Page Down" on keyboard, or drag it
out the window. The PAUSE events also can be inserted/removed from the schedule from rightclick menu.
2.3.2.6 Cue [Suprimir]
By double-clicking on any title you will start to listen the file through the CUE playback output.
CUE audio is always sent to the CUE output (see Configuration Panel). If a title in CUE is
double-clicking again, then the last 5 seconds will be played. This feature is known as CUE END.
The CUE play and stop buttons, a CUE VU-Meter and the Seeking bar are located in InfoMusic
module.
To stop CUE, click on Stop-cue button in 'OnAir InfoMusic', or ESCape in keyboard.
TRADITIONAL CUE
If you prefer using the channel monitor console, turn on the CUE mode CyberPlay double-click
on the legend 'CUE' which is to the left of the timer. This causes audio playback CyberPlay NOT
be reported by RDS; IRDS or stored in air register (air files.). This mode is used by some
operators instead of using a dedicated channel monitoring; prefer to work in the traditional
style, activating CUE on each channel of the console, as if each playback channel were a
separate device.
2.3.2.7 Select a title [cursor arrows Up / Down]
To select a certain title click on it. A yellow cursor will only indicates that this title is selected.
Please note this does not meant it is ready to be aired
SOLIDYNE AUDICOM
Page 43
SOLIDYNE AUDICOM
2.3.2.8 How to remove an item from schedule [Backspace]
To eliminate a title of the program log, just select it, and drag&drop it toward the left lateral of
CyberPlay’s window (or drop it in the Display & Counter area). It can also be eliminated by right
clicking on it and choosing the Remove option.
2.3.2.9 How to insert a title [Ins]
The user can drag&drop any audio file from InfoMusic or from File Manager. Select the audio
clip to insert in the program log, and then drag it into CyberPlay on the position you want to
insert it; a blue flat line will appear indicating the position where the title will be inserted. The
insert button can also be used, then the file will be inserted where the yellow line (in the
CyberPlay log) is located.
2.3.2.10 Change the position of an item in the schedule
The position of the titles in the schedule can be changed, that is to say, you can change the
order of the titles. To change the position of an element, select it and drag&drop above or
below its actual position. A blue line will appear indicating the new position in which the title will
be inserted when dropping it.
REMEMBER: Some actions can be disabled in you user account.
2.3.3 CYBERPLAY TOOLS
2.3.3.1 Mode AUTO / MANUAL
In AUTOMATIC mode, the on-air scheduling is make according to PGM log files. By default, the
file "pgm" contains a generic AutoDj, so the mode "AUTO" scheduled music using the format
AutoDj "default", which considers all songs available in the Infomusic database. You must
change the PGM file (using CyberPlay Editor) for the "auto" mode uses different musical styles
at different hours. The automatic programming can be very advanced, including sponsors,
prerecorded presentations for each song (partners files) that are aired considering the Intro
time of the songs, begining/ending crossfade times for each song, and more.
In MANUAL mode, AUDICOM ignores the PGM programming file. Only commercial breacks are
scheduled. You can fills the time between commercial breaks with the audio files you want.
Note that AUDICOM do not add stop pints (PAUSES) between commercial breaks. In manual
mode, you must add songs or pauses between the adds; otherwhise AUDICOM will play adds
one after another indefinitely.
By default, 'Live' blocks do not add pauses after commercial breaks. If you need 'pauses' before
commercial breaks, you can change this feature fron Configuration Panel.
2.3.3.2 Reload the schedule (adds and blocks)
Although CyberPlay load automatically the files to arm the programming schedule every day,
you can reload these files in case of last time modifications. Every day at 18:00 Hs CyberPlay
loads archives LOG and PGM for the next day. This value can be changed from the AUDICOM
Configuration Panel.
The user will need TO RELOAD the programming schedule when:
- > modifies the schedule of the current day.
- > modifies the schedule for tomorrow last the 18:00 Hs.
When programming logs are remotely changed, RELOAD icon will blink indicating that log or
pgm files was changed. In order to reload the program logs, the operator will have to press
button RELOAD. The programming will be re-assembled considering the new Log/Pgm files.
Also you can use the keyboard shortcut Alt R.
If the musical programming are modified (PGM archives), or modifies the commercial breaks
after the hour of automatic loading (18:00 by default), who makes changes MUST TO NOTIFY
Page 44
SOLIDYNE AUDICOM
On-air screen
to the AIR OPERATOR so he press the RELOAD button (in that case the Reload button does not
give warning).
These operations can be made while AUDICOM is on the air or while stopped. If you reload the
program logs while AUDICOM is on the air, is recommendable that a musical theme be playing
and remains a minute or more so that the title ends.
While the programming is recalculated, the played title stays on the air, but disappears from
the CyberPlay window. When the new programming schedule is ready, the green cursor (next
title) will be positioned closest on the item to the present hour. When the play of previous title
ends, the new programming starts to play. You can finalize the play of the previous title to start
with the updated programming pressing Play.
Note: You can reload a single file of the programming logs. For this, expands the CyberPlay
window and double click on the display on the field LOG or PGM to reload only a part of the
programming.
Refers to the chapter CyberPlay Editor to details on programming files.
2.3.3.3 Save changes to LOG files
Changes made to commercial blocks are automatically saved in the LOG file.. This function is
called "Autolog". Autolog will not save changes to the list of commercials when:
The current user is not authorized to modify the traffic announcements.
The
LOG
file
was
externally
altered
LOG amended ("Reload" button flashing).
and
the
alarm
is
active
Photo
The 'Save LOG option allows the operator to update the log file manually;regime even if the file
has been modified externally. 'Save LOG' does not allow you to save the log if the user is
enabled to modify the traffic announcements. Pressing the button a dialog box will open to
confirm.
2.3.3.4 Next Title [Enter]
Pressing Enter changes the status of the selected title (yellow cursor), making it the next one
going to be aired. In this condition, the cursor changes to green color indicating it is the “next
title” going to be aired. If no title has been choose as “next title”, (there is no green cursor at
all), the next title to go on air will be the one that it is after the one currently under
reproduction (the one below the red cursor).
A title can be selected as the “next title”, just by double-clicking on the title’s airing time (gray
area). Please remember that double-clicking on the color title’s file name area will reproduce
the title in by the CUE speakers (and will place a yellow cursor on the file)..
2.3.3.5 Insert AutoDJ
Inserts a musical block 'AutoDj' on the schedule. The user defines the FORMAT and time of
start and end block AutoDJ. Commercial breaks that remain contained in the time slot is
maintained unchanged, being aired at the scheduled time.
SOLIDYNE AUDICOM
Page 45
SOLIDYNE AUDICOM
2.3.3.6 Mix [Asterisk]
This button have action only in MIX mode, controlling the level of the background audio when a
mix take place. It’s used, for example, to superimpose a recording of a speaker on a musical
topic, to give a radio promotional or the actual time.
The Mix button determines the music's level when you mix two files. There are four preset
values that they are selected pressing the button several times. The values are 100%, 50%,
25% and 10%.
This level is only valid when the mixture is carried out by software, using only one output
channel (e.g.: playing the Meteor-time). Remember that AUDICOM 8 allows you to use more
than one output device
2.3.3.7 Right-click menu
Making a right-click on a title, a drop-down menu appears with the following tools:
CUE: CUE selected file.
CUE End: Play the last five seconds of selected files.
Play: Plays the item selected as "Next".
Stop: Ends the playing of selected file.
Fade & Play: Fade out the current file and start the Next.
Fade & Stop: Fade out the current file and stop.
InfoMusic: Loads the selected title in the InfoMusic module. (If
the title is not registered in the Database, this option appears
disabled).
Internet... Search the Internet for more information on this
title, using the default browser
Copy TANDA: Copy the content of a commercial block.
Insert TANDA: Insert an empty commercial block.
Insert Meteor: Shows a menu with Meteor options.
Insert Pause: Inserts a pause in the program log, above the
selected title. When playing reaches this point, the audio stops.
Insert Random: Insert a Random, to insert files from a specific
folder.
Remove: Remove de selected item from schedule.
Remove all equal: Remove all item with equal name from the schedule.
Remmember: many of these operations may be restricted in your user profile. If you try to
perform a forbidden action, a popup message will appear informing you that you do not have
permission to perform this action. In doubt consult your network administrator or technical
staff.
2.4 PlayList Manager
You can work with playlists. AUDICOM has an auxiliary module (two in the Multicast version)
that handles playlists. Playback Auxiliary listings; Pressing the 'PlayList' icon on the toolbar the
'PlayList Manager' module opens. You can drag titles to 'PlayList Manager' from any AUDICOM
window. The list is saved as a text file (TXT) in \AUDICOM\PGM folder.
PlayList Manager supports lists created in other applications for playback, compatible formats.
M3u and. Plt (Winamp, Windows Media Player) with simple text editor (eg, Windows Notepad),
or using the form on AUDICOM CyberPlay Editor > PlayLists.
Page 46
SOLIDYNE AUDICOM
On-air screen
Pressing the 'PlayList' icon on the
toolbar (or the key combination Alt P)
the 'Playlist Manager' window will
open. The drop-down menu at the
bottom of the 'Playlist Manager' shows
the available lists. To add an external
list, copy it to the \AUDICOM\PGM
folder.
To create a play list, you can drag
titles from File Manager, InfoMusic,
Live Assist or CyberPlay. Enter a name
and click "Save" (Save). Lists created
from PlayList Manager are saved in.
Txt in the \ AUDICOM \ folder PGM
As in other AUDICOM modules, titles
appear in different colors, by date of
last release to air. Comments appear
in violet, while breaks and commands
'Meteror' are indicated by the name of
the
corresponding
command.
In
addition, music (Class = Music in the
database) are shown with blue
background, while the promotional
cuts
are
shown
with
yellow
background.
CUE: To listen to a degree by the
previous monitoring channel, doubleclick on the title or select it and press
the Cue button. To stop CUE, press'
Stop CUE '(can also pause playback by
pressing STOP CUE' on-air InfoMusic
window).
Playback is done using the CUE
channel assigned. If you prefer using
the PlayList channel monitor console,
you need to activate the mode in
PlayList CUE module, double-click on
the CUE caption displayed on the left
of the time counter. Activation of CUE
in the module that generates audio
playback from PlayList NOT be reported by RDS; IRDS nor compute the broadcast register (File
'air.'). This mode is used by some operators instead of using a dedicated channel monitoring;
prefer to work in a traditional way, activating CUE console on each channel.
To play back a title on the air, select it and press the PLAY button. When the title ends,
playback stops. PlayList Manager plays the titles one at a time. If you need to schedule several
titles continued, insert them into the CyberPlay window.
The seekbar can jump to any point in the file..
The slider (at right of Stop) lets you change the playback speed (pitch) in a range of +/- 5%.
The button "<-Insert" load the full list in the CyberPlay schedule. The insertion will take place
over the title currently selected (yellow cursor). PlayList titles will be added respecting the
location of commercial blocks, ie, if necessary titles may be spread over several commercial
breaks, depending on the length of the list (*).
PlayList titles can also be individually inserted into the main schedule. To do this, select a title
and drag it to the window CyberPlay.
Notes
If there is no selected item in CyberPlay, the listing is NOT inserted. The comment
window will show "Set the insertion point"
(*) IMPORTANT: If the duration exceeds PlayList block SOLO titles are inserted until the
end of the block. The PlayList does not extend to next show. For example, a 1 hour
PlayList inserted at 17:30 in live a block, which ends at 18:00 Hs titles ONLY are inserted
until 18:00 Hrs Playlist Manager can play by a different audio channel of the main
channel, defined in the Configuration Panel.
AUDICOM 'Multicast' allows two 'PlayList Manager' simultaneously in separate playback
channels.
SOLIDYNE AUDICOM
Page 47
SOLIDYNE AUDICOM
2.5 Live Assist
2.5.1 Overview
This module allows you to "shoot on-the-air" cuts just clicking a button. Live Assist can work
alone, with the CyberPlay list stopped, or can play mixing over the current file. This tool is
useful for play effects, promotional cuts, background music, etc. 'Live Assist "can play on a
separate audio device for mixing the audio externally on the console, or share the device with
CyberPlay module with internal mixing. The playback device is assigned in the Configuration
Panel.
The audios are organized keypads, which in turn are grouped into pages. The number of
buttons on each file contains depends on the number of rows and columns, as defined in
Configuration Panel. In the previous image, Live Assist features 9 rows and 4 columns
(maximized) which represents 36 buttons per page. There are 12 pages per user.
To create a new set 'Live Assist' operator select an icon, and arranges the pages as you like
and save it with a name. Each operator can have one or more files and organize them
according to their needs. There is no limit to the number of sets 'Live Assist'.
The window size can be changed by dragging their edges, as is standard in Windows. The
button size is set automatically when you resize the window.
Live Assist can be operated from the computer keyboard.
Page 48
SOLIDYNE AUDICOM
On-air screen
2.5.2 Set the output devices
Live Assist can play the main program output (shared with CyberPlay), or use a separate
channel to mix the signals externally to the console. The assignment of the output channels are
configured from the 'Configuration Panel' (AConfig).
Additionally, AUDICOM can work with a second window Live Assist 2, which can be set to play
using a third audio device.
2.5.3 USING LIVE ASSIST
2.5.3.1 Maximized view
The Live Assist window can be expanded to visualize all the buttons. In the normal view only
some buttons are displayed. Size are changed from maximize/minimize icon located at the topright corner.
2.5.3.2 Pause/Stop & Fade-stop
'Pause' stops the playback, but can be resumed from that point by
pressing Play. When the audio is paused, the button changes to 'Stop'.
If you press it definitely stops playing. Fade-stop produces a gradual
fade level and stops playback.
2.5.3.3 Cueing
Right-clicking on a button, you access the CUE option for previewing (uses the output channel
'CUE' defined in the Configuration Panel). CUE also activated if you hold down the right button
for over 1 second.
Another option is enabled in the channel CUE console, and turn on 'Live Assist' CUE mode by
double-click on the CUE legend on the left side of the timer. This causes the audio playback to
'Live Assist' NO is reported by RDS; IRDS or saved to on-air logs (.air). This mode is used by
some operators instead of using a channel monitoring dedicated, prefer to work with the
traditional method, activating CUE console on each channel, as if the output channels
'AUDICOM' were separate hardware devices.
2.5.3.4 Play mode
There are three play mode, which toggle by successive clicks on button:
NORMAL PLAY: The file plays only one time. If while the file is playing you launch
another file, this will be queued and will aired when the first one ends. Queued files
will flash.
MODO LOOP: The file plays for uncertain time, when it concludes beginning again. To
stop the loop play, press 'Stop' or change the play mode to Normal or Instant-Play
and launch another button.
MODO INSTANTÁNEO: If while a file is played you launch another button, the play
starts immediately, interrupting the current play.
Chain to air: This function is used to chain the Live Assist playing with the air
scheduling. Being stopped the air scheduling, press one or several buttons on
Live Assist and, ultimately, the button 'Link to Air'. Live Assist window will close.
When the sequence of Live Assist concludes, the playing will continue with the
main scheduling. From the keyboard, the same operation can be made pressing the space bar
(Play) after launch a file from L.A.
2.5.3.5 Mark in/out
You can set start and end points for each button. To define markers proceed:
Enable CUE mode double click on the cue on the screen legend. This allows you to play audio
without RDS sent or left in the on-air logs.
Press the button you want to work.
Right Clicking on the button displays a menu with the options "Mark In", "Mark Out".
SOLIDYNE AUDICOM
Page 49
SOLIDYNE AUDICOM
Listen to audio and clicking "Mark In" at the time you want shed the brand.
2.5.4 Live Assist sets
Shows the name and icon corresponding to the current set of tabs. The
icons are located in the folder AUDICOM\LA-Icons. You can add or delete
icons as you like.
Private sets can be made. They can be accessed only by the users that
created them. The private sets appear with the user name below the
icon. If somebody tries to load your private set, a pop up message will
appear indicating that the operation is not allowed.
2.5.4.1 Export / import Tab contents
A Tab contents a group of buttons. Clicking a button the file plays on-the-air. Press a tab to
open it. To change a tab's name, right-click on it and select Edit
In maximized view the buttons Export and Import appears. Export allows dumping the content
of the current Tab to a playlist file (TXT type). The playlist will contain a list with the files
loaded in the current Tab, sorted according to the button's numbers. Remember that this
playlists can be loaded in the module CyberPlay, as is detailed in CyberPlay - Operation - Insert
Playlists.
The button Import allows to load a playlist into the current tab. Each item of the playlist will be
loaded in a button according to the order of appearance.
2.5.4.2 Creating new sets
Each set contains twelve tabs and each tab has buttons where the audio files are loaded. To
make a 'Live Assist' set proceed as follows:
1.
Right-clicking on the window of icons a menu will appear.
2.
Select the option Add; a window appears. Select an icon and enter a name for the set.
3.
If you wants that nobody have access to this set, check the option 'Private'. This Live
Assist set only will be accessible when you are registered with your user name. Press
OK. The new Live Assist set will appear in the icons window.
4.
You can load files in the Live Assist buttons by drag & drop from File Manager.
5.
To change the set, select it and make a right-click. Select the option to Edit. You can
change the name and the icon.
2.5.5 SETTINGS
2.5.5.1 SIZE OF BUTTONS
The number of buttons that contains each tab can be modified from the Settings Panel. The size
of the buttons changes according to the quantity of visible buttons. If you diminish the quantity
of buttons, they will appear biggest. If you increase the quantity the buttons they will appears
smaller. The quantity of buttons is determined by the number of lines and columns that it
contains the tab. The size changes too according to windows size.
By default Live Assist presents 4 rows and 12 files, that is to say 48 buttons per Tab. From
Settings Panel you can change the font size and font type.
2.5.5.2 DATA FILE
Live Assist store all information (users, references to the files) in a file called Liveass.dat (and
Liveass2.dat for Live Assist 2). The locations of these files are indicated in the AUDICOM.ini file:
[Live Assist]
Grid=5 12
State=1
LastPos=0 3 0
IconPath=c:\AUDICOM\LA-ICONS
File=c:\AUDICOM\LIVEASS.DAT
LastPos2=0 0 0
Page 50
SOLIDYNE AUDICOM
On-air screen
This is the default location. Live Assist 2 data file will be created in that same location.
2.5.5.3 ICONS
All the icons used by Live Assist are stored in the folder /AUDICOM/LA-ICONS. This location
also can be modified from AUDICOM.ini:
[Live Assist]
Grid=5 12
State=1
LastPos=0 3 0
IconPath=c:\AUDICOM\LA-ICONS
File=c:\AUDICOM\LIVEASS.DAT
LastPos2=0 0 0
Remember that you can add or delete icons as you like.
2.6 InfoMusic ON-AIR
2.6.1 Overview
This module allows you the following actions:
a)
b)
c)
d)
View and change the information on the data base.
Make searches.
Cueing
Insert titles into CyberPlay.
SOLIDYNE AUDICOM
Page 51
SOLIDYNE AUDICOM
e)
f)
g)
h)
Change
Change
Change
Change
the
the
the
the
cross fade times
Intro time
start time
end time
Note
e) and f) are permanent changes registered in the data base; g) and h) are changes
valid only for this occurrence.
2.6.2 How to use on-air InfoMusic
There are three operation modes for InfoMusic in on-air desktop:
1) Current's title viewing.
2) Searches into database.
3) Cueing.
2.6.2.1 Current's title viewing
InfoMusic shows the information of the current title. As the titles go playing, the information is
updated in real time. In any moment you can edit the InfoMusic data and save the changes in
the database, whenever you have the corresponding permission in your user profile.
2.6.2.2 Search and access the database
Pressing the button 'Clear' the "current title's viewing" mode is suspended, and an
text field appears in the 'TITLE' area. You are now in the SEARCH mode. Notice that
the button 'Clear' has changed to 'Search'. In this mode, you can make different searches, by
title, by performer, by style, etc. Once selected the search criteria, press 'Search'.
The search results appear in a separate window that can
be placed anywhere on the screen. If done a second
search will open a second window, remaining available
the results of the first search. A third search replaces
the contents of the first window, a fourth replace the
second, and so on.
If you want to work with a single results window, close
the window 1 before performing the second search. You
can retain the results of a search in window 1, working
on the new search window 2. To do so close the window
2 after a search, that this window reopens with every
search, instead of replacing the contents of the window
1.
From the 'Search results' window, titles can be inserted
in the CyberPlay schedule; by drag and drop or pressing
the 'Insert' button (blue arrow). The selected title will
be added in the CyberPlay window above the selected
item (yellow cursor).
Note
The content of menus Style, Performer, etc. is updated whenever the InfoMusic module
is opened. If changes occurs on the data base from a Production workstation, these
changes will not appear in the 'Onair Infomusic' until it is closed and re-opened.
The operation mode is similar to the InfoMusic-Production. In order to know more about
InfoMusic and Musical Data Base Base refers to InfoMusic-Production
2.6.2.3 Keyboard shortcuts
The function keys F5 to F12 are for 'Onair InfoMusic', as is described next:
Page 52
F5........
SEARCH----> Starts the search according to the defined parameters.
F6........
EMPTY FIELDS----> Suspends the visualization of the current title and raisin to the
search mode, cleaning all fields (except Class) to make a new search.
SOLIDYNE AUDICOM
On-air screen
F 7.......
STYLE----> Opens the menu Style, inside which you can move with the cursor
arrows (up–down). Pulsing again confirms the selected article. This procedure is
same in all the remaining fields. If you press F7 while InfoMusic is in
“visualization” mode, it changes to the search mode, emptying all the fields except
Style. E.g.: AUDICOM is on-air playing a theme of Soda Stereo classified as PopRock. If F7 is pressed, then all fields are emptied except Style, which stays as
Pop-Rock. Pressing F5 now (Search) you will obtain all the musical titles Pop-Rock
style as a result.
F 8.......
GENDER----> Idem previous but for Gender menu.
F 9.......
AUTHOR----> Idem previous but for Author menu.
F10.......
PERFORMER----> Idem previous but for Performer menu.
F11.......
TOP HIT----> Idem previous but for Top-Hit menu.
F12.......
OPENS / CLOSES THE INFOMUSIC MODULE.
2.6.3.4 Cross Fade Editor
Here you can see the cross fade
value for each title. The display
represents graphically as the
title will be mixed with the next
title. The handles allows to
change the overlapping time,
which can be between 0 to 5
seconds.
When a cross fade take place between two files with different overlapping time, the shortest
time is used. The starting slope is always zero, so the Fade In value should be interpreted as
the overlapping time at the start. On the other hand, the ending slope vary according to the
cross fade value, to obtain better results.
Changes on the cross fade times are stored in the Database (Fade-IN/Fade-OUT) if the user
have the correspondent rights (see Access Levels).
WARNING
Changes on the start/end points and cross-fade times will take place from the second
title (including the current in play) in ahead.
2.6.3.5 Intro
Allows to the operator to set or edit the intro-time of a musical theme (time elapsed from the
music starts to the singer begins). To make this: listen the title on CUE. When the musical intro
ends, press SET. The display Intro will show the time elapsed since the music starts to play
until the moment at which you pressed SET. If you press SET while Cue is in Stop display
returns to zero. The arrows allows to adjust the Intro value. Left-click on them changes the
value at intervals of a second; right click will change the value by tenth of seconds. If you stays
the arrow pressed, changes will be proportional to the time that remained pressed the arrow.
The changes will be saved in the database only if you user profile have enables this attributes.
The Intro sets using Infomusic-Production.
2.6.3.6 Start Time
Allows to set the point where the topic will begin to play. For fix the Start Time, plays by CUE
the title and press Set at the point where you wants that the theme begins when it will be
aired. Pressing Set while CUE is stopped the display returns to zero. This value isn't stored in
database. Only take effect for the current play.
2.6.3.7 End Time
Allows to set the point where the topic will ends. For fix the End Time, plays by CUE the title
and press Set at the point where you wants that the theme ends on-air. Pressing Set while CUE
is stopped the display returns to zero. due isn't stored in database. Only take effect for the
current play.
SOLIDYNE AUDICOM
Page 53
SOLIDYNE AUDICOM
2.7 I REC: Instant recorder
2.7.1 OPERATION
Just clicking on the REC button the recording immediately starts. The module I-REC will
appear on the screen like it's shown next:
At the inferior part of the window, a VUmeter indicates the
level of the input signal. Pay special attention so that the
VUmeter don't light the last red lines to avoid clipping on
the signal. While is recording, the spools of I-REC will be in
movement, for a clear visualization.
To stop the recording, click on the image. The animation
will stop and the file will be saved, as is explained later.
The recording can also conclude closing I-REC, for that you
can press the I-rec button in the AUDICOM's Tool Bar.
To change the position on the desktop window, click and
drag from the title bar (where Instant Recorder says). It
suits to move it when it's not recording. Remember that a
click on the image will stop the recording! This small
module always opens up in the position in which was
closed.
2.7.1.1 File names
There are two ways for naming the I-REC files: automatic names or defined by the user.
Automatic names: In this way, I-REC will name the files when concluding the recording. The
operator don't need to confirm any operation. The automatic name has the format AAMMDD
HHMMSS (Year, Month, Day, Hour, Minute and Second).
Defined by the operator: This mode activates by pressing the N that is to the left of the
VUmeter. In this mode I-REC will give to the operator the opportunity to enter a name for the
file before save it, for which a dialogue box will appear.
2.7.2 SETTINGS
You access to this window right-clicking into the I-rec window. While this window is open I-Rec
will not record.
2.7.2.1 Audio input
The recording device for I-Rec, set from AUDICOM's Configuration Panel.
2.7.2.2 Sample Rate (Hz)
It determines the speed to which the file will be recorded. Use speeds of 44100 and 32000 for
material of high quality, of 22050 for file material that doesn't require great sound quality, and
11025 or less for recording of telephone lines. Remember that I-Rec doesn't compress the
audio, therefore, one minute of stereo audio at 44100 will occupy 10 MB approximately.
Page 54
SOLIDYNE AUDICOM
On-air screen
2.7.2.3 Channels
Selects between mono or stereo recording
2.7.2.4 Directory (folder)
Here you define the destination folder for recorded files. Is recommended to use a local drive.
This folder must belong to the AUDICOM's audio folders structure AUDICOM so that it appears
in File Manager. Default locations is C:\AUDICOM\Audio\I-REC
2.7.2.5 "Loop" Recorder
Activating this mode I-REC will retain in memory the last "N" minutes of the audio program.
You can save this last minutes to disk clicking into the I-Rec window. The name can be
automatic or entered by the user.
The Loop mode is indicated by a red "L" that appears to the right of the VU.
You can leave to the I-REC active in Loop mode a lot of hours, since it doesn't make use of the
disk; only requires the memory space to house those "N" minutes of audio.
Nota
I-REC only works on the air desktop. It is not possible to run it on the AUDICOM
general desktop (Desktop.exe). In other words, I-REC is only available for the AIR
workstations.
2.8 Media Ingest – AUDICOM File Manager
2.8.1 Overview
AUDICOM File Manager shows all audio folders available for each terminal. Local and network
folders are showed as Tabs the main screen. File Manager works with a fixed folders structure.
All folders outside this structure will be ignored. The audio files are organized in different
folders that are classified by type (Music, Spots, Promotional, Commercial, Effects, etc.).
With File Manager you can search files, play on-air, insert into the CyberPlay schedule or load
files into Live Assist buttons.
In each terminal File Manager shows only the folders defined for this terminal (audioDrives).
The access to each folders can be restricted by user settings. These restrictions are determined
by the AUDICOM Administrator that assigns the permits for each user from the ‘Access Levels'
panel.
2.8.2 Using AUDICOM File Manager
The main window shows all audio files of the selected folder with the following information:
PERFORMER - TITLE - LENGTH - FORMAT - PATH
To OPEN a folder, click on the tabs above the window. Each tab correspond to an audio folder.
When you have more than 18 folders, use the scroll buttons (A.. Z) to move among pages.
It is possible to sort the list by clicking the column's header. You can predetermine the
preferred order for each folder, when creating the folder or later from the window "INFO", that
is explained later.
A useful feature that facilitates the location of files is the keyboard quick access. Pressing a
letter, the first title that begins with that letter is selected. The cursor is positioned according to
the column by which the list is sorted. Example:
Suppose that you have the following files:
"Amelita Baltar - Balada para un loco"
"Chabuca Granda - Amarraditos"
If titles are sorted by "Performer", pressing the key "A" selection cursor will jump to "Amelita
Baltar - Balada para un loco" If titles are sorted by "Title" the cursor will select "Chabuca
Granda - Amarraditos", although the first letter is "C".
SOLIDYNE AUDICOM
Page 55
SOLIDYNE AUDICOM
Window size and its position can be changed.
2.8.2.1 TITLES COLORS
All files that are into the InfoMusic data base appears in main window in several colors. This
colors changes according to the time lapsed from the last time it was played on-air. This
method allows you to recognize quickly the titles recently aired; without necessity of reviewing
the whole program log.
The default nomenclature of colors is the following one:
RED................................................... < 4 Hours
ORANGE......................................... 4 a 12 Hours
GREEN........................................... 12 a 24 Hours
BLACK.............................................. > 24 Hours
2.8.2.2 FOLDER COLORS
You can define a color for each folder to improve its visibility. To make this, right-click on the
tab and select the option "Info". You can chose between 8 available colors. The 8 colored
Page 56
SOLIDYNE AUDICOM
On-air screen
buttons located over the tab's allows you to filter the folders by colors. E.g.: Pressing the red
button you will see only the red folders; pressing the black you will see black folders, and so
on. To see all the folders again press the multicolored button.
The color assigned to a folder is valid for all terminals of a network. We recommended to make
a list with the description of colors assigned to the different folders (red=music; green=spots;
yellow=effects; etc.) and to stick it in a visible place next to the computers, so that the
operators are accustomed to the use of the filters by colors, that are helpful.
2.8.2.3 REFRESH FOLDER CONTENTS [ / Num pad ]
If you add new files and they don’t appear on File Manager, press the Update button so
that the new files appears. This is this way because when you select a folder for the
first time, the program explores the disk and stores in memory the content
information, to be able to manage it faster. When you selects this folder again, the data are
read from memory, and if new files were added in the disk, they won't appear in the window.
So that the program reads the disk and upgrade the information housed in the memory, you
must press the Update button. At the window’s top the time and date of the last upgrade are
indicated. When you move or delete files the content updates automatically.
2.8.2.4 INSERT [ Enter ]
Pressing this button, the selected title is inserted in the program log (CyberPlay
window), over the selected title (yellow cursor). If there is not any title selected in
the Air Screen, the insertion is canceled. Remember that you can also insert titles
into program log by Drag and Drop.
If several files are selected in File Manager, all they can be inserted at the same time into
program log, pressing the button 'Insert' or by Drag & Drop.
2.8.2.5 CUE START/STOP [ Delete ]
Starts the CUE play. You can CUE a title by double-click on it. In the On-Air
desktop, you can control the CUE play from 'OnAir InfoMusic' module, which
include VU-meters and seeking bar to listen the file at any point.
Pressing this button while Cue plays, you listens the second five ends of the file. This action is
knowledge as Cue End. The keyboard shortcut for this action is 'Delete' key.
To Stop the CUE play, right-click on CUE button.
WARNING: If the computer has only one audio device, double-click on a title will play using
this device, the same used for PLAY.
2.8.2.6 PLAY
Plays the selected title, which is indicated by a RED cursor.
File Manager always uses the PROGRAM output, that is to say, the same one that
the CyberPlay main window (schedule player). If the main scheduling is on-air, the
file played from File Manager will mix with the program signal. The mix level is determined by
the respective levels of the files. In this case the button Mix don’t take effect (only works with
Live Assist and automatic mixes like Partners files).
File Manager VU-Meters shows the real level of the audio file. The counter indicates the elapsed
time and a seek bar allows you to play the file from any point
SEEKING BAR
2.8.2.7 STOP / PAUSE
Stop behaves as in the CyberPlay module: Pressing this button once, the
reproduction stops and stays in that point (as pause). When pressing Play it
continues the reproduction from where one had stopped. Pressing the button twice
(or with double click), the reproduction of stops completely. The yellow cursor of selection
happens to the following file, therefore, if it becomes to press Play, it will be begun to
reproduce the following title of the list.
SOLIDYNE AUDICOM
Page 57
SOLIDYNE AUDICOM
2.8.2.8 AUDIO EDIT
You access to this option when File Manager is expanded, or by the rightclick menu. "Audio Edit" opens the selected file using the program that
windows have associated to this file extension. In AUDICOM default
installations, the associated program is the FX5 audio editor. You can change this
simply installing another audio edition software. If the selected file is a .txt, AUDICOM
News Suite will open up.
2.8.2.9 SYNCRO
This option allows to transfer the difference of files contained between two folders.
For this, select a source folder in a window and a 'destined' folder in the other
side. Pressing SYNCRO the following options will appear:
Synchronize left window: If we activated this option, It cases out Manager will copy in the
folder of the left all the archives of the right folder that are not in the window of the left. Like
result, the folder of the left will have ALL the archives of the right folder (but those that could
have the left folder that is not in the other).
Synchronize right window: it will copy on the right folder all files of the left folder that are
not in the right. Like result, the right folder will have ALL files of the left folder (but those that
could have the right that is not in the other).
Synchronize both windows: Selecting both options, right and left folders will have the same
contents.
2.8.2.10 FULL VIEW
Pressing this button a second panel will appear at the right. Right panel allows you to
move or copy files among folders, and others functions that will be explained later.
When you make a click on a file, the active window changes, which is indicated by the
green arrow. Play and stop buttons will act on the file selected in the active window.
2.8.2.11 MOVE AND COPY
To move files of a folder to other, open the second window. Select a file that you can move in a
window. To select several files simultaneously:
a) Maintaining pressed the key Control (Ctrl) select the files clicking on them.
b) Select a file and, maintaining pressed the key SHIFT, mark a second file. In this case all the
files that are among both signal they will be selected.
In the right panel second, open the destination folder. Click and drag the selected files to the
destination folder. The files will be moved. If you moves files registered in the Database, their
location will be upgraded automatically.
To copy files proceed in the same way, but pressing and hold key Control (CTRL) while drags
the files. A sign will appear (+) next to the file icon indicating that it will be copied.
When copy/move titles to an autoDB folder, can happens:
a) that the file is not registered in the database, in which case it is entered (see below).
b) that the file already registered in this database. In this case remains
All information except "Style" that takes the name of the new folder. In other words, the audio
files you enter a folder AutoDB, always take the style of that folder. To change the style, you
can do it from InfoMusic. The AutoDB function only works when copying or moving files. Then
the information is not modified.
If you copy or move songs from a 'AutoDB' folder to a classic folder, the information in the
database remains unchanged.
Notes
If by mistake you moves database files using Windows Explorer, AUDICOM will correct the
location when these files when it be played on-air. It is not convenient that it happens, because
it demands to AUDICOM to carry out an exhaustive search in all drives.
If by mistake you delete o rename files using Windows Explorer, database will report these files
as "missing" (media = _missing).
Page 58
SOLIDYNE AUDICOM
On-air screen
2.8.2.12 RENAME
Pressing F2 a window will appears to edit the Title and Performer for the selected file. You don't
need to enter the file extension, since it doesn't changes. The Database is automatically
updated if corresponds (when the folder is "autoDB" or if the file was registered from
InfoMusic-Prod).
The file name format always must be "Performer-Title", no mater if file a promotional,
advertisement or a song..If the audio file don't needs "Performer", leaves this field empty.
The [Abc] button toggle between uppercase/lowercase to facilitate the correction of titles.
Pressing the button successively the case changes.
Example:
A file called "Radio Buenos Aires.mp3" appears with the column "Performer" empty and "Radio
Buenos Aires" as "Title". You can change the name (F2) adding "Promocional" in the field
"Performer". The file name will be "Promocional-Radio Buenos Aires.mp3".
The file "05 - Lucho Gonzalez - Centro al corazón.mp3" is loaded as Performer = "05 - Lucho
Gonzalez" and Title = "Centro al corazón". You can correct the Performer pressing F2.
JORGE FANDERMOLE becomes Jorge Fandermole touching the button [Abc]
2.8.2.13 DELETE
To delete a file, make a right-click on it. Select the option Delete and confirm the operation. If
the deleted file was registered in the Database, it will be removed from database automatically.
You can delete several files at the same time selecting them like it was explained previously.
Deleted files sends to Recycle Folder.
2.8.2.14 SEARCH [F3]
Pressing the key F3 (or from right-click menu), a dialogue box appears to enter the searchingcriteria.
SEARCH: allows to enter a title or a word to make the search. The search takes place by name.
It does not matter if the file is loaded or not in the data base.
EXHAUSTIVE MODE: If checked (default) File Manager search for the entered text in whole
titles If this option is disabled, only those files that begins whit the entered letters are
searched.
EXCLUDE: Allows to enter one or more words. Files that include these words are omitted.
LENGTH BIGGER THAN [secs]: The search is limited to those files whose length surpass the
defined length.
LENGTH SMALLER THAN [secs]: The search is limited to those files whose length is below
the defined value.
ONLY IN LOCAL DISCS: The search is carried out only in the local drives. Network drives are
not explored. (disabled by default)
ONLY IN LOCAL FOLDERS: The search is carried out only in the current folder.
SOLIDYNE AUDICOM
Page 59
SOLIDYNE AUDICOM
BETWEEN DATES: It allows to enter an interval of dates to limit the search to the files
recorded between those dates (considering the Windows modified date).
BETWEEN HOURS: It allows to enter an interval of dates to limit the search to the files
recorded between those hours (considering the Windows modified date).
Press SEARCH to start the process. The results shows into the windows "Found files":
From this window you can play a file, insert it into the Main Scheduling; to place it into a Live
Assist button. Also you can delete files (if you have the appropriate permission in you user
profile). Report generates a text file with the result of the search.
Page 60
SOLIDYNE AUDICOM
On-air screen
2.8.2.15 NEW FOLDERS
File Manager Shows all the subfolders contained in the paths \AUDICOM\Audio and
\AUDICOM\Text; of all HD drives defined in 'Configuration Panel'. Folders outside
/AUDICOM/Audio path, will be ignored. To include them, move them to the AUDICOM's AUDIO
folder. Up to 320 folders can be created on local and network drives. Folders with
repeated names are not allowed. If there are folder with the same name in different
workstations, File Manager will only show the content of the local folder.
To add new folders press 'New Folder' icon (
) . The following window appears:
Here the NEW FOLDER properties are set:
Name: The folder name can have up to fifteen (15) characters, but someone can be not visible
on TABs depending on the upper/case combination and windows size. Remember that in music
folders with 'autoDB' enabled the name of the folder will be the musical STYLE in the Database.
Disc / Server: It defines the drive in which the new folder will be created. It can be a local
disk or a network disk. You must have writing permission.
Folder type: There are three types of folders:
Audio Folders: contains audio files, like music, commercial spots, promotionals, etc.
Text folders: contains the text files that AUDICOM manages, used for news. They allow to
create text files with associated audio files: when you insert this text files in the air scheduling,
also load automatically the associated audio file. Text files are showed on the commentaries
window and Teleprompter (if it exists). See "News Suite".
Extra folders: Although the folder’s path which AUDICOM works is rigid, is possible to use a
folder that is outside of the \AUDICOM\Audio path, that will appear as a Tab in File Manager
like the other folders. Using the button 'Define', explore the network and select the folder that
you want to incorporate to File Manager. The files contained in Extra-Folders can’t be used by
AutoDj, You can use these files manually: playing from File Manager; cuing them; dragging
them to the program log; moving them or to copying them to other folders. IT´S NOT
SOLIDYNE AUDICOM
Page 61
SOLIDYNE AUDICOM
POSSIBLE TO INCLUDE FILES FROM EXTRA FOLDERS IN THE LOG/PGM FILES. Extra-folders
appears in blue on the tabs, always at the end of the list.
Class: Defines the content of a folder (Music, Promos, Spots, Effects, etc.) This information is
of great importance for 'autoDB' folders, since it changes the behavior of automatic indexing
Colour: Defines the Tab's colour. This colour is defined for all AUDICOM terminals.
Sort by: You can choose the default sorting for each folder, so when you enters to this folder
the contents appears sorted by Performed, by Title or Length. The choose will be made
according to the type of material. When viewing, you can sort the listing as you wants; but
when you leaves the folder, it returns to its default sort parameter.
Fade in/out: Fade In/Out in AUDICOM 8 can be configured on a Style/Folder basis, or on an
audio file basis. In both cases, the crossfade indications are in tenths of a second, so a value of
5 means 0.5 seconds. By default when you create using File Manager a Music Folder, the cross
fade is set to 15 (both for in/out). This means that you will hear a 1.5 seconds fade, when this
audio is faded to the next song in the Playlist. By the way, the actual value used in a fade, is
the smallest value between the fadeout value of the track that's ending, and the fadein value of
the track that's starting.
Using the above logic, a music track before a commercial break won't never produce a
crossfade between the two blocks (commercials and station ID's have a fadein value of 0 or
almost zero).
2.8.2.18 IMPORT FOLDER
When you maximizes the File Manager, an "Import Folder" button appears (which has a CD
icon). This tool allows you to load, temporarily, a folder located outside the AUDICOM's folders
path. Folders located anywhere of the disk or the network can be imported, even from a CDROM.
Pressing this button, a window with a tree structure will appear. Explore and select the wished
folder. The folder will be added to the File Manager tabs, like an extra folder. This way you can
copy files to File Manager folders, or to play them on-air.
Imported folders will be removed from File Manager when you close it (pressing Alt + F4).
Files contained in the imported folders ONLY CAN BE PROGRAMMED IN MANUAL FORM. Like the
extra-folders, files from imported folders cannot be included on programming logs, nor stored
in the data base. Therefore, they can't be used for AutoDj.
2.8.2.19 DELETE A FOLDER
Folders can be deleted only when they are empty, by double-click on the Tab. To rename a
folder, you must create a new folder with the new name and move, using AUDICOM File
Manager, all the files to the new folder. Then, erase the old folder. This must be made in this
way to maintain updated the Database information.
2.8.2.20 FOLDER INFO (properties)
Rigth-click on a Tab and select INFO. The following window appears, showing the folder
settings:
Name: Name of the folder. It cannot be changed.
autoDB: Enabling this option, all files saved on this folder are automatic added into AUDICOM
data base (see 2.8.3 autoDb).
Colour: Changes the Tab color. A drop-down menu shows the eight (8) available colors, witch
allows to group folders. Colored buttons over the Tabs allows to filter the shown folders.
Pressing red button you will see only red folders, pressing the black you obtains only black
folders, and so on. To return to all folders, press the multicolor button (this action force to read
the folder from HD. Press multicolor button if you create folders from Windows Explorer and
new folders are not shown).
Sort by: You can choose the default sorting for each folder. When you access to this folder the
contents appears sorted by Performed, by Title or by Length. The choose will be made
according to the type of material. When viewing, you can sort the listing as you wants; but
when you leaves the folder, it returns to its default sort.
Show Performer: In folders with non musical material, "Performer" information usually is not
used, so the column appears empty. You can hide the Performer column for this cases (disabled
by default).
Page 62
SOLIDYNE AUDICOM
On-air screen
2.8.2.21 EXPLORE THE NETWORK
The main window of File Manager shows ALL folders of the AUDICOM network (except those
whose access is restricted for the current user). In expanded mode, the right window allows
you to visualize all the folders or only those of a particular terminal. In the drop-down menu,
you can select the terminal to explore.
If two terminals have folders with the same name, the LOCAL folder will only be shown. Spouse
that in the Air terminal a folder called "Promos" exists (\\Aire\C\AUDICOM\Audio\Promos), and
there
are
a
folder
with
the
same
name
in
the
Production
workstation
(\\Produccion\C\AUDICOM\Audio\Promos). When you click on the Tab "Promos" in the Air
terminal, you will see only the files of the local folder, in the same way, when you select
"Promos" in Production PC, only the files of the local folder will see. To see the folder of the
other terminal you must expand the File Manager and select this terminal in the right window.
2.8.2.22 RIGHT-CLICK MENU
Right-clicking on a file you obtains the following options:
Cue: Plays the file through the monitoring channel.
Cue End: CUE the last five seconds of the selected file.
Cue Stop: Stops the CUE play.
Add to play queue: It is used while File Manager plays a file. This option add the selected title
to a “queue list” and play it when finishes the current title. The remaining time of queue list
appears in the counter, which will change his color indicating that there are one or more files in
queue.
Save as Playlist.txt: Selecting two or more files, it can be saved as a Playlist. The order into
the Playlist will be the current appearance order.
SOLIDYNE AUDICOM
Page 63
SOLIDYNE AUDICOM
AutoEdit...: Runs autoEdit in background to remove in/out silences from selected files. When
the process conclude, autoEdit window will pop-up showing a report.
Edit: Opens the file using the application that Windows have associated for that file extension.
In the basic installation of AUDICOM the associated application will be the FX5-Editor, but you
will install another editor.
InfoMusic: Working on the AIR desktop, this option shows the data of the selected title in the
InfoMusic-Air window. On the production desktop, runs the InfoMusic-Producction module.
Search: Opens the search windows (F3).
Delete: Deletes the file from the disk and from database. Deleted files are sent to Windows
Recycle folder.
Rename: It allows to change the file name updating the database. It's not necessary to type
the extension of the file. The keyboard shortcut for this function is F2.
Sort by name: Sort the titles in alphabetical order. Same action obtains by clicking on the row
header
Sort by length: Sort the titles by duration, from smaller to bigger Same action obtains by
clicking on the row header.
Show...: This options allows to filter the folder contents to view only recent files.
2.8.3 autoDB (automatic file indexing)
When a folder has this feature enabled, all files copied to the folder are automatically entered
into InfoMusic data base. This feature really simplify the work of load music into data base. Just
copying files to an autoDb folder, the titles are is added to data base with Name, Performer and
Style, being enabled to be used by AutoDj. Obviously, you can complete or modify the
information soon, from InfoMusic-Production.
In an autoDb folder, audio files are indexed as following:
a) File Manager analyzes the file name. If the file name format is "Performer - Title.mp3",
what is at the left of the score is indexed as "Performer"; and what is at the right of
the score is loaded as "Title". If the file name don't have score; the file name is
indexed as Title, and "Performer" field remains empty. (Note: If the file name has two
or more scores, last score is considered).
b) If available, additional MP3 internal information is loaded from ID Tag (ID3 V1 / V2).
c)
The field "Class" of the data base corresponds with the "Class" defined for this folder
when it was created (to check this, right-click and choose "Info").
d) If the folder contains songs (Class=music) the folder name is the "Style" for all files of
this folder. If the folder doesn't contents music, the field "Style" remains empty.
e) If the folder contains songs (class=music), a default value of 1 sec. is set for
crossfades. If files aren't music, crossfade times are zero.
f)
If the title already exist into database, new title will be renamed adding the subfix (2);
(3); etc. Remember that you can easily change the Title using Rename window (F2).
Example: "Carlos Gardel - El día que me quieras.mp3" and "Julio Sosa - El día que me
quieras.mp3" they have identical titles. Titles will be loaded as "El día que me quieras"
y "El día me quieras (2)".
Once a file was indexed, you can edit the information only from "Rename" on File Manager
(Title and Performer) and from InfoMusic. AutoDB only adds new files to the data base. If you
enables autoDB in a folder that contains previously indexed files, these files remains without
changes. When you MOVE a file between autoDB folders, the field STYLE is updated according
to the name of destination folder.
In addition, when autoDb option is enabled, all new files saved in this folder are analyzed in
order to remove beginning/ending silences. This action is performed by AutoEdit algorithm,
which works trimming compressed audio data, avoiding re-compression that will cause loss of
audio quality. For more information about AutoEdit please see AutoEdit: automatic silence
removal.
2.8.4 AVANCED INFORMATION
All AUDICOM drives have the following folders structure:
Page 64
SOLIDYNE AUDICOM
On-air screen
\AUDICOM\Audio
Always keep in mind that File Manager will show all the folders located in Audio and only those
(except the extra-folders). For example, if you have two drives, C and D, File Manager shows
the folders located at C:/AUDICOM/Audio, and the folders located at D:/AUDICOM/Audio like
this folders will be located in a single disk. Cannot be subfolder inside ‘Audio’ folder, if
exists, they will be ignored.
When you create a new folder on a disk that doesn't have the AUDICOM\Audio structure, File
Manager will create that folders tree structure automatically. This is also valid for Text folders
(\AUDICOM\Text).
Discs (or their partitions) are defined in Configuration Panel.
SOLIDYNE AUDICOM
Page 65
SECTION 3
SCHEDULING
3.1 Cyber Play Editor
The commercial breaks and blocks of program contents creates separately in different files. The
advertising schedule registers in .LOG files whereas the program blocks are in .PGM files.
The commercial breaks can be created automatically or in manual form. For the first case a
complete module called ADMICOM is included. To create it manually, you can use the CyberPlay
Editor module, descripted in this chapter.
The programs blocks are made using the CyberPlay Editor module. You can define musical
blocks, live shows, satellite links, etc. into the PGM programming logs.
As the commercial breaks like the program blocks are created with a set of instructions own of
AUDICOM, that agrees to know although it is not necessary to remember them, because also
there are wizards who facilitate the programming task
3.1.1 Overview
The user access to this tool from AUDICOM's tool bar by clicking on 'CyberPlay Editor' icon.
Remember that you can login as "Programador" to access to an empty desktop, without
CyberPlay and other tools used on-air.
Remember: The administrator can restrict the access to this module.
With 'CyberPlay Editor' you can create commercial and musical schedules. The traffic
advertising are contained in '.LOG' files, and the music and artistic contents are stored in '.PGM'
files.
The commands that define the schedule, and the audio files (Promotional cuts; Spots; etc.) are
Edited as text in CyberPlay Editor LOG and PGM windows. Many commands also can be handled
in graphical form, directly from the Test-CyberPlay window; or using the Magic Programming
wizards who facilitate the work.
Keep in mind the traditional gird schedule used in radio stations, that define the schedule for
each day from 00:00 to 24:00. Basically that's what we do in CyberPlay.
Daily schedule (FM 88.1, Bermejo, Mendoza, Argentina)
Next the commands or instructions are described. This commends generates the commercial
breaks ("Batch") and the different blocks. These instructions will begin with slash unless the
opposite be indicated. This slash indicates that this line is an instruction to be interpreted by
CyberPlay. All commends must be written in a single line.
Page 67
SOLIDYNE AUDICOM
SOLIDYNE AUDICOM
The first block always must start at 00:00 Hs and the last one must ends at 24:00 Hs. It's
VERY IMPORTANT that this is done this way, because otherwise the software won't be able to
identify the changes day by day and the scheduling will be erroneous.
The use of uppercase, lowercase or any combination among them are supported.
If there isn't a block defined for some hour rage, it will be graphically indicated on the
CyberPlay Test like a gray block with the label EMPTY.
The STATUS windows reports warnings (syntaxis error, empty ranges, superimposed blocks,
unknown AutoDJ formats, and so).
CyberPlay Editor full view
3.1.2 LOG & PGM scheduling files
The commercial breaks and the program blocks can be defined in several ways. Few files can
define the programming for an entire year.
•
•
•
•
•
for
for
for
for
for
a specific date (I.e. December 25 2004)
a certain day (I.g. for every Monday of the year)
a day of a certain month (E.g. for every Monday of April)
one specific month (Ej. for the whole month of August)
the entire year
AUDICOM uses the following order of priority when loading the files to generate the
programming schedule for every day:
Priority 1
YYYYMMDD.LOG (or.PGM)
Year - Month - Day. Eg.: 20040526 Contents the commercial breaks (or
program blocks) for May 26 2004.
Priority 2
WED11.LOG (or.PGM)
Contents the commercial breaks (or programs) for all Wednesday of
November.
Priority 3
SUN00.LOG (or.PGM)
The double zero indicates any Sunday of the Year.
Priority 4
MONTH04.LOG (or.PGM)
Indicates the whole month of April.`
Priority 5
MONTH00.LOG (or.PGM)
Indicates all days of the year..
Page 68
SOLIDYNE AUDICOM
Schedule
3.1.2.1 Creating the daily schedule
Every day, the air-module loads the log and pgm files for the next day, according to the order
of priority. It can take, for example, the commercial breaks (Log file) defined for August 14
1998 (980814.LOG) and the program blocks (pgm) for August (MONTH08.PGM).
The load takes place automatically every day at 18:00 Hs. You can change this hour from
Configuration Panel.
This way, it is not necessary to reload the programming manually, so that AUDICOM registers
the changes done to the next-day-files during the labor day. If you changes the programing
logs for the current day; or the programing logs for the following day after the hour of
automatic load, you must to advice to the on-air operator so that he UPDATE MANUALLY the
programming schedule. For details, see ' Changes on the programing log' in the chapter
"CyberPlay -> Operations".
WARNING: Make backup copies periodically of all LOG and. PGM files; since if these files are
lost accidentally you will get lost the programming of the radio.
3.1.3 Load and save files
3.1.3.1 Loading a file
This description is valid for windows LOG and PGM, since the procedure is similar for
both. Here you can load the programming files individually, although is possible to
load both files (log & pgm) simultaneously, as it's explained later. Pressing the
button will appear the following window:
Drop-down menus Day, Day of the Week, Month and Year allows to enter the date for wanted
file. Also, you can select a file directly from the right list.
REMEMBER: The file name is the date for which they were generated, as was explained above.
3.1.3.2 Loading LOG and PGM for a date
When the CyberPlay Editor module opens, automatically loads the programming
files for the current day (commercial breaks and program blocks). This button
allows you to load both LOG and PGM files for the selected date. After loading the
files the graphical preview is generated on the CyberPlay Test window.
SOLIDYNE AUDICOM
Page 69
SOLIDYNE AUDICOM
Press the button, select a date in the almanac and to confirm with OK. CyberPlay Editor will
load the LOG and PGM files corresponding to the selected date, as was explained previously.
LOG and PGM files can be edited and saved in independent form.
3.1.3.3 Save LOG / PGM
Press this button to save the changes made to a Log or Pgm file. A windows will
appear, similar to the Load window.
To create a NEW FILE, enter the file name (using the menus) and press OK. If the
entered name does not exist, a new file for the indicated date is created. In a file with equal
name exists, a message will appear to confirm the overwriting.
Notes: AUDICOM includes demo programming files (7 log's and 7 pgm's), which must be
erased (or edited) so that they don't interfere with your programming.
3.1.3.4 Play Lists
The window SAVE PGM includes the SAVE PLAYLISTS button. Playlist are listed of
titles in TXT format, that can be inserted in the air programming schedule. The use
of the PlayLists is described next.
Pressing this button a dialog box appears, to enter a name for the PlayList. That name will be
shown by the PlayList Manager. PlayList manager is a tool that manages the PlayList on the airdesktop. The PlayList are saved into the PGM folder.
Mark the "Show only PlayLists" checkbox to see only the playlists.
3.1.4 Creating Musical contents
AUDICOM not only manages ads and music. You can define all the events that will occur on the
air. next, the types of content blocks are briefly described :
LIVE show: AUDICOM generates breakpoints between commercial breaks (optionally can
generate blocks between batches WITHOUT stopping points) . AUDICOM stays on stop while
the live show take place, and the operator can insart music and material between batches. The
CyberPlay counters alert to the operator when the on-air time of the next commercial break is
approaching.
Automatic music program ( AutoDj ): AUDICOM plays music between commercial breaks.
The musical selection is done title by title, in real time , based on predefined criteria (AutoDj
formats) and using the music database InfoMusic. You can also work with play lists, own or
externally generated by other tools (Power Gold, Selector).
Satellite Programs: AUDICOM switches between local ads and satellite program. The
computer controls the audio console. There are two types of satellite blocks, those in which the
switching is done by time, thus more complex requiring control signal via satellite.
Links and repeaters via the Internet: Similar to satellite blocks, but AUDICOM switched to a
streaming server or an 'I-Link' link a header AUDICOM.
Special Inclusions (ExactTime), direct programming: Are different ways to schedule
events within blocks explained above, at a particular time. This may include songs, sponsors,
promotional cuts, etc.
These types of blocks and other features are detailed in "Commands for contents shcedule" in
this chapter (see the menu on the left).
3.1.4.1 Magic Programming
This assistant facilitates the programming of the blocks, since you don't need to
type the instructions, which are generated by 'Magic Programming' and inserted an
the cursor position on the correspondent window.
When pressing this button the following window appears::
Page 70
SOLIDYNE AUDICOM
Schedule
Here you select the type of block to program. You can define the following blocks:
Live, AUDICOM generates only commercial breaks, with 'PAUSES' at the end of each
batch to stop the playing.
Automatic Musical blocks, where AutoDj fills with songs the segments among
commercial breaks.
Satellite Fill; where time between batches are filled with the signal from the satellite.
Satellite Slave; where a control signal from satellite starts/stop the AUDICOM's
advertising.
The "direct sequence of titles" is a powerful tool that allows to create a musical listing
using different methods, as is detailed in "Listas Working with Playlists".
Exacttime option is a special inclusion inside a block that allows to include titles so that they
be on-the-air at certain hour. To know details about the commends, see "CyberPlay
Editor/Commands for contents schedule". Press 'Continue' to jump to the next step.
In this window you define a Name for the radio show and the Beginning and Ending times.
Pressing continue you pass to the following step.
SOLIDYNE AUDICOM
Page 71
SOLIDYNE AUDICOM
Here you can define Sponsor files to the radio show. Or you can use promotions cuts,
presentations and ending cuts, etc. Leaving the field NAME empty, it's assumed that these
radio show doesn't have Sponsors neither presentation files. In the fields Open, Mid and Close
the file names are entered, typing them or by drag 'n' drop from File Manager (or InfoMusicProduction).
If an AutoDj block is programming, a fourth window will appear, which allows to select from a
drop-down menu the format for the automatic musical block (basically it determinate the music
style).
Finally, it is possible to enter a special inclusion 'ExactTime', including one or several titles,
such as a news program, sponsored songs, etc. The special inclusion is defined for a certain
time, and may include special commands such as time, temperature, etc.
Magic Programming will create the instruction corresponding to the requested block. The
instruction for the previous example would be:
/Block /20:00-22:00 /Live Consagrados
/Sponsor TITRAIJU +Open="Auspicio de apertura" +Mid"Comienzo de bloque"
+Close="Auspicio de cierre"
Page 72
SOLIDYNE AUDICOM
Schedule
3.1.4.2 Direct sequence of titles
This option is used to make a music play list, which can be saved to a file; or scheduled into the
PGM file, so this play list will be pre-loaded into the Cyber-Play main schedule.
In the first case the list is saved as PlayList in a TXT file type. In the second case the title list is
inserted into the file 'PGM' programming content. The insertion occurs at the cursor point. Can
also insert a direct sequence of titles from CyberPlay-Test window, right-clicking on the header
of the block in which you want to insert the titles and choosing the appropriate menu option.
The available options are:
Ranking based on TOP HIT: Generates a list based on the information “TOP HIT” of data
base.
Ranking based on weekly plays: Generates a list based how many times the title played last
week. The list starts with the titles with greatest amount of emissions.
Subordinated AutoDJ: AutoDJ generates a list of selected titles according to the "AutoDJ
Format" defined, operating the same way as when working in real time but generating the full
list.
Random music: Generates a play list with random titles, with no consideration the last time
on-air.
Choose an option and click 'Next'. A menu will appear to indicate the length of the PlayList.
Select the duracción and press OK. The list is generated and displayed in the preview window.
In the case of Subordinated AutoDJ; an extra menu to indicate the musical format appears.
Remember: A PlayList can include comments (informative text), pauses; and Time command
(/ Time). The latter two can be inserted directly from the CyberPlay window, right-clicking on
the position where you want to insert the event.
Recuerde: Un PlayList puede incluir Comentarios (texto informativo), Pausas y el comando
Hora (/Time). Estos dos últimos pueden insertarse directamente desde la ventana
CyberPlay, haciendo click derecho en la posición donde quiera insertar el evento.
3.1.4.3 WORKING WITH PLAY LISTS
This option is used to create playlists or to schedule a segment with a listing of titles including
in the PGM file.
In the first case the title's list is saved as a PlayList file, with TXT format. For the second case
the generated list is added into the PGM file. The insertion takes place an the cursor point. You
can also to insert a direct sequence of titles from the CyberPlay Test window. For this, select
the header of the block in which you want add the titles and choose one option.
Ranking based on TOP HIT: Generates a listing based on the TOP HIT database field.
Ranking based on weekly aired: Generates a listing according to the last time on air
statistics. The listing will begin with those titles that have greater amount of emissions.
Subordinated AutoDj: AutoDj generates a selection of titles according to the specified
format, working with the same criteria that the real time AutoDj blocks.
Random music: Generates a listing of random titles, without considerate the last on-air
dates.
Choose an option and press 'Next'. A menu will appear to indicate an estimated length for the
PlayList. Select a length and press OK. The listing is generated and showed on the Test window.
For the case of Subordinated AutoDj, it will appear an extra menu to indicate the AutoDj
format.
Remember: A PlayList can include comments (informational text) commands "breaks" and the
command time (/ Time). The latter two can be inserted directly from the CyberPlay Test
window, right-clicking on the position where you want to insert the event.
DESCRIPCION
The PlayLists are text files (txt) containing a list of titles to be played on the air. These lists are
inserted into the CyberPlay window (desktop air) using the PlayList Manager.
Basically a PlayList contains the names of the songs, one below the other; but can also include
commands AUDICOM: COMMENTS (;) TIME (/ Time) and BREAKS (/ Pause).
SOLIDYNE AUDICOM
Page 73
SOLIDYNE AUDICOM
CREATING A PLAYLIST
The playlists are created in the "CyberPlay Editor" module in the PGM window. There are two
ways to create them
a) By drag&drop from File Manager to PGM box; or from InfoMusic-Production.
b) Using Magic Programming.
a) Create the list manually
Click on button 'NEW PGM' to empty the PGM window and start a new schedule file. The 'Magic
Programming' wizard opens. Press 'Cancel' we do not use this wizard.
Open 'File Manager' or InfoMusic-Production (recommended) and locate the title you want to
add to the playlist. Select it and drag it to the PGM field 'CyberPlay Editor'. The cursor will be
positioned below the title inserted, ready to continue adding other titles. Add one by one the
titles to complete the listing.
After completing the list, press TEST to generate the preview and validation PlayList, which
appears CyberPlay shown in window.
b) Create the list automatically
In this case generates AUDICOM list, which can be manually modified later. Press 'NEW PGM'.
Programming wizard opens. Select 'Direct Sequence titles' option. Click Next. Four options
appear to create the list:
Ranking based on TOP HIT: Generates a list based on the information contained in the TOP
HIT AUDICOM data base.
Ranking based on last week: Generates a list considering how many times the title was
broadcast in the last week. Listing the titles begin with recorded highest emissions.
Subordinated AutoDj: AutoDj generates a selection of titles in the format specified, operating
just as when working in real time (blocks AutoDj)
Random Music: Generate a list of random titles, regardless of the last date.
Choose an option and click 'Next'. Indicate the duration (estimated) that must have the
PlayList. Press OK. The list is generated and displayed in the preview window (TEST).
Subordinated AutoDj option for an extra menu to indicate the musical format appears.
Remember: A PlayList can include comments (informational text), Intermission Time command
(/ Time). The latter two can be inserted directly from the CyberPlay window, right-clicking on
the position where you want to insert the event.
PREVIEW AND EDIT THE LISTS
From the preview window graphics you can:
•
Check the length of each title and full PlayList.
•
Verify the existence of programmed files that appear in RED if AUDICOM not find them in
the corresponding audio servers (this does not happen with a newly created llista but can
occur listings that contain nonexistent old titles).
•
Reposition titles, dragging them with the 'mouse' up or down.
•
Insert from a menu (right click) minute breaks and reports (command / Time).
•
Clear titles (right click> delete).
•
Add titles directly inserting the CyberPlay window (Drag & Drop from InfoMuscicProduction or File Manager).
An example of PlayList shown:
Page 74
SOLIDYNE AUDICOM
Schedule
Note that the first line "; Manual Playlist" is a comment, as it is preceded by a semicolon (;).
Look to the right in the preview appears as informative text, not duration. Any line preceded by
a semicolon (;) is interpreted as a comment, allowing to enter multiple lines of text.
The PlayList example contains a PAUSE, which is indicated by a black bar as standard on
AUDICOM. Remember to pause do not have a fixed term. The operator must press PLAY to
resume playback.
File "The Omen" appears in red, indicating that it was not found in any AUDICOM unit. In this
condition, the air al playback will skip it to continue with the next title.
SAVE A PLAYLIST
To save the list, press the PGM store window. The 'New PlayList "button allows you to enter a
name for the list.
The content of the window is saved in PGM txt format. The playlist.txt files are stored in the
PGM folder. The box 'Show only PlayLists' to filter the contents of the window to see only those
files.
Note: You can also create playlists manually, using any text editor (eg, Windows Notepad).
Files must be saved in the \ AUDICOM \ PGM folder so they can be used by AUDICOM. Once in
the PGM folder, the playlist can be loaded to verify the TEST-window CYBERPLAY the existence
of programmed files.
HOW TO INSERT A 'PLAYLIST' IN THE MAIN SCHEDULE
The desktop module CyberPlay Air has a button called 'PlayList', which opens the PlayList
Manager window. From here are displayed and loaded the PlayList files.
SOLIDYNE AUDICOM
Page 75
SOLIDYNE AUDICOM
The top menu shows all the available lists (found in PGM folder). When selecting a list, its
contents are displayed in the window PlayList Manager. As with all modules AUDICOM, titles
appear in different colors according to the time elapsed since the last release to air.
Comments appear in violet, while Meteor breaks and commands are indicated with the
corresponding legend.
To refresh the list in the pattern programming, select this pattern first (CyberPlay window) the
point where you want to insert the PlayList. Note that the insertion will occur ABOVE the
selected item. Presinando the LOAD button is complete Playlist inserted.
Times the commercial breaks are respected, so the titles can be distributed among several
batches, depending on the length of the PlayList.
PlayList titles can be added individually to the programming schedule. To do this, select one or
more titles (Ctrl + click) and drag them to the CyberPlay window. The titles will be added in the
order they were selected.
IMPORTANT
If the PlayList will exceed the length of the block titles ONLY are inserted to completion. The
PlayList does not extend to the next block. For example: 1 Insert a PlayList hra. at 17:30 on a
LIVE block ends at 18:00 Hs titles ONLY are inserted until 18:00 Hrs
3.1.4.4 DIRECT INCLUSION
This allows to include audio files directly into the scheduling logs. The titles placed below the
command are included by appearance order. If the interval between two commercial breaks are
exceeded, the remaining titles will be programed after the batch, considering the batch's
flexibility time.
Next, an example of direct inclusion:
/Block /07:00-09:00 /Live
Front Line Assembly - Gun
Funker Vogt - Civil War
Leaether Strip - Kill a raver
Wumpscut - Womb
BlutEngel - My Time
Hocico - Coward as a slave
Aghast View - Truthhead
Solitary Experiment - Soldiers of Fortune
Decoded Feedback - Passion of flesh
Second Disease - Can't be me
This facility can be used to add prerecorded shows of long play. Consider that if the file length
is, for example, 45 minutes, must have sufficient space between the batches so that the file
can be added. The flexibility of the batches will consider, so that if the time between two
commercial batches is 45 minutes and you tries to insert a file of 46 minutes of length, the
batch moves to give rise to the block. This is very useful when guideline the name of the file
and is overwritten the same file periodically to update the programming (that is to say, each
new program is recorded with the same file name not to be changing the programming
guideline, so that the programmed file name is always the same one but it changes his
content). In this cases, is recommended to use AutoDj blocks instead Live blocks, so that the
AutoDj compensates, with promotional cuts or music , any time difference between the
duration of the blocks and the batches. If a Live block is used, can appear pauses if the file
length is smaller to the time between batches.
WARNING: If you tries to program a file of 30 minutes and the batches are defined at
intervals of 15 minutes, the file could not be programmed. The case that even can occur it
appears at the end of the day (depends on the characteristics of the programming).
Note: Files containing point as part of the name (eg 107.5.wav) (.) Must be entered including
extension, if they are not registered in the database
3.1.5 COMMERCIAL BREAKS (/batch)
You can create the commercial scheduling in two ways: in manual form or automatically using
Solidyne Admicom (recommended). To know how to use Admicom, see Admicom: Traffic and
budget.
Non-commercial radio, or radio stations that working with a few ads can handle ads manually
without having to manage a database of customers. To create a commercial break manually,
follow the next steps:
Page 76
SOLIDYNE AUDICOM
Schedule
1-
Into the LOG field you enters the batch commands. This commands defines ONE
commercial breack at certain time, therefore there will be many commands as breaks have
the LOG.
Example:
2-
/Batch Break-1 /00:00
Below the command, create a list of spots by drag&drop the files from File Manager or
InfoMusic-Prod.
Example:
/Batch Break-1 /00:00
Coca Cola
Sancor
Sony
Arcor
Note
Remember that files cannot be programmed from the 'extra' audio folders (see File
Manager).
Files containing point as part of the name (eg 107.5.wav) (.) That are not admitted
to the Database MUST be typed including extension
3-
To add another commercial block, for example half hour later; repeat the previous steps.
4-
After entering all breaks, save the file as was explained previously.
3.1.5.1 EasyLog
We recommend the use of EASY LOG tool to create a 24 Hs structure with empty commercial
breaks. This way, the manual work is easy. This tool inserts the batch instructions, below which
you will insert the audio files.
Clicking on this button the following window appears:
Select 'Generate schedule' and press 'Continue'. The options 'Schedule..."' and "Delete..." will
be analyzed later.
SOLIDYNE AUDICOM
Page 77
SOLIDYNE AUDICOM
From time: The hour in which the first batch will be created.
To time: The hour in which the last batch will be created.
Time between batches: Time between batches, in minutes.
Flexibility: Time in minutes that a batch can be moved in an AutoDj block. By default, all
commercial breaks generated by Magic Programming are flexible. You can change manually the
flexibility of each batch.
3.1.5.2
Add a SPOT to schedule
If selects this option, Magic Programming will show this:
This window allows you to schedule one spot simultaneously in several batches. Just enter the
segment in which you want to program the file.
3.1.5.3 Remove a spot occurrence
This option allows to delete all occurrences of an spot for certain schedule interval.
Note: Remember to save the LOG file so that the modifications take effect. If you are editing
the current programming logs (or tomorrow's logs before 18:00 Hs), you must reload the
schedule in 'On-Air' workstation.
3.1.5.4 Print
It allows to print the commercial batch (file.log), the programs log (file.pgm) and
the programming graphical test (CyberPlay Test window). All printings are made
according to the current log and pgm files
3.1.6 How to add titles into LOG & PGM fields
There are three ways to add titles in the edition fields LOG and PGM
Page 78
SOLIDYNE AUDICOM
Schedule
•
To type it into text fields.
•
By Drag and Drop from File Manager.
•
By Drag and Drop from InfoMusic.
In addition, the files can be dropped in CyberPlay TEST window.
3.1.7 Previewing the schedule (F9)
The CyberPlay Test window shows graphically how the schedule is conformed.
Pressing 'Test' the graph is generated according to the commands introduced in
LOG and PGM fields. This graph is similar to the one that you see at the on-air
screen, allowing to check if the commands entered are according to the desire
schedule.
In addition, a validation is made (LOG and PGM) to detect syntaxis errors. The result of this
validation appears on the STATUS box, below the LOG/PGM fields.
3.1.7.1
Test-CyberPlay
Audio files: If some title doesn't correspond to any file, it appears in RED. On the on-air
screen, this files are showed with the legend ERROR, and the play will jump to the next title.
AutoDj: It check the formats of AutoDj blocks. If they are nonexistent formats, a warning will
appear on the status window. This condition must be fix in the window PGM entering a valid
format. When an AutoDj block has defined a nonexistent format, the music selection will be
made using a 'Default' format that includes all the available styles on data base.
Remember: Always check visually the schedule. Keep in mind that any error on the schedule
(overlapping among blocks, schedule holes, unknown titles, etc.) must be fixed, otherwise, the
schedule on-air will be erroneous.
You can listen the audio files from the preview window. Obviously, you need a sound card on
these workstation for make this. To listen a title, just select it on the CyberPlay Test window
and press PLAY.
3.1.7.2
Edit the schedule from TEST windows
Many aspects of the schedule can be changed directly from the preview window. Right-clicking
an item a drop-down menu will show the following options:
PLAY / STOP: Play controls.
INSERT METEOR: Inserts a METEOR
command
above
selected point
(yellow cursor).
INSERT PAUSE: Inserts a PAUSE
above selected point.
REMOVE: Delete the selected item.
In case of a commercial spots, ONLY
THAT OCCURRENCE of the spot is
deleted. In order to delete all the
occurrence of a spot use MAGIC
PROGRAMMING.
SOLIDYNE AUDICOM
Page 79
SOLIDYNE AUDICOM
When you make a change from the preview window, the corresponding code is generated
automatically in window LOG or PGM according to corresponds. Making double-click on an item,
the code line that generates that item is focused on the corresponding window.
3.1.7.3 Changing the order of the titles
You can change the order of an item by drag&drop upwards or downwards. Also you can drag
Pauses and Meteor commands.
To modify the start or end time for a block, makes double-click on the block's header to localize
the correspondent code in the edit window (LOG or PGM) and edit in the line of code the hour
that you want change.
3.1.8 Multiple terminals
Some AUDICOM modules (CyberPlay Editor; AutoDj Editor; InfoMusic-Prod) allows to work
remotely with the data of others AUDICOM terminals. It is the case of a Production terminal
viewing the database of an air terminal, or a CyberPlay Editor changing the programming for
several Air terminals. All these modules have a drop-down menu called "Current terminal".
This menú allows choosing between anyone of the AUDICOM active terminals. "Default host"
always refers to the local workstation; unless the administrator of AUDICOM has redefined the
default settings (AUDICOM.ini).
When this menu opens for the first time, the exploration of the network begins, in search of
active terminals of AUDICOM. This operation can take a few seconds. The result is stored in a
cache, being no delays in the later accesses. In order to update the terminals, select the option
"_update hosts..."
3.1.9 Commands for commercial breaks
3.1.9.1 BATCH OF ADS
/Batch [name] /HH:MM XYZ
This is the command line that generate a commercial break. The [Name] is optional. Below this
sentence, the spots titles are added.
/HH:MM
Hour in that commercial break must start (In hours:minutes)..
XYn
This variables defines the flexibility time for the batches, that is to say, if
the batch must played on-air exactly at the indicated hour, or its starting
time can be changed. This variables (XYn) are optional and they can adopt
the following values:
X=S (Start)
It indicates that the specified time refers to the beginning.
X=E (End)
It indicates that the specified time refers to the ending.
Y=C (Clock)
It indicates that the start time is o´clock when working on automated mode.
Y=F (Flexible) It indicates that the start time is flexible
n
How much minutes can be moved the batch when the start time is flexible.
NOTES
Page 80
SOLIDYNE AUDICOM
Schedule
By default, the indicated schedule refers to the starting of the commercial break and the
flexibility will be five minutes (SF5).
The variable 'Yn' will be ignored if the variable 'X' is not defined. To change the flexibility
of a commercial break, you need to specify if the indicated hour refers to the start or the
end of the commercial break.
In commercial breaks generated by Admicom, an asterisk will appear (*) at the end of the
instruction, followed by two numbers separated by a slash (*23/36). These numbers indicates
the file length and the category in the record of clients.
Examples:
Batch /08:15 SF5
It indicates a commercial break that begins at 8 hours 15 minutes, with 5 minutes of
tolerance. That is to say, if at 8:15 o'clock there is a song on the air, the commercial
break waits to the song finishes (AutoDj).
/Batch Our Children /22:30 SC
The commercial break starts at 22:30 o'clock.
/Batch /17:00 EC
The commercial break finishes exactly at the 17 hours (for example so that the news of
the 17 Hs starts o'clock. Or so that the last spot of the commercial break announces
that next it comes the exact hour report.
3.1.9.2 RANDOM
/RND,folder,n*prefix
This command allows to schedule in random mode one or more files from a specific folder. The
CyberPlay air module will show a commentaries text saying "Random". When the random's onair time approaches, CyberPlay choose and insert the titles into the main list. Random titles will
appear with in violet. The random command are the following:
/RND
Random command
,foder
Name of source
\AUDICOM\Audio.
,n
Number of files to be added. It can be between 1 and 10.
*prefix
Optional parameter. Allows to enter a text to filter the folder contents.
The selection will be reduced only to files that begins with these
characters.
folder.
This
folder
must
be
located
on
Example:
/batch /08:15 SF5
Spot-1
Spot-2
/RND,Spots,3*summer
Spot-3
After the Title-2, 3 random files will be added, from the folder Spots. These files names
will begin with 'summer'.
NOTE
The command Random doesn't use the Database neither it carries out a control on the
on-air date of the files. The selection of the files is made in random form. However, the
random commando uses the attribute "file" to take control on the selected files. When a
file is choose, its attribute "file" is changed, and this file will not be choose until all files
of these folder being used by the 'random'.
Although the files are registered in the Database, the titles programmed by the
instruction RANDOM are not mixed with cross fade.
Remember that this instruction, like all instructions for commercial breaks, can be used
in ExactTime blocks.
SOLIDYNE AUDICOM
Page 81
SOLIDYNE AUDICOM
3.1.9.3 TIME
/Time /n
It plays the announcement corresponding to the current time. The same action is obtained
pressing the button 'Time' on the AUDICOM Toolbar.
The variable /n determines the voice used for the announcement. If it's not defined, the
announcement will refers to the status of toolbar 'Voice' button. The options are:
/1
/2
/3
/4
Male voice
Female voice
Alternative voice
Alternate between voices
Keep in mind that this will modify the state of the button, therefore, if after an instruction
/Time /1 (masculine) there is an instruction /Time without specified locution, it will be played
on-air with male voice, unless the operator has modified the state of the button in the tool bar.
Example:
/Batch /08:15 SF5
Spot-1
Spot-2
/Time
Spot-3
NOTE
In the schedule, the times assigned to Meteor items are estimated. This produces that if
a commercial break begins with a Meteor, the time of suitable error is bigger to the real
one. This takes place because the difference is corrected to the playing instantly the
Meteor. In the case of the 'Time', the announcement aired will conform in real time. The
estimation of times in the schedule doesn't AFFECT the playing of the announcement
'Time' on-air, since this it begins at exact time.
3.1.9.4 TEMP
/Temp
Plays the announcement correspondent to the current temp. Is equivalent to press the button
"Temp" in the tool bar.
Example
/batch /20:30
/Temp
Spot-1
Spot-2
3.1.9.5 HUMIDITY
/Hum
Plays the announcement correspondent to the current humidity. Is equivalent to press the
button "Hum" in the tool bar.
Example
/batch /07:00
Spot-1
/Hum
Spot-2
3.1.9.6 PRESURE
/Pres
Plays the announcement correspondent to the current pressure. Is equivalent to press the
button "Pressure" in the tool bar.
Example
Page 82
SOLIDYNE AUDICOM
Schedule
/batch batch-X /17:00 EF3
Spot-1
Spot-2
/Temp
/Pres
3.1.9.7 RAIN
/Rain
Plays the announcement correspondent to the current rainfall. Is equivalent to press the button
"Rainfall" in the tool bar.
NOTE
If the rainfall is zero, the announcement is not played (command is cancelled).
Example:
/batch /10:45 SF8
Spot-1
Spot-2
/Temp
/Pres
/Rain
3.1.9.8 WEATHER REPORT
/Meteor
Chains the reports of the current time, the temp, the humidity, the pressure and rainfall;
played in this order. Is equivalent to press all buttons in the tool bar.
Example:
/batch /00:00
Spot-1
Spot-2
Spot-3
/Meteor
Spot-4
After the Spot-3 plays the announcements for the time; temperature; humidity;
atmospheric pressure and rainfall.
3.1.9.9 COMMENTARY
;(Commentary)
If you enters a semicolon (;) following by text, this will be interpreted like a commentary text
and will appear in the schedule list with blue fonts.
Example:
/batch /09:15 SF1
Spot-1
;This is comment text example
;You can enters several lines of comments whenever they are preceded by ";".
;
;It can also have empty lines
;Next two Spots and the time o'clock will be played on-air
Aviso-2
/Time
Aviso-3
3.1.9.10 PAUSES (Stop point)
/Pause
Insert a pause. AUDICOM will stay on STOP until you press play.
SOLIDYNE AUDICOM
Page 83
SOLIDYNE AUDICOM
Example
/batch Pause example /13:30 ES3
Spot-1
Spot-2
/Temp
/Hum
; Next the command is executed and the program Stops until you press play.
; When pressing Play the playing starts from Spot-3.
/Pause
Spot-3
3.1.9.11 PAUSES WITH TEXT
/Text [Name] /SSS
Frist text line
Second text line
Last text line
EMPTY LINE
This command also inserts a pause, but the text entered below the instruction appears in the
commentary window of the on-air screen. It can contain any number of lines. Below the last
text line it should ALWAYS have an EMPTY line. The modifier /SSS allows to enter the
approximate time for the reading. This time will appear indicated in the CyberPlay window but
only as reference for the operator; the program will remain in Stop until Play is pressed.
Example
/batch Demo /08:30 SC
Spot-1
Spot-2
Spot-3
; Next a command Text is executed
; Notice that the last text line is empty.
/Text /30
If the text is directly typed in the window, will press Enter when a text line occupies
the wide of the window, otherwise the text will appear in a single line at the
commentary window. If you inserts text copying from the Windows clipboard, it will
appear in a single line, for what you will give it format creating several lines by
pressing 'Enter'.
Spot-4
Spot-5
Spot-6
3.1.9.12 CHAINED EVENTS
@ (Chained events)
This command allows to chain up to four titles. If one of the chained titles is not found, the
other chained titles will be skipped played on the air. Notice that this command doesn't require
to be preceded by a slash "/". The chained Titles will be graphically represented in the window
CyberPlay
The main application of the command 'chained events' is for automated breaking news. When
used the 'Virtual Journalism' for automatic recording of the news, reporters and journalists
phoning to Radio Station and leave recorded their news, using a system of "Voice Mail"; or send
it via mailLink (see AUDICOM WEBTools). The news is programmed as a Multiple Event, with a)
Opening b) News file c) Close. If events are chained, in the absence of any news, no airs and
Closing Presentation.
Example:
/batch /12:00 SF5
/Time
Spot-1
Spot-2
; Next an example of chained events
@Opening
@News_report20140227
Page 84
SOLIDYNE AUDICOM
Schedule
@Close
Spot-3
Spot-4
If the audio file "News_report20140227 " doesn't exist, "Opening" and "Close" are
skipped.
3.1.9.13 REGIONAL
/Regional
It is used to command remote stations via satellite (SatSlave). When recognizing this
command, AUDICOM changes the state of the USB GPIO. This is the control signal that will
commute to the remote workstation via satellite, so that it starts to transmit the signal of the
satellite. It involves to all the files programmed after the /regional, until concluding the
commercial break. During that time, data pin 4 will remain active. When concluding the
commercial break, the pin returns to its original state and the remote station continues with
their local schedule.
The communication is made using an ON/OFF line of the satellite header. When this switch is
activated in the header, sends the signal to the satellite and activates a relay or logical signal in
all satellite receivers. For more info please refers to Remote Control and Satélites.
Example:
/batch /08:30 SC
Spot-1
Spot-2
Spot-3
/Regional
Spot-4
Spot-5
Spot-6
/Regional will produce the commutation in the slave workstation which enables the audio
program coming from the satellite. When concluding the commercial break another control
signal is sent and the slave workstation returns to the local schedule.
3.1.10 COMMANDS FOR ARTISTIC SCHEDULING
3.1.10.1 LIVE SHOWS
/Block /HH:MM-HH:MM /Live [show name]
This command line generates a live-show block. In live radio shows, AUDICOM only program
the advertising. You can fills the time between commercial breaks with the audio files you want.
Note that AUDICOM do not add stop pints (PAUSES) between commercial breaks. In manual
mode, you must add songs or pauses between the adds; otherwhise AUDICOM will play adds
one after another indefinitely. But if you wants, you can change this feature in order that
AUDICOM adds a PAUSE (a stop point into scheduling) after each commercial break.
In a Live Block, the counter 'BLOCK' will show the remaining time for the beginning of the next
commercial break. When remains less than one minute for the ads; a progressive red line will
appear above the counter, which indicates that the commercial break must be aired soon This
action prevents to the operator, who will press PLAY to the commercial break be aired.
The syntaxes for LIVE blocks are as follows:
/HH:MM-HH:MM
Inicio y finalización del bloque en horas y minutos.
/Live
Indica que se trata de un bloque en vivo.
[Título de bloque]
Este parámetro es opcional. Permite ingresar un título para el bloque
que puede poseer como máximo 32 (treinta y dos) caracteres. Los
corchetes no son necesarios.
Example:
SOLIDYNE AUDICOM
Page 85
SOLIDYNE AUDICOM
/Block /17:00-20:00 /Live ENTREVISTAS AL ATARDECER
Programa en vivo que comienza a las 17:00 Hs y finaliza a las 20:00 Hs.
3.1.10.2 META-NAMES: including canning stuff
The distribution of pre-recorded or "canned" content in radio programming is increasingly
widespread. The stations include within certain time programs acquired from independent
producers who develop media content. These files are downloaded from the Internet as
compressed audio files, and must be scheduled to air automatically. With new MetaNombres of
AUDICOM, this task can now be fully automated.
Usually each day the name of these files is different, so it was not possible (so far) make a
weekly generic programming, taking rates to perform a specific schedule for each day of the
week. For example, a canned program daily one-hour, is usually arranged in 4 blocks of 15
minutes with the following names:
Ranking_Top40_Monday-Block-1.mp3
Ranking_Top40_Monday-Block-2.mp3
Ranking_Top40_Monday-Block-3.mp3
Ranking_Top40_Monday-Block-4.mp3
Since for each day of the week the media file name will change (Ranking_Top40_TuesdayBlock-1.mp3, Ranking_Top40_Wesday-Block-1.mp3, etc) needed to program each singly day of
the week. This has now been simplified with the introduction of MetaNames. Now it is possible
to to assemble a single generic block one-hour, valid throughout the week:
/Block /10:00-11:00 /Live Ranking Top40
Ranking_Top40_<day>-Block-1.mp3
Ranking_Top40_<day>-Block-2.mp3
Ranking_Top40_<day>-Block-3.mp3
Ranking_Top40_<day>-Block-4.mp3
AUDICOM replace every day 'MetaName' <day> by the word 'Monday', 'Tuesday', 'Wednesday',
etc.. This avoids having to generate patterns files for each day. There in AUDICOM (Built 8.40
onwards) MetaNames many that can be combined according to the needs
<d>:
<dd>:
<day>:
<day3>:
<m>:
<mm>:
<month>:
<month3>:
<yy>:
<yyyy>:
<w>:
Is replaced by the day's number ('1' to '31')
Is replaced by the day's number expressed with two digits ('01' to '31')
Is replaced by the weekday name
Is replaced by the weekday short name ('Mon', 'Tue', etc).
Is replaced by the number of month ('1' to '12')
Is replaced by the number of month expressed in two digits ('01' a '12')
Is replaced by the month's name ('January', 'Febrary', etc)
Is replaced by month's short name ('Jan', 'Feb', etc)
Is replaced by the year expresed with two digits (14)
Is replaced by the year expressed with four digits (2014)
Number of week of the month.
The MetaNames can be combined. Here is an example from audio files news agency:
REPORT-09hs-20120307.mp3
REPORT-10hs-20120307.mp3
REPORT-11hs-20120307.mp3
These news briefs to be airing every hour. Are scheduled using metanombres and Exacttime, as
follows:
/Exacttime /09:00
REPORT-09hs-<yyyy><mm><dd>.mp3
/Exacttime /10:00
REPORT-10hs-<yyyy><mm><dd>.mp3
/Exacttime /11:00
REPORT-11hs-<yyyy><mm><dd>.mp3
Page 86
SOLIDYNE AUDICOM
Schedule
3.1.10.3 AUDICOM Auto-DJ and third party music schedulers
AUTO-DJ
/Block /HH:MM-HH:MM /AutoDj="Format" [title]
It defines an AutoDj block. In this segments, AUDICOM conforms a musical playlist, in real
time, selecting the songs from a Database, according to the predefined criteria (called AutoDJ
'FORMAT'). The AutoDj blocks shows on screen in light blue color. A header line "AutoDj
Controller" indicates that these segment will be scheduled by AutoDj.
In AutoDj blocks, you will not see a pre-programed full list of songs on the scheduling, since
the selection will be made in real time, when the start time of the block approaches. In AutoDj
blocks, the time adjustment is dynamic. You can remove a song added by AutoDj from the
playlist; but automatically AutoDJ will insert another song in order to fulfill the schedule. You
can also add titles manually into AutoDJ blocks, or to change the position of the programmed
titles (by drag & drop).
The AutoDJ command line and its parameters are the following:
/HH:MM-HH:MM
AutoDJ block starting/ending time, expresed in hour and
minutes.
/AutoDj="Format" It defines the format AutoDj. This format determines the
style of music and features that should be considered for
selection. The different formats are created in AutoDj
Editor module.
Example:
/Block /00:00-03:00 /AutoDj="Tangos" Stars of tango
AutoDJ selects the music to be aired between 00:00 Hs to 03:00 Hs.
Important: AutoDj select songs from the database. The files are not recorded in the database
cannot be used by AutoDj. To make time offsets, AUDICOM uses the 'Promotional' cuts and
'Fills' (recorded in the database). If there is no promotional cuts available in the database, no
time compensation can make for those events requiring o'clock start.
EXTERNAL-DJ
This block allows you to take a song list generated by an external scheduling software (RCS
Selector, Power Gold). To perform the integration, follow next steps:
a) Set up the scheduler software to generate lists with 24 blocks of one hour. These files
must be saved with the name mmddyy.txt in 'C: \ AUDICOM\PGM' in order to
'CyberPlay Editor "and" Playlist Manager "can be used for display.
b) Using AUDICOM CyberPlay Editor, define the ExternalDj segments with the following
command ('Magic Programming' assistant can be used):
/Block /00:00-24:00 /ExternalDJ="C:\Audicom\PGM\<yy><mm><dd>.TXT"
The previous example plays music the whole day; but you can define any hour range:
/Block /02:00-06:00 /ExternalDJ="C:\Audicom\PGM\<yy<mm><dd>.TXT" Night Music
In this case AUDICOM creates an automatic musical block for the segment 02:00-06:00 Hs
based on external scheduler.
If CODES is used in the lists of external scheduler, these codes should be entered in the
"External-ID" field of the Database AUDICOM (using InfoMusic-production or InfoMusic Air).
And the external scheduler should generate lists YYYYMMDD.cod format. Note that the lists do
not have ".txt" extension. If the extension is ".txt" AUDICOM assumes that this is a list of titles
(no codes). If the extension is. "Cod" assumed to be lists of codes.
Additionally, if watches schedules are used; to indicate the time of each musical block to use
the following into the file "cod": /xx:00 where xx is the time from 00 to 23.
SOLIDYNE AUDICOM
Page 87
SOLIDYNE AUDICOM
The list is saved in C: \ Audicom \ pgm so that "CyberPlay Editor" and "Playlist Manager" can be
used for display. The scheduled this list using "ExternalDJ" is as follows:
/Block /00:00-01:00 /ExternalDJ="C:\Audicom\pgm\<YYYY><MM><DD>.cod"
/Block /01:00-02:00 /ExternalDJ="C:\Audicom\pgm\<YYYY><MM><DD>.cod"
...
/Block /22:00-23:00 /ExternalDJ="C:\Audicom\pgm\<YYYY><MM><DD>.cod"
/Block /23:00-24:00 /ExternalDJ="C:\Audicom\pgm\<YYYY><MM><DD>.cod"
If the external playlist for this day is not found, the selection will be made using an AutoDJ with
“Default” format.
NOTES
During the extension of externalDJ, is a requirement that one event at every hour
must be scheduled (a commercial break, ExactTime).
AUDICOM keeps track of the last title played from each external list, creating pointer
file for each list with the extension '.PTR'. These files are located in
('C:\Audicom\PGM').
DIRECT INCLUSION
In a live segment or block AutoDj, you can include a list of files that appear in the main play list
ready to be played on the air. To this, add the titles under the instruction '/Live', as shown in
the following example.
/Block /12:00-24:00 /Live
Dead Leaf Echo
Denn die todten reiten schnell
Corvus Corax - Bacchus
Zauberquelle
Psyche
The list of titles entered under '/Live' command is included directly in the scheduling in order of
appearance. If the listing length exceeds the block time (until the next commercial break), the
list continues after the commercial break. Notice how the titles in the following example
You can include Meteor commands (/ time, / temp,. Etc), pauses (/ pause), Comments (;) and
random files (/ RND).
Direct inclusion allows files scheduled at specific times, dividing the block into multiple blocks
and including files directly within each block. See the following example:
/Block /00:00-01:00 /AutoDJ="clasics" Night
AudioFile-1
/Block /01:00-02:00 /AutoDJ="clasics" Night-2
AudioFile-2
Page 88
SOLIDYNE AUDICOM
Schedule
/Block /02:00-03:00 /AutoDJ="clasics" Night-3
AudioFile-3
In the above example, an AutoDj is used, so AUDICOM work in automatic mode generating
music according the AutoDJ format 'classical'. But the first item of each block was predefined
(AudioFile-1, AudioFile-2, etc.). The difference of time between the duration of the 'Post' and
the length of the block is filled with music. The predefined audio files will be the same day after
day. In order to "AudioFile" will rotate, you can use the RANDOM command. An example:
/Block /00:00-01:00 /AutoDJ="clasica" Night
/RND,audioFolder-A,1
/Block /01:00-02:00 /AutoDJ="clasica" Night-2
/RND,audioFolder-B,1
/Block /02:00-03:00 /AutoDJ="clasica" Night-3
/RND,audioFolder-C,1
This way, every day will be played a different "AudioFile".
3.1.10.4 Special inclusion: EXACTTIME
/ExactTime [Nombre del ExactTime] /HH:MM SYZ
ExactTime allows to play, at specified hour, a list of events. This command is of great utility
when you need to program songs with auspices, fixed sections (eg: "Most wanted"; "New
releases"; etc). The special inclusion allows you to schedule any event at any time. In the
CyberPlay window, Exacttime shows like a commercial break, but with violet background.
Exacttime supports all the commands used for the commercial breaks (/Time; /Rnd; /Pausa;
chained events, commentaries text; etc.). Also MetaNames are supported.
The previous example can be solved using ExatTime in the following way:
/BLOCK /00:00-06:00 /AutoDJ="clasics" Night
/EXACTTIME /00:00
/RND,audioFolder-A,1
/EXACTTIME /01:00
/RND,carpetaMensajes2,1
/EXACTTIME /03:00
/RND,carpetaMensajes3,1
A commercial break always have priority over the Exacttime; this means that if the schedules
between an Exacttime and a commercial break are coincident, and both have the same priority,
Exacttime will be moved below the Batch. But if the priority is different (different flexibility
values), will be scheduled first those of smaller flexibility.
Parameters for ExactTime command are the same that used for Batches:
/HH:MM
XYn
Hour in that ExactTime must scheduled (In hours:minutes).
This variables defines the flexibility time for the ExactTime. If the
batch must played on-air exactly at the indicated hour, or its
starting time can be changed. This variables (XYn) are optional and
they can adopt the following values.
X=S (Start)
It indicates that the specified time is the start time.
X=E (End)
It indicates that the specified time is the end time.
Y = C (Clock) It indicates that the start time is o´clock when working
on automated mode.
SOLIDYNE AUDICOM
Page 89
SOLIDYNE AUDICOM
Y = F (Flexible) It indicates that ExactTime is flexible.
n
How much minutes can be moved the ExactTime when the start/end
time is flexible
Notes
By default, the indicated schedule refers to the starting of the ExactTime and the
flexibility will be five minutes (SF5).
The variable 'Yn' will be ignored if the variable 'X' is not defined. To change the flexibility
you need to specify if the indicated hour refers to the start or the end of the ExactTime.
Examples:
/Block /19:00-20:00 /Live
/ExactTime EXAMPLE /19:30
Recuerdos en el tiempo
Title-1
Title-2
On-live block follows its normal course until the Exacttime of 19:30; when the operator press
Play, Exacttime starts to play. When Title-2 finishes, AUDICOM stops and the live show
continues.
/Block /08:30-12:30 /AutoDj="Jazz Music"
/Exacttime /10:00 SF3
/Time
/Temp
/Hum
The AutoDj that began to the 08:30 Hs is interrupted by the Exacttime at 10:00 Hs. At this
moment, the locutions corresponding to the hour, temperature and current humidity plays onair. Then the AutoDj continues programming music until the 12:30 Hs
/Block /07:00-12:00 /Live
/Exacttime /07:45
; INFORME de TRANSITO
@Transito Apertura
@transito<dd><mm><aa>
@Transito CIERRE
In this example, the block 'ExactTime' includes a traffic report. The report is defined using
"MetaNombre" so that every day AUDICOM looking for a file that corresponds to today's date,
for example, transito03112013 (March 11 2013). Being chained (@), if the report by that date
is not available, the opening and closing cuts are canceled.
MIX a file
AUDICOM have another command related with ExactTime, that allows to schedule a song with a
Sponsor/presentation file "stepping" the introduction of the song. The syntaxis is as follow:
+ "Title"/SS/KK
where:
"Title" Title of the audio file.
/SS
Time in seconds that it lapses from the beginning of the song until the
Sponsor starts to play.
/KK
It determines the relative levels with those that it was carried out the
mixture of the two files. It can adopt the values 10; 25; 50 and 100%
The parameters /SS/KK are optional. If they don't exist, the file Sponsor start to play with the
song and the levels are fixed by the button MIX.
Page 90
SOLIDYNE AUDICOM
Schedule
Example:
/Block /18:00-20:00 /Satslave
/Exacttime /18:45 EC
Title-1
+ "Recuerdos en el tiempo"/05/25
When the Exacttime at 18:45 plays, go on-air with the file Title-1 and five seconds
later, it play the announcement "Sponsor file" 'stepping' the song.
3.1.10.5 Blocks with Sponsors
/Sponsor [name] +Open="Title"/SS/KK +Mid="Title"/SS/KK +Close="Title"/SS/KK
This command allows to assign different files (for example sponsors, separators, etc.) for the
program's beginning and ending and for the finalization of each commercial break of that
program. This instruction must be used always after a block's command line.
+Open="Title"
It defines the file that will be played at the beginning of the program block (to present the
program, for example)
+Mid="Title"
It defines the file that will be played when each commercial break contained in the program
concludes (so that the speaker announces: we continue with our program...)
+Close="Title"
It defines the file that will be played when concluding the program (so that the speaker
closes the program and say goodbye to the audience).
If the program block is an AutoDj, the symbol '+' means that the file will be played on the air
mixed to the music. If you wants that the music plays after the sponsor file ends, use the
symbol * instead '+'. In live, Satfill and Satslave blocks the use of '+' or '*' parameters it's
shadowy, since both will be considered as an '*' and the program block will continue after the
sponsor file. In AutoDj's programs, the closing Sponsor is played when beginning the last block
of the program. In Live and Satellite programs, the ending sponsor is added at the end of the
last commercial break of these program, separated by a pause. The way in that the Sponsor file
"steps" to the music in an AutoDj is fixed by the variables /SS/KK; which are described next:
/SS
Time in seconds that it lapses from the beginning of the song until the
Sponsor starts to play.
/KK It determines the relative levels with those that it was carried out the
mixture of the two files. It can adopt the values 10; 25; 50 and 100%
The parameters /SS/KK are optional. If they don't exist, the file Sponsor start to play with the
song and the levels are fixed by the button MIX.
Examples:
/Block /22:00-24:00 /Live
/Sponsor Example *Open="Title-1" *Mid="Title-2" *Close="Title-3"
When the block begins at 22:00 Hs, reproduces the file "Title-1". At the end of each
commercial break will be played on air the file "Title-2"; and like block closing will
reproduce the file Title-3
/Block /03:00-07:00 /AutoDj="Classic"
/Sponsor ARTISTIC *Open="Title-1" +Mid="Titleo-2"/03/50 *Close="Title-3"
When the block begins, the file "Title-1" is played on-air. Next, the music programmed
by the AutoDj starts. At the end of each commercial break, 3 seconds after the first
title of the block, the file Title-2 plays "stepping" to the music. The mixing will be
carried out with a relationship of 50%. When concluding the last AutoDj title, the file
Title-3 is played
SOLIDYNE AUDICOM
Page 91
SOLIDYNE AUDICOM
3.1.10.6 INTERNET LINK - ILink (only for Multicast and higher)
Link with others AUDICOM terminals
/Block /00:00-24:00 /ILink="AutoDj Jazz" ilink://[IP]:[port]
This instruction is used by AUDICOM Multicast repeater terminals which re-transmit the
incoming streaming audio+metadata, from a master station. In the repeater station, the iLink
block replaces the commercial breaks from the header for local ads. The iLink command is
described in "Internet Tools -> iLink"
Link with public streaming
/Block /00:00-24:00 /ILink="AutoDj Jazz" mms://[IP]:[port]
This feature allows you to download any streaming audio on the Internet. The MMS protocol is
standard in Windows and does not require installing additional decoders. Other supported
protocols require the installation of the corresponding decoder.
AUDICOM Pro supports only the mms protocol. AUDICOM Multicast and higher also supports the
following protocols:
HTTP Streams: icyx://[stream path] Assumes port 80, unless otherwise
indicated.
RTSP Streams: rtpx://[stream path] Assumes port 554, unless otherwise
indicated.
HTTP/RTSP Streams: htpx://[stream path] Assumes port 80, unless
otherwise indicated.
RTMP Flash Streams: rtmx://[stream path] Assumes port 1935, unless
otherwise indicated.
The syntax of the command block 'AutoDj' is declared ("AutoDj Jazz" in the example) that will
be used as backup in case the connection to the streaming server is lost. In that case, when
the connection is restored, AUDICOM interrupted to AutoDj and streaming resumes.
3.1.10.7 Satellite FILL
/Block /HH:MM-HH:MM /Satfill /X [Título del bloque]
In this blocks AUDICOM works playing the signal from the satellite (or a VHF link). According to
the programming schedule, interrupts the satellite transmission to play to the local
programming, usually commercial breaks or news coming from the AUDICOM' s journalism
system.
When the local programming ends, AUDICOM enters to the "SYNCRO" mode. In this state,
plays the audio signal coming from the satellite and waits until the schedule of the next
commercial break to continue with the local programming.
The commutation of the signal can be made in two ways:
a> controlling the console via USB GPIO, if the console support it.
b> connecting the satellite signal to the line input of the soundcard. AUDICOM
will commute the line input of the soundcard. In this case you can only
commute one input, although there is more than one sound card available.
The modifier /X selects the source to commute. It can be 1, 2, 3 or 4, corresponding these
numbers to the outputs of the GPIO respectively. This allows to command until four channels
on the console. For details please refers to "Remote Control and Satellites"
Page 92
SOLIDYNE AUDICOM
Schedule
3.1.10.8 Master - Slave satellite
/Block /HH:MM-HH:MM /Satslave [Title]
The function of these blocks consists on the commutation of signals by automated control of
the console's channels (Solidyne series 2300/2600). The switching between the local signal,
generated by AUDICOM, and the external signal, requires a control signal received via satellite.
The external programming is represented CyberPlay schedule like a SatFill black bar called
"SYNC".
The control signals are transmitted via USB GPIO. In this mode (SYNC), the console's channel
connected to the satellite is enabled, remaining in that state until the arrival of a control signal
(from a line of commutation on the satellite header) to the GPIO. When this occurs, AUDICOM
leaves the mode SYNC and start to play the local scheduling.
When the commercial break ends, the connection with the satellite resumes. The next control
signal will launch to the second commercial break and so forth.
If by mistake on the schedule, the number of control pulses (sent by the Master workstation)
were bigger than the number of local Batches, AUDICOM will jump to the first Batch, then the
second, etc. If in a 24-hours satelital block the quantity of pulses arrived is smaller to the
number of commercial breaks programmed for that day, a backwardness will take place in the
continuity, so the first pulses of the following day will launch to the last commercial break of
the current day. This is this way because the system was designed so that it never skip a
commercial break.
Summarizing: If there are programmed 90 commercial blocks and by mistake of programming
on the Master station (or because the satellite lost a pulse) only 89 pulses arrived, the
announce Nº90 will be put on the air after the 00:00 hours. After this, the following announces
correspond to the following day programming. In the other case, if there are more pulses than
requested, the first announce of that day will be played, and so one, until the 00:00 hours.
The last SYNCRO of a satelital slave program doesn't require of a control pulse. It will appear
programmed as Syncro, but if the corresponding pulse not arriving, the commutation will made
according to the schedule, so that the next program begins o'clock.
When the SatSlave block ends, the control of commercial break from LPT is disabled and closes
the console's fader of the satellite, spending to the following block.
Example:
/Block /10:00-12:30 /Satslave
The satellite is played from 10:00 Hs to 12:30 Hs. The advertising coming from the satellite is
replaced by the local advertising.
3.2 Automated scheduling: Auto-DJ EDITOR
3.2.1 Overview
Create an automatic music selection is simple. The user only defines an automatic block
(AutoDj) with a specific format. These blocks creates using 'CyberPlay Editor', and are played
on-air by "AutoDj": an advanced musical selection, which operates selecting titles in real time
based on the musical data base and behavior templates (AutoDJ format).
In the previous topic we explained how to create AutoDj blocks. Here we explain how to create
the "templates" for that block, which determinates the behavior of AutoDJ scheduler. AutoDJ
templates are created using the "AutoDj Editor" module. You access to Auto-DJ Editor module
from "AUDICOM tool bar", or from the icons group "AUDICOM" in Windows start-up menu. The
following window appears:
SOLIDYNE AUDICOM
Page 93
SOLIDYNE AUDICOM
From here the user creates the templates that control the AutoDj behavior. With the AutoDj
scheduler, AUDICOM selects in real time (that is to say, while is on-the-air) the whole music
playlist according to the defined AutoDj template. This templates contains the criteria that
AutoDj will use to choose the songs, based on parameters like the style, gender,
performer, etc.
To make the musical selection AutoDJ assigns to each title a score, which varies according to
how many parameters agree with the current template. The order in which the titles are
revised is determined by the last date on-air, starting always with the older titles. The assigned
score can vary from 0 to 100. Those titles that obtain more than 90 points will be scheduled
automatically. Each item of a title have different punctuation values, for example, the Style
gives to a title more points that the item 'Mode'.
3.2.2 AutoDJ criteria
3.2.2.1 Styles
Allows you to select the music's style enabled for this AutoDj template. A template can include
only one style, several styles or all the available styles. AutoDj will schedule ONLY the styles
enabled in the template. The styles will rotate, and no predominance of one over another,
except in cases any of the styles have few titles, and thus is included less frequently (the date
of last reproduction air prevails in selection). The order in which the styles are in the "Styles"
window NO defines the order of airing, except when "Induced mode" is activated.
The "Induced Mode" allows you to define how much titles AutoDj schedule of each style. When
this option is enabled, every time that you press the button 'Add' the selected style is added to
the list. This way you can define a style's sequence:
Chill-Out
Jazz
Jazz
Page 94
SOLIDYNE AUDICOM
Schedule
Chill-Out
Blues
Blues
AutoDj will schedule this sequence, repeating the cycle again and again. The order of the styles
in the list can be changed by drag and drop.
3.2.2.2 Performers
It defines the performers enabled for the current template. The option "Repeat each" is used to
avoid that the same performer will scheduled consecutively. The value indicates how many
different performers AutoDj must include, as minimum, between two titles of the same
performer. This number is not a strict value.
3.2.2.3 Authors
It defines the performers enabled for the current template.
3.2.2.4 Include Top Hits
Titles marked as Top Hit will be aired regularity. This important feature allows you to have on
rotation a group of most-wanted themes. E.g.: If you define Top 40 every 1 hour, a title ranked
as Top 40 will be on air approximately every 1 hour.
3.2.2.5 Genders
Repetition values can be assigned for each gender. This is useful when you wants to avoid the
succession of two titles interpreted by soloists, duets or orchestras. The number indicates how
many themes of different gender AutoDj must program, as minimum, between two of the same
gender.
3.2.2.6 Tempo / Mode
The grids Tempo (speed of the music) and Mode (loudness) are another variables that controls
the AutoDj behavior. You can request that soft titles don't be played consecutively, or to avoid
the succession of a soft music and another very loud, etc. In the same way, you can avoid the
succession of "Largo" tempo themes, or the mixture of "Allegro" with "Largo", etc. You can
define all variants in the Tempo and Mode grids, by checking the boxes.
A checked box reduce the probabilities that these combination takes place.
Example: Checking the box “Very Loud” in the file “Soft”, “Very loud” songs will be avoided
after a soft title (but will be accepted “Very Soft”, “Soft” and “Loud” songs). Whenever ADj
selects a title, look for the Tempo & Modo matrix to check if the selected title is compatible
with the last scheduled.
In the same way, if last selected title is 'Presto', and the Tempo/Mode matrix have a checked
the row “Presto” / column “Largo”; all “Largo” titles looses priority to have the next title.
If you wants that all the combinations have the same probability, leaves all checkboxes
unchecked (recommended for small databases). In order to reduce to the maximum the
probability of certain tempo/modo value, check to the entire ROW and the entire COLUMN for
that Tempo/Modo value.
Prediction rule: For the case of the first title of a block, to not having previous title, anyone is
considered "valid”. For this case in individual, it is considered that the selected title does not
have all the combinations restricted, that is to say, a Matrix with the entire row checked. If this
happens that title loses priority, since no title that follows it is compatible. Example: If the
entire row "Allegro" is marked, the first title of a block could not be "Allegro".
The prediction rule is implemented because, although an entire column is marked, eg "Very
strong," the first title of the block could be "very strong" (having no previous qualifications). To
avoid this, the "Very strong" row must also be marked in full. Row and column marking the
priority of that value is reduced for any pocisión.
Other examples:
-“I don't want that “Loud” and “Very loud” titles be programmed" -. Examining the
requirement, we see that you only want “Soft” music for your block. For make this, check all
squares on the COLUMNS “Loud” and “Very loud”. But also the ROWS "Loud" and "Very loud" to
avoid that the first title of a block does not fulfill the requirement.
SOLIDYNE AUDICOM
Page 95
SOLIDYNE AUDICOM
NOTES
If a title “X” does not have defined the Tempo/Mode in the data base, then it will be able
to precede or to be after any other title without concerning tempo/mode (since
tempo/mode of "X" is not known).
Remember that this rule is of low priority respect to Style and Performer, and its
effectiveness depends on the dimension of the data base. By such reasons, whichever
greater ones are the restrictions, more difficult is to fulfill the rule. To greater amount of
titles, greater it will be the efficiency of these Matrices.
3.2.2.7 Promotional cuts
This option enables to AutoDj to include promotional cuts on the musical scheduling. This
promos are selected from the database. The numeric field “Every titles” defines how many titles
will be scheduled between two promos. The text field 'Promos' allows to enter a character filter
that restring the selection to promos whose title begins with the filter text.
Example: In the previous image the text field 'Promos' is Summer, and the field 'Every titles' is
3. Under these conditions, AutoDj will look in the Database for a promotional (Class=Promo)
that begins with the word Summer, and will program one promo each three songs. The
selection of the promos is carried out keeping in mind the last time on-air date. If AutoDj don't
found any promo that begins with “Summer”, no promos will be included.
Use of the category 'Promo'
You can classify a promotional in InfoMusic database in two ways: like a PROMO or like a
PomoPGM.
PROMOS: This kind of promo's are enabled to be used in ALL AutoDj blocks, no matter what
kind of format is defined. AutoDj can use this promo's to time adjustment if it were necessary.
PROMOPGM: The category PROMOPGM is also used by AutoDj, but only when is required to
insert a promotional cut into the musical scheduling. PromoPGM’s are not used for time
adjustments, because these promotional are reserved for specific programs.
InfoMusic database allows you to catalog a promotional according to its use:
a) Promo’s enabled to be included in AutoDj musical blocks each "n" titles, related to the
current show. This kind of promos are registered as Class=PromoPgm and they can be used
by AutoDj with filters. E.g.: if the promo’s are Night-1, Night-2, Night-3, etc., and the filter is
Night, only promo’s that begins with the word Night will be scheduled.
b) Promotional cuts with general announcements that can be aired at any moment. The
system uses them for time adjustments in automatic scheduling; at midnight, and before the
o’clock or low tolerance commercials blocks. This kind of promos are registered as
Class=Promo.
c) Special promos, only used in some radioshows that don’t be managed by AutoDj, are
catalogued as Class=Separators.
NOTE
In the 'Configuration Panel', the category used by AutoDj when insert promos each “n”
titles can be changed.
3.2.2.8 Partners files
This option enables AutoDj to use the partners files, which are the presentation anouncements
of each song. If this checkbox is blank, the songs will be aired without presentations, although
the partners files exists. To more details please refers to Partners files
3.2.2.9 Insert Meteor
It allows to insert a Weather report (time, temperature, etc.) each 'n' titles. The option VOICE
allows to define the voice used for the announce (1 Male; 2 = Female; 3 = Extra).
Page 96
SOLIDYNE AUDICOM
Schedule
3.2.3 How to create an AutoDJ template
I)
First you need to select the destiny workstation, for which the template will be created.
This is necessary only for networks system, with more than one on-air terminal. For a
single on-air workstation, the template was always created in the correct location
II)
Press NEW to clean all fields. Enter a name for the new template in the field “Template”.
III)
Choose a music's style from combo-box Styles. A drop-down menu will show all the
styles from database. Select a style and press Add. The style will be added to the list. To
add more styles proceed in the same way. If you wants that the template includes all the
available styles, check the option 'All'. To remove a style from the list, select it and press
“Delete”. “Induced Mode" allows you to define how much titles AutoDj will schedule for
each Style. If this option is enabled, pressing the button “Add” successively you adds a
style to the list several times. Remember: Under "induced Mode" the number of
appearances of a style in the list determines how many titles of that style AutoDj will
schedule (Eg: entering Pop, Pop, Pop, Classic80, Latin; AutoDj will program three POP
songs, one Classic80 and one Latin. Soon the sequence repeats).
IV)
To choose the Performers proceed in the same way that in the previous item. The
checkbox "Repeat every" allows you to define how much titles of different performers
AutoDj will schedule, as minimum, between two titles of the same Performer. This isn’t
an strict rule.
V)
To choose the authors proceed as was explained before.
VI)
You can include Top Hits in the AutoDj scheduling. In InfoMusic database each title can
be ranked as Top-100, Top-40, Top-25, Top-10 or No Top. If you wants that AutoDj
includes Top-Hits on the scheduling, you must define in the AutoDj template a Top-Hit
category and the time interval. E.g.: if Top-10 is checked with a repetition value of 0,5
Hs, each half hour AutoDj will schedule a Top-10.
VII) Define the repetition value for the Genders, selecting them and enter a value in the
corresponding box. You can assign different values for each gender. E.g.: if 'Male Singer'
have assigned the value 3, its means that between two titles interpreted by male singer,
AutoDj will include, as minimum, three titles of different Genders. Remember that the
repetition values are not a strict rule.
VIII) Set the Tempo/Mode matrix by checking the coordinates. If you doesn't want that the
AutoDj uses these parameters leaves all checkbox’s in blank.
IX)
In order that AutoDj includes promotional cuts, assign a value to the field “Every Titles”
on the section Promos.
X)
X) Clic the checkbox ‘Use Partner Files’ of the section Presentations if you wants to
enable to AutoDj to use the presentation files
XI)
Press the button CHECK to validate the template.
Note: This function also check for the existence of the styles included in the template. If
you load a template that contains a nonexistent style, the loose style is named as “loose
style” and replaced by promotional cuts.
XII) Once you set all the parameters of the template, press 'Save'. The new template will be
saved.
XIII) To delete a template, select it in the menu and press 'Delete'.
NOTE
An AutoDJ template is a set of rules that determines the music's style that AutoDJ will
use to make the automatic musical scheduling. STYLES are defined in the InfoMusic
database (ussually it are coincident with the names of 'autoDB' folders in FileManager).
Each AutoDJ segment works according to one template. If you don’t define any template
for AutoDJ (see CyberPlay Editor), AutoDj will use a DEFAULT format, which contains all
the available music styles.
SOLIDYNE AUDICOM
Page 97
SOLIDYNE AUDICOM
3.3 Manejo de Noticias
3.3.1 Overview
The following describes, in general, different forms of news programming to be issued
automatically, and can be generated on the radio or come remotely via email or phone.
AUDICOM allows you to manage news in two ways: scheduled news and automatic inclusion for
breaking news.
The scheduled news can as well be divided in two classes: of sure occurrence and of uncertain
occurrence. The sure occurrence news are those that you know about their existence for what
are incorporated in the scheduling log. Examples of these news are the commands /METEOR
(Time, temp, etc). The inclusion of this news can be made using ExactTime blocks inside the
PGM scheduling. Being this class of news of predictable nature, you can include it directly into
the scheduling log (PGM).
The second class of scheduled news are those will be played on-air at a certain hour, if they
exist, but its occurrence cannot be guaranteed. This class of news are scheduled using chained
events into an EXACTTIME block. The chained items allow to define until 4 serial files whose
emission will take place only if all exists. In case that one of these files will not found, all
sequence is aborted. E.g.: an opening file, a promotional cut, the news files and the closing file
are scheduled as chained events. The name of the news file uses a “MetaName”, which changes
every day being valid only for these date. For more details, please see "Special Incusion" en
"Scheduling -> Manual Scheduling -> Artistic contents"
The news may come from an audio file generated AUDICOM WebTools (mail-link), or some
software Mailing Voice (Phone).
Instant news, however, was designed to be used when the radio station transmits with
automatic scheduling (autoDJ, i-Link, satellite) without the need for scheduling changes. The
NEWS application runs in background for checking the arrival of news. When a news arrives by
e-mail (or phone, depending on the implementation), NEWS is in charge of play it on-the-air,
and then continue with regular programming.
The News Suite allows to work with text files associated to audio files, being able to insert news
in the Cyberplay air-screen, be already single text or audio + text. This easiness enables the
possibility, working on a network, that several journalists publish their news (whit the
associated audio files) in different workstations and they send them to the boss of news, who
organizes and sends the news to the air workstation.
3.3.2 News Suite
Open the module News Suite from AUDICOM's applications bar (Eg: from programming
desktop). This module is a text editor destined to the writing of the news and journalistic
information. Format TXT works with archives standard. The operation is very simple, similar to
the one of other text processors (Ej: Block de Notas de Windows). It allows to work with
multiple windows between which the tools can be used To cut, To copy and To stick standards
of Windows.
Page 98
SOLIDYNE AUDICOM
Schedule
The green line that appears to the right, indicates the wide one to which will be fit the text in
the window of commentaries of the air screen and in the Teleprompter module. In order to see
the text so as it will visualize the speaker to work draining the wide one of the window until the
green line.
3.3.2.1 Estimation of reading's time
News Suite incorporates an important tool that allows to estimate how long the speaker will
take in reading the text. The calculation is carried out per second based on a variable that
determines the reading speed, in characters (c.p.s.). The preset value of factory is of 15 c.p.s.,
a value average. The value modifies from the menu Edit> Sep Speed.
To know which is the dear duration of the text, to press F9. A square will appear informing
the quantity of words, the total of letters and the duration estimated in minutes and seconds.
3.3.2.2 Text files with attached audio
The text files can associate to one or two files of audio, like it explains to himself next:
1>
Write and save the text.
2>
Go to File Manager and expand the second window (click on red arrow located in the
right angle).
3>
Visualize in one of the windows the text files and in the other one the audio files that
wants to associate.
4>
Select the text to which wants to associate audio and drag a file of audio toward the
text window. The file of audio dragged it will be associated to the selected text.
The text files that have audio associate change their name in the following way:
@@News@[email protected]
The double @ it indicates that the file of text News has associates two files of audio, Audio-1
and Audio-2. The names of the files of audio associates sink to the name of the text file
separated by an @. The format of the text file doesn't lose temper, its extension continues
being txt.
The files of audio can be recorded in any format supported by AUDICOM. It is recommended to
use the format wav (PCM) since it facilitates the edition of the files.
SOLIDYNE AUDICOM
Page 99
SOLIDYNE AUDICOM
3.3.2.3 Text files location
Like the audio files, the text files are in a fixed folder structure that is defined in the file
"Configuration Panel".
This means that AUDICOM only considers the folders located inside TEXT folder, which are
shown in File Manager as Tabs in violet color.
To create a text folder proceed like with audio folders. AUDICOM File Manager is integrated to
the concept since News Suite it allows to see and to publish the text files. Selecting a file and
pressing the button Edit (or by double-click) the file is loaded in a window of News Suite.
3.3.3 NEWS (breaking news)
3.3.3.1 News Management - The application NEWS
This tool runs in the background to verify the occurrence of news and schedule the air emission
of those files. "News" is executed manually from the group AUDICOM programs, but if you use
it daily is recommended to add a button to the Toolbar AUDICOM, or even a shortcut to the
group "Start" in Windowsso that it is run when booting.
News source: In this field the path to the folder that receives the files defined. The material
can come via email, managed AUDICOM Web Tools, an FTP transfer or application of Voice Mail
No matter the source, when an audio file fall into this folder, "News" will schedule air. Files.
Wav and. Mp3 are supported
Open: A file that will be played before the news. This file must be recorded in WAV or MP3
format and located in the same folder that the news files (folder source of news). The file
name must includ the extension. So that the news be aired without presentation file, leave
this field empty.
News: This field allows to include a filter text for the news files. By default 'NEWS' plays all
compatible audio files that appears in the news source folder (*. WAV; *.MP3). One or more
characters can be included before the asterisk so that the program only plays those files that
begin with those characters.
Close: It specifies a file that will be reproduced after the news. The considerations for the
format and location of the file are the same ones that those explained for the file Opening.
The field News Source Folder 2 and their respective files Opening, News and Closing, it allows
to define a second directory of news with their respective files of Opening and Closing..
Page 100
SOLIDYNE AUDICOM
Schedule
Safe Time: When the news is generated in anyone of the folders Origin of the News, News will
wait for a time before sending them to the air. This time of security is expressed in minutes and
serves so that the journalist who is recording the note by telephone has time to listen to the
recorded message and to rewrite it or to eliminate it if it is necessary. Values between 10 and
12 minutes usually are appropriate.
Start: When pressing this button, the program is activated and it is minimized in
the taskbar of Windows, waiting the arrival of news. When it detects a new file in
the directory origin of news, it inserts a pause in the programming, under the title
in reproduction. When it concludes the topic that was to the air, NEWS it will emerge on the
screen of air and it will begin to reproduce the news. Once concluded the reproduction of the
same one, AUDICOM will continue with the habitual programming.
Remember that the news that were emitted to the air, will be kept in the folder
\AUDICOM\Audio\OldNews, with the name: Week day_ Hour_Minute.wav.
NOTE
The module News supports the way Autorun. If this way is activated (AUDICOM.ini
[Settings]); when pulling up News it will be activated if after one minute it is not carried
out any operation.
Play: If when the news is incomes the AUDICOM's On-Air screen is not running,
NEWS will emerge on screen so that the operator plays the news manually, by
pressing the button 'Play'
Cancel: closes the module NEWS. Not to close the application while it is
reproducing a news to the air.
3.3.3.2 How it works
The module NEWS is an application that it works consuming very few resources of CPU in the
background. It revises to intervals periodic two definable directories for the user in search of
new news. In the event of finding them it tries to locate to the Module of Air. If this flaw will
stop the reproduction of any application AUDICOM and it will emerge in first plane of the desk
of Windows awaiting a manual starting.
On the other hand, if the Module of Air is running, 'News' will insert in the same one a pause
after the topic at the moment in reproduction. The module NEWS verifies to intervals of 1
second if the Module of Air is in reproduction, when detecting that Air is detained it assumes
the control reproducing an opening file in the first place, then the news and finally the closing
file. Once fact this is minimized again and Air continues with the programming.
As much the news as the opening files and closing should be files. WAV. The format WAV is to
election (PCM, ADPCM, etc.), the resolution likewise (1 or 2 channels, 8 or 16 bites; 11, 22 or
44 kHz, etc.). These files should be located in the same directory to which the news arrive, the
software NEWS differentiates the opening files and closing of the news. These files, also, are
optional being been able to do without of anyone of them.
If it wants himself that NEWS looks for in a single directory, coarse with leaving in white the
field 'News Source Directory.' The directory origin of news can be in any directory and unit (I
dial). It is even possible to indicate that it looks for in a net unit being able to the same one to
be associated to a logical unit or to use UNC to define the address.
In the AUDICOM audio folder (usually \AUDICOM\AUDIO) it will be created, if not exist, the
folder 'OldNews'. Once correspondent the news to the air, it is moved from the directory origin
to the directory OldNews, also modifying the name from the file to Week day_
Hour_Minute.wav. This avoids that the news comes out to the air again. If the directory origin
belonged to a net unit, it is necessary to have writing permission on this unit, because of not
being the news it won't be able to this way to move and it will leave to the Air an and another
time.
In order to avoid to interrupt a commercial break, NEWS detects as much as the current topic
has left time of reproduction. If they are less than 25 seconds it assumes that it is reproducing
a commercial break and wait a title that has more than 25 seconds of duration (usually any
topic musical hard 3-5 minutes).
When a news arrives, a time of confirmation should be completed so that it is programmed in
the Module of Air. This time allows the journalist to modify or to erase the message. NEWS
expects a time (by default 30 sec.) starting from the creation of the file before programming it
to leave to the air. You can change this time from 'News' main screen
NOTE
SOLIDYNE AUDICOM
Page 101
SOLIDYNE AUDICOM
The module NEWS was not designated to be used while the Air module is in on-live (LIVE
block).
Page 102
SOLIDYNE AUDICOM
SECTION 4
INGEST MEDIA
4.1 Overview
Access editing programs and database management from the desk AUDICOM Production. This
is built from the basic desktop (desktop.exe), configuring it with the appropriate tools.
Remember that this is determined by the administrator in the 'Access Levels' module, air
operators will access the desktop of air and other staff access the generic AUDICOM desk,
which will be configured according to the needs of each terminal.
AUDICOM has one default Desktop Production, which you access by login as:
User:
Pass:
Produccion
(none)
Here you will find all the tools that you will need to record and edit the audio files. The musical
database and file management is made with InfoMusic-Production and AUDICOM File Manager.
AUDICOM adds a external audio editors (third part software). The multitrack waveform editor
AUDACITY (http://audacity.sourceforge.net/)
It is also included the following tools with AUDICOM 8, oriented to the production workstation:
CDex: one of the best programs "Rippers" existent. These they are used to transfer compact
disks to the rigid disk in direct form.
AutoEdit (developed by Solidyne): A powerful automatic editor, remove beginning and ending
silences on mp3 files. Avoid silences or faulty cross fades on the air. This program works
directly on the compressed file, without altering the audio quality (Do not recompress the MP3
file).
HD Corder: It's a quick editor. Simple module for record and edit non-compressed audio
(WAV-PCM). Very easy-to-use. Work basic to cut, paste and insert. Ideal for news workstations.
InfoMusic-Prod: Full administration of the musical Database and transfer files among
workstations.
4.2 Data Base of media files (InfoMusic-Production)
4.2.1 Overview
AUDICOM incorporates a very powerful system of musical information, based on 14
fundamental parameters of the music. These parameters are used by AutoDJ to create
automatically, on-the-fly, a very complete musical scheduling; with a respect for the artistic
conditions, something very difficult to obtaining with other systems.
AUDICOM has a database which store the whole information of each media file: amount times
that were emitted on-air; last time on-air; best week; etc. This kind of data is registered in
automatic form; but other parameters, like File Class (Music, Promo, Spot, etc.), Gender,
Performer, Author, etc.; are entered by the user using InfoMusic. This information is used later
by AutoDj to carry out the musical selection.
It’s easy to enter the information of each audio file into Database, since the InfoMusic graphical
environment facilitates the work. Each parameter has its own field and when a parameter is
entered, it’s kept in a drop-down menu, so that you don’t need to enter the same parameter
more than once. Instead that, you simply opens the drop-down menu and selects it directly
Remember:
The folders with attribute 'autoDB' are a great tool and are the recommended method for
ingest media. Please refer to AUDICOM File Manager for details.
4.2.2 Users fields
These fields are for detailed file information. The user can fill all fields or only the more
important ones. All fields can leave empty, with the exception of Class and Style. But, whatever
more empty fields have, smaller artistic quality will have the AutoDJ schedule.
Page 103
SOLIDYNE AUDICOM
SOLIDYNE AUDICOM
InfoMusic-Prod has keyboard shortcuts, which are indicated in the following explanations
among brackets.
4.2.2.1 FILE NAME
This field shows the name and the full path of the current media file. To add a new file to the
database using InfoMusic, proceed as following (remember that you can ingest media by simply
copying a file using AUDICOM File Manager and 'autoDB' folders):
a) In the menu WORKSTATION, select the workstation in which is the file that you look
for. By default InfoMusic uses the local workstation.
b) Press the button New. A window will appear, showing the audio folders of the current
workstation.
c)
Look for the desired file and select it.
d) Press Open. The file will be load into Infomusic. The name of the file will also appear in
the field Title.
e) If the file name has the format performer-title.mp3, you needs to remove the
performer from the title field and enter it in the Performer field. Make sure of make
this before save the title.
Note
You can add several files at the same time with the option SCAN, like will be
explained later.
Once the file is added to the Database, you cannot modify the field Title from InfoMusic, but
you can change it using File Manager. In this case, the title on the database and the file name
will be the same.
You cannot REGISTER A SAME FILE WITH TWO DIFFERENT TITLES. If you tries to make this,
InfoMusic will show a warning noticing that the file is already registered in the Database with
another title, and the action will not take place.
If you tries to register a file with an existing title, InfoMusic will add to the title a the number
"(2)", "(3)", and so.
4.2.2.2 TITLE
It is the NAME which the media file registers into the Database. When loading a file from the
button 'New', the file name also appears in the Title field. The titles can have as maximum 32
characters (including spaces).
The titles which the files are registered in the Database can be modified from File Manager.
Remember that File Manager shows the DATABASE TITLE when the files are registered, and the
FILE NAME for those files that are not registered on the data base. MODIFYING THE TITLE (of a
registered file) FROM AUDICOM FILE MANAGER, THE FILE NAME WILL BE MODIFIED TOO, AND
BOTH, DATABASE TITLE AND FILE NAME, WILL BE THE SAME.
If you wants to modify the title which a media file is registered without change the file name,
you need to remove it from data base and enter it again.
NOTE
If you enters a series of numbered titles that overpass the value of ten, keep in mind
that in order to they appears correctly orderly, you will align the numbers to the right,
adding so many zeros like characters has the biggest number. For example, to enter
twenty numbered titles, you will write them in the following way: Title 01; Title 02; Title
03; etc.
The following characters cannot be used on titles: / * \ " " |? <>:
Page 104
SOLIDYNE AUDICOM
Ingest media
4.2.2.3 COMMENTARY
It allows to enter a text that appears in the commentary window on the On-Air Desktop while
the file is aired. This field is used to add song/artist data that interest to the listeners. This text
can have as maximum 254 characters.
If the media file contains an internal metada with comments, it will be loaded in the
commentary field.
4.2.2.4 STYLE [ F7 ]
This field defines the STYLE for a title (Classic, Melodic,
Instrumental, Jazz, Pop, Rock&Roll, etc.). The list of styles
enables to the AutoDJ for choose music according a required style.
A style incorrectly loaded into the data base would do that, for example, into a Jazz program a
Pop be scheduled. New styles (as all the other data) are loaded into InfoMusic a single time,
soon the styles are chosen from a drop-down menu.
Before start a massive ingest of media, we recommend to think how to define the styles
according to the kidn of radio will, and to use always the same criteria to catalogue the music.
This will to make easy the scheduling and on-live operation of AUDICOM. For optimum system
performance, is of little use to have styles with little amount of titles.
NOTE
The style 'Not classified' is created by dbReindex when it detects titles with the field
'Style' empty.
4.2.2.5 PERFORMER [ F10 ]
Performer name. Every time that you enters a name, this is added
to the drop down menu. When you load files using the SCAN tool,
this field can be automatically filled if the file names are of the type
"performer-title.mp3".
4.2.2.6 AUTHOR [ F9 ]
It allows entering the name of the composers.
4.2.2.7 POSITION
You can assign a special location for certain type of media. It can
be for Opening or Closing, depending on their characteristics. This
facilitates the task to the on-air operator when he needs to look for
a title with certain characteristics, for example, a song to be used
as ending of a radio show. The opening/closing condition is, of course, quite subjective. When
the topics don't have opening or closing vocation, leave this field empty. The fact that a topic
be classified as "opening" or "closing", it doesn't imply that AutoDj will locate it in those
positions. This indication is only informative, to manual selection.
4.2.2.8 TEMPO
This concept, very used for music, refers to the speed with which a
score is executed. InfoMusic-Prod has four fixed values that follow
the habitual nomenclature from classical music (with Italian words)
that go from Long for a slow song, they continue with Andante, if the music is but quick, then
Allegro and finally Presto if is very fast.
SOLIDYNE AUDICOM
Page 105
SOLIDYNE AUDICOM
4.2.2.9 MOOD
Mood refers to the sound intensity (loudness) not to the execution
speed. Has four fixed values: Very Soft (Muy suave), Soft (suave),
Loud (fuerte) and Very Loud (muy fuerte). A melodic song, almost
sung whispering will deserve the qualification of "Very Soft". A Big Band of Jazz would be
cataloged as "Loud". And a Heavy Rock classified as "Very Strong".
This classification allows to the AutoDJ carries out appropriate programming at different hours
of the day. One Tuesday at 11 in the night, for example, AutoDj can reject songs classified as
Very Strong, but will be able to include them at that same hour the Saturday night.
4.2.2.10 GENDER [ F8 ]
It specifies the interpreter behavior, that is to say, Male or Female
Soloist; Quartet; Group; Orchestra; etc. You can enters so many
categories as wish.
This information allows to the AutoDJ to program after a female singer ballad, another ballad
but sung by a duet, then male voice, etc.; giving variety to the programming.
4.2.2.11 RECORDING COMPANY
It allows you to enter the name of the recording company. This field
is of little importance in the musical programming, but is of great
importance if the Radio has contracts with recording companies to
promote their artists, and for those countries that require this data
for legal questions (Ej: royalties).
4.2.2.12 TOP HIT [ F11 ]
You can define if the song figures the ranking. The available options
are selected from the drop-down menu and cannot modify. You can
choose between Non Top (empty field); Top-100; Top-40; Top-25 or
Top-10. This allows the AutoDJ to create programs including songs from the ranking. When you
creates the AutoDj formats for automatic programming, you can include Top-Hits so that they
repeat each certain time.
4.2.2.13 CLASS
It define the content of the audio file: Music, Spots (advertising),
Fills or Promotional Cuts. This distinction is fundamental for
AutoDJ, so that the musical themes can be programmed
independently of the Promos, Fills, etc.
Use of the category 'Promo'
There are two ways to classifying a promotional cut: like a PROMO or like a PROMOPGM. The
difference resides in that the first ones are enabled to be used into AutoDj blocks and can be
used as fill files for time adjustments, into any AutoDj format. The category PROMOPGM is also
used by AutoDj when it requires to insert promotionals into the programming, but are not used
for time adjustments.
Next, we describe three categories:
a) Promotionals to be added into AutoDj blocks randomly, each "n" titles, exclusives for specific
radio-shows. They registers as Class=PromoPgm and can be filtered by AutoDj Format. For
example, if the titles are morning-1, morning-2, morning-3, etc., and the filter in the AutoDj
Format is morning; only this group (which begins with "morning") are enabled to be aired when
when AutoDj works with that format.
b) Promotionals for general announcements, enabled to be used at any time, into any radio
show. AUDICOM uses them to adjust the times in automatic programming; at the 00:00 Hs.
and before commercial batches. with exact time or low tolerance. They register as
Class=Promo.
c) Special promotionals, exclusive for certain radioshows. This category are not managed in
automatic form by AutoDj. They are programmed manually. They are stored as
Class=Separators.
Page 106
SOLIDYNE AUDICOM
Ingest media
Note
In the configuration file Autodj.ini, you can define the category for AutoDj use, by modifying
the line promoPgmClass=PromoPgm (default). This allows, of being necessary, to configure the
AutoDj so that it uses the category Promo instead PromoPgm when the insertion of promotional
each "n" title is active.
4.2.2.14 PROCESSING
If you have a digital audio processor Solidyne 562dsp , you can
assign the processing for each security type . When the title is
played , the program switches AUDICOM processing in audio
processor , as indicated in this field.
The allocation is made to each title . If you want to assign a different processing for each
musical style and not one for each song , you must enter the same program processing , eg 20
: Rock & POP in each title .
The processor is not controlled directly by AUDICOM , but it has its own software called "
VirtualRack " . VirtualRack has a way of working called AUDICOM , which receive the AUDICOM
parámentros and transmits audio processor .
If VirtualRack is not running, the AUDICOM can not handle the processor. It should be a
shortcut to VirtualRack in the Windows Start menu, for the application to run if the computer is
restarted. VirtualRack is installed with AUDICOM . You can run in "demo " mode even without a
processor connected . For details, see Help in VirtualRack.
4.2.2.15 MEDIA
It specifies if the title is stored in the HD or in another support.
Although the AutoDJ only operates in the first case, often is
important for the operators to know if certain titles are available in
CD's or another support. For this, you a use InfoMusic as a complete database for your Radio.
When the support is different from HD, the title can be entered without associated file (leaving
empty the field 'File'). If you inserts in the AIR SCREEN a title registered with support different
to HD, a message will appear indicating that the title is in a removable support, and a pause
will be inserted into the programming schedule so that the operator plays on the air this title
from a CD, MD, etc.
If a title appears with Support = _misssing, the audio file to which makes reference this record
doesn't exist. Was moved, renamed or deleted. This can happens when you delete, move or
rename files using the Windows Explorer. To detect lost files, runs dbReindex with the option
"Verifies that the files exist
4.2.2.16 ALBUM ID / CD # / Track
Track # specifies the tack number when Support field isn't HD (CD
or MiniDisc, DAT, etc.). If this field is zero (0), it is assumed that the
support is a CD-Rom. When you inserts this title into the CyberPlay
programming, a message will appear to indicate you that verify if
the CD-Rom is into the CD-Rom drive. The title will be inserted the programming schedule like
a HD file. If the CD-ROM not this present, the title will be ignored and marked as error, and the
playing will continue with the next title. The field CD # identifies the CD volume
The ExternalID/AlbumID field is intended for entering the identification
code generated by an external software musicalización (Selector,
Powergold). It can also be used to enter catalog code Discs. The field
is alphanumeric and accepts up to sixteen characters.
4.2.2.17 FADE IN / OUT
It defines the cross fade between the titles. Here you enters the values for
Fade In (Input) and Fade Out (Output). Each title has their own cross fade
values. These values are given in tenth of second, and can vary between 0
and 50 (5 seconds). You must choose the appropriated value according to the music's
characteristics. Eg:A theme that ends smoothly can take values from 15 to 50. An abrupt end
will require shorter values as 5 to 10. A commercial spot that starts and adds with human voice
they take zero values, to avoid overlapping with the following spots. On the other hand if they
begin or ends with music or sound effects, values from 3 to 6 can be optimal. In files with
length smaller than 8 seconds, cross fade times are ignored.
SOLIDYNE AUDICOM
Page 107
SOLIDYNE AUDICOM
NOTE
When you access to InfoMusic from HD-Corder, default values will be zero for files
smaller than one minute, Files bigger than one minute will have cross fade times of 25
by default and they will be classified as "Music"
4.2.3 INTRO TIME (and transport controls)
The user can hear the current title using the buttons Play and Stop. The VU-meter shows the
recording level. The field 'Length' shows the total length of the file. Below this is the INTRO
time (zero by default).
To set the intro time is simple:
•
Plays the file.
•
When the introduction ends (the singer start to sing) press SET INTRO. The elapsed
time will be shown at the right box.
•
Now, press PLAY INTRO to play the file from the intro time, in order to check if the
value is okay.
•
The field Intro Time is editable, so you can manually adjust the value from keyboard.
•
The seeking bar allows you to play the file at any position.
Remember that the time 'Intro' will appear in the 'Intro counter' at On-Air Screen. This counter
shows the Intro Time in a regressive count, so the operator (or the speaker) know how much
time he has to talk over the music. Also, the Intro time is used in automatic programming,
since AutoDj is able to play the presentations for each song, mixed on the music according to
the time of intro. This way, just when the presentation ends, the singer begins, like make it the
best speakers in a live show!
Take advantage of all automation features that AUDICOM offers you, and your listeners will
think that your radio is always on-live!
4.2.4 System fields
This are fixed fields, you cannot modify them from InfoMusic-Prod. They are automatically filled
by AUDICOM. The fixed fields are the following ones
4.2.4.1 LENGTH
Total duration of the file, given in minutes:seconds. This value can be updated with the tool
dbReindex, using the option "Verifies that the files exist." This is useful when registered files (in
the database) are edited.
4.2.4.2 Fs / BITRATE
It indicates the sample rate for wav-pcm files or the bitrate (kbps) for mpeg files.
4.2.4.3 REC MODE
It indicates if the audio was recorded in discreet stereo (2S), that is to say, two independent
channels; mono (MB) or pseudo-stereo (JS - Joint Stereo).
4.2.4.4 RECORDING DATE
It shows the date in which the file was recorded, given in month/day/year.
Page 108
SOLIDYNE AUDICOM
Ingest media
4.2.4.5 LAST TIME ON-AIR
It shows the date and hour in which the file was aired for last time.
4.2.4.6 LAST WEEK PLAYED
It shows the last week that this title was on air, and number of times in that week.
4.2.4.7 BEST WEEK
Indicates the week in which the title was aired more times.
4.2.5 Using InfoMusic-Prod
4.2.5.1 SCAN - Checking registered files / Ingest several files simultaneously
This tool allows you to explore a folder and generate a listing of unregistered files on
this folder. All unregistered files can be added to the data base in only one step.
To explore a folder, press the button Scan and select a folder from the AUDICOM audio path. If
you are working in a network, explore the directories through the Network environment
(windows network icon), so that the file reference is UNC. Once selected the folder, presses to
Open; the following window will appear:
In this window you can select one or more files to enter it to the database. To select several
files, drags the mouse pressing the left button, like is standard in Windows OS. You can also
make successive "clicks" pressing the key control (Ctrl).
Clear: Delete the list content.
Scan: Makes a new exploration. The new result will be added to the current content.
Close: Closes the Scan window. If you re-open the Scan window, the last list of non registered
files will appear. This list will be retained until InfoMusic-Prod closes.
Add: It add the selected files to the Database. The procedure varies as one or several files are
selected:
A single file: If there is only one file selected, its name is entered in the fields File Name
and Title, like happens when a file is loaded from the button 'New'. Once you complete the
other fields, press the button Save to add the new title to the Database. If you doesn't
press 'SAVE' the title is not registered. If the MP3 file is entered, the information contained
in the header TAG-ID will be loaded in the InfoMusic fields, if available.
SOLIDYNE AUDICOM
Page 109
SOLIDYNE AUDICOM
Several files: If there is more than one selected file, the files will be entered all
simultaneously into the data base. For this case, pressing the button Add will appear the
following window:
Here you can enter the most important parameters so that AUDICOM starts to work in
automatic mode
Class defines the type of file, that is to say, if the file is music, a promotional cut, a
commercial spot, etc
Style; define if a music file is Rock, Pop, Jazz, Classic, Electronic, etc. Remembers to take
special care in the cataloging of the styles to use.
Performer: If all the files to be entered with SCAN belong to the same interpreter, you
can define it here so that this information is already loaded.
Fade In/Out: Predefined cross fade times. You can change this values later, to adjust the
times for each song.
Interpretar Nombre de Archivo como: SCAN will load the file name into the field
TITLE. Normally, the files generated by AUDICOM's "ripper" are titled as "Artist - Song
Title" or vice versa. Eg: "Depeche Mode - I feel you.mp3". This feature allows you to
define the format of the file names, so that SCAN load the song title and the Artist in their
correspondent fields.
NOTE
Before entering files to the Database, it is advised to correct the file names so all are of
the type: Performer - SongTitle.mp3. This will facilitate the task when you register the
files with Infomusic-Prod and will allow you to have orderly your files and backup
copies.
Pressing OK the selected files are added directly to the Database. When concluding the
operation, a message will appear showing the results. If some files are not added, it's can
happens because some titles already exist or the file is invalid.
4.2.5.2 SEARCH [ F5 ]
InfoMusic offers a great flexibility to search titles. The easy way is the search by
title. Type in the field "Title" the song name that you wants to find and press
"AtoZ". The title will appear in the window FOUND REGISTRIES. If you enters
only one word, the search will give like result all those titles that contain that
word. Disable the mode 'EXHAUSTIVE' to limit the titles to those that BEGIN with
the entered word. If you enter a single letter, the result always will be the titles that begin with
that letter.
A more precise searching is obtained combining different parameters. Titles with parameters in
common can be looked for. Eg: titles from certain authors, all titles from the style "Jazz", all
"Spots", etc.
To make a search, define one or more parameters for the search, keeping empty those fields
that don't interest for the searching. Press the button AtoZ to start the search (or press F5 from
keyboard). In the window Found Records will appear the titles that coincides with the specified
search parameters.
Page 110
SOLIDYNE AUDICOM
Ingest media
Examples:
Select Author= Astor Piazzolla and press AtoZ to search. All songs written by Astor
Piazzolla will appear. Now, add Recording Company=EMI. You will obtain only the
Piazzolla music edited by EMI. Finally, add Gender=Quintet, you will limit the search to
Astor Piazzolla and Quintet music, edited by EMI.
Select Class = Promos and start the search. All registered "Promos" will appear.
Searching by title: Lets us suppose that you need to find the song "My Dear Buenos Aires".
Entering "Dear" word in the field TITLE begins the search. If the EXHAUSTIVE option is
activated, you will obtain like result ALL the titles that contains the word "dear", without
mattering in what position is. If the "exhaustive search" is enabled, the result will show only
those titles that BEGIN with the word "dear". Entering a "D" you will see all the titles that begin
with "D". In order to finalize this example, suppose that in addition to the "D" you selected
"Carlos Gardel" in the field "Performer". You will obtain a listing with all the titles sung by
Gardel that begin with "D".
4.2.5.3 FOUND RECORDS
This window shows the result of a search sorted alphabetically. Each title shows its length and
the full path to the associated file. This windows use the nomenclature of colors used in the File
Manager, standard in AUDICOM: the colors indicates the time lapsed from the last time on-air.
RED................................................... < 4 Hours
ORANGE.......................................... 4 a 12 Hours
GREEN.......................................... 12 a 24 Hours
BLACK.............................................. > 24 Hours
4.2.5.4 RIGHT-CLIC MENU
Right-clicking on a title launches a menu with the following options:
Play/Stop: Play controls.
File Manager: Opens the AUDICOM File Manager
Delete: Remove the title from the Data Base (not the file from HD).
Sort by name: Sorts the content of the window in alphabetical order.
Sort by length: Sorts the content of the window according to the lengths, from smaller to
bigger.
4.2.5.5 SCROLL BUTTONS [ Up/Down arrows ]
Allows you to explore the content of the Found Records window.
SOLIDYNE AUDICOM
Page 111
SOLIDYNE AUDICOM
4.2.5.6 SAVE [F2]
Save the record to the database, or save changes for an existing record.
Remember: you can enter a single file with the button 'New', or make a batch
adding with 'Scan', in which case the files registers directly and you not need to
press Save.
When you make changes to a record, remember to press SAVE to save the
changes
4.2.5.7 DELETE
It delete a record from the database. A dialog-box appears to confirm the action.
This dialog-box has a checkbox that allows you to delete at the same time the
audio file and the database record. Keep this option unchecked (default) to
conserve the audio file. Once deleted, a file cannot recover.
Remember: Files not registered in the Database cannot be used by AutoDj for
automatic scheduling.
4.2.5.8 EMPTY FIELDS [ F6 ]
Clean all fields. This is useful when you needs to make successive searches.
Pressing F7 all fields are cleaned except "Performer", to facilitate the next search.
4.2.5.9 PRINT
You have the following print options:
To print the current record data: Prints all the parameters of current selected
title.
Found records with full path: Prints the content of the "Found records" window including the
length and full path of the associated audio file.
Found records with Performers: Prints the complete listing at the moment of Titles shown in
the window 'Found Registrations', with their respective Interpreters.
4.2.5.10 EXIT
Minimizes the Infomusic-Prod window. The minimized window recover their original
size pressing the button InfoMusic of the AUDICOM desktop's toolbar
4.2.6 Data base structure
When you works with AUDICOM on networks, you can use one or several Databases operating
at the same time, depending on the involved AIR workstations. AUDICOM 8 can work with
several Databases at the same time since it uses a technology called Synchronized Databases
(SDB).
In big networks, the files are recorded and register in the Production terminal, then, the new
titles are sent to the different Air workstations. To know with detail the different databases
configurations for networks, see "AUDICOM & Networks > Software settings".
From a terminal "production" you can browse any of the databases on the network. This is
useful when more than one air terminal operation. All available handsets appear in the "Current
Terminal" dropdown
Page 112
SOLIDYNE AUDICOM
Ingest media
"Default Host" always points to the local terminal, except that the AUDICOM administrator has
modified the default settings (Configuration Panel).
When this menu is displayed for the first time, the network is scanned for active Terminal
AUDICOM. This may take several seconds. The result is stored "in a cache", not having delays
in subsequent access to this menu. To update the terminal, select "_update hosts".
4.2.6.1 Transfer - Transferring files between different workstations
When you incorporate new titles from the Production terminal, you need to export
the new titles to the different workstations. This work way is used in big networks,
with more than one ON-AIR studio.
Pressing the Transfer button you access to the advanced functions to manage
titles between databases
What do you wants to copy?
The first step is to determine which titles will be exported. There are four possible options:
Current title: It exports ONLY the title selected at this moment.
Titles shown in "found records" window: Exports the searching result. This way, if you
want to transfer all the titles of certain Style, Interpreter, etc., you makes the corresponding
search and then export them using this option.
Titles added in the last N days: Exports ALL the titles added to the database in the last days.
The drop-down menu allows you to select a number of days to consider until today's, that is to
say, 3 will means ALL titles added in the last three days.
All titles: It exports the complete Database. Allows to duplicate all the data. (see Styles filter)
Where do you wants to copy?
The second step is to define the destiny workstations:
To one workstation: Exports the titles to only one workstation, selected from the drop-down
menu at right.
To all workstations: Transfers the titles to ALL AUDICOM workstations with database (Air and
Production terminals).
SOLIDYNE AUDICOM
Page 113
SOLIDYNE AUDICOM
To specific workstations: This option allows to specify two or more destinations. The
different workstations are declared with names UNC, separated by point and coma (;). For
example: \ \ FM\C\AUDICOM\Db; \ \ AM\C\AUDICOM\Db, the titles are exported FM to the
workstations and AM.
FILTER BY STYLES
This option is used to validate the styles located in each workstation when exporting the titles.
When you export a title but the Style of this title doesn't exist in the destination terminal, you
can opt for not to transfer that title, or transfer it and create the Style in the destination
terminal.
Yes, the styles must exist at destiny: The titles are not transferred if their styles doesn't
exist in the destiny workstation. Eg: Let us suppose the case of two FM workstations with
different musical profile. The musical programming for FM-1 plays Rock&Pop, for a young
target, with many TopHit's. On the other hand, FM-2 programming is 80's and Soft music. Both
radios use the same production study, from where it's loaded the artistic material and the
music for both radios. Probably have in common some musical Styles, but others will be
exclusive of each radio. When you export, for example, all the titles recorded in the last five
days to both workstations, FM-1 will accept only those titles whose Styles exists in FM-1, in the
same way, FM-2 will accept only the titles whose styles already exists in FM-2.
No, copy without validating the Style at destiny: All selected titles are transferred, without
verifying the styles at destiny. If a title belongs to a Style that doesn't exist in the destiny
workstation, the Style will be created in this workstation.
IINCLUDE THE AUDIO
Finally, you will indicate if you wants to copy the audio files or transfer only the database
records. If the files are commercial spots, artistic or promotional cuts, we recommend to send a
copy to each AIR workstation. It is very convenient to have duplicated this material so that the
management take place from the local disks and for back up (always is easier to record again a
song than redo an promotional cut o a commercial spot).
For the case of the music, the location depends of the network settings. Generally, the music
files are stored in the AIR workstations or Network server. For more information about the
organization of files on networks, refers to "AUDICOM on Networks > Audio Files".
The transfer's options are:
Yes, copy the audio files to the equivalent location: This option copies the audio files to
the destiny workstations, using the same paths of the source workstation, that is to say, if in
the source terminal (Eg: Production) the file is located in the folder "Tango", it will be copied in
the same folder at destiny terminal. If this folder doesn't exist at destiny, a folder "Tango" is
created.
NOTES
If the drive C:\ of destiny terminal does not have free space to copy the audio files; the
operation will fail. In this case, you can transfer only the database records and soon to
copy the audio files to another unit using File Manager (when the files are added to the
programming schedule, AUDICOM corrects the path on the data base). Remember that
you can view folders from a specific terminal on File Manager. The "Syncro" option is
another useful tool to synchronize the content between two folders.
In the Configuration Panel the user must define the audio drives as UNC paths. If DOS
paths exists, it will be interpreted like the UNC equivalent path, that is to say, if
AudioDrives=CD;
InfoMusic-Prod
will
interpret
AudioDrives=
\\terminal_name\C;\\terminal_name\D.
Not to copy the audio files: It transfers ONLY the database records. The audio files remain in
the local workstation, or in the main Server if the files was recorded here
4.3 AutoEdit: Automatic trim of silences
4.3.1 Using AutoEdit
It is very important that the audio files don't have unexpected silences at the beginning or the
end, since they can produce 'holes' on-the-air. AutoEdit automatically removes silences from
beginning and ending, working directly over the compressed audio, without re-encoding, that is
to say, without altering the audio quality. Remember that if you opens an MP3 file using an
Page 114
SOLIDYNE AUDICOM
Ingest media
standard audio editor, and then save it as MP3, the information is compressed for a second
time, and as result takes place a new loss of quality.
AutoEdit supports WAV PCM (not compressed); MP3 (MPEG II Layer III); Wav-mp3 (files wav
but that internally are MP3, rarely today); and any other format whose CODEC is installed in
the Windows OS. The use of this powerful tool is described next:
4.3.1.1 SOURCE FOLDER
Is the folder that contains the files to process (CD Ripper by default). Open a folder with the
button Choose and select a file anyone. The name of the selected file will appear in the field
File, like is explained next
4.3.1.2 FILE
It shows the full name of selected file. You can process this file in particular, or to use wildcards
(asterisk) to process to other files. The button 'Generic Name' allows you to extend the process
to more than a file. Next an example step to step.
Pressing the button 'Source Folder' the user selects the file:
"Kraftwerk - Expo 2000 (Radio Mix).mp3"
whose name will appear in the field File. Now, if you press the button 'Generic Name', in the
field File will happen:
Kraftwerk - *. mp3
The name of the song, Expo 2000 (Radio Mix) (that is to say what is after the script) it was
replaced by an asterisk (*). This means that AutoEdit will process ALL the files that begin with
"Kraftwerk - ".
SOLIDYNE AUDICOM
Page 115
SOLIDYNE AUDICOM
If you press 'Generic Name' again...
K *. mp3
and all the files that begins with "K" will be processed, pressing 'Generic Name' once again
obtains:
*. mp3
and all mp3 files of that folder are processed.
Remember: We recommend to use ALWAYS audio files names type "Performer - Title.mp3".
4.3.1.3 DESTINATION FOLDER
According to this setting, the edited files can be remain in the source folder, or to be moved to
AutoEdit folder, that is a FIXED folder of the system.
4.3.1.4 PROCEED
Starts the edition process. AutoEdit will remove, quickly, the intro and outro silences. WORKS
DIRECTLY ON THE AUDIO FILES, WITHOUT RE-ENCODING. THERE IS NOT LOST OF QUALITY.
The thresholds used for the detection of the silences are FIXED; they were tested in factory
with diverse types of musical material.
As the files go being edited, they appear in the main window where is showed the suppressed
times, the total duration and the location of the edited file. Pressing the button 'expand' you
can appreciate clearly the report..
4.3.1.5 CONFIGURE
Settings are:
Destination folder = source folder: The edited files will remain in the folder source.
Delete original files: When this option is checked, original files are deleted once edited.
Otherwise they stay both files. If the previous option is enabled (edited files stay in the source
folder), the original files will be renamed, adding them the extension. bak.
Ignore files previous to N days: Checking this option AutoEdit works only with files recorded
in the last days. In the right checkbox you define the how much days to consider. Eg. If you
activate the option and enter 2, autoEdit only processes the files recorded in the last two days.
4.3.1.6 PLAY
Plays the selected file. If while reproduces a file you presses Play again, the last TEN seconds
will be listened, in order to check the end of the edited file. Files cannot be played while
autoEdit is working.
4.3.2 AutoEdit & Data Base
If registered files are processed, for example the whole folder 'Jazz'; use the option 'destination
folder = source folder'. For further security, you can disable the option 'delete original files'.
The Database will be automatically updated, since AutoEdit will modify the duration time of the
files. The Intro times also be corrected if is necessary.
WARNING: In networked systems, in order to correctly update the Database, the files should
be loaded in AutoEdit through the 'Network' access, so that the references remain in UNC. That
is to say, the files to edit must be "\\Produccion\C\AUDICOM\Audio\CD-Ripper" and not
"C:\AUDICOM\Audio\CD-Ripper." In this last case the Database won't be upgraded.
Page 116
SOLIDYNE AUDICOM
SECTION 5
NETWORK SETTINGS
5.1 Example of an installation on Windows network
You must use a Microsoft network over TCP / IP protocol (default on Windows).
It is very convenient to use a dedicated network, that is, the computers are interconnected with
their own HUB, isolated from other networks (the administrative area, for example). This
ensures the exclusive use of the network by AUDICOM applications. Not recommended creating
a network share 'Working Group', as this does not provide the independence necessary to the
network. A HUB 10 Mbits be enough.
We will analyze a real example of a basic network, composed by the following terminals. Cited
quotes the name of the terminal on the network.
123456-
AM workstation "AM"
FM workstation "FM"
Recordings Studio "Production"
News terminal "News"
Traffic and administration "Comercials"
File Server "ServerSolidyne"
If the user wants to receive a recommendation on the characteristics of the machines to buy,
consult to [email protected].
5.1.1 Settings
Is convenient that all PC's have a dedicated partition for the operating system. 10 GB will be
enough. AUDICOM installs on C:\AUDICOM. The folder AUDICOM must be shared for writing
and reading. Each computer must have installed the sharing service to files and printers.
All the references through the network will be made via UNC, so is convenient to name to the
computers with the name of the correspondent studio (AM, FM, Production, etc.), in order to
avoid confusions.
The network has a dedicated file server (not for applications). The applications are installed in
each terminal. The server stores the media files (.MP3 .WAV .MP4 etc). If you wants to work
with a centralized database located in the server, we recommend to keep the main files in the
Production terminal and soon export it to the file server.
Install in each terminal only the applications that you need. Then, each terminal will be
customized as will see later on. The server doesn’t require applications. The Admicom (Traffic
and Ads) will only be necessary in the terminal of "Commercial Administration".
We assume for our example that all the PC's has a dedicated partition to the operating system.
AUDICOM installs always on C:\AUDICOM. AUDICOM doesn't install components in the Windows
system folders.
In the following chapters we will analyze the configuration of AUDICOM, always referring to the
previous example.
5.1.2 AUDICOM settings
Most of settings are made from AUDICOM Configuration Panel, located in the AUDICOM
icons group. Remember that all terminals must share the folder AUDICOM for read/write.
5.1.3 Location of data base
ADBDir=C:\AUDICOM\DB
Indicates the location of the Database AUDICOM. In a two-terminal network without file server
(Production Studio <-----> Study of Air), the simplest alternative is to work with a single
database, located in Terminal 'on-air'. For this configuration the terminal should point to
Production Database terminal "on-air (\\Air\AUDICOM\Db) Music will be recorded directly in the
database of the 'on-air' terminal.
Page 117
SOLIDYNE AUDICOM
SOLIDYNE AUDICOM
NOTE
You can optionally work with a database in each terminal. From the terminal
"Production" the user can explore the database of the "on-air" terminal ("terminal
current" menu)
The music will be registered in the database "Production" and then be transferred to the
terminal "on-air" (Transfer)
In more complex networks with more than one terminal to broadcast, working with databases
synchronized. For this explanation consider the example given in the previous chapter "Network
Installation". Remember:
1.
2.
3.
4.
5.
6.
Terminal AM
Terminal FM
Productions Studio
News
Commercials
Media server
"AM"
"FM"
"Production"
"News"
"Commercials"
"ServerSolidyne"
The applications are installed on each terminal. In this case there will be two databases, one in
each air terminal. Ideally, the files in the database are housed in the terminal and not the
server, to optimize access speed and so that in case of a network failure or server, air terminals
continue to operate autonomous.
In the proposed network architecture, terminal applications "Production" are configured so that,
by default, read and write one of the terminals in the studies, such as "FM". Thus, opening
InfoMusic-Prod (which is the module that manages the database) the information in the "FM" is
displayed. Obviously, you can change the "AM" terminal to manage the terminal. Each air
terminal will be configured to access their local data bases. The reference from "Production" will
be using UNC:
"AM"
ADBDir=\\AM\AUDICOM\DB
"FM"
ADBDir=\\FM\AUDICOM\DB
"Production"
ADBDir=\\FM\AUDICOM\DB
Cada terminal de aire opera con una Base de Datos local. Desde la terminal de Producción se
administran las diferentes Bases de Datos (Ver: "Operación de AUDICOM en Red"). Los
diferentes módulos de AUDICOM están preparados para leer/escribir en las distintas Bases de
Datos según sea necesario.
Backups
BackupDirectory=C:\AUDICOM\DB
AUDICOM make backup copies of the database daily. By default, this backups are made in the
database folder, but you can change it. UNC address is supported.
The system makes backup copies of the last three days, copying the file data.dbf to
backdata.dbf; backdata2.dbf and backdata3.dbf
5.1.4 Scheduling files
LogDir=C:\AUDICOM\LOG
PgmDir=C:\AUDICOM\PGM
This folder contains the scheduling files .log and .pgm. These files contain the spots lists and
the songs schedule respectively.
The scheduling files are located in the terminal "Air". They can be stored on the server file (eg \
\ Server \ AUDICOM \ LOG) but is not recommended for reasons of practicality. Thus our
example terminals are configured for access to the LOG and folders PGM their local disks.
Since the scheduling module CyberPlay, the user can access all air terminals.
5.1.5 Audio files
AudioDir=C:\AUDICOM\AUDIO
It defines a fixed folder structure in which are stored all AUDICOM's audio folders. The default
path is C:\AUDICOM\Audio and you don't need to modify it. AUDICOM only considers the
Page 118
SOLIDYNE AUDICOM
Network settings
folders located in AUDIO, and this folders cannot have sub-folders. All folders outside this
structure will be ignored.
AudioDrives=CDE
It define the drives enabled for the storage of audio. Each drive will contain the folder's
structure explained before. New folders can be created from AUDICOM File Manager, that will
create the corresponding path of being necessary (if AUDICOM\Audio doesn't exist is created).
In networks, the reference must be UNC, separating each path with a semicolon (;) (doesn't
leave spaces after semicolons):
AudioDrives=\\Server\AUDICOM;\\Production\AUDICOM
IMPORTANT:
It is necessary to provide full access to the drive C:\, only AUDICOM folder (full access) is
shared. If the file server has more disks (D:\, E:\, Etc), these MUST be full shared and declared
in AudioDrives as follow:
AudioDrives=\\Server\AUDICOM;\\ServerSolidyne\D;\\ServerSolidyne\E
in where \\ServerSolidyne\ AUDICOM is the drive C:\ that shares only the folder 'AUDICOM'. In
all disks there are the structure \ AUDICOM \Audio\(SUBfolder of audio) detailed above.
Additionally, the line AudioDrives to control access to folders of audio in different terminals, as
AUDICOM only shows the volumes declared in AudioDrives. File Manager displays folders first
unit declared in the first instance. Should first declare local drives and network volumes then.
Assume that in our example requires that the "AM" and "FM" terminals only have access to
local audio folders, and "ServerSolidyne". "Production", however, have access to all system
folders, while "commercial" only access folders containing advertisements. "News" will only
access to air terminals. The configuration at each terminal is as follows:
"FM" AudioDrives=\\FM\ AUDICOM;\\Server\ AUDICOM;\\Server\D;\\Noticias\AUDICOM
"AM" AudioDrives=\\AM\ AUDICOM;\\Server\ AUDICOM;\\Server\D;\\Noticias\AUDICOM
"Production"
AudioDrives=\\Produccion\
AUDICOM;\\FM\
AUDICOM;\\AM\AUDICOM;\\Server\AUDICOM;\\Server\D;\\Noticias\ AUDICOM
"News"
AudioDrives=\\Noticias\ AUDICOM;\\FM\ AUDICOM;\\AM\ AUDICOM
"Commercial"
AudioDrives=\\FM\ AUDICOM;\\AM\ AUDICOM
NOTES
Remember to set color coding in File Manager to organize your folders and to facilitate
searches with the color filter. In "Production", remember to configure the software used
for the temporary folder is on a local drive.
For more information about the organization of files on networked systems, see AUDICOM
Network> File Management
5.1.6 AUDICOM system files
ProgramDir=C:\AUDICOM
Installation folder.
5.1.7 AutoDj Editor
This module doesn't require a special configuration, but we remind you that AutoDj Editor (used
to create the AutoDj formats for the automatic musical blocks) saves the information into the
file Autodj.ini. The AIR program reads that file to know how to program the automatic blocks.
AutoDj Editor module allows to select from a drop-down menu, the workstation over it will
work, that is to say, from which workstation will read (and write) the file Autodj.ini.
Have this in mind when you make the formats for AutoDj. If by mistake you creates a format in
a mistaken workstation, the AIR program will be unable to notice the change and the
programming will be erroneous. AUDICOM's AIR module always reads Autodj.ini from the local
disk.
SOLIDYNE AUDICOM
Page 119
SOLIDYNE AUDICOM
5.2 Users and permissions
5.2.1 Users and access level
Each operator has a user name and password to enter to AUDICOM with customized permits
and attributions. The user's profiles are defined by the administrator of AUDICOM. User names,
passwords and the permits are defined from the module Access Levels, which is access only
from "Start up" menu: StartUp>Programs>AUDICOM>Access Levels (security.exe).
5.2.2 Administrator
The user profiles can be modified ONLY by the Administrator user, since he is the only one
authorized to access to the "Access Levels" module. Therefore, the first user to configure is the
Administrator.
Open the AUDICOM I-logon window and login as user=Administrador, without Password. After
login, you can open the module Access Levels from "Start Up" menu. Pressing the button
Password you can define your password and press SAVE. It suits to write down it in a sure
place, for the case that you forget it. If you forgets the password, you don't be able to access
to the Access Level module. In this case, consult to Solidyne technical support
([email protected]).
Several users with Administrator privileges are supported. Any user will become "administrator"
by checking the option "User is administrator" Remember that this enables to that user to open
the module Access Levels and modify all users profiles.
Administrator users can't have restricted actions. They have full access on all screens.
5.2.3 New users
12-
Page 120
Press the button Add.
Enter a name for the new user.
SOLIDYNE AUDICOM
Network settings
3-
Press Password if you wants to define the user passwords. You can leave empty the
passwords so that the users defines his password if they wants. This way you avoids that
the users forget the password assigned by the Administrator.
NOTE
In case that an user forgets his password, you will must to delete it and to create a new
user.
45-
Configure the user profile with the permits and attributions checkbox's.
Press Save to register the changes.
To delete an User, simply select it and press the button Delete.
5.2.4 Permits description
Security server: Location of the User's Database. The passwords and users profiles are stored
in an encrypted file. This file will be acceded by all the workstations, for what is usually located
in the Server.
Flaws in the network, system off-line: Every time that an user enters to the system, a local
copy of the user's database is generated in the local disk. In case that the Server cannot be
accessible, AUDICOM will use the local copy. Under this condition AUDICOM won't save the
modifications that the user makes in the configuration of his desktop.
5.2.5 Air
Run air module: It enables/disable the access to the Air desktop.
Change the playlist order: It prohibits to change the play order fixed by the programming
logs (files LOG and PGM), that is to say, the operator cannot activate the green cursor (next).
When he stops the playing, it will be started from the stopped title. Pauses can be inserted in
any point of the programming schedule.
Insert/remove titles from PlayList: Inhibits the operator to insert, delete or alter the
position of the content of the commercial batches. By enabling this option, the operator can
work on the program blocks, but cannot change the commercial schedule. Pauses are exempt
from this restriction, the operator is enabled to insert / remove pauses at all times. The user
can also change the playback sequence indicating "next title" (green cursor).
Use of Meteor:: It disables the Meteor buttons of the desktop toll bar, for what the operator
won't be able to shoot on-air an announce manually. Time and weather reports only can be
programmed in the log/pgm files.
Use of Instant-Rec: It disables the module I-REC
5.2.6 File Manager
Plays from the File Manager: It disables the on-air PLAY from this module.
Add/remove folder, modify colors: The operator cannot create neither delete folders,
neither will be able to modify the assigned colors.
Move, rename, delete files: It restricts these actions operating from File Manager. However,
the files can be deleted from the Operating system (Windows Explorer). But remember that if
files are deleted or renamed from Windows, and they are registered in the Database, you will
must to delete this title from database. If the operator has restricted the access to the
Database, won't be able to make it for what he will be in evidence the erased titles. The profiles
of the Windows users can be customized on each terminal; users in AIR terminal can have
restricted access to audio files.
Hidden folders: Here you enters the names of the File Manager folders, that you want to hide
for that user. The different folders are separated by semicolons (;). Hidden folders don't appear
in the File Manager for this user.
Example:
Editions;
For this user, File Manager hides the folders Editions and Call-2.
Call-2
Hidden Servers/Volumes: It restricts the access to certain workstations or disks. Paths must
be UNC type. Eg: \\Production\D; the user don't have access to the folders of the drive D of
"Production"..
SOLIDYNE AUDICOM
Page 121
SOLIDYNE AUDICOM
5.2.7 Live Assist
Plays from Live Assist: It enables to the operator to work with Live Assist module.
Create and modify public sets: It allows to the operator create/modify/erase the Live Assist
shared sets, which are available to all users.
Create private sets: It enables to the user to create private Live Assist sets (it only can be
acceded by this user).
5.2.8 Admicom
Run Traffic / CyberPlay Editor: It enables the access to the module of Admicom (automatic
generation of commercial logs) and to the CyberPlay Editor (manual generation of commercial
and programming logs).
Runs Aaudit: It enables the access to the module Aaudit, the viewer of the emission logs.
Edit AutoDj formats: It enables the access to the module AutoDj Editor, to create or modify
the formats of the AutoDj automatic blocks.
Enter to Admicom customer files: It enables the access to the Admicom.
Execute Admicom Billing: It enables the access to the module of Billing of Admicom
5.2.9 InfoMusic
Add/Delete titles from InfoMusic: It enables to the user to add or remove titles from the
musical database.
Edit title's data: By checking it the user can change the database contents.
Modify the Intro & Cross Fade: Enables to the user to change these values from InfoMusicProd and InfoMusic-Onair.
Operations between Databases: Enables the "transfer" functions to export titles.
5.2.10 Starting application
It determines the application that runs when the user is logged on AUDICOM. Operators of AIR
workstations will have as initial application aire.exe. For all other workstations desktop.exe
must be used, which soon are customized as Production, Administration, etc.
5.2.11 Skin
Define el Skin o entorno gráfico para cada usuario. Luego, cada usuario puede modificarlo.
Note: If you wants to define an unique graphic environment for each workstation, and that the
users cannot change it, you can delete in each workstation the skin that it doesn't need, leaving
alone the used skin. The skin's folder is \AUDICOM\Skins.
5.2.12 Presets
It presents a group users with default settings according to each user's job.
5.2.13 Pop-up messages
When an user tries to carry out a non allowed action, an pop-up message will appear notifying
the restriction. These messages disappear automatically lapsed some seconds, or clicking on
them.
In this example the user tried to play from File Manager
Page 122
SOLIDYNE AUDICOM
Network settings
5.3 Using AUDICOM on networks
We will continue with our example of 5 terminals and a Servant, connected through a network
to peer-to-peer type Windows:
123456-
Terminal AM
Terminal FM
Production
News
Traffic and ads
File server
"AM"
"FM"
"Production"
"News"
"Commercial"
"ServerAUDICOM"
Each computer has access to local discs (that are physically in that computer) and discs of
network (they are the discs of the other computer), to through of references UNC. After they
detail the units that each terminal has, and if they are or not shared for other terminals.
Terminals AM, FM, Produccion, Noticias y Comercial:
C:
D:
Not shared, partition dedicated to the operating system and AUDICOM files.
Shared as read/write.
Server:
C:
D:
E:
Not shared, partition dedicated to the operating system.
Shared as read/write.
Shared as read/write.
The drives for main storage are in the server. Remember that the AUDICOM installer creates
the Windows user "AUDICOM". This is necessary in W2000 so that the terminals have access to
each other.
5.3.1 Access between AUDICOM terminals
(CyberPlay Editor; AutoDj Editor; InfoMusic-Prod)
Some AUDICOM modules (CyberPlay Editor; AutoDj Editor; InfoMusic-Prod) allows to work
remotely with the data of others AUDICOM terminals. It is the case of a Production terminal
viewing the database of an air terminal, or a CyberPlay Editor changing the programming for
several Air terminals. All these modules have a drop-down menu called "Current terminal":
This menu allows choosing between anyone of the AUDICOM active terminals. "Default host"
always refers to the local workstation; unless the administrator of AUDICOM has redefined the
default settings (AUDICOM.ini).
When this menu opens for the first time, the exploration of the network begins, in search of
active terminals of AUDICOM. This operation can take a few seconds. The result is stored in a
cache, being no delays in the later accesses. In order to update the terminals, select the option
"_update hosts..."
5.3.2 Audio files and database
•
Music and the presentations will be stored in the Servant.
•
Each air terminal will locally have all the commercial warnings (Spots), promotional, Base
de Datos and the archives of programming (Log's and Pgm's). This way, in case that it fails
the network, the air terminals will continue operating.
We will work with synchronous Data bases, that is to say, each air terminal has its own Data
base, Programming works directly on the Air terminals. The organization of the archives
explains in detail in the chapter "File layout".
SOLIDYNE AUDICOM
Page 123
SOLIDYNE AUDICOM
5.3.2.1 How to register files
It will be necessary to enter to Base de Datos all music and the promotional ones. Once
engravings, the archives move to the different terminals (or to the Servant) and soon are
registered in Base de Datos according to corresponds.
The titles are recorded and published in the terminal of Production (in local discs). When they
are ready to leave to the air, it is sent them to the terminal that corresponds according to is
music, spots, etc. Also the tool Transfer de InfoMusic-Prod is possible to export registries
between Data bases using.
Generally, the commercial warnings are not registered in Base de Datos. It can do it if it wishes
it but it does not represent any advantage, unless it wants to assign a small fused time of
among them.
It is desired to enter new a promotional one of the radio terminal FM.
•
In the terminal of Production, the promotional file is recorded "Your there are
elejido.wav to us"
•
The file of publishes and it is completed to leave to the air.
•
We opened Cases out Manager and we expanded to see it the second window.
•
In the window of the right we selected from the Audio menu ' drivé terminal FM, to see
single the folders of that terminal.
•
In the window of the left we looked for the file "Your there are elejido.wav to us" and
we move it towards FM (dragging it to the right window). If it wishes to copy it presses
it Ctrl while it drags it.
•
The file now is in terminal FM.
•
In InfoMusic-Prod, we positioned ourselves in FM to work on Base de Datos of that
terminal.
•
We loaded the file from the button ' New, looking for it through Surroundings of
Network so that the reference is in way UNC.
•
We completed the corresponding fields and we kept the new title.
•
The promotional one has been registered directly in Base de Datos of the FM terminal
(it is not in A.M. nor in Production).
5.3.3 Making the program logs
Let us suppose that all the programming is generated from "the Commercial" terminal. We will
have all the tools there to generate the guidelines of programming for both Air terminals. All
the modules destined to the armed one of the programming guideline, have a pull-down menu
to select on what terminal this working (Publishing CyberPlay; Publishing AutoDj; InfoMusicProd; Case out Manager).
The commercial scheduling is generated by means of the Admicom. One by each air terminal
remembers that in our example we will have two facilities of Admicom. Each one has a
commercial data base, with the data and warnings of each one of the clients of the radio. (see
Traffic, Administration and Statistics) Traffic, Administration and Statistics). "ADMICOM A.M."
will generate the commercial guideline (LOG's) for the A.M. terminal, whereas "ADMICOM FM"
does the own thing for terminal FM.
If we wished to arm, for example, the musical programming for FM, we opened the Publishing
CyberPlay and we positioned ourselves in FM. we will be seeing the archives of programming of
that terminal (\\FM\C\AUDICOM\Log and \\FM\C\AUDICOM\Pgm). If we generated new
archives, they will keep directly in terminal "FM".
Consider that when it inserts titles to the Publishing CyberPlay from Cases out Manager or
Infomusic, these modules must be placed IN the TERMINAL for which we are creating the
programming. Otherwise, we can program by error a title that is not available for that terminal.
In the same way we come with Publishing AutoDj. The formats generated for the AutoDj Blocks
keep in the file autodj.ini, in each Air terminal. In order to create formats for FM, we must
select
that
terminal
in
the
menu
to
see
and
publish
the
FM
formats
(\\FM\C\AUDICOM\autodj.ini).
Page 124
SOLIDYNE AUDICOM
Network settings
5.3.4 Files
The location of the audio files must be designed from the outset and be respected by all users
AUDICOM. Now we give our recommendation on where to store audio files on the network. To
do this we consider the CLASS file, ie, if music files, promotional, commercial, etc.
5.3.5 A single on-air terminal
When there is a single terminal Air, it is normal that all files are located in the PC Air. They are
generated from the terminal Production always working on local disks. Once the files are ready
to be released into the air, they are entering the database (in production) and then transferred
to the Air Terminal, through InfoMusic-Prod. When titles are exported from InfoMusic-Prod, files
are copied to the PC Air, so it will be back in production. You can keep all the duplicate in both
terminals for security audio, or delete the songs from the albums production. You should always
keep copies of the files of the radio art, ads, etc.., Since the disk space they occupy very small
compared with music and disaster are more difficult to recover if you do not have the suitable
backings.
NOTE
Remember that ALL folders containing audio files MUST be within \ AUDICOM \ Audio, in
order to be recognized by AUDICOM. All folders located outside \ AUDICOM \ Audio are
ignaradas by AUDICOM.
5.3.6 Several on-air terminals
In this case, if the various air terminals need to share files, it is not desirable to have copies of
them in each terminal; therefore arises here the use of a network with dedicated audio server.
You can also set the system to one of the air terminals operate as both server (See "Network
Installations"). When several air terminals the following is recommended:
•
The songs files are stored in the terminal operating as a server.
•
Files promotional, filling special files (Fills) and general artistic notices, should have
them repeated each air terminals. Thus the system can continue operating with local
files in case of network failure.
The distribution of files to each terminal blocks from the terminal Production by File Manager
modules and InfoMusic-Prod.
In our example network, all the music is stored on the server. Once the files are there, enter
from production to the appropriate air terminal.
Remember that there should be folders with the same name in different network terminals.
SOLIDYNE AUDICOM
Page 125
SECTION 6
INTERNET TOOLS
6.1 iRDS streaming coder
6.1.1 Overview
"AUDICOM i-RDS" manages the streaming of the program signal. Connecting to Streaming
Server, and providing the encoded signal for distribution to listeners online.
The i-RDS can encode the audio simultaneously in two different qualities. There is a lower
quality encoding used to serve the listeners of Internet, we call public. And another of high
quality to make links between radio stations, which we called iLink.
Both audio signals encoded by IRDS contents imbibed information (metadata). In the case of
public stream to listeners information "Name" and "Interpreter" of the song is included. This
provides the same information as the RDS system, but on the website of the station.
The iLink high quality signal is accompanied by sync information, allowing the playback of local
events with more than the split second accuracy. Making the experience of a repeater looks so
lived like a really programming live from each city in a chain of stations. The commercials make
references to the region, as well as all the promos for the station, including weather information
corresponds to each of the remote cities of the radio network.
Page 127
SOLIDYNE AUDICOM
SOLIDYNE AUDICOM
6.1.2 Public streaming
IRDS generates audio data encoded in Windows Media Audio (streaming WMA) and passes
through the port 8080 (default). Not only transmits audio, but sends information "Artist" and
"Title" of each song. This information appears in the player.
The streaming is not send directly to end users, but requires a STREAMING SERVER that
provide this service. This server is in charge for distributing the streaming from the radio to the
end users. The number of users who can download the signal depends on the characteristics of
hired server. Check with your ISP.
Next, the “Public stream” screen. To enable the public streaming check the box “Public
signal”. If this box is unmarked, then the streaming is not encoded.
On air title: Artist and title of the currently playing item. Appears on the player listener.
Flash msg: Allows enivar an instant message, which will appear in the player software every
listener.
Public signal: Enables transmission of streaming to the server for retransmission to the
listeners.
Server address/Port: Enter the URL address and port of the server transmission streaming. If
'Server address' is blank, i-RDS can act as a server, ie access another computer can connect
directly for streaming. This option is reserved only for test transmissions and is not used to
supply audio to listeners. To stream via Internet should hire a provider of streaming audio.
Publishing point: This field is only visible if you have entered an address server. Name is an
identifier of the transmission, a part of the address access to a specific audio streaming on the
server. It can be anything that identifies the station. It can not contain spaces. For example
FM102 or Radio_Cultura.
Page 128
SOLIDYNE AUDICOM
ADMICOM: Traffic and ads
User address: Here i-RDS automatically generates address streaming access to the public,
according to the information in the fields above.
For example:
mms://www.streamnow.alsolnet.com:8080/AUDICOM. This information is used by the web
designer to set the audio player on the site of the radio.
If you do not enter an address streaming server in the "Server address" field; "User address"
field automatically detects and displays the external IP address computer, ie the IP that allows
access to that PC from outside the LAN. Clicking the REFRESH button this field is updated. The
first field (mms :/ / AIR 8080) shows the direction of access to streaming but using the name
of the PC on the network instead of the external IP, and is only for access the streaming from
another terminal on the local network.
Audio source: The encoded audio is taken from an external audio input , since Full program
signal (microphones, PCs, telephone calls) is required. In the case of transmission to the public,
should take the processed signal sent to air, directly from the output of a tuner or the audio
output of the audio processor . In some cases a second processor intended for public Internet
signal is used.
Profile: The streaming audio is encoded in WMA (Windows Media Audio). The rate bits per
second (kbps) determines the quality of audio transmission. Rates of 48 and 64 kbps are
standard values. When choosing the bit rate, consider the bandwidth provided by the streaming
server. Costs for these services vary depending on required bandwidth. The equation: quality
vs. number of listeners is an important item to consider. As the bandwidth of the server is
typically fixed, a higher bit rate, fewer listeners will be able to connect simultaneously. For
details, consult your streaming provider.
6.1.2.1 Streaming using AAC PLUS over Icecast server
If you require transmitting to Icecast servers, you must use an external encoder and link to
AUDICOM metadata to transmit the names of the songs and performers. The RDS AUDICOM
module generates a text file (TXT) which dumps the song information being broadcast. The
path to this file is defined in the encoder, so take this information and add to streaming audio.
We recommend using the software 'EdCast' to encode the streaming. In addition, you will need
the AAC codecs. Please refer in the AUDICOM forum at folloing link:
http://www.audicom.com.ar/index.php?option=com_kunena&Itemid=67&func=view&catid=4&i
d=62#63).
1-
Once the encoder is installed and sending to the streaming server, configure the i-RDS
info.
2-
Verify that the installed version of AUDICOM is 8.322 or higher.
3-
In the group of icons 'Start> Programs> Startup' create a link to EdCast so that it runs
every time Windows starts.
4-
Finally, configure RDS to store the information of song titles in a text file called
'shoutcast.txt' and then set the Encoder to once every 2 seconds to read that file and
add that information in the audio stream. To do this, set up as shown in the following
image:
SOLIDYNE AUDICOM
Page 129
SOLIDYNE AUDICOM
image taken from www.AUDICOM.com.ar
It's done. When playing the stream on the Internet with Windows Media Player (or equivalent
software), the names of the songs will be either the name of the radio station (depending on
how you have configured the RDS).
6.1.2.2 How to listen the streaming
The listener access to streaming audio through the web site of the radio. Responsible for
development of the website must configure an audio player with parameters according
streaming server hired.
Generate the web page from IRDS
As an alternative for those who need a quick and simple solution, IRDS generates a basic web
page with an embedded audio player, with which you can publish, in seconds, streaming audio
on the web. Later in this chapter, this function is detailed.
6.1.3 Using a streaming to link radio stations
ILink signal enables the transmission of high quality streaming to establish links "point to
point." ILink signal involves audio streaming and sync commands, which will be interpreted by
AUDICOM at the receiving (remote) station to manage regional scheduling.
iRDS allows direct connection of up to 5 remote terminals without the need for a Web
Server. If you needs to link more remote terminals, a streaming server will be necessary.
Page 130
SOLIDYNE AUDICOM
ADMICOM: Traffic and ads
iLInk signal: Check this box you enables the HQ streaming to link remote stations.
Server address/Port: Usually this field remains empty. Is only needed when you use a
Streaming Server to deliver audio to several repeaters. Default port is 8081.
iLink address: This is the address that repeaters must use to access to iLink master
signal generated by iRDS.
Audio source: The audio is taken from an external audio input, since iLink must encode the
PGM signal (mics, AUDICOM computers, phones, etc.). Choose from menu the input device in
where the PGM audio signal si connected.
Profile: The bitrate defines the audio quality. 128 kbps is the minimum value recommended to
link stations.
To check iRDS streaming from other terminal of the LAN (using default values):
open Windows Media Player
go to File > Open URL
to check the public streaming enter: mms://computer-name or http://computer-name
(field User address), in this example the default port 8080 is used.
to check the i-Link streaming enter
name:8081 (field iLink address)
SOLIDYNE AUDICOM
mms://computer-name:8081 or http://computer-
Page 131
SOLIDYNE AUDICOM
6.1.3.1 xLink: realtime link
The 'xLink' mode generates a stream containing only the metadata. It is used when it is
required that a repeater station to transmit without delay. In this case, the repeater computer
is in the same building as the headend, with which is linked via LAN using iLink (xLink in the
headend, the repeater station iLink). The audio signal is sent to the repeater PC using a
physical connection of audio (analog or digital, using a sound card connected to the computer).
The repeater receives the audio signal directly to an audio input, and receives metadata via
LAN, and replaces the ads and artistic accordingly. The audio generated by the repeater is
transmitted to the transmission plant using a real-time link.
6.1.3.2 How to receive the audio the remote station
In the (regional) remote station, the iLink signal is received by AUDICOM Multicast through a
module called 'iLink'. The configuration of this module is detailed in the next section of this
chapter.
Moreover, the regional station requires having certain program material to manage scheduling,
ie for replacing commercial breaks and cuts header identifiers (IRDS) by others for the region.
6.1.4 iRDS WEB player
Listeners plays the streaming from a website-based player. The webmaster must add this
feature to the web site of the radio station. For easy start, iRDS can generate a basic web site
player. This web-based player will use the parameters entered in the section "Public signal".
With this parameters, is possible to create the web player using the following interface:
Page 132
SOLIDYNE AUDICOM
ADMICOM: Traffic and ads
6.1.4.1 Publish the iRDS web player
To upload the web player you needs a web hosting provider, and know the account information
(name and password). Hosting account information are entered by pressing "UPLOAD" button,
and the web page generated by iRDS will be uloaded to Internet.
Users can access to iRDS web-player entering:
http://dominio_de_su_sitio_web_/AUDICOM/player.htm I.e.:
http://www.radioeter.com/AUDICOM/player.htm
6.1.5 FTP Update
This function dumps the metadata relating to the title currently playing to an XML file on an FTP
folder. This information is used to automate information on the website of the radio.
SOLIDYNE AUDICOM
Page 133
SOLIDYNE AUDICOM
6.1.6 TCP Metadata
This function transmits the metadata playback through a port on the local network. This
information may be used by third party applications and services.
The "Data format" field allows the transmitted parameters that are entered in <>, separated by
commas, as shown below. The options are:
<TITLE>
<ARTIST>
<BLOCK>
<CLASS>
<STYLE>
The information comes from AUDICOM data base, whith the exception of <BLOCK> that show
the type of content on-air (AutoDJ; Live; Spots).
An example for this string can be:
NP=<BLOCK>,<ARTIST>,<TITLE>,<CLASS>
Which generate sentences like the following ehan a son is on the air.
NP=AutoDJ,KATY PERRY,Unconditionally,Musica
And like this when the spot 'Publi Banda Ancha.mp4' is on the air:
NP=Batch,,Publi Banda Ancha,
Page 134
SOLIDYNE AUDICOM
ADMICOM: Traffic and ads
To subscribe to messages, initiate a TCP connection to port 8090 of the computer where the
"IRDS" service runs (PC air, unless it is configured to work on a dedicated server).
SOLIDYNE AUDICOM
Page 135
SOLIDYNE AUDICOM
6.2 iLink - transporting audio and linking remote stations
With an appearance similar to CyberPlay the
iLink recreates single and continuing air
schedule. iLink is only an informative
display, since when AUDICOM operates
mode iLink, audio program is repeated from
header (master) station, with the exception
of commercial breaks (green blocks) and
the identification spots emitted by the
master, which are automatically replaced by
their local equivalents.
The information displayed by iLink module
is the scheduling loaded at the master
station. iLink module uses this information
to
manage
the
regional
scheduling,
switching between 'remote' and 'Local'
audio.
The iLink control is not only able to link via
the Internet to a remote header, but also
allows the replacement of commercials
breaks of variable length in exactly; filling
the time differences (when the break length
at master stations is higher that regional
break) with music, promos and fills-cuts
This control also replaces all artistic spots
coming from the master station by those
spots that fit the local content of each
remote station. This replacement is done in
real time and is transparent for the
audience. To replace header-files, local-files
with the same length are used.
An advanced foldback system is activated in
case that Internet connection failure
prevents playback the streaming. In this
case, the iLink starts playback of automated
music segment, with a predefined criteria
(AutoDj). The AutoDJ template is set for
each hour of the day, making the interruption experience less traumatic as possible. Also local
commercial break still on-air according to the scheduling.
The Internet connection is constantly monitored. When the connection resumes, iLink awaits
the end of the current song and returns to the normal operation.
For receive the iLink signal from master station, you don't needs to make special settings.
Slave PC (repeater) must meet the following requirements: AUDICOM 8 Multicast installed and
a Wideband Internet access.
6.2.1 iLink output device
iLink will play the incoming streaming using the output device assigned as default for
Windows. so, to change the iLink output device, the Windows default output must be changed.
6.2.2 Using iLink in CyberPlay Editor
At the slave (repeater) station, an iLink block is programed to define the schedule segment to
connect with header station. This is done within the scheduling file (PGM) using CyberPlay
Editor.
You can create a single iLink segment for the whole day, or to make several iLink blocks to link
to the head at different times. The iLink block is similar to other types of AUDICOM blocks
(Live, AutoDj, Satellital). Block is created through the wizard "Magic Programming", choosing
the option "iLink Block".
Page 136
SOLIDYNE AUDICOM
ADMICOM: Traffic and ads
STEP 1
STEP 2
Program name: Here you enter the URL address for access to streaming generated at master
station. This URL is obtained iRDS module that runs on the PC header ('iLink address' field).
Usually is the IP and port of the computer running AUDICOM Multicast at the master station.
Example: iLink://190.247.72.170:8081
(in red color the IP header, in blue the port used by the header computer).
If iRDS transmitted to a server instead of behaving as server, in "Program name" you must
enter the server URL address.
Example: iLink://encoder.iviplanet.com/Audicom
From/to: Start time and end time for iLink block.
STEP 3: Not used. Press "Continue".
STEP 4
SOLIDYNE AUDICOM
Page 137
SOLIDYNE AUDICOM
AutoDJ: It is the AutoDj format (automatic musical block) that iLInk will use when:
a) The length of master commercial breack is longer than the regional breack. In
this case the time difference is adjusted by programming songs.
b) Internet connection fails. In this case iLink programmed music, and sent on-theair the regional commercials as they are scheduled, pending the re-connection to
Internet.
Ideally, the styles involved in these blocks 'AutoDj' containing songs of varying lengths. This
speeds up the time compensation. Furthermore, it should not use autoDJ of "induced mode"
because if we force a sequence of styles Hits'80, Hits'90, Hits'00, etc. autoDJ not have the
same ability to find songs with the exact length required, which if allowed to choose all the
songs of those musical styles.
STEP 5: Not used. Press "Continue"
Bock command will be similar to the following:
/Block /00:00-24:00 /ILink="AutoDj Jazz" iLink://190.247.72.170:8080
You can make several "iLink" blocks at different schedules, to have different music styles for
fill, according to the contents of each show transmitted by the header station.
6.2.2.1 Using iLink with xLink protocol
xLink protocol is used to generate a signal for a repeater with no delay (see 6.1.3.1 – Realtime
Link). At the Master terminal iRDS generates a streaming that only contents the metadata,
enabling the xLink mode. The terminal that works as “regional” receives the metadata via LAN
and the audio signal by standard audio connections (analog or digital). The command iLink
sentence used in “regional” terminal is like this:
/Block /08:00-14:00 /ILink="AutoDJTemplate" xLink://url/AudioDevice/input
Where:
url:
IP Address of iRDS server (with xLink enabled). Example: 192.168.0.50.
Default port is 8088.
AudioDevice: Name of audio device used to connect the audio signal. Example: Realtek
Hight Definition Audio
input:
Input of audio device. Example: Line input.
The final sentence will be as follow:
/Block /08:00-14:00 /ilink="Latinos" xlink://192.168.0.50/Realtek Hight Definition
Audio/Line input
Page 138
SOLIDYNE AUDICOM
ADMICOM: Traffic and ads
6.2.3 Replacement of ads
During the iLink event, AUDICOM plays audio streaming from the header station. When header
station plays a commercial break, iLink stopped streaming and playback a regional break. You
must define the same number of breaks in the header station and local stations. If the amount
of scheduled breaks do not match, iLink will behave as follows:
•
If the number of breaks at the header is larger than the number of scheduled breaks in
the local station, after playing all the regional breaks, iLink returns to the streaming
and no more replacement take place. There will be no filler music or repeated regional
commercials.
•
If the number of breaks at the header is less than the scheduled breaks in the local
station, the regional breaks surplus are ignored.
Regarding the duration of each commercial break, as usual is that the header pre-agreed
duration of the commercial breaks. In case of discrepancies, the behavior of iLink is:
If the batch header is longer than the regional batch, iLink up the difference on the following
basis:
Level-1: Try to complete with music the time remaining until the start of the next block.
As we saw, the type of filler music is defined when creating the boque iLink.
When the selected song does not cover the exact, or if time does not find any songs (most
likely with time differences of less than 3 minutes) iLink proceeds to compensate under
Level-2.
Level-2: If the time difference could not be accurately covered with a
song, iLink try to fill the remaining time with audios categorized as Class = PROMOS. One
or more promos will be added depending on the time that has to be completed. If the
remaining time of the batch is too small to place an additional artistic file (usually last
more than 2 or 3 seconds) switches to Level-3.
Level-3: When remaining few seconds to fill and no music or promos are short, then the
filling is made with audios Class = Fill. These audios are usually small 'arpeggios' (sounds /
effects) duration between 0 and 5 seconds. The advantage of being sound effects is that it
allows AUDICOM cut in case of need (although it is rarely necessary).
If the header break is shorter than regional break, iLink plays the whole regional break
and returns to the streaming. It is desirable that this situation does not occur, since it happens
the programming from header starts "truncated".
6.2.3.1 Using iLink with standard streaming
You can download a classic streaming. Such is the case of a header that does not have the
AUDICOM system or retransmission of a radio broadcast via the Internet. For programming
block 'iLink' proceeds as explained above, with the following exceptions:
Instead of acronym "iLink" will be used "mms".
Being a conventional streaming, no remote control commercial breaks. Will air on exact time as
scheduled (LOG files).
6.2.4 Replacement of promotional cuts
You can define certain promotional cuts played by header station to be replaced by regional
ones at the local station. I.e. When the header plays "101.1 FM transmits from London" in the
repeater it is replaced by a cut saying "From Liverpool to the whole world...".
The files to replace, and regional cuts, are identified with a prefix defined by the user. Suppose
that the header station transmits from the City of London and has a repeater in Liverpool. In
London, all the cuts that identifies the radio (address, telephone, email, etc.) begin with "Lon_".
In Liverpool, at the repeater, all cuts that begin with "Lon_" are replaced by local cuts, named
with prefix "Liv_". Thus, when the header broadcast "Lons_identification-1" in Liverpool airs
"Liv_identification-1."
In order to a file to be replaced, there must be a regional file with the same length. Tolerance is
+/- 0.5 seconds. If there is not a regional cut with equal length, the replacement is aborted.
SOLIDYNE AUDICOM
Page 139
SOLIDYNE AUDICOM
NOTE
Only files sheduled and those played from Live Assist using the main channel (no in MIX
mode) are replaced. If the header station plays an promotional cut over the music, it
isn't replaced at the repeater.
6.2.4.1 Media files for replacement
The regional files for replacement are those promotional cuts to replace the programming
header. These files should be saved in REPLACE folder (C:\AUDICOM\Audio\Replace).
Replacing files only occurs if the regional cut are of equal length to a header file to replace.
Therefore you need to know the length of the promotional cuts used in the header station that
should be replaced at the local station, and create at least one equivalent of equal length.
6.2.4.2 Replace commands
The file replacement are defined into iLink block using the following commend. Only one
replacement command can be used into a iLink block.
/replace ORIGINAL=
replaces the file with name "ORIGINAL" by any file located at the folder REPLACE with same
length.
/replace ORIGINAL*=
replace all files started with "ORIGINAL" by any file located at the folder REPLACE with the
same length.
/replace ORIGINAL*=REPLACE
replace all files that starts with "ORIGINAL" by a file of same length with name LOCAL located
in REPLACE folder.
/replace ORIGINAL*=REPLACE*
replace all files that starts with "ORIGINAL" by any file located in the folder REPLACE of same
length and that starts with "LOCAL".
/replace ORIGINAL=REEMPLAZO
replaces the file with name "ORIGINAL" by a file with same length and name LOCAL.
For the replacement occurs, "REPLACEMENT" file must be of equal length as the "ORIGINAL"
file. If the length does not match, it looks for any file in the REPLACE folder that match the
length of the file "ORIGINAL". If any files match, replace is aborted. It is considered a tolerance
of +/- 0.5 seconds
Example:
/replace Lon_*=Liv_*
all files that begin with Lon_ will be replaced by others whose first letters are Liv_ The asterisk
in "Lon_*" defines that no matter the full name.
The above example limits the selection to those regional files started in "Lon_. This is the most
used option because it allows only certain files can be used in determinated show. Remember
that while only one replacement can be defined into an iLink block, different iLink blocks can be
defined during the day, each with a diferent replace criteria.
If no file "Liv_" match with the length of the header file, iLink will search for any file with the
same length (+/- 0.5 sec) in "Replace" folder. If no file of the same length, the replacement is
aborted.
6.3 AUDICOM WEB Tools
Integration into a single platform for many activities a radio station, has been a priority for
Solidyne, making AUDICOM-9 is the first product that integrates the full life cycle of a radio
station. No matter the size of the medium, be it small, medium or a big multimedia, it is
necessary to work efficiently, quickly and neatly. For this we have incorporated remote access
from the Internet, so that a speaker simply changing tab in your web browser can go from the
cover of a newspaper, to participate in a chat with the crew. A producer, similarly, you can type
in a web whiteboard details on a note that is generating.
Page 140
SOLIDYNE AUDICOM
ADMICOM: Traffic and ads
6.3.1 Access
The WEB tools are available in versions AUDICOM 9 "Multicast", "HD Video" and "HDTV". On
setup, the AUDICOM installer launches the "AStart" application, which requests information for
the identification and configuration of the station and the AUDICOM terminals. In Astart you
must enter: the station name, the username and password, which will then be required to
access the WEB tools panel (see software setup). Once created the WebTools account, you will
receive a confirmation email that contains the data of the account. It is important to keep this
email, you may need in the future.
Access to the "Web Tools" panel from any web browser, running on any operating system by
entering the following address:
http://www.AUDICOM.us/Panel
A window to enter the user data will appear. These are set when AUDICOM installs.
6.3.2 Live Panel
Live Panel features a drop-down menu in the lower left corner, from which launched the WEB
applications. You can change the location of the windows on the screen, and in some cases its
size. An example of the panel with all visible features:
SOLIDYNE AUDICOM
Page 141
SOLIDYNE AUDICOM
6.3.3 CyberPlay
CyberPlay shows what happens in the terminal air: the current title, titles and played, and
those to be broadcast. Each change introduced by the operator is reflected in real time. The
information includes content from the main playlist (CyberPlay), auxiliary lists (PlayList
Manager 1 and 2) and instant access keypads (Live Assist 1 and 2).
6.3.4 Weather
These windows display the weather data of a certain city. You can add the number of cities you
want. To add a city, go to the "Live Panel" menu and select "LIVE Panel -> Add weather." In
the popup window, enter the city and press search. If the city is found, the bottom menu is
enabled, displaying the options that match your search. Choose a city from the menu and click
"Save."
The new windows will appear on Live Panel
Page 142
SOLIDYNE AUDICOM
ADMICOM: Traffic and ads
6.3.5 RSS contents
RSS technology allows WEB content with dynamic updating. To add a site, you need to copy the
RSS link provided by the site web, usually available in the form of link or directly on the RSS
icon. For example, the website of the news channel Telesur has an RSS icon in the upper right
corner. In this case, the icon contains a link that must be copied (right click, "copy link").
In the WEB Panel, go to "Start -> Live Panel -> Add RSS" and paste the link into the URL field:
"Name" allows you to enter a name for to identify the windows content. We recommend to use
short names. The name appears in the title bar of the RSS window. The RSS content will be
displayed in a rezizable window.
SOLIDYNE AUDICOM
Page 143
SOLIDYNE AUDICOM
"Update": A RSS windows updates its content every 10 minutes. A countdown shows the time
remaining for the next update. This information is critical for broadcasters when reading
information on the air, since when content is reloaded, they lose sight of the text for a few
seconds. And if new content enters, the text is in a different position than he was. Pressing the
"More time" button extends the time remaining for the next update.
6.3.6 Live reads
We call "live read" to the ads that do not appear as part of the commercial break, they are read
live broadcasters. The "Live Panel" manages read ads, which are ruled by the commercial
department (using the administration module Admicom).
Each notice appears in a popup window containing the text to be read. The windows remain on
display until the announcer reads. Once read, the speaker closes that window. When this
happens, the system records the time that announcement was read (time the window is closed)
and generates a sound recording of that piece of the show. Thus AUDICOM takes a dynamic
and effective control over on the air reading of each commercial was read.
Page 144
SOLIDYNE AUDICOM
ADMICOM: Traffic and ads
.
6.3.7 Chat room
The board functions as an internal CHAT room, which keeps communicated to all the team. The
texts published here are visible for all users connected.
6.3.8 Remove items from panel
To remove items from WEB Panel, go to "Start -> Settings". Icon to right lets remove that item
from the panel.
6.3.9 File Manager
This powerful tool allows you to transfer files directly to a computer at the studios of radio.
From an airport or a bar with WiFi access, you can transfer an audio file which will be in a few
minutes available for the operator.
NOTE for the Network Manager: Using the Web File Manager and the facility for use Web
Tools AUDICOM tools from outside the station requires port forward the range 777 to 780, to
the LAN IP of the on-air computer. Remember that on-air a computer must be assigned a fixed
IP address (DHCP disabled) for this redirection is successful. Finally, remember to set the IP to
work properly, it must be less than the value of the IP-Base of DHCP Server assigned on the
router.
SOLIDYNE AUDICOM
Page 145
SOLIDYNE AUDICOM
6.3.10 Mail-link, remote news
This capability allows users to send emails with audio attachments to the AUDICOM terminals.
Simply send the mail to: [email protected] and attach the file you wish to
send.
In this way a journalist can record an interview using a Samrtphone, and then send it via email to the radio station equipped with AUDICOM 9. The attachments are transferred to a folder
audio AUDICOM 9 (default AUDICOM sends a confirmation email to the journalist once the file
has been transferred to the audio server).
Additionally, the subject of the email can contain the name of the folder where the audio should
be stored (optional) and finally, the station can set up a keyword that must be placed in the
message body (optional) to restrict sending audios by unauthorized persons.
6.3.10.1 Mail-Link
The Mail-Link uses the address "alias" of the issuer, as defined during installation (AStart
assistant) and "@ AUDICOM.us" server, so that the e-mail will always be:
[email protected]
The 'alias' shown in AUDICOM screen next to the name of the radio, between parentheses. In
the example of image alias is "alexfm". So the Mail-Link address will be [email protected]
If the address was not created, you must use 'AStart' to complete the data (Home -> AUDICOM
-> AStart or directly C: \ AUDICOM \ Astart.exe).
The mail can be sent either from a PC, a laptop or an smarthpone. The device does not require
any special configuration. Only the e-mail Mail-Link is required to send the attachment.
6.3.10.2 Files and Folders
Mail sent to the Mail-Link address must contain only one file attachment, in. Mp3. At the
station, AUDICOM Web Tools receives the mail and copy the attached file to a folder and is
ready
to
be
aired.
You can specify the destination folder by entering the name of an existing folder in the
SUBJECT of the mail. For example: REPORTS. In this case, the audio will be copied to the
REPORTS folder. If the subject contains a text that does not correspond to any folder or is
blank, the file drops on the default folder called eMail
6.3.10.3 How to automate the emission
AUDICOM Web Tools must be running on the station, to receive mail and copy the audio to the
appropriate folder. The received audio can be played on-air automatically in several ways:
•
Audio file can be scheduled for a certain time, using an ExactTime.
•
Audio file can be issued immediately, interrupting the main PlayList.
You can include presentation and closing cuts, "chained" to the news so if the report fails, the
entire sequence is canceled.
/Block /07:00-12:00 /Live
/Exacttime /007:45
;Breacking news
@Opening
@report-<dd><mm><aaaa>
@Closing
In the above example, a micro programmed with a report that will be issued to 07:45. Note
that the file uses a "metaName", so that part of the file name will be, in this case, the current
Page 146
SOLIDYNE AUDICOM
ADMICOM: Traffic and ads
date (report-14032013.mp3). Thus this audio file will only be issued that day. If the next day
there is no new report, the entire block will be canceled being that items are chained (@)
To include more than one audio on the same day, simply add the time in the file name, keeping
'metaName' to date.
/Block /07:00-12:00 /Live
/Exacttime /07:30
;Bracking news
@Openign
@report-730-<dd><mm><aaaa>
@Closing
/Exacttime /08:30
;Bracking news
@Openign
@report-830-<dd><mm><aaaa>
@Closing
/Exacttime /09:30
;Bracking news
@Openign
@report-930-<dd><mm><aaaa>
@Closing
/Exacttime /10:30
;Bracking news
@Openign
@report-1030-<dd><mm><aaaa>
@Closing
In the example, four audios ruled with a different name are observed:
report-730-14032013.mp3, report-830-14032013.mp3, report-930-14032013.mp3 and report1030-14032013.mp3
For more information on Special Inclusion blocks, see ExactTime in Chapter "Scheduling"
If the Mail-Link should go on-the-air immediately, you need to use another AUDICOM tool
called 'NEWS'. This application runs in background and monitors an audio folder. When a file
drops into that folder, 'NEWS' emerge to disrupt air playlist and insert the audio received. The
main playlist does not stop abruptly, NEWS waits for the current title ends. In addition, you can
define cuts for opening and closing.
In this case use 'metanames' is not necessary, since the audio NEWS files that have already
been cast. Take special care with the configuration of the destination folder. NEWS can be
configured to use the default folder for 'Mail-Link', or you can create a folder for this purpose.
In this case the reporter should NOT forget to include the name of the folder in the SUBJECT of
the mail.
For details on use and configuration, see NEWS in "Scheduling -> Manage News"
Note that ease of Mail-Link to address attached to different folders; combines the modes
described above, with a fixed schedule ruled audios and folders for breaking news that will
begin airing immediately even when the radio is automated.
6.3.11 WebTools administration
The administration panel is used to create, delete or modify users and assign their access
rights. It is also used to manage advanced settings, such as the case of multiple stations
belonging to a multimedia, and managing multiple terminals on the same station. When the
user WebTools is created in the installation process AUDICOM (Astart), the WebTools server
also creates a default administrator user.
The 'media' or 'media group' is the name of the entity or organization that contains two or
more stations. For example, the media group "National Radio" can contain. "AM Nacional"
"Nationa Rockl" National Folk", etc. In the case of a media group, the name of 'media group'
will be used to access the Administration Panel of AUDICOM WebTools. Remember that you
receive this information by e-mail when set the stations (usually on AUDICOM installation, by
AStart assistant).
If the station is autonomous (does not have a 'media group'), media group will only contain
that "station", and the name to access the Administration Panel is the alias of the station
followed by '-admin'. The default password is the same as defined for that user.
To access the Administration Panel please contact the distributor.
SOLIDYNE AUDICOM
Page 147
SOLIDYNE AUDICOM
Both the administrator user name (alias) and password can be modified. If you do, be sure to
write down the new data (a good procedure is to forward the original email AUDICOM WebTools
to your email, detailing the changes).
By accessing the Admin Panel, you will see a menu with the following options:
Media Settings
Station
Terminals
Users
6.3.11.1 Media settings
Clicking "Edit" you can change the station name, its alias, password, and email contact.
Remember the alias and password are used to access the Administration Panel
6.3.11.2 Stations
It allows to change the data for each station.
To view the existing stations, press "Search".
To view the Station settings, select it and click on "View". A window will show the information
and the existing users for this station:
Page 148
SOLIDYNE AUDICOM
ADMICOM: Traffic and ads
Click on "Edit" to change the information or to add users. New users are added from main
menu in the option "Users".
6.3.11.3 Terminals
On each Station, it is possible define multiple terminals. This allows, in a Station with two or
more Studios, determine which Studio you want to access. When an Station has defined two or
more ON-AIR terminals, the login screen will require for:
•
Station
•
User name
•
Password
adding the option "STUDIO", to choose the ON-AIR terminal.
6.3.11.4 Users
This option allows to create new users. Once a new user is create, it must be added to one or
several Stations, from the options 'EDIT' of each Station.
SOLIDYNE AUDICOM
Page 149
SOLIDYNE AUDICOM
6.4 AudiCast
6.4.1 Overview
Had heard much talk of the Podcast, but it is clear that the term means. POD is a generic term
to call a portable audio player (this is an iPod, a cell phone, or MP3). BROADCAST As concerns
the distribution of audio / video programs in the form of a wide audience. Therefore, podcast is
the distribution of programs and content in portable MP3 players on demand. Here is an
example of real PodCast with AUDICOM 8.
Control completely automates AudiCast the three stages in the creation of a radio podcast. First
of all, is responsible for recording the program that plays MP3 from the promo for opening the
program to publish, until now that the audio file of the farewell program. In this way, AudiCast
a single MP3 audio file for each program that has the radio station on the day.
These audio files are then transferred to a server for Internet publication as they are
generating. Once audio files have been uploaded to the server, AudiCast is responsible for
creating a link on the website of the station to which listeners can learn to program it, and if
you want to download to your portable audio. Or they may decide to hear the program directly
from the web, but at the time of day most convenient for them.
This new technological revolution of the content on demand, putting control in the listener.
Since this time I decided that you want to listen to their favorite radio program. AUDICOM 8
makes publishing a podcast in a simple, automated task!
Having recorded all programs of a station, allows the production department to schedule
iterations of a successful program, or simply cover vacations a talent of the station.
Additionally, these recordings provide automatic 'tapes witness' for those media that have a
policy to safeguard all discharges to air.
6.5 General diagram
Page 150
SOLIDYNE AUDICOM
ADMICOM: Traffic and ads
SECTION 7
ADMICOM: Traffic and ads
7.1 Station settings
Admicom manages the ad scheduling for one or more radio stations (version AUDICOM
Multicast). Each station has a general configuration that defines the advertising time and the
general pattern of commercials batches.
When opening the application, the Admicom desktop appears empty. From the menus the user
access the different options.
7.1.1 Station
(Stations Settings -> Station) Here is the information about the station. By default there are
one station called "Demo".
7.1.1.1 Station information
Code: identification code or abbreviation for the station name. It supports up to 10
alphanumeric characters (i.e. AM1030).
Name: Is the real name of the radio. i.e. "Radio América"
Max advertising time: Sets a time limit for the advertising scheduled per hour. Usually the
limit of advertising per hour is regulated by laws, that differs in each country. When Admicom
generates the commercial breaks, never exceeds this limit. If the number of ads ruled is over
the limit of time, some ads will be rejected, according to its priority value.
Output path: Location of the folder in which .log files will be created, for the current station.
Audio path: Location of the folder containing the audio files (spots).
SOLIDYNE AUDICOM
Page 151
SOLIDYNE AUDICOM
7.1.1.2 Basic controls
To search an existent station press "Search"
To change the information of the current station, press "Edit"
To add a station, press "New" (only available at Multicast version).
To delete the current station, press "Delete". In order to delete a station, frist delete all ads
programmed to this station; and the hole commercial break layout from "Station settings>Station". Remember that all commercial breaks for certain day can be deleted, and then use
the function "Copy day" to copy this empty day to the others days.
7.1.2 Schedules
(Station setting -> Schedules) Here you define the schedules layout (the on-air time assigned
to each commercial break) for each day of the week.
Station: Selects a radio station from a list (only available at Multicast version).
Weekday: Selects a day of the week to create or edit commercial breaks at differents hours of
this day. To change the existent breaks press "Edit".
Copy Station: Copies the scheduling of commercial breaks from a station to another station
(only available at Multicast version).
Copy day: Copies the scheduling of commercial breacks and/or the segments definition from
the current day to one or more day a week.
7.1.2.1 Schedules
Here are defined all schedules for the selected day (menu "Week day"). To enable the edition of
the current schedule, press "Edit". To add a schedule press "New". To change an existing
schedule press "Change". In both cases the following windows appears:
Page 152
SOLIDYNE AUDICOM
ADMICOM: Traffic and ads
The time defined for each block can refer to the beginning or end of the commercial break.
Tolerance is used by the AUDICOM software to compensate the time when it works in automatic
mode (AutoDJ). Tolerance implies, in minutes, how match later or earlier the commercials can
be aired, respect to the time scheduled.
Mix 'Line of business': Defines whether the ads for the same line of business can share the
commercial break, or are refused and relocated at other times. Including one or the other spot
will be determined by their priorities for inclusion. A commercial break can accept two ads in
the same line of business, only if you enable the option 'Mix Line of Business', but will not
accept two occurrences of the same advertisement.
After enter the values, press "Save" to confirm the changes
7.1.2.2 Shows
Here certain radio shows are defined, by entering name, starting and ending time. This
information is stored for the current selected Station. To enable the edition press the "Edit"
button. Pressing "New" or "Change" button, the following window will appears:
Show: ID code and name of the radio show. You can type it or load it from a list (that shows
all radio shows entered from "Station settings - Shows").
Start/End time: All commercials assigned to this radio show, will be included in this schedule
segment.
Press “Save” to confirm the changes
7.1.3 Announcer
(Station Settings -> Announcer) Here you enter the name of announcers/locutors. This
information facilitates the data load in the This speeds up the loading of information in the files
of advertisements
SOLIDYNE AUDICOM
Page 153
SOLIDYNE AUDICOM
Code: Identification code or abreviation for the announcer. Supports up to 10 alphanumeric
characters.
Name: Full name.
Press “Save” to confirm the changes
7.1.4 Shows
(Stations Settings -> Shows) Enter, in generic terms, names of radio shows or segments, which
are stored in the database Admicom. In this window you loads only the names of the shows,
regardless of the time and station in which they are issued. The start and end time of each
segment are defined in "Station Settings -> Schedules". This is because in Multicast systems,
that manage multiple stations, the same show can be loaded at certain hour on the station "A "
and at different time in the station "B".
Adds can be programed to be aired into certain radio show by choosing the name of the radio
show from a list. An advantage of this method is that if the show changes the day or schedule
of emission, all ads that were ruled for that show will be automatically relocated.
Code: Allows to enter a ID code or abreviation to the show name. Supports up to 10
alphanumeric characters.
Name: Full name of the segment.
Press “Save” to confirm the changes
7.2 Commercial settings
This section allows to define the customers categories, advertaising agencies, and define the
commercial items
7.2.1 Customer categories
(Commercial settings -> Customer categories) A “Customer category” allows to differentiate
audio contents like “Promotionals”; “Public welfare campaigns”; “Local ads”; “National ads”;
etc. Each category corresponds to a priority, which is identified by a letter (A to Z). There can
be two categories with the same priority.
Page 154
SOLIDYNE AUDICOM
ADMICOM: Traffic and ads
For each new customer, is assigned a category, which defines the priority of the spots for that
customer in the commercial breaks. If a client must schedule several ads with different
priorities, it enters as an Agency.
Priority: Defines the priority for the customer categories.
Code: Identification code or abreviation for the category. Up to 10 alphanumeric characters.
Name: Full name of the category. For example: "Radio promos"
7.2.2 Ad agencies
(Commercial settings -> Ad agencies) This file allows to enter an Ad agency to the Admicom
data base. An Ad Agency groups several customers.
SOLIDYNE AUDICOM
Page 155
SOLIDYNE AUDICOM
7.2.3 Commercial item
(Commercial settings -> Commercial items) Commercial items are defined by names like
“Restaurant”; “Cell phones”, “Hotels”, “Supermarkets”, etc. You need to enter a code or
abbreviation for each commercial item (alphanumeric up to 10 characters).
To create a new commercial item, enter code and name into correspondent fields and press
"Save" at the bottom of the window. As was explained in "Station settings", each schedule has
defined if it accept or reject ads with the same item from different clients.
Como se explicó en "Configuración Emisora", cada tanda comercial tiene un atributo que define
si acepta o no mezclar avisos de un mismo rubro. Cuando las tandas comeriales rechazan
avisos de igual rubro, es posible que determinados rubros sean la exepción a la regla activando
la opción "Deshabilitar el rechazo de campañas con igual Rubro". Esto es útil para todos
los casos en que se desea programar más de un corte del mismo rubro en la misma tanda,
como por ejemplo los cortes promocionales de la radio.
7.2.4 Central de Medios
(Configuración Comercial -> Central de Medios)
Una Central de Medios permite agrupar
Agencias de Publicidad, de modo que sea posible hacer un seguimiento de un conjunto de
agencias. Es utilizada cuando varias agencias de publicidad pertenecen a una empresa madre o
"holding". Los datos de la planilla son similares a los requeridos para las Agencias.
Page 156
SOLIDYNE AUDICOM
ADMICOM: Traffic and ads
7.2.5 Ejecutivo de cuenta
(Configuración Comercial -> Ejecutivo de cuenta)
Fichas de los vendedores o
"ejecutivos de cuentas". Cuando se programa una campaña comercial, es posible definir el
vendedor que la negoció, para generar reportes sobre las operaciones de ese vendedor.
7.2.6 Medio de pago
(Configuración Comercial -> Medio de pago) Permite ingresar los medios de pago que
maneja la radio.
7.2.7 Origen
(Configuración Comercial -> Origen)
"Origen" es una etiqueta que permite agrupar
comerciales para luego realizar reportes específicos. Por ejemplo: "Canje", "Pauta estatal",
"Campañas de bien público", "Vendedores propios" son algunas de las denominaciones que
podría adoptar el campo "Origen".
SOLIDYNE AUDICOM
Page 157
SOLIDYNE AUDICOM
7.3 Ad campaigns
This section allows entering customer records, define the scheduling of announcements, and
generate the commercial schedule (.Log). To schedule a commercial spot, you need to have
completed at least the following settings:
1. Distribution of commercial breaks (see Broadcast Settings -> Tanda comercial).
2. Categories of client (see commercial settings)
3. Commercial item (see commercial settings)
4. The means of payment (see commercial settings)
7.3.1 Customers records
(Ad campaigns -> Customers) Allows to enter a Customer Recod to the Admicom data base.
Once the form is completed, press 'Save' to confirm.
Remmember: The category defines the PRIORITY of all ads for that customer (see
'Commercial settings -> Customer categories'). The priority will take effect when several ads of
a same item compete for the same commercial break witch reject to share ads with equal
commercial items; or ads that compete for the same position.
7.3.2 Ad
(Ad Campaigns -> Ad) Here you define the schedule for each ad
Page 158
SOLIDYNE AUDICOM
ADMICOM: Traffic and ads
Station: When Admicom manages multiples stations, here you define the Station to work. The
search icon (loupe) allows to select the station from a list. The left zone shows the
abbreviations, the right zone shows the full name.
Agency: Name of the advertising agency. The search icon (loupe) allows to select the station
from a list. If not applicable, leave this field empty.
Customer: Customer own the ad. If the customer don't exist, it must be entered from
"Schedule -> Customers".
Name: A name for the ad campaign. For example: "Celuphone Mother's day"
Commercial item: As has been defined, each commercial break may or may not accept the
same item ads. There may be exceptional items that can be repeated in the same batch; even
if the batch not supported repeated items.
Executive: Name of vendor who negotiated the contract. If not applicable leave the field
empty.
Internal Number and Order Number Agency: Number of internal order of the campaign
and order number sent by the agency.
Source: Label describing the origin of for scheduled commercials ("Exchange", "State
Advertisement", "Campaigns public good", "Sellers own").
Payment means: Displays the list of enabled media; that are entered in Commercial Settings
-> Payment means.
Commentaries: Text field for free use.
Gross: Fixed sum to be paid on a monthly basis (if such payment is agreed). Placing a monthly
fee, the monthly fixed value and the second value are added.
Agency commission: The percentage that corresponds to the agency as commission. If not
applicable, leave this field empty.
Discount: The total discount amount to apply on tariffs.
SOLIDYNE AUDICOM
Page 159
SOLIDYNE AUDICOM
7.3.2.1 Windows controls
Search:
Shows all current ads. Search can be restricted by Station, Customer or File. To change the
search criteria, first clear the fields used previously, selecting and deleting its contents. To view
or change an ad schedule, double-click on the title at the "found items" list.
a search of commercials
'Active': If this feature is enabled (default), the search will only look for ads currently on the
scheduling, and those that will be scheduled in the future. If this option disables, the searching
will include ads with ended contracts, that will appear in red.
Note: By default, the option “Active” is enabled. If it disables, the user should to press "Search"
again to update the results.
New: Empty all fields to schedule a new ad.
Edit: Allows to change the scheduling or the information of an existing ad.
Delete: Deletes the scheduling for the current ad.
Copy: Copies the current scheduling. This feature allows to replicate a scheduling from a
station to another one in a chain of stations.
Cancels and replace:
This option creates a duplicate of the Campaign for changes to the programming schedule,
without losing the previously scheduled. The new programming schedule will maintain Internal
Order Number but changing /0 to /1, to indicate that the first modification of the original
campaign. The campaign will enter duplicate.
7.3.2.2 Ad campaign
Detailed schedule
In addition to the main scheduling, an ad can be included for specified dates. In this mode are
defined the MONTH and a RANGE of HOURS. Once entered, a grid appears containing all days
of that month. In each box of the grid is entered the number of apparitions for that ad in the
specified day and hours.
To add a spot:
•
Page 160
Define the moth using the calendar showed at previous image.
SOLIDYNE AUDICOM
ADMICOM: Traffic and ads
•
Press "New" to enter a programming schedule. In addition the scheduling allows to
define the following data:
Type of ad: Determines if the ad is an spot (audio file); a "live read" to be read on-live by the
speaker; or a Sponsor. Both traditional ads as live reads are included in the commercial
schedule, but obviously the live read text do not include audio; only operate as a warning that
the ad should be read. Sponsors do not appear in scheduled commercials. They can only be
obtained through Auspices report.
File and length: Filename of the spot being programmed. When loading the audio Admicom
automatically fills the "Duration" field. Playback controls are located on the right allow you to
play the file.
Start/end time: Range of hours in witch the spot can be included.
Value Sec: Value per second, valid only for this occurrences.
Position into batch: Sets the position of the ad within the commercial break. The options are:
"First ad"; "second ad"; "Penultimate ad"; "Close ad"; "Indifferent". When two or more ads
wants the same position in a batch, will be scheduled the ad with higher category.
Live reads: In this text field is entered commercial ad; which will appear in the Web Tools
panel.
•
The same file can be included more than once with different time ranges.
•
The same advertisement can be programmed simultaneously in the "Simple" and
"Detailed" modalities. In this case, the occurrences set for each mode are summed.
For example:
Detailed pattern includes 5 occurrences announcement on Monday, November 12,
between 18:00 and 22:00 Hs
Simple programming schedule three appearances for any Monday
in that case, on Monday November 12 the ad will be issued 8 times (5 for the detailed
pattern, and 3 for the simple pattern)
Simple schedule
Each spot can have one or multiple emission schedules. To define a schedule click "New" in
the section "Simple schedule". The following window appears:
SOLIDYNE AUDICOM
Page 161
SOLIDYNE AUDICOM
Type of ad: Determines if the ad is an spot (audio file); a "live read" to be read on-live by the
speaker; or a Sponsor. Both traditional ads as live reads are included in the commercial
schedule, but obviously the live read text do not include audio; only operate as a warning that
the ad should be read. Sponsors do not appear in scheduled commercials. They can only be
obtained through Auspices report.
File and length: Filename of the spot being programmed. When loading the audio Admicom
automatically fills the "Duration" field. Playback controls are located on the right allow you to
play the file.
Position into batch: Sets the position of the ad within the commercial break. The options are:
"First ad"; "second ad"; "Penultimate ad"; "Close ad"; "Indifferent". When two or more ads
wants the same position in a batch, will be scheduled the ad with higher category.
Speaker: Indicates male or female voice.
Start date: Date on which the emission schedule will take effect.
End date: Ending date, in which the spot is scheduled for the last time. For the spot is
scheduled indefinitely, leave this field blank.
Value Sec: Amount billed for every second Emission
Texto PNT: In this text field is entered commercial ad; which will appear in the Web Tools
panel.
Week day: Define the days in which the spot will be scheduled.
Pauta por RANGO HORARIO: En este caso se pauta el aviso en todas las tandas
comprendidas en un intervalo horario, para lo cuál se define el rango horario y la cantidad de
veces que debe aparecer el aviso. En el ejemplo de la imagen el aviso se programará 4 veces
entre las 10:00 y las 22:00, de Lunes a Viernes. Si la cantidad de veces coincide con la
cantidad de tandas existentes en ese intervalo horario, la distribución del aviso resultará de un
aviso en cada tanda. (Nota: las tandas son numeradas en la generación. Puede saber cuantas
tandas hay en un día consultando los archivos LOG en el módulo 'CyberPlay Editor').
Page 162
SOLIDYNE AUDICOM
ADMICOM: Traffic and ads
Scheduled by show: Enables scheduled spots directly in certain shows or segments of radio
programming. The shows are entered in the 'Configuration Station -> Commercial Batch'
option. This facility allows the sale advertising to be scheduled within a program or radio show.
If the radio show date or time changes, just updating the radio show data announcements will
be automatically reassigned without changing the scheduled of each.
Scheduled by EXACT TIME: Allows entry the exact time at which the commercial will be
scheduled. Obviously, there must be a defined batch for that hour. If there is no definite time
for that commercial break, notice shall be included in the nearest commercial break. To enter a
schedule, write it in the field and press "Add Schedule" to add it to the list. "Clear" deletes the
selected schedule in the list.
7.3.3 Specials commands
7.3.3.1 Alternated ads
In the ad name field, two or more ads can be entered, separated by a "pipe " (|). This way,
both ads will be scheduled with alternance. The number of ads is limited by the length of the
field title (32 characters max.) The file names must be entered manually, not necessary the file
extension.
Example:
YPF-1|YPF-2
In this case the ads YPF-1 and YPF-2 will be included alternated, according to the main
scheduling.
7.3.3.2 Chained ads
It is possible to relate to two ads to be scheduled out one after another. The names of the ads
are written one after the other separated by the ">" (greater than). The file names are entered
manually, not necessary the file extension.
spot1>spot2
Both ads will be scheduled one after another
Spot1
Spot2
It is very useful for sponsored announcements like time, temperature, etc. For example:
SPONSOR_TIME>/TEMP
in where sponsor_time is the file name of the. The result will be:
SPONSOR_TIME
/TEMP
7.3.3.3 AUDICOM sentences
Some commands for AUDICOM software can be programmed as advertisements to be
automatically scheduled. For this we proceed as if it were spots, manually entering the
instruction instead of the name of the spot. Consider creating a Category for this commands.
Admicom supports the following commands:
Meteror command (/Time; /Temp: /Hum; /Pres; /Meteor): are used to schedule weather
announcements, which be aired with pre-recorded voices by AUDICOM. Create a Customer File
dedicated to this use. In the field "Customer name" enter, by example, 'AUDICOM'. Istead ads
you will program Meteor commands, scheduled by on-air hour.
Random: This command produces the income of a file randomly selected from a particular
folder. Instead of name of the ad enter the full sentence of the Random command.
Example: You want to schedule for every hour a spot on "advice" for road safety ". The spots
should be rotated each day to prevent the recurrence of every day at the same time.
/RND,RoadSafety,1 Each time that this command is scheduled, is aired a different spot from
the folder "RoadSafety".
Pauses (a stop point into the air playlist): Instead the file name, enter the command /Pause. It
will introduce a "Pause" into the commercial break, that is to say, a stop point for the on-air
play list.
SOLIDYNE AUDICOM
Page 163
SOLIDYNE AUDICOM
7.3.4 Generate the commercial breaks
(Ad Campaigns -> Schedule) Generating the commercial schedules files (.log) for each day.
These files are used in AUDICOM Air terminal to generate the unified playlist "CyberPlay"
(commercial breaks + automated musicalización + live events).
To generate the ad schedules .log files procced as follow:
1. Define the days for which you want to generate the scheduling (fields 'Start Date'- 'End
Date'). By default the scheduling is generated only for the current day. But you can generate
the .log files for a whole week, changing 'End Date'. You can type the date or enter it using the
calendar that appears when you click on the icon
2. Choose from the list the stations for which you can create the scheduling (only Multicast
version). This is not necessary when you manages only one radio.
3. Click on "Generate". Admicom will start to generate the advertising logs to specified days.
If needed, you can view the commercial breaks generated using the module "Cyber Play Editor
" of AUDICOM. This tool shows the grid of integrated programming (commercial breaks, music,
live events, satellites) as the operator will see in the studio. Remember AUDICOM also has the
audit module fro air emission ("Aaudit"), which provides reports based on the emitted files.
7.3.4.1 Rejected ads
Once concluded the generation of the .log files, a report of rejected ads appears on screen,
indicating the bill number; time (or segment); how many times the ad was rejected for these
batch; and the reason for the rejection. Spots can be rejected for the following reasons:
SEG = (seconds) By excess of time. The value 'maximum ads per hour' was reached. When this
limit is reached, any batch of this hour will accept ads. Eg: if an spot programmed for the
14:25's batch is rejected with reason "SEG", this means that the advertising programed from
14:00 to 15:00 Hs reaches the maximum allowed time. In this condition, all batches located
from 14:00 to 15:00 Hs will reject new ads. A solution is to locate this ads in others schedules
or to increase the maximum allowed time.
CAT = When two or more ads with equal category are programed to the same batch, the
system will include first the ad with greater priority and will reject the others ads. This is valid
only when the batch has enabled the option "Reject by category".
POS = Position conflict: there are two ads with the same position priority. Eg: the ads have
priority "First". Solution: To change the priority on the customer file of the rejected spot. Or
change the priority for the spot currently programed. See Commercial settings -> Customer's
categories.
REP = (Repeated) You are trying to include a spot two times into the same batch. This is not
allowed although the batch do not reject ads by category.
7.4 Reports
7.4.1 Solds report
Generate a report of aired ads for a specified customer, in a specified rage of dates.
Access to this report from 'Reports -> Solds'. Next will appear a field to choose the Station (in
case that you manages more than one station), the customer's name and the range of dates.
By clicking on 'Report' will appear on screen a detailed list with the ads of this customer, in
alphabetic sort. The options that appears over the report allows to print it, export it to an Excel
compatible file or save it as PDF
7.4.2 Agency billing
Shows a list with the ads of a specific Advertising Agency. This report include details about ads
aired in different Stations (for the case in which you manages more than one station).
The options that appears over the report allows to print it, export it to an Excel compatible file
or save it as PDF
Page 164
SOLIDYNE AUDICOM
ADMICOM: Traffic and ads
7.4.3 Live reads
Generates a report with the Sponsors and Live Reads. This report is generated for a specific
date.
7.4.4 Schedule profile
Comparative bar graph that shows the accumulated ads in each hour of the day. This report is
based on the .log files already generated. If you try to generate a report for a date for that the
.log file not was compiled yet, a message "Inexistent schedule" will appear.
On the horizontal axis represents the hours of day, from 0 to 24 Hs. On the vertical axis is
represented in minutes advertising time per hour. The height of the bars indicate how many
minutes of advertising are accumulated in segments of one hour.
The red line 'Max'indicates the limit of advertising time allowed per hour, which is defined in
"Station Setting -> Station". The schedules generated by Admicom never show a value that
exceeds that limit. But can occur if you modify a schedule manually from another AUDICOM
module (as Cyber Play Editor).
7.4.5 Ad campaign
Shows in simple way the campaign of a speciefied ad, based on the schedules. Reports based
on the aired ads can be obtained from the Aaudit module.
This report can be printed, exported as Excel compatible or saved as PDF.
REMEMBER: Air reports can be obtained from Audit module.
SOLIDYNE AUDICOM
Page 165
SOLIDYNE AUDICOM
8.5 Aaudit
8.5.1 Overview
Press the Audit button on the Applications Bar to open this module. It can find in the default
'Commercial' desktop (log in as user=comercial), or the user can add the Aaudit icon in the
current user's desktop.
This module allows to see the emission logs. The on-air desktop registers all events into .air
logs.
Like in the CyberPlay On Air window, the information is showed with a graphical environment.
Spots and others files played into a commercial break appears in green, titles played by AutoDj
or inside a live block, appears on light blue and marked with an asterisk. The schedules in
which AUDICOM was stopped are shown with yellow background and the legend "LIVE". To the
right, the gray zone indicates the exact time in which each file was played.
The Emission Logs are generated by the Air workstation and saved in the .AIR files. The name
of the file is the date of emission; there is a file for every day that AUDICOM was on-air. The
default location is C:\AUDICOM\Air and is defined in the configuration file AUDICOM.ini, in the
Input [Directories].
Note
From Windows Explorer, you can open the .air files by double click. Aaudit will open up.
Music or ads?
Aaudit has two methods to identify if a title is music or commercial spots.
a) according to the block in which it was played.
b) according the Database info.
All files played inside a batch are marked into the Emission Log as "commercial spot".
Therefore, if the operator inserts a music title in a commercial break, Aaudit will mark it as
"commercial spot". The database information is used to corroborate the type of file in the field
Class:
If Class =Spot this item appears on green
If Class is different from Spot (Promo, Music), it appears on light blue.
If Class field is empty or the file is not registered, the title will be considered a Spot.
Page 166
SOLIDYNE AUDICOM
ADMICOM: Traffic and ads
User's events log
As complementary information, the module of Air includes in the emission logs the users
login/logout. This information is shown in Aaudit with a gray bar with red text indicating the
login or logout time and the user name.
7.5.2 Playign a title
The user can listen the audio files selecting them on screen and pressing Play. The file plays
from its original location, therefore, if it was deleted or moved, the user won't be able to listen
it.
7.5.3 Open file
When Aaudit starts, shows the today "AIR" log. Pressing the button AIR you can
load another file. In the "Open" window you will usually see only the air files of the current
month. Use the drop-down menu 'File Type' to see the files of the previous month or all the
existent logs.
7.5.4 Multiple workstations
In big LANs that have more than one AIR workstation, you can see the emission logs of the
different workstations by selecting them from the following menu:
7.5.6 Save as TXT
Saves the current emission log in text format, to be able to open it with any text
editor.
7.5.7 Print
It presents a menu similar to the Graphics Reports menu (explained next), but
instead to show the information on screen, it sends it to the default printer
7.5.8 Reports
It presents a menu that allows to select the following reports:
Global Report: Shows information of the selected file: length, quantity of times played on-air
and the total time on-air. It is equal to double-click on the title.
Aaudit an spot: Generates a detailed report with all the emissions of the selected title, for a
specified dates interval. This report include day per day each emission of this title, with the real
time on-air to verify if the title was played complete.
SOLIDYNE AUDICOM
Page 167
SOLIDYNE AUDICOM
Listing for Royalties: It generates a listing to present before the responsible organisms of to
gather imposed by Royalties (i.e.: SADAIC in Argentina). They include Title, Performer, Author,
Label and code of the album.
7.5.9 Graphics Reports
It presents a menu that allows to select the graph type. The available options are:
Pie: Shows the percentages of music's time, spots and live shows for a day. Making doubleclick on the pie, the values are obtained in minutes and seconds.
24Hs Composition: It generates a bar graph that represents the quantity of music,
commercial spots and live shows emitted every hour of the day. Making a double-click on a bar
you obtains the emission times for that hour.
Accumulated Spot's time: Represents the amount of advertising accumulated on the day.
Detail of comercial spots emitted per hour: It generates a bar graph that represents in
minutes, the time of publicity emitted per hour.
3D Pie: It shows the same information that the graph of previous Cake but with a graph 3D.
Page 168
SOLIDYNE AUDICOM
ADMICOM: Traffic and ads
Detail of comercial spots emitted per hour - 3D: It shows the detail of announces emitted
per hour but the graph has an effect 3D.
Spots ranking: It generates a pie with the comparison of the aired time of each spot. The
times take at the moment of the registration open.
Favorite musical styles: It generates a pie comparing the time of air of the different musical
styles registered in the database.
SOLIDYNE AUDICOM
Page 169
SOLIDYNE AUDICOM
Remmember:
The .air files are generated in the Air workstation, the default folder is AUDICOM\Air. These
name of this files is the date in that it was created (Year-Month-Day.air). It is recommended to
delete the oldest files so that they don't occupy space in the disk.
Page 170
SOLIDYNE AUDICOM
SECTION 8
MANTEINANCE
8.1 dbReindex
Although the Database is a sure and reliable method of storing information, it certain
circumstances (for example, a power source failure, a failure in the computer), the files of the
Database can be damaged. If you note anomalies in AutoDj scheduling; or in the data shown
by InfoMusic-Prod, is symptom of the Database it is damaged. In that case, AUDICOM
dBreindex is a tool to solve the problem. Close all AUDICOM applications (Air, InfoMusic, AutoDj
Editor, File Manager, etc.) and runs from AUDICOM's icons group dBreidex
(C:\AUDICOM\dbReindex.exe). The following window will appear:
Reindex the database: This option reconstructs the data base using data.dbf file, making a
fast indexing.
Pack the database: It removes all data base entries that was deleted (deleted from InfoMusic
or AUDICOM File Manager) generating a new optimized Database. It's recommended to always
use this option.
Verify for the real files: This option check the if the records on the data base refers to a
existing media file. In addition, the field length updates according to the file header. If a record
refers to a nonexistent file, the record is disabled in the following way: the field MEDIA, before
HD (located in the hard disk), is changed to "_missing" indicating "lost file". This facilitates the
recognition of titles that appears into data base associated to nonexistent files.
Page 171
SOLIDYNE AUDICOM
SOLIDYNE AUDICOM
Revalidate _missing files: It recovers the records marked as LOST FILES (Media=_missing)
if the assocciated audio files now exist. It allows, by example, to disable data base records in
case of HD failure. The records remains into data base, but disabled for AutoDj and common
seraches. When you revcover the lost files, you can recover the records running dbReindx with
"Search missing files".
Polish 'title' fields: It converts the text from the title to the way Sentence (First letter
upercase).
Polish fields: It unifies the use uppercase/lowercase converting the fields "Author",
"Performer" and "Gender" to the format "first letter capitalized" and "Style" formats to "Way
Sentence". This option also check if the field "Style" has data. If this field is empty, is filled with
NOT CLASSIFIED, to facilitate serching of unclassified media.
Adjust drive mapping: This option verifies that the letter of the drive to which the titles
references coincides with the unit in which are the files. This is useful when a new HD are
added, because Windows change the letters of all the units. This will optimize the access from
AUDICOM to the files.
Delete _missing files: It erase the records with field Media=_missing. Once erased the record
cannot be recovered..
Rename files to <title>: If there are files whose name (Field 'Filename') it differs of the title
(Field Title) with which they are registered in the Database, the name of the file modifies so
that it coincides with the Title. THIS OPERATION MODIFIES THE FILES AND THERE IS NOT
FORM OF RETURNING BEHIND.
Rename files to <Performer - Title>:Rename the files with the format <interpreter> <title>, using the information of the fields Title and Interpreter of the Database. THIS
OPERATION MODIFIES THE FILES AND THERE IS NOT FORM OF RETURNING BEHIND.
Resets the aired date: It changes the last played date for all the titles (only for records Field
media=HD), so all will appears with the current date and time. The hundredth of second are
randomly assigned.
Deletes duplicated references: If duplicated record exist, that is, two titles on the Database
that referts to the same physical file, this option deletes the duplicated record. A symptom that
indicates the exitence of duplicated records usually is the repetition of a title in the automatic
scheduling.
Procced: Starts the restoration process.
Quit: Closes the application.
8.1.1 Self-diagnostics
AUDICOM possesses a security system that acts when the program closes in an inadequate
way. This system verifies the state of the Database and in case of find errors, it automatcally
repairs them.
The self-diagnosis can be activated in systems where the Database is located in a network
server, but it will be canceled if another user is accessing to the data base from another
terminal.
To activate or to disable the Self-diagnosis, modify the following line in AUDICOM.ini:
[Settings]
Autoreindex=1
If Autoreindex is 1 it means that it is active, if 0, is disabled.
8.2 Backups
Whenever a material is ingested in AUDICOM, all information entered in the database is
embedded in the media file. This allows, in case of damage in the database, it is possible to
retrieve information from the media (audio and video).
We recommend to backup the following folders.
\Audicom\DB\
Database of media files. Contents the files “user.ini” which save the
user profiles; “data.sqlite” which contents the database of MAM (Media Asset Management).
\Audicom\Log\*.log
Scheduling of Traffic.
\Audicom\Pgm\*.pgm
Scheduling of contents (titles, music).
\Audicom\Air\*.air
Records of aired files and specific actions of operators
Page 172
SOLIDYNE AUDICOM
Acerca de Solidyne
\Admicom\
Data base of advertisement
8.3 Support and updates
IMPORTANT: Always keep your system updated. Check for updates www.audicom.com.ar
If you have problems and cannot solve with the information available on this documentation,
feel free to contact our technical support via email or telephone, you may contact us to request
a review of the system via remote control. Thus, our technicians entering your computer to
verify the configuration and troubleshoot software
By this method technicians can run applications, open, edit, transfer and delete files, control
programs. You authorize us access to your computer and over coffee we solve the problem!
Please consult our sales department the cost of this service; with which it saves time and
expensive phone calls.
8.3.1 Updates
Updates are free for one year from date of purchase. These updates include all changes
published in the same product line (AUDICOM PRO; AUDICOM Multicast, AUDICOM Video HD)
For example, if you have "AUDICOM Multicast" version 9.2 and publishes "AUDICOM Multicast
10.0", you can download it if the license for downloading is valid.
Once the year of free updates, you can renew your subscription (www.audicom.com.ar)
To "AUDICOM Multicast" license updates also involves services "WEB TOOLS". Acquiring
AUDICOM Multicast provides one year free license of WEB tools.
The expiration date of the updates described in the module start "I-Logon" and on the top bar
of the software.
If you have problems and cannot solve with the information available on this assistance, our
technical support via email or telephone inquiries, you may contact Solidyne to request a
review of the system via the Internet. Thus, our technicians entering your computer to verify
the configuration and troubleshoot software
By this method technicians can run applications, open, edit, transfer and delete files, control
programs. You authorize us access to your computer and over coffee we solve the problem!
Please consult our sales department the cost of this service; with which it saves time and
expensive phone calls.
8.3.2 Contact us
Send us your request enclosing the following information so we can help you more efficiently:
•
Description of the computer on which the problem occurred (Brand processor speed,
RAM, hard drives, operating system)
•
Speed and type of network (if available)
•
Product version. AUDICOM version indicated in the "I-Logon" window and the toolbar.
Another way is to right-click on the executable file and choose Properties (aire.exe,
Fman.exe, etc)
•
If you have problems with the scheduling, and PGM LOG attach appropriate files.
Other files that may be useful depending on the case are:
•
Records of air emission (air files in C:. \ AUDICOM \ Air).
SOLIDYNE AUDICOM
Page 173
SOLIDYNE AUDICOM
•
File tracking error (C: \ xplayer.log).
This will save us time to find a satisfactory solution to your problem.
Page 174
SOLIDYNE AUDICOM