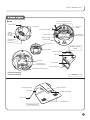
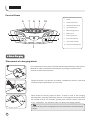
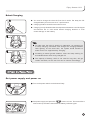
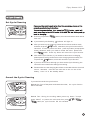
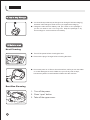
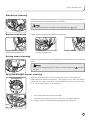
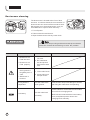
1
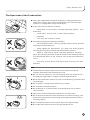
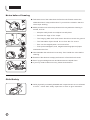
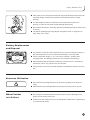
Robot Vacuum Cleaner
D54 User Guide
Thanks for purchasing
patented Robot
Vacuum Cleaner products. Hope you can enjoy it !
Thanks again for your choice!
Enjoy Smarter Life!
Content
1. Safety Instruction.... ................... 3
7 . G o Back Charging ........ ... ............ 13
User Guide............................ .. ........ 3
8. Cycle cleaning .. ..... ..... ...... ......... . 14
Power Supply for the Product..... . ......... 3
The Spectrum of Product Use.............. 4
Notes before Cleaning....................... 5
Set Cycle Cleaning.......................... 14
Cancel Cycle Cleaning ..................... 14
9. Day-to-Day Storage ..................... 14
Child Safety................... . ................ 5
Battery Replacement and Disposal ....... 6
10. Maintenance ............................ . 15
Resource Utilization . . . . . . . . . . . . . . . . . . . . . . . . . 6
Host Cleaning................................. 15
When Product is in Failure................ 6
Dust Box Cleaning .......................... 15
2. Content in the Original Package
and Technical Parameter........... . 7
3. Name of Par ts .............................. 8
Host . . . . . . . . . . . . . . . . . . . . . . . . . . . . . . . . . . . . . . . . . . . . . . 8
Control Panel................................... 9
Sponge Filter and Dust Box Cleaing.... . 16
Sponge Filter Replacement............... 17
Main Brush Cleaning....................... . 17
Side Brush Cleaning ........................ 18
Replace Side Brush .......................... 18
Up-Ground Height Sensor Cleaning.... 18
4. Batter y Charging............. ........ ... . 9
Dust Sensor Cleaning...................... 19
Placement of Charging Block............. 10
11. Alar m function....... ..... .... .. ...... . 19
Robot charging............ ................. . . 10
5. Power On/Pause/Power Off..... . .. . 10
Get pawer supply and power On........ .. 10
Pause. . . . . . . . . . . . . . . . . . . . . . . . . . . . . . . . . . . . . . . . . . 11
Power Off..................................... . 11
6 . Mode Selection.......... .. ............. . 12
Auto Mode ...... ...... .................... . . .. . 12
Intensive cleaning Mode..... ........ .. . .. . 12
12. Common Failure....................... 20
13. Other Problems........................ 21
1.Safety Instruction
Where there is a drop off in the cleaning area due to a step or stairs and they
are not carpeted, you should operate the unit to see that the unit can detect
the step without falling over the edge. It may become necessary to place a
physical barrier at the edge to keep the unit from falling over the drop but
make sure the physical barrier is high enough so that you or a family member
will not trip on the barrier and cause themselves injury.
NO
Guardrail
War ning
Set up
Guardrail
Note:
Do not open the equipment. The components inside the robot host are beyond repair by
user himself.
This product is only for domestic use, not suitable for industry or outdoor surroundings.
The User Guide
Please conform to the basic safety precautions as follows:
●
Read the content in this user guide carefully and install the robot according to the detailed instructions.
●
Safekeeping this guide. If you transfer this machine to another person, please make sure attach this booklet.
●
Any inconsistent operation with this guide would probably cause serious damage to both human being and the
machine itself.
Power Supply for the Product
Correct
● The power supply is from a Ni-MH chargeable battery inside the host of the
robot and it is specially assigned with a charging block to do recyclable
charge.
● Please double check the marked supply voltage on the charging block and
make sure it is applied according to the instructions.
● Do not use the damaged power cord or plug, while contact our after-sales
service or find our authorized supplier to maintain.
Electricity
leakage
● As the charging block is heavy, please never drag the block via pulling it’s
power cord.
● Remember never to twist and swing or screw the power cord excessively,
neither to block it when close the door.
We should not put heavy things on it as well.
● Do not let power cord touch hot or sharp surfaces.
Cloth
cleaning
Draw out
the plug
● Do not draw out the plug by pulling the cord.
● Keep wet hands away from the plug or machine.
● Pull the plug out of socket when you no longer use the charging block for
some time.
● Use dry cloth to wipe the dust on the plug frequently.
3
Enjoy Smarter Life!
The Spectrum of the Product Use
● This robot is applicable to domestic sweeping, including wooden floor,
rubber floor, ceramic tile, linoleum and medium or short-haired carpet
however, it is inapplicable to long-haired carpet.
● It can not be used for the floor as below:
---- Have water on the surface (including flammable liquids), such
as wet floor.
---- Inside toilet, shower room or other humid situation.
---- Staircase
---- The room with furnace or flame
● The following objects are definitely forbidden:
---- Not extinguished soot, burning cigarette butts or match, because
these objects would cause fire.
---- Sharp objects like glass debris, pin, paper clip,stones, gypsum,
and large piece of paper. These things may block the machine.
---- Water or other kind of liquid, especially detergent, kerosene,
petrol, paint, alcohol, perfume, as well as carpet or floor cleaning solution.
It would make the interior of the machine wet, so that may cause shortcircuit.
---- The toner of laser printer and copier which may bring fire and
explosion.
● Please keep the machine away from hot source such as oven and
fireplace, because the hot can distort the crust.
● Do not use the machine in the surroundings with any explosion risk.
For example, at gas station, oil depot, chemical plant and so on.
● Never use the machine outdoors. As rain or solid dust may get inside it and
cause damage.
● Do not repair or change any performance by yourself.
● Do not throw or bend the machine.
● Do not dampen it, or else the short-circuit would cause fire or electric
shock accident.
● Take care of routine maintenance and keep it in a clean place.
● Do not expose the machine in the extreme hot or cold surroundings. This
product is not allowed to long-time kept in the temperature below zero or
over thirty degree.
● Do not keep the machine in the liquid or expose it to high humidity.
● Do not place the machine close to burning cigarette or fire.
4
Notes before Cleaning
● Take extra care of the robot when the first it works. Please remove the
obstacles when it is beyond the robot. Try to avoid the situation that the
robot stops working.
● Make precautions to solve the problem which may make the cleaning in
trouble, such as:
---- Keep the easily knock over objects in a safe place.
---- Permian the edge of the carpet.
---- The hanging table cloth and curtain should not touch the ground.
---- The flammable object should be cut from the fire source.
---- Sort out the tangled power cord on the floor.
---- Pick up the newspaper, book, magazine and large piece of paper
scattered on the floor.
● Check whether the main brush is correctly fixed inside the robot before
cleaning.
● Examine if the dust box is empty and insure it is fixed before it works.
● See if up-ground height sensor and dust sensor are wiped clean.
● If you only need to clean one room, please close the door.
Child Safety
● Child, physically or mentally disabled and inexperienced are not allowed
to use it, unless their safety supervisor is there to give instruction.
5
Enjoy Smarter Life!
● Take good care of the product and keep it beyond child and people who can
not judge danger nearby. Extra attention should be paid when it stats
working.
● You should get the person inside the room know that the machine is
working, in order to avoid man-made damage like tripping.
● Do not take robot as toy. Carefully attention should be paid when child or pet
is around.
● The plastic package may bring danger of asphyxia and is supposed to
keep away from child.
Batter y Replacement
and Disposal
● You need to contact our after-sales when you want to change the battery. It
will cause explosion if you use replacement battery of wrong model.
● There is potential danger if you use other producer's battery and
charging block. The damage cause hence is not within the warranty.
● Please dispose the spent battery properly, because there is hazardous
substance which may pollute the environment.
● Conform with local environmental legislation and dispose it at the recovery
site.
Resource Utilization
● Do not take the package material as domestic garbage and discard it
freely.
● Please deliver the package material to proper recovery site for recycle.
When Product
is in Failure
● Do not repair or disassemble the machine when there is damage of the
power cord or failure of the host.
● Contact our after-sales service or our designate maintenance organization
for professional repair.
6
2.Content
Robot Vacuum Cleaner
D54 User Guide
Host
Charging block
User guide
Roll brush clean-up
gadget
technique parameter
The host
Working voltage
Rated power
Speed
Capacity of dust box
Noise
DC14.4V
220-240V~
DC17.5V
rated frequency
50Hz
0.7L
rated power
30W
≤62dB
rated out-put
currency
0.7A
0.25meter/second
About 4~5 hours
Duration upon full
battery 60 minutes
45 minutes
Max Coverage upon
full battery
90-120 M
Net weight
In-put voltage
rated out-put voltage
30W
Charging duration
Size
7
The charging block
2
335×335×100mm
2.8Kg
Enjoy Smarter Life!
3.Name of parts
host
up-ground height sensor
control button
wind gate
All-round
wheel
rotating side brush
welted
induction
infrared
receiver
suspended
driving wheel
main brush
rubber scraper
charging dock
electrode
on/off switch
buffer plate
dust sensor
bottom view of
robot
dust sensor
dust box handle
ash exit
dust box
charging and
alarm indicator
sponge filter
lock of dust box
open button of upper cover
elevation of robot
dust box
docking electrode
wind gate
power indicator
infrared transmitter
power cord
anti-skid band
charging block
8
Control Panel
6
2
7
8
9
10
3
AUTO
5
4
1.
Power
2.
AUTO mode button
3.
intensive mode buttom
4.
Cycle mode button
5.
Back charging button
6.
Battery level
7.
Alarming indicator
8.
Auto mode indicator
9.
Cycle mode indicator
10. Intensive mode indicator
1
4.Robot Charging
Placement of charging block
Put the block at an even place and make the base perpendicular to the ground.
Meanwhile, take a look at the marked electricity voltage to make sure the
product is used under instruction.
Tangle the power cord and do not scatter it besides the block in case that
robot would get impeded when it turns back .
m
0. 5
There should not be any object at least 1.5 meter in front of the charging
block. Besides, anything with strong reflector is not supposed to stay ahead of
the infrared receiver. For example, ground glass, smooth ceramic vase and
m
0. 5
1.5m
so on. Otherwise, the machine shall not detect the charging block.
Tips:
Please do not put the charging block to the staircase to avoid accidental
cases.
9
Enjoy Smarter Life!
Robot Charging
● You need to charge the robot the first time it works. Put away the fullcharged battery for use to ensure it's performance.
●
Charging duration should be around 4-6 hours.
●
Charging is only allowed under the temperature between 0 and 45 degree
and extreme hot or cold would extend charging duration or even
cause damage to the battery.
charging
status
Indicator
flashing
Tips :
To make sure the robot is working in saturation, we suggest you
to keep charging connected even though the charging indicator
lasts lighting. At the same time, the system would transfer to
weak current for supplementary charging.
charging
status
According to actual ground situation, robot can keep working for
around 45 minutes after being charged full.
Indicator
last
lighting
The capacity of battery, which is not used for long time, will get
certain decrease, so the use time can be shorten accordingly.
5.Power On/ Pause/ Power
Get power supply and power on
● Turn on the power switch on the bottom firstly.
● Get power supply and press the
button on host. There would be a
short music tip and at the same time the battery indicator lights.
AUTO
10
● Then choose the cleaning mode according to your needs. Press
button, the robot starts to work.
AUTO
or
Pause
● Press any button except the power button, it can pause the operation of
robot and keep it stay where it is.
AUTO
Tips:
On the status of pause, you can reset the cleaning mode, then press
or
button to restart the robot.
AUTO
Aanother way to pause the robot is that you can press any button or lift
the robot.
Power off
● Press
button, power is off and robot stops running.
Tips:
If you want the robot to stop running, you can press
under pause status.
button
Put the robot back to the charging block after it stops working for fear
that others would be tripped.
Tips:
Put the robot on the charging block and keep it charging after finishing
house cleaning.
Do not keep the robot on pause status for long time, because the full
charged battery could only last for around 20 hours . We suggest
you to turn it off when you do not want it to work .
11
Enjoy Smarter Life!
6.Mode Selection
Auto Mode
Under the Auto Mode, the AUTO indicator lights.
Route description: First the robot going straight ahead, it turns when it
meets obstacle. The robot will go back charging before run off the battery.
● If take this mode, the cleaning coverage would reach maximum compared
by the same ground situation.
● We recommend this mode when the ground is not too dirty and needs the
quick cleaning.
0. 5m
If robot detects that there is plenty of dust during the clean process. It
will take the fan-shaped or spiral route.
Under normal circumstance, it will take spiral route when it detects
plenty of large particles, and will take fan-shaped route when
few of small particles.
The clean can last 45 minutes under this mode, when it detects low
battery, the robot will go back charging automatically and the AUTO
indicator disappeared.
Intensive Cleaning Mode
Route description: under this mode, robot takes the same route as
automatic cleaning. It would search for charging block by itself before it
runs of battery.
Under the same ground circumstance, the cleaning effect is the
best .
If the ground is quite dirty, we recommend this mode .
12
7.Go Back Charging
●
When robot detects the low battery, it will go back charging
automatically. Now, the battery indicator is yellow. You also can
press
button to stop the working and go back charging, and
the color of the battery indicator will not change.
Route description: Robot will search for charging block automatically when it
detects low battery, after the charger connected successfully, the
indicator light flashing.
●
To make it easy for robot to search for charging block, you need to put the
block back to the wall and make sure there is no obstacle within 1.5
meters ahead of the infrared receiver. Check carefully whether there
is strong reflector in front of the charger, such as ground glass,
smooth ceramic vase and so on.
●
It takes time for robot to seek the charger. Robot can reserve enough
battery to go back the charging block.
●
If put the robot in a strait room, please make sure that there is enough
space for robot to go back charging.
●
Robot can return to the charger if the ground situation is not too
complicated. Under extreme circumstance, such as, huge house,
complex layout would bring difficulty for robot to seek for charger. So,
you should help to put the robot back to the charging block.
●
Please take care of the first automatic charging, if you find the robot
keeps turning in the certain area after trying several times to seek
back, you can help to place it on the charging block and look
through the charging.
●
When the robot goes back charging, the main brush will stop working.
And robot shall stay at the charger when it finishes charging and it
transfer to small currency to charge until you start operating.
?
strait room
??
strait room
13
Enjoy Smarter Life!
8.Cycle Cleaning
Set Cycle Cleaning
If you need the robot to work in the fixed time every day, please set the
procedure as belowing instruction:
Turn on the power button, then press the
button, robot will
work according to the AUTO mode till it show the low battery and go
back to charging.
AUTO
● The time you press the
time next.
button, then robot will start to work at that
●
If you set the Cycle Cleaning,
●
After you set the cycle cleaning, please do not choose another mode,
and also not press
button, otherwise, the cycle function will be
canceled. If want to pause the robot, press any button (except power
button). However, when you need to restart the robot, please still
press
button. Press any button will cancel the cycle function.
●
After set the cycle function, if you need the robot return to charging,
please pause it at first, and move it to the charging block manually. Do
not press the
button, which will cancel the cycle function.
●
If you turn off the robot, although you have set the Cycle Cleaning, the
robot will not work when the setting time coming.
●
Please make sure the charging block have connected with the electrical
source, otherwise, robot will not work due to the run out of the
battery, even it is in the standby status.
indicator will light on.
Cancel the Cycle Cleaning
If you need to cancel the cycle function:
AUTO
Method One: Turn off the power and restart the robot ; the cycle function
will be canceled.
Method Two : During the working status, press any button
AUTO
power button ) to pause the robot, and then press
button, the c ycle fu nction w ill b e c anceled.
( except
or AUTO or
14
9.Day-to-day Storage
● You should keep robot stay at charger even though it finishes charging,
because it will change to small currency to supplement charging.
● Charge the robot until full battery and put it back to the package if
you do not need to use it for long time. Keep the package in dry
surroundings to avoid sunshine or humidity.
10.Maintenance
Host Cleaning
● Turn off the power before cleaning the host.
● Draw out the plug of charger before cleaning the block.
● Do not use petrol or oil-like to clean the surface, while you can use water
or neutral detergent to scrub. Make sure you use dry cloth to wipe,
because any water is not allowed to infiltrate into the machine.
Dust Box Cleaning
1. Turn off the power.
11
2. Press “open” button.
3. Take off the upper cover.
open button
of upper cover
15
Enjoy Smarter Life!
Hold the handle of
21
dust box and lift it to
31
take out.
In order to avoid dust
leaking, lift the suction up
when you take out dust
box. Please mind your
speed doing this step.
Match the bottom
with trash can and
swing dust box
gently. You can mildly
beating it along the
edge of the can to get
the dust out.
41
Pour out the dust
61
on sponge filter.
51
If there is too much dust
on sponge filter, you can
open the lock and take
off the cover.
71
Close the cover and
hear "kaca" sound
which shows that it is
placed. Put the dust
box back into the host.
Tips:
If the dust box is not placed back or not properly placed. The
indicator lights.
Sponge filter and dust box cleaning
If there is too much dust
along dust box, you can put
the box under running
water to get rid of the dust
(make it dry under
sunshine for 24 hours).
Put it back into the host
Open the lock at the
bottom of dust box.
Pour out the dust on
sponge filter.
after the box and sponge
filter is completely dry.
16
Sponge Filter Replacement
1. Open the cover of the Deebot,
take out the dust box.
2. Push aside the lock catch of the
dust box ,then open the dust box
and clean it.
3. Extract the axle of the dust box’s
cover.
4. Replace the sponge filter and fix
the cover ,then put it back into
Deebot.
Main brush cleaning
Tips: Clean the main brush after it has operated for 4 or 5 recycles.
1
11
Undo the screw fixed on the
main brush.
2
Take off the frame of main brush.
2
3
Take out one side of main
brush from the belt.
1
44
Remove the hair and dust
which is in-between the belt.
54
Rip off the hair on main brush
with equipped roll brush
cleaning gadget to break off
the hair on main brush along
the groove.
7
Put the main brush back to the
host and take care of the
anastomosis of belt.
17
2
Wipe the dust on the roller
and put it back.
91
8
Fix the frame into host.
6
Tie up the screw.
Enjoy Smarter Life!
Side brush cleaning
Side brush is a kind of easy wear part. We suggest you to check it every time it
takes cleaning task. Please change it if necessary.
Note:
The host will alarm when the side brush tangled and the
Replace side brush
lights.
Please replace the side brush when it is destroyed.
Please remove the screws,
and take out the side brush.
Please push the new side brush
into the correct position.
Tight the screws.
Driving wheel cleaning
Please use the roll brush cleaning gadget to remove the dust or hair on driving
wheel.
Note:
If the wheel is tangled by hair or cloth, the host will alarm and
will light.
indicator
Up-ground height sensor cleaning
Up-ground height sensor
Up-ground height sensor is on the front bottom of robot. It can detect the
height difference above 8 centimeters. We suggest you to wipe the optical
board with dry cotton cloth after it finishes task to prevent the dust piling
on it, which would affect its performance.
1.
Turn off the power and remove the trash.
2.
Invert the robot, and then put it on the even and clean platform.
3.
Use dry cotton cloth to wipe three optical board of up-ground.
18
Dust sensor cleaning
The dust sensor is located at the front of dust
entrance. It is able to detect the concentration of
dust so that it can choose efficient mode to work.
We suggest you to clean dust sensor once you
clean dust box to improve work efficiency.
1. Turn off power.
2. Take out dust box and clean it.
3. Wipe the dust sensor with dry cotton cloth.
11.Alarm function
Note:
The robot will stop working and be alarm and tip sound at the
same time. Please do as belowing to solve the problem.
Icon
Cause of failure
1. Dust box is not
fixed into host.
2. Dust box is not
fixed properly .
1. Main brush or
driving wheel is
tangled by hair or
cloth.
2. Side brush is
blocked.
Driving wheel is
suspended.
Low battery.
19
Solution
Instruction
1. Put dust box back
into host.
2. Re-install dust
box and press it
down at the same
time.
1. Clean main brush.
2. Clean side brush
and put it back.
Put the robot at the
even ground.
Put the robot back
manually .
This function can prevent danger of child or
pet lifting the robot when it is operating.
Yellow indicator means that the robot starts
to look for the charging block.
Red indicator means that the lower battery
level, and please put the robot to the
charging block manually.
Enjoy Smarter Life!
12.Common Failure
No.
Problem
Solution
Turn off the power.
1. Check if there is dust on up-ground height
1
Robot keeps proceeding or moving
backward once power is on.
sensor, which cause robot to make wrong
signal. Use dry cloth to clean it.
2. Buffer collision is out of control. Put your
hand at left, middle and right in turn to see
if it can rebound by itself.
Robot may fall in trouble when it is working. In
such case, it will try every possibility to get out
of trouble, but it shall stay at a certain place
when it fails and starts alarm. You should help
2
Robot is in trouble.
it and get rid of the obstacle.
The trouble may be as follows:
1. It is tangled by power cord.
2. It is tangled by hanging curtain or fringe.
3. Too many obstacles before the robot.
Robot is able to detect most of the stairs over
8 centimeters height difference. However, its
3
Robot fails to detect the stairs.
performance will weaken when it is smooth
floor with height difference or the floor with
strong reflector.
4
The capacity to clean weakens.
Turn off power and take out the dust box, then
follow the steps as below:
1. Check whether there is too much dust on
sponge filter so that it needs to change it.
2. Make sure there is no dust which blocks the
suction.
3. Take out main brush and clean it. Insure the
both ends of main brush is not tangled by hair
or fiber. Fix it back after it is been cleaned.
4. Examine if there is dust or debris near
driving wheels.
5. Clean dust sensor.
If the failure still there after following the steps
above, please contact our after-sales.
20
Turn off the power supply, and then take out of
dust box. After removing the garbage,
overturn the robot.
5
There is much noise when the robot
1. Check whether the suction of main brush is
blocked.
works.
2. Examine and clean the main brush.
3. Examine and clean the side brush.
If the failure is still there after operating
according to the above procedure, Please
contact out after-sales service.
13.Other Problems
1.
How long can robot last working under
full battery?
Answer: It differs from the ground situation,
It takes around 45 minutes for even floor
such as wooden floor and ceramic tile, and
20 minutes for short-haired carpet.
2.
mode)
Answer: Under normal circumstance, it is
around 90-120 sq, but it differs from the
ground situation.
7.
Is it allowed for the robot to work
independently without taking care of?
Answer: Under normal circumstance,
robot will return or seek other route when
it meets obstacle. However, if it
controlled by remote control, it is not
able to change route in case of obstacle.
Answer: Yes. However, you should keep
person in the room informed about robot
operating to avoid tripping.
3.
What kind of equipment inside the robot
is used for dealing with failure?
8.
Answer: It is equipped with photosensitive
components which can detect the stair over
the height of 8 centimeters; for fear that it
would fall over.
4.
5.
Why does robot fail to work under set
mode?
Answer: Because when there is low
battery, it will do back to charging mode
automatically.
6.
21
What's the cleaning coverage once it is
charged full?(under automatic cleaning
Why there is garbage leaking from the
machine while robot operating?
Answer: a. Please check whether there is
too much garbage in dust box(if there is
too much dust on the floor, robot is not
able to alarm after working for some time
even though there is too much garbage in
dust box.). That's why you need to clean
dust box. b. See whether main brush is not
cleaned for long time, as it is tangled with
much hair and dust.
Is robot able to clean the bottom of the
furniture?
Answer: It is flat design, during normal
cleaning, it can go into table and bed corner
whose height is over 10 centimeters, such as
bed, wardrobe, sofa and tea table.
Why does robot stop working once it
meets obstacle?
9.
Why does robot fail to start cleaning on
appointment time?
Answer: a.Confirm whether there is much
remaining battery. Appointment timing is not
applicable when robot is returning to charge
after operating cleaning. b. Check if robot is
under standby status.
Enjoy Smarter Life!
10 . Why robot is not charging as it is put in
the charger? The charging indicator does
not light as well.
Answer: a. Examine whether the battery at
the bottom is installed in place, if cover
screw is loose, you need to fasten it. b.
Check if there is power supply for the socket.
c. Please contact our after-sales service
when the failure is still there.
11 . Why does the speed of robot slow down
sometimes?
Answer: When robot detects there is much
garbage and dust on the floor, it would turn
to low speed proceeding automatically.
12 . Is there any danger to furniture and child
when robot is proceeding?
17. How does main brush avoid being
tangled by power cord?
Answer: Robot is probably get tangled by the
wire scattered on the floor when it is
operating. At that time, robot will try to turn
back to get rid of it, and it will make alarm
sound when it fails after trying several times.
18. How can I stop the robot from operating
on appointment time since I will be away
from home for sometime?
Answer: You can cancel cycle cleaning.
19. How can I transfer my robot?
Answer: You can lift it up with both your
hands and lay on the ground quickly, dust
and garbage in dust box will come out if it is
not place back in time.
Answer: No. There is a soft rubber buffer
made of PVC in front of the host. It would try
other route once it touches furniture or child.
13 . Would robot affect pet?
Answer: Robot makes low noise when
operating, so there would be no shrill sound
which may cause pet restless or even
distrust. If you keep pet at home, we suggest
you to notice the first time the robot
operating.
14 . What should be noticed when cleaning
thecarpet?
Answer: Robot is not able to clean long hair
over 2 centimeters. Fold the banding first
when you start cleaning.
15 . Does it matter to keep the robot at the
charger when not using it?
Answer: Yes. Robot will transfer to small
currency to supplement charging. Please
avoid wrong operation by child.
16 . Is there any danger to wrongly touch the
docking electrode film between the host
and charger?
Answer: No. The two electrodes of
charger is of no voltage under output
mode(when there is no power supply);
it's maximum voltage is 24V which is safe
one under input mode(when it is charging).
20. How to use robot most effectively?
Answer: Put the robot and charger in the
same room, because it would shorten
seeking time and it can extend the working
time. If you need robot to clean every room
of house, you should put the charger in the
middle of house for the convenience of
return back to charge.
21. What should do if robot sucked liquid?
Answer: a. Turn off the power and take out
dust box, then empty it and wipe it dry. b.
Draw out the sponge filter and wipe it dry. c.
Take out main brush and clean it, then use
day cloth to wipe the brush and its interior.
Wait until the brush is dry and place it back.
d. Let the product dry by itself for at least
12hours(make sure circuit board is dry and
then get power on).
If the procedures above still do not make
it work, please contact our after-sales
service.
22
Enjoy smar ter life !
D54-000IM201101