1
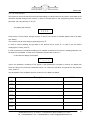
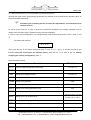
MD02176D
Programming Manual for the vending
machine model "EuroSnacky"
VERS. SOFTWARE E1.00
CONTENTS
1.1
INTRODUCTION ...............................................................................................................2
1.2
PROGRAMMING MODE ...................................................................................................2
1.3
COUNTER OF DISPENSED PRODUCTS.........................................................................3
1.4
PRICE SETTING ..............................................................................................................4
1.5
CURRENCY SETTING……………………………………………………………………………4
1.6
SETTING OF COIN ACCEPTOR LINES ...........................................................................5
1.7
SETTING OF REMAINING CREDIT PERSISTENCY ........................................................6
1.8
SETTING OF THE TYPE OF POWER SUPPLY................................................................7
1.9
TEST .................................................................................................................................8
1.9.1
CHECKING OF BATTERY OPERATION....................................................................8
1.9.2
CHECKING OF KEYBOARD OPERATION ................................................................9
1.9.3
CHECKING OF COIN ACCEPTOR LINES ................................................................9
1.9.4
CHECKING OF OPERATION OF PRODUCT DISPENSING MOTORS .....................9
2.0
ACCOUNTING ................................................................................................................10
2.1
PASSWORD SETTING ...................................................................................................11
2.2
RESTORATION OF STANDARD CONFIGURATION ………………………………………12
2.3
SETTING OF MDB PROTOCOL .....................................................................................13
2.4
SETTING OF STORAGE FUNCTION.............................................................................14
2.4.1
2.5
STORAGE INVENTORY .........................................................................................14
ERROR MESSAGES ......................................................................................................15
This programming manual is valid also for
the model "EuroSnacky-Mignon"
1
QUASAR Electronics S.a.s. via Grande, 2 – 31048 Rovarè di S. Biagio di Callalta ( TV ) – ITALY –
Tel: ++390422895107 Fax: ++390422895274 e-mail: [email protected]
MD02176D
1.1 INTRODUCTION
The vending machine model EuroSnacky is provided with a software which allows to visualize and set a wide
range of parameters and functions in a clear and easy way. The programming operations are performed
through the display and the keyboard generally used for selection of products. In the programming mode
(see para. 1.2) the function of the keys will be different and the display will allow to visualize the parameters
to be modified.
1.2 PROGRAMMING MODE
In order to have access to the operating parameters it is necessary to get into the programming mode
through the “service” push-button located in the middle of the electronic card.
In order to get back to the normal operation mode, you have only to press the key ‡, after ~90 seconds
without pressing any push-button, the machine will automatically get out of the programming mode.
In the programming mode the display will visualize:
SSSS
The function of the keys used is the following:
Key • : ê ……………….. Allows to scroll the menu of functions / increases the values
Key ‚ : é …………………Allows to scroll the menu of functions / decreases the values
Key † : Enter / Save …….Allows to get into a sub-menu and to confirm any modification
Key ‡ : Esc ……………….Allows to get out of a previously selected menu
Key ˆ : Reset …………….Allows to reset the value of a visualized parameter
2
QUASAR Electronics S.a.s. via Grande, 2 – 31048 Rovarè di S. Biagio di Callalta ( TV ) – ITALY –
Tel: ++390422895107 Fax: ++390422895274 e-mail: [email protected]
MD02176D
1.3 COUNTER OF DISPENSED PRODUCTS
The machine is provided with two counters, CCII e CCtt, to count the number of products dispensed from
each shelf.
CCII stores the number of products dispensed cash.
CCtt stores the number of products dispensed with payment through credit key.
Select the counter to be visualized ( ex. CCII ) using the keys • and ‚.
The display will visualize:
CCII
Press the key † and select, through the keys • and ‚, the counter of the shelf to be visualized ( ex. shelf
no. 6 ).
The display will visualize:
C
6
In order to confirm the selected counter, press again the key †.
The display will visualize the number of dispensed products:
XX
The visualized counter can be reset by pressing ˆ. If it is not to be reset, you have only to press ‡.
In order to prevent any unwelcome resettings or to establish an access restriction, the resetting operation
may be subject to a password. In order to set a password, please refer to para. 2.1
The display will visualize:
- _ _ _
Type in the password, consisting of four figures. If the password is not typed in correctly, the display will
show the value of the previously visualized counter. To confirm the operation and get back to the previous
menu, press †. In order to get out of the programming mode press ‡ .
Follow the above mentioned procedure, selecting “CCtt”, to visualize the counter of dispensed products with
payment made through key systems.
3
QUASAR Electronics S.a.s. via Grande, 2 – 31048 Rovarè di S. Biagio di Callalta ( TV ) – ITALY –
Tel: ++390422895107 Fax: ++390422895274 e-mail: [email protected]
MD02176D
1.4 PRICE SETTING
The selling prices of products can be programmed independently for each shelf. Also, it is possible to
separate the prices of products purchased cash ( PPII ) from the prices of products purchased through credit
key ( PPtt ).
If no key payment system is installed in the machine, it is not necessary to set PPtt . The price setting is
made in both cases in the same way.
Select the price menu to be programmed (ex. PPII ) using the keys • and ‚.
The display will visualize:
PPII
Press to key † and select, through the keys • and ‚ , the shelf where the price should be modified ( ex.
shelf no.6 ).
The display will visualize:
P
6
In order to confirm the selection, press again the key †.
The display will visualize the previously set price, that can be increased or reduced by increases equivalent
to the value of the lowest value coin programmed (see para. 1.5 ), using again the keys • and ‚. In order
to reset the value press ˆ.
Once the desired price has been reached, press † to save the setting. Follow the above mentioned
procedure to set the prices of all the shelves to be modified.
Press ‡ to get back to the starting menu PPII.
1.5 CURRENCY SETTING
The currency setting allows to fix a scale factor to visualize the credit. This option allows to use the vending
machine with most of the existing currencies. In fact, 8 options are available ( 0.01 - 0.05 - 0.1 - 0.5 – 1 – 5 –
10 – 50 ) among which the minimum coin value to be used shall be identified.
The scale factor selection determines the increase value through which it will be possible to set the prices (
PPII - PPtt ) as well as the correct visualization of the counters ( CCII – CCtt - tttt ).
F
In all the machines delivered complete with payment systems the proper currency has
already been set.
4
QUASAR Electronics S.a.s. via Grande, 2 – 31048 Rovarè di S. Biagio di Callalta ( TV ) – ITALY –
Tel: ++390422895107 Fax: ++390422895274 e-mail: [email protected]
MD02176D
In order to modify the currency setting, in the programming mode, select the parameter EEEE using • and
‚.
The display will visualize:
EEEE
Press then the key † to visualize the scale factor value that has been previously set ( ex. “1” ):
The display will visualize:
1
Using • and ‚ select the value to be set. To confirm the choice and get back to the previous menu press
†. In order to get out without modifying the present setting, press ‡ .
Example: Regarding the Euro, the lowest value coin generally used is the 5 cent. Therefore, the
value of EEEE shall be set to 0.05. This value will allow to set the product prices with an
increase/reduction of 50 cent of Euro.
1.6 SETTING OF COIN ACCEPTOR LINES
In order to interface correctly a coin acceptor with the vending machine it is essential to program the
parameter “LLLL”. Through this setting, a value to the input lines to be used for payment systems is added.
There are 6 lines for the electronic acceptor ( L1 ÷ L6 ). In this connection, it is essential to know the type of
programming of the payment system to be used.
F
F
Before proceeding with programming of the lines, the currency value ( EEEE ) para.
1.5. must have been put in.
In all the machines delivered complete with payment system, programming of the coin
acceptor lines has already been made.
In order to modify setting of the coin acceptor lines, in the programming mode, select the parameter LLLL
using • and ‚.
The display will visualize:
LLLL
Press the key † and select, through the keys • and ‚, the line where the value should be modified ( ex.
line 2 ).
5
QUASAR Electronics S.a.s. via Grande, 2 – 31048 Rovarè di S. Biagio di Callalta ( TV ) – ITALY –
Tel: ++390422895107 Fax: ++390422895274 e-mail: [email protected]
MD02176D
The display will visualize:
L
2
Press then the key † to visualize the value that has been previously set ( ex.0.10):
The display will visualize:
0.10
Using the keys • and ‚ it is possible to modify the value of the visualized line. Should it be necessary to
reset the value, press the key ˆ. In order to confirm the modification and get back to the previous menu,
press †. To get out without modifying, press ‡ .
As mentioned in the user's manual, coin acceptors with output type “Pulse” or “ Parallel” can be used
indifferently. In both cases programming of lines is the following:
A) Programming of payment systems with output type “Pulse”.
Should a coi acceptor with “pulse” output be used, the line 3 ( L3 ) shall be programmed with the value
assigned by the line itself to the pulse ( check the features specified by the manufacturer ).
The other lines
( L1 – L2 – L4 – L5 – L6 ) shall be set to zero. In this mode, on each of the pulses coming from the coin
acceptor, the value set on "L3" shall be credited.
B) Programming of payment systems with output type “Parallel”
Should a coin acceptor with "parallel" output be used, it is necessary to program all the lines ( L1÷ L6 ) with
the respective value ( check the features specified by the manufacturer ). The non-used lines shall be set to
zero.
Example: In order to interface a coin acceptor in Euro having the following configuration:
CH1=0,05 €; CH2=0,10 €; CH3=0,20 €; CH4=0,50 €, it is necessary to program the machine as
follows: L1=0,05; L2=0,10; L3=0,20; L4=0,50; L5=0; L6=0.
1.7 SETTING OF REMAINING CREDIT PERSISTENCY
Any credit resulting from a sale cash can be used in two different ways: leaving the remaining credit for the
following sales; eliminating the remaining credit. In the latter case, the value will be cashed and entered by
the counter “rES”( see para. 2.0 ). Should the first option be chosen, it is possible to fix the persistency time
of remaining credit.
F
All the machines are supplied with a remaining credit persistency time infinite ( buCr=240 )
6
QUASAR Electronics S.a.s. via Grande, 2 – 31048 Rovarè di S. Biagio di Callalta ( TV ) – ITALY –
Tel: ++390422895107 Fax: ++390422895274 e-mail: [email protected]
MD02176D
In order to set a different credit persistency time, in the programming mode, select the parameter “buCr”
using • and ‚.
The display will visualize:
buCr
Press then the key † to visualize the value that has been previously set ( ex. 120 seconds ):
The display will visualize:
120
Using • and ‚ select the value to set. In order to reset the value press ˆ.
To confirm the choice and get back to the previous menu, press †. To get out without modifying the present
setting, press ‡ . The following table summarizes the different possibilities:
buCr
Remaining credit persistency time
0
Null
1 ÷ 239
Included between 1 ÷ 239 seconds
240
Infinite
Also in the multiple sale mode ( 1<buCr<239 ) any non-used remaining credit will be entered by the counter
“rES” ( see para.2.0 ).
1.8 TYPE OF POWER SUPPLY
The vending machine can be connected with the mains or battery operated, being the battery installed inside
the machine itself. Through this function it is possible to select the type of power supplied. In the
programming mode, select the parameter “POtE” using • and ‚.
The display will visualize:
PotE
Then press the key † and choose, through the keys • and ‚ ( rEtE - bAtt ), the type of power supply. To
confirm the choice press the key †. In order to get out without any modification, press ‡ .
7
QUASAR Electronics S.a.s. via Grande, 2 – 31048 Rovarè di S. Biagio di Callalta ( TV ) – ITALY –
Tel: ++390422895107 Fax: ++390422895274 e-mail: [email protected]
MD02176D
1.9 TEST
Through the TEST function, it is possible to check the good working order of some machine components.
During such the counters are not increased, nor the storage function is compromised. The available tests are
shown in the table here below.
Item
Description
tbAt
Checking of battery operation (on the battery-operated machines)
tASt
Checking of good working order of keyboard
LInE
Checking of coin acceptor lines
TOrE
Checking of good working order of product dispensing motors
In order to have access to the various tests, in the programming mode, select the parameter “tESt” using the
keys • and ‚.
The display will visualize:
tESt
Press the key † and choose, through the keys • and ‚, the item to be selected.
1.9.1 CHECKING OF BATTERY OPERATION
This test allows to check that the card gets connected and disconnected correctly.
The display will visualize:
tbAt
Press the key † to confirm the choice.
The display will visualize:
SLSL
At this point the card is in the "low consumption" mode; pressing any key or putting in a coin the card gets
connected and the display shall visualize:
LOn
Wait a few seconds, and the display will visualize again SLSL. In order to get out, keep the key ‡ pressed.
8
QUASAR Electronics S.a.s. via Grande, 2 – 31048 Rovarè di S. Biagio di Callalta ( TV ) – ITALY –
Tel: ++390422895107 Fax: ++390422895274 e-mail: [email protected]
MD02176D
1.9.2 CHECKING OF KEYBOARD OPERATION
This test allows to check the good working order of the keyboard.
The display will visualize:
tASt
Press the key † to confirm the choice.
Check on the display correspondence of the keys that are pressed. Wait a few seconds to get back to the
previous menu.
1.9.3 CHECKING OF COIN ACCEPTOR LINES
This test allows to check correspondence of the coin acceptor lines.
The display will visualize:
LInE
Press the key † to confirm the choice. Putting in the coin acceptor the various coins used, the display will
show the corresponding coin acceptor line. In order to get out and get back to the previous menu, press ‡.
1.9.4 CHECKING OF OPERATION OF PRODUCT DISPENSING MOTORS
This test allows to check that the single motors for product dispensing are in good working order.
The display will visualize:
tOrE
Press the key † and choose, through the keys • and ‚, the motor to test (C1÷C12).
Pressing again † the chosen motor will do a turn.
In order to get out and get back to the previous menu, press ‡.
As already mentioned, this test does not increase any counter, nor it compromises the storage function.
9
QUASAR Electronics S.a.s. via Grande, 2 – 31048 Rovarè di S. Biagio di Callalta ( TV ) – ITALY –
Tel: ++390422895107 Fax: ++390422895274 e-mail: [email protected]
MD02176D
2.0 ACCOUNTING
The electronic card of the machine stores all data relating to collected amounts and sales. These data are at
operator's disposal through some counters. In order to visualize them, in the programming mode, select the
parameter “tttt” using the keys • and ‚.
The display will visualize:
t t t t
Press the key † and choose, through the keys • and ‚, the counter to visualize (please refer to the table
here below).
The counters may be reset singly by pressing the key ˆ.
In order to confirm resetting and get back to the previous menu, press †. In order to get out without
modifying the counter, press ‡.
In order to prevent any unwanted resettings or to establish a restriction of access, the resetting operation can
be subject to a password. In order to set a password, please refer to para. 2.1.
In this case the display will visualize:
- _ _ _
Type in the password, consisting of four figures. If the password is not typed in correctly, the display will
show the value of the previously visualized counter. To confirm the operation and get back to the previous
menu, press †.
The parameters of the available counters are shown in the table here below.
Item
Description
Limits
ICt
Total amount collected in local currency
0<Ict<9999.99
ItP
Credits given to transponder key or chip card
0<ItP<9999.99
StP
Sales made through transponder key or chip card
0<StP<9999.99
SEL
Sales made cash
0<SEL<9999.99
rES
Total amount collected of remaining credit
0<rES<9999.99
tSP
Non used
n.u.
rIC
Non used
n.u.
CIC
Non used
n.u.
10
QUASAR Electronics S.a.s. via Grande, 2 – 31048 Rovarè di S. Biagio di Callalta ( TV ) – ITALY –
Tel: ++390422895107 Fax: ++390422895274 e-mail: [email protected]
MD02176D
2.1 PASSWORD SETTING
The password setting allows to have a restriction to some functions of the machine. More exactly, in a
machine where the password has been set, it is not possible to reset the counters of dispensed product
( CCII – CCtt ) and of accounting ( tttt ). The password consists of a sequence of four figures, each included
between 1 ÷ 9. The machine is supplied with no password, and to the four figures of which it consists the "0"
value is assigned.
In order to set a password, in the programming mode, select the parameter “CodE” using the keys • and
‚.
The display will visualize:
CodE
Press the key † to get into the password modification mode. The display will visualize the standard value:
0000
Proceed with assignment of a number included between 1 ÷ 9 to each of the four visualized figures through
the keys •,‚,ƒ,„. The key • increases the value of the first figure from left, the key ‚ the second one,
and so on. Once all the four figures have been entered, confirm by pressing †.
In order to get out of the function without saving the modifications, press ‡.
F
Write down and keep the password in a safe place. If it is lost, it will compromise the use
of the functions where it is request !
Afterwards, in order to modify a password, it will be necessary to type in again the existing password
proceeding as follows:
In this case the display will visualize:
- _ _ _
Using all the available keys type in the code.
Ex.: If the password to modify is “4 7 9 1” press the keys „ ‡ ‰ • in this order. When typing in,
care should be taken not to press inadvertently more times the same key.
If the sequence is correct, the display will visualize it, otherwise try again.
Then, proceed with the assignment of a new number included between 1 ÷ 9 for each of the four figures
visualized, through the keys •,‚,ƒ,„., as previously described.
Confirm the choice pressing †. In order to get out of the function without saving the modifications, press ‡.
11
QUASAR Electronics S.a.s. via Grande, 2 – 31048 Rovarè di S. Biagio di Callalta ( TV ) – ITALY –
Tel: ++390422895107 Fax: ++390422895274 e-mail: [email protected]
MD02176D
2.2 RESTORATION OF STANDARD CONFIGURATION
Through this option all the programming parameters are restored to the manufacturer's standard value, as
shown in the table here below.
F
Considering the possible presence of unwelcome adjustments, we recommend not to
use this function.
Of course in this case too, in order to avoid any unwelcome operations, the resetting operation may be
subject to the request to type in a password (see previous paragraph).
In order to carry out reconfiguration, in the programming mode, select the parameter “St.CF” using • and
‚.
The display will visualize:
S t. C F
Then press the key † and select through the keys • and ‚ ( no – yES ). To confirm the choice, and
therefore start with restoring all the standard values, press the key †. In order to get out, without
modifying the existing configuration, press ‡ .
Table of standard values
Description
Item
CCII
Counter of dispensed products paid cash
POtE
Setting of the type of power supply
coL
Setting of the storage function
CHIA
Setting of the communication protocol
COdE
Setting of the password
tttt
buCr
EEEE
Accounting
Std. Values
C1÷C12 = 0
REtE
C1÷C12 = 0
NO
0000
Ict;ItP;StP;SEL;rES; = 0
Setting of the change persistency time
240
Currency setting
0,05
L1=0,05 / L2=0,1 / L3=0,2
LLLL
Setting of the coin acceptor lines
PPtt
Setting of prices for payment through key
P1÷P12 = 0
PPII
Setting of prices for payment cash
P1÷P12 = 0
CCtt
Counter of dispensed products with payment through key
C1÷C12 = 0
L4=0,5 / L5=1 / L6=2
12
QUASAR Electronics S.a.s. via Grande, 2 – 31048 Rovarè di S. Biagio di Callalta ( TV ) – ITALY –
Tel: ++390422895107 Fax: ++390422895274 e-mail: [email protected]
MD02176D
2.3 SETTING OF MDB PROTOCOL
As mentioned in the user's manual, the machine can be connected with key payment systems (transponder
– chip card). In this case, for the required interface two communication protocols are mainly used:
“EXECUTIVE” and “MDB”.
In the machine the MDB protocol is used.
In order to know manufacturers and models to be used, please get in contact with the technical assistance
centre.
F
The MDB protocol is supported by an optional interface card, to be asked for when
purchasing the machine.
In order to start up the MDB interface, in the programming mode, select, through the keys • and ‚, the
parameter “CHIA”.
The display will visualize:
C HI A
Then press the key † and select, through the keys • and ‚, the mode to enable (please refer to the table
here below).
no
No protocol enabled
Mdb
MDB Protocol
In order to confirm the choice and get back to the previous menu, press †. To get out without modifying the
present setting, press ‡ .
F
After modifying the parameter “CHIA ” and the connection of a payment system, it is
necessary to switch off and then re-start the machine.
13
QUASAR Electronics S.a.s. via Grande, 2 – 31048 Rovarè di S. Biagio di Callalta ( TV ) – ITALY –
Tel: ++390422895107 Fax: ++390422895274 e-mail: [email protected]
MD02176D
2.4 SETTING OF STORAGE FUNCTION
As mentioned in the user's manual, it is possible to start the storage function counting the dispensed
products. Knowing the maximum number of products to be dispensed from each shelf, this option allows to
disable such shelf if no more products are available.
Therefore, in order to start up the storage handling, it is necessary to assign to each shelf the maximum
number of products that can be included.
Select from the programming menu the parameter “coL” using the keys • and ‚.
The display will visualize:
coL
Press the key † and select, through the keys • and ‚, the first shelf to set the relevant configuration (ex.
shelf no.1).
The display will visualize:
c
1
Confirm the selection pressing the key †. The display will visualize the previously set value. Through the
keys • and ‚ set the correct value, then press again † to save. Should it be necessary to reset the value,
use the key ˆ. Set the values of the remaining shelves following for each the above mentioned procedure.
Press ‡ to get back to the starting menu.
If a customer selects a shelf where there are no more products, the display will visualize:
SOLd
At this point, another shelf can be selected.
2.4.1 STORAGE INVENTORY
If the storage function as described in item 2.4 is started, it is essential to perform, on every refilling of the
machine, an inventory operation that restores the storage counters informing the machine of the refilling. To
this purpose, it is necessary to refill completely every shelf subject to the storage function otherwise it
will not be possible any more to check the machine product stocks.
14
QUASAR Electronics S.a.s. via Grande, 2 – 31048 Rovarè di S. Biagio di Callalta ( TV ) – ITALY –
Tel: ++390422895107 Fax: ++390422895274 e-mail: [email protected]
MD02176D
In order to carry out the inventory operation, after filling the shelf involved, in the programming mode, select
the item “IIII” from the main menu through the keys • and ‚.
The display will visualize:
IIII
Then press the key † and select, through the keys • and ‚, ( yes – no ) to proceed, or not, with the
inventory. Confirm the choice and get back to the previous menu through †. In order to get our without
modifying, press ‡.
2.5 ERROR MESSAGES
Wrong programming operations or some of the most dangerous troubles are signalled by the machine
display, thus allowing to take proper steps in good time. The table here below summarizes some of them.
Error
Cause
Effect
Possible Solution
Er 1
Breakage of self-stoppage of a All the selections are disabled.
Replace the damaged motor or
motor or motor jammed.
remove the cause of stoppage.
Switch off and restart the
machine.
Er 2
One
or
more
product The selection where the trouble Replace
the
non-operating
dispensing motors cannot work. has occurred is disabled. The motor. Switch off and restart
machine
continues
working the machine.
regularly.
Er 9
Communication problems with The payment system is not Check
the MDB payment system.
working.
connections
with
payment system. Switch off
and
restart
the
machine.
Apply to the service centre.
F
If power is supplied by battery, disconnect and re-connect battery with the machine.
15
QUASAR Electronics S.a.s. via Grande, 2 – 31048 Rovarè di S. Biagio di Callalta ( TV ) – ITALY –
Tel: ++390422895107 Fax: ++390422895274 e-mail: [email protected]