1
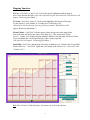
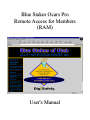
Blue Stakes Ocars Pro
Remote Access for Members
(RAM)
User's Manual
Blue Stakes Ocars Pro Remote Access for Members
(Created 10/14/02)
Welcome to the Blue Stakes of Utah Ocars Pro Remote Access for Members (RAM) manual. It is
designed to assist member utilities in updating and reviewing their member contact information and
fifteen-second latitude/longitude grid selections.
This document will serve as an instructional manual and reference guide. It will give step-by-step
information on how to use the RAM application, as well as what information is required to update
member information and grids.
RAM is designed to be user friendly. It provides members with the benefit of updating grid selections,
printing maps, reviewing contact information and notification reports, searching for location requests
and viewing transmissions in queue. All on-line, without the need of contacting the Blue Stakes Center.
The only requirements needed in order to use this system are a connection to the Internet (the faster the
better of course) and Internet Explorer 5.5 or later. If you don't have I.E. 5.5 or later you can download
it free from Microsoft. You will also want to use screen size 1152 x 864 in order to see the screen in its
entirety.
Other sub menus and privileges are available if you are authorized & trained to use Remote Ticket
Entry. To obtain the RTE user manual and training please contact the following:
For users that will be given access to both RTE and RAM - please contact Sherrie by email
[email protected] or call 801-538-5703.
For RTE training for users without RAM access, please contact Charley by email [email protected]
or call 801-538-5720.
2
Member Manual Table of Contents
(October 2002)
I.
II.
Getting Started (Page 4)
• Logging In ……………………………………………………..
• Remote Access Menu Options ………………………………
4
4
General (Pages 4-11)
• Grid Selections
Accessing Member Maps……………………………………
Adding & Removing Grids …………………………………..
Mapping Functions …………………………………………..
4-5
5
6
•
Map Books
Map Book Request …………………………………………..
Printing & Saving Member Maps …………………………….
7
8
•
Member Details ……………………………………………….
9-10
•
PDF Mapbooks ……………………………………………….
10
•
Profile
Remote Access Profile Maintenance ………………………..
10-11
Quickmap (Quick Look Up) ………………………………….
11
•
III.
Reports (Pages 12-13)
• Deliveries
Member Deliveries …………………………………………….
•
Notifications
Notification Report …………………………………………….
11-12
Queues
Delivery Queue Status ………………………………………..
12
Tickets (Pages 13-15)
• Search
Ticket …………………………………………………………….
Date ………………………………………………………………
Operator …………………………………………………………
Contractor ……………………………………………………….
Phone ……………………………………………………………
Location …………………………………………………………
Member …………………………………………………………
13
14
14
14
14
14
14
•
IV.
•
V.
10-11
Resend
By Ticket ……………………………………………………….
By Sequence ………………………………………………….
Test …………………………………………………………….
Summary ………………………………………………………
Helpful Information (Page 16)
• Shortcut Keys and Help ……………………………………
3
15
15
15
15
16
Remote Access Login
Logging In:
In order to access member information, you will need to go to www.bluestakes.org, then click on the
Ocars Pro Website (for authorized users only) link on the left-hand side of the screen. Select the Remote
Access link from the center of the screen. You will then need to enter your account information
provided to you by the Blue Stakes Center.
•
Account: Is the first initial of your first name and your full last name. (JDOE)
•
Password: A combination of letters and numbers provided by Blue Stakes.
(The password is case sensitive, make sure all letters are lower case.)
After entering the information click “Submit” and then you will be sent into another screen with
different options.
Remote Access Menu Options:
There will be a column on the left side of the screen with the following menu options, which will be
explained in the next few sections:
¾ General
¾ Reports
¾ Tickets
¾ General:
•
•
Grid Selections
Map Books
•
•
•
Grid Selections: This allows you to view, add and remove selected grids in Quickmap. The
Member Details
PDF Mapbooks
•
•
Profile
Quickmap
map functions require a “left click” with the mouse. Fields and buttons work with a “left click”
of the mouse or you may use “tab” and “enter”.
Accessing Member Maps
(Important Note: The Member, State and County Fields are mandatory!)
Member: Enter your member code or click on the drop down box to the right if you have access
to more than one member code.
State: Enter UT or click on the drop down box to the right and select Utah.
County: Enter the county or click on the drop down box to the right for a list of
Counties. To pull up a different county just type the name of the desired county.
Page: You may leave this blank or enter the page number or click on the drop down box to the
right of the map for a list of page #’s. (Not all counties have the same # of pages.)
Lookup: “Left Click” to lookup the requested information.
(The black box will appear “Retrieving QuickMap.”)
4
Landmark: Enter the name of the landmark in the box. Examples of landmarks might be Sandy,
Temple Square, Sandy Post Office, Liberty Park, etc.
Find: “Left Click” to find the landmark. (The black box will appear “Retrieving QuickMap.”)
Small Text Box: Landmarks similar to or matching the landmark appear in this box.
Lat: Enter the latitude point. Long: Enter the longitude point.
(Lat Example: ddmmss or dd.dddd/Long Example: -dddmmss or –ddd.dddd)
Point: “Left Click” to jump to the latitude/longitude point in the map.
(The black box will appear “Retrieving QuickMap.”)
Qmgrid: Enter the grid you wish to view. Example: 4025A11126B
(Grid numbers must be entered the same as they appear on the map & tickets.)
Goto Grid: “Left Click” to jump to the grid.
Large Text Box: Displays the selected grid numbers of the current map view.
Adding and Removing Member Grids
Sel Grid On: “Left Click” to turn grid selection mode on.
(Button will read “Sel Grid Off” when on. You must be at level 5 to add and remove grids. All
other functions of the map will not work while you are in grid selection mode.)
Adding and Removing Grids: “Left Click” to add or remove grids. Selected grids will be
highlighted in red with the grid number at the top of each grid. The selected grid numbers will
also show in the large text box to the right of the map.
(Important Note: A grid that has been removed will not be highlighted or show the grid number.
Example provided on page 6.)
Apply: “Left Click” to save changes in the map. This automatically updates your
Grids in the Ocars Pro database.
(The black box will appear “Retrieving QuickMap.”)
Cancel: “Left Click” to abandon changes and restore the previous grids.
Redraw: “Left Click” to redraw map with the submitted changes.
Clear Grids: “Left Click” will automatically turn on the grid selection mode and
remove all grids from the area of the map you are currently viewing.
(Pan & Zoom will not function in the mode.)
(Important Note: If you “Apply” after using this function the grids that were
removed will no longer be part of your member notification.)
5
Mapping Functions
To Pan: “Left Click” on the N, S, E or W in the purple highlight around the map to
move in the desired direction. (Pan will not function in grid selection mode. The black box will
appear “Retrieving QuickMap.”)
To Zoom: “Left Click” on the 0-7 in the green highlight at the bottom of the map.
0 is the closest, 5 is the furthest, 6 is County and 7 is the State View.
(Zoom levels will not function when in grid selection mode. The black box will
appear “Retrieving QuickMap.”)
Mouse Pointer: “Left Click” with the mouse pointer on any area in the map & that
area of the map will shift to the center of the map view. This works in all “Zoom
Levels”. County View displays all page numbers. Member selected pages will be red. State
View will display the selected grids in gray of the County requested.
(The black box will appear “Retrieving QuickMap.”)
Small Map: “Left Click” and the map will reduce to furthest view. Button reads “Large Map”
when in this view. “Left Click” again and it will return to the closest view. (Functions in all
“Zoom Levels”.)
Exit: This will close “Grid Selections” and return you to Ocars Pro Screen.
6
•
Map Books: Allows you to request a map book of your member grids. The map will be
delivered from the [email protected]. A valid email address is required. For instructions on
saving and printing member maps please refer to page 8.
(Note: Maps will only be generated if there are member grid selections in the requested county.)
Map Book Request
Email To: The email address will automatically appear from you’re user profile.
Member: Enter the “Member Code” you are requesting a map for. (Mandatory)
State: “UT” is the default of this field.
County: Enter the “County” you are requesting a map of. (Mandatory)
Submit: “Left Click” to submit the request.
Pending: “Left Click” for a list of pending jobs. Example:
History: “Left Click” to pull up the history of map book requests. Example:
Schedule: “Left Click” to display time table of when maps are generated. Example:
7
Printing & Saving Member Maps
The following instructions and examples will assist with viewing, printing and saving maps of
your member grid selections.
(Important Note: The URL connection is only available for 5 days following the map request!)
Email Confirmation: You will receive a message from [email protected]; UTAH
Map Server – Job Processed. The following example will provide a link to the county map
requested.
The requested county PDF file is ready!
Job Information:
JOB ID: 1012
RESULT: SUCCESS
MEMBER CODE: MBRCOD
COUNTY: 49035 (SALT LAKE, UT)
SUBMITTED: 2002/10/21 10:06:25 AM
STARTED: 2002/10/21 06:00:03 PM
FINISHED: 2002/10/21 06:21:05 PM
The PDF file may be downloaded from the following URL anytime during the next 5 days.
http://209.181.150.123:8000/MapGenBooks/MBRCOD 49035.PDF
Thank you,
OCARS Map Server
Viewing the Map: To download the map “Left Click” on the URL link to connect to the PDF
file. This link will allow you to view all pages of the entire county. Quarter Mile grids with an
“X” in the grid box have been selected for member notification.
Printing the Map: You may print the entire county book or individual pages of the map.
To print go to the word “File” in the tool bar. “Left Click” on “Print”. The Print box will appear.
In the “Print Range” box you may select All Pages, Current Page or a range of
Page Numbers. “Left Click” on “OK” to print the desired selection.
Saving the Map: To save the map “Left Click” on the “Floppy Disk Icon” in the tool bar.
The “Save As” screen will appear. In the “Save In” box left click and choose the location you
wish to save the map to. Next go to the bottom of the screen to the “File Name” box it should
show: *.pdf. Type the name you will save this file as. Be sure that you leave the .pdf extension
as it appears. The “Save As Type” will default to: Acrobat(*.pdf). Please do not change this or
you may not be able to read the file once it is saved.
(Important Note: Acrobat Reader is required to read the PDF file. You may download Acrobat
Reader from the link at the top of the page under PDF Mapbooks. “Left Click” on the acrobat
reader link on the home page and then follow the steps. In “Step 1” choose the correct
“Platform” that applies for your computer. Next “Left Click” on download in “Step 3”. Follow
the instructions from the download wizard to load this program on your computer.)
To Exit Map Books: “Left Click” on the X in upper right hand corner of Map Book Request.
8
• Member Details: Allows you to view a summary of member information. If any of the
information needs to be updated please send it via email:[email protected] or by
fax: 801-530-0562.
Member Details
Member Code: Your member code will automatically appear in this box or “left click” on the
drop down box to the right if you have more than one receiver site.
Submit: “Left Click” to display a summary of member information.
Explanation of Information:
General:
Code: Member Code ID: Auto # Generated by Blue Stakes Status: Active/Inactive
Name: Company Name
Type: Type of underground facility
Descr: What facility is marked
Group: Member Classification
Contact: Contact Person at Contact Number to report receiver problems
Transmissions: Monthly transmission totals for the most recent 12 months
Delivery Parameters: These are assigned by the Member Services Coordinator.
Dest: Alt (if applicaple) Main (main delivery)
Type: DMDM (modem/software)/MAIL (email)/FMDM (fax)
FAXW (undedicated fax)/OPER (voice)/DUMY (inhouse)
Delivery Address: email address or number deliveries are being sent too
Baud: Delivery Baud Rate (modem delivery specified by member/all others default)
Params: Parameters (modem delivery specified by member/all others default)
Answerback: 323 037 3437 (Requires your fax # to be programmed on member fax)
modems (only applies when specified by member)
Contacts: This information is entered from the member application. Please update or provide
missing information as soon as possible.
9
Contact Types:
Emergency: After Hours Emergency Contact Information
Contact: Admininstrative Contact Information
Receiving Location: Receiver Site Contact
Engineering: Planning & Design Contact
Billing: Accounts Payable Contact for Monthly Billing
Business Hours: Hours of Operation for Member
Rules: If this is applicable it will show an Alternate Member Code for delivery of tickets. This
may or may not include all tickets, emergencies, rush or 2ND Notice transmissions.
Most members with email delivery have an alternate emergency delivery destination or members
that have requested multiple receiver sites will have rules that apply.
County Notifications: This will list all counties the member is registered in.
Place Notifications: This will list all place names that the member is registered in.
•
PDF Mapbooks: Allows you to download, view and print all the counties in Utah that include
the gridding system we use. “Left Click” on the county you wish to view.
To view, print and save the maps please refer to the Map Books section on Page 7 for
instructions. (These maps do not include member grid selections.)
• Profile: Allows you to update your personal information for this account. You cannot change
the account number, password or phone number.
(Note: The ID#, created date & time, by who and the update information is auto generated by the
database.)
Remote Access Profile Maintenance:
Account: Assigned user name.
Type: CMNY – Please leave this as the CMNY, all users are a Company, unless specified by
Blue Stakes.
Company/Name: Name of the company.
Address: Company mailing address, city, state & zip code.
Ext: Phone Extension. (If applicable)
Caller: First and Last name of the user assigned to this account. Phone Number and Extension.
Fax: Company fax number including area code.
10
E-mail: Email address for the user assigned to this account.
(Please verify that the email address is entered correctly.)
Best Time: Enter the time frame that the user of this account is available.
Comments: Field is not currently used.
• Quickmap: This map allows you to reference an address or location. It is used for quick look
up reference only!
(Important Note: This map is will not allow you to access member grids or generate tickets.)
¾ Reports:
•
•
Deliveries
Notifications
• Queues
•
Deliveries: Allows you to view tickets that have been delivered to your member receiver site.
Member Deliveries
Code: Your assigned member code will default in this box. If you have more than one
receiver site code “Left Click” on the drop down arrow to the right or manually enter the
code you wish to view deliveries for.
Date: This field defaults to the current calendar date. If you wish to view a day other
the current date manually type in the date you wish to view.
(Example: 00/00/00 – This function will only allow you to view stored in our database. After 120
Days, tickets are archived and/or no longer available on-line.)
Submit: “Left Click” on this button and it will display the tickets delivered on the day
Requested for the member you request. The Tickets Delivered will show the following fields:
Code: Member Code
Ticket: Julienne date & Caller Number assigned to the request. (Example: 0001900417)
Rev: If this displays 000 following the ticket # no changes have been made to the original ticket.
If the last 0 is 1 or higher, revisions have been made to the original ticket. Example:
0001900417-002
(Revisions are when a ticket has been 2nd Noticed, retransmitted, cancelled, etc.)
Seq#: This is the number that represents how many tickets a member has received.
(Example: 00001, 00002, 00003, 00004, 00005, etc…)
11
Type: This is how the tickets are being delivered to this receiver site. The following
codes represent the different hardware used to deliver member transmissions:
DDD – Modem Delivery
FAX – Fax Delivery
FAXW – Undedicated Fax Delivery
MAIL – Email Delivery
DUMY – Inhouse Data (Accessed through the Blue Stakes Web Page.)
Delivered At: This will give the date and time the ticket was successfully transmitted to
the member receiver site.
Exit: “Left Click” to exit deliveries and return to Ocars Pro Screen.
•
Notifications: This allows members to view a report of the information they selected to receive
notice of excavation. Reports may be viewed individually by county, place and grid information or
you may check all boxes for a complete report.
Notification Report
Member: This will default to your assigned member code. If you have access to more
than one code “Left Click” on the drop down box to the right or manually type in the
member code you desire.
County: “Left Click” to place a check in the box to view the counties this member
code is registered in.
Place: “Left Click” to place a check in the box to view the place names this member code is
registered in.
Street: Is not used for member registration at this time.
Grid: “Left Click” to place a check in the box to view the grids this member selected.
Include County/Places member is not in: This will list all County/Place names that
are valid in the database.
State: This defaults to “UT”.
County: Type in the name of a single county you wish to view information.
(Leave this blank for all)
Grid Prefix: This allows you to view selected grids that match the prefix entered.
Examples:
39 = All grids starting with Latitude 39
40 = All grids starting with Latitude 40
%111 = All grids with Longitude 111
%112 = All grids with Longitude 112
4039 = All grids in this Latitude
%11115 = All grids in this Longitude
4042A11159D = This will display the grid if it is part of your grid selection.
12
Report: “Left Click” on this button to display the information entered in the above fields.
ASCII: “Left Click” to display selected grids in text format.
Example:
“UT","SALT LAKE","4049A11139A","A"
"UT","SALT LAKE","4049A11139B","A"
"UT","SALT LAKE","4049A11139C","A"
Clear: “Left Click” to clear the display screen.
To Exit: “Left Click” on the “X” in the upper right hand corner of the screen.
• Queues: Delivery queue status will allow you to view how many tickets are waiting to deliver to
your member receiver site.
¾ Tickets:
• Search
• Resend
• Search
Allows you to search for location requests. “Left Click” on search to open the search screen.
There are several different ways to search for a ticket, which are the buttons across the top of the
screen. You can only search for seven days at a time. The information entered must be exactly
how it appears on the ticket. All search buttons will only allow you access to accounts and
member codes you are authorized to view. Operator searches will only be available if you are
able to enter location requests through the RTE (Remote Ticket Entry).
(Ocars Pro database stores information for approximately 120 Days before archiving. Tickets
older than this will not be found.)
You will also notice that in each search function there are two options on how the tickets are
displayed, in a list or by a full view. The default is to list the tickets; you can display the tickets
by clicking on the Display option. This will show a full view of each ticket. This is good to use
if you are printing all of the tickets that were done over a period of time. All you have to do is
right click and then select print. This will print all of the tickets at once, where if you were to
print them from the list, you would have to open each ticket and print them all individually.
You will also notice in most of the search functions two additional options on how they are
sorted when they are listed/displayed. You can sort by Channel or by Completed. Channel just
tells whether it was called in the Blue Stakes center of if it was done by the WEB or through QT.
It will list them in chronological order according to the channel. Completed (default) will sort
the tickets according to when they were completed, listing/displaying the most recent first.
Below is a description of the different ways to search for the ticket. Note: Any time you search
for a ticket, the system will search for any ticket entered with your same phone number or
matches your member code, whether it was called into the center, entered through Remote
Access or through Quick Ticket.
13
Ticket
Searches for tickets with a ticket number. Enter the number in the box and then click on the Go
Tkt button. This will pull up a list of different revisions done on this particular ticket. If there
are no revisions, you will only see one link for the ticket.
Date
Search for tickets you have entered by using only dates. If you want to know all of the tickets
that you have entered for the week click on the date button and enter the date range you wish to
search, not exceeding seven days. Click on the Go Date button and it will pull up a list of all the
tickets that were entered for that week.
Operator
Search for tickets entered by a specific operator. You will have to enter the date range you wish
to search for and then enter the operator name (account name). For example: JDOE. Click on
Go Oper and it will list all of the tickets that were entered by that operator within that date range.
Contractor
This is helpful when you need the ticket number, but don’t know who called in the request in
your company. Enter the date range you wish to search and then enter your company’s name.
Click on the Go Cnt button and it will list all of the tickets that were entered by your company
within that date range.
Phone
Search for tickets that were entered with your same phone number. Enter the date range you
want to search. Click on the Go Ph button and it will list all of the tickets entered with your
same phone number.
Location
Search for tickets by the address. First enter the date range you are concerned about and then
enter the county and place. Then in the street field enter the street that the dig site is on. For
example, if the address you are looking for is 205 W 700 S, you will enter 700 S in the street
field. Note: this field is very picky, so if you are not sure how the street name is spelled, then
enter the first few letters of the street name and then click the Go Loc button. It will list all the
tickets that have those letters in their street name. The Grid field is for specific grid numbers.
You do not need these to complete this search; sometimes it makes it more difficult to search for
the address.
Member
This allows you to search for any tickets that you are a member on and received notification.
Enter the date range and then click the Go Mbr button. It will list all the tickets that had that
particular member code entered within the specified date range.
14
•
Resend:
Allows members to re-send a copy of their own missing tickets, end of day audits or tests to see if
their receiving equipment is working properly. When you re-send a ticket previously delivered the
ticket number will not change, but the original sequence number will be
re-assigned according to the number of deliveries you have received at the time you request the resend. The reset button under each function will clear the screen.
Example: If you request Sequence #0005 and have currently had 10 deliveries today, it will be
sequence #0011.
By Ticket
“Left Click” to re-send by ticket number. Enter the ticket number(s) you wish to receive and then
“Left Click” on submit. Example: 0001190457 (000 may not be required in front of the ticket #.)
You will receive a message that the ticket(s) have been queued.
By Sequence
“Left Click” to re-send by sequence number. Enter the date of the delivery. Then enter the sequence
number(s) you wish to receive and “Left Click” on submit. You will receive a message of the total #
of ticket(s) have been queued.
Summary
“Left Click” to receive a summary of ticket(s). Enter the date for the end of day audit you would
like to receive. This will only give you a list of all sequence and ticket numbers delivered, not the
tickets. You will receive a message stating the summary has been queued.
Test
“Left Click” to request a test ticket. Specify the # of test(s) you would like and “Left Click” on
submit. You will receive a message stating the # of test tickets have been queued.
(Test Tickets deliver in the current program format with a ticket number of 0000000000.)
15
Short Cut Keys and Help
Alt-Tab: Use this to switch between open programs. Holding the alt key down and hitting the tab key will show
you a list of all the programs that are currently open on your computer. It will allow you to go to another open
program by hitting the tab key until the box selects the program you want. If you do not have more than one
program open this will do nothing. You can use this to switch between the ticket entry screen and the map screen,
as well as between all your other office programs.
Using Auto-Complete in Internet Explorer: This allows you to recall information in a certain field in which you
have previously submitted information.
Set Up: In Internet Explorer, click Tools and select Internet Options. Under the Content Tab, click on the
AutoComplete Button. Make sure there is a check next to Forms. If you want to delete all the existing
data click on the Clear Forms button.
In the ticket entry screen: There are 2 ways to access the information that is stored in the fields.
1. Hit the Down Arrow key. This will bring up the list of all the previous information that
you've submitted in that field.
2. Start typing. If what you type matches anything that is stored, it will list all of the matches.
Keep typing if you want to narrow the list down. If there are no entries that match what you
want just ignore the drop down box.
Once you've highlighted or selected the data that you want using the arrow keys hit the Tab or
Enter key to move to the next field.
Back Button: If you want to go to the previous page/view, hit the Back button on your Internet Browser program
(Internet Explorer).
Backspace Key: When in the map screen, if you want to go to the previous view, hit the Backspace key on the
keyboard. This acts like the Back button in your Internet Explorer program. This can be very helpful for you to
get back to where you were if you make a mistake and go to the wrong area.
Readjusting the display properties: Right-click on a blank part of the desktop and select Properties. Go to the
Settings Tab. In the Screen Area section select the amount of pixels you want. The higher the number, the more
you can see on the screen at one time. We suggest 1024 by 764 pixels in order to view the entire TE screen
without scrolling from side to side. You can change it back and forth from your normal settings if you need/want
to. You can also click on a box that allows you to have the desktop settings show up in your system tray, which
makes it quick and easy to change these settings.
Maximizing the screen: In the top right-hand corner of the window there are 3 small buttons. Click on the one
that looks like a box (in between the _ and the X). This will maximize the window to the size of the screen. You
can also double-click anywhere on the Title Bar of the window (This is at the very top of the window where the
title of the window or program is. On most computers this part is blue.)
F11 key: This automatically maximizes the window screen and allows more information to be displayed on the
monitor at one time. If you press the F11 key again, it will take you back to normal view.
Resizing the windows inside the program: Some of the windows under the ticket report screens inside the
program can be resized. Move the mouse to the area between the two sections so the mouse changes into a
double-sided arrow. Click and drag the window to the size that you want.
16