1
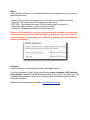
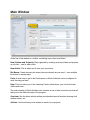
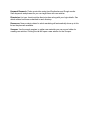
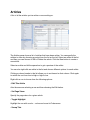
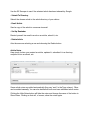
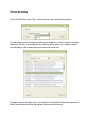
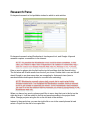
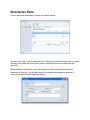
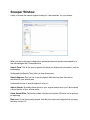
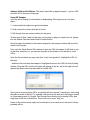
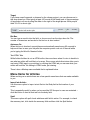
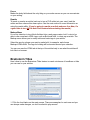
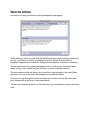
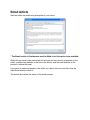
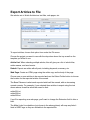
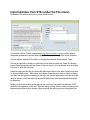
Article Architect User Manual
By Jay Jennings
Another Mohawk Man Creation
Article Architect web site: http://articlearchitect.com
Copyright 2007-2009 by Jay Jennings • All rights reserved.
Table of Contents
Introduction...................................................................................... 3
Preferences.......................................................................................4
Main Window.....................................................................................7
Projects............................................................................................. 9
Overview Pane................................................................................ 10
Articles ............................................................................................ 11
Research Pane ............................................................................... 14
Import Keywords ............................................................................
15
Type In Keywords........................................................................... 15
Directories Pane ............................................................................. 16
Snooper Pane................................................................................. 17
Resources Pane............................................................................. 20
Bio Boxes (Resource Boxes)........................................................ 21
New Article...................................................................................... 22
Rewrite Article ................................................................................
26
Email Article ....................................................................................
27
Submit Article .................................................................................
28
Export Articles................................................................................ 29
Import Articles from STK (under the File menu)......................... 30
Introduction
For video tutorials, please see the site online:
http://articlearchitect.com/learningcenter/
Article Architect helps you organize and manage all aspects of your article marketing,
whether you're doing "bum marketing" or using articles to drive traffic to your web sites.
Here are the basic steps to get started:
1. Go into Preferences and tweak things the way you like.
2. Click the Projects button in the toolbar and create a new project for whatever niche
you'd like to target.
3. If you need to do research on that niche, click the Research button and search for
relevant keywords. When you find them, drag them to the Saved Keyword list for later
use.
4. If you're looking for raw material to help you write an article, click the Snooper button
and use the power of the search engines to find all the content you need.
5. Now, click the New Article button in the toolbar and write your article.
6. Finally, choose an article directory from the Directories button and submit your article.
Yes, there are a few more details than that, but that's the basic flow you'll use with
Article Architect.
Preferences
Settings to make Article Architect work the way you want.
The Prefs window is broken into seven areas:
General
• Turn on Audio Feedback: With this checked you will hear a few tasteful bleeps and
bloops when doing some actions in the program.
• Window Background Color: Choose the background color for all but the main window.
• Focus Screen Color: When writing an article and going into Focus mode, this sets the
color of the border.
Keywords
• Minimum Keywords: The minimum number of matches for a keyword to make it worth
looking at.
• Maximum Competitors: The most matches you want to see for a keyword before the
competition is just too much.
Email
If you want to be able to email articles from inside AA, enter your mail server, username,
password, and the port number of the mail server (usually set to 25). You can get that
information from your ISP, or by looking in the preferences of your desktop-based email
client.
Categories
Add, edit, or delete categories. These categories are used when creating new articles.
Highlighting
Set the colors to be used when highlighting articles, etc.
Blogs
Set up Wordpress blogs: You can publish articles to a wordpress blog, but first set up
the information here.
•
•
•
•
•
Name: This is just for you to keep track of the blog, itʼs not published anywhere.
Blog URL: The regular URL for the main page of your blog.
RPC URL: This is usually the main URL plus /xmlrpc.php on the end of it.
Username: The username you use to log into your blog.
Password: The password you use to log into your blog.
Before you can publish to your blog from inside Article Architect, you must turn
on remote publishing in the Admin area of your Wodpress blog. Go to Settings
and then Writing, check the box next to XML-RPC, and then click Save Changes
button at the bottom.
Accounts
Login information for downloading Private Label Rights articles.
If you are a member of Sonic Toolkit you will have access to dozens of PLR articles
every month to which you can tweak/rewrite and send out as your own. Enter your STK
username and password in this box to be able to import the articles using the option
under the File menu.
Membership information can be found at http://SonicToolkit.com
Main Window
At the top of the window is a toolbar containing some often-used items:
New (Folders and Projects): Stay organized by creating as many folders and projects
as you like -- one for each niche.
New Article: This is where you'll write your new article.
Bio Boxes: Create as many bio boxes (resource boxes) as you need -- even multiple
bio boxes for each project.
Prefs: A quick way to get to the Preferences so Article Architect can be configured to
work the way you want.
Help: That icon takes you to the Learning Center online where you can find tutorial
videos and more..
The main window of Article Architect also contains a row of tabs across the top that will
take you to the different areas of the program.
Overview: See the latest articles written and submitted as well as stats showing total
articles written, etc.
Articles: List the articles you've written for each of your projects.
Keyword Research: Find a great niche using free Wordtracker and Google results.
Save keywords and phrases so you can target them with new articles.
Directories: List your favorite article directories here along with your login details. See
which articles have been submitted to each directory.
Resources: New products related to article marketing will automatically show up in this
list as they become available.
Snooper: Use the search engines to gather raw materials you can use as fodder for
creating new articles. Clicking the tab will open a new window for the Snooper.
Projects
A list of projects or niches for which youʼre writing articles.
Articles, saved keywords, and income records are all saved according to projects. Most
people will create a separate project for each niche or topic for which they write articles.
To create a new project, click the Projects icon in the toolbar. In the Projects window you
can select an existing project in the list and Edit or Delete, or click the New button to
create a new project.
Overview Pane
A quick look at how many articles youʼve written, submitted, etc.
This is a sort of dashboard for Article Architect. On the left you can see number of
articles written and number of articles submitted. You can also click days in the calendar
to see those stats by date.
The right side of the screen shows the last five articles written as well as the last five
articles submitted. Double-clicking an article in those lists will open the article tab with
that article highlighted.
Articles
A list of all the articles youʼve written or are working on.
The Articles pane shows a list of articles that have been written. You can specify the
articles to show by choosing a project from the list on the left. Select an article in the list
and then you can choose to Edit or Delete the article. Click the New button to create a
new article.
Select an article and hit the space-bar to get a preview of the article.
You can also right-click an article in the list and choose different options for each article.
Clicking a column header in the list allows you to sort based on that column. Click again
to switch the sort from low-to-high or high-to-low.
Right-click a row to choose from the following options:
• Edit This Article
Acts the same as selecting a row and then choosing the Edit button.
• Set Page Views
Specify the page views for a given article.
• Toggle Highlight
Highlight the row with a color -- colors can be set in Preferences.
• Snoop This
Use the SE Snooper to see if the selected article has been indexed by Google.
• Submit To Directory
Submit the chosen article to the article directory of your choice.
• Email Article
Send a copy of the article to someone via email.
• Set Up Reminder
Remind yourself via email to work on an article, submit it, etc.
• Delete Article
Acts the same as selecting a row and choosing the Delete button.
Article Notes
Keep track of when you created an article, updated it, submitted it to a directory,
compiled it into an ebook, etc.
Some article notes are added automatically (they say “auto” in the Type column). Other
can be added manually. You can also delete both auto and user-submitted article notes.
Clicking the Hide Notes button will hide the notes and change the name of the button to
Show Notes. Clicking on that will, of course, show the notes again.
Find Articles
Under the Edit Menu is the Find... option which will open the following window:
You can enter a word or phrase and then specify whether to search for that in the article
keywords, the title, or everything (body, summary, author name, etc.). Matches found
are returned in a list showing the project name and article title:
Highlight a row and hit space-bar to do a preview of the article. Double-click an article in
the list and that article will be highlighted in the main article window.
Research Pane
Do keyword research to find profitable niches for which to write articles.
Do keyword research using Wordtrackerʼs free keyword tool, and Google. Keyword
research requires a connection to the internet.
NOTE! Itʼs possible that Wordtrackerʼs tool could be down sometimes. In that
case, youʼll have to import lists of keywords or do research in some other way. I
have no control over whether external web sites are working or not, of course.
Enter a word or phrase into the field on the top-left and then click the Search button.
The list below will fill with results from the tool you chose. Double-click a row and AA will
check Google to see how many sites are competing for that search term (term is
searched inside double quote marks for use with bum marketing).
NOTE! Wordtracker normally returns daily counts but to match what Article
Architect started with, Iʼve multiplied the Wordtracker numbers that are returned
by 30 to get number of searches per month. So the Wordtracker result numbers
you see in AA will be different than the numbers youʼd see by going directly to the
Wordtracker web site.
When you have a key word or phrase you'd like to save, drag that row to the list on the
right and drop it. It will be added to the list and saved according to the project that's
active. Change projects using the list on the left side of the window.
Instead of drag-and-drop, you can also right-click a row in the search phrase list and
select a Project for the row to be copied into.
When right-clicking on a row in the keyword list you can also choose Drill Down and a
search will be run again using the keyword/phrase you selected.
Right-clicking inside the Saved Search Words list will also give you several options.
Import Keywords
If you have your own source of keywords you may want to import them into AA. To do
that you can use the Import Keywords button at the bottom of the window. Youʼll be able
to browse your hard drive and choose a file containing your keywords. The file should
be a text file and contain one keyword per line, like this:
travel nursing company
healthcare jobs
medical jobs
nursing employment
Of course since the list didnʼt come via Wordtracker you wonʼt have count numbers, but
you can still select one in the list and get the Google numbers if you like.
You can also use the keyword lists from AA Keywords (http://aakeywords.com) and
other sites that include daily count numbers from Wordtracker. The keywords lists that
work will look like this:
KEI
Count24Hours
0.645 592
0.164 495
0.022 308
1.642 281
491
411
256
233
Comp.Keyword
543000
travel nursing
1490000
nursing jobs
4380000
medical billing
48100new york nursing jobs
Type In Keywords
You can also click the Type In Keywords button at the bottom of the window and type in
(or paste) a list of keywords to be used.
Directories Pane
A list of the article directories to which you submit articles.
You can store a list of article directories here. After you've submitted an article to a given
directory, that article will show in the lower list when the directory is selected in the
upper list.
When adding a new directory, you can specify the URL and your username and
password for that site. You can also enter the minimum and maximum numbers of
words that a given site will accept for articles.
Snooper Window
A way to browse the search engines looking for “raw materials” for your articles.
What you see in this pane is basically a specialized browser window surrounded by a
few extra widgets that Iʼll describe here.
Search Term: This is the word or phrase for which youʼd like more information, such as
beekeeping.
Underneath the Search Term field is a drop-down menu...
Search Engines: This is a list of search engines and directory sites that can be
searched for your search term.
Underneath the list of search engines is a list of...
Add-on Words: By adding these words to your original search term, youʼll be covering
a broad section of your chosen niche.
Show Saved URLs: This button shows a list that will contain URLs that youʼre going to
be exploring.
Disk Icon: Itʼs not just a pretty picture, that disk icon saves text snippets that you drag
and drop on top of it.
Address Field and Go Button: This works much like a regular browser -- put in a URL
and click GO to browse to that page.
Using SE Snooper
Letʼs say weʼre looking for information on beekeeping. Weʼre going to do it in three
steps:
1. Locate sites that might have good information
2. Grab content from those sites weʼve found
3. Sift through that raw content looking for the gems
To take care of Step 1 and find the sites, weʼre going to plug our search word or phrase
into the Search Term field and click the Search button.
Since Google is the default in the search engine list, the browser window will show the
results from Google.
First, click the Show Saved URLs button to open the URL list window (it will float on top
of the other windows), or, you can use the pane at the bottom of the window to store
URLs.
Scan the list and when you see a site that *may* have good info, highlight the URL for
that site...
...and then click and drag that snippet of highlighted text into the URL list in the floating
window. Drop the URL onto the list and it will appear in the list, and to the right of it will
appear the search term that was used to find the URL.
Once youʼve found as many URLs as you like with the “generic” search term, start using
the add-on words in the list. For example, click the first one and youʼll be doing a search
for “beekeeping news” in Google. Run through those looking for promising URLs, and
drag them to the list at the bottom. Then move on to forum, blog, etc.
Some of the add-on words might not be relevant to your search word, but most of them
probably will be.
By the time you reach the bottom of the list, youʼll probably have dozens of URLs
collected -- and you still have more search engines to go!
Basically, keep collecting URLs until you think you have way more than enough.
Now weʼre on to the second step, grabbing content from those sites.
Grabbing the Content
Start with the first URL in your collection, and click it -- that web page should appear in
your browser. Skim the page looking for information that looks interesting or important
or your niche.
Note! Iʼll mention this more than once -- youʼre not looking for information to steal,
youʼre doing research. Itʼs just like grabbing books from the library and scanning them to
find information you can use.
When you find something you may be able to use (and at this point, donʼt do too much
filtering, grab lots), select it with your cursor so the text is highlighted, then grab that text
and drag it to the disk icon in the lower-left of the window. Drop the text on top of that
icon to save it.
The first time you drop some text it will ask you where you want to save it -- after that,
everything you drop on the icon will go into the same file.
While the mini-browser in SE Snooper isnʼt a real web browser, you can usually click
links on a page and go to the next page, etc. But there are some differences you should
be aware of...
1. Thereʼs no Back and Forward buttons like a browser, but if you do want to go back,
you can right-click on the HTML page youʼre looking at and choose Back from the popup menu.
2. You canʼt click a link thatʼs supposed to open a page in a new window -- for the main
reason that SS isnʼt a “windowed” program. However, if you want to follow a link that
usually opens a new window, you can right-click the link, choose Copy Shortcut from the
pop-up menu, and then paste that into the address bar at the top and hit Go.
Resources Pane
Extra tools, sites, etc., that may be helpful in article marketing.
When Article Architect starts it checks the AA server to see if any new resources are
available. If one is found, a row will appear in the list and you can right-click and choose
the option to get more information via your browser.
You can delete rows in the list, but resources are only added automatically.
Bio Boxes (Resource Boxes)
Create bio, or resource boxes, for each niche in which youʼre working.
You can create as many different bio boxes as you like. Most people will create at least
one separate bio box for each project.
Use the Choose A Project drop-down at the top of the window to specify which project
you want to work with.
To create a new bio box, click the Bio Boxes icon in the toolbar. In the Bio Boxes
window you can select an existing bio box in the list and Delete, or click the New button
to create a new bio box, or edit the selected bio.
After putting in the name and description in the fields at the bottom, click the Update
button to make your changes permanent.
New Article
The window where you write or edit your articles.
Choose a project and category from the drop-downs at the top of the window.
Fill in the Title, Author name, Summary, and keywords (separated by commas). Only the
title is required.
If you would like to brainstorm titles, click the button with that caption and follow the
instructions below.
Target
If you have saved keywords or phrases for the chosen project, you can choose one in
this drop-down box. After typing at least 100 words AA will keep track of the percentage
of keywords to all words using the slider to the right of the target phrase. Most people
think 3%-5% is about right.
Bio Box
You can type a new bio into the field, or choose one from the drop-down list. The
number of characters and words for the bio box is also tracked.
Autosave On
When this box is checked, new articles are automatically saved every 60 seconds to
help avoid loss in case your kid pulls the computer power cord out of the wall while
you're typing the World's Greatest Article.
Text/HTML Tabs
While Article Architect is not an HTML editor, there are times when itʼs nice to be able to
see what an article will look like in a browser. Since some article directories allow you to
use basic HTML tags in your articles, by clicking the HTML tab you can see what your
article will look like. No editing in HTML mode, just viewing.
Thereʼs also a Markup menu available thatʼs explained below.
Menu Items for Articles
When working on an article there are a few special menu items that are made available
to you.
Import Into Article...
Use this menu option to import a text file into the Body field at the location of your
cursor.
This is especially useful for when you've used the SE Snooper to save raw materials -click this button to load all that text into the body field.
Spell
This menu option will spell check whichever edit field is active. For example, to check
the summary text, click inside the summary field and then click the Spell button.
Focus
Makes the body field almost the only thing on your entire screen so you can concentrate
on your writing.
Rewrite
To tweak or rewrite an article (such as to turn a PLR article into your own), load the
article and then choose this menu option. See the next section for more information on
using the rewrite utility. (If youʼre going to rewrite an article and save it as New, itʼs
a good idea to turn off the Auto-Save feature before starting the rewrite.)
Markup Menu
Itʼs not my intention to turn Article Architect into a web page creator, but itʼs nice to be
able to use some basic HTML tags, such as Bold and Italic, to dress up an article. The
Markup menu allows you to easily add some basic tags to your article.
Select the word or phrase you want to make bold, for example, and choose
Markup>HTML>Bold. The tags for bolding will be inserted around your selection.
You can now use the HTML tab at the top of the article body to see what the article will
look like in a browser.
Brainstorm Titles
Hereʼs how to use the Brainstorm Titles feature to crank out dozens of headlines or titles
you can use for your articles.
1. Fill in the four blanks on the main screen. There are examples for each one and you
can always make changes, so don't be afraid to play around.
2. Click the Create Headlines button and AA will show you a list of dozens of headlines
using the words and phrases you included in Step 1.
3. When you see one you like, click the Use This One button and it will be inserted into
the Title field.
That's all there is to it. Quick and simple and does a great job.
One more really cool feature...
If you can think of a headline that you'd like included in the list when you generate them,
you can add to the list of headlines. Here's how:
1. Create a text file (using something like NotePad, NOT Word) called moreheadlines.txt
and put it in the same folder as AA.
2. Inside that text file put one new headline per line. It will look like this:
Can You Believe You'll ^1^ In ^2^ While Living In Space?!
You Will Never ^3^ -- Unless You Take A Look At This!
Notice the ^1^ "tokens?" Those match up with the questions asked by AA and will be
replaced when the titles are generated.
Most people won't want to go to the bother of creating their own headlines, but that's
okay because there are so many good ones in AA that you don't really need the extras.
Rewrite Article
Use this tool to help you rewrite an article paragraph by paragraph.
When editing an article you can click the Edit>Rewrite menu option and this window will
pop up. It contains your article, a paragraph at a time. (Article Architect thinks a
paragraph happens when it sees two carriage returns together - basically, a blank line.)
The top pane shows the original paragraph and is for viewing only. The bottom pane
shows a copy of the original and you can edit it, or even completely delete it.
The arrow buttons at the top allow you to jump from one paragraph to the next. When
you move from one to the other the changes youʼve made are saved.
So work your way through the article and when youʼre done, click the OK button and
your changes will all show up in the original article.
You can then Update that article, or Save As New if youʼre wanting to create a derivative
work.
Email Article
Send an article via email using a template of your choice.
* The Email section in Preferences must be filled in for this option to be available.
Right-click an article in the main article list and you can then choose a template for the
email, a subject line (defaults to the title of the article), and the email address of the
person to receive the email.
If you want to make any tweaks to the article you can do that now, and then click the
Send Email button to email it.
The bottom box shows the status of the email process.
Submit Article
Helps you submit your articles to the online article directories.
Choose the article directory using the drop-down box and the click the Go button.
If you need to log in you can click the Copy Username button and then right-click inside
the username field of the web site and choose Paste. Do the same with password.
When submitting an article, click the button corresponding to the piece of the article you
need to deal with and that piece will be copied to the clipboard. All you need to do then
is to select the field in the web page where it needs to go, and paste it in.
After submitting an article to a directory, click the Set Submission Date button at the
bottom of the screen. Do that each time you submit an article to a different directory to
keep track of which articles have been submitted to which directories.
Export Articles to File
Get articles out of Article Architect as text files, web pages, etc.
To export articles, choose that option from under the File menu.
Choose the project you want to use with the drop-down box a the top as well as the
template youʼd like to use:
Article List: When selecting multiple articles, this will give you a list of article titles,
author names, and word counts.
Default: Exports an article with all parts, including keywords, summary, etc.
Web Page: Create an HTML page using the article copy as the body of the page.
Choose one or more articles to be exported and use the Select Folder button to choose
the location for the exported articles to be saved.
The Base Filename is what each exported article will be named, with an increasing
numeric counter. For example, if you selected three articles to export using the text
shown above, three files would be saved to disk:
article001.txt
article002.txt
article003.txt
If youʼll be exporting as a web page, youʼll want to change the Extension field to htm or
html.
The Make Links Live checkbox (not shown in the above picture) will wrap any links it
finds in HREF tags so they are clickable in the exported file.
Import Articles from STK (under the File menu)
Download PLR articles that you can then tweak/rewrite.
If you have a Sonic Toolkit membership (http://SonicToolkit.com) you will be able to
download thousands of private label rights (PLR) articles directly into Article Architect.
Use the option under the File menu to bring up the window shown above. Then...
Choose a keyword to search on (optional) and a date and click the Check for Articles
button. Matching articles will be shown in the list above. You can double-click an article
in the list to view the contents.
Select as many articles as you would like (Windows users: hold down Control and click
to select multiple rows -- Mac users: hold down Command and click to select multiple)
and then set the options available on the right (all articles imported at once will use the
options shown). Click the Import Selected Articles button and the selected articles will
be imported.
When you view the articles in the regular list, youʼll see that each one has had “PLR”
added to the beginning of the title. That will help you keep track of which articles youʼve
imported and which youʼve written. When you edit the article you can change the title.