1
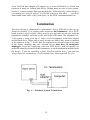
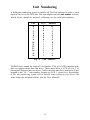
Hard Drive for the Amiga® 500
Installation Manual
This equipment generates and uses radio frequency energy and if not installed and used properly,
that is, in strict accordance with the manufacturer's instructions, may cause interference to radio and
television reception. It has been type tested and found to comply with the limits of a Class B computing device in accordance with the specifications in Subpart J of Part 15 of FCC Rules, which
are designed to provide reasonable protection against such interference in a residental installation.
However, there is no guarantee that interference will not occur in a particular installation. If this
equipment does cause interference to radio or television reception, which can be determined by turning the equipment off and on, the user is encouraged to try to correct the interference by one or more
of the following measures:
•
•
•
•
Reorient the receiving antenna
Relocate the computer with respect to the receiver
Move the computer away from the receiver
Plug the computer into a different outlet so that computer and receiver
are on different branch circuits
If necessary, the user should consult the dealer or an experienced radio/television technician for
additional suggestions. The user may find the following booklet prepared by the Federal Communications
Commission helpful: "How to Identify and Resolve Radio-TV Interference Problems." This booklet
is available from the U.S. Government Printing Office, Washington, D.C., 20402, Stock No.
004-000-00345-4.
FastTrak installation manual written by Marty Flickinger
FastTrak firmware copyright © 1989
All rights reserved.
AmigaDOS, Kickstart, Intuition, and Workbench are all trademarks of Commodore-Amiga, Inc.
Amiga is a registered trademark of Commodore-Amiga, Inc.
SECOND PRINTING June 1989
Copyright © 1989 by Xetec, Inc.
All specifications subject to change without notice.
238906
Hard Drive for the Amiga® 500
2804 Arnold Rd.
Salina, KS 67401
(913) 827-0685
LIMITED WARRANTY
Xetec, Inc. warrants this hard disk drive known as the FastTrak to be in good
working order for a period of one year from the date of purchase from Xetec,
Inc. or an authorized dealer. Should this product fail to be in good working order
at any time during this warranty period, Xetec will, at its option, repair or replace
this product with no additional charge except as set forth below. Repair parts
and replacement products will be furnished on an exchange basis and will be either
reconditioned or new. All replaced parts and products become the property of
Xetec, Inc. This limited warranty does not include service to repair damage to
the product resulting from accident, disaster, abuse, or non-Xetec modification
of the product.
Limited warranty service may be obtained by delivering the product during the
warranty period to an authorized Xetec dealer or to Xetec, Inc., and by providing
proof of purchase date. Warranty will be valid for registered owners only. If this
product is delivered by mail, you agree to insure the product or assume the risk
of loss or damage in transit, to prepay shipping charges to Xetec, Inc., and to
use the original shipping container or equivalent. Contact Xetec, Inc., 2804 Arnold Rd., Salina, KS 67401, (913) 827-0685 for further information.
All express and implied warranties for this product including the warranties of
merchantability and fitness for a particular purpose, are limited in duration to
a period of one year from the date of purchase, and no warranties, whether expressed or implied, will apply after this period. Some states do not allow limitations on how long an implied warranty lasts, so the above limitations may not
apply to you.
If this product is not in good working order as warranted above, your sole remedy
shall be repair or replacement as provided above. In no event will Xetec be liable
to you for any damages including any lost profits, lost savings or other incidental
or consequential damages arising out of the use of, or inability to use such product, even if Xetec or an authorized Xetec dealer has been advised of the possibility
of such damages, or for any claim by any other party.
Some states do not allow the exclusion or limitation of incidental or consequential damages for consumer products, so the above limitations or exclusions may
not apply to you.
This warranty gives you specific legal rights, and you may also have other rights
which may vary from state to state.
Table of Contents
Introduction
Inventory
Precautions
1
Installation
Host Adaptor Options
Changing the Option Jumpers
Connecting Everything
5
Adding More Drives
Termination
The Device Address
Unit Numbering
11
Customer Service
Equipment Return Policy
Specifications
Index
15
15
15
17
i
ii
INTRODUCTION
• Inventory
• Precautions
1
Congratulations on purchasing a FastTrak hard drive, one of the fastest and most
complete hard drive systems available for your Amiga® 500 computer. Here's
an overview of its features:
• DMAx™ hardware boosts data transfers to 45 times faster than
floppies (depending on the hard drive) using AmigaDOS™ (even
faster using direct methods)
• Boot off the hard drive on a vl.3 system
• Utilities included for formatting, partitioning, and data archiving
• Supports up to 7 SCSI drives (or other SCSI devices)
•
Pass-thru bus allows other peripherals to use the expansion bus
• Drive enclosure has its own power supply and cooling fan (no fan
on the FastTrak jr)
•
Host adaptor internal connector accepts optional math
coprocessor/512K-4Meg RAM board
• Compatible with Xetec FastTape streaming tape backup subsystems
One of the major components of the FastTrak drive system is the host adaptor.
This unit is basically an interface between your computer and the hard drive
enclosure. It generates a special set of signals that the hard drive unit understands.
These signals conform to the SCSI (Small Computer Systems Interface) standard
which is commonly used by many storage devices. This makes it easy to add
more drives or other devices. (By the way, pronunciation of "SCSI" is divided
between "scuzzy" and "sexy," so pick a side. Rest assured that neither is a
very accurate description of the SCSI format.)
The other major component is the hard drive enclosure. The hard disk drive itself
is contained in this unit, as well as a power supply, controller card (if applicable),
and other miscellany. The controller card is another interface of sorts, used with
ST-506 type drives to adapt them to the SCSI data coming into the drive. Most
of the FastTrak models use embedded SCSI drives which can connect directly
to the SCSI bus, eliminating the controller card.
2
Inventory
Before doing anything else, identify the following components included in your
FastTrak drive system.
Hard Drive
Power Cord
Host Adaptor
SCSI Data Cable
Manual
Warranty card
Boot Disk
Fig. 1 - Components
3
Precautions
Your FastTrak hard drive has been designed to make installation a breeze. Nevertheless, read this manual very carefully, paying particularly close attention to
the first few chapters. You're gambling with the future of your data if you skim
these important sections!
The hard disk itself is probably the most sensitive electronic device you will ever
encounter. Even a minor bump can damage the drive's magnetic surfaces, resulting
in a loss of data and possibly a ruined hard drive. The drive in your FastTrak
system is attached using a soft-mounting, which protects it from minor mechanical
shocks. Still, the following safeguards must be taken:
•
If you intend to move or ship the drive, use the included "Park"
utility (see the User Manual) to move the heads to an unused part
of the disk. In fact, it's a good practice to park the heads every
time you're ready to shut the system down.
• Never ship the drive in anything but its original carton.
• Never move the drive for the first 30 seconds after its power is
shut off to allow the platters to come to a full stop and for the
heads to auto-park (on applicable drives).
Another danger when installing the FastTrak drive is static discharge. Before
handling or installing the system components, you should prepare yourself so
that you do not damage them by your touch. First, a carpeted floor is always
dangerous! Leather-soled shoes also seem to be a problem. Static problems multiply when the humidity is low (generally in winter). A good rule to remember is
any time you have walked any distance, discharge yourself before touching your
computer or any peripheral. Large metal objects (such as a table) are a good place
to discharge, as is anything connected to earth ground (like the screw in the cover
of a wall socket).
4
INSTALLATION
•
•
•
Host Adaptor Options
Changing the Option Jumpers
Connecting Everything
5
Host Adaptor Options
Before you can install your hard drive system, a few jumpers in the host adaptor
need to be discussed. Your adaptor comes from the factory with the most popular
options already set. Changing them, however, will require the removal of the
host adaptor's cover. This is a simple operation that anyone who's careful can
perform. Read the following option descriptions to determine if you need to change
any of the jumpers.
Option 1: Operating System
Due to some important changes in the Amiga® 500 operating system, you must
set a jumper in the host adaptor depending on the version of Kickstart™ ROM
you have in your computer. Here's how to find out: make sure no disks are in
any floppy drives and turn your computer on. When the hand holding the disk
appears, asking you to insert Workbench™ look at the number just below the disk.
This is the version of the ROM installed.
The jumper is already set for v1.2, so unless you have a higher revision (1.3,
1.4, etc.), you don't need to change this jumper. If you do, see below for details.
Note: this jumper determines whether you will be able to boot directly from the
hard drive (not possible if set for vl.2). If your ROM is version 1.2 but you
set the jumper otherwise, the computer will "hang" when powering up.
Option 2: Power Source
One other option you can jumper in the host adaptor is where it will get its power.
As shipped, the host adaptor will draw its 5 volts from the computer. The other
option is to draw it from the power supply in the hard drive. The latter is recommended if you install the optional RAM module in the host adaptor, or if any
peripherals are plugged into the expansion port of the FastTrak host adaptor. If
neither of these is true, you can leave this jumper unchanged.
Note: drawing power from the hard drive supply only works with Xetec hard
drive enclosures. You may attach other SCSI devices, but they will not supply
the power needed for this option.
If you do need to draw host adaptor power from the hard drive, see the next section for details on changing the jumper.
6
Changing the Option Jumpers
If you determined in the previous section that you need to change one or more
of the jumpers in the host adaptor, follow these simple steps:
1) Using a phillips screwdriver, remove the six screws on the sides of
the host adaptor (not the ones on its bottom). Set them aside and
pull the cover straight off the base. Set it aside.
2)
Discharge yourself every time you are about to touch any of the
jumpers. Do not touch anything else!
3) Orient the host adaptor so that it matches Fig. 2. Find the three
areas marked. Never change any other junipers!
Fig. 2 - Jumper Locations
4)
Set the jumpers according to the following.
Operating System Jumper
ROM version 1.2
ROM version 1.3 or higher
Power Source Jumpers
From the host (computer)
H power
D power
From the drive
H power
D power
Fig. 3 - Jumper Settings
Never should there be a jumper on both H power and D power
at the same time!
5)
Replace the cover and the six screws.
Connecting Everything
Installation of the FastTrak drive system takes only a few moments, but must
be done carefully to avoid damage. Be gentle, and work slowly, referring to the
text frequently as you go.
1)
Make sure your computer and all peripherals work correctly before
installing your hard drive. This will prevent a misdiagnosis of other
problems.
2)
Make sure power is completely turned off to all components of
your computer and hard drive system.
3) Locate the small plastic cover on the lower-left side of your computer and pry it out with a small screwdriver. The cover will not be
needed as long as the FastTrak drive is connected to your system.
If you have another device that uses this expansion slot, it may be
installed in front of or behind the Xetec host adaptor. If behind,
remove it for now.
8
4)
If you own other devices that use the computer's expansion port,
remove the host adaptor's silver pass-thru cover. It's attached by
two screws on the bottom of the host adaptor.
5)
Lay the FastTrak host adaptor to the left of the computer, positioned so that its cover is readable as you sit at the keyboard. See Fig.
4. Slide it to the right into the computer's expansion slot, guiding
the host adaptor's connector onto the printed circuit board. Make
sure it is seated fully and squarely.
Fig. 4 - Host Adaptor Installation
6) If you unplugged any peripherals in step 3, plug them into the left
side of the FastTrak host adaptor.
9
7)
Locate the 25 pin data cable; plug one end into the connector on
the rear of the Host Adaptor, and secure the cable with the attached
screws.
8)
Attach the remaining end of the 25 pin data cable to the connector
marked "Host Adaptor" on the back of the hard drive enclosure.
See Fig. 5. Again, secure the cable with the attached screws.
CAUTION!
Unless your FastTrak hard drive enclosure is labeled otherwise, it has
been factory wired for:
115 volts A.C. 60 Hertz
Do not plug the power cord into any other voltage or frequency outlet.
For domestic American systems, the correct outlet type is the three prong
grounded variety. Use of a three prong adaptor in a two prong ungrounded outlet is strongly discouraged since such use presents a high shock
hazard and may damage your system.
Locate the AC power cable and plug the female end into the 115
VAC receptacle of the hard drive enclosure. Be absolutely sure it's
pushed in all the way. Make sure the Power Switch is in the OFF
position and plug the male end into a properly grounded 115 volt
AC, 60 Hz outlet.
Fig. 5 - Hard Drive Connections
10
ADDING MORE DRIVES
•
•
•
Termination
The Device Address
Unit Numbering
11
Your FastTrak host adaptor will support up to seven SCSI devices, which can
equate to as many as 14 hard disk drives. Adding more devices to your system,
however, is more complex than you might think. Unfortunately, when doing so,
you cannot just "plug in and go" as you did with your first drive — you must
understand some more of the principles of the SCSI communications bus.
Termination
The first concept to understand is termination. Every SCSI device has an optional set (usually 3) of resistor packs known as bus terminators. For a SCSIbased system to work reliably, there must be two and only two devices with the
terminators installed, each one on the end of the SCSI chain. The standard FastTrak system is setup as in fig. 6, with a set of terminators in the host adaptor
and the hard drive. When one or more devices are added, they must be inserted
in the chain as in fig. 7. Notice that the original two pieces are kept on the ends
of the chain, meaning that each inserted device must have its terminators
unplugged. If you are supplying your own SCSI device, look for specific instructions about the location of the terminators in the documention included with
the device. If you are installing a Xetec FastTrak add-on drive, you need not
worry about the terminators; it will already have them removed for you.
Fig. 6 - Standard System Termination
12
Fig. 7 - Expanded System Termination
Make absolutely sure that the devices on the ends of the SCSI chain have terminators in them, and that none of the other devices do. The system may appear
to work even if something deviates from these rules, but a lock-up could occur
at any time. So don't just test it, visually verify it!
The Device Address
Each device attached to the SCSI bus has its own unique code to which it and
only it responds. This code is called its device address. The device address of
the host adaptor is usually 7. Your original drive's address is set to 0, but is
changeable. This leaves addresses 1 through 6 for other devices that you might
add. If two devices on the bus have the same address, an error or lock-up will
result when you try to access either one.
To set a disk's device address, refer to the documentation included with it. FastTrak
add-on drives are shipped with their address set to 1. They may just be inserted
and used.
13
Unit Numbering
A deliberate numbering system is used by all FastTrak software to refer to each
physical device on the SCSI bus. The host adaptor uses this unit number to know
which device should be accessed. Following are the valid unit numbers:
Unit
0
1
2
3
4
5
6
10
11
12
13
14
15
16
LUN
0
0
0
0
0
0
0
1
1
1
1
1
1
1
Address
0
1
2
3
4
5
6
0
1
2
3
4
5
6
Fig. 8 - Unit Numbers
The LUN entry stands for Logical Unit Number. This is for SCSI controller cards
that can support more than one drive. These cards allow a LUN of 0 or 1 to
distinguish between the two drives. Cards with only one drive attached will not
respond to the "10 +" unit number, because no LUN 1 exists for it. Knowledge
of this unit numbering system will be helpful when setting up your drives and
when using the included utilities (see the User Manual).
14
CUSTOMER SERVICE
If you have a problem that is not covered in this manual, you may obtain help
by calling customer service at (913) 827-0685 between 10 a.m. and 4:30 p.m.
CST. We cannot help those who have not read this manual and the User
Manual.
Xetec also has a bulletin board in operation to provide support for all FastTrak
owners. The number is (913) 827-1974.
EQUIPMENT RETURN POLICY
Do not return any system or part thereof unless you have first called and received authorization. Any hardware to be returned will require an RMA (return
materials authorization). Any hardware without an RMA number clearly marked
on the outside of the box will be refused. Call (913) 827-0685 to obtain an RMA.
When shipping a drive, remember to use the Park command (see the User Manual)
and to use the original carton. Include a letter describing the problem and proof
of purchase, if under warranty.
The drive's warranty will only be honored if the registration card has been completed and mailed in.
SPECIFICATIONS
Model
FastTrak
FastTrak
FastTrak
FastTrak
FastTrak
jr
K20
Q40
Q80
M150
Capacity Sec/Trk
21MB
17
21 MB
17
42 MB
28&35
84 MB
28&35
154 MB
36
Heads
4
4
3
6
7
15
Cyls
604
607
834
834
1245
Avg. Seek
68 msec
40 msec
19 msec
19 msec
16 msec
Model
Bytes/Sect Encoding
FastTrak jr
512
MFM
FastTrak K20
512
MFM
FastTrak Q40
512
RLL
FastTrak Q80
512
RLL
FastTrak Ml50 512
RLL
Transfer
Transfer
Average
Average
rate (theoretical)
rate (practical)
read speed (thru DOS)
write speed (thru DOS)
Bits/Inch
13,400
10,200
22,055
22,055
-
Trks/Inch
800
800
1000
1000
-
1.5 Megabytes/sec
800,000 bytes/sec
175,000 — 550,000 bytes/sec
120,000 — 300,000 bytes/sec
Power requirements
Host adaptor (no FastRam card) 5 volts DC at 500mA max
Drive enclosure
120 VAC 60Hz 40W
Size
Host adaptor
Drive enclosure
9" x 3.5" x 1.25"
12" x 14" x 2.5"
Pin Name
1
REQ
2
MSG
3
I/O
4
RST
5
ACK
6
BSY
7
Gnd
8
D0
9
Gnd
10 D3
11
D5
12 D6
13 D7
Pin
14
15
16
17
18
19
20
21
22
23
24
25
16
Name
Gnd
C/D
Gnd
ATN
Gnd
SEL
DP
Dl
D2
D4
Gnd
Drive Pwr
RPM
3600
3600
3662
3662
3600
INDEX
Boot disk 3
Bulletin board 15
Bus terminator 12
Connector 16
Controller card 2
Data cable 3,9,10
Device address 13
Host adaptor 2,3,6,9
Installation 8-10
Jumpers 6,7
LUN 14
Power 6,8
Return Policy 15
SCSI 2,12
Specifications 15-16
Technical support 15
Termination 12-13
Terminators 12
Unit number 14
17
Amiga Hardware World
Everything about Amiga hardware...
~
http://amiga.resource.cx