1
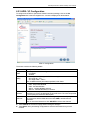
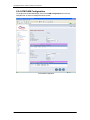
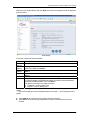
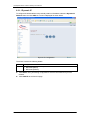
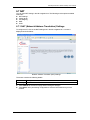
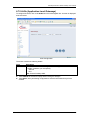
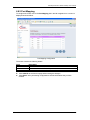
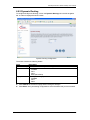
SOHOSpeed ADSL2+ Modem Gateway User’s Manual Revision 1.0 August 2005 SOHOSpeed ADSL2+ Modem Gateway User’s Manual Copyright This manual may not be copied, photocopied, transmitted, or translated into language or computer language, in any form, or by any means, in whole or in part, without the prior written consent by the manufacturer. © Copyright 2005 All rights reserved. Disclaimer The manufacturer makes no representations or warranties, expressed, statutory or implied, regarding the fitness or merchantability of this product for any particular purpose. Further, the manufacturer is no liable for any damages, including but not limited to, lost profits, lost saving, or other incidental or consequential damages arising out of the use of this product. The manufacturer also reserves the right to make any improvements or modifications to the product described in this manual at any time, without notice of these changes. ii SOHOSpeed ADSL2+ Modem Gateway User’s Manual Federal Communications Commission (FCC) NOTICE This equipment has been tested and found to comply with the limits for a Class B digital device, pursuant to Part 15 of FCC Rules. These limits are designed to provide reasonable protection against harmful interference in a residential installation. This equipment generates, uses and can radiate radio frequency energy and, if not installed and used in accordance with the instructions, may cause harmful interference to radio communications. However, there is no guarantee that interference will not occur in a particular installation. If this equipment does cause harmful interference to radio or television reception, which can be determined by turning the equipment off and on, the user is encouraged to try to correct the interference by one or more of the following measures: z Reorient of relocate the receiving antenna. z Increase the separation between the equipment and receiver. z Connect the equipment into an outlet on a circuit different from that to which the receiver is connected. z Consult the dealer or an experienced radio / TV technician for help. This unit was tested with shielded cables on the peripheral devices. Shielded cables must be used with the unit to insure compliance. This statement can be deleted if unit was not tested with shielded cables. The manufacture is not responsible for any radio or TV interference caused by unauthorized modifications to this equipment. Such modifications could void the user's authority to operate the equipment. This device complies with Part 15 of the FCC rules. Operation is subject to the following two conditions: 1. This device may not cause harmful interference. 2. This device must accept any interference that may cause undesired operation. CAUTION Always disconnect all telephone lines from the wall outlet before servicing or disassembling this equipment. iii SOHOSpeed ADSL2+ Modem Gateway User’s Manual IMPORTANT SAFETY INSTRUCTIONS When using your telephone equipment, basic safety precautions should always be followed to reduce the risk of fire, electric shock and injury to persons, including the following: 1. Do not use this product near water, for example near a bath tub, wash bowl, kitchen sink or laundry tub, in a wet basement or near a swimming pool. 2. Avoid using a telephone (other then a cordless type) during an electrical storm. There may be a remote risk of electric shock from lighting. 3. Do not use the telephone to report a gas leak in the vicinity of the Leak. 4. Use only the power cord and batteries indicated in this manual. Do not dispose of batteries in a fire. They may explode. Check with local codes for possible special disposal Instructions. iv SOHOSpeed ADSL2+ Modem Gateway User’s Manual Table of Contents 1. INTRODUCTION .................................................................................................................................... 2 1.1 FEATURES ................................................................................................................................................... 2 1.2 SYSTEM REQUIREMENTS ............................................................................................................................ 2 2. GETTING TO KNOW THE SOHOSPEED ........................................................................................ 4 2.1 PARTS CHECK ............................................................................................................................................. 4 2.2 FRONT PANEL ............................................................................................................................................. 5 2.3 REAR PANEL ............................................................................................................................................... 6 3. HARDWARE CONNECTION AND PC CONFIGURATION ......................................................... 8 3.1 CONNECTING YOUR SOHOSPEED ............................................................................................................. 8 3.2 CONFIGURING YOUR COMPUTERS ............................................................................................................. 9 4. LOGGING ON TO THE WEB APPLICATION............................................................................... 14 5. GETTING STARTED WITH THE CONFIGURATION MANAGER ......................................... 16 6. ADVANCED SETUP ............................................................................................................................. 18 6.1 SYSTEM..................................................................................................................................................... 19 6.1.1 Host Name Config ............................................................................................................................ 19 6.1.2 System Time ...................................................................................................................................... 20 6.1.3 Administrator Settings ...................................................................................................................... 21 6.1.4 User Settings..................................................................................................................................... 22 6.1.5 Firmware Upgrade .......................................................................................................................... 23 6.1.6 System Log ........................................................................................................................................ 24 6.1.7 Reset Amazon ................................................................................................................................... 25 6.2 ADSL ....................................................................................................................................................... 26 6.2.1 ADSL Line Status ............................................................................................................................. 26 6.2.2 ADSL PHY Configuration................................................................................................................ 27 6.2.3 ADSL VC Configuration .................................................................................................................. 28 6.2.4 ATM OAM Configuration ................................................................................................................ 29 6.3 WAN ........................................................................................................................................................ 31 6.3.1 WAN Settings .................................................................................................................................... 31 6.3.2 WAN Status ....................................................................................................................................... 38 6.3.3 Domain Name Server (DNS)............................................................................................................ 39 6.3.4 Dynamic Domain Name Server (DDNS)......................................................................................... 40 6.4 LAN ......................................................................................................................................................... 41 6.4.1 LAN Settings ..................................................................................................................................... 41 6.4.2 Spanning Tree Protocol Bridge Settings ......................................................................................... 42 6.5 SNMP (SIMPLE NETWORK MANAGEMENT PROTOCOL) ......................................................................... 43 6.6 FIREWALL ................................................................................................................................................. 44 6.6.1 Firewall Options............................................................................................................................... 44 6.6.2 Denial of Service (DoS) Options...................................................................................................... 45 6.6.3 Client Filter ...................................................................................................................................... 46 6.6.4 MAC Control .................................................................................................................................... 47 6.7 NAT ......................................................................................................................................................... 48 6.7.1 NAT (Network Address Translation) Settings ................................................................................. 48 6.7.2 Virtual Server ................................................................................................................................... 49 6.7.3 Port Mapping ................................................................................................................................... 50 6.7.4 DMZ (Demilitarized Zone) .............................................................................................................. 51 6.7.5 ALGs (Application Level Gateways) ............................................................................................... 52 6.8 VIRTUAL LAN.......................................................................................................................................... 53 6.8.1 VLAN Settings................................................................................................................................... 53 vi SOHOSpeed ADSL2+ Modem Gateway User’s Manual 6.8.2 Port Mapping ................................................................................................................................... 54 6.9 ROUTING SETTINGS .................................................................................................................................. 55 6.9.1 Static Routing ................................................................................................................................... 55 6.9.2 Dynamic Routing.............................................................................................................................. 56 6.9.3 Routing Table List ............................................................................................................................ 57 6.10 QOS (QUALITY OF SERVICE).................................................................................................................. 58 6.11 APPLICATION SERVERS .......................................................................................................................... 60 vii SOHOSpeed ADSL2+ Modem Gateway User’s Manual 1. Introduction Congratulations on becoming the owner of the SOHOSpeed ADSL2+ Modem Gateway. Your LAN (local area network) will now be able to access the Internet using your highspeed ADSL connection. This User Guide will show you how to install and set up the SOHOSpeed ADSL2+ Modem Gateway, and how to customize its configuration to get the most out of your new product. 1.1 Features f Internal ADSL modem for high-speed Internet access f 10/100Base-T Ethernet Router to provide Internet connectivity to all computers on your LAN f USB port for connecting a USB-enabled PC (Optional) f Network address translation (NAT), Firewall, and IP filtering functions to provide security for your LAN f Network configuration through DHCP Server and DHCP Relay f Services including IP route and DNS configuration, RIP, and IP and DSL performance monitoring f Configuration program you access via an HTML browser 1.2 System Requirements In order to use the SOHOSpeed ADSL2+ Modem Gateway, you must have the following: f ADSL service up and running on your telephone line, with at least one public Internet address for your LAN f One or more computers each containing an Ethernet 10Base-T/100Base-T network interface card (NIC) and/or a single computer with a USB port f An Ethernet hub/switch, if you are connecting the device to more than one computer on an Ethernet network f For system configuration using the supplied web-based program: a web browser such as Internet Explorer v5.0 or later, or Netscape v6.1 or later 2 SOHOSpeed ADSL2+ Modem Gateway User’s Manual 2. Getting to Know the SOHOSpeed 2.1 Parts Check In addition to this document, your SOHOSpeed should arrive with the following: f f f f f f f 4 One SOHOSpeed ADSL2+ Modem Gateway One Power adapter and power cord One USB cable (Optional) One Ethernet cable One RJ-11 telephone cord One CD-ROM (This manual and USB Driver) One Quick Installation Guide SOHOSpeed ADSL2+ Modem Gateway User’s Manual 2.2 Front Panel The front panel contains lights called LEDs that indicate the status of the unit. 1 port Gateway 4 ports Gateway 1 port Gateway LED Indicators LED POWER LAN USB WAN Internet PPP Status Glowing Dim Glowing Dim Blinking Glowing Dim Blinking Glowing Dim Blinking Glowing Dim Description Power on Power off The LAN port is connected to Ethernet device The LAN port is not connected to Ethernet device The Gateway is receiving/transmitting data via LAN port The USB port is connected to computer The USB port is not connected to computer The Gateway is receiving/transmitting data via USB port The WAN port is successfully linked with ADSL line The WAN port is not linked with any ADSL line The WAN port is trying (training) to link with ADSL line The Gateway is receiving/transmitting data The Gateway is not receiving/transmitting data 4 ports Gateway LED Indicators LED POWER WAN USB Internet PPP LAN 1/2/3/4 Status Glowing Dim Glowing Dim Blinking Glowing Dim Blinking Glowing Dim Glowing Dim Blinking Description Power on Power off The WAN port is successfully linked with ADSL line The WAN port is not linked with any ADSL line The WAN port is trying (training) to link with ADSL line The USB port is connected to computer The USB port is not connected to computer The Gateway is receiving/transmitting data via USB port The Gateway is receiving/transmitting data The Gateway is not receiving/transmitting data The LAN 1/2/3/4 port is connected to Ethernet device The LAN 1/2/3/4vport is not connected to Ethernet device The Gateway is receiving/transmitting data via LAN 1/2/3/4 port 5 SOHOSpeed ADSL2+ Modem Gateway User’s Manual 2.3 Rear Panel The rear panel contains the ports for the unit's data and power connections. 1 port Gateway 4 ports Gateway ADSL RESET USB (Optional) LAN DC IN 6 Connects the device to the wall jack for Internet connection Resets the device to default configuration values. Connects to the USB port on your PC. Connects the device to your PC's Ethernet port, or to the uplink port on your LAN's hub, using the cable provided. Connects to the supplied power converter cable. SOHOSpeed ADSL2+ Modem Gateway User’s Manual 3. Hardware Connection and PC Configuration 3.1 Connecting Your SOHOSpeed In this part, you connect the device to the phone jack, the power outlet, and your computer or network. The figure below illustrates the hardware connections. Refer to the steps that follow for specific instructions. WARNING Before you begin, turn the power off for all devices. These include your computer(s), your LAN hub/switch (if applicable), and the SOHOSpeed. 1 port Gateway Hardware Connections Overview 4 ports Gateway Hardware Connections Overview 8 SOHOSpeed ADSL2+ Modem Gateway User’s Manual Step 1. Connect the ADSL cable Connect one end of the provided phone cable to the port labeled ADSL on the rear panel of the device. Connect the other end to your wall phone jack. Step 2. Connect the Ethernet cable. If you are connecting a LAN to the SOHOSpeed, attach one end of a provided Ethernet cable to a regular hub port and the other to the Ethernet port on the SOHOSpeed. Step 3. Attach the power connector. Connect the AC power adapter to the PWR connector labeled DC IN on the back of the device and plug in the adapter to a wall outlet or power strip. Step 4. Power up your systems. Turn on and boot up your computer(s) and any LAN devices such as hubs or switches. 3.2 Configuring Your Computers This part provides instructions for configuring the Internet settings on your computers to work with the SOHOSpeed. Before you begin By default, the SOHOSpeed automatically assigns all required Internet settings to your PCs. You need only to configure the PCs to accept the information when it is assigned. Note In some cases, you may want to assign Internet information manually to some or all of your computers rather than allow the SOHOSpeed to do so. See ”Assigning static Internet information to your PCs” for instructions. 9 SOHOSpeed ADSL2+ Modem Gateway User’s Manual Windows® 95, 98 PCs: First, check for the IP protocol and, if necessary, install it: 1. In the Windows task bar, click the Start button, point to Settings, and then click Control Panel. 2. Double-click the Network icon. The Network dialog box displays with a list of currently installed network components. If the list includes TCP/IP, and then the protocol has already been enabled. Skip to step 9. 3. If TCP/IP does not display as an installed component, click . The Select Network Component Type dialog box displays. 4. Select Protocol, and then click . The Select Network Protocol dialog box displays. 5. Click on Microsoft in the Manufacturers list box, and then click TCP/IP in the Network Protocols list box. 6. Click to return to the Network dialog box, and then click again. You may be prompted to install files from your Windows 95/98 installation CD. Follow the instructions to install the files. 7. Click to restart the PC and complete the TCP/IP installation. Next, configure the PCs to accept IP information assigned by the SOHOSpeed: 8. Open the Control Panel window, and then click the Network icon. 9. Select the network component labeled TCP/IP, and then click If you have multiple TCP/IP listings, select the listing associated with your network card or adapter. 10. In the TCP/IP Properties dialog box, click the IP Address tab. 11. Click the radio button labeled Obtain an IP address automatically. 12. Click the DNS Configuration tab, and then click the radio button labeled Obtain an IP address automatically. 13. Click twice to confirm and save your changes. You will be prompted to restart Windows. 14. Click . Windows NT 4.0 workstations: First, check for the IP protocol and, if necessary, install it: 1. In the Windows NT task bar, click the Start button, point to Settings, and then click Control Panel. 2. In the Control Panel window, double click the Network icon. 3. In the Network dialog box, click the Protocols tab. The Protocols tab displays a list of currently installed network protocols. If the list includes TCP/IP, then the protocol has already been enabled. Skip to step 9. 10 . SOHOSpeed ADSL2+ Modem Gateway User’s Manual 4. If TCP/IP does not display as an installed component, click . 5. In the Select Network Protocol dialog box, select TCP/IP, and then click . You may be prompted to install files from your Windows NT installation CD or other media. Follow the instructions to install the files. After all files are installed, a window displays to inform you that a TCP/IP service called DHCP can be set up to dynamically assign IP information. 6. Click to continue, and then click your computer. if prompted to restart Next, configure the PCs to accept IP information assigned by the SOHOSpeed: 7. Open the Control Panel window, and then double-click the Network icon. 8. In the Network dialog box, click the Protocols tab. 9. In the Protocols tab, select TCP/IP, and then click 10. In the Microsoft TCP/IP Properties dialog box, click the radio button labeled Obtain an IP address from a DHCP server. 11. Click Control Panel. . twice to confirm and save your changes, and then close the Windows 2000 PCs: First, check for the IP protocol and, if necessary, install it: 1. In the Windows task bar, click the Start button, point to Settings, and then click Control Panel. 2. Double-click the Network and Dial-up Connections icon. 3. In the Network and Dial-up Connections window, right-click the Local Area Connection icon, and then select Properties. The Local Area Connection Properties dialog box displays with a list of currently installed network components. If the list includes Internet Protocol (TCP/IP), then the protocol has already been enabled. Skip to step 10. 4. If Internet Protocol (TCP/IP) does not display as an installed component, click . 5. In the Select Network Component Type dialog box, select Protocol, and then click 6. . Select Internet Protocol (TCP/IP) in the Network Protocols list, and then click . You may be prompted to install files from your Windows 2000 installation CD or other media. Follow the instructions to install the files. 7. If prompted, click to restart your computer with the new settings. Next, configure the PCs to accept IP information assigned by the SOHOSpeed: 8. In the Control Panel, double-click the Network and Dial-up Connections icon. 9. In Network and Dial-up Connections window, right-click the Local Area Connection icon, and then select Properties. 11 SOHOSpeed ADSL2+ Modem Gateway User’s Manual 10. In the Local Area Connection Properties dialog box, select Internet Protocol (TCP/IP), and then click . 11. In the Internet Protocol (TCP/IP) Properties dialog box, click the radio button labeled Obtain an IP address automatically. Also click the radio button labeled Obtain DNS server address automatically. 12. Click Control Panel. twice to confirm and save your changes, and then close the Windows Me PCs 1. In the Windows task bar, click the Start button, point to Settings, and then click Control Panel. 2. Double-click the Network and Dial-up Connections icon. 3. In the Network and Dial-up Connections window, right-click the Network icon, and then select Properties. The Network Properties dialog box displays with a list of currently installed network components. If the list includes Internet Protocol (TCP/IP), then the protocol has already been enabled. Skip to step 11. 4. If Internet Protocol (TCP/IP) does not display as an installed component, click . 5. In the Select Network Component Type dialog box, select Protocol, and then click . 6. Select Microsoft in the Manufacturers box. 7. Select Internet Protocol (TCP/IP) in the Network Protocols list, and then click . You may be prompted to install files from your Windows Me installation CD or other media. Follow the instructions to install the files. 8. If prompted, click to restart your computer with the new settings. Next, configure the PCs to accept IP information assigned by the SOHOSpeed: 9. In the Control Panel, double-click the Network and Dial-up Connections icon. 10. In Network and Dial-up Connections window, right-click the Network icon, and then select Properties. 11. In the Network Properties dialog box, select TCP/IP, and then click . 12 12. In the TCP/IP Settings dialog box, click the radio button labeled Server assigned IP address. Also, click the radio button labeled Server assigned name server address. 13. Click Control Panel. twice to confirm and save your changes, and then close the SOHOSpeed ADSL2+ Modem Gateway User’s Manual Assigning static Internet information to your PCs In some cases, you may want to assign Internet information to some or all of your PCs directly (often called “statically"), rather than allowing the SOHOSpeed to assign it. This option may be desirable--but not required--if: f You have obtained one or more public IP addresses that you want to always associate with specific computers (for example, if you are using a computer as a public web server). f You maintain different subnets on your LAN. Before you begin, be sure to have the following information on hand. Contact your ISP if necessary: f The IP address and subnet mask to be assigned to each PC. f The IP address of the default gateway for your LAN. In most cases, this is the address assigned to the LAN interface on the SOHOSpeed. By default, the LAN interface is assigned this IP address: 10.10.10.250. (You can change this number, or another number can be assigned by your ISP.) f The IP address of your ISP’s Domain Name System (DNS) server. On each PC, follow the instructions relating only to checking for and/or installing the IP protocol. Once it is installed, continue to follow the instructions for displaying Internet Protocol (TCP/IP) properties. Instead of enabling dynamic assignment of the IP addresses for the computer, DNS server, and default gateway, click the radio buttons that enable you to enter the information manually. Note Your PCs must have IP addresses that place them in the same subnet as the SOHOSpeed’s LAN interface. If the IP addresses you manually assign to your LAN PCs are in a different subnet than the LAN interface, change the LAN interface IP address as needed. 13 SOHOSpeed ADSL2+ Modem Gateway User’s Manual 4. Logging on to the Web Application The SOHOSpeed includes preinstalled program called the Configuration Manager, which provides an interface to the software installed on the device. It enables you to configure the device settings to meet the needs of your network. You access it through your web browser from any PC connected to the SOHOSpeed via the LAN port. Note The SOHOSpeed may already be configured to provide Internet connectivity for your network. If it works properly with the preconfigured settings, then you may not need to use the Configuration Manager. Contact your ISP to determine which settings you may need to change, if any. The Configuration Manager program is preinstalled into memory on the SOHOSpeed. To access the program, you need the following: f A PC or laptop connected to the LAN port on the SOHOSpeed. f A web browser installed on the PC. The program is designed to work best with Microsoft Internet Explorer® version 5.0, Netscape Navigator® version 6.1, or later versions. You can access the program from any computer connected to the SOHOSpeed via the LAN or USB ports. 1. From a LAN computer, open your web browser, type the following URL in the web address (or location) box, and press <Enter>: http://10.10.10.250 This is the predefined IP address for the SOHOSpeed. A login screen then displays, enter your password and then click 2. Note 14 . The first time you log into the program, use the default password Admin. You can change the password at any time while the user name cannot be changed. SOHOSpeed ADSL2+ Modem Gateway User’s Manual 5. Getting Started with the Configuration Manager The Amazon Web Application is displayed as shown below. Homepage Web configuration can be done by Administrators. Administrators have the right to configure all the options available in the Web interface. 16 SOHOSpeed ADSL2+ Modem Gateway User’s Manual Field Internet WAN IP Subnet Mask Gateway DNS Secondary DNS Connection Type LAN IP Address Subnet Mask DHCP Server Firewall Hardware Status WAN LAN WLAN USB Description Shows the IP Address assigned to the WAN Interface Displays the subnet mask of the WAN connection. Shows the Gateway Address of the Internet Service Provider Shows the address of the DNS server by the Internet Service Provider Shows the address of the second DNS server by the Internet Service Provider Shows the connection type which can be: z Bridge z Router z Unknown (means there is no connection established) Shows the local IP address of Amazon Shows the local subnet mask of Amazon. Shows the connection status which can be: z Disabled z Connected Shows the connection status which can be: z Disabled z Connected Shows the connection status which can be: z Disabled z Connected Shows the connection status which can be: z Disabled z Connected Shows the connection status which can be: z Disabled z Connected Shows the connection status which can be: z Disabled z Connected Information Connected Clients Bootloader Version BSP Version Amazon Kernel Version Shows the number of connected clients to Amazon. Shows the current version loaded. Shows the current version loaded. Shows the current Linux Kernel Version followed by the Software Release Version. Amazon Software Version Shows the current version loaded. Amazon Tool Chain Version Shows the current version loaded. ADSL Firmware Version Shows the current version loaded. 17 SOHOSpeed ADSL2+ Modem Gateway User’s Manual 6. Advanced Setup To log on to the Amazon Web Application, you must have a valid user name and password. To continue to the configure Amazon click on Advanced Setup. Configuration Menu for Administrators This chapter is only for Administrators. The Homepage is the first screen displayed when you log on to the Amazon Web Application. The Amazon Web Application is organized in one module: z Advanced Setup - Advanced setup features allow you to configure all the functions that are supported by the Amazon like Firewall and routing. Advanced Setup Click on the Advanced Setup link in the homepage. The following modules are displayed in the left navigation bar: z System z ADSL z WAN z LAN z SNMP z Firewall z NAT z VLAN z Route z QoS z Application Servers Advanced Setup 18 SOHOSpeed ADSL2+ Modem Gateway User’s Manual 6.1 System You can view the System link in the left navigation bar. The following options are available under System: z Host Name Config z System Time z Administrator Settings z User Settings z Firmware Upgrade z System Log z Reset 6.1.1 Host Name Config To configure System settings, you have to enter host and domain name. Click on the Host Name Config link in the left navigation bar, a screen is displayed as shown below: Hostname Configuration The screen contains the following details: Field Host Name Domain Name z z z Description To enter the host name of the Amazon. This is used to address Amazon by using this name instead of typing the IP address. To enter the domain name of the Amazon. Click CANCEL to exit from this page without saving the changes. Click APPLY at any time during configuration to save the information that you have entered. Click HELP at any time during configuration to get further help about this topic. 19 SOHOSpeed ADSL2+ Modem Gateway User’s Manual 6.1.2 System Time To configure the system time zone, click on the System Time link in the left navigation bar. A screen is displayed as shown below: System Time Configuration The screen contains the following details: Field Set Time Zone SNTP Client SNTP Server z z z 20 Description Sets the time zone where you are located. Used to enable/disable the Simple Network Time Protocol client. Used to specify the Simple Network Time Protocol server. Click CANCEL to exit from this page without saving the changes. Click APPLY at any time during configuration to save the information that you have entered. Click HELP at any time during configuration to get further help about this topic. SOHOSpeed ADSL2+ Modem Gateway User’s Manual 6.1.3 Administrator Settings To change the password for the administrator, click on the Administrator Settings link in the left navigation bar. A screen is displayed as shown below. Administrator Password Configuration The screen contains the following details: Field Current Password Password Re-type Password z z z Description This is activated only for the Modify Administrator Password option. This is the password that is associated to the entered user’s name. This is the password of the login user. This is not active for Reset User Password. This is the password verification. This is not active for Reset User Password. Click CANCEL to exit from this page without saving the changes. Click APPLY at any time during configuration to save the information that you have entered. Click HELP at any time during configuration to get further help about this topic. 21 SOHOSpeed ADSL2+ Modem Gateway User’s Manual 6.1.4 User Settings To change or add new users, click on the User Settings link in the left navigation bar. A screen is displayed as shown below. User Configuration While adding a user, each user must be assigned a separate port. Hence the number of users that can be added to the system depends on the number of ports available on the Amazon. The screen contains the following details: Field Operation Type Description This entry allows to: Add new User / Delete User / Modify User Password / Reset User Password Port This entry is used to specify to which Port the user shall be assigned to. Note:The number of users is restricted to the number of port available. Extension Number This is the extension number of a user. The maximum possible length for extension number is 6. Current Password This is entry must be used to type in the current password in order to allow to specify a new password in the entry below. Password This is the new password of the login user. Re-type Password This is the password verification in order to allow the change. z z z 22 Click CANCEL to exit from this is page without saving the changes. Click APPLY at any time during configuration to save the information that you have entered. Click HELP at any time during configuration to get further help about this topic. SOHOSpeed ADSL2+ Modem Gateway User’s Manual 6.1.5 Firmware Upgrade To update the system firmware, click on the Firmware Upgrade link in the left navigation bar. A screen is displayed as shown below. Firmware Update The screen contains the following detail: z Click Browse to select a specified file name to change the File Name. z Click APPLY at any time during configuration to start the firmware update. z Click on “Click here to check for an upgrade on Infineon’s website” to search for a new Version on the Infineon website. 23 SOHOSpeed ADSL2+ Modem Gateway User’s Manual 6.1.6 System Log To view the system logs, click on the System Log link in the left navigation bar. A screen is displayed as shown below. Security Log The screen contains the following details: Field Description Log File This lists all the system events. Download This bottom will open a command window and ask you: z Open: Means the complete Log file can be opened z Save: Means you can specify a location to save the Log file z Cancel: Cancel accessing the Log file z More Info: Standard Windows Info Option Clear Clears the Log File display. Refresh Refreshes the Log File display. z z z 24 Click Download to download the log file to your computer. Click Clear to clear this page. Click Refresh to retrieve system event and update the log file. SOHOSpeed ADSL2+ Modem Gateway User’s Manual 6.1.7 Reset Amazon To reboot the system, click on the Reset link in the left navigation bar. A screen is displayed as shown below. Reset Amazon The screen contains the following detail: z z Click Reset to reboot the system without change any settings. Click Factory/Reset to reboot the system with default factory settings. 25 SOHOSpeed ADSL2+ Modem Gateway User’s Manual 6.2 ADSL You can view the ADSL ATM Settings in the left navigation bar. This settings option configures the ATM parameter. The following are the options available under ADSL: z ADSL Line Status z ADSL PHY Configuration z VC Configuration z OAM Configuration 6.2.1 ADSL Line Status To view the ADSL line status, click on the ADSL Status link in the left navigation bar. A screen is displayed as shown below. ADSL Line Status 26 SOHOSpeed ADSL2+ Modem Gateway User’s Manual 6.2.2 ADSL PHY Configuration To configure the PHY (physical layer) settings, click on the ADSL PHY Configuration link in the left navigation bar. A screen is displayed as shown below. ADSL PHY Configuration The screen contains the following details: Field Description Encapsulation Mode The encapsulation can be configured to: z Auto select z G.992.1 Anex A z G.992.1 Anex B z G.992.3 Anex A z G.992.3 Anex B z G.992.5 Anex A z G.992.5 Anex B Trellis-Coded It allows to Enable or Didable Trellis-Coded Modulation. Modulation z z Click CANCEL to exit from this page without saving the changes. Click APPLY at any time during configuration to save the information that you have entered. 27 SOHOSpeed ADSL2+ Modem Gateway User’s Manual 6.2.3 ADSL VC Configuration To configure the ATM PVC (Permanent Virtual Connection) settings, click on the VC Configuration link in the left navigation bar. A screen is displayed as shown below. ATM VC Configuration The screen contains the following details: Field Description Encapsulation The encapsulation can be configured to: z LLC/SNAP Mode z VCMUX VPI/VCI Amazon support the full range of VPI/VCI meaning: z VPI range 00H – FFH setting z VCI range 0000H – FFFFH Click on Add to add the parameters specified in their fields. QoS Mode Amazon Supports the following ATM QoS traffic classes per VC: z UBR - Unspecified Bit Rate z CBR - Constant Bit Rate z VBR-rt - Variable Bit Rate-real time z VBR-nrt - Variable Bit Rate-non real time Cell Delay This parameter is required for VBR-rt (Variable Bit Rate - real time) Variation connections. It will only be displayed for this traffic class. The value is specified in ms to specify the maximum allowed jitter. Total VC Shows all active VC Channels and the configured parameters. Specify the Channels new connection with the fields above and click ADD to enable this new connection. Click on one of the Channels on click DELETE to remove the Channel z z 28 Click CANCEL to exit from this page without saving the changes. Click APPLY at any time during configuration to save the information that you have entered. SOHOSpeed ADSL2+ Modem Gateway User’s Manual 6.2.4 ATM OAM Configuration To configure the ATM OAM settings, click on the OAM Configuration link in the left navigation bar. A screen is displayed as shown below. ATM OAM Configuration 29 SOHOSpeed ADSL2+ Modem Gateway User’s Manual The screen contains the following details: Field OAM F4 Setting VPI Channel F4 Loopback F4 transmit interleave time F4 Continuity Check DirectionIn Description Used to enable/disable OAM (Operation Administration & Maintenance) feature. Displays the selected VPI channel of the OAM F4 Setting Table. Used to enable/disable F4 loopback Configures the time (in ms) for the interval to send F4 loopback cells. Used to enable/disable the F4 CC (Continuity Check) function. In addition you can specify the Direction, which is either z Sink (Amazon receives F4 CC cells and replies) z Source (Amazon generates F4 CC cells and waits for the reply) z Both OAM F4 Setting This table displays all active connections with the parameter information on: z No: Number Table z VPI: Virtual Path Identifier z Loopback: Enabled or Disabled z Continuity: Enabled or Disabled z Direction: Sink or Source or Both z Transmit Time: actual value in ms F5 Setting VPI Channel Displays the selected VPI channel of the OAM F5 Setting Table. VCI Channel Displays the selected VCI channel of the OAM F5 Setting Table. F5 Loopback Used to enable/disable F5 Loopback F5 Transmit Configures the time (in ms) for the interval to send F5 loopback cells. Interval time F5 Continuity Used to enable/disable the F5 CC (Continuity Check) function. Check DirectionIn In addition you can specify the Direction, which is either: z Sink (Amazon receives F5 CC cells and replies) z Source (Amazon generates F5 CC cells and waits for the reply) z Both OAM F5 Setting This table displays all active connections with the parameter information on: z No: Number Table z VPI: Virtual Path Identifier z Loopback: Enabled or Disabled z Continuity: Enabled or Disabled z Direction: Sink or Source or Both z Transmit Time: actual value in ms z z 30 Click CANCEL to exit from this page without saving the changes. Click Modify at any time during configuration to save the information that you have entered. SOHOSpeed ADSL2+ Modem Gateway User’s Manual 6.3 WAN You can view WAN settings in the left navigation bar. The following are the options available under WAN: z WAN Setting z DNS (Domain Name Server) z DDNS (Dynamic Domain Name Server) 6.3.1 WAN Settings To configure the WAN interface, click on the WAN Setting link in the left navigation bar. A screen is displayed as shown below. Multiple VCCs Settings 31 SOHOSpeed ADSL2+ Modem Gateway User’s Manual After select your WAN interface and click APPLY, the WAN configuration screen is displayed as shown below. WAN Setting The screen contains the following details: Field Attached Channel Dynamic IP Address Static IP Address PPPoE Description Specifies the channel to use for the specified mode. To get your IP Address from your service provider (means Amazon is DHCP client on the WAN) click APPLY. To enter the WAN interface IP Address of Amazon enable this field and click APPLY. Point-to-Point Protocol over Ethernet used for connecting to the ISP, click APPLY. PPPoA Point-to-Point Protocol over ATM used for connecting to the ISP, click APPLY. Bridge Bridge mode used for bridge your Modem and DSLAM, and To enter the Bridge Configuration (RFC2684) of Amazon, select the attached channel and enable this field. Then click APPLY. The options to choose for the bridge mode are: z LLC/SNAP - VPI/VCI Setting x/xx* z VCMUX - VPI/VCI Setting y/yy2** * The VPI/VCI settings must be configured before in the ADSL -> VC Configuration menu (ADSL). **The VPI/VCI settings must be configured before in the ADSL -> VC Configuration menu (ADSL). z z 32 Click CANCEL to exit from this page without saving the changes. Click APPLY at any time during configuration to save the information that you have entered. SOHOSpeed ADSL2+ Modem Gateway User’s Manual 6.3.1.1 Dynamic IP To configure the WAN interface to dynamically obtain an IP address, select the Dynamic IP Address button and click APPLY. A screen is displayed as shown below. Dynamic IP Configuration The screen contains the following details: Field Protocol z z Description This option allows to select the protocols: z RFC 2684 (MPoA) z RFC 2364 (PPPoA) Click APPLY at any time during configuration to save the information that you have entered. Click CANCEL to exit from this page. 33 SOHOSpeed ADSL2+ Modem Gateway User’s Manual 6.3.1.2 Static IP for the WAN Side To configure the WAN interface to use a static IP address, select the Static IP Address button and click APPLY. A screen is displayed as shown below. WAN Static IP Configuration The screen contains the following details: Field IP address assigned by your ISP Subnet Mask ISP Gateway Address Protocol 34 Description To enter the IP Address of Amazon. To enter the Subnet Mask of Amazon. To enter the Gateway address of the Amazon. Select the supported Protocol: z RFC2516 based (not shown in the window): RFC2684 - LLC Bridged RFC2684 - LLC Routed RFC2684 - VC Routed z RFC2364 – PPPoA z Classic IP SOHOSpeed ADSL2+ Modem Gateway User’s Manual 6.3.1.3 PPPoE To configure the WAN interface to use PPPoE, select the PPPoE button and click APPLY. A screen is displayed as shown below. PPPoE Configuration The screen contains the following details: Field User Name Password Retype Password MTU Description To enter a name to use the PPPoE session. To enter a password of the login user. To enter the password again to reconfirm. To enter the maximum connection units of the PPPoE. The MTU range is 1400 to 1492 bytes. By default, it is 1492. Dial on Demand This feature allows to automatically re-connect to the service provider once the connection was lost. Can be enabled or disabled. The parameter Maximum Idle Time must be specified if this feature is enabled. Maximum Idle Time The period of time to keep the connection alive if no packets are transmitted. In another words, if no packets are transmitted between LAN port and WAN port or between Amazon and WAN, the connection is disconnected after 'Maximum idle time. If the Auto-reconnect check box is selected, the PPP connection is re-established if some data is received from the upper layers to be transmitted on this link. Relay LAN site This feature allows to enable/disable a PPPoE relay session. PPPoE Session Attached Channel Specifies the ATM Channel used for the PPPoE session. These channels are specified in Attached Channel. z z Click CANCEL to exit from this page without saving the changes. Click APPLY at any time during configuration to save the information that you have entered. 35 SOHOSpeed ADSL2+ Modem Gateway User’s Manual 6.3.1.4 PPPoA To configure the WAN interface to use PPPoA, select the PPPoA button and click APPLY. A screen is displayed as shown below. PPPoA Configuration The screen contains the following details: Field User Name Password Retype Password MTU Description To enter a name to use the PPPoA session. To enter a password of the login user. To enter the password again to reconfirm. To enter the maximum connection units of the PPPoA. The MTU range is 1400 to 1500 bytes. By default, it is 1500. Dial on Demand This feature allows to automatically re-connect to the service provider once the connection was lost. Can be enabled or disabled. The parameter Maximum Idle Time must be specified if this feature is enabled. Maximum Idle Time The period of time to keep the connection alive if no packets are transmitted. In another words, if no packets are transmitted between LAN port and WAN port or between Amazon and WAN, the connection is disconnected after 'Maximum idle time. If the Auto-reconnect check box is selected, the PPP connection is re-established if some data is received from the upper layers to be transmitted on this link. z z 36 Click CANCEL to exit from this page without saving the changes. Click APPLY at any time during configuration to save the information that you have entered. SOHOSpeed ADSL2+ Modem Gateway User’s Manual 6.3.1.5 Bridge Settings To configure the Bridge settings, select the Bridge button and click APPLY. A screen is displayed as shown below. Bridge Configuration The screen contains the following details: Field Description Attached The options to choose for the bridge mode are: Channel z LLC/SNAP - VPI/VCI Setting x/xx* z VCMUX - VPI/VCI Setting y/yy** * The VPI/VCI settings must be configured before in the ADSL -> VC Configuration menu (ADSL). ** The VPI/VCI settings must be configured before in the ADSL -> VC Configuration menu (ADSL). z z Click CANCEL to exit from this page without saving the changes. Click APPLY at any time during configuration to save the information that you have entered. 37 SOHOSpeed ADSL2+ Modem Gateway User’s Manual 6.3.2 WAN Status To view the WAN status, click on the WAN Status link in the left navigation bar. A screen is displayed as shown below. 38 SOHOSpeed ADSL2+ Modem Gateway User’s Manual 6.3.3 Domain Name Server (DNS) To configure the DNS address, click on the DNS link in the left navigation bar. A screen is displayed as shown below: DNS Configuration The screen contains the following details: Field Description Domain Name Server Enter the DNS address of the primary DNS server. (DNS) Address Secondary DNS Enter the address of the secondary DNS server, if available. Address (optional) z z Click CANCEL to exit from this page without saving the changes. Click APPLY at any time during configuration to save the information that you have entered. 39 SOHOSpeed ADSL2+ Modem Gateway User’s Manual 6.3.4 Dynamic Domain Name Server (DDNS) To configure the DDNS address, click on the DDNS link in the left navigation bar. A screen is displayed as shown below: Dynamic DNS Configuration The screen contains the following details: Field Description Enable DDNS Support Used to enable the Dynamic Domain Name Server support. Select DDNS Server DHS For this server you have to specify: z The host name prefix z User Name z Password DYNDNS For this server you have to specify: z The host name prefix z User Name z Password DYNS For this server you have to specify: z The host name prefix z User Name z Password z z 40 Click CANCEL to exit from this page without saving the changes. Click APPLY at any time during configuration to save the information that you have entered. SOHOSpeed ADSL2+ Modem Gateway User’s Manual 6.4 LAN You can view LAN Setting in the left navigation bar. The following are the options available under LAN: z LAN Setting z DHCP Client List z STP Bridge 6.4.1 LAN Settings To configure the LAN interface, click on the LAN Settings link in the left navigation bar. A screen is displayed as shown below. LAN Settings The screen contains the following details: Field IP Address Subnet Mask Wireless z z Description Used to enter the LAN interface IP Address of Amazon. To enter the LAN Subnet Mask of Amazon. Used to Enable/Disable the Wireless LAN support. Click CANCEL to exit from this page without saving the changes. Click APPLY at any time during configuration to save the information that you have entered. 41 SOHOSpeed ADSL2+ Modem Gateway User’s Manual 6.4.2 Spanning Tree Protocol Bridge Settings To configure the STP Bridge settings, click on the STP Bridge Settings link in the left navigation bar. A screen is displayed as shown below. STP Bridge Configuration The screen contains the following details: Field Description Enable STB Bridge Enables/Disables the STB Bridge z z 42 Click CANCEL to exit from this page without saving the changes. Click APPLY at any time during configuration to save the information that you have entered. SOHOSpeed ADSL2+ Modem Gateway User’s Manual 6.5 SNMP (Simple Network Management Protocol) To enable the SNMP options, click on the SNMP link in the left navigation bar. A screen is displayed as shown below: SNMP Configuration The screen contains the following details: Field Description Enable SNMP It allows to enable or disable SNMP. Read only community Specifies the character string which contains the cleartext password to specify the read privilege between the SNMP agent and manager. Write only community Specifies the character string which contains the cleartext password to specify the write privilege between the SNMP agent and manager. Enable Trap It allows to enable or disable Trap. Trap Host IP Specifies the Trap host IP number. Trap Port Specifies the Trap Port number. Trap community Specifies the privilege of SNMP trap. z Click APPLY at any time during configuration to save the information that you have entered. 43 SOHOSpeed ADSL2+ Modem Gateway User’s Manual 6.6 Firewall You can view Firewall Settings in the left navigation bar. The following are the options available under Firewall: z Firewall Settings z DoS Options z Client Filtering z MAC Control 6.6.1 Firewall Options To enable the firewall options, click on the Firewall Setting link in the left navigation bar. A screen is displayed as below: Firewall Settings Configuration The screen contains the following details: Field Description Firewall Setting It allows to enable or disable the firewall. z 44 Click APPLY at any time during configuration to save the information that you have entered. SOHOSpeed ADSL2+ Modem Gateway User’s Manual 6.6.2 Denial of Service (DoS) Options To configure the DoS firewall options, click on the DoS Options link in the left navigation bar. A screen is displayed as shown below: DoS Settings Configuration The screen contains the following details: Field Enable Hacker Attack Protect Discard PING form WAN Discard PING the Gateway z Description If check box is selected, all hacker attack events are logged and dropped. This is used for Discard PING form WAN. If check box is selected, all PING form the WAN side are dropped. This is used for Discard PING the Gateway feature. If check box is selected, all PING to Amazon packet for the LAN side are dropped. Click APPLY at any time during configuration to save the information that you have entered. 45 SOHOSpeed ADSL2+ Modem Gateway User’s Manual 6.6.3 Client Filter To enable Client Filter, click on the Packet Filtering link in the left navigation bar. A screen is displayed as shown below: Packet Filtering Configuration The screen contains the following details: Field Enable Client Filter Source IP Source Port Destination IP Destination Port Protocol Enable z z 46 Description To enable or disable the Packet Filtering feature of Amazon. To enable, select the check box. To enter the filter IP Address range of the local machine under Amazon by its source. To enter the filter Port number range of the local machines under Amazon by its source. To enter the filter IP Address range of the local machine under Amazon by its destination. To enter the filter Port number range of the local machines under Amazon by its destination. This is used for filter protocol. Select TCP or UDP to filter the protocol type packets from the local machines. To provide more IP Addresses of the WAN interface. Click CANCEL to exit from this page without saving the changes. Click APPLY at any time during configuration to save the information that you have entered. SOHOSpeed ADSL2+ Modem Gateway User’s Manual 6.6.4 MAC Control To configure MAC Control, click on the MAC Control link in the left navigation bar. A screen is displayed as shown below: MAC Control Configuration The screen contains the following details: Field MAC Address Control Policy MAC Address Add z z Description Allows to specify the MAC address control mode to be: z Disable z Deny All z Permit All Allows to specify the MAC address control policy to be: z Disable z Deny z Permit To assign the blocking MAC address for local machine. Used to add additional entries in the table. Click Add at any time during configuration to add the specified MAC address entry in the list. Click APPLY at any time during configuration to save the information that you have entered. 47 SOHOSpeed ADSL2+ Modem Gateway User’s Manual 6.7 NAT You can view NAT Setting in the left navigation bar. The following are the options available under NAT: z NAT Settings z Virtual Server z Port Mapping z DMZ z ALGs 6.7.1 NAT (Network Address Translation) Settings To configure NAT, click on the NAT Settings link in the left navigation bar. A screen is displayed as shown below: Network Address Translation (NAT) Settings The screen contains the following details: Field Description NAT Settings Used to Enable or Disable the Network Address Translation. z z 48 Click CANCEL to exit from this page without saving the changes. Click APPLY at any time during configuration to save the information that you have entered. SOHOSpeed ADSL2+ Modem Gateway User’s Manual 6.7.2 Virtual Server To configure virtual server, click on the Virtual Server link in the left navigation bar. A screen is displayed as shown below: Virtual Server Configuration The screen contains the following details: Field Private IP Private Port Type Public Port Enabled z z Description To enter a private IP address of specified entry. To enter a private Port number of the specified entry. To select virtual server protocol type of the specified entry. To enter a public port number of the internet user to access the virtual server. To enable the specified entry of the virtual server. Click CANCEL to exit from this page without saving the changes. Click APPLY at any time during configuration to save the information that you have entered. 49 SOHOSpeed ADSL2+ Modem Gateway User’s Manual 6.7.3 Port Mapping To configure Port Mapping, click on the Port Mapping link in the left navigation bar. A screen is displayed as shown below: Port Mapping Configuration The screen contains the following details: Field Server IP Mapping Port Enabled z z 50 Description To enter the IP Address of a specified local machine. To assign a range of port or specific port number to route the packets. To enable a specified entry of the Port Mapping. Click CANCEL to exit from this page without saving the changes. Click APPLY at any time during configuration to save the information that you have entered. SOHOSpeed ADSL2+ Modem Gateway User’s Manual 6.7.4 DMZ (Demilitarized Zone) To configure the DMZ, click on the DMZ link in the left navigation bar. A screen is displayed as shown below: DMZ Configuration The screen contains the following details: Field Enable IP Address z z Description To enable or disable the DMZ setting of Amazon. Select the check box to enable. To enter IP Address of the DMZ host. Click CANCEL to exit from this page without saving the changes. Click APPLY at any time during configuration to save the information that you have entered. 51 SOHOSpeed ADSL2+ Modem Gateway User’s Manual 6.7.5 ALGs (Application Level Gateways) To configure the ALGs, click on the ALGs link in the left navigation bar. A screen is displayed as shown below: ALGs Configuration The screen contains the following details: Field Enable SIP z z 52 Description To enable or disable the RTSP application level support select the check box to enable. In addition you must specify: z Client IP z Port Note: Protocol is always UDP. Click CANCEL to exit from this page without saving the changes. Click APPLY at any time during configuration to save the information that you have entered. SOHOSpeed ADSL2+ Modem Gateway User’s Manual 6.8 Virtual LAN You can view VLAN Settings in the left navigation bar. The following are the options available under VLAN: z Port Settings z Port Mapping 6.8.1 VLAN Settings To configure the VLAN, click on the VLAN Settings link in the left navigation bar. A screen is displayed as shown below. VLAN Settings The screen contains the following details: Field VLAN Settings z z Description Used to Enable or Disable the VLAN. Click CANCEL to exit from this page without saving the changes. Click APPLY at any time during configuration to add the information that you have entered. 53 SOHOSpeed ADSL2+ Modem Gateway User’s Manual 6.8.2 Port Mapping To configure the VLAN, click on the Port Mapping link in the left navigation bar. A screen is displayed as shown below. Port Mapping Configuration The screen contains the following details: Field ADM6996L Port Port VLAN ID Tagged z z 54 Description To enter the Port Number of ADM6996L. To enter the Port VLAN ID for this port. To enable/disable tagging of packets on this port. Click CANCEL to exit from this page without saving the changes. Click APPLY at any time during configuration to add the information that you have entered. SOHOSpeed ADSL2+ Modem Gateway User’s Manual 6.9 Routing Settings You can view Routing Settings in the left navigation bar. The following are the options available under Routing: z Static Routing z Dynamic Routing z Routing Table List 6.9.1 Static Routing To configure the Static Routing, click on the Static Routing link in the left navigation bar. A screen is displayed as shown below. Static Routing Configuration The screen contains the following details: Field Destination LAN IP Subnet Mask Gateway z z Description To enter the IP Address of routing entry. To enter the Subnet Mask of routing entry. To enter the Gateway address of routing entry. Click Add at any time during configuration to add the information that you have entered. Click APPLY at any time during configuration to add the information that you have entered. 55 SOHOSpeed ADSL2+ Modem Gateway User’s Manual 6.9.2 Dynamic Routing To configure the Dynamic Routing, click on the Dynamic Routing link in the left navigation bar. A screen is displayed as shown below. Dynamic Routing Configuration The screen contains the following details: Field Description Dynamic Routing To Enable or Disable dynamic routing. Listen Mode To configure the listen mode to: z Disabled z RIP1 z RIP2 z Both (RIP1+RIP2) Supply Mode To configure the supply mode to: z Disabled z RIP1 z RIP2 z z 56 Click CANCEL to exit from this page without saving the changes. Click APPLY at any time during configuration to save information that you have entered. SOHOSpeed ADSL2+ Modem Gateway User’s Manual 6.9.3 Routing Table List To see the current Routing table list, click on the Routing Table List link in the left navigation bar. A screen is displayed as shown below. Routing Table List The screen contains the following details: Field Destination LAN IP Subnet Mask Gateway Metric Interface z Description Shows the IP Address of routing entry. Shows the Subnet Mask of routing entry. Shows the Gateway address of routing entry. Counts the number of hops. Displays the interface of this entry. Possible displays are: z Br0; this is the WAN interface z Br1; this is the integrated Ethernet Phy interface of Amazon z Br2; this is the MII interface of Amazon Click Refresh at any time to update the displayed information. 57 SOHOSpeed ADSL2+ Modem Gateway User’s Manual 6.10 QoS (Quality of Service) You can view QoS in the left navigation bar. The Settings option is available under QoS. The supported configurations are: z QoS Setting z DiffServ 6.10.1 QoS Setting To configure the QoS setting, click on the QoS Setting link in the left navigation bar. A screen is displayed as shown below. QoS Settings The screen contains the following details: Field Description Quality of Service Used to Enable or Disable the bandwidth control and DiffServ marking. z z 58 Click CANCEL to exit from this page without saving the changes. Click APPLY at any time during configuration to save the information that you have entered. SOHOSpeed ADSL2+ Modem Gateway User’s Manual 6.10.2 DiffServ (Differential Services) To configure DiffServ, click on the DiffServ link in the left navigation bar. A screen is displayed as shown below. DiffServ Configuration The screen contains the following details: Field Description VoIP Used to Enable or Disable the DiffServ support for Voice over IP. Virtual Server Used to Enable or Disable the DiffServ support for Virtual Server. z z Click CANCEL to exit from this page without saving the changes. Click APPLY at any time during configuration to save the information that you have entered. 59 SOHOSpeed ADSL2+ Modem Gateway User’s Manual 6.11 Application Servers You can view Application Servers Setting in the left navigation bar. The Settings option is available under Applications Servers. Application Servers Configuration The screen contains the following details: Field Web Server Description Select the check box to enable or disable: z The acceptance from WAN z The Port number z The acceptance from LAN Telnet Server Select the check box to enable or disable: z The acceptance from WAN z The Port number z The acceptance from LAN SSH Server Select the check box to enable or disable: z The acceptance from WAN z The Port number z The acceptance from LAN TFTP Server Select the check box to enable or disable: z The acceptance from WAN z The Port number z The acceptance from LAN FTP Server Select the check box to enable or disable: z Acceptance from WAN z Port number z Acceptance from LAN SNMP Select the check box to accept SNMP from WAN. IGMP Proxy Enable/Disables the IGMP Proxy function. z z 60 Click CANCEL to exit from this page without saving the changes. Click APPLY at any time during configuration to save the information that you have entered.