1
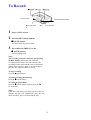
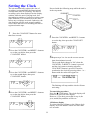
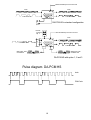
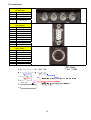
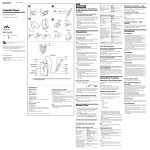
Kraus Messtechnik GmbH Gewerbering 9, D-83624 Otterfing, +49-8024-48737, Fax. +49-8024-5532 – Germany Web: www.kmt-gmbh.com E-mail: [email protected] User manual DA-PCM HS 1 Operating instructions tape deck Inserting a Cassette 1 Press and hold down the small button and Notes When disconnecting the unit from the power source, make sure the cassette compartment door is closed. Otherwise, you may not be able to close it afterward. If this happens, re-connect the power source. When inserting a cassette, make sure that the side with which the tape is visible inside is facing upward. If you inset the cassette upside down, you may not be able to take the cassette out. slide the HOLD/PUSH OPEN-switch to the OPEN position. HOLD/PUSH OPEN-switch While pressing 2 3 To eject the cassette While the unit is in the stop mode, press and hold down the small button and slide the HOLD/PUSH OPEN-switch to the OPEN position. Open the cassette compartment door. Insert a cassette with the window facing upward. HOLD/PUSH OPEN While pressing Record-protect shutter Slide the record-protect shutter to the left to protect a recorded tape from being accidentally erased by recording on the tape for the second time. 4 Close the cassette compartment door. If the shutter is open, you cannot record on the tape The cassette will be loaded automatically. If the shutter is closed, you can record on the tape 2 To Record SP/LP out of function out of function 1 2 3 HOLD/PHUSH OPEN REC out of function REC Insert a DAT cassette Press the REC button and the ❙❙ PAUSE-button. The unit enters the pause mode. Press either the ¾ PLAY-or the ❙❙ PAUSE-button. The recording starts. Notes The recording cannot be started by just pressing the REC button, instead, the unit enters the recording monitor mode. The unit can enters the recording monitor mode whether the record-protect shutter of the cassette is open or not. Recording is possible only when the shutter is closed. To stop recording Press the STOP-button. To pause recording momentarily Press the ❙❙ PAUSE-button. To cancel the pause mode Press the ❙❙ PAUSE-button again or press the ¾ PLAY-button. Notes If the unit is left in the pause mode for more than five minutes, the unit will automatically enter the stop mode in order to protect its head and the tape. 3 Notes on Recording SP/LP out of function out of function HOLD/PHUSH OPEN REC out of function REC Do not leave any unrecorded parts on a DAT tape. If there is a blank (unrecorded) part left on a DAT tape, the absolute time* will not be written thereafter. Also, when the tape is being fastforwarded or rewound, it will stop at that point. In order not to leave any unrecorded parts on a tape while recording, observe the following: To avoid any accidental operation (Hold function) Slide this switch to the HOLD position to avoid any accidental operation while the unit is set in a particular operational mode. z If you intend to continue to record on a tape which is partially recorded, make sure that you find the end of the previous recording first, then the start the new recording from that point without leaving any unrecorded gap. (If you fast-forward the tape, if should automatically stop where the previous recording has ended.) This signal indicates the beginning of a recorded program (track). By reading these start ID signals, the unit can cue the beginnings of the recorded programs (tracks) automatically. *The absolute time indicates the elapsed time from the beginning of the tape and the current position of the tape which is written digitally. The absolute time will be automatically written when you record a DAT tape for the very first time and cannot be erased once written. (In the HOLD Position are all switch lock!) .................................................................................... Start ID tape transport direction program (track) program (track) program (track) start ID To write the start IDs automatically while recording This start codes are set by each new recording, also by using the "Pause button" by recording. To write the start IDs manually while recording While recording, press the REC button at the point where you wish to write the start ID. When you record to the end of a DAT tape The tape automatically rewinds to the beginning and will stop there. (Auto-rewind function) Note While writing the start IDs, the W R I T E indication comes on and the START-ID - indicator flashes for about nine seconds. While the unit is set in this mode, no operational buttons other than the STOP button will function. 4 Playback out of function 1 2 Insert a DAT cassette Cleaning the Head Press the ¾ PLAY-button. Playback starts. The SP/LP switch is out of function. Prolonged operation may cause contamination of the head. To make the best possible recording and playback, we recommend you to clean the head periodically, using the cleaning cassette DT-1OCL (not supplied)*. To stop playback Press the STOP-button. To pause playback momentarily Press the ❙❙ PAUSE-button. To cancel the mode, press either the ❙❙ PAUSE-button or the ¾ PLAY-button. How to use the cleaning cassette 1 Insert the cleaning cassette as you would a normal DAT cassette. 2 Press the ¾ PLAY button, then press the 3 STOP button after about 10 seconds. 3 Remove the cleaning cassette without Notes rewinding it. If the unit is left in the pause mode for more than five minutes, the unit will automatically enter the stop 4 Proceed with recording and playback with a mode in order to protect its head and the tape. normal DAT cassette and check the sound quality. To fast forward the tape Press the ¾¾/¾¾I button when the unit is in the stop Notes on the cleaning cassette mode. z The cleaning cassette cannot be used for recording or playback. To rewind the tape Press the I½½/½½ - button when the unit is in the z Do not clean the head with the cleaning stop mode. cassette more than five times in succession. Cleaning the head continuously for a long When a tape is played back to the end period of time may cause wear to the head. The tape will be rewound to the beginning automatically and the unit enters the stop mode. z Do not rewind the cleaning cassette each time (Auto-rewind function) you use it. When the cleaning cassette tape is taken up (wound) completely, rewind it to the beginning and reuse it. The cleaning cassette can be used approximately 200 times, with 10 seconds of cleaning each time. 5 Locating the beginning of a program (track) out of function out of function Press either ¾¾/¾¾I or I½½/½½ button quickly once during playback. If the unit is in the fast forward/rewind mode, press either the ¾¾/¾¾I or I½½/½½ button once. Or if the unit is in the stop mode, press either the ¾¾/¾¾I or I½½/½½ button twice. To locate the beginning of the succeeding program (track) To locate the beginning of the previous program (track) Press ¾¾/¾¾I the same number of times as the programs (tracks) to be skipped. E.g. to locate the beginning of the fifth program (track) Press ¾¾/¾¾I the same number of times as the programs (tracks) (including the currently played one) to be skipped. E. g. to locate the beginning of the fourth program (track) including the currently played one 6 Display Day/AM/PM-indicator Tape counter/clock/message indicator z The tape counter indications z Clock display Each time you press the COUNTER button, the display changes cyclically as follows: Each time you press the CLOCK button, the display changes cyclically as follows: Tape counter (normale display) RECORDED TIME* (date of the recording) Absolute time RECORDED TIME* (time of the recording) Remaining time of tape Current date (year, month, date) To reset the tape counter (normal display) to Current time (hour, minute, secound) 00H00M00S Press the RESET button. *The RECORDED TIME will not be displayed while the unit is in the recording, recording monitor, or pause mode. Remaining time of the tape The remaining time left on the tape will normally come on after about 16 seconds of commencing playback in the SP mode. However, there may be some aberration in the amount of time displayed which depends upon the tape you use. Note The tape counter should not be used as a clock What is being displayed on the counter is not completely accurate in terms of displaying the actual time. Therefore, do not use the tape counter as a clock. 7 Setting the Clock The unit automatically registers the date of recording (year/month/date/day/hour/minute/ second) at the time of recording. The date of recording can be then displayed on the display window while the unit is playing back, fast forwarding/rewinding or cueing/reviewing a tape (Date function). It is essential to set the clock before any recordings are made. Otherwise, the date function will not work properly and the correct date and time of a recording will not be registered on the tape. Proceed with the following steps while the unit is in the stop mode. 1 Press the CLOCK/SET button for more than four seconds. 5 Press the COUNTER/- and RESET/+ buttons to set the day, then press the CLOCK/SET button. 2 Press the COUNTER/- and RESET/+ buttons to set the year digits, then press the CLOCK/SET button. 6 Repeat steps 2 to 4 to set the correct current time (hour/minute/second). The second digits change to "00" when the COUNTER/- or RESET/+ button is pressed and the clock starts activating when the CLOCK/SET button is pressed. Therefore, synchronize the clock by pressing either - or + button with the radio time-signal etc. 3 Press the COUNTER/- and RESET/+ buttons to set the month digits, then press CLOCK/SET-button. The flashing will stop and the clock will start activating.. 4 Press the COUNTER/- and RESET/+ buttons To cancel the procedure Press the STOP button. The clock display will return to the previous time display. However, if you have proceeded to step 6, the year, month, day and date will be set. to set the date digits, then press the CLOCK/SET button. 12/24 hour display To select either the 12-hour or the 24hour clock display. Press the RESET button for more than two seconds. 8 Precautions On Safety Should any solid object of liquid fall into the unit, unplug the unit and have it checked by qualified personnel before operating it any further. On Installation Do not install the unit in a location near heat sources such as radiators or air ducts, or in a place subject to direct sunlight and excessive dust. On Moisture Condensation If the unit is brought directly from a cold to a warm location, moisture may condense inside the unit. In such a condition, the tape may adhere to the head drum and can be damaged, or the unit may not operate properly (the 6-indicator has come on). Always remove the DAT cassette from the unit when the unit is not to be used for an extended period of time. If moisture is present Operating buttons and controls may not function properly. The unit may shut off. 9 Remote Start/Stop via 5-30 V DC level Clock Clock SET + CLOCK - COUNTER RESET LIGHT DA-PCM HS PAUSE STOP REC/ID WRITE PLAY PCM Code TTL PCM Code TTL DA-PCM HS in standard configuration Remote control box Opt. 3 Remote Start/Stop via 5-30 V DC level Clock SET + CLOCK COUNTER Clock RESET LIGHT PCM Code TTL Opt. 1 PCM DA-PCM HS PAUSE STOP PLAY REC/ID WRITE PCM Code TTL Opt. 2 Opt. 2 IRIG B time 1kHz modulated In IRIG B time 1kHz modulated Out DA-PCM HS with option 1, 2 and 3 Pulse diagram DA-PCM HS clock PCM Code 10 Clock battery replacement: Lithium battery TYPE Sonnenschein SL340 The battery is used for storage of the date and time during power off. The life time of the battery is approximately 1 year. With a completely discharged battery the date and time values will be lost when power is off. Battery change is carried out by removing the two screws of the battery cover on the DAT recorder right side and insertion of a new battery, Old battery connections have to be removed by using a soldering iron. (WARNING !!! Do not exchange the red and blue wires!). The red wire is to connect to the ++ connection and the blue to -- one when re-soldering the connections of the new battery. 11 Pin connection: PCM In/Out Clock In/Out BNC Signal 1 PCM In 2 Clock In 3 Clock Out 4 PCM Out Audio / Remote control box 9 pol. Cannon Pin Signal 1 RCB Clock 2 RCB Out 3 RCB In 4 Loudspeaker Out 5 Microphone In 6 reserved 7 reserved 8 +5V 9 GND PWR 7 pol. Tuchel Pin Signal 1 Remote min 15 sec 2 ++18-32 V 3 Event min 60 sec. 4 GND 5 -- 18-32 V WRC (write contr.) 6 7 not connected LED WRC LED 12