1
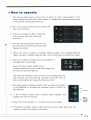
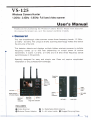
VS-125
W ireless Cam era Hunter
1.2GHz - 2.4GHz - 5.8GHz Full band video scanner
User's Manual
T h a n k y o u f or p u r c h a s i n g t h e W i r e l e s s C a m e r a H u n t e r . P l e a s e f i r s t r e a d o v e r
t h i s m a n u a l f o r p r o p e r u s e , s a v e t h i s m a n u a l a n d k e e p it h a n d y .
<» G eneral
This new br eak th ro ugh vide o sc a n n e r covers three fr e q u e n cy bands: 1.2 GHz 2.4 GHz - 5.8 GHz. The unique 5.8 GHz scann ing te ch n o lo g y makes this device
the only one of its kind.
This detector detects and displays multiple hidden wire less c am e r a s in multiple
f r e q u e n c y ba n ds up to 30 0 feet (d ep e n d in g on o u t p u t p o w e r of so u r c e
transmitter). It sc ans 1.2 GHz, 2.4 GHz and 5.8 G Hz three fr e q u e n cy bands
sy nc hr on ou s ly in 30 seconds.
Specially desi gned for easy and simple
use.
Does not require comp licate d
installation or any professional knowledge.
Earphone
output
Video
system
indication
i
Scan I stop
switch
AV
tie
J
Video
output
tuner
240
Fine tune
120
Detected
band
indication
IK
Battery
low
indication
Band selection
of screen display
Scanning
indication
t* G
120
o
oo
AV output
jack
n
Speaker
< left side >
: right s id e :
Image lock indication
INCLUDES
Q Video Scanner.
© External Power Adaptor.
@ 3 x Detachable SMA Antenna.
Q 3 x AV output cable. 0 Rugged Carrying Case.
1/ 6
* H o w to operate
1. This device might need a shor t time to warm up und er cool weather. If the
screen app ea rs verticle lines wh en switch on, please wait several se c o n d s then
it will b e c o m e normal after wa rm up.
2. Turn on the po w er switch and this devic e will
start auto scanning.
570
«|
3. The re are 3 rows red LED in the below
of the screen, they are "Scanning
•• -
S *0
—
........
2.4G
2 50
I70M
I.2G
indication".
4. The red LED of s c ann ing indication will
shuttle t o -a nd -fr o show ing the sc an n ed
fr e q u e n c y division.
5. Wh en this device detects a wi re le ss ca m er a signal, the co rre s p o n d e n d in g
"Band indication" (yellow LED) will light up and the screen will s h o w the image.
6. T he re are 3 sets of "I mage lock and indication" in
the right side of the screen.
LOCK
Press the " S c a n / S t o p " button of the
c o r re s p o n d e n t band once to latch the image and
1.2G
NTSC
PAL
SEC AM
SCAN 1 STOP
the red Lock LED will light up.
The scanning indication (red LED row) of the locked band will
stop moving, but the scann ing indication (red LED row) of
other unlock bands will
keep shuttling to-and-fro.
7. The Vi de o system indication (green LED) will light up at NTSC
or P A L / S E C A M to indicate the detected signal is NTSC or
PA L/ SE C AM .
8.
If the
w i r e le s s
camera
also
s en d in g
audio
signals,
the
spea ker will play the sounds.
9. Press "Fine tune" buttons (+ -) to adjust the screen image.
10. The Band indication (yellow LED) will stay at the locked band and the
screen will s how the image of lock band.
Fine tune
Band
selection
of screen
display
11. Press the “ band selection b u t t o n ” to shift the screen
to other unlocked band. If this devic e detects wi reless
ca m er a signal in other band, the screen will app ear
the image.
12. Press the Scan / Stop button of the co rr e s p o n d e n t
band once to latch the secon d detected image and
the red Lock LED will light up.
13. The scanning indication (red LED) of the secon d locked band will stop
moving, the scanning indication (red LED) of other unlock band will keep
shuttling to-and-fro.
14. This device can lock the image of the 3 fr e q u e n c y bands at the sam e time.
Press band selection switch to shift and watch the screen image of different
f re qu enc y bands.
« POW ER S A V IN G M ODE
Press and hold the "Band sele ction " button and then turn
on the power, V S -1 2 5 will e n t e r p o w e r s a v i n g m ode.
T he LCD s c r e e n will fir st light up in blue th en light off.
W he n V S - 1 2 5 det ects vide o signals, the LCD screen will
light up and dis pl a y the ca u g h t vide o image.
* Audio I Video Output
There are 3 AV output ja c k in the right side. Co n n e c t the
A / V output cable s with DVR to record the scanned
audio and v id e o signal of the 3 f r e q u e n c y bands
individually.
The DVR should have audio input to enable the audio
recording. And only the displayed f re q ue nc y band could
recor d the audio.
In the upper side of the AV output jack, there are 3 Video
output tuners for adjusting the output video image of the
3 fr e q u e n c y band s in o rd er to match the c o n n ec te d
DVR.
< right side >
* LCD monitor control buttons
There are 4 buttons in the left side of front view: Power - Menu - Down - Up
1. Press “ P O W E R ” to switch Off / On the LCD monitor.
2. Pr es s ” M E N U ” Key get into OSD (On -S cr ee n Display) control:
Co ntra st,
Br ig ht n es s ,
Hue,
Color,
S h a rp n e s s ,
V o lu m e
3. Press ” U P ” and " D O W N " to increase or de c re as e the setting.
—
3/ 6
• Audio demodulation
1. This device has audio dem od ul at io n covering the most pop ular free uencies.
The available audio dem od ul at io n f re qu enc ie s are as follows.
A u d io fre q u e n c ie s
W ire le s s ca m e ra
F re q u e n c y band
6.0 MHz
6.5 MHz
5.5 MHz
1.
1.2 GHz
V (default)
V
V
2.
2.4 GHz
V (default)
V
V
3.
5.8 GHz
V
V (default)
X
NO.
•
2. W h e n this device detects wi re le ss ca m er a signals, hold the Band selection
button and press the Sca n/sto p switch of selected band (1.2 GHz or 2.4 GHz
or 5.8 GHz) on ce to shift the fr e q u e n cy of audio dem od ulatio n.
3. For example, the default audio d em od ul at io n of 1.2 GHz band is 6.0 MHz,
after above step 2., it will shift to 6.5 MHz. Repeat the step 2., the audio
de mo d ul at io n will shift to 5.5 MHz. Then back to 6.0 M H z - > 6 . 5 M H z - > 5 . 5
MHz in a cycle.
* The audio d em od ul at io n of 5.8 GHz band has 2 fre q ue nc ie s only: 6.5 MHz
and 6.0 MHz.
4. A ft e r turn off the power of this device, the audio dem od ul at io n will return to
the default frequency.
Hold the Band selection
button and press the
S ca n/s to p switch of selected
band once to shift the
f re q ue nc y of audio
demodulation.
4/6
* Lo w battery w arning
W h e n the “ bat tery l o w ” indication lights on, it me ans the bat tery is running down.
Please c on ne ct the switching pow er ada pto r to recharge the bat tery and this
device will keep detecting.
It will take abo ut 36 hours to full charge the battery if this device is working
( power ON). It will takes only 8 hours to full charge the bat tery if this device is
power OFF.
If you are not going to use this device for a long time, please c hec k
power every 2-3 months. If the bat tery runs down, c on n ec t the AC
recharge the built-in rech ar gea ble battery for eight (8) hours. This
l o n g e v i ty of the ba t t e ry and also pr event d a m a g e to unit due
deterioration.
the battery
ada pt o r to
will ensure
to ba t t e ry
* Notice of use
1. Un aut hor ized repair or di s a s s e m b ly of this device will void all the warranties.
2. Avoid water.
3. Do not store this device in an ex cessive ly hot place.
4. Avoid knocks or dropping this device.
* Specifications
WARNING
D im e n sio n
L 1 9 x H 1 4 x T 4 c m (a n te n n a le ng th not in c lu d e d )
W e ig h t
a b o u t 860g (in clu d in g re c h a rg e a b le b a tte ry)
1. S w itch in g p o w e r a d a p to r
P o w er
2. B uilt-in re ch a rg e a b le b a tte ry
B a tte ry life
N o rm al m ode: a b o u t 40 m in u te s a fte r full ch a rg e
P o w e r saving m ode: a b o u t 70 m in u te s a fte r fu ll ch a rg e
D ete c tin g F re q u e n c y
1 ,2G H z, 2.4 G H z, 5 .8 G H z th re e fre q u e n c y ba nd s
M o n ito r
3 .5" H igh re so lu tio n LC D, C o lo r o r B /W ca m e ra co m p a tib le
S ca n in d ic a tio n 1
N T S C o r PA L / S E C A M V id e o fo rm a t in d ica tio n
S ca n in d ic a tio n 2
S ca n n in g LED in d ica tio n x 3 fo r 3 fre q u e n c y bands
W a rn in g m od e
S c a n n in g band
M o nitor display
A udio dem o d u latio n
1. A c o u s tic d is p la y
2. S ile n t d e te ctio n th ro u g h e a rp h o n e
1 .2G H z - 2 .4 G H z - 5 .8 G H z th re e ba nd s s y n c h ro n o u s sca n n in g
1. A u to band sw itch in g
2. Band se le ctio n sw itch fo r m a n u a l band ch a n g e
1.2 G H z band
6.0 M H z - > 6 .5 M H z -> 5.5 M H z___________________
2.4 G H z band
6.0 M H z - > 6 .5 M H z - > 5.5 M H z
5.8 G H z band
6.0 M H z - > 6 .5 M H z
U se th is d ev ice as an auxiliary,
supp lem en tal help o r aid to prevent
the risk s cau sed by v id eo signal
tran sm issio n . This d evice d o es not
tak e th e p lac e o f all the supervisions.
P erfo rm an ce o f th is R adio frequency
(R F) p ro d u ct w ill b e affe c te d b y the
c ircu m stan ce o f use. The producer
a n d m ark etin g g ro u p accepts no
lia b ility fo r any loss o r d am age by
m alfu n ctio n o r m isuse.
N o p a rt o f this m anual m ay be
rep ro d u ced , tran sm itted, transcribed,
o r tran slated into a n y language in any
form b y a n y m eans, e lectrical or
m ech an ical, in clu d ing photocopying,
reco rd in g , o r in fo rm ation a nd retrieval
sy stem s, w ith o u t the express w ritten
p erm issio n o f m an u facturer. Products
m en tio n ed in th is m anual are for
id en tificatio n p u rp o ses only. A ll brand
n am es ap p earin g in this m anual m ay
o r m ay no t b e reg istered tradem arks or
copyrights o f their respective companies.
T h e m an u fa c tu re r reserv es the right to
change o r m o d ify th e sp ecifications o f
any o n e o r all o f these products as
d eem ed necessary at any tim e w ithout
p rio r no tificatio n . T he m anufacturer
m ay fu rth er rev ise this m anual from
tim e to tim e w ith o u t prio r notice.
C o p y rig h t 2001-2010,
A ll rig h ts reserved.
A u d io
I V id e o o u tp u t
D e te c tin g D is ta n c e
A V o u tp u ts x 3 fo r 3 ba nd s sy n c h ro n o u s re co rd in g ,
w jt ^ 3 5 m m V id e o /A u d io o u tp u t ja c k x 3 (fo r re co rd in g )
M ade in Taiw an.
Up to 300 fe e t (d e p e n d in g on o u tp u t p o w e r o f so u rce tra n s m itte r)
* T h e d e t e c t i n g d i s t a n c e w ill be v a r ie d d e p e n d i n g on th e t y p e a n d o u t p u t p o w e r o f s ig n a l s o u rc e s .
* S p e c i f i c a t i o n m a y c h a n g e w i t h o u t n o ti c e .
a
VS125PK1B
09.2010
5/ 6
NOTICE OF BATTERY
1. W hen the battery runs down, If the switch still keeps at "on", the battery will
be over discharged and will damage the battery. Please set the on/off
Switch at "off' and connect the power adaptor to charge this unit for 8 hours.
2. Battery will be over charged if you keep on charging it without using that will
also damage battery. The producer and seller accept no liability for the
damage caused by the over discharge or charge.
E x te rn a l b a tte ry fo r lo n g e r o p e ra tio n o f V S -1 2 5
An extra battery cable for
user to connect a 12V battery
to extend the operation time.
Reference information of 12V battery
http://www.vuasa.com .tw/ enalish/03 vrla/01 list.php?TID=1
Model
Voltage (V)
Capacity(AH)
Dim ensions (mm)
W eight (kg)
NP2.3-12
12
2.3
L178 x W 34 x H 64
09
NP4-12
12
4
L 90 x W 70 x H 105.5
16
Approx. operation time of VS-125
Voltage (V)
Capacity(AH)
Screen On
Power saving
12
0.7
40 min.
70 min
NP2.3-12
12
2.3
120 min.
210 mir ).
NP4-12
12
4
220 min.
380 miri.
Model
Inside
Battery
—
6/ 6