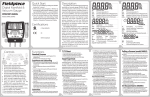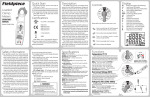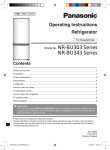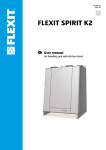
1
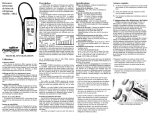
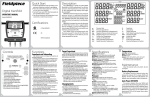
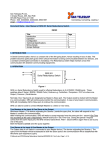
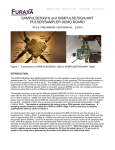
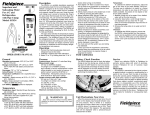
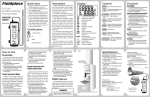
MICRONS OF MERCURY
Fieldpiece
Quick Start
Description
1. Power on your SVG3 by holding the
button for 1 second.
2. Connect to system directly to an
unused service port, a Schrader core
removal tool (SCRT), or via hoses.
3. View vacuum in microns of mercury
on the top line and rate of change
(±microns per minute) on the bottom line.
Easy View
Vacuum Gauge
OPERATOR'S MANUAL
Model SVG3
MICRONS OF MERCURY
ALARM
CE
Vacuum Pressure
Units of measure: microns (µm) of mercury
Connector type: Standard 1/4" female flare fitting. "T"
fitting included ( 3 male flare ports)
Range: 0 to 9999 microns of mercury
Accuracy: ±(5% of reading + 5 microns), 50 to 1000
microns
Resolution: 1 micron (50 to 2000 microns), 250
microns (2001 to 5000 microns), 500 microns (5001
to 8000 microns), 1000 microns (8001 to 9999
microns)
Rate: Microns per minute
Refresh rate: 0.5 seconds
Atmospheric pressure: "OL" will be displayed
Maximum overload pressure: 500 psig
MIN
WEEE
Operating temperature: 32°F (0°C) to 122°F (50°C) at
<75%RH
Storage temperature: -4°F to 140°F (-20°C to 60°C), 0
to 80% RH (with battery removed)
Temperature coefficient: 0.1 x (specified accuracy)/°C
(<18°C or >28°C)
Over range: "OL" is displayed
Power: 4 x AAA batteries, NEDA 24A, JIS UM4, IEC R03
Auto power off: after 15 minutes of readings more
than 10,000 microns if APO is active.
Battery life: 40 hours standard use (alkaline) without
backlight use.
Low battery indication:
is displayed when the
battery voltage drops below the operating level.
MIN
SVG3
General
MIN
C-Tick (N22675)
ENTER
Specifications
MIN
VACUUM
GAUGE
Controls
VACUUM
GAUGE
ALARM
Proper evacuation of any system
Hold 1 second to power SVG3 on/off. Press exposed to atmosphere is critical to
<1 second to toggle backlight.
ensure efficient operation and the
MICRONS OF MERCURY
ENTER
MICRONS OF MERCURY
SVG3 is the right tool to help HVACR
SVG3 VACUUM
professionals verify they reach proper
VACUUM
Press to activate Alarm Lo, Alarm Hi, and GAUGE
ALARM
return to real time mode. Hold 1 second to GAUGE
vacuum levels. See your vacuum
ALARM
enter or exit Alarm Set mode.
measurement clearly and easily with
MIN
the newly designed easy-view hook
ENTER
and backlight. SVG3 is built for field
Lock in selected digit and move to next in ENTER
SVG3
MICRONS OF MERCURY
use with its ruggedized rubber case.
Alarm Set Mode.
SVG3
SVG3 VACUUM
Reducing connec tions miniMICRONS OF MERCURY
GAUGE
ENTER
m i ze s l e a k s, s o t h e S V G 3 h a s
Top Line: Live Vacuum Measurement
ALARM
Increase or decrease blinking digit in a female 1/4" flare fitting with
in Microns of Mercury (Hg)
Alarm Set Mode. Toggle to display VACUUM
schrader depressor so you can
Bottom Line: Rate of Micron Change stopwatch or rate of change when an ALARM
GAUGE
connect it directly to a service port or
or Alarm
Stopwatch ENTER GAUGE alarm is activated in real time mode.
MIN
ALARM
VACUUM
MIN
your valve core removal tool.
SVG3
Be alerted when you've reached
Auto Power Off Enabled MICRONS OF MERCURY
your desired vacuum levels with built
Battery Life
MICRONS
in Hi and Lo Alarm functions.
CheckOF
forMERCURY
Alarm Set Mode
MICRONS
OF
MERCURY
leaks with rate indication in microns
ENTER
Low Alarm Mode
BACKLIGHT NOTE: The backlight timer is automatically
extended for 1 min when any button is pressed. A short
VACUUM
High Alarm Mode
per minute. The HVACR professional
VACUUM
press of toggles backlight on and off.
GAUGE
MIN
can do more with confidence that
he
Rate ofSVG3
Micron Change
GAUGE
(±Microns Per Minute)
is doing the job right ALARM
the first time.
ALARM
Certifications
MIN
Display
RoHS Compliant
MIN
MIN
MIN
MIN
MINMIN
MICRONS
MICRONS
OFOF
MERCURY
MERCURY
MICRONS OF MERCURY
01
02
MICRONS OF MERCURY
VACUUM
VACUUM
MICRONS OF MERCURY
03
04
ENTER
VACUUM
ENTER VACUUM
ALARM
ALARM
MICRONS
MICRONS
OFOF
MERCURY
MERCURY
GAUGE
GAUGE
GAUGE
GAUGE
VACUUM
VACUUM
ALARM
How to Use
ALARM
ALARM
ENTER
ENTER
Normal Mode
ENTER
VACUUM
GAUGE
Low and High Alarms
ALARM
Be alerted when you've reached your
desired vacuum levels. Work on other
ENTER
ENTER
SVG3
tasks at the jobsite and let SVG3 alert
ENTER
SVG3
SVG3
you when the system is ready.
SVG3
SVG3
Activate the low alarm (default 500
microns) to alert when the vacuum has
dropped to your desired micron level.
Activate the high alarm (default 1000
microns) to see how long it takes the
system to stabilize after the vacuum
pump has been isolated. If the system
does not stabilize over time, you may
have a leak in the system or your connections.
The stopwatch will start when an
alarm is activated. It will restart when
the low alarm has been reached to show
how long you've pulled a vacuum after
reaching your desired micron level. The
stopwatch will stop when the high alarm
has been reached to show how long it
took to rise to your high alarm value.
When an alarm is activated the UP or
DOWN ARROW toggles the stopwatch
and rate of change (± microns per minute) display.
10
ENTER
Recommended
Setup
Measure deep vacuums to
m o n i t o r yo u r s y s t e m e v a c u a tions. Deep vacuums help remove
non-condensable gases that can
cause problems in a system.
There are many ways to connect to
the system, Fieldpiece recommends
using a SCRT and the shortest vacuum
rated hoses possible. Fewer connections reduce the potential for leaks.
06
How to Activate the Alarms
Vacuum Tips
How to Set the Alarms
Follow all manufacturer's evacuation procedures over those in this
manual in regards to specifications on
how to evacuate systems. To achieve
a deep vacuum efficiently Fieldpiece
recommends the following practices.
1. Press ALARM to activate low alarm.
2. Press ALARM again to deactivate low alarm and
activate high alarm.
3. Press ALARM again to deactivate high alarm and
return to real time mode.
SVG3
SVG3
MIN
MICRONS OF MERCURY
VACUUM
GAUGE
ALARM
ENTER
SVG3
MIN
MIN
MICRONS OF MERCURY
MICRONS OF MERCURY
VACUUM
GAUGE
VACUUM
GAUGE
ALARM
1. Connect to system. Techs typically prefer connecting to the Schrader Core Removal Tool (SCRT) or an
unused service port.
2. Hold for 1 second to power ON the SVG3.
3. The top display shows the vacuum in microns of
mercury.
4. The bottom display shows how fast the measurement is increasing or decreasing (± microns of
mercury per minute).
ALARM
ENTER
ENTER
SVG3
SVG3
Other Common
Setups
To
Service
Port
To
Pump
Hose
To
Pump
Schrader Core
Removal Tool
Directly to
Service Port
(tool not included)
07
SVG3
ALARMGAUGE
GAUGE
SVG3
05
08
09
Hose to
Removal
Tool
1. Remove Schrader cores and core depressors from
the service ports using a valve core removal tool
(purchased separately).
2. Use the shortest vacuum rated hoses with the
largest diameter available.
3. Inspect rubber seals at both ends of your hoses for
damage that may result in leakage.
4. Avoid using hoses with low loss fittings when
evacuating a system.
5. Avoid over-tightening the female flare fitting of
the SVG3. Over-tightening may cause the rubber
gasket to wear more quickly and create leaks. It is
not necessary to over tighten SVG3 to the extreme
to create a good seal.
The default low (500 microns) and
high (1000 microns) alarm values can
easily be set to whatever you want.
11
1. Hold ALARM for 1 second to enter Alarm Set Mode.
The first digit of LO alarm will blink.
2. Use ARROWS to change the blinking number. Press
ENTER to lock in a digit and move to the next digit.
Repeat for all LO alarm digits.
3. When LO alarm is complete, the first digit of HI alarm
will blink. Use ARROWS to change the blinking
number. Press ENTER to lock in a digit and move to
the next digit. Repeat for all HI alarm digits.
4. When all digits of HI alarm are locked in you will
automatically exit Alarm Set Mode and your
customized alarm values will be saved.
Note: Anytime while in Alarm Set Mode, you can press
ALARM to toggle between alarm HI set and alarm
LO set. Hold ALARM to exit Alarm Set Mode and
save at any time.
Note: "Err" will show if you try to set the HI alarm
lower than the LO alarm, or the LO alarm higher
than the HI alarm.
12
Replacement Parts
Maintenance
Clean the exterior with a dry cloth.
Do not use liquid.
Rubber gasket and Schrader depressor are user-replaceable. Worn
out gaskets and depressors can lead
to a bad seal. Over-tightening of the
SVG3 female flare fitting may cause
the rubber gasket to wear more
quickly. Replace if the rubber gasket
becomes worn or the Shrader depressor is not in the center. Both these
parts can easily be found at your local
HVACR distributor.
Battery Replacement
Power off SVG3. Unscrew battery
cover, and replace the 4 AAA batteries.
!
Battery Cover Screw
Cleaning the Sensor
In the USA, call Fieldpiece Instruments for one-price-fix-all out of warranty service pricing. Send check or
money order for the amount quoted.
Send the meter freight prepaid to
Fieldpiece Instruments. Send proof
of date and location of purchase for
in-warranty service. The meter will be
repaired or replaced, at the option of
Fieldpiece, and returned via least cost
transportation.
For international customers, warranty for products purchased outside
of the U.S. should be handled through
local distributors.
16
This meter is warranted against
defects in material or workmanship
for one year from date of purchase.
Fieldpiece will replace or repair the
defective unit, at its option, subject
to verification of the defect.
This warranty does not apply to
defects resulting from abuse, neglect, accident, unauthorized repair,
alteration, or unreasonable use of the
instrument.
Any implied warranties arising
from the sale of a Fieldpiece product,
including but not limited to implied
warranties of merchantability and
fitness for a particular purpose, are
limited to the above. Fieldpiece shall
not be liable for loss of use of the
instrument or other incidental or
consequential damages, expenses, or
economic loss, or for any claim of such
damage, expenses, or economic loss.
State laws vary. The above limitations or exclusions may not apply to
you.
EVAPORATOR
RETURN AIR
SUPPLY AIR
Low Pre
ssu
r
THROTTLE
VALVE
ide
eS
For Service
15
Limited Warranty
the gas is condensed into a liquid,
additional removal of heat causes
a temperature drop that is known
as subcooling. TXV/EXV systems are
charged to subcooling since superheat is controlled by the throttle
valve. Subcooling measurements are
taken on the liquid line between the
condenser and TXV/EXV. Finally, the
subcooled liquid enters the restrictor
and the cycle starts again.
REFRIGERANT
FLOW
Pr
COMPRESSOR
h
14
The Evaporator, Condenser, Restrictor (Throttling valve) and Compressor
are the four basic components of an
air conditioner. Following one pound
of refrigerant through the system
shows the function of each component.
Subcooled liquid refrigerant at high
pressure enters the restrictor and is
throttled to saturated refrigerant at a
lower pressure. The restrictor can be
either a fixed or TXV/EXV type. The
fixed type must be charged to a target
superheat that varies with indoor and
outdoor conditions. TXV/EXV systems
must be charged to subcooling.
The evaporator capacity varies
with the indoor heat load on a fixed
restrictor. The TXV/EXV regulates the
size of the restriction to maintain a
constant superheat. This essentially
adjusts the capacity of the evaporator
responding to the indoor heat load.
After the restrictor, refrigerant
enters the evaporator at a low temperature and pressure, and boils
(evaporates) into a gas by absorbing
heat from the indoor air. The refrigerant stays at the same temperature
and pressure until all the refrigerant
evaporates into a gas. After the refrigerant becomes a gas, it will continue to
absorb heat and become superheated
at which point its temperature will
change. The Superheat measurement
is the best indication of refrigerant
charge level in a fixed restrictor system. A TXV/EXV system will keep the
superheat constant. There must be
superheat present to ensure liquid
does not flood the compressor.
Superheat measurements are
taken on the suction line between
the evaporator and compressor.
The compressor takes this low
temperature, low pressure, slightly superheated refrigerant and compresses
it to a much higher temperature and
pressure.
The highly superheated gas enters
the condenser and rejects heat into
the outside air. The refrigerant condenses back into a liquid. Once all of
Hig
1. Remove both the Schrader depressor and rubber
gasket from the flare fitting. Dispose of worn
rubber gasket. A small pair of needle nose plyers
can easily pull out the depressor and the gasket at
the same time. Be careful not damage the Schrader
depressor.
2. Re-insert and center the Schraeder depressor into
the flare fitting. If the depressor does not stay
centered, replace with a new one.
3. Drop in and position of the new rubber gasket
(standard 1/4" rubber gasket replacement part)
around the Schraeder depressor. Push in with your
finger.
4. Lock O-ring into place by screwing in the included
brass T-fitting. Do not over-tighten.
1. Turn off your SVG3.
2. Remove the core valve depressor and rubber gasket.
A small pair of needle nose plyers can easily pull
out the depressor and the gasket at the same time.
Be careful to not puncture or tear the gasket.
3. Fill the cavity halfway with isopropyl (rubbing)
alcohol.
4. Use your index finger to cover female flare fitting
and gently swirl and shake the alcohol within the
cavity for about 15 to 30 seconds.
5. Pour out the alcohol and let the vacuum sensor dry
with the flare fitting facing down.
6. Re-insert core depressor and rubber gasket. Screw in
T-fitting (included) to lock in the rubber gasket.
Note: Do not use an object such as a cotton swab to
clean the sensor. This may damage the sensor.
13
A/C Basics
es
sure
Side
OUTDOOR AIR
HOT AIR
CONDENSER
17
18
More Great Tools
from Fieldpiece
-OFF
AUTO
SYNC
S FOR
PRES
ND
1 SECO
F
UNITS
ON/OF
s
Wireles rant
Refrige
Scale
ZERO
S FOR
PRES
ND
1 SECO
SRS2
80
WIRELESS ENAB
LED
SENSITI
H
VITY AUT
O-ZERO
M
T
80
SC57
LOW-BAT
L
L/M/H
MUTE
Wireless Refrigerant Scale
Model SRS2C
BATTERY
CHECK
O
F
F
ZERO
ON/OFF
PRESS FOR
1 SECON
D
Heated
Diode
Refrigera
Leak De nt
tector
SYNC
SEL
M
M
SRL8
TRUE RMS AUT
O OFF
30V
MAX
TEMP
K-TYPE
CAT III
600V
www.fieldpiece.com
19
© Fieldpiece Instruments, Inc 2013; v22
Heated Diode Refrigerant Leak Dectector
Model SRL8
Wireless 4-Port Manifold
Model SMAN4
20
21
22
23
Dual In-Duct Psychrometer
Model SDP2
Wireless Clamp Meter
Model SC57
24